


MODEL: HP200LPB
MODEL: HP200LPWF
MODEL: RH31LT
Rambo
®
HIGH
PRESSURE BURNER
INSTALLATION & OPERATING INSTRUCTIONS
The appliance should be installed in accordance with the following:
• AS/NZS 5601.1: gas installations part 1: general installations
• Manufacturer’s installation instructions;
• Local gas fitting regulations;
• Municipal building codes; and
• Any other relevant statutory regulation.
The appliance must be installed, serviced and removed by an authorised person only.
IMPORTANT:
• Carefully read and understand this Installation & Operating Instruction booklet in full
• Familiarise yourself with the appliance BEFORE connecting the appliance to the gas cylinder
• Retain this manual for future reference
• You MUST purchase a suitable regulator and hose assembly
REGULATOR AND HOSE ASSEMBLY DETAILS
This appliance must be connected to a certified hose and regulator assembly to ensure safe operation as
follows: Propane Gas regulator fitted with a POL type inlet fitting, outlet pressure of 100 kPa and Certified to
AS4621 and an 8mm High Pressure hose (maximum length 1.8 metres) certified to AS/NZS 1869 class ‘C’ or
‘D’. The hose outlet fitting required to ensure compatibly with the inlet connection of this appliances is ¼” BSP
female threaded nut and 60º inverted flare.
THE CORRECT ASSEMBLY MUST BE USED - DO NOT USE ADAPTORS
FOR OUTDOOR USE ONLY

HP200LPB, HP200LPWF, RH31LT OPERATING INSTRUCTIONS
1
PACKAGE CONTENT
HP200LPB/HP200LPWF
HP200LPB Burner x 1 (HP200LP only)
HP200LPWF 2 Ring High Pressure Stockpot
Burner x 1 (HP200LPWF only)
RHS005 1.8m Braided Hose (Connected) x 1
LF103P-100KPA 100kPa High Pressure
Regulator (Connected) x 1
RH31LT
RH31LT High Pressure Burner x 1
RHS005 1.8m Braided Hose (Connected) x 1
LF103P-100KPA 100kPa High Pressure
Regulator (Connected) x 1
WARNING
•
Important. Read these instructions carefully before use. Familiarise yourself with the
appliance before connecting it to its gas supply. Keep these instructions for future reference.
•
It is the operator’s responsibility to check the appliance is properly assembled and
maintained.
•
Do not lay the gas cylinder down – cylinder should be stored / used in the upright position.
•
Hazardous fire or explosion may result if instructions are ignored.
•
Never check for leaks with a match or open flame
•
Do not store or use petroleum products or other flammable vapours and liquids in the vicinity
of this appliance.
•
ONLY USE IN WELL-VENTILATED AREAS, but not facing against any draught.
•
CARBON MONOXIDE HAZARD - USING THIS APPLIANCE IN AN ENCLOSED
SPACE MAY CAUSE DEATH. DO NOT USE IN CARAVANS, TENTS, MARINE
CRAFT, CARS, MOBILE HOMES OR SIMILAR LOCATIONS.
•
Do not move the appliance during operation .
•
Avoid twisting or kinking of the flexible gas hose.
•
Do not use cooker near any air opening(s) into buildings (i.e. windows, doorways, ventilation
ducts etc.)
•
Leak test all connections before use and after each cylinder refill – refer “How to Check for
Gas Leaks” in this manual. NEVER check for leaks with a match or open flame.
•
An LP cylinder not connected for use in this appliance shall not be stored near this appliance.
•
Ensure the gas hose is not placed under the appliance or allowed to contact any hot
surfaces of the appliance.
•
This appliance must not be modified or changed in any way.
•
Disconnect the gas cylinder from the burner prior to storage. It is also recommended that the
gas cylinder be stored outdoors in a well-ventilated area.
•
Do not use any other gas type except the one specified on the label/data plate.
•
Use only the gas regulator specified in this instructions page or advised by your dealer. An
inferior or a damaged regulator could cause an incomplete combustion or other troubles with
the burner.
•
Do not leave the burner unattended when in use. Always turn off the burner and the main
gas valve after each use.
•
Do not use the burner as a space heater under any circumstance.
•
Do not cover or blow out the flames. This could cause gas leaking.
•
Always keep flammable materials away from the burner.
•
Make sure that you use cooking woks, pots or pans that sit firmly on the trivet. Do not use
pots that are too small / large for the burner size, as they could be unstable on the trivet.
•
The maximum vessel size is Ø50 cm for HP200LPWF model, Ø70 cm for HP200LPB model
and Ø60 cm for RH31LT model.
•
If abnormal combustion is observed when in use, turn off the main gas valve and examine
the burner (Refer to Trouble-Shooting Guide).
•
Do not spray aerosols in the vicinity of the burner when in use.
•
Children and adults should be alerted to the high temperatures of the cooker and its effect
on surrounding surfaces, clothing and skin.

HP200LPB, HP200LPWF, RH31LT OPERATING INSTRUCTIONS
2
•
CAUTION: accessible parts may be very hot. Keep young children away.
•
Children or the elderly should be supervised when near this appliance.
•
Do not hang clothing or other flammable material on or near this appliance.
•
If the cooker fails to operate correctly, contact place of purchase or their authorised agent for
advice and service. Do not continue to use the appliance and do not attempt repair yourself.
•
Make sure the gas inlet hose is clean and not blocked before connecting the gas.
•
Always ensure that adequate fresh air is provided for ventilation.
•
The burner must only be operated on a level, firm non-combustible surface.
•
This burner shall not be used in a position where it could create a fire hazard and the
minimum clearances to combustible materials must be observed.
•
A spider web can interfere with the flow of gas / air into the burner. The opening into the
burner directly in front of the gas valve should be checked regularly and cleared with a pipe
cleaner or similar length device.
•
Do not attempt to repair the burner yourself.
FOR YOUR SAFETY – WHAT TO DO IF YOU SMELL GAS
Turn off gas supply at bottle immediately and extinguish all naked flames.
Remove the appliance from any potential ignition sources and do not operate any electrical
equipment near the appliance (e.g.: light switches, power points, mobile phones, pagers,
other appliances)
Allow sufficient time for any accumulated propane gas to disperse
Check for damage to seals and hoses and if no damage is visible, ensure fittings are
adequately tight then check for gas leaks using soapy water as detailed in this manual in a
well ventilated area. Do not try to detect leaks using a flame
If odour / gas leak persists, turn off the gas supply at the gas cylinder and contact an
authorized service agent.
Do no use this appliance if it has damaged or worn seals.
Do not use this appliance if it is leaking, damaged or does not operate properly.
HOW TO CHECK FOR GAS LEAKS
To check for leaks, open the gas supply at the bottle with the appliance gas valves in the
OFF position (DO NOT SWITCH APPLIANCE ON) and check for leakage by brushing a
solution of soapy detergent and water onto the connection points at the bottle and the
appliance. If bubbling is evident (it may take more than 30 seconds to appear) this indicates
a gas leak is present. If disassembling, cleaning, reassembling and tightening the connection
does not rectify the leak you should close the gas cylinder valve and consult the place of
purchase for assistance.
Turn on the gas and check for gas leakage at all joints with soapy water or other approved
methods.
PROCEDURES FOR GAS LEAKAGE
The strong and distinctive odour of gas may make you aware of a gas leak. If you suspect a gas
leak:
Immediately turn off the gas supply at the gas bottle;
Turn off all appliances and pilot lights;
Do not allow gas to build up in the area.
Do not use any naked flame or other ignition source (such as light switches, power points,
mobile phones and pagers);
Do not operate any electrical equipment in the vicinity of a gas leak;
Contact your licensed gas fitter to repair the leak and re-light the appliance.
NEVER ATTEMPT TO REPAIR THE APPLIANCE YOURSELF.
IT MUST BE SERVICED AND REPAIRED BY A LICENSED PLUMBER OR GAS FITTER
HP200LPB, HP200LPWF, RH31LT OPERATING INSTRUCTIONS
3
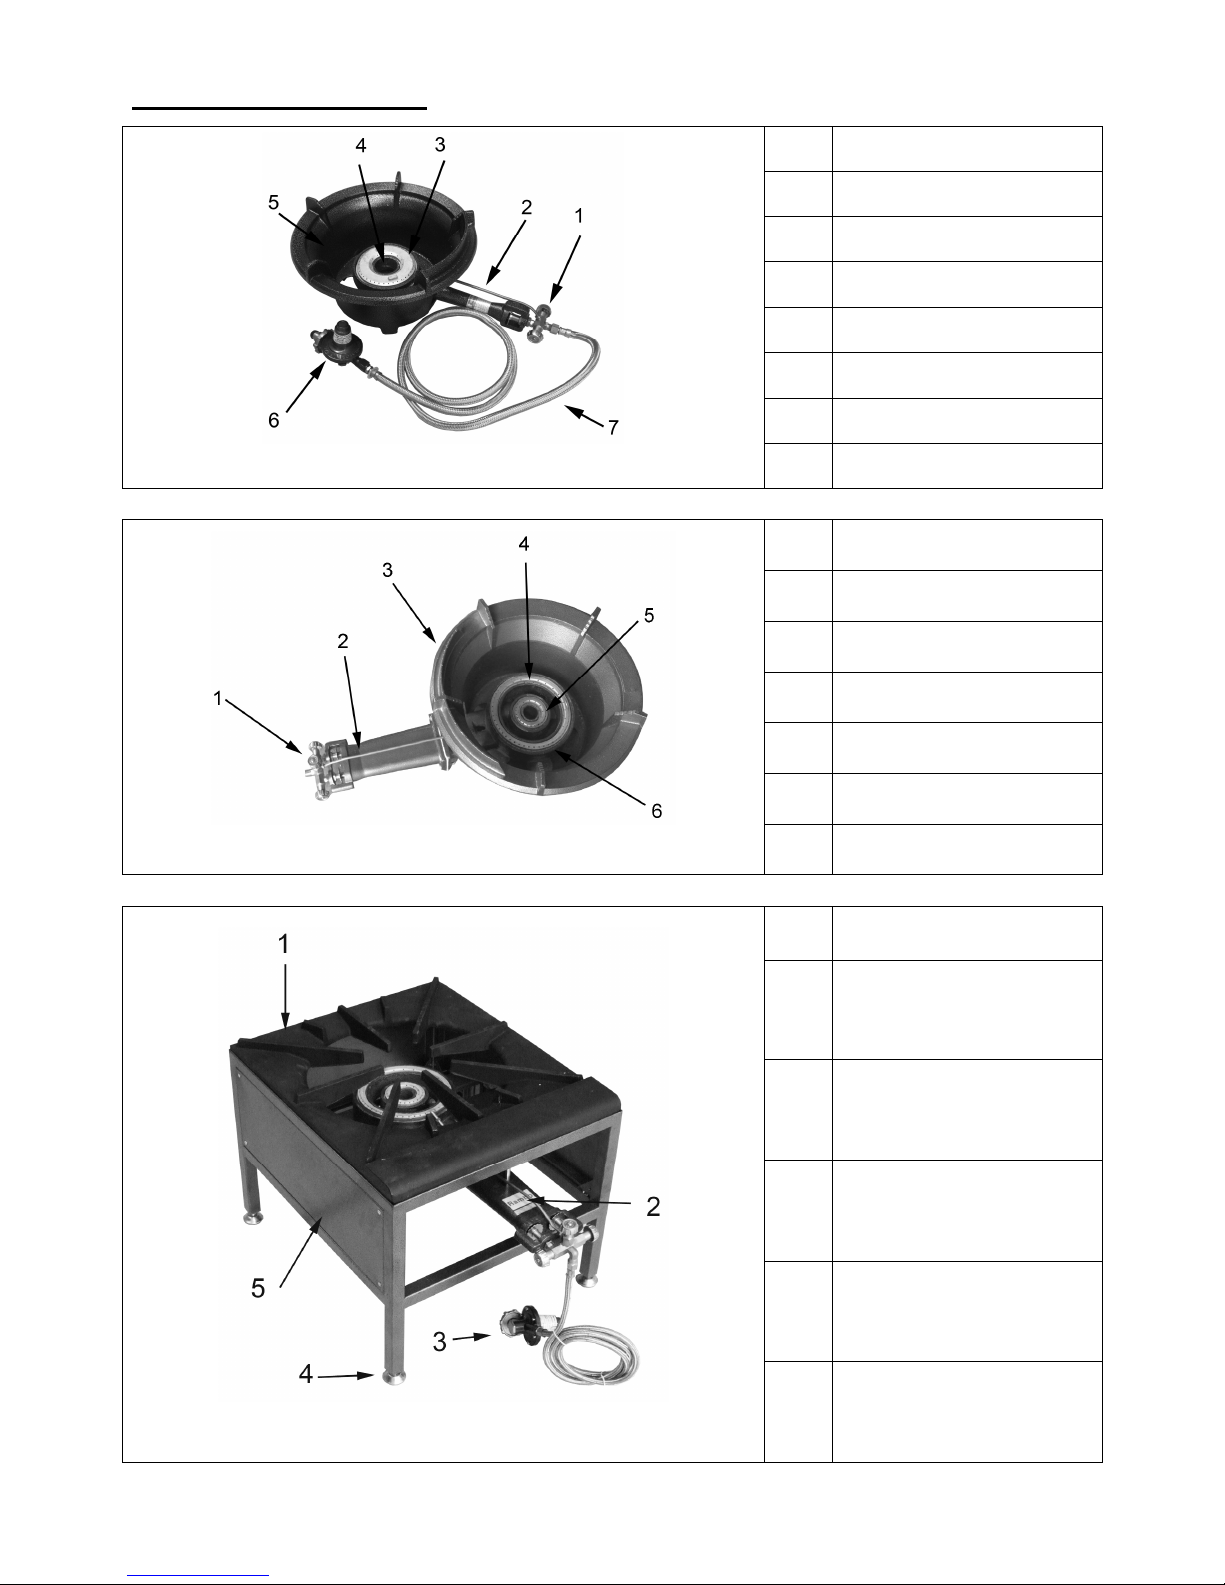
COMPONENT & PARTS
RH31LT
No. Part Name
1 Gas Manifold
2 Pilot Tube
3 Burner Cap
4 Burner Head
5 Bowl
6 Regulator
7 Hose
HP200LPB
No. Part Name
1 Gas Manifold
2 Pilot Tube
3 Bowl
4 Outer Ring Cap
5 Inner Ring Cap
6 Burner Head
HP200LPWF
No. Part Name
1 Trivet
2 HP200LP Burner Head
3 Regulator
4 Adjustable Foot
5 Body Frame

HP200LPB, HP200LPWF, RH31LT OPERATING INSTRUCTIONS
4
PREPARE TO ASSEMBLE THE APPLIANCE
Check for damage on the appliance. If damage occurs, please contact Austcrown or your dealer.
Do not use a damaged appliance.
WARNING! It is hazardous to use a damaged appliance.
Positioning the Appliance
Only use the appliance in well ventilated areas. The appliance must be sited with at least a
1000mm gap between both sides and the rear of the appliance and at least 2700mm from the
trivet of the appliance and any combustible or non-combustible materials above the appliance.
When the burner is assembled abutting a side or rear wall, the wall must be of non-combustible
material, e.g. ceramic tiles.
The appliance must be used on a level, stable, non-flammable surface when in use. If used on
the ground in an area with long grass ensure that the grass is not long enough to enter under
the appliance or at the sides as this could result in the grass catching fire.
It is important that the ventilation openings of the appliance are not obstructed.
The appliance should be protected from direct draughts and be positioned or protected against
direct penetration by any trickling water (e.g. rain).
If the appliance is install at outdoor, a proper shelter with well ventilation should be use to
protect the appliance from draughts and rain. Some examples of shelter are shown below,
IMPORTANT: The dimension and building materials of the shelter must be meet the
requirements mentioned above, or contact your gas filter / local Gas Authority for information on
clearances and material required
 Loading...