

Page 1

IMPORTANT:
READ THESE INSTRUCTIONS CAREFULLY
FAMILIARISE YOURSELF WITH THE APPLIANCE BEFORE CONNECTING IT TO A GAS
CYLINDER.
KEEP THESE INSTRUCTIONS FOR FUTURE REFERENCE.
RETAIN THIS MANUAL FOR FUTURE REFERENCE
A LOW PRESSURE REGULATOR WITH AN OUTLET PRESSURE OF 2.75kPa AND HOSE
ASSEMBLY IS INCLUDED WITH THE APPLIANCE.
REGULATOR AND HOSE ASSEMBLY DETAILS
This appliance must be connected to a certified hose and regulator assembly to ensure safe operation as
follows: Propane Gas (LP) regulator fitted with a POL type inlet fitting, outlet pressure of 2.75kPa and Certified
to AS4621 and an 8mm nominal bore hose (maximum length 1.5 metres) certified to AS/NZS 1869 class ‘B’
or ‘D’. The hose outlet fitting required to ensure compatibly with the inlet connection of this appliances is ¼”
BSP female threaded nut and 60º inverted flare.
THE CORRECT ASSEMBLY MUST BE USED - DO NOT USE ADAPTORS
The use of any equivalent certified hose/regulator assembly compliant with the requirements above is
acceptable
WARNING: Only use the hose assembly supplied with this appliance for connection the cylinder - DO
NOT USE ADAPTORS
Please contact your supplier / distributor for replacement hose and regulator assembly.
The use of any equivalent LP gas regulator with hose assembly certified to AS4621 (maximum length 1.5
meters) and AS/NZS 1869 is acceptable
FOR OUTDOOR USE ONLY
A LOW PRESSURE REGULATOR MUST BE USED WITH THIS APPLIANCE
COUNTRY COOKERS
ASSEMBLY & OPERATING MANUAL
GB02LP
2 burner
country cooker
GB03LP
3 burner
country cooker
GB01LP
1 burner
country cooker
Page 2

GB010203 2
IMPORTANT
These appliances are suitable for use with propane gas (LP) @ 2.75 kPa.
This appliance must not be modified or changed in any way.
After connecting the gas supply, turn on the gas and check for leaks at all joints with soapy water or other
approved method. UNDER NO CIRCUMSTANCES USE A NAKED FLAME to CHECK FOR LEAKS.
Disconnect the gas cylinder from the cooker prior to storage. It is also recommended that the gas cylinder
be stored outdoors in a well-ventilated area out of the reach of children. Any indoor storage shall comply
with AS/NZS 1596.
FOR YOUR SAFETY- WHAT TO DO IF YOU SMELL GAS
Turn off gas supply at bottle immediately and extinguish all naked flames.
Remove the appliance from any potential ignition sources and do not operate any electrical equipment near the
appliance (eg: light switches, power points, mobile phones, pagers, other appliances)
Allow sufficient time for any accumulated propane gas to disperse
Check for damage to seals and hoses. If no damage is visible, ensure fittings are adequately tight then check
for gas leaks using soapy water as detailed in this manual in a well ventilated area. NEVER try to detect leaks
using a flame
If odours / leaks persist, turn off the gas supply at the gas cylinder and contact an authorized service agent.
WARNING
COUNTRY COOKERS ARE PORTABLE APPLIANCES SUITABLE FOR OUTDOOR USE ONLY,
THEY ARE NOT SUITABLE FOR INSTALLATION
DO NOT USE THIS APPLIANCE IN AN ENCLOSED AREA, IT IS FOR OUTDOOR USE ONLY.
IT IS THE OPERATOR’S RESPONSIBILITY TO CHECK THE APPLIANCE IS PROPERLY
ASSEMBLED AND MAINTAINED
DO NOT USE THIS APPLIANCE IF IT HAS DAMAGED OR WORN SEALS
DO NOT LAY THE GAS CYLINDER DOWN – CYLINDER SHOULD BE STORED / USED IN THE
UPRIGHT POSITION
FAILURE TO FOLLOW INSTRUCTIONS IN THIS MANUAL COULD RESULT IN PHYSICAL
INJURY AND/OR PROPERTY DAMAGE.
HAZARDOUS FIRE OR EXPLOSION MAY RESULT IF INSTRUCTIONS ARE IGNORED.
LEAK TEST ALL CONNECTIONS WITH SOAPY WATER BEFORE USE AND AFTER EACH
CYLINDER REFILL
NEVER CHECK FOR LEAKS WITH A MATCH OR OPEN FLAME
DO NOT STORE OR USE PETROLEUM PRODUCTS OR OTHER FLAMMABLE VAPOURS AND
LIQUIDS IN THE VICINITY OF THIS APPLIANCE
SPARE PROPANE CYLINDERS NOT CONNECTED TO APPLIANCE MUST NOT BE STORED
NEAR THE APPLIANCE WHILST THE APPLIANCE IS IN OPERATION
“USE ONLY IN WELL VENTILATED AREAS”
“CARBON MONOXIDE HAZARD – THIS APPLIANCE CAN PRODUCE CARBON MONOXIDE
WHICH HAS NO ODOUR. USING THE APPLIANCE IN AN ENCLOSED SPACE (FOR EXAMPLE,
CARAVAN, TENT, CAR, AND MOBILE HOME) MAY CAUSE DEATH”.
DO NOT MOVE THE APPLIANCE DURING OPERATION
KEEP OUT OF REACH OF CHILDEN.
AVOID TWISTING OR KINKING OF THE FLEXIBLE GAS HOSE
ENSURE THE GAS HOSE IS NOT PLACED UNDER STRESS OR STRAIN OR PLACED UNDER
THE APPLIANCE OR ALLOWED TO CONTACT ANY HOT SURFACES OF THE APPLIANCE
Page 3

GB010203 3
PARTS INDEX / ASSEMBLY INSTRUCTIONS
Parts Index – Refer to FIGURE 1, 2 & 3 below
1. Trivet
2. Screw & Washer & Nut
3. Leg
4. Burner Head
5. Gas Valves
6. Screw for Gas Valve
7. Bolt and Spring
STEP 1
STEP 2
STEP 3
FIGURE 1: GB01LP
STEP 1
STEP 2
STEP 3
FIGURE 2: GB02LP
STEP 1
STEP 2
STEP 3
FIGURE 3: GB03LP
Page 4
GB010203 4
ASSEMBLY INSTRUCTIONS
The manufacturer and their appointed agents decline any responsibility in the case of assembly not being in
accordance with these instructions. You will require a Philips head screwdriver and adjustable wrench for
assembly purposes and you should also refer to exploded view / parts list as necessary.
Refer to steps in FIGURES 1, 2 & 3 above.
1. Remove all packing material and literature from the carton.
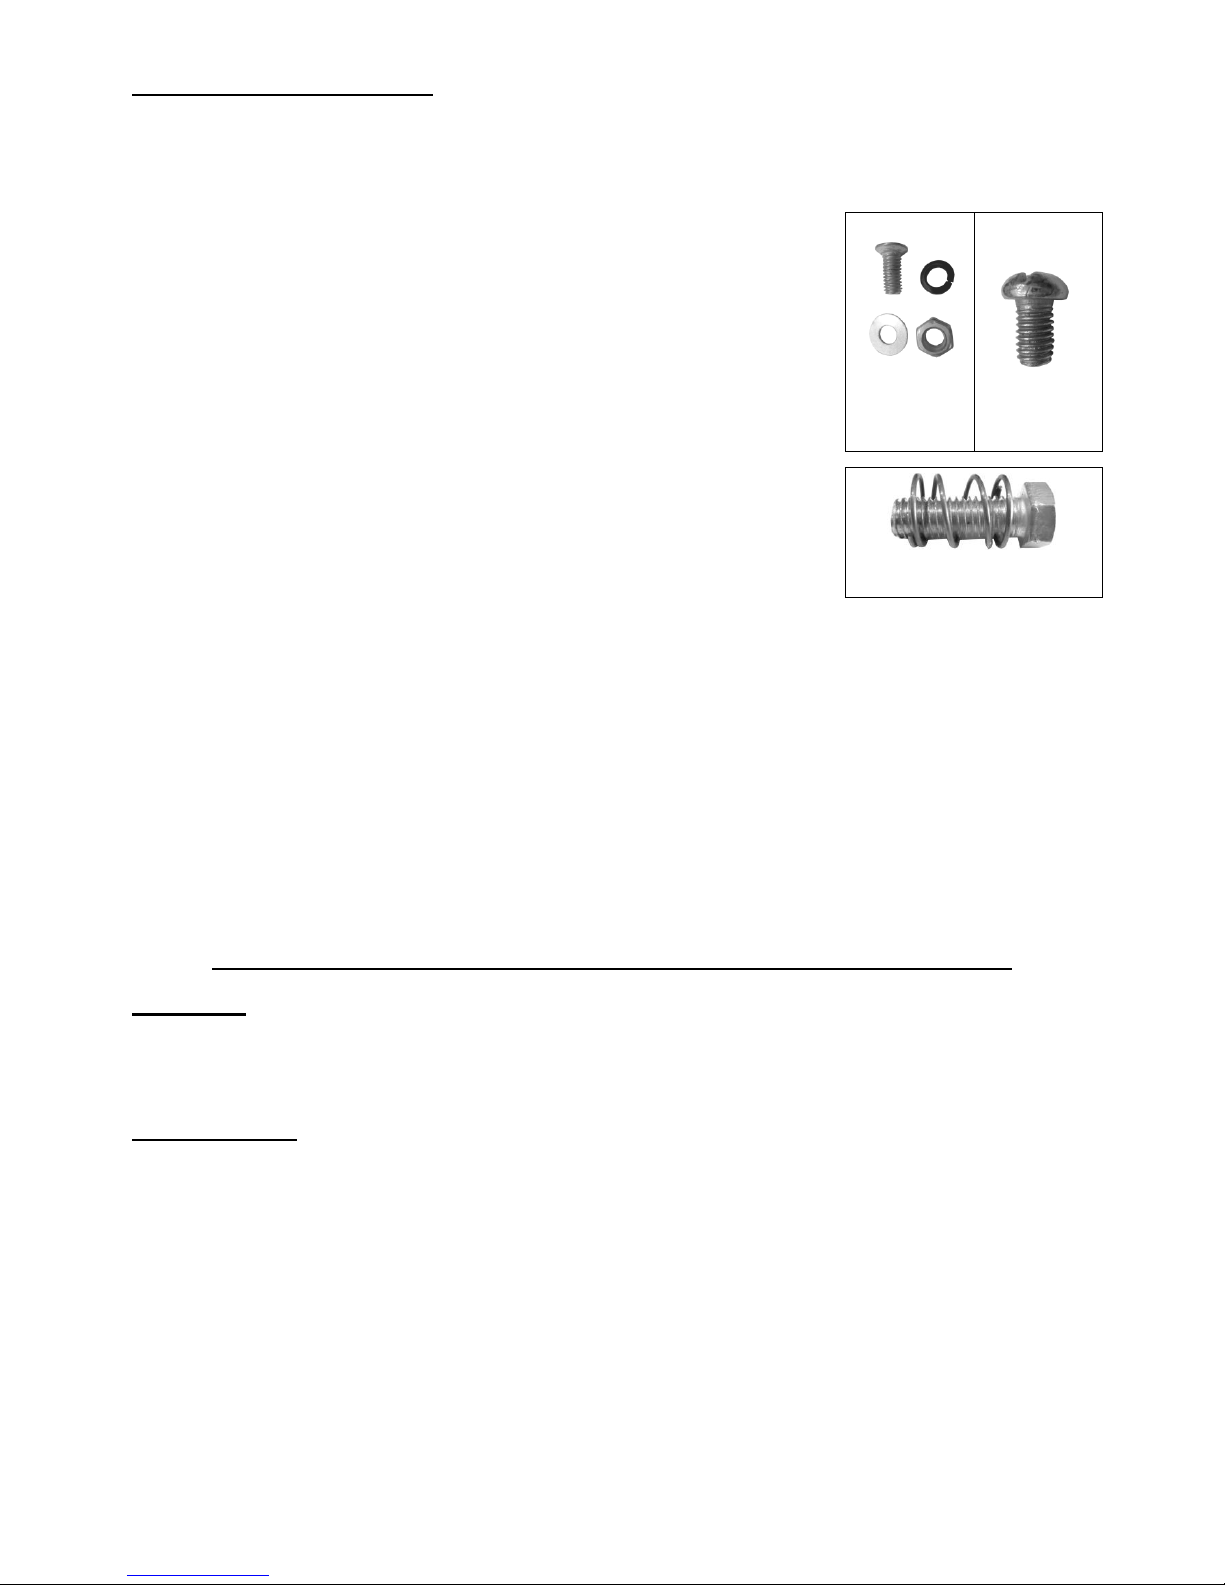
2. Attach the legs to the cooker frame with the screws (Screw A) supplied tighten the screws.
3. Insert the bolt through the spring (Figure 4), and install the set into the screw
hole at the front left of the venturi of the burner hand (See Step 2 of Figure
1,2,and 3). This bolt is used to control the air, read “Lighting the burner” page 5
for more information
4. Insert the burners and secure with the front and rear screws (Screw A) – do not
tighten the screws yet.
5. Attach the gas valve/s to the front of the burners by screw on the valve
(GB01LP Only) or with screws (Screw B, you may need to shift the burners
slightly to the right position to align the screw holes) - tighten the screws. Then
tighten the screws for the burner heads.
PLEASE NOTE THERE WILL BE A SIGNITIFATE AEROATION HOLES BESIDE
THE INLET OF THE BURNER HEAD/S. THIS IS NORMAL. THE HOLES ARE FOR LETTING AIR IN FOR
COMBUSTION.
6. Attach the outlet of the gas supply hose to the inlet connection at the gas manifold and tighten the connection
fully in a clockwise direction using a suitable spanner.
7. Connect the regulator end of the gas supply hose to the LPG cylinder and tighten the connection fully in a
counter-clockwise direction.
8. You must check for gas leaks before use and whenever a fitting (hose or regulator) is disconnected or
reconnected, or cylinder is refilled – To check for gas leaks, open the cylinder valve with the appliance gas
valves in the ‘OFF’ position and check for leakage by brushing a solution of detergent and water on to the
connection points at the bottle and the appliance. If bubbling is evident (may take up to 30 seconds to appear)
this indicates a gas leak is present. If disassembling, cleaning, reassembling and tightening the connection
does not rectify the leak you should close the gas cylinder valve and consult the place of purchase for
assistance.
WARNING: YOU MUST NEVER USE A NAKED FLAME TO TEST FOR GAS LEAKS.
GAS TYPE
These country cookers are suitable for use with propane gas (LP) only and cylinder sizes 4.5 kg or larger with a
POL fitting. Only cylinders which comply with AS2030.1 should be used. It may be hazardous to attempt to fit
other types of gas containers
PRECAUTIONS
Select a suitable position for the country cooker. It is important to ensure maximum performance, economy
and safety of operation.
Always ensure that adequate fresh air is provided for ventilation.
The country cooker must only be operated OUTDOORS and on a level firm non-combustible surface.
Spiders’ webs can interfere with the flow of gas / air into the burner causing yellow or abnormal flame. The
opening into the burner directly in front of the gas valve should be checked and cleared with a pipe cleaner or
similar length device.
The country cooker is a portable outdoor appliance and is not designed to be installed
This cooker shall not be used in a position where it could create a fire hazard and the following minimum
clearances to combustible materials must be observed: MINIMUM CLEARANCE FROM COUNTRY COOKER
TO REAR OR SIDES OF COMBUSTIBE SURFACES MUST BE NO LESS THAN 250MM AND TO
OVERHEAD COMBUSTIBLE SURFACES NO LESS THAN 1200MM.
Screw A
(part index
number 2)
Screw B
(part index
number 6)
Figure 4
(part index number 7)
Page 5

GB010203 5
Do not spray aerosols in the vicinity of this country cooker while it is in operation
Do not use this appliance where petroleum products or other liquids having flammable vapours are stored or
used.
Do not hang clothing or other flammable material on or near this appliance.
Children and adults should be alerted to the high temperatures of the country cooker and its effect on
surrounding surfaces, clothing and skin.
Children or the elderly should be supervised when near this appliance
If the country cooker fails to operate correctly, contact place of purchase or their authorised agent for advice
and service. DO NOT CONTINUE TO USE THE APPLIANCE and DO NOT ATTEMPT REPAIRS YOURSELF.
OPERATING INSTRUCTIONS
LIGHTING THE BURNER:
1. Before lighting, ensure the country cooker is on a level non-combustible surface outdoors and required
minimum Clearances from combustible surfaces are maintained as follows: at least 250mm from REAR OR
SIDES and at least 1200mm OVERHEAD.
2. Check the gas hose and rubber seal or ‘O’ ring of regulator inlet fitting for signs of damage, abrasion or
cracking – PVC hoses may harden with age - replace the hose and regulator assembly if any damage is
evident.
3. Ensure the gas supply hose is connected to the gas inlet of the country cooker and the regulator is
connected to the LP cylinder and check that both connections are tight – refer sections 5 & 6 of assembly
instructions.
4. Turn on the LP cylinder valve in a counter clockwise direction and check for gas leaks as previously
described in section 7 of the assembly instructions.
5. Turn the appliance control valve counter-clockwise until the lever is in line with the burner and light the
burner with a long taper or long match.
6. Turn the bolt at the left hand side of the venturi back and forth until you get nice blue flame. This step is
important, as it ensures there is a right mix of air and gas to achieve a blue flame.
7. The burner may now be adjusted to the desired flame setting.
Turn control valve clockwise for low flame or counter-clockwise for high flame.
SHUTTING DOWN THE BURNER:
1. Turn LP cylinder gas valve fully clockwise to “OFF” position. The gas must always be turned off at the
cylinder to ensure there is no gas flow and that no gas remains in the regulator, hose and appliance during
non-use/storage.
2. Once the flame has gone out, Turn appliance control valve(s) to “OFF” position, which is at 90 to the line
of the burner.
DO NOT TOUCH HOT SURFACES, ALLOW THE COUNTRY COOKER TO COOL BEFORE CLEANING IF
NECESSARY.
ANCILLARY SERVICE INFORMATION
MAINTENANCE
SERVICE INSTRUCTIONS FOR LISCENSED GAS FITTER OR PLUMBER.
(a) Remove all covers and other parts for access to all components.
(b) Remove all components for services.
Do not attempt any maintenance within 30 minutes of country cooker being used.
Burner ports may be cleaned with either compressed air or pipe cleaner or similar device.
Any spiders’ webs formed in the burner inlet must be cleared with a pipe cleaner or similar length device.
Caution: Operation of the burner with a web in the inlet may result in leakage and/or ignition of gas at the burner
inlet.
It is also recommended that the hose assembly and regulator inlet fitting seals be checked for damage, abrasion,
cracking or displacement before each use. PVC hose assemblies may harden with age and should be replaced if
this occurs. If a replacement part or assembly is required please contact place of purchase or an authorised agent
for advice.
Page 6

GB010203 6
Periodic service should be performed at intervals not exceeding 6 months by an authorised service agent or more
often if required
ABNORMAL OPERATION
You should cease using the appliance and seek service from an authorised agent if any of the following are
observed during operation of the appliance: sooting / carbon build up on the appliance or pans, excessive yellow
tipping of the burner flame, flames lifting off the burner ports or flashing back. Flame abnormality may be due to
gas supply restriction or blockage of burner ports or venturi. Gas spillage may occur if the burner inlet is partially
blocked by a spider web, the gas may ignite around the burner inlet.
It is recommended that an authorised person/service agent perform all maintenance.
If the country cooker fails to operate correctly, contact place of purchase or authorised agent for advice and
service. DO NOT ATTEMPT REPAIRS YOURSELF.
CONVERSION
This country cooker is suitable for use with propane gas (LP) only and may not be converted for use any other type
of gas. For further advice, contact place of purchase or their authorised agent for advice.
SPECIFICATIONS
Model
GB-01LP
GB-02LP
GB-03LP
Product name
1 burner country cooker
2 burner country cooker
3 burner country cooker
Injector orifice
Diameter
Ø 1 mm
2 x Ø 1mm
3 x Ø 1 mm
Nominal Hourly
Gas Consumption
(MJ/h)
12
2 x 12
3 x 12
Overall dimensions
140mm x 345mm x 269mm
140mm x 345mm x 520mm
140mm x 345mm x 783mm
Gas type
Propane
Gas pressure (kPa)
2.75±0.05
AGA Certificate No.
6327G
PROCEDURES FOR GAS LEAKAGE
The strong and distinctive odour of gas may make you aware of a gas leak. If you suspect a gas leak:
Immediately turn off the gas supply at the cylinder valve
Turn off all appliances and pilot lights, and turn off supply at the gas meter;
Do not allow gas to build up in the area. Open all doors and windows to both disperse the gas and provide
ventilation;
Do not use any naked flame or other ignition source (such as light switches, power points, mobile phones and
pagers);
Do not operate any electrical equipment in the vicinity of a gas leak;
Contact your licensed gas fitter to repair the leak and relight the appliance.
NEVER attempt to repair the appliance yourself.
IT MUST BE SERVICED AND REPAIRED BY A LICENSED PLUMBER OR GAS FITTER
NOTE:
Austcrown Pty. Ltd and their appointed agents will not be liable in respect of any misuse, which is not in
accordance with the instructions and precautions specified in this booklet.
Austcrown Pty Ltd
17 Greenaway Street, BULLEEN VIC 3105, Australia
Email: [email protected]
Web: www.auscrown.com.au
Technical Assistance Services
For service, spare parts and repairs, contact
AUSTCROWN PTY LTD
(03) 98501629.
Please provide the appliance model number and serial number.
This information is given on the label located left-hand side panel.
Page 7
 Loading...