

RAM TRUCK 1500 2010, 2010 TRUCK 2500, TRUCK 3500 2010, 2010 TRUCK 3500 User Manual

2010
1500/2500/3500
IMPORTANT: This User Guide is intended to
familiarize you with the important features
of your vehicle. The DVD enclosed contains
your Owner’s Manual, Navigation Radio or
Multimedia Radio Manual, Warranty Booklets,
Tire Warranty and 24-Hour Towing Assistance
(new vehicles purchased in the U.S.) or
Roadside Assistance (new vehicles purchased
in Canada) in electronic format. We hope you
find it useful. If you are the first registered
owner of your vehicle, you may obtain a printed
copy of the Owner’s Manual, Navigation Radio
or Multimedia Radio Manual or Warranty
Booklet by calling 1-800-992-1997 (U.S.) or
1-800-387-1143 (Canada) or by contacting
your dealer. Replacement manuals may be
purchased by visiting www.techauthority.com.
Copyright © 2009 Chrysler Group LLC.

TABLE OF CONTENTS
INTRODUCTION/WELCOME
WELCOME FROM CHRYSLER GROUP LLC . 2
CONTROLS AT A GLANCE
DRIVER COCKPIT ..............4
INSTRUMENT CLUSTER ..........6
GETTING STARTED
KEYFOB...................8
THEFT ALARM ................9
SEATBELT .................9
CHILD RESTRAINTS .............9
FRONTSEATS................12
REARHEATEDSEATS............15
HEATED STEERING WHEEL .........15
TILT STEERING COLUMN / ADJUSTABLE
PEDALS...................16
POWER SLIDING REAR WINDOW .....17
DIESEL ENGINE STARTING
PROCEDURES................17
PROGRAMMABLEFEATURES .......18
OPERATING YOUR VEHICLE
TURN SIGNALS/WIPER/WASHER/HIGH
BEAMSLEVER .............. 20
HEADLIGHT SWITCH ............21
SPEED CONTROL LEVER ......... 22
MANUAL CLIMATE CONTROLS .......23
AUTOMATIC TEMPERATURE
CONTROL(ATC)...............23
PARKSENSE
PARKVIEW®REAR BACK-UP CAMERA . . 24
DIESEL EXHAUST BRAKE
(ENGINE BRAKING) ............ 24
IDLE-UP FEATURE (DIESEL/AUTOMATIC
TRANSMISSIONONLY)...........25
TIRE PRESSURE MONITOR SYSTEM
(TPMS) – 2500 MODELS ONLY ......25
POWERSUNROOF ............ 26
WIND BUFFETING ..............27
®
REAR PARK ASSIST .... 24
ELECTRONICS
NON-TOUCH-SCREENRADIOS...... 28
TOUCH-SCREENRADIOS......... 30
REMOTE AUDIO CONTROLS ........34
VIDEO ENTERTAINMENT SYSTEM (VES)™
UNIVERSAL CONSUMER INTERFACE ....35
ELECTRONIC VEHICLE INFORMATION
CENTER (EVIC) .............. 36
UNIVERSAL GARAGE DOOR OPENER . . 36
POWERINVERTER ............ 38
POWER OUTLET ............. 38
UCONNECT™ PHONE .......... 39
VOICECOMMAND .............41
..34
OFF-ROAD CAPABILITIES
FOUR-WHEEL DRIVE OPERATION .... 42
UTILITY
EASY-OFFTAILGATE ............43
RAMBOX®.................44
TRAILER TOWING WEIGHTS (MAXIMUM
TRAILER WEIGHT RATINGS) ........47
RECREATIONAL TOWING (BEHIND
MOTORHOME, ETC.) ............47
BRAKE/TRANSMISSION INTERLOCK
MANUAL OVERRIDE ........... 49
WHAT TO DO IN EMERGENCIES
24 HOUR TOWING ASSISTANCE -
U.S. ONLY .................50
INSTRUMENT CLUSTER WARNING
LIGHTS ...................50
IF YOUR ENGINE OVERHEATS .......53
JACKINGANDTIRECHANGING.......54
JUMP-STARTING ............. 60
EMERGENCY TOW HOOKS .........63
TOWINGADISABLEDVEHICLE...... 64
FREEING A STUCK VEHICLE ........65
EVENT DATA RECORDER (EDR) ..... 66
MAINTAINING YOUR VEHICLE
OPENING THE HOOD ............67
ENGINE COMPARTMENT ......... 68
FUEL FILTER/WATER SEPARATOR —
DIESELONLY................72
EXHAUST REGENERATION —
DIESELONLY................73
FLUIDS AND CAPACITIES ..........74
MAINTENANCE CHART ...........78
FUSES................... 82
TIREPRESSURES............. 84
WHEEL AND WHEEL TRIM CARE ......85
EXTERIOR BULBS ..............85
CONSUMER ASSISTANCE
CHRYSLER GROUP LLC CUSTOMER
CENTER.................. 86
CHRYSLER CANADA INC. CUSTOMER
CENTER.................. 86
ASSISTANCE FOR THE HEARING
IMPAIRED................. 86
PUBLICATIONS ORDERING ........ 86
REPORTING SAFETY DEFECTS IN THE
50 UNITED STATES AND
WASHINGTON, D.C. ............87
TIRE WARRANTY ..............87
MOPAR ACCESSORIES
MOPAR®ACCESSORIES ......... 90

INTRODUCTION/WELCOME
WELCOME FROM CHRYSLER GROUP LLC
Congratulations on selecting your new Chrysler Group LLC vehicle. Be assured that it
represents precision workmanship, distinctive styling, and high quality - all essentials
that are traditional to our vehicles.
IMPORTANT: This User Guide is intended to familiarize you with the important features of
your vehicle. The DVD enclosed contains your Owner’s Manual, Warranty Booklets, Tire
Warranty, and 24-Hour Towing Assistance (new vehicles purchased in the U.S.) or
Roadside Assistance (new vehicles purchased in Canada) in electronic format. We hope
you find it useful. Retail customers may obtain a printed copy of any of these booklets;
call 1-800-890-4038 (U.S.) or 1-800-387-1143 (Canada) or ask your dealer.
For complete owner information, refer to the DVD in the owner’s kit provided at the time
of new vehicle purchase. For your convenience, the information contained on the DVD
may also be printed and saved for future reference.
Not all features shown in this guide may apply to your vehicle.
Chrysler Group LLC is committed to protecting our environment and natural resources. By
converting from paper to electronic delivery for the majority of the user information for
your vehicle, together we greatly reduce the demand for tree-based products and lessen
the stress on our environment.
Vehicles Sold In Canada
With respect to any Vehicles Sold in Canada, the name Chrysler Group LLC shall be
deemed to be deleted and the name Chrysler Canada Inc. used in substitution therefore.
Driving And Alcohol
Drunken driving is one of the most frequent causes of accidents.
Your driving ability can be seriously impaired with blood alcohol levels far below the
legal minimum. If you are drinking, don’t drive. Ride with a designated non-drinking
driver, call a cab, a friend, or use public transportation.
WARNING!
Driving after drinking can lead to an accident. Your perceptions are less sharp, your
reflexes are slower, and your judgment is impaired when you have been drinking.
Never drink and then drive.
This guide illustrates and describes the operation of features and equipment that are
either standard or optional on this vehicle. This guide may also include a description of
features and equipment that are no longer available or were not ordered on this vehicle.
Please disregard any features and equipment described in this guide that are not
available on this vehicle. Chrysler Group LLC reserves the right to make changes in
design and specifications and/or make additions to or improvements to its products
without imposing any obligation upon itself to install them on products previously
manufactured.
2

INTRODUCTION/WELCOME
CAUTION!
Never park your vehicle over dry grass or other combustible materials. The heat from
your vehicle exhaust system could cause a fire.
CHRYSLER, DODGE, JEEP, ATF+4, MOPAR and Uconnect are registered trademarks of
Chrysler Group LLC.
COPYRIGHT ©2009 CHRYSLER GROUP LLC
3
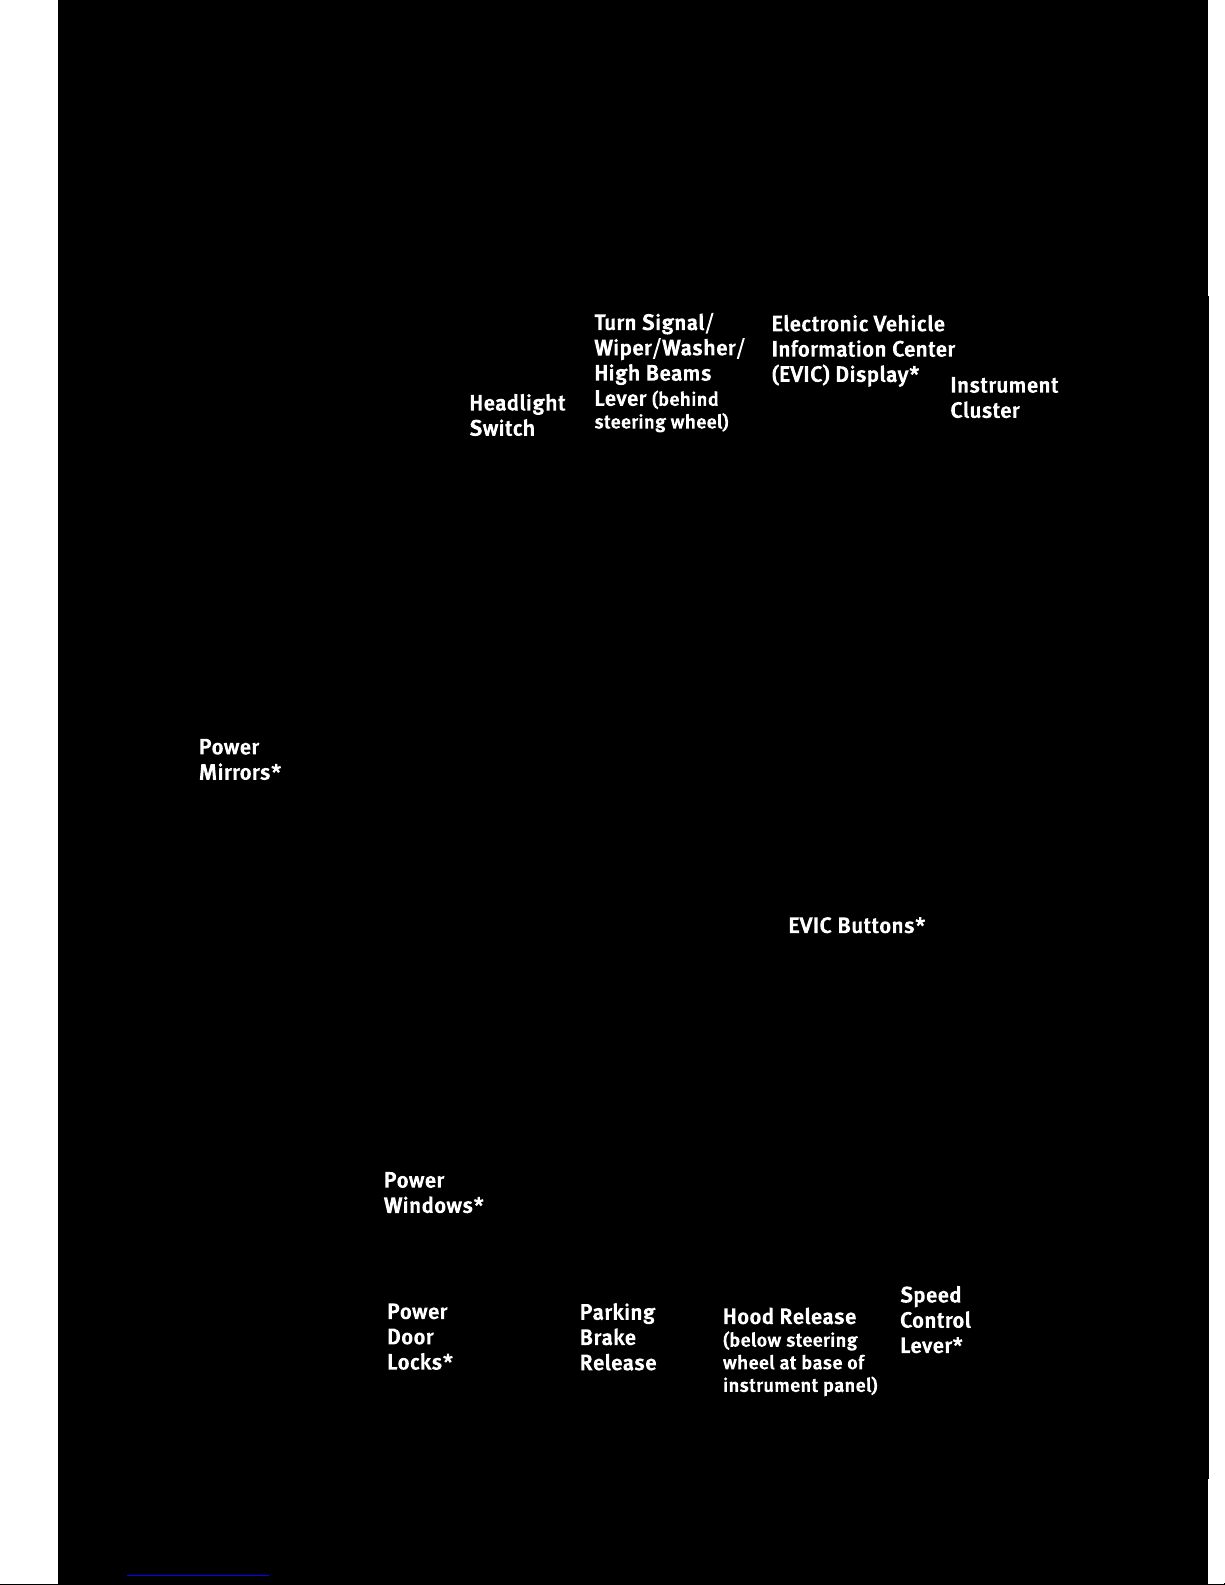
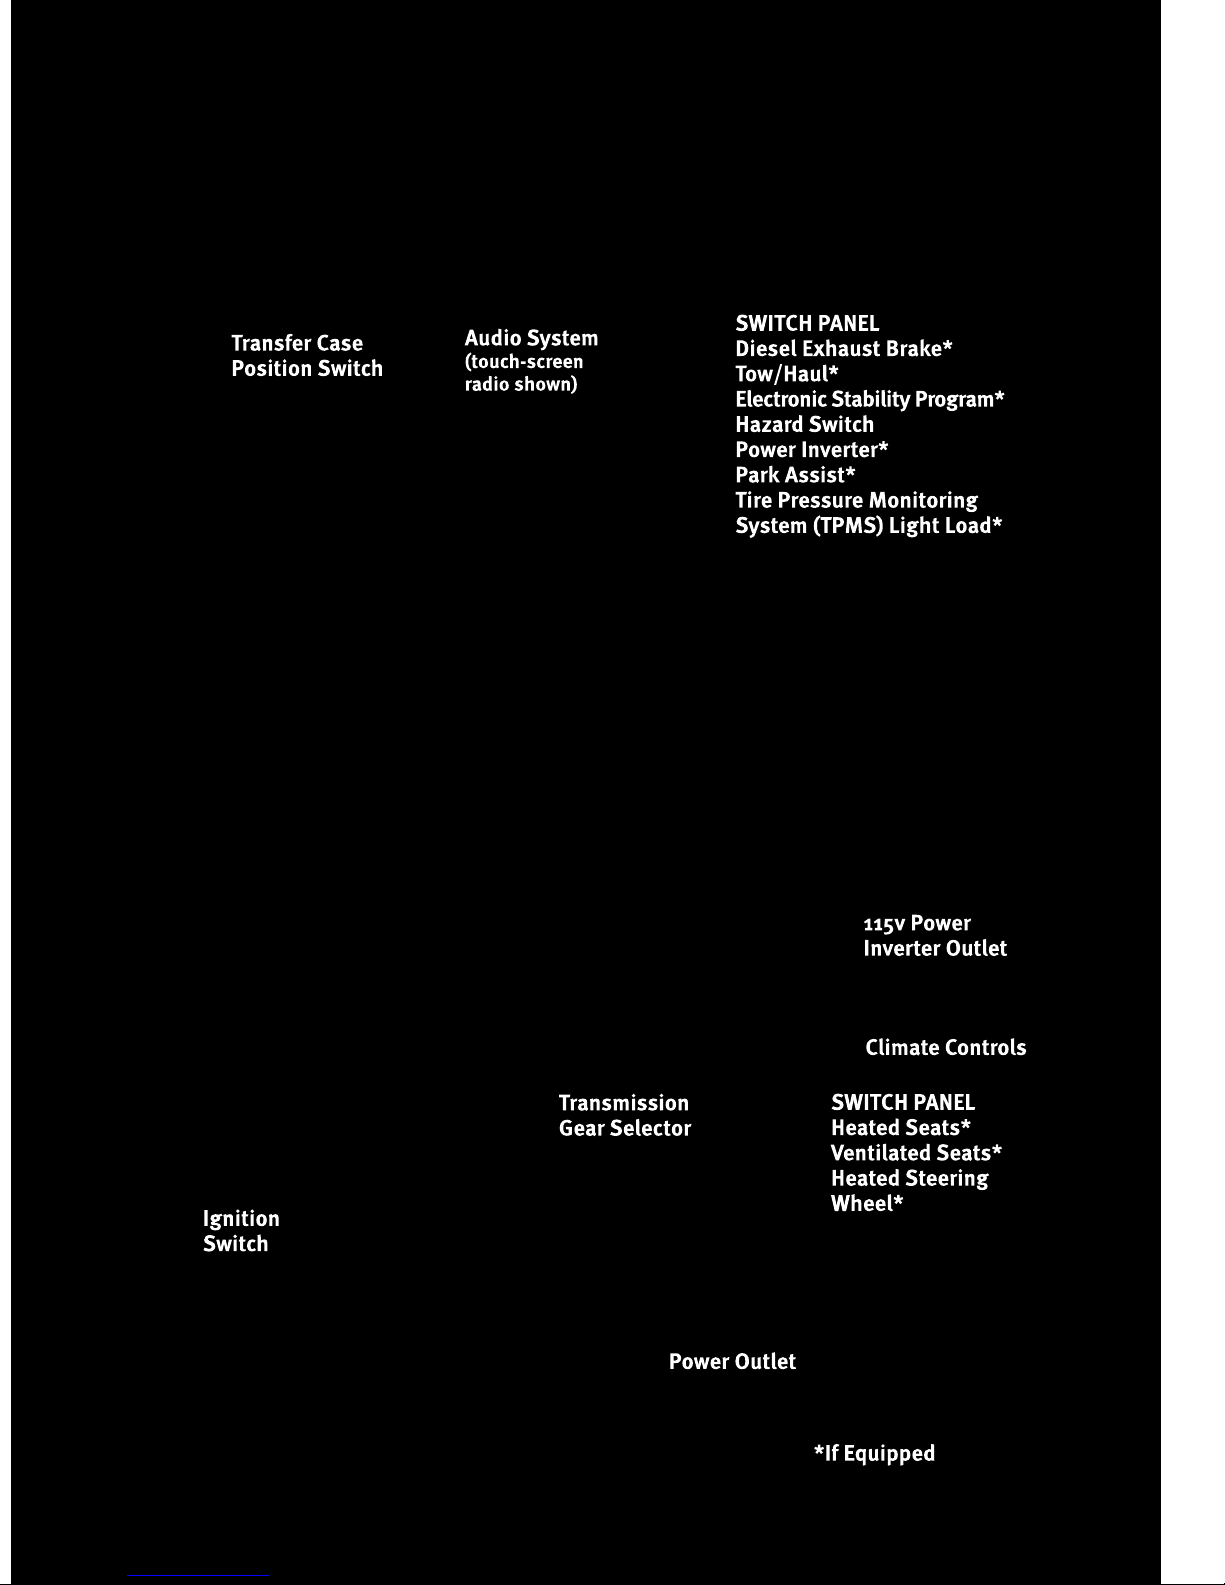
CONTROLS AT A GLANCE
DRIVER COCKPIT
4
CONTROLS AT A GLANCE
5
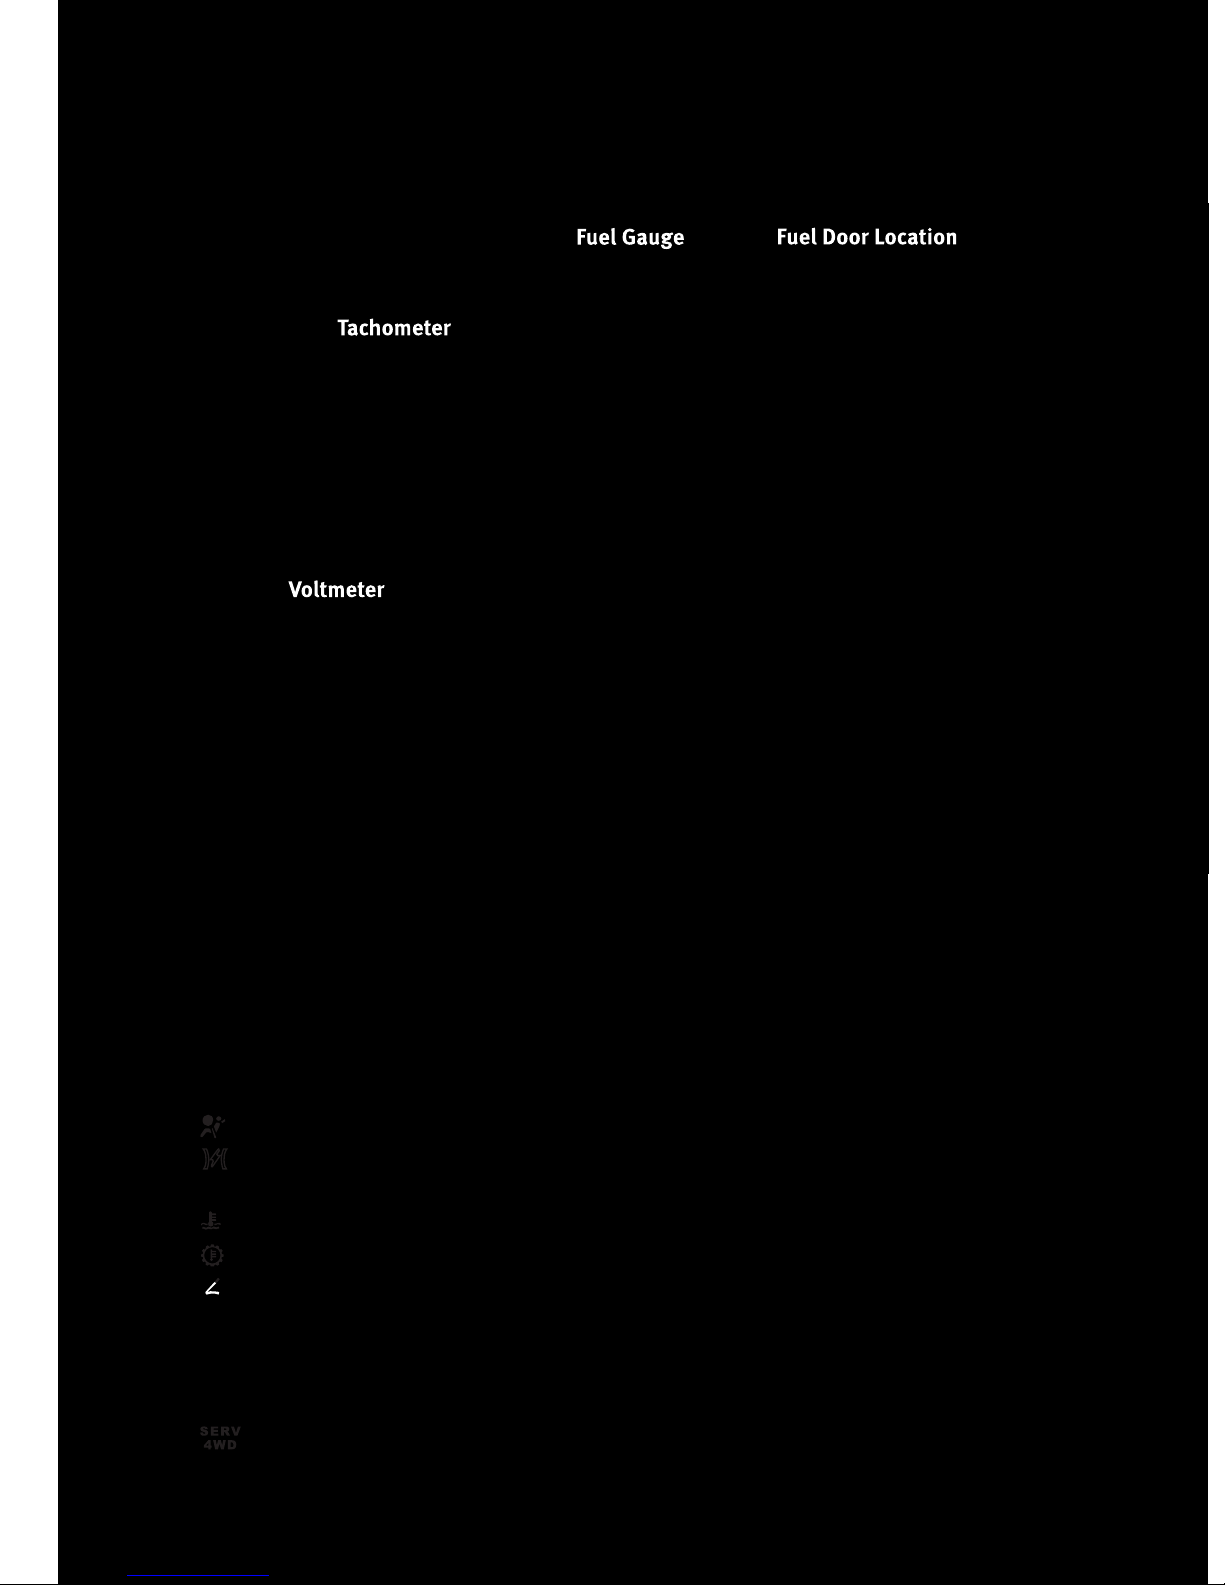
CONTROLS AT A GLANCE
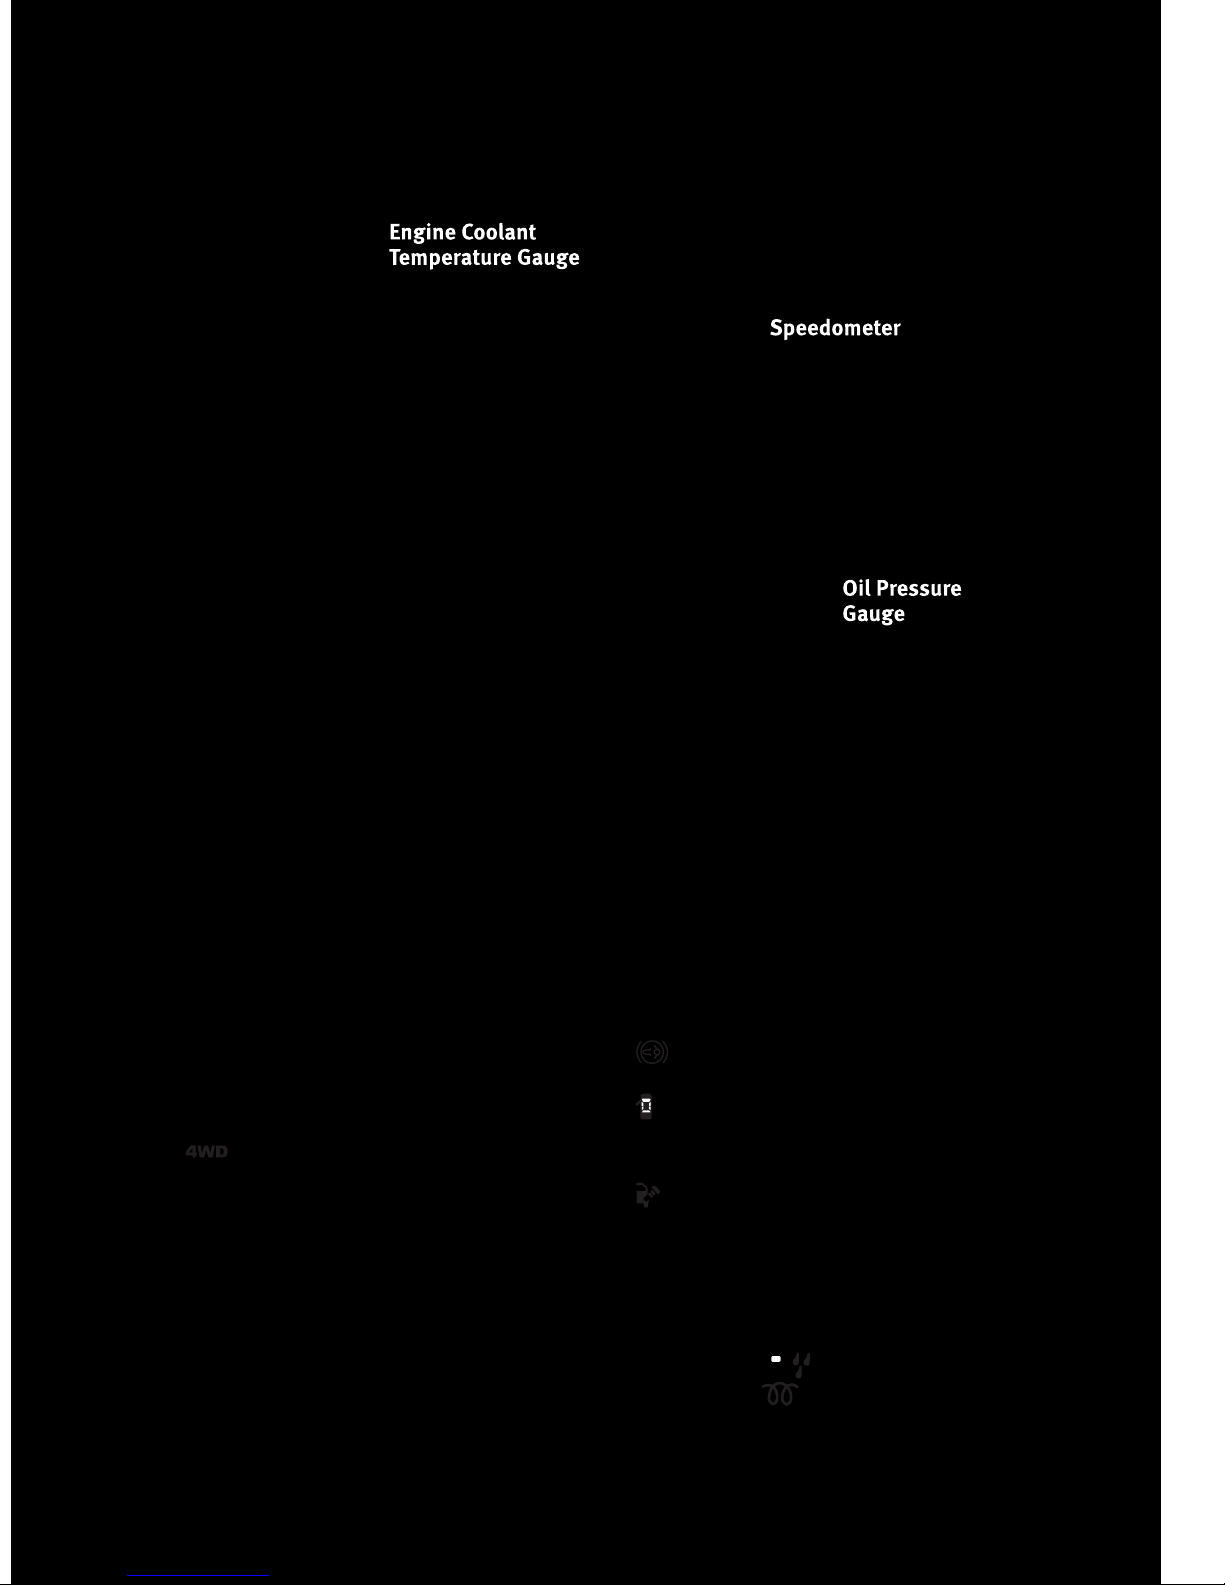
INSTRUMENT CLUSTER
Warning Lights
- Low Fuel Warning Light
- Charging System Light**
- Oil Pressure Warning Light**
- Anti-Lock Brake (ABS) Light**
- Airbag Warning Light**
- Electronic Throttle Control (ETC) Light
- Tire Pressure Monitoring System (TPMS) Light
- Engine Temperature Warning Light
- Transmission Temperature Warning Light
- Seat Belt Reminder Light
BRAKE
- Brake Warning Light**
- Malfunction Indicator Light (MIL)**
- Electronic Stability Program (ESP) Indicator Light/Brake Assist System
(BAS) Warning Light
- SERV (Service) 4WD Indicator Light
6
CONTROLS AT A GLANCE
Indicators
- Turn Signal Indicators
- High Beam Indicator
- Front Fog Light Indicator
- Vehicle Security Indicator*
- TOW/HAUL Indicator
- Four-Wheel Drive LOW Mode
Indicator
- Four-Wheel Drive and 4LOCK
Mode Indicator
- 4WD Auto Indicator
- Electronic Stability Program
(ESP)/Traction Control System
(TCS) Indicator
- Cargo Lamp On Indicator
- Exhaust Brake Indicator (Diesel
Only)
- Door Ajar Indicator
- Electronic Speed Control On
Indicator
- Loose Gas Cap Indicator
Odometer Messages
ECO - Fuel Saver Indicator LoWASH - Low Washer Fluid
door - Door Ajar noFUSE* - Fuse Fault
gASCAP - Fuel Cap Fault CHAngE OIL* - Change Engine Oil
Lo tirE - Low Tire Pressure Water in Fuel -
Wait to Start -
* If equipped
** Bulb Check with Key On
(Diesel Only)
(Diesel Only)
7

GETTING STARTED
KEY FOB
Locking And Unlocking The Doors
• Press the LOCK button once to lock all the
doors. Press the UNLOCK button once to
unlock the driver’s door only and twice
within five seconds to unlock all the doors.
• All doors can be programmed to unlock on
the first press of the UNLOCK button. Refer
to Programmable Features in this guide.
WARNING!
Leaving unattended children in a vehicle is dangerous for a number of reasons. A child
or others could be injured. Children should be warned not to touch the parking brake,
brake pedal, or the shift lever. Do not leave the Key Fob in the ignition. A child could
operate power windows, other controls, or move the vehicle.
Remote Start
x
• Press the REMOTE START button
START button a third time shuts the engine off.
• To drive the vehicle, press the UNLOCK button, insert the Key Fob in the ignition and
turn to the ON/RUN position.
• With remote start, the engine will only run for 15 minutes (timeout) unless the ignition
Key Fob is placed in the ON/RUN position.
• The vehicle must be started with the Key Fob after two consecutive timeouts.
2
twice within five seconds. Pressing the REMOTE
WARNING!
• Do not start or run an engine in a closed garage or confined area. Exhaust gas
contains Carbon Monoxide (CO) which is odorless and colorless. Carbon Monoxide
is poisonous and can cause serious injury or death when inhaled.
• Keep Key Fob transmitters away from children. Operation of the Remote Start
System, windows, door locks or other controls could cause serious injury or death.
Panic Alarm
• Press the PANIC button once to turn the panic alarm on.
• Wait approximately three seconds and press the button a second time to turn the
panic alarm off.
8

GETTING STARTED
Express Window Feature
• To remotely lower both front door windows at the same time, press and release the
UNLOCK button and then immediately press and hold the UNLOCK button until the
windows lower to the level desired or until they lower completely.
Emergency Key
• Should the battery in the vehicle or the Key Fob transmitter go dead, there is an
emergency key located in the Key Fob. To remove the emergency key, slide the button
at the top of the Key Fob sideways with your thumb and then pull the key out with your
other hand.
THEFT ALARM
To Arm
• Press the Key Fob LOCK button or the power door lock switch while the door is open.
To Disarm
• Press the Key Fob UNLOCK button and turn the ignition to the ON position.
SEAT BELT
• Be sure everyone in your vehicle is in a seat and using a seat belt properly.
WARNING!
In a collision, you and your passengers can suffer much greater injuries if you are not
properly buckled up. You can strike the interior of your vehicle or other passengers, or
you can be thrown out of the vehicle. Always be sure you and others in your vehicle
are buckled up properly.
CHILD RESTRAINTS
• Every state in the United States and all Canadian provinces require that small children
ride in proper restraint systems. This is the law, and you can be prosecuted for
ignoring it.
WARNING!
In a collision, an unrestrained child, even a tiny baby, can become a projectile inside
the vehicle. The force required to hold even an infant on your lap could become so
great that you could not hold the child, no matter how strong you are. The child and
others could be badly injured. Any child riding in your vehicle should be in a proper
restraint for the child's size.
Installing The LATCH - Compatible Child Restraint System
• Your vehicle’s second row passenger seats are equipped with the child restraint
anchorage system called LATCH, which stands for Lower Anchors and Tether for
CHildren. LATCH child restraint anchorage systems are installed in the rear seat
outboard positions.
9

GETTING STARTED
• LATCH equipped seating positions have both lower anchor bars, located at the back of
the seat cushion, and tether strap anchorages, located behind the seat back.
Installing The Lower Attachments:
• The vehicle lower anchorages are round bars located at the rear of the seat cushion
where it meets the seatback.
• Loosen the adjusters on the lower straps
and on the tether strap so that you can more
easily attach the hooks or connectors to the
vehicle anchors.
• Attach the lower hooks or connectors over
the top of the seatcover material.
• Then tighten the straps as you push the
child restraint rearward and downward into
the seat.
Installing The Top Tether Strap (With Either Lower Anchors Or Vehicle Seat
Belt) - Regular Cab - Front Seat:
• Place the child restraint on the seat and adjust the tether strap so that it will reach
over the seat back under the head restraint to the tether anchor directly behind the
seat.
• Lift the cover (if so equipped), and attach
the hook to the square opening in the sheet
metal.
• Install the child restraint and remove the
slack in the tether strap according to the
manufacturer's instructions.
Installing The Top Tether Strap (With Either Lower Anchors Or Vehicle Seat
Belt) - Quad Cab®/Crew Cab/Mega Cab®- Rear Seats:
• Obtain tether straps by raising the head restraints and reaching between the rear
glass and rear seat. The tether strap may be retained with an elastic band.
Accessibility to the tether strap is greatly improved by raising the seat cushion to the
“up” position. Remove the elastic before use.
• Place a child restraint on each outboard rear seat and adjust the tether strap so that it
will reach under the head restraint to the tether anchor directly behind the seat and
then to the anchor directly behind the center rear seat.
• Pass each tether strap hook under the head restraint and through the loop of webbing
behind the child seat.
• Route each tether strap to the anchor behind the center seat, and attach the hooks to
the metal ring.
10

GETTING STARTED
• Place a child restraint on the center rear seat and adjust the tether strap so that it will
reach under the head restraint to the tether anchor directly behind the seat and to the
anchor directly behind the right seat.
• Install the child restraint and remove the slack in the tether strap according to the
manufacturer’s instructions.
1. Inner Anchor Strap Ring(s)
2. Snap Hook
3. Tether Strap
4. Passenger's Side Rear Child Seat
5. Rear Center Child Seat
6. Driver's Side Rear Child Seat
WARNING!
• Improper installation of a child restraint to the LATCH anchorages can lead to failure
of an infant or child restraint. The child could be badly injured or killed. Follow the
manufacturer’s directions exactly when installing an infant or child restraint.
• An incorrectly anchored tether strap could lead to increased head motion and
possible injury to the child. Use only the anchor positions directly behind the child
seat to secure a child restraint top tether strap.
Installing The Child Restraint Using The Vehicle Seat Belts
• To install a child restraint, first, pull enough of the seat belt webbing from the retractor
to route it through the belt path of the child restraint and slide the latch plate into the
buckle.
• Next, extract all the seat belt webbing out of the retractor and then allow the belt to
retract into the retractor. Finally, pull on any excess webbing to tighten the lap portion
around the child restraint. Any seat belt system will loosen with time, so check the
belt occasionally, and pull it tight if necessary.
• Route the tether strap to provide the most direct path for the strap between the
anchor and the child seat, preferably between the head restraint posts underneath the
head restraint.
• Attach the tether strap hook of the child restraint to the tether anchor and remove
slack in the tether strap according to the child restraint manufacturer’s instructions.
NOTE: Ensure that the tether strap does not slip into the opening between the
seatbacks as you remove slack in the strap.
11

GETTING STARTED
WARNING!
Rearward-facing child seats must NEVER be used in the front seat of a vehicle with a
front passenger airbag. An airbag deployment could cause severe injury or death to
infants in this position.
FRONT SEATS
WARNING!
Adjusting a seat while the vehicle is moving is dangerous. The sudden movement of
the seat could cause you to lose control. The seat belt might not be properly adjusted,
and you could be injured. Only adjust a seat while the vehicle is parked.
Manual Seat Adjustment
Forward/Rearward
• Lift up on the adjusting bar located at the
front of the seat near the floor and release
at the desired position, then release the
handle to lock the seat into position."
Recliner
• Lift the recliner lever located on the
outboard side of the seat, lean back and
release at the desired position.
12

GETTING STARTED
WARNING!
• Actuating the recliner handle will allow the seatback to swing (dump) forward on
manual recliner seats. Do not stand or lean in front of the seat while actuating the
handle. The seatback may swing forward and hit you causing injury. This dump
feature allows access to the storage bin behind the seat. To avoid injury, place your
hand on the seatback and actuate the handle, then position the seatback in the
desired position.
• Do not ride with the seatback reclined so that the seat belt is no longer resting
against your chest. In a collision, you could slide under the seat belt and be
seriously or even fatally injured. Use the recliner only when the vehicle is parked.
Eight-Way Driver Power Seat
• The seat switch controls forward/backward and up/down.
• The seatback switch controls the angle of the seatback. Push switch forward or
rearward and the seatback will move in either direction.
CAUTION!
DO NOT place any article under a power seat or impede its ability to move as it may
cause damage to the seat controls. Seat travel may become limited if movement is
stopped by an obstruction in the seat’s path.
Power Lumbar
• The lumbar controls are located on the
outboard side of the seat cushion. The
lumbar support can be increased by
pressing the front of the switch and
decreased by pressing the back of the
switch.
Memory Seats
• The memory seat feature allows you to save the driver's seat position, driver's outside
mirror position, adjustable brake and accelerator pedals, Automatic Temperature
Control (ATC) temperature setting and radio station preset settings. The driver's
memory buttons are located on the outboard side of the driver's seat cushion.
• Adjust all memory profile settings, press the SET button, then press 1 or 2 within five
seconds.
• To program a Key Fob to the memory position, place the ignition switch in the OFF
position and press and release the LOCK button within 10 seconds on the Key Fob to
be programmed.
Press 1 or 2 to recall the saved positions, or press UNLOCK on the programmed Key Fob.
•
• Refer to the Owner's Manual on the DVD for further details.
13

GETTING STARTED
Front Heated Seats
• The controls for front heated seats are
located on the center instrument panel
below the climate controls.
• Press the switch once to select High-level
heating. Press the switch a second time to
select Low-level heating. Press the switch a
third time to shut the heating elements Off.
WARNING!
• Persons who are unable to feel pain to the skin because of advanced age, chronic
illness, diabetes, spinal cord injury, medication, alcohol use, exhaustion or other
physical conditions must exercise care when using the seat heater. It may cause
burns even at low temperatures, especially if used for long periods of time.
• Do not place anything on the seat that insulates against heat, such as a blanket or
cushion. This may cause the seat heater to overheat. Sitting in a seat that has been
overheated could cause serious burns due to the increased surface temperature of
the seat.
CAUTION!
Repeated overheating of the seat could damage the heating element and/or degrade
the material of the seat.
Ventilated Seats
• Small fans that draw the air from around the
occupant and exhaust it underneath the
seat and into the passenger compartment
are located in the seat cushion and
seatback. The fans draw this air across the
surface of the seat using air ducts and fine
perforations in the covering to help keep
the driver cooler in higher ambient
temperatures.
• The ventilated seat switches are located in
the center instrument panel below the
climate controls. Press the switch once to
select High speed. Press the switch a
second time to select Low speed.
14

GETTING STARTED
REAR HEATED SEATS
• Second row heated seat switches are
located on the rear of the center console.
• Press the switch once to select High-level
heating. Press the switch a second time to
select Low-level heating. Press the switch a
third time to shut the heating elements Off.
WARNING!
• Persons who are unable to feel pain to the skin because of advanced age, chronic
illness, diabetes, spinal cord injury, medication, alcohol use, exhaustion or other
physical conditions must exercise care when using the seat heater. It may cause
burns even at low temperatures, especially if used for long periods of time.
• Do not place anything on the seat that insulates against heat, such as a blanket or
cushion. This may cause the seat heater to overheat. Sitting in a seat that has been
overheated could cause serious burns due to the increased surface temperature of
the seat.
CAUTION!
Repeated overheating of the seat could damage the heating element and/or degrade
the material of the seat.
HEATED STEERING WHEEL
• The steering wheel contains a heating
element that heats the steering wheel to
one temperature setting.
• The heated steering wheel switch is located
on the center instrument panel below the
climate controls.
• Once the heated steering wheel has been
turned on, it will operate for approximately
58 to 70 minutes before automatically
shutting off. The heated steering wheel can
shut off early or may not turn on when the
steering wheel is already warm.
15

GETTING STARTED
TILT STEERING COLUMN / ADJUSTABLE PEDALS
Tilt Steering Column
• The tilt lever is located on the steering
column, below the turn signal lever.
• Pull forward on the lever and move the
steering wheel up or down as desired.
• Release the lever to lock the steering wheel
into position.
Adjustable Pedals
• Press the switch located on the left side of the steering column forward to move the
brake and accelerator pedals away from the driver and press the switch rearward to
move the pedals closer to the driver.
NOTE: The pedals cannot be adjusted when the vehicle is in REVERSE or when the
Electronic Speed Control is set.
WARNING!
Tilting the steering column while the vehicle is moving is dangerous. Without a stable
steering column, you could lose control of the vehicle and have an accident. Adjust
the column only while the vehicle is stopped. Be sure it is locked before driving.
WARNING!
Do not adjust the pedals while the vehicle is moving. You could lose control and have
an accident. Always adjust the pedals while the vehicle is parked.
CAUTION!
Do not place any article under the adjustable pedals or impede its ability to move, as
it may cause damage to the pedal controls. Pedal travel may become limited if
movement is stopped by an obstruction in the adjustable pedal's path.
16

GETTING STARTED
POWER SLIDING REAR WINDOW
• The switch for the power sliding rear
window is located on the overhead console.
• Press the left side of the switch to open the
glass and the right side of the switch to
close the glass.
DIESEL ENGINE STARTING PROCEDURES
Engine Block Heater
• For ambient temperatures below 0°F (-18°C), engine block heater usage is
recommended.
• For ambient temperatures below –20°F (-29°C), engine block heater usage is required.
• The engine block heater cord is routed under the hood to the right side and can be
located just behind the grille near the headlamp.
• Connect the heater cord to a ground-fault interrupter protected 110–115 volt AC
electrical outlet with a grounded, three-wire extension cord.
NOTE: The block heater will require 110 volts AC and 6.5 amps to activate the heater
element.
• The block heater must be plugged in at least one hour to have an adequate warming
effect on the coolant.
Remember to disconnect the cord before driving. Damage to the 110–115 volt electrical
cord could cause electrocution.
WaterInFuelMessage
• If a Water In Fuel message or indicator appears in the cluster and a chime
sounds five times, the fuel/water separator will need to be drained immediately to
prevent engine damage.
• Refer to Maintaining Your Vehicle in this guide for draining instructions or see your
dealer.
Cold Start Procedure
• Turn the ignition switch to the ON position. If the Wait To Start light appears in
the cluster, wait for the light to turn off before starting.
• In extremely cold conditions, when the engine temperature may be below 0°F (-18°C),
cycle the manifold heaters twice with a five-second pause between cycles.
• Refer to the Owner's Manual Diesel Supplement on the DVD for further details.
WARNING!
17

GETTING STARTED
PROGRAMMABLE FEATURES
Electronic Vehicle Information Center (EVIC) – If Equipped
• The EVIC can be used to program the following Personal Settings. Press the UP or
DOWN
Scroll through the settings using the UP or DOWN button. Press the SELECT button to
change the setting.
• Select Language • Headlamps With Wipers
• Nav-Turn By Turn • Automatic High Beams – If Equipped
• Park Assist System • Wiper Mode – If Equipped
• Auto Door Locks • Easy Exit Seat – If Equipped
• Auto Unlock Doors • Tilt Mirror In Reverse
• Remote Unlock Sequence • Key-Off Power Delay
• RKE Linked To Memory • Illuminated Approach
• Remote Start Comfort Sys. • Hill Start Assist (HSA)
• Horn With Remote Start • Display Fuel Savor – If Equipped
• Horn With Remote Lock • Compass Variance
• Flash Lamps With Lock • Calibrate Compass
• Headlamp Off Delay
button until SYSTEM SETUP displays, then press the SELECT button .
Key Fob Programmable Features
• The following features may also be programmed by using the Key Fob transmitter or
the ignition switch and driver's door lock switch.
NOTE: Pressing the LOCK button while you are inside the vehicle will activate the
Vehicle Security Alarm. Opening a door with the Vehicle Security Alarm activated will
cause the alarm to sound. Press the UNLOCK button to deactivate the Vehicle Security
Alarm.
Unlock On First Press
• To unlock either the driver's side, or all doors, on the first press of the UNLOCK button:
• Press and hold the LOCK button for at least 4 seconds, but no longer than
10 seconds. Then, press and hold the UNLOCK button while still holding the LOCK
button.
• Release both buttons at the same time.
Auto Unlock Doors On Exit
• To have all of the vehicle doors unlock when any door is opened:
• Enter your vehicle, close all the doors and fasten your seat belt.
• Within 15 seconds, cycle the ignition switch from the OFF position to the ON
position a minimum of four times, ending in the OFF position (do not start the
engine).
• Within 30 seconds, press the driver’s door lock switch in the UNLOCK direction. A
single chime will indicate that programming is complete.
18

GETTING STARTED
Auto Door Lock
• To have the doors lock automatically when the vehicle’s speed exceeds 15 mph
(24 km/h):
• Enter your vehicle, close all the doors and fasten your seat belt.
• Within 15 seconds, cycle the ignition switch from the OFF position to the ON
position a minimum of four times, ending in the OFF position (do not start the
engine).
• Within 30 seconds, press the driver’s door lock switch in the LOCK direction. A
single chime will indicate that programming is complete.
Sound Horn With Lock
• To turn the horn chirp on or off when the doors are locked:
• Press the LOCK button for at least 4 seconds, but no longer than 10 seconds. Then,
press the PANIC button while still holding the LOCK button.
• Release both buttons at the same time.
Flashing Lights With Lock
• The turn signal lights flashing, when the doors are locked or unlocked, feature can be
turned on or off. To turn this feature on or off:
• Press and hold the UNLOCK button for at least 4 seconds, but no longer than
10 seconds. Then, press and hold the LOCK button while still holding the UNLOCK
button.
• Release both buttons at the same time.
19

OPERATING YOUR VEHICLE
TURN SIGNALS/WIPER/WASHER/HIGH BEAMS LEVER
Turn Signals/Lane Change Assist
• Tap the lever up or down once and the turn signal (right or left) will flash three times
then automatically turn off.
Wipers
Intermittent, Low And High Operation
• Rotate the end of the lever to the first detent position for one of five intermittent
settings, the second detent for low wiper operation and the third detent for high wiper
operation.
Washer Operation
• Push the end of the lever inward to the second detent and hold for as long as spray is
desired.
High Beams
• Push the lever away from you to activate the high beams.
• A high beam symbol will illuminate in the cluster to indicate the high beams are on.
NOTE: For safe driving, turn off high beams when oncoming traffic is present to prevent
headlight glare and as a courtesy to other motorists.
20

OPERATING YOUR VEHICLE
HEADLIGHT SWITCH
Automatic Headlights/Parking
Lights/Headlights
• Rotate the headlight switch to the first
detent for parking lights
second detent for headlights
• Rotate the headlight switch to “A” for AUTO
headlights.
• When set to “A” (AUTO), the system
automatically turns the headlights on or off
based on ambient light levels.
Instrument Panel Dimmer
• Rotate the dimmer control to the extreme left position to fully dim the instrument
panel lights and prevent the interior lights from illuminating when a door is opened.
• Rotate the dimmer control right to increase the brightness of the instrument panel
when the parking lights or headlights are on.
• Rotate the dimmer control right to the next detent position to fully brighten the
odometer and radio when the parking lights or headlights are on. Refer to your
Multimedia or Navigation User Manual on the DVD for display dimming.
• Rotate the dimmer control right to the last detent position to turn on the interior
lighting.
and to the
.
Cargo Light
• The cargo light is strategically placed lighting that helps illuminate the bed area of the
truck. A cargo light symbol will illuminate in the cluster to indicate the light is on.
• Push the button to turn ON/OFF the cargo lighting.
21

OPERATING YOUR VEHICLE
SPEED CONTROL LEVER
Cruise ON/OFF
• Push the ON/OFF button to activate the
Speed Control.
• The cruise symbol
instrument cluster to indicate the Speed
Control is on.
• Push the ON/OFF button a second time to
turn the system off.
WARNING!
will appear on the
Leaving the Electronic Speed Control system on when not in use is dangerous. You
could accidentally set the system or cause it to go faster than you want. You could lose
control and have an accident. Always leave the Electronic Speed Control system off
when you are not using it.
Set
• With Speed Control on, push down and release the lever to set a desired speed.
WARNING!
Electronic Speed Control can be dangerous where the system cannot maintain a
constant speed. Your vehicle could go too fast for the conditions, and you could lose
control. An accident could be the result. Do not use Electronic Speed Control in heavy
traffic or on roads that are winding, icy, snow-covered or slippery.
Accel/Decel
• Push and hold the lever up to accelerate or down to decelerate the vehicle; release the
lever to save the new set speed.
• Once a speed is set, tapping the lever up or down will increase or decrease the set
speed approximately 1 mph (2 km/h).
Cancel
• Pull the lever toward you, push the clutch pedal or apply the brakes to cancel the set
speed and maintain the set speed in memory.
• Push the ON/OFF button to turn the system off and erase the set speed memory.
Resume
• To resume a previously selected speed in memory, push the lever up and release.
22

OPERATING YOUR VEHICLE
MANUAL CLIMATE CONTROLS
Air Recirculation
• Rotate the Temperature Control to the MAX A/C position to automatically turn on both
Air Conditioning and Recirculation.
• For window defogging, turn the recirculation button off.
• Recirculation is not allowed in defrost, floor, defrost/floor (mix) modes.
/Max A/C
AUTOMATIC TEMPERATURE CONTROL (ATC)
• Rotate both the Mode Control and Blower Control to the AUTO position.
• Select the desired temperature by pushing the up or down temperature buttons for the
driver or passenger.
• The system will maintain the set temperature automatically.
Air Conditioning (A/C)
• If the A/C button is pushed while in the AUTO mode, the indicator light may flash three
times to indicate the cabin air is being controlled automatically.
23

OPERATING YOUR VEHICLE
SYNC Temperature Button
• Push the SYNC button once to control the driver and passenger temperatures
simultaneously. Push the SYNC button a second time to control the temperatures
individually.
Air Recirculation
• Use recirculation for maximum A/C operation.
• For window defogging turn the recirculation button off.
• If the recirculation button is pushed while in the AUTO mode, the indicator light may
flash three times to indicate the cabin air is being controlled automatically.
PARKSENSE®REAR PARK ASSIST
• If an object is detected behind the rear bumper while the vehicle is in REVERSE, a
warning will display in the instrument cluster and a tone, that changes speed
depending on the distance of the object from the bumper, will sound.
PARKVIEW®REAR BACK-UP CAMERA
• You can see an on-screen image of the rear of your vehicle whenever the shift lever is
put into REVERSE. The ParkView
radio display screen, located on the center stack of the instrument panel.
®
Rear Back-Up Camera image will be displayed on the
WARNING!
Drivers must be careful when backing up even when using the ParkView®Rear
Back-Up Camera. Always check carefully behind your vehicle, and be sure to check for
pedestrians, animals, other vehicles, obstructions, or blind spots before backing up.
You are responsible for the safety of your surroundings and must continue to pay
attention while backing up. Failure to do so can result in serious injury or death.
DIESEL EXHAUST BRAKE (ENGINE BRAKING)
• The exhaust brake feature will only function when the driver turns the exhaust brake
switch to the ON position.
• The switch is located on the switch bank below the audio system.
• Once the switch is in the ON position and the vehicle is moving faster than 5 mph
(8 km/h); the exhaust brake will automatically operate when the driver removes
pressure from the accelerator pedal.
• Exhaust braking is most effective when the engine RPM is higher.
Use of aftermarket exhaust brakes is not recommended and could lead to engine
damage.
CAUTION!
24

OPERATING YOUR VEHICLE
WARNING!
Do not use the exhaust brake feature when driving in icy or slippery conditions as the
increased engine braking can cause the rear wheels to slide and the vehicle to swing
around with the possible loss of vehicle control, which may cause an accident
possibly resulting in personal injury or death.
NOTE: For optimum braking power, it is recommended to use the exhaust brake while in
TOW/HAUL mode.
IDLE-UP FEATURE (DIESEL/AUTOMATIC TRANSMISSION ONLY)
• The Idle-Up Feature uses the speed control switches to increase engine idle speed and
quickly warm the vehicle’s interior. This feature must be enabled by your dealer. See
your local Dodge dealer.
• With the transmission in PARK, the parking brake applied, and the engine running,
push the speed control ON/OFF switch on, then push the SET switch.
• The engine RPM will go up to 1100 RPM. To increase the RPM, push and hold the
ACCEL/RESUME switch and the idle speed will increase to approximately 1500 RPM. To
decrease the RPM, push and hold the DECEL switch and the idle speed will decrease
to approximately 1100 RPM.
• To cancel the Idle Up Feature, either push the CANCEL switch, push the ON/OFF switch
or push the brake pedal.
TIRE PRESSURE MONITOR SYSTEM (TPMS) – 2500 MODELS
ONLY
Tire Light Load Inflation Switch Description
• The Tire Pressure Monitoring System on your vehicle has two different tire pressure
settings based on vehicle loading. The Tire Light Load Switch is located on the
Instrument Panel below the climate controls.
• The “Light Load Inflation” and “Max Load Inflation” tire pressures recommended for
your vehicle based on vehicle loading are found on the Supplemental Tire Pressure
Information Label located on the rear face of the driver front door.
• When the vehicle is in the “Light Load Inflation” setting, the Tire Light Load Inflation
switch is On. The indicator light is Off when in the “Max Load Inflation” setting.
Light Load Inflation (Indicator Light On)
• If the passenger and cargo are less than the Light Load Pressure Definition shown on
the Supplemental Tire Pressure Information Label, inflate or deflate tires to the correct
“Light Load Inflation” pressure. If the indicator light is not on, the mode can be
changed by pushing the switch once.
• If the light on the switch flashes On and Off, after the button is pressed to switch
between modes, this indicates conditions are not correct to switch modes. The
system will not allow switching modes until the tire pressures have been set to Light
Load Inflation as indicated on the Supplemental Tire Pressure Information Label.
25

OPERATING YOUR VEHICLE
Max Load Inflation (Indicator Light Off)
• If the passenger and cargo exceed the Light Load Pressure Definition shown on the
Supplemental Tire Pressure Information Label, inflate or deflate tires to the correct
“Max Load Inflation” pressure. If the indicator is on, reset by pushing the switch once.
• If the tire pressure monitoring light and a “low tire” message appears in the cluster,
inflate the tire pressures to the “Max Load Inflation” setting as indicated in the
Supplemental Tire Pressure Information Label.
• After any tire pressure adjustment, the vehicle may need to be driven for up to
20 minutes at speeds over 15 mph for the tire pressure information to be updated, or
for a low tire pressure warning to go out.
• For additional information, refer to the Owner's Manual on the DVD.
POWER SUNROOF
• The power sunroof switch is located on the overhead console.
WARNING!
• Never leave children in a vehicle with the key in the ignition switch. Occupants,
particularly unattended children, can become entrapped by the power sunroof
while operating the power sunroof switch. Such entrapment may result in serious
injury or death.
• In an accident, there is a greater risk of being thrown from a vehicle with an open
sunroof. You could also be seriously injured or killed. Always fasten your seat belt
properly and make sure all passengers are properly secured too.
• Do not allow small children to operate the sunroof. Never allow your fingers, other
body parts, or any object to project through the sunroof opening. Injury may result.
Opening Sunroof
Express
• Press the switch rearward and release. The sunroof will fully open and stop
automatically.
Closing Sunroof
Express
• Press the switch forward and release. The sunroof will close automatically from any
position.
Manual Open/Close
• Press and hold the switch rearward to open or forward to close the sunroof. Any
release of the switch will stop the movement, and the sunroof will remain in a partially
open or closed position until the switch is pressed again.
Venting Sunroof
• Press and release the "VENT" button, and the sunroof will open to the vent position.
This is called “Express Vent” and will occur regardless of sunroof position. During
Express Vent operation, any movement of the switch will stop the sunroof.
26

OPERATING YOUR VEHICLE
Pinch Protection Feature
• This feature will detect an obstruction in the opening of the sunroof during Express
Close operation. If an obstruction in the path of the sunroof is detected, the sunroof
will automatically return to the open position.
NOTE: Pinch protection is disabled while the switch is pressed and held during manual
opening and closing of the sunroof.
WIND BUFFETING
• Wind buffeting can be described as a helicopter-type percussion sound. If buffeting
occurs with the rear windows open, adjust the front and rear windows together.
• If buffeting occurs with the sunroof open, adjust the sunroof opening, or adjust any
window. This will minimize buffeting.
27
 Loading...