PROMASTER city
OWNER’S MANUAL
2019
VEHICLES SOLD IN CANADA
With respect to any Vehicles Sold in Canada, the name
FCA US LLC shall be deemed to be deleted and the name
FCA Canada Inc. used in substitution therefore.
DRIVING AND ALCOHOL
Drunken driving is one of the most frequent causes of
accidents.
Your driving ability can be seriously impaired with blood
alcohol levels far below the legal minimum. If you are
drinking, don’t drive. Ride with a designated nondrinking driver, call a cab, a friend, or use public transportation.
WARNING!
Driving after drinking can lead to an accident.
Your perceptions are less sharp, your reflexes are
slower, and your judgment is impaired when you
have been drinking. Never drink and then drive.
This manual illustrates and describes the operation of
features and equipment that are either standard or optional on this vehicle. This manual may also include a
description of features and equipment that are no longer
available or were not ordered on this vehicle. Please
disregard any features and equipment described in this
manual that are not on this vehicle.
FCA US LLC reserves the right to make changes in design
and specifications, and/or make additions to or improvements to its products without imposing any obligation
upon itself to install them on products previously manufactured.
Copyright © 2018 FCA US LLC
SECTION PAGE
INTRODUCTION ...................................................................3
1
GRAPHICAL TABLE OF CONTENTS ......................................................7
2
GETTING TO KNOW YOUR VEHICLE ...................................................13
3
GETTING TO KNOW YOUR INSTRUMENT PANEL . .........................................69
4
SAFETY .........................................................................87
5
TABLE OF CONTENTS
1
2
3
4
5
STARTINGANDOPERATING.........................................................147
6
INCASEOFEMERGENCY ...........................................................189
7
SERVICING AND MAINTENANCE .....................................................231
8
TECHNICAL SPECIFICATIONS ........................................................285
9
MULTIMEDIA ....................................................................295
10
CUSTOMER ASSISTANCE ............................................................319
11
INDEX..........................................................................325
12
6
7
8
9
10
11
12

INTRODUCTION
CONTENTS
䡵 INTRODUCTION .........................4
1
䡵 WARNINGS AND CAUTIONS ................5
䡵 HOW TO USE THIS MANUAL ...............5
▫ Essential Information ......................5
▫ Symbols ...............................5
䡵 VAN CONVERSIONS/CAMPERS ..............5
䡵 VEHICLE MODIFICATIONS/ALTERATIONS .....6
4 INTRODUCTION
INTRODUCTION
Dear Customer,
Congratulations on selecting your new vehicle. Be assured
that it represents precision workmanship, distinctive styling, and high quality. This Owner’s Manual has been
prepared with the assistance of service and engineering
specialists to acquaint you with the operation and maintenance of your vehicle. It is supplemented by Warranty
Information, and customer oriented documents. In the
attached Warranty Booklet, you will find a description of
the services that FCA offers to its customers, the Warranty
Certificate and the details of the terms and conditions for
maintaining its validity. Please take the time to read all of
these publications carefully before driving your vehicle for
the first time. Following the instructions, recommendations, tips, and important warnings in this manual will
help assure safe and enjoyable operation of your vehicle.
Be sure you are familiar with all vehicle controls, particularly those used for braking, steering, transmission, and
transfer case shifting (if equipped). Learn how your vehicle
handles on different road surfaces. Your driving skills will
improve with experience.
This Owner’s Manual describes all versions of this vehicle.
Options and equipment dedicated to specific markets or
versions are not expressly indicated in the text. Therefore,
you should only consider the information which is related
to the trim level, engine, and version that you have
purchased. Any content introduced throughout the Owner’s Information, that may or may not be applicable to your
vehicle, will be identified with the wording “If Equipped”.
All data contained in this publication are intended to help
you use your vehicle in the best possible way. FCA aims at
a constant improvement of the vehicles produced. For this
reason, it reserves the right to make changes to the model
described for technical and/or commercial reasons. For
further information, contact an authorized dealer.
NOTE: After reviewing the Owner’s Information, it should
be stored in the vehicle for convenient referencing, and
remain with the vehicle when sold.
When it comes to service, remember that an authorized
dealer knows your vehicle best, has factory-trained technicians and genuine MOPAR® parts, and cares about your
satisfaction.
HOW TO USE THIS MANUAL
Essential Information
Consult the Table of Contents to determine which section
contains the information you desire.
Since the specification of your vehicle depends on the items
of equipment ordered, certain descriptions and illustrations may differ from your vehicle’s equipment.
The detailed index at the back of this Owner’s Manual
contains a complete listing of all subjects.
Symbols
Some vehicle components have colored labels whose symbols indicate precautions to be observed when using this
component. Refer to “Warning Lights and Messages” in
“Getting To Know Your Instrument Panel” for further
information on the symbols used in your vehicle.
WARNINGS AND CAUTIONS
This Owner’s Manual contains WARNINGS against operating procedures that could result in a collision, bodily
injury and/or death. It also contains CAUTIONS against
procedures that could result in damage to your vehicle. If
INTRODUCTION 5
you do not read this entire Owner’s Manual, you may miss
important information. Observe all Warnings and Cautions.
VAN CONVERSIONS/CAMPERS
The New Vehicle Limited Warranty does not apply to body
modifications or special equipment installed by van
conversion/camper manufacturers/body builders. U.S.
residents refer to the Warranty Information book, Section
2.1.C. Canadian residents refer to the “What Is Not Covered” section of the Warranty Information book. Such
equipment includes video monitors, VCRs, heaters, stoves,
refrigerators, etc. For warranty coverage and service on
these items, contact the applicable manufacturer.
Operating instructions for the special equipment installed
by the conversion/camper manufacturer should also be
supplied with your vehicle. If these instructions are missing, please contact your authorized dealer for assistance in
obtaining replacement documents from the applicable
manufacturer.
For information on the Body Builder’s Guide refer to
www.rambodybuilder.com. This website contains dimensional and technical specifications for your vehicle. It is
1
6 INTRODUCTION
intended for Second Stage Manufacturer’s technical support. For service issues, contact your authorized dealer.
VEHICLE MODIFICATIONS/ALTERATIONS
WARNING!
Any modifications or alterations to this vehicle could
seriously affect its roadworthiness and safety and may
lead to a collision resulting in serious injury or death.
GRAPHICAL TABLE OF CONTENTS
CONTENTS
䡵 FRONT VIEW ............................8
2
䡵 INSTRUMENT PANEL .....................10
䡵 REAR VIEW .............................9
䡵 INTERIOR ..............................11
8 GRAPHICAL TABLE OF CONTENTS
FRONT VIEW
Front View
1 — Hood/Engine Compartment 4 — Wheels/Tires
2 — Windshield 5 — Exterior Mirrors
3 — Headlights 6 — Doors
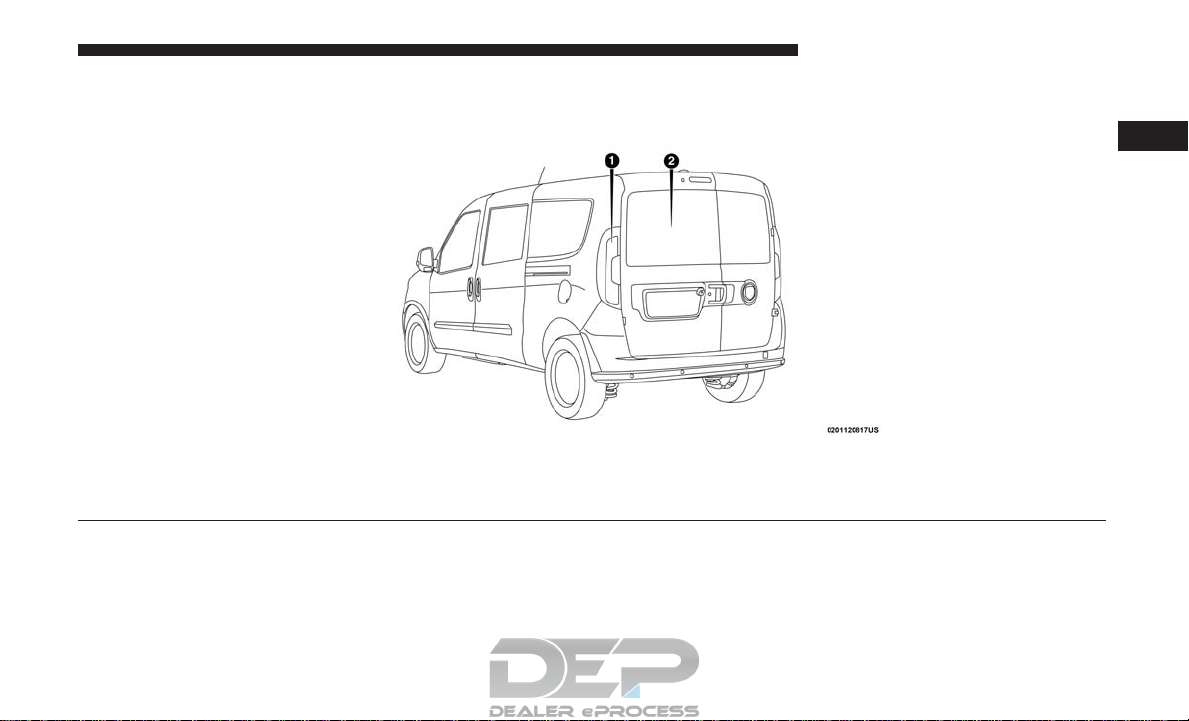
REAR VIEW
1 — Rear Lights
2 — Cargo Area Doors
GRAPHICAL TABLE OF CONTENTS 9
2
Rear View
10 GRAPHICAL TABLE OF CONTENTS
INSTRUMENT PANEL
Instrument Panel
1 — Uconnect VR And Phone Buttons 5 — Windshield Wiper Lever
2 — Multifunction Lever 6 — Switch Panel
3 — Instrument Cluster 7 — Uconnect System
4 — Speed Controls 8 — Climate Controls
INTERIOR
Interior
1 — Window Switches 3 — Gear Selector
2 — Seats 4 — Glove Compartment
GRAPHICAL TABLE OF CONTENTS 11
2

GETTING TO KNOW YOUR VEHICLE
CONTENTS
䡵 KEYS .................................16
▫ KeyFob..............................16
▫ To Lock The Doors.......................17
▫ Sound Horn With Lock ...................18
▫ Key Fob Battery Replacement ..............18
▫ Programming Additional Key Fobs ...........19
▫ General Information .....................19
䡵 IGNITION SWITCH .......................19
▫ Ignition Key Removal ....................19
▫ Key-In-Ignition Reminder .................20
䡵 SENTRY KEY ...........................20
▫ Replacement Keys .......................21
▫ General Information .....................21
䡵 VEHICLE SECURITY ALARM — IF EQUIPPED . . .22
▫ To Arm The System ......................22
3
▫ To Disarm The System ....................22
▫ Rearming Of The System ..................22
▫ Security System Manual Override ............22
䡵 DOORS ...............................23
▫ Door Locks ...........................23
▫ Sliding Side Door .......................25
▫ Child Lock System .......................27
▫ Double Rear Swing Doors .................28
䡵 SEATS ................................29
▫ Manual Adjustment (Front Seats) ............29
▫ Heated Seats — If Equipped ...............31
▫ Folding Rear Seat — If Equipped ............32
䡵 HEAD RESTRAINTS ......................34

14 GETTING TO KNOW YOUR VEHICLE
▫ Front Adjustment........................34
▫ Parking Lights .........................42
▫ Rear Adjustment ........................34
▫ Front Removal..........................35
▫ Rear Removal ..........................36
䡵 STEERING WHEEL .......................37
▫ Tilt/Telescoping Steering Column ............37
䡵 MIRRORS ..............................38
▫ Inside Day/Night Mirror — If Equipped ......38
▫ Outside Mirrors ........................38
▫ Power Outside Mirrors — If Equipped ........39
▫ Vanity Mirror ..........................40
䡵 EXTERIOR LIGHTS .......................41
▫ Multifunction Lever ......................41
▫ Headlights ............................41
▫ Daytime Running Lights — If Equipped .......41
▫ High Beams ...........................41
▫ Flash-To-Pass ..........................42
▫ Follow Me Home/Headlight Delay ...........42
▫ Fog Lights — If Equipped .................42
▫ Turn Signals ...........................42
▫ Lane Change Assist ......................43
䡵 INTERIOR LIGHTS .......................43
▫ Courtesy/Interior Lights...................43
䡵 WIPERS AND WASHERS ...................46
▫ Front Wiper Operation ....................46
▫ Rear Wiper Operation — If Equipped .........47
䡵 CLIMATE CONTROLS .....................48
▫ Manual Climate Control Overview ...........48
▫ Climate Control Functions .................52
▫ Operating Tips .........................52
䡵 WINDOWS .............................54
▫ Power Windows — If Equipped .............54
▫ Window Bar Grates — If Equipped ...........57

▫ Wind Buffeting .........................57
GETTING TO KNOW YOUR VEHICLE 15
䡵 INTERNAL EQUIPMENT ...................61
䡵 HOOD ................................58
▫ Opening ..............................58
▫ Closing...............................59
䡵 CARGO AREA FEATURES ..................60
▫ Rear Cargo Tie-Downs ...................60
▫ Storage ..............................61
▫ Cupholders ...........................63
▫ Power Outlets .........................63
䡵 ROOF RACK — IF EQUIPPED ...............66
3
16 GETTING TO KNOW YOUR VEHICLE
KEYS
Key Fob
Your vehicle uses a key start ignition system. The ignition
system consists of a key fob with a Remote Keyless Entry
(RKE) and an ignition switch.
The key fob contains an integrated mechanical key. To use
the mechanical key, simply push the mechanical key release button.
In case you need duplicate keys, please contact an authorized dealer so that they can order copies for you.
Key Fob With Integrated Mechanical Key
1 — Key Blade Release Button
2 — Driver/Passenger Unlock Button
3 — Lock Button
4 — Cargo Lock/Unlock Button
Remote Keyless Entry (RKE)
This system allows you to lock or unlock the doors from
distances up to approximately 66 ft (20 m) using a handheld key fob. The key fob does not need to be pointed at the
vehicle to activate the system.

NOTE: The key fob may not be able to be detected by the
vehicle if it is located next to a mobile phone, laptop or
other electronic device; these devices may block the key
fob’s wireless signal.
Key Fob
To Unlock The Doors
Cargo Vehicle (Canada) — If Equipped
Push and release the unlock button on key fob to unlock
the front two doors. Push and release the Cargo unlock
GETTING TO KNOW YOUR VEHICLE 17
button on key fob to unlock the cargo area (side lateral
sliding doors and rear doors). The turn signal lights will
flash to acknowledge the unlock signal.
Cargo Vehicle (United States) — If Equipped
Push and release the unlock button on key fob to unlock all
doors. Push and release the Cargo unlock button on key
fob to unlock the cargo doors. The turn signal lights will
flash to acknowledge the unlock signal.
Passenger Vehicle
Push and release the unlock button on key fob to unlock all
doors. Push and release the Cargo unlock button on key
fob to unlock the cargo doors. The turn signal lights will
flash to acknowledge the unlock signal.
To Lock The Doors
Push and release the lock button on the key fob to lock all
doors. The turn signal lights will flash to acknowledge the
signal. If a door is open, the turn signal lights will flash at
an increased rate. This is to indicate that a door is still open.
Horn activation settings after an RF lock command can be
adjusted manually. For further information, refer to
“Uconnect Settings” in “Multimedia”.
3
18 GETTING TO KNOW YOUR VEHICLE
Locking Doors With A Key
1. Insert the key with either side up.
2. Turn the key to the right to lock the door.
3. Turn the key to the left to unlock the door.
Refer to “Dealer Service” in “Servicing And Maintenance”
for maintenance procedures.
Sound Horn With Lock
This feature will cause the horn to chirp when the doors are
locked with the key fob. This feature can be turned on or
turned off. To change the current setting, refer to
“Uconnect Settings” in “Multimedia” for further information.
Key Fob Battery Replacement
NOTE: Perchlorate Material – special handling may apply.
See www.dtsc.ca.gov/hazardouswaste/perchlorate.
The recommended replacement battery is CR2032.
1. Push the mechanical key release button and release the
mechanical key to access the battery case screw located
on the side of the key fob.
2. Rotate the screw located on the side of the key fob using
a small screwdriver.
Key Fob Screw Location
3. Take out the battery case. Remove and replace the
battery observing its polarity.
4. Refit the battery case inside the key fob and turn the
screw to lock it into place.
Programming Additional Key Fobs
Programming the key fob may be performed by an authorized dealer.
NOTE: Once a key fob is programmed to a vehicle, it
cannot be repurposed and reprogrammed to another vehicle.
General Information
The following regulatory statement applies to all radio
frequency (RF) devices equipped in this vehicle:
This device complies with Part 15 of the FCC Rules and
with Industry Canada license-exempt RSS standard(s).
Operation is subject to the following two conditions:
1. This device may not cause harmful interference, and
2. This device must accept any interference received, including interference that may cause undesired operation.
GETTING TO KNOW YOUR VEHICLE 19
IGNITION SWITCH
Ignition Key Removal
1. Place the gear selector in PARK.
2. Rotate the key to the STOP/OFF/LOCK position.
3. Remove the key from the ignition switch lock cylinder.
3
NOTE: Changes or modifications not expressly approved
by the party responsible for compliance could void the
user’s authority to operate the equipment.
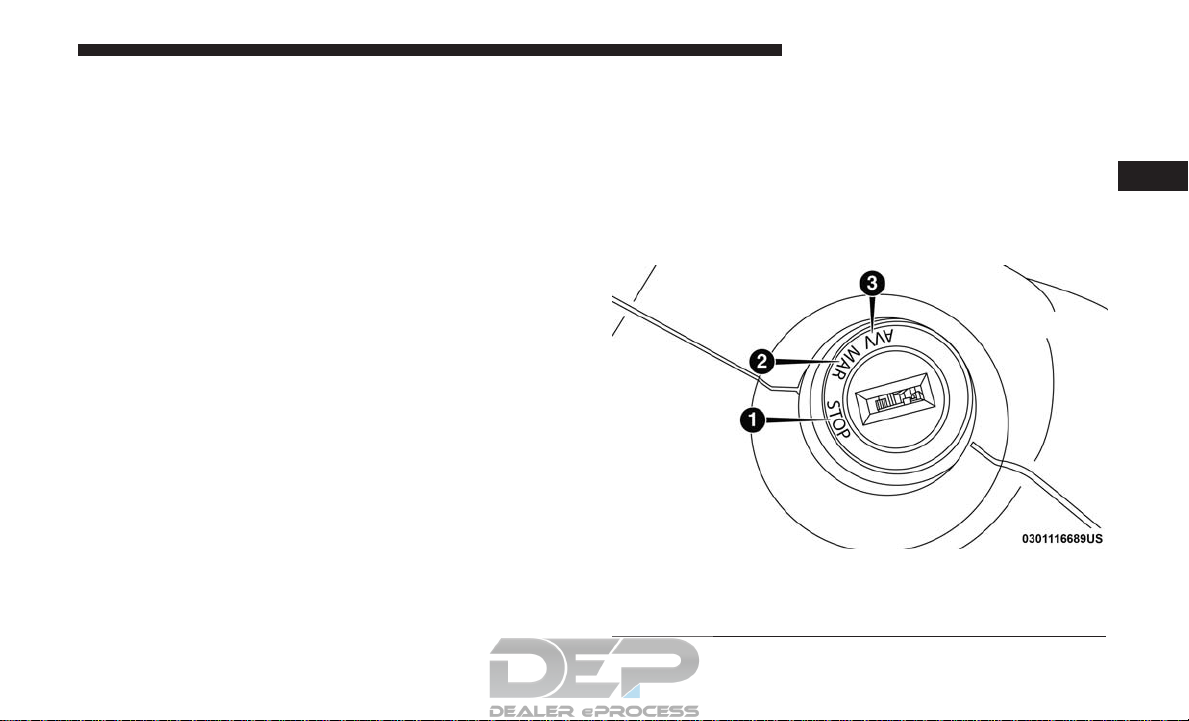
1 — STOP (OFF/LOCK)
Ignition Switch Positions
2 — MAR (ACC/ON/RUN)
3 — AVV (START)
20 GETTING TO KNOW YOUR VEHICLE
WARNING!
• Before exiting a vehicle, always shift the transmission into PARK, apply the parking brake, and remove the key fob from the vehicle. When leaving the
vehicle, always lock your vehicle. In case you switch
off the vehicle and the transmission is not in PARK
position, a warning message will appear on the
cluster which suggests you to shift the transmission
into PARK position and, then, you can remove the
key within 15 seconds. If 15 seconds expire, you have
to rotate the key from OFF/LOCK position to ON/
RUN position and come back to OFF/LOCK position
in order to remove the key.
Never leave children alone in a vehicle, or with access
•
to an unlocked vehicle. Allowing children to be in a
vehicle unattended is dangerous for a number of
reasons. A child or others could be seriously or fatally
injured. Children should be warned not to touch the
parking brake, brake pedal or the gear selector.
•
Do not leave the key fob in or near the vehicle, or in a
location accessible to children. A child could operate
power windows, other controls, or move the vehicle.
(Continued)
WARNING! (Continued)
• Do not leave children or animals inside parked
vehicles in hot weather. Interior heat build-up may
cause serious injury or death.
CAUTION!
An unlocked vehicle is an invitation. Always remove
the key from the ignition and lock all the doors when
leaving the vehicle unattended.
Key-In-Ignition Reminder
Opening the driver’s door when the key is in the ignition
and the ignition switch position is STOP/OFF/LOCK
sounds a signal to remove the key.
SENTRY KEY
The Sentry Key Immobilizer System prevents unauthorized vehicle operation by disabling the engine. The system
does not need to be armed or activated. Operation is
automatic, regardless of whether the vehicle is locked or
unlocked.
The system uses ignition keys which have an embedded
electronic chip (transponder) to prevent unauthorized vehicle operation. Therefore, only keys that are programmed
to the vehicle can be used to start and operate the vehicle.
NOTE: A key which has not been programmed is also
considered an invalid key, even if it is cut to fit the ignition
switch lock cylinder for that vehicle.
If the vehicle security light is on after the key is turned to
the ON/RUN position, it indicates that there is a problem
with the electronics.
CAUTION!
• Always remove the Sentry Key from the vehicle and
lock all doors when leaving the vehicle unattended.
• The Sentry Key Immobilizer system is not compatible with some aftermarket remote starting systems.
Use of these systems may result in vehicle starting
problems and loss of security protection.
GETTING TO KNOW YOUR VEHICLE 21
Replacement Keys
NOTE: Only keys that have been programmed to the
vehicle electronics can be used to start the vehicle. Once a
Sentry Key has been programmed to a vehicle, it cannot be
programmed to any other vehicle. When having the Sentry
Key Immobilizer System serviced, bring all vehicle keys
with you to an authorized dealer.
The VIN is required for authorized dealer replacement of
keys. Duplication of keys may be performed at an authorized dealer.
General Information
The following regulatory statement applies to all radio
frequency (RF) devices equipped in this vehicle:
This device complies with Part 15 of the FCC Rules and
with Industry Canada license-exempt RSS standard(s).
Operation is subject to the following two conditions:
1. This device may not cause harmful interference, and
3
All of the keys provided with your new vehicle have been
programmed to the vehicle electronics.
2. This device must accept any interference received, including interference that may cause undesired operation.
22 GETTING TO KNOW YOUR VEHICLE
NOTE: Changes or modifications not expressly approved
by the party responsible for compliance could void the
user’s authority to operate the equipment.
VEHICLE SECURITY ALARM — IF EQUIPPED
The Vehicle Security Alarm monitors the vehicle doors and
ignition for unauthorized operation. When the Vehicle
Security Alarm is activated, interior switches for door locks
are disabled. The system provides both audible and visible
signals. Every intrusion attempt causes three continuous
alarm cycles. Every alarm cycle lasts for 30 seconds. For 26
seconds, the horn will sound, and the turn signal lights will
flash. For four seconds, it will pause. After a maximum of
10 alarm cycles, only the turn signal lights will flash until
the next alarm activation.
To Arm The System
To arm the system, the vehicle security alarm will set when
you use the key fob to lock the doors. If a door or the hood
is not properly shut, the alarm system will not be armed.
To Disarm The System
Use the key fob to unlock the door and disarm the system.
The vehicle security alarm will also disarm if a pro-
grammed Sentry Key is inserted into the ignition switch. To
exit the alarming mode, push the key fob unlock button, or
insert a programmed Sentry Key into the ignition switch.
The vehicle security alarm is designed to protect your
vehicle. However, you can create conditions where the
system will give you a false alarm. If one of the previously
described arming sequences has occurred, the vehicle
security alarm will arm regardless of whether you are in
the vehicle or not. If you remain in the vehicle and open a
door, the alarm will sound. If this occurs, disarm the
vehicle security alarm.
Rearming Of The System
If the system has not been disabled, the vehicle security
alarm will rearm itself after the 15 additional minutes of
turn lamps flashing. If the condition which initiated the
alarm is still present, the system will ignore that condition
and monitor the remaining doors and ignition.
Security System Manual Override
The vehicle security alarm will not arm/disarm if you
lock/unlock the doors using the manual door lock plunger.
DOORS
Door Locks
GETTING TO KNOW YOUR VEHICLE 23
Locking The Doors From The Outside
Follow the below methods to lock the vehicle from the
outside
Central Lock
The door locks can be locked or unlocked from inside the
vehicle by using the door handle.
• To lock the doors, push down on the door handle.
• To unlock the doors, pull up on the door handle.
Locking With A Key Fob
Key Fob
1 – Key Blade Release Button
2 – Driver Passenger Unlock Button
3 – Lock Button
4 – Cargo Lock/Unlock Button
3

24 GETTING TO KNOW YOUR VEHICLE
Push and release the lock button on the key fob to lock all
doors. The turn signal lights will flash to acknowledge the
signal.
Horn activation settings after an RF lock command can be
adjusted manually. For further information, refer to
“Uconnect Settings” in “Multimedia”.
Locking With The Key Blade
Key Blade Released
Push the Key Blade Release Button to expose the key blade,
insert the key blade into the doors exterior lock cylinder
and turn the key clockwise to lock the front door.
Unlock The Doors From The Outside
Follow the below methods to unlock the vehicle from the
outside:
Unlocking With A Key Fob For All Passenger Vans and
US Cargo Vans (If Equipped)
To unlock all the doors, push and release the unlock button
on the key fob. The turn signal lights will flash to acknowledge the unlock signal. Push and release the Cargo unlock
button to unlock the rear cargo doors only.
Unlocking With A Key Fob For Canadian Cargo Vans (If
Equipped)
Push and release the unlock button to unlock the front
doors. Push and release the Cargo unlock button to unlock
the side sliding doors and the rear cargo doors.
Unlocking With The Key Blade
Push the Key Blade Release Button to expose the key blade,
insert the key blade into the driver door exterior lock
cylinder and turn the key counterclockwise to unlock the
all doors.
Unlocking The Rear Cargo Area From Inside The Vehicle
Pull up on the lock/unlock lever located on the drivers
door panel to the 1st detent to unlock all doors from inside
the vehicle.
Auto Unlock Doors
This feature unlocks all front doors when one of the front
door is opened.
NOTE: If the rear or side door is open, only the rear or side
door is unlocked.
Sliding Side Door
On Cargo versions, the sliding side door is fitted with a
spring-loaded latch that stops the door from opening any
further. To lock it, simply push the door as far as it will go;
to unlock it, pull forward firmly.
Opening And Closing From Outside The Vehicle
Opening/Unlocking With A Key Fob In the Passenger
Vehicle and US Cargo Vehicle (If Equipped)
Push and release the unlock button on the key fob to
unlock all doors. Push and release the cargo unlock button
on the key fob to unlock the sliding side doors. To open one
GETTING TO KNOW YOUR VEHICLE 25
of the sliding side doors, pull the handle out from the
bottom, then slide the door towards the rear of the vehicle
until it locks into place and cannot go any further. The turn
signal lights will flash to acknowledge the unlock signal.
Opening/Unlocking With A Key Fob In the Canadian
Cargo Vehicle (If Equipped)
Push and release the unlock button on the key fob to
unlock the front two doors. Push and release the cargo
unlock button on the key fob once to unlock the
passenger/cargo area (side lateral sliding doors and rear
doors). The turn signal lights will flash to acknowledge the
unlock signal.
Unlocking With The Key Blade In Passenger Vehicle
Push the key blade release button to expose the key blade,
insert the key blade into the driver door exterior lock
cylinder and turn the key counterclockwise to unlock all
doors.
Unlocking With The Key Blade In Cargo Vehicle
Push the key blade release button to expose the key blade,
insert the key blade into the driver door exterior lock
cylinder and turn the key counterclockwise to unlock the
front doors. Push the key blade release button to expose the
3
26 GETTING TO KNOW YOUR VEHICLE
key blade, insert the key blade into the rear door exterior
lock cylinder and turn the key counterclockwise to unlock
the rear doors.
Closing/Locking With A Key Fob
Push and release the lock button on the key fob to lock all
doors, including the cargo area (side lateral sliding doors
and rear doors). The turn signal lights will flash to acknowledge the lock signal.
Horn activation settings after an RF lock command can be
adjusted manually. For further information, refer to
“Uconnect Settings” in “Multimedia”.
Locking With The Key Blade In Passenger Vehicle
Push the key blade release button to expose the key blade,
insert the key blade into the driver door exterior lock
cylinder and turn the key clockwise to lock all doors.
Locking With The Key Blade In Cargo Vehicle
Push the key blade release button to expose the key blade,
insert the key blade into the driver door exterior lock
cylinder and turn the key clockwise to lock the front doors.
Push the key blade release button to expose the key blade,
insert the key blade into the rear door exterior lock cylinder
and turn the key clockwise to lock the rear doors.
Closing And Locking From Outside
Grab the side door handle and push towards the front of
the vehicle. Once the side door is secured in the full closed
position, use one of the locking methods above to lock the
sliding side doors.
Opening And Closing From The Inside
Opening:
Pull the interior door handle switch to unlock the door,
then pull the handle and slide the door towards the rear of
the vehicle until it can go no further.
Closing:
Pull the interior door handle switch to release the door and
then push it towards the front of the vehicle.
Key Emergency Lock (KEL) Device
The sliding side doors are provided with a device for
locking all the doors using the lock in case of a power fault.
The device can be engaged with the sliding side doors
open as follows:
1. Key Emergency Lock Device not engaged (doors released)
2. Key Emergency Lock Device engaged (fit the ignition
key in its seat and rotate clockwise), door locked
The device is released and the doors can be opened as
follows:
If the power is restored:
• By remote control.
• Opening a front door by inserting the key into the key
cylinder.
If the power is not restored:
• Opening the driver side door by key fob and the other
doors (passenger’s side and sliding side door) pulling
the inner handle.
If the child lock was engaged and the previously described
locking procedure was carried out, operating the internal
handle will not open the door but will only realign the door
lock knob. To open the door, the outside handle must be
pulled. The door central locking/unlocking button is not
disabled by the engagement of the emergency lock.
GETTING TO KNOW YOUR VEHICLE 27
Child Lock System
This system prevents the sliding side doors being opened
from the inside.
The child locks can only be engaged/disengaged with the
sliding side door open:
Child Lock System
To Engage Or Disengage The Child-Protection Door Lock
System
1. Open the rear door.
3
2. Insert the tip of the emergency key into the lock and
rotate to the lock or unlock position.
28 GETTING TO KNOW YOUR VEHICLE
3. Repeat steps 1 and 2 for the opposite rear door.
The device remains engaged even if the doors are unlocked
remotely. This system prevents the sliding side doors to be
opened from the inside.
WARNING!
Avoid trapping anyone in a vehicle in a collision.
Remember that the rear doors can only be opened from
the outside when the Child-Protection locks are engaged (locked).
NOTE: For emergency exit from the rear seats when the
Child-Protection Door Lock System is engaged, manually
raise the door lock knob to the unlocked position, roll
down the window, and open the door using the outside
door handle.
Double Rear Swing Doors
The rear double swing doors are fitted through a fastening
system which stops them when they reach an opening
angle of approximately 90 degrees.
To open them wider to an angle of 180 degrees, push the
locking device (one on each side) and simultaneously open
the doors.
Using the key fob on the door, you can do the following:
• For Cargo versions with swing door/cargo doors: cen-
trally unlock the load compartment (sliding side doors +
rear swing doors/tailgate), centrally lock all the doors.
• For versions with swing door: local unlocking/locking.
Opening/Closing The First Swing Door From The Outside
To open the door, turn the key in the lock or push the cargo
unlock button on the key fob and then pull the exterior
handle to the left. To close the door, turn the key in the lock
or push the lock button on the key fob.
Emergency Opening Of The First Swing Door From The Inside
From inside the vehicle, use the interior door release
mechanism located on the left rear trim panel.
Opening The Second Swing Door
After having opened the first door, pull the handle located
on the door face toward the rear of the vehicle.

SEATS
Seats are a part of the Occupant Restraint System of the
vehicle.
WARNING!
• It is dangerous to ride in a cargo area, inside or
outside of a vehicle. In a collision, people riding in
these areas are more likely to be seriously injured or
killed.
• Do not allow people to ride in any area of your
vehicle that is not equipped with seats and seat belts.
In a collision, people riding in these areas are more
likely to be seriously injured or killed.
• Be sure everyone in your vehicle is in a seat and
using a seat belt properly.
GETTING TO KNOW YOUR VEHICLE 29
Manual Adjustment (Front Seats)
The front driver and passenger seats can be adjusted
forward and rearward, and if equipped, may be reclined
and the height and lumbar can be adjusted.
WARNING!
• Adjusting a seat while driving may be dangerous.
Moving a seat while driving could result in loss of
control which could cause a collision and serious
injury or death.
• Seats should be adjusted before fastening the seat
belts and while the vehicle is parked. Serious injury
or death could result from a poorly adjusted seat belt.
3

30 GETTING TO KNOW YOUR VEHICLE
Height Adjustment — If Equipped
The height adjustment lever is located on the center
outboard side of the seat. Lift up or push down on the front
lever to adjust the front of the seat up or down.
Recliner Adjustment
The recliner knob is on the rear outboard side of the seat. To
recline the seatback, rotate the knob rearward without
leaning back. To return the seatback to its normal upright
position, lean forward, rotate the knob forward until the
seatback is in the upright position.
Seat Adjustments
1 — Forward/Rearward Adjustment Bar
2 — Height Adjustment Lever
3 — Recliner Knob
4 — Lumbar Knob
Forward And Rearward Adjustment
The adjustment bar is at the front of the seat, near the floor.
Pull the bar upward to move the seat forward or rearward.
Release the bar once the seat is in the desired position.
Then, using body pressure, move forward and rearward on
the seat to be sure that the seat adjusters have latched.
Lumbar Support — If Equipped
This feature allows you to increase or decrease the amount
of lumbar support. The lumbar control knob is located on
the rear upper outboard side of the seatback. Rotate the
control forward to increase and rearward to decrease the
desired amount of lumbar support.
WARNING!
• Adjusting a seat while the vehicle is moving is
dangerous. The sudden movement of the seat could
cause you to lose control. The seat belt might not be
(Continued)

WARNING! (Continued)
adjusted properly and you could be injured. Adjust
the seat only while the vehicle is parked.
• Do not ride with the seatback reclined so that the
shoulder belt is no longer resting against your chest.
In a collision you could slide under the seat belt and
be seriously or even fatally injured. Use the recliner
only when the vehicle is parked.
Heated Seats — If Equipped
On some models, the front driver and passenger seats may
be equipped with heaters in both the seat cushions and
seatbacks. The controls for the front heated seats are
located on the lower outboard side of the seat.
GETTING TO KNOW YOUR VEHICLE 31
3
Heated Seat Control Button
Push the switch once to turn on the heated seats. The LED
on the switch illuminates when the heated seat is on. Push
the switch a second time to shut the heating elements off.
NOTE:
• This feature is only available with the ignition key in
MAR (ACC/ON/RUN) position.
• Once a heat setting is selected, heat will be felt within
two to five minutes.

32 GETTING TO KNOW YOUR VEHICLE
WARNING!
• Persons who are unable to feel pain to the skin
because of advanced age, chronic illness, diabetes,
spinal cord injury, medication, alcohol use, exhaustion or other physical condition must exercise care
when using the seat heater. It may cause burns even
at low temperatures, especially if used for long
periods of time.
• Do not place anything on the seat or seatback that
insulates against heat, such as a blanket or cushion.
This may cause the seat heater to overheat. Sitting in
a seat that has been overheated could cause serious
burns due to the increased surface temperature of the
seat.
Folding Rear Seat — If Equipped
To provide additional storage area, each rear seat can be
folded flat to allow for extended cargo space.
1. Locate the release lever (upper outboard side of seat),
and lift it upward until the seatback releases.
Seatback Release Lever
2. Slowly fold down the seatback.

3. Pull forward on the lower release lever located on the
lower outboard side of seat and lift the seat for extended
cargo space.
Seat Release Lever
GETTING TO KNOW YOUR VEHICLE 33
3
Extended Cargo Space
4. Reverse order for original setting.

34 GETTING TO KNOW YOUR VEHICLE
HEAD RESTRAINTS
Head restraints are designed to reduce the risk of injury by
restricting head movement in the event of a rear impact.
Head restraints should be adjusted so that the top of the
head restraint is located above the top of your ear.
WARNING!
• All occupants, including the driver, should not operate a vehicle or sit in a vehicle’s seat until the head
restraints are placed in their proper positions in
order to minimize the risk of neck injury in the event
of a crash.
• Head restraints should never be adjusted while the
vehicle is in motion. Driving a vehicle with the head
restraints improperly adjusted or removed could
cause serious injury or death in the event of a
collision.
Front Adjustment
To raise the head restraint, push the adjustment button,
located on the base of the head restraint, pull upward on
the head restraint. To lower the head restraint, push the
adjustment button, located on the base of the head re-
straint, and push downward on the head restraint.
Front Head Restraint
1 — Release Button
2 — Adjustment Button
Rear Adjustment
The center head restraint is adjustable and removable. To
raise the head restraint, push and hold the adjustment
button, located on the base of the head restraint and pull
upward on the head restraint. To lower the head restraint,
push and hold the adjustment button, and push downward
on the head restraint till the desired height is reached.

GETTING TO KNOW YOUR VEHICLE 35
WARNING!
ALL the head restraints MUST be reinstalled in the
vehicle to properly protect the occupants. Follow the
re-installation instructions above prior to operating the
vehicle or occupying a seat.
Center Head Restraint
1 — Release Button
2 — Adjustment Button
WARNING!
A loose head restraint thrown forward in a collision or
hard stop could cause serious injury or death to occupants of the vehicle. Always securely stow removed
head restraints in a location outside the occupant
compartment.
Front Removal
To remove the head restraint, raise it as far as it can go then
push the release button and the adjustment button at the
base of each post while pulling the head restraint up. To
reinstall the head restraint, put the head restraint posts into
the holes and push downward. Then adjust the head
restraint to the appropriate height.
WARNING!
• A loose head restraint thrown forward in a collision
or hard stop could cause serious injury or death to
occupants of the vehicle. Always securely stow removed head restraints in a location outside the
occupant compartment.
(Continued)
3

36 GETTING TO KNOW YOUR VEHICLE
WARNING! (Continued)
• ALL the head restraints MUST be reinstalled in the
vehicle to properly protect the occupants. Follow the
re-installation instructions above prior to operating
the vehicle or occupying a seat.
Rear Removal
Outboard Head Restraints
The outboard head restraints can be removed by pushing
the release buttons, located at the base of the head restraint
and pull upward on the whole assembly. To reinstall the
head restraint, put the head restraint posts into the holes
and push downward. Then adjust it to the appropriate
height.
Outboard Head Restraint Release Buttons
Center Head Restraint
To remove the head restraint, push the release button and
adjustment button while pulling upward on the whole
assembly and raise it as far as it can go. To reinstall the
headrest, put the headrest posts into the holes while
pushing the release button and adjustment button. Then
adjust it to the appropriate height.

WARNING!
• A loose head restraint thrown forward in a collision
or hard stop could cause serious injury or death to
occupants of the vehicle. Always securely stow removed head restraints in a location outside the
occupant compartment.
• ALL the head restraints MUST be reinstalled in the
vehicle to properly protect the occupants. Follow the
re-installation instructions above prior to operating
the vehicle or occupying a seat.
GETTING TO KNOW YOUR VEHICLE 37
3
STEERING WHEEL
Tilt/Telescoping Steering Column
This feature allows you to tilt the steering column upward
or downward. It also allows you to lengthen or shorten the
steering column. The tilt/telescoping control handle is
located on the steering column, below the turn signal lever.
Tilt/Telescoping Control Handle
To unlock the steering column, push the control lever
downward. To tilt the steering column, move the steering
wheel upward or downward as desired. To lengthen or
shorten the steering column, pull the steering wheel outward or push it inward as desired. To lock the steering
column in position, pull the control lever up until fully
engaged.

38 GETTING TO KNOW YOUR VEHICLE
WARNING!
Do not adjust the steering column while driving.
Adjusting the steering column while driving or driving with the steering column unlocked, could cause the
driver to lose control of the vehicle. Failure to follow
this warning may result in serious injury or death.
MIRRORS
Inside Day/Night Mirror — If Equipped
A single ball joint mirror is provided in the vehicle. It is a
twist on mirror that has a fixed position at the windshield.
The mirror head can be adjusted up, down, left, and right
for various drivers. The mirror should be adjusted to center
on the view through the rear window.
Headlight glare from vehicles behind you can be reduced
by moving the small control under the mirror to the night
position (toward the rear of the vehicle). The mirror should
be adjusted while the small control under the mirror is set
in the day position (toward the windshield).
Adjusting Rearview Mirror
Outside Mirrors
To receive maximum benefit, adjust the outside mirror(s) to
center on the adjacent lane of traffic with a slight overlap of
the view obtained on the inside mirror.
WARNING!
Vehicles and other objects seen in an outside convex
mirror will look smaller and farther away than they
really are. Relying too much on side convex mirrors
(Continued)

WARNING! (Continued)
could cause you to collide with another vehicle or other
object. Use your inside mirror when judging the size or
distance of a vehicle seen in a side convex mirror.
Manual Outside Mirror Adjustment — If Equipped
From the inside of the vehicle, use the control lever to
adjust the mirror.
Manual Mirror Control Lever
Manual Folding Door Mirrors
The door mirrors are hinged to allow the mirror to be
folded rearward to help avoid damage.
GETTING TO KNOW YOUR VEHICLE 39
3
Folding Mirrors
CAUTION!
It is recommended to fold the mirrors into the full
rearward position to resist damage when entering a car
wash or a narrow location.
Power Outside Mirrors — If Equipped
The power mirror controls are located on the mirror flag
trim above the driver’s door trim panel. To adjust a mirror,
turn the control knob toward the left or right mirror
positions indicated. Tilt the control knob in the direction
you want the mirror to move. When you are finished

40 GETTING TO KNOW YOUR VEHICLE
adjusting the mirror, turn the control to the center (neutral)
position to prevent accidental mirror movements.
Power Mirror Controls
1 — Driver Mirror Select Position
2 — Neutral Position
3 — Passenger Mirror Select Position
4 — Four-Way Mirror Control Switch
Vanity Mirror
The driver and passenger sun visors are located on the
headliner, near the front windshield. The sun visor can be
rotated downward or up against the door glass. Your
vehicle may be equipped with courtesy mirror located on
the passenger sun visor.
Sun Visor (Passenger Side Shown)
Sun Visor “Slide-On-Rod” Feature
The sun visor “Slide-On-Rod” feature allows for additional
flexibility in positioning the sun visor to block out the sun.
1. Fold down the sun visor.
2. Unclip the visor from the center clip.
3. Pull the sun visor toward the inside rearview mirror to
extend it.

EXTERIOR LIGHTS
Multifunction Lever
The multifunction lever controls the operation of the
headlights, parking lights, turn signals, headlight beam
selection and the passing lights. The multifunction lever is
located on the left side of the steering column.
Multifunction Lever
Headlights
To turn on the headlights, turn the end of the multifunction
lever to the headlight position. When the headlight switch
is on, the parking lights, taillights, license plate light, the
GETTING TO KNOW YOUR VEHICLE 41
clearance lights and instrument panel lights are also turned
on. To turn off the headlights, turn the end of the multifunction lever back to the O (Off) position.
Daytime Running Lights — If Equipped
NOTE: When the headlights are turned on, the Daytime
Running Lights will be deactivated.
To activate the Daytime Running Lights (DRL), rotate the
end of the multifunction lever to the O (Off) position.
NOTE:
• The low beams and side/taillights will not be on with
DRL.
• In certain markets, the DRL function may be optional
and can be programmed to be on or off through the
Uconnect system screen. Refer to “Uconnect Settings” in
“Multimedia” for further information.
The Daytime Running Lights will come on whenever the
ignition is ON, the headlight switch is off, the parking
brake is off, and the turn signal is off.
High Beams
With the low beams activated, pull the multifunction lever
towards the steering wheel to turn on the high beams. A
3

42 GETTING TO KNOW YOUR VEHICLE
high beam symbol will illuminate in the cluster to indicate
the high beams are on. Pull the multifunction lever a
second time to switch the headlights back to low beam.
NOTE: If the vehicle’s ignition is turned OFF, both high
and low beam headlights will also turn off.
Flash-To-Pass
You can signal another vehicle with your headlights by
partially pulling the multifunction lever toward the steering wheel. This will cause the high beam headlights to turn
on until the lever is released.
Parking Lights
These lights can only be turned on with ignition key in the
STOP position or removed, by moving the end of the
multifunction lever to O (off) position and then to the
headlight position.
The warning light telltale in the instrument panel comes
on. The lights stay on until the next ignition cycle is
performed.
Follow Me Home/Headlight Delay
When this feature is selected, the driver can choose to have
the headlights remain on for a preset period of time after
the engine is turned OFF.
Activation
Remove the key or turn the ignition to the STOP (OFF/
LOCK) position, and pull the multifunction lever toward
the steering wheel within two minutes. Each time the lever
is pulled, the activation of the lights will be extended by 30
seconds. The activation of the lights can be extended to a
maximum of 210 seconds.
Deactivation
Pull the multifunction lever toward the steering wheel and
hold it for more than two seconds.
Fog Lights — If Equipped
The fog light switch is located on the center stack of the
instrument panel, just below the climate controls. Push the
switch once to turn the fog lights on. Push the switch a
second time to turn the fog lights off.
NOTE: If the vehicle’s ignition is turned OFF, the fog lights
will also turn off.
Turn Signals
Move the multifunction lever up or down and the arrows
on each side of the instrument cluster flash to show proper
operation of the front and rear turn signal lights.

NOTE: If either light remains on and does not flash, or
there is a very fast flash rate, check for a defective outside
light bulb. If an indicator fails to light when the lever is
moved, it would suggest that the indicator bulb is defective.
Lane Change Assist
Tap the lever up or down once, without moving beyond
the detent, and the turn signal (right or left) will flash five
times then automatically turn off.
INTERIOR LIGHTS
Courtesy/Interior Lights
These lights are mounted between the sun visors on the
overhead console. Each light is turned on by pushing the
corresponding switch.
Left Switch
• Push the left switch to the left to turn off the auto dome
lights. The dome lights will not automatically turn on
when a door is opened.
• Push the left switch to the right to turn on the dome
lights.
GETTING TO KNOW YOUR VEHICLE 43
Right Switch
• Push the right switch to the left to turn on the left map
light.
• Push the right switch to the right to turn on the right
map light.
Map/Dome Lights
1 — Auto/Off 3 — Left Map
2 — Dome 4 — Right Map
3

44 GETTING TO KNOW YOUR VEHICLE
Rear Lights
Cargo Vehicle
Cargo Vehicle Interior Lamp Locations
1 — Lateral Roof Light
2 — Rear Roof Light
Lateral Roof Light
This is located on the right side of the load compartment.
Rear Roof Light
This is located on the rear panel of the load compartment.
In auto-mode the light comes on automatically when you
open the sliding doors and the rear wing doors and goes
out when you close them.
• Push the left-hand side of the lens to switch the light off
when the doors are open.
• Push the right hand side of the lens to switch the light on
when the doors are open.
Lateral Roof Light
1—Off
2 — Auto
3—On

Passenger Vehicle
The interior lamps are located in the center of the roof,
above the second row seating and in the roof in the center
of the rear load area.
GETTING TO KNOW YOUR VEHICLE 45
• Push the left-hand side of the lens to switch the light off
when the doors are open.
• Push the right-hand side of the lens to switch the light
on when the doors are open.
3
Passenger Vehicle Interior Lamp Locations
1 — Rear Roof Light
2 — Second Row Seating Light
Second Row Seating And Rear Roof Lights Operation
In auto-mode, the light comes on automatically when you
open the sliding doors and the rear wing doors and goes
out when you close them.
Interior Light
1—Off
2 — Auto
3—On

46 GETTING TO KNOW YOUR VEHICLE
Cargo Compartment Light — If Equipped
The cargo compartment light comes on automatically
when the swing doors are opened and turns off when the
doors are closed.
Cargo Compartment Light Windshield Wiper Lever
WIPERS AND WASHERS
The windshield wiper/washer lever is located on the right
side of the steering column.
NOTE: The windshield wipers/washers will only operate
with the ignition in the ON/RUN position.
Front Wiper Operation
There are five different modes of operation for the front
windshield wipers. The windshield wiper lever can be
moved in several positions to access these modes.
Windshield Wiper Off
This is the normal position of the wiper lever.
Low Speed
Rotate the end of the lever upward to the second
detent. The wipers will operate at low speed.

High Speed
Rotate the end of the lever upward to the third
detent. The wipers will operate at high speed.
Intermittent Wiper System
Rotate the end of the lever upward to the first
detent. The wipers will operate at intermittent
speed. When the vehicle’s speed increases, the time between the wipes will decrease.
Windshield Washers
Pull the windshield wiper/washer lever toward the steering wheel to activate the washers. The wipers will activate
automatically for three cycles after the lever is released.
CAUTION!
• Turn the windshield wipers off when driving
through an automatic car wash. Damage to the windshield wipers may result if the wiper control is left in
any position other than off.
• In cold weather, always turn off the wiper switch and
allow the wipers to return to the park position before
(Continued)
GETTING TO KNOW YOUR VEHICLE 47
CAUTION! (Continued)
turning off the engine. If the wiper switch is left on
and the wipers freeze to the windshield, damage to
the wiper motor may occur when the vehicle is
restarted.
• Always remove any buildup of snow that prevents
the windshield wiper blades from returning to the
off position. If the windshield wiper control is
turned off and the blades cannot return to the off
position, damage to the wiper motor may occur.
Manual High Speed/Mist
Push the lever upward from the off position. The wipers
will operate at high speed to clear off road mist or spray
from a passing vehicle. This operation will continue until
the lever is released. When the lever is released, the wipers
will return to the off position and automatically shut off.
Rear Wiper Operation — If Equipped
Rear Windshield Wiper Operation
Rotate the windshield wiper lever center ring upwards to
operate the rear window wiper as follows:
• In intermittent mode when the front window wiper is
not operating.
3

48 GETTING TO KNOW YOUR VEHICLE
• In synchronous mode (at half the speed of the front
window wiper) when the front window wiper is operating.
• In continuous mode while vehicle is in REVERSE.
With the windshield wipers on, and REVERSE gear engaged, rear window wiping will be continuous in the same
way.
Rear Windshield Washer Operation
Pushing the windshield wiper lever forward activates the
rear window washer. Keep the windshield wiper lever
pushed for more than quarter a second to activate the rear
window wiper as well. Releasing the windshield wiper
lever will activate the smart washing function, as described
for the windshield wipers.
The function stops when the windshield wiper lever is
released.
CLIMATE CONTROLS
Manual Climate Control Overview
Manual Climate Control

Manual Climate Control Descriptions
Icon Description
A/C Button
Push the A/C button to engage the Air Conditioning (A/C). A LED will illuminate when the
A/C system is engaged. The A/C can be deselected manually without disturbing the mode control selection.
Recirculation Button
Press and release this button to change the system between recirculation mode and outside air
mode. Recirculation can be used when outside conditions such as smoke, odors, dust, or high
humidity are present. Recirculation can be used in all modes except for Defrost. Recirculation
may be unavailable if conditions exist that could create fogging on the inside of the windshield.
The A/C can be deselected manually without disturbing the mode control selection. Continuous
use of the Recirculation mode may make the inside air stuffy and window fogging may occur.
Extended use of this mode is not recommended.
Front Defrost
Use Defrost mode with maximum temperature settings for best windshield and side window
defrosting and defogging. Turn the knob to the Front Defrost position. Air comes from the
windshield and side window demist outlets.
Rear Defrost Button — If Equipped
Push and release the Rear Defrost Control button to turn On the rear window defroster and the
heated outside mirrors (if equipped). An indicator will illuminate when the rear window defroster is On. The rear window defroster automatically turns OFF after 20 minutes.
GETTING TO KNOW YOUR VEHICLE 49
3

50 GETTING TO KNOW YOUR VEHICLE
Icon Description
Temperature Control
Use this control to regulate the temperature of the air inside the passenger compartment. Rotating the knob counterclockwise, from top center into the blue area of the scale, indicates cooler
temperatures. Rotating the knob clockwise, into the red area, indicates warmer temperatures.
Blower Control
There are four blower speeds. Use this control to regulate the amount of air forced through the
system in any mode you select. The blower speed increases as you move the control clockwise
from the OFF position.
Modes Control
Push the button in the center of the knob to change the airflow distribution mode. The airflow
distribution mode can be adjusted so air comes from the instrument panel outlets, floor outlets,
defrost outlets and demist outlets. The Mode settings are as follows:
Panel Mode
Panel Mode
Air comes from the outlets in the instrument panel. Each of these outlets can be individually
adjusted to direct the flow of air. The air vanes of the center outlets and outboard outlets can be
moved up and down or side to side to regulate airflow direction. There is a shut off wheel located below the air vanes to shut off or adjust the amount of airflow from these outlets.

Icon Description
Bi-Level Mode
Bi-Level Mode
Air comes from the instrument panel outlets and floor outlets. A slight amount of air is directed
through the defrost and side window demister outlets.
NOTE:
Bi-Level mode is designed under comfort conditions to provide cooler air out of the panel outlets and warmer air from the floor outlets.
Floor Mode
Floor Mode
Air comes from the floor outlets. A slight amount of air is directed through the defrost and side
window demister outlets.
GETTING TO KNOW YOUR VEHICLE 51
3
Mix Mode
Mix Mode
Air is directed through the floor, defrost, and side window demister outlets. This setting works
best in cold or snowy conditions that require extra heat to the windshield. This setting is good
for maintaining comfort while reducing moisture on the windshield.
System Maintenance
In winter, the climate control system must be turned on at
least once a month for about ten minutes.
Have the system inspected at an authorized dealer before
the summer.

52 GETTING TO KNOW YOUR VEHICLE
Climate Control Functions
A/C (Air Conditioning)
The Air Conditioning (A/C) button allows the operator to
manually activate or deactivate the air conditioning system. When the air conditioning system is turned on, cool
dehumidified air will flow through the outlets into the
cabin. For improved fuel economy, press the A/C button to
turn off the air conditioning and manually adjust the
blower and airflow mode settings. Also, make sure to select
only Panel, Bi-Level or Floor modes.
NOTE:
• For Manual Climate Controls, if the system is in Mix,
Floor or Defrost Mode, the A/C can be turned off, but
the A/C system shall remain active to prevent fogging of
the windows.
• If fog or mist appears on the windshield or side glass,
select Defrost mode, and increase blower speed if
needed.
• If your air conditioning performance seems lower than
expected, check the front of the A/C condenser (located
in front of the radiator), for an accumulation of dirt or
insects. Clean with a gentle water spray from the front of
the radiator and through the condenser.
Recirculation
In cold weather, use of Recirculation mode may lead to
excessive window fogging. The Recirculation feature may
be unavailable (button on the touchscreen greyed out) if
conditions exist that could create fogging on the inside of
the windshield.
On systems with Manual Climate Controls, if equipped,
the Recirculation mode is not allowed in Defrost mode to
improve window clearing operation. Recirculation is disabled automatically if this mode is selected. Attempting to
use Recirculation while in this mode causes the LED in the
control button to blink and then turns off.
Operating Tips
NOTE: Refer to the chart at the end of this section for
suggested control settings for various weather conditions.
Summer Operation
The engine cooling system must be protected with a
high-quality antifreeze coolant to provide proper corrosion
protection and to protect against engine overheating. OAT
coolant (conforming to MS.90032) is recommended. Refer
to “Fluids and Lubricants” in “Technical Specifications” for
proper coolant selection.

Winter Operation
To ensure the best possible heater and defroster performance, make sure the engine cooling system is functioning
properly and the proper amount, type, and concentration
of coolant is used. Refer to “Fluids and Lubricants” in
“Technical Specifications” for proper coolant selection. Use
of the air recirculation mode during Winter months is not
recommended because it may cause window fogging.
Vacation/Storage
Any time you store your vehicle or keep it out of service
(i.e., vacation) for two weeks or more, run the air conditioning system at idle for about five minutes in fresh air
with the blower setting on high. This will ensure adequate
system lubrication to minimize the possibility of compressor damage when the system is started again.
Window Fogging
Vehicle windows tend to fog on the inside of the glass in
mild, rainy and/or humid weather. Windows may frost on
the inside of the glass in very cold weather. To clear the
windows, select Defrost or Mix mode and increase the
front blower speed. Do not use the Recirculation mode
without A/C for long periods, as fogging may occur.
GETTING TO KNOW YOUR VEHICLE 53
CAUTION!
Failure to follow these cautions can cause damage to
the heating elements:
• Use care when washing the inside of the rear window. Do not use abrasive window cleaners on the
interior surface of the window. Use a soft cloth and a
mild washing solution, wiping parallel to the heating elements. Labels can be peeled off after soaking
with warm water.
•
Do not use scrapers, sharp instruments, or abrasive
window cleaners on the interior surface of the window.
• Keep all objects a safe distance from the window.
Outside Air Intake
Make sure the air intake, located directly in front of the
windshield, is free of obstructions such as leaves. Leaves
collected in the air intake may reduce airflow, can cause
odor, and if they enter the plenum they could plug the
water drains. In Winter months make sure the air intake is
clear of ice, slush and snow.
Cabin Air Filter
The climate control system filters out dust and pollen from
the air. Contact an authorized dealer to service your cabin
air filter, and to have it replaced when needed.
3

54 GETTING TO KNOW YOUR VEHICLE
Control Setting Suggestions For Various Weather Conditions
Control Settings Suggestions For Various Weather
Conditions Chart
WINDOWS
Power Windows — If Equipped
Power Window Switch Panel
1 – Rear Window Control Buttons – If Equipped
2 – Driver Passenger Window Control Buttons
3 – Passenger Window Lock Button
The control on the left front door panel has up-down
switches that give you fingertip control of all power
windows. There is a single opening and closing switch on
the front passenger door for passenger window control. If

the vehicle is equipped with rear power windows, a single
opening and closing switch on the rear passenger doors for
passenger window control is provided.
NOTE: The key off power delay feature will allow the
power windows to operate for up to three minutes after the
ignition is turned OFF. This feature is cancelled when
either front door is opened.
The window opening mechanism is fitted with sensors that
can detect the presence of an obstacle whilst the window is
closing. When this happens, the system activates and the
movement of the glass is immediately reversed.
If the presence of an object is detected and the system is
activated, it may be necessary to perform the reset procedure by fully opening the windows.
WARNING!
•
Never leave children alone in a vehicle, or with access
to an unlocked vehicle. Allowing children to be in a
vehicle unattended is dangerous for a number of
reasons. A child or others could be seriously or fatally
injured. Children should be warned not to touch the
parking brake, brake pedal or the gear selector.
GETTING TO KNOW YOUR VEHICLE 55
WARNING! (Continued)
• Do not leave the key fob in or near the vehicle or in
a location accessible to children. A child could operate power windows, other controls, or move the
vehicle.
Auto-Down Feature
The window switches are equipped with an Auto-Down
feature. Push the window switch for half a second, release,
and the window will go down automatically.
To stop the window from going all the way down during
the auto-down operation, pull up or push down on the
switch briefly.
To open the window part way, lift the window switch to
the detent for less than half a second and release it to stop
the window.
NOTE: The power window switches remain active for up
to three minutes after the ignition switch has been turned
OFF. Opening either of the vehicle’s front doors will cancel
this feature.
3
(Continued)

56 GETTING TO KNOW YOUR VEHICLE
Auto-Up Feature
The window switches are equipped with an Auto-Up
feature. Lift the window switch to the detent for half a
second, release, and the window will go up automatically.
To stop the window from going all the way up during the
auto-up operation, pull up/push down on the switch
briefly.
To close the window part way, lift the window switch to
the detent for less than half a second and release it when
you want the window to stop.
WARNING!
There is no auto-reverse protection when the window
is almost closed. Be sure to clear all objects from the
window before closing.
Power Windows System Initialization
The power windows may be reset if any of the following
occurs:
• On the front doors
• Fuse or battery are disconnected when the window is
moving.
• 50 window movements without ever closing the window.
• On the rear doors (in addition to the condition for the
front doors)
• Fuse or battery are disconnected when the window is
moving.
• The auto-revese system is activated while the window
is moving and the door is opening.
• 50 window movements without ever closing the window.
• One door opening movements with the window moving, without ever closing the door.
• Three door opening with the window in motion.
During these maneuvers, the upper stop position is
never reached.
Proceed as follows for initialization:
1. Completely close the driver’s door window, keeping the
operating button pushed for at least five seconds after
the (upper) end of travel position.
2. Proceed in the same way on the passenger’s side door
button and on the buttons of rear doors.

Window Bar Grates — If Equipped
This vehicle may be equipped with metal grates over the
side door windows. This feature is a part of the vehicle’s
safety system, and is designed to protect you and your
passengers in the event of an accident.
Window Bar Grates
GETTING TO KNOW YOUR VEHICLE 57
WARNING!
The metal grates over the sliding door windows are
designed to protect you in the event of an accident.
Modification or removal of the grates could lead to
serious injury or death.
Wind Buffeting
Wind buffeting can be described as the perception of
pressure on the ears or a helicopter-type sound in the ears.
Your vehicle may exhibit wind buffeting with the windows
down in certain open or partially open positions. This is a
normal occurrence and can be minimized. If the buffeting
occurs open the front windows together to minimize the
buffeting.
3

58 GETTING TO KNOW YOUR VEHICLE
HOOD
Opening
To open the hood, two latches must be released.
1. Pull the release lever located below the instrument panel
and in front of the driver’s door.
Hood Release Lever
2. Move to the outside of the vehicle, reach into the
opening beneath the center of the hood and push up the
safety latch lever to release it, before raising the hood.
Hood Safety Latch Lever Location
3. Raise the hood and place the hood prop rod in hood slot
to secure the hood in the open position.

CAUTION!
GETTING TO KNOW YOUR VEHICLE 59
Closing
Be sure to disengage the rod and secure it in close
position before closing the hood. Damage may occur.
Hood Prop Rod
WARNING!
Be sure the hood is fully latched before driving your
vehicle. If the hood is not fully latched, it could open
when the vehicle is in motion and block your vision.
Failure to follow this warning could result in serious
injury or death.
CAUTION!
To prevent possible damage, do not slam the hood to
close it. Lower hood to approximately 12 inches (30 cm)
and drop the hood to close. Make sure hood is fully
closed for both latches. Never drive vehicle unless
hood is fully closed, with both latches engaged.
3

60 GETTING TO KNOW YOUR VEHICLE
CARGO AREA FEATURES
Rear Cargo Tie-Downs
To make it easier to secure your load, there are hooks (if
equipped) fixed to the floor.
Rear Cargo Tie-Downs (Cargo Version)
Rear Cargo Tie-Downs (Passenger Version)
NOTE: Power washing is not allowed inside the cargo
area.

GETTING TO KNOW YOUR VEHICLE 61
WARNING!
• To help protect against personal injury, passengers
should not be seated in the rear cargo area. The rear
cargo space is intended for load carrying purposes
only, not for passengers, who should sit in seats and
use seat belts.
• Cargo tie-down hooks are not safe anchors for a child
seat tether strap. In a sudden stop or accident, a hook
could pull loose and allow the child seat to come
loose. A child could be badly injured. Use only the
anchors provided for child seat tethers.
The weight and position of cargo and passengers can
change the vehicle center of gravity and vehicle handling. To avoid loss of control resulting in personal
injury, follow these guidelines for loading your vehicle:
• Do not carry loads which exceed the load limits
described on the label attached to the left door or left
door center pillar.
(Continued)
WARNING! (Continued)
• Always place cargo evenly on the cargo floor. Put
heavier objects as low and as far forward as possible.
• Place as much cargo as possible in front of the rear
axle. Too much weight or improperly placed weight
over or behind the rear axle can cause the rear of the
vehicle to sway.
• Do not pile luggage or cargo higher than the top of
the seatback. This could impair visibility or become
a dangerous projectile in a sudden stop or accident.
INTERNAL EQUIPMENT
Storage
Glove Compartment
The glove compartment is located on the passenger side of
the instrument panel.
3

62 GETTING TO KNOW YOUR VEHICLE
To open the glove compartment, pull the release handle.
NOTE: The glove compartment handle is equipped with a
lock. To lock the glove compartment, remove the emergency key from the key fob, insert emergency key into
glove compartment handle lock cylinder and turn the key
to the lock position and remove the key. Use the reverse
sequence to unlock the glove compartment.
Glove Compartment Release Handle
Dash Storage
The dash storage is located on the right side of the
instrument panel above the glove compartment.
Dash Storage

Overhead Console Storage
There is additional shelf storage above the front sun visors.
Overhead Console Storage Location
Cupholders
A cupholder is located in the front and rear of the center
console.
GETTING TO KNOW YOUR VEHICLE 63
Power Outlets
Your vehicle is equipped with 12 Volt (15 Amp) power
outlets that can be used to power cellular phones, small
electronics and other low powered electrical accessories.
The power outlets are labeled with either a “key” or a
“battery” symbol to indicate how the outlet is powered.
Power outlets labeled with a “key” are powered when the
ignition is in the MAR (ACC/ON/RUN) position, while
the outlets labeled with a “battery” are connected directly
to the battery and powered at all times.
NOTE:
• All accessories connected to the “battery” powered
outlets should be removed or turned off when the
vehicle is not in use to protect the battery against
discharge.
3

64 GETTING TO KNOW YOUR VEHICLE
Driver And Front Passenger Power Outlets
The power outlets are located in between the driver and
front passenger seats.
Driver And Front Passenger Power Outlets
Load Compartment Power Outlet
The Load Compartment Power Outlet is located on the left
side of the rear cargo compartment. Depending on trim
levels, the Power Outlet location may vary.
Load Compartment Power Outlet

Load Compartment Power Outlet Underhood Power Outlet Fuse Locations
CAUTION!
Do not connect devices with power higher than 180W
to the outlet. Using unsuitable adaptors may damage
the outlet.
GETTING TO KNOW YOUR VEHICLE 65
3
1 — #85 Fuse 15A Blue Rear Power Outlet 12V
2 — #15 Fuse 15A Blue IP Power Outlet 12V
3 — #30 Fuse 15A Blue 2nd IP Power Outlet 12V
WARNING!
To avoid serious injury or death:
• Only devices designed for use in this type of outlet
should be inserted into any 12 Volt outlet.
• Do not touch with wet hands.
(Continued)

66 GETTING TO KNOW YOUR VEHICLE
WARNING! (Continued)
• Close the lid when not in use and while driving the
vehicle.
• If this outlet is mishandled, it may cause an electric
shock and failure.
CAUTION!
• Many accessories that can be plugged in draw power
from the vehicle’s battery, even when not in use (i.e.,
cellular phones, etc.). Eventually, if plugged in long
enough, the vehicle’s battery will discharge sufficiently to degrade battery life and/or prevent the
engine from starting.
• Accessories that draw higher power (i.e., coolers,
vacuum cleaners, lights, etc.) will degrade the battery
even more quickly. Only use these intermittently and
with greater caution.
• After the use of high power draw accessories, or long
periods of the vehicle not being started (with accessories still plugged in), the vehicle must be driven a
sufficient length of time to allow the generator to
recharge the vehicle’s battery.
ROOF RACK — IF EQUIPPED
The crossbars and siderails are designed to carry the
weight on vehicles equipped with a luggage rack. The load
must not exceed 150 lbs (68 kg), and should be uniformly
distributed over the luggage rack crossbars.
NOTE: If not equipped with crossbars, your authorized
dealer can order and install Mopar crossbars built specifically for this roof rack system.
Distribute cargo weight evenly on the roof rack crossbars.
The roof rack does not increase the total load carrying
capacity of the vehicle. Be sure the total load of cargo inside
the vehicle plus that on the external rack does not exceed
the maximum vehicle load capacity.
To move the crossbars, loosen the attachments, located at
the upper edge of each crossbar, approximately eight turns
using the anti-theft wrench provided with the Mopar
crossbars. Then, move the crossbar to the desired position,
keeping the crossbars parallel to the rack frame. Once the
crossbar is in the desired position, retighten the with the
wrench to lock the crossbar into position.

NOTE:
• To help control wind noise when the crossbars are not in
use, place the front and rear crossbars approximately 24
inches (61 cm) apart. Optimal noise reduction can then
be achieved by adjusting the front crossbar forward or
aft using increments of 1 inch (2.5 cm).
• If (or any metallic object) is placed over the satellite
radio antenna (if equipped), you may experience interruption of satellite radio reception. For improved satellite radio reception, avoid placing the rear crossbar over
the satellite radio antenna.
WARNING!
Cargo must be securely tied down before driving your
vehicle. Improperly secured loads can fly off the vehicle, particularly at high speeds, resulting in personal
injury or property damage. Follow the roof rack cautions when carrying cargo on your roof rack.
GETTING TO KNOW YOUR VEHICLE 67
CAUTION!
• To prevent damage to the roof of your vehicle, DO
NOT carry any loads on the roof rack without the
crossbars deployed. The load should be secured and
placed on top of the crossbars, not directly on the
roof. If it is necessary to place the load on the roof,
place a blanket or other protective layer between the
load and the roof surface.
• To avoid damage to the roof rack and vehicle, do not
exceed the maximum roof rack load capacity of 150 lb
(68 kg). Always distribute heavy loads as evenly as
possible and secure the load appropriately.
• Load should always be secured to cross bars first,
with tie down loops used as additional securing
points if needed. Tie loops are intended as supplementary tie down points only. Do not use ratcheting
mechanisms with the tie loops. Check the straps and
thumb wheels frequently to be sure that the load
remains securely attached.
• Long loads that extend over the windshield, such as
wood panels or surfboards, or loads with large
frontal area should be secured to both the front and
rear of the vehicle.
3
(Continued)

68 GETTING TO KNOW YOUR VEHICLE
CAUTION! (Continued)
• Travel at reduced speeds and turn corners carefully
when carrying large or heavy loads on the roof rack.
Wind forces, due to natural causes or nearby truck
traffic, can add sudden upward lift to a load. This is
especially true on large flat loads and may result in
damage to the cargo or your vehicle.

GETTING TO KNOW YOUR INSTRUMENT PANEL
CONTENTS
䡵 INSTRUMENT CLUSTER ...................70
▫ Instrument Cluster Descriptions .............71
▫ Yellow Warning Lights ....................78
▫ Green Indicator Lights ....................82
4
䡵 INSTRUMENT CLUSTER DISPLAY ............72
䡵 TRIP COMPUTER.........................72
▫ Trip Button ............................72
▫ Trip Functions .........................73
▫ Values Displayed .......................73
䡵 WARNING LIGHTS AND MESSAGES ..........74
▫ Red Warning Lights ......................74
▫ Blue Indicator Lights .....................82
䡵 ONBOARD DIAGNOSTIC SYSTEM — OBD II ....83
▫ Onboard Diagnostic System (OBD II)
Cybersecurity ..........................83
䡵 EMISSIONS INSPECTION AND MAINTENANCE
PROGRAMS ............................84

70 GETTING TO KNOW YOUR INSTRUMENT PANEL
INSTRUMENT CLUSTER
Instrument Cluster

Instrument Cluster Descriptions
1. Speedometer
• Indicates vehicle speed.
2. Fuel Gauge
• The pointer shows the level of fuel in the fuel tank
when the ignition switch is in the ON/RUN position.
The fuel pump arrow symbol points to the side
•
of the vehicle where the fuel door is located.
3. Temperature Gauge
The temperature gauge shows engine coolant tempera-
•
ture. Any reading within the normal range indicates that
the engine cooling system is operating satisfactorily.
• The gauge pointer will likely indicate a higher temperature when driving in hot weather or up mountain
grades. It should not be allowed to exceed the upper
limits of the normal operating range.
WARNING!
A hot engine cooling system is dangerous. You or
others could be badly burned by steam or boiling
coolant. You may want to call an authorized dealer for
service if your vehicle overheats. If you decide to look
(Continued)
GETTING TO KNOW YOUR INSTRUMENT PANEL 71
WARNING! (Continued)
under the hood yourself, see “Servicing And Maintenance.” Follow the warnings under the Cooling System
Pressure Cap paragraph.
CAUTION!
Driving with a hot engine cooling system could damage your vehicle. If the temperature gauge reads “H,”
pull over and stop the vehicle. Idle the vehicle with the
air conditioner turned off until the pointer drops back
into the normal range. If the pointer remains on the
“H,” turn the engine off immediately and call an
authorized dealer for service.
4. Tachometer
• Indicates the engine speed in revolutions per minute
(RPM x 1000).
5. Instrument Cluster Display
• When the appropriate conditions exist, this display
shows the instrument cluster display messages. Refer
to “Instrument Cluster Display” in “Getting To Know
Your Instrument Panel” for further information.
4

72 GETTING TO KNOW YOUR INSTRUMENT PANEL
INSTRUMENT CLUSTER DISPLAY
Your vehicle will be equipped with an instrument cluster
display, which offers useful information to the driver. With
the ignition in the STOP/OFF mode, opening/closing of a
door will activate the display for viewing, and display the
total miles, or kilometers, in the odometer. Your instrument
cluster display is designed to display important information about your vehicle’s systems and features. Using a
driver interactive display located on the instrument panel,
your instrument cluster display can show you how systems are working and give you warnings when they are
not. The instrument cluster display controls allow you to
scroll through the main menus and submenus. You can
access the specific information you want and make selections and adjustments.
TRIP COMPUTER
The Trip Computer is located in the instrument cluster. It
features a driver-interactive display (displays information
such as trip information, range, fuel consumption, average
speed, and travel time).
NOTE: The Uconnect System also has a Trip Computer
display and menus to customize the information displayed
in the cluster. For further information, refer to “Uconnect
Settings” in “Multimedia”.
Trip Button
The TRIP button, located on the right steering column
stalk, can be used to display and to reset the previously
described values.
• A short button push displays the different values.
• A long button push resets the system and then starts a
new trip.
New Trip
To reset:
• Push and hold the TRIP button to reset the system
manually.
• When the “Trip distance” reaches 99999.9 miles or
kilometers or when the “Travel time” reaches 999.59 (999
hours and 59 minutes), the system is reset automatically.
• Disconnecting/Reconnecting the battery resets the system.
NOTE: If the reset operation occurs in the presence of the
screens concerning Trip A or Trip B, only the information
associated with Trip A or Trip B functions will be reset.

Start Of Trip Procedure
With the ignition on, push and hold the TRIP button for
over two seconds to reset trip information.
Exit Trip
1. To exit the Trip function, wait until all the values have
been displayed or hold the MENU button for longer
than one second.
2. Briefly push and release the MENU button to go back to
the menu screen or push and hold the MENU (approximately one second) to go back to the main screen
without storing settings.
Trip Functions
Both trip functions are resettable (reset — start of new trip).
“Trip A” can be used to display the figures relating to:
• Range
• Trip distance A
• Average Economy A
• Instantaneous Economy
• Average speed A
• Travel time A (driving time)
GETTING TO KNOW YOUR INSTRUMENT PANEL 73
“Trip B” can be used to display the figures relating to:
• Trip distance B
• Average Economy B
• Average speed B
• Travel time B (driving time)
NOTE: “Trip B” functions may be excluded (see “Trip B
Data”). “Range” and “Instantaneous Economy” cannot be
reset.
Values Displayed
Range
This indicates the distance which may be traveled with the
fuel remaining in the tank, assuming that driving conditions will not change. The message “----” will appear on the
display in the following cases:
• Distance less than 30 miles (or 50 km).
• The vehicle is parked for a long time with the engine
running.
NOTE: The range depends on several factors: driving
style, type of route (freeway, residential, mountain roads,
etc.), conditions of use of the vehicle (load, tire pressure,
etc.). Trip planning must take into account the above notes.
4

74 GETTING TO KNOW YOUR INSTRUMENT PANEL
Travel Distance
This value shows the distance covered since the last reset.
Average Fuel Consumption
This value shows the approximate average consumption
since the last reset.
Current Fuel Consumption
This indicates the fuel consumption. The value is constantly updated. The message “----” will appear on the
display if the vehicle is parked with the engine running.
Average Speed
This value shows the vehicle’s average speed as a function
of the overall time elapsed since the last reset.
Travel Time
This value shows the time elapsed since the last reset.
WARNING LIGHTS AND MESSAGES
The warning/indicator lights will illuminate in the instrument panel together with a dedicated message and/or
acoustic signal when applicable. These indications are indicative and precautionary and as such must not be consid-
ered as exhaustive and/or alternative to the information
contained in the Owner’s Manual, which you are advised to
read carefully in all cases. Always refer to the information in
this chapter in the event of a failure indication. All active
telltales will display first if applicable. The system check
menu may appear different based upon equipment options
and current vehicle status. Some telltales are optional and
may not appear.
Red Warning Lights
— Air Bag Warning Light
This light will turn on for four to eight seconds as a bulb
check when the ignition is placed in the ON/RUN or
MAR/ON/RUN position. If the light is either not on
during startup, stays on, or turns on while driving, have
the system inspected at an authorized dealer as soon as
possible. This light will illuminate with a single chime
when a fault with the Air Bag Warning Light has been
detected, it will stay on until the fault is cleared. If the light
comes on intermittently or remains on while driving, have
an authorized dealer service the vehicle immediately.
— Brake Warning Light
This warning light monitors various brake functions, including brake fluid level and parking brake application. If
the brake light turns on it may indicate that the parking

brake is applied, that the brake fluid level is low, or that
there is a problem with the anti-lock brake system reservoir.
If the light remains on when the parking brake has been
disengaged, and the fluid level is at the full mark on the
master cylinder reservoir, it indicates a possible brake
hydraulic system malfunction or that a problem with the
Brake Booster has been detected by the Anti-Lock Brake
System (ABS) / Electronic Stability Control (ESC) system.
In this case, the light will remain on until the condition has
been corrected. If the problem is related to the brake
booster, the ABS pump will run when applying the brake,
and a brake pedal pulsation may be felt during each stop.
The dual brake system provides a reserve braking capacity
in the event of a failure to a portion of the hydraulic
system. A leak in either half of the dual brake system is
indicated by the Brake Warning Light, which will turn on
when the brake fluid level in the master cylinder has
dropped below a specified level.
The light will remain on until the cause is corrected.
NOTE: The light may flash momentarily during sharp
cornering maneuvers, which change fluid level conditions.
GETTING TO KNOW YOUR INSTRUMENT PANEL 75
The vehicle should have service performed, and the brake
fluid level checked.
If brake failure is indicated, immediate repair is necessary.
WARNING!
Driving a vehicle with the red brake light on is
dangerous. Part of the brake system may have failed. It
will take longer to stop the vehicle. You could have a
collision. Have the vehicle checked immediately.
Vehicles equipped with the Anti-Lock Brake System (ABS)
are also equipped with Electronic Brake Force Distribution
(EBD). In the event of an EBD failure, the Brake Warning
Light will turn on along with the ABS Light. Immediate
repair to the ABS system is required.
Operation of the Brake Warning Light can be checked by
turning the ignition switch from the OFF position to the
ON/RUN position. The light should illuminate for approximately two seconds. The light should then turn off
unless the parking brake is applied or a brake fault is
detected. If the light does not illuminate, have the light
inspected by an authorized dealer.
4

76 GETTING TO KNOW YOUR INSTRUMENT PANEL
The light also will turn on when the parking brake is
applied with the ignition switch in the ON/RUN position.
NOTE: This light shows only that the parking brake is
applied. It does not show the degree of brake application.
— Battery Charge Warning Light
This warning light will illuminate when the battery is not
charging properly. If it stays on while the engine is running, there may be a malfunction with the charging system.
Contact an authorized dealer as soon as possible.
This indicates a possible problem with the electrical system
or a related component.
— Door Open Warning Light
This indicator will illuminate when one or more door(s) are
not fully closed.
NOTE: If the vehicle is moving and a door is opened, there
will also be a single chime.
— Electronic Throttle Control (ETC) Warning
Light
This warning light will illuminate to inform of a problem
with the Electronic Throttle Control (ETC) system. If a
problem is detected while the vehicle is running, the light
will either stay on or flash depending on the nature of the
problem. Cycle the ignition when the vehicle is safely and
completely stopped and the transmission is placed in the
PARK position. The light should turn off. If the light
remains on with the vehicle running, your vehicle will
usually be drivable; however, see an authorized dealer for
service as soon as possible.
If the light continues to flash when the vehicle is running,
immediate service is required and you may experience
reduced performance, an elevated/rough idle, or engine
stall and your vehicle may require towing. The light will
come on when the ignition is placed in the ON/RUN or
MAR/ON/RUN position and remain on briefly as a bulb
check. If the light does not come on during starting, have
the system checked by an authorized dealer.
— Engine Coolant Temperature Warning Light
This warning light warns of an overheated engine condition. If the engine coolant temperature is too high, this
indicator will illuminate and a single chime will sound. If
the temperature reaches the upper limit, a continuous
chime will sound for four minutes or until the engine is
able to cool: whichever comes first.
If the light turns on while driving, safely pull over and stop
the vehicle. If the A/C system is on, turn it off. Also, shift

the transmission into NEUTRAL and idle the vehicle. If the
temperature reading does not return to normal, turn the
engine off immediately and call for service.
Refer to “If Your Engine Overheats” in “In Case Of
Emergency” for further information.
— Oil Pressure Warning Light
This warning light will illuminate to indicate low engine
oil pressure. If the light turns on while driving, stop the
vehicle, shut off the engine as soon as possible, and contact
an authorized dealer. A chime will sound when this light
turns on.
GETTING TO KNOW YOUR INSTRUMENT PANEL 77
WARNING!
If you continue operating the vehicle when the Transmission Temperature Warning Light is illuminated you
could cause the fluid to boil over, come in contact with
hot engine or exhaust components and cause a fire.
CAUTION!
Continuous driving with the Transmission Temperature Warning Light illuminated will eventually cause
severe transmission damage or transmission failure.
4
Do not operate the vehicle until the cause is corrected. This
light does not indicate how much oil is in the engine. The
engine oil level must be checked under the hood.
— Transmission Temperature Warning Light — If
Equipped
This warning light will illuminate to warn of a high
transmission fluid temperature. This may occur with
strenuous usage such as trailer towing. If this light turns
on, stop the vehicle and run the engine at idle or slightly
faster, with the transmission in PARK or NEUTRAL, until
the light turns off. Once the light turns off, you may
continue to drive normally.
— Seat Belt Reminder Warning Light
When the ignition is first placed in the ON/RUN or
MAR/ON/RUN position, if the driver’s seat belt is unbuckled, a chime will sound and the light will turn on.
When driving, if the driver or front passenger seat belt
remains unbuckled, the Seat Belt Reminder Light will flash
or remain on continuously and a chime will sound. Refer to
“Occupant Restraint Systems” in “Safety” for further information.

78 GETTING TO KNOW YOUR INSTRUMENT PANEL
— Transmission Fault Warning Light
This light will illuminate (together with a message in the
instrument cluster display and a buzzer) to indicate a
transmission fault. Contact your authorized dealer if the
message remains after restarting the engine.
— Engine Oil Level Warning Light
This warning light appears on the panel when the engine
oil level falls below the minimum recommended value.
Restore the correct engine oil level or contact your authorized dealer for service.
Yellow Warning Lights
— Anti-Lock Brake (ABS) Warning Light
This light monitors the Anti-Lock Brake System (ABS). The
light will turn on when the ignition is placed in the
ON/RUN or MAR/ON/RUN position and may stay on
for as long as four seconds.
If the ABS light remains on or turns on while driving, then
the Anti-Lock portion of the brake system is not functioning and service is required. However, the conventional
brake system will continue to operate normally if the brake
warning light is not on.
If the ABS light is on, the brake system should be serviced
as soon as possible to restore the benefits of Anti-Lock
Brakes. If the ABS light does not turn on when the ignition
is placed in the ON/RUN or MAR/ON/RUN position,
have the light inspected by an authorized dealer.
— Low Fuel Warning Light
When the fuel level reaches approximately 2–3 gal (9–11 L)
this light will turn on, and remain on until fuel is added.
— Generic Warning Light
The Generic Warning Light will illuminate if any of the
following conditions occur: Engine Oil Pressure Sensor
Failure, External Light Failure, Parking Sensor Failure, Fuel
Cut-Off Fail/Intervention, Generic Failure on Trailer, or Air
Bag telltale recovery.
The telltale will blink in case of Air Bag Warning Light
Failure. Contact an authorized dealer immediately for
service.

— Tire Pressure Monitoring System (TPMS)
Warning Light
The warning light switches on and a message is displayed
to indicate that the tire pressure is lower than the recommended value and/or that slow pressure loss is occurring.
In these cases, optimal tire duration and fuel consumption
may not be guaranteed.
Should one or more tires be in the condition mentioned
above, the display will show the indications corresponding
to each tire.
CAUTION!
Do not continue driving with one or more flat tires as
handling may be compromised. Stop the vehicle,
avoiding sharp braking and steering. If a tire puncture
occurs, repair immediately using the dedicated tire
repair kit and contact an authorized dealer as soon as
possible.
Each tire, including the spare (if provided), should be
checked monthly when cold and inflated to the inflation
pressure recommended by the vehicle manufacturer on the
vehicle placard or tire inflation pressure label. (If your
vehicle has tires of a different size than the size indicated
GETTING TO KNOW YOUR INSTRUMENT PANEL 79
on the vehicle placard or tire inflation pressure label, you
should determine the proper tire inflation pressure for
those tires.)
As an added safety feature, your vehicle has been
equipped with a Tire Pressure Monitoring System (TPMS)
that illuminates a low tire pressure telltale when one or
more of your tires is significantly under-inflated. Accordingly, when the low tire pressure telltale illuminates, you
should stop and check your tires as soon as possible, and
inflate them to the proper pressure. Driving on a significantly under-inflated tire causes the tire to overheat and
can lead to tire failure. Under-inflation also reduces fuel
efficiency and tire tread life, and may affect the vehicle’s
handling and stopping ability.
Please note that the TPMS is not a substitute for proper tire
maintenance, and it is the driver’s responsibility to maintain correct tire pressure, even if under-inflation has not
reached the level to trigger illumination of the TPMS low
tire pressure telltale.
Your vehicle has also been equipped with a TPMS malfunction indicator to indicate when the system is not operating
properly. The TPMS malfunction indicator is combined
with the low tire pressure telltale. When the system detects
a malfunction, the telltale will flash for approximately one
4

80 GETTING TO KNOW YOUR INSTRUMENT PANEL
minute and then remain continuously illuminated. This
sequence will continue upon subsequent vehicle start-ups
as long as the malfunction exists. When the malfunction
indicator is illuminated, the system may not be able to
detect or signal low tire pressure as intended. TPMS
malfunctions may occur for a variety of reasons, including
the installation of replacement or alternate tires or wheels
on the vehicle that prevent the TPMS from functioning
properly. Always check the TPMS malfunction telltale after
replacing one or more tires or wheels on your vehicle to
ensure that the replacement or alternate tires and wheels
allow the TPMS to continue to function properly.
CAUTION!
The TPMS has been optimized for the original equipment tires and wheels. TPMS pressures and warning
have been established for the tire size equipped on
your vehicle. Undesirable system operation or sensor
damage may result when using replacement equipment that is not of the same size, type, and/or style.
Aftermarket wheels can cause sensor damage. Using
aftermarket tire sealants may cause the Tire Pressure
(Continued)
CAUTION! (Continued)
Monitoring System (TPMS) sensor to become inoperable. After using an aftermarket tire sealant it is
recommended that you take your vehicle to your authorized dealer to have your sensor function checked.
— Vehicle Security Warning Light
This warning light will illuminate when the vehicle security alarm system has detected an attempt to break into the
vehicle.
— Engine Check/Malfunction Indicator Warning
Light (MIL)
The Engine Check/Malfunction Indicator Light (MIL) is a
part of an Onboard Diagnostic System called OBD II that
monitors engine and automatic transmission control systems. This warning light will illuminate when the ignition
is in the ON/RUN position before engine start. If the bulb
does not come on when turning the ignition switch from
OFF to ON/RUN, have the condition checked promptly.
Certain conditions, such as a loose or missing gas cap, poor
quality fuel, etc., may illuminate the light after engine start.
The vehicle should be serviced if the light stays on through

several typical driving styles. In most situations, the vehicle will drive normally and will not require towing.
When the engine is running, the MIL may flash to alert
serious conditions that could lead to immediate loss of
power or severe catalytic converter damage. The vehicle
should be serviced by an authorized dealer as soon as
possible if this occurs.
WARNING!
A malfunctioning catalytic converter, as referenced
above, can reach higher temperatures than in normal
operating conditions. This can cause a fire if you drive
slowly or park over flammable substances such as dry
plants, wood, cardboard, etc. This could result in death
or serious injury to the driver, occupants or others.
CAUTION!
Prolonged driving with the Malfunction Indicator
Light (MIL) on could cause damage to the vehicle
control system. It also could affect fuel economy and
driveability. If the MIL is flashing, severe catalytic
converter damage and power loss will soon occur.
Immediate service is required.
GETTING TO KNOW YOUR INSTRUMENT PANEL 81
— Electronic Stability Control (ESC) Warning
Light — If Equipped
The “ESC Indicator Light” in the instrument cluster will
come on when the ignition is placed in the ON/RUN or
MAR/ON/RUN position, and when ESC is activated. It
should go out with the engine running. If the “ESC
Indicator Light” comes on continuously with the engine
running, a malfunction has been detected in the ESC
system. If this light remains on after several ignition cycles,
and the vehicle has been driven several miles (kilometers)
at speeds greater than 30 mph (48 km/h), see your authorized dealer as soon as possible to have the problem
diagnosed and corrected.
• The “ESC Off Indicator Light” and the “ESC Indicator
Light” come on momentarily each time the ignition is
placed in the ON/RUN or MAR/ON/RUN position.
• Each time the ignition is turned to ON/RUN or MAR/
ON/RUN, the ESC system will be on, even if it was
turned off previously.
• The ESC system will make buzzing or clicking sounds
when it is active. This is normal; the sounds will stop
when ESC becomes inactive.
• This light will come on when the vehicle is in an ESC
event.
4

82 GETTING TO KNOW YOUR INSTRUMENT PANEL
— Electronic Stability Control (ESC) Off Warning
Light — If Equipped
This warning light indicates the Electronic Stability Control
(ESC) is off.
Each time the ignition is turned to ON/RUN or ACC/ON/
RUN, the ESC system will be on, even if it was turned off
previously.
Green Indicator Lights
— Turn Signal Indicator Lights
When the left or right turn signal is activated, the turn
signal indicator will flash independently and the corresponding exterior turn signal lamps will flash. Turn signals
can be activated when the multifunction lever is moved
down (left) or up (right).
NOTE:
• A continuous chime will sound if the vehicle is driven
more than 1 mile (1.6 km) with either turn signal on.
• Check for an inoperative outside light bulb if either
indicator flashes at a rapid rate.
— Park/Headlight On Indicator Light
This indicator light will illuminate when the park lights or
headlights are turned on.
— Front Fog Indicator Light — If Equipped
This indicator light will illuminate when the front fog
lights are on.
— Cruise Control Indicator Light — If Equipped
This indicator light will illuminate when the cruise control
is activated.
NOTE: There will be no change in the indicator light
when the desired speed is set.
Refer to “Speed Control” in “Starting And Operating” for
further information.
Blue Indicator Lights
— High Beam Indicator Light
This indicator light will illuminate to indicate that the high
beam headlights are on. With the low beams activated,
push the multifunction lever forward (toward the front of
the vehicle) to turn on the high beams. Pull the multifunction lever rearward (toward the rear of the vehicle) to turn
off the high beams. If the high beams are off, pull the lever
toward you for a temporary high beam on, ⬙flash to pass⬙
scenario.

ONBOARD DIAGNOSTIC SYSTEM — OBD II
Your vehicle is equipped with a sophisticated Onboard
Diagnostic system called OBD II. This system monitors the
performance of the emissions, engine, and transmission
control systems. When these systems are operating properly, your vehicle will provide excellent performance and
fuel economy, as well as engine emissions well within
current government regulations.
If any of these systems require service, the OBD II system
will turn on the Malfunction Indicator Light (MIL). It will
also store diagnostic codes and other information to assist
your service technician in making repairs. Although your
vehicle will usually be drivable and not need towing, see
an authorized dealer for service as soon as possible.
CAUTION!
• Prolonged driving with the MIL on could cause
further damage to the emission control system. It
could also affect fuel economy and driveability. The
vehicle must be serviced before any emissions tests
can be performed.
(Continued)
GETTING TO KNOW YOUR INSTRUMENT PANEL 83
CAUTION! (Continued)
• If the MIL is flashing while the vehicle is running,
severe catalytic converter damage and power loss
will soon occur. Immediate service is required.
Onboard Diagnostic System (OBD II) Cybersecurity
Your vehicle is required to have an Onboard Diagnostic
system (OBD II) and a connection port to allow access to
information related to the performance of your emissions
controls. Authorized service technicians may need to access this information to assist with the diagnosis and
service of your vehicle and emissions system.
WARNING!
•
ONLY an authorized service technician should connect
equipment to the OBD II connection port in order to
read the VIN, diagnose, or service your vehicle.
• If unauthorized equipment is connected to the OBD
II connection port, such as a driver-behavior tracking
device, it may:
• Be possible that vehicle systems, including safety
related systems, could be impaired or a loss of
(Continued)
4

84 GETTING TO KNOW YOUR INSTRUMENT PANEL
WARNING! (Continued)
vehicle control could occur that may result in an
accident involving serious injury or death.
• Access, or allow others to access, information
stored in your vehicle systems, including personal
information.
For further information, refer to “Cybersecurity” in “Multimedia”.
EMISSIONS INSPECTION AND MAINTENANCE PROGRAMS
In some localities, it may be a legal requirement to pass an
inspection of your vehicle’s emissions control system.
Failure to pass could prevent vehicle registration.
For states that require an Inspection and Maintenance (I/M), this check verifies the “Malfunction Indicator Light (MIL)” is functioning and is
not on when the engine is running, and that the
OBD II system is ready for testing.
Normally, the OBD II system will be ready. The OBD II
system may not be ready if your vehicle was recently
serviced, recently had a dead battery or a battery replace-
ment. If the OBD II system should be determined not ready
for the I/M test, your vehicle may fail the test.
Your vehicle has a simple ignition actuated test, which you
can use prior to going to the test station. To check if your
vehicle’s OBD II system is ready, you must do the following:
1. Cycle the ignition switch to the ON position, but do not
crank or start the engine.
NOTE: If you crank or start the engine, you will have to
start this test over.
2. As soon as you cycle the ignition switch to the ON
position, you will see the “Malfunction Indicator Light
(MIL)” symbol come on as part of a normal bulb check.
3. Approximately 15 seconds later, one of two things will
happen:
• The MIL will flash for about ten seconds and then return
to being fully illuminated until you turn OFF the ignition or start the engine. This means that your vehicle’s
OBD II system is not ready and you should not proceed
to the I/M station.
• The MIL will not flash at all and will remain fully
illuminated until you place the ignition in the off position or start the engine. This means that your vehicle’s

OBD II system is ready and you can proceed to the I/M
station.
If your OBD II system is not ready, you should see an
authorized dealer or repair facility. If your vehicle was
recently serviced or had a battery failure or replacement,
you may need to do nothing more than drive your vehicle
as you normally would in order for your OBD II system to
update. A recheck with the above test routine may then
indicate that the system is now ready.
Regardless of whether your vehicle’s OBD II system is
ready or not, if the MIL is illuminated during normal
vehicle operation you should have your vehicle serviced
before going to the I/M station. The I/M station can fail
your vehicle because the MIL is on with the engine
running.
GETTING TO KNOW YOUR INSTRUMENT PANEL 85
4


SAFETY
CONTENTS
䡵 SAFETY FEATURES .......................88
▫ Child Restraints .......................122
▫ Four-Wheel Anti-Lock Brake System (ABS) .....88
▫ Electronic Brake Control System .............89
䡵 AUXILIARY DRIVING SYSTEMS ..............93
▫ Tire Pressure Monitoring System (TPMS) ......93
䡵 OCCUPANT RESTRAINT SYSTEMS ...........98
▫ Occupant Restraint Systems ................98
▫ Important Safety Precautions ...............98
▫ Seat Belt Systems .......................99
▫ Supplemental Restraint Systems (SRS) ........110
▫ Transporting Pets ......................142
䡵 SAFETY TIPS ...........................142
▫ Transporting Passengers ..................142
▫ Exhaust Gas ..........................143
▫ Safety Checks You Should Make Inside The
Vehicle ..............................143
▫ Periodic Safety Checks You Should Make
Outside The Vehicle ....................145
5

88 SAFETY
SAFETY FEATURES
Four-Wheel Anti-Lock Brake System (ABS)
The Four-Wheel ABS is designed to aid the driver in
maintaining vehicle control under adverse braking conditions. The system operates with a separate computer to
modulate hydraulic pressure, to prevent wheel lock-up
and to help avoid skidding on slippery surfaces.
The system’s pump motor runs during an ABS stop to
provide regulated hydraulic pressure. The pump motor
makes a low humming noise during operation, which is
normal.
The ABS includes an amber ABS Warning Light. When the
light is illuminated, the ABS is not functioning. The system
reverts to standard non-anti-lock brakes. Turning the ignition OFF and ON again may reset the ABS if the fault
detected was only momentary.
WARNING!
• The ABS contains sophisticated electronic equipment that may be susceptible to interference caused
(Continued)
WARNING! (Continued)
by improperly installed or high output radio transmitting equipment. This interference can cause possible loss of anti-lock braking capability. Installation
of such equipment should be performed by qualified
professionals.
• Pumping of the Anti-Lock Brakes will diminish their
effectiveness and may lead to a collision. Pumping
makes the stopping distance longer. Just press firmly
on your brake pedal when you need to slow down or
stop.
• The ABS cannot prevent the natural laws of physics
from acting on the vehicle, nor can it increase braking or steering efficiency beyond that afforded by the
condition of the vehicle brakes and tires or the
traction afforded.
• The ABS cannot prevent collisions, including those
resulting from excessive speed in turns, following
another vehicle too closely, or hydroplaning.
• The capabilities of an ABS equipped vehicle must
never be exploited in a reckless or dangerous manner
that could jeopardize the user’s safety or the safety of
others.

When you are in a severe braking condition involving the
use of the ABS, you will experience some pedal drop as the
vehicle comes to a stop. This is the result of the system
reverting to the base brake system.
Engagement of the ABS may be accompanied by a pulsing
sensation. You may also hear a clicking noise. These
occurrences are normal and indicate that the system is
functioning properly.
SAFETY 89
braking distances. The BAS complements the anti-lock
brake system (ABS). Applying the brakes very quickly
results in the best BAS assistance. To receive the benefit of
the system, you must apply continuous braking pressure
during the stopping sequence, (do not “pump” the brakes).
Do not reduce brake pedal pressure unless braking is no
longer desired. Once the brake pedal is released, the BAS is
deactivated.
5
Electronic Brake Control System
Your vehicle is equipped with an advanced electronic
brake control system that includes the Brake Assist System
(BAS), Traction Control System (TCS), Hill Start Assist
(HSA), Electronic Stability Control (ESC), Electronic Roll
Mitigation (ERM) and Trailer Sway Control (TSC). All
systems work together to enhance vehicle stability and
control in various driving conditions and are commonly
referred to as ESC.
Brake Assist System (BAS)
The BAS is designed to optimize the vehicle’s braking
capability during emergency braking maneuvers. The system detects an emergency braking situation by sensing the
rate and amount of brake application and then applies
optimum pressure to the brakes. This can help reduce
WARNING!
The Brake Assist System (BAS) cannot prevent the
natural laws of physics from acting on the vehicle, nor
can it increase the traction afforded by prevailing road
conditions. BAS cannot prevent collisions, including
those resulting from excessive speed in turns, driving
on very slippery surfaces, or hydroplaning. The capabilities of a BAS-equipped vehicle must never be
exploited in a reckless or dangerous manner, which
could jeopardize the user’s safety or the safety of
others.
Traction Control System (TCS)
The Traction Control System (TCS) monitors the amount of
wheel spin of each of the driven wheels. If wheel spin is
detected, brake pressure is applied to the slipping wheel(s)

90 SAFETY
and engine power is reduced to provide enhanced acceleration and stability. A feature of the TCS system, Brake
Limited Differential (BLD), functions similar to a limited
slip differential and controls the wheel spin across a driven
axle. If one wheel on a driven axle is spinning faster than
the other, the system will apply the brake of the spinning
wheel. This will allow more engine torque to be applied to
the wheel that is not spinning. This feature remains active
even if TCS and ESC are in the Partial Off mode. Refer to
“Electronic Stability Control (ESC)” in this section for
further information.
Hill Start Assist (HSA)
The HSA system is designed to assist the driver when
starting a vehicle from a stop on a hill. HSA will maintain
the level of brake pressure the driver applied for a short
period of time after the driver takes their foot off of the
brake pedal. If the driver does not apply the throttle during
this short period of time, the system will release brake
pressure and the vehicle will roll down the hill. The system
will release brake pressure in proportion to the amount of
throttle applied as the vehicle starts to move in the
intended direction of travel.
HSA Activation Criteria
The following criteria must be met in order for HSA to
activate:
• Vehicle must be stopped.
• Vehicle must be on a 5% (approximate) grade or greater
hill.
• Gear selection matches vehicle uphill direction (i.e.,
vehicle facing uphill is in forward gear; vehicle backing
uphill is in REVERSE gear).
HSA will work in REVERSE and all forward gears when
the activation criteria have been met. The system will not
activate if the vehicle is placed in NEUTRAL or PARK.
WARNING!
There may be situations on minor hills with a loaded
vehicle, or while pulling a trailer, when the system will
not activate and slight rolling may occur. This could
cause a collision with another vehicle or object. Always
remember the driver is responsible for braking the
vehicle.

Electronic Stability Control (ESC)
The Electronic Stability Control (ESC) enhances directional
control and stability of the vehicle under various driving
conditions. ESC corrects for over/under steering of the
vehicle by applying the brake of the appropriate wheel to
assist in counteracting the over/under steer condition.
Engine power may also be reduced to help the vehicle
maintain the desired path.
ESC uses sensors in the vehicle to determine the vehicle
path intended by the driver and compares it to the actual
path of the vehicle. When the actual path does not match
the intended path, ESC applies the brake of the appropriate
wheel to assist in counteracting the oversteer or understeer
condition.
• Oversteer - when the vehicle is turning more than
appropriate for the steering wheel position.
• Understeer - when the vehicle is turning less than
appropriate for the steering wheel position.
SAFETY 91
WARNING!
• Electronic Stability Control (ESC) cannot prevent the
natural laws of physics from acting on the vehicle,
nor can it increase the traction afforded by prevailing
road conditions. ESC cannot prevent accidents, including those resulting from excessive speed in
turns, driving on very slippery surfaces, or hydroplaning. ESC also cannot prevent accidents resulting
from loss of vehicle control due to inappropriate
driver input for the conditions. Only a safe, attentive,
and skillful driver can prevent accidents. The capabilities of an ESC equipped vehicle must never be
exploited in a reckless or dangerous manner which
could jeopardize the user’s safety or the safety of
others.
• Vehicle modifications, or failure to properly maintain your vehicle, may change the handling characteristics of your vehicle, and may negatively affect
the performance of the ESC system. Changes to the
steering system, suspension, braking system, tire
type and size or wheel size may adversely affect ESC
performance. Improperly inflated and unevenly
worn tires may also degrade ESC performance. Any
5
(Continued)

92 SAFETY
WARNING! (Continued)
vehicle modification or poor vehicle maintenance
that reduces the effectiveness of the ESC system can
increase the risk of loss of vehicle control, vehicle
rollover, personal injury and death.
ESC Activation/Malfunction Indicator Light And ESC OFF Indicator Light
The ESC Activation/Malfunction Indicator Light
in the instrument cluster will come on when the
ignition switch is turned to the MAR (ON/RUN)
position for four seconds. If the ESC Activation/
Malfunction Indicator Light comes on continuously with
the engine running, a malfunction has been detected in the
ESC system. If this light remains on after several ignition
cycles, and the vehicle has been driven several miles
(kilometers) at speeds greater than 30 mph (48 km/h), see
your authorized dealer as soon as possible to have the
problem diagnosed and corrected.
The ESC Activation/Malfunction Indicator Light (located
in the instrument cluster) starts to flash as soon as the tires
lose traction and the ESC system becomes active. The ESC
Activation/Malfunction Indicator Light also flashes when
TCS is active. If the ESC Activation/Malfunction Indicator
Light begins to flash during acceleration, ease up on the
accelerator and apply as little throttle as possible. Be sure to
adapt your speed and driving to the prevailing road
conditions.
NOTE:
• The ESC Activation/Malfunction Indicator Light and
the ESC OFF Indicator Light come on momentarily each
time the ignition switch is turned ON.
• Each time the ignition is turned ON, the ESC system will
be ON even if it was turned off previously.
The ESC OFF Indicator Light indicates the Electronic Stability Control (ESC) is partially off.
Electronic Roll Mitigation (ERM)
This system anticipates the potential for wheel lift by
monitoring the driver’s steering wheel input and the speed
of the vehicle. When ERM determines that the rate of
change of the steering wheel angle and vehicle’s speed are
sufficient to potentially cause wheel lift, it then applies the
appropriate brake and may also reduce engine power to
lessen the chance that wheel lift will occur.

ERM can only reduce the chance of wheel lift occurring
during severe or evasive driving maneuvers; it cannot
prevent wheel lift due to other factors, such as road
conditions, leaving the roadway, or striking objects or other
vehicles.
WARNING!
Many factors, such as vehicle loading, road conditions
and driving conditions, influence the chance that
wheel lift or rollover may occur. ERM cannot prevent
all wheel lift or roll overs, especially those that involve
leaving the roadway or striking objects or other vehicles. The capabilities of an ERM-equipped vehicle
must never be exploited in a reckless or dangerous
manner which could jeopardize the user’s safety or the
safety of others.
SAFETY 93
NOTE: TSC cannot stop all trailers from swaying. Always
use caution when towing a trailer and follow the trailer
tongue weight recommendations. Refer to “Trailer Towing” in “Starting And Operating” for further information.
When TSC is functioning, the “ESC Activation/
Malfunction Indicator Light” will flash, the engine power
may be reduced and you may feel the brakes being applied
to individual wheels to attempt to stop the trailer from
swaying. TSC is disabled when the ESC system is in the
“Partial Off” mode.
WARNING!
If TSC activates while driving, slow the vehicle down,
stop at the nearest safe location, and adjust the trailer
load to eliminate trailer sway.
5
Trailer Sway Control (TSC) — If Equipped
TSC uses sensors in the vehicle to recognize an excessively
swaying trailer and will take the appropriate actions to
attempt to stop the sway. The system may reduce engine
power and apply the brake of the appropriate wheel(s) to
counteract the sway of the trailer. TSC will become active
automatically once an excessively swaying trailer is recog-
nized.
AUXILIARY DRIVING SYSTEMS
Tire Pressure Monitoring System (TPMS)
The Tire Pressure Monitor System (TPMS) will warn the
driver of a low tire pressure based on the vehicle recommended cold placard pressure.
The tire pressure will vary with temperature by about 1 psi
(7 kPa) for every 12°F (6.5°C). This means that when the

94 SAFETY
outside temperature decreases, the tire pressure will decrease. Tire pressure should always be set based on cold
inflation tire pressure. This is defined as the tire pressure
after the vehicle has not been driven for at least three
hours, or driven less than 1 mile (1.6 km) after a three hour
period. The cold tire inflation pressure must not exceed the
maximum inflation pressure molded into the tire sidewall.
Refer to “Tires” in “Servicing And Maintenance” for information on how to properly inflate the vehicle’s tires. The
tire pressure will also increase as the vehicle is driven - this
is normal and there should be no adjustment for this
increased pressure.
The TPMS will warn the driver of a low tire pressure if the
tire pressure falls below the low-pressure warning limit for
any reason, including low temperature effects and natural
pressure loss through the tire.
The TPMS will continue to warn the driver of low tire
pressure as long as the condition exists, and will not turn
off until the tire pressure is at or above the recommended
cold placard pressure. Once the low tire pressure warning
(TPMS Warning Light) illuminates, you must increase the
tire pressure to the recommended cold placard pressure in
order for the TPMS Warning Light to turn off. The system
will automatically update and the TPMS Warning Light
will turn off once the system receives the updated tire
pressures. The vehicle may need to be driven for up to 20
minutes above 15 mph (24 km/h) in order for the TPMS to
receive this information.
NOTE: When filling warm tires, the tire pressure may need
to be increased up to an additional 4 psi (28 kPa) above the
recommended cold placard pressure in order to turn the
TPMS Warning Light off.
For example, your vehicle may have a recommended cold
(parked for more than three hours) placard pressure of 30
psi (207 kPa). If the ambient temperature is 68°F (20°C) and
the measured tire pressure is 27 psi (186 kPa), a temperature drop to 20°F (-7°C) will decrease the tire pressure to
approximately 23 psi (158 kPa). This tire pressure is sufficiently low enough to turn on the TPMS Warning Light.
Driving the vehicle may cause the tire pressure to rise to
approximately 27 psi (186 kPa), but the TPMS Warning
Light will still be on. In this situation, the TPMS Warning
Light will turn off only after the tires are inflated to the
vehicle’s recommended cold placard pressure value.

CAUTION!
• The TPMS has been optimized for the original
equipment tires and wheels. TPMS pressures and
warning have been established for the tire size
equipped on your vehicle. Undesirable system operation or sensor damage may result when using
replacement equipment that is not of the same size,
type, and/or style. Aftermarket wheels can cause
sensor damage.
• Using aftermarket tire sealants may cause the Tire
Pressure Monitoring System (TPMS) sensor to become inoperable. After using an aftermarket tire
sealant it is recommended that you take your vehicle
to an authorized dealership to have your sensor
function checked.
• After inspecting or adjusting the tire pressure always
reinstall the valve stem cap. This will prevent moisture and dirt from entering the valve stem, which
could damage the TPMS sensor.
SAFETY 95
NOTE:
• The TPMS is not intended to replace normal tire care and
maintenance or to provide warning of a tire failure or
condition.
• The TPMS should not be used as a tire pressure gauge
while adjusting your tire pressure.
• Driving on a significantly under-inflated tire causes the
tire to overheat and can lead to tire failure. Underinflation also reduces fuel efficiency and tire tread life,
and may affect the vehicle’s handling and stopping
ability.
• The TPMS is not a substitute for proper tire maintenance, and it is the driver’s responsibility to maintain
correct tire pressure using an accurate tire pressure
gauge, even if under-inflation has not reached the level
to trigger illumination of the TPMS Warning Light.
• Seasonal temperature changes will affect tire pressure,
and the TPMS will monitor the actual tire pressure in the
tire.
5

96 SAFETY
Base System
This is the TPMS warning indicator located in
the instrument cluster.
The TPMS uses wireless technology with wheel rim
mounted electronic sensors to monitor tire pressure levels.
Sensors, mounted to each wheel as part of the valve stem,
transmit tire pressure readings to the Receiver Module.
NOTE: It is particularly important for you to check the tire
pressure in all of the tires on your vehicle regularly and to
maintain the proper pressure.
The TPMS consists of the following components:
• Receiver Module.
• Four Tire Pressure Monitoring Sensors.
• Tire Pressure Monitoring System Warning Light.
Tire Pressure Monitoring Low Pressure Warnings
The Tire Pressure Monitoring System Warning Light will
illuminate in the instrument cluster, an audible chime will
be activated, and the “Check tire pressure” text message
will display when one or more of the four active road tire
pressures are low. Should this occur, you should stop as
soon as possible, check the inflation pressure of each tire on
your vehicle, and inflate each tire to the vehicle’s recommended cold placard pressure value. The system will
automatically update and the Tire Pressure Monitoring
Light will extinguish once the updated tire pressures have
been received. The vehicle may need to be driven for up to
20 minutes above 15 mph (24 km/h) to receive this
information.
Check TPMS Warnings
The Tire Pressure Monitoring Telltale Light will flash on
and off for 75 seconds and remain on solid when a system
fault is detected, an audible chime will be activated and a
proper text message will be displayed. If the ignition key is
cycled, this sequence will repeat providing the system fault
still exists. The Tire Pressure Monitoring Telltale Light will
turn off when the fault condition no longer exists. Asystem
fault can occur with any of the following scenarios:
1. Jamming due to electronic devices or driving next to
facilities emitting the same radio frequencies as the TPM
sensors.
2. Installing some form of aftermarket window tinting that
affects radio wave signals.

3. Snow or ice around the wheels or wheel housings.
4. Using tire chains on the vehicle.
5. Using wheels/tires not equipped with TPM sensors.
NOTE: Your vehicle can be equipped with either Tire
Service Kit, compact spare tire or regular size spare tire
(with or without original TPMS sensor).
1. Tire Service Kit (original tire sealant – if equipped): After
fixing the punctured tire with original tire sealant, the
original situation will be restored, so system will turn off
the telltale during the normal drive.
2. Compact Spare Tire – if equipped: The compact spare
wheel is not equipped with TPMS sensor. So when
mounted, during the normal drive the system will turn
on the telltale (flashing for approximately 75 sec. then
remains solid). This condition persists until a wheel
equipped with original TPMS sensor has been mounted
on the vehicle.
3. Regular size spare tire (not equipped with TPMS sensor): When mounted, during the normal drive the
system will turn on the telltale (flashing for approximately 75 sec. then remains solid). This condition persists until a wheel equipped with original TPMS sensor
SAFETY 97
has been mounted on the vehicle. Then the system will
be restored and the telltale will turn off during the
normal drive.
4. Regular size spare tire (equipped with TPMS sensor):
When mounted, the telltale will turn off during the
normal drive.
5. In all the above cases please check the replacement tire
inflation pressure before driving your vehicle.
6. In case of tire replacement, if the vehicle is driven for
short periods of time, then the system can take a while
to be restored.
NOTE: For a correct Tire Pressure Monitoring behavior,
please wait for about 20 minutes in key-off during each tire
substitution.
General Information
This device complies with Part 15 of the FCC rules and RSS
210 of Industry Canada. Operation is subject to the following conditions:
1. This device may not cause harmful interference.
2. This device must accept any interference received, including interference that may cause undesired operation.
5

98 SAFETY
NOTE: Changes or modifications not expressly approved
by the party responsible for compliance could void the
user’s authority to operate the equipment.
OCCUPANT RESTRAINT SYSTEMS
Some of the most important safety features in your vehicle
are the restraint systems:
Occupant Restraint Systems
• Seat Belt Systems
• Supplemental Restraint Systems (SRS) Air Bags
• Child Restraints
Some of the safety features described in this section may be
standard equipment on some models, or may be optional
equipment on others. If you are not sure, ask an authorized
dealer.
Important Safety Precautions
Please pay close attention to the information in this section.
It tells you how to use your restraint system properly, to
keep you and your passengers as safe as possible.
Here are some simple steps you can take to minimize the
risk of harm from a deploying air bag:
1. Children 12 years old and under should always ride
buckled up in the rear seat of a vehicle with a rear seat.
2. A child who is not big enough to wear the vehicle seat
belt properly (Refer to “Child Restraints” in this section
for further information) must be secured in the appropriate child restraint or belt-positioning booster seat in a
rear seating position.
3. If a child from 2 to 12 years old (not in a rear-facing child
restraint) must ride in the front passenger seat, move the
seat as far back as possible and use the proper child
restraint (Refer to “Child Restraints” in this section for
further information).
4. Never allow children to slide the shoulder belt behind
them or under their arm.
5. You should read the instructions provided with your
child restraint to make sure that you are using it
properly.
6. All occupants should always wear their lap and shoulder belts properly.
7. The driver and front passenger seats should be moved
back as far as practical to allow the front air bags room
to inflate.
 Loading...