


Documentation Center
Quick Start Guide
Prerequisites
What do you need?
1. RAK7258 WisGate Edge Lite
2. Ethernet Cable (RJ-45 Port)
3. A Windows/Mac OS/Linux Computer
What's included in the Package?
Figure 1: RAK7258 Package Contents
Product Configuration
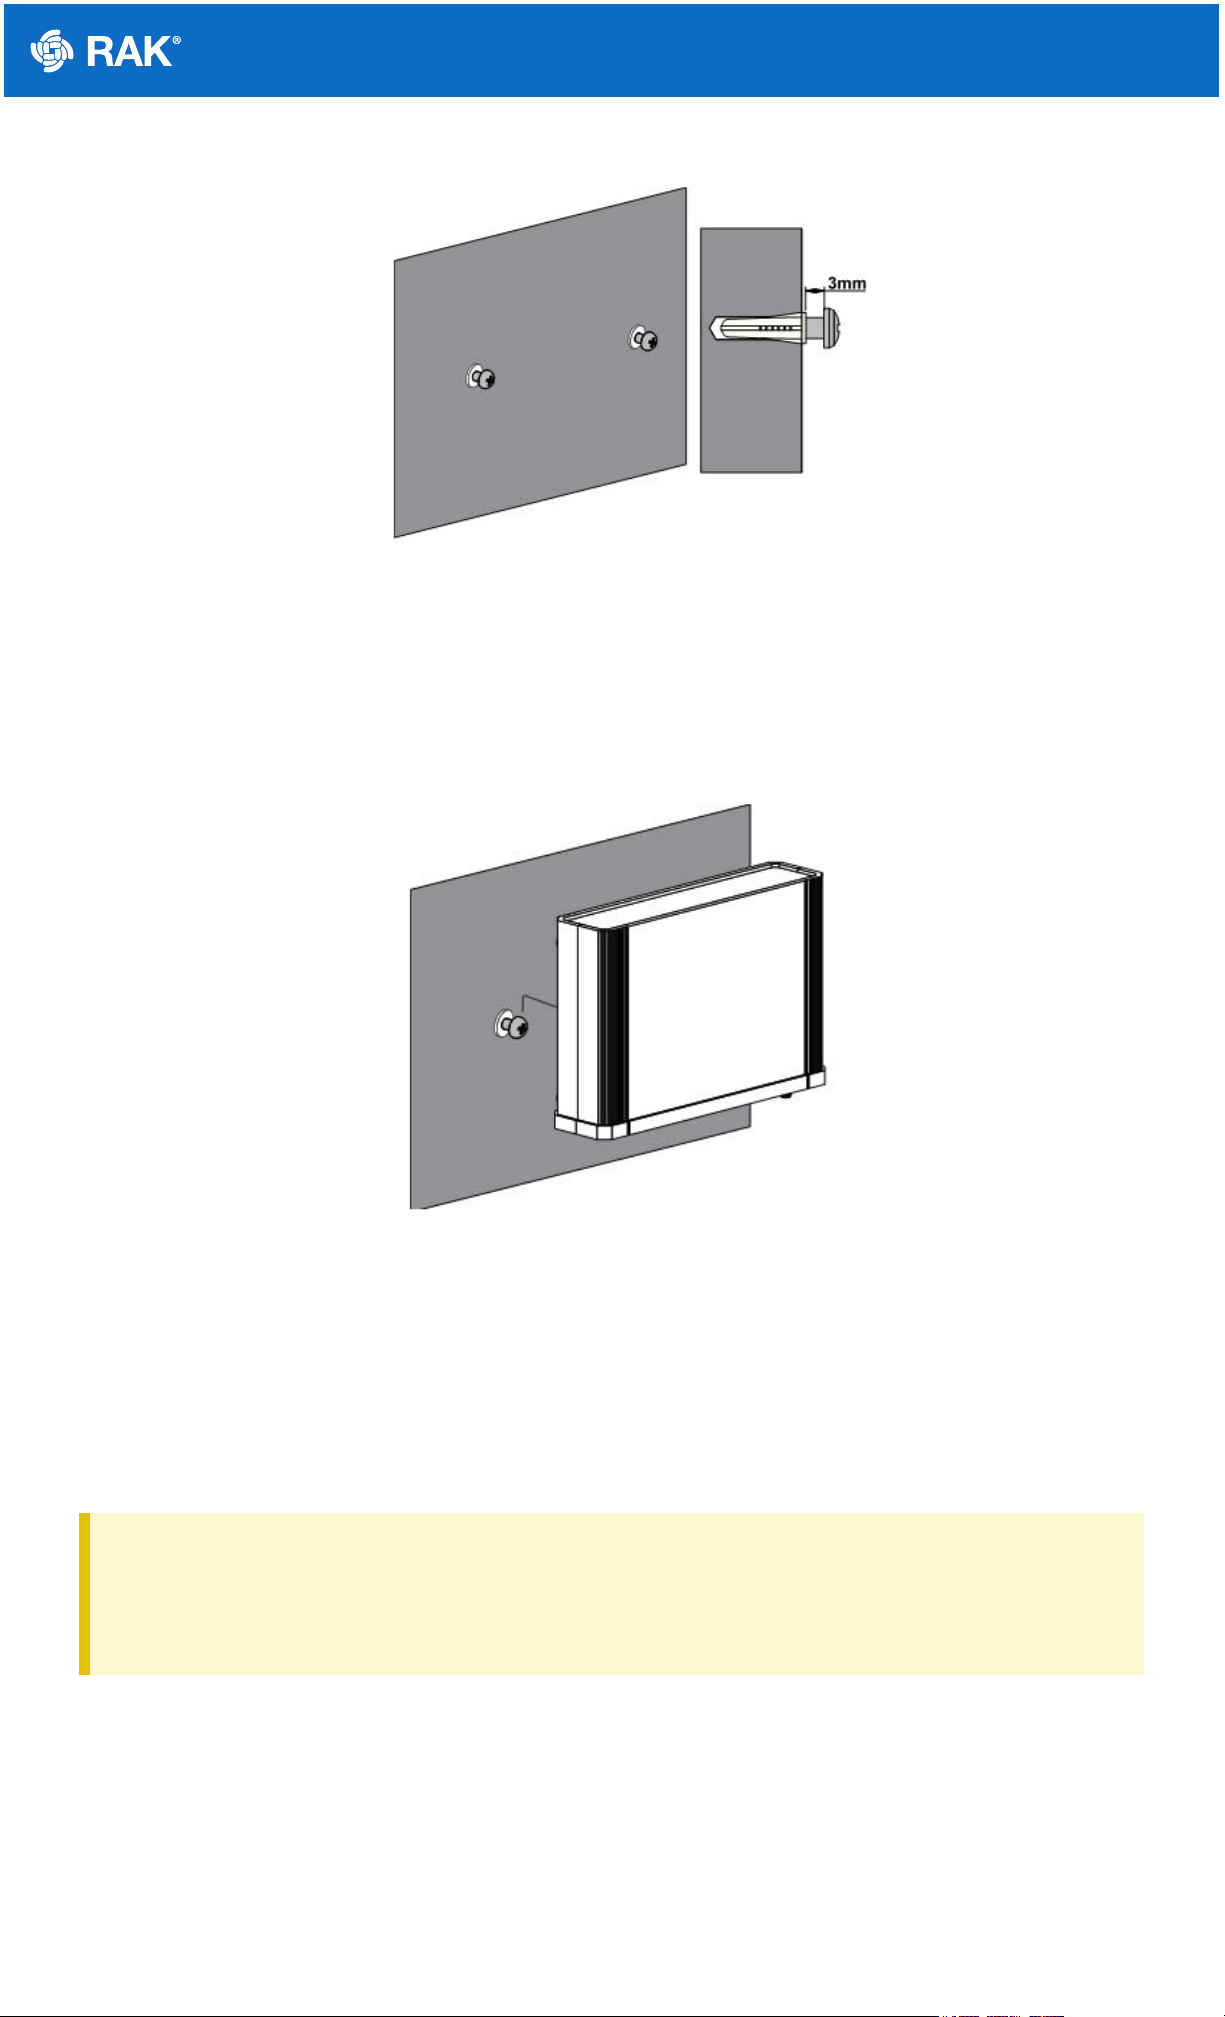
Wall Mounting Guide
1. Use a 5-millimeter drill bit to drill 2 holes on a wall. Follow the dimensions on the image as a guideline for
spacing the holes. When done insert the screw anchors into the wall.
Figure 2: RAK7258 WisGate Edge Lite Bottom Panel
2. Install the screws into the wall, leaving about 3-millimeters of clearance.
Documentation Center
Figure 3: RAK7258 WisGate Edge Lite Wall Screw Arrangement
3. Insert the screw heads into the hanging holes located on the gateway back-plate, then gently pull down to
complete the installation
Figure 4: RAK7258 WisGate Edge Lite Wall Attachment Guide
Power on the Gateway
1. Attach the LoRa Antenna
First and foremost, screw on the antenna to the SMA connector back panel of the RAK7258 WisGate Edge Lite
⚠
WARNING
Do not power the device if the LoRa Antenna port has been left open to avoid potential damage in the
RAK7258 WisGate Edge Lite.
2. Power the Gateway ON
It is recommended to use the 12V DC adapter that comes with the RAK7258 WisGate Edge Lite. Optionally, you
can use your own PoE cable and injector since the device supports PoE.
Casing and Ports

Documentation Center
Figure 5: RAK7258 WisGate Edge Lite Back Panel
Status LED Indicators
Reset Key Functions
The function of the Reset key is as follows:
1. Short press: Restarts the Gateway
2. Long press (5 seconds and above): Restore Factory Settings
Access the Gateway
In this section, several ways in accessing the gateway are provided to have different alternatives for you to choose
depending on the availability of the requirements needed.
LEDs Status Indication
PWR Power Indicator, LED is on when the device is powered
ETH ON– link is up, OFF – link is down, Flashing – Data is being transferred
LoRa
ON - LoRa module status is up, OFF – LoRa module status is down, Flashing – LoRa module
data is being transferred
ACT Reserved for future use
STAT Reserved for future use
WLAN AP Mode : ON - WLAN status is up, Flashing - Data is being transferred
STA Mode : Slow Flashing (1Hz) - Disconnected, ON - Connected, Flashing - Data is being
transferred

Documentation Center
⚠
WARNING
Do not power the device if the LoRa Antenna port has been left open to avoid potential damage in the
RAK7258 WisGate Edge Lite."
Wi-Fi AP Mode
By default, the Gateway will work in Wi-Fi AP Mode which means that you can find an SSID named like
"RAK7258_XXXX" on your PC's Wi-Fi Network List. "XXXX" is is the last two bytes of the Gateway MAC address.
📝
NOTE:
No password is required to connect via Wi-Fi
Using your preferred Web browser, login the credentials provided below:
Browser Address: 192.168.230.1
Username: root
Password: root
Figure 6: Web User Interface Log-in
WAN Port DHCP IP
When DHCP Server is in the network where the gateway WAN interface is located, the WAN interface can
automatically get the IP address. After inquiring the IP address of the gateway through DHCP Server, the WEB
management platform of the gateway can be accessed through the DHCP IP address of WAN interface. Same as
with the Wi-Fi AP mode, the same IP Address: 192.168.230.1 shall be used to access the Web Management
Platform.
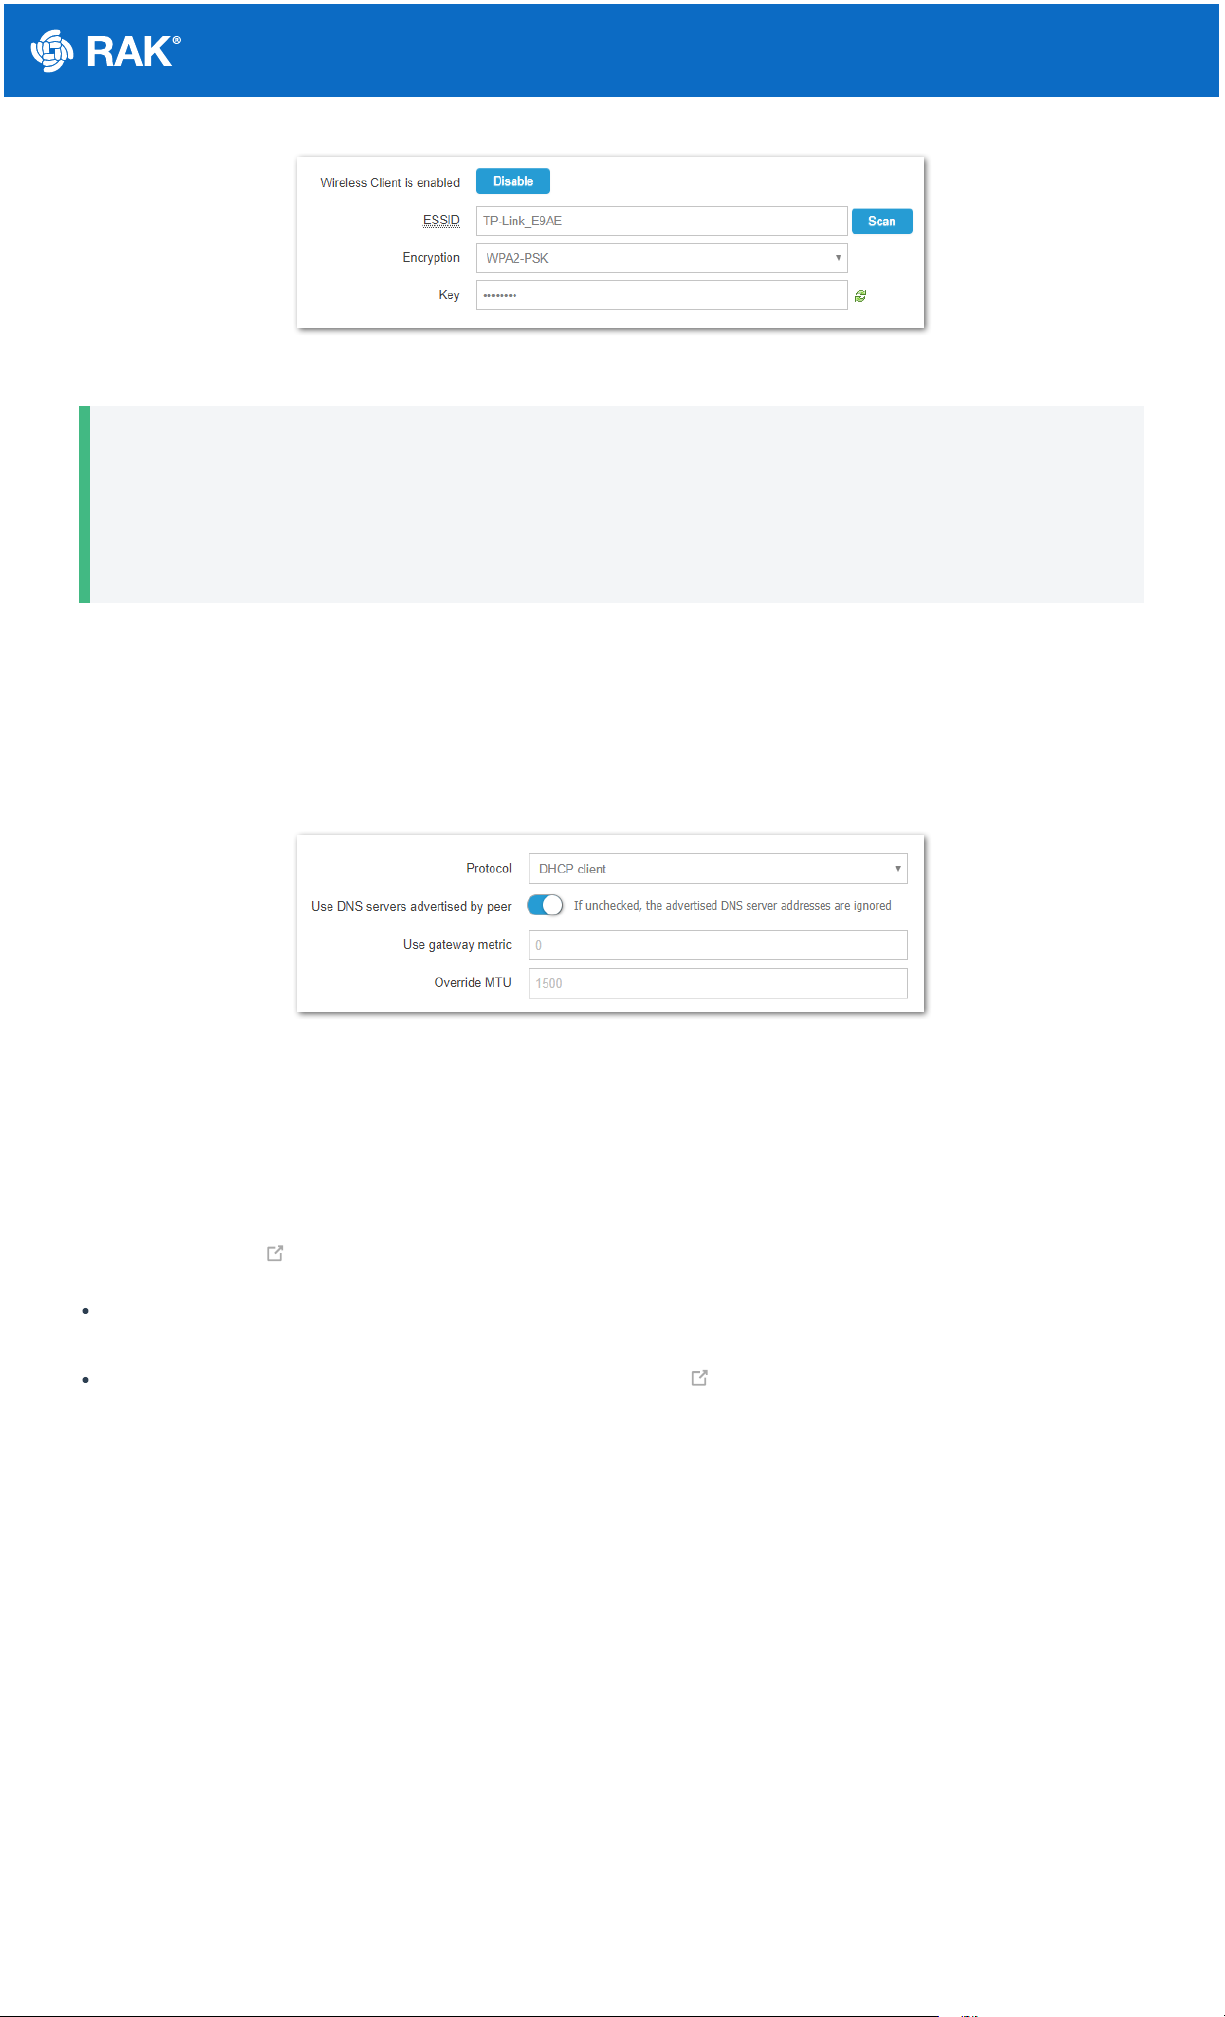
Access the Internet
Connect through Wi-Fi
Go into the Network>Wi-Fi Menu and make sure to enable the Wireless Client as it is disabled initially. Enter or
click "Scan" to choose your ESSSID, select the right Encryption method and enter the correct Key.
Documentation Center
Figure 7: Connect through Wi-Fi Credentials
📝
NOTE:
Assuming you have entered the correct parameter values you should get an IP address assigned by your
Wi-Fi router's (AP) built-in DHCP server. You can use this new IP address to log in via a web browser
(same way as in AP mode).
Connect through Ethernet/PoE
Connect the Ethernet Port (ETH) of the RAK7258 WisGate Edge Lite via an Ethernet cable to your Router. The
router’s DHCP server should assign an IP Address to the Gateway. You can change the default settings below if
you wish (details in the User Manual).
Figure 8: Connect through Ethernet Settings
Connecting to The Things Network (TTN)
The Things Network is about enabling low power devices to use long range gateways to connect to an open-
source, decentralized network to exchange data with Application. Learn more about The Things Network through
their documentation .
First, you should have connected your RAK7258 WisGate Edge Lite into the internet through a router according
to the method which has been introduced in the Access the Internet section of this document.
Now go to the TTN Website: https://www.thethingsnetwork.org/ and Login. You will then see the following
page:

Documentation Center
Figure 9: The Things Network Home Page
1. In the Register Gateway menu, select the “I’m using the legacy packet forwarder” option, and fill-in the
Gateway EUI.
Figure 10: Registering your Gateway
📝
NOTE:
The Gateway EUI can be found either on the sticker on the casing or via the LoRa Packet Forwarder page
in the LoRa Gateway menu once you log via the Web UI.
2. Select your Frequency Plan depending on your location. This should populate the Router field. Optionally you
can choose to enter the Gateway coordinates in the map’s upper right corner and select if the gateway is indoor
or outdoor via the Antenna placement field below the map.
3. Upon successful registration you should see the following screen:

Documentation Center
Figure 11: Gateway successfully connected to The Things Network (TTN)
📝
NOTE:
By default, the Gateway is set to connect to TTN. For detailed information about advanced configuration
options refer to the WEB Management Platform - LoRa Network section.
Last Updated: 9/13/2020, 2:53:36 PM
 Loading...