

Rako Wk-hub User Manual

WK-HUB Instruction Manual
For programming a wired system: “Wired system Programming
Guide”
Please read HUB info sheet before proceeding with this manual
Contents:
1 Functions of the WK-HUB
2 Installing the WK-HUB
3 Discovering the HUB and Setting the House Number
3.1 Discovering the HUB
3.2 Setting up the HUB using the Webpage Wizard
3.2 Managing the HUB House number
3.3 If you cannot connect to the HUB
4 Linking the HUB for cloud services
4.1 Where to find each cloud service
4.2 Linking the HUB to Cloud services
5 Adding the HUB as a device to Rasoft Pro
6 Uploading the project file
7 Downloading the project file
8 Events
8.1 Setting Events using Rasoft Pro
8.2 Setting Events via the HUB webpages
8.3 Setting Events using the Rako App.
9 Mappings
9.1 Mapping wireless commands to give multi-room functionality
9.2 Triggering Macros from Maps
10 Macros
10.1 Writing Macros
10.2 Triggering Macros
11 Holiday Mode
12 UDP Feedback
12.1 Live feedback
12.2 UDP feedback log
12.3 HUB Webpages logs
2
1 Functions of the WK-HUB
The WK-HUB will add the following features to a Rako wired system:
- Network interface: including remote control via mobile devices and programming
software. Also used for IP integration of 3rd party control systems.
- Cloud Gateway: Interfaces with Amazon Alexa, Google Home, Apple Homekit,
Sonos etc.
- Storing Project file information: Room, Channel and Scene information can be
stored.
- Timed Events: Automatic functions at fixed times including dawn & dusk.
- Mapping: Commands can be redirected to perform other tasks.
- Macros: Series of commands that are triggered by a single command or event.
Specific steps can be enabled and disabled giving conditional functionality.
- Holiday Mode: Replays recorded scene activity, creating an occupied look to a
property.
- Wired-Wireless Interface: The WK-HUB functions as an interface between wireless
signals and the wired network.
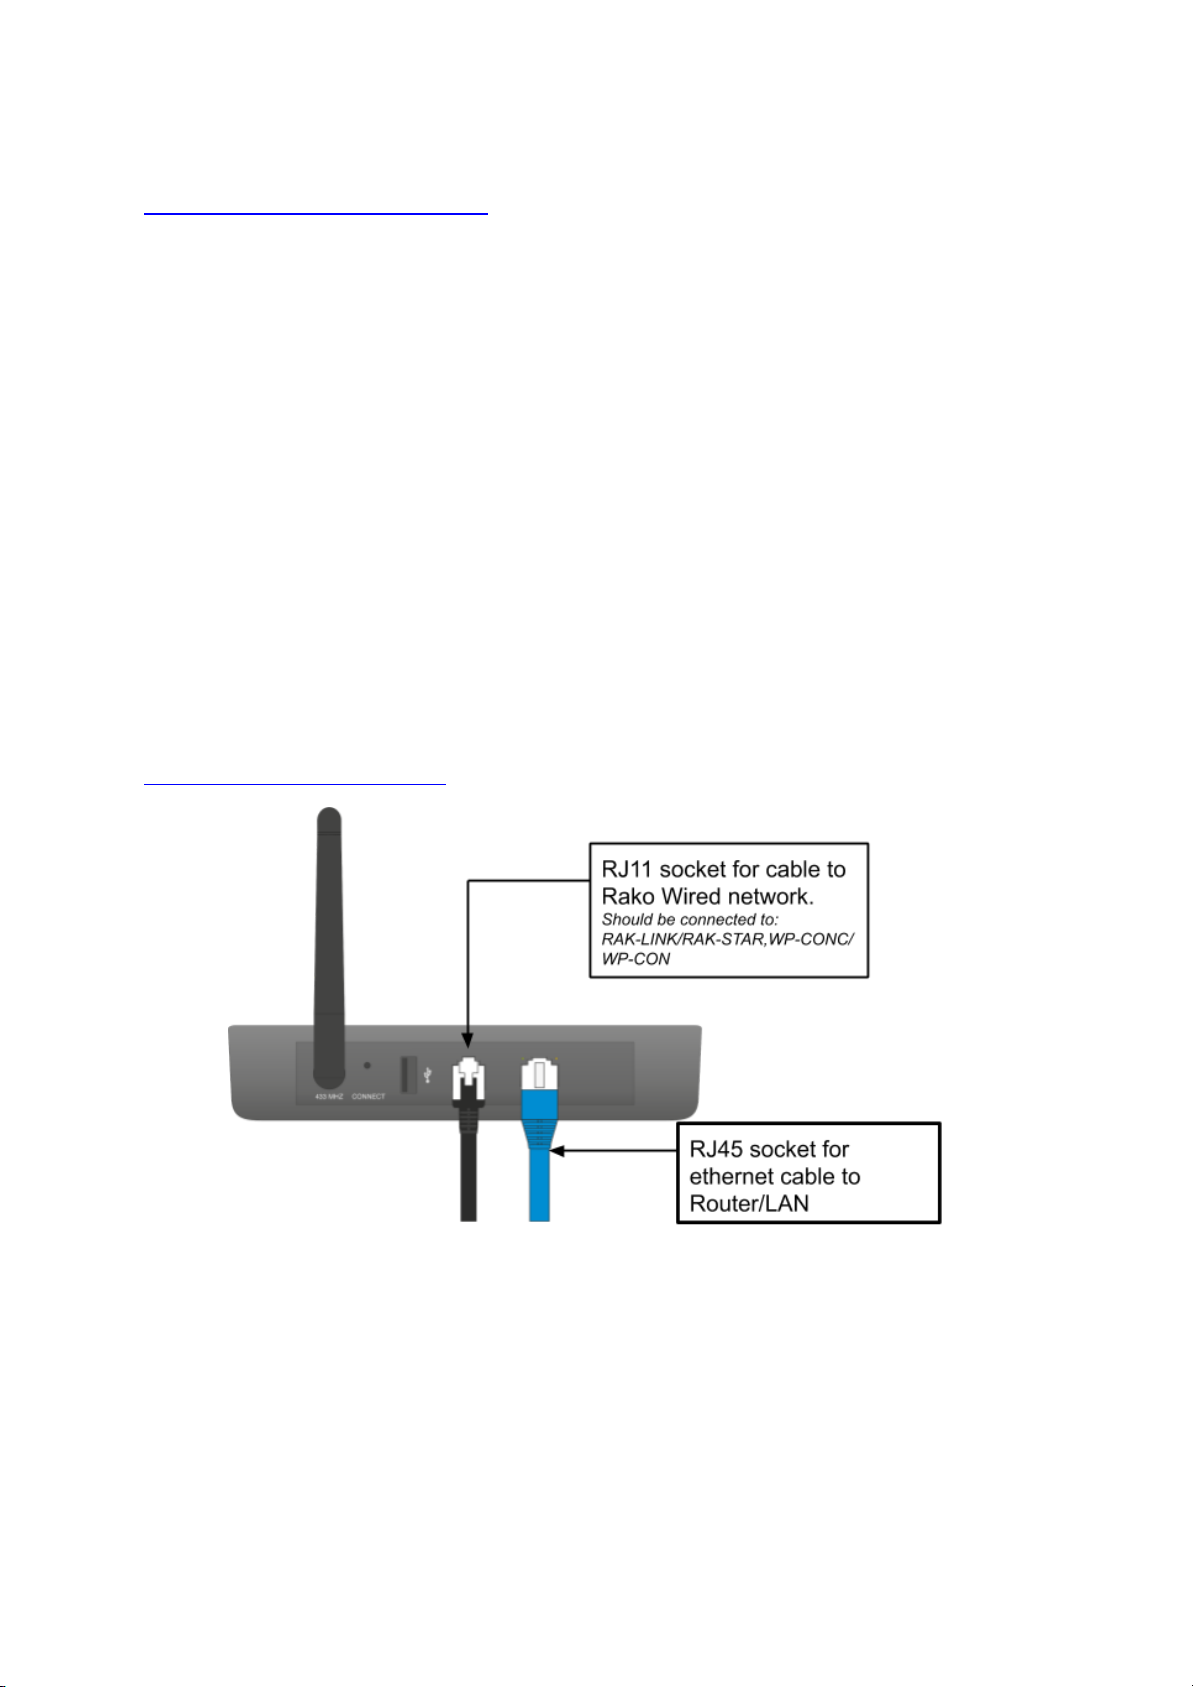
2 Installing the WK-HUB
- Step 1: Plug RJ11 cable provided into the WK-HUB and an available RJ11 port in a
RAK-LINK/RAK-STAR/WPCON-C etc.
- Step 2: Plug the Ethernet patch cable from the WK-HUB to a spare port in a router or
network switch.
- Step 3: Mount the WK-HUB to a wall using fixing point at top of case if desired.
WK-HUB Manual Version 1.0.2
3
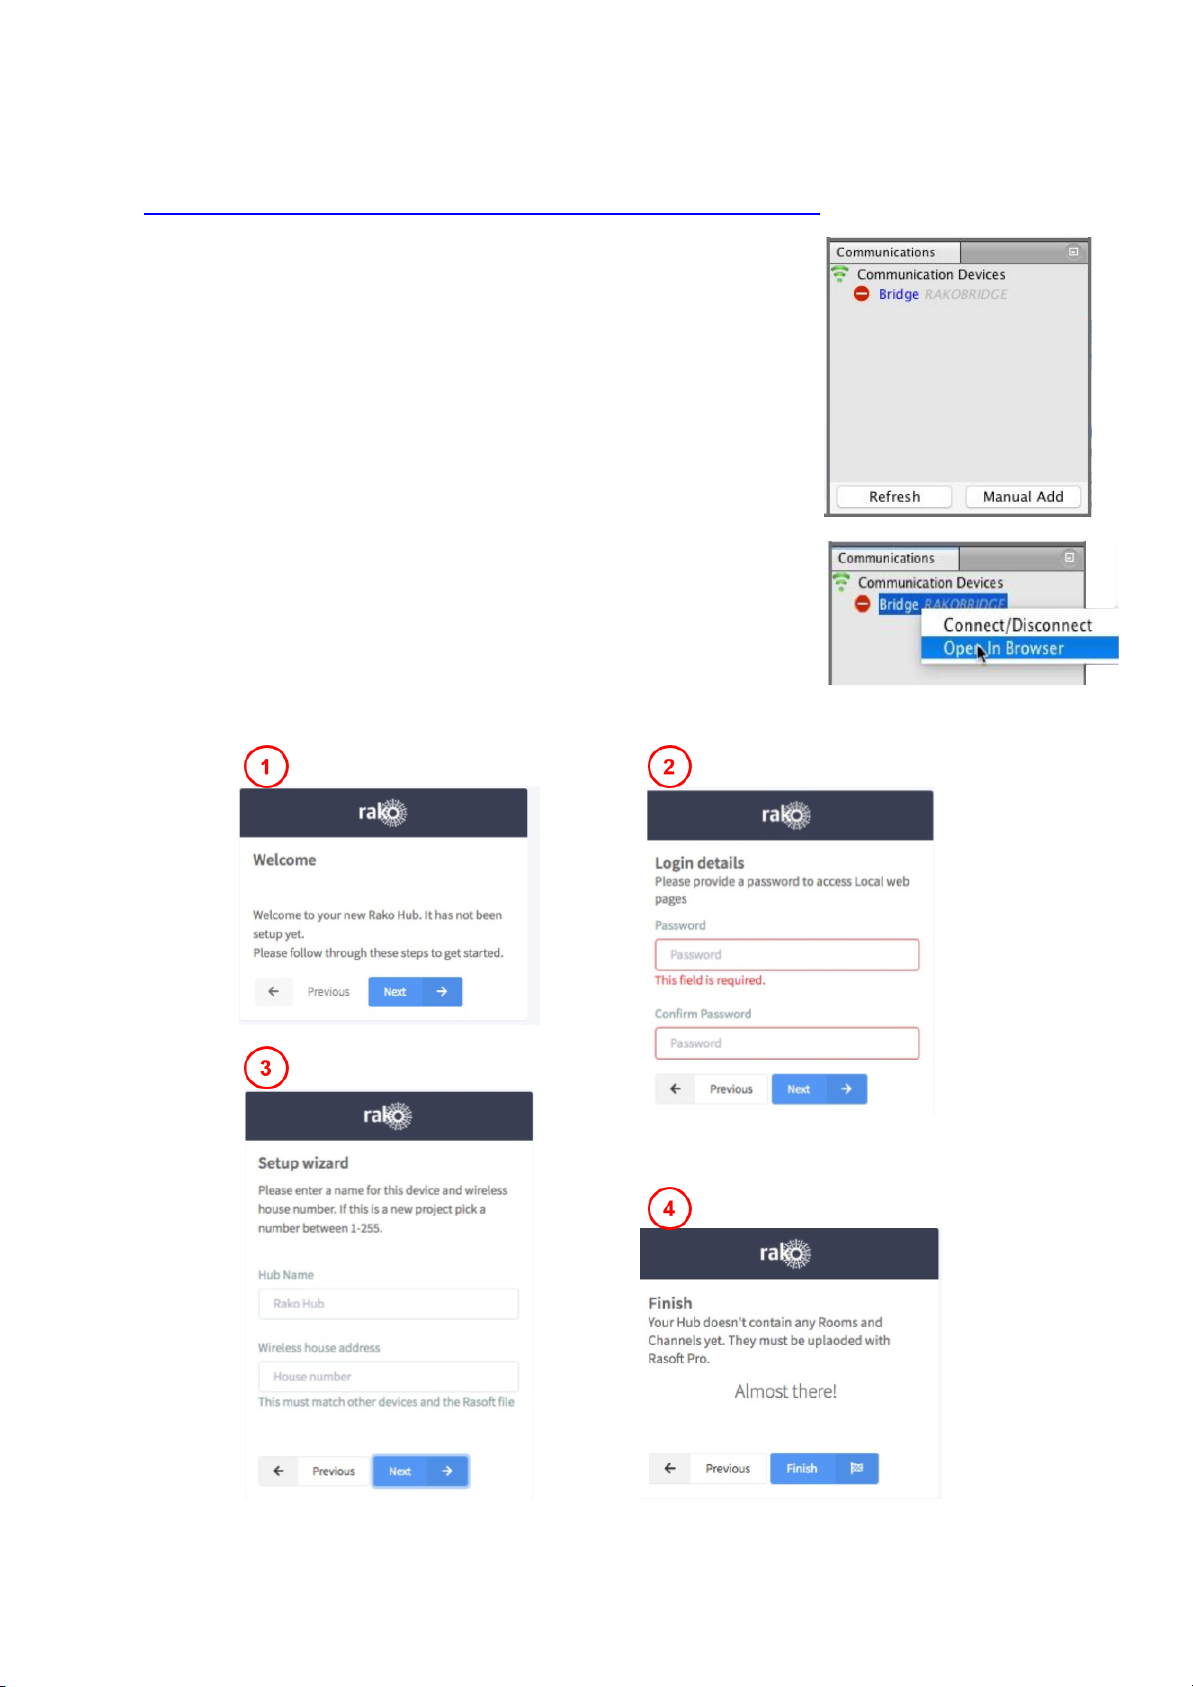
3 Discovering the HUB and Setting the House Number
Before proceeding with any programming the HUB needs to be
discovered and the House number set. This is done via a webpage
setup wizard.
3.1 Discovering the HUB
Open Rasoft Pro programming software. Ensure that the laptop is
connected to the same network as the HUB.
The HUB should appear in the “Communication” window in the
bottom right of the software with a red stop sign. If it does not
appear press “Refresh”.
3.2 Setting up the HUB using the Webpage Wizard
To access the HUB Webpages right click the communication device
in the bottom right of the software. Select “Open in Browser”
WK-HUB Manual Version 1.0.2

4
Step 1 - Welcome page, select “Next to begin setup”.
Step 2 - Set a Password, this will be used to login to the webpages. It will also be the
password used to login to the App if a password is needed.
Step 3 - Sets the House number of the HUB and therefore system. This should be set to
match the Rasoft Pro project file as defined in the “New Project Wizard”.
Step 4 - Select “Finish” to complete setup.
3.2 Managing the HUB House number
Leaving the HUB on the default House address of 1 is strongly discouraged. Leaving
the House number as 1 drastically increases the likelihood of interface from nearby
Rako systems.
The HUB always has a default House Address of 1 if has not been setup before. When
beginning any programming using the HUB it is important to first ensure the House is set the
same as the address used when creating the Project File.
The change the House number if the HUB has already been set up as described in 3.2 see
below:
WK-HUB Manual Version 1.0.2
5
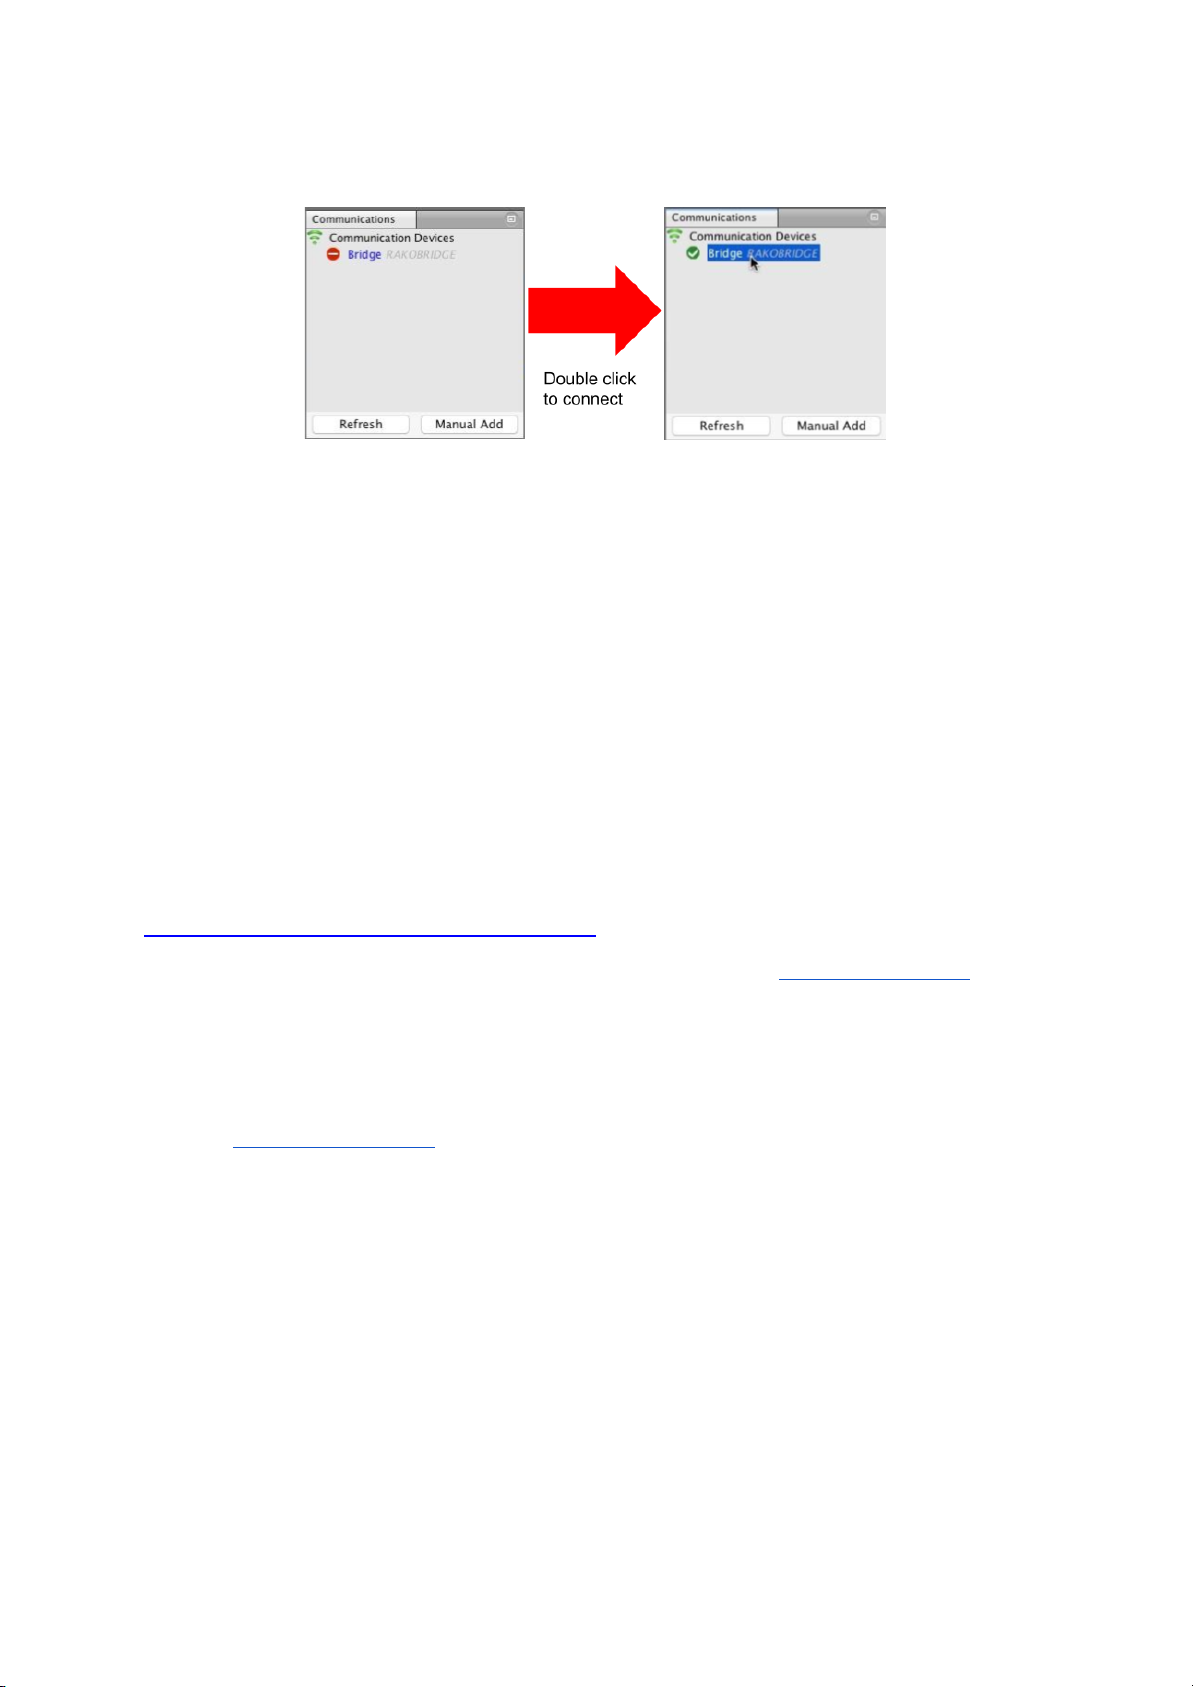
As a final check it is advisable to disconnect and reconnect to the Bridge:
If no pop-up box appears then the HUB House number and Project file House number are
the same.
WARNING
If a pop up box appears with a warning about the House number click “Cancel”. Do not
continue programming this means there is a conflict between the “Project File House
Number” and “HUB House Number”.
3.3 If you cannot connect to the HUB
If the software cannot connect to the HUB first restart the software and ensure that it is fully
updated. If the HUB still does not appear it is most likely a networking issue. If this problem
cannot be solved then the HUB can be connected to point to point using a standard ethernet
cable.
4 Linking the HUB for cloud services
To be able to access cloud services the HUB must be linked to a my.rakcontrols.com
account.
4.1 Where to find each cloud service
Some cloud services are configured and customised from the HUB webpage whereas others
are from my.rakocontrols.com
HUB webpage: Sonos Activities (new cloud API and “ACM” style custom IP strings)
including custom and default templates (RCM/WCM-audio style keypads)
My.rakocontrols.com: Amazon Alexa, Google Home and Apple Homekit including “Custom
Scenes” and advanced apple homekit configuration (Channel and Room mode etc.)
NB
More detailed descriptions of how to use the more advanced settings within the cloud services are
linked from the relevant section of either the HUB webpages or my.rakcontrols.com
WK-HUB Manual Version 1.0.2
6
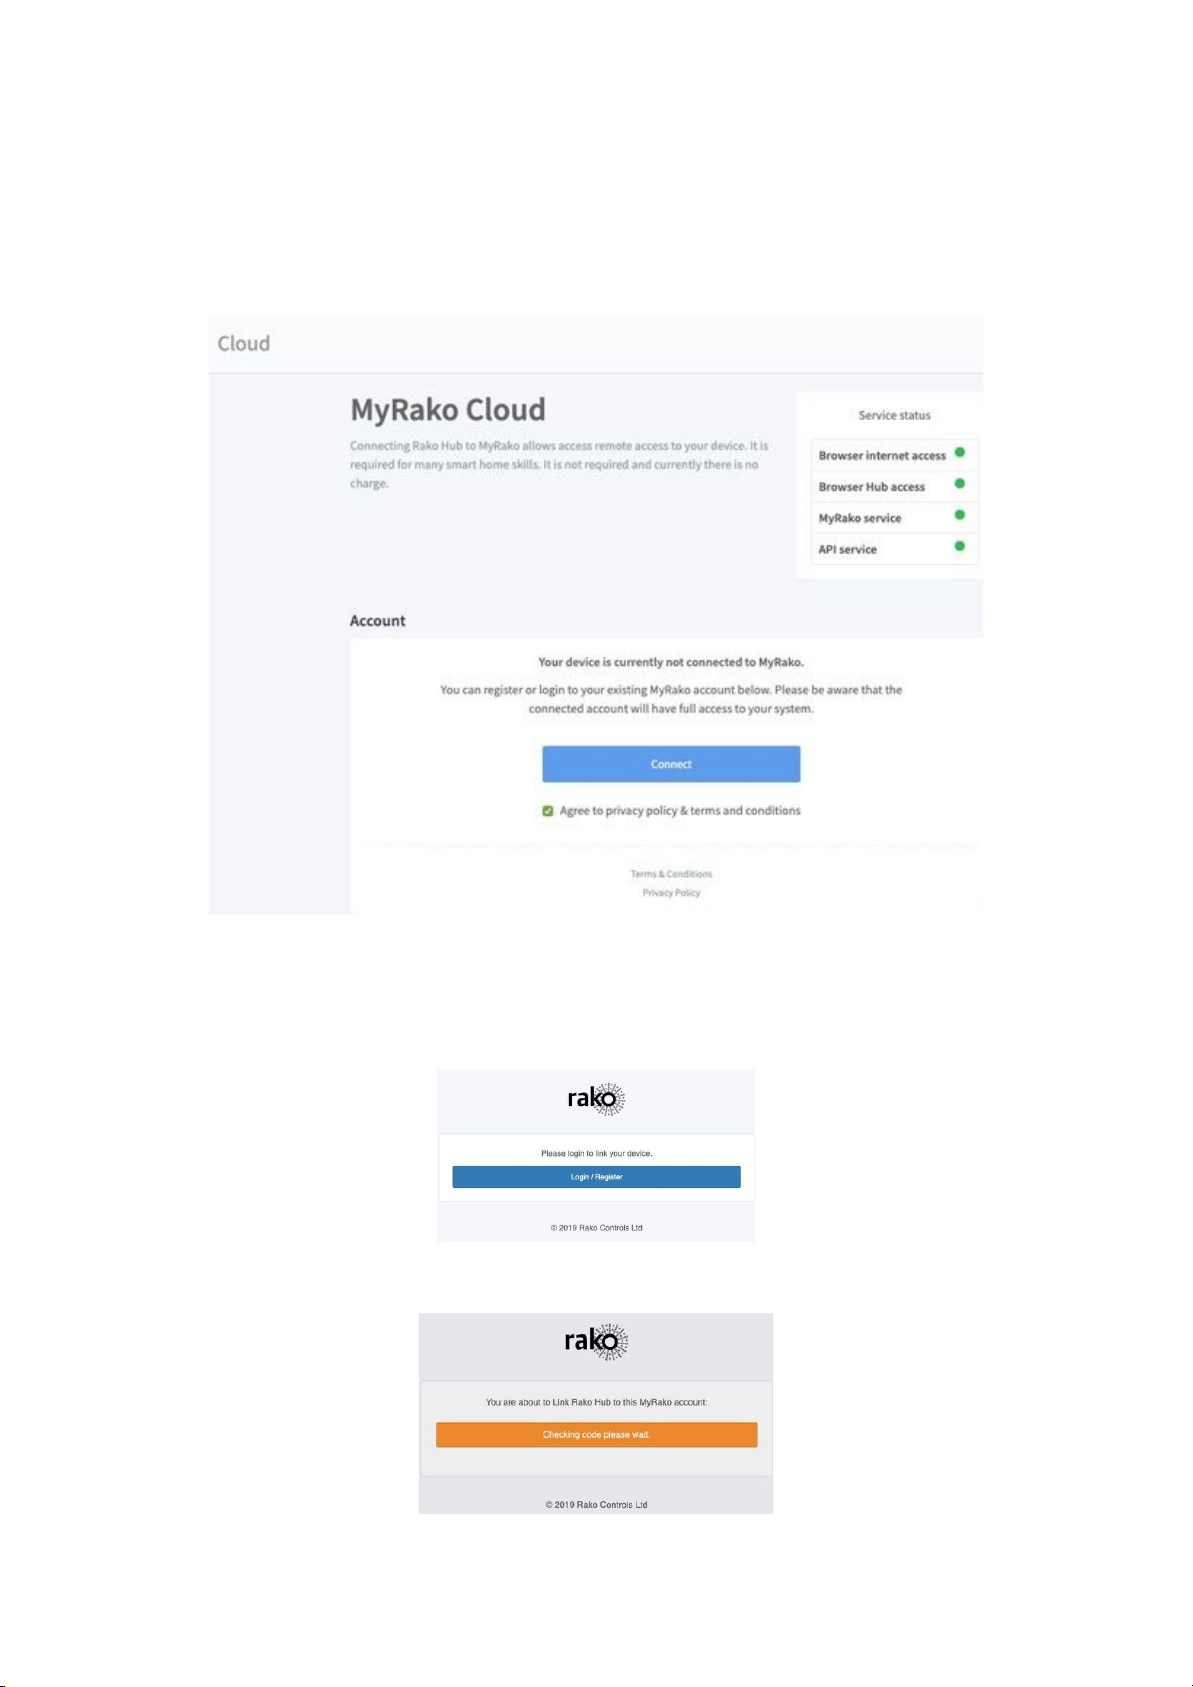
4.2 Linking the HUB to Cloud services
This is linked via the HUB webpages, navigate to the “Cloud” section from the menu on the
right hand side of the screen. This will open a page as below:
NB
Make sure that all “Service Status” is green before proceeding with the following steps:
Step 1 - Press “Connect”: this will link you to the my.rakocontols.com page.
Step 2 - Press “Login/Register” if you already have a my.rakcontrols.com use the email and
password that is used for this, if not create an account.
WK-HUB Manual Version 1.0.2
 Loading...