

Page 1

RAK-STAR: CAT-5 star distribution unit
Rako Wired system can be connected by Loop in/Loop out wiring scheme or by
Home Run scheme.
In Home Wiring scheme all Wall Plates and other devices can be wired back to a
central position. This is normally where RAK-4 dimmers, RAK-Links and other Rako
system components are installed.
The RAK-STAR distribution unit allows the Home Run wiring to be achieved.
“Loop in / Loop out “wiring
system.
CAT5 Cable is connected from
one device to the next in perfect
order to allow correct
transmission of signals along a
single CAT5 cable.
Device at each end of cable must
be terminated (Term) All other
devices are Unterminated
(Unterm).
Each device is supplied with
jumper links to allow correct
setting of termination.
UNTER
M
UNTER
M
UNTER
M
UNTER
M
UNTER
M
UNTER
M
UNTER
M
UNTER
M
TERM
TERM
Figure 1
“Home Run” or “Star” wiring
system.
With RAKO Wiring Distribution
Unit. There is freedom to route
cables to suit the installation.
Wiring can be “Home Run” or a
mixture of Home Run and Loop
in / Loop Out.
In addition, parts of the network
can be isolated during
commissioning to allow easy
testing and fault finding.
Each wiring spur must be
terminated. (Jumper settings are
different to those for Loop in /
Loop out wiring scheme).
UNTER
M
UNTER
M
UNTER
M
UNTER
M
STAR TERM
STAR TERM
STAR TERM
STAR TERM
STAR TERM
STAR TERM
Figure 2
See Figures 5 & 6 for detail of how to make correct cable terminations
WITHOUT RAK-STAR
WITH RAK-STAR
Page 2
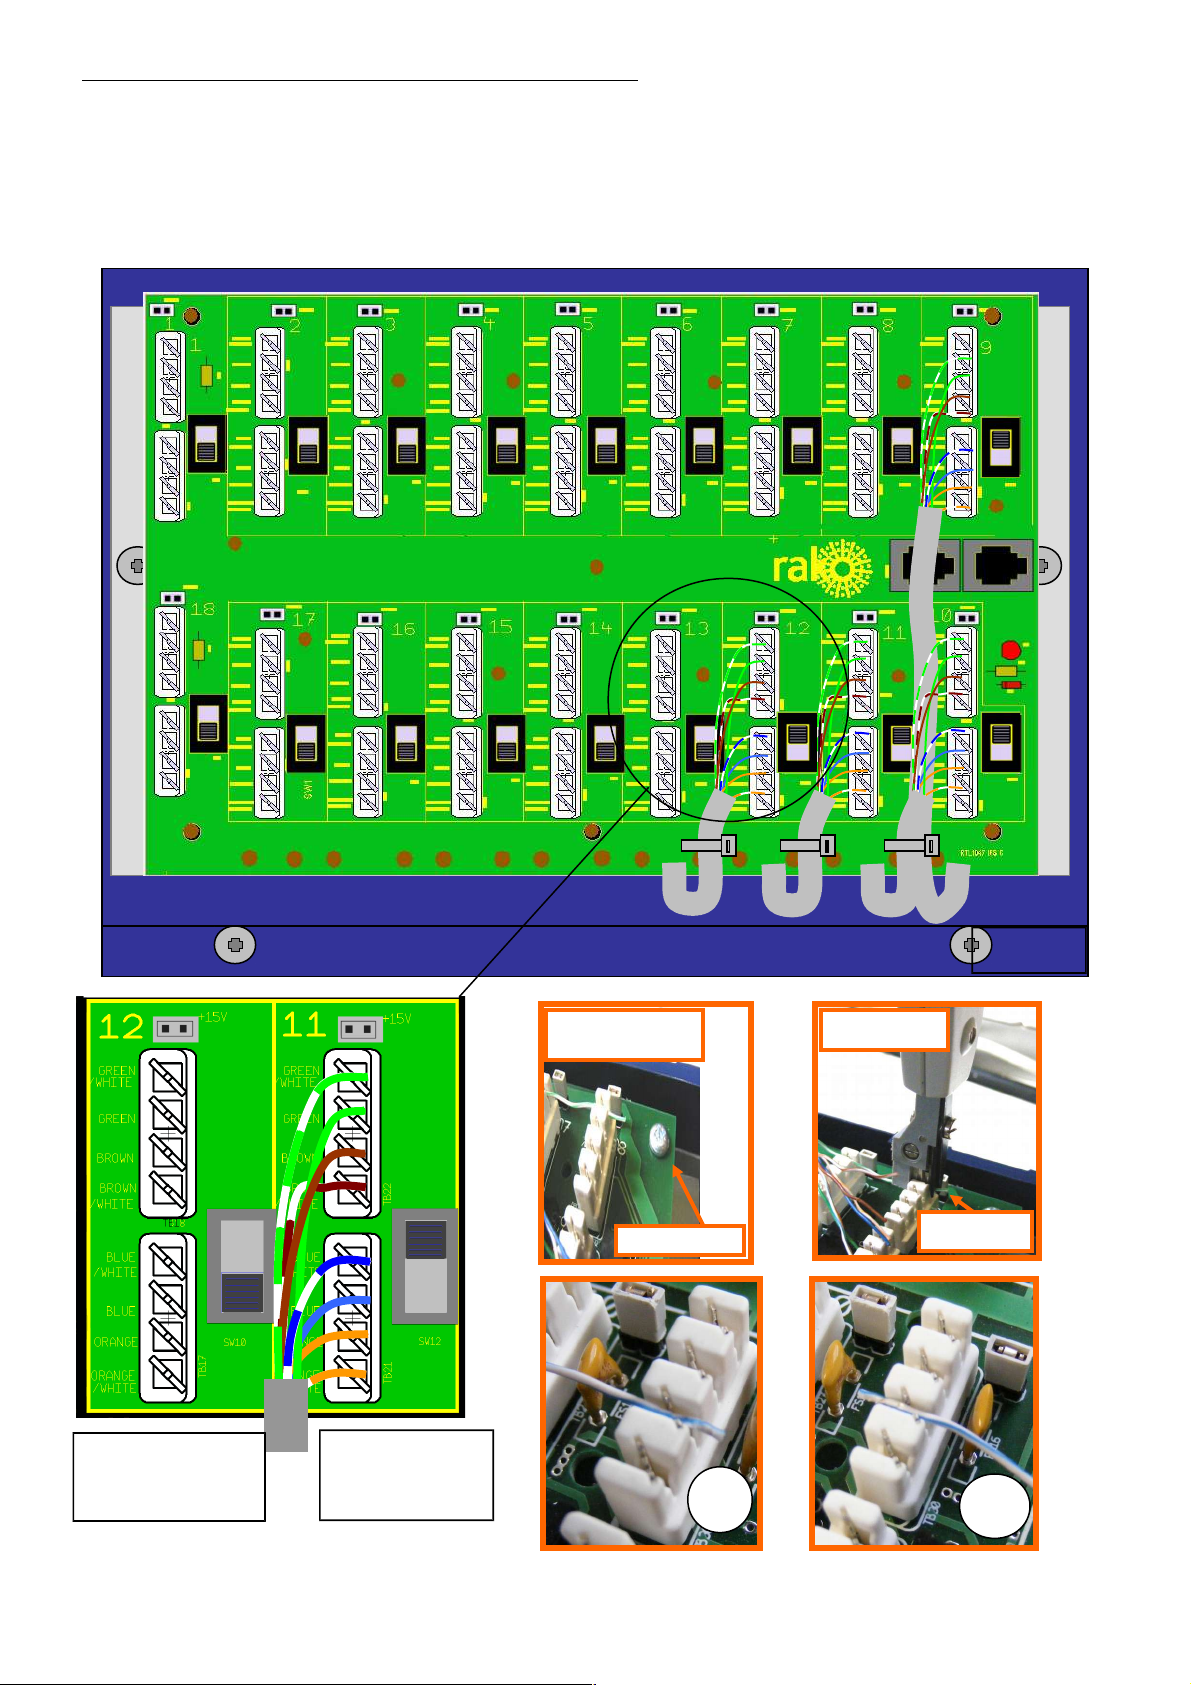
RULES FOR WIRING CAT5 CABLES TO DISTRIBUTION BOX
1. Follow the Colour Code marked next to the Punch down Connectors
2. Only put ONE CAT5 cable in each Punch Down Connector
3. Only put a switch in UP position when it’s Punch Down connector has been
populated with CAT5 cable. This will connect that section of cable to the network.
4. Put switches in DOWN position when their Punch down connectors are empty.
PUNCH DOWN HAS STEP
ON THIS SIDE
LAY WIRE IN CONNECTOR
THIS WAY AROUND
TOOL IS PUSHED ON TO
CONNECTOR THIS WAY
AROUND
SCISSOR ACTION OF
TOOL REMOVES
EXCESS WIRE
position, so switch
is DOWN
No cables in this
This position
has cables, so
switch is UP
Figure 3
Page 3
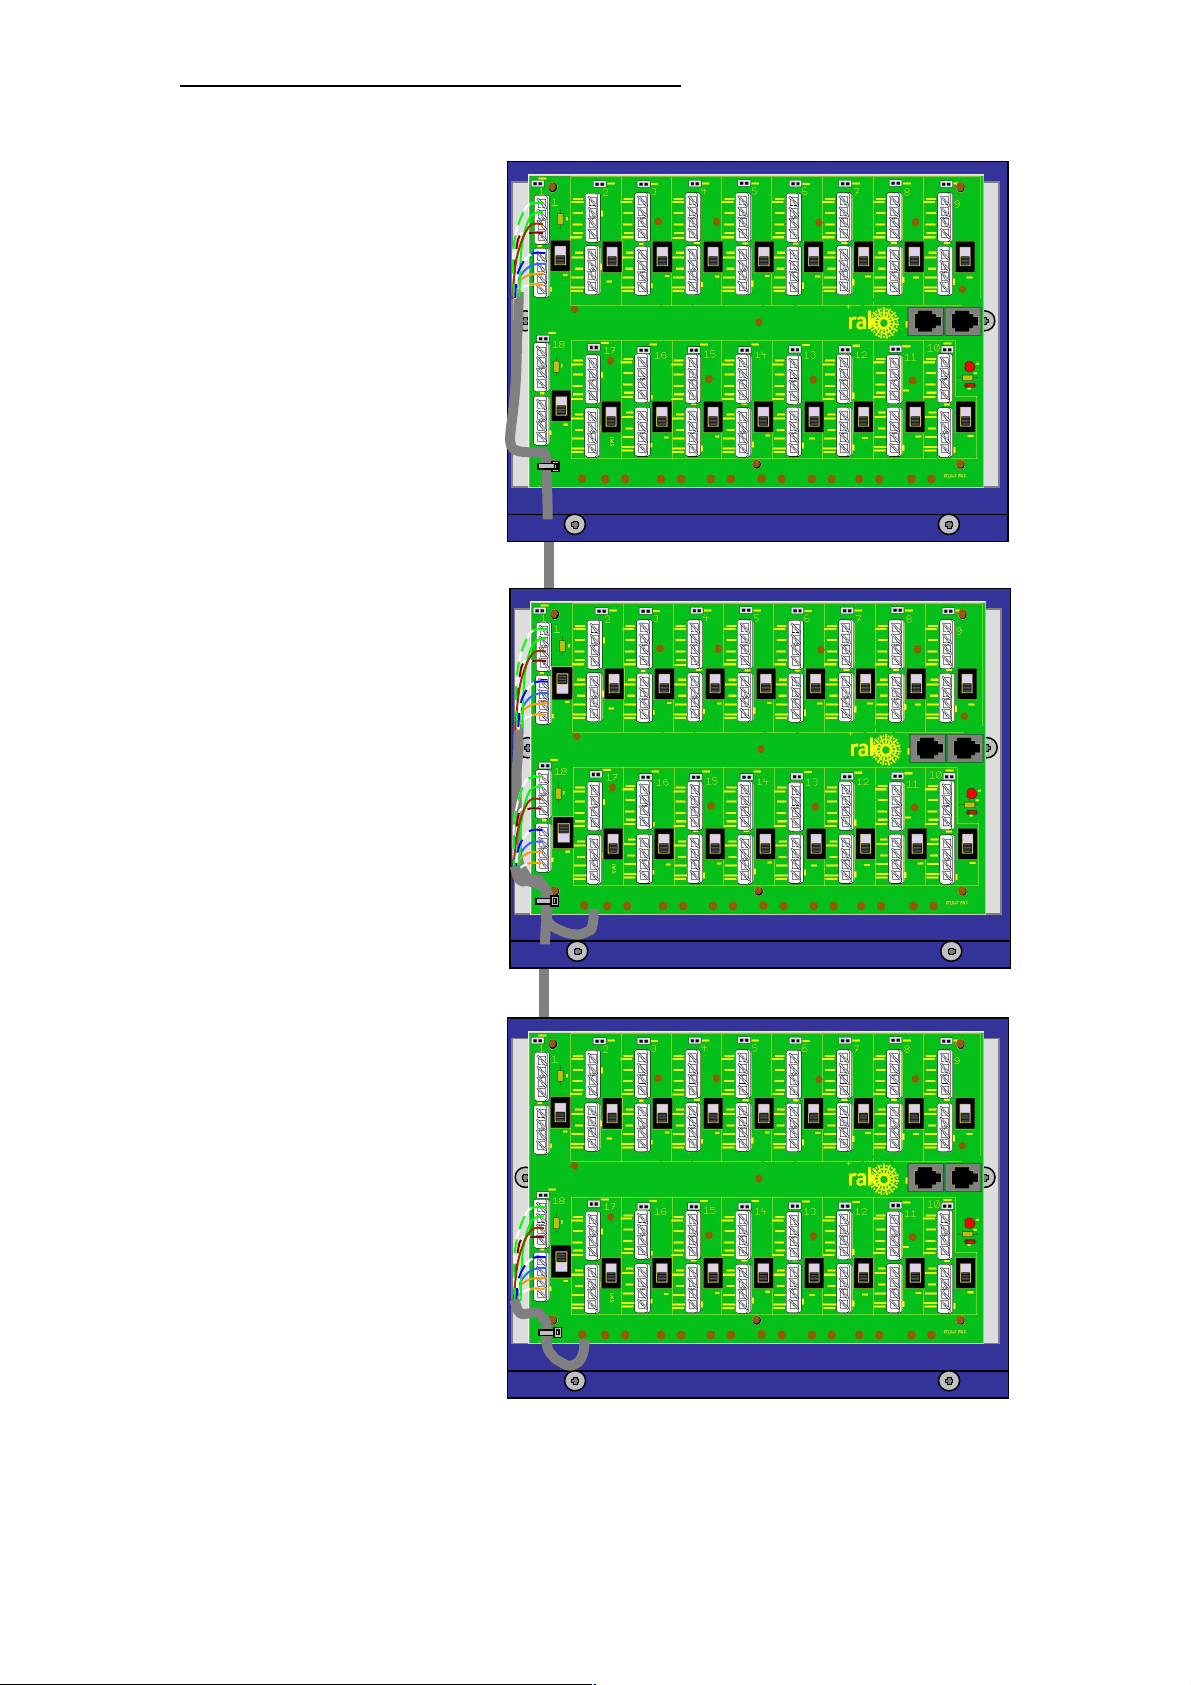
USING MORE THAN ONE RAK-STAR UNIT
If number of connections is too great
then 2, 3 or more RAK-STAR units can be
connected together to give bigger
capacity.
WHEN CONNECTING RAK-STAR
UNITS TOGETHER, ONLY USE
FIRST AND LAST CONNECTOR
NUMBERS.
Picture here shows 3 RAK-STAR units
connected together:
RAK-STAR 1 connector 1
Goes to
RAK-STAR 2 connector 18
RAK-STAR 2 connector 1
Goes to
RAK-STAR 3 connector 18
RAK-STAR 2
RAK-STAR 3
RAK-STAR 1
Figure 4
Page 4

Termination Jumpers
Wall Plates and RAKLink boxes require Termination jumpers
(see also figures 1 & 2).
UNTERM
TERM
STAR TERM
TERMINATION JUMPERS ON
RAKLINK
UNTERM
NOTE: Devices are supplied unterminated
TERM
with jumpers supplied in shipping positions
as above
STAR
TERM
TERMINATION JUMPERS ON WALL
PLATE
Figure 5
Page 5

DIAGNOSING FAULTS USING A RAKSTAR
The RAKStar unit allows keypads to be cabled individually back to a central point rather than running
the data network as a daisy chain arrangement. As well as allowing a star wiring arrangement the
RAKStar can be extremely useful in diagnosing cabling issues if the user is familiar with its operation.
Cabling issues are by far the most common problem with wired systems and can be the most timeconsuming to correct. A Rako wired network should work faultlessly and any intermittent problems or
delays in uploading information to Rako devices are all symptoms of wiring faults.
To facilitate easy diagnosis the RAKStar has switches that isolate the data to each leg and header
connectors which isolate the low voltage power.
BASIC PRINCIPLE.
The RAKStar forms a daisy chain network for the Rako wired system out of home run or star wiring. It
does so by using the green-green/white pair of the CAT5 cable as a return for the data back to the
RAKStar. A simplified diagram (1) of the data wiring switching can be seen below.
Simplified Diagram (1) Showing Blue and Green Data Line Only
Note: Simplified diagram shows Blue and Green data pair. In reality the switch is 4 pole and the
switching is repeated for the Blue/White and Green/White pairs.
DATA
Using the switches and header connectors associated with each punch-down connection, each leg can
be isolated from the data and power respectively. The ability to isolate legs is a powerful diagnostic
tool when trying to troubleshoot network problems.
Each leg has a black switch near the associated punch-down connector. With the switch in the up
position data is sent out on that leg. With the switch in the down position that leg is bypassed and
the data connection passes directly to the next leg. A switch in the up position where there is no
device connected will
break
the data line.
I
Page 6

IMPORTANCE OF CORRECT TERMINATION
From the simplified diagram (1) it can be seen that if a user connects to a Rako Bridge at position X
the data route to panel 4 is down the Green pair of 1, out on the Blue of 2, back on Green pair, 3 is
bypassed with the switch in the DOWN position and out on Blue to panels 4. It can be seen that if
panel 2 does not have the Star terminations in place the data stops at panel 2 and goes no further.
From the same diagram (1) it can be seen that of the two panels connected to 4 the first must NOT be
terminated but the last panel needs to be Star terminated. The rule is that the last device on any leg
must be Star terminated. The RAKStar has an internal end of line termination.
IDENTIFYING DATA FAULT LOCATION
From the simplified diagram (1), if there was a fault on the Green return pair of panel 2 it can be seen
that no data will get to panels 3 or higher. At this point the fault could either be with the Green
return of 2 OR the Blue of 4. If the data switch of 2 is put into the Down position isolating that panel
and communication is now possible with panel 4 then the Blue of 4 is proved to be good and the fault
must be with the Green of 2. Equally if there is still no communication with 4 then the fault is
certainly with the Blue of 4. This can further proved by switching 2 back on switching 4 off and trying
communication with the RAKLink of 5.
NOTE
It can be seen that when investigating a fault on panels 1-5 from Bridge position Y that the data flow
is reversed, i.e. data is sent out to the panels on the Green pair and returns to the RAKStar on the
Blue pair.
BRIDGE NETWORK STATUS FEEDBACK.
The embedded web page in the Bridge (as accessed when configuring the Bridge) gives a network bus
status message depending on the number of failed message transmits and receives. The following
messages are the most common
Bus: Active – indicates a good network
Bus: Active Tx Warn – indicates some degree of intermittency.
Bus: Passive Tx – indicates a high degree of intermittency.
All messages other than 'Active' should prompt further investigation.
RULES FOR MULTIPLE RAKSTARS
With reference to the simplified diagram (1) it can be seen that if another RAKStar were to be
connected to the first RAKStar in any position other than on the first or last punch-down connections
(1 or 18) the network would continue along the second RAKStar and have no return path to the first.
The rule is that two RAKStars should be connected using the first or last punch-downs only.
Page 7

POWER
The header connector associated with each punch-down determines whether 15V DC power is sent
out to that leg with power being sent if the header connector is fitted (see Power Diagram (3)). The
single red LED on the circuit board indicates whether 15V DC power is present on the RAKStar.
In the event that there is a short circuit on the power cores of the data cable (see core voltage table
below) the most likely result is that the resettable fuse in the RAKLink will trip and the power LED will
extinguish on the RAKStar. The header connectors are then useful to isolate the power from
individual legs until the leg with a fault can be determined. Note that after tripping the internal fuse
power to the RAKLink will need to be cycled before the fuse will re-set.
Diagram (2)
CORE VOLTAGE TABLE
Core colour Function Typical voltage
Green/White Data + (return) 2.5-3V
Green Data - (return) 2.5-3V
Brown Power - 0V
Brown/White Power + 15V
Blue/White Data + 2.5-3V
Blue Data - 2.5-3V
Orange Power - 0V
Orange/White Power + 15V
NOTES ON VOLTAGES
The Rako wired network will stop working when the power voltage drops below approximately 10V.
The data voltages should be measured relative to the GND pin on the 2 way aux power terminal.
Figure 6
 Loading...