

Page 1

Pro2-Series 3D Printer
Quick Start Guide
* Please review this entire guide before operating the printer.
Pro2 Pro2 Plus
Page 2

The contents of this Quick Start Guide may be updated over time. For the latest
version, scan the QR code or visit the link below.
www.raise3d.com/pages/download#down-quickguide
Page 3

A. List of Parts
Pro2
Filament
Run-out Sensor
Filament Feeder
Fans
Hot Ends
Touch Screen
Pro2-Series 3D Printer
/ Quick Start Guide
Camera
Filament
Guide Tube
HEPA Filter
Z Ball Screws
Pro2 Plus
Print Bed
Z-Stage
Filament
Run-out Sensor
Filament Feeder
Fans
Hot Ends
Touch Screen
Print Bed
Z-Stage
Wheels
USB Storage Slots
Power Inlet
Ethernet Interface
Power Switch
Camera
Filament
Guide Tube
HEPA Filter
Z Ball Screws
USB Storage Slots
Power Inlet
Ethernet Interface
Power Switch
01 02
Page 4

Pro2-Series 3D Printer
/ Quick Start Guide
B. Hardware Installation
1
Remove!
Locate the four shipping zip ties, and
remove them.
It's recommend to unclip these as opposed
to cutting. They can be reused if you need
to transport your machine in the future.
3
2
Remove!
(×24)
Peel the yellow sticker and remove the 24
security spacers.
These clips are designed to hold the
extruder assembly in place during shipping
and should be saved for future transport.
Do not operate printer with clips installed.
4
Remove!
(×2) Hex Wrench
Select the largest of the included hex head
wrench (3mm), and remove all four hex
head security bolts from Z-axis clamps (2
bolts each).
These are located on the left and right
sides on the printer on the ball screw
thread.
(3 mm)
Plug the machine into a wall outlet using
the power adapter for your designated
country. (5 included)
Flip the switch to power the unit on.
Page 5

Pro2-Series 3D Printer
B. Hardware Installation (continued)
/ Quick Start Guide
5
6
Once the unit has been powered, the
printer will go through a start-up sequence.
Your Raise3D printer will take approximately 60 seconds to boot up. When the touch
screen displays the "Home" screen, the
printer is ready.
Open the "Utilities" tab, and press the Z
Homing button.
OK the request, and the print bed will
begin to “home” or move to the origin
position.
This will also allow you to access your
accessory packages.
7
Open the front door, and remove the
starter box and filament box from the base
of the printer.
Open these packages, and compare with
the following contents list.
03 04 05 06
Page 6

Pro2-Series 3D Printer
/ Quick Start Guide
B. Hardware Installation (continued)
List of Contents
3mm
2.5mm
2mm
1.5mm
Power Cable
(×5)
USB Storage
Nozzle
Cleaning Kit
Hex Wrenches
Heat Resistant Gloves
15A
10A
Tweezers
Fuse
Filament
(×2)
Filament Holder
(×2)
Thumb Screws
(Spare)
Build Plate
(with Build Surface
inside Protective Cover)
Spatula
Other Accessories
(Spare)
04 05 06
Page 7

Pro2-Series 3D Printer
B. Hardware Installation (continued)
/ Quick Start Guide
8
Lower the Z platform by 50mm.
To do this, set the interval at "10mm" by
selecting it in the "Move Steps" bar. This
will move the bed 10mm per arrow click.
Click this downward arrow 5 times to move
Z platform downward to 50mm.
10
Protective Foam
Cover
Build Plate
Remove!
9
Loose the two thumb screws on the Z
platform by rotating the two thumbscrews
counter-clockwise.
11
Remove the aluminum build plate from the
foam packaging.
Using the included spatula, remove the
leveling calibration model from your build
plate.
05 06
Page 8

Pro2-Series 3D Printer
/ Quick Start Guide
B. Hardware Installation (continued)
12
13
Slide the build plate onto the Z platform
with the logos facing upwards, and the
handle edge facing the front of the
machine.
Re-install the thumb screws, rotating
clockwise, to lock the build plate into
position.
06
14
A B
Mount Points
C D
Open the side door of the printer, and
install the filament holders into the
mounting points. Open one of the included
spools of filament, and place it on the
holder.
NOTE: The direction of filament spool should be
placed to rotate in clockwise if at points B and D,
and should be oriented to rotate counterclockwise at mount points A and C.
Page 9

Pro2-Series 3D Printer
B. Hardware Installation (continued)
/ Quick Start Guide
15
16
Locate the open end of the filament, and
feed it through the guide tube.
Press the “Utilities” tab on the screen and
set the temperature of the left nozzle for
the filament that you're using.
Press the “Load” button and the printer will
begin to heat. When the target temperature is reached, press "Load". Complete
the feeding operation according to the
instructions on the screen.
NOTE: This document's instructions are based on
the properties of Raise3D PLA filament. This is
the standard filament included with your product
and it is advised to use the Raise3D PLA for
testing and initial setup.
07 08 09 10
Page 10
Pro2-Series 3D Printer
/ Quick Start Guide
C. ideaMaker Installation
The ideaMaker slicing software is
available on the USB storage drive
included with your printer.
Additional downloads and versions
are available online at:
www.raise3d.com/
pages/download
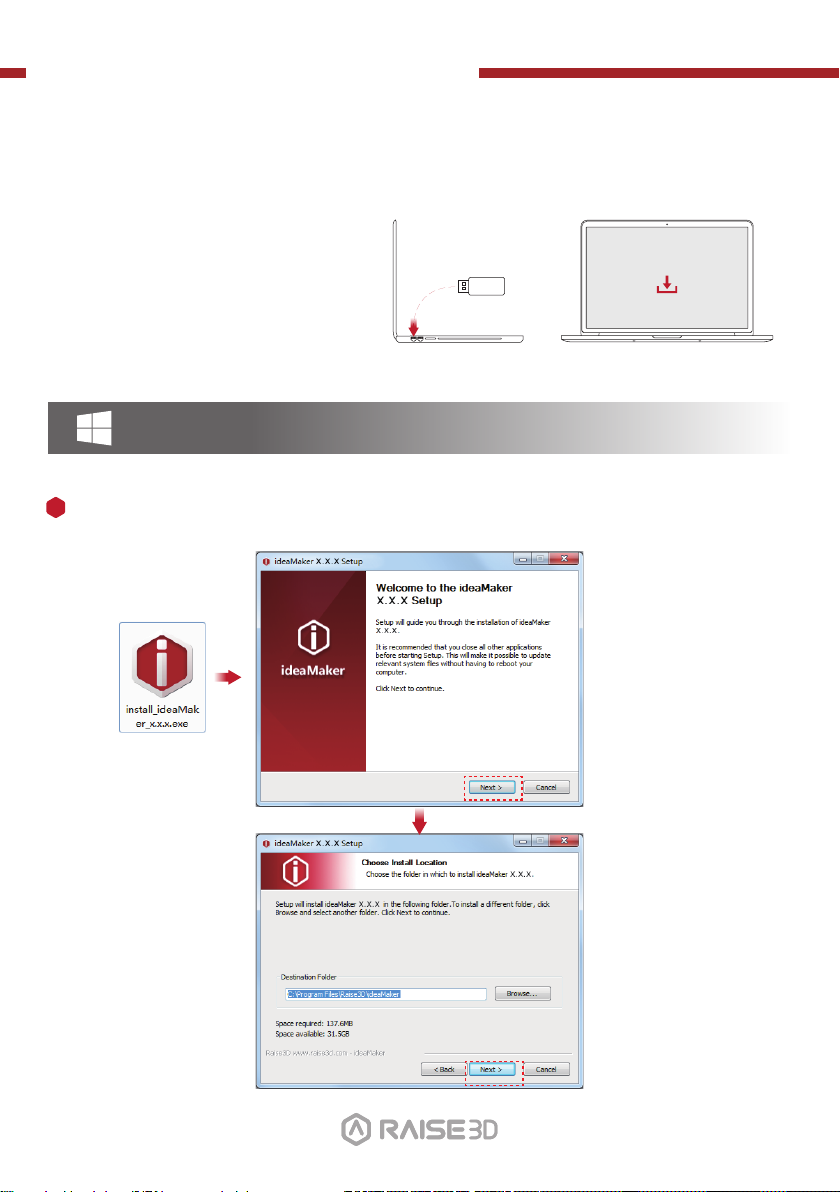
WINDOWS
1
Open the installer and choose your preferred language. Select the installation location
for ideaMaker, and click "Next".
www.raise3d.com
Download ideaMaker
08 09 10
Page 11
Pro2-Series 3D Printer
/ Quick Start Guide
C. ideaMaker Installation (continued)
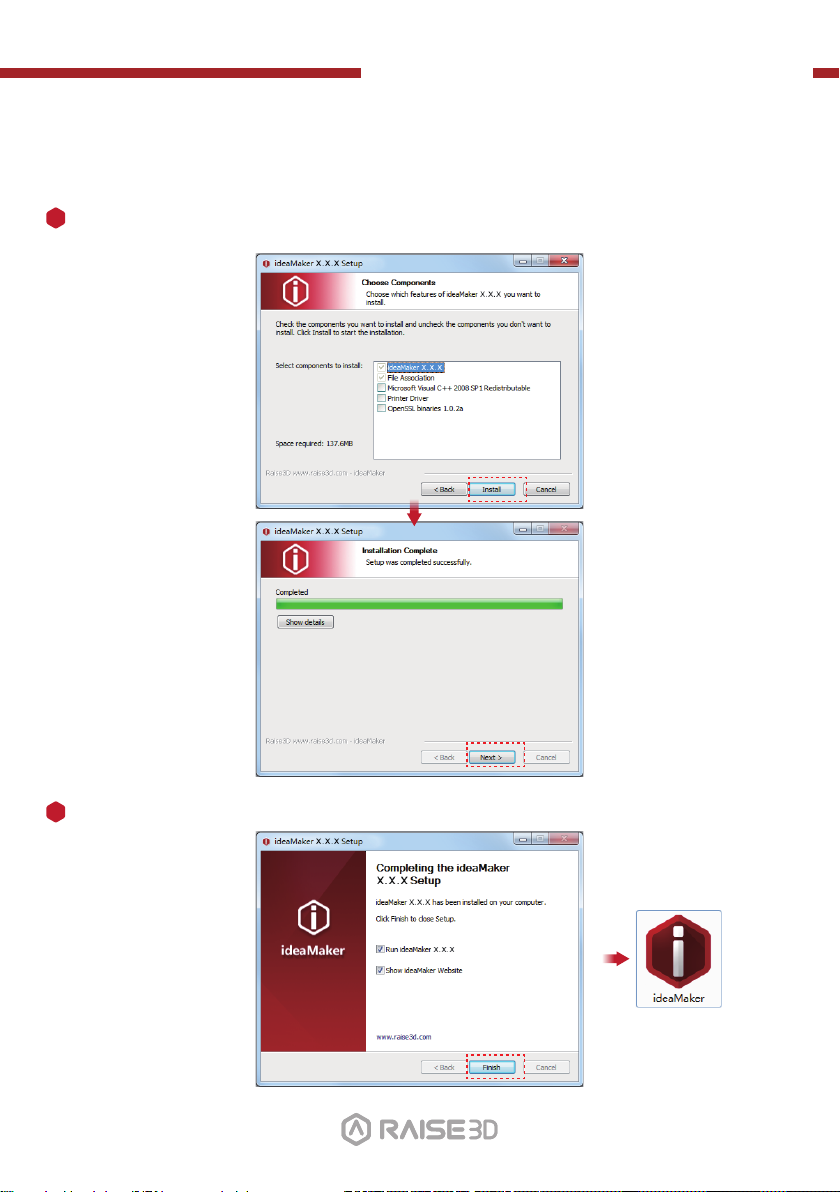
2
Follow the instructions provided by the console, and click "Install". After the installation
is finished, click "Next" to go to the next step.
3
Click "Finish" and ideaMaker is installed.
09 10
Page 12

Pro2-Series 3D Printer
/ Quick Start Guide
C. ideaMaker Installation (continued)
MAC OS X
Open the Disk Image for the ideaMaker installer. This is located in the USB storage drive
included with your printer, or download the latest version from
www.raise3d.com/pages/download#down-im.
Drag the ideaMaker icon(left) into the Application folder on the right side.
10
Page 13

Pro2-Series 3D Printer
/ Quick Start Guide
D. ideaMaker Initial Settings
1
When launching ideaMaker for the first time you, you will need to select your printer
model from the drop-down list, then press "Next".
2
Select the diameter of your filament. Press "Finish" to finalize the initial settings.
NOTE: ALL Pro2-Series printers use 1.75mm filaments.
11 12 13 14
Page 14

Pro2-Series 3D Printer
/ Quick Start Guide
E. Using ideaMaker
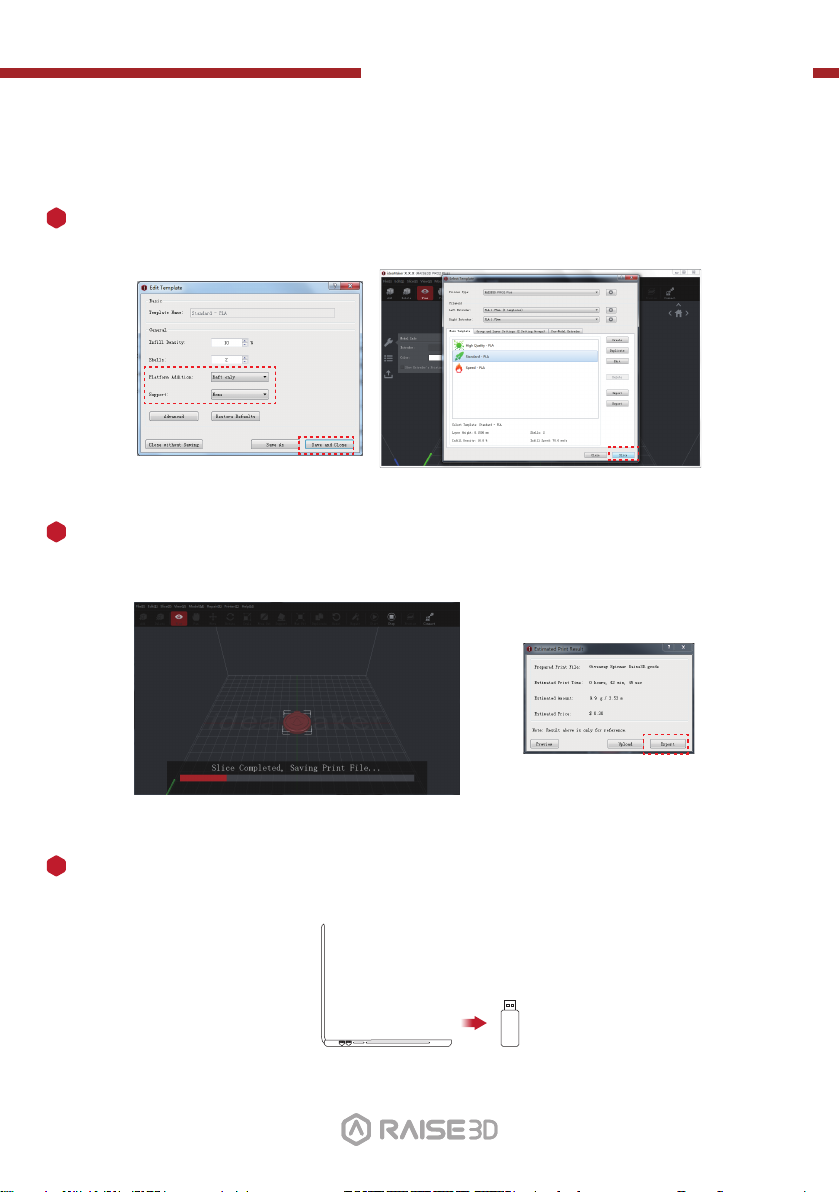
1
Click the "+" button to import “Giveaway Spinner” included in the USB storage.
2
Click the "Start" or “ ” button to begin slicing the model.
3
Confirm your printer type and material are correct, then select the standard slicing
template.
Click “Edit” to select the type of Platform Addition and the type of Support.
12 13 14
Page 15
Pro2-Series 3D Printer
/ Quick Start Guide
E. Using ideaMaker (continued)
4
Select your type of Platform Addition and Support in the "Edit" window. Click "Save
and Close" to return to the previous menu. Click "Slice" to generate your file.
5
Save the sliced files (.gcode and .data) by exporting to the USB storage drive.
NOTE: File names that do not conform to the Western Latin character set may not
display properly.
6
Confirm that the files are saved and eject the USB storage.
13 14
Page 16

Pro2-Series 3D Printer
/ Quick Start Guide
F. Start First Print
1
2
3
0.2mm
The Pro2/Pro2 Plus units are preleveled in the
factory, but we recommend verifying that the
leveling has not changed during shipping.
First, home the X/Y Axis by selecting the
"home" button, then Z axis "home" button.
If the homing procedures complete without
issues, reposition the print head.
Select "10mm" for "Move Steps" and move X to
50mm, Y to 10mm.
Please use the feeler gauge to check the
distance between nozzle and printing platform.
The optimal distance between is 0.2mm.
The best condition of this is that you can feel a
little friction when you slide the feeler gauge
into the gap.
Feeler Gage
The distance between the nozzle and the
printing platform can be adjusted by turning the
thumb screw on the left-front corner of the
Z-plate, the higher the screw stands out, the
further the distance between the nozzle to the
printing platform gets.
14
Closer Further
Page 17
Pro2-Series 3D Printer
F. Start First Print (continued)
/ Quick Start Guide
4
USB Storage
5
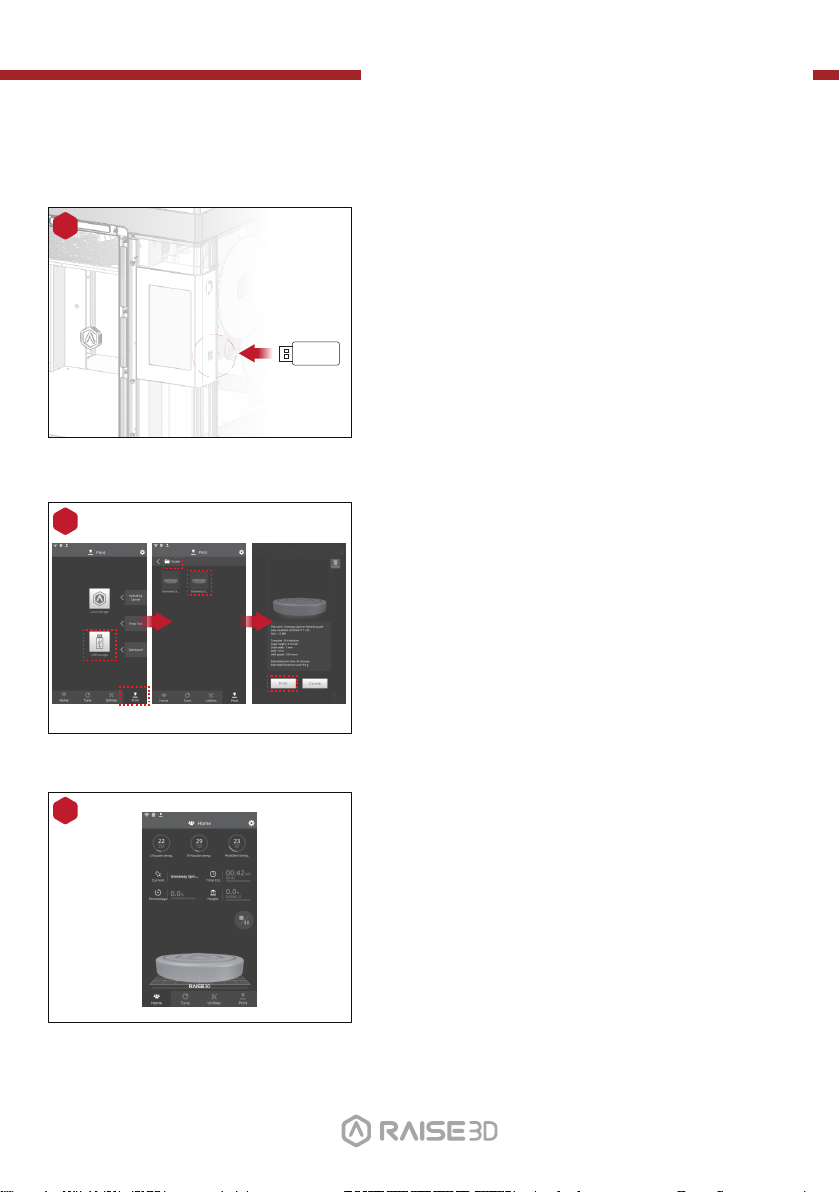
Insert the USB storage that contains your sliced
model (.gcode and .data files).
Insert this USB drive into the USB slot on the
side of touchscreen.
Select the “Print” tab, and choose “USB Storage”.
Select the file and check the printing parameters
and settings. Press “Print” to start printing the
test file.
6
During printing, you can check the status of your
print including printing time remaining and other
parameters from the touchscreen in the “Home”
interface.
NOTE: The touch screen will display an image of your
model on-screen during printing. This image will only be
shown when the file is sliced by ideaMaker and the
.data file is saved in USB storage or uploaded to screen.
15 16 17 18
Page 18
Pro2-Series 3D Printer
/ Quick Start Guide
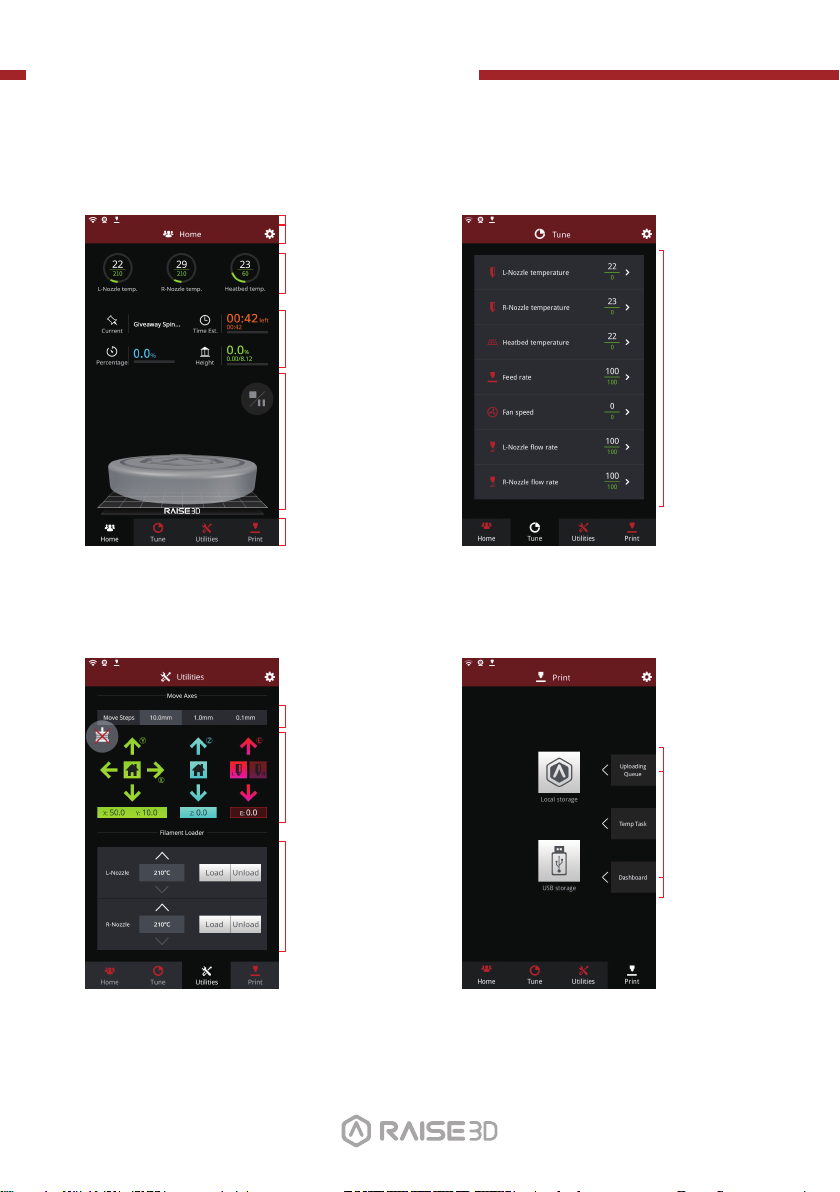
G. User Interface
Home Tune
· Status bar
· Menu title, Settings Button
· Extruder and Heat
Bed temperature
· Current model name,
total print time, current
printing status and height
· Visual display of current
model
· Pause/Resume button
· Stop button
· Taskbar
· Printing
parameters and
adjustment
· Moving step distance
setting
· Disable motor button
· X/Y/Z axes move/return
to original position
· Load and unload
function for the L&R
extruders.
· Choose where to
load the print job
from
· Check uploading
list, recovery task
list, printing
statistics
Utilities Print
16 17 18
Page 19

Pro2-Series 3D Printer
/ Quick Start Guide
H. Dual-Extruder Print - Slicing
1
Open ideaMaker, Click the "+" button to import your two models (.stl/.obj/.3mf file). You
can download a file or use the test model included in the USB storage drive.
Choose one of the models and set its designated Extruder as Left Extruder from the
2
left side 'Model Info' window.
17 18
Page 20

Pro2-Series 3D Printer
/ Quick Start Guide
H. Dual-Extruder Print - Slicing (continued)
Choose the other model and set Extruder as the Right Extruder using the 'Model Info'
3
window.
4
Click the "Start" or “i” button to begin the slicing of the model.
5
Confirm your printer type and materials for both extruders, then select the standard
slicing template.
Click “Edit” to select the type of Platform Addition and the type of Support.
18
Page 21

Pro2-Series 3D Printer
/ Quick Start Guide
H. Dual-Extruder Print - Slicing (continued)
6
Select your type of Platform and Support in the "Edit" window. Click "Save and Close"
to return to the previous menu. Click "Slice" to generate your file.
7
Save the sliced files (.gcode and .data) to your USB storage drive.
NOTE: File names that do not conform to the Western Latin character set may not
display properly.
8
Confirm that the files are saved and eject the USB storage.
19 20 21 22
Page 22

Pro2-Series 3D Printer
/ Quick Start Guide
H. Dual-Extruder Print - Hardware Installation
The following steps show how to feed the right nozzle. For the other hardware installations
steps please see with Part B. Hardware Installation in this guide.
1
A B
Mount Points
C D
2
Install the filament holder in the mount
point on the side of the printer and place a
spool of filament on the holder.
NOTE: The direction of filament spool should be
placed to rotate in clockwise at mount points B
and D and counterclockwise at mount points A
and C.
Feed the filament through the guide tube.
20 21 22
Page 23

Pro2-Series 3D Printer
/ Quick Start Guide
H. Dual-Extruder Print - Hardware Installation (continued)
3
Open the “Utilities” tab on the screen and
set the temperature of the right nozzle for
the filament you're using, then press the
“Load” button.
Finish the feeding operation step by step
according to the instructions on the
screen.
NOTE: This document is set based on the
Raise3D PLA filament, delivered with the printer.
We advise that using the Raise3D PLA for this
initial setup and testing.
21 22
Page 24

Pro2-Series 3D Printer
/ Quick Start Guide
H. Dual-Extruder Print - Start First Print
1
2
3
0.2mm
The Pro2/Pro2 Plus units are preleveled in the
factory, but we recommend verifying that the
leveling has not changed during shipping.
First, home the X/Y Axis by selecting the
"home" button, then Z axis "home" button.
If the homing procedures complete without
issues, reposition the print head.
Select "10mm" for "Move Steps" and move X to
50mm, Y to 10mm.
Please use the feeler gauge to check the
distance between nozzle and printing platform.
The optimal distance between is 0.2mm.
The best condition of this is that you can feel a
little friction when you slide the feeler gauge
into the gap.
Feeler Gage
The distance between the nozzle and the
printing platform can be adjusted by turning the
thumb screw on the left-front corner of the
Z-plate, the higher the screw stands, the further
the distance between the nozzle will be from the
printing platform.
22
Home the Z axis after each adjustment.
Closer Further
Page 25

Pro2-Series 3D Printer
/ Quick Start Guide
H. Dual-Extruder Print - Start First Print (continued)
4
USB Storage
5
Insert the USB storage that contains your sliced
model (.gcode and .data files).
Insert this USB drive into the USB slot on the
side of touchscreen.
Open the “Print” tab, and choose “USB Storage”
to open the file storage path. Select your dual
extrusion file to check the printing parameters
and settings. Press “Print” to start printing test
file.
6
During printing, you can check the status of your
model including the remaining printing time and
other parameters from the “Home” interface on
the touchscreen.
NOTE: The touch screen will display an image of your
model on-screen during printing. This image will only be
shown when the file is sliced by ideaMaker and the
.data file is saved in USB storage or uploaded to screen.
23
Page 26
Technical Specifications
CONSTRUCTIONITEM
PRINTER
Single Print Dual Print Single Print Dual Print
12×12×11.8 inch
305×305×300 mm
24.4×23.2×29.9 inch
620×590×760 mm
Power Supply Input
Power Supply Output
Print Technology
Filament Diameter
Print Head Travel Speed
Max Build Plate Temperature
Build Plate Material
Build Plate Leveling
Supported Materials
Nozzle Diameter
Max Nozzle Temperature
Operating Sound
Operating Ambient Temperature
Pro2
11×12×11.8 inch
280×305×300 mm
Print Head
XYZ Step Size
Build Plate
Connectivity
Monitoring
Pro2 Plus
Build Volume (W×D×H)
12×12×23.8 inch
* *
305×305×605 mm
Machine Size (W×D×H)
24.4×23.2×43.5 inch
620×590×1105 mm
Universal 100-240 VAC, 50/60 Hz
600 Watts, 24 VDC
FFF
Dual-head with electronic lifting system
1.75mm
0.78125, 0.78125, 0.078125 micron
30 - 150 mm/s
Heated aluminum build plate with magnetic holding
110 ºC
Silicone
Pre-calibrated leveling
PLA/ ABS/ HIPS/ PC/ TPU/ TPE/ NYLON/ PETG/ ASA/
PP/ Glass Fiber Filled/ Carbon Fiber Enforced/ Metal
Particles Filled / Wood Filled
0.2/ 0.4/ 0.6/ 0.8mm
300 ºC
Wi-Fi, LAN, USB port
Live camera
50 dB
15 - 30 °C, 10 - 90% RH non-condensing
11×12×23.8 inch
280×305×605 mm
24
SOFTWARE
PRINTER CONTROLLERELECTRICAL
Resume Print after Power Outage
Slicing Software
Supported File Types
Supported OS
Machine Code Type
User Interface
Screen Resolution
Motion Controller
Logic Controller
Onboard Flash
Network
Memory
OS
Ports
ideaMaker
STL, OBJ, 3MF
WINDOWS/ IOS/ LINUX
GCODE
7 inch Touch Screen
Ethernet 802.11b/g/n Wifi 2.4GHz/5GHz
Second Generation
1024*600
ATM Cortex M7.400MHZ FPU
32 bit freescale imx6, Quad core 1Ghz ARM processor
1GB
8GB
Embedded Linux
Usb2.0*2, Ethernet*1
: When you are prin ting with dual material.
Page 27

Experiencing Difficulties?
If you run into any issues during the guided setup, please contact our expert technicians by opening a ticket online at: http://help.raise3d.com.
Page 28

4th Floor, Building B5, 1600 North Guoquan Rd, Shanghai, China 200438
+86 21 65337855
43 Tesla, Irvine, CA 92618, USA
+1 888 963 9028
www.raise3d.com
 Loading...