

Page 1

E2 3D Printer
Quick Start Guide
* Please review this entire guide before operating the printer.
Page 2

Raise3D E2_Quick Start Guide
CONTENTS
Safety ........................................................................................................................... 1
Electromagnetic Compatibility - EMC ........................................................................... 2
Technical Specifications ............................................................................................... 4
Printer Components and Parts ..................................................................................... 6
Raise3D Supplies and Accessories .............................................................................. 10
Precaution and Hardware Installation........................................................................ 11
Software Installation .................................................................................................. 13
WLAN Connection ...................................................................................................... 20
Maintenance .............................................................................................................. 21
Start Printing .............................................................................................................. 23
User Interface ............................................................................................................ 24
Experiencing Difficulties/Contact Information ........................................................... 25
www.raise3d.com
Page 3
Raise3D E2_Quick Start Guide
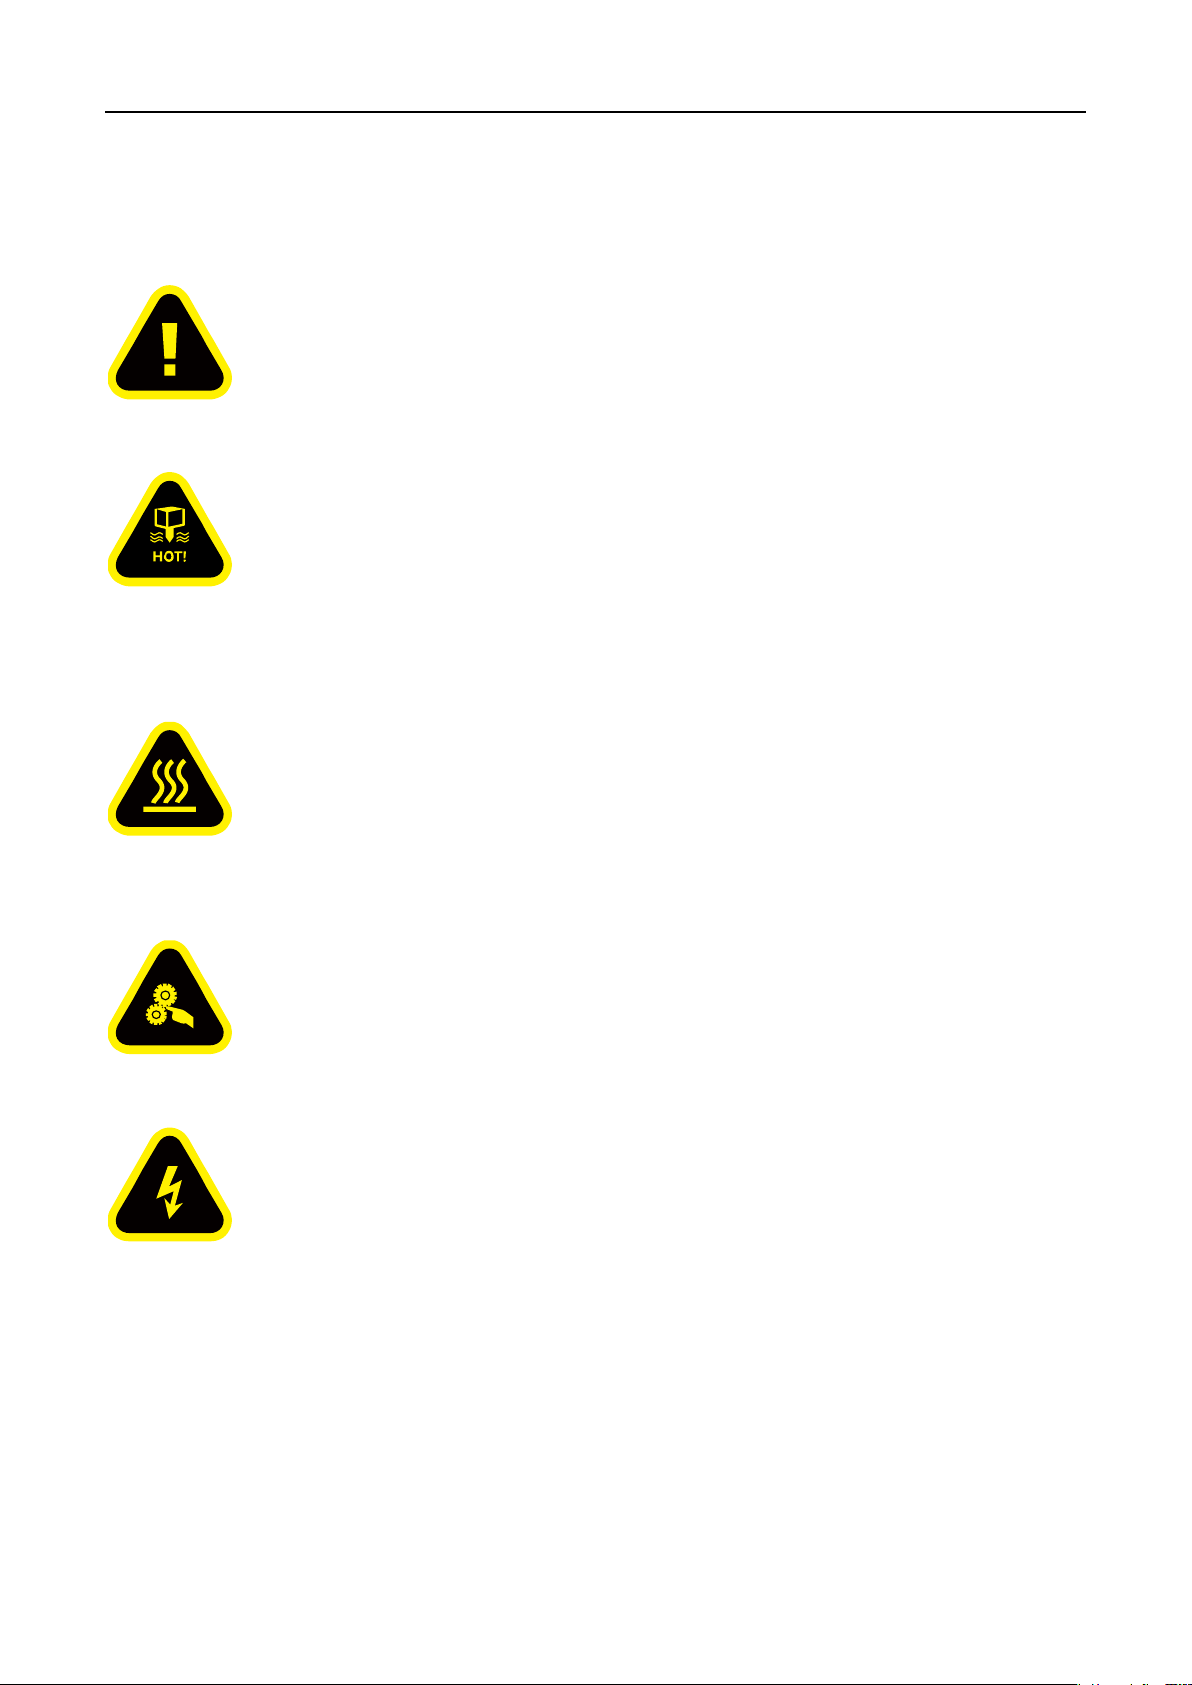
Safety
Warning: Indicates a potentially hazardous situation which, if not avoided, may result in injury or
damage.
Hot Nozzle: The hot nozzle sign indicates the presence of devices with high temperatures. Always
use extra care when working around heated components. Always wear the heat resistant gloves provided in the
Starter Box when working near the nozzle.
Nozzle temperatures in the printer can reach 300℃(572℉).
Hot Surface: The hot surface sign indicates the presence of devices with high temperatures.
Always use extra care when working around heated components. Always wear the heat resistant gloves provided
in the Starter Box when working near hot surfaces.
Moving Parts: The moving parts sign indicates that a hazard exists. If touched, it can cause serious
bodily injury. Always keeps hands clear of moving parts.
High Voltage: The high voltage sign indicates the presence of high voltages. Always stay away from
exposed circuitry. It is recommended that all conductors be removed.
- 1 -
www.raise3d.com
Page 4
Raise3D E2_Quick Start Guide
AT
BE
BG
CZ
DK
EE
FR
DE
IS
IE
IT
EL
ES
CY
LV
LI
LT
LU
HU
MT
NL
NO
PL
PT
RO
SI
SK
TR
FI
SE
CH
UK
HR
Function
Frequency
Maximum Output Power (EIRP)
Wi-Fi
2412-2472 MHz
18 dBm(b)/ 18 dBm (g)/ 13 dBm (HT)
5150-5250 MHz
19 dBm(a)/ 18.5 dBm(HT20)/ 17.5 dBm(HT40)
5725-5850 MHz
14 dBm(a)/ 14 dBm(HT20)/ 14 dBm(HT40)
Function
Frequency
Maximum Output Power (EIRP)
Wi-Fi
2412-2462 MHz
5150-5250 MHz
15.36 dBm(a)/ 14.79 dBm(HT20)/ 14.41 dBm(HT40)
5725-5850 MHz
15.48 dBm(a)/ 14.49 dBm(HT20)/ 14.06 dBm(HT40)
CE Mark Warning
This is a Class B product, in a domestic environment, may cause radio interference, in which case the user
may be required to take adequate measures.
Electromagnetic Compatibility - EMC
⚫ Simplified EU Declaration of Conformity
Raise3D declares that this device is in compliance with the essential requirements and other relevant provisions of
Directive 2014/53/EU. Full text of the EU declaration of conformity is available at https://www.raise3d.com.
CE Output power table:
FCC Output power table:
18.31dBm(b)/ 15.62dBm (g)/ 14.9 dBm (HT 20)
- 2 -
www.raise3d.com
Page 5

Raise3D E2_Quick Start Guide
⚫ FCC Statement
This device and its antenna must not be located or operated in conjunction with any other antenna and
transmitter.
This device complies with part 15 of the FCC rules. Operation is subject to the following two conditions: (1) this
device may not cause harmful interference, and (2) this device must accept any interference received, including
interference that may cause undesired operation.
NOTE: The manufacturer is not responsible for any radio or TV interference caused by unauthorized modifications
to this equipment. Such modifications could void the user’s authority to operate the equipment.
NOTE: This equipment has been tested and certified to comply with the limits of a Class B digital device, pursuant
to part 15 of the FCC Rules. These limits are designed to provide reasonable protection against harmful
interference in a residential installation. This equipment generates uses and can radiate radio frequency energy
and, if not installed and used in accordance with the instructions, may cause harmful interference to radio
communications. However, there is no guarantee that interference will not occur to a particular installation. If this
equipment does cause harmful interference to radio or television reception, which can be determined by turning
the equipment off and on, the user is encouraged to try to correct the interference by one or more of the
following measures:
- Reorient or relocate the receiving antenna.
- Increase the separation between the equipment and receiver.
- Connect the equipment into an outlet on a circuit different from that to which the receiver is connected.
RF exposure information: This equipment complies with FCC radiation exposure limits set forth for an uncontrolled
environment. This equipment should be installed and operated at a minimum distance of 20cm between the
radiator and your body.
Changes or modifications not expressly approved by the party responsible for compliance could void the user’s
authority to operate the equipment.
- 3 -
www.raise3d.com
Page 6
Raise3D E2_Quick Start Guide
ITEM
E2
CONSTRUCTION
Build Volume (W×D×H)
Single Extruder Print
Dual Extruder Print
13.0×9.4×9.4 inch /330×240×240 mm
11.6×9.4×9.4 inch / 295×240×240 mm
Machine Size (W×D×H)
23.9×23.5×18.3 inch / 607×596×465 mm
ELECTRICAL
Power Supply Input
Power Supply Output
100-240 V AC, 50/60 Hz 230 V @2A
24 V DC,350 W
PRINTER
Print Technology
Print Head
Filament Diameter
XYZ Step Size
Print Head Travel Speed
Build Plate
Max Build Plate Temperature
Heated Bed Material
Build Plate Leveling
Supported Materials
Nozzle Diameter
Hotend
Max Nozzle Temperature
Connectivity
Noise Emission (Acoustic)
Operating Ambient Temperature
Storage Temperature
Technical Certifications
Filter
SOFTWARE
Slicing Software
Supported File Types
Supported OS
Machine Code Type
ideaMaker
STL/ OBJ/ 3MF
Windows/ macOS/ Linux
GCODE
PRINTER
CONTROLLER
User Interface
Network
Resume Print after Power Outage
Screen Resolution
Motion Controller
Logic Controller
Memory
Onboard Flash
OS
Ports
7-inch Touch Screen
Wi-Fi, Ethernet
Firmware recording, no need for battery installation
1024×600
Atmel ARM Cortex-M4 120MHz FPU
NXP ARM Cortex-A9 Quad 1 GHz
1 GB
8 GB
Embedded Linux
USB2.0×2, Ethernet×1
Technical Specifications
FFF
Independent Dual Extruders
1.75 mm
0.78125, 0.78125, 0.078125 micron
30 - 150 mm/s
Flexible Steel Plate with Buildtak
110 °C
Silicone
Mesh-leveling with Flatness Detection
PLA/ ABS/ HIPS/ PC/ TPU/ TPE/ NYLON/ PETG/ ASA/ PP/ PVA/ Glass
Fiber Infused/ Carbon Fiber Infused/ Metal Fill/ Wood Fill
0.4 mm (Default), 0.2/ 0.6/ 0.8/ 1.0 mm (Available)
V3P (V3 hotend with PTFE version)
300 °C
Wi-Fi, LAN, USB port, Live camera
<50 dB(A) when building
15 - 30 °C, 10 - 90% RH non-condensing
-25 to 55 °C, 10 - 90% RH non-condensing
CB, CE, FCC, RoHS, RCM
HEPA filter with activated charcoal
- 4 -
www.raise3d.com
Page 7

Raise3D E2_Quick Start Guide
The firmware is based on RepRapFirmware (https://github.com/dc42/RepRapFirmware)
The electronics inspired by Duet3D.
DUET 2 WIFI and DUET 2 ETHERNET LICENSE
The Duet WIFI/ DUET 2 WIFI and DUET ETHERNET are licensed under the terms of the CERL OHL 1.2 (see below or
http://www.ohwr.org/attachments/2388/cern_ohl_v_1_2.txt for full text) will the following additional conditions:
a. Attribution:
Any reproductions or modifications of the hardware must contain the following attribution on the silkscreen and
packaging:
"Based on the DuetWifi by Think3dPrint3d and Esher3d, see www.duet3d.com for the original DuetWifi
information. This reproduction/modification is not endorsed or supported in any way by Think3dPrint3d or
Escher3d".
b. Logos:
No reproduction or modification of the Duet 2 Wifi or Ethernet hardware may contain the Think3dPrint3d,
Escher3d or Duet3d logos.
Should you need any further information, please do not hesitate to email us at inquiry@raise3d.com.
- 5 -
www.raise3d.com
Page 8
Raise3D E2_Quick Start Guide
F. Power Saving Button
G. Filament Box
H. Flexible Plate
A. Air Filter Box
B. Extruder
C. Hotend
D. Platform Tray
E. Touch Screen
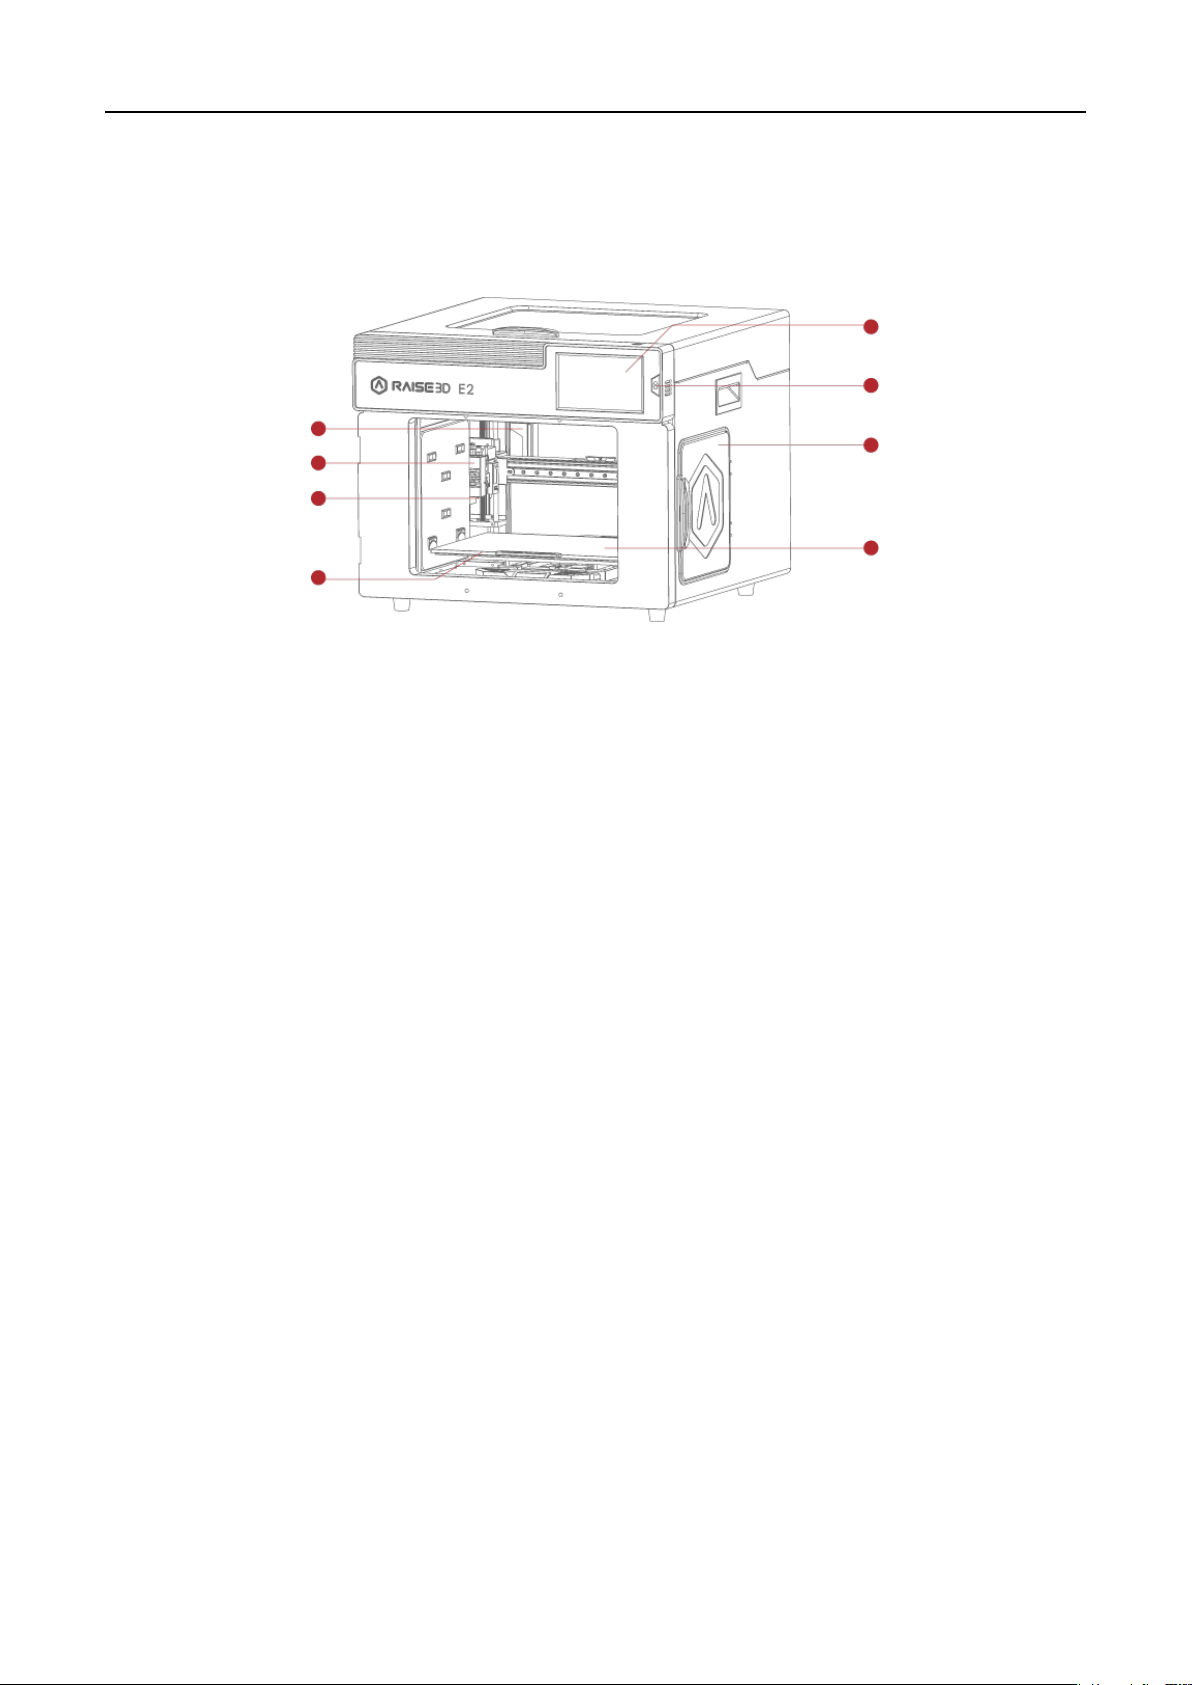
Printer Components and Parts
1. Front Parts
A. Air Filter Box
Contains the air filter, which can filter out part of the harmful gas produced in the printing process.
B. Extruder
Feeds the filament into the hotend.
C. Hotend
The hotend consists of a nozzle, heater block, thermocoupler, heater rod, throat tube, and heat sink.
D. Platform Tray
The Platform Tray is highly magnetized to ensure that the build plate stays in place.
E. Touch Screen
On-board computing system to display printer status, error messages, and receive commands.
F. Power Saving Button
Quick press to put the screen and LED in sleep/wake mode; Long press for 10 seconds to restart.
G. Filament Box
Holds the filament that will be printed.
H. Flexible Plate
You can easily remove your models after they've finished printing by bending the plate.
- 6 -
www.raise3d.com
Page 9
Raise3D E2_Quick Start Guide
F. Filament Exit
G. Filament Run-out Sensor
I. Air Filter Fan
H. Switching Power Supply
J. Ethernet Port
A. Electric Control
System
B. Camera
C. LED Light Bar
D. Filament Holders
E. Input Power
2. Back Parts
A. Electric Control System
Includes screen components and the motion control panel. Do not open without permission.
B. Camera
Used to observe the operation of the printer.
C. LED Light Bar
Provides interior lighting of the chassis.
D. Filament Holder
Holds the filament spool, maximum weight 3 kg.
E. Input Power
AC input and switching.
F. Filament Exit
The filament leads from here to the extruder.
G. Filament Run-out Sensor
Detects when the material has run out.
- 7 -
www.raise3d.com
Page 10

Raise3D E2_Quick Start Guide
H. Switching Power Supply
Switches from alternating current to direct current. Please be careful, it’s dangerous! Do not remove the
power box without permission.
I. Air Filter Fan
Pulls air out of the machine through the air filter.
J. Ethernet Port
RJ45 port to connect the printer to a network.
- 8 -
www.raise3d.com
Page 11

Raise3D E2_Quick Start Guide
D. X-axis Left Motor
A. Z-axis Endstop
Limit Switch
B. Left Extruder
B. Right Extruder
C. X-axis Guide Rail
D. X-axis Right Motor
E. Z-axis Right Motor
E. Z-axis Left Motor
C. X-axis Guide Rail
3. Other Parts
A. Z-axis Endstop Limit Switch
Limits the maximum position in the Z direction and provides a Z-axis zero reference.
B. Extruder (Left/Right)
Feeds the filament into the hotend.
C. X-axis Guide Rail
Guides the extruder’s movement along the X-axis.
D. X-axis Motor (Left/Right)
Respectively controls the corresponding extruder for horizontal movement.
E. Z-axis Motor (Left/Right)
Controls both ends of the X-axis beam for synchronous lifting movements.
- 9 -
www.raise3d.com
Page 12

Raise3D E2_Quick Start Guide
Power Cable
(×5)
Hex Wrenches
Filament
(×2)
Tweezers
Heat Resistant Gloves
Spatula
Filament
Guide Tube
(×2)
Nozzle
Cleaning Kit
(×1)
Filament Holder
(×4)
USB Storage
Fuse
0.3 mm Feeler Gauge
(×1)
Filament Box Block
(×4)
quick connector
(×2)
Plastic rivet
(×4)
Raise3D Supplies and Accessories
- 10 -
www.raise3d.com
Page 13

Raise3D E2_Quick Start Guide
WARNING
Precaution and Hardware Installation
⚫ Read the entire installation section before starting installation
Connect equipment to a grounded facility power source. Do not defeat or bypass the ground lead.
• Know the location of equipment branch circuit interrupters or circuit breakers and how to turn them
on and off in case of emergency.
• Know the location of fire extinguishers and how to use them. Use only ABC type extinguishers on
electrical fires.
• Know local procedures for first aid and emergency assistance at the customer facility.
• Use adequate lighting for the equipment.
• Maintain the recommended range of temperature and humidity in the equipment area.
• Do not use this product in an environment containing volatile or flammable compounds.
⚫ Environmental requirements
• E2 is for indoor use only.
• Excessive solids (conductive or non-conductive) in the air may cause system damage.
• The accumulation of oil in the air can damage the plastic parts of the printer.
• The operating temperature should be in the range of 15°C to 30°C, with a relative humidity range of 10% to 90%
without condensation. The storage temperature shall be in the range of -25°C to 55°C, and the relative humidity
range shall be 10% to 90% non-condensation.
• The altitude shall not exceed 2,000 meters.
• Noise (Acoustics) : <50dB(A) during printing
NOTE: E2 printers may generate vibrations which depend mainly on the geometry of parts being printed and
material characteristics. This will need to be taken into account if locating the printer near vibration sensitive
equipment. Please note that during transportation in low temperatures, there is a chance the machine may frost
or freeze. The printer can resume use after being kept 4 - 6 hours in an area that is room temperature.
⚫ Input supply connection and grounding
During installation, the main outlet socket should be protected according to appropriate rules. Check the input
voltage, phase, and frequency supplied to this machine before turning it on. Verify the connection of grounding
wires from the machine to the input source. The allowable input voltages are 1x (90-240)V 50Hz/60Hz. For more
information about input supply refer to the technical specification section of this manual and to the rating plate of
the machine. Make sure the amount of power available from the input connection is adequate for normal
operation of the machine.
- 11 -
www.raise3d.com
Page 14

Raise3D E2_Quick Start Guide
Use hands to remove the Z-axis and X-axis locks.
Please carefully store the removed locks, so that
they can be installed again and used in
subsequent transportation.
The top foam contains five power cords of
different standards. Please use the power cord
that conforms to your current country (or region)
and connect it to the power socket. Turn on the
switch and start the device.
Turn on the power and the printer will enter the
boot process. Your Raise3D printer will take about
60 seconds to boot. When the touch screen
displays the "Welcome" window, the printer is
ready. Then you can finish the installation and
first print according to the Setup guide.
⚫ Hardware Installation and First Print
- 12 -
www.raise3d.com
Page 15

Raise3D E2_Quick Start Guide
Software Installation
⚫ ideaMaker Installation
The slicing software, ideaMaker, is available
on the USB storage device included with your
printer.
Additional downloads and versions are
available online at:
https://www.raise3d.com/download/
➢ Open the installer and choose your preferred language. Select your preferred installation location for
ideaMaker, and click "Next".
- 13 -
www.raise3d.com
Page 16

Raise3D E2_Quick Start Guide
➢ Follow the instructions provided by the guide, and click "Install". After the installation is finished, click "Next"
to go to the next step.
➢ Click "Finish" and ideaMaker is installed.
- 14 -
www.raise3d.com
Page 17

Raise3D E2_Quick Start Guide
Open the Disk Image for the ideaMaker installer. This is located in the USB storage device included with your
printer. Alternatively, you can download the latest version from https://www.raise3d.com/download/.
Next, drag the ideaMaker icon(left) into the Application folder on the right side.
- 1 5 -
www.raise3d.com
Page 18

Raise3D E2_Quick Start Guide
⚫ ideaMaker Initial Settings
➢ When launching ideaMaker for the first time, you will need to select your printer model. Select "printer
setting" and choose the type of the printer you are using, then press "Next".
➢ Select the diameter of your filament. Press "Finish" to finalize the initial settings.
NOTE: ALL E2 printers use 1.75 mm filaments.
- 16 -
www.raise3d.com
Page 19

Raise3D E2_Quick Start Guide
⚫ Using ideaMaker
➢ Click the "+" button to import "Giveaway Spinner" included in the USB storage device.
➢ Click the "Start" or " " button to begin slicing the model.
- 17 -
www.raise3d.com
Page 20

Raise3D E2_Quick Start Guide
➢ Confirm your printer type and material are correct, then select the standard slicing template.
Click "Edit" to select the type of Platform Addition and the type of Support.
➢ Click "Save and Close" to return to the previous menu. Click "Slice" to generate your file.
- 18 -
www.raise3d.com
Page 21

Raise3D E2_Quick Start Guide
➢ Save the sliced files (.gcode and .data) by exporting them to the included USB storage device.
NOTE: File names that do not conform to the Western Latin character set may not display properly.
➢ Confirm that the files are saved and eject the USB storage device.
- 19 -
www.raise3d.com
Page 22

Raise3D E2_Quick Start Guide
You can connect to a network by selecting
the SSID and inputting the password. When
the Wi-Fi module is manufactured, 2.4G is
set at HT20, 5GHz is set at HT40.
Note: The Wi-Fi’s frequency is fixed before
being manufactured. The customer is not
allowed to modify the Wi-Fi’s parameters.
(If needed, please contact our tech support
team).
Alternatively, you can select "Add Other
Network" and input a name and password.
WLAN Connection
- 2 0 -
www.raise3d.com
Page 23

Raise3D E2_Quick Start Guide
The printers are pre-leveled at the factory, but
we recommend verifying that the leveling has not
changed during shipping.
How to level up the X-axis:
As shown in figure 1, click "Maintenance" to level
up the X-axis and it will touch the top beam until
horizontal.
Click the "Utilities" menu and home the Z-axis.
Press the upward arrow to lift the Z-axis about
0.3 mm-0.7 mm.
Check the distance between the nozzle and the
printing platform. After pushing the left extruder
to the center position on the platform, loosen the
nozzle screw.
Maintenance
- 2 1 -
www.raise3d.com
Page 24

Raise3D E2_Quick Start Guide
Take out the gauge from the Accessory Kit and
insert it between the nozzle and the platform.
Adjust the nozzle so that the distance between
the nozzle and the printing platform exactly
matches the thickness of the gauge (about 0.3
mm). Tighten the nozzle screw and remove the
gauge. The other nozzle is adjusted in the same
way.
Follow the steps shown in the figure on the touch
screen to run 9-point automatic leveling.
After the 9 grid interface automatically closes, the
leveling is finished.
- 2 2 -
www.raise3d.com
Page 25

Raise3D E2_Quick Start Guide
Insert the USB storage device into the USB slot on
the side of the touch screen.
Select the "Print" tab, and choose "USB Storage".
Select the file and check the printing parameters
and settings. Press "Print" to start printing the
test file.
During printing, you can check the status of your
printing, including printing time and other
parameters, from the touch screen in the "Home"
interface.
NOTE: The touch screen will display an image of
your model on-screen during printing. This image
will only be shown when the file is sliced by
ideaMaker before being uploaded to the printer.
Start Printing
- 2 3 -
www.raise3d.com
Page 26

Raise3D E2_Quick Start Guide
Home
Tune
Extruder and heatbed
temperature
Current model name
Total print time
Current print status
Print height
Status
Pause, Resume and Stop
button
Menu and Settings button
Taskbar
Visual display of the
current model
Print parameters
Move the axis
Loading/Unloading
Leveling
Visual display of X/Y/Z axes
Coordinate value and
Custom edit function
Choose the X/Y/Z axes
Move distance "Unit Settings"
X/Y/Z axes move and return
button
Disable motor button
Upload, Resume Print
Task, and Print Statistics
The storage location of the
printed file
Utilities
Print
User Interface
- 2 4 -
www.raise3d.com
Page 27

Raise3D E2_Quick Start Guide
- 25 -
Experiencing Difficulties/Contact Information
If you run into any issues during this guided setup, please contact our expert technicians by creating a ticket at
support.raise3d.com. Customers outside of the US, please contact your local Raise3D distributor or reseller.
For sales information please contact us at sales@raise3d.com.
Other inquiries: for any other inquiry please send an email to inquiry@raise3d.com.
www.raise3d.com
Page 28

US Office
43 Tesla, Irvine, CA 92618, USA
+1 888 963 9028
Netherlands Office
Stationsplein 45 Unit A4.004 3013AK Rotterdam, the Netherlands
China Office
4th Floor B5, 1688 North Guoquan Road, Yangpu District, Shanghai 200438
400 6367 888 (For the Mainland of China only)
 Loading...