

Page 1
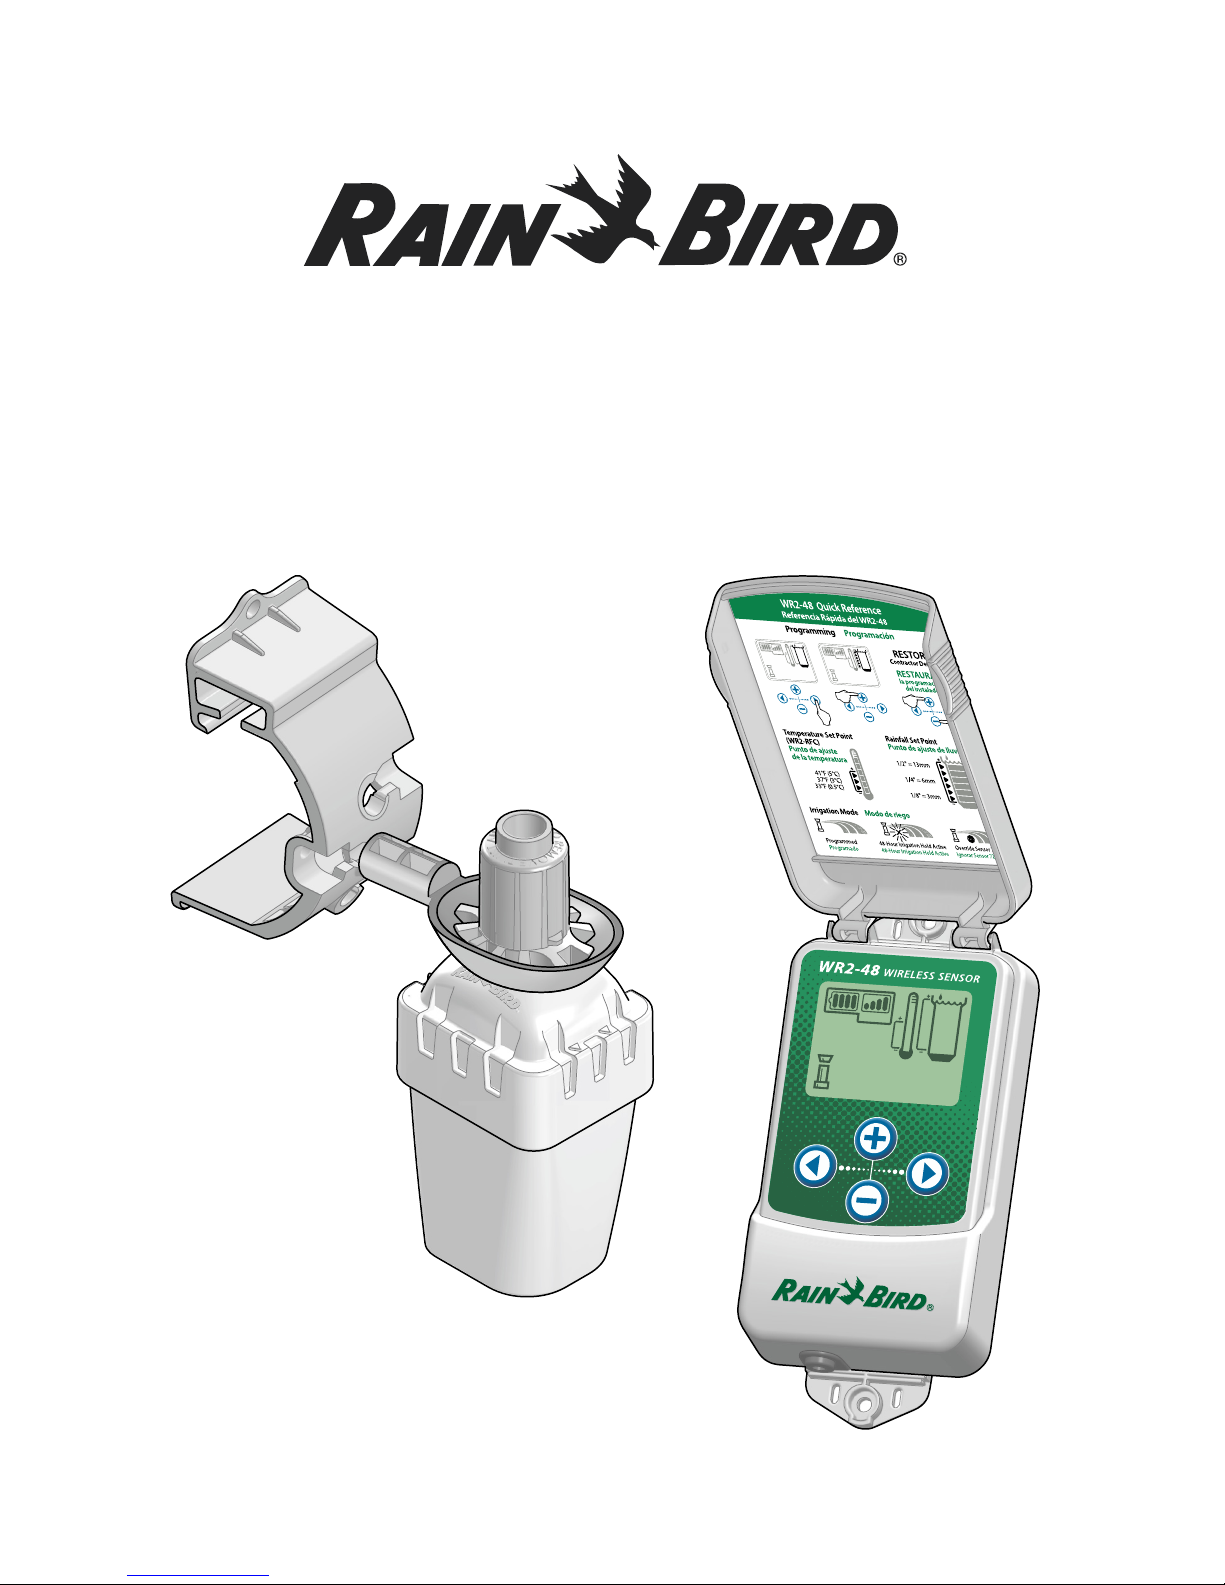
WR2-48 Wireless Sensor
User Manual
Manual del usuario
Page 2

Contents
EN
ES
page 11
Safety Information ................................ 1
Introduction ........................................... 1
WR2 Components ................................................................ 2
WR2 Benefits ........................................................................... 2
Mounting the Controller Interface ......... 2
Wiring the Controller Interface to the
Irrigation Controller .............................. 3
Initial Power Up ..................................... 4
Controller Interface Display Icons ................................ 4
Sensor Status .....................................................................4
Environmental Conditions ...........................................4
Irrigation Modes ............................................................... 5
Synchronize the Sensor and Controller
Interface ................................................ 5
Programming the Set Points .................. 6
Rainfall Set Point ................................................................... 6
Temperature Set Point
(Rain/Freeze Sensor only) ................................................. 6
Programming Irrigation Modes ............. 6
Saving, Resetting and Restoring
Settings .................................................. 7
Save Contractor Default Settings ................................. 7
Reset Contractor Default Settings ...............................7
Restore Contractor Default Settings ........................... 7
Restore Standard Setting ..................................................7
Select the Sensor Location ..................... 7
Sensor Mounting Instructions ............... 8
Using Multiple Controller
Interface Units ....................................... 8
WR2 Wireless Sensor Alerts &
Troubleshooting .................................... 9
Page 3

WR2-48 Wireless Sensor
1
Safety Information
Symbols used in this manual:
CAUTION: Symbol alerts the user
to the presence of un-insulated
“dangerous voltage” within the
product’s enclosure that may be of
sucient magnitude to constitute a
risk of electric shock.
NOTE: Symbol alerts the user to the
presence of important operating or
maintenance (servicing) instructions.
Interference With Other Electronic
Devices
All radio transmitters broadcast energy
through the air. This energy may interfere
with other electronic devices in close
proximity to the WR2 Wireless Sensor. To
lower the risk of electronic interference:
Do not place sensitive electronics
(computers, telephones, radios, etc.) in
close proximity to the Controller Interface
or Sensor.
Use clip-on ferrite sleeves on the
connection or power cables of aected
electronic device(s).
NOTE: The irrigation controller / timer
should be isolated via a circuit breaker
or cuto switch.
NOTE: Batteries removed from the
sensor should be disposed of in
accordance with local regulations.
NOTE: Changes or modications
not expressly approved by the party
responsible for compliance could void
the user’s authority to operate the
equipment.
Introduction
Congratulations on your purchase of
the WR2 Wireless Sensor.
Now in accordance with California
Executive Order B-29-15, prohibiting
the application of potable water to
outdoor landscapes during and within
48 hours after measurable (1/4” or
greater) rainfall.
The Rain Bird Wireless Rain Sensor is
designed for residential and commercial
irrigation systems. It saves water
and extends irrigation system life by
automatically sensing precipitation and
interrupting irrigation during rain and low
temperature events.
Programming logic can suspend irrigation
using the “Quick Shut O ” feature or when
the amount of rainfall exceeds the rainfall
set point. Likewise, the Wireless Rain /
Freeze Sensor will suspend irrigation when
the sensor temperature reading is below the
temperature set point.
At Rain Bird, we are focused on developing
products and technologies that use water in
the most ecient manner possible. The rain
and rain / freeze sensor illustrate Rain Bird’s
commitment to this Intelligent Use of Water.
The product is part of Rain Bird’s family of
water conservation solutions that include
the SMRT-Y Soil Moisture Sensor, U-Series,
HE-VAN, and Rotary Nozzles, and the ESPSMTe controller.
Please read through these instructions in
their entirety or refer to the programming
demo (www.rainbird. com/WR2) before
installing your WR2 Wireless Sensor. Also,
reference your irrigation system controller /
timer installation instructions for the proper
connection of rain sensors.
Page 4

1
2
4
3
5
7
8
6
WR2-48 Wireless Sensor
2
WR2 Components
A
Controller Interface
B
Sensor
C
Battery Cassette and Lithium CR2032
Battery
D
Sensor Mounting Bracket Assembly
E
Mounting Hardware
F
User’s Manual
G
Quick Reference Guide
H
WR2-48 Quick Reference Label
NOTE: Tools needed for installation:
drill, drill bit, and Phillip’s head
screwdriver.
WR2 Benefits
All settings are programmed through the
Controller Interface device
Large easy to understand icons communicate
irrigation mode and sensor status
Sensor LED indicator enables one-person
setup, reducing installation time
Battery is easy to install / replace
Aesthetic appearance - no external
antennas
Easy to install, self-levelling sensor bracket
mounts to at surfaces or rain gutters
“Quick Shut O ” interrupts active
irrigation cycle during a rain event
Enhanced antenna array provides
superior signal reliability that overcomes
most line of sight obstructions
Automatically prevents irrigation for
48-hours following a rainfall event (WR248 model only).
Mounting the
Controller Interface
Choose a location near the irrigation
controller / timer.
CAUTION: The cable harness is 30
inches (76.2 cm) long, so before
mounting the device, ensure the wires
easily reach the irrigation controller’s
connection terminals.
Select a at surface
adjacent to the irrigation
controller.
For best performance,
the Controller Interface
should be installed at
least ve feet (1.5m)
above the ground.
It is recommended that
the Controller Interface
be installed away from
sources of electrical interference (such
as transformers, generators, pumps, fans,
electrical meter boxes) and metal objects
to maximize communication range.
Use the mounting hardware supplied.
Attach the Controller Interface to the wall.
Page 5
RED or
BLACK
WHITE
GREEN
TO VALVES
COMMON
FROM VALVES
RED
BLACK
WHITE
GREEN
TO VALVES
RED or
BLACK
GREEN or
WHITE
TO VALVES
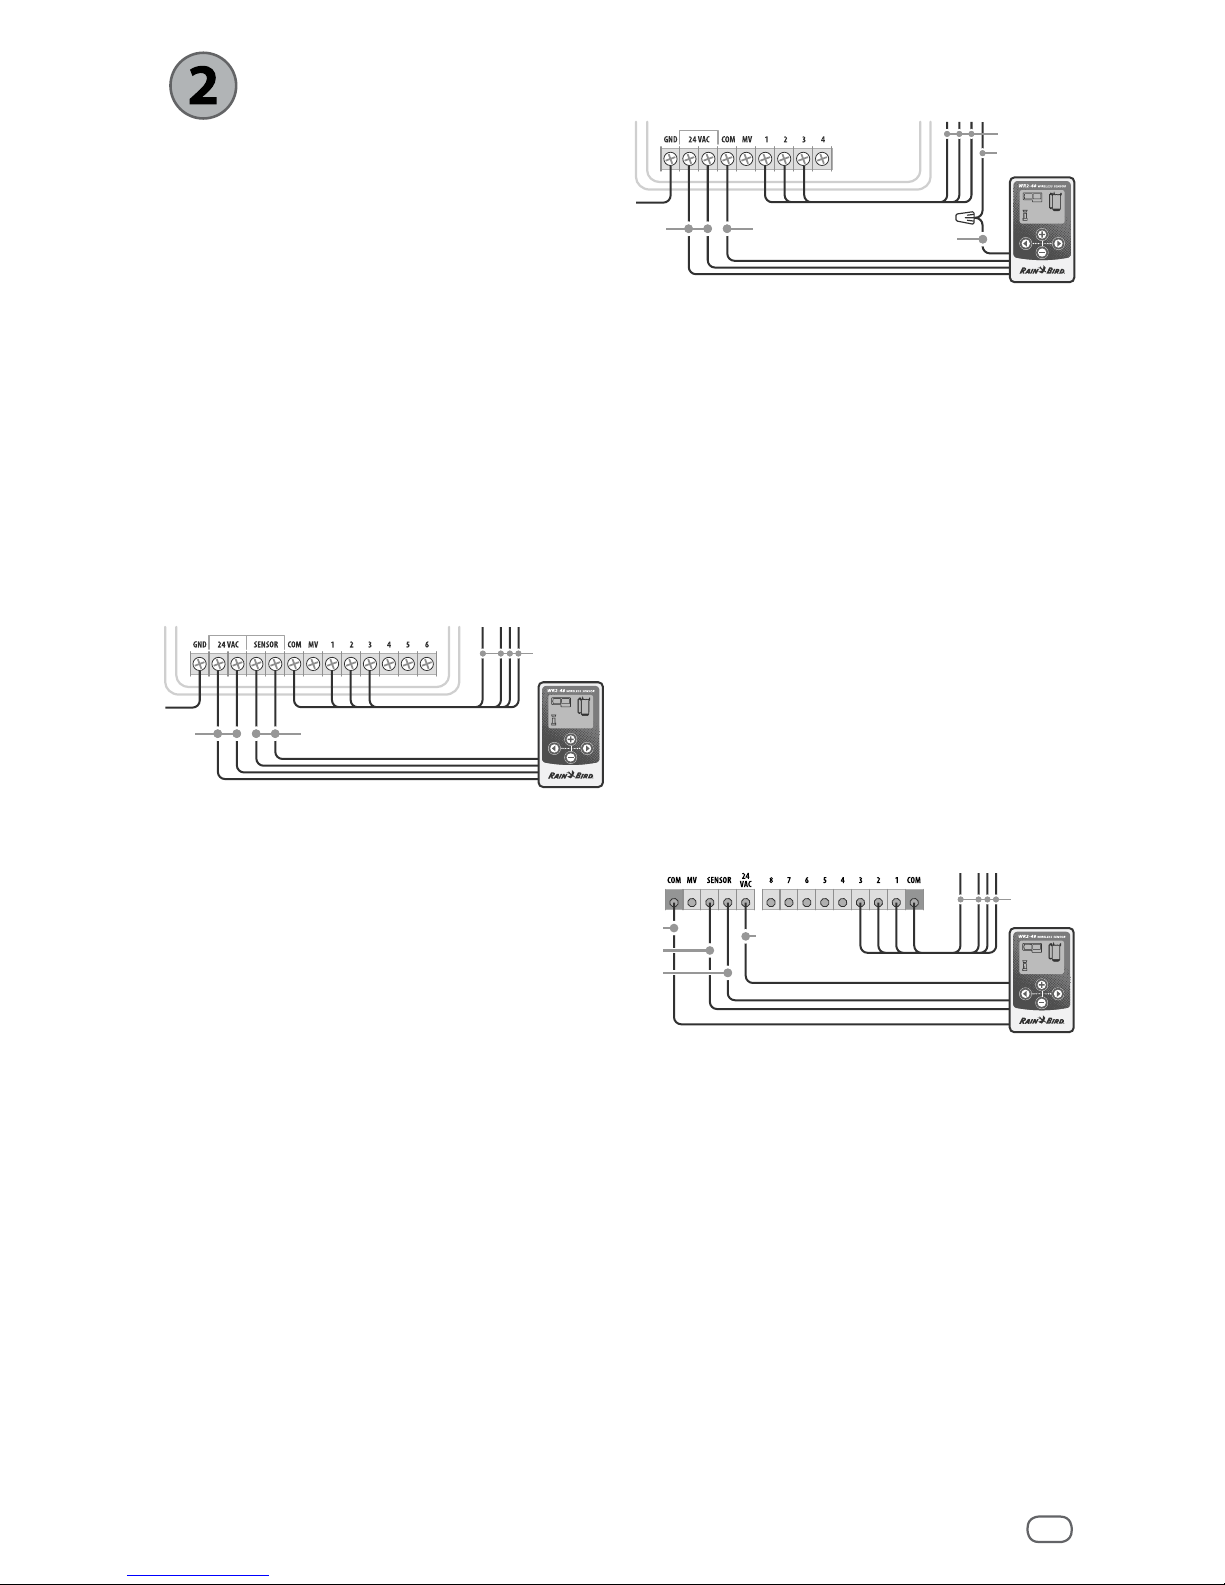
WR2-48 Wireless Sensor
3
Wiring the Controller
Interface to the
Irrigation Controller
NOTE: This unit is designed to be
installed in conjunction with 24VAC
circuits only. Do not use with 110 or
220/230 VAC circuits.
NOTE: The Controller Interface has 4
wires that must be connected to the
irrigation controller / timer. If your
timer does not have an internal 24VAC
power source, you will need to splice
the red and black Controller Interface
wires to a 24VAC transformer.
Controllers with sensor inputs (with
or without pump start / master
valve)
1. Disconnect power to the irrigation
controller.
2. Connect the red and black wires to
the 24 volt AC power on the irrigation
controller.
3. If present, remove “jumper wire” between
sensor terminals.
4. Connect the white and green wires to
the sensor inputs.
5. Reconnect power to the irrigation
controller.
NOTE: Ensure the sensor switch on
the irrigation controller panel is in the
active position.
Controllers with no sensor inputs (with
or without pump start / master valve)
1. Disconnect power to the irrigation
controller.
2. Connect the red and black wires to the
24volt AC power on the irrigation controller.
3. Disconnect the wires from the Common
terminal on the controller.
4. Connect the green wire to these
disconnected wires using a wire connector.
5. Connect the white wire to the Common
terminal on the controller.
6. Reconnect power to the irrigation
controller.
NOTE: Ensure the sensor switch on
the irrigation controller panel is in the
active position.
ESP-MC and ESP-LXME Modular
Controllers
1. Disconnect power to the irrigation
controller.
2. Connect the red wire to the 24 volt AC
terminal on the irrigation controller.
3. Connect the green and white wires to
the sensor terminals.
4. Connect the black wire to the Common
terminal on the controller.
5. Reconnect power to the irrigation
controller.
NOTE: Ensure the sensor switch on
the irrigation controller panel is in the
active position.
Page 6
WR2-48 Wireless Sensor
4
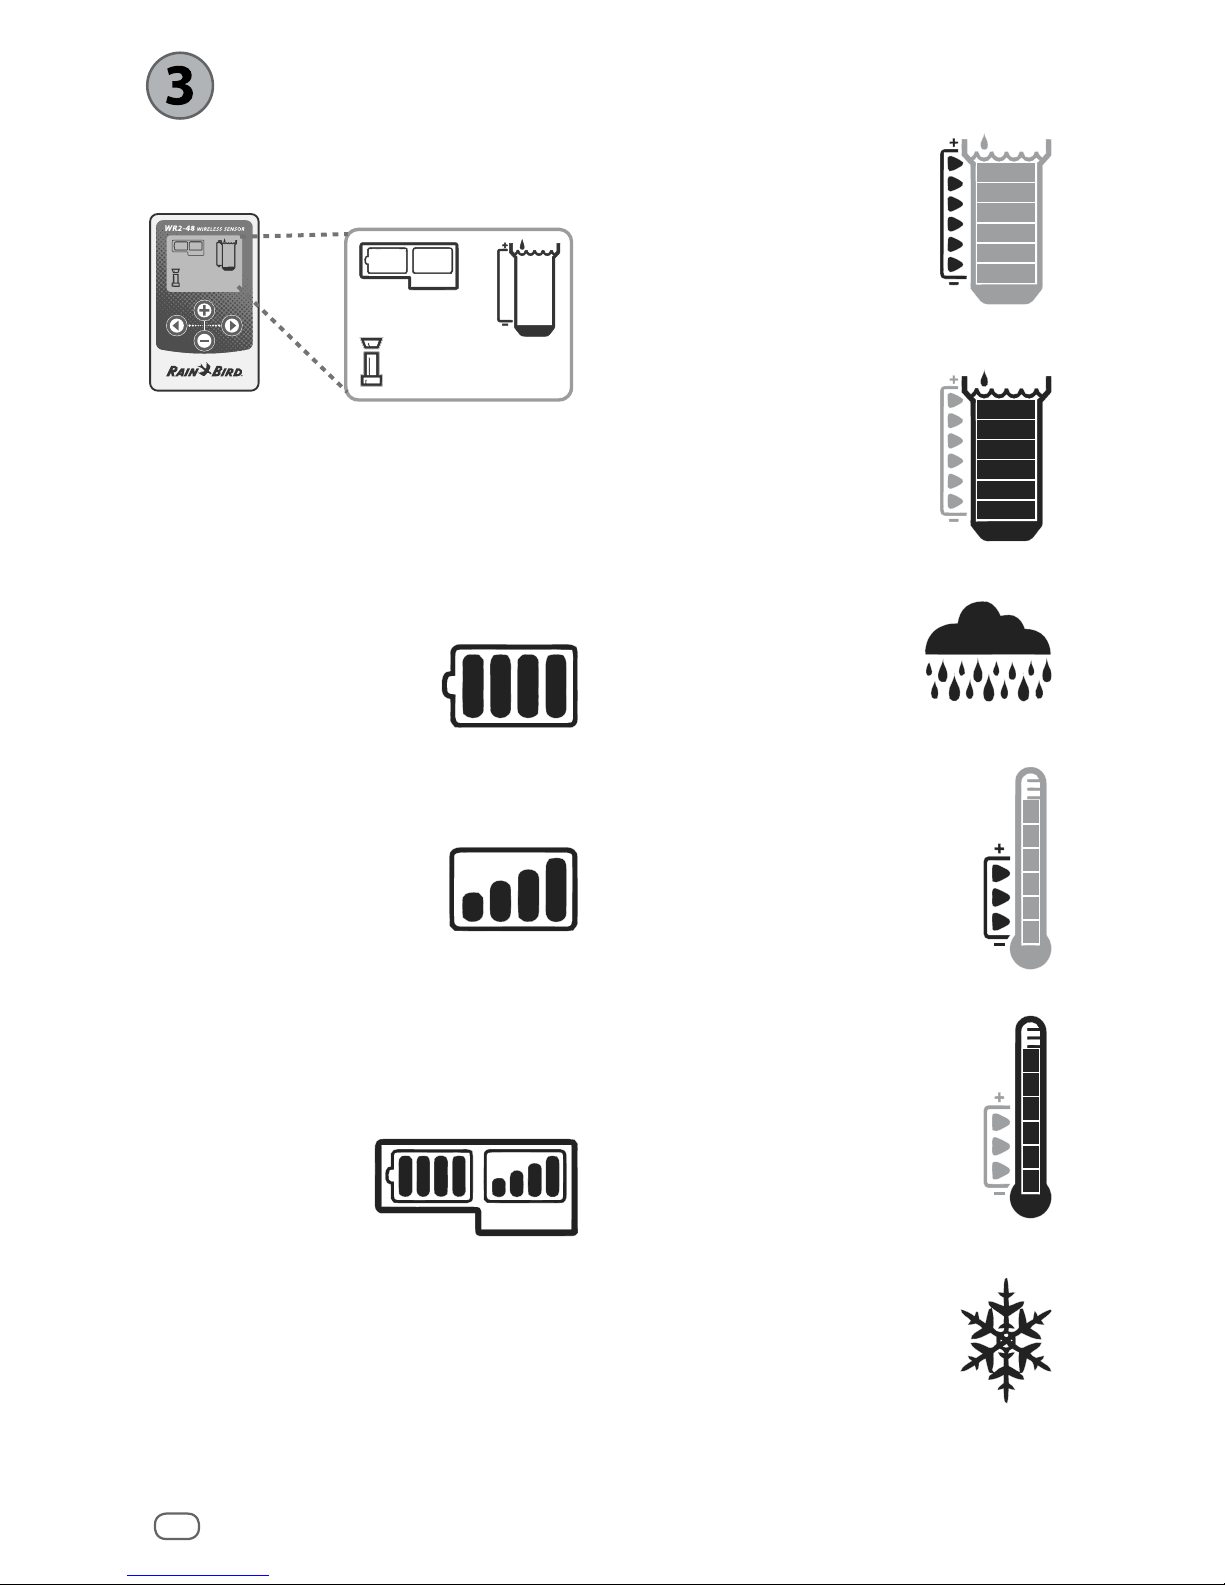
Initial Power Up
After power is applied, the Controller
Interface displays the following icons.
Controller Interface Display
Icons
Sensor Status
Battery Life Remaining:
Four (4) dark bars indicate
full battery strength.
Replace battery when
only one (1) bar remains.
Signal Strength:
Illustrates strength of
the radio signal between
Sensor and Controller
Interface. Four (4) dark
bars indicate maximum
signal strength.
Sensor Indicator /
Pairing Status:
The Sensor and
Controller Interface
synchronize
communication
addresses. Battery Life
and Signal Strength will
ash while synchronizing,
and then stop when
paired.
Environmental Conditions
Rainfall Set Point:
Select from six (6) set points
ranging from 1/8” (3mm) to
1/2” (13mm). A set point closer
to the top of the icon allows
for more precipitation to occur
before irrigation is suspended.
Rainfall Indicator:
Illustrates approximate
amount of rainfall relative to
Rainfall Set Point.
Rainfall Trip Indicator:
Displays when the Sensor has
suspended irrigation due to
“Quick Shut O “ or satisfying
rainfall set point.
Temperature Set Point
(Rain/Freeze Sensor only):
Select from three (3) set
points: 33°F (0.5°C), 37°F (3°C),
or 41°F (5°C). Selecting a lower
set point allows irrigation at
lower temperatures.
Temperature Indicator
(Rain/Freeze Sensor only):
Illustrates approximate
temperature relative to
Temperature Set Point.
Temperature Trip Indicator
(Rain/Freeze Sensor only):
Only displays when the Sensor
has suspended irrigation due
to temperature reading that
is below the temperature set
point.
Page 7

WR2-48 Wireless Sensor
5
Irrigation Modes
Programmed Irrigation
WR2 Wireless Sensor is actively managing
the irrigation
controller / timer.
Once a set point
is satised by
environmental conditions, or the “Quick
Shut O ” feature is activated, irrigation is
suspended. An X and corresponding trip
indicator (rainfall, temperature, or both)
will automatically display when irrigation is
suspended.
48-Hour Irrigation Hold Active
WR2-48 Model Only
Irrigation will be prevented
for 48 hours following
measured rainfall. The
display shall ash an X to
indicate the irrigation hold.
Override Sensor for 72 Hours
NOTE: Selecting Override Sensor cancels
any 48-hour hold
on irrigation.
User has elected
to permit
irrigation in accordance with the timer
schedule regardless of environmental
conditions (i.e. rainfall or low temperature
is detected by the sensor). System will
automatically resume programmed
irrigation mode after 72 hours (Note: X
and trip indicator will be displayed when
returning to programmed irrigation mode if
set points are satised).
Synchronize
the Sensor and
Controller Interface
After the Controller Interface is wired
to the irrigation timer, the Sensor and
Controller Interface need to establish a
radio communication link. When the link
is established, the Sensor and Controller
Interface are considered “paired.”
1. On the Controller
Interface, push
and hold both
arrow buttons
simultaneously to
begin the installation sequence.
2. After the “Sensor Indicator / Pairing
Status” icon ashes, remove the label
from the bottom of the sensor.
3. The ashing “Sensor Indicator / Pairing
Status” icon prompts you to insert the
battery cassette with battery into the
Sensor lower casing as shown. Align the
arrow on the battery cassette with the
unlocked indicator on the bottom of the
Sensor.
4. Rotate the battery cassette clockwise
until the arrow points toward the locked
indicator. The light on the bottom of the
Sensor will blink once to indicate that
the sensor is now powered up.
Page 8
WR2-48 Wireless Sensor
6
5. The Sensor is successfully paired to
the Controller Interface when the
“Sensor Indicator / Pairing Status” icon
stops ashing. Once paired, sensor
signal strength and battery life are
communicated via the Controller Interface
icons. Additionally, a blinking light on
the bottom of the Sensor indicates signal
strength for 20 minutes immediately
following successful pairing. These “self
test” features are an indication that your
WR2 Wireless Sensor is operational.
Programming the
Set Points
The WR2 Wireless Sensor allows the
contractor to establish rainfall and
temperature set points appropriate for
local environmental and soil conditions.
Alternately, the contractor may elect to use
the “Standard Setting”: temperature 37°F
(3°C), rain fall ¼” (6mm) and “programmed
irrigation” mode. The ”Standard Setting” is
programmed at the factory and is active
after successful pairing.
Rainfall Set Point
1. Push left or right
arrow on keypad to
navigate to the Rainfall
Indicator icon.
2. When the Rainfall
Indicator icon ashes,
press the + / – button
on the keypad to set
programming details.
Each press of the button
adjusts the set point.
Select from six (6) set
points ranging from 1/8”
(3mm) to 1/2” (13mm).
3. Press the left or right
arrow to accept
programming details
and to navigate to
next icon.
Temperature Set Point
(Rain/Freeze Sensor only)
1. Push left or right arrow
on keypad to navigate
to the Temperature
Indicator icon.
2. When the
Temperature Indicator
icon ashes, press
the + / – button on
the keypad to set
programming details.
Select one of three
temperature settings:
33°F (0.5°C), 37°F (3°C),
or 41°F (5°C).
3. Press the left or right
arrow to accept
programming details
and to navigate to
next icon.
Programming
Irrigation Modes
1. Push left or right arrow
on keypad to navigate
to the Irrigation Mode
icon.
2. When the Irrigation
Mode icon ashes,
press the + / –
button on the keypad
to set programming
details. Manually set
one of three irrigation
modes. See Irrigation
Modes.
3. Press the left or right
arrow to accept
programming details
and to navigate to
next icon.
Page 9

WR2-48 Wireless Sensor
7
Saving, Resetting
and Restoring
Settings
Save Contractor Default
Settings
Once the Controller
Interface is completely
programmed, press
+ and right arrow
buttons simultaneously
for ve (5) seconds to
save contractor default
setting. All programmed
icons will ash in unison
one time to indicate
program is saved.
Reset Contractor Default
Settings
The Contractor default setting stores
programming details related to rainfall and
temperature set points.
Reset and save programming details in
accordance with Section
and .
Restore Contractor Default
Settings
If this programming is inadvertently
changed, it is simple to restore.
Press + and – buttons
simultaneously for ve
(5) seconds, or until
the screen goes blank.
When icons reappear,
contractor default
settings are restored.
Restore Standard Setting
Press the – and
left arrow buttons
simultaneously
for ve (5)
seconds, or until
the screen goes
blank, to cancel
Select the Sensor
Location
The communication range for the
WR2 Wireless Sensor is 700 feet
(213.4 meters).
A blinking light on the bottom of the
Sensor indicates signal strength for 20
minutes immediately following successful
pairing. The Sensor updates its signal
strength every 3 seconds (i.e. 1 blink =
reliable signal strength, series of 4 blinks
= strongest signal strength). If the signal
strength is not optimum in one location,
try another location. Even as little as a few
feet dierence in placement can improve
signal strength.
Select a mounting location where the
rain sensor will receive direct rainfall.
Make sure the sensor extends beyond
the roof line, tree limbs and any other
obstructions. Install the Rain Sensor in
an area that receives as much rain and
sunlight as the landscape. Be sure to
mount the sensor above spray from the
sprinklers.
Signal Sensor LED
GOOD
Install
1-4 Blinks
POOR
DO NOT install
Does not blink
the Contractor default setting and restore
the ”Standard Setting”: temperature 37°F
(3°C), rain fall ¼” (6mm) and “programmed
irrigation” mode. When icons reappear,
”Standard Setting” is active.
Page 10

Remove Cap
1
Insert
2
Replace Cap
3
Attachment
Bracket
Extension
Arm
2
mounting
bracket
gutter
1
WR2-48 Wireless Sensor
8
Sensor Mounting
Instructions
This section provides detailed instructions on how to install the sensor.
Sensor Bracket Assembly
Components
Attaching the bracket to a
gutter
Slide the top portion of the attachment
bracket over the lip of the gutter. Rotate the
bracket downward over the gutter as shown
in the following installation steps.
Attaching the bracket to a
flat surface
Use the supplied hardware to mount the
attachment
bracket to a
at surface
such as a wall
or fence.
Installing the Sensor in the
attachment bracket
To insert the Sensor in the attachment
bracket you must rst remove the Sensor
cap. Hold the sensor body in one hand;
gently twist the cap with your other hand.
Slide the neck of the sensor up through the
opening of the extension arm. Reinstall the
cap. A clicking sound indicates that the two
latches on the sensor body have fully reengaged the cap.
Using Multiple
Controller
Interface Units
Up to four (4) Controller Interface units can
be paired to one (1) sensor.
1. Ensure all Controller Interface Units are
powered up.
2. Synchronize the Sensor to the rst
Controller Interface in accordance with
Section .
3. As you approach the second Controller
Interface, remove the battery cassette
from the Sensor. Push both arrow
buttons simultaneously on the second
Controller Interface. Wait 5 seconds.
Page 11

WR2-48 Wireless Sensor
9
Reinsert the battery into the Sensor. The
Controller Interface “Sensor Indicator /
Pairing Status” icon stops ashing when
the device is synchronized to the Sensor.
Continue with programming the second
Controller Interface.
4. Repeat step 3 to pair additional Controller
Interface units to the Sensor.
5. When multiple Controller Interface units
are paired to one sensor, rely on the LCD
screen signal strength indications only.
WR2 Wireless Sensor Alerts & Troubleshooting
The unique two-way communication technology of the Rain Bird Wireless Rain and Rain/
Freeze Sensor provides continuous monitoring of the Sensor status and communicates the
following Controller Interface alerts.
Alert LCD Display Description Resolution
Initial
Power Up
Failure
LCD screen is blank Initial Power up
screen / icons do not
appear indicating the
Controller Interface is
not receiving power.
Conrm correct wiring of the Controller
Interface to the Irrigation Controller.
No Sensor
Paired
“Sensor Indicator /
Pairing Status” icon
continues to ash
During Installation:
The sensor does
not pair and is not
communicating
with the Controller
Interface.
1. Pair the sensor (see Section ).
2. If step 1 does not correct the
situation, then check/replace the
battery.
Sensor
Pairing
Broken
“Sensor Indicator
/ Pairing Status”
icon does not
communicate
battery life or signal
strength
After the WR2 Wireless
Sensor is in operation:
A sensor that does not
communicate battery
life / signal strength to
the Controller Interface
is no longer paired.
1. First check/replace the battery.
If a new battery is installed, the sensor
automatically reacquires the Controller
Interface.
2. If you replace a sensor that is paired
to the Controller Interface, you will
have to pair the new sensor to the
Controller Interface.
Low Battery “Battery Life
Remaining” icon
has only one (1) bar
illuminated
Initial Power Up Failure Replace the battery.
1. Remove battery cassette from sensor.
2. Remove battery from cassette.
3. Insert new battery using label on
battery cassette to properly orient
battery.
4. Insert battery cassette into sensor.
5. Sensor LED blinks once to indicate
the sensor is powered up. Under
normal operation, battery should last
for four (4) or more years.
WARNING
Chemical Burn Hazard. Keep Batteries away from children. This product contains a lithium button/coin cell battery. If
a new or used lithium button/coin battery is swallowed or enters the body, it can cause severe internal burns and can
lead to death in as little as 2 hours. Always completely secure the battery compartment. If the battery compartment
does not close securely, stop using the product, remove the battery, and keep it away from children. If you think batteries might have been swallowed or placed inside any part of the body, seek immediate medical attention. The cells
shall be disposed of properly. Even used cells may cause injury.
Page 12

WR2-48 Wireless Sensor
10
Declaration of Conformity
I the undersigned, hereby declare that the equipment specied above,
conforms to the above Directive(s) and Standard(s).
Application of
Council Directives:
Standards To Which
Conformity Is Declared:
Manufacturer’s Name:
Manufacturer’s Address:
Equipment Description:
Equipment Class:
Model Numbers:
2004/10S/EC
1999/5/EC
EN55014-1:2006
EN55022:2006
EN55014-2: 1997 +Al:2001
EN61000-4-2
EN61000-4-3
EN61000-4-8
EN 300 220-2 V2.1.2
Rain Bird Corp.
9491 Ridgehaven Court
San Diego, CA 92123
619-674-4068
Irrigation Controller
Class B
WRS
Place: San Diego, Ca.
Signature:
Full Name: Ryan Walker
Position: Controls Manuf. Division Director
Page 13

WR2-48 Wireless Sensor
11
Índice
EN
page 1
ES
Información de seguridad .................................12
Introducción ......................................................12
Componentes del sensor WR2 ...........................................................13
Ventajas del sensor WR2 .......................................................................13
Montaje de la interfaz del programador ...........13
Instalación del cableado entre la interfaz del
programador y el programador de riego ..........14
Puesta en marcha inicial .................................... 15
Iconos de la pantalla de la interfaz del programador .............15
Estado del sensor ................................................................................ 15
Condiciones ambientales.................................................................15
Modos de riego ..................................................................................... 16
Sincronización del sensor y la interfaz del
programador .....................................................16
Programación de los niveles preestablecidos ...17
Nivel de lluvia preestablecido ............................................................17
Temperatura preestablecida
(sólo en el sensor de heladas) ............................................................17
Programación de los modos de riego ................17
Guardar, restablecer y restaurar los niveles .....18
Guardar los valores predeterminados por el instalador ........18
Restablecer los valores predeterminados por
el instalador .................................................................................................18
Restaurar los valores predeterminados por el instalador .....18
Restaurar los valores estándar ...........................................................18
Elección del lugar para el montaje del sensor ...18
Instrucciones para el montaje del sensor ..........19
Uso de varias unidades de interfaz del
programador .....................................................19
Alertas y resolución de problemas del sensor
inalámbrico WR2 Wireless Sensor .....................20
Page 14

WR2-48 Wireless Sensor
12
Información de seguridad
Símbolos utilizados en este manual:
PRECAUCIÓN: Este símbolo advierte
al usuario de la presencia de “voltaje
peligroso” sin aislamiento en el
interior de la carcasa del producto,
que podría ser suciente para
presentar riesgo de electrocución.
NOTA: Este símbolo advierte
al usuario de la presencia de
instrucciones de funcionamiento o
mantenimiento (servicio) importantes.
Interferencias con otros dispositivos
electrónicos
Todos los transmisores de radio trasmiten
energía a través del aire. Esta energía puede
interferir con otros dispositivos electrónicos
que se encuentren en las proximidades del
sensor inalámbrico WR2-48. Para reducir el
riesgo de interferencias electrónicas:
No coloque dispositivos electrónicos
sensibles (ordenadores, teléfonos, radios,
etc.) en las proximidades de la interfaz de
control o del sensor.
Utilice abrazaderaae ferrita en las
conexiones o los cables de alimentación
de los dispositivos electrónicos afectados.
NOTA: El programador de riego /
temporizador debe aislarse mediante un
disyuntor o un interruptor de apagado.
NOTA: Las pilas retiradas del sensor
se deben desechar de acuerdo con la
normativa local.
NOTA: Los cambios o modificaciones que
no hayan sido aprobados expresamente
por la parte responsable de la conformidad
podrían anular la autorización al usuario
para utilizar el equipo.
Introducción
Le felicitamos por haber adquirido
el sensor inalámbrico WR2 Wireless
Sensor.
Ahora, de acuerdo con la Orden
Ejecutiva de California B-29-15, que
prohíbe la aplicación de agua potable a
los paisajes al aire libre durante y dentro
de las 48 horas después medible (1/4 “o
mayor) de lluvia.
El sensor de lluvia inalámbrico de Rain
Bird se ha diseñado para sistemas de
riego residenciales y comerciales. Detecta
automáticamente las precipitaciones e
interrumpe el riego durante períodos de
lluvia o de baja temperatura, lo que permite
ahorrar agua y aumentar la vida útil del
sistema de riego.
La lógica de programación permite cancelar
el riego mediante la función de apagado
rápido o cuando la cantidad de lluvia
supere el nivel preestablecido. De la misma
manera, el sensor de heladas cancelará el
riego cuando la lectura de temperatura del
sensor se encuentre por debajo del nivel
preestablecido.
El objetivo de Rain Bird es desarrollar
productos y tecnologías que utilicen el
agua de la manera más eciente posible.
Los sensores de lluvia y de heladas son un
ejemplo del compromiso de Rain Bird con
este uso inteligente del agua.
Este producto forma parte de la gama de
soluciones de ahorro de agua de Rain Bird,
que incluye el sensor de humedad del suelo
SMRT-Y, las boquillas giratorias, HE-VAN y de
la serie U, y el programador ESP-SMTe.
Antes de instalar el sensor inalámbrico WR2
Wireless Sensor, lea la totalidad de estas
instrucciones o consulte la demostración
de programación (www.rainbird.com/WR2).
Para conectar correctamente los sensores
de lluvia, consulte las instrucciones de
instalación del programador / temporizador
de su sistema de riego.
Page 15

1
2
4
3
5
7
8
6
WR2-48 Wireless Sensor
13
Componentes del sensor WR2
A
Interfaz del programador
B
Sensor
C
Compartimento de la pila y pila de litio
CR2032
D
Soporte de montaje del sensor
E
Accesorios de montaje
F
Manual del usuario
G
Guía de referencia rápida
H
Etiquetas de la guía de referencia rápida
del sensor WR2
NOTA: Herramientas necesarias
para la instalación: taladro, broca y
destornillador Phillips
Ventajas del sensor WR2
Todos los ajustes se programan mediante
el dispositivo de interfaz del programador.
Dispone de iconos grandes y fáciles de
entender para informar del modo de riego
y el estado del sensor.
El indicador LED del sensor permite que
una sola persona realice la conguración,
lo que reduce el tiempo de instalación.
La pila se puede instalar y sustituir con
facilidad.
Su aspecto es estético, sin antenas externas.
La instalación es sencilla y el soporte
autonivelante del sensor permite realizar
el montaje en supercies planas o en
canaletas de lluvia.
El sistema de apagado rápido interrumpe
el ciclo de riego activo cuando llueve.
El sistema de antena mejorado aumenta
la abilidad de la señal y permite salvar
la mayoría de los obstáculos que se
encuentren en la línea visual.
Evita automáticamente el riego durante
48 horas después de un evento de lluvia.
(Sólo WR2-48 modelo.)
Montaje de la interfaz
del programador
Elija un lugar próximo al programador
/ temporizador de riego.
PRECAUCIÓN: La longitud del cableado
es de 76,2 cm (30 pulgadas), por lo
que antes de montar el dispositivo se
debe comprobar que los cables lleguen
fácilmente a los terminales de conexión del
programador de riego.
Elija una supercie
plana adyacente al
programador de riego.
Para obtener el máximo
rendimiento, la interfaz
de control se debe
instalar como mínimo
a una altura de 1,5m
(cinco pies) por encima
del suelo.
Se recomienda
instalar la interfaz del
programador alejada de
fuentes de interferencia eléctrica (como
transformadores, generadores, bombas,
ventiladores y cajas de contadores de
electricidad) y objetos metálicos, para
maximizar el alcance de la comunicación.
Page 16

ROJO o
NEGRO
BLANCO
VERDE
A LAS VÁLVULAS
COMÚN DE LAS
VÁLVULAS
ROJO o
NEGRO
VERDE o
BLANCO
A LAS VÁLVULAS
ROJO
NEGRO
BLANCO
VERDE
A LAS VÁLVULAS
WR2-48 Wireless Sensor
14
Instalación del
cableado entre
la interfaz del
programador y el
programador de riego
NOTA: Esta unidad se ha diseñado para
su instalación únicamente con circuitos
de 24 VCA. No se debe utilizar con
circuitos de 110 ó 220/230 VCA.
NOTA: La interfaz del programador
tiene 4 cables que se deben conectar al
programador / temporizador de riego.
Si el temporizador no dispone de una
fuente de alimentación interna de 24
VCA, deberá empalmar los cables rojo
y negro de la interfaz del programador
a un transformador de 24 VCA.
Programadores con entradas para
sensores (con o sin válvula principal
/ arranque de bomba)
1. Desconecte la alimentación del
programador de riego.
2. Conecte los cables rojo y negro a la
fuente de alimentación de 24 voltios de
CA del programador de riego.
3. Retire el “cable puente” entre los
terminales del sensor (si lo hay).
4. Conecte los cables blanco y verde a las
entradas del sensor.
5. Vuelva a conectar la alimentación del
programador de riego.
NOTA: Compruebe que el interruptor
del sensor del panel del programador
de riego esté en posición activa.
Programadores sin entradas para
sensores (con o sin válvula principal /
arranque de bomba)
1. Desconecte la alimentación del
programador de riego.
2. Conecte los cables rojo y negro a la
fuente de alimentación de 24 voltios de
CA del programador de riego.
3. Desconecte los cables del terminal
común del programador.
4. Conecte el cable verde a estos cables
desconectados mediante un conector
para cables.
5. Conecte el cable blanco al terminal
común del programador.
6. Vuelva a conectar la alimentación del
programador de riego.
NOTA: Compruebe que el interruptor
del sensor del panel del programador
de riego esté en posición activa.
Programadores ESP-MC y ESP-LXME
Modular
1. Desconecte la alimentación del
programador de riego.
2. Conecte el cable rojo al terminal de 24
voltios de CA del programador de riego.
3. Conecte los cables verde y blanco a las
terminales para el sensor
4. Conecte el cable negro al terminal
común del programador.
5. Vuelva a conectar la alimentación del
programador de riego.
NOTA: Compruebe que el interruptor
del sensor del panel del programador
de riego esté en posición activa.
Utilice los accesorios de montaje
suministrados. Fije la interfaz del
programador a la pared.
Page 17

WR2-48 Wireless Sensor
15
Puesta en marcha
inicial
Al aplicar la corriente, la interfaz del
programador muestra los iconos siguientes.
Iconos de la pantalla de la interfaz del programador
Estado del sensor
Carga restante de la pila:
Cuatro (4) barras oscuras
indican que la pila está
completamente cargada.
Sustituya la pila cuando
sólo quede una (1) barra.
Intensidad de la señal:
Indica la intensidad de
la señal de radio entre el
sensor y la interfaz del
programador. Cuatro (4)
barras oscuras indican que
la intensidad de la señal es
la máxima.
Indicador del
sensor / estado de
sincronización:
El sensor y la interfaz
del programador
sincronizan las direcciones
de comunicación. Los
indicadores de carga de
la pila e intensidad de
la señal se encienden
intermitentemente
durante la sincronización y
permanecen jos cuando
están sincronizados.
Condiciones ambientales
Nivel de lluvia
preestablecido:
Se puede elegir entre seis (6)
niveles, que van desde 3 mm
(1/8”) a 13 mm (1/2”). Cuanto
más próximo esté el nivel a la
parte superior del icono, mayor
será la precipitación necesaria
para que se cancele el riego.
Indicador de lluvia:
Indica la cantidad de lluvia
aproximada en relación al nivel
de lluvia preestablecido.
Indicador de cancelación por
lluvia:
Indica si el sensor ha cancelado
el riego porque se ha activado
la función de apagado rápido
o se ha alcanzado el nivel de
lluvia preestablecido.
Temperatura preestablecida
(sólo en el sensor de
heladas):
Se puede elegir entre tres (3)
niveles preestablecidos: 0,5 °C
(33 °F), 3 °C (37 °F) o 5 °C (41 °F).
Si se selecciona un nivel más
bajo, se permitirá el riego con
temperaturas más bajas.
Indicador de temperatura
(sólo en el sensor de heladas):
Indica la temperatura
aproximada en relación a la
temperatura preestablecida.
Indicador de cancelación por
descenso de temperatura
(sólo en el sensor de heladas):
Sólo aparece cuando el sensor
ha cancelado el riego porque
la lectura de temperatura se
encuentra por debajo del límite
preestablecido.
Page 18

WR2-48 Wireless Sensor
16
Modos de riego
Riego programado
El sensor
inalámbrico WR2
Wireless Sensor
gestiona de
manera activa el programador / temporizador
de riego. Cuando las condiciones ambientales
alcanzan uno de los niveles preestablecidos
o se activa la función de apagado rápido, se
cancela el riego. Cuando se cancela el riego,
aparecerán automáticamente una X y el
indicador de cancelación correspondiente
(lluvia, temperatura o ambos).
Pausa de 48 horas de riego activa
Sólo modelo WR2-48
Se evitara riego durante 48
horas después de la lluvia
medida. En la pantalla deberá
parpadear una X para indicar
la pausa de riego
Ignorar las indicaciones del sensor
durante 72 horas
NOTA: La selección del sensor de anulación
cancela cualquier retención de 48 horas en
el riego.
El usuario
ha decidido
permitir el riego
según la programación independientemente
de las condiciones ambientales (incluso
si el sensor detecta lluvia o helada).
Después de 72 horas, el sistema reanudará
automáticamente el modo de riego
programado (Nota: si se cumplen los niveles
preestablecidos, la X y el indicador de
cancelación aparecerán al volver al modo de
riego programado).
Sincronización del
sensor y la interfaz
del programador
Una vez realizado el cableado entre la
interfaz del programador y el temporizador
de riego, el sensor y la interfaz del
programador deben establecer un enlace
de comunicación por radio. Cuando se haya
establecido el enlace, se considerará que el
sensor y la interfaz del programador estarán
“sincronizados”.
1. Para comenzar
la secuencia de
instalación, pulse y
mantenga pulsados
simultáneamente los
dos botones de echa
de la interfaz del programador.
2. Cuando el icono “Indicador del sensor /
Estado de sincronización” se encienda
intermitentemente, retire la etiqueta de la
parte inferior del sensor.
3. El icono “Indicador del sensor / Estado
de sincronización” se encenderá
intermitentemente para indicarle que
introduzca el compartimento de la pila
con la pila en la carcasa inferior del sensor,
como se muestra en la ilustración. Alinee
la echa del compartimento de la pila con
el indicador de apertura de la parte inferior
del sensor.
4. Gire el compartimento de la pila en el
sentido de las agujas del reloj hasta el
indicador de cierre. La luz de la parte
inferior del sensor parpadeará una
vez para indicar que el sensor está
encendido.
Page 19

WR2-48 Wireless Sensor
17
5. El sensor estará correctamente sincronizado
con la interfaz del programador cuando
el icono “Indicador del sensor / Estado de
sincronización” deje de parpadear. Cuando
se haya realizado la sincronización, la
intensidad de la señal y la carga de la pila
se indicarán mediante los iconos de la
interfaz del programador. Además, una
luz intermitente en la parte inferior del
sensor indica la intensidad de la señal
durante 20 minutos después de realizarse
correctamente la sincronización. Estas
funciones de “autocomprobación” también
indican que el sensor inalámbrico WR2
Wireless Sensor funciona correctamente.
Programación
de los niveles
preestablecidos
El sensor inalámbrico WR2 Wireless Sensor
permite al instalador establecer los niveles
de lluvia y temperatura preestablecidos
adecuados para las condiciones locales
ambientales y del terreno. Alternativamente,
el instalador también puede elegir utilizar los
valores estándar: temperatura 3 °C (37 °F), lluvia
6 mm (¼”) y modo de “riego programado”. Los
valores estándar se programan en fábrica y
son los que están activos después de realizar
correctamente la sincronización.
Nivel de lluvia preestablecido
1. Pulse la echa a la derecha
o a la izquierda del teclado
para desplazarse al icono
del indicador de lluvia.
2. Cuando el icono
del indicador de
lluvia se encienda
intermitentemente, pulse el
botón + / – del teclado para
ajustar la programación.
Cada pulsación del botón
permite ajustar el nivel
preestablecido. Se puede
elegir entre seis (6) niveles,
que van desde 3 mm (1/8”)
a 13 mm (1/2”).
Temperatura preestablecida
(sólo en el sensor de heladas)
1. Pulse la echa a la derecha
o a la izquierda del teclado
para desplazarse al icono del
indicador de temperatura.
2. Cuando el icono del indicador
de temperatura se encienda
intermitentemente, pulse el
botón + / – del teclado para
ajustar la programación.
Seleccione uno de los tres
ajustes de temperatura
posibles: 0,5 °C (33 °F), 3 °C (37
°F) o 5 °C (41 °F).
3. Pulse la echa a la derecha
o la echa a la izquierda
para aceptar los ajustes de
la programación y pasar al
icono siguiente.
Programación de
los modos de riego
1. Pulse la echa a la derecha
o a la izquierda del teclado
para desplazarse al icono
del modo de riego.
2. Cuando el icono del modo
de riego se encienda
intermitentemente, pulse el
botón + / – del teclado para
ajustar la programación.
Establezca manualmente
uno de los tres modos de
riego posibles. Consulte la
sección Modos de riego.
3. Pulse la echa a la derecha
o la echa a la izquierda
para aceptar los ajustes de
la programación y pasar al
icono siguiente.
3. Pulse la echa a la derecha
o la echa a la izquierda
para aceptar los ajustes de
la programación y pasar al
icono siguiente.
Page 20

WR2-48 Wireless Sensor
18
Guardar,
restablecer y
restaurar los niveles
Guardar los valores predeterminados por el instalador
Cuando la interfaz del
programador haya
sido completamente
programada, pulse
simultáneamente los
botones + y echa a la derecha durante
cinco (5) segundos para guardar los valores
predeterminados por el instalador. Todos
los iconos programados se encenderán
intermitentemente al unísono para indicar
que se ha guardado el programa.
Restablecer los valores predeterminados por
el instalador
Los valores predeterminados por el
instalador son los detalles de programación
almacenados relativos a los niveles de lluvia
y temperatura preestablecidos.
Para restablecer y guardar los detalles de la
programación siga las indicaciones de las
secciones y .
Restaurar los valores
predeterminados por el
instalador
Si se cambia esta
programación
inadvertidamente, es
muy sencillo restaurarla.
Pulse los botones + y –
simultáneamente durante
cinco (5) segundos o hasta que la pantalla
se ponga en blanco. Cuando vuelvan a
aparecer los iconos, se habrán restaurado
los valores predeterminados por el
instalador.
Restaurar los valores
estándar
ponga en blanco para cancelar los valores
predeterminados por el instalador y restaurar
los valores estándar: temperatura 3 °C (37 °F),
lluvia 6 mm (¼”) y modo de “riego programado”.
Cuando vuelvan a aparecer los iconos, se
habrán activado los valores estándar.
Elección del lugar para
el montaje del sensor
El rango de alcance del sensor
inalámbrico WR2 Wireless Sensor es
de 213,4 metros (700 pies).
Una luz intermitente en la parte inferior
del sensor indica la intensidad de la
señal durante 20 minutos después de
que se haya realizado correctamente
la sincronización. El sensor actualiza la
intensidad de la señal cada 3 segundos
(1 intermitencia = intensidad aceptable
de la señal, una serie de 4 intermitencias
= intensidad máxima de la señal). Si la
intensidad de la señal en un lugar no
es la ideal, se debe probar a realizar la
instalación en otro. Incluso unos pocos
centímetros de diferencia pueden
aumentar la intensidad de la señal.
Para realizar el montaje, elija un lugar en el
que la lluvia caiga directamente sobre el
sensor. Compruebe que el sensor no esté
tapado por el alero del tejado, ramas de los
árboles ni ningún otro obstáculo. Instale
el sensor de lluvia en una zona que reciba
tanta lluvia y luz solar como el terreno.
Asegúrese de montar el sensor por encima
de la pulverización de los aspersores.
Señal LED del sensor
BUENA
Instalar
1-4 Intermitancias
MALA
NO instalar
No intermitente
Pulse el botón – y
el botón de echa
a la izquierda
simultáneamente
durante cinco (5)
segundos o hasta
que la pantalla se
Page 21

Inserte
2
Volver a
colocar la tapa
3
Retire la tapa
1
Soporte de
fijación
Brazo de
extensión
2
Soporte de
Fijacion
Canaleta
1
WR2-48 Wireless Sensor
19
Instrucciones para
el montaje del
sensor
Esta sección incluye instrucciones
detalladas para instalar el sensor.
Componentes del soporte
del sensor
Conexión del soporte a una
canaleta
Deslice la parte superior del soporte de
jación sobre el reborde de la canaleta. Gire
el soporte hacia abajo sobre la canaleta
como se muestra en los pasos de instalación
siguientes.
Conexión del soporte a una
superficie plana
Utilice
las piezas
suministradas
para montar
el soporte de
jación a una
supercie
plana, como
una pared o
una verja.
Instalación del sensor en el
soporte de fijación
Para insertar el sensor en el soporte de
jación, debe retirar previamente la tapa
del sensor. Sujete el cuerpo del sensor con
una mano y gire suavemente la tapa con la
otra mano. Deslice el cuello del sensor hacia
arriba a través de la apertura del brazo de
extensión. Vuelva a colocar la tapa. Cuando
escuche un clic, signicará que las dos
pestañas del cuerpo del sensor han encajado
completamente en la tapa.
Uso de varias
unidades de interfaz
del programador
Es posible sincronizar hasta cuatro (4)
unidades de interfaz del programador con
un (1) sensor.
1. Compruebe que todas las unidades
de interfaz del programador estén
encendidas.
2. Sincronice el sensor con la primera
interfaz del programador de acuerdo a
las indicaciones de la sección .
3. Al acercarse a la segunda interfaz del
programador, retire el compartimento
de la pila del sensor. Pulse
Page 22

WR2-48 Wireless Sensor
20
simultáneamente ambos botones
de echa en la segunda interfaz del
programador. Espere 5 segundos.
Vuelva a colocar la pila en el sensor. El
icono “Indicador del sensor / Estado
de sincronización” de la interfaz del
programador dejará de parpadear
cuando el sensor y el dispositivo
estén sincronizados. Continúe con la
programación de la segunda interfaz del
programador.
4. Repita el paso 3 para sincronizar
unidades de interfaz del programador
adicionales con el sensor.
5. Si hay varias interfaces del programador
sincronizadas con un único sensor,
confíe únicamente en las indicaciones de
intensidad de la señal de la pantalla LCD.
Alerta Pantalla LCD Descripción Solución
Error de
puesta en
marcha inicial
La pantalla LCD está
en blanco
No aparece la pantalla de
encendido inicial ni los iconos,
lo que indica que la interfaz
del programador no recibe
corriente.
Compruebe si el cableado entre la interfaz de
control y el programador de riego es correcto.
No hay ningún sensor
sincronizado
El icono “Indicador
del sensor / Estado de
sincronización”
sigue intermitente
Durante la instalación: El
sensor no sincroniza ni se
comunica con la interfaz del
programador.
1. Sincronice el sensor (consulte la sección
).
2. Si el paso 1 no corrige el problema,
compruebe/sustituya la pila.
El sensor ha
dejado de
estar sincronizado
El icono “Indicador
del sensor / Estado
de sincronización” no
indica la carga de la
pila o la intensidad
de la señal
Después de que el sensor
inalámbrico WR2 Wireless
Sensor esté funcionamiento:
El sensor que no indique la
carga de la pila / intensidad
de la señal a la interfaz del
programador ya no está
sincronizado.
1. En primer lugar, compruebe / sustituya la
pila. Al instalar una pila nueva, el sensor retoma
automáticamente la conexión con la interfaz
del programador.
2. Si sustituye un sensor que ya estaba
sincronizado con la interfaz del programador,
deberá sincronizar el nuevo sensor
Carga de la
pila baja
El icono “Carga
restante de la pila”
sólo tiene una (1)
barra iluminada
El sensor ha transmitido una
señal para indicar que la
carga de la pila es baja
Sustituya la pila.
1. Retire el compartimento de la pila del sensor.
2. Extraiga la pila del compartimento.
3. Inserte la nuevas pila respetando la polaridad
indicada en la etiqueta del compartimento.
4. Inserte el compartimento de la pila en el
sensor.
5. El indicador LED del sensor se encenderá
una vez para indicar que está encendido. En
condiciones de funcionamiento normales, la
pila debería durar cuatro (4) años o más.
Alertas y resolución de problemas del sensor
inalámbrico WR2 Wireless Sensor
La tecnología de comunicación bidireccional exclusiva de los sensores de lluvia y de heladas de Rain Bird permite
supervisar continuamente el estado del sensor y transmiten las siguientes alertas a la interfaz del programador.
ADVERTENCIA
Peligro de quemadura química. Mantenga las baterías fuera del alcance de los niños. Este producto contiene una
batería de Litio tipo botón/moneda. Si una batería de Litio tipo botón/moneda nueva o usada es tragada o entra el
cuerpo, puede causar quemaduras internas severas y puede llevar a la muerte en tan poco tiempo como 2 horas.
Siempre asegure completamente el compartimento de la batería. Si el compartimento no cierra de manera segura,
deje de usar el producto, quite las baterías y mantengalas fuera del alcance de los niños. Si piensa que las baterías
podrían haber sido tragadas o colocadas dentro del alguna parte del cuerpo, busque atención médica inmediata.
Deberá disponer de las baterías apropiadamente. Aún las baterías usadas pueden causar daño.
Page 23

WR2-48 Wireless Sensor
21
Declaración de conformidad
El abajo rmante declara que el equipo especicado anteriormente
cumple las Directivas y Normas anteriores.
Directivas del Consejo
aplicadas:
Normas que cumple el
dispositivo:
Nombre del fabricante:
Dirección del fabricante:
Descripción del equipo:
Clase de equipo:
Números de modelos:
2004/10S/EC
1999/5/EC
EN55014-1:2006
EN55022:2006
EN55014-2: 1997 +Al:2001
EN61000-4-2
EN61000-4-3
EN61000-4-8
EN 300 220-2 V2.1.2
Rain Bird Corp.
9491 Ridgehaven Court
San Diego, CA 92123 EE. UU.
619-674-4068
Programador de riego
Clase B
WRS
Lugar: San Diego, Ca., EE. UU.
Firmado:
Nombre completo: Ryan Walker
Cargo: Director, División de fabricación de controles
Page 24

®
Registered Trademark of Rain Bird Corporation
© 2017 Rain Bird Corporation 637469-04 Rev.09/17
Rain+Birdt
Rain Bird Corporation
6991 East Southpoint Road
Tucson, AZ 85756
USA
Tel: (520) 741-6100
Rain Bird Corporation
970 W. Sierra Madre Ave.
Azusa, CA 91702
USA
Tel: (626) 812-3400
Rain Bird International
145 North Grand Ave.
Glendora, CA 91741
USA
Tel: +1 (626) 963-9311
Rain Bird Technical Services
(800) RAINBIRD (1-800-724-6247)
(U.S. and Canada)
Specication Hotline
800-458-3005 (U.S. and Canada)
The Intelligent Use of Water™
www.rainbird.com/WR2
www.rainbird.com
 Loading...