

Page 1

ESP-SMT Smart Modular Control System
Installation & Operation Guide
Page 2

Safety Information
WARNING:
A CIRCUIT BREAKER OR CUTOFF SWITCH IS TO BE PROVIDED IN THE FIXED WIRING TO ISOLATE THE
CONTROLLER. THE CURRENT DATE AND TIME ON THE CONTROLLER IS RETAINED BY A LONG-LIFE LITHIUM
BATTERY, WHICH MUST BE DISPOSED OF IN ACCORDANCE WITH LOCAL REGULATIONS.
LIGHTNING FLASH SYMBOL is intended to
alert the user to the presence of un-insulated
F
“dangerous voltage” within the product’s
enclosure that may be of sucient magnitude to
constitute a risk of electronic shock to persons.
For technical assistance contact Rain Bird at 1-800-247-3782
IMPORTANT
This Installation and Operation Guide supports ESP-SMT control
panels with a date code later than March 31, 2011.
EXCLAMATION POINT SYMBOL is intended
to alert the user to important operating or
!
maintenance (servicing) instructions in the
literature accompanying the product.
Page 3

Contents
Introduction ..........................................................1
Welcome to Rain Bird ....................................................1
The Intelligent Use of Water .................................................1
ESP-SMT Smart Modular Control System ..................1
Features and Benefits ............................................................ 2
Controls, Switches and Indicators .........................5
Controller Panel Features .............................................5
Weather Sensor Features .............................................6
Set Current Date & Time ........................................7
Set Month ................................................................................. 7
Set Day of Month .................................................................... 7
Set Year ...................................................................................... 7
Set Hour ....................................................................................7
Set Minutes .............................................................................. 8
Review Current Date & Time ................................................ 8
Configure Controller .............................................9
Method 1: Select Location by Zip Code .....................9
Method 2: Enter Custom Data for Location ........... 11
Enter Allowed Water Days ......................................... 13
No Restrictions ......................................................................13
By Days of the Week .............................................................13
By Even Days of the Month ................................................14
By Odd Days of the Month .................................................14
Cyclical .....................................................................................15
Block One Day A Week .........................................................15
Set Allowed Watering Windows ............................... 16
Input Zone Information
Method 1: Zone Setup Wizard .................................. 19
Select Specific Zone Number .............................................19
Turn Zone to ENABLE status ...............................................19
Enter Soil Type .......................................................................20
Select Sprinkler Type Method ............................................21
Select Time-Based Method ................................................24
Cycle/Soak ..............................................................................25
Select Plant Type Method - Grass Lawns ........................26
Select Plant Type Method - Non-Grass Lawns ............... 27
Select Plant Water Needs - (Non-Grass Plant Types) .... 27
Custom Plant Factor Method ............................................. 28
Enter Plant Density ...............................................................28
Enter Shade Factor ...............................................................29
Enter Plant Maturity - (Established Method) .................29
Enter Plant Maturity - (Newly Planted Method) ............29
Review Zone Information .................................................. 30
Method 2: Copy Zone to Zone(s) .............................32
Special Features ..................................................34
Event Days Off .......................................................................34
Short Circuit Test ...................................................................35
Advanced Controller Setup ................................................36
Advanced Zone Setup .........................................................37
Save Settings to “Contractor Default” Program ............. 38
Set Units .................................................................................. 39
Fine Tune Watering By Zone ................................40
.......................................19
ESP-SMT Smart Modular Control System
-III-
Page 4

System Review.....................................................42
Controller Settings Review
Zone Settings Review ..........................................................43
Next Irrigation Estimate Review .......................................43
Weather Data Review ..........................................................44
Weather Log Review ............................................................45
Event Log Review..................................................................45
Restore Settings ..................................................48
Restore “Contractor Default” Program Settings ...........48
Restore “Factory Default” Program Settings ..................49
Manual Watering .................................................50
Manually Water Selected Zones ........................................50
Manually Water All Active Zones (Test Program) ..........52
Off Position or Adjust Display
Contrast Function ................................................53
Auto Position or Suspend Watering Function .....54
Installation ..........................................................56
Installing The Controller ............................................ 56
Select Location ...................................................................... 56
Installation Tools Required .................................................57
Mounting the Controller ...........................................58
Connect Field Wiring .................................................. 60
Station Valve Wiring .............................................................60
Master Valve / Pump Start Relay .......................................60
Jumper Setting for Unused Stations ................................61
Connect Sensor Communication Wire To
Controller Panel.....................................................................61
.................................................42
Connect Transformer ................................................. 62
Remote Panel Programming .................................... 65
Installing Station Expansion Modules .................... 66
Installing ESP-SMT Upgrade Panel .......................... 67
Installing The Weather Sensor .................................. 68
Locating the SMT Weather Sensor ...................................68
Sensor Installation Procedure ...........................................68
Trouble-shooting ................................................70
Appendix .............................................................73
Irrigation System Overview ...................................... 73
Basic Valve (Zone) Operation .............................................73
Description Of Each Soil Type................................... 74
Simple Test To Determine The Soil Type ..........................75
Soil Classification Triangle ..................................................76
How the ESP-SMT Smart Control System Works ... 77
Evapotranspiration ...............................................................77
Effective Rainfall....................................................................78
Plant Available Water ........................................................... 78
Management Allowed Depletion (MAD) .......................79
“Checkbook” Method of Irrigation ...................................79
Replenish Accumulated Water Requirement (AWR) ....79
Applying the “Cycle and Soak” Principle .........................80
Determine Zone Application Rate ........................... 81
Sprinkler Type Default Method (least accurate) ............ 81
Total Area Covered Method to Determine Precipitation
Rate and Efficiency (moderate accuracy) .......................82
Zone System Audit Method (most accurate) ................83
ESP-SMT Smart Modular Control System
-IV-
Page 5
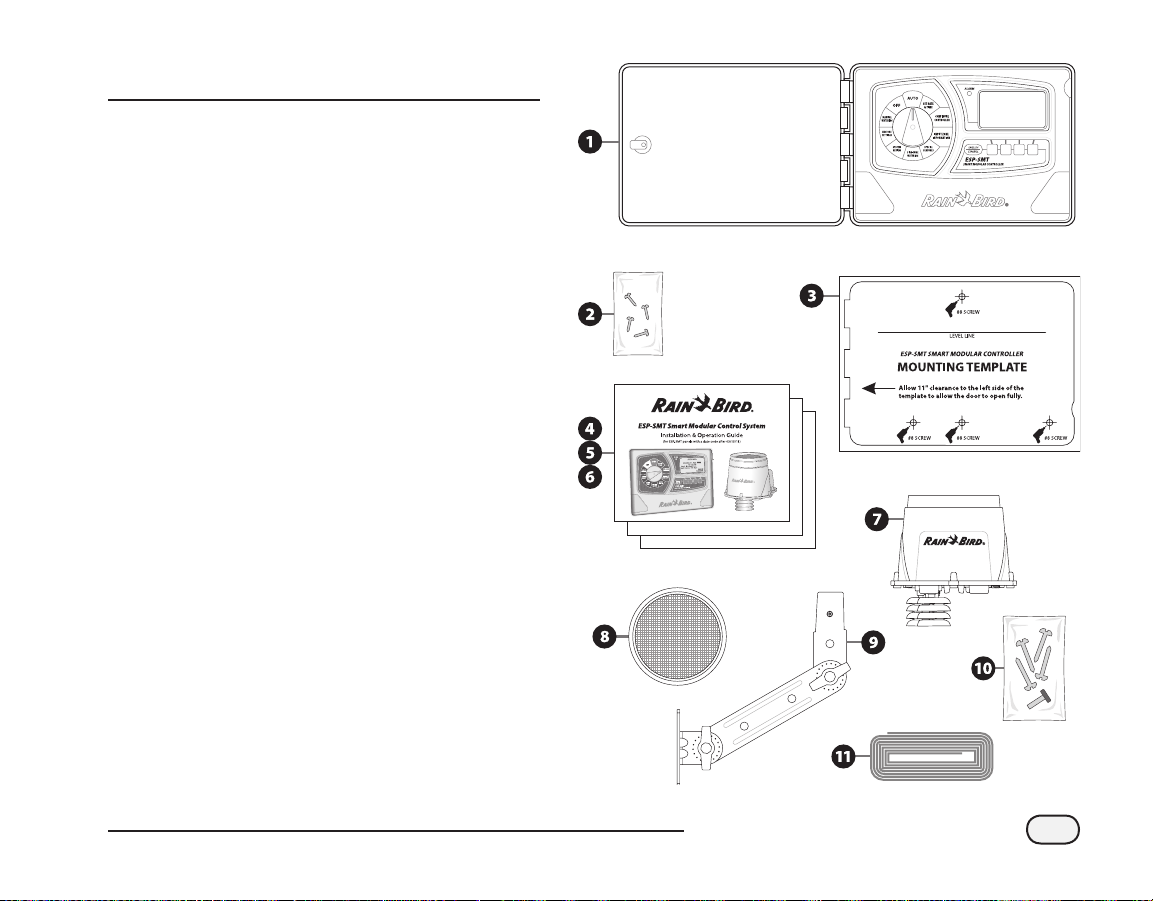
Check Box Contents
ESP-SMT System
It is recommended that you familiarize yourself with
the various items below, prior to beginning the
installation process.
Box Contents
ESP-SMT Modular Controller (1 of 3 models below)
A
a. ESP-SMT4 (outdoor controller with key-lock)
b. ESP-SMT4i (indoor controller)
c. ESP-SMT-UPG (upgrade panel for previously installed
ESP-M controller)
Controller Mounting Hardware (Four #8 screws)
B
Other hardware may be required depending on the
mounting surface and materials)
Mounting Template (controller models only)
C
ESP-SMT Installation & Operation Guide
D
ESP-SMT Site Prole Chart
E
ESP-SMT Installation & Quick Setup Poster
F
SMT Weather Sensor
G
Weather Sensor Debris Screen
H
Weather Sensor Mounting Bracket
I
Mounting Bracket Hardware (Four Phillips head screws +
J
nger screw for mounting sensor to mounting bracket)
Sensor Wire - 25 feet of 20-2 UV rated wire (not
K
rated for direct burial)
ESP-SMT Smart Modular Control System
P/N:637654-01
-V-
Page 6
Introduction
Welcome to Rain Bird
The Intelligent Use of Water
At Rain Bird, we believe it is our responsibility to develop
products and technologies that use water eciently. Our
commitment also extends to education, training and
services for our industry and our communities.
The need to conserve water has never been greater. We want
to do even more and with your help we can.
Visit www.rainbird.com for more information about The
Intelligent Use of Water.
ESP-SMT Smart Modular Control System
Thank you for selecting the new state-of–the-art Rain
Bird ESP-SMT “Smart” Modular Control System. For more
than seven decades, Rain Bird has led the irrigation
industry in meeting professional water management
needs by providing the highest quality water ecient
products and services available. The new Rain Bird smart
control system is designed to keep your landscape
healthy and vibrant by providing you unparalleled
automatic on-site
The Rain Bird ESP-SMT “Smart” Modular Control System
can operate up to 13 dierent zones. The system
consists of a controller and an on-site weather sensor
that communicates weather data on a regular basis back
to the controller. As weather conditions change, the
watering control.
AUTO
OFF
ENGLISH
ENGLISH
ESPAÑOL
ESPAÑOL
irrigation schedule adjusts accordingly. Studies have
indicated that most traditional “time-based” controllers
are only adjusted on average 2 to 3 times per year. The
lack of appropriate irrigation schedule adjustments
generally result in signicant over-watering.
The Rain Bird ESP-SMT controller automatically adjusts
each zone’s irrigation schedule on a daily basis based on
the actual site weather conditions. When the ESP-SMT
is programmed properly, you will maintain a vibrant,
healthy landscape while consuming 30% to 50% less
water than a traditional time-based control system.
Once the site and zone parameters are set-up in the
controller, the optimal irrigation schedule is developed
automatically for your convenience.
ESP-SMT Smart Modular Control System
1
Page 7

There are three ESP-SMT models:
• 4 Station Indoor Controller (ESP-SMT4i)
• 4 Station Outdoor Controller (ESP-SMT4)
• Upgrade Kit for ESP-Modular (ESP-SMT-UPG)
Each control system can be expanded to operate up to 13
zones by using 3 zone expansion modules (ESPSM3).
Features and Benefits
The ESP-SMT Controller automatically optimizes the daily
irrigation schedule based on weather data collected by
the on-site weather sensor. In addition to this time and
water saving feature, the control system has other unique
features that provide easy installation, set-up, operation
and exibility to customize the unit to your particular site
conditions.
Large Backlit Dot Matrix Display
Up to 8 lines of text are displayed at once with menu
options to help prompt you in making your selections.
The adjustable backlit display dramatically improves the
readability of the display in dimly lit areas.
Programmable with 9 Volt Battery
The backlit display will illuminate under battery power
allowing for remote programming. All pre-programmed
information is saved in non-volatile memory for retrieval
at a future date.
English/Spanish Button
A simple push of the language button will toggle the
display text to read in either English or Spanish.
Color Coded Dial Positions
Ten color coded dial positions enable the user to easily
perform the initial controller set-up and subsequent
operation of the control system.
Alarm Light
Red LED on the front panel illuminates to warn you of
any issues that require immediate attention.
Meet Water Restrictions
Set user-dened watering days and watering times to
meet local water restrictions.
Block Day a Week
Permanently blocks a specic day of the week
independent of the assigned days to irrigate. This is
especially useful if you want to prevent irrigation on a
specic day.
Zone Set-Up Wizard
An automatic data entry system walks the user through
the process of entering all of the required zone set-up
information for each zone.
Grow-In Period
The controller allows the user to set a “grow-in” irrigation
schedule per zone with a user set time period before the
controller automatically converts the irrigation schedule
to the weather based method.
Default Values
Each selection has a common industry standard default
value assigned to assist novice users in setting up the
controller.
ESP-SMT Smart Modular Control System
2
Page 8

Custom Values
For more advanced users, the controller will allow the
user to overwrite the default values with a user selected
value further optimizing the irrigation schedule to
match specic site conditions.
Event Days Off
Allows you to select up to four specic dates in which
you want to block irrigation from occurring. This can be
useful if you have planned an event that will take place
in the yard on specic dates.
Short Circuit Test
Enable you to perform a electronic diagnostic test to
determine on a zone by zone basis if there is a “Short”
circuit or if the circuit is “Good”.
Cold Weather Shutdown
All irrigation will be suspended to prevent potential
freeze damage to the irrigation components if the
measured temperature is below a user set level.
Rainfall Shutdown
Irrigation will be suspended if the measured rainfall
exceeds a user set threshold.
Individual Zone Shutdown
Each individual zone can be either set in an “active” or
“inactive” mode. This is ideal if repairs are necessary on
a zone and you want to continue irrigating the other
zones on the system.
System Review
Allows the user to look at a log of irrigation and alarm
events by date or by zone. Additionally, the user can
view the next estimated scheduled irrigation cycle by
zone and review the current and past weather data.
Suspend Irrigation
Allows the user to suspend irrigation for a period of
time (1 minute to 14 days), at which time the system will
return to the AUTO mode.
Save & Restore Settings
Save your current program in memory, so that if the
program gets changed inadvertently, you can easily
retrieve the previously saved program.
Manually Water Combination of Zones
User can set a zone or any combination of zones to run
manually, each with it’s own run time prior to returning
to the AUTO mode.
Manually Water all Zones (TEST)
All zones that are present in the available modules can
be set to run for the same period of time sequentially.
This is a time-saver in performing a system walkthrough
and/or when winterizing a system.
Fine Tune by Zone
Each zone’s calculated run-time can easily be adjusted
from an increase of up to 30% to a decrease of 30%
without changing any of the other pre-set programming
information that was entered in the initial controller and
zone set-up.
ESP-SMT Smart Modular Control System
3
Page 9
Hot Swap-able Station Expansion Modules
Easily expand the zone capability by inserting up to
three, 3 station expansion modules for a maximum of 13
stations. This can be done while the unit is connected
to AC power.
Tool-less Communication Wire Terminal
No tools are required to connect the pair of
communication wires to the controller or the sensor.
There is no polarity required on either the controller or
the sensor connection to provide communication.
LED Light to Validate Sensor Communication
A green LED located in the Sensor communication wire
compartment will blink when power is applied and
continuously illuminate when there is communication
between the controller and the sensor. This prevents
the need of going back to the controller to verify
communication during installation.
Adjustable Sensor Mounting Bracket
Mounting Bracket Arms can be adjusted in ne
increments to assist that the sensor pod is mounted
level in virtually any installation scenario. The arms have
a wire routing mechanism that provides a “strain relief”.
Rain Gauge
The rain gauge not only acts as a rain shut-o device,
it also provides rainfall intensity and accumulation
information to the controller in order to prevent overirrigation by accounting for “eective” rainfall.
Removable Debris Screen
Prevents leaves and other large debris from getting into
the tipping bucket mechanism and preventing accurate
rainfall measurement. It can be easily removed to clean
debris o the screen surface.
Removable “Tipping” Rain Bucket”
The Tipping Rain Bucket can be easily removed from the
sensor housing to clean out debris that may have made
it past the debris screen into the mechanism.
ESP-SMT Smart Modular Control System
4
Page 10
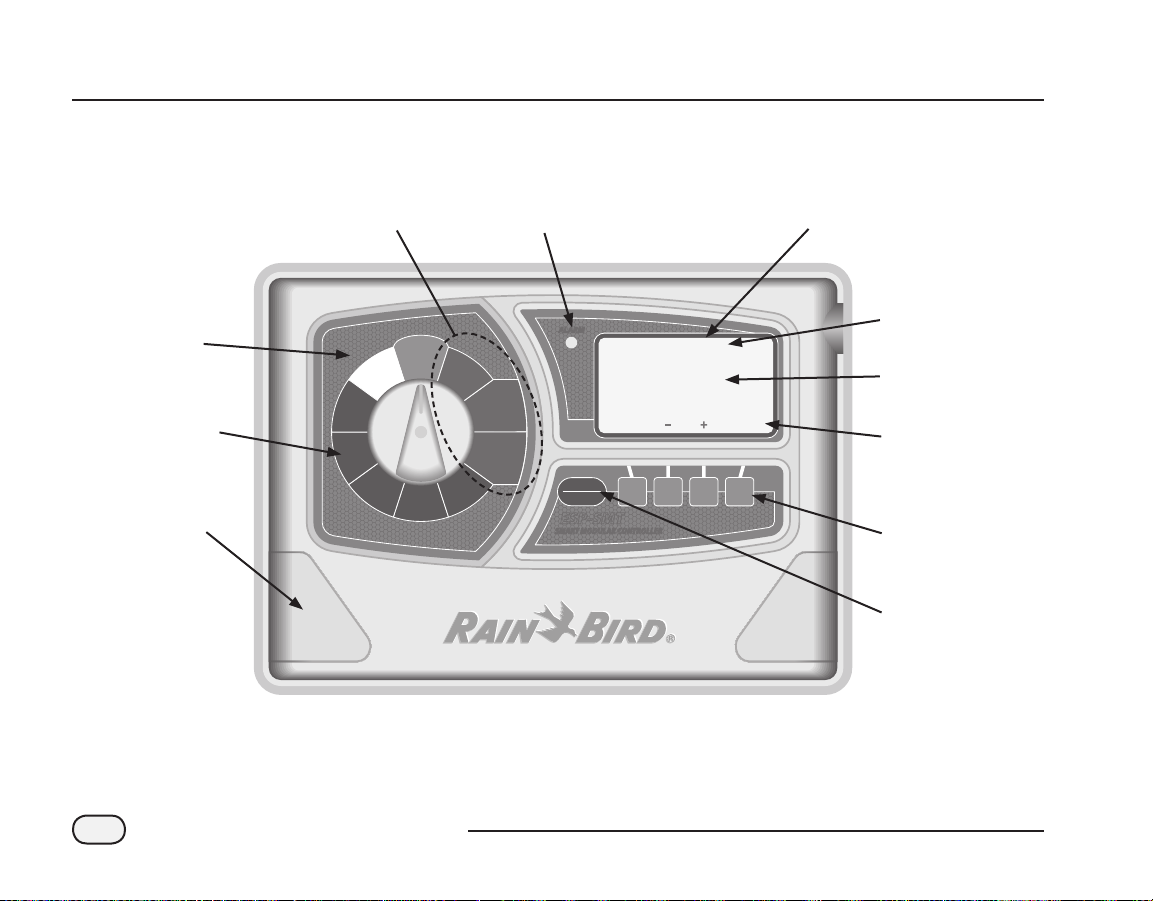
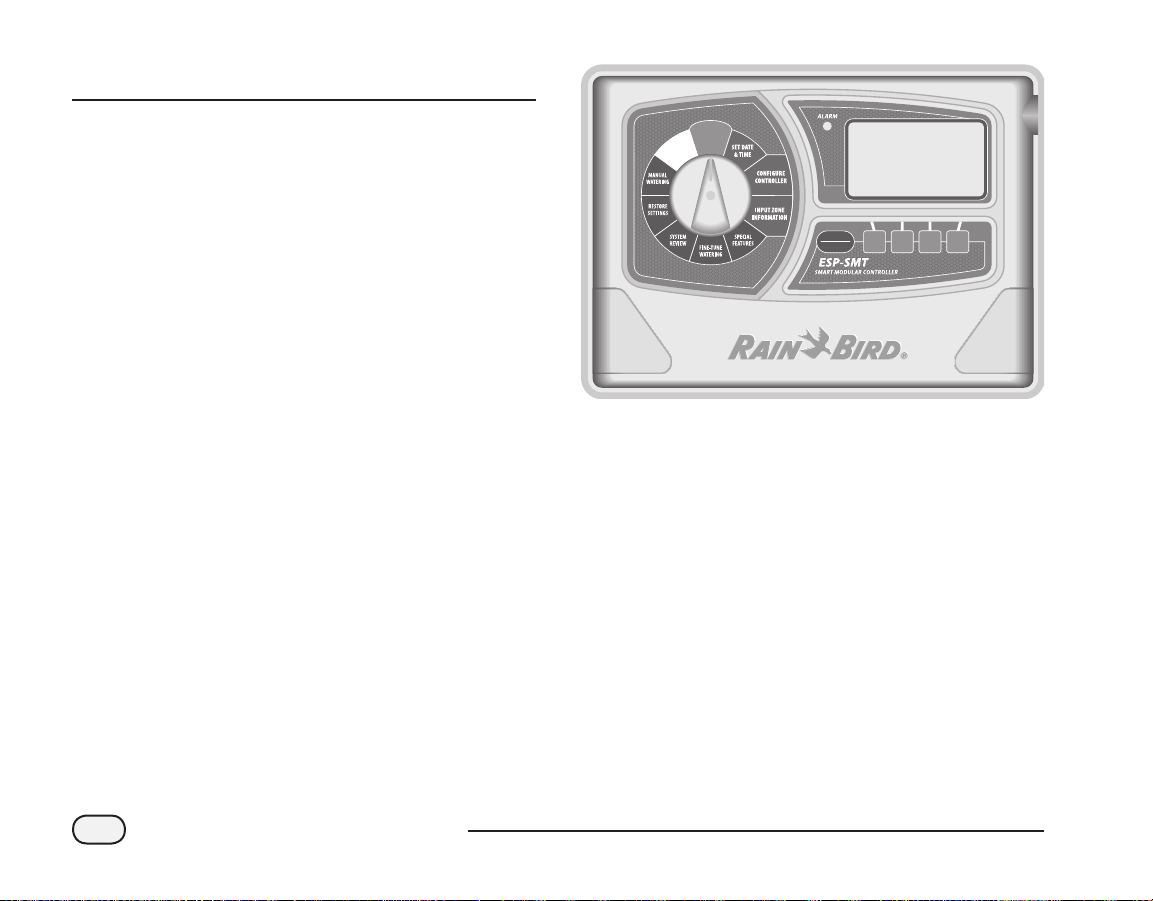
Controls, Switches and Indicators
Controller Panel Features
COLOR-CODED DIAL
POSITIONS FOR
“EASE OF USE”
“CONTRACTOR DEFAULT”
PROGRAM RESTORE
(2) GRIP AREAS
TO ASSIST
INITIAL CONTROLLER
& ZONE SET-UP DIAL
POSITIONS (LIGHT BLUE)
AUTO
OFF
MANUAL
WATERING
RESTORE
SETTINGS
SYSTEM
REVIEW
FINE-TUNE
WATERING
ALARM LIGHT ILLUMINATES
WHEN CONDITIONS PREVENT
IRRIGATION
ALARM
SET DATE
& TIME
CONFIGURE
SPECIAL
FEATURES
CONTROLLER
INPUT ZONE
INFORMATION
BACK NEXT
ENGLISH
ENGLISH
ESPAÑOL
ESPAÑOL
ESP-SMT
SMART MODULAR CONTROLLER
SET CURRENT
DATE AND TIME
24 M ar 2009
10:16 AM
LARGE BACK-LIT
DOT-MATRIX
DISPLAY
DURING REMOTE
PROGRAMMING
REMOTELY
PROGRAMMABLE
USING 9V BATTERY
The ESP-SMT Smart Modular controller panel is designed to upgrade previously installed ESP-Modular controllers (ESP-SMT-UPG Kit).
SCREEN TITLE
SCREEN TEXT
FUNCTION LABELS
FOR SET-UP &
NAVIGATION
NAVIGATION
BUTTONS WITH
ACCELERATOR
ENGLISH/SPANISH
BUTTON FOR
EASY SWITCHING
OF DISPLAY
LANGUAGE
ESP-SMT Smart Modular Control System
5
Page 11
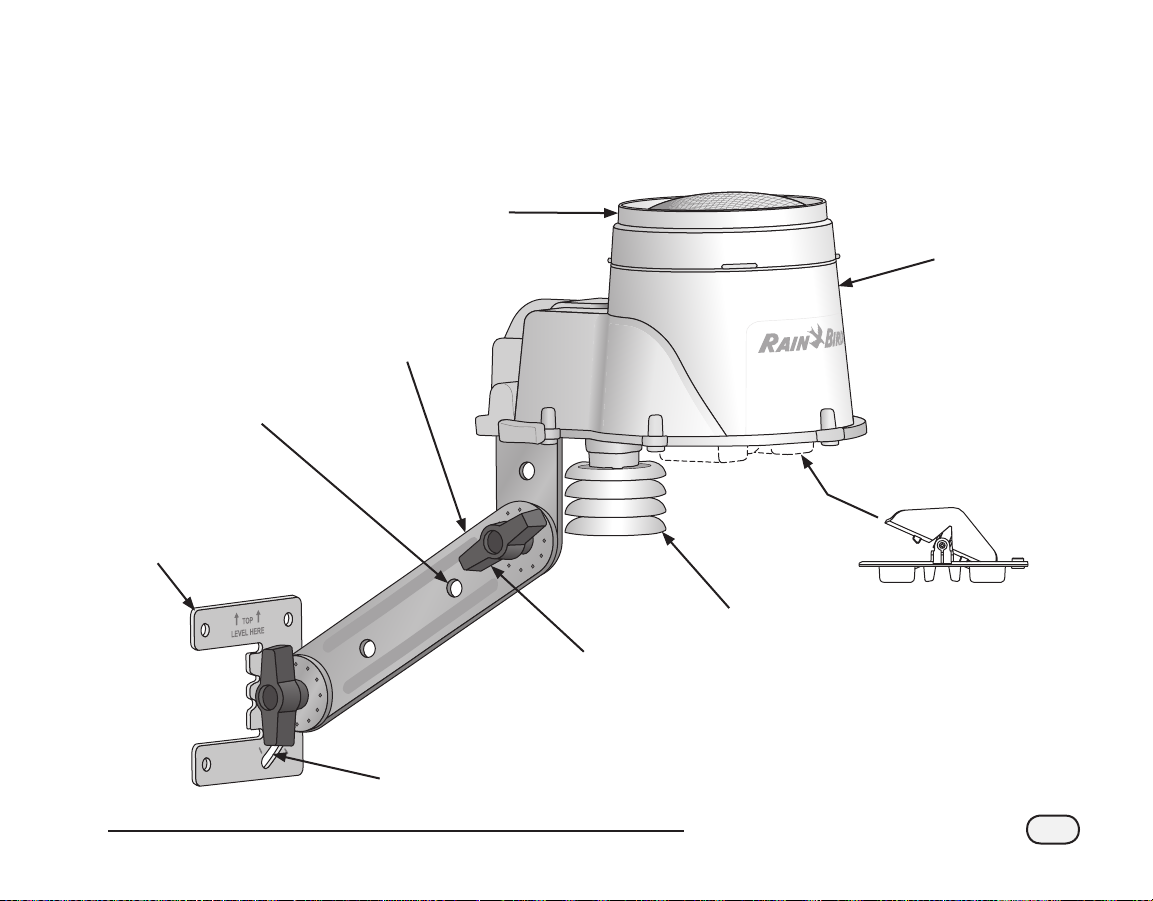
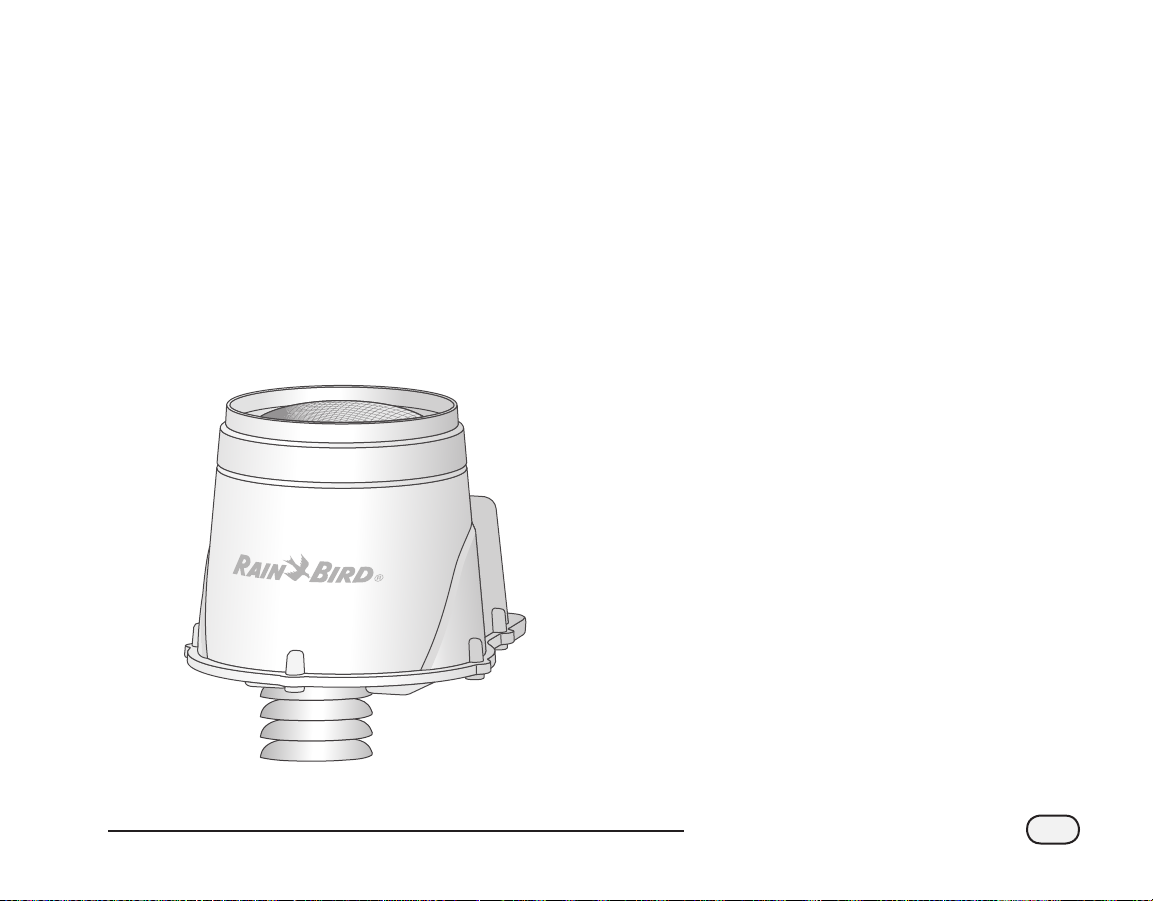
Weather Sensor Features
The durable Weather Sensor provides high and low temperature and rainfall data to the ESP-SMT Controller for daily
irrigation schedule adjustments.
REMOVABLE
DEBRIS SCREEN
SENSOR
HOUSING
ADJUSTABLE
MOUNTING
BRACKET
HOLES IN BRACKET
ARMS (3) TO
ROUTE WIRING
AND PROVIDE
“STRAIN RELIEF”
MOUNTING
BASE
SLOT FOR EASY
LEVELING OF
UNIT
WING NUTS (2)
FOR SENSOR
POSITIONING
ADJUSTMENTS
SOLAR
SHIELD WITH
TEMPERATURE
SENSOR
ESP-SMT Smart Modular Control System
REMOVABLE
TIPPING
RAIN BUCKET
6
Page 12

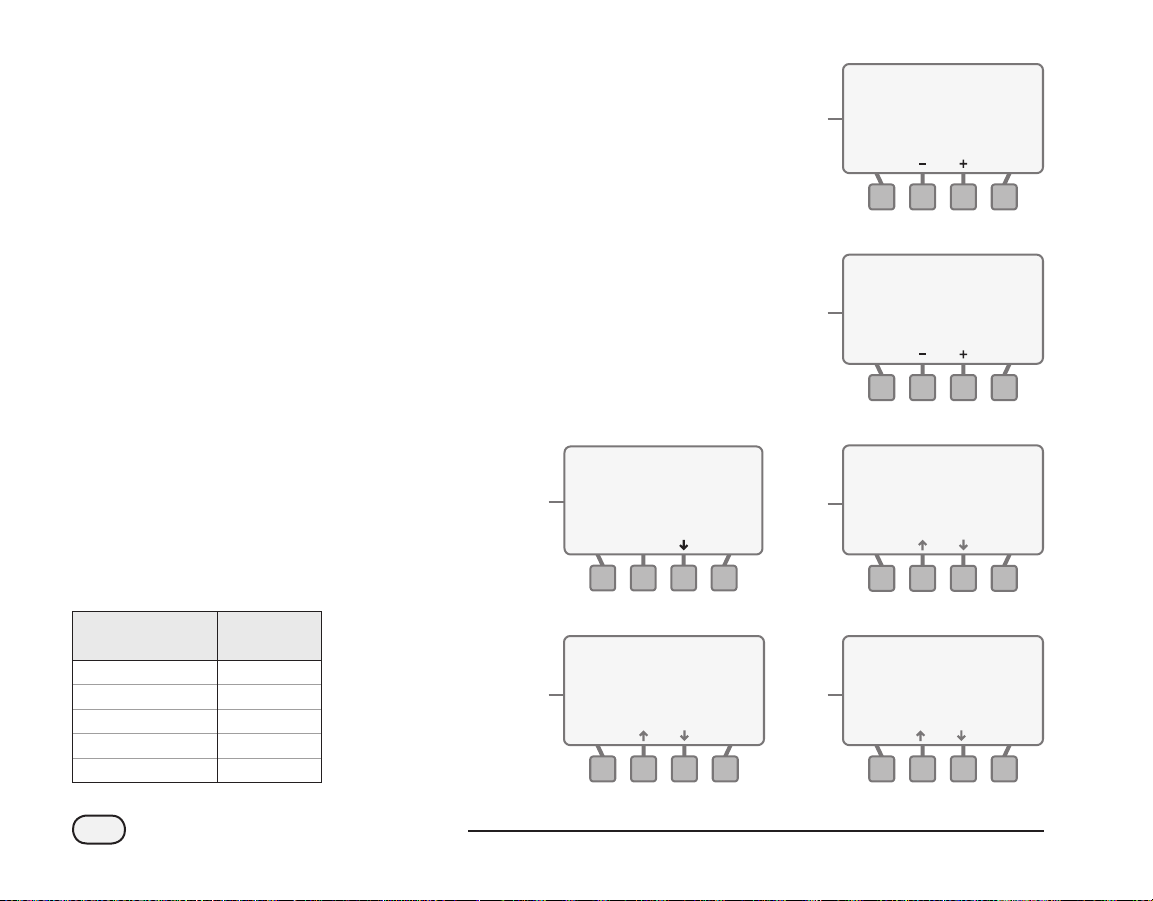
Set Current Date & Time
This section shows you how to set the current date & time on the ESP-SMT Controller.
Rotate the dial to the SET DATE & TIME position...
The SET CURRENT DATE & TIME
A
screen will appear and the three
letter month designation will be
MANUAL
WATERING
RESTORE
SETTINGS
OFF
SYSTEM
REVIEW
AUTO
FINE-TUNE
WATERING
SET DATE
& TIME
SPECIAL
FEATURES
CONFIGURE
CONTROLLER
INPUT ZONE
INFORMATION
blinking on the display.
Set Month
a. Press the - or + button(s) until the
current month is shown; then press
the NEXT button.
Set Day of Month
b. The day of the month will begin to
blink. Press the - or + button(s) until
the current day is shown; then press
the NEXT button.
Set Year
c. The year will begin to blink. Press
the - or + button(s) until the current
year is displayed; then press the
NEXT button.
SET CURRENT
DATE AND TIME
A
a.
A
b.
A
c.
01 Jan 2007
10:16 AM
BACK NEXT
SET CURRENT
DATE AND TIME
01
10:16 AM
BACK NEXT
SET CURRENT
DATE AND TIME
24 Ma r 2007
10:16 AM
BACK NEXT
Ma r 2007
NOTE: Make sure the hour is set
correctly to either AM or PM.
!
ESP-SMT Smart Modular Control System
7
Set Hour
d. The hour will begin to blink. Press
the - or + button(s) until the current
hour appears on the display; then
press the NEXT button.
A
d.
Page 13
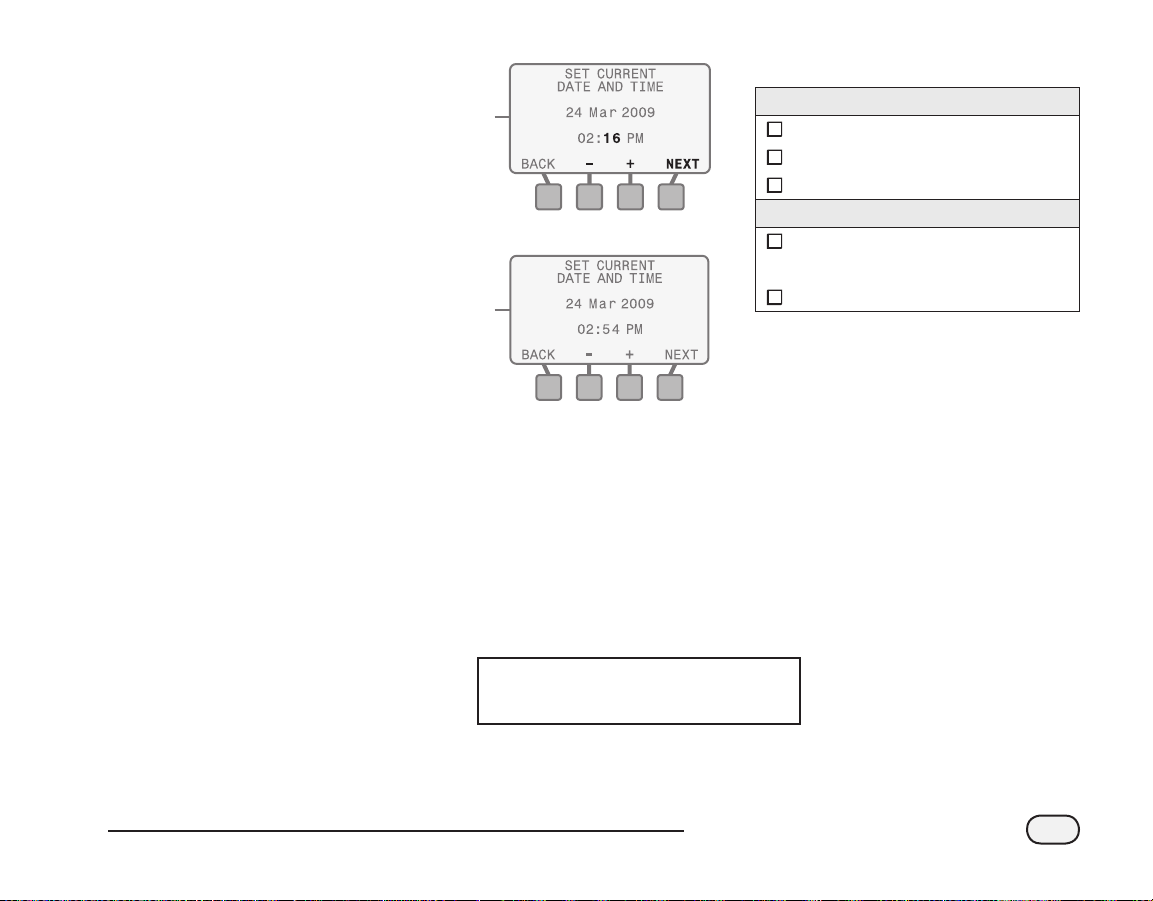
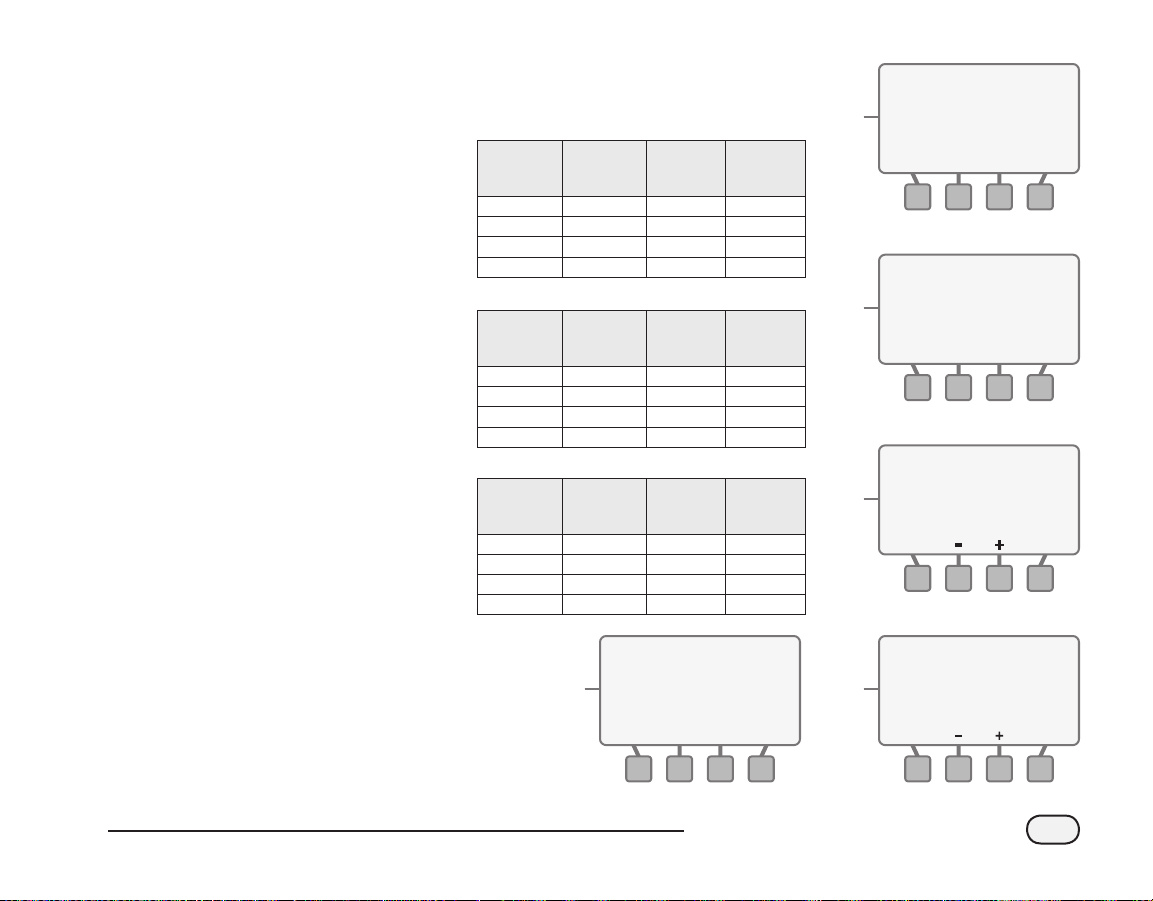
Set Minutes
e. The minutes will begin to blink.
Press the - or + button(s) until the
current minutes are shown; then
press the NEXT button to review
the current Date & Time settings.
Review Current Date & Time
Review the information on the
B
screen to conrm that all settings
are correct:
• If the information is not
correct:
Press either the BACK button
or the NEXT button to navigate
backward or forward to the
section that requires a change;
then follow the instructions
above to make a modication to
that section.
• If the information is correct:
Rotate the dial into any other
position and the entered
information in the SET DATE &
TIME dial position will be saved
in the controller memory. The
internal lithium battery will save
the current date and time during
power outages.
e.
B
NOTE: To rapid advance through
the values shown on various
!
screens, depress and hold the
corresponding navigation button
to activate the “Accelerator”
feature.
You have now completed all of the required
steps to set the current date and time on the
controller.
Review Checklist
Set Current Date
Set Current Month
Set Current Day of Month
Set Current Year
Set Current Time
Set Current Hour
( confirm or is correct)NOTE: AM PM
Set Current Minute
ESP-SMT Smart Modular Control System
8
Page 14
Configure Controller
This section shows you how to configure the ESP-SMT controller for your site
conditions using one of the following Two methods:
1) Select Location by Zip Code; 2) Enter Custom Site Data relative to site location
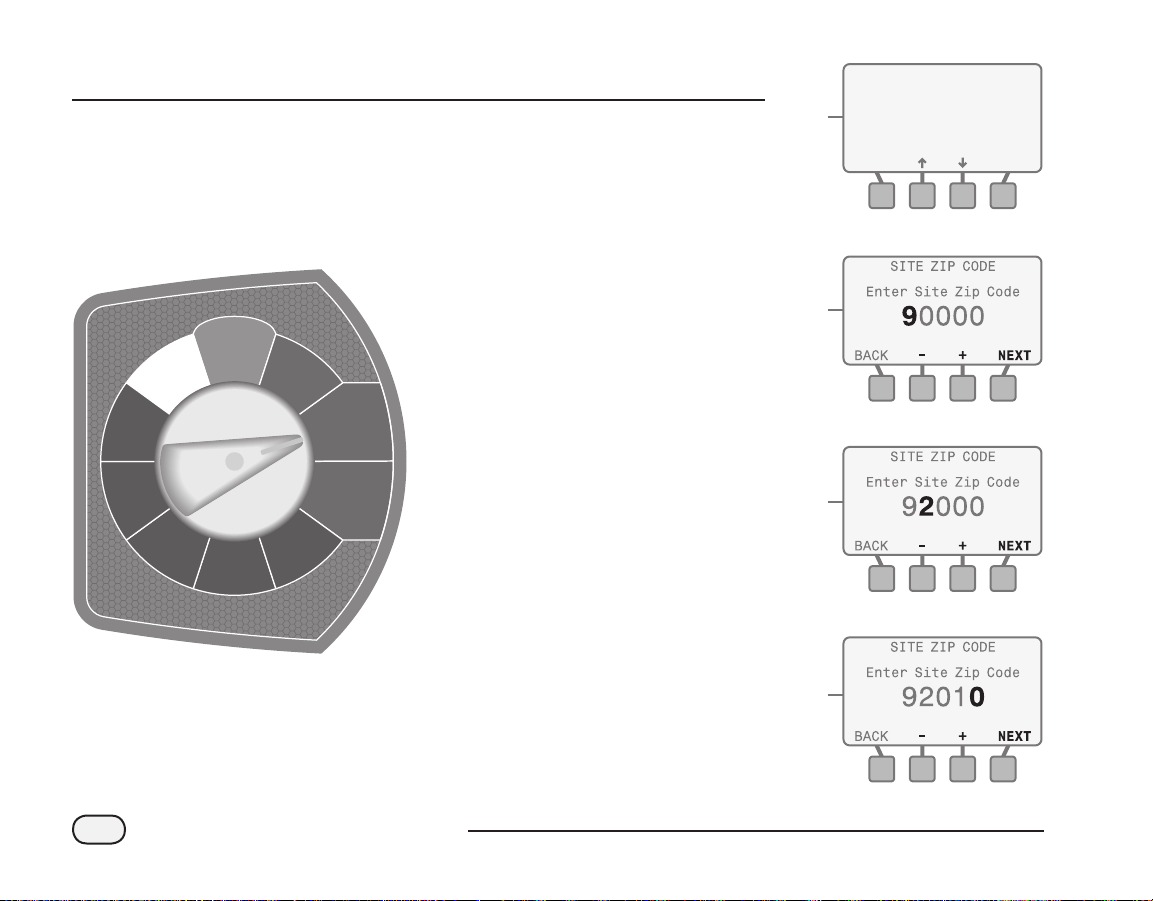
Method 1: Select Location by Zip Code
Rotate the dial to the CONFIGURE CONTROLLER position...
The CONFIGURE CONTROLLER
A
screen will appear and Enter Site
Zip Code will be blinking; press the
MANUAL
WATERING
RESTORE
SETTINGS
OFF
SYSTEM
REVIEW
AUTO
FINE-TUNE
WATERING
SET DATE
& TIME
SPECIAL
FEATURES
CONFIGURE
CONTROLLER
INPUT ZONE
INFORMATION
SELECT button.
The SITE ZIP CODE screen will
B
appear and the 1st digit of the zip
code will be blinking.
a. Press the - or + button(s) to set the
number from 0 to 9 to match the 1st
digit of the site zip code; then press
the NEXT button.
b. The 2nd digit of the zip code will
begin to blink. Press the - or +
button(s) to set the number from 0
to 9 to match the 2nd digit of the
site zip code; then press the NEXT
button.
c. Perform this function until all 5 digits
of the site zip code are entered; then
press the NEXT button.
CONFIGURE CONTROLLER
Enter Site Zip Code
A
Enter Custom Data for
Location
B
a.
B
b.
B
c.
- OR -
SELECT
ESP-SMT Smart Modular Control System
9
Page 15

NOTE: If the zip code you entered
is not found in the controller
!
database, the closest zip code
available will be substituted and
you will be asked “Is this Correct?”
The zip code you entered will be
C
displayed and you will be asked:
Is This Correct?
• If you press the NO button:
The screen will revert back to
allow you to modify the previously
entered zip code values (steps 2
and 3)
• If you press the YES button:
The ALLOWED WATER DAYS screen
D
will appear.
Use the UP or DOWN arrow
button(s) to navigate to enter the
desired Allowed Water Days and
Time (see page 13 for details).
SITE ZIP CODE
C
D
92010
Is This Correct?
NO YES
ALLOWED WATER DAYS
No Restrictions
By Days of the Week
Even Days: 2,4,6,… 30
Odd Days: 1,3,5,…no31
Cyclical:Every _ Days
BACK
SELECT
ESP-SMT Smart Modular Control System
10
Page 16
Configure Controller
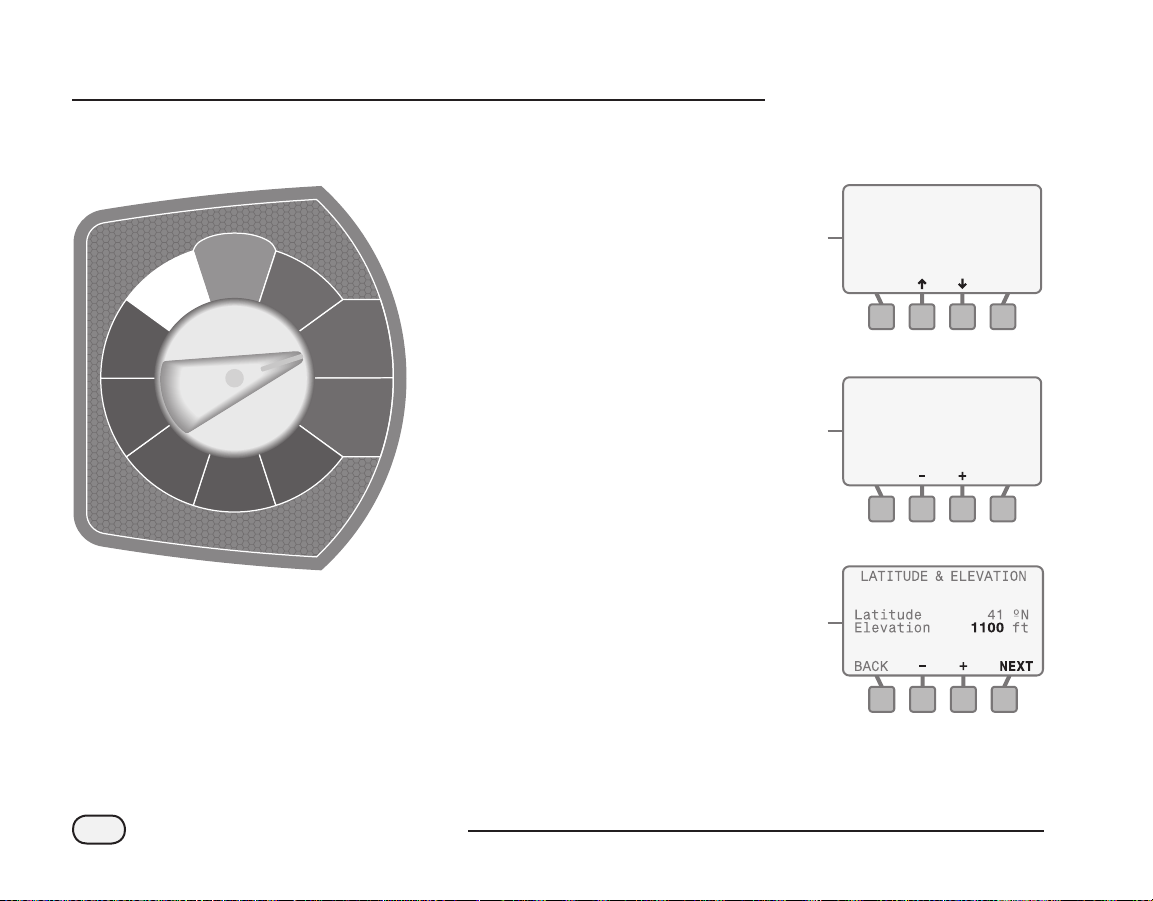
Method 2: Enter Custom Data for Location
Rotate the dial to the CONFIGURE CONTROLLER position...
The CONFIGURE CONTROLLER
A
screen will appear. Press the UP or
DOWN arrow button(s) until Enter
MANUAL
WATERING
RESTORE
SETTINGS
OFF
SYSTEM
REVIEW
AUTO
FINE-TUNE
WATERING
SET DATE
& TIME
SPECIAL
FEATURES
CONFIGURE
CONTROLLER
INPUT ZONE
INFORMATION
Custom Data for Location begins
to blink; then press the SELECT
button.
The LATITUDE & ELEVATION
B
screen will appear and the value
corresponding to Latitude will be
blinking.
a. Press the - or + button(s) until the
correct value is entered; then press
the NEXT button.
b. The value for Elevation will begin
to blink. Press the - or + button(s)
until the correct value (100 foot
increments) is entered; then press
the NEXT button.
CONFIGURE CONTROLLER
Enter Site Zip Code
A
Enter Custom Data for
Location
LATITUDE & ELEVATION
Latitude 35 °N
B
Elevation 0 ft
a.
B
b.
- OR -
SELECT
NEXTBACK
ESP-SMT Smart Modular Control System
11
Page 17
The AVG WIND SPEED screen will
C
appear and the value for January
will be blinking.
a. Press the - or + button(s) until the
correct value is entered and then
press the NEXT button.
b. The value for February will begin to
blink. Press the - or + button(s) until
the correct value is entered; then
press the NEXT button.
c. Perform this function until you have
entered the value for December;
then press the ACCEPT button.
NOTE: Historical weather
information can usually be
!
found at the local airport or local
university web site.
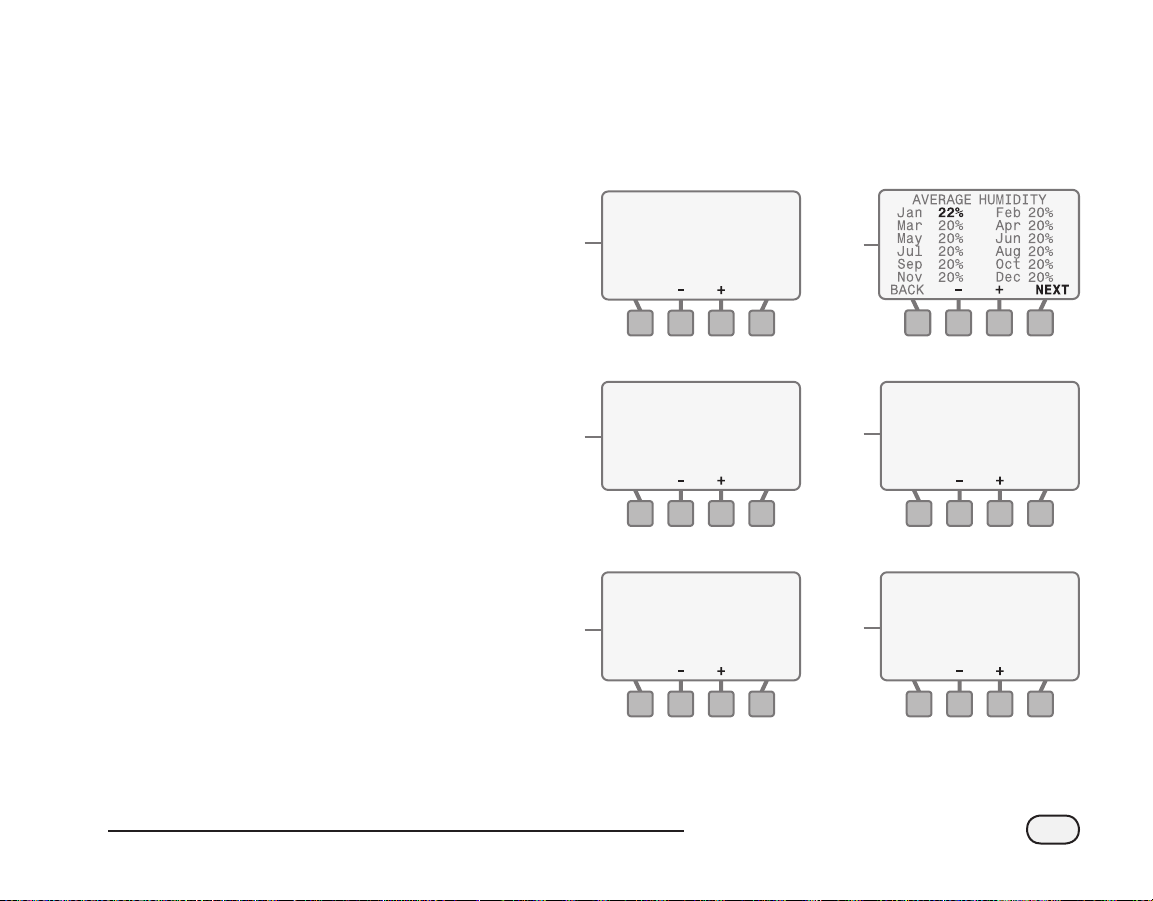
The AVERAGE HUMIDITY screen will
D
appear and the value for January
will be blinking.
a. Press the - or + button(s) until the
correct value is entered; then press
the NEXT button.
b. The value for February will begin to
blink. Press the - or + button(s) until
the correct value is entered; then
press the NEXT button.
c. Perform this function until you have
entered the value for December;
then press the ACCEPT button.
AVG WIND SPEED MPH
Jan 7.5 Feb
Mar 3.0 3.0
May Jun
C
a.
C
b.
C
c.
3.0 3.0
Jul Aug
3.0 3.0
Sep Oct
3.0 3.0
Nov Dec
3.0 3.0
AVG WIND SPEED MPH
Jan Feb
7.5
Mar Apr
3.0
May Jun
3.0 3.0
Jul Aug
3.0 3.0
Sep Oct
3.0 3.0
Nov Dec
3.0 3.0
AVG WIND SPEED MPH AVERAGE HUMIDITY
Jan Feb
7.5
Mar Apr
4.8 4.3
May Jun
3.7 5.1
Jul Aug
4.4 2.3
Sep Oct
6.1 1.8
Nov Dec
2.5 1.2
Apr
3.0
NEXTBACK
5.2
3.0
NEXTBACK
5.2
ACCEPTBACK
D
a.
AVERAGE HUMIDITY
Jan 22% Feb 27%
Mar 20%
May Jun
D
Jul Aug
Sep Oct
b.
Nov Dec
Jan Feb
Mar Apr
May Jun
Jul Aug
D
Sep Oct
c.
Nov Dec
Apr
20%
20%
20%
20%
22% 27%
21% 31%
38% 45%
52% 46%
39% 32%
28% 23%
20%
20%
20%
20%
20%
NEXTBACK
ACCEPTBACK
ESP-SMT Smart Modular Control System
12
Page 18

Enter Allowed Water Days
NOTE: Check with your local
water authorities to see if there
!
are any current water restrictions
in effect that would dictate what
days and/or time of day that you
are permitted to irrigate your
site.
The ALLOWED WATER DAYS screen will
appear with the following options to
chose from:
No Restrictions
Can irrigate on any day(s)
If there are no restrictions on
A
what days you can irrigate, press
the SELECT button when No
Restrictions is blinking on the
display; the BLOCK ON SPECIFIC
DAY OF WEEK screen will appear
(see step 8 on page 15 for details).
By Days of the Week
Set custom 7 day schedule
Press the UP and DOWN arrow
B
button(s) until By Days of the
Week is blinking; then press the
SELECT button.
The rst day of the week, Mo
C
(Monday) will be blinking in the
Allow Watering display.
a. You can either allow watering
to occur or block watering from
occurring on that day by pressing
either the BLOCK or ALLOW
button(s). After the Block or Allow
selection is made, press the NEXT
button.
b. The next day of the week, TU
(Tuesday) will begin to blink. Press
either the BLOCK or ALLOW
button(s) to block or allow watering
to occur for that day as well.
c. Select Block or Allow for each
day of the week and continue the
process until the information is
entered for each day.
ALLOWED WATER DAYS
No Restrictions
By Days of the Week
Even Days: 2,4,6,… 30
A C
Odd Days: 1,3,5,…no31
Cyclical:Every _ Days
BACK
SELECT
ALLOWED WATER DAYS
No Restrictions
By Days of the Week
B
Even Days: 2,4,6,… 30
Odd Days: 1,3,5,…no31
Cyclical:Every _ Days
BACK
WATER BY DAY OF WEEK
Allow Watering:
Tu Th Sa
Mo We Fr Su
Block Watering:
C
a.
C
b.
c.
BLOCK ALLOW NEXTBACK
WATER BY DAY OF WEEK
Allow Watering:
Mo We Fr Su
Block Watering:
Tu
BLOCK ALLOW NEXTBACK
WATER BY DAY OF WEEK
Allow Watering:
Mo We Fr
Block Watering:
Tu Th Sa
BLOCK ALLOW NEXTBACK
SELECT
Th Sa
Su
ESP-SMT Smart Modular Control System
13
Page 19

Once you’ve entered the Block or
Allow information for each day of
the week, press the NEXT button
and the SET ALLOWED WATERING
TIME screen will appear (see page
16 for details).
By Even Days of the Month
Water on all even days of each month
(2nd, 4th… 28th, 30th)
Press the UP and DOWN arrow
D
button(s) until Even Days: 2, 4,
6, ...30 is blinking; then press the
SELECT button; the BLOCK ON
SPECIFIC DAY OF WEEK screen will
appear (see step 8 on page 15 for
details).
NOTE: Some water restrictions
will allow irrigation on all odd days
!
with the exception of the 31st
day of any month. The Odd Days
selection will not allow irrigation
on the 31st of any month or on
Feb. 29th in leap years.
ALLOWED WATER DAYS
No Restrictions
By Days of the Week
D
Even Days: 2,4,6,… 30
Odd Days: 1,3,5,…no31
Cyclical:Every _ Days
BACK
SELECT
By Odd Days of the Month
Water on all odd days of each month (1st,
3rd... 29th, not on 31st)
Press the UP and DOWN arrow
E
button(s) until Odd Days: 1,3,5,
…no31 is blinking; then press the
SELECT button; the BLOCK ON
SPECIFIC DAY OF WEEK screen will
appear (see step 8 on page 15 for
details).
ALLOWED WATER DAYS
No Restrictions
By Days of the Week
E
Even Days: 2,4,6,… 30
Odd Days: 1,3,5,…no31
Cyclical:Every _ Days
BACK
SELECT
ESP-SMT Smart Modular Control System
14
Page 20

Cyclical
Water every 2 to 14 days
Press the UP and DOWN arrow
F
button(s) until Cyclical: Every
_ Day is blinking; then press the
SELECT button.
The CYCLICAL WATERING screen
G
will appear and the value for Water
Every X Days will be blinking.
a. Press the - or + button(s) to enter
a value of between 2 and 14 days
between irrigation cycles; then
press the NEXT button.
b. The date to Begin Watering dd
mmm will begin to blink. Press the
- or + button(s) to set the date in
which you want the rst irrigation
cycle to begin; then press the NEXT
button; the BLOCK ON SPECIFIC DAY
OF WEEK screen will appear.
NOTE: You can delay the actual
start date up to the number of
!
days you set between irrigation
cycles.
Block One Day A Week
Allows a specific day of the week to be
blocked on a regular basis.
The BLOCK WATERING ON SPECIFIC
H
DAY OF WEEK screen will appear.
Press the UP and Down arrow
button(s) until the desired selection
is blinking; then press the SELECT
button and the SET ALLOWED
WATERING TIME SCREEN will appear
(see next page for details).
NOTE: An ideal application of this
feature is to block irrigation on the
!
day the gardener normally comes.
The ESP-SMT controller will always
block irrigation on the specific day
of the week selected independent
of the Allowed Watering Day’s
selection that was entered in
the Configure Controller Section
during step 3 on page 13.
ALLOWED WATER DAYS
No Restrictions
By Days of the Week
Even Days: 2,4,6,… 30
F
Odd Days: 1,3,5,…no31
Cyclical:Every _ Days
BACK
CYCLICAL WATERING
Water Every 3 Days
G
Begin Watering 01 Jan
a.
CYCLICAL WATERING
Water Every 5 Days
G
Begin Watering 04 Jan
b.
BLOCK WATERING ON
SPECIFIC DAY OF WEEK
None Monday
Tuesday Wednesday
Thursday Friday
H
Saturday Sunday
Sat & Sun
BACK
SELECT
NEXTBACK
NEXTBACK
SELECT
ESP-SMT Smart Modular Control System
15
Page 21

Set Allowed Watering Windows
You must set specic time periods
in which irrigation can occur on the
previously set Allowed Watering Days.
When the SET ALLOWED WATER
A
TIME (screen is displayed the
a.
06:00AM is blinking under the
1st Watering Window text that is
displayed on the screen
b. Press the - or + button(s) to set
the time in which the irrigation
schedule will begin if irrigation is
needed on that particular Allowed
Watering Day. Once the desired
time is reached, press the NEXT
button.
c. The text under the 1st Watering
Window representing an ending
time of 6:00PM will begin to blink.
Press the - or + button(s) to set the
time in which the irrigation schedule
must end. Once the desired end
time is reached, press the NEXT
button.
d. If a 2nd Watering Window is desired,
Press the ON button and a second
watering time will be displayed.
Press the NEXT button and the start
time of the 2nd watering window
will begin to blink.
e. Press the - or + button(s) to set the
2nd Watering Window in which
the irrigation schedule will begin
if irrigation is needed on that
particular Allowed Watering Day.
Once the desired time is reached,
press the NEXT button.
SET ALLOWED WATER TIME
1st Watering Window
AM To 06:0006:00 PM
A
A
2nd Watering Window
a.
SET ALLOWED WATER TIME
1st Watering Window
2nd Watering Window
b.
OFF
AM To 06:0005:00 PM
OFF
NEXTBACK
NEXTBACK
SET ALLOWED WATER TIME
1st Watering Window
AM To 09:0005:00 AM
A
2nd Watering Window
c.
SET ALLOWED WATER TIME
1st Watering Window
AM To 09:0005:00 AM
A
A
2nd Watering Window
d.
e.
AM To 11:4506:15 PM
SET ALLOWED WATER TIME
1st Watering Window
AM To 09:0005:00 AM
2nd Watering Window
PM To 11:4506:00 PM
OFF
NEXTBACK
ON
NEXTONOFFBACK
ON
NEXTBACK
ESP-SMT Smart Modular Control System
16
Page 22
NOTE: You must have at least a
15 minute time frame between
!
the end of a water window and
the beginning of another water
window.
f. The text under the 2nd Watering
Time representing the ending
time will begin to blink. Press the
- or + button(s) to set the time in
which the 2nd Watering Time must
end. Once the desired end time is
reached, press the NEXT button.
The Grow-In Water Window screen
B
will appear and the text under the
Grow-In Watering Time representing
the start time will begin to blink.
a. Press the - or + button(s) to set the
time in which the irrigation schedule
will begin every calendar day. Once
the desired time is reached, press
the NEXT button.
b. The text under the Grow-In Watering
Time representing the ending time
will begin to blink. Press the - or +
button(s) to set the time in which
the Grow-In Watering Time must
end. Once the desired end time is
reached, press the NEXT button.
The ALLOWED WATERING review
C
screen will appear. This screen
displays the Allowed Irrigation Days
and the Allowed Watering Times
that you set previously and asks you
to either ACCEPT or to CHANGE
the information.
If you press the CHANGE button,
D
the screen will revert back to
ALLOWED WATERING DAYS. Modify
the information by following the
previous steps in the Set Watering
Days and Set Watering Times
section of this user manual.
If you press ACCEPT then the
CONFIGURE CONTROLLER screen
will appear.
You have now completed all of the required
steps to configure the controller.
SET ALLOWED WATER TIME
1st Watering Window
AM To 09:0005:00 AM
A
2nd Watering Window
f.
ON
PM To 11:4508:00 PM
NEXTBACK
GROW-IN WATER WINDOW
Water every day
between
a.
b.
AM To 05:0009:00 PM
GROW-IN WATER WINDOW
Water every day
between
AM To 04:0009:00 PM
ALLOWED WATERING
By Days of the Week
Mo We Fr
05:00 AM To
08:00
PMAMTo
Grow-in: Daily
09:00
CHANGE ACCEPT
ALLOWED WATER DAYS
No Restrictions
By Days of the Week
Even Days: 2,4,6,… 30
Odd Days: 1,3,5,…no31
Cyclical:Every _ Days
BACK
To
NEXTBACK
NEXTBACK
09:00 AM
11:45
04:00PMPM
SELECT
ESP-SMT Smart Modular Control System
17
Page 23
EXAMPLE:
Watering Restrictions are imposed;
You can only irrigate on even days of the
month from 10:00 PM until 6:00AM; lawn
maintenance occurs every Wednesday.
Lawns on Zones 1 & Zone 2 are newly
seeded and require a grow-in watering
period of 14 days at 3 minutes per cycle
for 8 cycles per calendar day to keep the
seed moist during the warmest part of
the day.
To meet site conditions, CONFIGURE
CONTROLLER as follows:
• Set Allowed Watering Days to Even Days
Of The Month
• Set Block Irrigation on Wednesdays
• Set 1st Watering Window from 10:00 PM
to 11:45PM
• Set 2nd Watering Window from
12:00AM (midnight) to 06:00AM
• Set Grow-In Watering Time from 9:00AM
until 5:00PM – Zone 1 &2 watering will
occur for the next 14 calendar days
for 3 minutes per cycle 8 times evenly
divided by the Grow-In Watering Time
(In this example 8 cycles in 8 hours = 1
cycle every hour)
Review Checklist
Enter Site Data
Location by Zip Code
5 Digit Site Zip Code (OR)
Site Custom Data
Site Latitude
Site Elevation
Monthly Avg. Wind Speed
Monthly Avg. Humidity
Set Allowed Watering Days (select one)
No Restrictions (OR)
Custom Day(s) of the week (OR)
Even Days of the Month (OR)
Odd Days of the Month- not 31st (OR)
Cyclical
Days between Cycle
Beginning Date
Block Day Of Week
Set Allowed Watering Times
Set 1st Watering Window
Set 2nd Watering Window
Set Grow-in Watering Window
ESP-SMT Smart Modular Control System
18
Page 24
Input Zone Information
This section shows you how to input information that is specic to each zone you plan
to irrigate. There are three methods to accomplish this task:
1) Zone Setup Wizard; 2) Advanced User Entry; 3) Copy Zone to Zone(s)
Method 1: Zone Setup Wizard
This method is recommended for new users of the ESP-SMT Controller.
Rotate the dial to INPUT ZONE INFORMATION position...
INPUT ZONE INFORMATION
Zone Setup Wizard
A
Copy Zone to Zone
SELECT ZONE
SELECT
AUTO
OFF
MANUAL
WATERING
RESTORE
SETTINGS
SYSTEM
REVIEW
FINE-TUNE
WATERING
ESP-SMT Smart Modular Control System
19
SET DATE
& TIME
SPECIAL
FEATURES
CONFIGURE
CONTROLLER
INPUT ZONE
INFORMATION
The INPUT ZONE INFORMATION
A
screen will appear with the Zone
Setup Wizard blinking; press the
SELECT button.
Select Specific Zone Number
The SELECT ZONE screen will appear.
B
Press the - or + button(s) until the
desired Zone Number is displayed;
then press the NEXT button.
Turn Zone to ENABLE status
Zone OFF is displayed. Press the
C
ENABLE button to change zone
status.
Zone XX ENABLED is displayed;
D
press the NEXT button.
NOTE: You can still input zone
information with the zone in the
!
OFF mode. This may be beneficial
B
C
D
Zone 3
OFF
SELECT ZONE
Zone 3
OFF
SELECT ZONE
Zone 3
ENABLED
NEXTBACK
NEXTBACK OFF ENABLE
NEXTBACK OFF ENABLE
Page 25

to pre-program all zones of the
controller using a 9V battery prior to
AC power being applied.
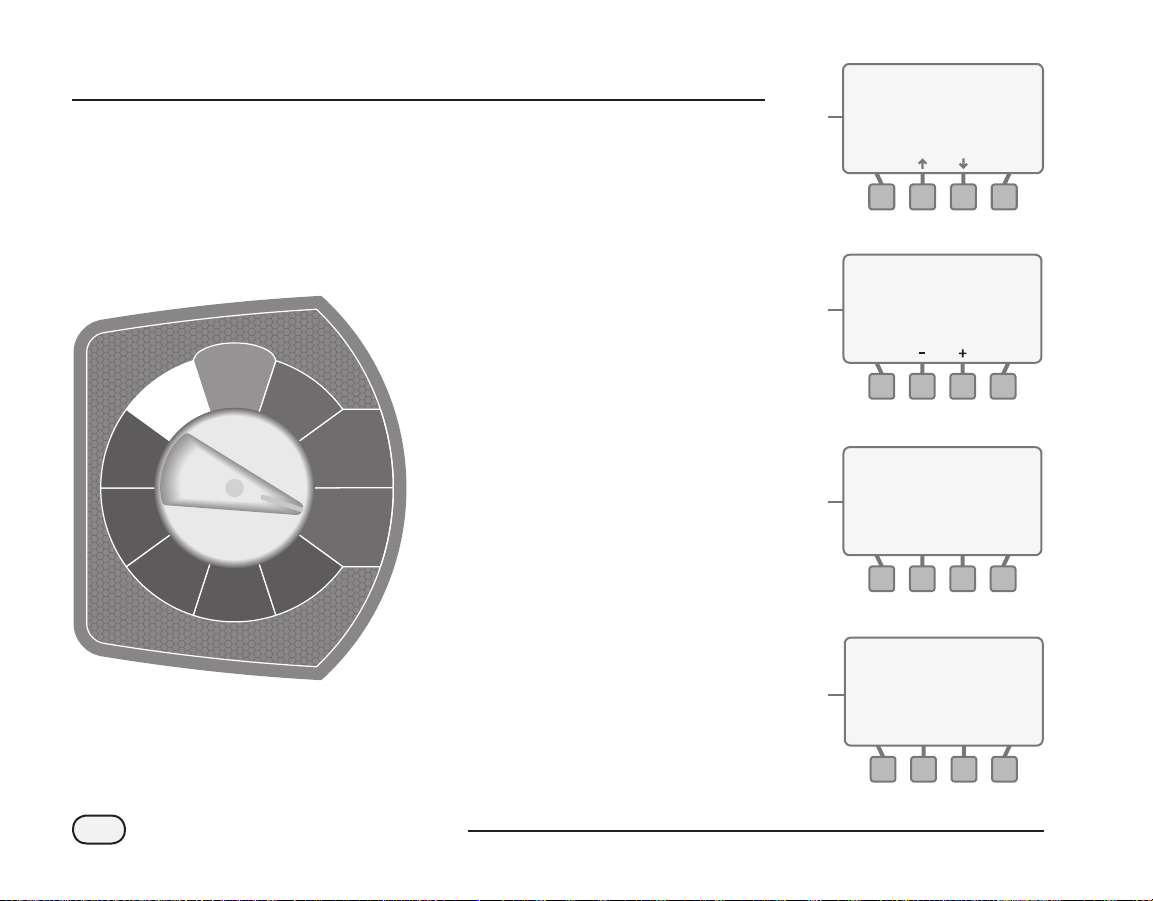
Enter Soil Type
The SOIL TYPE screen will appear.
E
Press the DOWN arrow button until
the desired Soil Type begins to blink;
then press the SELECT button.
If you would like a description of the
F
soil type that is blinking, press the
Help button.
Soil Types
The adjacent table lists
the Soil Type default
values that are used to
determine the irrigation
schedule.
To help you determine
the specific type of soil to
select, see page 73 of the
user manual.
Sand
Loamy Sand
Sandy Loam
Loam
Clay Loam
Silty Clay
Clay
A description screen will appear for
G
the soil type that was blinking when
the Help button was depressed.
a. To view the next page of the soil
description; press the MORE
button.
b. The second Soil Description screen
will appear; After reviewing the
information; press the NEXT button
and the SOIL TYPE screen will
appear. You can then select that soil
type or continue the Help process
to identify the description that best
matches the sites soil type.
Available Water Basic Intake Rate
inch water /inch of soil inchesper hour
0.06”
0.08”
0.12”
0.17”
0.18”
0.17”
0.17”
0.60”
0.50”
0.40”
0.35”
0.20”
0.15”
0.30”
Management
Allowable
Depletion (MAD)
50%
50%
55%
50%
50%
40%
3
5%
SOIL TYPE
Sand Loamy Sand
Sandy Loam Loam
Clay Loam Silty Clay
5
Clay
BACK
Help
SOIL TYPE
Sand Loamy Sand
Sandy Loam Loam
Clay Loam Silty Clay
6
Clay
Help
SANDY LOAM SOIL 1 of 2
Some individual sand
grains can be seen &
felt. Enough silt
7
and/or clay soil
particles to provide
a.
soil cohesion.
SANDY LOAM SOIL 2 of 2
When dry, casts can
be formed that will
not break with
7
careful handling.
b.
See Manual For Details
Zone 2
SELECT
Zone 2
SELECTBACK
MOREBACK
NEXTBACK
ESP-SMT Smart Modular Control System
20
Page 26
Once you’ve identied the correct
H
soil type for the site; press the down
arrow button until the desired soil
type is blinking; press the SELECT
button.
Select Sprinkler Type Method
The SPRINKLER TYPE screen will
I
appear;
Press the up or down arrow button(s)
to navigate to the dominant sprinkler
type for that zone; then press the
SELECT button.
NOTE: It is recommended that
the Default Net Application rate be
!
adjusted to match the actual zone
conditions. See pages 81-83 for
different methods to determine
the correct value.
Sprinkler Type - Default Net
Application Rates
The screen will display the default
J
Net Application Rate for the
sprinkler type selected.
If you need to change this value to
K
better match the actual application
rate, press the - or + button(s) until
the desired value is shown.
If choosing Drip as the sprinkler
L
type, you will be given two types of
drip to select from.
a. When Drip is blinking on the display,
press the SELECT button.
b. Select Point Source or Inline Grid.
SOIL TYPE
Sand Loamy Sand
Sandy Loam Loam
Clay Loam Silty Clay
8
Clay
Help
Zone 2
SELECTBACK
ROTOR Zone 2
Net Application Rate:
J
0.45 in/hr
ROTOR Zone 2
Net Application Rate:
K
0.25 in/hr
SPRINKLER TYPE Zone 2
Sprays Rotors
Bubblers
Rotary Nozzle
L
a.
BACK
Time-Based
Drip
- OR -
NEXTBACK
NEXTBACK
SELECT
Sprinkler Type
Sprays
Rotors
Rotary Nozzle
Bubblers
Point Source Drip
ESP-SMT Smart Modular Control System
21
Net Application
Rate (in/hr)
1.60
0.45
0.50
2.50
0.80
SPRINKLER TYPE Zone 2
Sprays Rotors
Bubblers
9
Rotary Nozzle
Time-Based
BACK
- OR -
Drip
SELECT
DRIP Zone 2
Point Source
L
Inline Grid
b.
SELECTBACK
Page 27
If Point Source Drip is selected, a
M
series of notes will be displayed to
describe how to determine the net
application rate for point source
emitters.
a. Continue to press NEXT to advance
to the next screen.
b. Press the NEXT button.
c. Press the NEXT button.
d. Similar to other sprinkler types, the
default net application rate for point
source drip will appear.
e. Use the - or + button(s) to change
the value until it matches the
conditions of the zone. Press the
NEXT button and the CYCLE/SOAK
screen will appear.
Drip Irrigation Emitter
Application Rates
Clay Soil
Flow in
Gallons per
hour
0.5 2.0’ 3.14 0.26”
Loam Soil
Flow in
Gallons per
hour
0.5 1.5’ 1.77 0.45”
Sandy Soil
Flow in
Gallons per
hour
0.5 1.0’ 0.79 1.02”
Wetted Area
(Dia. Ft.)
1 2.5’ 4.91 0.33”
2 3.0’ 7.07 0.45”
5 3.0’ 7.07 1.13”
Wetted Area
(Dia. Ft.)
1 2.0’ 3.14 0.51”
2 2.5’ 4.91 0.65”
5 2.5’ 4.91 1.63”
Wetted Area
(Dia. Ft.)
1 1.0’ 0.79 2.03”
2 1.25’ 1.23 2.61”
5 1.25’ 1.23 6.52”
Wetted Area
(Sq. Ft.)
Wetted Area
(Sq. Ft.)
Wetted Area
(Sq. Ft.)
Application
Rate (inches
per hour)
Application
Rate (inches
per hour)
Application
Rate (inches
per hour)
POINT SOURCE EMITTERS
Zone GPM is (# of
Emitters * Flow Rate
of Emitters in GPH)
M
and dividing by 60
b.
POINT SOURCE EMITTERS
Net Application Rate
is calculated as
(96.25 * Zone GPM) +
M
Estimated Soil Wetted
Area of all point
c.
source emitters.
DRIP Zone 10
Net Application Rate:
M
0.80 in/hr
d.
NEXTBACK 1 of 3
NEXTBACK 1 of 3
NEXTBACK
POINT SOURCE EMITTERS
Application Rate is
calculated by first
calcuting the Total
M
Zone GPM and
Estimated Wetted Area
a.
in Sq Ft.
DRIP Zone 10
Net Application Rate:
M
0.60 in/hr
e.
NEXTBACK 1 of 3
ESP-SMT Smart Modular Control System
NEXTBACK
22
Page 28

If Inline Grid is selected:
N
a. The Flow Rate value will blink. Use
the - or + button(s) to change the
Flow Rate to the desired value. Press
the NEXT button.
b. The Emitter Spacing value will blink.
Use the - or + button(s) to change
the value as desired. Press the NEXT
button.
c. The Row Spacing value will blink.
Use the - or + button(s) to change
to the desired value. Press the NEXT
button.
d. The Estimated Application Rate
screen will appear with the Adjust
Factor blinking. Use the - or +
button(s) to change to the desired
Adjust Factor value. Press the NEXT
button.
e. The CYCLE/SOAK screen will
appear.
Flow Rate GPH0.90
Emitter Spacing in12
N
a.
Row Spacing in12
Flow Rate GPH0.90
Emitter Spacing in12
N
Row Spacing in12
Flow Rate GPH0.90
Emitter Spacing in18
N
Row Spacing in12
c.
Zone 11INLINE GRID
NEXTBACK
Zone 11INLINE GRID
NEXTBACK
Zone 11INLINE GRID
NEXTBACK
INLINE GRID Zone 11
Est.Application
0.64 in/hr
N
N
Adjust Factor 100%
Net Application Rate:
d.
0.64 in/hr
INLINE GRID Zone 11
Est.Application
0.64 in/hr
Adjust Factor 95%
Net Application Rate:
e.b.
0.61 in/hr
Rate:
NEXTBACK
Rate:
NEXTBACK
ESP-SMT Smart Modular Control System
23
Page 29

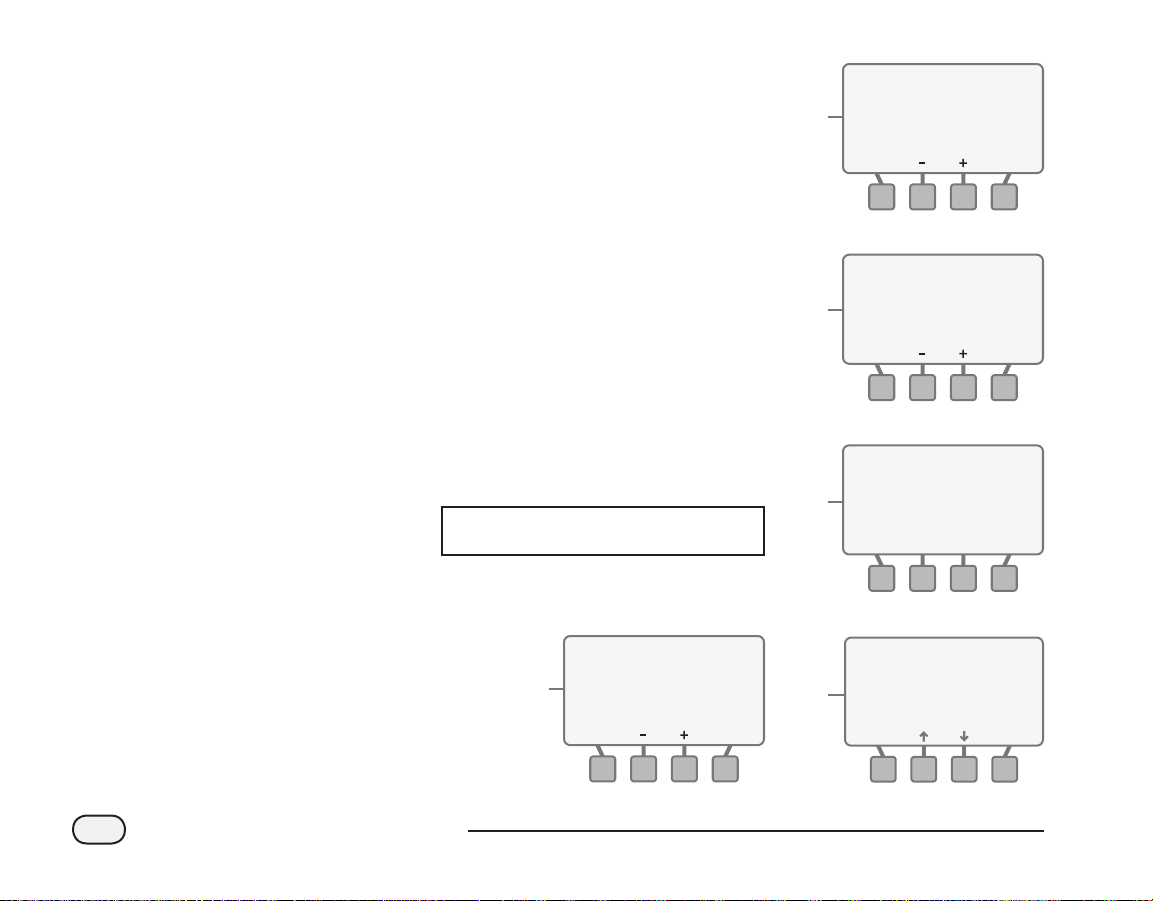
Select Time-Based Method
Press the up or down arrow
O
button(s) to navigate to the TimeBased text and press the SELECT
button.
The TIME–BASED screen for the
P
selected zone will appear and the
Every XX Days value will be blinking.
Press the - or + button(s) to set the
desired number of calendar days
between irrigation schedules. Press
the NEXT button.
The Water XXX Minutes value
Q
will begin to blink. Press the - or +
button(s) to set the minutes for each
irrigation cycle. Press the NEXT
button.
The For X Times Per Day value will
R
begin to blink. Press the - or +
button(s) to set the desired number
of irrigation cycles per day. Press the
NEXT button.
NOTE: A typical application for
using the time-based method is
!
for 1) zones that irrigate potted
plants and 2) a zone that may be
used to fill a pool.
SPRINKLER TYPE Zone 1
Sprays Rotors
Bubblers
O
P
Rotary Nozzle
- OR -
Time-Based
BACK
TIME-BASED
Odd Days:1,3,5,...no 31
Except Wednesday
Desired Every
Water For xx Minutes
xx Times Per Day
Drip
SELECT
Zone 12
2 Days
NEXTBACK
TIME-BASED
Odd Days:1,3,5,...no 31
Except Wednesday
Desired Every
Q
R
Water For 8 Minutes
xx Times Per Day
TIME-BASED
Odd Days:1,3,5,...no 31
Except Wednesday
Desired Every
Water For 8 Minutes
3 Times Per Day
Zone 12
2 Days
NEXTBACK
Zone 12
2 Days
NEXTBACK
ESP-SMT Smart Modular Control System
24
Page 30

The CYCLE/SOAK screen will appear
S
with 0° - 2° blinking.
a. Use the up or down arrow
button(s) to select the slope degree
category representative of the
zone topography. Press the NEXT
button.
b. The Automatic Cycle and Soak
Mode will blink. If you agree with the
automatically calculated maximum
cycle value and the minimum soak
value, press the NEXT button.
c. If you want to change the
automatically calculated cycle and
soak values, press either the - or +
button(s) and Custom will blink.
Press the NEXT button.
d. The Maximum Cycle value will blink.
Use - or + button(s) the to increase
or decrease the maximum cycle
time. Press the NEXT button.
e. The Minimum Soak value will blink.
Use the - or + button(s) to change
to the desired minimum soak time
value.
f. Press the NEXT button. The Plant
Type screen will appear.
CYCLE/SOAK
Select Slope in Deg.
0-2° 3-4°
5-7° 8°-up
Cycle/Soak Automatic
S
Max Cycle Min
a.
Min Soak
BACK
Zone xx
(6)
(40) Min
NEXT
CYCLE/SOAK
Slope in deg.
Cycle/Soak Mode
Automatic Custom
S
Max Cycle Min
c.
Min Soak
BACK
CYCLE/SOAK
Slope in Deg.
Cycle/Soak Mode
S
Max Cycle Min
Min Soak
d.
BACK
CYCLE/SOAK
Slope in deg.
Cycle/Soak Mode
Automatic Custom
S
Max Cycle Min
e.
Min Soak
BACK
(4)
(32)
(4)
(32)
(4)
(32)
Zone xx
8°-up
(4)
(32) Min
NEXT
Zone xx
8°-up
Custom
(4)
(32) Min
NEXT
Zone xx
8°-up
(8)
(32) Min
NEXT
ESP-SMT Smart Modular Control System
25
CYCLE/SOAK
Select Slope in Deg.
0-2° 3-4°
5-7° 8°-up
Cycle/Soak Automatic
S
Max Cycle Min
b.
Min Soak
BACK
Zone xx
(6)
(40) Min
NEXT
CYCLE/SOAK
Slope in Deg.
Cycle/Soak Mode
S
Max Cycle Min
Min Soak
f.
BACK
(4)
(32)
Zone xx
8°-up
Custom
(8)
(50) Min
NEXT
Page 31

Select Plant Type Method -
Grass Lawns
While the PLANT TYPE screen is
T
displayed, Grass Lawn will be
blinking; press the SELECT button.
The GRASS VARIETY screen will
U
appear. Press the UP and Down
arrow button(s) until the desired
variety (Cool Season or Warm
Season) is blinking; then press the
SELECT button and the SHADE
FACTOR screen will appear (see
page 29 for details).
PLANT TYPE
Grass Lawn Annuals
Ground Cover Shrubs
Desert Plants Trees
Mixed Planting
T
Custom Plant Factors
BACK
PLANT TYPE
Grass Lawn Annuals
Ground Cover Shrubs
Desert Plants Trees
Mixed Planting
U
Custom Plant Factors
BACK
Zone 1
- OR -
SELECT
Zone 1
- OR -
SELECT
Most “Cool Season” grasses do not spread
through runners, but rather from actual seed
that germinates. Cool Season varieties usually
have individual blades that grow in a vertical
orientation.
Cool Season Variety
Most “Warm Season” grass varieties grow
(spread) through runners that branch out
horizontally from the established lawn or
from planted stolons. In general, Warm Season
grasses go dormant in the winter.
Warm Season Variety
ESP-SMT Smart Modular Control System
26
Page 32

Select Plant Type Method -
Non-Grass Lawns
While the PLANT TYPE screen is
V
displayed, press the UP and DOWN
arrow button(s) until the desired
plant type (non-grass) is blinking;
then press the NEXT button and
the PLANT WATER NEEDS screen will
appear (see next page for details).
Plant Factor & Root Depth by Plant Type - Default Values
The adjacent table lists the
default species factor (Ks)
and root depth values used
to calculate the irrigation
schedule. If you do not want
to use the default values then
use the Custom Plant Factor
method.
The plant choices and their
respective Ks values listed in
the table are representative
of different plant varieties
that fall into these broad
categories.
Plant Type
Grass – Cool Season
Grass – Warm Season
Annual Color
Ground Cover
Shrubs
Desert Plants (Natives)
Trees
Mixed Planting
Select Plant Water Needs -
(Non-Grass Plant Types)
The PLANT WATER NEED screen will
W
appear with the plant type selected
and Average selection blinking.
Use the UP and DOWN arrow
X
button(s) to navigate to the desired
plant water need for that specic
zone. Press the SELECT button and
the PLANT DENSITY screen will
appear.
High
Average
Need
ESP-SMT uses monthly Kc values,
published in the Irrigation Assoc.
SWAT Testing Protocol - 8th Draft.
150%
90%
70%
50%
90%
90%
Need
120%
50%
50%
30%
50%
50%
Low
Need
100%
20%
20%
15%
20%
20%
Root
Depth
3”
3”
2”
6”
8”
12”
12”
6”
PLANT TYPE
Grass Lawn Annuals
Ground Cover Shrubs
Desert Plants Trees
V
Mixed Planting
Custom Plant Factors
BACK
PLANT WATER
NEEDS
Mixed Plants
W
X
Average
BACK
PLANT WATER
NEEDS
Mixed Plants
Average
BACK
- OR -
High
Low
High
Low
Zone 1
SELECT
Zone 1
SELECT
Zone 1
SELECT
For example: a low water need shrub would use 20% of ETo and have
a default root depth of 8 inches.
ESP-SMT Smart Modular Control System
27
Page 33

Custom Plant Factor Method
While the PLANT TYPE screen is
Y
displayed, press the UP and DOWN
arrow button(s) until Custom Plant
Factors is blinking; then press the
SELECT button.
The CUSTOM PLANT FACTORS
Z
screen will appear with the Species
Factor value blinking.
a. Press the - or + button(s) to adjust
Species Factor (Ks) to the desired
value; then press the NEXT
button.
b. The Root Depth value will begin
to blink. Press the - or + button(s)
to adjust Root Depth to the desired
value; then press the NEXT button
and the PLANT DENSITY screen will
appear.
For more plant variety specific information,
it is recommended that you access Water Use
Classifications of Landscape Species (WUCOLS) Guide developed by the University of
California. This guide is available through the
California Department of Water Resources at:
http://ucce.ucdavis.edu/files/
filelibrary/1726/15359.pdf
Enter Plant Density
While the PLANT DENSITY screen is
27
displayed, press the UP and DOWN
arrow button(s) until the desired
plant density description starts to
blink, press the SELECT button
and the SHADE FACTOR screen will
appear.
The following table lists the Density Factor
default values that are applied to the Species
Factor (Ks) above to determine the irrigation
schedule.
Density Factor by Plant Type
Plant Type Dense Medium Sparse
Cool Turf
Warm Turf
Annual Color 1.0 1.0 0.8
Ground Cover 1.1 1.0 0.5
Shrubs 1.1 1.0 0.6
Desert/Native 1.3 1.0 0.6
Trees 1.3 1.0 0.6
Mixed Planting 1.2 1.0 0.6
Custom Plant Factor 1.2 1.0 0.6
Density is not a factor for
Cool Turf or Warm Turf
PLANT TYPE
Grass Lawn Annuals
Ground Cover Shrubs
Desert Plants Trees
Y
Mixed Planting
Custom Plant Factors
BACK
CUSTOM PLANT Zone 2
FACTORS
Species Factor(Ks)1.0
Z
Root Depth 6 in
a.
CUSTOM PLANT Zone 2
FACTORS
Species Factor(Ks)0.8
Z
Root Depth 12 in
b.
PLANT DENSITY
Mixed Plants
BACK
Dense
Medium
Sparse
27
Zone 1
- OR -
SELECT
NEXTBACK
NEXTBACK
Zone 1
SELECT
ESP-SMT Smart Modular Control System
28
Page 34

Enter Shade Factor
The SHADE FACTOR screen will
28
appear. Press the UP and DOWN
arrow button(s) until the desired
Shade Factor description starts to
blink; then press the SELECT button
and the PLANT MATURITY screen
appears.
The following table lists the Sun / Shade
Factor default values that are applied to the
Species Factor (Ks) to determine the irrigation
schedule.
Exposur Non-Turf Turfe
Full Sun
25% Shade
50% Shade
75% Shade
Full Shade
1.30
1.15
1.00
0.75
0.50
1.00
0.89
0.77
0.67
0.56
Enter Plant Maturity -
(Established Method)
While the PLANT MATURITY screen
29
is displayed;
Press the UP and DOWN arrow
button(s) until Established is
blinking on the display; then press
the SELECT button and the ZONE
REVIEW screen will appear.
Enter Plant Maturity -
(Newly Planted Method)
While the PLANT MATURITY screen
30
is displayed:
a. Press the UP and DOWN arrow
button(s) until Newly Planted,
Grow-in Period is blinking on the
display; then press the SELECT
button.
b. The NEWLY PLANTED screen will
appear and the value For the Next
XX Days will be blinking. Press the
- or + button(s) to adjust to the
desired number of days (this value
can be from 0 to 99 days); then press
the NEXT button.
c. The value for Cycles Per Day
will begin to blink. Press the - or +
button(s) to adjust to the desired
Cycles Per Day (this value can be
from 1 to 8 cycles per day); then
press the NEXT button.
SHADE FACTOR
Full Sun
BACK
25% Shade
50% Shade
75% Shade
Full Shade
28 30
Zone 1
SELECT
PLANT MATURITY
Established
29
BACK
PLANT MATURITY
30
a.
BACK
NEWLY PLANTED
Water Every Calendar
Day For Next 14 Days
30
Cycles Per Day 2
Minutes Per Cycle
b.
09:00 AM to 04:00 PM
NEWLY PLANTED
Water Every Calendar
Day For Next 14 Days
Cycles Per Day 6
Minutes Per Cycle 5
c.
09:00 AM to 04:00 PM
- OR -
Newly Planted
Grow-in Period
Established
- OR -
Newly Planted
Grow-in Period
Zone 2
SELECT
Zone 2
SELECT
Zone 2
5
NEXTBACK
Zone 2
NEXTBACK
ESP-SMT Smart Modular Control System
29
Page 35

d. The value for the Minutes Per
Cycle will begin to blink. Press the
- or + button(s) to adjust to the
desired Minutes Per Cycle (this value
can be from 1 to 30 minutes per
cycle); then press the NEXT button
and the ZONE REVIEW screen will
appear.
Review Zone Information
The REVIEW screen displays the
previously entered information for the
specic zone that you entered in the
previous steps following the Zone Input
Wizard
If you want to change any of the
31
information on the REVIEW screen,
press the CHANGE button and the
SOIL TYPE screen will appear. Go
to step 5 on page 20 to change the
information as required.
If you accept all of the information
32
in the REVIEW screen then press the
ACCEPT button.
The SELECT ZONE screen will
33
appear. Select the next zone and
repeat steps starting on page 19 for
all zones that will be enabled either
now or in the future.
As you enter information for each
active zone, it will be saved for recall
in the event of a power outage.
You have now completed all of the required
steps for the INPUT ZONE INFORMATION
dial position (see page 31 for Review
Checklist).
Zone 2
75% Shade
Zone 2
NEXTBACK
8° - up
Average
ACCEPT
NEWLY PLANTED
Water Every Calendar
Day For Next 14 Days
Cycles Per Day 6
Minutes Per Cycle
d.
09:00 AM to 04:00 PM
REVIEW ON
Rotor 0.4 in/hr
Sandy Loam
Slope
31
Shrubs
Sparse
Plants Established
CHANGE
REVIEW ON
Rotor 0.4 in/hr
Sandy Loam
Slope
3230
Shrubs
8
Sparse
Plants Established
CHANGE
33
Zone 2
8° - up
Average
75% Shade
ACCEPT
SELECT ZONE
Zone 3
OFF
NEXTBACK
ESP-SMT Smart Modular Control System
30
Page 36

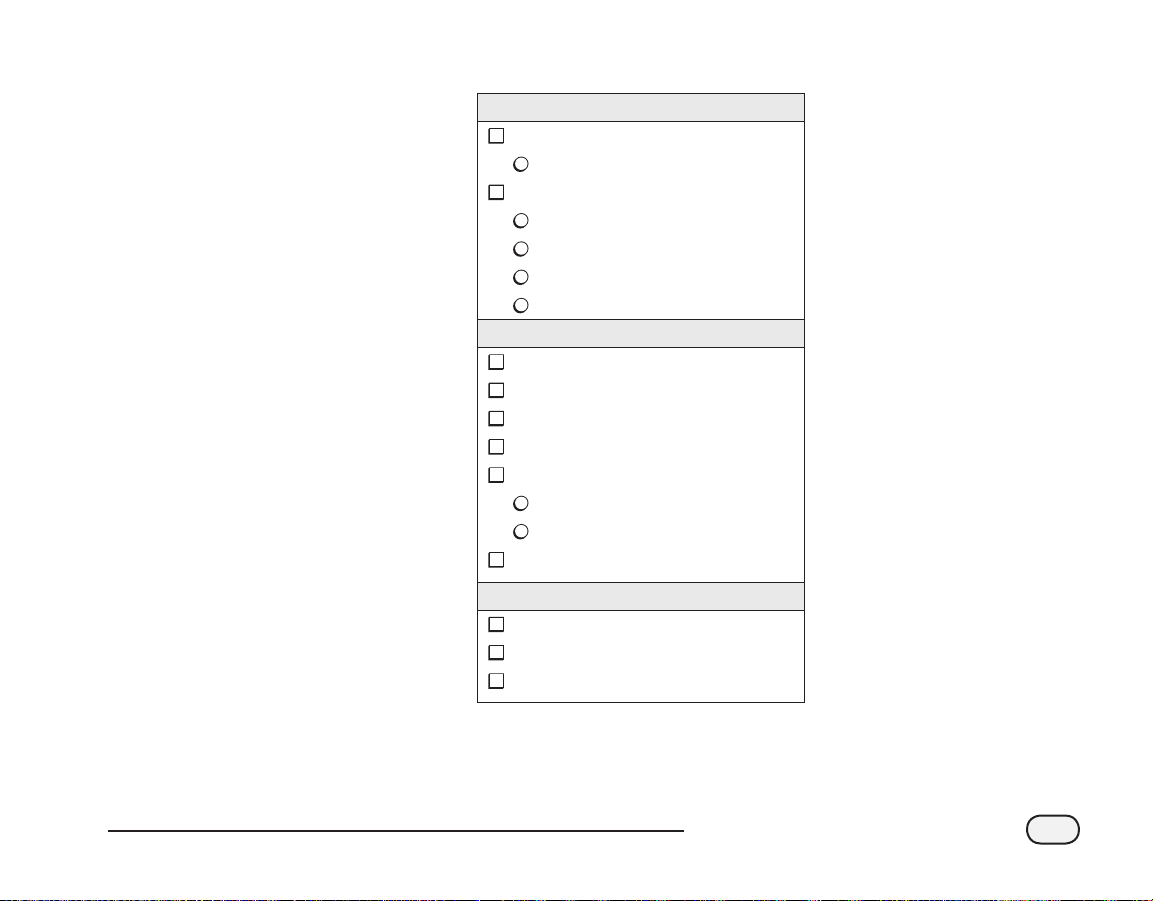
Review Checklist Zone Method #1 - Zone Setup Wizard
Select Specic Zone Number1
2
Turn Zone to ENABLED or OFF
3 Enter Soil Type
Sand
Sandy Loam
Clay Loam
Loamy Sand
Loam
Silty Clay
Clay
or
Select Time -based Mode
Every XX Days
Water XXX Minutes
For X Times Per Day
4
Select Sprinkler Type
Sprays
Rotary Noz
Rotors
Bubblers
Drip
5 Enter Slope in XX Degrees
0-2°
5-7°
3-4°
8° - up
6
Select Plant Type
Grass Lawn
Cool Season Variety
Warm Season Variety
Annuals
Ground Cover
Shrubs
Desert Plants (Natives)
Trees
Mixed Planting
or
Custom Plant Factors
Species Factor (Ks)
Root Depth
7
Plant Water Needs By Zone
High
Medium
Low
8 Enter Plant Densit y
Dense
Medium
Sparse
9
Enter Shade Factor
Full Sun
25% Shade
50% Shade
75% Shade
Full Shade
10
or
Established
Newly Planted
Water Next XX Days
XX Cycles per Day
XX Minutes per Cycle
11 Review Screen
Accept Data - Select
the next zone and
repeat steps starting
on page 19
Change Data - Go to
step 5 on page 20 to
change the information
as required
ESP-SMT Smart Modular Control System
31
Page 37

Input Zone Information
Method 2: Copy Zone to Zone(s)
This method is useful if the conditions for one zone match other zones.
Rotate the dial to INPUT ZONE INFORMATION position...
The INPUT ZONE INFORMATION
A
screen will appear. Press the UP and
DOWN arrow button(s) until Copy
Zone to Zone is blinking; then
press the SELECT button.
The Copy From Zone value will
B
begin to blink;
a. Press the - or + button(s) until the
source Zone number is displayed;
then press the NEXT button.
b. The To Zone value will blink.
Press the - or + button(s) until
the destination Zone number is
displayed; then press the NEXT
button.
c. The next destination zone will begin
to blink. Press the - or + button(s)
until the destination Zone number
is displayed; then press the NEXT
button. Repeat this process to add a
third destination zone if needed.
MANUAL
WATERING
RESTORE
SETTINGS
OFF
SYSTEM
REVIEW
AUTO
FINE-TUNE
WATERING
SET DATE
& TIME
SPECIAL
FEATURES
CONFIGURE
CONTROLLER
INPUT ZONE
INFORMATION
INPUT ZONE INFORMATION
Zone Setup Wizard
A
Copy Zone to Zone
COPY ZONE DATA
Copy From Zone 1
To Zone
And To Zone
a.
B
b.
B
c.
And To Zone
COPY ZONE DATA
Copy From Zone 2
To Zone
And To Zone
And To Zone
COPY ZONE DATA
Copy From Zone 2
To Zone
And To Zone
And To Zone
SELECT
2
--
--
NEXTBACK
3
--
--
NEXTBACK
3
6
8
NEXTBACK
ESP-SMT Smart Modular Control System
32
Page 38

The COPY ZONE DATA screen will
C
display the information you just
entered.
a. If the information is incorrect then
press the QUIT button.
b. Zone Data NOT copied screen will
appear.
If the information is correct then
D
a.
press the COPY button.
b. A conrmation screen will appear.
Press the NEXT button.
The original INPUT ZONE
E
INFORMATION screen will appear.
COPY ZONE DATA
Copy From Zone 2
C
a.
C
b.
To Zone
And To Zone
And To Zone
Start Copy or Quit
COPY ZONE DATA
Zone Data
NOT Copied
Press NEXT To Continue
COPY ZONE DATA
Copy From Zone 2
3
6
8
COPYQUIT
D
a.
D
NEXT
b.
INPUT ZONE INFORMATION
E
To Zone
And To Zone
And To Zone
Start Copy or Quit
COPY ZONE DATA
And To Zone
And To Zone
Zone Setup Wizard
Copy Zone to Zone
COPYQUIT
Copy Complete
From Zone 2
To Zone
NEXT
SELECT
3
6
8
3
6
8
ESP-SMT Smart Modular Control System
33
Page 39

Special Features
This section shows you how to customize the irrigation schedule for your site to
meet your specific needs by utilizing the ESP-SMT controller’s Special Features.
Rotate the dial to SPECIAL FEATURES position...
The SPECIAL FEATURES screen will
A
appear allowing you to utilize any
combination of the following ve
MANUAL
WATERING
RESTORE
SETTINGS
OFF
SYSTEM
REVIEW
AUTO
FINE-TUNE
WATERING
SET DATE
& TIME
SPECIAL
FEATURES
CONFIGURE
CONTROLLER
INPUT ZONE
INFORMATION
Special Features:
Event Days Off
Allows you to block irrigation on up to 4
specific dates up to 365 days in advance.
If you’d like to block irrigation from
B
occurring on a specic date(s):
when Event Days Off is blinking
on the display press the SELECT
button;
The EVENT DAYS OFF screen will
C
appear;
a. Press the + button and the current
date will appear in the rst available
line of dashes.
b. Press either - or + button(s) to
change to the date that you
would like to block irrigation from
occurring; then press the NEXT
button.
SPECIAL FEATURES
Event Days Off
Short Circuit Test
Adv. Controller Setup
A
Advanced Zone Setup
Save Contractor Dflts
Set Units
C
a.
b.
SELECT
ESP-SMT Smart Modular Control System
34
Page 40

c. The second entry line will begin to
blink. Press the + button and the
current date appears and begins
to blink. Press either - or + button(s)
to change to the date that you
would like to prevent irrigation from
occurring; then press the NEXT
button.
d. Continue this process until all
desired Event Days O are displayed
(maximum of 4 dates). In the screen
example, irrigation will be blocked
from occurring on July 3rd & 4th, as
well as Dec 24th and 25th as there
are parties planned in the yard on
those specic dates.
NOTE: Event Day Off dates can
be entered in any order. The ESP-
!
SMT controller will block irrigation
based on the chronological order
of the dates listed on the screen
independent of the Allowed
Watering Days entered in the
Configure Controller Section.
NOTE: Do not press the - button
when the current date appears
!
on the screen as this date will
be canceled and dashes will reappear on the screen.
Short Circuit Test
Allows you to run a test to validate that
the wiring is working properly.
If you would like to conduct a Short
D
Circuit Test to validate the wiring
integrity on a zone by zone basis:
Press the UP and Down arrow
button(s) until Short Circuit Test is
blinking on the display; then press
the SELECT button.
The SHORT CIRCUIT TEST screen will
E
appear and a Short Circuit Test will
be initiated;
a. The short circuit test identies on
a zone by zone basis, the electrical
integrity of each zone as “Good”,
“Short” or “Not Present”.
b. If you want to run the short circuit
test again after you’ve identied and
xed a problem, press the RETEST
button.
c.
EVENT DAYS OFF
03 Jul 2009
d.
D
E
a.
5
b.
04 Jul 2009
24 Dec 2009
25 Dec 2009
SPECIAL FEATURES
Event Days Off
Short Circuit Test
Adv. Controller Setup
Advanced Zone Setup
Save Contractor Dflts
Set Units
SHORT CIRCUIT TEST
MV-G 4-G 8-N 12-N
1–G 5-G 9-N 13-N
2-G 6-G 10-N
3-G 7-S 11-N
S-Shorted G-No Short
N-Not Present
SHORT CIRCUIT TEST
MV-G 4-G 8-N 12-N
1–G 5-G 9-N 13-N
2-G 6-G 10-N
3-G 7-G 11-N
S-Shorted G-No Short
N-Not Present
NEXTBACK
SELECT
RETESTBACK
RETESTBACK
ESP-SMT Smart Modular Control System
35
Page 41

Advanced Controller Setup
Allows you to set an ETo adjustment
factor, set a Zone to Zone Delay and/
or Suspend Watering when rainfall
exceeds a user set value, and/or when
the temperature falls below a user-set
value.
If you would like to globally program
F
the controller to:
• Set an ETo adjustment factor to
adjust for sensor placement.
• Set a time delay between one
valve turning o and the next
valve turning on.
• Suspend irrigation when rainfall
exceeds a specic amount.
• Suspend irrigation when the
temperature falls below a preset
level.
Press the UP and Down arrow
button(s) until Adv. Controller
Setup is blinking on the display;
then press the SELECT button.
The ADV CONTROLLER SETUP
G
screen will appear with the value
for the ET Adjustment factor
blinking;
a. Press the - or + button(s) to set the
desired ET adjustment factor; then
press the NEXT button.
NOTE: This feature can be used
to globally increase or decrease
!
the calculated ETo value thereby
adjusting the overall water needs.
b. Press the - or + button(s) to set the
desired zone delay time value; then
press the NEXT button.
NOTE: An ideal application of the
Zone to Zone Delay feature is for a
!
slow filling well in which a delay
is required to allow the well to fill
back to a minimum level prior to
the next zone irrigating.
c. The Suspend Watering When Rain
Over value will begin to blink.
Press the - or + button(s) to set the
desired rainfall value; then press the
NEXT button.
NOTE: The Suspend Watering
When Rain Over XX inches feature
!
allows you to customize how
much rainfall is required before
suspension of the irrigation
system will occur.
SPECIAL FEATURES
Event Days Off
Short Circuit Test
Adv. Controller Setup
Advanced Zone Setup
F
Save Contractor Dflts
Set Units
ADV CONTROLLER SETUP
ETo Adjust Factor
Zone To Zone Delay
G
Suspend Watering When
Rain Reaches
a.
-OR- Temp Below
ADV CONTROLLER SETUP
ETo Adjust Factor
Zone To Zone Delay
G
Suspend Watering When
Rain Reaches
b.
-OR- Temp Below
ADV CONTROLLER SETUP
ETo Adjust Factor
Zone To Zone Delay
Suspend Watering When
G
Rain Reaches
c.
-OR- Temp Below
SELECT
100%
2 Seconds
0.04in
35°F
NEXTBACK
90%
2 Seconds
0.04in
35°F
NEXTBACK
90%
4 Seconds
0.04 in
35°F
NEXTBACK
ESP-SMT Smart Modular Control System
36
Page 42

d. The Temp. Below: value will begin
to blink. Press the - or + button(s) to
set the desired temperature value;
then press the NEXT button.
NOTE: The Suspend Watering
When Temp. Below XX feature
!
allows you to set a temperature
threshold when irrigation will be
suspended to prevent potential
freeze damage to the system
components.
Advanced Zone Setup
Allows you to assign each zone to:
• Use/Not Use a Master Valve / Pump
Start Relay.
• Use/Not Use the ESP-SMT Rain Gauge
information.
If you would like to set a specic zone
H
to use or not use a Master Valve or
Pump Start Relay and/or the rainfall
measurement information gathered
from the ESP-SMT Rain Gauge:
Press the UP and Down arrow
button(s) until Advanced Zone
Setup is blinking on the display;
then press the SELECT button.
The ADVANCED SETUP screen
I
will appear and the Zone Number
begins to blink;
a. Press the - or + button(s) until the
desired Zone number is displayed;
then press the NEXT button.
b. Use Master Valve: YES will begin to
blink. Press either the YES or NO
button(s) and either YES or NO will
be displayed; then press the NEXT
button.
c. Use Rain Sensor: YES will begin to
blink; press either the YES or NO
button(s) and either YES or NO will
be displayed; then press the NEXT
button.
ADV CONTROLLER SETUP
ETo Adjust Factor
Zone To Zone Delay
Suspend Watering When
G
Rain Reaches
d.
-OR- Temp Below
90%
4 Seconds
0.10in
35°F
NEXTBACK
SPECIAL FEATURES
Event Days Off
Short Circuit Test
Adv. Controller Setup
Advanced Zone Setup
H
Save Contractor Dflts
Set Units
ADVANCED SETUP
Use Master Valve YES
I
Use Rain Gauge YES
a.
ADVANCED SETUP
Use Master Valve NO
I
Use Rain Gauge YES
b.
ADVANCED SETUP
Use Master Valve NO
9
Use Rain Gauge NO
c.
SELECT
Zone 6
NEXTBACK
Zone 6
NEXTBACK NO YES
Zone 6
NEXTBACK NO YES
ESP-SMT Smart Modular Control System
37
Page 43

Save Settings to “Contractor
Default” Program
The SPECIAL FEATURES screen
J
will appear and Save Contractor
Deflts will be blinking. If you want
to save your current settings into
memory for retrieval at a later
date in case you or your customer
accidentally makes undesired
setting adjustments, press the
SELECT button.
The SAVE CURRENT SETTINGS TO:
K
Contractor Defaults screen will
appear. If you want to continue the
process of saving your settings to
Contractor Default, press the SAVE
button.
A WARNING screen will appear.
L
If you want to continue to save
your current settings press the
CONTINUE button.
The CURRENT SETTINGS SAVED
M
screen will appear. Press the
CONTINUE button.
SPECIAL FEATURES
Event Days Off
Short Circuit Test
Adv. Controller Setup
Advanced Zone Setup
J
Save Contractor Dflts
Set Units
SAVE CURRENT
SETTINGS TO:
Contractor Defaults
K
WARNING
Saving Settings To
Contractor Defaults
L
SELECT
Will Overwrite All
Previously Saved
Contractor Defaults
SAVEQUIT
M
SAVEQUIT
ESP-SMT Smart Modular Control System
38
Page 44

Set Units
Allows you to assign the Time Format
and the Unit Format displayed on the
ESP-SMT screen.
If you would like to change the time
N
format or the unit format from that
currently shown on the display:
Press the UP and Down arrow
button(s) until Set Units is blinking
on the display; then press the
SELECT button.
The SET TIME FORMAT screen will
O
appear and the current time
format will blink. If you wish to
change the time format to an
alternate choice (For Example: from
AM/PM format to 24 Hour format):
Press the UP or DOWN button(s) to
the desired time format; then press
the SELECT button.
The SET UNITS FORMAT screen
P
will appear and the current unit
format will blink. If you wish to
change the unit format to an
alternate choice (For Example:
English format to Metric format):
Press the UP or DOWN button(s) to
the desired time format; then press
the SELECT button.
NOTE: The factory default
or Automatic setting will
!
automatically set the time format
to “AM/PM” and the Unit format
to “English” when the ESP-SMT
controller is connected to a 60Hz
power source.
SPECIAL FEATURES
Event Days Off
Block One Day A Week
Wiring Test
Adv. Controller Setup
N
Advanced Zone Setup
Set Units
SET TIME FORMAT
O
P
Automatic
24-Hour
BACK
SET UNITS FORMAT
Automatic
English
BACK
SELECT
AM/PM
SELECT
Metric
SELECT
ESP-SMT Smart Modular Control System
39
Page 45

Fine Tune Watering By Zone
This section shows you how to make quick, minor adjustments (+/- 60%) to
each zone’s run-time calculation based on changing weather patterns and the
site/zone parameters previously entered.
Rotate the dial to FINE TUNE WATERING position...
MANUAL
WATERING
RESTORE
SETTINGS
OFF
SYSTEM
REVIEW
AUTO
FINE-TUNE
WATERING
SET DATE
& TIME
SPECIAL
FEATURES
CONFIGURE
CONTROLLER
INPUT ZONE
INFORMATION
The FINE TUNE BY ZONE screen will
A
appear and the value for Zone 1 will
begin to blink.
IIf you want to ne-tune the irrigation
B
amount applied to Zone 1, press either
the - or + button(s) until the desired value
is displayed. Press the NEXT button and
the value for zone 2 will begin to blink.
Continue to press the NEXT button to
C
advance to the next Zone you would
like to Fine Tune. Press either the - or
+ button(s) to adjust the value. Once
the desired value is displayed, press the
NEXT button and the value for the next
sequential Zone will begin to blink.
NOTE: After making all of the Fine
Tune By Zone adjustments, move the
!
dial into the AUTO position. These
adjustments will occur indefinitely
until you rotate the dial into the FINE
TUNE WATERING position and make
additional adjustments.
A
B
C
FINE TUNE BY ZONE
% %
+0
% %
+0 +0
%
+0 n/a
%
+0
5
+0
FINE TUNE BY ZONE
+0
+0
+0
5
+0
FINE TUNE BY ZONE
+0
+0
+14
5
-8
n/a
%
%
61 +12
+0
%
72
%
%
+0
83
%
n/a
94
%
n/a
%
%
+0
%
61 +12
72
%
%
-11
83
%
n/a
94
%
n/a
%
1061 +0
1172
1283
1394
10
11
12
13
10
11
12
13
NEXTBACK
NEXTBACK
NEXTBACK
n/a
n/a
n/a
n/a
n/a
n/a
n/a
n/a
n/a
n/a
n/a
n/a
ESP-SMT Smart Modular Control System
40
Page 46

System Review
This section shows you how to review (not change) the controller and zone
information that you have entered into the controller. It also allows you to
review various logs of past Irrigation Events, Alarm & Note Conditions, and
measured Weather data. There are six dierent Information Review modes.
Rotate the dial to SYSTEM REVIEW position...
AUTO
OFF
MANUAL
WATERING
RESTORE
SETTINGS
SYSTEM
REVIEW
FINE-TUNE
WATERING
ESP-SMT Smart Modular Control System
41
SET DATE
& TIME
SPECIAL
FEATURES
CONFIGURE
CONTROLLER
INPUT ZONE
INFORMATION
The CONTROLLER REVIEW screen will
appear allowing you to use any one of
the six Information Review modes.
Controller Settings Review
Allows you to review all of the current
settings that were selected while in the
CONFIGURE CONTROLLER dial position
and the controller specific settings while
in the SPECIAL FEATURE dial position.
To review the Controller Settings:
A
when Controller Settings is blinking;
press the SELECT button.
If you congured the controller
B
using the “Enter Site Zip Code”
mode;
a. The CONTROLLER SETTINGS screen
will appear displaying the Zip
Code, Allowed Irrigation Days and
Allowed Irrigation Time (Watering
Window).
CONTROLLER REVIEW
Controller Settings
Zone Settings
Next Irrigation Est.
A
Weather Data
Weather Log
Event Log
CONTROLLER SETTINGS
Zip Code 92010
Even Days: 2,4,6,...30
B
06:00 AM To
a.
06:00 PM To 11:00 PM
BACK
Lat 41° N Elev 1200ft
Even Days: 2,4,6,...30
B
06:00 AM To
b.
06:00 PM To 11:00 PM
BACK
Except Tuesday
Water Windows
CONTROLLER SETTINGS
Except Tuesday
Water Windows
SELECT
10:00 AM
10:00 AM
Page 47

OR: If you congured the controller
using the “Enter Custom Data For
Location” mode;
b. The CONTROLLER SETTINGS
screen will appear displaying the
Locations Latitude and Elevation,
Allowed Irrigation Days and
Allowed Irrigation Time (Watering
Window).
Zone Settings Review
Allows you to review the all of the current
settings that were selected while in the
INPUT ZONE INFORMATION dial position
and the zone specific settings while in
the SPECIAL FEATURE dial position.
If you want to review all Zone
C
Settings on a Zone by Zone basis;
press the UP or DOWN button(s)
until Zone Settings is blinking
on the display; press the SELECT
button.
The rst Zone Review screen (1of 2)
D
will appear for Zone 1 with the Zone
a.
number blinking. If you would like
to review Zone Information for a
dierent Zone (Example – Zone 3);
press the - or + button(s) until the
desired zone is displayed.
b. To review additional zone
information for the selected Zone;
press the MORE button and the
second Zone Review screen (Page 2
of 2) will appear.
To return to the CONTROLLER
REVIEW screen; press the NEXT
button.
Next Irrigation Estimate Review
On a zone-by-zone basis, allows you to
review the next estimated irrigation
event based on the past climatic
conditions.
If you would like to review the
E
next estimated irrigation cycle on
a zone by zone basis; press the UP
and DOWN button(s) until Next
Irrigation Est. is blinking on the
display; press the SELECT button.
CONTROLLER REVIEW
Controller Settings
Zone Settings
Next Irrigation Est.
Weather Data
C
Weather Log
Event Log
Zone 2 ON Page 1 of 2
Rotary Noz 0.50 in/hr
Custom Ks
Root Depth 6 in
D
Sparse Full Shade
a.
New 14Days 5Cyc 17Min
Zone 2 ON Page 2 of 2
Sandy Loam
Cycle/Soak Automatic
Max Cycle
Min Soak
D
Use Master Valve
b.
Use Rain Gauge
CONTROLLER REVIEW
Controller Settings
Zone Settings
Next Irrigation Est.
Weather Data
E
Weather Log
Event Log
SELECT
1.2 Avg
MOREBACK
8°-up
11 Min
43 Min
YES
YES
NEXTBACK
SELECT
ESP-SMT Smart Modular Control System
42
Page 48

The NEXT IRRIGATION EST. screen
F
will appear displaying the next
estimated cycle and run times
for Zones 1 thru Zone 5; press
the MORE button and the same
information for Zones 6 thru Zone
10 will appear.
The NEXT IRRIGATION EST. screen
G
will appear displaying the next
estimated cycle and run times
for Zones 6 thru Zone 10; press
the MORE button and the same
information for Zone 11 thru Zone
13 will appear.
The NEXT IRRIGATION EST. screen
H
will appear displaying the next
estimated cycle and run times
for Zones 11 thru Zone 13; press
the DONE button to return to the
CONTROLLER REVIEW screen.
NOTE: If the measured rainfall
appears to be significantly less
!
than the actual rainfall, see the
trouble-shooting section in the
Appendix.
Weather Data Review
Allows you to review the current
temperature and the measured rainfall
over the past 24 hours based on the
information communicated to the ESPSMT controller from the SMT Weather
Sensor.
If you would like to review the
I
current temperature and the rainfall
that has occurred in the last 24 hours
as measured by the SMT Weather
Sensor; press the UP or DOWN
button(s) until Weather Data is
blinking on the display; press the
SELECT button.
The WEATHER DATA screen will
J
appear displaying the current
temperature, as well as the amount
of rainfall measured in the last 24
hours (- or + 1 hour) by the ESP-SMT
sensor.
NEXT IRRIGATION EST.
Zone Date Minutes
1 15 Dec
F
2
3
4
OFF
5
13 Dec
17 Dec
13 Dec
Default
Default
21
MOREBACK
7
NEXT IRRIGATION EST.
Zone Date Minutes
6
G
H
I
J
7
8
OFF
9
10
NEXT IRRIGATION EST.
Zone Date Minutes
11
15 Dec
OFF
12
13
OFF
CONTROLLER REVIEW
Controller Settings
Zone Settings
Next Irrigation Est.
Weather Data
Weather Log
Event Log
WEATHER DATA
Current Temp: 72 ºF
Rain in Last
24 Hours: 1.24 in
BACK
16 Dec
20 Dec
19 Dec
17 Dec
Default
120
MOREBACK
28
DONEBACK
SELECT
5
7
ESP-SMT Smart Modular Control System
43
Page 49

Weather Log Review
Allows you to review a daily log of
high and low temperature, calculated
Evapotranspiration (ETo), and the
measured rainfall for the past 30 days
based on the information communicated
to the ESP-SMT controller from the SMT
Weather Sensor.
To review the Weather Log, press
K
the UP or DOWN button(s) until
Weather Log is blinking on the
display; press the SELECT button.
To review the same information for
L
additional dates; press either the
Pg Up or Pg Dn button(s) until the
desired dates are displayed.
Event Log Review
Allows you to review watering events
and Alarm & Note conditions in one of
three different views:
1. Alarms and Notes by date in
chronological order
2. Event Log by date in chronological
order
3. Event Log by Zone
To review Alarms and Notes, Events
M
by Date or Events by Zone; press
the UP and DOWN button(s) until
Event Log is blinking on the display;
press the SELECT button.
The EVENT LOG screen will appear
N
and Alarms and Notes will begin to
blink; press the SELECT button.
The ALARMS AND NOTES screen will
O
appear displaying various “Alarm”
and/or “Note” conditions by the
Date and Time that they occurred.
To view additional dates; press
either the Pg Up or Pg Dn button(s)
until the desired dates appear.
CONTROLLER REVIEW
Controller Settings
Zone Settings
Next Irrigation Est.
Weather Data
Weather Log
Event Log
SELECT
WEATHER LOG (ºF,in)
Date Hi Low ETo Rain
03May 85
87
02May
L
M
N
84
01May
80
30Apr
86
29Apr
BACK PgDn PgUp
CONTROLLER REVIEW
Controller Settings
Zone Settings
Next Irrigation Est.
Weather Data
Weather Log
Event Log
BACK
EVENT LOG
Alarms and Notes
Events by Date
Events by Zone
BACK
ALARMS AND NOTES
10:16
03 May
11:24
04 May
10:02
05 May
OK
BACK PgDn PgUp
55
.12
56
.15
53
.11
55
.14
54
.15
SELECT
SELECT
High Temp
A
Rain Susp
A
Short Z10
A
.23
.15
0
0
0
ESP-SMT Smart Modular Control System
44
Page 50

To review events by date - While in
P
the EVENT LOG screen, press the UP
and DOWN button(s) until Events
By Date is blinking on the display;
press the SELECT button.
The EVENTS BY DATE screen will
Q
appear. Press the Pg Up or Pg Dn
button(s) until the desired date is
displayed. Events that occurred on
the selected date will be displayed
in chronological order. If all of the
events will not t on the one screen,
you can press the Pg Up or Pg Dn
button(s) to view additional records.
To return to the EVENT LOG menu
screen; press the BACK button.
When the EVENT LOG screen is
R
present; press the UP or DOWN
button(s) until Events By Zone is
blinking on the display; press the
SELECT button.
The EVENTS BY ZONE screen will
S
appear and the zone number will
be blinking. To change the zone
number; press the NEXT button
until the desired zone number is
displayed. Events that occurred
on that zone will be displayed in
chronological order. If all of the
events will not t on the one screen,
you can press the Pg Up or Pg Dn
button(s) to view additional events.
To review Event Log information for
T
other zones, press the NEXT button
until the desired zone is displayed.
• To return to the EVENT LOG menu
screen; press the BACK button.
EVENTS BY DATE
03 May 08:00
03 May
08:12
03 May
09:16
03 May
Q
R
S
09:26
03 May
09:42
10:16A High Temp
03 May
PgDn PgUp
BACK
EVENT LOG
Alarms and Notes
Events by Date
Events by Zone
BACK
EVENTS FOR Zone 2
01 May
08:05
08:12
03 May
08:20
06 May
08:25
10 May
08:12
15 May
08:15
18 May
PgDn PgUp
BACK NEXT
Z01
A
Z02
A
Z03
A
Z06
A
Z08
A
SELECT
Z02
A
Z02
A
Z02
A
Z02
A
Z02
A
Short Z02
A
12 Mi
64 Mi
10 Mi
16 Mi
8 Mi
59 Mi
64 Mi
72 Mi
85 Mi
53 Mi
ESP-SMT Smart Modular Control System
45
Alarms and Notes
Events by Date
P
Events by Zone
BACK
EVENT LOG
SELECT
EVENTS FOR Zone 2
01 May
08:05
08:12
03 May
08:20
06 May
08:25
10 May
T
08:12
15 May
08:15
18 May
PgDn PgUp
BACK NEXT
Z02
A
Z02
A
Z02
A
Z02
A
Z02
A
Short Z02
A
59 Mi
64 Mi
72 Mi
85 Mi
53 Mi
Page 51

Events that will appear in the Event Logs
Screen Text Event Description
ESP-SMT Smart Modular Control System
46
Page 52

Restore Settings
This section shows you how save the program information you have entered
into the ESP-SMT controller in memory and then how to retrieve the saved
information when necessary. This dial position also allows you to clear all
information stored in the controller and reset the controller to its original
Factory Settings.
Rotate the dial to RESTORE SETTINGS position...
Restore “Contractor Default”
Program Settings
Press the UP or DOWN button(s)
AUTO
OFF
MANUAL
WATERING
RESTORE
SETTINGS
SYSTEM
REVIEW
FINE-TUNE
WATERING
ESP-SMT Smart Modular Control System
47
SET DATE
& TIME
SPECIAL
FEATURES
CONFIGURE
CONTROLLER
INPUT ZONE
INFORMATION
A
until the RESTORE SETTINGS FROM
Contractor Defaults screen begins
to blink; then press the SELECT
button.
The RESTORE CURRENT SETTINGS
B
FROM Contractor Defaults screen
will appear. Press the RESTORE
button.
The RESTORING TO Contractor
C
Defaults screen will appear with
a message that reads: Please Wait
While Unit Recongures.
While the controller is restoring
D
the Contractor Default settings,
the Rain Bird ESP-SMT screen will
appear until all information has
been programmed into the ESPSMT controller.
RESTORE SETTINGS FROM
Contractor Defaults
A
B
Factory Defaults
RESTORE CURRENT
SETTINGS FROM:
Contractor Defaults
C
Rain Bird
D
ESP-SMT
Smart Modular
Controller
SELECT
RESTOREQUIT
Page 53

Restore “Factory Default”
Program Settings
The RESTORE SETTINGS FROM
E
screen will appear and Contractor
Defaults will be blinking. Press the
UP or DOWN button(s) until the
Factory Defaults begins to blink;
then press the SELECT button.
RESTORE CURRENT SETTINGS FROM
F
Factory Defaults will appear. Press
the RESTORE button.
A WARNING screen will appear. If
G
you want to continue to restore the
original factory settings. Press the
CONTINUE button.
The RESTORING TO Factory Defaults
H
screen will appear with a message
that reads: Please Wait While Unit
Recongures.
While the ESP-SMT is restoring
I
the Factory Default settings, the
screen as shown will appear until all
information has been programmed
into the ESP-SMT controller.
NOTE: If you elect to restore
Factory Defaults, all previously
!
programmed information will be
erased and replaced with Factory
default values. Information saved
in Contractor Defaults is not
erased.
RESTORE SETTINGS FROM
Contractor Defaults
E
F
G
Factory Defaults
SELECT
RESTORE CURRENT
SETTINGS FROM:
Factory Defaults
RESTOREQUIT
WARNING
Restoring Factory
Defaults Will Delete
ALL Current Settings.
Contractor Defaults
Will Be Retained.
RESTOREQUIT
H
I
RESTORING TO
Factory
Defaults
Please Wait While
Unit Reconfigures
Rain Bird
ESP-SMT
Smart Modular
Controller
ESP-SMT Smart Modular Control System
48
Page 54

Manual Watering
This section shows you how to manually water an individual zone, a
combination of individual zones, or all zones.
Rotate the dial to MANUAL WATERING position...
The MANUAL WATERING screen
A
will appear and Water Selected
Zones will be blinking. If you want
MANUAL
WATERING
RESTORE
SETTINGS
OFF
SYSTEM
REVIEW
AUTO
FINE-TUNE
WATERING
SET DATE
& TIME
SPECIAL
FEATURES
CONFIGURE
CONTROLLER
INPUT ZONE
INFORMATION
to manually water a single zone or
a combination of zones, Press the
SELECT button.
Manually Water Selected Zones
Water a single Zone or any combination
of Zones with a specific manual run time
for each Zone.
The MANUAL WATERING MINUTES
B
PER ZONE will appear and the
value for Zone 1 will begin to blink.
If you want to apply water on zone 1
manually, press the - or + button(s)
to set the desired amount of manual
irrigation for zone 1; then press the
NEXT button.
MANUAL WATERING
Water Selected Zones
A
B
Water All Zones
MANUALLY WATER
MINUTES PER ZONE
1 12
2 7 11
0
3 8 12
0
4 9 13
0
5
0
- OR -
6 0
n/a
n/a
0
SELECT
10 n/a
n/a
n/a
n/a
NEXTBACK
ESP-SMT Smart Modular Control System
49
Page 55

Continue to press the NEXT button
C
until you get to the next Zone you
would like to apply water manually.
Press either the - or + button(s) to
adjust the value.
Once the desired value is displayed.
Press the NEXT button and the
value for the next sequential Zone
will begin to blink. Continue the
process until the time for the last
active zone is set.
Press the START button and the
D
WATERING-MANUAL screen will
appear and the rst zone that you
set to manually water in numerical
sequence and Minutes Remaining
will show the amount of manual
irrigation time left on the zone.
The Minutes Remaining will count
E
down to 0 and then the next Zone
that you set to manually operate
will be displayed with the Minutes
Remaining displayed.
If you desire to stop the manual
F
watering for the current zone and
want to advance to the next zone
that has a manual run time, press
the ADV. ZONE button and the
next valve will begin to manually
operate.
If you want to cancel all manual
watering, press the CANCEL button
on the screen OR turn the dial to the
OFF position.
NOTE: If manual watering
starts when automatic watering
!
is occurring, the automatic
watering will be cancelled for
that day and will resume on the
next allowed watering day when
a new auto watering schedule is
generated.
MANUALLY WATER
MINUTES PER ZONE
1 12
2 7 11
0
3 8 12
C
D
E
F
0
4 9 13
120
5
14
WATERING-MANUAL
Watering Zone
Minutes Remaining 12
CANCEL
WATERING-MANUAL
Watering Zone
Minutes Remaining 120
CANCEL
WATERING-MANUAL
Watering Zone
Minutes Remaining 14
CANCEL
6 0
n/a
n/a
11
10 n/a
n/a
n/a
n/a
NEXTBACK
ADV.
ZONE
ADV.
ZONE
ADV.
ZONE
1
4
5
ESP-SMT Smart Modular Control System
50
Page 56

Manually Water All Active Zones
(Test Program)
Water all Zones with the same manual
run time per zone.
The MANUAL WATERING screen will
G
appear and Water Selected Zones
will be blinking. Press the UP or
DOWN arrow button(s) until Water
All Zones is blinking; then press the
SELECT button.
The MANUALLY WATER ALL ZONES
H
screen will appear and the value for
Water All Zone for XX Minutes Each
will begin to blink.
Press the - or + button(s) to set the
I
desired amount of manual irrigation
run time for all Zones; then press the
START button.
The Minutes Remaining for Zone 1
J
will count down to 0 and then Zone
2 will be displayed with the Minutes
Remaining displayed.
If you desire to stop the manual
K
watering for the current zone and
want to advance to the next zone.
Press the ADV. ZONE button and
the next valve will begin to manually
operate.
If you want to cancel all manual watering,
press the CANCEL button on the screen
OR turn the dial to the OFF position.
NOTE: The MANUALLY WATER
ALL ZONES feature is a time saving
!
tool to perform a quick system
“walk-thru” or to perform “system
winterization” without having to
walk back to the controller to set
each zone’s manual run time one
zone at a time.
MANUAL WATERING
Water Selected Zones
G
H
- OR -
Water All Zones
SELECT
MANUALLY WATER
ALL ZONES
Water All Zones
For 1 Minutes Each
STARTCANCEL
I
WATERING-MANUAL
Watering Zone
Minutes Remaining 2
J
CANCEL
WATERING-MANUAL
Watering Zone
Minutes Remaining 2
K
CANCEL
ADV.
ZONE
ADV.
ZONE
1
2
ESP-SMT Smart Modular Control System
51
Page 57

Off Position or Adjust Display Contrast Function
This section shows you how to easily prevent all irrigation from occurring. In
this dial position, you can also adjust the contrast of the LCD display to make
it more readable in varying light conditions
Rotate the dial to OFF position...
The ALL WATERING OFF screen will
A
appear. If you want to adjust the
contrast of the LCD display to make
it more readable for your given
light condition. Press the - or +
button(s) until the desired contrast
is achieved.
MANUAL
WATERING
OFF
AUTO
SET DATE
& TIME
CONFIGURE
CONTROLLER
A
RESTORE
SETTINGS
SYSTEM
REVIEW
FINE-TUNE
WATERING
SPECIAL
FEATURES
INPUT ZONE
INFORMATION
ESP-SMT Smart Modular Control System
52
Page 58

Auto Position or Suspend Watering Function
This section describes the various displays that may occur when the dial is
in this position. It also will show you how to suspend irrigation for a user
determined period of time and then resume automatically after the time has
elapsed
Rotate the dial to AUTO position...
SET DATE
& TIME
SPECIAL
FEATURES
CONFIGURE
CONTROLLER
INPUT ZONE
INFORMATION
MANUAL
WATERING
RESTORE
SETTINGS
SYSTEM
REVIEW
FINE-TUNE
WATERING
ESP-SMT Smart Modular Control System
53
No Irrigation Currently Occurring
The AUTO MODE screen will appear
A
displaying the current date and
time. Additionally, based on the
weather data retrieved, information
is displayed showing the estimated
date when the next irrigation cycle
will occur.
Automatic Irrigation Is Occurring
The WATERING-AUTOMATIC screen
B
will appear displaying the current
day of the week. It will also display
the current zone being irrigated
and the Minutes Remaining on
this zone.
NOTE: When the dial is left in
the AUTO position, any required
!
irrigation will automatically begin
at the start of the Allowed Watering
Time on Allowed Watering Days.
AUTO MODE
Monday 01 Apr 2009
A
B
07:25 AM
Next Irrigation
Estimate: 02 Apr
WATERING – AUTOMATIC
Wednesday 06:45 PM
Watering Zone
Minutes Remaining
BEGIN
SUSPEND
2
14
BEGIN
SUSPEND
Page 59

Manual Irrigation Is Occurring
The WATERING-MANUAL screen will
C
appear. It will display the current
zone being irrigated and the
Minutes Remaining.
Suspend Automatic Irrigation
If you want to suspend irrigation
D
for a preset amount of time, press
the BEGIN SUSPEND button when
the AUTO MODE or the WATERINGAUTOMATIC screens are displayed.
The SUSPEND WATERING screen will
E
appear with the suspend time value
blinking. Press the UP or DOWN
button(s) until the desired amount
of suspension time is displayed.
If you want to stop the suspension
F
of irrigation and resume automatic
irrigation, press the RESUME
button and the AUTO WATERING
screen will appear.
WATERING-MANUAL
Watering Zone
Minutes Remaining 12
C
CANCEL
AUTO MODE
Monday 05 May 2009
Next Irrigation
D
Estimate: 07 May
10:25 AM
E
1
ADV.
ZONE
BEGIN
SUSPEND
SUSPEND WATERING
Watering
F
G
Suspended For:
2 Days
RESUME
AUTO MODE
Monday 06 May 2009
05:00 PM
Next Irrigation
Estimate: 07 May
BEGIN
SUSPEND
ESP-SMT Smart Modular Control System
54
Page 60

Installation
This section provides information on how to install the ESP-SMT Controller.
Installing The Controller
Select Location
Select a location that has a at, stable surface in an area
protected from vandalism.
Using the mounting template, mount the controller at
A
eye level and allow at least 11” of horizontal clearance
so the hinged cabinet door can swing fully open to
the left.
Allow enough clearance for electrical conduit and
B
connections at the bottom of the plastic cabinet.
Select a location that has access to 120 VAC electrical
C
power. It is best to run a dedicated circuit for the controller;
one that cannot be turned off by a light switch.
NOTE: Select a location that allows the
communication wire (a pair of #16 AWG or #18AWG
!
UV rated wire maximum distance 200 feet) to be easily
run from the ESP-SMT controller to the SMT Weather
Sensor.
NOTE: The ESP-SMT controller must be installed in
compliance with local electrical codes. Indoor models
!
must be installed indoors only. Outdoor models (with
locking cabinets) may be installed either indoors or
outdoors.
A
11"
CAUTION: To minimize electromagnetic
interference, select a location at least 15 feet (4,6 m)
F
away from high-draw motors, such as air conditioners
or refrigerators.
Never share a 120 VAC circuit with pumps, motors,
shop tools, etc. as they may interfere with the correct
operation of the controller.
C
ALARM
AUTO
SETDATE
OFF
&TIME
CONFIGURE
MANUAL
CONTROLLER
WATERING
RESTORE
INPUTZONE
SETTINGS
INFORMATION
SPECIAL
SYSTEM
REVIEW
ENGLISH
ENGLISH
FEATURES
ESPAÑOL
ESPAÑOL
FINE-TUNE
WATERING
ESP-SMT
SMARTMODULARCONTROLLER
3"
B
ESP-SMT Smart Modular Control System
55
Page 61

Installation Tools Required
a. Phillips slot-head screwdriver (#1, #2 & #3 tip)
b. Marking pencil for template
c. Wire stripper
d. Torpedo level
e. Drill bit & hammer drill (if installing in masonry or
concrete, select drill bit accordingly)
Optional Items:
• If the communication wire run is greater than 25 feet,
additional wire will be required (#18 AWG or #16
AWG, 2 strand UV rated wire recommended - 200 feet
maximum distance from controller to sensor)
• Ladder to reach sensor mounting location
Valve (Zone) and Communication Wire
Entrances
The ESP-SMT controller has three “knockouts” available for
routing valve & sensor communication wires, two on the
underside of the cabinet, and one on the back.
The underside of the cabinet has two knockouts sized for
A
either a 1” or 1-1/4” PVC male adapter.
To use the larger hole, turn the cabinet upside down. Place
B
the blade of a slot-head screwdriver in the groove around
the knockout. Tap the handle of the screwdriver to punch
in the knockout in two places.
To route field and communication wires through the back
C
of the cabinet, use the 1-1/4” knockout provided. Punch
out the knockout, as described in step 2.
a.
b.
d.
e.
c.
B
A
ESP-SMT Smart Modular Control System
56
Page 62

Mounting the Controller
Before you mount the controller, we recommend you
remove the door and face panel. Although these steps are
not absolutely necessary, they will make installation easier.
If necessary, unlock the door with the supplied key.
A
Open the door of the cabinet and swing it to the left.
Remove the door from the hinges.
B
Open the face panel by grasping the crescent shaped
C
nger hold on the top right side of the cabinet. Swing
the face panel to the left.
Disconnect the ribbon cable from the panel by gently
D
pulling the connector up and away from the socket.
Avoid pulling directly on the ribbon cable.
Slip the front panel hinge pins out of the cabinet
E
sockets. Remove the bottom of the panel rst.
CAUTION: When re-assembling the connector,
observe the keyed orientation of the connector. If
F
correctly connected, the red line on the cable will be
on the top side.
Thisdevice complieswith Part15 ofthe FCCRules.
Operationis subjectedto thefollowing twoconditions:
Thisdevice maynot causeharmful interferenceand
(1)
Thisdevice mustaccept anyinterference received,
(2)
includinginterference thatmay causeundesired operation.
Thisclass Bdigital apparatusmeets allrequirements ofthe
CanadianInterference CausingEquipment Regulations.
Cetappariel Numériquede laclasse Brespecte toutesles
exigencesdu Règlementsur lematériel brouilleurdu Canada.
WARNING
RISK OFFIR E,EX PLOSION AND ELECTRI CALS HOCK.
THIS CONTROLLE RUSE SA NON-REP LACEABLE LITHI UM
BATTERY. DISPO SEOF ALL ELECTR ONIC PRODUCTS IN
ACCORDANC EWIT HLOC ALLAW SAND FEDE RALR EGULATION S.
Thisdevice complieswith Part15of theFCC Rules.
Operationis subjectedto thefollowingtwo conditions:
(1)
Thisdevice maynot causeharmfulinterference and
(2)
Thisdevice mustaccept anyinterferencereceived,
includinginterference thatmay cause undesiredoperation.
Thisclass Bdigital apparatusmeetsall requirementsof the
CanadianInterference CausingEquipmentRegulations.
Cetappariel Numériquede laclasseB respectetoutes les
exigencesdu Règlementsur lematérielbrouilleur duCanada.
WARNING
RISK OFFIR E,EX PLOSION AND ELECTRI CALSH OCK.
THIS CONTROLLE RUSE SA NON-REP LACEABLE LITHI UM
BATTERY. DISPO SEOF ALL ELECTR ONIC PRODUCTS IN
ACCORDANC EWIT HLOC ALLAW SAND FEDE RALRE GULATION S.
LAWN SPRI NKLER CON TROL
-DOMESTICINPUT: 12 0 VAC, 0 .3 AMPS, 60Hz
OUTPUT: 2 5.5 VAC, 1.0 AMPS , 60Hz
RESET
IFDISPL AYIS SCRAMBLED
ORBLANK ,PUSH THE
RESET BUTTON
AB
AUTO
OFF
MANUAL
WATERING
RESTORE
SETTINGS
SYSTEM
REVIEW
FINE-TUNE
WATERING
SETDATE
&TIME
SPECIAL
FEATURES
CONTROLLER
INPUTZONE
INFORMATION
C
ALARM
CONFIGURE
ENGLISH
ENGLISH
ESPAÑOL
ESPAÑOL
SMARTMODULARCONTROLLER
C
LAWN SPRI NKLER CONT ROL
-DOMESTICINPUT: 12 0 VAC, 0 .3 AMPS, 60Hz
OUTPUT: 2 5.5 VAC, 1.0 AMPS, 60Hz
SMXSENSOR
ACCESSORY
RESET
IFDISPL AYIS SCRAMBLED
ORBLANK ,PUSH THE
RESET BUTTON
D
SMXSENSO R
ACCESSORY
ESP-SMT Smart Modular Control System
57
E
Page 63

The ESP-SMT Smart Modular controller has a single
F
keyhole slot at the rear top of the cabinet. At the
bottom of the cabinet are three circular mounting
holes. Mount the controller so that at least one of the
bottom holes lines up with a wall stud or other solid
surface.
Hold the mounting template at eye level against the
G
mounting surface. Use a pencil to mark the position
of the top keyhole slot and one or more of the bottom
holes.
Drive an appropriate fastener for the type of wall into
H
the mark for the keyhole slot.
Drill or tap a pilot hole on the mark for the lower
I
mounting hole(s). DO NOT drive a fastener into these
locations yet.
Hang the controller by the keyhole slot. Make sure the
J
fastener is well up in the narrow part of the keyhole.
Drive the appropriate fastener(s) into the lower
K
mounting hole(s). Verify that the cabinet is secure.
G
#8 SCREW
LEVEL LINE
ESP-SMT SMART MODULAR CONTROLLER
MOUNTING TEMPLATE
Allow 11" clearance to the left side of the
template to allow the door to open fully.
#8 SCREW #8 SCREW #8 SCREW
J
H
I
3X
3X
K
ESP-SMT Smart Modular Control System
58
Page 64

Connect Field Wiring
Station Valve Wiring
Connect each valve by its own separate power wire
A
to one of the numbered screw terminals, as shown in
the illustration.
Connect a common wire to one of the leads on each
B
valve. Connect the other end of the common wire to
the COM terminal. Wires used to connect the valves
must be code-approved for underground installation.
Master Valve / Pump Start Relay
NOTE: Complete this section only if your system
requires a master valve (an automatic valve installed
!
on the mainline pipe upstream from the station
valves) or a pump start relay. The controller does not
provide main power for a pump.
Connect the master valve or pump start relay wiring
C
to the controller as shown in the illustration.
B
ESP-SMT Smart Modular Control System
59
C
Page 65

Jumper Setting for Unused Stations
WIRES TO
SMT SENSOR
LAWN SP RINKLER CONTROL
-DOMESTIC INPUT: 120 VAC , 0.3 AMPS, 60Hz
OUTPUT: 25.5 V AC, 1.0 AMPS, 60Hz
SMXSEN SOR
ACCESSORY
IFDI SPLAY ISSCR AMBLED
ORBL ANK,P USHTH E
RISK OFF IRE, EXPLOSI ONA NDEL ECTRICAL SHO CK.
THIS CONTROL LERU SES ANO N-REPLAC EABLE LITHIU M
BATTERY. DIS POSE OFA LLE LECTRONI CPRO DUCTS IN
ACCORDAN CEW ITHL OCAL LAWS AND FEDERAL REG ULATIONS .
RESET
RESET BUTTON
Thisdevice complieswith Part15 ofthe FCC Rules.
Operationis subjectedto thefollowing twoconditions:
(1)
(2)
Thisclass Bdigital apparatusmeets allrequirements of the
CanadianInterference CausingEquipment Regulations.
Cetappariel Numériquede laclasse Brespecte toutes les
exigencesdu Règlementsur lematériel brouilleurdu Canada.
Thisdevice maynot causeharmful interferenceand
Thisdevice mustaccept anyinterference received,
includinginterference thatmay causeundesired operation.
WARNING
CAUTION: To prevent pump damage when using
a pump start relay, use a jumper to connect unused
F
stations to a station that is being used.
If unused stations are not jumpered and they are
accidentally turned on, the pump may operate with no
ow (dead-head). Dead-heading could cause the pump to
overheat or burnout.
Connect Sensor Communication Wire To
Controller Panel
Make sure you have enough (2 x #16AWG or 2 x
A
#18AWG) UV rated wire to run from the controller to
the sensor location (maximum of 200 feet).
Strip the two communication wire leads 1/4” and
B
insert the leads into the green connector located on
the back of the ESP-SMT controller panel (polarity is
not important).
Route the sensor communication wire(s) through
C
the channel tabs on the back panel to provide “strain
relief”.
Once the panel is inserted back into the controller
D
chassis, route the two communication wires through
the eld-wire knockout that you made based on an
earlier installation step.
!
NOTE: Apply 120VAC power to the controller
prior to connecting the communication wires to
the SMT Weather Sensor to allow for verification of
communication between the sensor and controller.
JUMPER
WIRE
B
C
ESP-SMT Smart Modular Control System
60
Page 66

Connect Transformer
ESP-SMT Indoor Controller
The ESP-SMT indoor controller has an external transformer
that reduces standard supply voltage to 24 VAC to
operate the sprinkler valves. You will need to connect this
transformer to terminals within the controller cabinet.
CAUTION: To prevent electrical shock and potential
damage to the transformer, DO NOT plug in the
F
transformer until you have connected its cable to the
controller.
Make sure the transformer is NOT plugged in.
A
Feed the three transformer wires through the bottom
B
left hole in the cabinet. Then pull about 12” of the
cable up into the cabinet.
Tie a loose overhand knot in the cable just inside
C
the controller to prevent strain on the connector
terminals.
On the horizontal terminal strip at the top of the
D
controller cabinet, connect the green wire to the
“GND” terminal.
Connect one of the remaining two wires to a 24 VAC
E
terminal. Connect the other wire to the second 24
VAC terminal. Connect either wire to either 24 VAC
terminal; polarity of these wires is not important.
BC
A
E
Verify that all connections are secure. Then plug
F
the transformer into any standard three-pronged
grounded electrical outlet.
NOTE: All electrical connections and wiring runs
must be made according to local building codes.
!
D
ESP-SMT Smart Modular Control System
61
Page 67

ESP-SMT Outdoor Controller
The ESP-SMT outdoor controller has an internal transformer
that reduces standard supply voltage (120 VAC) to 24 VAC
to operate the valves connected to the controller. You will
need to connect power supply wires to the transformer’s
three wires.
CAUTION: To prevent electrical shock, make sure all
supply power is OFF before connecting these wires.
F
Electrical shock can cause severe injury or death.
With the door and face panel removed, locate the
A
high-voltage compartment in the lower left corner of
the controller cabinet.
Using a #1 Phillips screw tip, remove the screw on the
B
right edge of the compartment cover. Then pull the
cover open to expose the transformer’s primary input
wires.
Attach a 1/2” (1,3cm) conduit tting to the bottom
C
entrance of the high-voltage compartment. Then
attach conduit to the tting.
Bring three supply wires from the power source
D
through the conduit into the high-voltage
compartment.
CONNECT
120 VAC
C
D
ESP-SMT Smart Modular Control System
62
Page 68

Using a code-approved wire connector, connect the wires
as follows:
Strip the insulation from the incoming wires to expose
E
about 1/2” (1,3cm) of bare wire. Connect the black
supply wire (“hot”) to the black transformer wire.
Connect the white supply wire (“neutral”) to the white
F
transformer wire.
Connect the green supply wire (“ground”) to the
G
green transformer wire.
NOTE: The ground wires MUST be connected to
provide electrical surge protection.
!
Verify that all connections are secure. Then close the
H
cover of the high-voltage compartment and secure it
with the screw.
NOTE: All electrical connections and wiring runs
must be made according to local building codes.
!
E
G
F
CONNECT
120 VAC
ESP-SMT Smart Modular Control System
63
H
Page 69

Remote Panel Programming
Installing a 9-Volt alkaline battery in the ESP-SMT Smart
Modular controller will allow you to program the controller
panel while disconnected from the cabinet.
The battery is NOT required to maintain program
information. After you pre-program the ESP-SMT
controller, remove the 9-Volt battery. The programmed
information will then be saved in non-volatile memory.
Open the cabinet door and then open the front panel
A
by grasping the crescent shaped nger hold on the
top right side of the cabinet. Swing the face panel to
the left.
Locate the battery compartment on the rear of the
B
front panel.
Install the new battery and slide it into the
C
compartment. Then close the front panel.
The controller panel may now be disconnected from the
housing in order to operate remotely. Refer to previous
chapter “Mounting the Controller” for instructions on how
to disconnect the controller panel.
NOTE: With a battery installed and the front panel
disconnected from the cabinet, you can program all
!
zone information and it will be immediately saved
in nonvolatile memory. However, once AC is applied,
information entered for a non-existent module will be
erased.
C
B
Thisdevice complieswith Part 15of the FCCRules.
Operationis subjectedto the followingtwo conditions:
(1)
Thisdevice maynot cause harmfulinterference and
(2)
Thisdevice mustaccept any interferencereceived,
includinginterference thatmay cause undesiredoperation.
Thisclass Bdigital apparatus meetsall requirements ofthe
CanadianInterference CausingEquipment Regulations.
Cetappariel Numériquede la classeB respecte toutesles
exigencesdu Règlementsur le matérielbrouilleur du Canada.
WARNING
RISK OF FIRE, EXP LOSION AND ELE CTRICA LSH OCK.
THIS CONTR OLLER USES A NON- REPLACE ABLE LITHI UM
BATTERY .D ISPOSE OF ALL ELE CTRONIC PR ODUCTS IN
ACCORDA NCE WITH LOCAL LA WS AND FEDERA LRE GULATIO NS.
LAWN SPRINKLE R CO N TROL
-DOMESTI CINPUT: 120 VAC, 0.3 AMPS, 60Hz
OUTPUT: 25.5 VAC, 1.0 AMPS, 60H z
RESET
IF DISPLAY IS SCRAMBLED
OR BLANK, PUSH THE
RESET BUTTON
SMX SENSOR
ACCESSORY
ESP-SMT Smart Modular Control System
64
Page 70

Installing Station Expansion Modules
Optional modules for the ESP-SMT Smart Modular
controller provide terminals for up to nine additional
valves (zones) for a total of 13 separate zones.
You can install optional 3 station expansion modules
in any open position in the cabinet. The valve numbers
associated with each terminal (e.g., 5, 6, and 7) are molded
into the cabinet.
Open the cabinet door and then open the front panel
A
by grasping the crescent shaped nger hold on the
top right side of the cabinet. Swing the face panel to
the left.
Locate an open module expansion slot in the cabinet.
B
Make sure the lever on the module is in the unlocked
C
position (pointing to the left). Place the module in the
slot between the plastic rails.
Push the module toward the top of the cabinet until it
D
snaps into place.
Slide the lever to the locked position (to the right).
E
To remove a module, slide the lever to the unlocked
F
position, then pull the module down and out of the
slot.
A
C
D
E
NOTE: You can install or remove any modules with or
without AC voltage connected. The modules are “hot-
!
swappable.”
ESP-SMT Smart Modular Control System
65
Page 71

Installing ESP-SMT Upgrade Panel
Open the door of the existing ESP-Modular cabinet.
A
Open the ESP-Modular panel by grasping the crescent
B
shaped nger hold on the top right side of the cabinet.
Disconnect the ribbon cable from the panel by gently
C
pulling the connector up and away from the socket.
Slip the front panel hinge pins out of the cabinet
D
sockets.
Re-connect the ribbon cable to the ESP-SMT
E
Controller panel, then slip the hinge pins back into
the cabinet sockets.
CAUTION: When re-assembling the connector,
observe the keyed orientation of the connector. If
F
correctly connected, the red line on the cable will be
on the top side.
NOTE: Be sure to remove the ESP-Modular quick
reference label that is adhered to the inside of the
!
controller door as this information is no longer valid
after the ESP-SMT panel upgrade is installed.
Thisdevice complieswith Part15 ofthe FCCRules.
Operationis subjectedto thefollowing twoconditions:
Thisdevice maynot causeharmful interferenceand
(1)
Thisdevice mustaccept anyinterference received,
(2)
includinginterference thatmay causeundesired operation.
Thisclass Bdigital apparatusmeets allrequirements ofthe
CanadianInterference CausingEquipment Regulations.
Cetappariel Numériquede laclasse Brespecte toutesles
exigencesdu Règlementsur lematériel brouilleurdu Canada.
WARNING
RISK OFFIR E,EX PLOSION AND ELECTRI CALS HOCK.
THIS CONTROLLE RUSE SA NON-REP LACEABLE LITHI UM
BATTERY. DISPO SEOF ALL ELECTR ONIC PRODUCTS IN
ACCORDANC EWIT HLOC ALLAW SAND FEDE RALR EGULATION S.
A
Thisdevicecomplies withPart 15of theFCC Rules.
Operationissubjected tothe followingtwo conditions:
(1)
Thisdevicemay notcause harmfulinterference and
(2)
Thisdevicemust acceptany interferencereceived,
includinginterferencethat maycause undesiredoperation.
ThisclassB digitalapparatus meetsall requirementsof the
CanadianInterferenceCausing EquipmentRegulations.
CetapparielNumérique dela classeB respectetoutes les
exigencesduRèglement surle matérielbrouilleur duCanada.
LAWN SPRI NKLER CON TROL
-DOMESTICINPUT: 12 0 VAC, 0 .3 AMPS, 60Hz
OUTPUT: 2 5.5 VAC, 1.0 AMPS , 60Hz
SMXSENSO R
RESET
IFDISPL AYIS SCRAMBLED
ORBLANK ,PUSH THE
RESET BUTTON
LAWN SPRI NKLER CONT ROL
-DOMESTICINPUT: 12 0 VAC, 0 .3 AMPS, 60Hz
OUTPUT: 2 5.5 VAC, 1.0 AMPS, 60Hz
N3969
RESET
ACCESSORY
REMOTE
MANUAL
WATERING
RESTORE
SETTINGS
C
OFF
SYSTEM
REVIEW
E
ALARM
AUTO
SETDATE
&TIME
CONFIGURE
CONTROLLER
INPUTZONE
INFORMATION
SPECIAL
ENGLISH
ENGLISH
FEATURES
ESPAÑOL
FINE-TUNE
WATERING
ESPAÑOL
ESP-SMT
SMARTMODULARCONTROLLER
ESP-SMT Smart Modular Control System
66
Page 72

Installing The Weather Sensor
Locating the SMT Weather Sensor
Select a convenient outdoor location in close proximity
(wire-run distance is 200 feet maximum) to the ESP-SMT
controller. Place in an unobstructed area away from
reective heat so that the unit can provide accurate onsite temperature and rainfall measurements.
Mount the unit at least 6 feet above the ground surface
to accurately measure ambient temperature. Suggested
installation locations include, but are not limited to the
eave of a residence roof, a wood fence post, siding of a
residence, etc.).
The sensor mounting bracket is designed to mount on
any vertical surface. Easy adjustment of the mounting
arms assist to make sure the installed sensor is level. UV
rated #16AWG or #18AWG wire is recommended for the
communication wires if more than 25 feet is required.
Sensor Installation Procedure
Run the communication wire to the location in which
A
the sensor will be mounted.
Place the mounting bracket assembly base against a
B
vertical mounting surface and drive one of the screws
into the upper left hole of the base (do not tighten
completely).
Drive a second screw into the middle area of the
C
adjustment slot located on the lower right corner of
the mounting base.
Level the mounting base. Hold in place.
D
Tighten the screws in the slot rst and then assure that
E
all 4 screws are tightened to the mounting surface to
secure the mounting base.
TOP
LEVEL
TOP
HERE
LEVEL HERE
ACCESS HERE TO
CLEAN RAIN SENSOR
ESP-SMT Smart Modular Control System
67
Page 73

Feed the wire(s) through the three holes
F
located in the mounting arms to provide a
“strain relief’.
Unscrew the captured screw of the wiring
G
compartment cover to expose the sensor
housing and green wire connector within the
wiring compartment.
Strip the two communication wire leads 1/4”
H
and insert into the connectors (polarity is not
important). If the wires are attached to the
ESP-SMT controller and AC power is available,
a green LED will blink. Once communication
has been established between the sensor and
the controller, the LED will illuminate.
Re-attach the wiring compartment cover and
I
route the wire through the two openings.
Then tighten the captured screw to secure the
cover to the housing.
Attach the sensor housing assembly to the
J
top of the mounting arm. Align the mounting
hole on the bracket and the arm and using
the provided thumb screw, attach the sensor
to the mounting bracket assembly.
Adjust each of the mounting arms to assure
K
that the top of the sensor is secured in a level
conguration.
Slip the sensor debris cover onto the top of
L
the sensor.
TIPPING
BUCKET
ESP-SMT Smart Modular Control System
68
Page 74

Trouble-shooting
This section shows you how to trouble-shoot problems with the ESP-SMT Controller or Sensor Pod.
Symptom Possible Cause Correction
Automatic
irrigation is not
occurring
Dial is set to OFF Position. Set the dial to the AUTO position.
The unit is in a SUSPEND Mode due to user entry. Set the Dial to AUTO and press the RESUME button.
Irrigation is not required based on accumulated weather
data.
Today is not an “Allowed Watering Day” If regulations permit, change the “Allowed Watering Days” by rotating the dial to the
Block Day of Week feature is activated. Rotate the dial to the CONFIGURE CONTROLLER dial position and change the Allowed
Event Day O feature is activated. Rotate the dial to the SPECIAL FEATURES dial position and remove the day from Event
Irrigation suspended due to measured rainfall. Move the dial to the SPECIAL FEATURES dial position. Change the user set value to
Irrigation suspended due to measured low temperature. Move the dial to the SPECIAL FEATURES dial position. Change the user set value to
Zone to Zone Delay is activated for an extended duration. Move the dial to the SPECIAL FEATURES dial position. Change the Zone to Zone Delay
An individual zone has been set in the OFF (inactive) mode. Move the dial to the INPUT ZONE INFORMATION dial position. Change the zone setting
AC Power has been lost and is not currently available. NO AC
POWER will be blinking in the AUTO screen if a 9V battery
is installed.
If the plant material needs irrigation, manually water the aected zone(s).
CONFIGURE CONTROLLER dial position and enter new information for the Allowed
Water Days, or the Block Watering on Specic Day of Week.
Watering Day status from BLOCK to ALLOW.
Days O status.
higher rainfall threshold from Advanced Controller Setup.
lower threshold from Advanced Controller Setup.
feature to a shorter time value from Advanced Controller Setup.
to ENABLED (active).
Reset the circuit breaker or make the necessary repairs to assure a consistent 120 VAC
+/- 10% power supply.
ESP-SMT Smart Modular Control System
69
Page 75

Symptom Possible Cause Correction
Alarm LED is illuminated “No Pod Communication” appears on the screen when the
communication has been lost for more than one hour.
SHORT Z xx appears on the screen when a short has been
detected on a specic valve(s).
Display is partially or completely blank. An electrical surge or lightning strike has disrupted or
damaged the controllers electronics.
Temperature Reading does not match
the actual ambient temperature for an
extended period of time.
Inaccurate rain fall measurement occurs
on a regular basis.
Individual valve does not come on. The zone is set in the OFF (inactive) position. Rotate the dial to the INPUT ZONE INFORMATION and
Zone is too Wet. Incorrect Zone Parameters are set such as the Sprinkler
Zone is too Dry. Incorrect Zone Parameters are set such as the Sprinkler
Run o is occurring on a regular basis. Zone input information may not match active site conditions. Rotate the dial to the INPUT ZONE INFORMATION position
Unit is absorbing reective heat and/or from adjacent
pavement.
Debris Screen is clogged and is not allowing the rainfall to
activate the tipping bucket mechanism.
Sensor rain funnel is clogged. Clear the funnel.
Valve wiring problem. Run short circuit test to identify short conditions and
Application Rate.
Precipitation Rate.
Identify if there is connection or wiring problem. If
not, press the reset button located on the back of the
controller.
Fix the wiring problem between the controller and the
identied zone.
Push the RESET button located on the back of the
controller front panel.
Turn o the controller and disconnect the 9V battery. Let
the controller rest for 2-3 minutes then restore power to
the controller. If the electrical surge did no permanent
damage, the controller will accept programming
commands and function normally.
Relocate the sensor to a more appropriate location.
Clean the debris o the Debris Screen.
change the statue of the zone to ENABLED (active).
repair accordingly.
Rotate the dial to the FINE TUNE WATERING dial position
and decrease watering by up to 60% in 1% increments.
Rotate the dial to the FINE TUNE WATERING dial position
and increase watering by up to 30% in 1% increments.
and change the soil type and/or degree slope.
ESP-SMT Smart Modular Control System
70
Page 76

Symptom Possible Cause Correction
NOTE 1 on Display Screen. All Zones are OFF. Rotate the dial to the INPUT ZONE INFORMATION position and change the status of each
desired zone to an ENABLED (Active) mode.
NOTE 2 on Display Screen. All Watering Days are OFF. Rotate the dial to the CONFIGURE CONTROLLER position and change the Allowed Watering
Days.
NOTE 3 on Display Screen. Unusually High Temperature Reading. Verify that the temperature sensor is not malfunctioning. Relocate the sensor in a dierent
location to measure more accurately the ambient temperature of the site.
NOTE 4 on Display Screen. Unusually High Rainfall Reading. Remove the Tipping Rain Bucket from the sensor housing. Clean with mild soap and water.
Verify that the tipping mechanism is functioning properly and reinsert the mechanism into
the sensor housing.
NOTE 5 on Display Screen. Watering Not Completed During Watering
Window.
NOTE 6 on Display Screen. Irrigation Suspended Due to Extreme
Cold.
NOTE 7 on Display Screen. Irrigation Suspended Due to Rain. If irrigation is desired at the current rainfall amount, rotate the dial to the SPECIAL FEATURES
NOTE 8 on Display Screen. Unit is Re initializing, Please WAIT. Unit has encountered a small problem. The controller will correct itself – no action is
If this is an occasional occurrence, the controller will nish the required irrigation during the
next allowed watering day. If it is a regular occurrence, expand the Watering window while
in the CONFIGURE CONTROLLER dial position. Another solution is to use to FINE TUNE aected
zones.
If irrigation is desired at this temperature, rotate the dial to the SPECIAL FEATURES dial
position. Change the user set value to lower threshold temperature value.
dial position. Change the user set value to a higher rainfall threshold.
necessary.
For technical assistance contact Rain Bird at 1-800-247-3782
ESP-SMT Smart Modular Control System
71
Page 77

Appendix
Irrigation System Overview
Basic Valve (Zone) Operation
The ESP-SMT Smart Modular controls when your sprinkler system turns on, and how long the sprinklers run. The controller
has several valves connected to it, as shown in the illustration on the following page.
Each valve opens when it receives power from the controller, and the sprinklers connected to that valve turn on. When
these sprinklers have run per the automatic irrigation schedule, the controller shuts o the valve and opens the next valve
scheduled to irrigate.
AUTO
SETDATE
OFF
&TIME
MANUAL
WATERING
RESTORE
SETTINGS
SPECIAL
SYSTEM
FEATURES
REVIEW
FINE-TUNE
WATERING
Controller
ALARM
CONFIGURE
CONTROLLER
INPUTZONE
INFORMATION
ENGLISH
ENGLISH
ESPAÑOL
ESPAÑOL
ESP-SMT
SMARTMODULARCONTROLLER
Power
Valves
Sprinklers
Wires
Common
Wire
ESP-SMT Smart Modular Control System
72
Page 78

Description Of Each Soil Type
Sand
• Loose and single grained. Each grain of sand can be easily
seen and has a gritty feel.
• Squeezed when dry, sands cannot form a cast and will
readily fall apart when released.
• Squeezed when moist, soil will form a very weak cast that
will crumble if touched.
Loamy Sand
• Resembles sand as it is loose and single grained. Most
individual grains can be seen. Feel is not as gritty as sand.
• Squeezed when dry, soil forms a slight cast that readily falls
apart when hand releases soil.
• Squeezed when moist, soil is slightly cohesive. Fragile cast
can be formed more than with sand.
Sandy Loam
• Some individual sand grains can be seen and felt.
• Enough silt and/or clay soil particles to provide soil
cohesion when moist.
• When dry, casts can be formed that will not break with
careful handling.
Loam Soil
• Medium textured soil. Mixture of sand, silt and clay with
none dominant.
• When dry, soil can form a cast that can be handled freely.
• Squeezed moist, soil is fairly smooth and plastic with a
gritty feel.
Clay Loam
• Fine textured soil. Even distribution of sand, silt and clay.
Soil feels like it has more clay than sand or silt.
• Forms clods that are firm when moist and hard when dry.
• When the moist soil is squeezed between the thumb and
forefinger it forms a thin ribbon that will barely sustain it’s
own weight.
Silty Clay
• Soil has a moderate amount of fine grains of sand and clay
particles. Medium sized particles represent less than 50%
of all soil particles.
• When dry, soil forms very hard clods that can be broken.
• When moist, a moderate size ribbon can be formed that
will support it’s own weight.
Clay Soil
• Very fine textured soil.
• When dry, forms very hard lumps that are hard to break up.
• When moist, soil is extremely sticky and plastic.
• Squeezed soil will form a thin, long flexible ribbon that will
not break easily.
ESP-SMT Smart Modular Control System
73
Page 79

Simple Test To Determine The Soil Type
1. Remove 1 to 2 cups of soil at the approximate root
depth of the plant material you plan to irrigate
2. Place the soil into a glass jar in which you can see the
contents (a Mason jar or an empty mayonnaise jar
works well)
3. Fill the balance of the glass jar with water.
4. Screw the cover onto the jar and shake vigorously
until all of the soil particles are suspended in the
water.
5. Set the closed jar onto a at surface and let sit until
most of the soil particles have settled to the bottom
of the jar (this can take a few hours).
The settled soil will be deposited in layers with the
heavier soil particles (sand) forming the bottom layer,
followed by the next heaviest soil particles (silt), and
nally the lightest soil particles (clay).
6. Measure the total height of all the soil layers
combined.
7. Measure the height of each of the three individual
soil layers (sand, silt and clay) and compare these
values to the total soil height to get an approximate
percentage of each soil type.
8. Apply these percentages to the Soil Classication
Triangle on the adjacent page to identify the Soil
Type description.
1/2"
3" TOTAL
HEIGHT
Example: Total Soil Height = 3 inches.
The soil is comprised of the following:
• Clay; ½ inch (0.5/3.0) = 17%
• Silt; 2 inches (2.0/3.0) = 66%
• Sand; ½ inch (0.5/3.0) = 17%
Apply these values to the Soil Classication Triangle on the
next page to determine the soil type description.
2"
1/2"
ESP-SMT Smart Modular Control System
74
Page 80

Soil Classification Triangle
This tool is used to classify the soil based on soil texture.
Soil texture describes the size and shape of individual
soil particles such as sand, silt, or clay. The soil texture
class describes the relative amounts of sand, silt, and
clay in that particular soil.
Soil texture has a major inuence on the amount of
water stored (moisture holding capacity) in a soil. This is
used to determine how much to irrigate and the timing
of required irrigation.
The ability of water to enter the soil prole (inltration
rate) and the rate at which water can move through the
soil (permeability) is determined by the soil texture. The
inltration rate and permeability of the soil, combined
with the slope of the irrigated area will determine how
long each irrigation event (cycle) should run and how
much time should elapse (soak) between cycles to
prevent water from running o the soil.
To determine the Soil Type (Classication) using the Soil
Classication Triangle, draw a parallel line for the value
of each soil particle type. The Soil Type is identied by
where the three lines intersect in the Soil Classication
Triangle.
0
100
CLAY
50
10
20
LOAM
40
17%
90
80
PERCENT
CLAY
40
30
20
10
LOAMY
SAND
0
90
100
SAND
70
60
50
CLAY
LOAM
SANDY
LOAM
80
70
60
PERCENT SAND
The three soil particle type lines for the soil sample
example intersect in the LOAM soil classification area.
30
SILTY
CLAY
30
40
PERCENT
SILT
50
60
20
70
66%
10
17%
80
90
100
0
ESP-SMT Smart Modular Control System
75
Page 81

How the ESP-SMT Smart Control System Works
How Much? >>>
0.51 + losses"
Unlike a traditional time-based irrigation controller that
employs xed station run times, start times, and irrigation
days manually set by the user, the Rain Bird ESP-SMT Smart
Control System irrigation schedule automatically changes
daily based on specic weather conditions at the site.
Weather information is collected in real-time by an on-site
SMT Weather Sensor and communicated to the ESP-SMT
Controller. This collected weather information is combined
with 1) historic weather information for the site location
and 2) specic site and individual zone parameters that
are entered into the controller by the user to automatically
create an optimized irrigation schedule that will promote
healthy deep rooted plants while conserving water. Based
on the soil type and slope conditions, the overall irrigation
requirement is split into multiple “cycle and soak” irrigation
events, thereby eliminating the problems from water runo.
available water (PAW) for the plant material growing in
the soil. The soil texture and the MAD will determine the
amount and frequency of irrigation
Evapotranspiration
The Evapotranspiration (ET) rate is usually expressed
in inches of water lost over a time period (usually on
a daily basis) due to evaporation from the soil surface
and transpiration from the plant surfaces. The ET rate is
inuenced greatly by the weather conditions at the site.
For example; a hot dry environment would have a much
higher ET rate and require longer, more frequent irrigation
than a cool, humid environment.
EVAPOTRANSPIRATION (ET )
Automated Management Allowed Depletion (MAD)
Irrigation Scheduling Method
The objective of an automated irrigation system is to
augment rainfall in order to re-supply the (soil) with
enough available water for the plant to make up for the
water lost through Evapotranspiration (ET). The proven
MAD method looks at the soil as a water reservoir that
supplies the plant with water as needed. The soil texture
(class) of the soil reservoir inuences the amount of water
that can be stored in the soil, as well as the potentially
ET
Inches/Day
MAD 0.5"
PAW1"
IRRIGATE:
When? >>>>>
After 4 days
ESP-SMT Smart Modular Control System
Day
(50% MAD)
76
Page 82

In this example the daily water losses due to ET are as follows:
Day ET/Day
1 0.18”
2 0.16”
3 0.16”
4 0.18”
5 0.14”
Total 0.81
Effective Rainfall
Not all rainfall is usable by the plant. If the rainfall intensity
is high, the rain may not percolate completely to the plant
root zone before running o the clay soils or in sandy soils,
the water may go below the plant root zone. The integral
tipping rain bucket measures both the total amount and
intensity of the rainfall and determines how much of it
should be considered “eective” rainfall.
In this example the daily water losses due to ET are as follows:
Day Total Rain Effective Rain
1 0.00” 0.00”
2 0.00” 0.00”
3 0.46” 0.16”
4 0.00” 0.00”
5 0.00” 0.00”
Total 0.46 0.16
Plant Available Water
In the attached example, the plants roots are 12 inches
deep. The soil class is Loam. Looking at the adjacent Soil
Water Holding Capacity Table, the AW is 0.17 inches of
water per inch of soil. The Plant Available Water (PAW) in
this example would be 0.17 inch/inch X 6 inch root depth
= 1.02 inches of potentially available water in the soil
reservoir for the plant material.
Soil Available Water (AW) Table MAD Table
Soil Type or Class Available Water (AW)
(in of water per in of soil)
Clay 0.17
Silty Clay 0.17
Clay Loam 0.18
Loam 0.17
Sandy Loam 0.12
Loamy Sand 0.08
Sand 0.06
ESP-SMT Smart Modular Control System
77
Page 83

Management Allowed Depletion (MAD)
This is the maximum amount of amount of Plant Available
Water (PAW) expressed as a percent that the irrigation
manager has determined can be removed from the soil
from ET before irrigation will need to occur. To promote
Plant Health and deep root growth, it is best to irrigate only
when the root zone has reached MAD. In this example, the
MAD value is 50% (see Table below); so irrigation will need
to occur when the PAW level reaches 0.51 inches (1.02” @
50%)
Managed Allowed Depletion (MAD) Table
Soil Type or Class
Sand 30%
Loamy Sand 50%
Sandy Loam 50%
Loam 50%
Clay Loam 40%
Silty Clay 40%
Clay 30%
Available Water (AW)
(in of water per in of soil)
“Checkbook” Method of Irrigation
The on-site SMT Weather Sensor constantly monitors
the weather and communicates the information to the
controller on a daily basis. Once the Accumulated Water
Requirement reaches the MAD threshold value, irrigation
will begin if it is on an Allowed Watering Day. An analogy
to this scenario is your checkbook…. rainfall is the amount
of free money going in, and ET being the money being
withdrawn; and irrigation representing a deposit that you
put into your account to bring it up to a certain threshold
value.
The Table below shows the Accumulated Water
Requirement (AWR) for the example:
Day ET/Day
1 0.18” 0.00” 0.18” 0.18”
2 0.16” 0.00” 0.16” 0.34”
3 0.16” 0.16” 0.00” 0.34”
4 0.18” 0.00” 0.18” 0.52”
5 0.14” 0.00” 0.14”
In the example, irrigation will occur on Day 4 as the Accumulated
Water Requirement (0.52) has reached the calculated Management
Allowed Depletion (0.51).
Effective
Rain
Net Water
Req’t
Accumulated
Water Req’t
”
0.66
Replenish Accumulated Water Requirement (AWR)
The total amount of time that each zone needs to operate
is dependent on the Net Application Rate (Precipitation
Rate X System Eciency) that the sprinkler system is
applying.
For example, if the precipitation rate for a rotor zone is 0.6
inches per hour and the eciency is 85%, then the Net
application Rate is 0.52 inches per hour. To replenish the
AWR, the zone would need to have a total run time of 1
hour on Day 4.
ESP-SMT Smart Modular Control System
78
Page 84

Applying the “Cycle and Soak” Principle
In most soil types, you would not want to run the zone’s
irrigation system for one hour in duration as this would
most likely cause signicant water loss through runo.
Based on the soil type and degree of slope information
entered into the controller for the zone, the ESP-SMT
controller will determine the maximum “cycle” time and
minimum “soak” time required to irrigate without runo.
These prescribed cycle and soak times are based on
the Water Intake rate of the soil type as identied in the
following tables:
Soil Type or Class Basic Intake Rate
Soil Type or Class
Sand 0.60”
Loamy Sand 0.50”
Sandy Loam 0.40”
Loam 0.35”
Clay Loam 0.20”
Silty Clay 0.15”
Clay 0.10”
Basic Intake Rate
(inches per hour)
This process would continue on a daily basis as shown is
the table below:
Illustrative Scheduling Example
Day ET/Day
1 0.18” 0.00” 0.18” 0.18” ---
2 0.16” 0.00” 0.16” 0.34” ---
3 0.16” 0.16” 0.00” 0.34” ---
4 0.18” 0.00” 0.18” 0.52” 0.53”
5 0.14” 0.00” 0.14” 0.13” ---
6 0.13” 0.10” 0.03” 0.16” ---
7 0.15” 0.11” 0.04” 0.20” ---
8 0.14” 0.00” 0.14” 0.34” ---
9 0.11” 0.00” 0.11” 0.45” ---
10 0.16” 0.00” 0.16” 0.61” 0.60”
11 0.12” 0.00” 0.12” 0.13” ---
12 0.12” 0.00” 0.12” 0.25” ---
In this example the irrigation schedule for the zone would be:
Day 4 - 60 minutes (Cycle 1 = 30 minutes & Cycle 2 = 30 minutes)
Day 10 – 68 minutes (Cycle 1 = 30 minutes, Cycle 2 = 30 minutes,
Cycle 3 = 8 minutes).
Effective
Rain
Net Water
Req’t
Accumulated Water
Req’t
Irrigation
Event
ESP-SMT Smart Modular Control System
79
Page 85

NOTE: The maximum cycle time is set at 30 minutes
even if the infiltration rate of the soil will allow more
!
as this assures that additional zones will get irrigated
during the allotted watering time.
As you can see, to optimize an irrigation schedule for each
zone can be a tedious task. The ESP-SMT Control System
automatically optimizes the Irrigation Schedule per the
method described above for each zone on a daily basis.
This is how we can make the claim that the ESP-SMT
“smart” Control System can promote healthier plants with
signicant water savings when compared to the traditional
time-based irrigation controllers on the market today.
Determine Zone Application Rate
The Net Application Rate that is entered into the controller
(Default or user-Set) is extremely important to optimize
the irrigation schedule and to prevent water run-o.
The greater the application rate, the shorter the required
run times and/or cycles needed to apply the needed
replacement water to the plants root zone and conversely
the lower the net application rate, the longer the required
run times and/or cycles needed.
Sprinkler Type Default Method (least accurate)
The ESP-SMT controller provides Net Application rates for
the dierent sprinkler type. To use this method, see page 21,
in the Input Zone Information section.)
The Table below provides the Default Net Application Rate
Values by Sprinkler Type that are used by the controller if
this method is used.
Sprinkler Type
Sprays
Rotors
Rotary Nozzle
Bubblers
Point Source Drip
ESP-SMT Smart Modular Control System
Net Application
Rate (in/hr)
1.60
0.45
0.50
2.50
0.80
80
Page 86

Total Area Covered Method to Determine
Precipitation Rate and Efficiency (moderate
accuracy)
1. Determine the Manufacturer and Model of the
sprinkler being used in the zone, making particular
note of the specic nozzle being used at each
sprinkler location. For Example a Rain Bird 5004 with
the following MPR nozzles are being used on Zone 1
(Full Circle = MPR 30Q, Half Pattern = MPR30H and
Quarter Patterns = MPR30Q). See illustration in the
next column.
2. Determine the operating water pressure at the
Sprinkler Nozzle. Example = Water Pressure = 45 psi.
3. Obtain Catalog Information for Sprinkler (This
information is usually found on the Manufacturer
web site).
5004 MPR Nozzle Series @ 45 psi
Model Radius Pattern Flow (GPM)
30Q 30 Foot Quarter 1.40
30H 30 Foot Half 2.59
30F 30 Foot Full 5.78
4. Determine the Total Amount of ow (GPM) for the
area being covered by the zone.
Example: (4) 30Q’s @ 1.40 GPM+ (6) 30H’s @ 2.59
GPM + (2) 30F’s @ 5.78. Total Zone 1 Flow = 32.7GPM
5. Determine the Total Area (square feet) covered by
Zone 1.
Example: the area is 60 feet by 90 feet = 5,400 square
feet (SF)
6. Calculate the Precipitation Rate (PR) using the
following formula:
Total Flow (GPM) X 96.3
____________________
Total Area (sq. ft.)
Example: Zone 1 PR = 32.7 X 96.3
__________
5,400
7. Enter 0.58 inches per hour into the ESP-SMT
controller based on information contained on page
20-21 of this User Manual.
60 FT.
30Q
(1.40)
30 H
(2.59)
30Q
(1.40)
30 H
(2.59)
30F
(5.78)
30 H
(2.59)
Irrigated
Area
30 H
(2.59)
30F
(5.78)
30 H
(2.59)
30Q
(1.40)
30 H
(2.59)
30Q
(1.40)
ZONE 1
TOTAL
FLOW
(32.7
GPM)
ESP-SMT Smart Modular Control System
81
90 FT.
Page 87

8. Determine the Eciency Rating - Chose an
eciency rating based on your visual observation
of system condition and operating pressure at the
nozzle from the Table below:
Sprinkler Type
Sprays
Rotors
Rotary Nozzle
Bubblers
Drip
Poor
Performance
50%
55%
55%
50%
70%
Average
Performance
60%
70%
70%
60%
80%
Good
Performance
70%
80%
80%
70%
90%
Example: Zone 1 Sprinkler Type is a Rotor and the zone
operating condition is average, so the sprinkler eciency
value is 70% based on information in the table above.
9. Determine the Net Application Rate - The ESPSMT controller will automatically calculate the Net
Application Rate for the zone in which you entered
the Precipitation Rate and Eciency.
Example: Precipitation Rate = 0.44 inches per hour
Eciency = 70%
Net Application Rate for Zone 1 is 0.31 inch/hour
(0.44 X 70%) = 0.31 inches per hour
Zone System Audit Method (most accurate)
1. Place a series of catchment devices (that are the
same size & shape) throughout the area that the
zone is irrigating.
2. Turn on the zone and run for at least 10 minutes to
collect water in the catchment device.
3. The amount of water collected in each catchment
device is measured and analyzed to determine the
Distribution Uniformity (DU).
Information on how to perform an Irrigation
System Audit correctly is available on the Irrigation
Association web site at www.irrigation.org
ESP-SMT Smart Modular Control System
82
Page 88

This equipment has been tested and found to comply with the limits
for a Class B digital device, pursuant to Part 15 of the FCC Rules. These
limits are designed to provide reasonable protection against harmful
interference in a residential installation.
This equipment generates, uses, and can radiate radio frequency energy
and, if not installed and used in accordance with the instructions,
may cause harmful interference to radio communications. However,
there is no guarantee that interference will not occur in a particular
installation.
If the equipment does cause harmful interference to radio or television
reception, which can be determined by turning the equipment o and
on, the user is encouraged to try to correct the interference by the
following measures:
RAIN BIRD CORPORATION
6991 E. Southpoint Road
Tucson, AZ 85756
• Reorient or relocate the receiving antenna.
• Increase the separation between the equipment and the receiver.
• Connect the equipment into an outlet on a circuit dierent from
that to which the receiver is connected.
• Consult the dealer or an experienced radio/TV technician for
help.
Changes or modications not expressly approved by Rain Bird Sales,
Inc., could void the user’s authority to operate the equipment.
This product was FCC certied under test conditions that included the
use of shielded I/O cables and connectors between system components.
To be in compliance with FCC regulations, the user must use shielded
cables and connectors and install them properly.
03/11
® Registered trademark of Rain Bird Corporation
© 2011 Rain Bird Corporation
www.rainbird.com
P/N: 637522-01
03/31/11
 Loading...