

Page 1

ESPLXD-ET Controller
Installation, Programming & Operation Guide
ESPLXD-ET user-manual (670504-01) artwork_120716.indb 1 7/16/2012 3:48:00 PM
Page 2

Symbols
NOTE: Symbol is intended to alert the user to important operating,
functionality or maintenance or installation instructions.
WARNING: Symbol is intended to alert the user to the presence
of electricity within the controller which may constitute a risk of
electronic shock or other hazard.
CAUTION: Symbol is intended to alert the user to important
instructions or conditions that could seriously affect irrigation
effectivity or controller operation.
DIAL: Symbol indicates that the user is required to turn the dial
on the controller to the appropriate setting in order to follow
subsequent instructions as described in that section.
REPEAT: Symbol indicates that a repetition of previous steps
or actions may be required in order to continue or complete the
controller programming process.
Safety Information
WARNING: A circuit breaker or cutoff switch must be provided
in the fixed wiring to isolate the controller.
WARNING: The current date and time on the controller is
retained by a long-life lithium battery, which must be disposed of
in accordance with local regulations.
WARNING: You must use special precautions when valve wires
(also known as station or solenoid wires) are located adjacent to or
share a conduit with other wires, such as wires used for landscape
lighting, other “low voltage” systems or other “high voltage”
power. Be sure to separate and insulate all conductors carefully
taking care not to damage wire insulation during installation. An
electrical “short” (contact) between the valve wires and another
source of power can damage the controller and create a fire
hazard.
NOTE: This appliance is not intended for use by persons (including
children) with reduced physical, sensory or mental capabilities, or
lack of experience and knowledge, unless they have been given
supervision or instruction concerning use of the appliance by a
person responsible for their safety.
Children should be supervised to ensure that they do not play
with the appliance.
For ESPLXD-ET technical assistance contact Rain Bird at 800 RAINBIRD (1-800-724-6247) U.S. and Canada or
visit us on the web at www.rainbird.com
For ETC Manager Cartridge technical assistance contact the ET Manager Hotline at 1-877-351-6588 or
visit us on the web at www.rainbird.com/etmanager
ESPLXD-ET user-manual (670504-01) artwork_120716.indb 2 7/16/2012 3:48:00 PM
Page 3

I
ESPLXD-ET Controller
Contents
Section A - Introduction & Overview ................... 1
Welcome to Rain Bird .......................................................1
ESPLXD-ET Controller ...................................................... 1
Controller Features ..................................................................................1
Controls, Switches and Indicators ....................................................2
ET Manager Cartridge ......................................................3
Cartridge Features ...................................................................................3
Weather-Based Irrigation Control ....................................................3
WaterSense® Certification ....................................................................4
Controls and Indicators .........................................................................5
2-Wire Path Overview .......................................................6
Star Pattern ..................................................................................................6
Loop Pattern ...............................................................................................7
Decoders ......................................................................................................8
Types of Decoders ...............................................................................8
Field Decoder Addresses ..................................................................8
Valves (Stations) ........................................................................................9
Programming Overview .................................................10
Irrigation Controller Definitions .....................................................10
Programs ...............................................................................................10
Watering Days ....................................................................................10
Watering Start Time .........................................................................10
Station Run Time ...............................................................................10
Programming Guide ............................................................................10
Fill Out Programming Guide ....................................................... 10
Apply Decoder Address Labels ..................................................11
Storing the Programming Guide ...............................................11
Remote Programming ........................................................................11
Programming Checklist .....................................................................12
Set Up Hardware ............................................................................... 12
Set Up Programs ................................................................................12
Set Up Programs (Optional) .........................................................12
Set Up ET Manager Cartridge .....................................................12
Review Setup ......................................................................................12
Optional Setup ...................................................................................12
AUTO ...............................................................................13
Automatic Operation .......................................................................... 13
Alarm Conditions ..................................................................................14
Decoder Address Alarms ............................................................... 14
FloWatchTM Alarms ............................................................................14
Review Alarm Messages ................................................................14
Resetting the Controller ....................................................................15
Resetting the ET Manager Cartridge ...........................................16
Optional Features ........................................................... 17
Station Expansion Module (ESP-LXD-SM75) ............................17
Section B - Basic Programming .......................... 19
Set Current Date & Time .................................................19
Program Select Switch ...................................................20
Select Program ....................................................................................... 20
Setup Wizards .................................................................20
Valve Types Setup ................................................................................. 20
Master Valves Setup ............................................................................. 22
Weather Sensors Setup ...................................................................... 24
Set Up Decoder-Based Weather Sensors ...............................24
Weather Sensors Bypassed/Active Switch ............................25
Local Weather Sensors ................................................................... 25
Custom Pause Sensors ................................................................... 25
Custom Prevent Sensors ............................................................... 25
Station Setup ...........................................................................................26
Flow Sensors Setup ..............................................................................28
Set Up Rain Bird Flow Sensor ...................................................... 28
Set Up Custom Flow Sensor ........................................................ 29
Set Watering Start Times ................................................ 31
Select Days to Water .......................................................32
Station Run Times ........................................................... 33
ESPLXD-ET user-manual (670504-01) artwork_120716.indb 1 7/16/2012 3:48:00 PM
Page 4

II
ESPLXD-ET Controller
ET Manager Cartridge Configuration ............................34
Programming Overview ....................................................................34
Programming Checklist .....................................................................34
Irrigation Site Assessment ................................................................35
ET Manager Scheduler Software ...................................................35
ET Manager Resource CD .............................................................. 35
Installing the Software ...................................................................35
Create a Schedule Report ............................................................. 36
EZ Setup Wizard ..................................................................................... 40
Complete Setup .....................................................................................41
Test Weather Signal ..........................................................................41
Setup a Local Rain Gauge ............................................................. 41
ESPLXD-ET Controller Settings ...................................................41
Section C - System Diagnostics .......................... 43
Test All Stations/Check System ...................................... 43
Confirm Programs ................................................................................. 43
Program Summary ........................................................................... 43
Review Program .................................................................................44
Program Run Time ............................................................................47
Station Run Time ...............................................................................48
Test All Stations ......................................................................................49
2-Wire Path Diagnostics .....................................................................50
Short Finding ......................................................................................50
Decoder Test ........................................................................................52
Line Survey ...........................................................................................54
Calculate System Amperage ...................................................54
Run a Line Survey .........................................................................54
Interpreting Line Survey Results ........................................... 55
Ping Decoders .................................................................................... 56
Ping Station or MV Decoder ....................................................56
Interpreting Ping Results ..........................................................56
Ping Sensor Decoder ..................................................................57
Weather Sensor Status ........................................................................58
Master Valve Status .............................................................................. 59
ET Manager Alert Messages ...........................................60
Landscape Condition Issues .......................................... 63
Section D - Advanced Programming .................. 67
Seasonal Adjust %..........................................................67
Adjust Individual Program ................................................................ 67
Adjust By Month ....................................................................................68
Select Months to Adjust ................................................................68
Select Programs To Adjust ............................................................69
Delay Watering ...............................................................70
Rain Delay ................................................................................................. 70
Calendar Day Off ...................................................................................71
Water Windows ......................................................................................72
Set Up Water Window ..................................................................... 72
Watering Cycles ..............................................................73
Watering Cycle Definitions ...............................................................73
Custom, Odd, Odd no 31st, Even .................................................. 73
Cyclical Days ............................................................................................75
Station Settings .............................................................. 76
Set Up Cycle+SoakTM ...........................................................................76
Set Up Station Delay ............................................................................77
Set Up SimulStationsTM ...................................................................... 78
Set SimulStationsTM for Program ................................................78
Set SimulStationsTM for Controller .............................................79
Station Sequencing .............................................................................. 80
ET Manager .....................................................................82
Status Menu ....................................................................83
Moisture Levels ......................................................................................83
Weather Signal .......................................................................................84
ET, Rain and Adj %.................................................................................86
Logs Menu ......................................................................88
Irrigation Logs ......................................................................................... 88
Interrupts ..................................................................................................90
Weather Information ...........................................................................91
ESPLXD-ET user-manual (670504-01) artwork_120716.indb 2 7/16/2012 3:48:01 PM
Page 5

III
ESPLXD-ET Controller
Settings Menu ................................................................ 92
Irrigation Control Menu ..................................................................... 92
Irrigation Amount .............................................................................92
Landscape Adjust .............................................................................94
Run Time Limits ..................................................................................96
System Settings Menu ........................................................................98
Data Source Menu ............................................................................98
Weather Region .............................................................................98
Rain Source ................................................................................... 100
Weather Signal ........................................................................ 100
Local Rain Gauge ................................................................... 102
Rain Region ..............................................................................103
Signal Provider Code................................................................104
Control Settings Menu ................................................................ 106
Effective Rain ...............................................................................106
ET Settings Menu ....................................................................... 108
ET Source ................................................................................... 108
Elevation .................................................................................... 110
Wind Adjustment .................................................................. 112
Options Menu .............................................................................114
Units ............................................................................................. 114
Signal Kc ..................................................................................... 116
Clear Data .................................................................................. 118
Set Historical ET ..............................................................................120
Weather Interrupts ............................................................................ 122
Manual Watering ..........................................................124
Backup and Recall Programs .......................................124
Section E - Options & Special Features ............ 125
Backup and Recall Programs .......................................125
Store Default Programs ................................................................... 125
Recall Default Programs .................................................................. 126
Delayed Recall .....................................................................................127
Programming Backup Cartridge (PBC-LXD) ................128
PBC-LXD Features .............................................................................. 128
Barcode Scanning Feature ............................................................. 128
Installing a PBC-LXD .........................................................................129
Backup Programs to PBC-LXD ...................................................... 131
Restore Programs from PBC-LXD................................................132
Reinstall the ET Manager Cartridge........................................... 133
Decoder Barcode Scanning ..........................................134
Install Barcode Scanning Pen ....................................................... 134
Set Up Barcode Scanning Pen .....................................................137
Test Barcode Scanning Pen ........................................................... 138
Scan Field Decoder Addresses .................................................... 139
Reinstall the ET Manager Cartridge........................................... 141
Special Features ...........................................................142
Set Language .......................................................................................142
Set Hours Mode ..................................................................................142
NOMV Cycling ...................................................................................... 143
ESPLXD-ET user-manual (670504-01) artwork_120716.indb 3 7/16/2012 3:48:01 PM
Page 6

IV
ESPLXD-ET Controller
Section F - Flow Management .......................... 145
Introduction to Flow .....................................................145
FloZonesTM Overview........................................................................ 145
ESPLXD-ET Flow Management Features................................. 145
FloManagerTM Overview .............................................................145
FloWatchTM Overview ................................................................... 145
Set Flow Units ...................................................................................... 146
FloManagerTM ...............................................................146
Set Up and Use FloManagerTM ....................................................147
Enable (Or Disable) FloManagerTM ........................................ 147
Set Flow Rates Manually ................................................................. 148
Set Station Rates............................................................................. 148
Set FloZoneTM Rates ......................................................................149
FloWatchTM ................................................................... 150
Set Up and Use FloWatchTM .......................................................... 150
Enable (or Disable) FloWatchTM .............................................. 151
SEEF and SELF Settings and Actions ......................................... 152
Set Up and Configure SEEF and SELF ................................... 152
Learn Flow .............................................................................................155
Learn Flow Automatically (All Stations) .............................. 155
Learn Flow Automatically (Custom Stations) ................... 156
View and Clear Flow Alarms .......................................................... 158
View Station Flow Alarms ..........................................................158
View FloZoneTM Flow Alarms .................................................... 159
Clear Flow Alarms .......................................................................... 160
View Flow Rates ..................................................................................161
View Flow Rates for Stations ..................................................... 161
View Flow Rates for FloZonesTM .............................................162
View and Clear Flow Logs .............................................................. 163
View Current Flow .............................................................................. 164
Clear Flow Rates .................................................................................. 165
Section G - Auxiliary Operation ....................... 167
Module Status ..............................................................167
Smart Module Status ........................................................................ 167
Check Station Module(s) ............................................................167
Clear Programs .............................................................168
Clear Individual Program ................................................................ 168
Clear All Programs..............................................................................169
Restore Defaults .................................................................................. 170
Manual Watering ..........................................................171
Start Station Manually ..................................................................... 171
Start Program Manually .................................................................. 173
MV Water Window.............................................................................. 174
Set Up MV Water Window .......................................................... 174
Manually Opening a MV ............................................................ 176
Test All Stations ................................................................................... 177
OFF ................................................................................178
Adjust Display Contrast ................................................................... 178
Turn Off 2-Wire Path .......................................................................... 178
Close Master Valves ........................................................................... 180
ESPLXD-ET user-manual (670504-01) artwork_120716.indb 4 7/16/2012 3:48:01 PM
Page 7

V
ESPLXD-ET Controller
Section H - Installation .................................... 181
Install the Controller ....................................................181
Installation Checklist ........................................................................ 181
Check Box Contents .......................................................................... 182
Select Location for Controller ...................................................... 183
Gather Installation Tools .................................................................183
Access Controller Cabinet .............................................................. 184
Open or Remove Controller Front Panel ............................184
Mount the Receiver/Antenna....................................................... 185
Mount Controller ................................................................................ 186
Install Modules ....................................................................................187
Install LXD Decoder Module .................................................... 187
Install Station Expansion Modules ........................................188
Connect Field Wiring ....................................................188
Connecting the 2-Wire Cable ....................................................... 189
Connecting Power to the Controller ............................190
Connect Ground Wire ...................................................................... 190
Connect Power Source .................................................................... 190
Complete Controller Installation .................................192
Programming Under Battery Power ......................................... 192
Connect the ET Manager Cartridge .............................193
Overview ................................................................................................193
Connect Cartridge Cables .............................................................. 194
Rain Gauge Installation ...................................................................196
Install the Local Rain Gauge ..................................................... 196
Connect the Local Rain Gauge ................................................ 196
Connect Decoders to Field Wiring ................................197
Wire Splices ........................................................................................... 197
Field Decoder Connections...........................................................198
Master Valves and MV Decoders ................................................. 198
Surge Protection and Grounding ............................................... 199
Install Lightning Surge Protectors (LSP-1s) ....................... 199
Decoder Managed Flow Sensors ................................................ 199
Connect Flow Sensors ................................................................. 199
Decoder Managed Weather Sensors ........................................ 200
Local Weather Sensors ..................................................................... 200
Connect Local Weather Sensors ............................................. 200
Verifying Field Installation ............................................................. 201
Appendix ......................................................... 203
Electrical Requirement Code of Magnetic Solenoid ...203
Master Valve and Pump Set-up Tips ............................204
Irrigation Amount and Station Run Times ................... 205
Total Irrigation Amount...................................................................205
Station Run Time Settings .............................................................. 206
Program Station Run Times ........................................................... 206
Moisture Level Example ...............................................207
ET Manager Cartridge Default Settings ......................208
ET Manager Menu Tree ................................................. 209
Test Cases......................................................................210
Rain Bird Support .........................................................212
ESPLXD-ET user-manual (670504-01) artwork_120716.indb 5 7/16/2012 3:48:01 PM
Page 8

this page intentionally left blank
ESPLXD-ET user-manual (670504-01) artwork_120716.indb 6 7/16/2012 3:48:01 PM
Page 9
1
ESPLXD-ET Controller
Section A - Introduction & Overview
Welcome to Rain Bird
Thank you for purchasing your new state-of-the-art Rain
Bird ESPLXD-ET controller.
For over seven decades Rain Bird has led the irrigation industry in
meeting water management needs by providing the highest quality
products and services available.
ESPLXD-ET Controller
Your new Rain Bird controller is designed to provide years of
highly manageable irrigation control.
The ESPLXD-ET is an irrigation controller designed for commercial use.
It accommodates up to 50 stations and through the addition of Station
Modules can easily be expanded to address up to 200 total stations.
The ESPLXME-ET uses weather data to automatically adjust irrigation
schedules to reduce water consumption by watering only when the
plants need it.
Controller Features
The ESPLXD-ET controller has a variety of advanced features to help
you manage water efficiently, including:
Flow, power, and priority management
2-Wire and controller-based diagnostics
Large variety of user-configurable irrigation program options to
meet the most demanding irrigation needs while still addressing
municipal mandates and restrictions
Upgrade features including Station Modules, Programming Backup
Cartridge (PBC) and IQ Central Control
Supports one local and three decoder-based sensor inputs
Outdoor-rated plastic cabinet which can be upgraded to the
optional metal cabinet (LXMM) and pedestal (LXMMPED)
UL and CE certified
ESPLXD-ET user-manual (670504-01) artwork_120716.indb 1 7/16/2012 3:48:02 PM
Page 10
2
ESPLXD-ET Controller
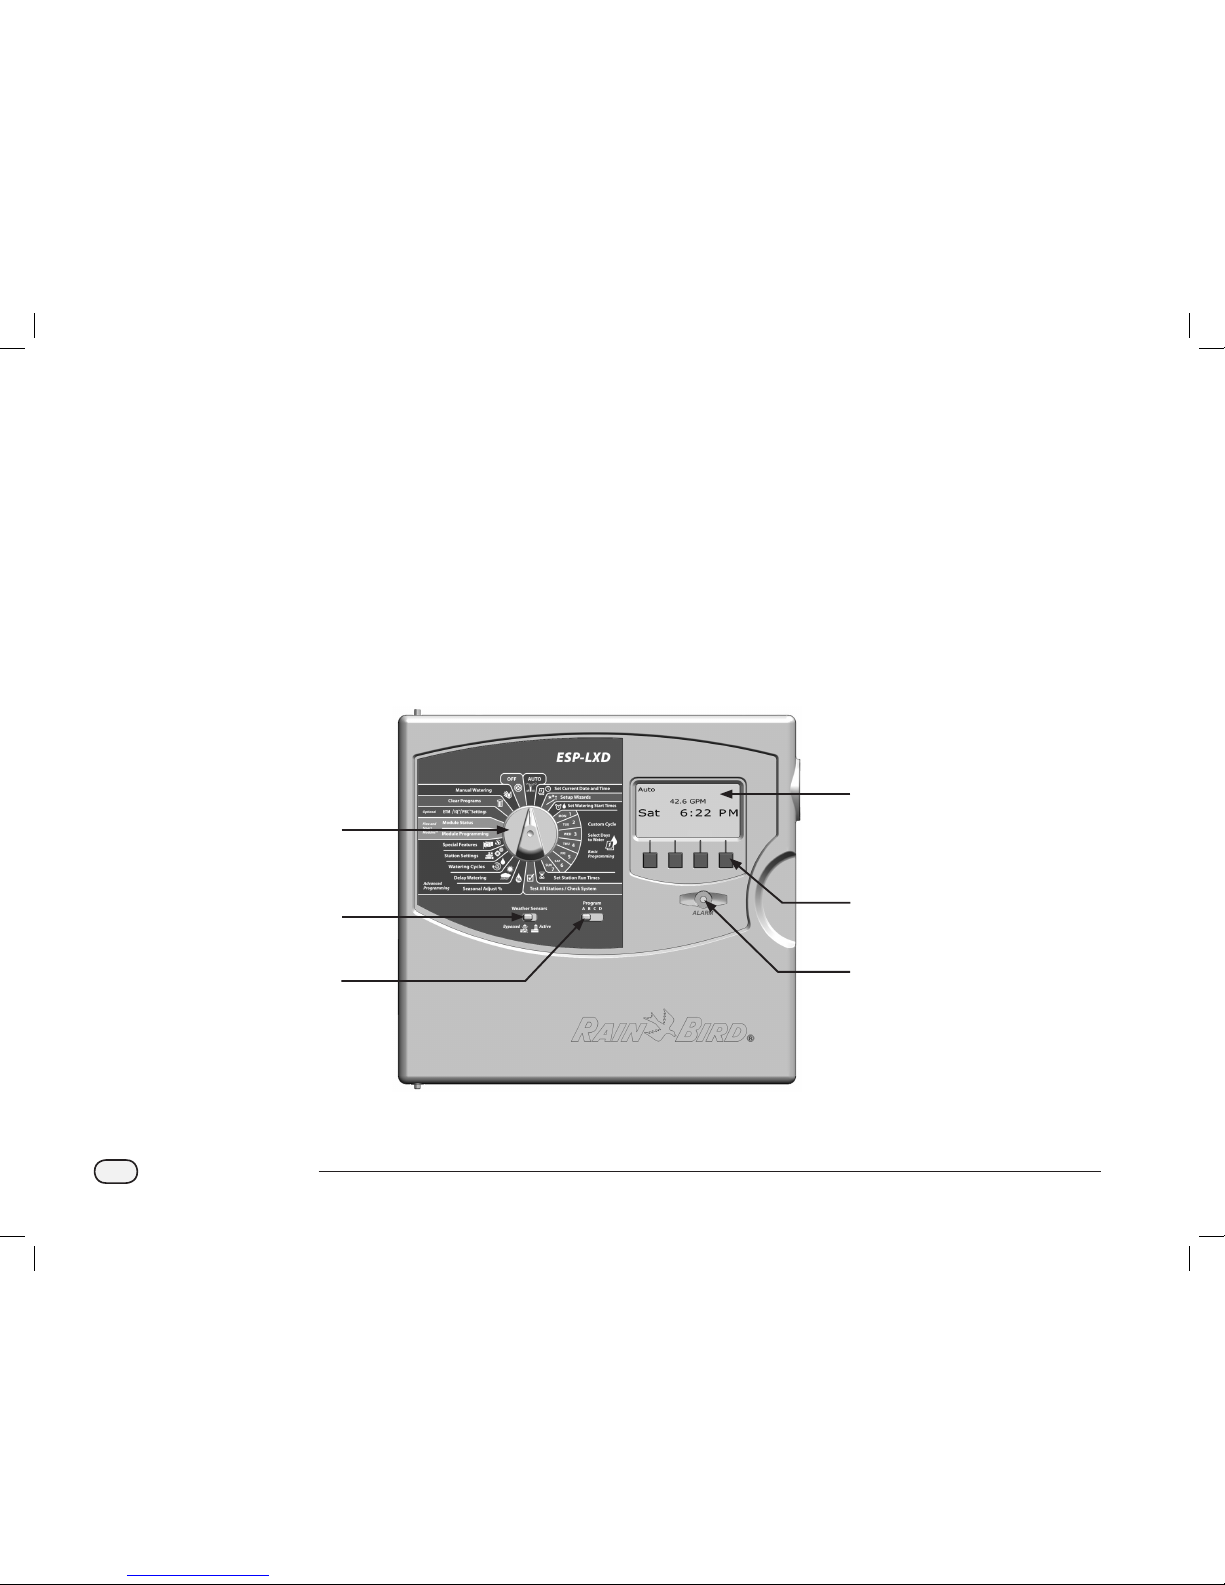
D
Display
Displays time of day during normal operation; shows commands
during programming; shows active station and remaining run
time during watering
E
Programming Buttons
Press buttons to enter and change program information.
Press and HOLD buttons to accelerate settings for hours,
minutes and seconds, dates or percentages.
F
Alarm Light
Illuminates to indicate various types of alarm conditions. See
Alarm Conditions for more details on how to review and clear
alarms).
Controls, Switches and Indicators
Key operational features of the ESPLXD-ET Controller front panel:
A
Programming Dial
Used for programming and to turn the controller on and off.
B
Weather Sensors Switch
Set the controller to obey or ignore input from optional sensors.
See Section B, Weather Sensors Setup for more details.
C
Program Select Switch
Select watering Program A, B, C, or D. See Section B, Program
Select Switch for more details.
ESPLXD-ET Controller Front Panel Features
1
2
3
4
5
6
ESPLXD-ET user-manual (670504-01) artwork_120716.indb 2 7/16/2012 3:48:02 PM
Page 11

3
ESPLXD-ET Controller
ET Manager Cartridge
The ET Manager Cartridge provides weather-based
irrigation control.
Real time weather information is used to automatically adjust watering
run times to meet the needs of the landscape, which significantly
reduces overwatering.
Cartridge Features
Key features of the ET Manager Cartridge include:
Water savings of 20–50% over traditional time-based irrigation
control.
Seasonal Adjust percentages are automatically adjusted according
to current weather conditions to efficiently manage water use.
Weather Interrupts based on current rainfall, temperature, and
wind speed automatically cancel watering during adverse weather
conditions.
Irrigation Logs provide total amount of water applied, number of
days watered, current weather information, and Weather Interrupt
history.
Weather-Based Irrigation Control
Watering requirements are automatically adjusted according to
landscape needs based on weather and site conditions.
The ET Manager Cartridge is programmed to receive hourly weather
information from a local Weather ReachTM Signal Provider (WRSP) and
uses this information along with site-specific settings to determine
when and how much water your landscape needs.
NOTE: To find your local Weather ReachTM Signal Provider, you
can create a site-specific Schedule Report using the ET Manager
Scheduler software found on the ET Manager Resource CD
(included) or visit www.rainbird.com/wrsp.
The ET Manager Cartridge manages watering by changing the Seasonal
Adjust percentage value that is set in the ESPLXD-ET Controller. This
increases or decreases the programmed watering run times for each
station. When watering is not needed, the Seasonal Adjust percentage
will be set to 0% to conserve water. When watering is needed, the
Seasonal Adjust percentage will increase to meet watering needs. A
minimum and maximum limit can be set by the user.
The ET Manager uses measured ET values to determine watering needs.
Evapotranspiration (ET) is a measurement of water that evaporates
from the soil and transpires from the plant. ET represents moisture loss
from the root zone.
Weather parameters used to measure evapotranspiration (ET) include:
Solar Radiation
Wind
Temperature
Humidity
Local rainfall amounts are received from the weather signal or measured
by an on-site rain gauge (the ET Manager Cartridge accepts input from
both 1mm/tip and 0.01”/tip rain gauges).
The Rain Bird Local Rain Gauge (ETM-RG) is the recommended on-site
Rain Gauge for use with the ET Manager Cartridge.
ESPLXD-ET user-manual (670504-01) artwork_120716.indb 3 7/16/2012 3:48:02 PM
Page 12

4
ESPLXD-ET Controller
WaterSense® Certification
The ESPLXD-ET Controller is certified by the EPA as a product
that conserves water.
WaterSense is a partnership program sponsored by the U.S.
Environmental Protection Agency (EPA) that labels products proven to
conserve water.
All WaterSense labeled products are independently certified to meet
the EPA’s water efficiency and performance criteria. The criteria for
irrigation controllers is based on the industry’s Smart Water Application
Technologies™ guidelines for weather-based controllers.
The presence of a WaterSense label identifies the Rain Bird ESPLXD-ET
Controller as a product proven to conserve water, save money and help
save the environment.
ESPLXD-ET user-manual (670504-01) artwork_120716.indb 4 7/16/2012 3:48:03 PM
Page 13
5
ESPLXD-ET Controller
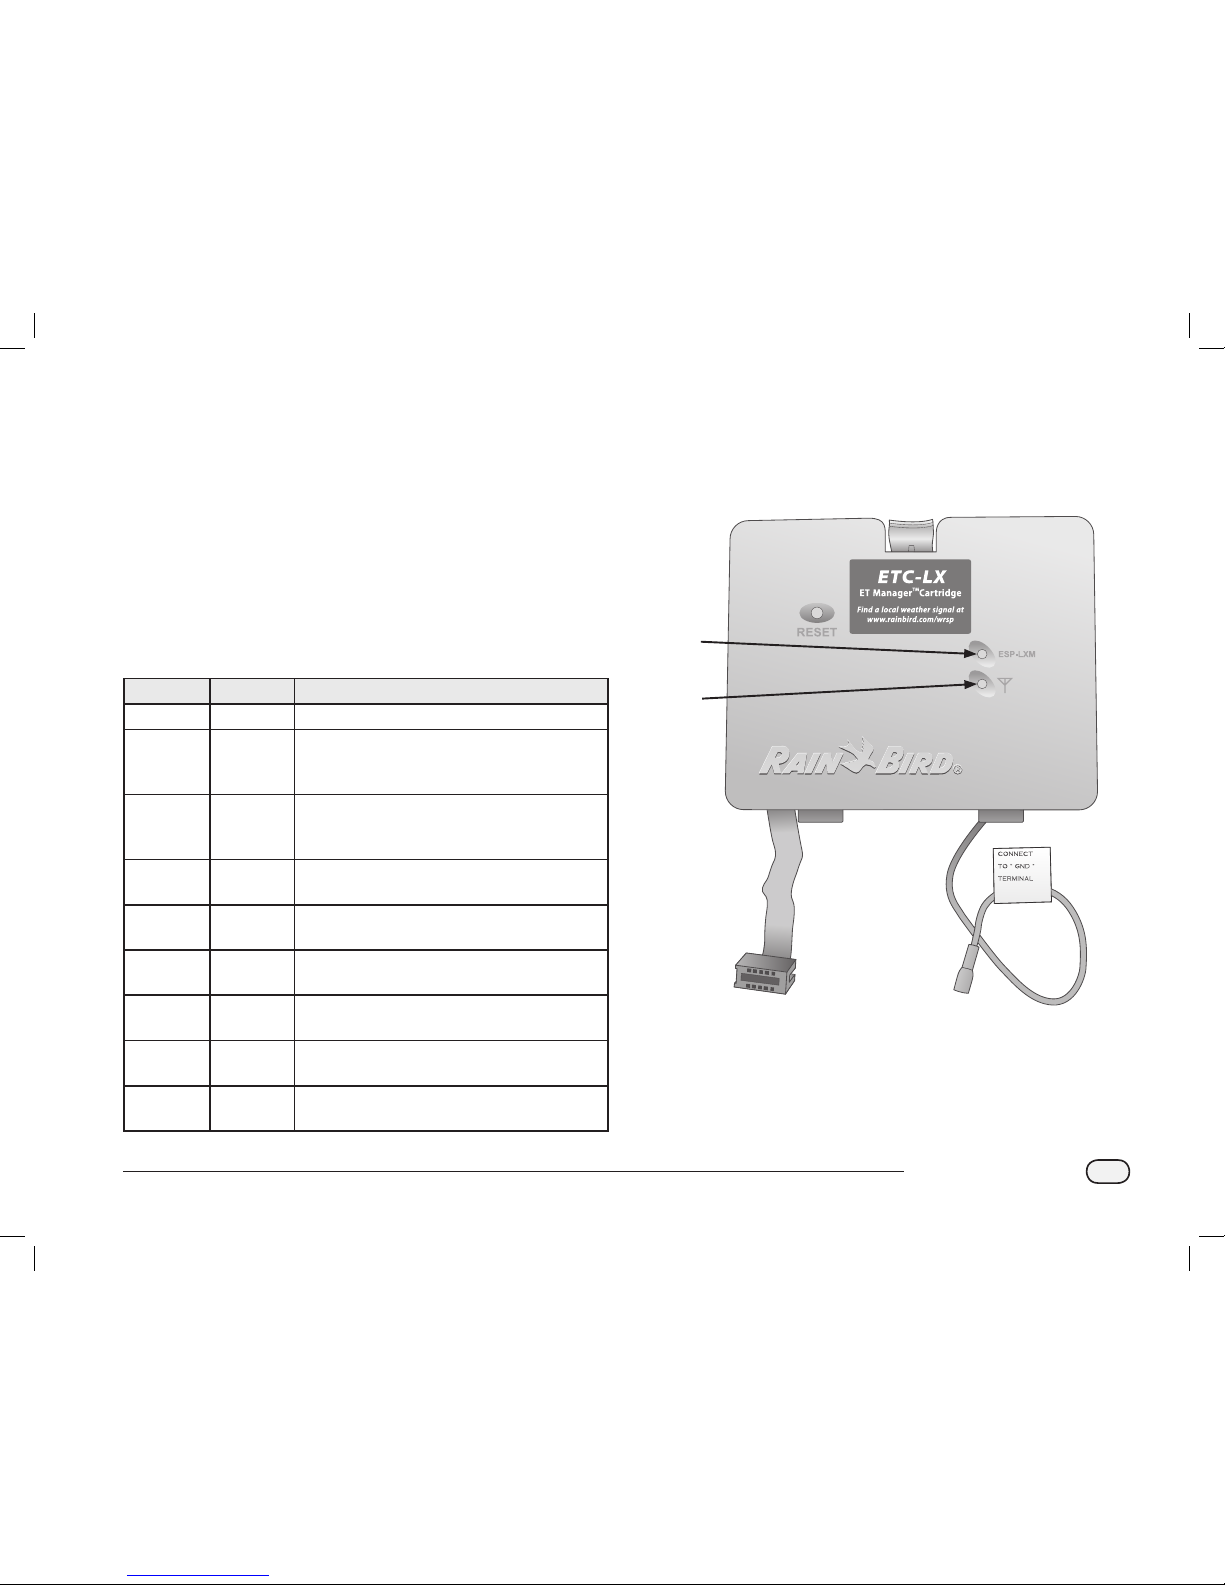
Controls and Indicators
Key operational features of the ET Manager Cartridge:
A
Cartridge Power Indicator
LED indicates power status.
B
Communications Indicator
LED indicates communication status between cartridge and
controller.
NOTE: Light Emitting Diode (LED) lights appear on the right side
of the ET Manager Cartridge. LEDs provide continuous status
updates and illuminate according to the following table.
Color Indication Activity
None (dark) No Power
Upper light
Red
Blinking Power is present – communication between
ESPLXD-ET Controller and ET Manager
Cartridge is absent.
Lower light
Red
Blinking Power is present – communication between
the controller and ET Manager Cartridge is
absent.
Upper light
Green
Solid Power and communications are OK.
Lower light
Green
Solid Power and communications are OK.
Both lights
Green
Blinking A Rain Gauge input was detected.
Both lights
Yellow
Blinking Call Rain Bird Technical Support
Both lights
Amber
Blinking No connection between cartridge and
controller.
Both lights
Amber
Solid Failed to communicate.
ET Manager Cartridge Features
1
2
ESPLXD-ET user-manual (670504-01) artwork_120716.indb 5 7/16/2012 3:48:03 PM
Page 14
6
ESPLXD-ET Controller
2-Wire Path Overview
The ESPLXD-ET controller with 2-Wire path has some key
advantages over traditionally wired controllers.
In a traditionally wired system, separate wires are required for each
valve which can be no further than a few hundred yards or meters from
the controller.
The ESPLXD-ET utilizes a 2-Wire electrical path, upon which decoders
can be attached at any location. This allows greater design flexibility
and significantly greater distances to be supported. Valves in a two wire
system can be managed using up to 3.3 miles (5.5 Km) of total wire
path. Two types of 2-Wire path designs are supported:
Star Pattern
A Star Pattern allows branching as often as necessary without ever
looping the wire back to the controller.
This generally allows more design flexibility but at the expense of some
distance. The distance from the controller to the farthest decoder is
known as the critical path; the greatest distance supported with 14
AWG cable is 1.65 miles (2.66 Km).
NOTE: The ESPLXD-ET controller has 8 connections for up to four
separate 2-Wire paths.
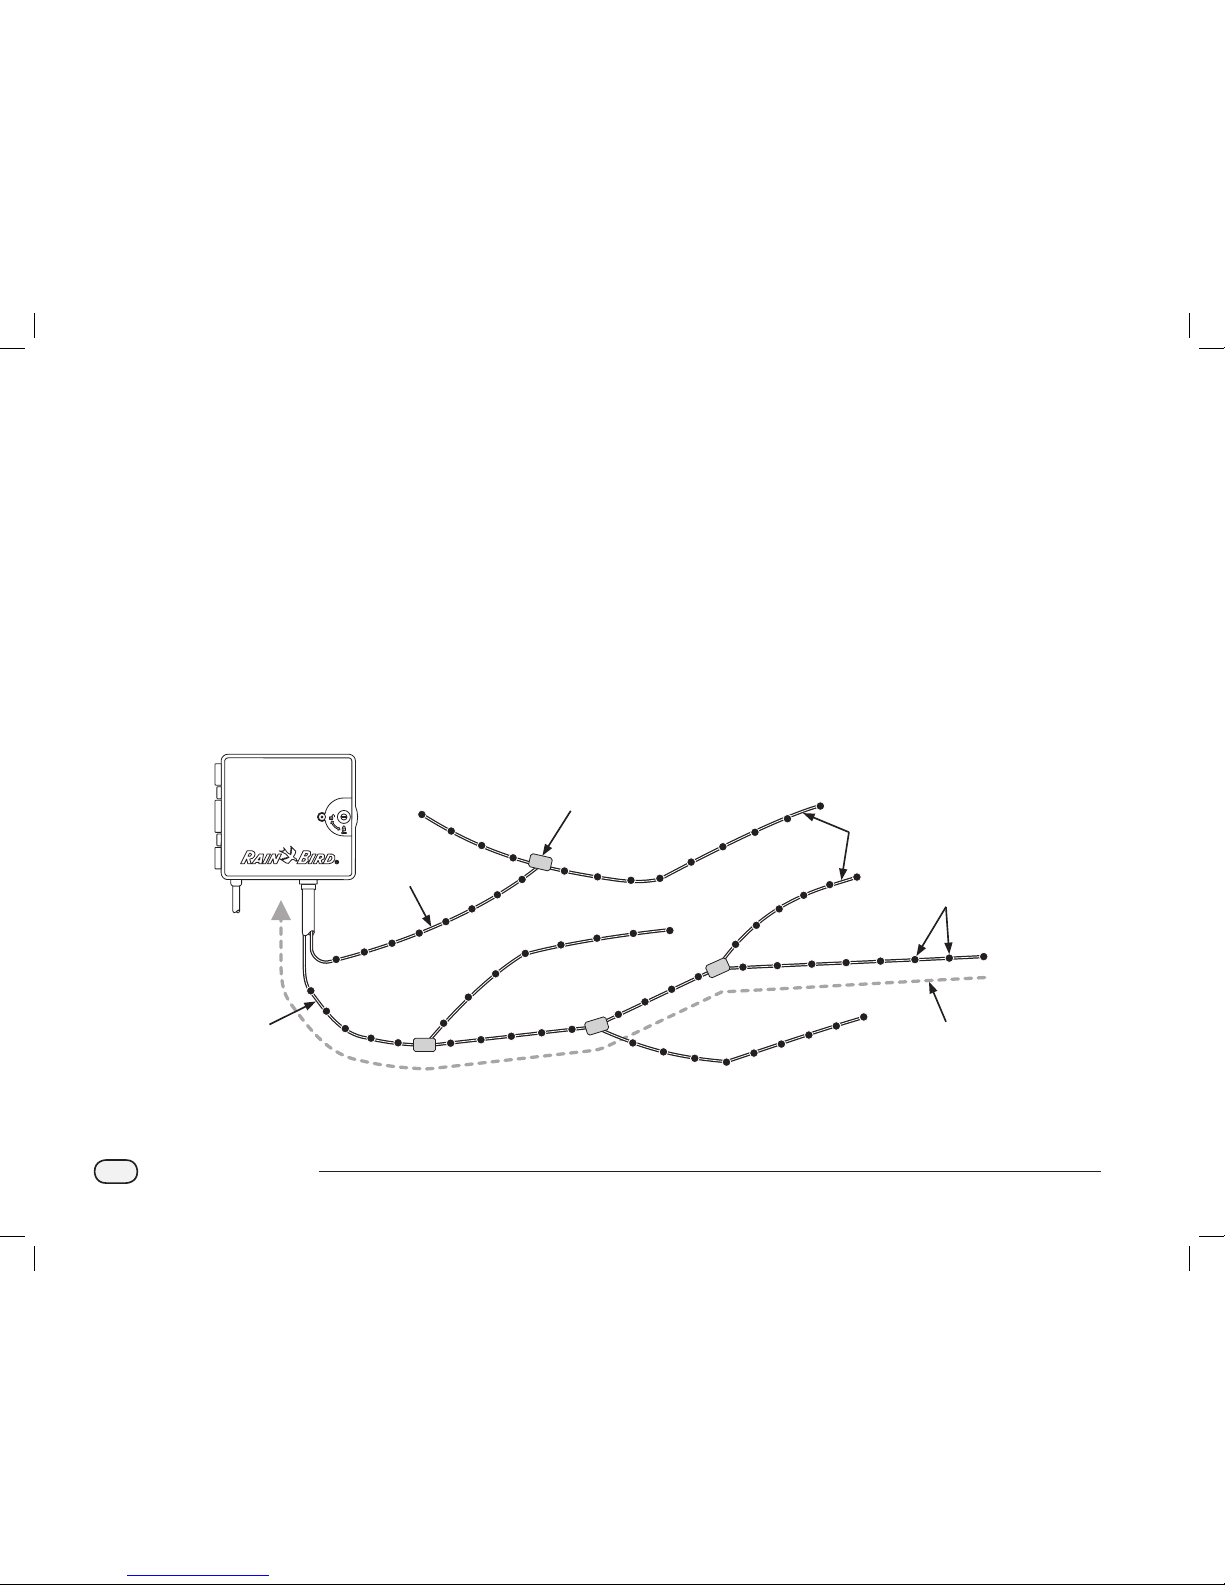
2-Wire Path Star Pattern Design
Valve Boxes (Typical)
2-Wire splice at branch
take-offs allow easy
breaking of loop for
troubleshooting
Decoders
(Typical)
ESPLXD-ET Controller
Critical Path
Distance from farthest
decoder back to
controller (maximum
1.65 miles (2.66 Km)
using 14 AWG cable)
First
2-Wire
Path
Second
2-Wire
Path
Branches
ESPLXD-ET user-manual (670504-01) artwork_120716.indb 6 7/16/2012 3:48:04 PM
Page 15
7
ESPLXD-ET Controller
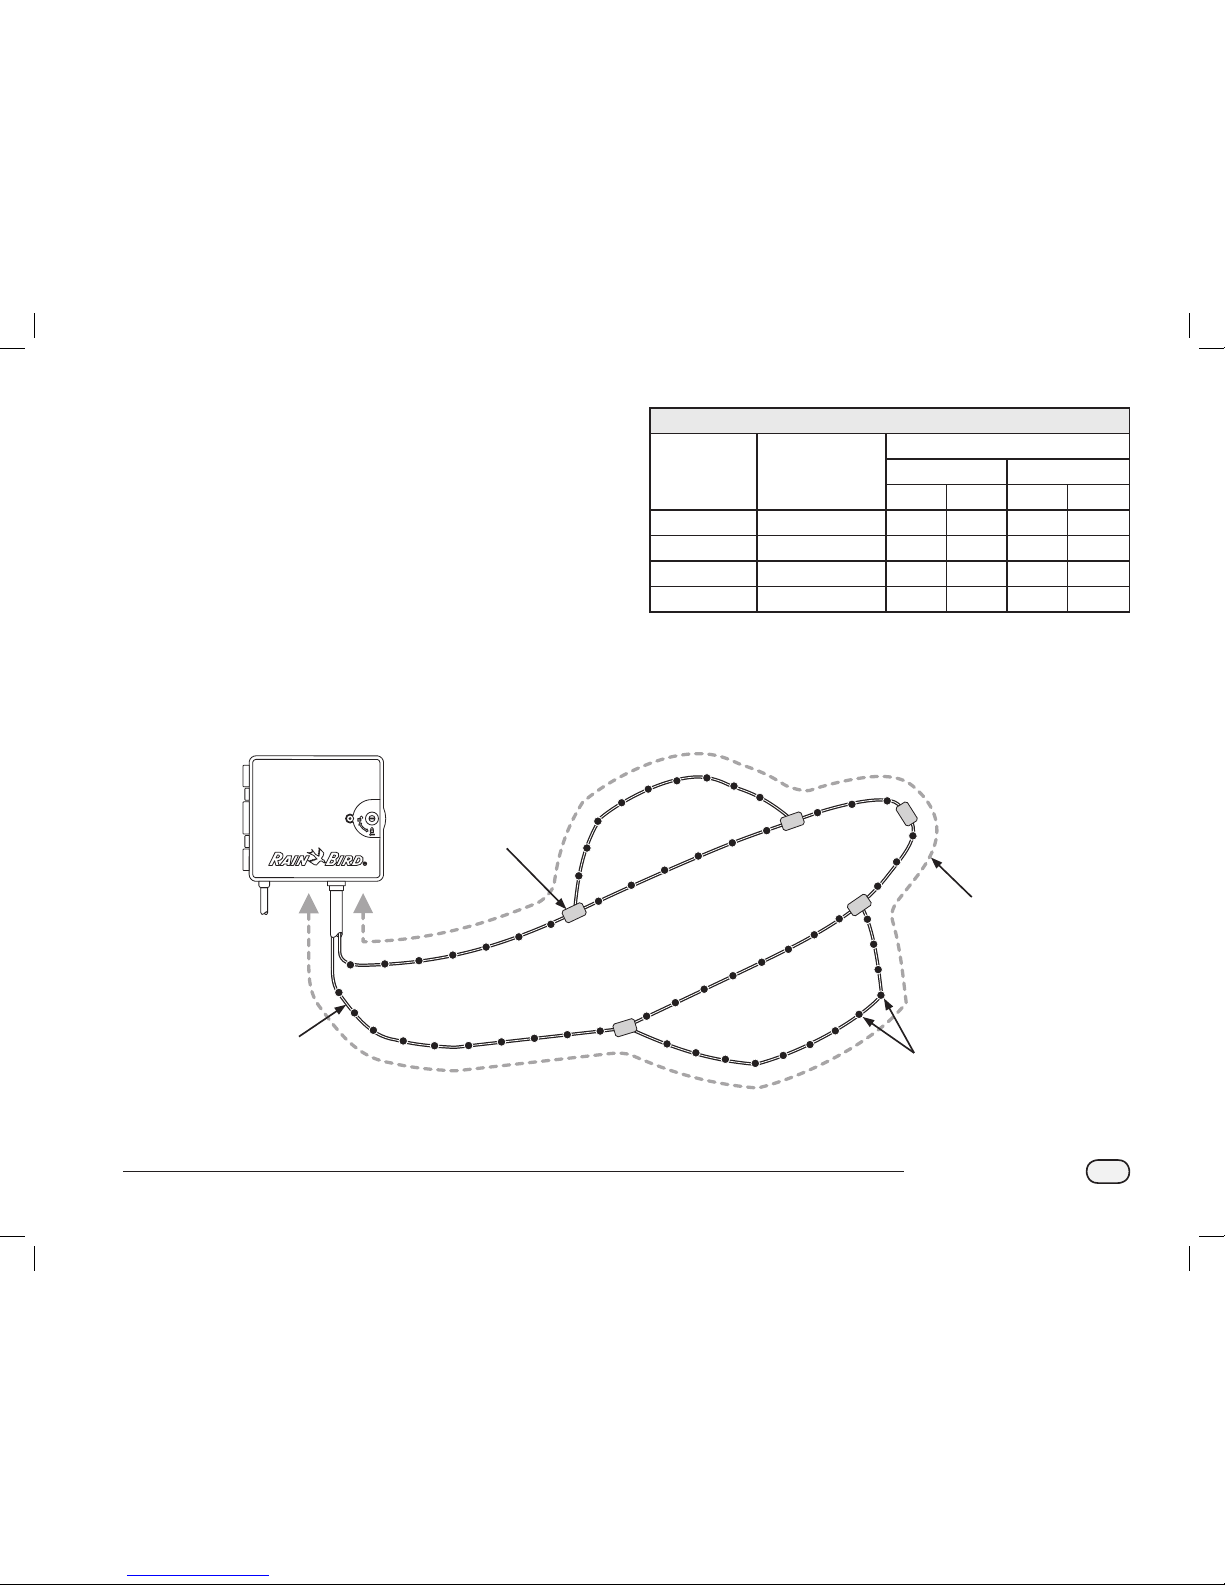
Loop Pattern
A Loop Pattern supports the greatest distance from controller to
decoders.
However the Loop Pattern requires that the 2-Wire path loop back and
return to the controller. The critical path for a Loop design is determined
by calculating the distance around the loop to the farthest decoder
and back to the controller. For both the Star and Loop designs, different
distances can be supported with larger gauge cable.
Maximum Critical Path Lengths for 2-Wire Paths
Nominal Wire
Size
Ohms per 1000’ or
Ohms per Km (per
conductor)
Max. Length For Critical Path
Star Loop
Km Miles Km Miles
2.5 mm2 7.5 Ohms/Km 3.00 1.86 12.00 7.46
14 AWG 2.58 Ohms/1000’ 2.66 1.65 10.63 6.61
12 AWG 1.62 Ohms/1000’ 4.23 2.63 16.93 10.52
10 AWG 1.02 Ohms/1000’ 6.72 4.18 26.89 16.71
2-Wire Loop Pattern Design Decoders and Valves
Valve Boxes (Typical)
2-Wire splice at branch
take-offs allow easy
breaking of loop for
troubleshooting
Decoders
(Typical)
ESPLXD-ET Controller
Critical Path
Total cable length of
the loop’s critical path
(maximum 6.61 miles
(10.63 km) using
14 AWG cable)
Branch #2 Loop
Main Trunk Loop
2-Wire
Loop
Branch #1 Loop
ESPLXD-ET user-manual (670504-01) artwork_120716.indb 7 7/16/2012 3:48:04 PM
Page 16

8
ESPLXD-ET Controller
Decoders
The ESPLXD-ET controls your irrigation system using decoders.
A decoder is a device which attaches to the 2-Wire path and performs
a task such as opening a valve for irrigation. Some, such as sensor
decoders can be used to provide weather sensor status to the controller.
Typically a controller has several decoders connected, each with one or
more valves attached. Valve outputs at the controller are called stations
and are numbered sequentially. ESPLXD-ET controller is designed to
keep track of your decoders so that once installed and set up all you
have to do is manage irrigation for the various stations.
Types of Decoders
Field Decoders
Used to open and close valves for irrigation, these are the most
commonly used decoders.
Master Valve (MV) Decoders
Used to open and close master valves. Both Normally Open master
valves (NOMVs) and Normally Closed master valves (NCMVs) are
supported. The ESPLXD-ET controller can manage up to five Master
Valves.
Weather Sensor Decoders
Used to provide an interface between the weather device and the
controller. The ESPLXD-ET controller can support up to three weather
sensor decoders.
Local Sensor
The ESPLXD-ET controller can also interface to a local sensor, such as
a rain shutoff device. The local weather sensor connects directly to
the ESP-LXD-M50 module via a separate wired or wireless connection
rather than through a Sensor Decoder connected to the 2-Wire path.
The ESPLXD-ET controller supports one Local Sensor.
Field Decoder Addresses
Field decoders have unique five digit address identifiers. Decoder
addresses can be reprogrammed if necessary, using the Rain Bird DPU210 Decoder Programming Unit.
Rain Bird Field Decoder Models
Decoder
Model
Number of
Addresses
Per Decoder
Maximum
Number Of
Solenoids
Per Address
Maximum
Addresses
Operating At
Once
FD-101 1 1 1
FD-102 1 2 1
FD-202 2 2 2
FD-401* 4 1 4
FD-601* 6 1 4
* Decoder includes Line Surge Protection.
Some decoders can support more than one valve. For example, an
FD-102 decoder has a single address, but can control 2 different
valves. However both valves would always have to open and close
simultaneously since the FD102 only has a single address. An FD-401
could manage four valves, each independently since four addresses are
available.
NOTE: The ESPLXD-ET controller also supports setup by scanning
decoder barcode labels using the optional Programming Backup
Cartridge (PBC-LXD). See Section E for more details.
ESPLXD-ET user-manual (670504-01) artwork_120716.indb 8 7/16/2012 3:48:04 PM
Page 17
9
ESPLXD-ET Controller
The ESPLXD-ET lets you set a delay between stations. For example, if
you set a one minute delay, station 1 will run until finished, followed
by a one minute delay. Then station 2 will run, followed by another one
minute delay, and so on. See Section D, Station Delay for more details.
The order in which stations are selected to operate depends on the
following settings:
Station Sequencing settings
Station priorities
Station run times
Station program assignment
Station flow rate (FloManager)
POC flow rate (FloManager)
SimulStation settings
NOTE: When using Station Sequencing by priorities, set station
priorities higher for stations you want selected earlier in a program
and lower for stations you want selected later in a program.
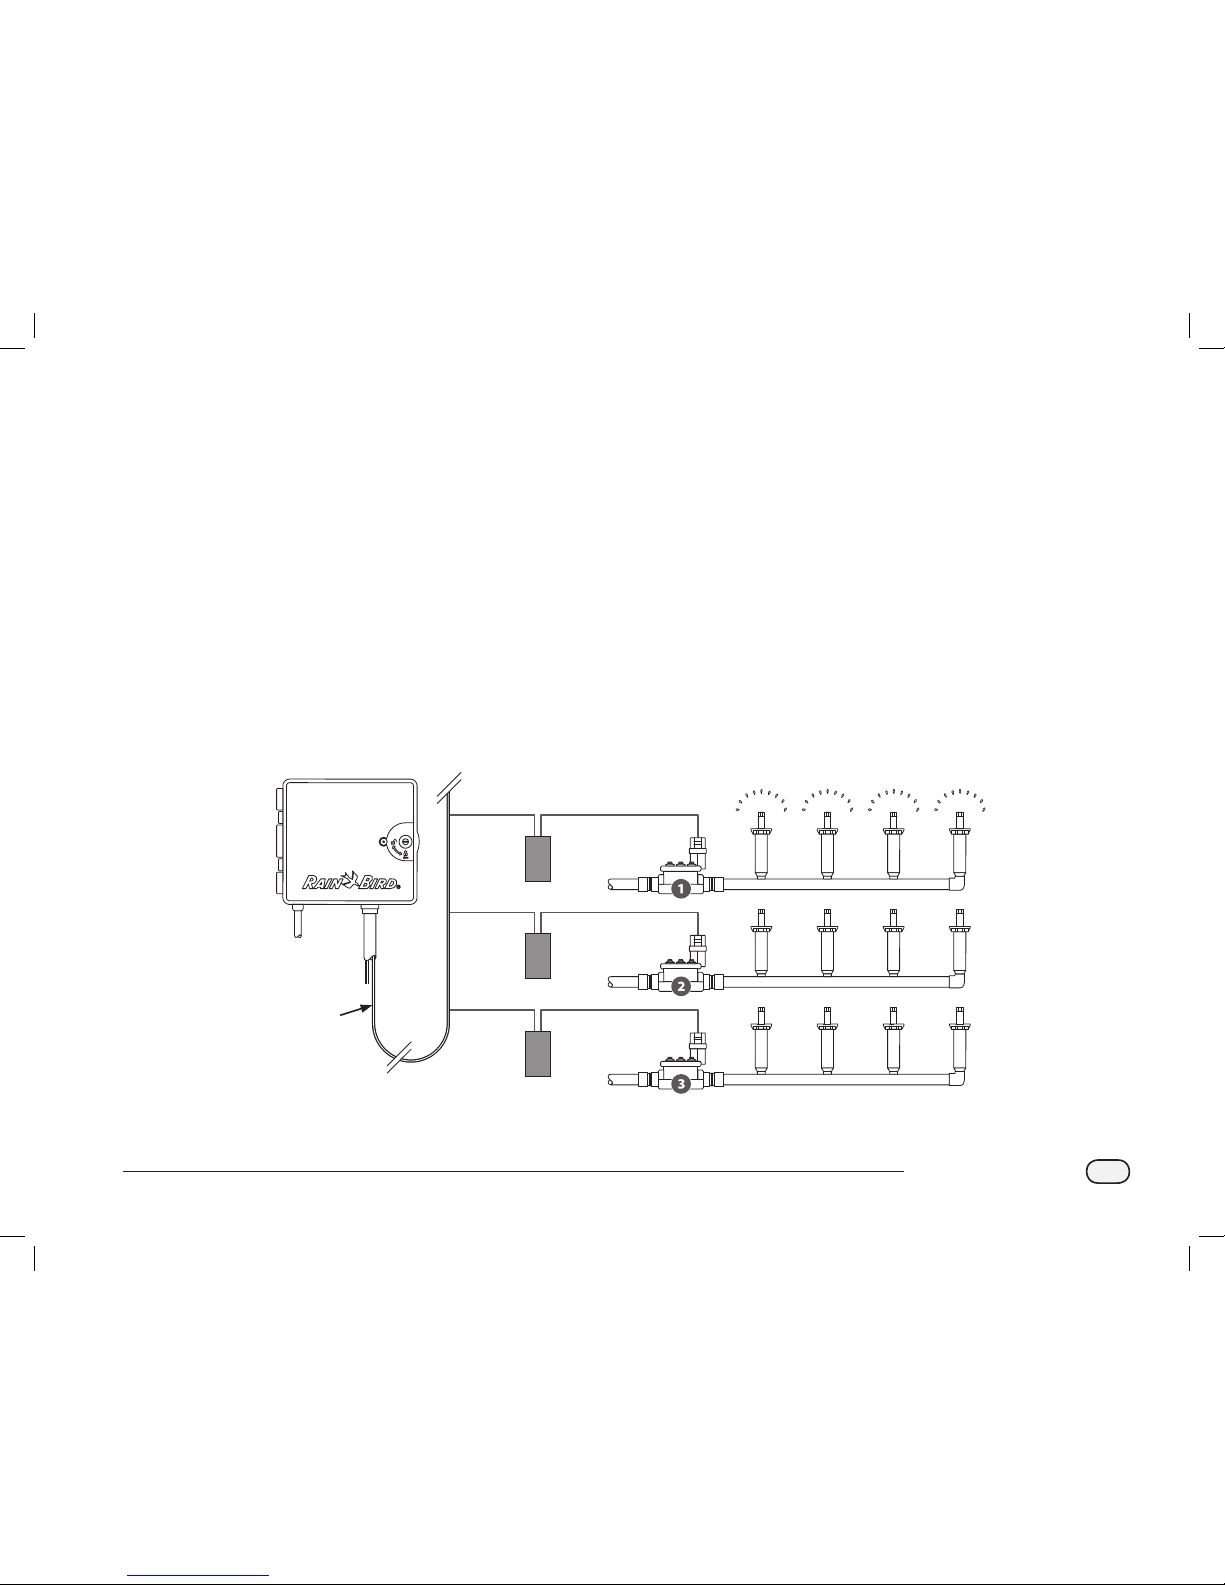
Valves (Stations)
Valves (or stations) operate at times as specified by irrigation programs.
The controller sends signals to the appropriate decoder, powering
the valve solenoid to open or close. When additional stations are
scheduled, another signal is sent to the next decoder and the cycle
continues. For example, the controller sends the first decoder a signal
to open it’s valve, allowing irrigation. When finished, the controller
signals the decoder to shut off it’s valve and then signals the second
decoder to open the valve. Then when the second station is finished,
the third station will begin watering and so on.
NOTE: The ESPLXD-ET’s SimulStations feature allows you to
operate multiple stations at the same time. See section D for more
details.
NOTE: The ESPLXD-ET’s Cycle+Soak feature may delay valve
operation. See Section D, Cycle+Soak for more details.
Typical Decoder and Valve Operation
2-Wire
Path
ESPLXD-ET Controller
2nd Decoder
3rd Decoder
Valves
1st Decoder
Sprinklers
ESPLXD-ET user-manual (670504-01) artwork_120716.indb 9 7/16/2012 3:48:05 PM
Page 18
10
ESPLXD-ET Controller
Programming Overview
Irrigation Controller Definitions
Programs
The process of telling the controller exactly when and for how long
you want to water. The controller opens and closes the remote control
valves according to a program you set.
Each program contains:
Watering Days
The days of the week or calendar dates on which irrigation is allowed.
For example, specific days such as Monday, Wednesday and Friday
could be designated as your “watering days”. Or else cyclical, such as
every third day, or perhaps only on even or odd days of the month.
Watering Start Time
The time(s) of day that irrigation begins; this is the time that the
first station in the program begins watering; all other stations in the
program then follow in sequence.
NOTE: The term “start time” refers to the time that a program
starts, not to the time that each individual station begins to run.
Station Run Time
The length of time (in hours and minutes) that each individual station
is programmed to run.
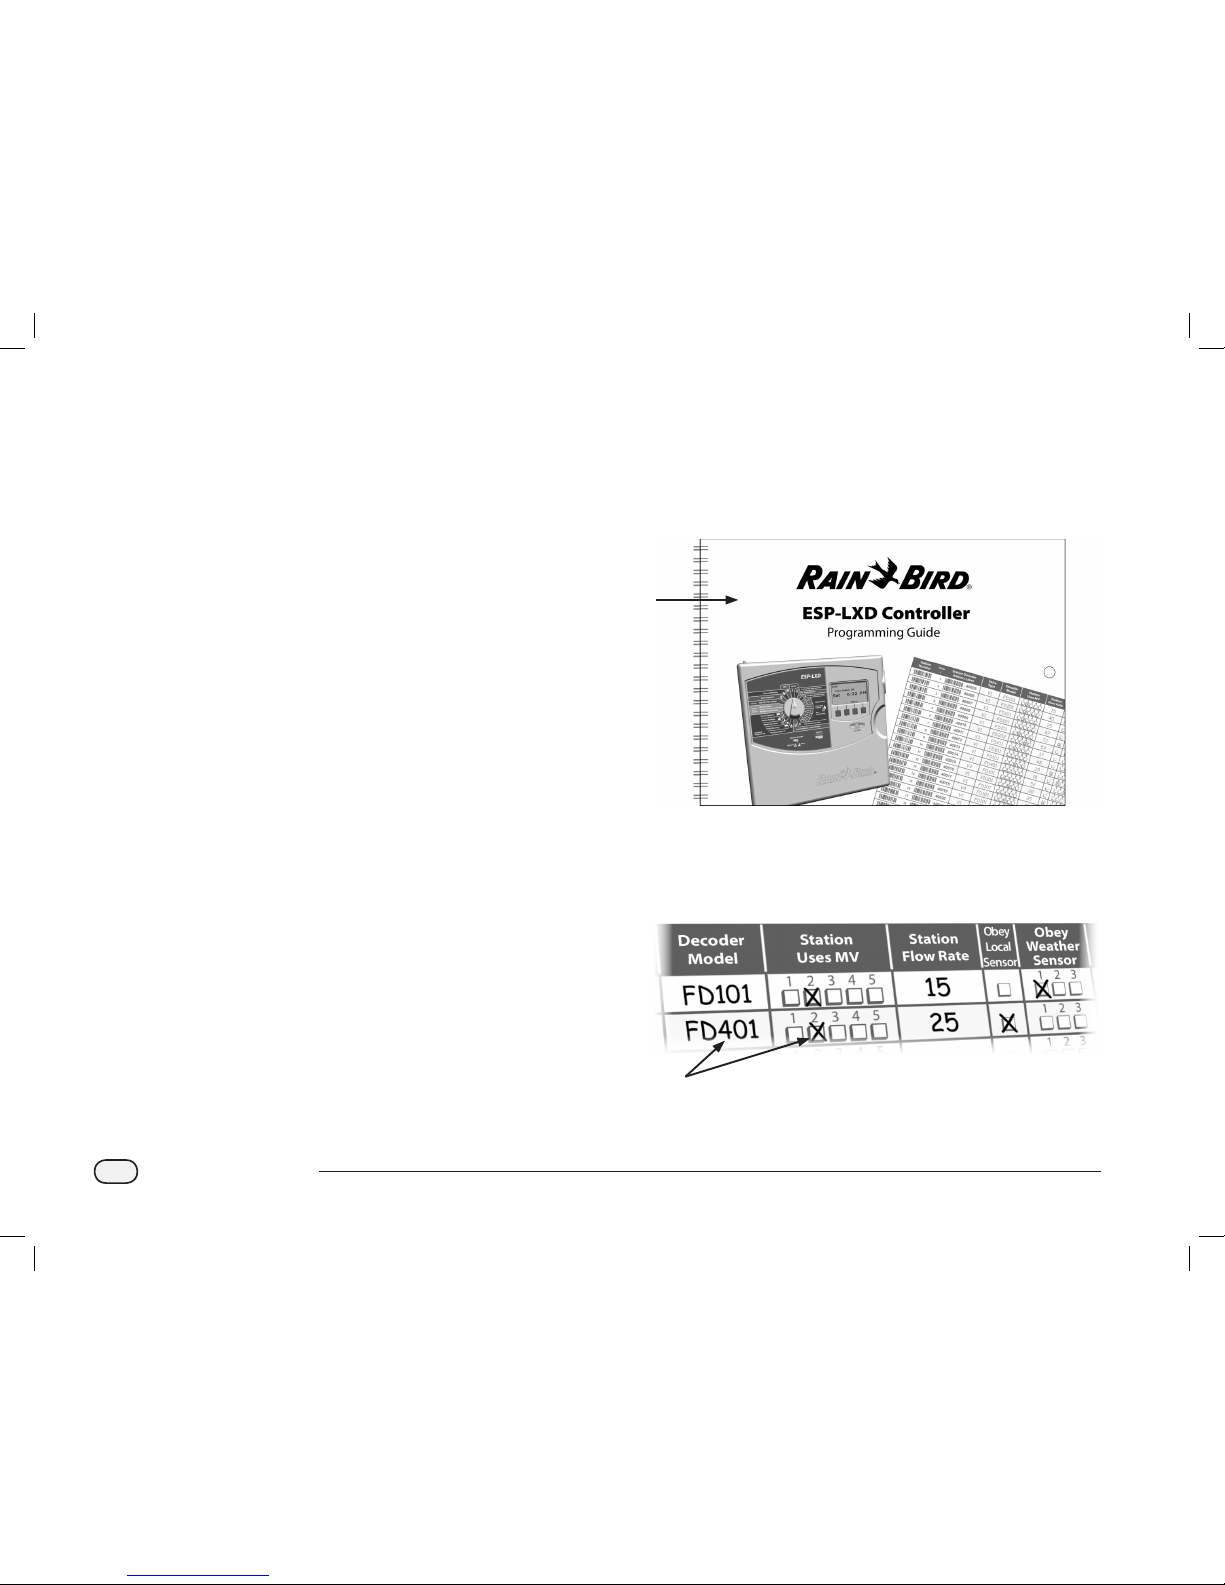
Programming Guide
Before you begin programming, fill out the Programming Guide. See
the Programming Guide instructions for more details.
A
Locate the Programming Guide that came with the ESPLXD-ET
controller.
1
Fill Out Programming Guide
B
Follow the instructions to enter information about your
system hardware and settings in the appropriate fields on the
Programming Guide.
2
Continued on next page...
ESPLXD-ET user-manual (670504-01) artwork_120716.indb 10 7/16/2012 3:48:05 PM
Page 19
11
ESPLXD-ET Controller
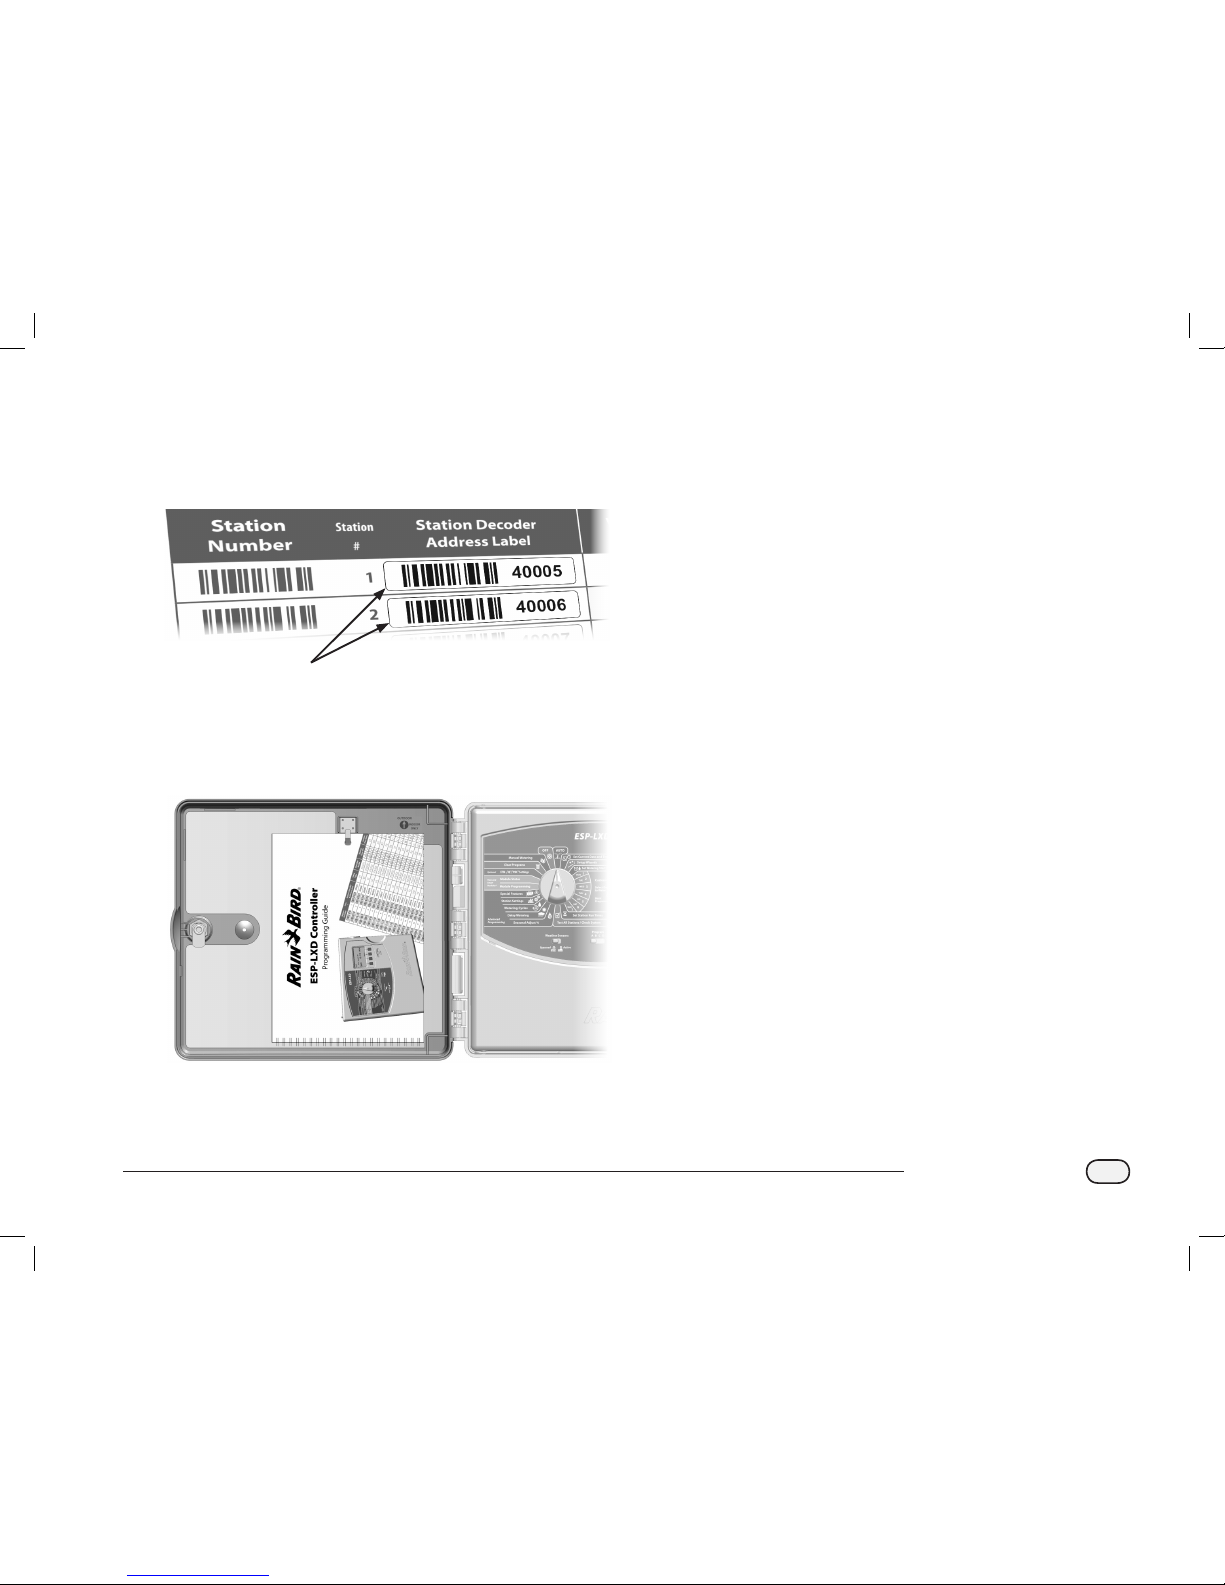
Apply Decoder Address Labels
C
Follow the instructions to apply station, master valve, flow and
weather sensor decoder address labels in the appropriate fields
on the Programming Guide.
3
Storing the Programming Guide
Return the Programming Guide to a permanent, safe location when
you’re finished working with it. We recommend hanging it on the hook
inside the controller cabinet door as shown below.
Remote Programming
The ESPLXD-ET controller can be programmed while operating under
battery power.
This feature is useful if the controller is installed in an area that is not
easily accessible. It also lets you enter program information before
installing the controller at the job site. See Section H, Programming
Under Battery Power for more details.
ESPLXD-ET user-manual (670504-01) artwork_120716.indb 11 7/16/2012 3:48:06 PM
Page 20

12
ESPLXD-ET Controller
Programming Checklist
When programming the ESPLXD-ET controller for the first time, it is
recommended that you complete the following steps in order.
For your convenience a check-off box is provided for each step.
Set Up Hardware
Install LXD decoder module ..................................................... Page 187
Install SM Station Modules ....................................................... Page 188
Install ET Manager Antenna ..................................................... Page 185
Install ET Manager Cartridge ................................................... Page 193
Fill out Programming Guide (see Programming Guide instructions)
Apply decoder address labels (see Programming Guide instructions)
Clear program information....................................................... Page 168
Set language .................................................................................. Page 142
Set time ............................................................................................ Page 19
Set date ............................................................................................ Page 19
Set up valve types ........................................................................ Page 20
Set up master valves ................................................................... Page 22
Set up weather sensors (optional) ......................................... Page 24
Set up stations and decoders .................................................. Page 26
Set up flow sensors (optional) ................................................. Page 28
Set Up Programs
A B C D
Select program (A, B, C or D) ............................. Page 20
Set watering start times ..................................... Page 31
Select watering days * ......................................... Page 32
Set station run time(s) ......................................... Page 33
* See Watering Cycles dial position for Odd, Odd31, Even and
Cyclical watering cycles.
Set Up Programs (Optional)
Set seasonal adjust .............................................................Page 67
Create a water window ..................................................... Page 72
Set up a station delay ........................................................ Page 77
Set up SimulStations .......................................................... Page 78
Set Up ET Manager Cartridge
Create Schedule Report ............................................................. Page 36
Run EZ Setup Wizard ................................................................... Page 40
Test Weather Signal ..................................................................... Page 41
Review Setup
Confirm program .........................................................................Page 43
Test stations ................................................................................... Page 49
Check 2-Wire setup .....................................................................Page 50
Check installed modules ...........................................................Page 167
Optional Setup
Check weather sensor status ..........................................Page 58
Schedule calendar days off .............................................. Page 71
Create a MV manual water window .............................. Page 174
Set Cycle+Soak ..................................................................... Page 76
Set flow units ........................................................................Page 146
Activate FloManager .......................................................... Page 147
Activate FloWatch ............................................................... Page 151
Set up SEEF and SELF actions ......................................... Page 152
Set controller to AUTO ............................................................... Page 13
ESPLXD-ET user-manual (670504-01) artwork_120716.indb 12 7/16/2012 3:48:06 PM
Page 21
13
ESPLXD-ET Controller
AUTO
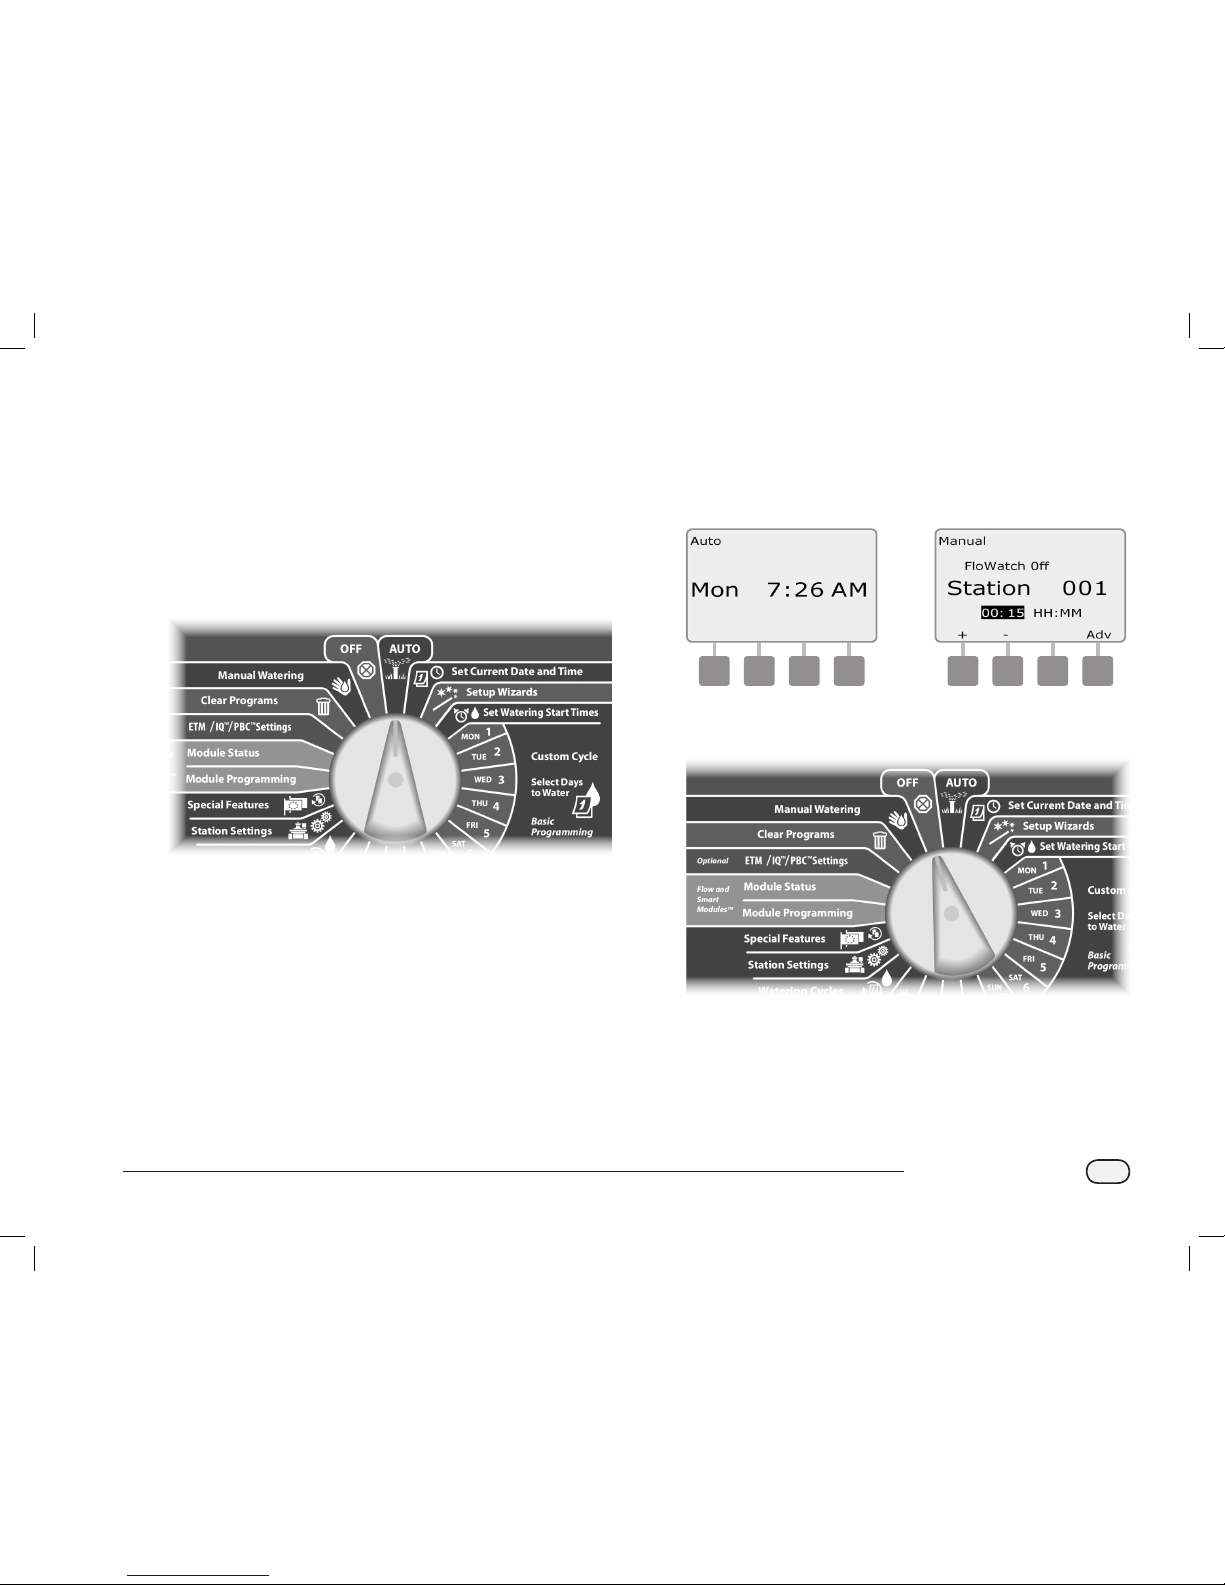
Automatic Operation
The controller will operate automatically with the controller dial set
to AUTO.
If you forget to return the dial to AUTO, the controller will automatically
continue to run programs, unless the dial is set to the OFF position
when all irrigation is canceled.
Turn the controller dial to AUTO.
A
The Auto screen is displayed with the current day and time shown.
B
When a program is running in AUTO mode, the station number will
display on the screen. Press the + or – buttons to add or subtract
minutes from the run time for the currently running station. To
advance to the next station in a program, press the Adv button.
1 2
To cancel a currently running program, turn the controller dial to
OFF for three seconds and then return the dial to AUTO.
ESPLXD-ET user-manual (670504-01) artwork_120716.indb 13 7/16/2012 3:48:06 PM
Page 22
14
ESPLXD-ET Controller
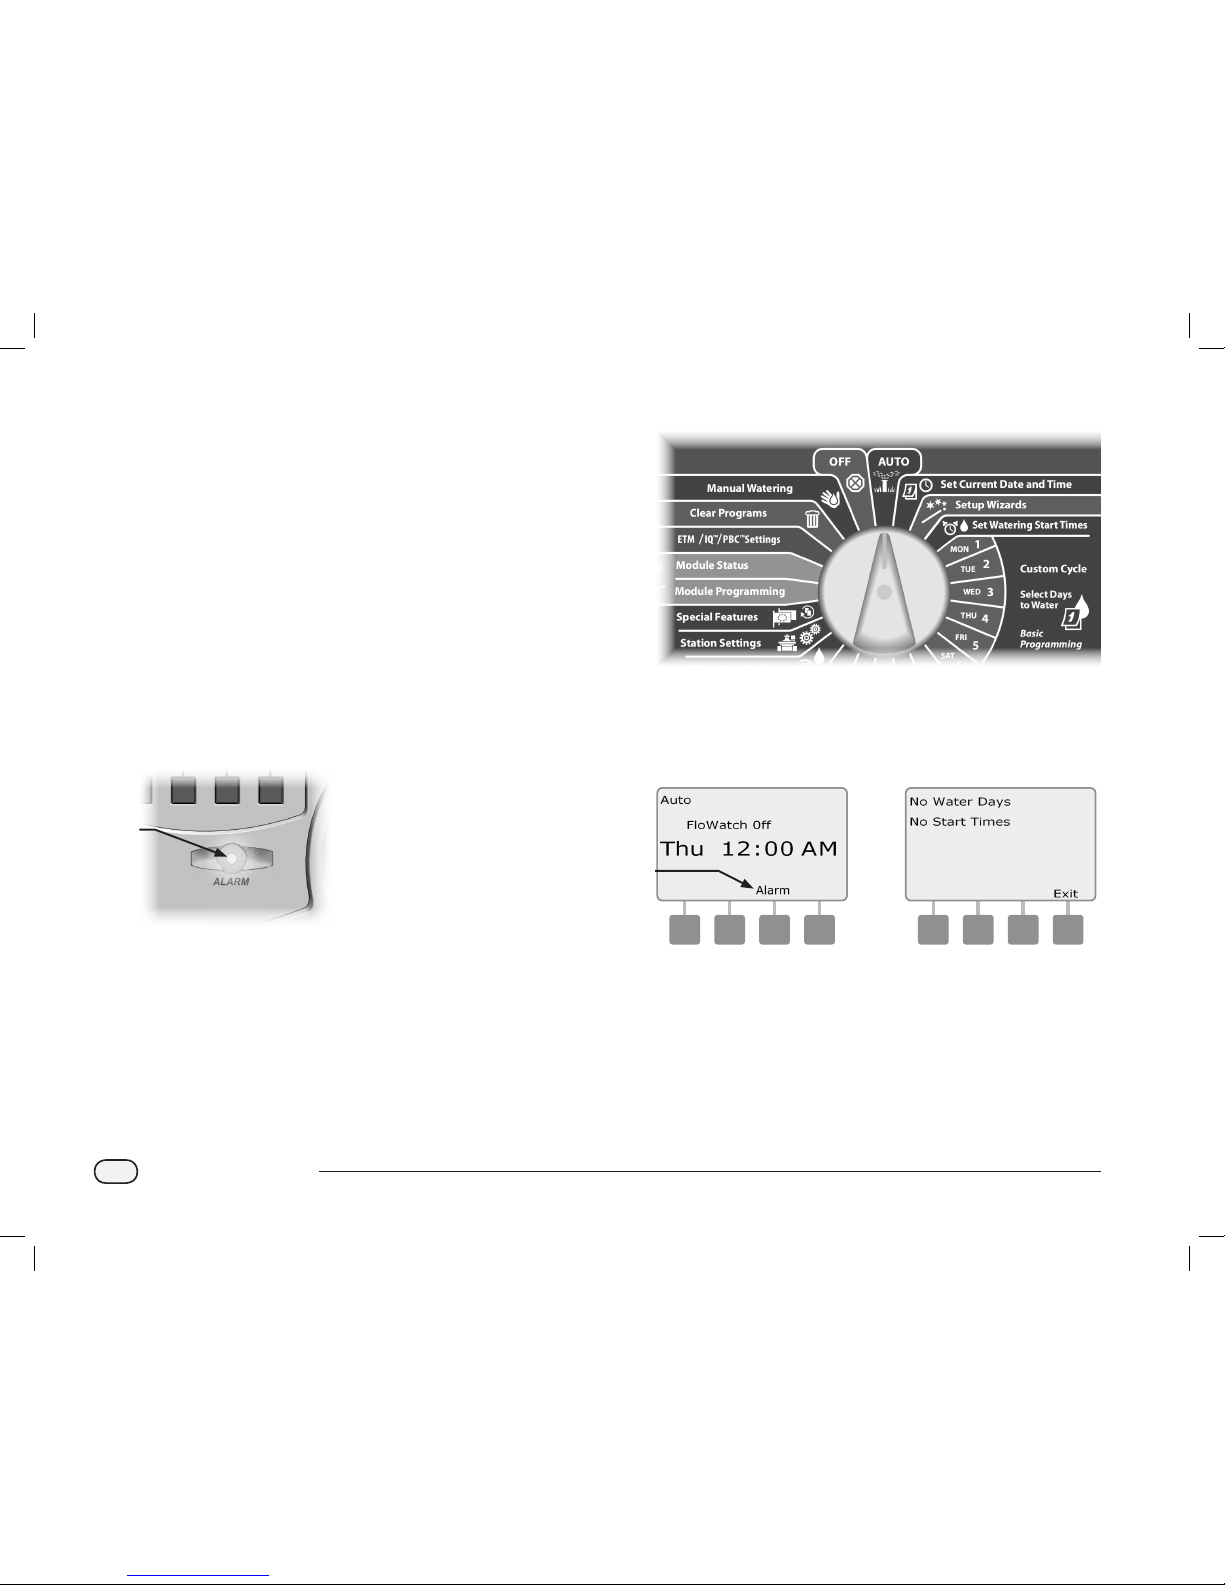
Alarm Conditions
An alarm condition can occur when programming omissions or other
issues prevent normal irrigation.
Decoder Address Alarms
The controller will alarm if duplicate decoder addresses are entered
for one or more weather sensors, flow sensors or stations. To clear the
alarm, enter a different decoder address for one of the decoders. Only
the first two duplicates will be shown, so you may need to repeat this
process until all duplicate addresses have been cleared.
FloWatchTM Alarms
The controller will alarm for certain flow conditions if you have FloWatch
set up. See Section F, Flow Management for more details.
Review Alarm Messages
A
When an alarm condition is detected, the alarm light on the
controller front panel will illuminate.
1
Turn the controller dial to AUTO.
B
When an alarm condition is present, the Alarm button label will be
present on screen. Press the Alarm button to view alarm details.
C
Any present alarm conditions will then be displayed. Press the
Next button if necessary, to advance to the next page.
b
c
NOTE: Take the appropriate action to address each alarm
condition. When all alarms have been addressed, the alarm light
on the front panel will no longer be illuminated.
ESPLXD-ET user-manual (670504-01) artwork_120716.indb 14 7/16/2012 3:48:07 PM
Page 23
15
ESPLXD-ET Controller
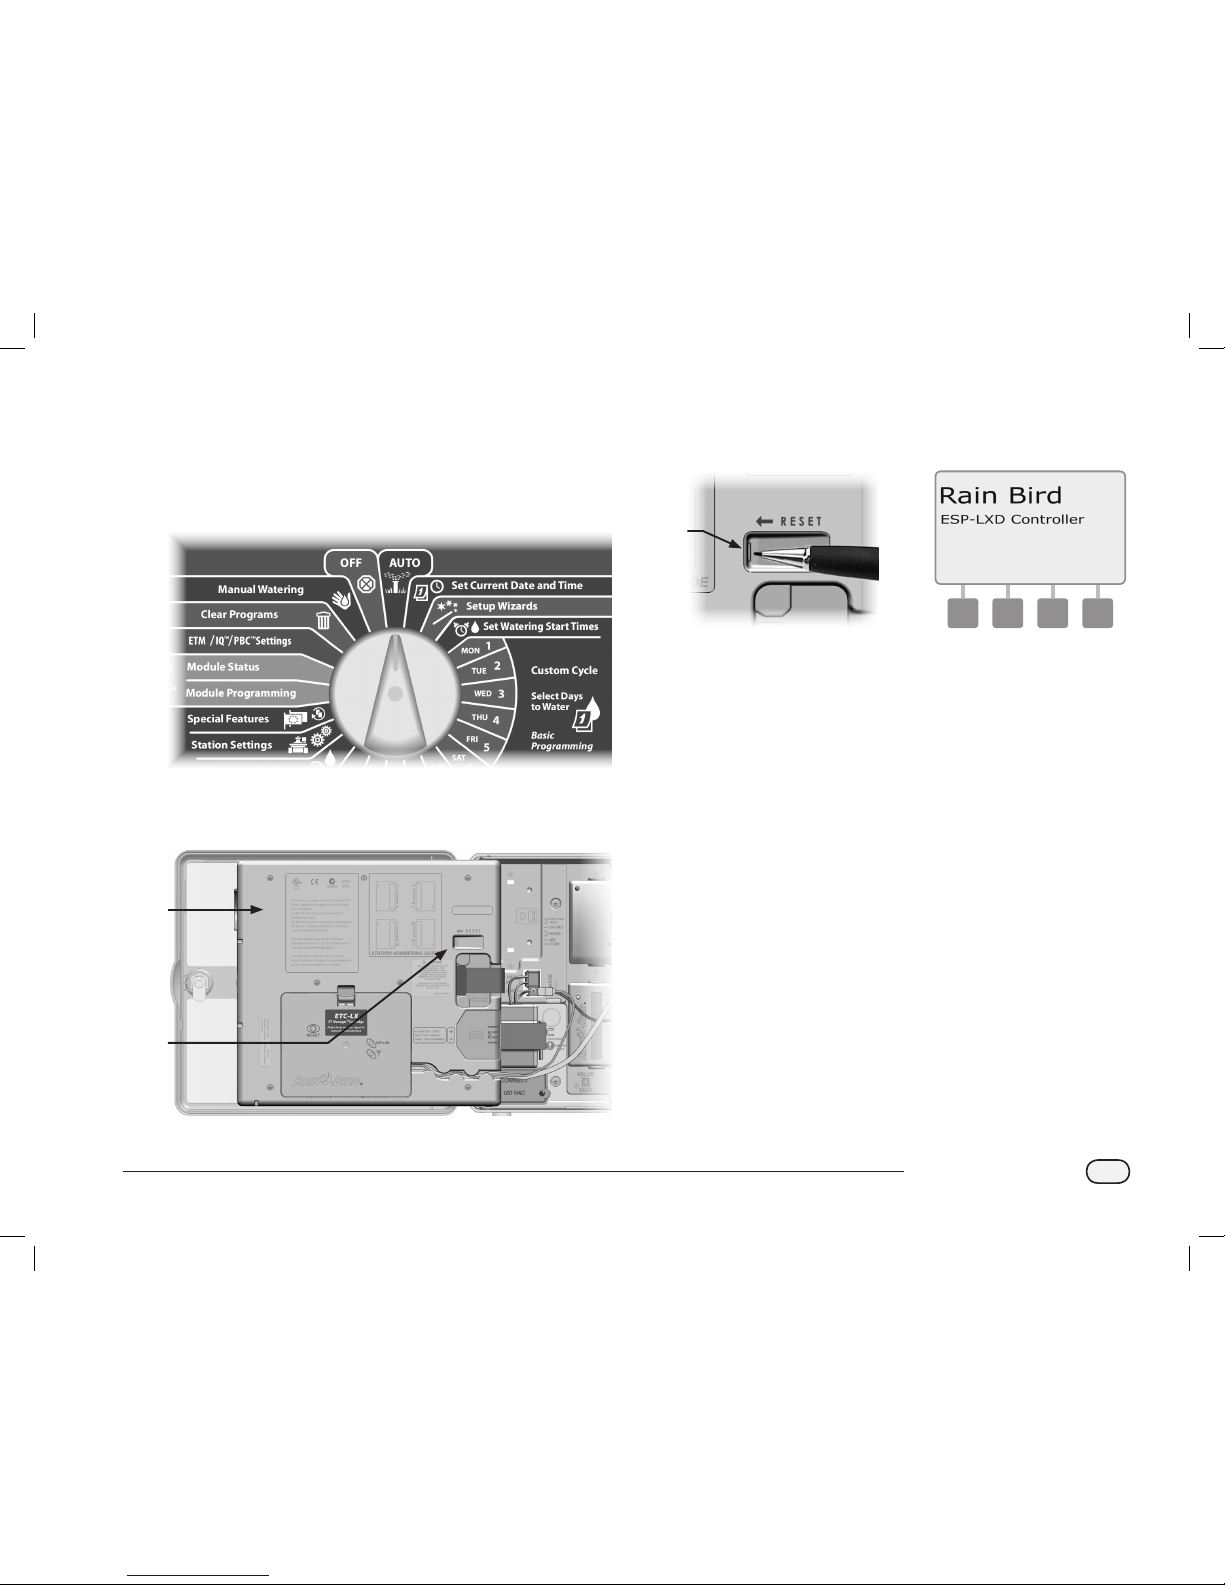
Resetting the Controller
Sometimes you may want to reset (or reboot) the ESPLXD-ET controller.
Using the controller’s reset feature does not change or delete the
programs you have loaded into the controller.
Turn the controller dial to AUTO.
A
Open the controller outer cabinet door and inner front panel.
B
Locate the RESET button on the back of the front panel.
1
2
C
Use a pen or pencil to depress the RESET button.
D
The “Rain Bird” screen appears, confirming reset.
3 4
ESPLXD-ET user-manual (670504-01) artwork_120716.indb 15 7/16/2012 3:48:07 PM
Page 24
16
ESPLXD-ET Controller
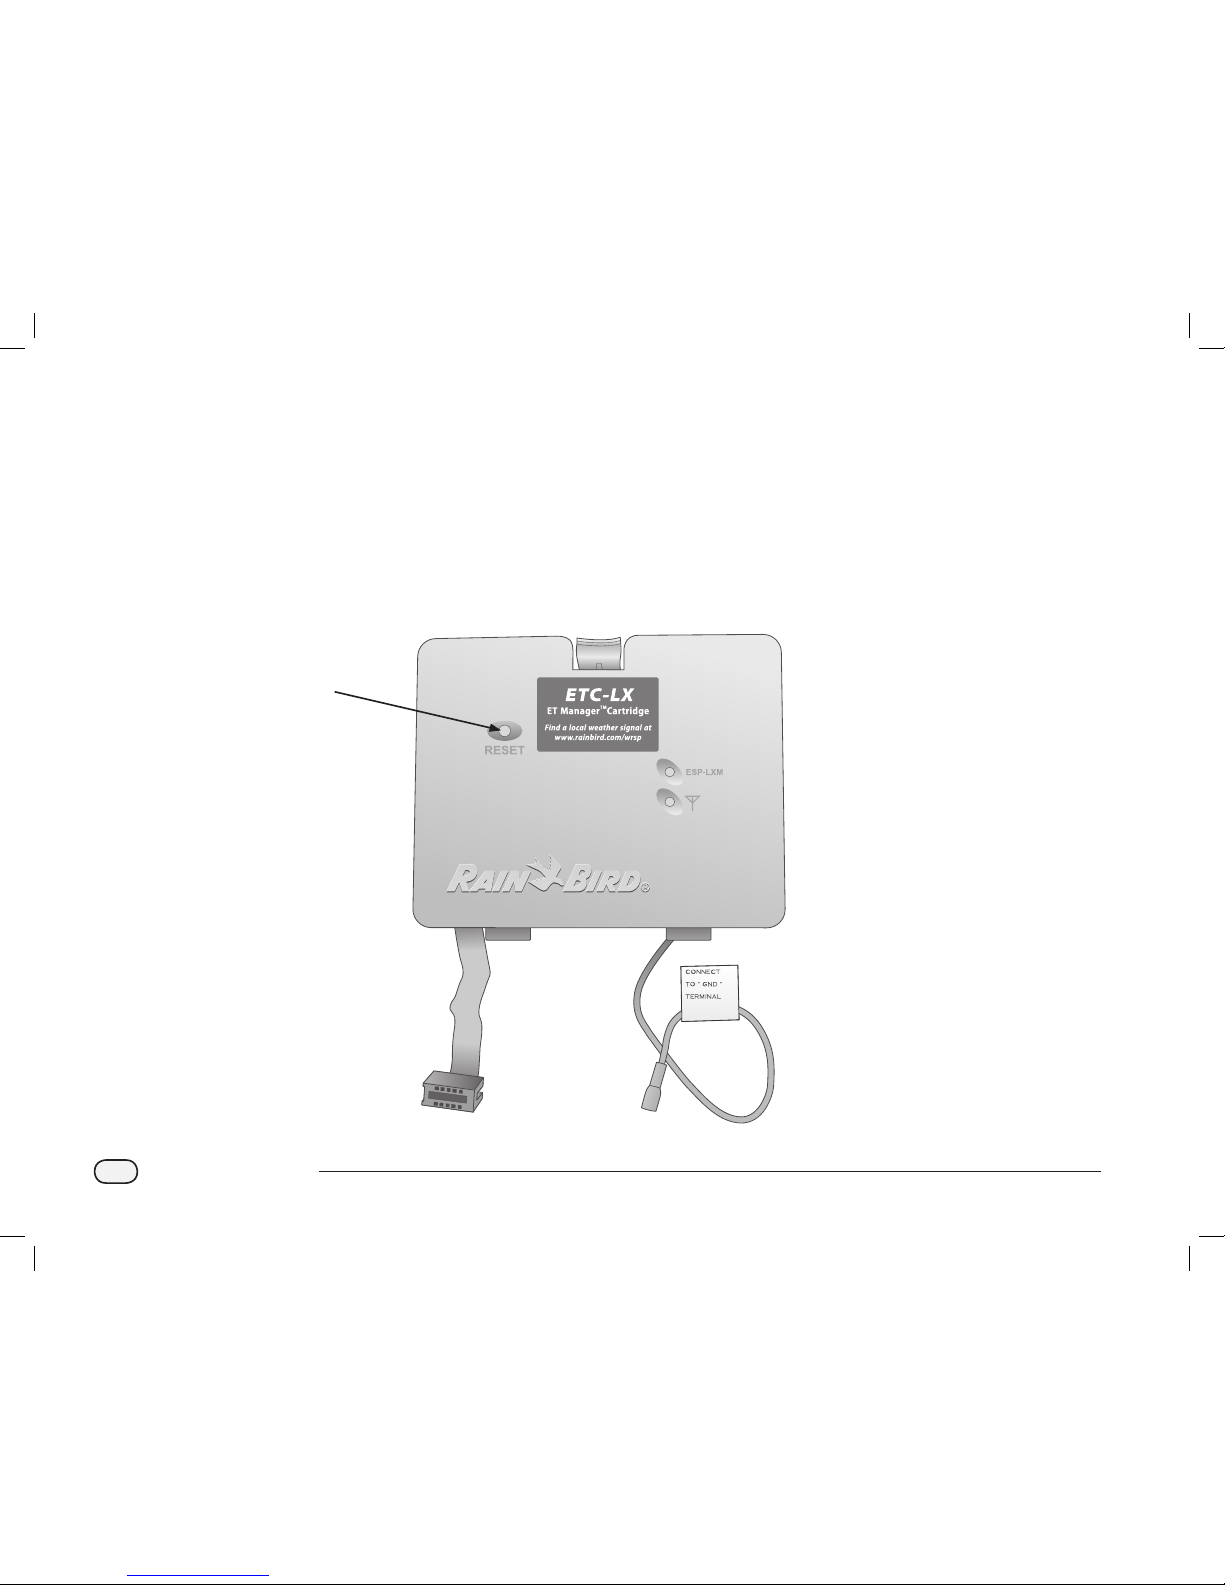
Resetting the ET Manager Cartridge
A Reset button is provided on the face of the ET Manager Cartridge.
The purpose of this control button is to restart the cartridge’s internal
programming and re-enable communications with the ET Manager
Receiver.
NOTE: Resetting the ET Manager Cartridge does not affect
internally stored data such as event logs, WRSP signal provider
codes or other settings.
RESET
BUTTON
ESPLXD-ET user-manual (670504-01) artwork_120716.indb 16 7/16/2012 3:48:07 PM
Page 25
17
ESPLXD-ET Controller
Optional Features
Station Expansion Module (ESP-LXD-SM75)
The ESPLXD-ET controller comes standard with 50 stations available.
This can easily be expanded by adding one or two optional ESP-LXDSM75 Station Modules. Each station module adds 75 additional stations
to increase capacity to 125 or 200 stations.
ESP-LXD-SM75 Station Expansion Module
ESPLXD-ET user-manual (670504-01) artwork_120716.indb 17 7/16/2012 3:48:07 PM
Page 26

18
ESPLXD-ET Controller
this page intentionally left blank
ESPLXD-ET user-manual (670504-01) artwork_120716.indb 18 7/16/2012 3:48:07 PM
Page 27
19
ESPLXD-ET Controller
Section B - Basic Programming
Set Current Date & Time
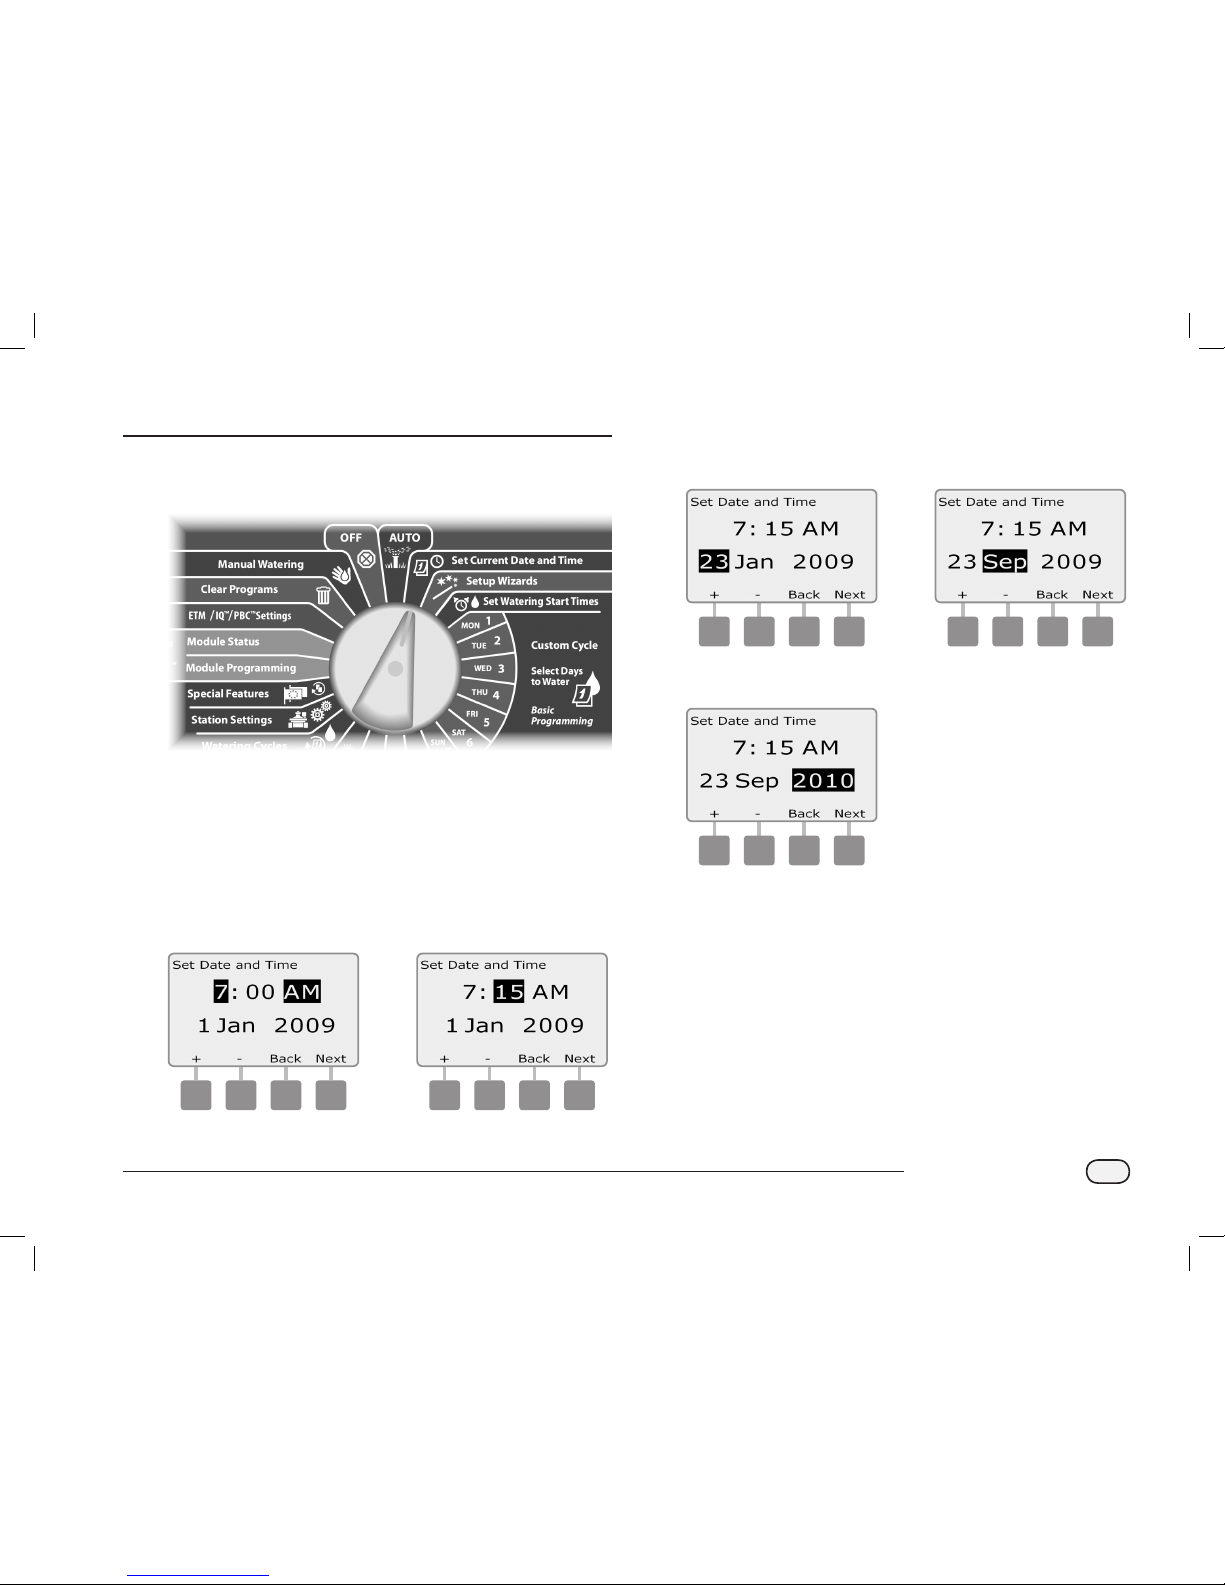
Turn the controller dial to Set Current Date and Time.
A
The Set Date and Time screen appears. Press the + and – buttons
to set the current hour; then press Next.
NOTE: Be sure to set the hour correctly to either AM or PM.
Press and HOLD buttons to accelerate settings for hours and
minutes.
B
Press the + and – buttons to set the current minute; then press
Next.
1 2
C
Press the + and – buttons to set the current day; then press Next.
D
Press the + and – buttons to set the current month; then press
Next.
3 4
E
Press + and – to set the current year.
5
ESPLXD-ET user-manual (670504-01) artwork_120716.indb 19 7/16/2012 3:48:08 PM
Page 28
20
ESPLXD-ET Controller
Program Select Switch
Always begin programming by setting the Program Select
switch to the desired program.
Four independent Programs, A, B, C and D are available in the
ESPLXD-ET controller. Multiple programs allow you to set watering
schedules to meet different requirements for plant materials,
soils, slopes, and shady or sunny areas. Programs can operate
simultaneously with the only limitation being the number of
stations you program to run simultaneously.
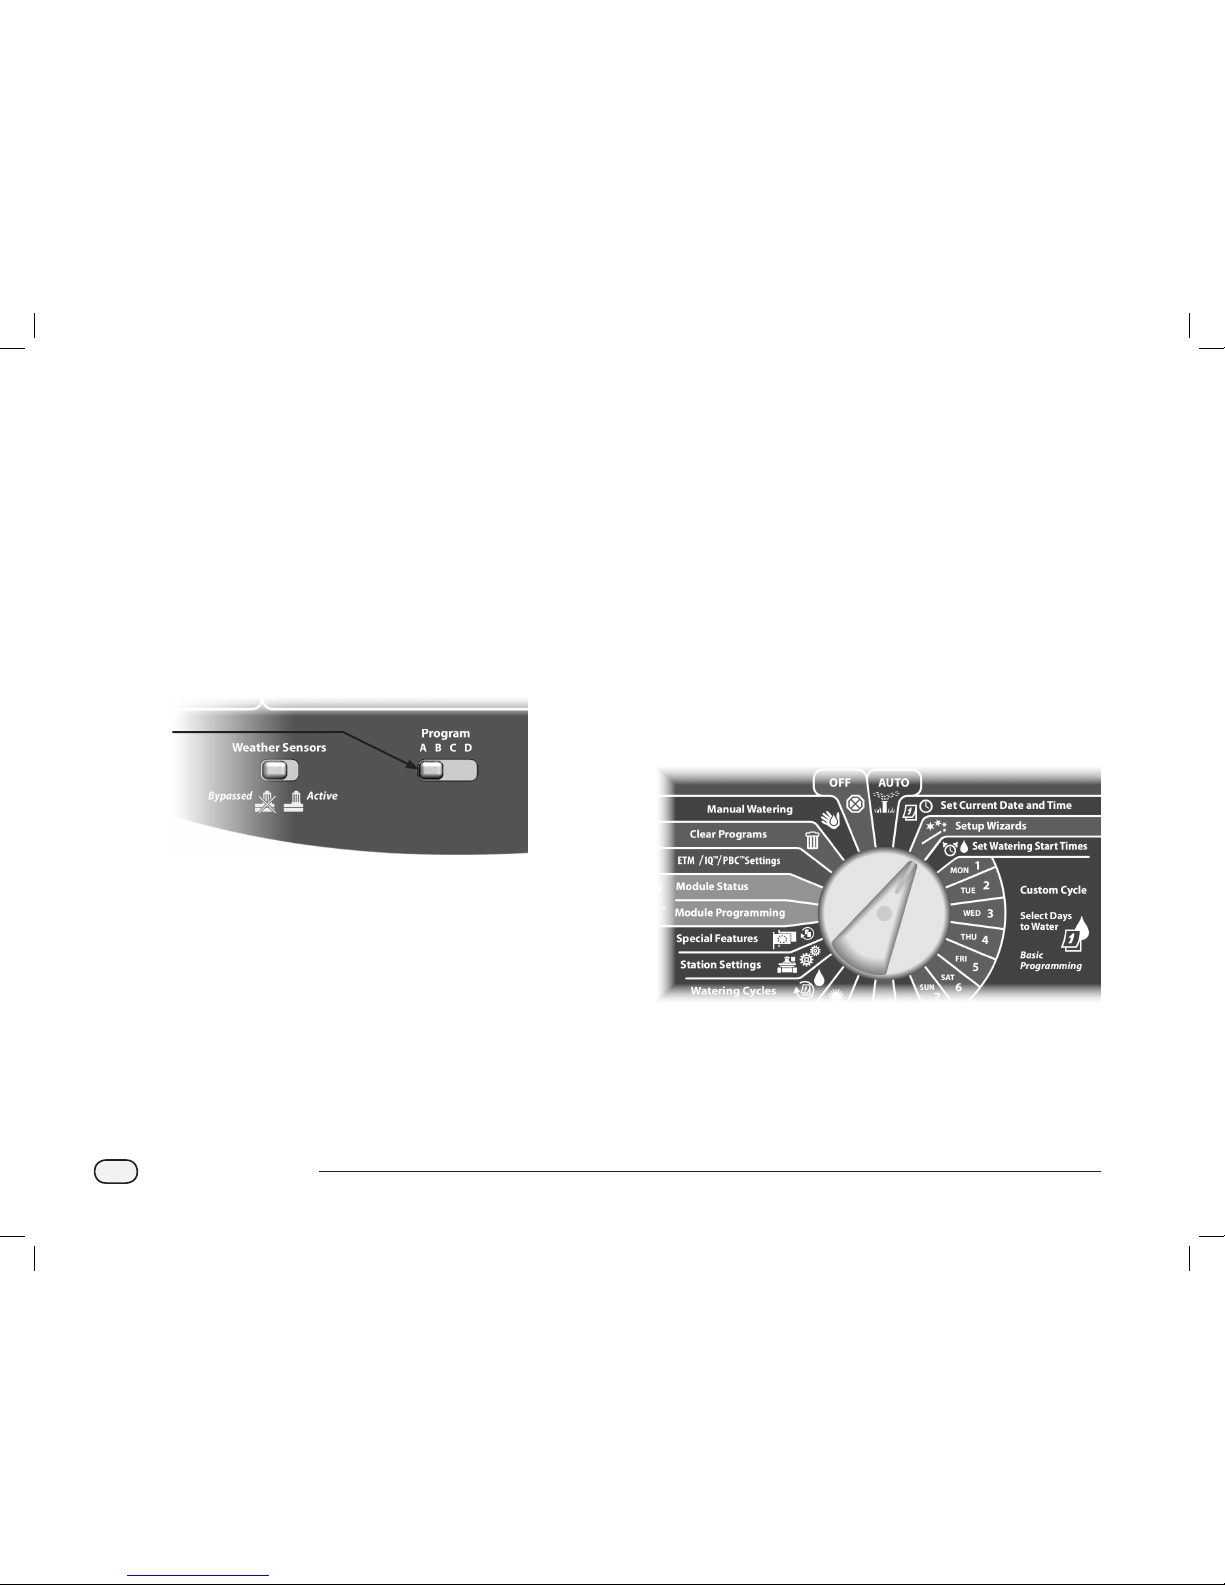
Select Program
On the controller front panel, slide the Program Select switch
under the A, B, C, or D, then begin programming.
Program
Select
Switch
NOTE: When programming the controller, any programspecific information you enter, such as start times or watering
days, will affect only the selected program.
Setup Wizards
Setup Wizards take you through each step for setting up your
hardware in the ESPLXD-ET controller.
It’s most effective to use the Setup Wizards in the order they appear
on the screen: Valve Types, Master Valves, Weather Sensors (if present),
Station Setup, and finally Flow Sensors (if present).
Valve Types Setup
The Valve Type Setup Wizard tells the ESPLXD-ET controller what
types of valves are used by your irrigation system.
Up to five different valve types are supported by ESPLXD-ET, set up as
V1, V2, V3, V4, and V5.
NOTE: It’s not necessary to set up additional valve types if you’re
only using one or two types of valves at your job site.
Turn the controller dial to Setup Wizards.
ESPLXD-ET user-manual (670504-01) artwork_120716.indb 20 7/16/2012 3:48:08 PM
Page 29
21
ESPLXD-ET Controller
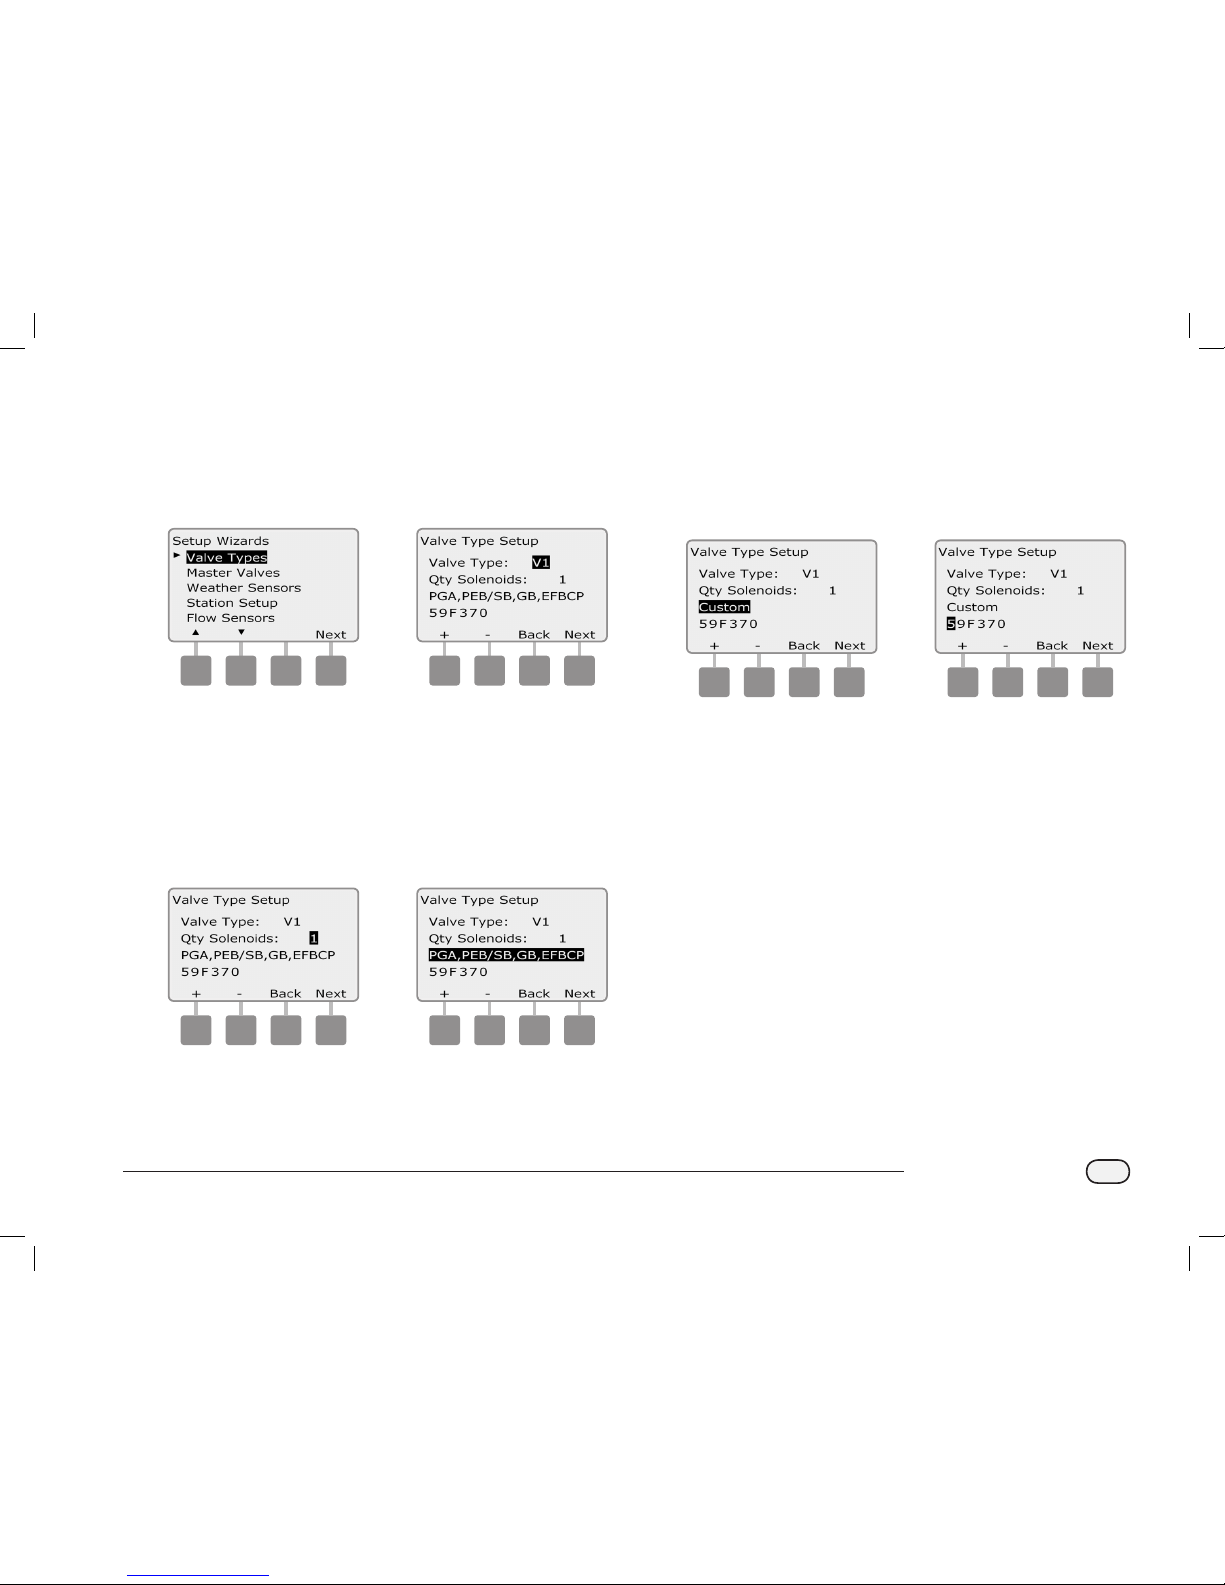
A
The Setup Wizards screen appears with Valve Types selected;
press Next.
B
The Valve Type Setup screen appears. Press the + and – buttons to
choose a name for the first valve type (V1 is default); then press
Next.
1 2
C
Press the + and – buttons to select the quantity of solenoids your
V1 valve type supports; then press Next.
NOTE: The default quantity of solenoids is 1, however some
decoders can control 2 solenoids.
D
Press the + and – buttons to see the models of Rain Bird valves
which the ESPLXD-ET supports. Select your valve type (if present);
then press Next.
3 4
NOTE: Rain Bird residential valves (DV and JTV series) are not
compatible with ESPLXD-ET decoders. Use Rain Bird commercial
valves (PGA, PEB, GB, EFB-CP and BPE series).
E
If you do not see your valve type, select Custom; then press Next.
F
Press the + and – buttons to enter the switch code for your valves.
NOTE: For custom switch codes for non Rain Bird valves, contact
the Rain Bird Global Support Plan group or see values in the
Appendix.
5 6
Repeat this process to set up additional valve types.
NOTE: Be sure to note each valve type on your Programming
Guide for future reference.
ESPLXD-ET user-manual (670504-01) artwork_120716.indb 21 7/16/2012 3:48:09 PM
Page 30
22
ESPLXD-ET Controller
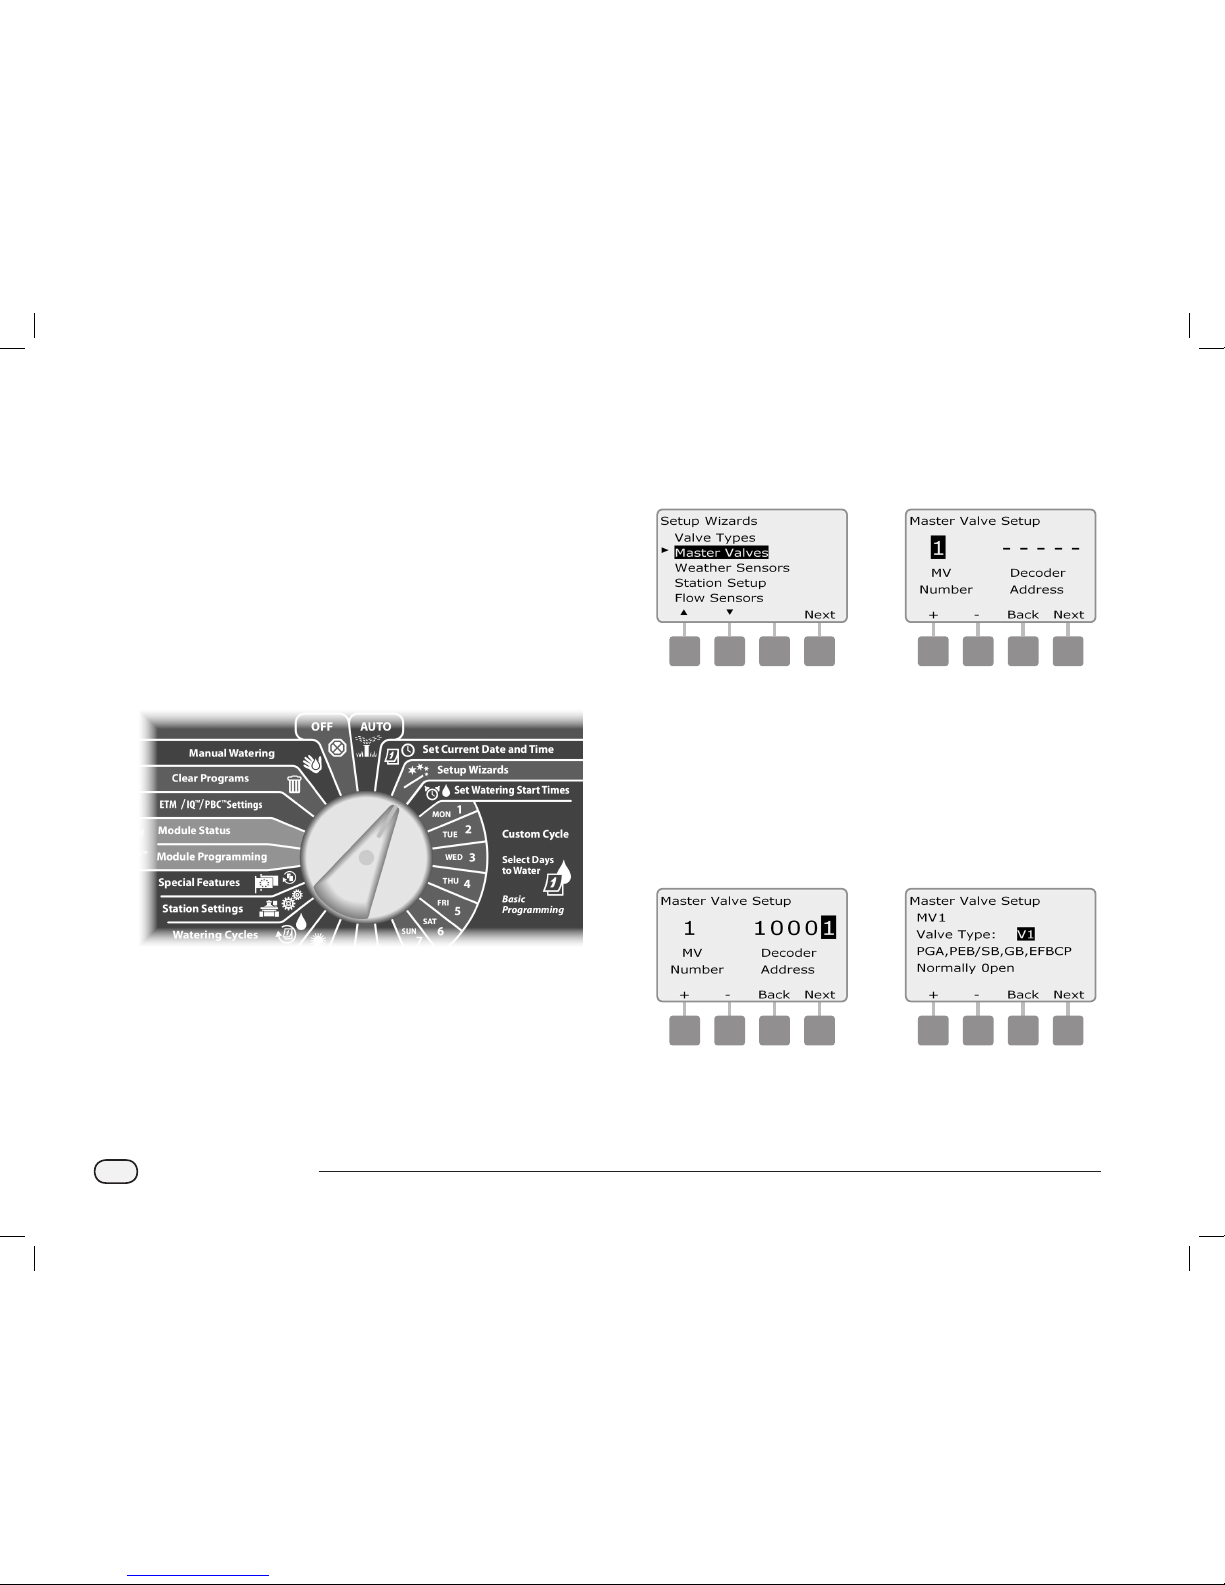
Master Valves Setup
The Master Valves Setup Wizard tells the ESPLXD-ET controller what
types of master valves (MVs) are used by your irrigation system.
The ESPLXD-ET supports up to 5 Master Valves or pumps. Each MV
must be connected to a Field Decoder and set up in the controller. Both
Normally Open master valves (NOMVs) and Normally Closed master
valves (NCMVs) are supported. Pumps are set up in the controller as
Master Valves. If you are installing a pump, follow the instructions
below, choosing the Pump Start Relay valve type in step 4. For wiring
instructions for a pump please see Appendix B.
NOTE: Follow the previous instructions to set up valve types
before setting up master valves.
Turn the controller dial to Setup Wizards.
A
The Setup Wizards screen appears. Press the Down Arrow button
to select Master Valves; then press Next.
B
The Master Valve Setup screen appears. Press the + and – buttons
to enter the desired MV number; then press Next.
1 2
C
Press the + and – buttons to enter the decoder address, pressing
Next and Back to navigate between the number setting fields;
then press Next.
NOTE: An alarm will show if a duplicate master valve decoder
address is entered for more than one MV. See Section A, Alarm
Conditions for more details.
D
Press the + and – buttons to select the type of valve you’re using
for this MV; then press Next.
3 4
NOTE: Rain Bird residential valves (DV and JTV series) are not
compatible with ESPLXD-ET decoders. Use Rain Bird commercial
valves (PGA, PEB, GB, EFB-CP and BPE series).
ESPLXD-ET user-manual (670504-01) artwork_120716.indb 22 7/16/2012 3:48:09 PM
Page 31

23
ESPLXD-ET Controller
E
Press the + and – buttons to select Normally Open or Normally
Closed for the MV; then press Next.
NOTE: Standard irrigation valves are Normally Closed (powered
to open). Normally Open valves are specialty valves that are
powered to close.
F
A confirmation screen appears asking you to assign MVs to
FloZones; press Next to continue.
5 6
G
On the FloZone assignment screen, press the + and – buttons to
associate the MV with the appropriate FloZone; then press Next.
NOTE: A FloZone can use more than one MV as it’s source(s), but
an MV can only be assigned to a single FloZone.
H
The Shared MVs screen shows the other MVs associated with the
selected FloZone.
7 8
Repeat this process to set up additional master valves. Be sure to
note each MV on your Programming Guide for future reference.
ESPLXD-ET user-manual (670504-01) artwork_120716.indb 23 7/16/2012 3:48:09 PM
Page 32

24
ESPLXD-ET Controller
Weather Sensors Setup
The Weather Sensor Setup Wizard tells the ESPLXD-ET controller what
types of weather sensors are used by your irrigation system.
Weather sensors are not required for the ESPLXD-ET controller, but they
increase functionality by allowing you to prevent or pause irrigation
based on changing weather conditions. The ESPLXD-ET can support up
to three decoder-based weather sensors and one local weather sensor.
See Section H, Weather Sensor Installation for more details.
Set Up Decoder-Based Weather Sensors
Turn the controller dial to Setup Wizards.
A
The Setup Wizards screen appears. Press the Down Arrow button
to select Weather Sensors then press Next.
B
The Weather Sensor Setup screen appears. Press the + and –
buttons to enter the desired weather sensor number; then press
Next.
1 2
C
Press the + and – buttons to enter the decoder address, pressing
Next and Back to navigate between the number setting fields;
then press Next.
NOTE: An alarm will show if a duplicate sensor decoder address
is entered for more than one weather sensor. See Section A, Alarm
Conditions for more details.
D
Press the + and – buttons to select the type of weather sensor.
(Rain, Wind, Freeze and Soil moisture sensors are supported); then
press Next.
3 4
ESPLXD-ET user-manual (670504-01) artwork_120716.indb 24 7/16/2012 3:48:10 PM
Page 33

25
ESPLXD-ET Controller
E
Press the + and – buttons to set the desired settling time; then
press Next.
5
NOTE: Settling time is how long a weather condition must last
before the controller takes action. For example, if a freeze sensor
has a 5 minute settling time then the temperature would have
to remain below the sensor’s threshold set point for 5 minutes
before irrigation is paused. Settling time can be set for immediate
(0 seconds) or up to 10 minutes long.
Repeat this process to set up additional weather sensors. Be sure
to note each weather sensor on your Programming Guide for
future reference.
Weather Sensors Bypassed/Active Switch
You can set the controller to ignore or obey input from weather sensors.
The Weather Sensors switch activates or bypasses all installed weather
sensors on your system. This switch only affects scheduled automatic
cycles. Manual watering ignores the local weather sensor.
F
On the controller front panel, slide the Weather Sensors switch to
Bypassed (to ignore) or Active (to obey).
6
Local Weather Sensors
Follow the manufacturer’s installation instructions. See Section H,
Weather Sensor Installation for more details.
Custom Pause Sensors
When a weather condition becomes true, a Custom Pause sensor will
stop irrigation and also stop the irrigation timer. When the condition
becomes false again, irrigation will start exactly where it left off. For
example, if a station is set to irrigate for 20 minutes but is shut down
by a Pause sensor after only 5 minutes; when the weather condition
becomes false again and after Resume, that station will receive the full
remaining 15 minutes of irrigation left on the timer.
Custom Prevent Sensors
When a weather condition becomes true, a Custom Prevent sensor
will stop irrigation but allow the irrigation timer to continue to run.
When the condition becomes false again, irrigation will resume at the
same time had the weather condition never occurred. For example, if
a station is set to irrigate for 20 minutes but is shut down by a Prevent
sensor after only 5 minutes, if the condition becomes false again after
10 minutes then that station will only receive the remaining 5 minutes
of irrigation left on the timer.
Sensor Types
Type Action
Rain Prevent
Wind Pause
Freeze Pause
Soil Moisture Prevent
Custom Pause Pause
Custom Prevent Prevent
ESPLXD-ET user-manual (670504-01) artwork_120716.indb 25 7/16/2012 3:48:10 PM
Page 34

26
ESPLXD-ET Controller
Station Setup
The Station Setup Wizard tells the ESPLXD-ET controller how many
and what type of stations are used by your irrigation system.
Each valve within an irrigation system is referred to as a station. Be sure
to note the location of each station on the Programming Guide so they
can be set up correctly in the controller.
The ESPLXD-ET controller also supports station setup by scanning
decoder barcode labels using the optional Programming Backup
Cartridge (PBC-LXD). See Section E for more details.
NOTE: Before setting up stations, follow the previous instructions
to set up valve types, master valves and weather sensors (if
present).
Turn the controller dial to Setup Wizards.
A
The Setup Wizards screen appears. Press the Down Arrow button
to select Station Setup then press Next.
B
The Station Setup screen appears. Press the + and – buttons to
enter the desired station number; then press Next.
1 2
C
Press the + and – buttons to enter the decoder address, pressing
Next and Back to navigate between the number setting fields;
then press Next.
NOTE: An alarm will show if a duplicate decoder address is
entered for more than one station. See Section A, Alarm Conditions
for more details.
D
Press the + and – buttons to select the type of valve you’re using
for this station; then press Next.
3 4
ESPLXD-ET user-manual (670504-01) artwork_120716.indb 26 7/16/2012 3:48:10 PM
Page 35

27
ESPLXD-ET Controller
NOTE: Station Priorities are only used when Station Sequencing
is set to Sequence by Station Priority. If you’re using the default
Sequence by Station Numbers, then skip the next step by pressing
Next.
E
Press the + and – buttons to set station priority. Each station can
be set to high, medium, low or Non-irrigation. Station priority is
especially important when multiple programs run simultaneously.
The controller will run all high priority stations first, then all
medium and finally all low priority, regardless of the station’s
program settings.
NOTE: Non-irrigation stations such as fountains and landscape
lighting receive priority to always run, regardless of weather
conditions.
F
The FloZone Assignment screen lets you assign stations to
FloZones if you’re using either the FloWatch or FloManager
features. Press the + and – buttons to see available FloZones, or if
you’re not using FloZones, select zero; then press Next.
5 6
NOTE: If you have already set up your MVs and FloZones, the MV
assignments for the currently selected FloZone will be shown in
the bottom portion of the screen.
G
The Weather Sensor Assignment screen lets you select which
weather sensors a particular station will obey. Press the + and –
buttons to set Y, for weather sensors which that station should
obey, or set N, for sensors which that station should ignore. Press
Next and Back to navigate between the WS fields.
7
NOTE: All weather sensors, both decoder-based and local, can
be turned on (Active) or off (Bypassed) using the Weather Sensors
switch on the controller front panel. See Weather Sensors Setup
for more details.
Repeat this process to set up additional stations.
ESPLXD-ET user-manual (670504-01) artwork_120716.indb 27 7/16/2012 3:48:10 PM
Page 36

28
ESPLXD-ET Controller
Flow Sensors Setup
The Flow Sensor Setup Wizard tells the ESPLXD-ET controller what
flow sensors are used by your irrigation system.
Flow sensors are not required for the ESPLXD-ET controller, but they
add functionality by alerting you to abnormally high or low flow rates
and even shutting down affected MVs or stations if flow rates exceed
set thresholds. The ESPLXD-ET can support up to five flow sensors.
Set Up Rain Bird Flow Sensor
Turn the controller dial to Setup Wizards.
A
The Setup Wizards screen appears. Press the Down Arrow button
to select Flow Sensors; then press Next.
B
The Flow Sensor Setup screen appears. Press the + and – buttons
to enter the desired flow sensor number; then press Next.
1 2
C
Press the + and – buttons to enter the decoder address, pressing
Next and Back to navigate between the number setting fields;
then press Next.
NOTE: An alarm will show if a duplicate sensor decoder address
is entered for more than one flow sensor. See Section A, Alarm
Conditions for more details.
D
Press the + and – buttons to select the Rain Bird flow sensor model
that you’re using.
3 4
E
The Master Valve and FloZone assigned to the flow sensor is
displayed. Press Next.
5
Repeat this process to set up additional flow sensors. Be sure to
note each flow sensor on your Programming Guide for future
reference.
ESPLXD-ET user-manual (670504-01) artwork_120716.indb 28 7/16/2012 3:48:11 PM
Page 37

29
ESPLXD-ET Controller
Set Up Custom Flow Sensor
Turn the controller dial to Setup Wizards.
A
The Setup Wizards screen appears. Press the Down Arrow button
to select Flow Sensors; then press Next.
B
The Flow Sensor Setup screen appears. Press the + and – buttons
to enter the desired flow sensor number; then press Next.
1 2
C
Press the + and – buttons to enter the decoder address, pressing
Next and Back to navigate between the number setting fields;
then press Next.
NOTE: An alarm will show if a duplicate sensor decoder address
is entered for more than one flow sensor. See Section A, Alarm
Conditions for more details.
D
Press the + and – buttons to select Custom; then press Next.
3 4
E
Press the + and – buttons to set the flow sensor K Factor, pressing
Next and Back to navigate between the number setting fields;
then press Next.
F
Press the + and – buttons to set the flow sensor Offset, pressing
Next and Back to navigate between the number setting fields;
then press Next.
5 6
ESPLXD-ET user-manual (670504-01) artwork_120716.indb 29 7/16/2012 3:48:11 PM
Page 38

30
ESPLXD-ET Controller
G
The Master Valve and FloZone assigned to the flow sensor is
displayed. Press Next.
7
Repeat this process to set up additional custom flow sensors. Be
sure to note each flow sensor on your Programming Guide for
future reference.
ESPLXD-ET user-manual (670504-01) artwork_120716.indb 30 7/16/2012 3:48:11 PM
Page 39

31
ESPLXD-ET Controller
Set Watering Start Times
Start times are the time(s) of day that the program begins.
You can assign up to eight Start Times to a single program. Multiple
Start Times allow you to run a program more than once on each day.
For example, if you’re growing new lawn seed, you may want to water
several times a day to keep the seedbed or top dressing damp.
NOTE: Start times apply to the entire program and not just to an
individual station.
NOTE: Enter Start Times that your landscape would need during
the hottest, driest part of the year. The ET Manager will change
the Seasonal Adjust percentages depending on the weather
conditions.
Turn the controller dial to Set Watering Start Times.
A
The Set Start Times screen appears. Press the + and – buttons to
set Start Time for the current program; then press Next.
Press and HOLD buttons to accelerate settings for hours and
minutes.
NOTE: If the desired program is not selected, use the Program
Select switch to change it. See Section B, Program Select Switch
for more details.
B
Press the + and – buttons to set the start number (1 through 8).
1 2
Change the Program Select switch and repeat this process to set
up additional Watering Start Times for other programs as desired.
NOTE: Cycle+SoakTM is an alternative method of dividing the
total Station Run Time into smaller cycle times. If you plan to use
Cycle+Soak, only a single Watering Start Time is required for each
program. See Section D, Cycle+Soak for more details.
ESPLXD-ET user-manual (670504-01) artwork_120716.indb 31 7/16/2012 3:48:12 PM
Page 40

32
ESPLXD-ET Controller
Select Days to Water
Watering Days are the specific days of the week on which
irrigation is allowed to take place.
The ESPLXD-ET controller can be programmed to irrigate on different
days, dates and cycles. Regardless of which Watering Cycle you set, the
controller will only irrigate on the days or dates that you select. For
additional information see Watering Cycles later in this section.
NOTE: The selections you make on the day positions of the
controller dial will carry over to the Watering Cycles day settings
and vice versa.
NOTE: Every day should be selected as a watering day if possible.
The ET Manager will change the Seasonal Adjust percentages
depending on the weather conditions.
Turn the controller dial to Mon 1.
A
The Custom screen appears. Press the Allow or Prevent buttons to
choose whether or not to allow irrigation starts to occur for that
day of the week.
NOTE: If the desired program is not selected, use the Program
Select switch to change it. See Section B, Program Select Switch
for more details.
B
Turn the controller dial to Tue 2 and repeat the process.
1 2
Repeat this process for all other days of the week in the program.
Then change the Program Select switch and repeat this process to
select Days to Water for other programs as desired.
ESPLXD-ET user-manual (670504-01) artwork_120716.indb 32 7/16/2012 3:48:12 PM
Page 41

33
ESPLXD-ET Controller
Station Run Times
Run Times are the number of minutes (or hours and minutes)
that each station runs.
Once your stations are set up, you will want to assign irrigation Run
Times for each one. Station Run Times are particular to programs; so
typically stations are set for a single program.
NOTE: Enter Run Times that your landscape would need during
the hottest, driest part of the year. The ET Manager will change
the Seasonal Adjust percentages to increase or decrease watering
run times depending on the weather conditions.
Turn the controller dial to Set Station Run Times.
A
The Set Run Times screen appears. Press the + and – buttons to
enter the station to program; then press Next.
NOTE: If the desired program is not selected, use the Program
Select switch to change it. See Section B, Program Select Switch
for more details.
B
Press the + and – buttons to set the Station Run Time. Range can
be from 00 hours, 00 minutes (no Run Time) up to 24:00 hours.
Press and HOLD buttons to accelerate settings for hours and
minutes.
1 2
Change the Program Select switch and repeat this process to set
up additional Station Run Times for other programs as desired.
ESPLXD-ET user-manual (670504-01) artwork_120716.indb 33 7/16/2012 3:48:12 PM
Page 42

34
ESPLXD-ET Controller
ET Manager Cartridge Configuration
Programming Overview
After installation, the ET Manager Cartridge must be configured to
receive weather data from a local weather station, and a watering
schedule based on actual site conditions needs to be determined.
A detailed Site Assessment is recommended to gather information
(such as sprinkler types, soil types and root depth) about the site
that will help determine the watering schedule.
The Rain Bird ET Manager Scheduler software program uses the
capabilities of your sprinkler system and actual site conditions
to help prepare a watering schedule and determine ET Manager
Cartridge and ESPLXD-ET controller settings.
After using the ET Manager Scheduler Software, use the Schedule
Report Summary generated from your inputs to help complete the
EZ Setup Wizard.
Programming, configuration, and operation of the ET Manager
Cartridge is ALL accomplished from the same dial position on the
LX Controller - ETM™ / IQ™ Settings or ETM™ / IQ™ /PBC™ Settings.
If you are NOT using the ET Manager Scheduler Software, you will
need to have the information listed below prior to programming the
cartridge. This information is available on the Weather ReachTM Signal
Provider Information Sheet found online at www.rainbird.com/wrsp or
through your distributor.
Inputs from the Weather ReachTM Signal Provider Information
Sheet:
Signal Provider Code
Weather Region number
Approximate Elevation
Average Daily Historical ET values for each Month (used as backup
data)
Irrigation Amounts per Program:
Irrigation Amount (in inches or mm) for each program
The Irrigation Amount setting is the amount of water applied by
the irrigation system per program start time. If necessary, Irrigation
Amounts can be manually calculated. See the Irrigation Amount and
Station Run Times section in the Appendix for more details.
ET Manager Programming Software
The Rain Bird® ET Manager Programming Software (ETMPS) is an
optional program (available for purchase) that uses your personal
computer to simplify ET Manager programming. This application allows
the user to transfer ET Manager Scheduler settings directly from the PC
to an ET Manager Cartridge via a USB cable.
Refer to the ET Manager Programming Software Operation Guide
located on the Resource CD for more information.
Programming Checklist
When programming the ETC Manager Cartridge for the first time, it is
recommended that you complete the following steps in order.
For your convenience a check-off box is provided for each step:
Conduct Site Assessment .......................................................... Page 35
Install Scheduler Software ........................................................ Page 35
Create Schedule Report ............................................................. Page 36
Run EZ Setup Wizard ................................................................... Page 40
Test Weather Signal ..................................................................... Page 41
Set up Rain Gauge (optional)................................................... Page 41
Check ESPLXD-ET Controller Settings ..................................Page 41
Set Controller to Auto
ESPLXD-ET user-manual (670504-01) artwork_120716.indb 34 7/16/2012 3:48:12 PM
Page 43

35
ESPLXD-ET Controller
Irrigation Site Assessment
A detailed site assessment will help the ET Manager Scheduler software
determine an effective watering schedule. Use the ET Manager Site
Assessment Worksheet located on the Resource CD to help complete
the site assessment.
Factors to consider while assessing the irrigation site:
Is my irrigation system designed so that each valve has only one
general plant type assigned to it? What is that plant type?
Are all my rotors/sprays achieving head to head coverage? What
level of distribution and efficiency am I achieving at the site?
What sprinkler types am I using? Rotors? Sprays? Drip?
What type(s) of soil are present on the property? If more than one
type, where is each located in relation to the hydro-zones?
Is the plant life mature or young? How deep are the roots for each
plant type?
What, if any, areas are on a slope?
Is my landscape generally healthy?
Answers to the preceding questions and information gathered from
completing the Site Assessment Worksheet will help guide you through
the ET Manager Scheduling Software.
NOTE: The ET Manager Cartridge will not automatically
compensate for irrigation design errors or faulty sprinkler
equipment.
ET Manager Scheduler Software
ET Manager Resource CD
Included in the purchase of your ET Manager Cartridge is a FREE
Resource CD. This CD includes the ET Manager Scheduler Software,
Tutorials, Worksheets, Application Information, Designer Resources,
and more.
It is highly recommended to use the ET Manager Scheduler Software
before starting any programming of your ET Manager Cartridge.
Installing the Software
A
Insert the ET Manager Resource CD into the CD / DVD drive on
your computer.
B
Double-click the ETMiCD.exe file.
C
Select the “Install ET Manager Scheduler” option to install the
Scheduling Software.
ESPLXD-ET user-manual (670504-01) artwork_120716.indb 35 7/16/2012 3:48:13 PM
Page 44

36
ESPLXD-ET Controller
Create a Schedule Report
The ET Manager Scheduler Operation Guide, which is located on the Resource CD or available in the Help menu, contains detailed and helpful
instructions on creating a Schedule Report and should be used as a reference when creating a Schedule Report. Use the information from your Site
Assessment Worksheet to fill in the Schedule Report tabs.
a
A
From the ET Manager Scheduler home screen, select “New Schedule ETC-LX”.
ESPLXD-ET user-manual (670504-01) artwork_120716.indb 36 7/16/2012 3:48:13 PM
Page 45

37
ESPLXD-ET Controller
B
The Site tab appears. Complete every field, then click “Next” in the bottom right corner.
NOTE: As each tab is completed, a new tab is created at the top of the page for future reference.
REPEAT Step 2 for each new tab until all tabs are complete.
b
ESPLXD-ET user-manual (670504-01) artwork_120716.indb 37 7/16/2012 3:48:13 PM
Page 46

38
ESPLXD-ET Controller
C
Once you have completed all the tabs, a summary tab will be created. Save the Schedule Report to your computer. You can create a different
schedule for as many irrigation sites as you need, and retrieve any file in the future to add or update the schedule.
3
ESPLXD-ET user-manual (670504-01) artwork_120716.indb 38 7/16/2012 3:48:13 PM
Page 47

39
ESPLXD-ET Controller
D
Print and refer to the Schedule Report to program the ET Manager Cartridge using the EZ Setup Wizard.
NOTE: If you have purchased the ET Manager Programming Software, the summary from the Scheduler Software can be sent directly to the
ET Manager Cartridge through your computer. Refer to the ET Manager Programming Software Operation Guide located on the Resource CD
for more information.
4
ESPLXD-ET user-manual (670504-01) artwork_120716.indb 39 7/16/2012 3:48:14 PM
Page 48

40
ESPLXD-ET Controller
EZ Setup Wizard
It is highly recommended to use the ET Scheduler Software to create a
Schedule Report before programming your ET Manager Cartridge.
The Schedule Report contains all the Signal Provider Code, Weather
Region, Elevation, Average Daily Historical ET values, and Irrigation
Amount Per Program Start Time values you will need to use the EZ
Setup Wizard.
NOTE: If you are NOT using the ET Manager Scheduler Software,
this information is available on the Weather ReachTM Signal
Provider Information Sheet found online at www.rainbird.com/
wrsp or through your distributor.
To use the EZ Setup Wizard follow these steps:
Turn the controller dial to ETMTM/IQTM (or ETMTM/IQTM/PBCTM)
Settings.
NOTE: If the EZ Setup Wizard is NOT displayed, press the EZ
button from the Moisture Levels screen.
A
The EZ Setup Wizard appears. Press Next.
B
The Signal Provider Code screen appears. Press the + and -
buttons to enter the value for A. Press Next to move to the next
letter. When the value for every letter is entered, press Next.
a b
C
The Weather Region screen appears. Press the + and - buttons to
enter the Weather Region number; then press Next.
D
The Units screen appears. Press the + and - buttons to select
English or Metric; then press Next.
c 4
E
The Elevation screen appears. Press the + and - buttons to enter
the elevation for the irrigation site; then press Next.
F
The Average Daily Historical ET screen appears. Press the + and -
buttons to enter the daily Historical ET average for January. Press
Next to move to the next month. When the ET average for every
month is entered, press Next.
e f
NOTE: Historical ET data will be used if the “ET Source” is set to
“Historical”, in the event of a power outage, or as backup to paging
signal interference. The ET Manager CAN be used with historical
data only – instead of receiving data from a weather station.
ESPLXD-ET user-manual (670504-01) artwork_120716.indb 40 7/16/2012 3:48:14 PM
Page 49

41
ESPLXD-ET Controller
G
The Irrigation Amount Per Program Start Time screen appears.
Press the + and - buttons to enter the Irrigation Amount for
Program A. Press Next to move to the next program. When the
Irrigation Amount for every program is entered, press Done.
NOTE: To manually calculate Irrigation Amounts, see the
Irrigation Amount and Station Run Times section in the Appendix.
g
NOTE: Programs which you do NOT want watered based on
evapotranspiration (such as landscape lighting or a fountain
feature) must be set to “Non ET”. This is set by pressing the - button
until 0.00 is displayed, then pressing the - button one more time
to display “Non ET”.
Complete Setup
Test Weather Signal
To verify that your ET Manager Cartridge is ready to receive weather
data, check the signal and activation status by following the steps in
the Weather Signal section.
Setup a Local Rain Gauge
If you have installed the Local Rain Gauge (ETM-RG), you must set the
ET Manager Cartridge Rain Source to “ETM-RG” by following the steps
in the Rain Source section.
ESPLXD-ET Controller Settings
After the ET Manager Cartridge is setup, the current program settings
in the ESPLXME-ET Controller should be updated or verified based on
the Schedule Report and the following guidelines.
ESPLXD-ET Controller programming guidelines:
Irrigate EVERYDAY of the week if possible.
Enter start and run times that your landscape would need during
the hottest, driest part of the year.
Set Seasonal Adjust to 100%.
Remember, the ET Manager will change the Seasonal Adjust
percentages to increase or decrease watering run times depending on
the weather conditions.
NOTE: It is important to keep all run times for a valve on one
Program. For example, do not turn on Valve 1 in both Programs
A and B.
ESPLXD-ET user-manual (670504-01) artwork_120716.indb 41 7/16/2012 3:48:14 PM
Page 50

42
ESPLXD-ET Controller
this page intentionally left blank
ESPLXD-ET user-manual (670504-01) artwork_120716.indb 42 7/16/2012 3:48:15 PM
Page 51

43
ESPLXD-ET Controller
Section C - System Diagnostics
Test All Stations/Check System
Review and confirm scheduled irrigation Programs, Program
Run Times and Station Run Times.
Confirm Programs
The ESPLXD-ET controller can make calculations and provide feedback
on Start Times and total Run Times for programs and stations.
Program Summary
Review program information for all programs:
Turn the controller dial to Test All stations/Check System.
A
The System Diagnostics screen appears with Confirm Programs
selected; press Next.
B
The Confirm Programs screen appears with Program Summary
selected; press Next.
1 2
C
The Program Summary screen appears, providing a summary of
Run Times, Start Times and water days for all programs.
3
NOTE: In the above example, Program A will run because it has
Station Run Times, Start Times and Watering Days all programmed,
as indicated by the “Y” in each column for PGM A.
Program B however will not run as it is missing both the Start Time
and Water Days programming, as indicated by the “N” in each of
those columns for PGM B. Programs C and D will not run since
both lack Station Run Times, Start Times and Watering Days.
ESPLXD-ET user-manual (670504-01) artwork_120716.indb 43 7/16/2012 3:48:15 PM
Page 52

44
ESPLXD-ET Controller
Review Program
Review program information for a station:
Turn the controller dial to Test All stations/Check System.
A
The System Diagnostics screen appears with Confirm Programs
selected; press Next.
B
The Confirm Programs screen appears. Press the Down Arrow
button to select Review Program; then press Next.
a b
C
The Watering Start Times review screen appears with start times
displayed for the currently selected program. Press Next.
NOTE: If the desired program is not selected, use the Program
Select switch to change it. See Section B, Program Select Switch
for more details.
D
The Watering Day Cycle review screen appears with the current
watering day cycle displayed. Press Next.
c d
E
The Watering Starts Allowed On review screen appears with
allowed watering days displayed. Press Next.
F
The Run Times review screen appears with run times for each
station displayed. Press Next.
e f
ESPLXD-ET user-manual (670504-01) artwork_120716.indb 44 7/16/2012 3:48:16 PM
Page 53

45
ESPLXD-ET Controller
G
The Seasonal Adjust review screen appears with seasonal
adjustment percentage displayed. Press Next.
H
The Seasonal Adjust by Month review screen appears with seasonal
adjustment percentage displayed for the first allowed month.
Press the + and – buttons to see Seasonal Adjust percentage for
other months as desired; then press Next.
g h
I
The Rain Delay review screen appears with number of days
remaining until next watering date displayed. Press Next.
J
The Calendar Day Off review screen appears with all selected
calendar days off displayed. Press Next.
i j
K
The Station Delay review screen appears with delay time between
stations displayed. Press Next.
L
The Cycle+Soak Minutes review screen appears with the
Cycle+Soak times for each station displayed. Press Next.
k l
M
The Master Valve Assignment review screen appears with MV and
associated FloZone information displayed. Press Next.
N
The Weather Sensor Assignment review screen appears with
stations that use sensor override displayed. Press Next.
m n
ESPLXD-ET user-manual (670504-01) artwork_120716.indb 45 7/16/2012 3:48:16 PM
Page 54

46
ESPLXD-ET Controller
O
The Water Window review screen appears with water window
open time, close time and duration displayed. Press Next.
P
The Maximum Number of SimulStations for program review
screen appears with the maximum number of stations that can
operate simultaneously for that program are displayed. Press
Next.
o p
Q
The Maximum Number of SimulStations for controller review
screen appears with the maximum number of stations that can
operate simultaneously for that controller are displayed. Press
Next.
R
The Backup Programs review screen appears with the Contractor
Default backup program status displayed. Press Next.
q r
ESPLXD-ET user-manual (670504-01) artwork_120716.indb 46 7/16/2012 3:48:16 PM
Page 55

47
ESPLXD-ET Controller
Program Run Time
Review total Run Time for an individual program:
Turn the controller dial to Test All stations/Check System.
A
The System Diagnostics screen appears with Confirm Programs
selected; press Next.
B
The Confirm Programs screen appears. Press the Down Arrow
button to select Program Run Time; then press Next.
1 2
C
The Total Run Time screen appears and total Run Time is displayed
for the currently selected program.
NOTE: If the desired program is not selected, use the Program
Select switch to change it. See Section B, Program Select Switch
for more details.
3
NOTE: For stations set up for Cycle+Soak, the Cycle Time (when
irrigation is occurring) will be included in Program Run Time
calculations but Soak times will NOT be included. See Section D,
Cycle+Soak, for more details.
Change the Program Select switch and repeat this process to
review and confirm Program Run Times for other programs as
desired.
ESPLXD-ET user-manual (670504-01) artwork_120716.indb 47 7/16/2012 3:48:17 PM
Page 56

48
ESPLXD-ET Controller
Station Run Time
Review total Run Time for all stations:
Turn the controller dial to Test All stations/Check System.
A
The System Diagnostics screen appears with Confirm Programs
selected; press Next.
B
The Confirm Programs screen appears. Press the Down Arrow
button to select Station Run Time; then press Next.
1 2
C
The Sta Run Time Per Day screen appears with total Run Time
displayed for the currently selected station in all four programs.
For programs where a particular station is not used no runtime
will show.
D
Press the + and – buttons to advance and see additional stations.
3 4
NOTE: Soak times for stations set up with Cycle+Soak are not
included in the Station Run Time calculations. See Section D,
Cycle+Soak for more details.
ESPLXD-ET user-manual (670504-01) artwork_120716.indb 48 7/16/2012 3:48:17 PM
Page 57

49
ESPLXD-ET Controller
Test All Stations
You can test all stations connected to your controller by running each
of them in station number sequence.
Sometimes this is useful after installation, for general maintenance or
as a first step in troubleshooting your system.
NOTE: Only stations with programmed run times are included in
the Test All Stations operation.
Turn the controller dial to Test All stations/Check System.
A
The System Diagnostics screen appears. Press the Down Arrow
button to select Test All stations; then press Next.
B
The Test All stations screen appears. Press the + and – buttons to
adjust the Test Run Time (adjustable from 1 to 10 minutes) per
station; then press Run.
1 2
C
A confirmation screen appears.
D
Once Run is pressed, stations can be monitored and advanced by
turning the dial to the AUTO position and using the Adv button.
Press the + and – buttons to increase or decrease Run Time
minutes for the current station.
3 4
ESPLXD-ET user-manual (670504-01) artwork_120716.indb 49 7/16/2012 3:48:17 PM
Page 58

50
ESPLXD-ET Controller
2-Wire Path Diagnostics
Although finding the exact location of issues in the field often requires
some amount of in-the-field troubleshooting with a clamp meter, the
controller has some built-in features to help you narrow down the
possible issues.
Before beginning 2-Wire path diagnostics, it may be helpful to take the
following steps to eliminate possible other causes:
1. Review and Confirm Programs to check station priorities.
If a suspect station isn’t watering as scheduled, the underlying
issue could be programming-related. The ESPLXD-ET controller
irrigates based on the station priorities. If multiple programs are
running, higher priority stations will irrigate prior to medium
priority stations, and medium priority stations will irrigate prior to
lower priority stations. See Section B, Station Setup and Confirm
Programs for more details.
2. Run a Test All Stations check to ensure valves are working properly.
The Test All Stations manual test will take priority above preprogrammed irrigation and allow you to determine which stations
are working properly. See Test All Stations for more details.
Short Finding
The ESPLXD-ET controller can quickly determine if shorts are present
on the two-wire path.
Turn the controller dial to Test All stations/Check System.
A
The System Diagnostics screen appears. Press the Down Arrow
button to select 2-Wire Diagnostics; then press Next.
B
The 2-Wire Diagnostics screen appears with Short Finding
selected; press Next.
1 2
ESPLXD-ET user-manual (670504-01) artwork_120716.indb 50 7/16/2012 3:48:18 PM
Page 59

51
ESPLXD-ET Controller
C
The Short Finding Mode screen will appear. Press the On button
to begin the Short Finding process.
D
A confirmation screen appears to warn that irrigation will be
disabled during the Short Finding process. Press and hold Yes to
proceed with Short Finding.
3 4
E
A confirmation screen appears, stating that irrigation has been
disabled.
F
A second confirmation screen appears showing that Short Finding
is now On and in progress.
5 6
NOTE: Use a clamp meter to isolate and repair shorts in the
two-wire path. Once repairs are finished, be sure to return to the
controller and turn the dial to exit short finding mode. Irrigation
can not occur until short finding mode has been cancelled.
ESPLXD-ET user-manual (670504-01) artwork_120716.indb 51 7/16/2012 3:48:18 PM
Page 60

52
ESPLXD-ET Controller
Decoder Test
The ESPLXD-ET controller may be able to provide specific information
on particular decoders.
Turn the controller dial to Test All stations/Check System.
A
The System Diagnostics screen appears. Press the Down Arrow
button to select 2-Wire Diagnostics; then press Next.
B
The 2-Wire Diagnostics screen appears. Press the Down Arrow
button to select station Decoder Test; then press Next.
1 2
C
A confirmation screen appears; press Start.
D
A second confirmation screen appears to confirm the Decoder
Test is In Progress.
3 4
E
The Decoder Test Result screen appears. If no issues are found, the
screen will display a No Issues Found message; press Back.
F
If the controller found issues with one or more decoders, the
information will be displayed. If multiple issues are found, this
may require more than a single screen. Press the Next button to
continue through the issue screens, noting the issues as you go.
5 6
ESPLXD-ET user-manual (670504-01) artwork_120716.indb 52 7/16/2012 3:48:18 PM
Page 61

53
ESPLXD-ET Controller
this page intentionally left blank
ESPLXD-ET user-manual (670504-01) artwork_120716.indb 53 7/16/2012 3:48:18 PM
Page 62

54
ESPLXD-ET Controller
Line Survey
If you determine that one or more stations are not working properly,
then before going into the field to address the issue you can take steps
at the controller starting with a Line Survey.
Calculate System Amperage
For the Line Survey it’s helpful to know what the total (approximate)
amperage for your system should be. This can be estimated using the
following formula:
System Amperage Calculation
Quantity of single address station decoders X 0.5 mA
+ Quantity of multiple address station decoders X 1.0 mA
+ Quantity of active decoders X 17.5 mA
+ Quantity of other SD210 decoders X 8.0 mA
= Approximate total system amperage (in mA)
* Single address station decoders include the FD-101 & FD-102 decoders
** Multiple address station decoders include the FD-202, FD-401 & FD-601 decoders
Run a Line Survey
Once you have calculated the approximate amperage for your system,
use the following steps to perform a line survey for your system:
Turn the controller dial to Test All stations/Check System.
A
The System Diagnostics screen appears. Press the Down Arrow
button to select 2-Wire Diagnostics; then press Next.
B
The 2-Wire Diagnostics screen appears. Press the Down Arrow
button to select Line Survey; then press Next.
1 2
ESPLXD-ET user-manual (670504-01) artwork_120716.indb 54 7/16/2012 3:48:19 PM
Page 63

55
ESPLXD-ET Controller
C
The Line Survey results will be displayed on a single screen.
3
Interpreting Line Survey Results
A and B represent the two phases of the 2-Wire control system (not
the two wires in the 2-Wire path). The Voltage1 reading for a normal
healthy system is typically in the +14.0 to + 16.0 range for both A and
B. The Voltage2 reading is typically in the -20.0 to -21.0 range for both
A and B. The Voltage1 reading should be approximately equal for A and
B, and the Voltage2 reading should also be approximately equal for A
and B.
If the Voltage1 or Voltage2 readings are 0.0 for either A or B, then one of
the wires on the 2-Wire path are probably shorted to ground.
Milliamperage (mA) varies with the number of decoders installed on
your system and should be approximately equal to the amperage
calculations detailed above for both A and B.
Three flags also appear below the voltage and amperage readings. For
a normal healthy system the flags should typically read OK; abnormal
readings will cause the flag to change to Not OK.
If the temperature flag reads Not OK, discontinue irrigation and allow
your system to cool for an hour or more before repeating the line survey.
If the Current or Overload flags read Not OK, short circuits within your
2-Wire path are typically to blame. However, a Not OK Current flag can
also be due to one or more misconfigured decoders, and a Not OK
Overload flag can be caused by a dead short.
If any of the Line Survey results are irregular, it’s best to attempt to
carefully check the 2-Wire path for short circuits and rerun the test.
If you have checked your 2-Wire path and believe it to be in good
condition, checking specific decoders can often help identify specific
issues (see Ping Decoders below).
ESPLXD-ET user-manual (670504-01) artwork_120716.indb 55 7/16/2012 3:48:19 PM
Page 64

56
ESPLXD-ET Controller
Ping Decoders
The ESPLXD-ET controller can provide detailed information on a
specific decoder.
This can be helpful to narrow a repair trip into the field to one decoder
or a set of decoders on a particular branch of the two wire path. You can
ping a Station decoder, MV decoder or Sensor decoder. Interpretation
of the results is essentially the same for station and MV decoders.
Ping Station or MV Decoder
Turn the controller dial to Test All stations/Check System.
A
The System Diagnostics screen appears. Press the Down Arrow
button to select 2-Wire Diagnostics; then press Next.
B
The 2-Wire Diagnostics screen appears. Press the Down Arrow
button to select Ping Decoders; then press Next.
1 2
C
The Ping Decoder screen appears with Station Decoder selected.
Press Next to ping a Station decoder (or else press the Down
Arrow button to select MV Decoder); then press Next.
D
The Ping Station (or MV) Decoder screen appears. Press the + and
– buttons to select the desired Station (or MV); then press Ping.
3 4
E
The controller will ping the selected decoder and report;
amperage Prior to the ping, plus In-Rush and Holding current, all
in milliamps.
5
Interpreting Ping Results
The Prior amperage is based on line current for your system and
should be about the same as the previously Calculated System
Amperage.
The In-Rush current reading is typically less than 200 mA. A reading
of 100 mA or less typically indicates an open output, often caused
by a poor connection from the solenoid to the valve.
ESPLXD-ET user-manual (670504-01) artwork_120716.indb 56 7/16/2012 3:48:19 PM
Page 65

57
ESPLXD-ET Controller
The Holding current is typically 10 mA or less. A reading of 50 mA or
greater typically indicates a shorted decoder output.
Ping Sensor Decoder
Turn the controller dial to Test All stations/Check System.
A
The System Diagnostics screen appears. Press the Down Arrow
button to select 2-Wire Diagnostics; then press Next.
B
The 2-Wire Diagnostics screen appears. Press the Down Arrow
button to select Ping Decoders; then press Next.
1 2
C
The Ping Decoder screen appears. Press the Down Arrow button
to select Sensor Decoder; then press Next.
D
The Ping Sensor Decoder screen appears. Press the + and –
buttons to select the desired Sensor; then press Ping.
3 4
E
The controller will ping the selected sensor decoder and report
the D-Level and Reading. Typically these will show as OK. If a Not
OK reading is reported, check the connections to that sensor
decoder or replace it.
5
ESPLXD-ET user-manual (670504-01) artwork_120716.indb 57 7/16/2012 3:48:20 PM
Page 66

58
ESPLXD-ET Controller
Weather Sensor Status
Turn the controller dial to Test All stations/Check System.
A
The System Diagnostics screen appears. Press the Down Arrow
button to select Wthr Sensor Status; then press Next.
B
The Weather Sensor Status screen appears, showing installed
weather sensors and their current status.
1 2
Each sensor will display one of five status conditions:
a. Monitoring - sensor is active monitoring current weather
conditions.
b. <Inactive> installation has not been completed or the sensor is
not linked to any stations.
c. PAUSING - current weather condition has caused the sensor to
pause irrigation.
d. PREVENTING - current weather condition has caused the sensor
to prevent irrigation.
e. BYPASSED - sensor switch is in the Bypassed position and the
sensor is not monitoring current weather conditions.
NOTE: If current weather conditions are sufficient for a weather
sensor to prevent or pause irrigation, then a message appears on
the Auto screen. This is not considered an alarm, so the controller
alarm light will not illuminate.
ESPLXD-ET user-manual (670504-01) artwork_120716.indb 58 7/16/2012 3:48:20 PM
Page 67

59
ESPLXD-ET Controller
Master Valve Status
Turn the controller dial to Test All stations/Check System.
A
The System Diagnostics screen appears. Press the Down Arrow
button to select Wthr Sensor Status; then press Next.
B
The MV Status screen appears, showing installed master valves
and their current status.
1 2
ESPLXD-ET user-manual (670504-01) artwork_120716.indb 59 7/16/2012 3:48:20 PM
Page 68

60
ESPLXD-ET Controller
Message Probable Cause Action
1 Hour Rain Interrupt If rainfall over the last hour is at or above the 1 Hour
Rain setting, watering is interrupted. Once the total
rainfall in the last hour drops below the 1 Hour Rain
setting, the 1 Hour Rain Interrupt will clear.
NONE. Watering will resume when the total effective rainfall within an
hour falls below your set threshold.
24 Hour Rain Interrupt If rainfall over the last 24 hours is at or above the
Rain Interrupt setting, watering is interrupted. Once
the total rainfall in the last 24 hours drops below the
Rain Interrupt setting, the 24 Hour Rain Interrupt will
clear.
NONE. Watering will resume when the total effective rainfall within 24
hours falls below your set threshold.
Display Completely Blank Possible power failure or unit reset during firmware
upgrade.
Do not remove power or reset the ETC unit for 10 min. or until firmware
upgrade is complete.
Historical ET is NOT set The ET Manager Cartridge uses historical ET values
set by the user as a backup in the event weather
signal service is not available. If no Historical ET has
been programmed, this message is displayed.
Monthly historical ET values for your area are available on the Weather
Reach
TM
Signal Provider information sheet and from the Historical ET
database included in the ET Manager Cartridge Resource CD. Look
up your city and state, then program the monthly values into the ET
Manager Cartridge (see the Set Historical ET section).
Local Rain Gauge Input
Failure Check Wiring
If you are using a Rain Gauge to collect rain data and
there is a problem with the input to the Rain Tip Wire
terminal then this message is displayed.
Verify the on-site Rain Gauge is installed and wired properly. Check the
length of the Rain Gauge wire for cuts or nicks and replace any damaged
wire. Check the Rain Gauge for damage. Once any wiring problem is
corrected, turn the dial to the ETM™/IQTM or ETM™/IQTM/PBC
TM
position.
From the Moisture Levels screen, press the Alrt button to view the Alert
Message and press CLEAR. If the problem persists, the Alert will return.
ET Manager Alert Messages
When the ET Manager generates a Weather Interrupt or detects a
problem or fault in the system, an Alert Message is displayed. The
following table lists all the possible Alert Messages (in alphabetical
order) and the appropriate course of action to resolve the issue.
NOTE: Pressing Ok when an Alert Message is displayed will
temporarily clear the message from the display, but does not
solve the problem. Active alerts can be viewed by pressing Alrt
on the Moisture Levels screen.
ESPLXD-ET user-manual (670504-01) artwork_120716.indb 60 7/16/2012 3:48:20 PM
Page 69

61
ESPLXD-ET Controller
Message Probable Cause Action
Low Weather Signal
Accuracy
If data reception accuracy is less than 50% then the
Low Weather Signal Accuracy message is displayed.
There are 4 reasons the Weather Signal Accuracy
may be low:
The Signal Accuracy % is based on the last 16 days,
so if there was a period of no data, it will take time
for the % to increase.
Signal service has been canceled by the Weather
ReachTM Signal Provider.
The Signal Provider is having technical difficulties.
Weak radio reception.
Weak radio reception or radio interference may cause missed weather
signals. A Remote Mounting Kit may be needed to improve radio
reception. Contact your Rain Bird Distributor to find out more information
about an optional Remote Mounting Kit (ETM – RMK). Turn the dial to
the ETM™/IQTM or ETM™/IQTM/PBC
TM
position. From the Moisture Levels
screen, press the Alrt button to check for other Alert Messages and refer
to trouble shooting for applicable message(s). It may be that your WRSP
had system problems that interrupted the weather signal for a period of
time. If data continues to be missed for several days, contact your WRSP,
to check if there has been interruption in the weather signal.
NOTE: A calculated ET value based on previously received weather
information and the historical ET programmed in your ET Manager will
be used.
No Paging Signal Detected The ET Manager Cartridge verifies the presence of
the Paging Signal every minute. If the paging signal
is not detected after a period of time, this message
will be displayed. There are 3 reasons the weather
signal would not be detected;
The radio needs to be reset.
The Signal Provider Code has not been set correctly.
Weak radio reception.
If this Alert Message occurs, wait two minutes to ensure the weather
signal will not be detected within the next few minutes. If the Alert
Message remains, follow these steps:
Follow the steps in the Weather Signal section to test the Weather Signal.
From the Weather Signal screen, press More, then Reset, then Back.
Wait two minutes. If the Signal changes from “Not Detected” to
“Detected,” your paging signal has been restored.
Verify the Signal Provider Code is programmed correctly. If the code was
programmed incorrectly, enter correct values and repeat steps 1 and 2 as
needed.
If the Signal Provider Code is programmed correctly and the Alert
Message remains, an external mounting kit may be needed to improve
radio reception. Contact your Rain Bird Distributor to find out more
information about an optional Remote Mounting Kit (ETM-RMK).
ESPLXD-ET user-manual (670504-01) artwork_120716.indb 61 7/16/2012 3:48:21 PM
Page 70

62
ESPLXD-ET Controller
Message Probable Cause Action
No Signal, Service
Activation Required, Please
Contact Signal Provider
A Weather ReachTM Signal Provider (WRSP) may
offer weather signal service on a subscription basis,
requiring activation. If the terms of service have not
been met the WRSP may deactivate signal reception.
In this case the ET Manager Cartridge will continue
to function utilizing Historical ET.
Contact your Weather ReachTM Signal Provider to establish services and
activate your signal. To find your WRSP, go online at www.rainbird.com/
wrsp or contact your Rain Bird Distributor.
Radio Initialization
Failure Press ET Manager
Cartridge Reset
Your ET Manager Cartridge uses a radio to receive
the weather signal. If the ET Manager Cartridge
is experiencing radio initialization problems, this
message will appear.
The radio may need to be re-initialized. To do so, press the Reset button
on the ET Manager Cartridge. If the problem persists, the ET Manager
Receiver must be replaced. Contact your Rain Bird Distributor.
Radio Failure Your ET Manager Cartridge uses a radio to receive
the weather signal. If the ET Manager Cartridge has
detected a radio failure, this message will appear.
The radio may need to be re-initialized. To do so, press the Reset button
on the ET Manager Cartridge. If the problem persists, the ET Manager
Receiver must be replaced. Contact your Rain Bird Distributor.
Signal Provider Code is
NOT set
The ET Manager Cartridge has not been
programmed with a Signal Provider Code.
Enter the appropriate Signal Provider Code. To obtain your Signal
Provider Code, go on line to www.rainbird.com/wrsp or contact your Rain
Bird Distributor.
Temperature Interrupt If the hourly weather signal contains air
temperatures that reach or are below the
Temperature Interrupt setting, watering is
interrupted. Once the air temperature rises above
the programmed interrupt setting as received in the
hourly weather signal, the Temperature Interrupt will
clear.
NONE. Watering will resume when the temperature exceeds your set
threshold.
Wind Interrupt If the hourly weather signal contains wind speeds
that reach or exceed the Wind Interrupt setting,
watering is interrupted. Once the wind speed
decreases below the programmed interrupt setting,
as received in the hourly weather signal, the Wind
Interrupt will clear.
NONE. Watering will resume when the wind slows down below your set
threshold.
ESPLXD-ET user-manual (670504-01) artwork_120716.indb 62 7/16/2012 3:48:21 PM
Page 71

63
ESPLXD-ET Controller
Landscape Condition Issues
If you notice the landscape is too dry or wet, the following table lists
suggestions to help resolve the issue. The most important factor for
consideration is the health of the landscape.
NOTE: If you need assistance or advice on landscape issues, call
the ET Manager Hotline at: 1-877-351-6588.
Condition Probable Cause Action
Dry or wet spots in the
landscape
Dry and wet spots are often caused by inefficiency in
the distribution of water by your irrigation system.
Check the sprinkler heads near the spot that is dry or wet. It is possible
that a broken or clogged head or nozzle needs to be replaced.
Check the layout of your sprinkler design. Proper sprinkler designs should
ensure head to head coverage. Changing a nozzle size, adding or moving
a head may improve water distribution.
If steps 1 and 2 do not solve the problem, check the run times in the ESPLX Controller. Adding or subtracting time for the station where the spot
appears may compensate for minor irrigation system inefficiencies.
NOTE: Manual watering to a dry spot will speed recovery. Adjust the run
time using small intervals of time, 1 or 2 minutes. Monitor the spot after
an adjustment has been made. This will help determine what run time is
optimal to prevent dry or wet spots.
Entire station or zone is
too dry or wet
Stations or zones are the distinct areas in your
landscape watered by one valve. Dry or wet stations
or zones are often caused by a run time problem
programmed in the controller.
Start the zone to confirm that the zone is operating properly.
Check the run time on your ESP-LX Controller for the station. The dry or
wet station can be caused by too little or too much watering.
Manually water the station if it is too dry to get it the water it needs.
Adjust the run time using small intervals of time, 1 or 2 minutes. This will
help determine what run time is optimal to prevent dry or wet stations.
ESPLXD-ET user-manual (670504-01) artwork_120716.indb 63 7/16/2012 3:48:21 PM
Page 72

64
ESPLXD-ET Controller
Condition Probable Cause Action
Several stations in a
program are too dry or
too wet
There are two possible causes for all the stations in a
program being to dry or too wet:
A run time problem programmed in your controller.
The Irrigation Amount.
If the program is too dry, manually water the program to get it the water
it needs.
Check the run times in your ESP-LX Controller. The dry or wet program
can be caused by too little or too much run time for each station.
Adjust the run time(s) using small intervals of time. This will help
determine what run time is optimal to prevent dry or wet stations.
If steps 1 and 2 do not fix this problem, adjust the Irrigation Amount for
the program.
NOTE: You want to decrease your Irrigation Amount if you are
experiencing a wet program, and increase your Irrigation Amount if you
have a dry program.
The site is watering every
day
There are three possible causes why the site is
watering everyday:
ET rates are high enough that daily watering is
necessary (no action is required)
The Irrigation Amount(s) are programmed too low.
The Minimum Run Time Limit is programmed too
low.
The Irrigation Amounts could be programmed too low. The total Irrigation
Amount should be equal to or above peak historical ET values. See the
Irrigation Amount and Station Run Times section in the Appendix for
more details.
The Minimum Run Time Limit lets you decide the smallest percentage of
the watering cycle you will allow to run. Setting the Minimum Run Time
Limit to 0% means that with each amount of ET received the ET Manager
Cartridge will try to replace the water immediately even if it means
running the Programs for only 1% of their scheduled time. Adjust the
Minimum Run Time up (default setting is 80%).
I want to water on the next
cycle
There may be occasions when, in your judgment, the
sprinklers should water the next watering cycle.
To water the next cycle you may manually start the program(s), or adjust
the Moisture Levels for the selected program(s) to 0 (see the Moisture
Levels section).
ESPLXD-ET user-manual (670504-01) artwork_120716.indb 64 7/16/2012 3:48:21 PM
Page 73

65
ESPLXD-ET Controller
Condition Probable Cause Action
After a rainstorm my
irrigation system resumes
watering too soon
There are several reasons which could cause the
irrigation system to resume watering too soon after
a rainstorm:
The rainfall received in the weather signal may not
correctly represent rainfall at your site.
Location of your optional on-site Rain Gauge may be
ineffective.
The Rain Source in the ET Manager Cartridge may be
programmed incorrectly.
Effective Rain settings may need to be adjusted.
The weather signal rainfall value may not correctly represent rainfall at
your site. Connect an optional on-site Rain Gauge (ETM-RG).
Check the location of your optional on-site Rain Gauge, make certain
there are no obstacles blocking rain from entering the Rain Gauge.
Check the Rain Source to verify the ET Manager Cartridge is programmed
to use data from the correct Rain Source and correct gauge ETM-RG
1mm/tip or Local Gauge 0.01”/tip (RAINGAUGE) (see the Rain Source
section for details).
The Maximum Hourly Rain setting may be limiting the amount of rainfall
applied to the Moisture Levels. Change the Maximum Rain to a higher
amount to accept more hourly rainfall in the Moisture Levels (see the
Effective Rain section for details). For example, if Max Hourly Rain is set
to 0.25” and rain for the last hour is 1.00”, only 0.25” will be added to the
Moisture Level.
The Saturation Allowance may be too low. Change the Saturation
Allowance to a higher amount to accept more rainfall in the Moisture
Level(s) (see the Effective Rain section for details).
After a rainstorm my
irrigation system does not
resume watering soon
enough
There are several reasons the irrigation system may
not resume watering soon enough after a rainstorm:
The rainfall received in the weather signal may not
correctly represent rainfall at your site.
The Rain Source in the ET Manager Cartridge may be
programmed incorrectly.
Effective Rain settings may need to be adjusted.
The weather signal rainfall value may not correctly represent rainfall at
your site. Connect an optional on-site Local Rain Gauge (ETM-RG).
Check the Rain Source to verify the ET Manager Cartridge is programmed
to use data from the correct Rain Source.
The Maximum Hourly Rain setting may be accepting more rainfall into
the Moisture Levels than the landscape is actually capable of accepting.
Change the Maximum Hourly Rain to a lower amount to limit rainfall in
the Moisture Levels.
The Saturation Allowance may be too high. The Saturation Allowance
creates a limit to the amount of rain that can accumulate in the Moisture
Level(s). Change the Saturation Allowance to a lower amount to decrease
the amount of rainfall that can accumulate in the Moisture Level(s).
ESPLXD-ET user-manual (670504-01) artwork_120716.indb 65 7/16/2012 3:48:21 PM
Page 74

66
ESPLXD-ET Controller
Condition Probable Cause Action
It was raining and the
sprinklers were running
There are several reasons the irrigation system may
be watering during a rainstorm:
The rainfall received in the weather signal may not
correctly represent rainfall at your site.
The Rain Source in the ET Manager Cartridge may be
programmed incorrectly.
Rain Interrupt settings may need to be adjusted.
The weather signal rainfall value may not correctly represent rainfall at
your site. Connect an optional on-site Local Rain Gauge (ETM-RG).
Check the Weather Info for the last hour of rain to verify the rain data is
being reported by your ET Manager Cartridge.
Check the Rain Source to verify the ET Manager Cartridge is programmed
to use data from the correct Rain Source. If correct check the Rain Gauge
for proper functionality (you may need to contact your Weather ReachTM
Signal Provider).
Program a 1 Hour Rain Interrupt to stop watering until rain accumulations
reach below the programmed 1 Hour Rain Interrupt setting.
Program a 24 Hour Rain Interrupt to cancel watering until rain
accumulations reach below the programmed 24 Hour Rain Interrupt
setting.
ESPLXD-ET user-manual (670504-01) artwork_120716.indb 66 7/16/2012 3:48:21 PM
Page 75

67
ESPLXD-ET Controller
Section D - Advanced Programming
The ESPLXD-ET controller has a wide variety of advanced but
easy-to-use features designed to simplify irrigation.
Seasonal Adjust %
The ET Manager Cartridge manages watering by changing the Seasonal
Adjust percentage value. This increases or decreases the programmed
watering run times for each station. When watering is not needed, the
Seasonal Adjust percentage will be set to 0% to conserve water. When
watering is needed, the Seasonal Adjust percentage will increase to
meet watering needs.
NOTE: See Weather-Based Irrigation Control in the Introduction &
Overview section for details.
The Seasonal Adjust % should be set to 100% and controlled by the
ET Manager, unless fine-tune adjustments to the watering schedule
are necessary. Seasonal adjustments can be managed by month or by
program.
CAUTION: Multiple Seasonal Adjustment settings affect each
other and can significantly impact irrigation. For example, if
you set a program-level Seasonal Adjustment of 10% and then
a monthly Seasonal Adjustment of 10% then irrigation will be
reduced to 1% of normal (10% of 10%). Consider using only one
type of Seasonal Adjustment setting.
CAUTION: Setting a small number for the Seasonal Adjustment
percentage will greatly reduce watering and setting to 0% will
cancel irrigation entirely. Use caution when making Seasonal
Adjustment settings.
Adjust Individual Program
Turn the controller dial to Seasonal Adjust %.
A
The Seasonal Adjust screen appears with Individual PGM selected;
press Next.
B
Press the + and – buttons to set the seasonal adjustment
percentage (from 0 - 300% ).
Press and HOLD buttons to accelerate settings for percentages.
NOTE: If the desired program is not selected, use the Program
Select switch to change it. See Section B, Program Select Switch
for more details.
1 2
Change the Program Select switch and repeat this process to set
Seasonal Adjustments for other programs as desired.
ESPLXD-ET user-manual (670504-01) artwork_120716.indb 67 7/16/2012 3:48:22 PM
Page 76

68
ESPLXD-ET Controller
Adjust By Month
Select Months to Adjust
Turn the controller dial to Seasonal Adjust %.
A
The Seasonal Adjust screen appears. Press the Down Arrow button
to select By Month; then press Next.
B
The Seasonal Adjust by Month screen appears with % Adjust
selected; press Next.
1 2
C
Press the + and – buttons to select the month you would like to
adjust; then press Next.
D
Press the + and – buttons to set the Seasonal Adjustment
percentage (from 0 - 300% ).
Press and HOLD buttons to accelerate settings for percentages.
3 4
Repeat this process to set Seasonal Adjustments for other months
as desired. Then change the Program Select switch and repeat
this process to set Seasonal Adjustments By Month for other
programs as desired.
NOTE: The % Adjust will automatically change to the new
month’s percentage setting on the first day of the month.
ESPLXD-ET user-manual (670504-01) artwork_120716.indb 68 7/16/2012 3:48:23 PM
Page 77

69
ESPLXD-ET Controller
Select Programs To Adjust
Turn the controller dial to Seasonal Adjust %.
A
The Seasonal Adjust screen appears. Press the Down Arrow button
to select By Month; then press Next.
B
The Seasonal Adjust by Month screen appears. Press the Down
Arrow button to select Select PGMs; then press Next.
1 2
C
Press the Yes or No buttons to set Monthly Adjust for the current
selected program.
D
To set another program, change the Program Select switch to the
desired program; a confirmation appears.
3 4
Repeat this process to set Monthly Adjustments for other
programs as desired.
ESPLXD-ET user-manual (670504-01) artwork_120716.indb 69 7/16/2012 3:48:23 PM
Page 78

70
ESPLXD-ET Controller
Delay Watering
Rain Delay
The ESPLXD-ET controller’s Rain Delay feature lets you discontinue
irrigation for a few days after a period of heavy rain.
The ESPLXD-ET can also be equipped with an optional Rain Bird ET
Manager Cartridge to automatically calculate and automate rain
shutdown. Ask your Rain Bird distributor for more details or visit the
Rain Bird web site, www.rainbird.com.
NOTE: If you have a rain sensor attached to your controller, it may
be unnecessary to manually program a Rain Delay. Consult the
rain sensor device documentation for more details.
Turn the controller dial to Delay Watering.
A
The Delay Watering screen appears with Rain Delay selected;
press Next.
B
The Rain Delay screen appears. Press the + and – buttons to set
the number of days (from 0 to 14 days) for the Rain Delay. The
next irrigation date after the Rain Delay calculates and displays
automatically.
1 2
NOTE: A Rain Delay affects all programs, but stations set up as
Non-irrigation will still run during a Rain Delay.
ESPLXD-ET user-manual (670504-01) artwork_120716.indb 70 7/16/2012 3:48:23 PM
Page 79

71
ESPLXD-ET Controller
Calendar Day Off
You can schedule certain days of the year as Non-irrigation, such as
holidays when landscape may receive heavy use.
The ESPLXD-ET controller can be programmed to suspend irrigation on
a particular calendar date, up to 5 different days of the year.
NOTE: Calendar Day Off dates can only be selected 365 days
in advance. Then once a Calendar Day Off has passed, it will
be removed from the list and must be reprogrammed for the
following year if desired.
Turn the controller dial to Delay Watering.
A
The Delay Watering screen appears. Press the Down Arrow button
to select Calendar Day Off; then press Next.
B
The Calendar Day off screen appears, showing (up to 5) scheduled
calendar days off in chronological order. Unprogrammed days will
show as Unused.
1 2
C
Press the + and – buttons to set the Calendar Day Off date as
desired. Press the Next and Back buttons to select other days as
desired.
Press and HOLD buttons to accelerate settings for dates.
3
NOTE: Calendar Day Off affects ALL programs and stations,
including non-irrigation stations. Consider not using this feature
if any of your programs include essential functions such as door
locks or sports field lighting.
ESPLXD-ET user-manual (670504-01) artwork_120716.indb 71 7/16/2012 3:48:23 PM
Page 80

72
ESPLXD-ET Controller
Water Windows
You can specify certain times of the day/night when irrigation is
allowed.
Otherwise watering is not allowed outside these “Water Windows”. This
is helpful to comply with local regulations which may prohibit irrigation
during certain hours.
CAUTION: Be sure a Water Window is sufficient to allow irrigation
programs to run completely. Irrigation scheduled outside the
Water Window will not run but will resume when the Water
Window opens again. This can cause irrigation programs to “stack”
and eventually create an alarm condition if the controller stacks 8
or more programs.
NOTE: Water windows can be scheduled to cross midnight. For
example, a Water Window can start at 10:00 PM and continue until
4:00 AM the next morning. Be sure your Watering Start Times are
set to occur within the Water Window. See Section A, Watering
Start Times for more details.
Set Up Water Window
Turn the controller dial to Delay Watering.
A
The Delay Watering screen appears. Press the Down Arrow button
to select Water Window; then press Next.
B
The Water Window screen appears. Press the + and – buttons to
set the time when the Watering Window opens; then press Next.
Press and HOLD buttons to accelerate settings for hours and
minutes.
1 2
C
Press the + and – buttons to set the time when the Watering
Window closes. As you adjust the close time, the duration of your
Water Window calculates automatically.
NOTE: To clear a previously set Water Window, press the + and
– buttons to set both the Open and Close times to OFF (between
11:59 and 12:00 AM).
D
To set another program, change the Program Select switch to the
desired program; a confirmation appears.
3 4
Repeat this process to set or clear Water Windows for other
programs as desired.
ESPLXD-ET user-manual (670504-01) artwork_120716.indb 72 7/16/2012 3:48:24 PM
Page 81

73
ESPLXD-ET Controller
Watering Cycles
The ESPLXD-ET controller supports a variety of flexible
watering day cycle options.
Watering Cycle Definitions
Custom Days: irrigation starts every day; but only on days of the
week where program starts are allowed.
Odd Dates: irrigation starts on all odd numbered calendar days,
such as the 1st, 3rd, 5th, etc.
Odd Dates no 31st: irrigation starts on all odd numbered calendar
days, such as the 1st, 3rd, 5th, etc., but not on the 31st.
Even Dates: irrigation starts on all even numbered calendar days,
such as the 2nd, 4th, 6th, etc.
Cyclical Dates: irrigation starts at regular chosen intervals such as
every 3rd or 5th day, regardless of the calendar date.
CAUTION: Regardless of the Watering Cycle, irrigation will start
only on days of the week where program starts are allowed See
Section B, Select Days to Water for more details. It’s important
to select allowed irrigation days carefully to avoid landscape
damage in case irrigation delays are lengthy.
NOTE: A watering cycle is selected as soon as it is highlighted
with the cursor.
NOTE: Every day should be selected as a watering day if possible.
The ET Manager will change the Seasonal Adjust percentages
depending on the weather conditions to meet the needs of the
landscape.
Custom, Odd, Odd no 31st, Even
The process for setting up Custom, Odd, Odd no 31st, and Even
Watering Cycles is very similar.
Turn the controller dial to Watering Cycles.
A
The Watering Cycle screen appears. Press the up and Down Arrow
buttons to select the desired Watering Cycle; then press Next.
NOTE: If the desired program is not selected, use the Program
Select switch to change it. See Section B, Program Select Switch
for more details.
B
The Program start allowed screen appears. Press the Yes button
to allow irrigation to start on a given day or press No to prevent
irrigation from starting.
1 2
ESPLXD-ET user-manual (670504-01) artwork_120716.indb 73 7/16/2012 3:48:24 PM
Page 82

74
ESPLXD-ET Controller
C
Press the Next and Back buttons to navigate through the days of
the week and repeat the selection process as desired.
3
Change the Program Select switch and repeat this process to set
Watering Cycles for other programs as desired.
NOTE: Watering day selections carry over to Watering Days dial
positions and vice-versa. See Section B, Select Days to Water for
more details.
ESPLXD-ET user-manual (670504-01) artwork_120716.indb 74 7/16/2012 3:48:24 PM
Page 83

75
ESPLXD-ET Controller
Cyclical Days
Turn the controller dial to Watering Cycles.
A
The Watering Cycle screen appears. Press the Down Arrow button
to select Cyclical Days; then press Next.
NOTE: If the desired program is not selected, use the Program
Select switch to change it. See Section B, Program Select Switch
for more details.
B
The Day Cycle screen appears. Press the + and – buttons to set the
watering day cycle (from 1 to 30 days). For example, set to 03 if
you want to water every third day; then press Next.
1 2
C
Press the + and – buttons to set the first date for the Watering
Cycle to begin; then press Next.
Press and HOLD buttons to accelerate settings for dates.
D
The Watering Day Cycle screen appears. Press the Yes button to
allow irrigation to start on a given day of the week or else press No
to prevent irrigation from starting.
3 4
E
Press the Next and Back buttons to navigate through the days of
the week and repeat the selection process as desired.
5
Change the Program Select switch and repeat this process to set
Cyclical Watering for other programs as desired.
NOTE: Watering day selections carry over to Watering Days dial
positions and vice-versa. See Section B, Select Days to Water for
more details.
ESPLXD-ET user-manual (670504-01) artwork_120716.indb 75 7/16/2012 3:48:25 PM
Page 84

76
ESPLXD-ET Controller
Station Settings
Set Up Cycle+SoakTM
The ESPLXD-ET controller Cycle+Soak feature allows water to be applied
to stations intermittently and without creating complex programs.
It can apply to any station and is useful for locations such as hillsides
which can be difficult to irrigate effectively.
Cycle+Soak consists of two settings, the cycle time (how long a station
will run before soaking) and soak time (how long irrigation is paused
before applying another cycle). For example, a station can be set up to
receive 15 minutes of irrigation in three 5 minute cycles, with two 10
minutes periods of soak time in between waterings.
NOTE: Cycle+Soak settings apply to stations no matter which
programs it may be used in.
Turn the controller dial to Station Settings.
A
The Station Settings screen appears with Cycle+Soak selected;
press Next.
B
The Cycle+Soak screen appears. Press the + and – buttons to enter
the desired station number; then press Next.
1 2
C
Press the + and – buttons to set the Cycle time (between 1-60
minutes). Or to cancel Cycle+Soak on that station, set to 0 minutes;
then press Next.
Press and HOLD buttons to accelerate settings for minutes.
D
Press the + and – buttons to set the Soak time (between 1-60
minutes). Or to cancel Cycle+Soak on that station, set to 0 minutes;
then press Next.
3 4
NOTE: Consider using short Soak times, particularly if your
watering schedule or Water Window is short. Long soak times
could prevent irrigation from completing prior to the end of the
Water Window. See previous Water Windows for more details.
NOTE: The controller is designed to allow additional stations in
the irrigation queue to run during the soak time for Cycle+Soak
stations.
Repeat this process to set up Cycle+Soak on other stations.
ESPLXD-ET user-manual (670504-01) artwork_120716.indb 76 7/16/2012 3:48:25 PM
Page 85

77
ESPLXD-ET Controller
Set Up Station Delay
The ESPLXD-ET controller can be programmed to include a delay
between stations. This feature delays the start of the next sequential
station in a program after the previous station completes.
CAUTION: Consider using short Station Delay times, particularly
if your watering schedule or Water Window is short. Long delay
times could prevent scheduled irrigation from completing prior
to the end of the Water Window. See previous Water Windows for
more details.
Turn the controller dial to Station Settings.
A
The Station Settings screen appears. Press the Down Arrow button
to select Station Delay; then press Next.
B
The Delay Between stations screen appears. Press the + and
– buttons to set the delay time (from 00:01 second to 10:00
minutes). Or to clear Station Delay on that station, set to 00:00;
then press Next.
Press and HOLD buttons to accelerate settings for minutes and
seconds.
NOTE: If the desired program is not selected, use the Program
Select switch to change it. See Section B, Program Select Switch
for more details.
1 2
Change the Program Select switch and repeat this process to set
Station Delay for other programs as desired.
ESPLXD-ET user-manual (670504-01) artwork_120716.indb 77 7/16/2012 3:48:25 PM
Page 86

78
ESPLXD-ET Controller
Set Up SimulStationsTM
To prevent the ESPLXD-ET controller from irrigating too many stations
simultaneously, you can set the maximum number of stations per
program that are allowed to run. This can be beneficial for systems with
a small water source and to help ensure uniform water distribution.
CAUTION: The ESPLXD-ET can run multiple programs and
stations concurrently. If all four programs are running two stations,
then theoretically 8 stations could be operating at the same time.
Many irrigation systems do not have sufficient hydraulic capacity
to accommodate such a load. SimulStations can be used to limit
the maximum number of stations per program or for the entire
controller, but in general we recommend enabling FloManager
and setting program-level and LXD-level SimulStations to a fairly
high number. This will allow FloManager to provide maximum
irrigation based on your system’s hydraulic capacity. Consult the
FloManager portion of this manual in Section F and Appendix C
for additional details.
Set SimulStationsTM for Program
Turn the controller dial to Station Settings.
A
The Station Settings screen appears. Press the Down Arrow button
to select SimulStations; then press Next.
B
The Station Settings screen appears with PGM SimulStations
selected; press Next.
1 2
C
The Maximum Number of SimulStations screen appears. Press the
+ and – buttons to set the maximum number of irrigation stations
(from 1 to 8) that can operate simultaneously for this program;
then press Next.
3
Change the Program Select switch and repeat this process to set
the Maximum Number of Stations for other programs as desired.
ESPLXD-ET user-manual (670504-01) artwork_120716.indb 78 7/16/2012 3:48:26 PM
Page 87

79
ESPLXD-ET Controller
Set SimulStationsTM for Controller
NOTE: The LXD SimulStations settings will supersede programlevel settings. For example, if the LXD setting is 2 but three
programs have a maximum setting of 4, then only 2 stations will
be allowed to run simultaneously.
Turn the controller dial to Station Settings.
A
The Station Settings screen appears. Press the Down Arrow button
to select SimulStations; then press Next.
B
The Station Settings screen appears. Press the Down Arrow button
to select LXD SimulStations selected; then press Next.
1 2
C
The ESPLXD-ET Maximum Number of SimulStations screen
appears. Press the + and – buttons to set the maximum number of
irrigation stations (from 1 to 8) that can operate simultaneously;
then press Next.
D
Press the + and – buttons to set the maximum number of nonirrigation stations (from 1 to 4).
3 4
NOTE: The Non-Irrigation SimulStations setting is used to
configure the maximum number of Non-Irrigation stations
that can operate simultaneously and allows you to balance the
number of Irrigation and Non-Irrigation stations that can operate
simultaneously. Also note that when SimulStations are set to a
maximum of 8, if a Normally Closed Master Valve has to be held
open for irrigation to occur, it will limit the maximum number of
SimulStations to 7.
ESPLXD-ET user-manual (670504-01) artwork_120716.indb 79 7/16/2012 3:48:26 PM
Page 88

80
ESPLXD-ET Controller
Station Sequencing
The ESPLXD-ET offers advanced programming features to optimize
water windows. The Station Sequencing option allows you to select
from two methods of station sequencing for program operation:
Sequence by Station Number (system default).
Sequence by Station Priority (required when using FloManager).
This option decreases the overall time required to complete the
program when operating multiple stations simultaneously.
Station Sequencing by Station Numbers will select stations to
operate in the following order:
1 Station number 1 > 2 > 3 . . .
2 Program assignment A > B > C > D
NOTE: Non-irrigation priority stations will always be selected to
operate first.
Station Sequencing by Station Priority will select stations to
operate in the following order:
1 Station priority Non-Irrigation > High > Medium > Low
2 Station run time Longest run time > shortest run time
3 Station number 1 > 2 > 3 . . .
4 Program assignment A > B > C > D
NOTE: If FloManager is turned ON, then the default Station
Sequencing setting is Sequence by Station Priorities. To select
Station Sequencing by Station Number, FloManager must first
be turned OFF. See Section F, Flow Management, Enable/Disable
FloManager for more details.
Turn the controller dial to Station Settings.
A
The Station Settings screen appears. Press the Down Arrow button
to select Station Sequencing; then press Next.
B
The Station Sequencing screen appears. Press the + and – buttons
to set Station Sequencing by either Station Numbers or Station
Priorities, as desired.
1 2
NOTE: When Station Sequencing is set to Sequence by Station
Priorities, you can still manually operate stations in station
number sequence using the Test All Stations option from the
Manual Watering dial position. See Section G, Auxiliary Operation,
Manual Watering, Test All Stations for more details.
ESPLXD-ET user-manual (670504-01) artwork_120716.indb 80 7/16/2012 3:48:26 PM
Page 89

81
ESPLXD-ET Controller
this page intentionally left blank.
ESPLXD-ET user-manual (670504-01) artwork_120716.indb 81 7/16/2012 3:48:26 PM
Page 90

82
ESPLXD-ET Controller
ET Manager
Once the ET Manager Cartridge has been programmed, it will begin
managing your watering schedules based on current weather
conditions and your irrigation system capabilities.
The ET Manager shows irrigation status, keeps irrigation logs for
each program, and provides system settings to customize cartridge
operation.
When the ESPLXD-ET Controller dial is set to the ETMTM/IQTM (or ETMTM/
IQTM/PBCTM) Setting position, the display and soft-keys are controlled by
the ET Manager Cartridge.
NOTE: Once the ET Manager Cartridge is initially installed and
programmed, the Moisture Levels screen becomes the default
home screen. Press Menu on the Moisture Levels screen to access
the ET Manager.
ET Manager Menu
ESPLXD-ET user-manual (670504-01) artwork_120716.indb 82 7/16/2012 3:48:27 PM
Page 91

83
ESPLXD-ET Controller
Status Menu
Moisture Levels
Check the current irrigation status for each program.
The moisture level represents the current amount of moisture in your
soil and is constantly changing due to evapotranspiration (ET), rain, or
irrigation events. The ET Manager Cartridge will use the Moisture Level
to set the Seasonal Adjust percentage in the ESPLXD-ET Controller.
NOTE: Moisture Levels is the default home screen for the ETMTM/
IQTM (or ETMTM/IQTM/PBCTM) Setting dial position, and can also be
accessed through the ET Manager Status Menu.
Turn the controller dial to ETMTM/IQTM (or ETMTM/IQTM/PBCTM)
Settings.
A
The Moisture Levels screen appears. The current Moisture Level is
indicated graphically for each program. Press the Adj button to
view actual Moisture Levels.
NOTE: The display indicates that Program A’s Moisture Level is
full while Program B’s Moisture Level is low. This does NOT mean
the landscape is completely dried out, only that Program B will
need watering soon.
B
The current Moisture Level and Total Irrigation Amount screen
for Program A appears. Press Next to view the next program’s
Moisture Level.
NOTE: Press the + and - buttons to manually adjust the Moisture
Level for the selected program if desired.
a b
ESPLXD-ET user-manual (670504-01) artwork_120716.indb 83 7/16/2012 3:48:27 PM
Page 92

84
ESPLXD-ET Controller
Weather Signal
Verify the status of the radio signal from your local weather
station.
A Weather ReachTM Signal Provider retrieves weather information
from local weather stations. The information is broadcast as a weather
signal via a paging radio frequency to your ET Manager Cartridge. The
weather signal contains the most recent weather conditions including:
solar energy, temperature, wind, humidity, and rainfall.
Turn the controller dial to ETMTM/IQTM (or ETMTM/IQTM/PBCTM)
Settings; then press Menu.
A
The ET Manager screen appears. Press the 1 button to select
Status.
B
The Status screen appears. Press the 2 button to select Weather
Signal.
a b
ESPLXD-ET user-manual (670504-01) artwork_120716.indb 84 7/16/2012 3:48:27 PM
Page 93

85
ESPLXD-ET Controller
C
The Weather Signal screen appears. The status of the signal will
show “Signal Detected” when the unit is ready to receive
weather information.
NOTE: If the status displays “No Signal Detected” wait two
minutes. If the signal is still not detected, go to the Alert Messages
section and follow the steps for “No Paging Signal Detected”.
D
The activation status will show “Activated” when the unit is
receiving hourly weather data for the programmed Weather
Region. Press More to view a log of received signals.
NOTE: If the activation status shows “Not Activated” contact
your Weather ReachTM Signal Provider to establish services. (You
will need to provide the Weather ReachTM Signal Provider with the
ET Manager Receiver serial number, which can be found on the
label attached to the receiver/antenna). Once activated the ET
Manager Receiver will begin receiving hourly weather data.
c d
E
The Counters screen appears. Press More to cycle through each
page.
NOTE: The ET Manager retains data from every signal that is
received from the weather station, Weather Region, Rain Region
and the local Rain Gauge. The Counters can be reset to 0 by
pressing Reset.
e
ESPLXD-ET user-manual (670504-01) artwork_120716.indb 85 7/16/2012 3:48:28 PM
Page 94

86
ESPLXD-ET Controller
ET, Rain and Adj %
Display recent ET values, rainfall amounts and Seasonal
Adjust percentages.
The ET Manager can display calculated ET values, recent rainfall
amounts, current Seasonal Adjust percentages and the number of
completed starts per program. ET values and rainfall amounts for the
last hour, day, week, and two week period are available.
Turn the controller dial to ETMTM/IQTM (or ETMTM/IQTM/PBCTM)
Settings; then press Menu.
A
The ET Manager screen appears. Press the 1 button to select
Status.
B
The Status screen appears. Press the 3 button to select ET, Rain
and Adj %.
a b
C
The ET screen appears. Press Next to view rainfall amounts.
D
The Rain screen appears. Press Next to view Seasonal Adjust
percentages.
c 4
ESPLXD-ET user-manual (670504-01) artwork_120716.indb 86 7/16/2012 3:48:28 PM
Page 95

87
ESPLXD-ET Controller
E
The Seasonal Adjust screen appears.
e
ESPLXD-ET user-manual (670504-01) artwork_120716.indb 87 7/16/2012 3:48:28 PM
Page 96

88
ESPLXD-ET Controller
Logs Menu
Irrigation Logs
View the irrigation history for each program.
Irrigation logs include the last irrigation date, the total number of days
watered and the total estimated amount of water applied in inches
since the start date.
The total number of days watered is derived from the number of
completed start times. For example, if the ET Manager determines
that only 2 of the 3 start times for a given program are necessary, the
number of watering days added to this log will be 0.66 (2/3 of a typical
watering day).
Turn the controller dial to ETMTM/IQTM (or ETMTM/IQTM/PBCTM)
Settings; then press Menu.
A
The ET Manager screen appears. Press the 2 button to select Logs.
B
The Logs screen appears. Press the 1 button to select Irrigation
Logs.
a b
C
The PGM A Irrigation Log appears. Press Next to view the next
program’s Irrigation Log.
D
To clear the log, press Clear.
3 4
ESPLXD-ET user-manual (670504-01) artwork_120716.indb 88 7/16/2012 3:48:29 PM
Page 97

89
ESPLXD-ET Controller
E
The log will reset the Last date to None, Days Watered and Total
Water to 0.00, and the Since date to the current date. Press Next
to view the next program’s Irrigation Log.
e
ESPLXD-ET user-manual (670504-01) artwork_120716.indb 89 7/16/2012 3:48:29 PM
Page 98

90
ESPLXD-ET Controller
Interrupts
View the history of recent weather interrupts.
The ET Manager can cancel irrigation during rain, high winds, freezing
temperatures, or a Provider Interrupt from the WSRP (see the Weather
Interrupts section for more details). Interrupt History displays the last
5 interrupt events that have occurred, including the type, date and
time it started, and when the interrupt cleared. When the ET Manager
issues a weather interrupt, the alarm light on the ESPLXD-ET controller
is illuminated.
Turn the controller dial to ETMTM/IQTM (or ETMTM/IQTM/PBCTM)
Settings; then press Menu.
A
The ET Manager screen appears. Press the 2 button to select Logs.
B
The Logs screen appears. Press the 2 button to select Interrupts.
a b
C
The Interrupt History screen appears. Press Next to view the next
Interrupt.
3
NOTE: If no interrupt events have occurred, the Interrupt History
will display “None”.
ESPLXD-ET user-manual (670504-01) artwork_120716.indb 90 7/16/2012 3:48:29 PM
Page 99

91
ESPLXD-ET Controller
Weather Information
View the latest weather information received from the local
weather station.
View the latest detailed weather information received by the ET
Manager Cartridge from the most recent weather signal.
Turn the controller dial to ETMTM/IQTM (or ETMTM/IQTM/PBCTM)
Settings; then press Menu.
A
The ET Manager screen appears. Press the 2 button to select Logs.
B
The Logs screen appears. Press the 3 button to select Weather
Information.
a b
C
The Weather Information screen appears. Press More to see more
details
3
D
The Rain screen appears. Press Next to cycle through the Rain,
Temperature, Wind and Humidity weather categories
NOTE: Values displayed as being “Last Hour” are updated each
time a weather signal is received. Values displayed as “High” and
“Low” are the high and low values since 12:00 AM that day.
d d
d d
a. b.
c. d.
ESPLXD-ET user-manual (670504-01) artwork_120716.indb 91 7/16/2012 3:48:30 PM
Page 100

92
ESPLXD-ET Controller
Settings Menu
Irrigation Control Menu
The Irrigation Control Menu determines how much water is used
during irrigation, adjusts watering needs based on landscape type and
sets watering run time limits.
Irrigation Amount
View and make adjustments to the amount of water that is
used during irrigation.
The Irrigation Amount is the amount of water applied to the landscape
during each program start, and is based on information about your
sprinkler system and landscape.
To determine Irrigation Amounts, refer to the ET Manager
Schedule Report or see the Irrigation Amount and Station Run
Times section in the Appendix.
Turn the controller dial to ETMTM/IQTM (or ETMTM/IQTM/PBCTM)
Settings; then press Menu.
A
The ET Manager screen appears. Press the 3 button to select
Settings.
B
The ET Manager Settings screen appears. Press the 1 button to
select Irrigation Control.
a b
C
The Irrigation Control screen appears. Press the 1 button to select
Irrigation Amount.
D
The Irrigation Amount screen appears. Press Edit to manually
adjust the amount for Program A.
c d
ESPLXD-ET user-manual (670504-01) artwork_120716.indb 92 7/16/2012 3:48:30 PM
 Loading...