

Page 1
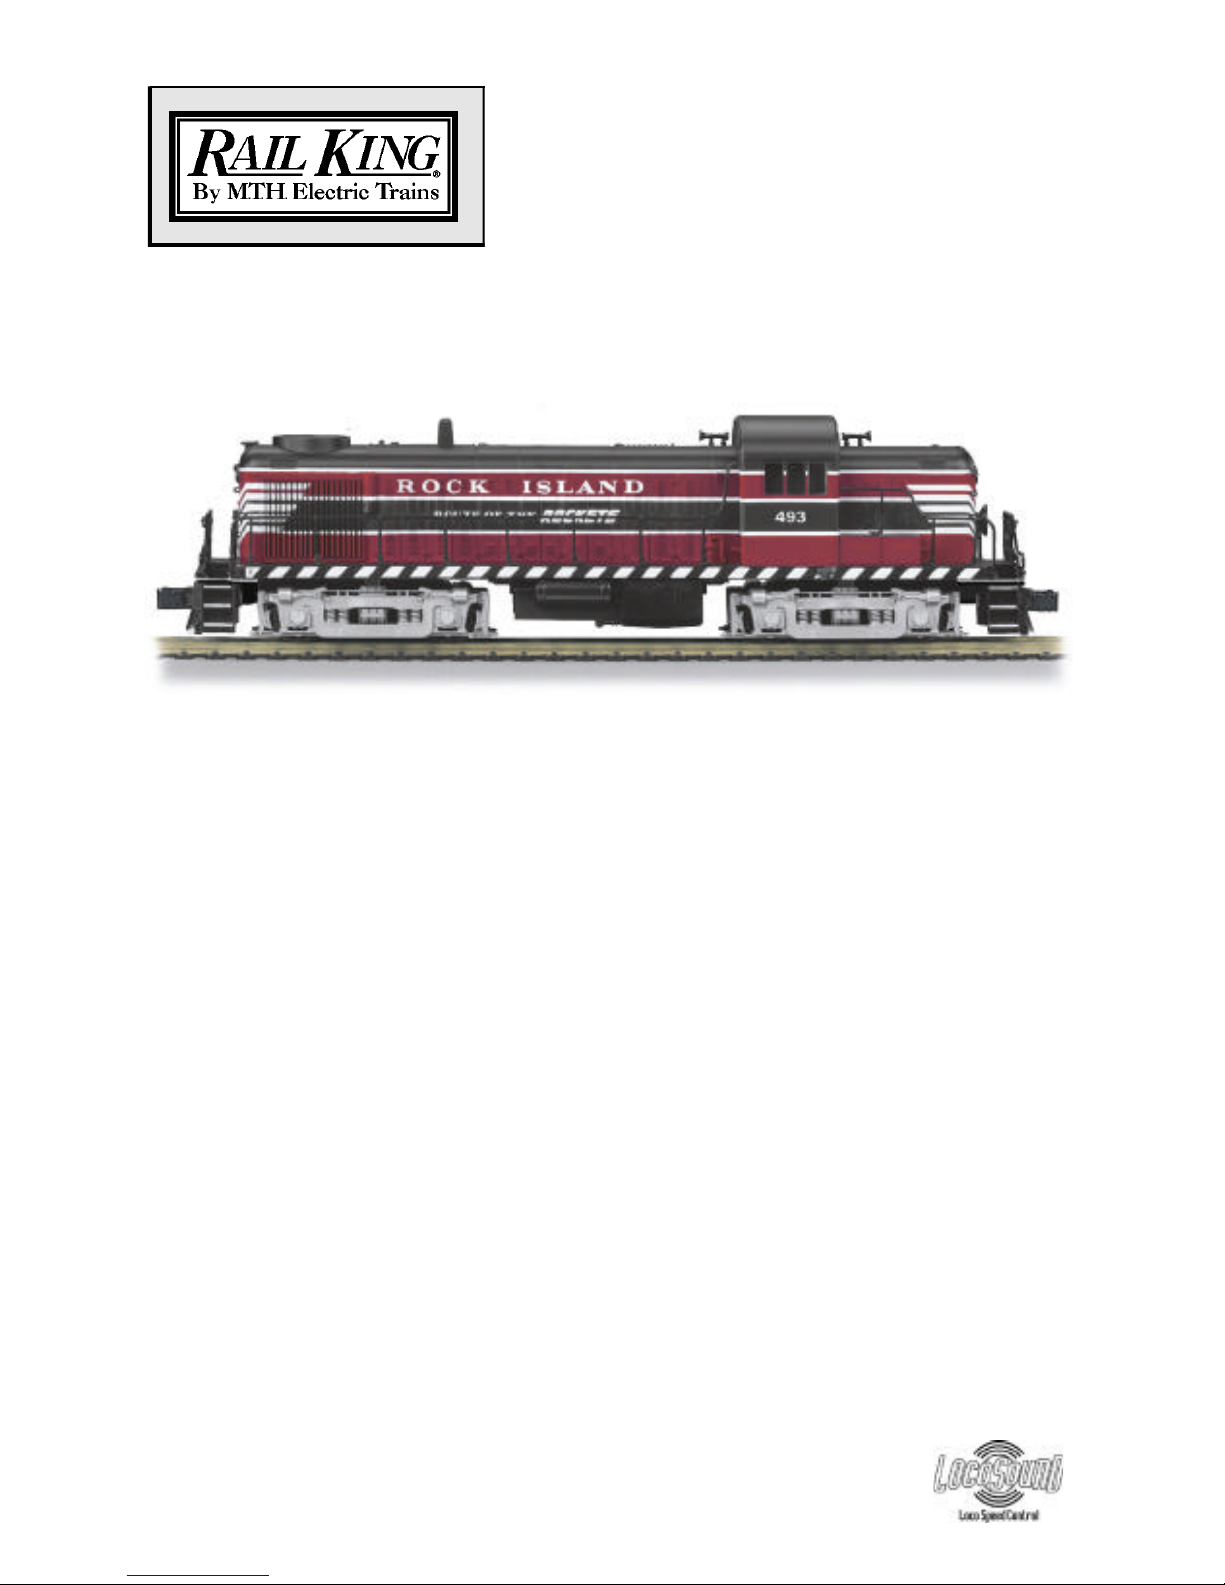
RAILKING RS-3
DIESEL ENGINE
OPERATING INSTRUCTIONS
This RailKing RS-3 Diesel Engine is perfectly suited for all types of work on your
railroad. It has an ABS body and die-cast floor and runs on O-27 track. This RailKing
Diesel Engine contains M.T.H.’s Loco-Sound™ sound and train control system. The
locomotive is easy to operate with any compatible standard AC transformer (see the
compatibility chart on page 14), and is completely compatible with most other 3-rail
locomotives, rolling stock, and accessories.
Please read all the accompanying instructions carefully before setting up and operating
your locomotive.
Page 2
2
RailKing RS-3 Diesel Engine
Table of Contents
Initial Lubrication 3
Basic Operation 4
Throttle 4
Operation Buttons 4
Speed Control 5
Direction Lock 5
Proto-Cast and Proto-Dispatch 6
Volume Control 7
Maintenance 8
Lubrication and Greasing Instructions 8
Cleaning the Wheels, Tires and Track 9
Locomotive Traction Tire Replacement 10
Locomotive Light Bulb Replacement 11
Troubleshooting 12
Compatibility 13
Transformer Compatibility Chart 14
Safety Precautions 15
Service and Warranty Information 16
Page 3
3
RailKing RS-3 Diesel Engine
Initial Lubrication
Although the engine was lubricated at the factory, it is important that you
lubricate the chassis before operation. Lightly grease the outside idler and
drive gears (marked “G” in Fig. 3 on pg. 9) to prevent them from squeaking.
Use light household oil and follow the lubrication points marked “L” in Fig.
2 on pg. 8. Do not over-oil. Use only a drop or two on each pivot point.
At this point, you are ready to put your engine on the track and begin running
it.
Page 4
4
RailKing RS-3 Diesel Engine
Basic Operation
Throttle – Throttle up the power to your track. Give about 10-14 volts or
enough power so that the engine’s headlight shines brightly. Then put the
engine into motion by either firmly pressing the Direction button on your
transformer or remote once or dropping and advancing the throttle to put the
engine in forward.
Operation Buttons
Use the operation buttons on your transformer or remote as described below.
Horn/Whistle - To sound the horn, firmly press the Horn/Whistle button. The
horn will sound for as long as you continue to depress the button. It will stop
when you release the button.
Bell - To sound the bell, firmly press and release the Bell button. To turn the
bell off, press and release the Bell button again. The bell will continue to ring
from the time you turn it on until you press and release the button again to turn
it off.
Direction – Your train is programmed to start in neutral. The first direction
after neutral upon start-up is forward. Firmly press and release the Direction
button to allow the engine to move forward. Just as you must stop your
automobile between forward and reverse, this engine will not go directly from
forward to reverse; it goes into neutral between directions. If the train has
been moving forward, the first press of the Direction button will put the train
from forward into neutral, the second press into reverse, the third press back
into neutral, and the fourth back into forward. To prevent accidental
high-speed start-ups, this engine is programmed to restart in neutral each time
the track voltage is turned off for 25 seconds or more.
Page 5
5
RailKing RS-3 Diesel Engine
Speed Control:
M.T.H. engines equipped with Loco-Sound have speed control capabilities
that allow the engine to maintain a constant speed up and down grades and
around curves, much like an automobile cruise control. You can add or drop
cars on the run, and the engine will maintain the speed you set.
While the engine is programmed to start with the speed control feature
activated, you can opt to turn it off. This means the engine’s speed will fall as
it labors up a hill and increase as it travels downward. It is also affected by the
addition or releasing of cars while on the run. The engine will run more slowly
at a given throttle voltage when speed control is on than when it is off.
To turn speed control on and off, put the engine in neutral, then press the
transformer’s Whistle button firmly but quickly one time then immediately
press the Bell button two times. Repeat the 1 whistle, 2 bells code to return it
to the other condition. You will want to do this during the initial neutral upon
start-up if you ever couple this engine to another engine that is not equipped
with speed control to avoid damaging the motors in either engine. Each time
you shut down the engine completely, it will automatically turn speed control
on.
Direction Lock:
You can lock your engine into a direction (forward, neutral, or reverse) so that
it will not change directions. To do this, put the engine into the direction you
want or into neutral, to lock it into neutral, run it at a very slow crawl (as
slowly as it will move without halting), and quickly but firmly press your
remote’s Horn button once followed immediately by three presses of the Bell
button. Two horn blasts will indicate that the engine has made the change.
The engine will not change direction (including going into neutral) until you
repeat the 1 horn, 3 bells code to return the engine to its normal condition,
even if the engine is kept without power for extended periods of time.
Feature to Be Activated:
Speed Control On/Off
Lock into a Direction/Unlock
Button Code:
1 Whistle, 2 Bells
1 Whistle, 3 Bells
Page 6
6
RailKing RS-3 Diesel Engine
Proto-Cast and Proto-Dispatch:
When used with the RailKing Remote Lock-on (sold separately),
Loco-Sound-equipped engines gain Proto-Cast™ and Proto-Dispatch
™
features.
Proto-Cast: This feature allows you to play audio recordings through your
engine’s speakers. You must supply the audio source (a small portable
CD/tape player is sufficient) and a male-to-male mini cable (1/8” plug, like
that used for the headset with a portable CD/tape player) to connect your audio
source to the remote lock-on. To use Proto-Cast, simply plug the mini-cable
into your audio source (usually into the headphone jack) and into the “Audio”
port on the right side of the remote lock-on and adjust the volume.
Proto-Dispatch: This feature allows you to broadcast your own voice through
your engine’s speakers. You must supply the microphone and a mini cable
(1/8” plug, like that used for the headset with a portable CD/tape player) to
connect your microphone to the remote lock-on. To use Proto-Dispatch,
simply plug the mini-cable into the microphone and into the “Mic” port on the
left side of the remote lock-on and speak into the microphone.
When these features are in use, the locomotive’s own sounds (engine sounds
and bells, whistles, and horns) will be muted so that only the sounds you
broadcast will be heard. Because these two features are voice activated, there
will be a 10-15 second delay after you stop speaking into the microphone or
turn off the audio source before the engine sounds resume. To stop using the
feature and return to normal operation, unplug the cable from the lock-on jack.
If using parallel tracks with multiple Loco-Sound-equipped engines,
Proto-Cast and Proto-Dispatch transmissions from one track may be picked up
by the other nearby engines.
If you experience popping and interference, try cleaning the track with
denatured alcohol as described in the “Cleaning the Wheels, Tires and Track”
section of this booklet.
Note: M.T.H. does not recommend using Proto-Cast and Proto-Dispatch
at the same time.
Page 7
7
RailKing RS-3 Diesel Engine
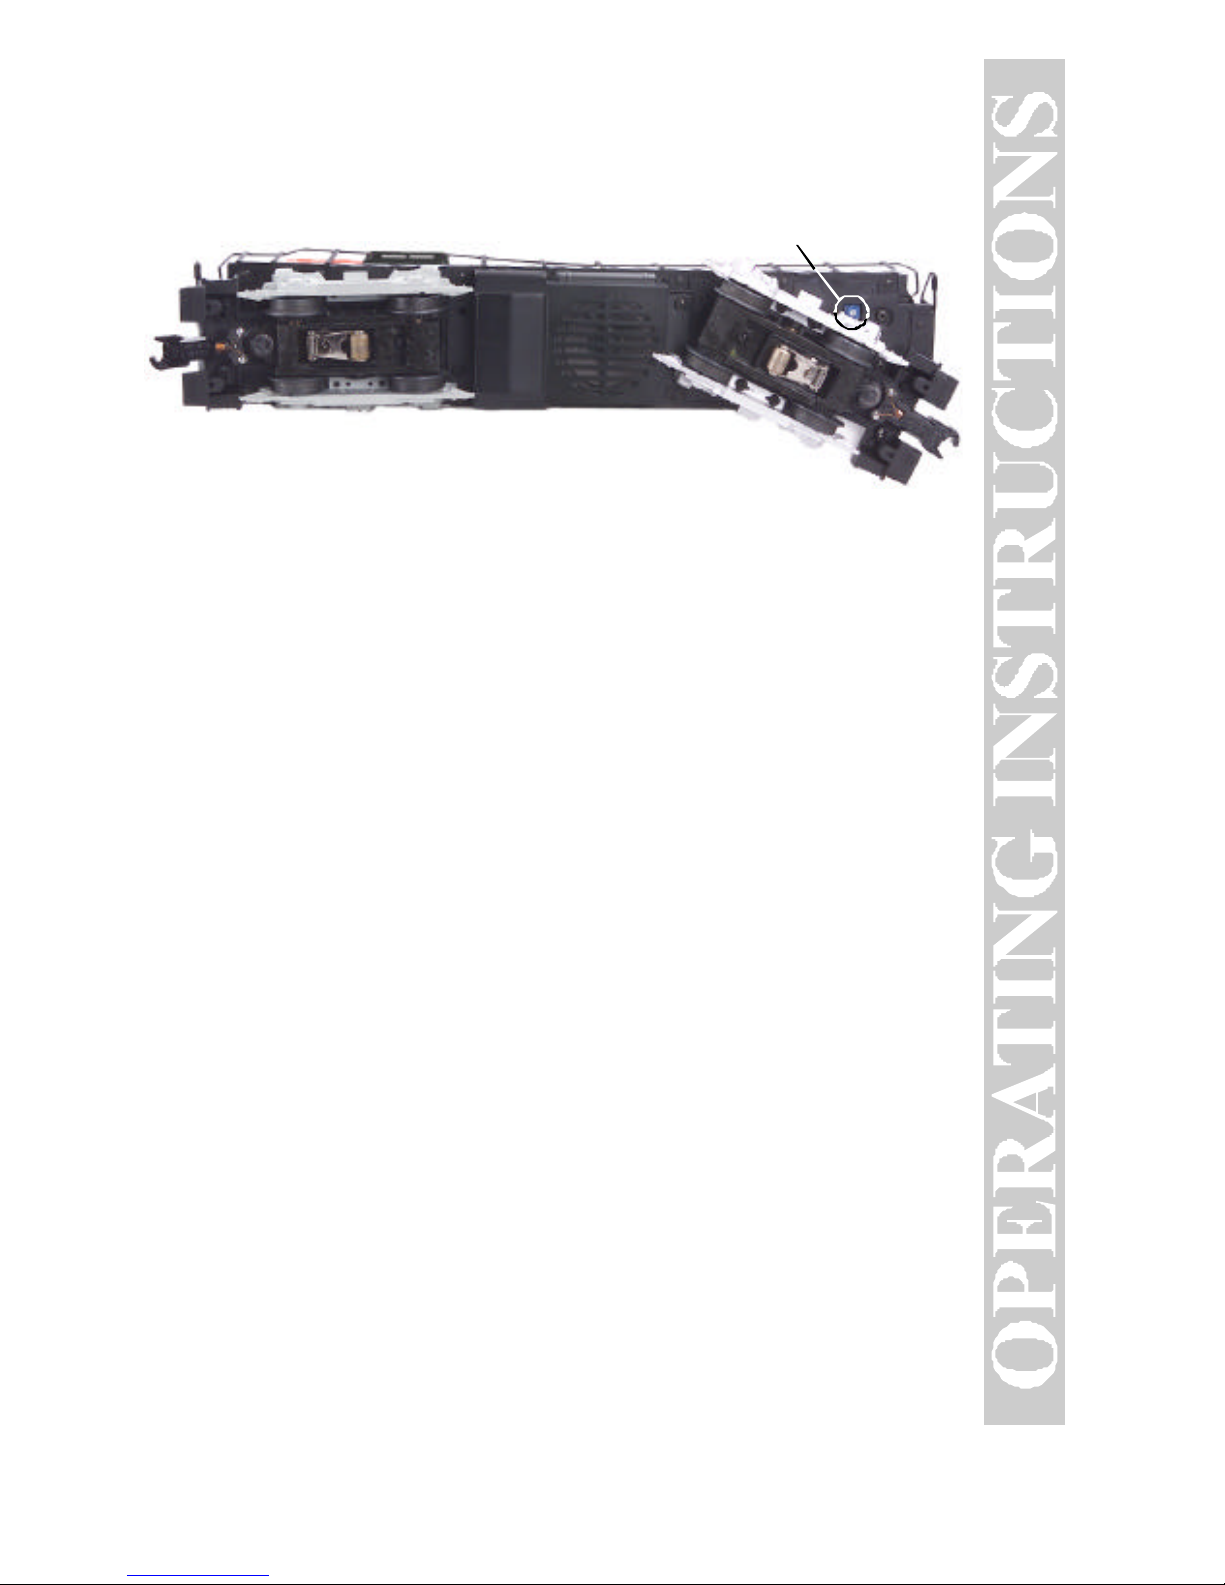
Volume Control – To adjust the volume of all sounds made by this
engine, turn the master volume control knob located under the engine
clockwise to increase the volume and counter-clockwise to decrease the
volume (see Fig. 1).
Loco-Sound
Volume Adjustment Knob
Figure 1. Location of the Loco-Sound Volume Adjustment Knob
Page 8
8
RailKing RS-3 Diesel Engine
Maintenance:
Lubrication and Greasing Instructions
The engine should be oiled and greased in order to run properly.
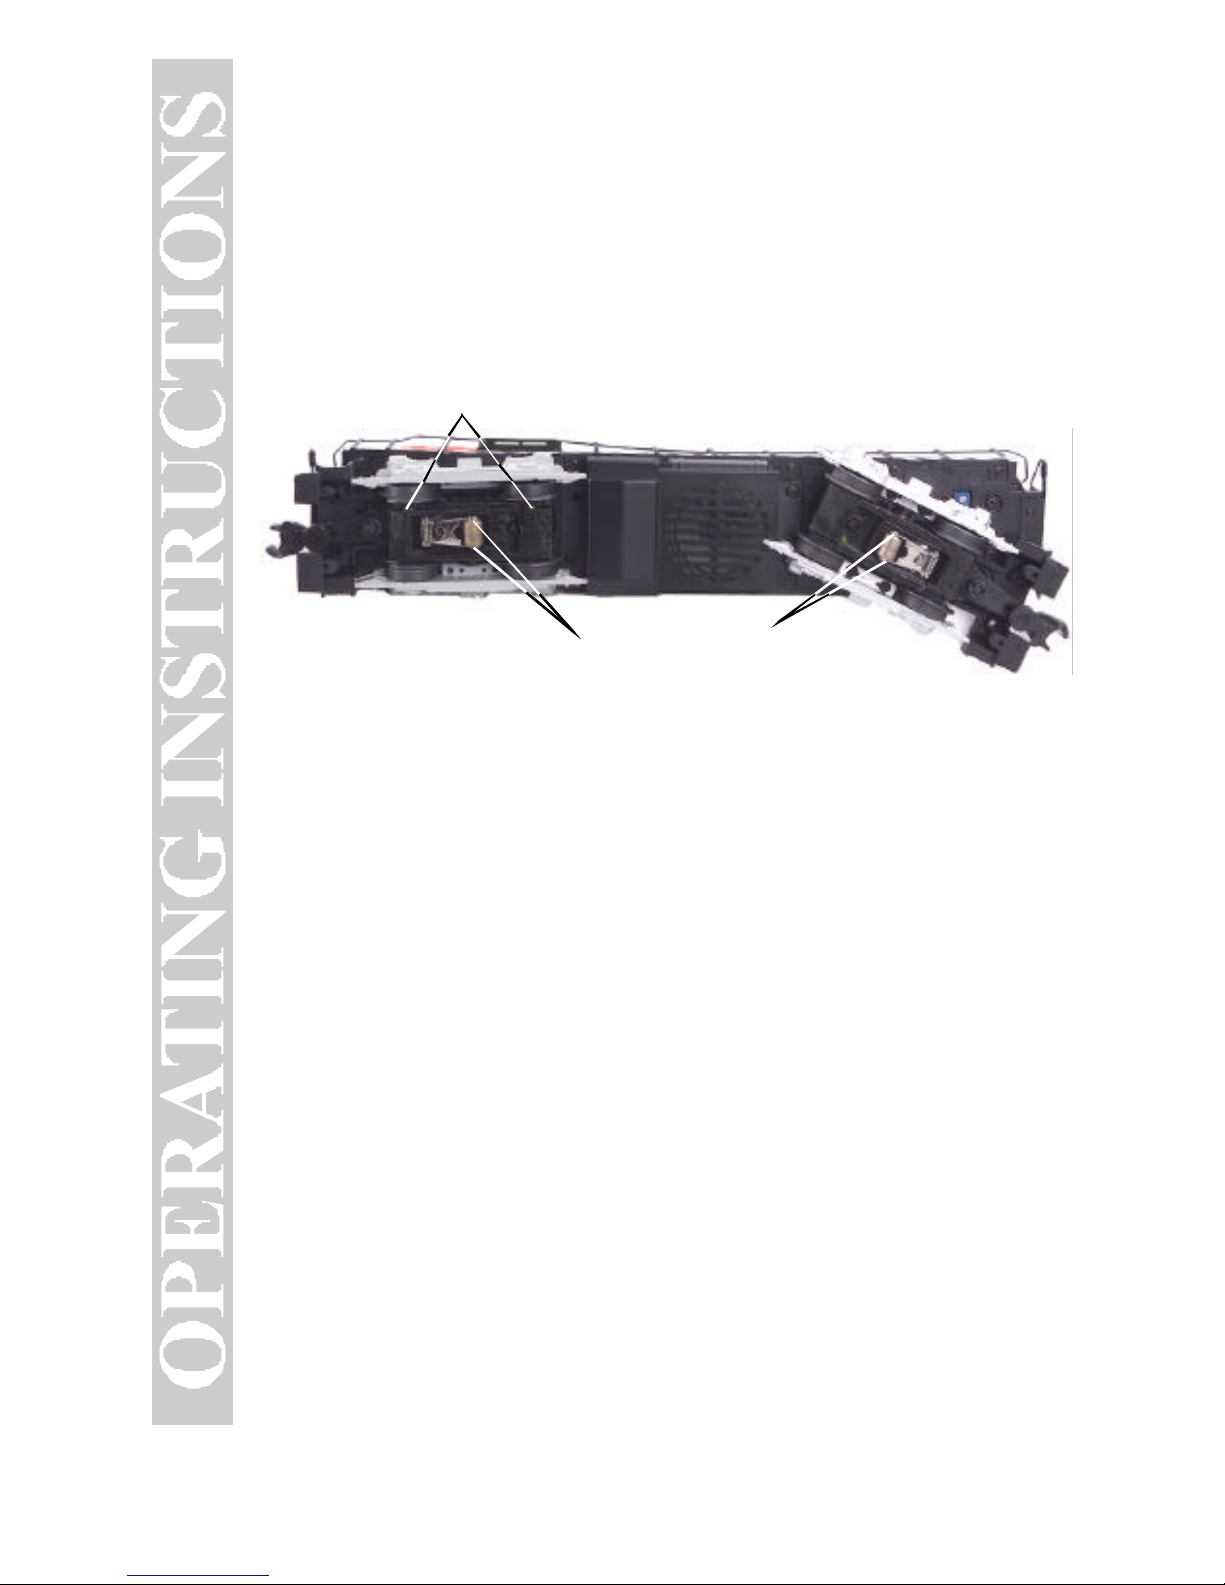
You should regularly lubricate all outside idler gears and pickup rollers to
prevent them from squeaking. Use light household oil and follow the
lubrication points marked “L” in Fig. 2. Do not over oil. Use only a drop or
two on each pivot point.
The locomotive’s internal gearing was greased at the factory and should not
need additional grease until after 50 hours of operation or one year, whichever
comes first. Use lithium based grease and follow the greasing instructions
below. Note that in some tightly packed engines you may need to move
internal components temporarily in order to access the gears.
1. Remove the Phillips screws from the chassis, as seen in Figure 3, then lift
the body away from the chassis. Use caution when removing the body to make
sure the handrails clear the cab housing so that the paint is not damaged.
2. Remove the truck blocks from the chassis by unscrewing the black Phillips
motor mount screw (labeled motor mount screw in Figure 3) on the bottom of
each truck block.
3. Once the motor mount screw has been removed, pull the motor away from
the truck block and lightly coat the motor worm gear and bronze drive gear (in
the truck block) with grease.
Lubricate Pick Up Rollers (L)
Lubricate Wheel Axles (L)
Figure 2. Lubrication Points on the Engine
Page 9
9
RailKing RS-3 Diesel Engine
4. Reassemble the truck and motor, being careful not to pinch any wires
between the truck block and motor mount.
5. Repeat the procedure for the other motor and truck
6. Reassemble the chassis and body, being careful that the wires are not caught
between the body and chassis, as this can lead to a short that may damage the
electronics beyond repair.
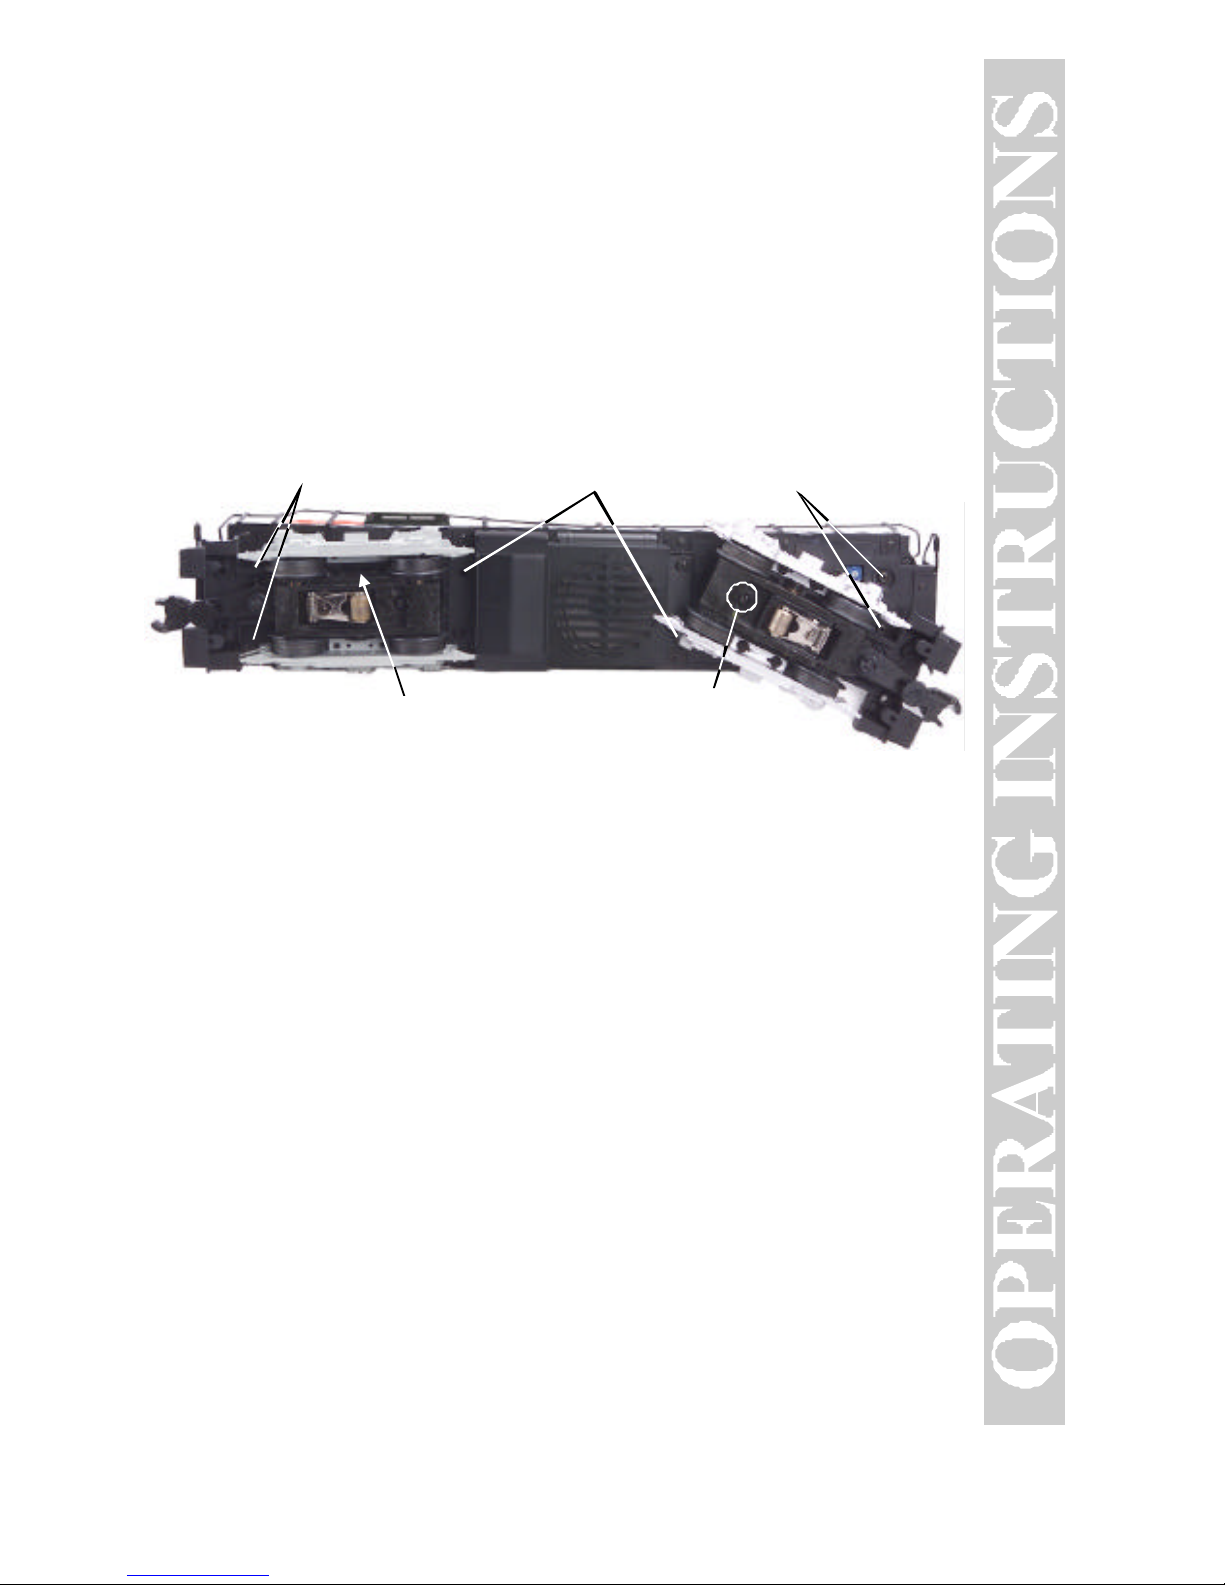
It is also a good idea to lubricate the outside truck block idler and drive gears
with grease occasionally. Add grease to the points marked with “G” in Figure
3.
Body Mount Screws
Body Mount Screws
Motor Mount Screw
Grease Idler Gear (G)
Body Mount Screws
Figure 3. Greasing Points on the Engine and Locations of Body Mounting Screws
Page 10
10
RailKing RS-3 Diesel Engine
Cleaning the Wheels, Tires and Track
Periodically check the locomotive wheels and pickups for dirt and buildup,
which can cause poor electrical contact and traction as well as prematurely
wear out the neoprene traction tires. Wheels and tires can be cleaned using
denatured alcohol (not rubbing alcohol), which can be found in home
improvement stores, applied with a cotton swab.
Occasional cleaning of the track will also help to ensure good electrical contact
and to prolong the life of your engine’s tires. To clean the track, use a clean
rag and denatured alcohol (not rubbing alcohol). Unplug the transformer and
wipe the rails of the track, turning the rag frequently to ensure that you are
using clean cloth on the rails.
Traction Tire Replacement Instructions
Your locomotive is equipped with two neoprene rubber traction tires on each
powered truck block. While these tires are extremely durable, you may need to
replace them at some point.
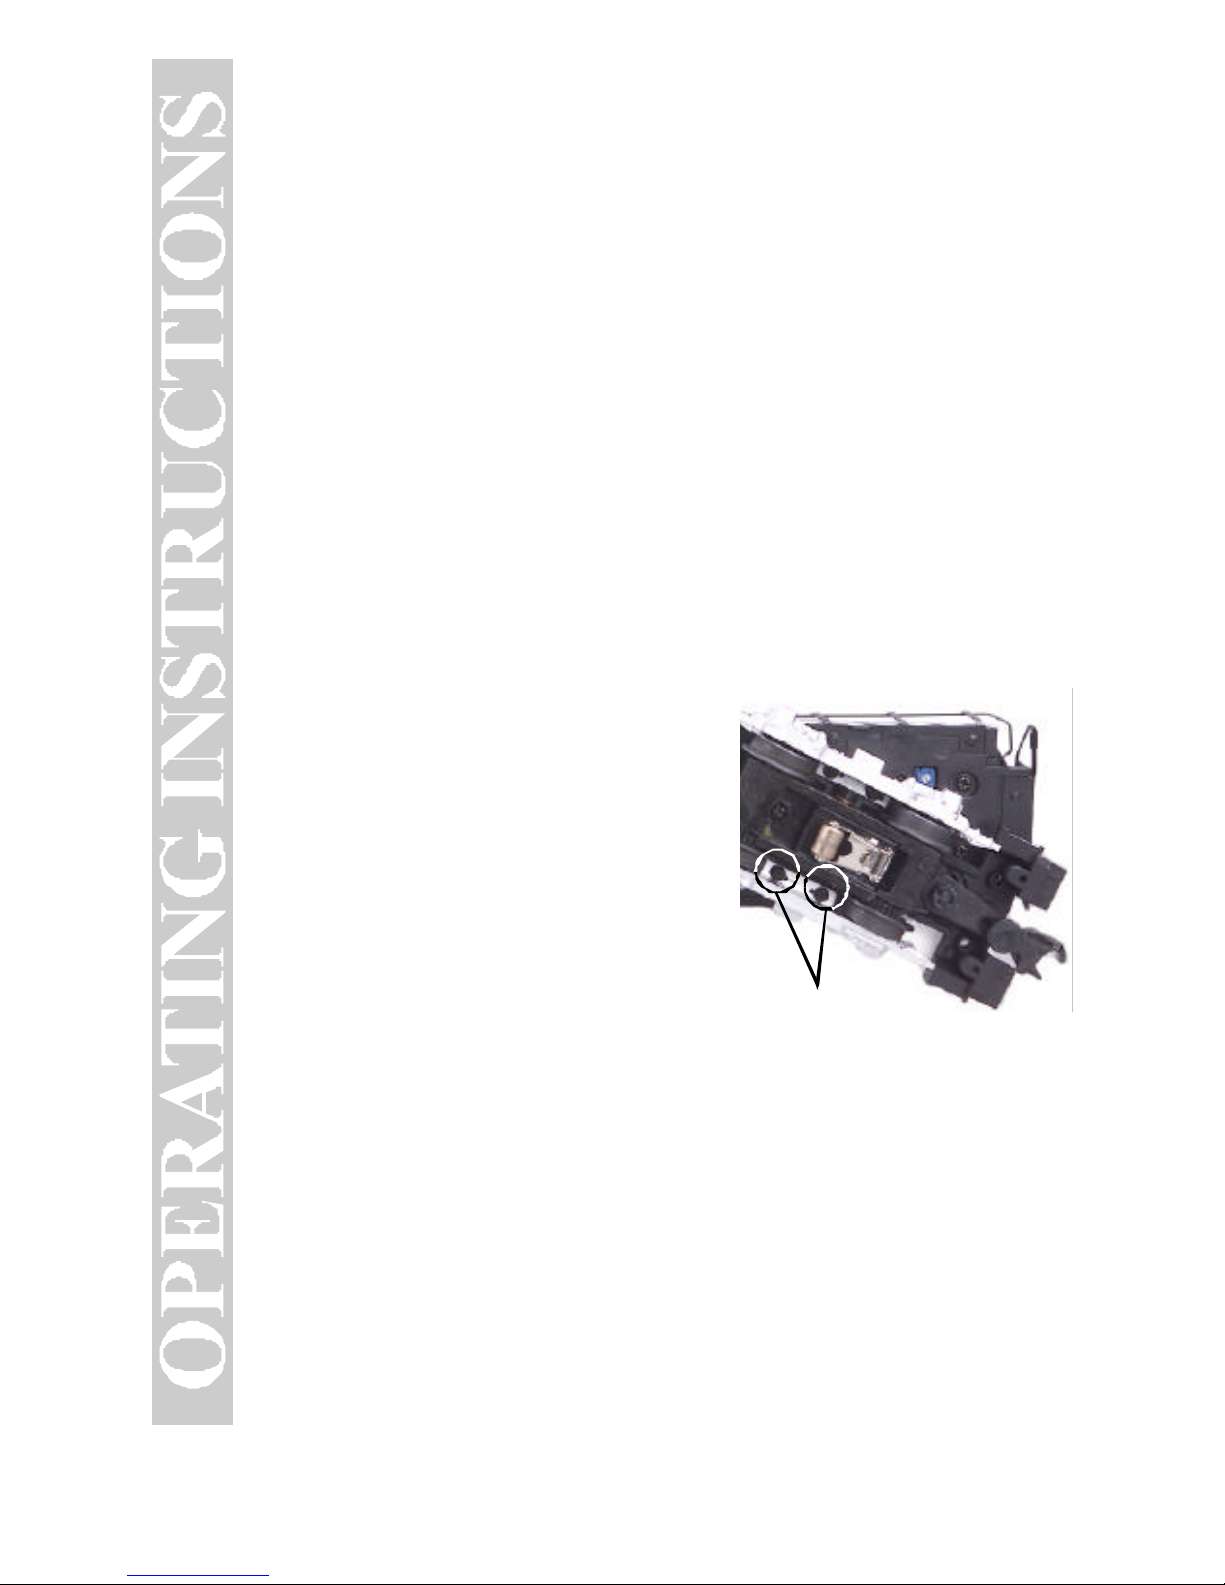
First, remove the truck sides from the truck
block. To do this, turn your engine upside
down. If there are visible Phillips screw
heads between the truck frame and truck
block (see Fig. 4), go to step A. If not, go to
step B.
A. Remove the two Phillips screws that
attach the truck sides to the truck block.
B. Remove the trucks from the chassis and
the truck sides from the trucks in order to
slip the new tire over the grooved drive
wheel. See Fig. 4 for which screws you
must remove to do this.
Once the truck sides have been removed:
1. Make sure the old tire has been completely removed from the groove in the
drive wheel, using a razor blade or small flathead screwdriver to pry away any
remains.
Truck Screws
Figure 4. Screws to Remove to
Access the Traction Tires
Page 11
11
RailKing RS-3 Diesel Engine
2. Slip the new tire onto the wheel. You may find it useful to use two small
flathead screwdrivers to stretch the tire over the wheel.
3. If you twist the tire while stretching it over the wheel, you will need to
remove and reinstall the tire. Otherwise your engine will wobble while
operating.
4. Make sure the tire is fully seated inside the groove. Use a razor blade to
trim away any excess tire that doesn’t seat itself inside the groove properly.
5. Reassemble in reverse order.
One set of replacement tires is packaged with the model. Additional tires are
available directly from the M.T.H. Parts Department (phone: 410-381-2580;
fax: 410-423-0009; e-mail: [email protected]; mail: 7020 Columbia
Gateway Drive, Columbia MD 21046-1532).
Locomotive Light Bulb Replacement
To replace the light bulb in the locomotive, follow these instructions:
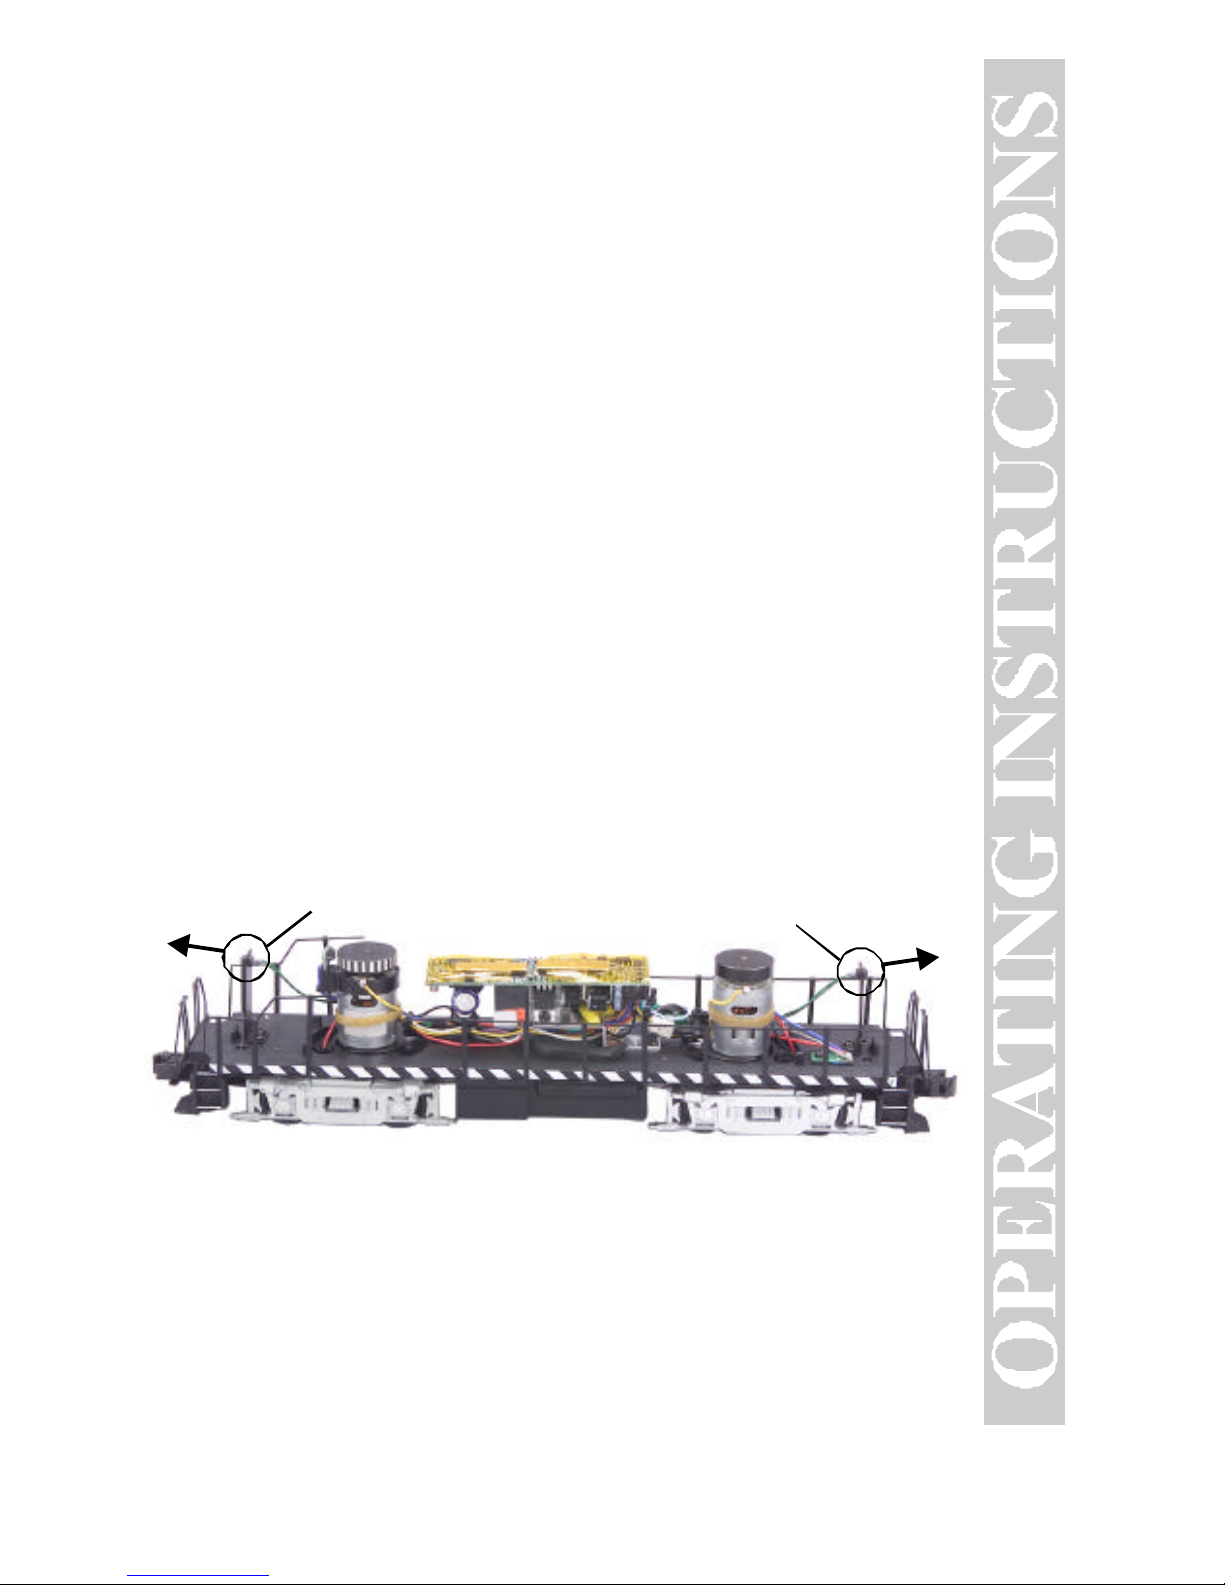
Follow the cab removal instructions found in the “Lubrication and Greasing”
section of this booklet. Once the body has been removed, remove the
lightbulb as shown in Fig. 4 and replace it.
You can obtain replacement bulbs directly from the M.T.H. Parts Department.
Rear Light
Head Light
Figure 5. Location of the headlamp and the rear light in the Engine.
Page 12
12
RailKing RS-3 Diesel Engine
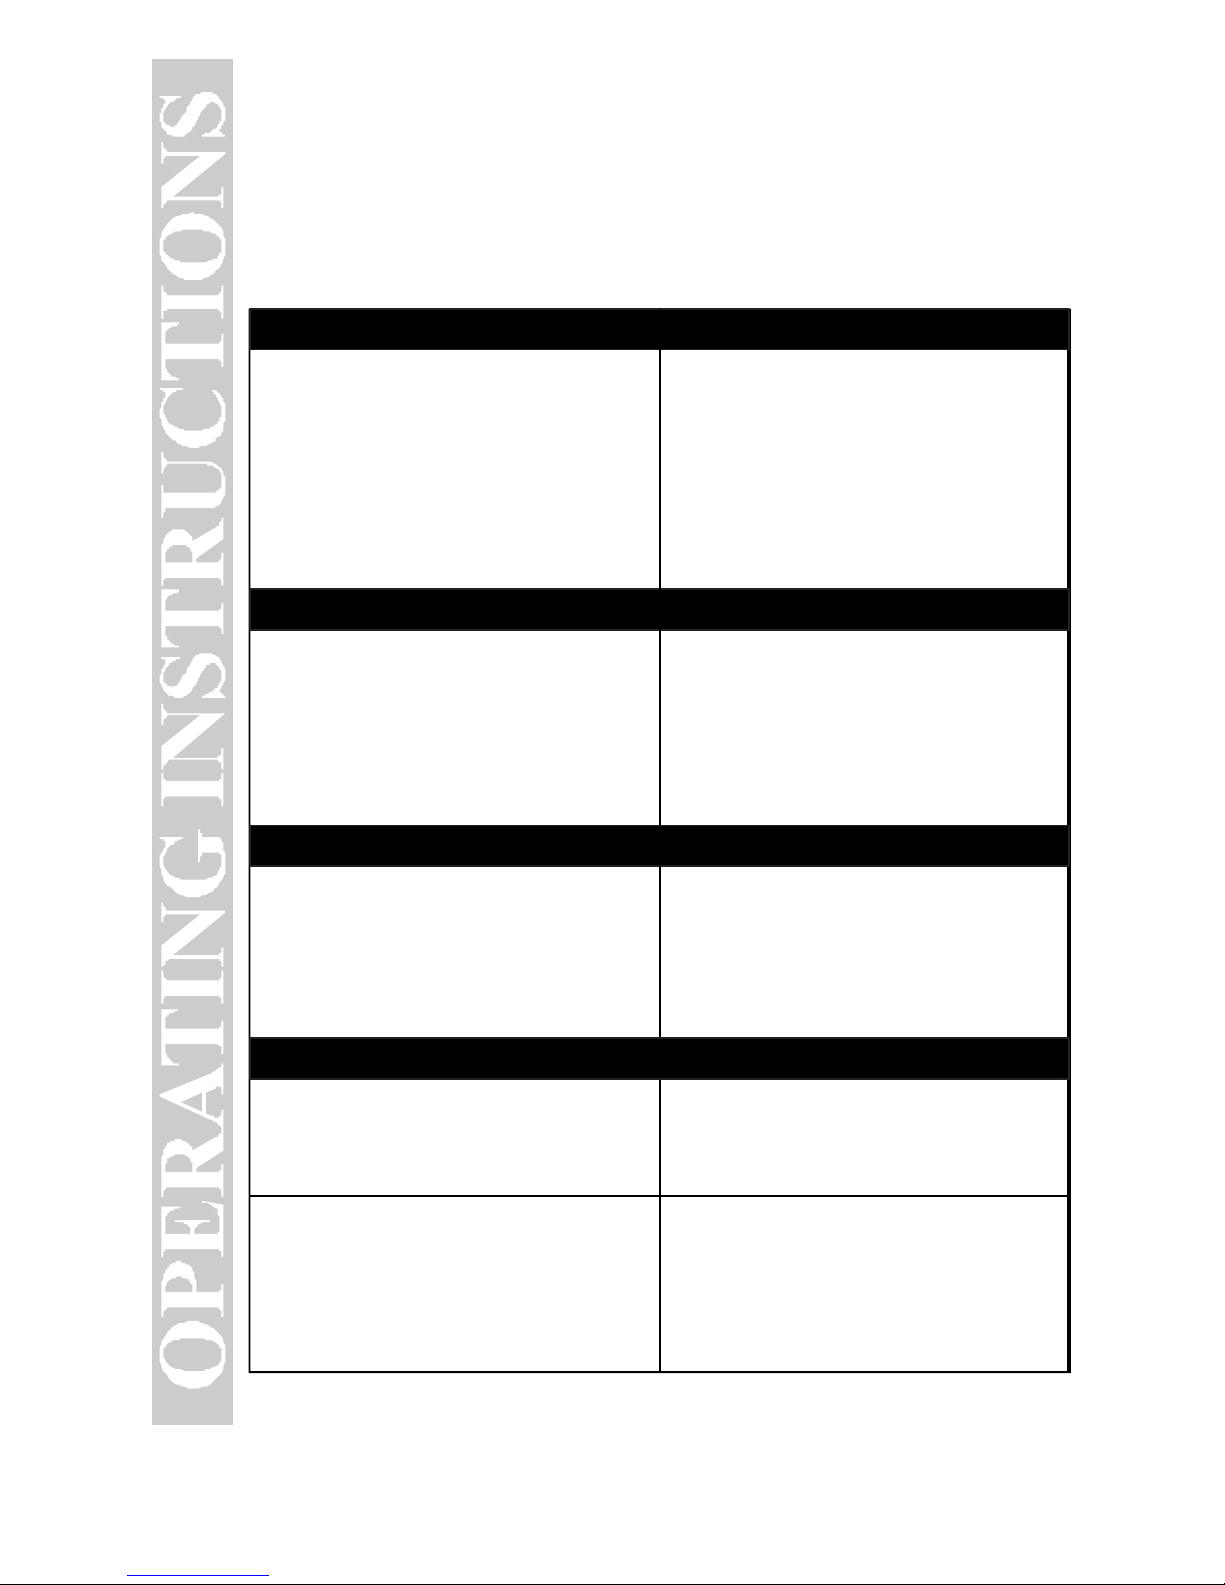
Troubleshooting Loco-Sound™ Problems
Although Loco-Sound has been designed and engineered for ease of use, you
may have some questions during initial operation. The following table should
answer most questions. If your problem cannot be resolved with this table,
contact M.T.H. for assistance (telephone: 410-381-2580; fax: 410-423-0009;
[email protected], 7020 Columbia Gateway Drive, Columbia MD
Starting Up
Horn
Bell
Remedy
Remedy
Remedy
Remedy
When I first turn the power on, the
engine will not begin to run. I have to
turn the throttle off and then on again
to get the engine to operate.
I can’t get the horn to blow when I
press the whistle button.
I can’t get the bell to ring when I press
the bell button.
You may be pressing the button too
quickly. Try pressing the whistle button
more slowly, taking approximately one
full second to fully depress the button.
You may be pressing the button too
quickly. Try pressing the bell button
more slowly, taking approximately one
full second to fully depress the button.
This is normal behavior. To prevent
accidental high-speed start-ups, LocoSound is programmed to start up in
neutral anytime track power has been
turned off for several seconds. See
the "Basic Operation" section for more
details.
Lock-out Remedy
I can’t get the engine to run after I
power up the transformer. It sits still
with the engine sounds running.
The engine won’t lock into forward,
neutral, or reverse.
The engine is locked into the neutral
position. Follow the procedure in the
“Lock into a Direction” section.
Engine speed must be below 10 scale
mph (approx. 10 volts or less in
conventional mode).
Page 13
13
RailKing RS-3 Diesel Engine
Volume Remedy
The sounds seem distorted, especially
when the whistle or bell is activated.
Loco-Sound volume is set too high.
Turn the volume control knob on the
bottom of the chassis counterclockwise to reduce the volume.
Compatibility
This engine will operate on any traditional O-31 or larger O Gauge track
system, including M.T.H.’s RealTrax® or ScaleTrax™ or traditional tubular
track. It is also compatible with most standard AC transformers. (See page 14
for a complete list of compatible transformers and wiring instructions.)
Page 14
14
RailKing RS-3 Diesel Engine
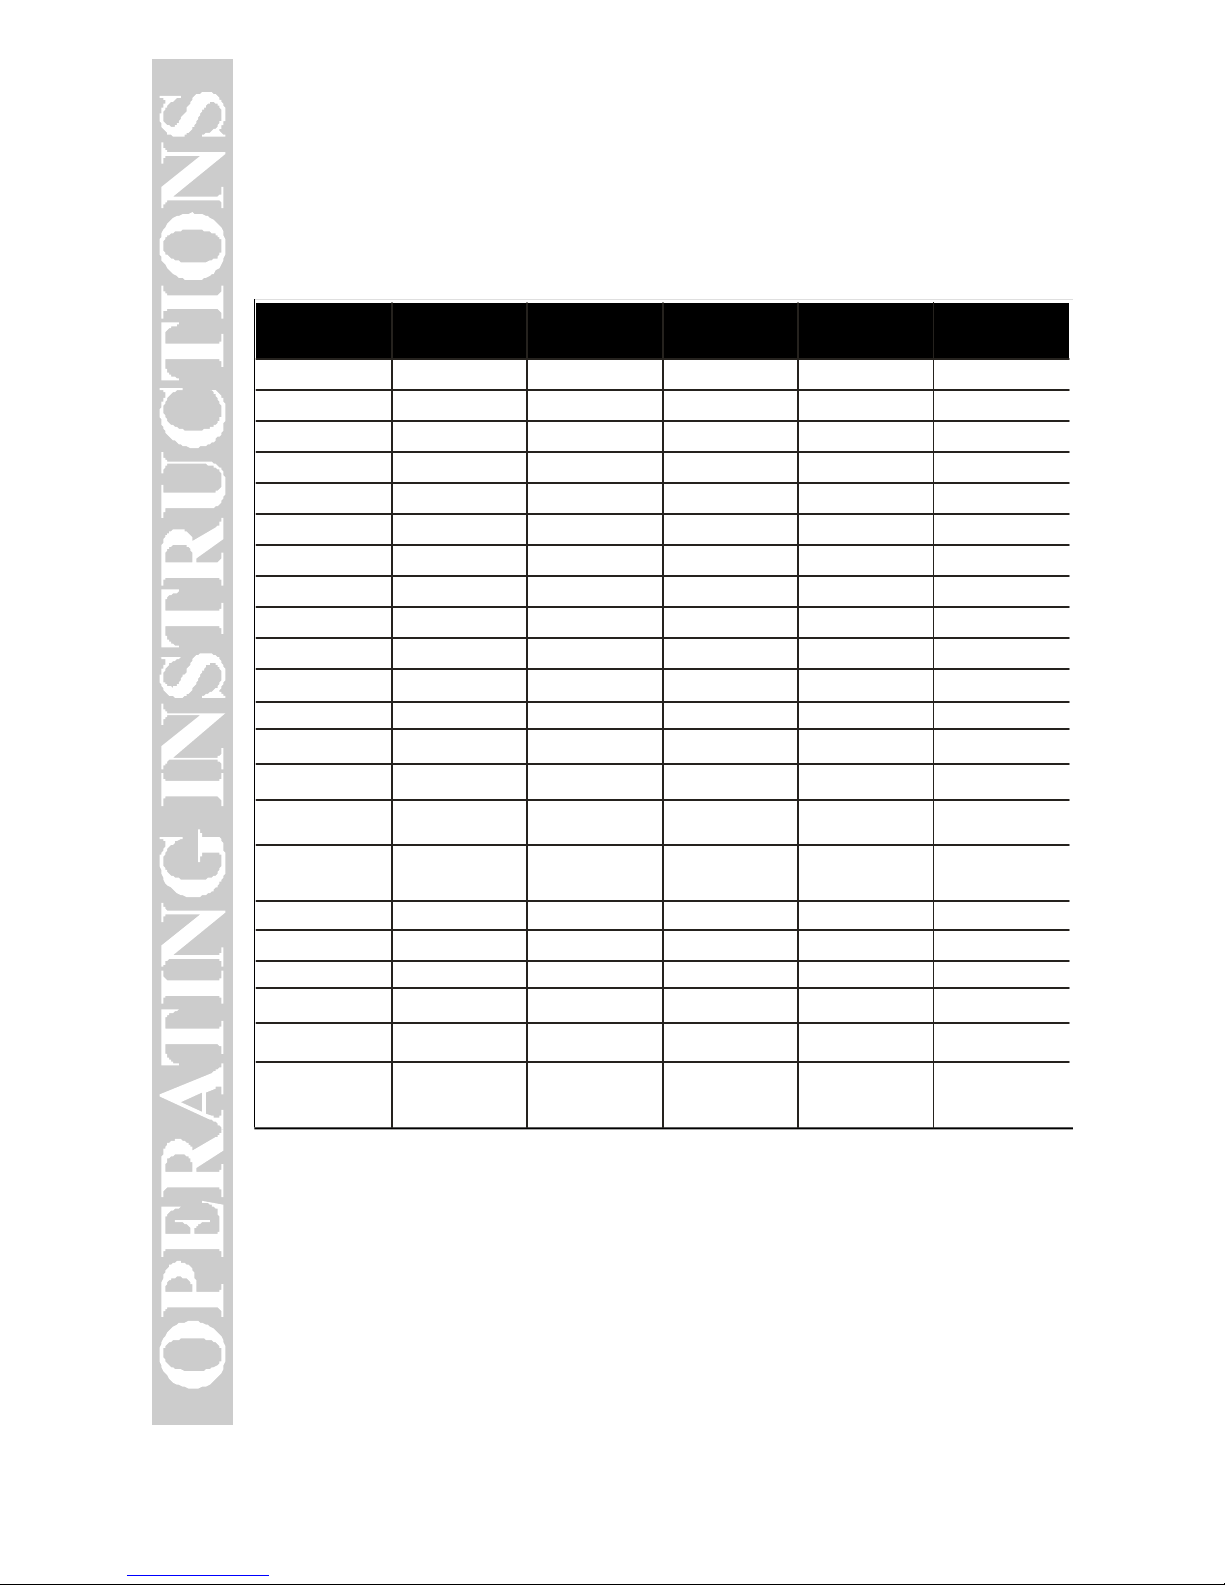
Transformer Compatibility and Wiring Chart
Note that many of the operational commands described in these instructions
require a bell button, so if your transformer does not have its own bell button,
you should consider adding one to get the full benefit of the system.
Transformer
Model
Center Rail Outside Rail
Min/Max.
Voltage
Power
Rating
Transformer
Type
Lionel 1032 U A 5-16v 90-Watt Standard
Lionel 1032M U A 5-16v 90-Watt Standard
Lionel 1033 U A 5-16v 90-Watt Standard
Lionel 1043 U A 5-16v 90-Watt Standard
Lionel 1043M U A 5-16v 90-Watt Standard
Lionel 1044 U A 5-16v 90-Watt Standard
Lionel 1053 U A 8-17v 60-Watt Standard
Lionel 1063 U A 8-17v 60-Watt Standard
All-Trol Left Terminal Right Terminal 0-24v 300-Watt Electronic
Dallee Hostler Left Terminal Right Terminal Electronic
Lionel LW A U 8-18v 75-Watt Standard
Lionel KW A or B U 6-20v 190-Watt Standard
Lionel MW
Outside Track
Terminal
Inside Track
Terminal
5-16v 50V.A. Electronic
Lionel RS-1 Red Terminal Black Terminal 0-18v 50V.A. Electronic
Electronic
Lionel RW U A 9-19v 110-Watt Standard
Lionel SW U A Unknown 130-Watt Standard
Lionel TW
U A 8-18v 175-Watt Standard
Lionel ZW
Lionel Post-War
Celebration
Series ZW
A,B,C or D
A,B,C or D
U
Common
8-20v
0-20v
275-Watt
135/190 Watt
Standard
MTH Z-500 Red Terminal Black Terminal 0-18v 50-Watt Electronic
MTH Z-750 Red Terminal Black Terminal 0-21v 75-Watt Electronic
MTH Z-4000 Red Terminal Black Terminal 0-22v 390-Watt Electronic
* Conventional Mode Only
Page 15
15
RailKing RS-3 Diesel Engine
CAUTION: Electrically Operated Product:
Not recommended for children under 10 years of age. M.T.H.
recommends adult supervision with children ages 10 - 16. As with all
electric products, precautions should be observed during handling and
use to reduce the risk of electric shock.
WARNING: When using electrical products, basic safety precautions should
be followed including the following:
Read this manual thoroughly before using this device.
M.T.H. recommends that all users and persons supervising use examine the
hobby transformer periodically for conditions that may result in the risk of
fire, electric shock, or injury to persons, such as damage to the primary cord,
plug blades, housing, output jacks or other parts. In the event such conditions
exist, the transformer should not be used until properly repaired.
Page 16
Service & Warranty Information
How to Get Service Under the Terms of the Limited One-Year Warranty
For warranty repair, do not return your product to the place of purchase. Instead, follow the
instructions below to obtain warranty service as our dealer network is not prepared to service the
product under the terms of this warranty.
1. First, write, call or FAX M.T.H. Electric Trains, 7020 Columbia Gateway Drive, Columbia, MD
21046, (Tel 410-381-2580; FAX No.: 410-423-0009; e-mail: [email protected]), stating
when it was purchased and what seems to be the problem. You will be given a return authorization
number to assure that your merchandise will be properly handled upon its receipt.
2. CAUTION: Make sure the product is packed in its original factory packaging including its foam
and plastic wrapping material so as to prevent damage to the merchandise. The shipment must be
prepaid and we recommend that it be insured. A cover letter including your name, address, daytime
phone number, e-mail address (if available), Return Authorization number, a copy of your sales
receipt and a full description of the problem must be included to facilitate the repairs. Please
include the description regardless of whether you discussed the problem with one of our service
technicians when contacting M.T.H. for your Return Authorization number.
3. Please make sure you have followed the instructions carefully before returning any merchandise
for service.
Limited One-Year Warranty
All M.T.H. products purchased from an Authorized M.T.H. Train Merchant are covered by this
warranty.
See our website at www.mth-railking.com or call 1-888-640-3700 to identify an Authorized M.T.H.
Train Merchant near you.
M.T.H. products are warrantied for one year from the date of purchase against defects in material or
workmanship, excluding light bulbs and traction tires. We will repair or replace (at our option) the
defective part without charge for the parts or labor, if the item is returned to M.T.H. Electric Trains
within one year of the original date of purchase. This warranty does not cover damages caused by
improper care, handling, or use. Transportation costs incurred by the customer are not covered under
this warranty.
Items sent for repair must be accompanied by a return authorization number, a description of the
problem, and a copy of the original sales receipt from an Authorized M.T.H. Train Merchant, which
gives the date of purchase. Call 410-381-2580, fax 410-423-0009, or e-mail the Service Department at
[email protected] to obtain a return authorization number.
This warranty gives you specific legal rights, and you may have other rights that vary from state to state.
Service Department
M.T.H. Electric Trains
7020 Columbia Gateway Drive
Columbia MD 21046-1532
 Loading...