

Page 1

RK
AIL ING
®
By MT H ElectricTrains
RAILKING NW-2 DIESEL ENGINE
OPERATING INSTRUTIONS
Thank you for purchasing the RailKing® production of General Motors’
NW-2 diesel engine. The engine’s durable ABS body and die-cast trucks
are traditionally sized for operation on any O-27 Gauge track. The engine
should operate for years with any compatible AC transformer (see the chart
on page 35 for a list of compatible transformers) and is completely
compatible with most 3-rail locomotives, rolling stock and accessories.
The locomotive is equipped with either an electronic horn or the
ProtoSound® Digital Sound and train control system which contains several
deluxe features that are simple and fun to operate. Each feature is described
among the following pages which should be read before the engine is
operated. For those of you who can’t wait to get started, the Quick Start
Basic Operating Instructions found on Pages 3 and 4 should be read so that
you understand the basics of the operating system. Please note that some
features are only found in the ProtoSound® models and are marked as such.
Features not marked as ProtoSound® features are available in all models.
RAILKING
Page 2

Table Of Contents
QUICK START - BASIC OPERATION
PROTOSOUNDS® OPERATING INSTRUCTIONS
ProtoSound® DCRU® Reverse Unit Operation(All 3-Rail Models) 5
Horn Operation 5
Bell Operation 5
ProtoCoupler Operation 6
Squeaking Brake Sounds 7
Tips On Using Squeaking Brakes 8
Freight Yard Sounds (FYS) 9
Tips On Using The Freight Yard Sounds 13
Self-Recharging Battery Backup System 15
Replacing The Battery 15
ProtoSound® Volume Adjustment 16
USING “RESET" TO PROGRAM PROTOSOUNDS®
Entering RESET Options 17
Setting The Engine Volume 18
Programming For A Separate Bell Button Controller 19
Programming For Squeaking Brake Operation 19
Programming For Horn In Neutral Operation 20
Programming For Cab Chatter Sounds 21
Programming For ProtoCoupler Operation 22
Programming For FYS Operation 22
Activating Reverse Unit Lock-Out Control 23
Resetting All ProtoSound® Options To Factory Defaults 24
Reverse Unit Lockout Control Functions 25
Locking The Engine Into Forward or Reverse 25
Unlocking The Engine 25
Locking The Engine Into Neutral 25
OIL & LUBRICATION INSTRUCTIONS
TRACTION TIRE REPLACEMENT INSTRUCTIONS
LIGHT BULB REMOVAL & REPLACEMENT
TROUBLE SHOOTING PROTOSOUND™ PROBLEMS
ProtoSound® RESET Feature Chart 34
Transformer Wiring Chart 35
O-27 OPERATION
SERVICE AND WARRANTY INFORMATION
HOW TO GET SERVICE
LIMITED ONE YEAR WARRANTY
3
4
17
27
28
29
30
36
36
36
36
RAILKING
RailKing NW-2 Operating Manual
2
Page 3

QUICK START - BASIC OPERATION
The RailKing NW-2 contains state-of-the art electronics with several builtin automatic features for incredibly realistic operation. Despite these
advanced features, the NW-2 is easy to operate with any compatible
standard AC transformer (see the compatibility chart on page 35).
All models are controlled by a ProtoSound® DCRU® electronic reverse
unit. The reverse unit operates in the same manner that all reverse units
function by using forward, neutral and reverse states that are entered each
time the throttle is turned on and off or by using the transformer direction
switch (if so equipped).
The reverse unit is designed to
ignore dirty track, dead spots on
switches or minor short circuits
without disrupting the engine
operation, even at slow, prototypical
speeds. Once the engine is placed
on the track, the throttle on the
transformer can be advanced. You
will see that only the engine’s lights
come on and that only two dings of
Figure 1: ProtoSound® DCRU® Lockout Switch
the ProtoSound® bell occur
followed by the diesel start-up
sounds (on ProtoSound® equipped 3-rail models). The engine does not run.
This is known as the RESET state
and is explained in more detail
RESET
Forward
Neutral
Reverse
Neutral
beginning on Page 4. The
ProtoSound® DCRU® will not
power the motors until the throttle
is turned OFF and then ON again.
Figure 2: DCRU Cycle Phases
At this point, the engine will now
function just like any other
electronic or mechanical E-unit. On ProtoSound® equipped engines, the
diesel engine sounds will change in volume as the engine begins to move.
The horn can be activated by pressing the whistle button on the transformer
just as any horn would be activated. See the sections later in this guide,
beginning on page 5, for more information on activating the horn and bell
sounds.
DCRU® Electronic Reverse Unit
Lockout Switch
RAILKING
RailKing NW-2 Operating Manual
3
Page 4

PROTOSOUNDS® OPERATING
INSTRUCTIONS
The MTH ProtoSound® digital sound and train control system provides
the operator with unprecedented realistic operation on your model railroad.
In addition to actual diesel engine, CD-equivalent 16-bit digital sounds,
you get the following features:
Built-In ProtoSound® DCRU® Reverse Unit * Authentic Diesel Engine Horn
*
Sound * Authentic Diesel Engine Bell Sound * Squeaking Brake Sound * Freight
Yard Sounds * Operating Remote Controlled ProtoCoupler™ * SelfRecharging Battery Back-Up System With Automatic Battery Shut-Off *
Remotely Controlled Reverse Unit Lock-Out * Remotely Adjustable Diesel
Engine Volume * Authentic Diesel Engine Start Up & Shut Down Sounds *
Random Selection of Four “Cab Chatter" Radio Transmission Sound Clips *
Each feature is described among the following pages. Though the system
is easy to use, we encourage you to read the instructions thoroughly.
ProtoSound® DCRU® REVERSE UNIT
As mentioned in the Basic Operating section, the engine is controlled by a
ProtoSound® DCRU® reverse unit that contains the standard forwardneutral-reverse states found on most reverse units. However, as described
earlier, when power is first applied to the track, the reverse unit begins in
RESET or what seems like a neutral state. Power must be interrupted again
to get the locomotive to enter the forward state. It is this first RESET state
that gives ProtoSound® its unique, remote controlled functions. The
system will enter RESET whenever power to the track is off for three or
more seconds. NEUTRAL will be referred to as the state between Forward
and Reverse.
ProtoSounds® is equipped with a microprocessor, that, depending on the
amount of memory it is allotted, allows the user to utilize several remotely
activated functions. In the simplest terms, ProtoSounds® has its own
“Computer" controlling these functions. In fact, the power of this
microprocessor is the same as that of a 286 desktop computer! In order to
access many of these remotely controlled functions, the user must be in the
RESET state to do so. RESET is entered anytime power to the locomotive
has been off for more than 3 to 5 seconds. When the engine first enters
RESET, the microprocessor initiates a system check to determine if the
system, transformer and engine are operating correctly. This takes
RAILKING
RailKing NW-2 Operating Manual
4
Page 5

approximately 2.2 seconds during which you will hear the engine’s startup
sounds begin. In order for ProtoSounds® to properly initiate the system
check, do not advance the transformer throttle past 10 volts when you first
enter RESET, wait for the diesel startup sounds to begin and then slowly
turn the transformer throttle to the off position and then back on again to
enter the forward phase. Interrupting the power too quickly may cause the
system to re-enter RESET (signaled by two dings of the bell). Should this
happen, wait longer before interrupting the power to enter the Forward
phase.
ProtoSounds® comes with several programmable functions, including
Engine Volume Adjustment, Separate Bell Button Operation (preprogrammed at the factory), Cab Chatter On/Off Control, ProtoCoupler
On/Off Control and Horn-In-Neutral Operation. Each of these features are
described in more detail later. You will notice that when in RESET, your
engine will not respond to the whistle button with a horn blast or continuous
bell ringing. In fact, when in RESET and the whistle button is depressed,
only one single bell chime will be heard each time the whistle button is
pressed. If you don’t want to configure or change your locomotive using
any of these programmable features, simply leave RESET and wait 2.2
seconds before interrupting the power to put the engine in forward. After
you leave RESET, your engine will operate normally in all the direction
states of forward, neutral and reverse.
HORN OPERATION
Your RailKing NW-2 ProtoSound® equipped engine is equipped with a
digital recording of a diesel horn. The horn sound can be activated anytime
the engine is in forward or reverse by pressing the whistle button on your
transformer. The horn will continue to blow as long as the whistle button is
depressed. The horn will not function in RESET and must be configured
through a RESET option to allow the horn to work when the engine is in
neutral. See page 17 for information on horn programming in the Using
RESET To Program ProtoSounds® section of this manual.
BELL OPERATION
Your RailKing NW-2 ProtoSound® equipped engine is equipped with a
digital recording of an actual diesel bell. Unlike previous versions of
ProtoSounds®, the bell can be turned on or off with any separate bell
button, like the Lionel® Railsounds® No. 5906 Bell Button, by simply
RAILKING
RailKing NW-2 Operating Manual
5
Page 6

pushing the button. If you don’t have a separate bell button, the bell can be
controlled through your transformer’s whistle button whenever the engine
is in NEUTRAL. The bell will never ring continuously in RESET
(Remember NEUTRAL is the state between Forward and Reverse). Once
the bell is turned on, it will continue to ring when the engine is cycled into
forward or reverse until you press the bell button or re-enter NEUTRAL
and turn the bell off with the whistle button.
In fact, because of ProtoSounds® state-of-the-art design, the
microprocessor remembers its last command. Therefore, unless you turn
the bell off before you quit running your train, the next time you run the
engine, the bell will come on. No matter whether you come back an hour
later or a year later, the bell will begin chiming once the engine enters one
of the three directional states.
To turn the bell on using the transformer’s whistle button, turn on power to
the track and cycle the engine into NEUTRAL. Turn the throttle to 8 volts
or less (any higher voltage will arm the ProtoCoupler™) and press the
whistle button. The bell should begin chiming. To turn the bell off, press
the whistle button again. If you want to keep the bell on while running the
engine, simply interrupt the power with the transformer throttle or the
transformer directional switch and enter forward or reverse.
PROTO-COUPLER™ OPERATION
Your RailKing NW-2 ProtoSound® equipped locomotive has two coilwound ProtoCouplers™ for remote uncoupling action. The couplers are
mounted on the power trucks. Because the ProtoCoupler™ is controlled
through ProtoSounds® microprocessor, it doesn’t’t require an uncoupling
track section or modification to your layout to function. The three simple
steps below are required to operate the coupler.
1. Put your engine in NEUTRAL and turn the throttle all the
way up.
2. Press the transformer whistle button to “Arm" the coupler.
(You will hear a “Clank")
3. After arming the coupler, press the whistle button again to
open the coupler.
Put Engine In Neutral
At Full Power
Press & Release
The Whistle Button
Ca-Clunk
H
Listen For The
Ca-Clunk Sound
Press & Release
The Whistle Button
H
See The Coupler Open
And Listen For The
Cha-Chusshh Sound
Cha-Chussshhh
RAILKING
RailKing NW-2 Operating Manual
6
Page 7

When the knuckle fires open you will hear the buzzing of the coil
energizing and the sound of the air lines coming apart. It can best be
described as a CHA-CHUSHHH sound. The coupler doesn’t’t have to be
fired in NEUTRAL. Once the
coupler is armed it can be fired
in Forward, Neutral or Reverse.
However, you may find that the
coupler doesn’t’t open when
firing the coupler at high
speeds. Reduce the voltage
setting on your transformer if
this occurs and run your engine
at a slower speed before firing
the coupler. If the coupler
continues to open erratically, try
lubricating the knuckle with
light oil as indicated in Fig. 3.
For multiple heading purposes, only one of the two ProtoCouplers™ will
function at any one time. Use the coupler direction switch as shown in Fig.
5 on page 16 to select either the front or rear coupler. Simply slide the
switch toward the direction of the coupler you want to make active.
Lubricate Coupler Rivet
Figure 3: Lubricating The ProtoCouplers
SQUEAKING BRAKE SOUNDS
ProtoSound® equipped engines feature the ability to play the sound of
squeaking brakes whenever your engine slows in speed. There are two
settings for activating the squeaking brake sounds. The default setting
allows the brake sounds to play while the engine is in forward or reverse
and the transformer throttle is lowered from a high setting to a low setting
(14 volts to 8 volts or less). The second setting requires that a bell button be
used to “arm” the brake feature and is explained in more detail in the
“Activating Freight Yard Sounds” section found later in this manual. The
sound itself is a stored record on the ProtoSounds® software chip and will
always play the same brake sound for the same three second length each
Throttle Down From
High Voltage To Low
Listen For The
Squeaking Brake Sounds
Squeeek
RAILKING
RailKing NW-2 Operating Manual
7
Page 8

time the voltage is reduced from high to low. Some practice may be
required to synchronize the playing of the brake sounds with the movement
of the engine. It is not uncommon for the engine to stop before the brake
sound is completed. Operators will find that by coordinating the movement
of the throttle setting from 8 volts to off will allow the engine to maintain its
movement while the brake sounds play. Note: The brake sounds will not
be heard if the transformer throttle is not set above 14 volts and/or not
reduced below 8 volts.
TIPS ON USING THE SQUEAKING BRAKE FEATURE
Because the squeaking brake feature always plays for approximately 3
seconds, it is possible that the brake sounds will play longer or shorter than
what visually seems prototypical. You will find that by practicing with the
brake feature, you can quickly determine how quickly to throttle down and
what speeds and voltage settings give you the most prototypical braking effect.
Typical users will find the feature to be a very realistic way to simulate the
sound of an engine slowing down for curves, crossings or coming to a stop at a
station, side track or switch yard. As mentioned above, you will find that
initially your engine may continue to play the brake sounds once your engine
comes to a stop or that the sounds stop prematurely before the engine comes to
a complete halt. For example, if you simply run the engine and turn the throttle
off quickly, the brake sounds will likely continue playing even though the
engine has come to a complete stop. This annoying effect can be eliminated by
simply practicing with the brake feature. In no time, you will quickly learn
how to feather" the throttle to keep the engine moving while the brake sounds
play and then turning the throttle off just as the sounds stop. Remember that
once you stop the engine, you should turn the throttle to the off position if you
dont want to activate the Freight Yard Sounds feature described later in this
manual.
The ProtoSound® squeaking brake feature also has the ability to simulate the
squeal of wheel flanges when your train enters a curve at high speeds. The
same brake squealing sound plays, but you dont need to reduce the
transformer throttle to activate the squealing sounds. To play the squealing
sounds as wheel flange sounds, trigger the brake feature using either method 1
or 2 above. Once triggered set the transformer throttle setting at 14 volts or
higher. As your engine enters a curve (or anywhere on the layout) quickly
flick" your transformer whistle button about half way. This flicking" action
causes the transformer to release a short DC signal that ProtoSounds® reads as
an indicator to activate the brake sounds. The engine wont slow down even
though the sounds play. This simulates the wheel flange squeal of a train
traveling through a turn too quickly.
Note: Consistent activation of the wheel flange squealing is determined by the
condition of your transformers whistle button rectifier disc. Older rectifier
discs may not release a clear and strong enough DC signal required by
ProtoSounds® computer to play the wheel flange squealing.
RAILKING
RailKing NW-2 Operating Manual
8
Page 9

FREIGHT YARD SOUNDS (FYS)
ProtoSounds® comes equipped with operator controlled Freight Yard
Sounds, hereby referred to as FYS. This easy to use feature plays digitally
reproduced freight yard sounds whenever your engine stops on your layout
and is parked in the Neutral position. No additional wires or modifications
are needed on your layout to enjoy these amazing sound effects. The
sounds themselves are randomly generated and randomly “shuffled” on the
ProtoSounds® software chip. This gives the system the ability to produce
different sounds in a different order each time FYS is enabled. These
different sounds are heard each time you cycle the transformer throttle from
ON to OFF in the same manner that you would cycle the throttle to enter the
various states of Forward, Neutral and Reverse. The entire FYS sequence is
designed to simulate the arrival, loading or unloading and departure of a
freight train in a freight yard. Each sequence is described in more detail in
the following sections.
ACTIVATING FREIGHT YARD SOUNDS
Your ProtoSounds® equipped engine features an operator controlled
freight yard sound set. Once activated, this easy to use feature plays the
sound of freight yard activities whenever the operator places the engine in
the neutral position.
ARMING THE FREIGHT YARD FEATURE
Before the freight yard sounds can be heard, ProtoSounds® must activate
the feature so that the next time the engine enters the neutral position, the
sounds can play, The feature can be activated one of two ways.
Option 1: If you are using a separate bell button controller to ring your
bell (like the Lionel Railsounds® No. 5906 bell activation button) you can
activate the feature by pressing and holding the bell button for three seconds
or longer (it doesn’t matter if you are in forward, neutral or reverse). You
will hear the bell
chiming turn on and if
you listen carefully you
should hear an air
release sound after three
seconds have passed at
which time you can
Put Engine In Neutral,
Forward or Reverse
Press & Hold
The Railsounds® Bell Button
For 3 Seconds
Listen For The
Start Of The Bell Sound
Ding, Ding
Psshhee
Air Release Sound
Listen For The
After 3 Seconds
RAILKING
RailKing NW-2 Operating Manual
9
Page 10

release the bell button. (Note: because the air release sound is hard to
hear, we recommend that you count out a full three seconds before
releasing the bell button.) The bell will continue to chime, so if you want to
turn off the bell ringing, simply press and release the bell button a second
time. If you were in neutral when you triggered the brake feature, interrupt
the transformer throttle to enter either forward or reverse to allow the
engine to begin running. (
Note: the feature will only be activated in the
first direction state you enter after triggering the feature from the neutral
position. You cannot interrupt the power twice to enter another direction
state and still have the brake feature active.) Once your engine begins
running, you can trigger the sounds to begin playing whenever you enter
neutral.
Option 2 If you do not have a separate bell button on your layout, you can
still activate the feature with your transformer whistle button. To activate
the feature turn on the transformer throttle and get your engine into the
neutral position (not RESET). Once in neutral, set the transformer throttle
at 8 volts or less and press and hold the whistle button for at least three
seconds. You will hear the bell chiming turn on and if you listen carefully
you should hear an air release sound after three seconds have passed at
which time you can release the whistle button. (
release sound is hard to hear, we recommend that you count out a full three
seconds before releasing the whistle button.) The bell will continue to
chime, so if you want to turn off the bell ringing, simply press and release
the bell button a second
time. Interrupt the
Put Engine In Neutral
At Low Power
transformer throttle to enter
either forward or reverse to
allow the engine to begin
running. (
feature will only be activate
Note: the
Press & Hold
The Whistle Button
For 3 Seconds
in the first direction state
you enter after triggering the feature from the neutral position. You cannot
interrupt the power twice to enter another direction state and still have the
feature active.) Once your engine begins running, you can trigger the
sounds to begin by entering neutral.
Note: because the air
Listen For The
Start Of The Bell Sound
Ding, Ding
H
Psshhee
Listen For The
Air Release Sound
After 3 Seconds
RAILKING
RailKing NW-2 Operating Manual
10
Page 11

ACTIVATING AND TRIGGERING FREIGHT YARD SOUNDS
Before FYS can be heard the feature must be activated first. Activation is
accomplished by holding down the bell button for three or more seconds as
described in the Activating and Triggering The Squeaking Brake Sounds
section found earlier. Once the feature is activated, FYS will be played the
next time the engine enters the neutral position. In order for FYS to begin,
power must remain on once the engine enters the Neutral position. At this
point ProtoSounds® has taken over control of your engine and disabled the
bell and whistle buttons from any further operator functions. In addition,
ProtoSounds® has reconfigured the way the reverse unit functions by
disabling the reverse unit state during operation of the FYS feature. This
forces the engine to leave your freight yard in the same direction it arrived
in. The following operator controlled “events” control FYS’s actions and
sounds.
Event 1 (Forward) While the locomotive is running in forward (or
reverse) FYS is activated by the operator pushing and holding the bell
button down for three or more seconds. The locomotive bell begins
chiming and can be left on or turned off without disabling FYS.
Event 2 (Neural Before Reverse) The operator now interrupts the
transformer throttle to stop the engine and put it into Neutral. If the throttle
setting was at 14 volts or higher , ProtoSounds® will play the sound of
squeaking brake sounds as the engine comes to a halt.
A. Upon stopping of the engine, the operator must immediately turn
the throttle back on to keep the engine in the Neutral position. If the
bell was not turned off after activating FYS, it now turns off
automatically.
Note:
3 seconds of leaving the Forward phase will
disable FYS and shutdown ProtoSounds®. The
next time you turn power back on your engine will
be in the RESET position. See page 4 for more
information on RESET.
Failure to turn the throttle back on within
Put Engine In Neutral
At Low Power
RAILKING
RailKing NW-2 Operating Manual
11
Page 12
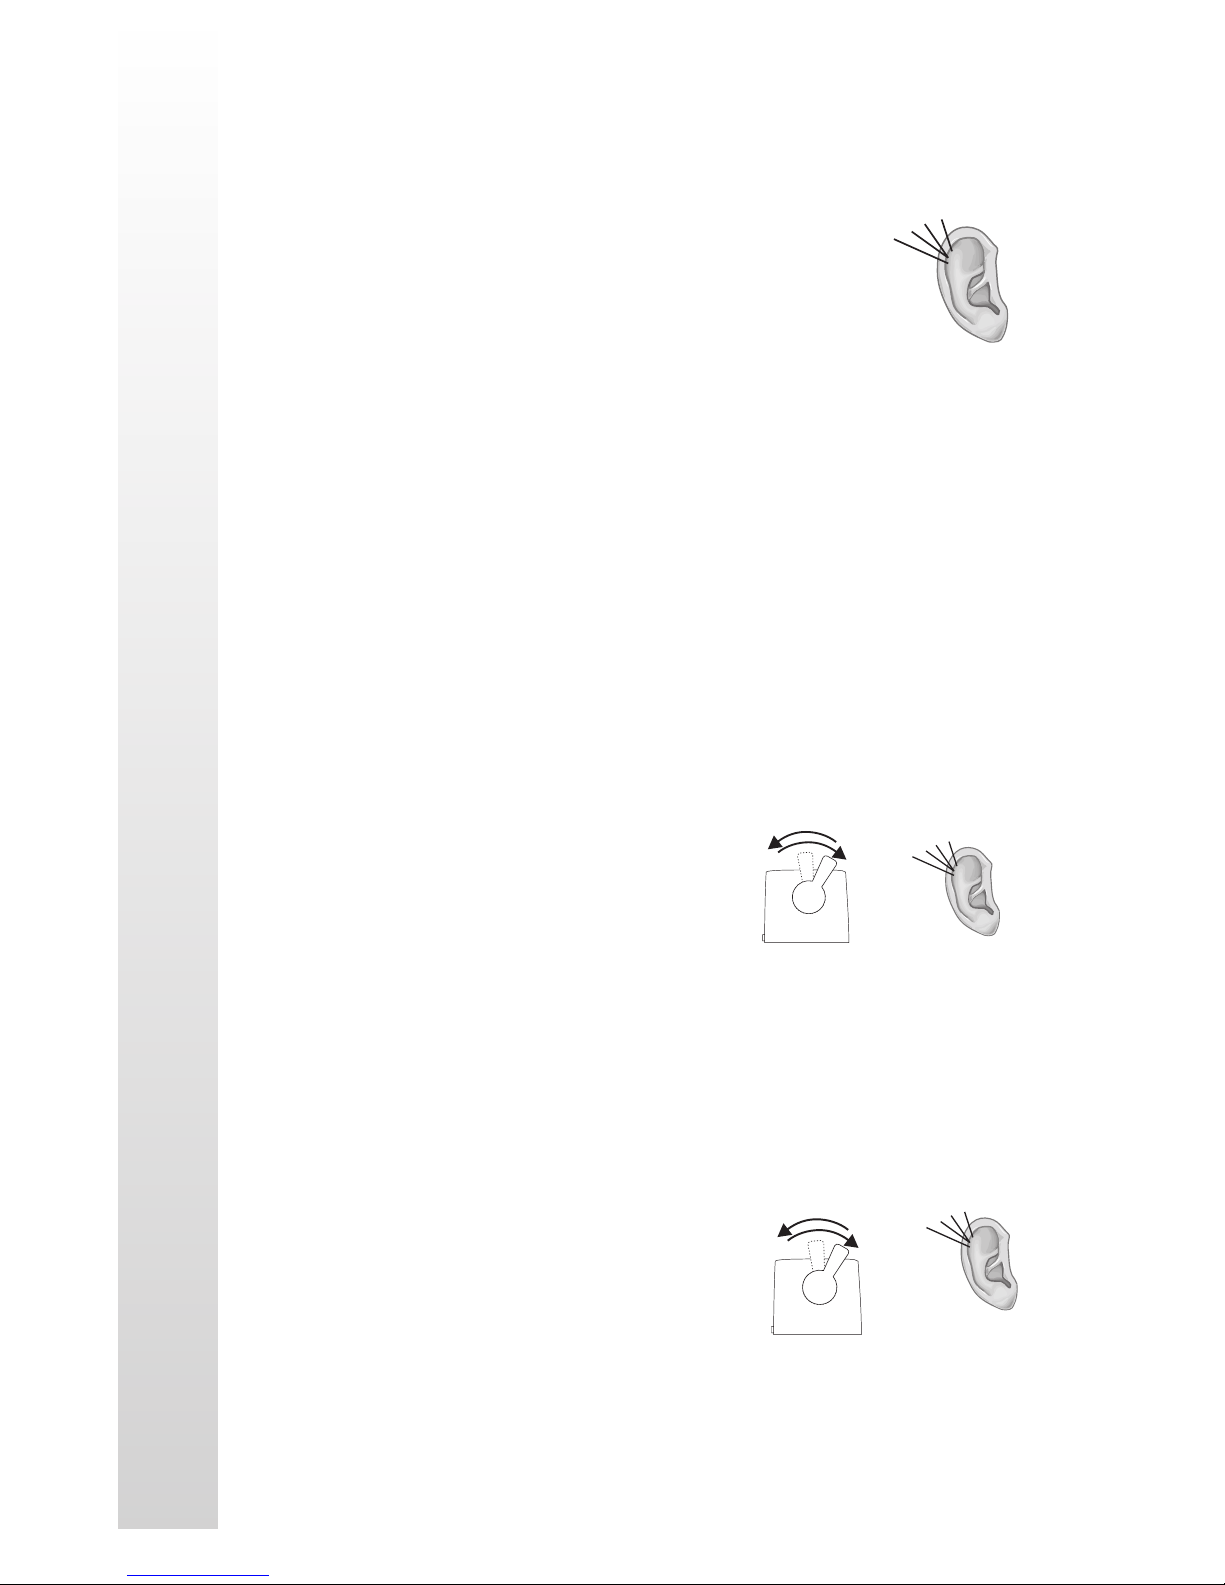
B. After entering Neutral, ProtoSounds® will immediately play an
air release sound followed approximately 2 seconds later by a Cab
Chatter Arrival Message. The arrival
message announces what yard the engine
has arrived in (the yard is described as
either Yard A or Yard B, alternating each
Listen For Air Release Sound
And Cab Chatter Message
Psshhhee
time FYS is enabled during the current
operating session. If the engine is turned
off for more than three seconds,
ProtoSounds® will automatically return
to the Yard A message the next time FYS
is enabled). Immediately following the arrival message, the sound of
freight car doors can be heard opening, followed by the sounds for
forklift engines. At this point various freight yard sounds can be
heard including forklift operation, engine sounds, reverse warning
horn beeps, and additional freight car door sounds.
Event 3: (Reverse) The operator now interrupts the transformer throttle
again to enter the next reverse unit phase; reverse. In an effort to enhance
realism, FYS has disabled the reverse phase so that it doesn’t power the
motors causing the engine to move backward. Upon entering reverse, FYS
confirms to the operator that it has entered
the reverse phase by immediately playing
a highlight sound best described as a
rumbling sound. You may have to go
Interrupt Throttle To
Enter The Next Phase
Listen For Engine
Rumbling Sound
Rummmbllle
through the entire FYS sequence several
times before you can clearly identify this
sound. After the rumbling highlight is
played, the freight yard sounds heard in
Event 2 continue to play randomly.
Event 4: (Neutral Before Forward) The operator now interrupts the
transformer throttle again to enter the next reverse unit phase, neutral before
forward. FYS confirms to the operator that
it has entered the neutral before forward
phase by emitting two quick air release
sounds. This is followed by a Cab Chatter
message that the engine in Yard A or B
(whichever yard designation was played in
Event 2) is preparing to depart the yard.
Upon completion of the cab chatter
RAILKING
RailKing NW-2 Operating Manual
Interrupt Throttle To
Enter The Next Phase
Psshee, Psshhee
Listen For 2
Air Release Sounds
12
Page 13
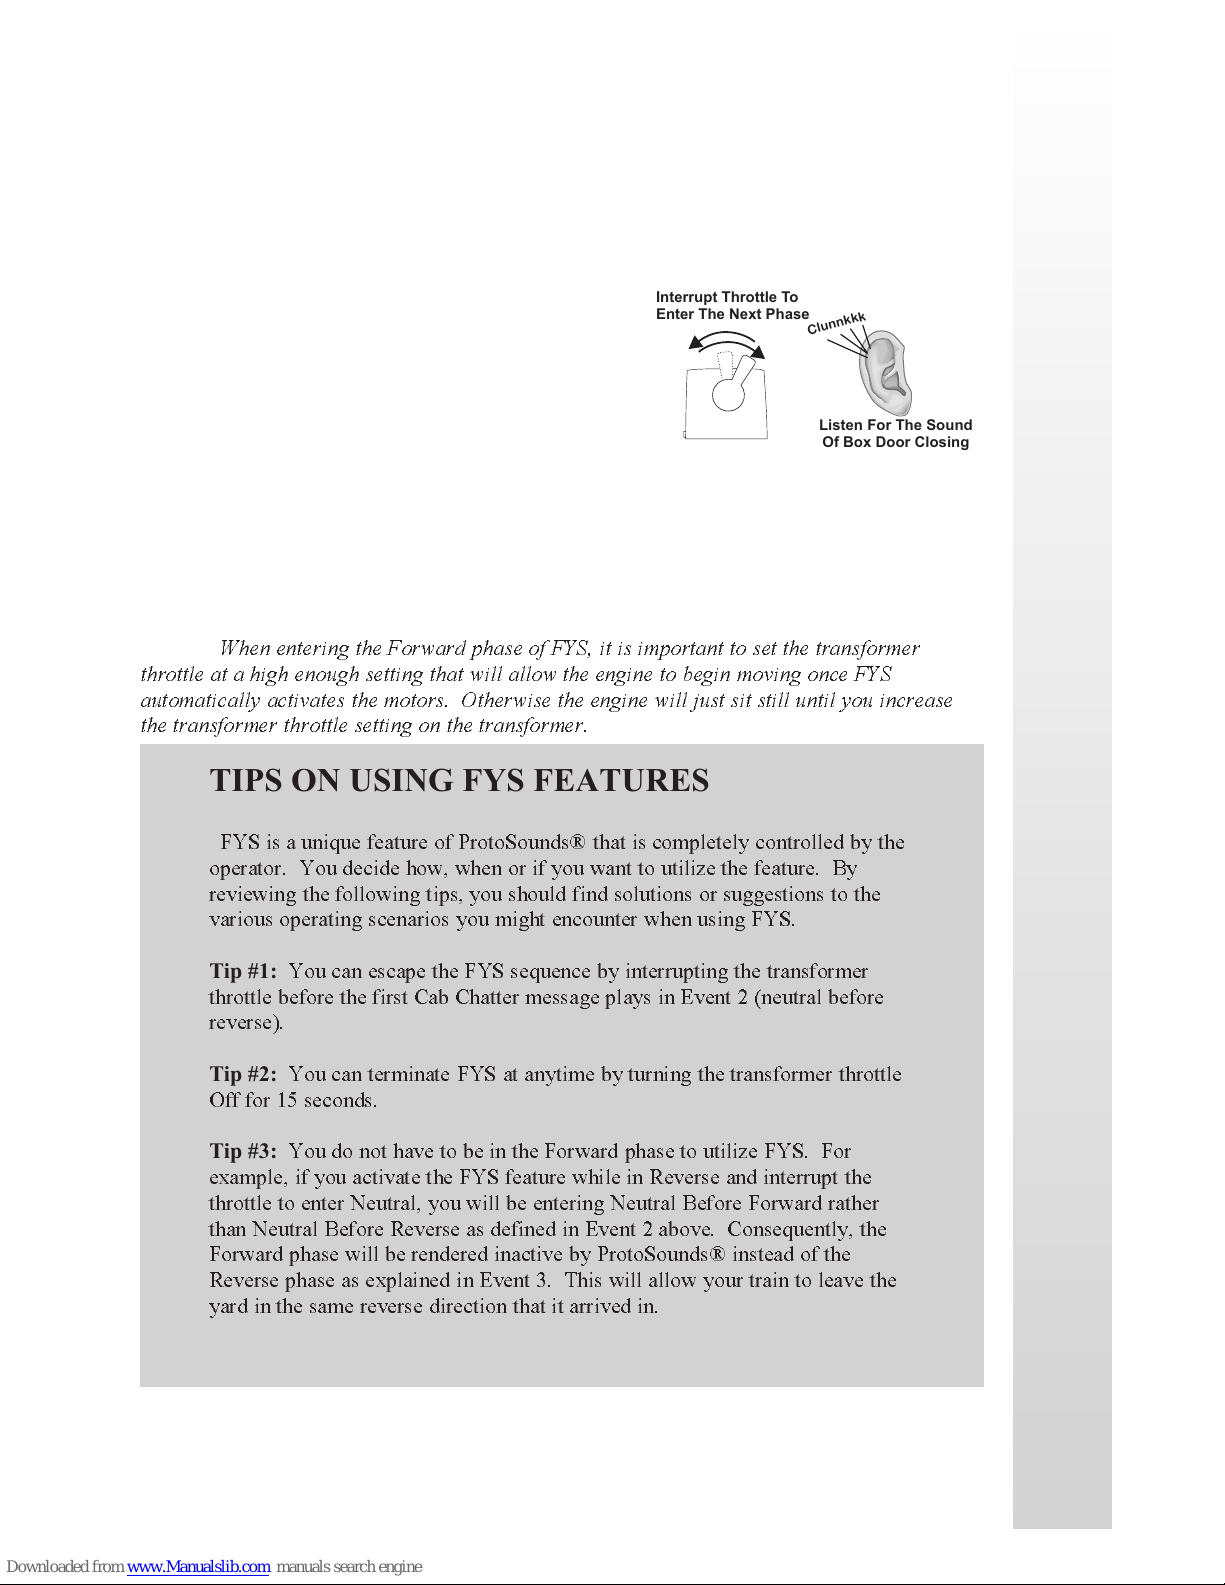
message, the freight yard sounds change as the forklift sounds turn off and
the freight car doors begin shutting.
Event 5: (Forward) The operator now interrupts the transformer throttle
again to enter the next reverse unit phase; Forward. FYS confirms to the
operator that it has entered the Forward
phase by playing the sound of the freight car
door closing. Within 2 seconds of the door
closing, the locomotive bell begins chiming,
Interrupt Throttle To
Enter The Next Phase
Clunnkkk
the diesel engine sounds come on and the air
compressor pumps start. After
approximately 7 chimes of the bell, the
engine begins moving in the forward phase
Listen For The Sound
Of Box Door Closing
with the bell continuing to ring another 7
chimes before automatically turning off.
Once the bell turns off, the operator regains control of the transformer
whistle and bell buttons and can ring the bell or blow the horn as usual.
Note:
throttle at a high enough setting that will allow the engine to begin moving once FYS
automatically activates the motors. Otherwise the engine will just sit still until you increase
the transformer throttle setting on the transformer.
When entering the Forward phase of FYS, it is important to set the transformer
TIPS ON USING FYS FEATURES
FYS is a unique feature of ProtoSounds® that is completely controlled by the
operator. You decide how, when or if you want to utilize the feature. By
reviewing the following tips, you should find solutions or suggestions to the
various operating scenarios you might encounter when using FYS.
Tip #1:
throttle before the first Cab Chatter message plays in Event 2 (neutral before
reverse).
Tip #2:
Off for 15 seconds.
Tip #3:
example, if you activate the FYS feature while in Reverse and interrupt the
throttle to enter Neutral, you will be entering Neutral Before Forward rather
than Neutral Before Reverse as defined in Event 2 above. Consequently, the
Forward phase will be rendered inactive by ProtoSounds® instead of the
Reverse phase as explained in Event 3. This will allow your train to leave the
yard in the same reverse direction that it arrived in.
You can escape the FYS sequence by interrupting the transformer
You can terminate FYS at anytime by turning the transformer throttle
You do not have to be in the Forward phase to utilize FYS. For
RAILKING
RailKing NW-2 Operating Manual
13
Page 14
Tip #4:
engine regardless of whether the second engine is equipped with an FYS
programmed ProtoSound® module. If the second engine isnt equipped with
FYS, the only thing to remember is that you not turn up the transformer
throttle very high when entering the Reverse phase found in Event 3. If the
throttle is set too high, then the second locomotive will begin vibrating on the
track as its motors will be turning in the reverse state since they cannot be
disabled automatically like FYS equipped engines. If your second engine is
equipped with FYS, you may want to disable it when used in double-headed
operations. To disable FYS, see the section on programming RESET
functions on page 28 of this manual.
You can utilize FYS even if you are double-heading with another
Tip #5:
the FYS sounds. for example, the brake sounds wont be heard if the high
voltage setting is below 13 volts when the power is interrupted to enter the
Neutral state.
Tip #6:
state by simply interrupting the transformer throttle. Any sound effects
programmed to play in that event will simply not occur. The only exception
is Event 2 and Event 5. In Event 2, interrupting the throttle has no effect on
FYS until after the arrival Cab Chatter message has completed and the freight
car doors have opened. In Event 5, you cannot interrupt FYS until after the
engine begins to move. Interrupting the throttle before the engine begins to
move has no affect on the locomotives operation.
It is not necessary for the squeaking brake sounds to be heard to play
You can leave any of the event states at any time after entering the
RAILKING
RailKing NW-2 Operating Manual
14
Page 15

SELF-RECHARGING BATTERY BACKUP SYSTEM
ProtoSounds® state-of-the-art design includes a self-recharging battery
backup system for improved performance at any speed. The self-recharging
battery backup system is automatically turned on or off whenever track
power is turned on or off. There are no switches to turn on or off to enjoy
the benefits of the automatic battery backup system. The battery ensures
that power to the sound system will remain on during directional changes,
setting RESET options, or when traveling over dirty track and switches.
The battery is a rechargeable NiCad type which is continually charged
from the track when power is applied. NiCad batteries are a dry battery and
should not leak or cause any damage to your locomotive and will last up to
five years or longer. If you notice that the sounds seem distorted or garbled
at low voltages or become silent when power from the transformer is shut
off, the battery may be going bad. Before replacing the battery, you should
put the engine in NEUTRAL and leave the transformer throttle at about 12
volts for fifteen minutes. This should temporarily recharge the battery. If
the garbled or distorted sounds are reduced, then your battery charge has
worn down. You can give your battery a full charge by leaving the engine
ON in NEUTRAL for 16 to 18 hours.
REPLACING THE PROTOSOUND® BATTERY
If you notice that the sounds seem distorted or garbled at low voltages or
become silent when power from the transformer is shut off, the battery may
be going bad. Before replacing the battery, you should put the engine in
NEUTRAL and leave the transformer throttle set at about 12 volts for 15
minutes. This should temporarily recharge the battery. If the garbled or
distorted sounds are reduced, then your battery charge has worn down. You
can give your battery a full charge by leaving the engine ON in the
NEUTRAL position for 18 hours. (Make sure the smoke unit switch is in
the OFF position to prevent harm to the smoke unit wicking).
If you need to replace the battery, replacement ProtoSound® batteries are
available from MTH ProtoSound® Electronics at 7020 Columbia Gateway
Drive, Columbia, MD 21046. A standard 9v alkaline battery can be
substituted as a temporary fix, but since alkaline batteries can’t take a
charge, it will eventually wear down. Regardless, it should give you a week
to a couple of months use while you wait for your replacement
ProtoSound® battery to arrive.
RAILKING
RailKing NW-2 Operating Manual
15
Page 16
PROTOSOUND® VOLUME ADJUSTMENT
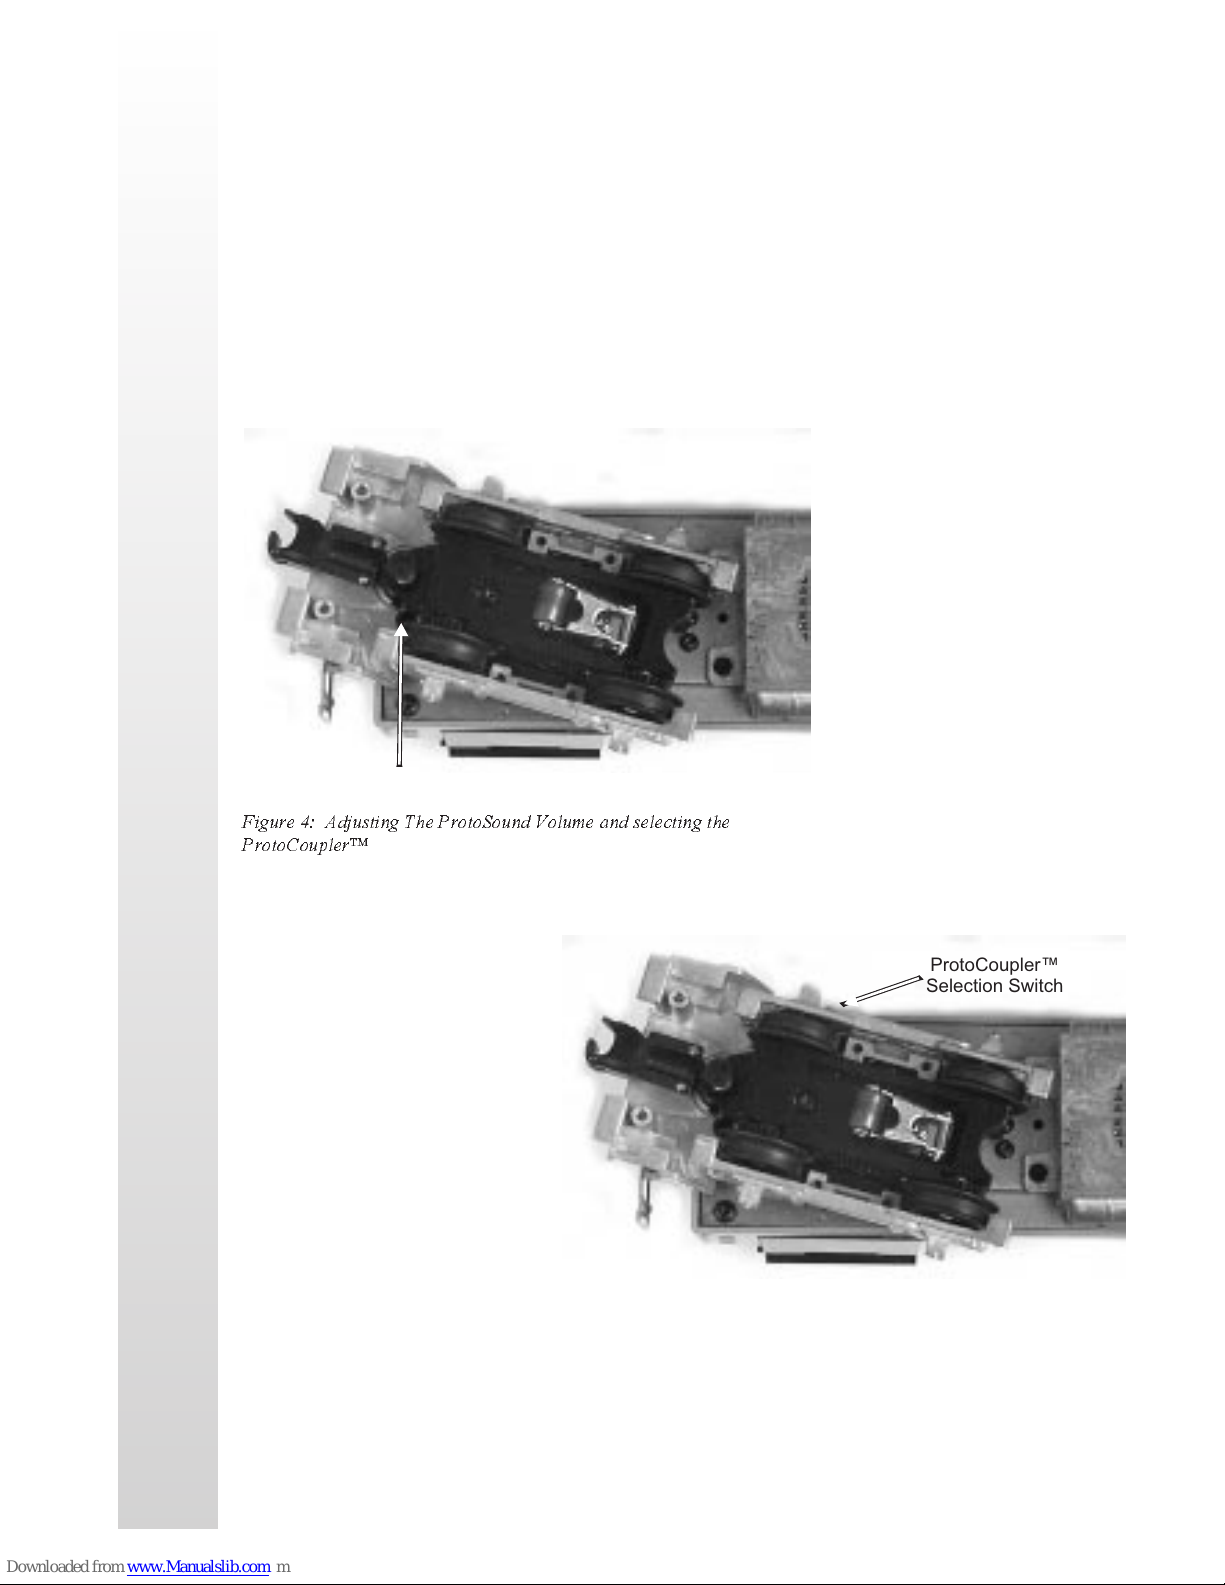
Your ProtoSound® system has two types of volume adjustment. A
manual turn knob on the bottom of the chassis (See Fig. 4 below) allows
you to control all the sounds in the system and a remote control “RESET"
option (Option # 6), allows you to control the volume level of the engine
sounds remotely from the transformer. Turning the volume adjustment
knob clockwise will increase the volume and counterclockwise will lower
the volume of all sounds; bell, horn, engine sounds, Cab Chatter, etc.
Proto-Sound®
Volume Control
Figure 4: Adjusting The ProtoSound Volume and selecting the
ProtoCoupler
ProtoCoupler™
Selection Switch
RAILKING
RailKing NW-2 Operating Manual
16
Page 17
USING “RESET" TO PROGRAM
PROTOSOUNDS®
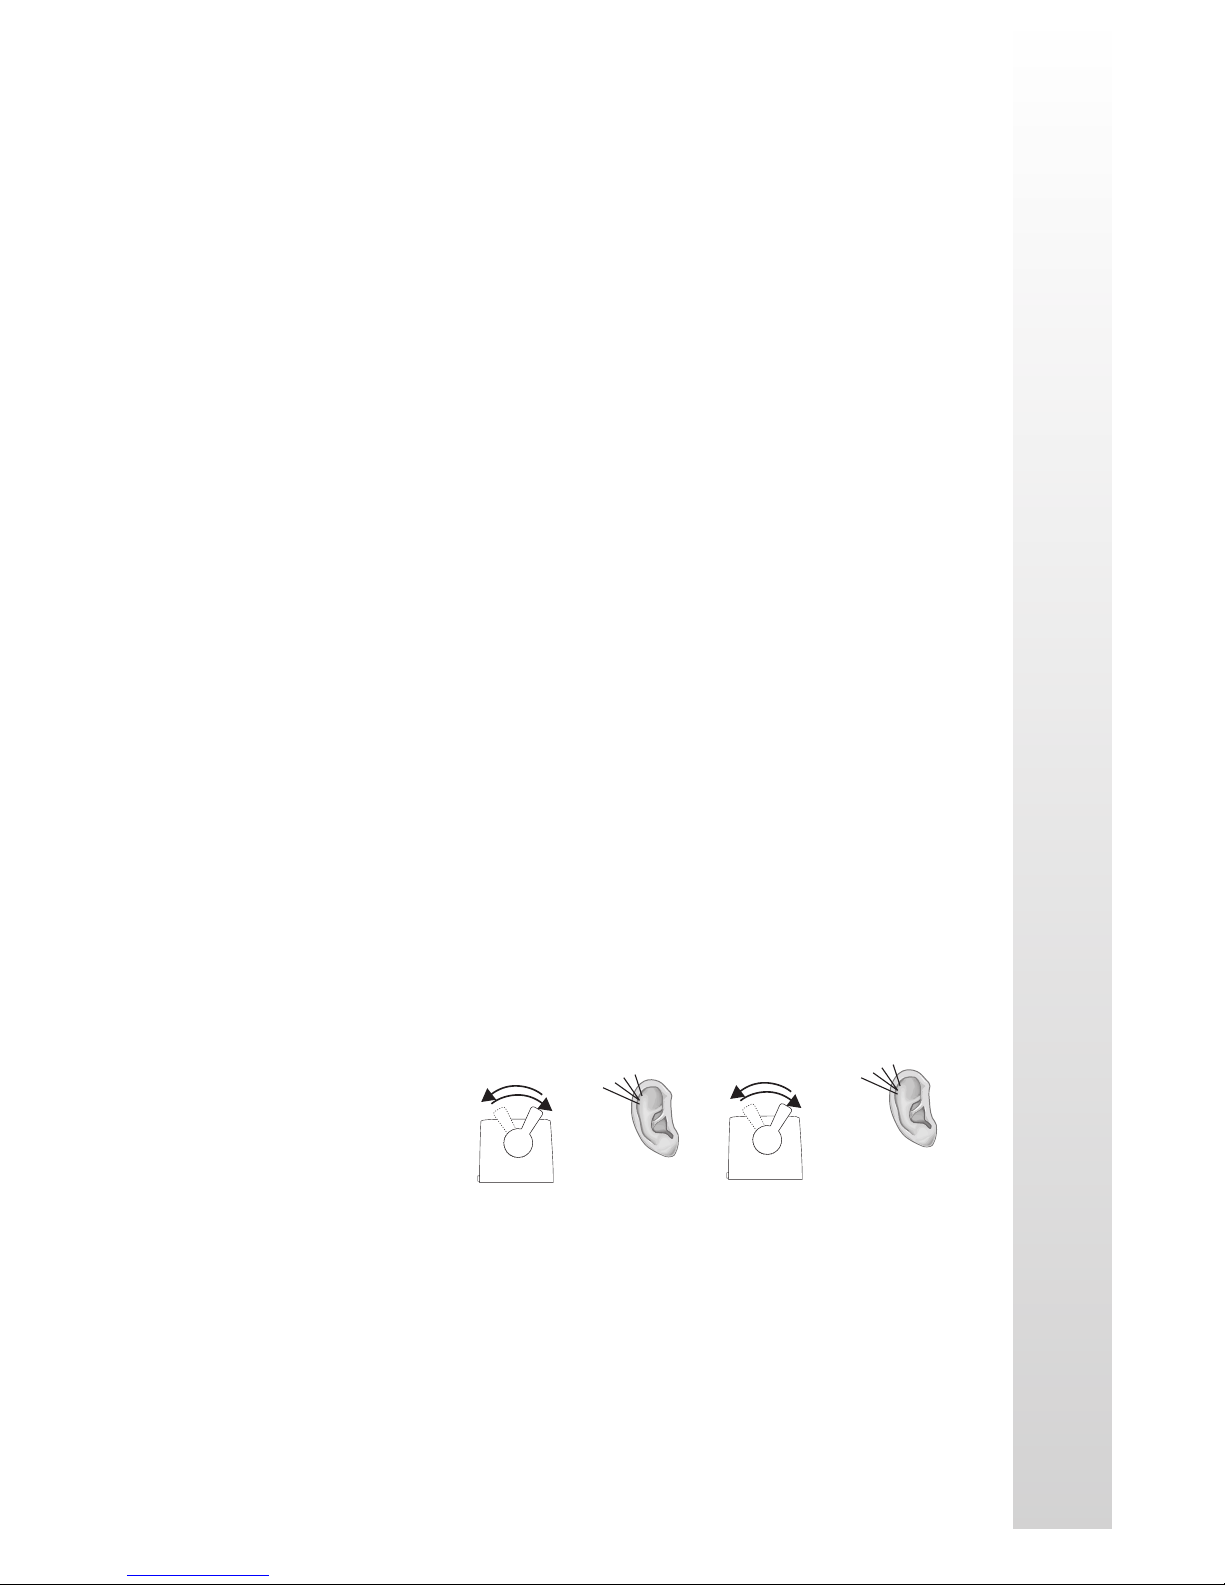
As mentioned earlier, there are several programmable options in each
ProtoSound® equipped engine that can be remotely set from any
compatible standard AC transformer equipped with a whistle button. For a
list of compatible transformers, see the chart on page 35. This hands-off
approach gives you unprecedented control of your railroad empire’s motive
power never before seen in model railroading. Each programmable feature
can be accessed whenever your engine is in the RESET state as described
earlier on page 4. By following the instructions below you will find the
programming easy and straight forward.
ENTERING RESET OPTIONS
ProtoSound® is equipped with a few programmable features that are
accessed in the RESET state by moving the transformer throttle up and
down between full voltage and low voltage (6 to 8 volts) without shutting
the transformer off completely. Each time this is done you advance, one
feature at a time, through the available options. An air-release sound is
heard each time the throttle is advanced. In addition, there are special
sounds to tell you what RESET position you are in.
For example, if you want to select Feature 2, you put the engine in
RESET, and move the throttle up and down from full throttle to low two
times. After the second advance, you will hear two “clinks" indicating that
the computer is now in Feature 2. Advance the throttle again and you will
hear three “clinks" for Feature 3. Advance it two more times and you will
hear a “clank" indicating
that you are now in
Feature 5. Advance the
throttle two more times
In RESET Mode
Move The Throttle
Up & Down From
High Voltage To Low
2 Times
Clink, Clink
Advance The Throttle
Up & Down From
High Voltage To Low
4 More Times
Clank, Clink
and you will hear a
“clank" and two “clinks"
indicating Feature 7. ((5
throttle advancements = 1
Listen For The
2 Clink Sounds
Listen For 1 Clank
And 1 Clink Sounds
clank) + (2 throttle
advancements = 2 clinks)). “Clank + “Clink" + “Clink" = Feature 7. You
can advance the throttle as quickly as you like (though you may not hear the
air-release sounds) and the computer will still remember the number of
RAILKING
RailKing NW-2 Operating Manual
17
Page 18
times the throttle is advanced by playing back the number of “Clinks" and
“Clanks" to confirm the feature you’ve selected.
SETTING THE ENGINE VOLUME
Of all the sounds that come with each ProtoSound® equipped locomotive,
the one most often turned down is that of the engine volume because it is
the one sound normally heard whenever the engine is running and is what
usually can become tiresome to the ear over prolonged running sessions.
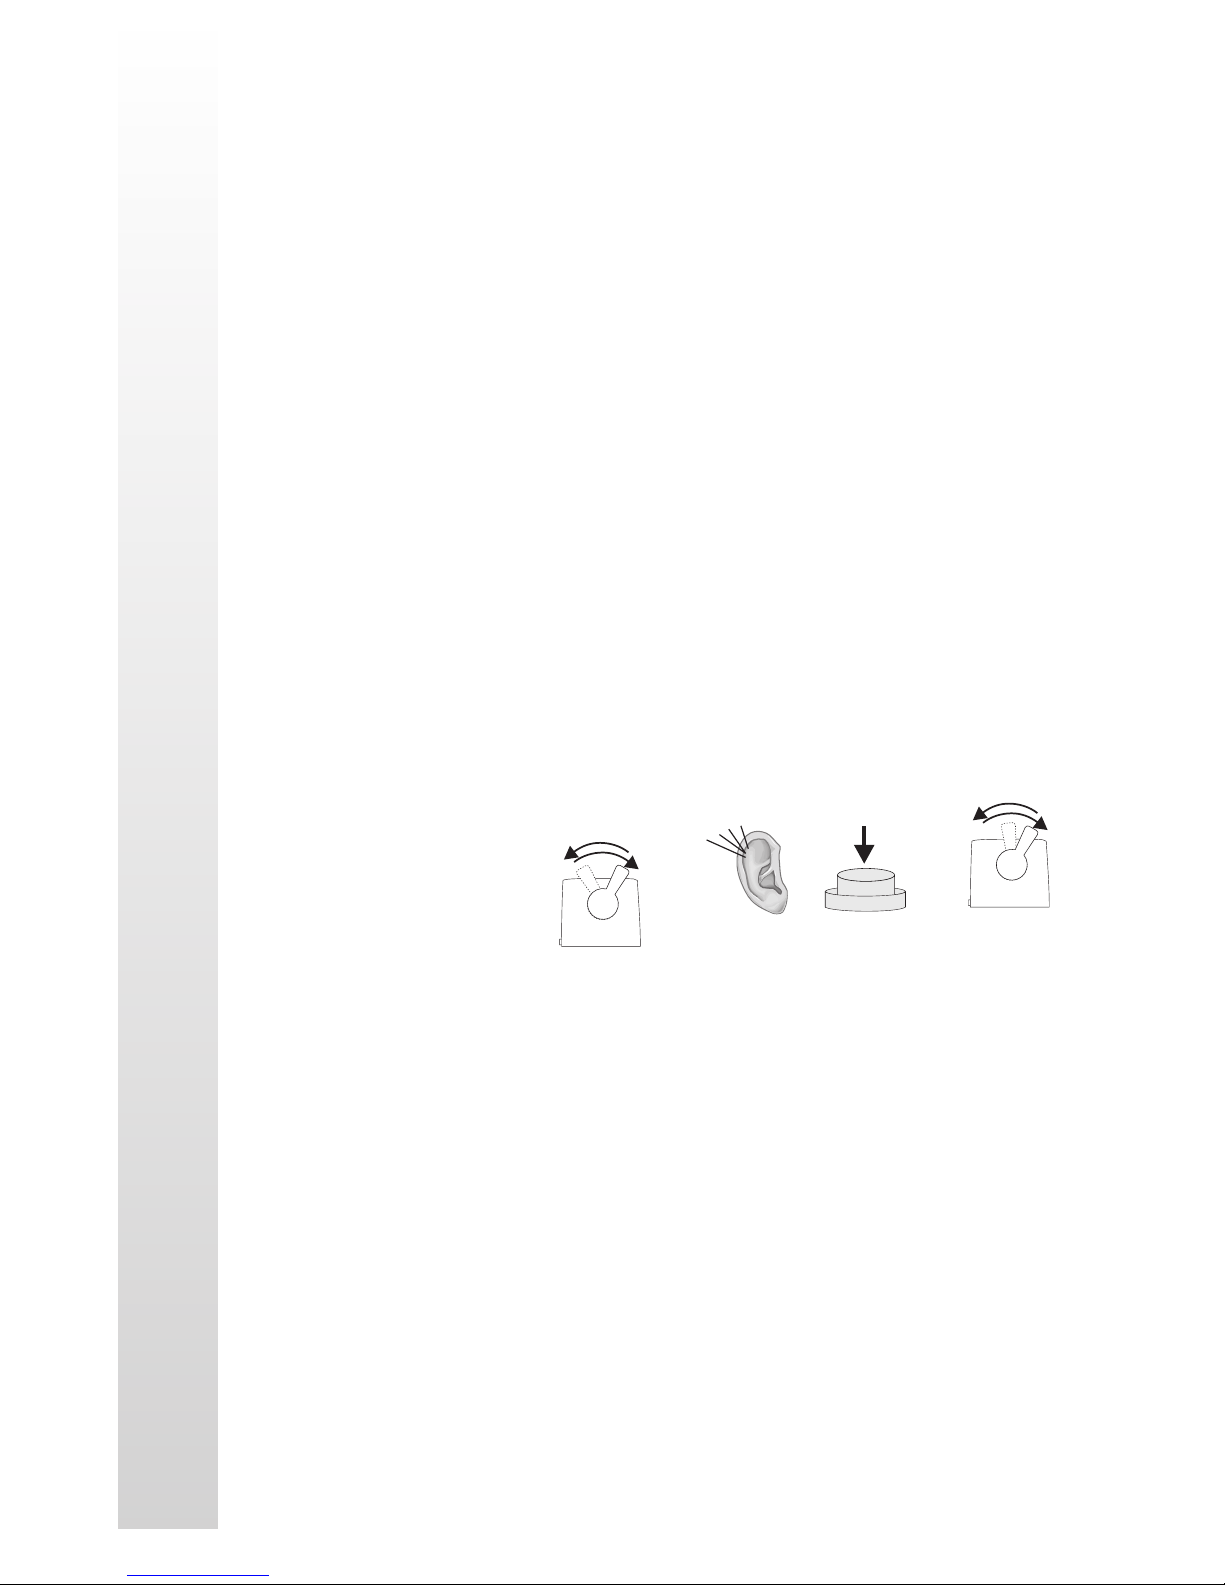
The volume adjustment is controlled through RESET Feature 6.
To access the feature, advance the transformer throttle to put the engine in
RESET. Move the throttle up and down, as described on page 17, 6 times.
After you hear the “clank" and “clink" indicating that you are in Feature 6,
press the whistle button to select the engine volume level you desire.
Pushing the whistle button once will give you full volume, which is the
factory setting. Pushing the whistle button a second time will give you 50%
volume, pushing it a third time will give you 25% volume and pushing it a
fourth time will give you no engine sound. The microprocessor will
immediately play the sound level each time the whistle button is pushed so
that you can decide if it is acceptable. You can recycle through the four
choices by simply
continuing to press the
whistle button.
In RESET Mode
Move The Throttle
Up & Down From
High Voltage To Low
6 Times
Clank, Clink
Push The Whistle Button
Until You Reach The
Setting You Desire
Once you have decided
on the appropriate
volume level, turn the
Listen For 1 Clank
And 1 Clink Sounds
H
Interrupt The Throttle
To “Lock-In”
The Volume Setting
transformer throttle off
and on again or press the
transformer direction switch to lock in your selection. The volume
adjustment will remain set at the level you have chosen until you change it
again. Regardless of the engine volume setting, the horn, bell, compressor
and Cab Chatter sounds will function normally. In fact because only the
engine volume is affected by selections in Feature 6, when you select 0
volume, you can still hear the horn, bell and Cab Chatter sounds when the
engine is running or in neutral.
RAILKING
RailKing NW-2 Operating Manual
18
Page 19
PROGRAMMING FOR A SEPARATE BELL BUTTON
CONTROLLER
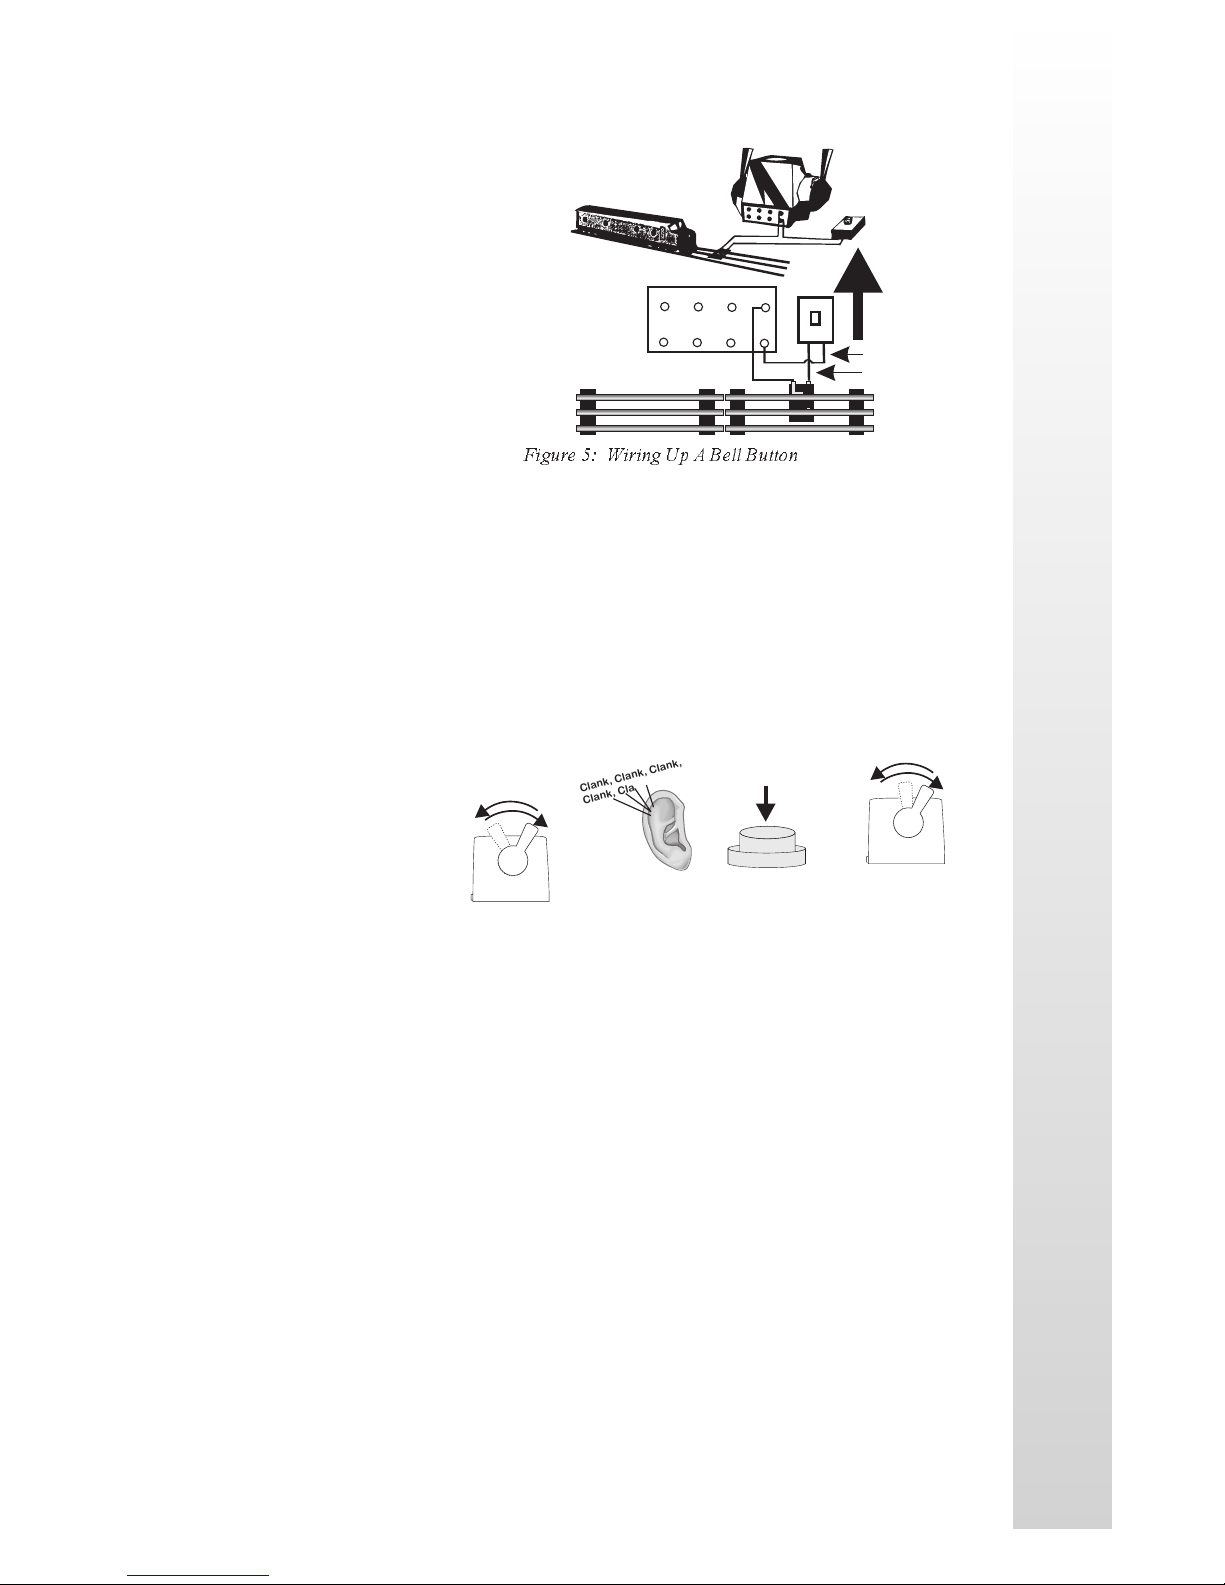
To operate ProtoSounds® with
a separate bell button controller,
like the Lionel® No. 5906 bell
button, you will need to wire up
the controller to your
transformer and track as shown
in Fig. 5. Once the button is
wired, ProtoSounds® comes
preprogrammed to allow you to
operate the bell by simply
Figure 5: Wiring Up A Bell Button
pushing the bell button once.
To turn the bell off, push the
button again. If the bell doesn’t’t function when you press the button, you
may need to re-program ProtoSounds to operate with a separate bell button
controller. To do this enter RESET and go to Feature 20. (See the section
Using RESET To Program ProtoSounds®on page 17.) Once in Feature
20, press the whistle button and wait for the module to sound a bell ding(s).
Continue pushing the
whistle button until the
module plays back two
dings (signifying that the
In RESET Mode
Move The Throttle
Up & Down From
High Voltage To Low
20 Times
Clank, Clank, Clank,
Clank, Clank
module has been
programmed for a bell
button). Simply turn the
Listen For 5 Clank
And 0 Clink Sounds
throttle off and then on
again to “Lock-In" the new setting. To reset the computer to its original
factory (default) setting (no separate bell button operation), repeat the above
procedure but keep pushing the whistle button until the computer only
responds with one bell ding.
Common
UAUBUCU
Push The Whistle Button
Until You Hear 2 Dings
D
H
RED Wire
BLACK Wire
Interrupt The Throttle
To “Lock-In”
The Bell Button Setting
RAILKING
PROGRAMMING FOR SQUEAKING BRAKE
OPERATION
ProtoSounds® can be programmed for squeaking brake operation in three
different manners; (1)Squeaking brakes can be activated by bell button
control, (2)they can be programmed for continuous operation subject to
throttle changes or (3)they can be programmed to be turned off. The default
setting is (2) Squeaking brakes are activated for full-time operation as
described on page 8. To change the default setting, enter RESET and go to
RailKing NW-2 Operating Manual
19
Page 20
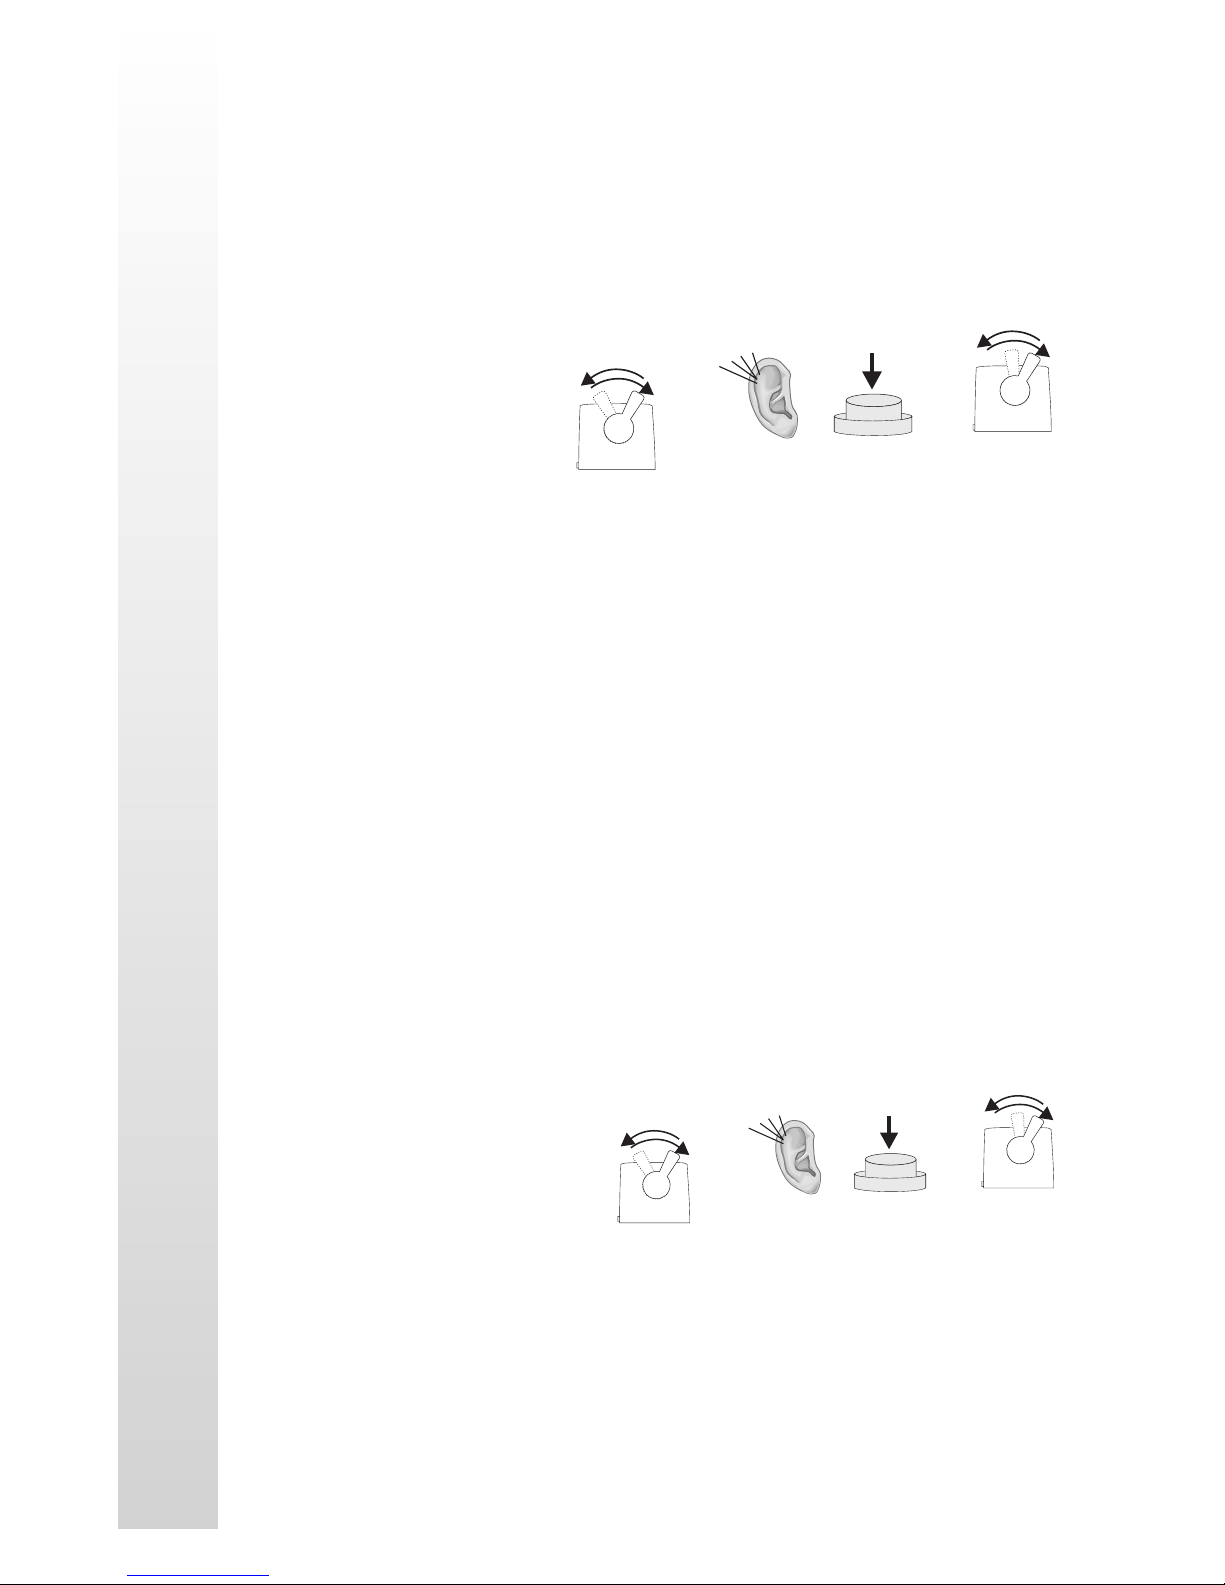
Feature 45. (See the section Using RESET To Program ProtoSounds® on
page 17). Once in Feature 45, press the whistle button and wait for the
module to sound a bell ding(s). Continue pressing the whistle button until
the module plays back one ding for option 1 - Squeaking brakes are
activated by the bell button. Press the whistle button again until the module
plays back two dings for option 2 - squeaking brakes are activated for fulltime operation, or press
the whistle button again
until the module plays
back three dings for
In RESET Mode
Move The Throttle
Up & Down From
High Voltage To Low
45 Times
Clank, Clank, Clank,
Clank, Clank, Etc.
Push The Whistle Button
Until You Hear The
Appropriate # Of Dings
option 3 -Squeaking
brakes off. Once you
have decided on the
Listen For 9 Clank
And 0 Clink Sounds
H
Interrupt The Throttle
To “Lock-In”
The Brake Setting
desired setting, simply
turn the throttle off and
then on again to “Lock-In” the new setting. To reset the computer to its
original factory default setting (option 2 - squeaking brakes are activated for
full-time operation, repeat the above procedure but keep pushing the whistle
button until the module only responds with one bell ding.
PROGRAMMING FOR HORN IN NEUTRAL
OPERATION
If you are operating your engine with a separate bell button and want to
blow your horn when your engine is in neutral, you will need to program
ProtoSounds® to do so as the factory setting only allows the horn to blow in
forward or reverse. To do this, enter RESET and go to Feature 25. (See the
section Using RESET To Program ProtoSounds® on page 17.) Once in
Feature 25, press the transformer whistle button and wait for ProtoSounds®
to sound a bell ding(s).
Continue pressing the whistle
button until ProtoSounds®
sounds two bell dings
(signifying that
ProtoSounds® has been
programmed to sound the
horn in neutral). Turn the
throttle off and then on again
to “Lock-In" your selection.
In RESET Mode
Move The Throttle
Up & Down From
High Voltage To Low
25 Times
Push The Whistle Button
Clank, Clank, Clank,
Clank, Clank, Etc.
Listen For 5 Clank
And 0 Clink Sounds
Until You Hear
2 Bell Dings
H
Interrupt The Throttle
To “Lock-In”
The Horn Setting
RAILKING
RailKing NW-2 Operating Manual
20
Page 21
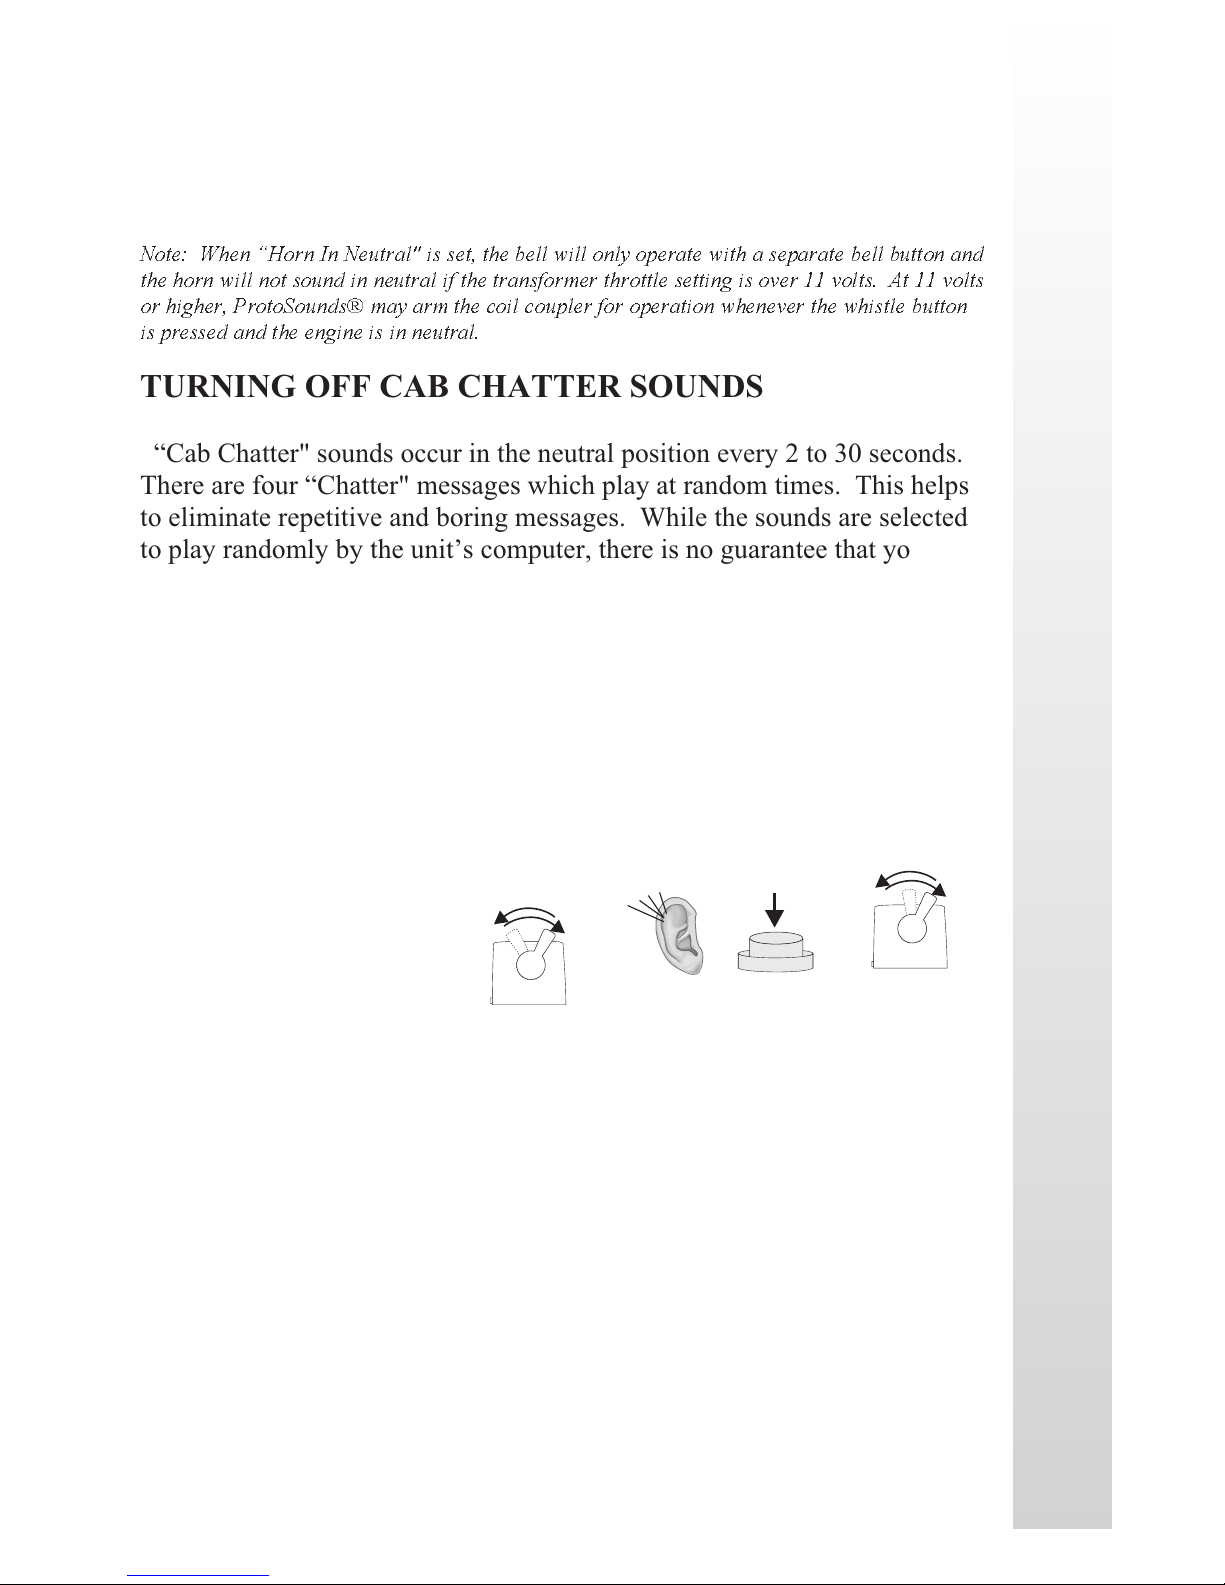
Now, whenever you are in neutral, you can blow the horn with the
transformer whistle button. To reset ProtoSounds® to its original factory
setting of no horn in neutral, repeat the above procedure but keep pressing
the whistle button in Feature 25 until ProtoSounds® only dings once instead
of twice.
Note: When Horn In Neutral" is set, the bell will only operate with a separate bell button and
the horn will not sound in neutral if the transformer throttle setting is over 11 volts. At 11 volts
or higher, ProtoSounds® may arm the coil coupler for operation whenever the whistle button
is pressed and the engine is in neutral.
TURNING OFF CAB CHATTER SOUNDS
“Cab Chatter" sounds occur in the neutral position every 2 to 30 seconds.
There are four “Chatter" messages which play at random times. This helps
to eliminate repetitive and boring messages. While the sounds are selected
to play randomly by the unit’s computer, there is no guarantee that you
won’t hear the same message repeated twice or more times. If you don’t
want to hear the Cab Chatter sounds, they can be turned off through Feature
23. To turn off the Cab Chatter sounds, enter RESET and go to Feature 23.
(See the section Using RESET To Program ProtoSounds® on Page 17.)
Once in Feature 23, press the transformer whistle button and wait for
ProtoSounds® to sound a bell ding(s). Continue pressing the whistle button
until ProtoSounds® sounds
two bell dings (signifying
that the module has been
programmed to turn the
Cab Chatter off). Simply
turn the transformer
throttle off and then on
again to lock in your
selection. To turn the Cab
Chatter sounds back on
again, repeat the above process, but keep pressing the transformer whistle
button in Feature 23 until ProtoSounds® only sounds one bell ding.
In RESET Mode
Move The Throttle
Up & Down From
High Voltage To Low
23 Times
Push The Whistle Button
Clank, Clank, Clank,
Clank, Clank, Etc.
Listen For 4 Clank
And 3 Clink Sounds
Until You Hear
2 Bell Dings
H
Interrupt The Throttle
To “Lock-In”
The Cab Chatter Setting
RAILKING
RailKing NW-2 Operating Manual
21
Page 22
PROGRAMMING FOR PROTOCOUPLER OPERATION
ProtoSounds® comes with a RESET feature that allows the operator to
remotely turn off the ProtoCoupler™ functions. This is especially useful
when double or triple-heading ProtoSound® equipped engines since every
engine equipped with a ProtoCoupler™ will fire when prompted to by the
operator. By turning off the ProtoCoupler™ operation on certain engines,
you can fire the couplers open on the other engines without uncoupling the
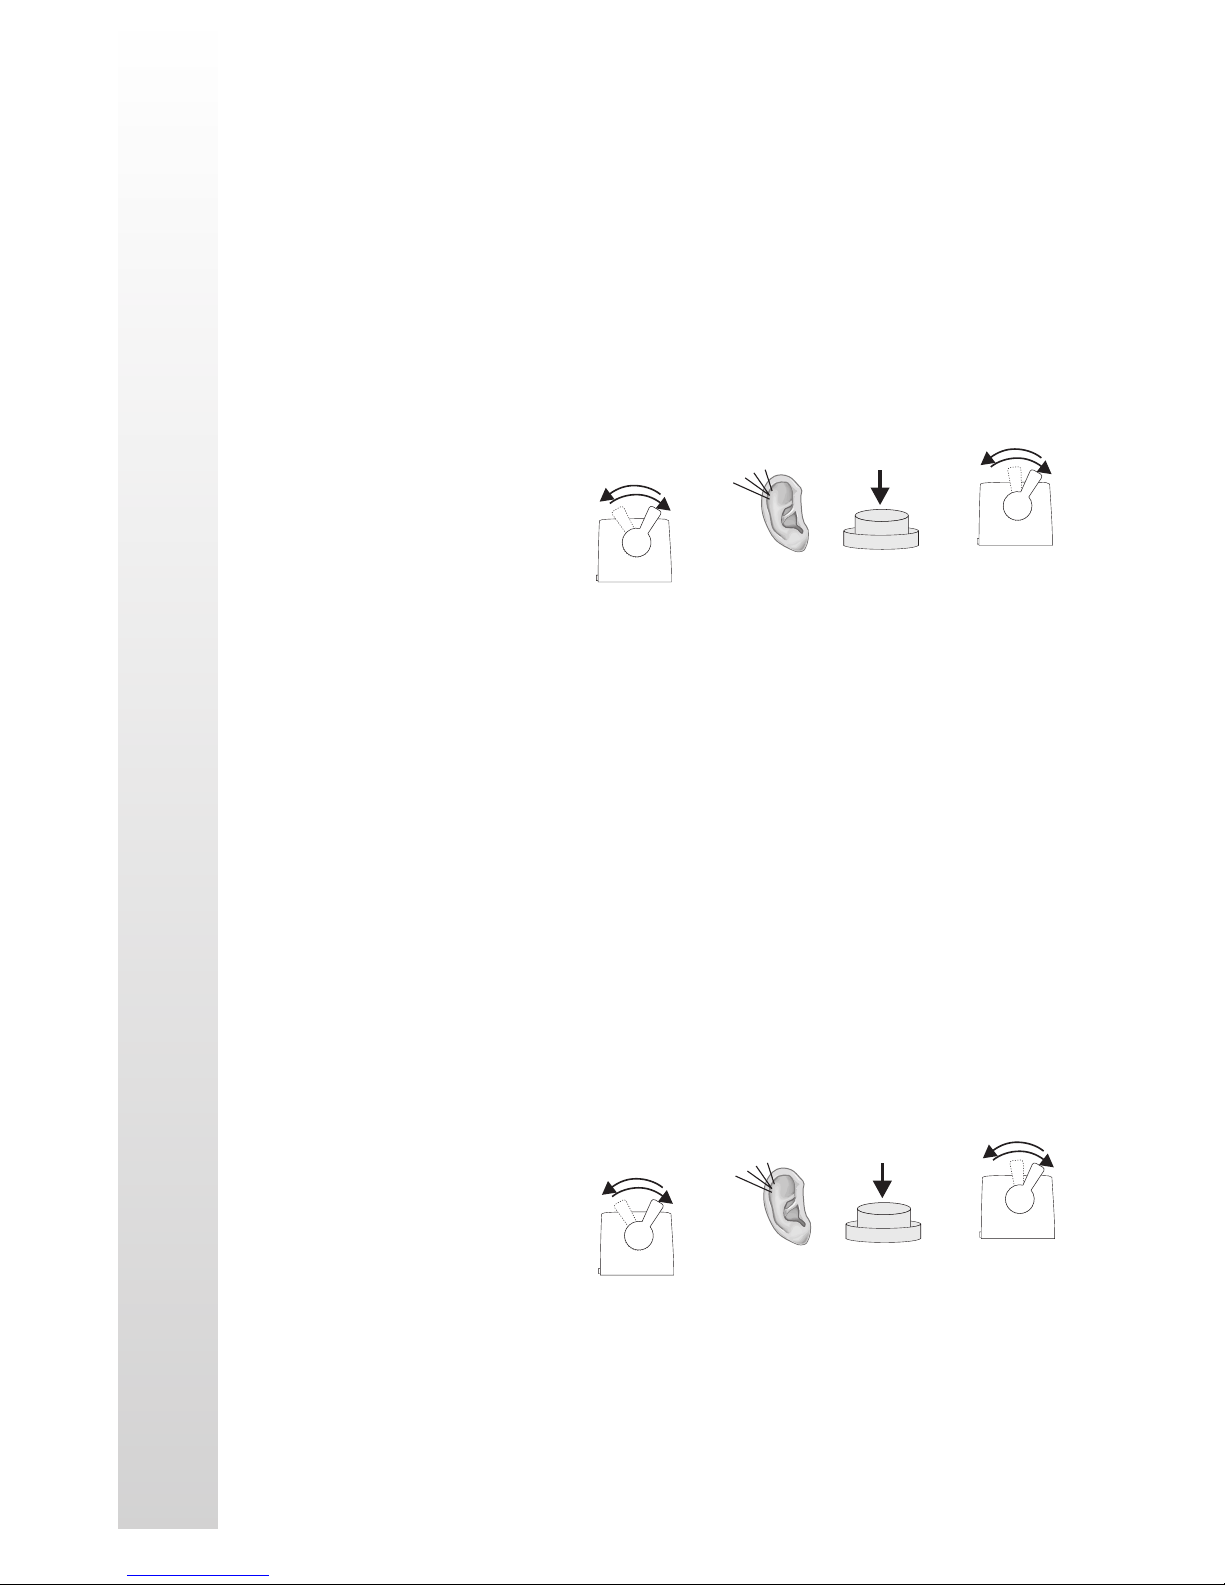
engines from each other. To turn the ProtoCoupler™ function off, enter
RESET and go to Feature
10. (See the section on
Using RESET To Program
ProtoSounds® on page 17.)
Once in Feature 10, press
the transformer whistle
button and wait for
ProtoSound® to sound a
bell ding(s). Continue
pressing the whistle button
until ProtoSounds® sounds two bell dings (signifying that the
ProtoCoupler™ option has been turned off). Simply turn the transformer
throttle off and then on again to lock in the new setting.
In RESET Mode
Move The Throttle
Up & Down From
High Voltage To Low
10 Times
Push The Whistle Button
Clank, Clank
Listen For 2 Clank
And 0 Clink Sounds
Until You Hear
2 Bell Dings
H
Interrupt The Throttle
To “Lock-In”
The Coupler Setting
PROGRAMMING FOR FYS OPERATION
ProtoSounds® is equipped with a RESET setting to turn off the Freight
Yard Proto-Effects (FYS) features. This is especially useful if you are
double-heading engines that are both equipped with FYS. You may not
want to stop at a yard and have both engines playing their FYS sound
effects. To turn off FYS, enter RESET and go to Feature 28. (See the
section on Using RESET
To Program ProtoSounds®
on page 17). Once in
Feature 28, press the
transformer whistle button
and wait for ProtoSounds®
to sound a bell ding(s).
Continue pressing the
whistle button on and off
until ProtoSounds® sounds
two bell dings (signifying
In RESET Mode
Move The Throttle
Up & Down From
High Voltage To Low
28 Times
Push The Whistle Button
Clank, Clank, Etc.
Listen For 5 Clank
And 3 Clink Sounds
Until You Hear
2 Bell Dings
H
Interrupt The Throttle
To “Lock-In”
The FYS Setting
RAILKING
RailKing NW-2 Operating Manual
22
Page 23
that the FYS features have been turned off). Simply turn the transformer
throttle OFF and then ON again to lock in the new setting. To reset
ProtoSounds® to its original factory setting of Squeaking Brakes and FYS
on, repeat the above procedure but keep pressing the whistle button in
Feature 28 until ProtoSounds® only dings once instead of twice.
ACTIVATING REMOTE LOCK-OUT CONTROL
ProtoSound® equipped engines feature a RESET setting that allows the
operator to remotely “lock” the engine into forward, neutral or reverse.
This is especially useful on layouts that feature “blocked” track sections.
The lockout feature comes from the factory in the OFF position, meaning it
is not active when you first take the engine out of the box. This is done to
prevent novice operators from accidentally locking their engine into
forward, neutral or reverse and then mistakenly thinking that the engine’s
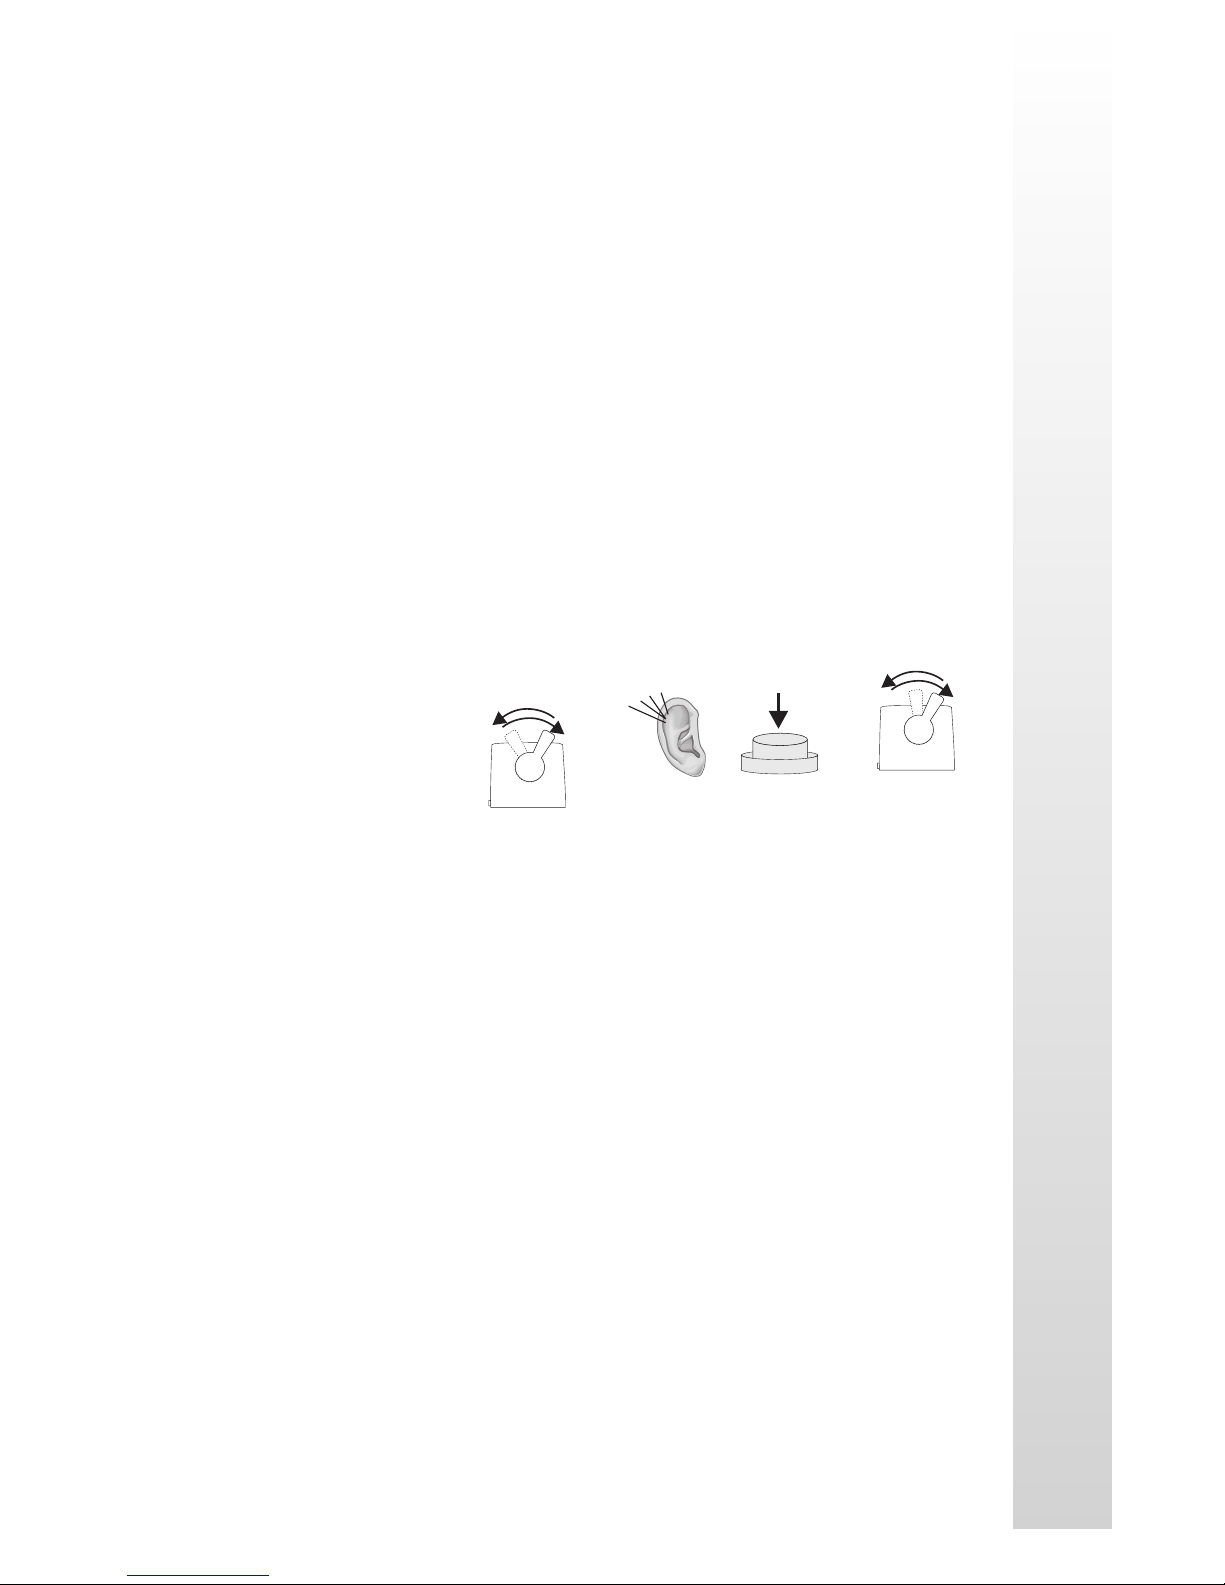
electronics have failed. To activate the Remote Lockout Control setting, go
to RESET Feature 40 (See
the section entitled Using
RESET To Program
ProtoSounds® on page
17). Once in Feature 40,
press the transformer
whistle button and wait for
ProtoSounds® to sound a
bell ding. Continue
pressing the whistle button
until ProtoSounds® sounds two bell dings signifying that the Remote
Lockout Control has been selected. To lock in the setting, simply turn the
throttle all the way off and then back on again. To turn the Remote
Lockout Control setting back off, go back to Feature 40 and press the
whistle button until only one bell ding sounds. To lock in the setting,
simply turn the transformer throttle off and then back on again.
Alternatively, you can go to RESET Feature 18 to reset all ProtoSound®
features back to their original factory defaults including Remote Lockout
Control.
In RESET Mode
Move The Throttle
Up & Down From
High Voltage To Low
40 Times
Push The Whistle Button
Clank, Clank, Etc.
Listen For 8 Clank
And 0 Clink Sounds
Until You Hear
2 Bell Dings
H
Interrupt The Throttle
To “Lock-In”
The Lock-Out Setting
RAILKING
RailKing NW-2 Operating Manual
23
Page 24
RESETTING ALL PROTOSOUND® OPTIONS TO
FACTORY DEFAULTS
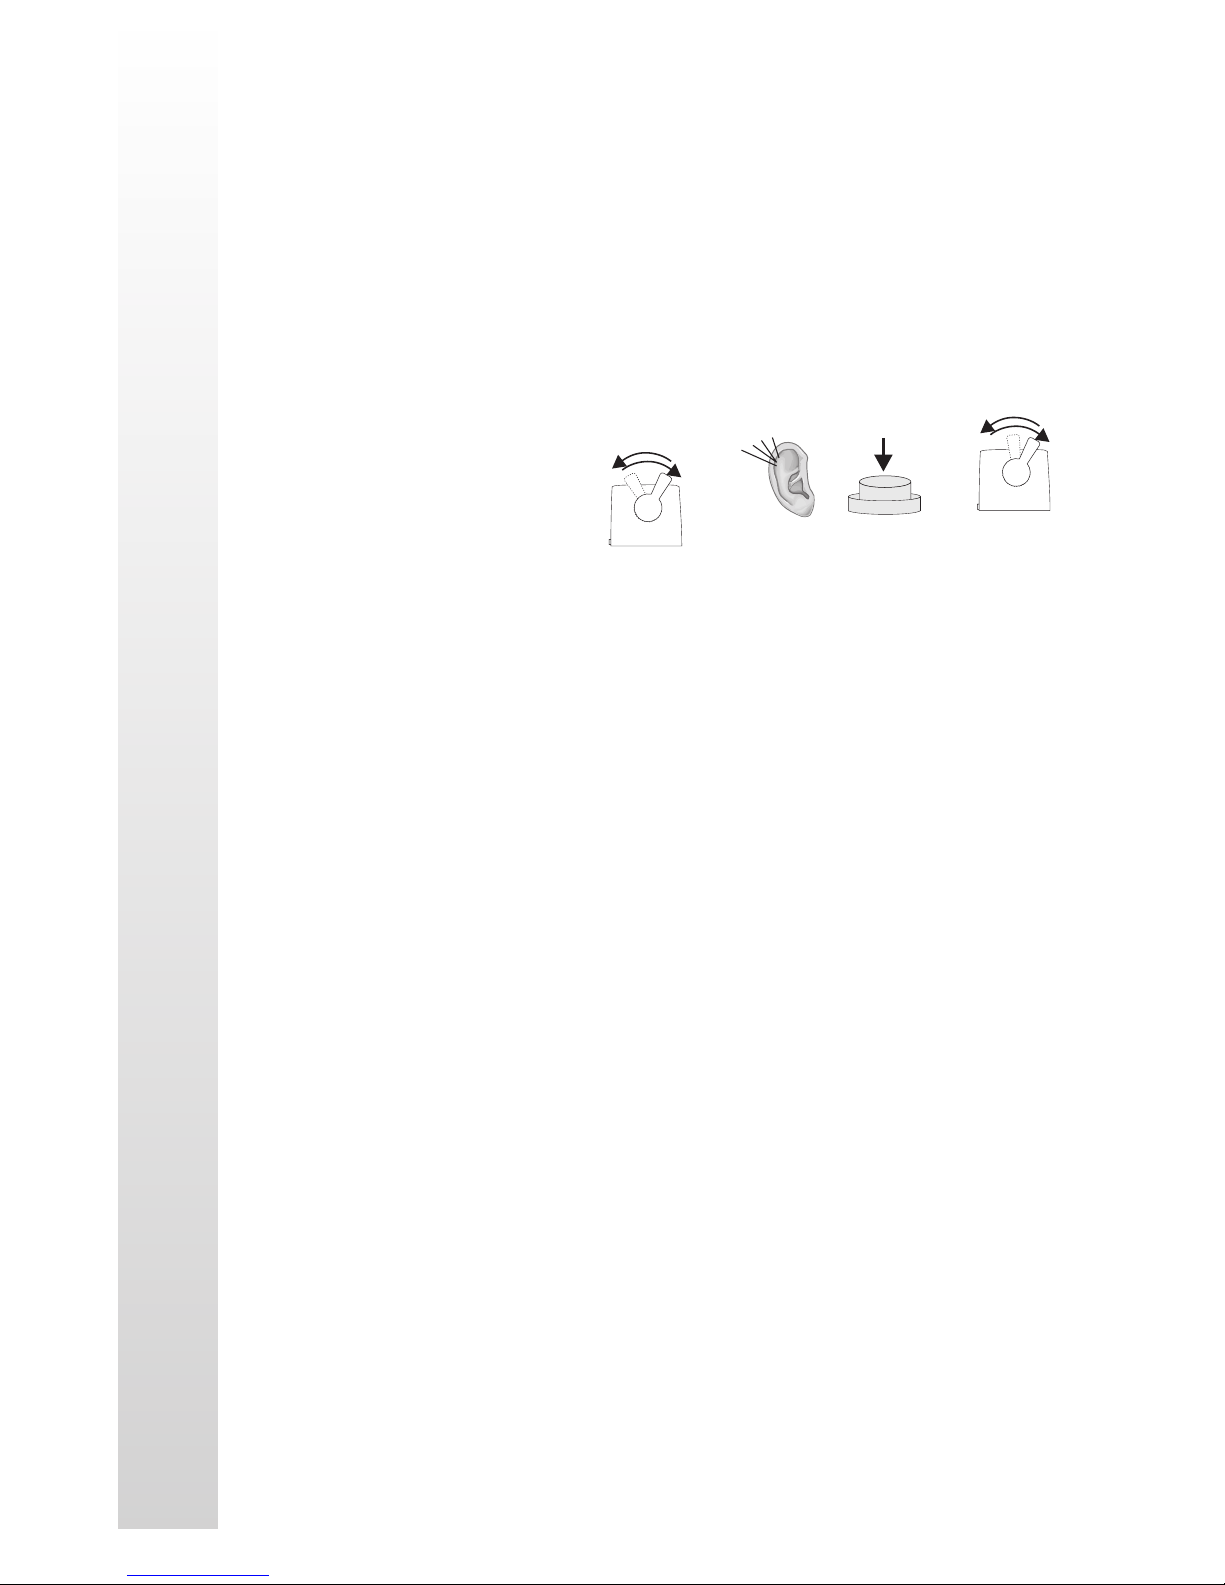
ProtoSounds® is equipped with a RESET feature (Feature 18) that resets
all programmable options back to their original factory settings. This is a
useful feature if you find your engine not operating the way you think it
should and don’t want to take the time to check each RESET feature one at
a time. To reset all the RESET features back to their original factory
settings, enter RESET and go
to Feature 18. (See the
section entitled Using
RESET To Program
ProtoSounds® on page 17).
Once in Feature 18, press the
transformer whistle button
and wait for ProtoSounds®
to sound a garbled bell
sound.
In RESET Mode
Move The Throttle
Up & Down From
High Voltage To Low
18 Times
Push The Whistle Button
Clank, Clank, Etc.
Listen For 3 Clank
And 3 Clink Sounds
Until You Hear
A Warbled Bell Ding
H
Interrupt The Throttle
To “Lock-In”
The Default Setting
RAILKING
RailKing NW-2 Operating Manual
24
Page 25

REVERSE UNIT LOCK-OUT OPERATION
ProtoSounds® unique design eliminates the need for a lock-out switch on
the locomotive by allowing the customer to lock the engine into any
directional state (forward, neutral or reverse) from the transformer. This
will allow users to run the engine on layouts equipped with block signals or
stop stations which would normally cycle the engine back into neutral. The
feature must be first turned on by accessing RESET Feature 40 (See section
entitled Using RESET To Program ProtoSounds® on page 17).
LOCKING THE ENGINE INTO FORWARD OR
REVERSE
To lock the engine into Forward or Reverse, use the transformer throttle to
enter Forward or Reverse (whichever state you want to lock the engine into)
and while the engine is moving press the whistle button. WHILE THE
HORN IS BLOWING TURN THE THROTTLE OFF AND THEN LET
GO OF THE WHISTLE BUTTON. After about one second, you will hear
a short horn blast. QUICKLY TURN THE THROTTLE BACK ON
AGAIN. Your engine is now locked into Forward or Reverse and it will
remain so until you unlock the engine, even if you wait a year to run your
engine again.
UNLOCKING THE ENGINE
Unlocking the engine is a similar procedure. WHILE THE ENGINE IS
MOVING, PRESS THE WHISTLE BUTTON. WHILE THE HORN IS
BLOWING, TURN THE THROTTLE OFF AND THEN LET GO OF
THE WHISTLE BUTTON. After three seconds without power you will
hear one chime of the RESET bell. TURN ON THE POWER AGAIN. Your
engine is now in RESET and will operate normally once you interrupt
power and enter the forward direction.
LOCKING THE ENGINE INTO NEUTRAL
To lock the engine into the NEUTRAL position, PUT THE ENGINE IN
NEUTRAL AND WITH THE THROTTLE STILL ON, PRESS THE
WHISTLE BUTTON. WHILE THE WHISTLE BUTTON IS BEING
PRESSED, TURN OFF THE THROTTLE AND LET GO OF THE
WHISTLE BUTTON. After about one second, you will hear a short blast
of the horn. QUICKLY TURN THE POWER BACK ON AGAIN. Your
engine is now locked into NEUTRAL.
RAILKING
RailKing NW-2 Operating Manual
25
Page 26
NOTE
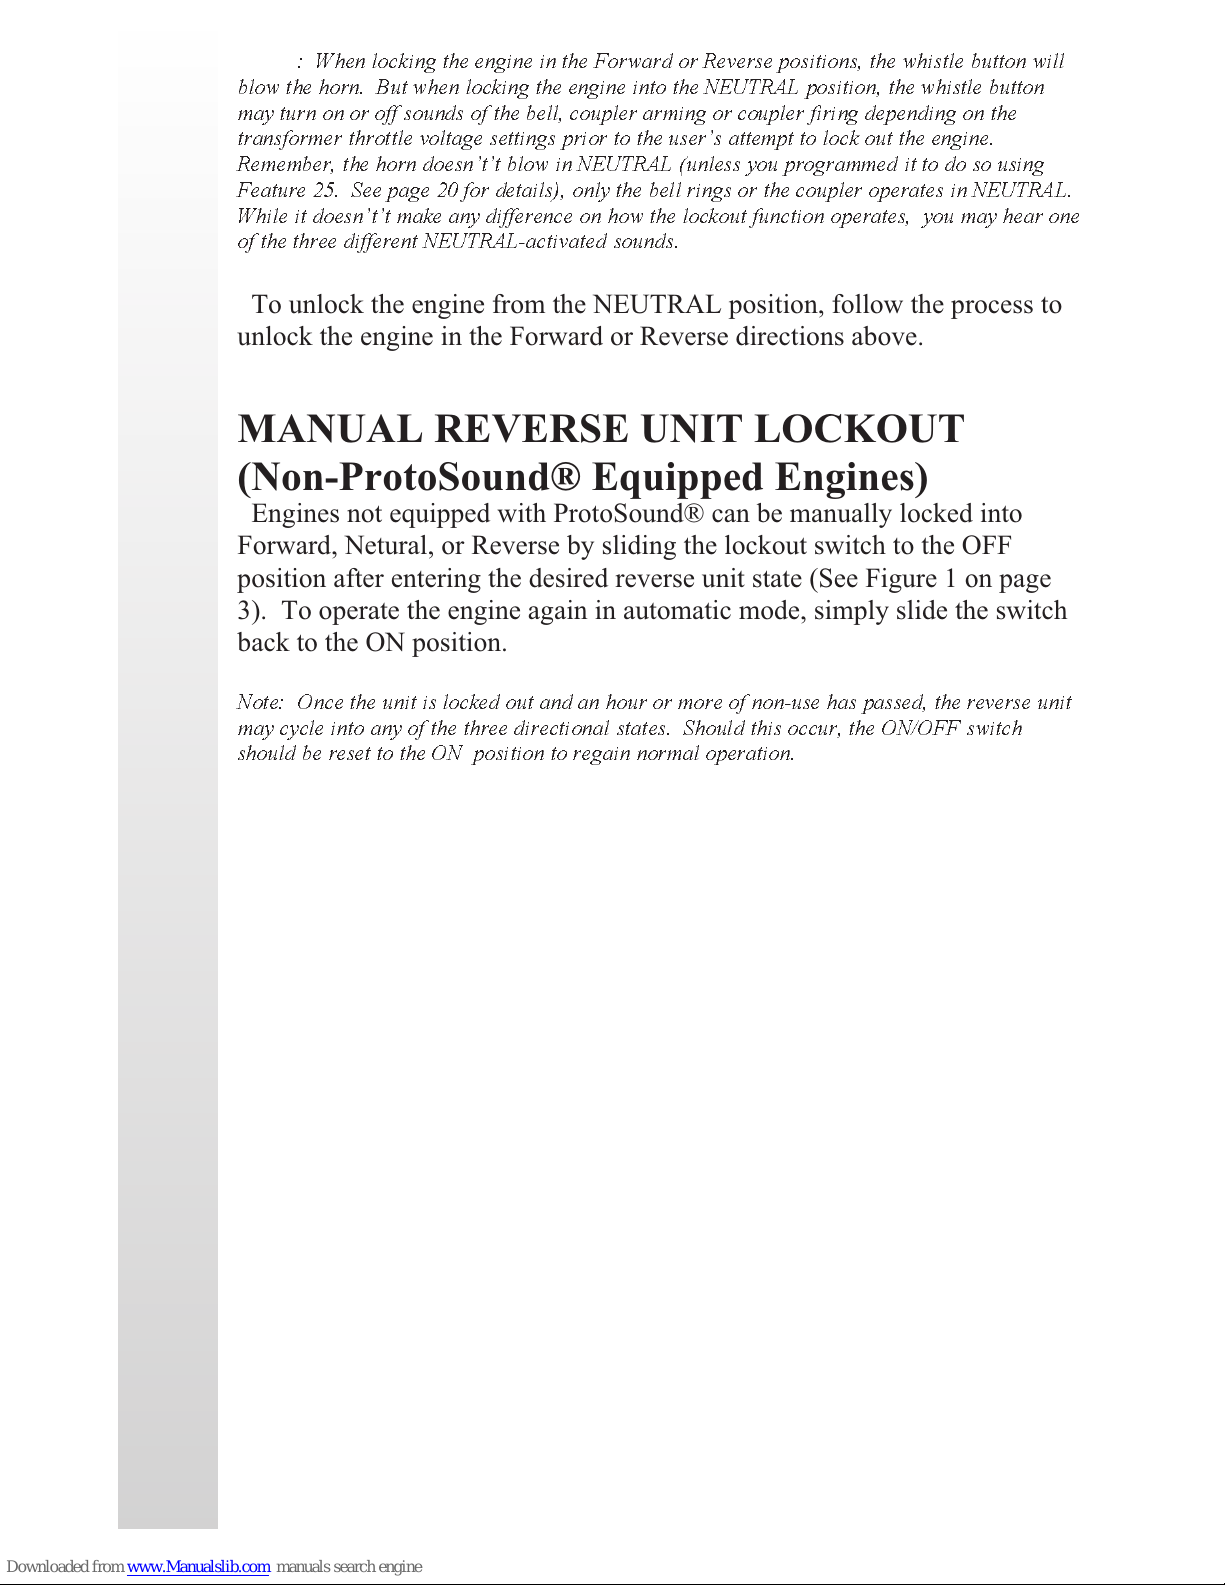
blow the horn. But when locking the engine into the NEUTRAL position, the whistle button
may turn on or off sounds of the bell, coupler arming or coupler firing depending on the
transformer throttle voltage settings prior to the users attempt to lock out the engine.
Remember, the horn doesntt blow in NEUTRAL (unless you programmed it to do so using
Feature 25. See page 20 for details), only the bell rings or the coupler operates in NEUTRAL.
While it doesntt make any difference on how the lockout function operates, you may hear one
of the three different NEUTRAL-activated sounds.
unlock the engine in the Forward or Reverse directions above.
: When locking the engine in the Forward or Reverse positions, the whistle button will
To unlock the engine from the NEUTRAL position, follow the process to
MANUAL REVERSE UNIT LOCKOUT
(Non-ProtoSound® Equipped Engines)
Engines not equipped with ProtoSound® can be manually locked into
Forward, Netural, or Reverse by sliding the lockout switch to the OFF
position after entering the desired reverse unit state (See Figure 1 on page
3). To operate the engine again in automatic mode, simply slide the switch
back to the ON position.
Note: Once the unit is locked out and an hour or more of non-use has passed, the reverse unit
may cycle into any of the three directional states. Should this occur, the ON/OFF switch
should be reset to the ON position to regain normal operation.
RAILKING
RailKing NW-2 Operating Manual
26
Page 27
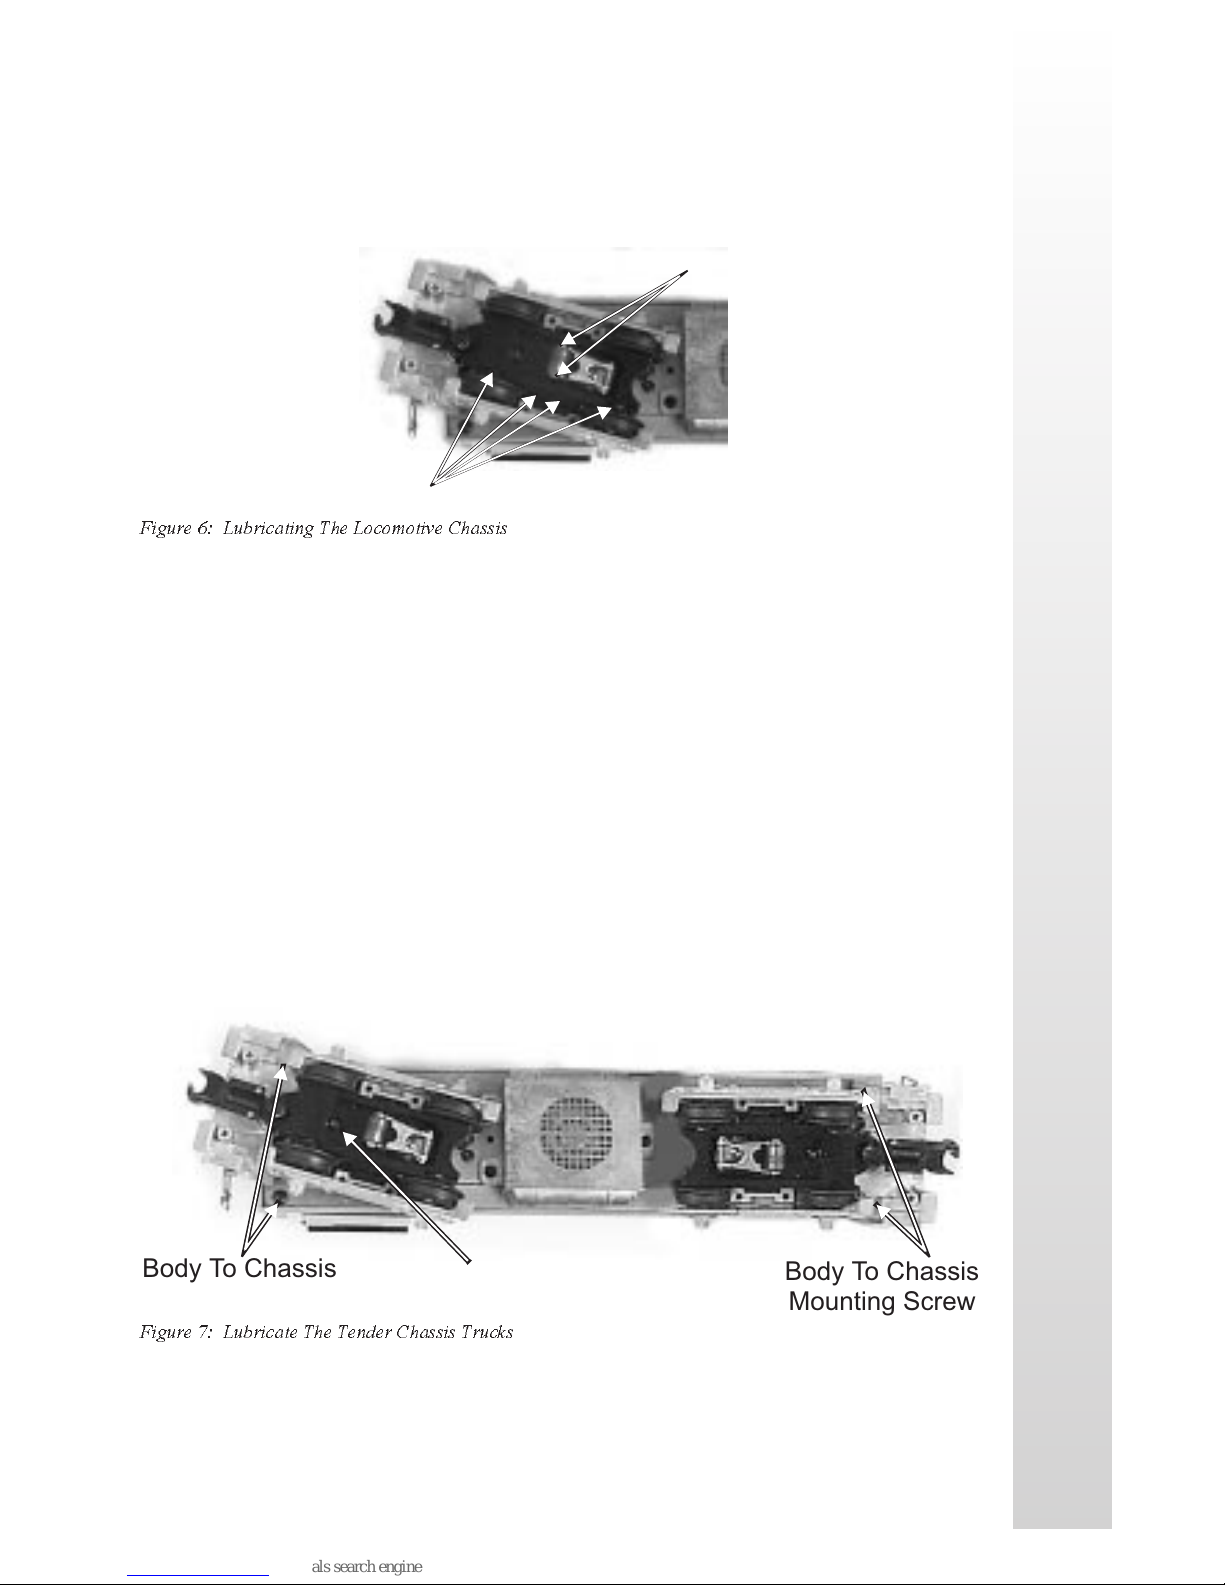
OIL & LUBRICATION INSTRUCTIONS
In order for the engine to perform correctly and quietly, it is important that
the chassis be lubricated before operation. Lubrication should include all
truck block bushings and pickup rollers to prevent them from squeaking.
Lubricate (L)
Pickup Rollers
Grease (G)
Wheel Gears
Figure 6: Lubricating The Locomotive Chassis
Use light household oil and follow the lubrication points marked “L" in Fig.
6 above.
The locomotive’s internal gearing in both power trucks has been greased at
the factory and shouldn’t’t need additional grease until after 50 hours of
operation or one year whichever comes first. Grease cannot be added to the
internal gearing until the body is removed from the chassis which is held in
place by four Phillips screws. The screws are located on each end of the
chassis’ as seen in Fig. 7 below. After removing the screws, lift the body
away from the chassis and lay the body next to the chassis.
Next, remove the truck blocks from the chassis by unscrewing the large
Phillips motor mount screw on the bottom of each truck block (See Fig. 7).
RAILKING
Body To Chassis
Mounting Screw
Figure 7: Lubricate The Tender Chassis Trucks
Once the motor mount screw has been removed, pull the motor away from
RailKing NW-2 Operating Manual
Motor Mount
Screw
Body To Chassis
Mounting Screw
27
Page 28

the truck block and lightly coat the motor worm gear and bronze drive gear
(in the truck block) with grease. Reassemble the truck and motor, being
careful not to pinch the pickup and ground wires between the truck block
and motor mount. Repeat the procedure for the other motor and truck and
then reassemble the chassis to the body. When reassembling the chassis and
body, be very careful that the lighting wire harnesses are not caught
between the body and chassis as this can lead to a short which may damage
the electronic circuit boards beyond repair.
In addition to the truck block internal gearing, it is a good idea to lubricate
the outside truck block “idler" and “drive" gears with grease. Use the
diagram shown in Fig. 6. on page 27 as a guide and add grease to the points
marked with a “G".
Periodically, check the locomotive wheels and pickups for dirt buildup as
this can significantly affect the engine’s ability to perform properly. Dirty
track and dirty wheels can cause both poor electrical contact as well as poor
traction, especially on elevated track sections. Finally, dirt and oil build up
can prematurely wear out the neoprene traction tires.
TRACTION TIRE REPLACEMENT
INSTRUCTIONS
Your locomotive is equipped with two neoprene rubber traction tires on
each power truck. While these tires are extremely durable and long-lasting
there may arise a time where they will need to be replaced. Should this
occur, you will need to remove the trucks and truck sides on the truck block
from the chassis in order to slip the new tire over the grooved drive wheel.
We suggest you follow the disassembly instructions found in the
Lubrication section on the preceding pages to dissemble the chassis and
truck blocks from the body.
Before the new tire can be installed, you must make sure the old tire has
been completely removed from the groove in the drive wheel. Use a razor
blade or small flatblade screwdriver pry away any remains left from the old
tire that may still be in the drive wheel groove. Once the old tire has been
completely removed, slip the new tire onto the wheel. You may find it
useful to use two small flatblade screwdrivers to assist you in stretching the
tire over the wheel. Be careful to avoid twisting the tire when stretching it
RAILKING
RailKing NW-2 Operating Manual
28
Page 29

over the wheel. If a twist occurs, the tire will have to be removed and
reinstalled or a noticeable wobble in your engine will occur when operating
the locomotive. In addition, it is important to make sure that the tire is
fully seated inside the groove. Any portion of the tire extending out of the
groove can cause the engine to wobble. A razor blade can be used to trim
away any excess tire that doesn’t’t seat itself inside the groove properly.
Once the new tire(s) are in place, reassemble the truck sides to the truck
blocks and then reassemble the chassis to the body. Replacement tires are
available directly from MTH Electric Trains.
HEADLIGHT REPLACEMENT
The NW-2 locomotive contains one bayonet 18v headlight bulb that is
controlled by the track voltage. The headlight bulb simply plugs into its
lamp socket and can be easily removed should the bulbs expire. To remove
the bulbs, follow the cab removal instructions found in the lubrication
section on the preceeding pages. Once the cab has been removed from the
chassis, gently twist and push the bulb to unlock it from its lamp housing.
Once unlocked, the bulb will pull out of the socket. Replacement bulbs are
available directly from MTH Electric Trains.
RAILKING
RailKing NW-2 Operating Manual
29
Page 30
TROUBLE SHOOTING PROTOSOUND®
PROBLEMS
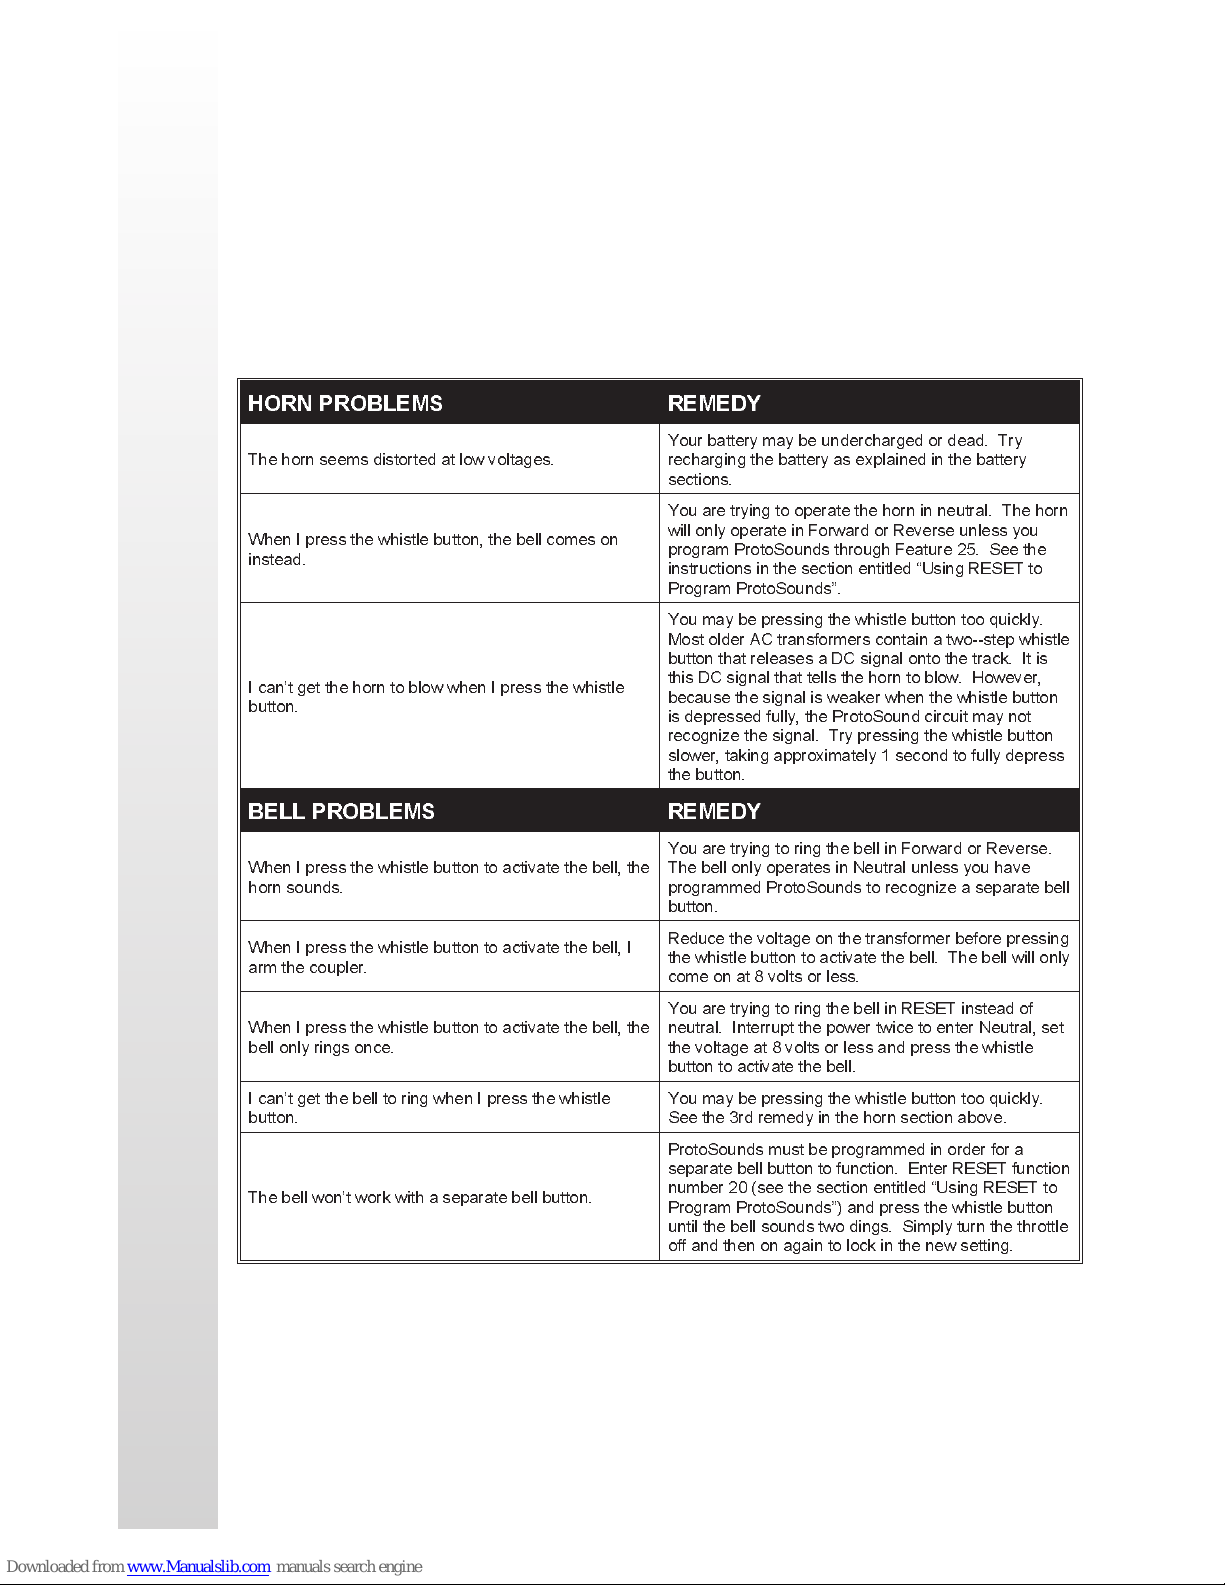
Although ProtoSound® has been designed and engineered for ease of use,
some questions may arise during initial operation. The following table
should answer most questions. If you find that your problem can’t be
resolved with this manual, contact MTH ProtoSound® Electronics (7020
Columbia Gateway Drive, Columbia, MD 21046, 410-381-2580) for
additional assistance.
HORN PROBLEMS REMEDY
The horn seems distorted at low voltages.
When I press the whistle button, the bell comes on
instead.
I cant get the horn to blow when I press the whistle
button.
Your battery may be undercharged or dead. Try
recharging the battery as explained in the battery
sections.
You are trying to operate the horn in neutral. The horn
will only operate in Forward or Reverse unless you
program ProtoSounds through Feature 25. See the
instructions in the section entitled Using RESET to
Program ProtoSounds.
You may be pressing the whistle button too quickly.
Most older AC transformers contain a two--step whistle
button that releases a DC signal onto the track. It is
this DC signal that tells the horn to blow. However,
because the signal is weaker when the whistle button
is depressed fully, the ProtoSound circuit may not
recognize the signal. Try pressing the whistle button
slower, taking approximately 1 second to fully depress
the button.
BELL PROBLEMS REMEDY
When I press the whistle button to activate the bell, the
horn sounds.
When I press the whistle button to activate the bell, I
arm the coupler.
When I press the whistle button to activate the bell, the
bell only rings once.
I cant get the bell to ring when I press the whistle
button.
The bell wont work with a separate bell button.
You are trying to ring the bell in Forward or Reverse.
The bell only operates in Neutral unless you have
programmed ProtoSounds to recognize a separate bell
button.
Reduce the voltage on the transformer before pressing
the whistle button to activate the bell. The bell will only
come on at 8 volts or less.
You are trying to ring the bell in RESET instead of
neutral. Interrupt the power twice to enter Neutral, set
the voltage at 8 volts or less and press the whistle
button to activate the bell.
You may be pressing the whistle button too quickly.
See the 3rd remedy in the horn section above.
ProtoSounds must be programmed in order for a
separate bell button to function. Enter RESET function
number 20 (see the section entitled Using RESET to
Program ProtoSounds) and press the whistle button
until the bell sounds two dings. Simply turn the throttle
off and then on again to lock in the new setting.
RAILKING
RailKing NW-2 Operating Manual
30
Page 31
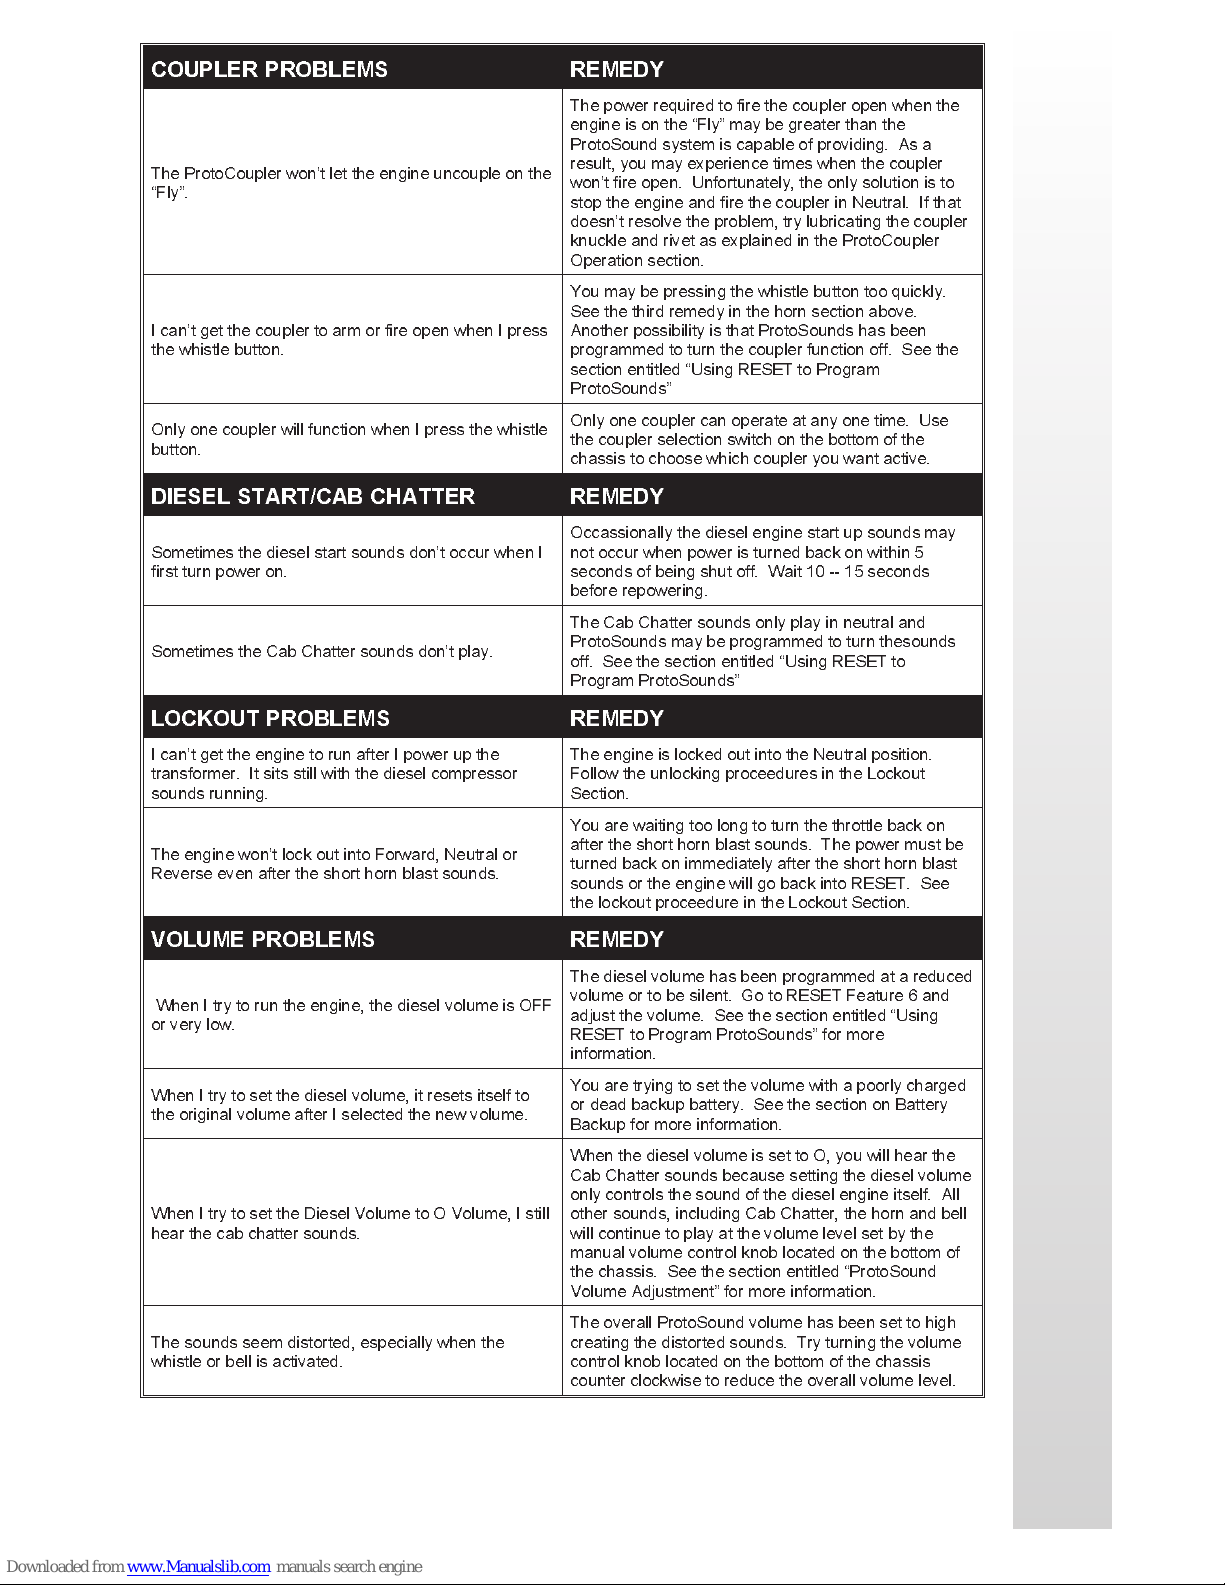
COUPLER PROBLEMS REMEDY
The power required to fire the coupler open when the
engine is on the Fly may be greater than the
ProtoSound system is capable of providing. As a
The ProtoCoupler wont let the engine uncouple on the
Fly.
I cant get the coupler to arm or fire open when I press
the whistle button.
Only one coupler will function when I press the whistle
button.
result, you may experience times when the coupler
wont fire open. Unfortunately, the only solution is to
stop the engine and fire the coupler in Neutral. If that
doesnt resolve the problem, try lubricating the coupler
knuckle and rivet as explained in the ProtoCoupler
Operation section.
You may be pressing the whistle button too quickly.
See the third remedy in the horn section above.
Another possibility is that ProtoSounds has been
programmed to turn the coupler function off. See the
section entitled Using RESET to Program
ProtoSounds
Only one coupler can operate at any one time. Use
the coupler selection switch on the bottom of the
chassis to choose which coupler you want active.
DIESEL START/CAB CHATTER REMEDY
Sometimes the diesel start sounds dont occur when I
first turn power on.
Sometimes the Cab Chatter sounds dont play.
Occassionally the diesel engine start up sounds may
not occur when power is turned back on within 5
seconds of being shut off. Wait 10 -- 15 seconds
before repowering.
The Cab Chatter sounds only play in neutral and
ProtoSounds may be programmed to turn thesounds
off. See the section entitled Using RESET to
Program ProtoSounds
LOCKOUT PROBLEMS REMEDY
I cant get the engine to run after I power up the
transformer. It sits still with the diesel compressor
sounds running.
The engine wont lock out into Forward, Neutral or
Reverse even after the short horn blast sounds.
The engine is locked out into the Neutral position.
Follow the unlocking proceedures in the Lockout
Section.
You are waiting too long to turn the throttle back on
after the short horn blast sounds. The power must be
turned back on immediately after the short horn blast
sounds or the engine will go back into RESET. See
the lockout proceedure in the Lockout Section.
VOLUME PROBLEMS REMEDY
The diesel volume has been programmed at a reduced
When I try to run the engine, the diesel volume is OFF
or very low.
When I try to set the diesel volume, it resets itself to
the original volume after I selected the new volume.
When I try to set the Diesel Volume to O Volume, I still
hear the cab chatter sounds.
The sounds seem distorted, especially when the
whistle or bell is activated.
volume or to be silent. Go to RESET Feature 6 and
adjust the volume. See the section entitled Using
RESET to Program ProtoSounds for more
information.
You are trying to set the volume with a poorly charged
or dead backup battery. See the section on Battery
Backup for more information.
When the diesel volume is set to O, you will hear the
Cab Chatter sounds because setting the diesel volume
only controls the sound of the diesel engine itself. All
other sounds, including Cab Chatter, the horn and bell
will continue to play at the volume level set by the
manual volume control knob located on the bottom of
the chassis. See the section entitled ProtoSound
Volume Adjustment for more information.
The overall ProtoSound volume has been set to high
creating the distorted sounds. Try turning the volume
control knob located on the bottom of the chassis
counter clockwise to reduce the overall volume level.
RAILKING
RailKing NW-2 Operating Manual
31
Page 32
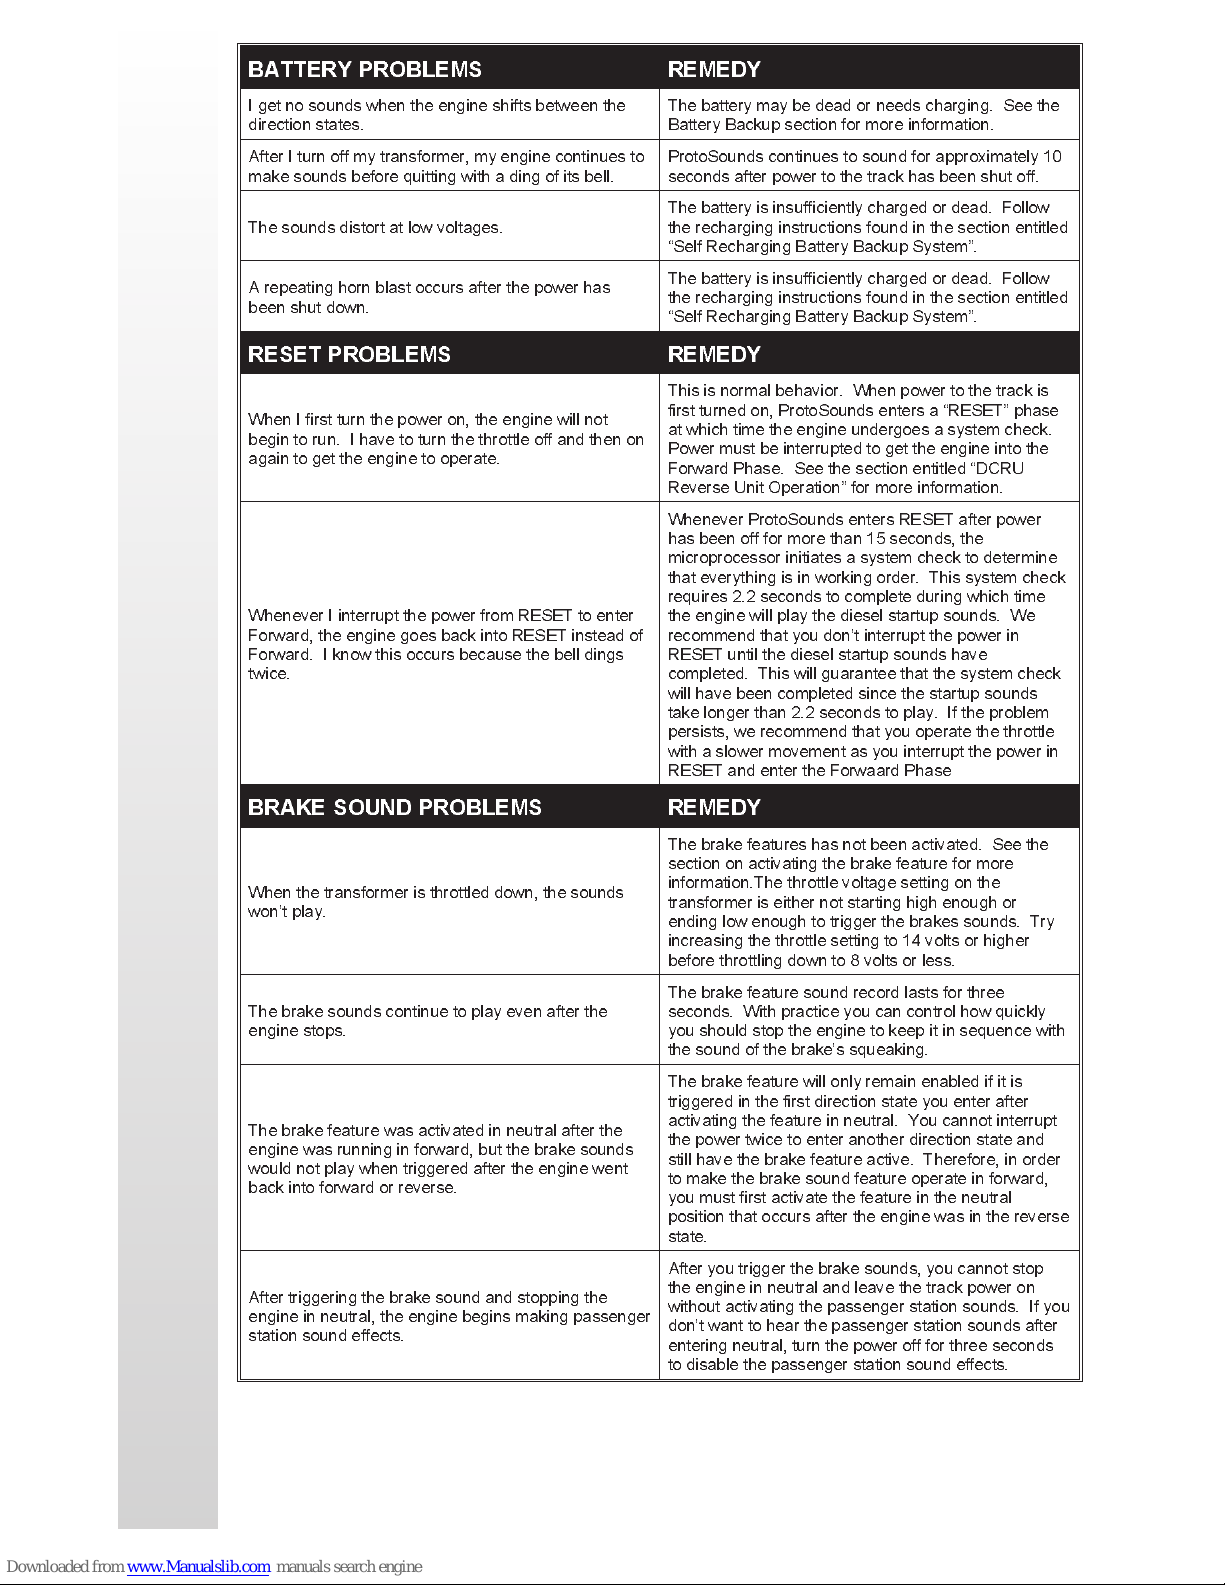
BATTERY PROBLEMS REMEDY
I get no sounds when the engine shifts between the
direction states.
After I turn off my transformer, my engine continues to
make sounds before quitting with a ding of its bell.
The sounds distort at low voltages.
A repeating horn blast occurs after the power has
been shut down.
The battery may be dead or needs charging. See the
Battery Backup section for more information.
ProtoSounds continues to sound for approximately 10
seconds after power to the track has been shut off.
The battery is insufficiently charged or dead. Follow
the recharging instructions found in the section entitled
Self Recharging Battery Backup System.
The battery is insufficiently charged or dead. Follow
the recharging instructions found in the section entitled
Self Recharging Battery Backup System.
RESET PROBLEMS REMEDY
This is normal behavior. When power to the track is
When I first turn the power on, the engine will not
begin to run. I have to turn the throttle off and then on
again to get the engine to operate.
Whenever I interrupt the power from RESET to enter
Forward, the engine goes back into RESET instead of
Forward. I know this occurs because the bell dings
twice.
first turned on, ProtoSounds enters a RESET phase
at which time the engine undergoes a system check.
Power must be interrupted to get the engine into the
Forward Phase. See the section entitled DCRU
Reverse Unit Operation for more information.
Whenever ProtoSounds enters RESET after power
has been off for more than 15 seconds, the
microprocessor initiates a system check to determine
that everything is in working order. This system check
requires 2.2 seconds to complete during which time
the engine will play the diesel startup sounds. We
recommend that you dont interrupt the power in
RESET until the diesel startup sounds have
completed. This will guarantee that the system check
will have been completed since the startup sounds
take longer than 2.2 seconds to play. If the problem
persists, we recommend that you operate the throttle
with a slower movement as you interrupt the power in
RESET and enter the Forwaard Phase
BRAKE SOUND PROBLEMS REMEDY
The brake features has not been activated. See the
section on activating the brake feature for more
When the transformer is throttled down, the sounds
wont play.
The brake sounds continue to play even after the
engine stops.
The brake feature was activated in neutral after the
engine was running in forward, but the brake sounds
would not play when triggered after the engine went
back into forward or reverse.
After triggering the brake sound and stopping the
engine in neutral, the engine begins making passenger
station sound effects.
information.The throttle voltage setting on the
transformer is either not starting high enough or
ending low enough to trigger the brakes sounds. Try
increasing the throttle setting to 14 volts or higher
before throttling down to 8 volts or less.
The brake feature sound record lasts for three
seconds. With practice you can control how quickly
you should stop the engine to keep it in sequence with
the sound of the brakes squeaking.
The brake feature will only remain enabled if it is
triggered in the first direction state you enter after
activating the feature in neutral. You cannot interrupt
the power twice to enter another direction state and
still have the brake feature active. Therefore, in order
to make the brake sound feature operate in forward,
you must first activate the feature in the neutral
position that occurs after the engine was in the reverse
state.
After you trigger the brake sounds, you cannot stop
the engine in neutral and leave the track power on
without activating the passenger station sounds. If you
dont want to hear the passenger station sounds after
entering neutral, turn the power off for three seconds
to disable the passenger station sound effects.
RAILKING
RailKing NW-2 Operating Manual
32
Page 33
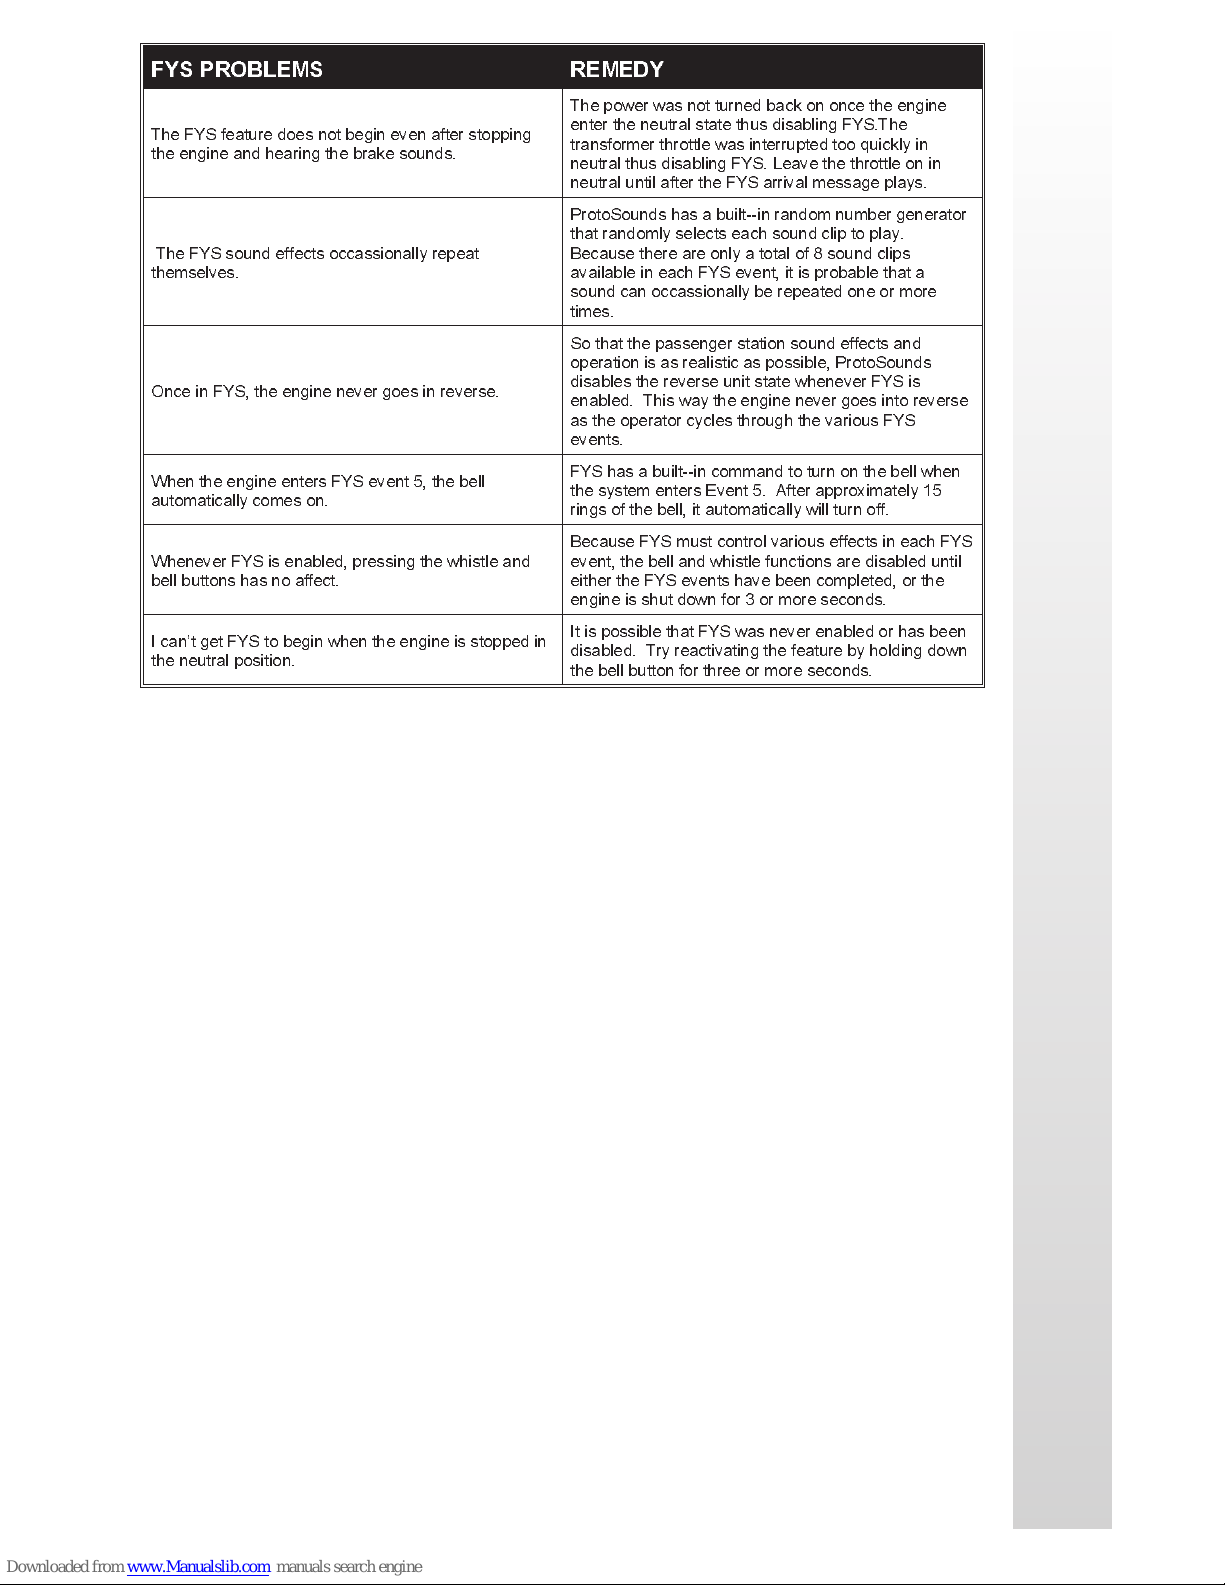
FYS PROBLEMS REMEDY
The power was not turned back on once the engine
The FYS feature does not begin even after stopping
the engine and hearing the brake sounds.
The FYS sound effects occassionally repeat
themselves.
Once in FYS, the engine never goes in reverse.
When the engine enters FYS event 5, the bell
automatically comes on.
Whenever FYS is enabled, pressing the whistle and
bell buttons has no affect.
I cant get FYS to begin when the engine is stopped in
the neutral position.
enter the neutral state thus disabling FYS.The
transformer throttle was interrupted too quickly in
neutral thus disabling FYS. Leave the throttle on in
neutral until after the FYS arrival message plays.
ProtoSounds has a built--in random number generator
that randomly selects each sound clip to play.
Because there are only a total of 8 sound clips
available in each FYS event, it is probable that a
sound can occassionally be repeated one or more
times.
So that the passenger station sound effects and
operation is as realistic as possible, ProtoSounds
disables the reverse unit state whenever FYS is
enabled. This way the engine never goes into reverse
as the operator cycles through the various FYS
events.
FYS has a built--in command to turn on the bell when
the system enters Event 5. After approximately 15
rings of the bell, it automatically will turn off.
Because FYS must control various effects in each FYS
event, the bell and whistle functions are disabled until
either the FYS events have been completed, or the
engine is shut down for 3 or more seconds.
It is possible that FYS was never enabled or has been
disabled. Try reactivating the feature by holding down
the bell button for three or more seconds.
RAILKING
RailKing NW-2 Operating Manual
33
Page 34
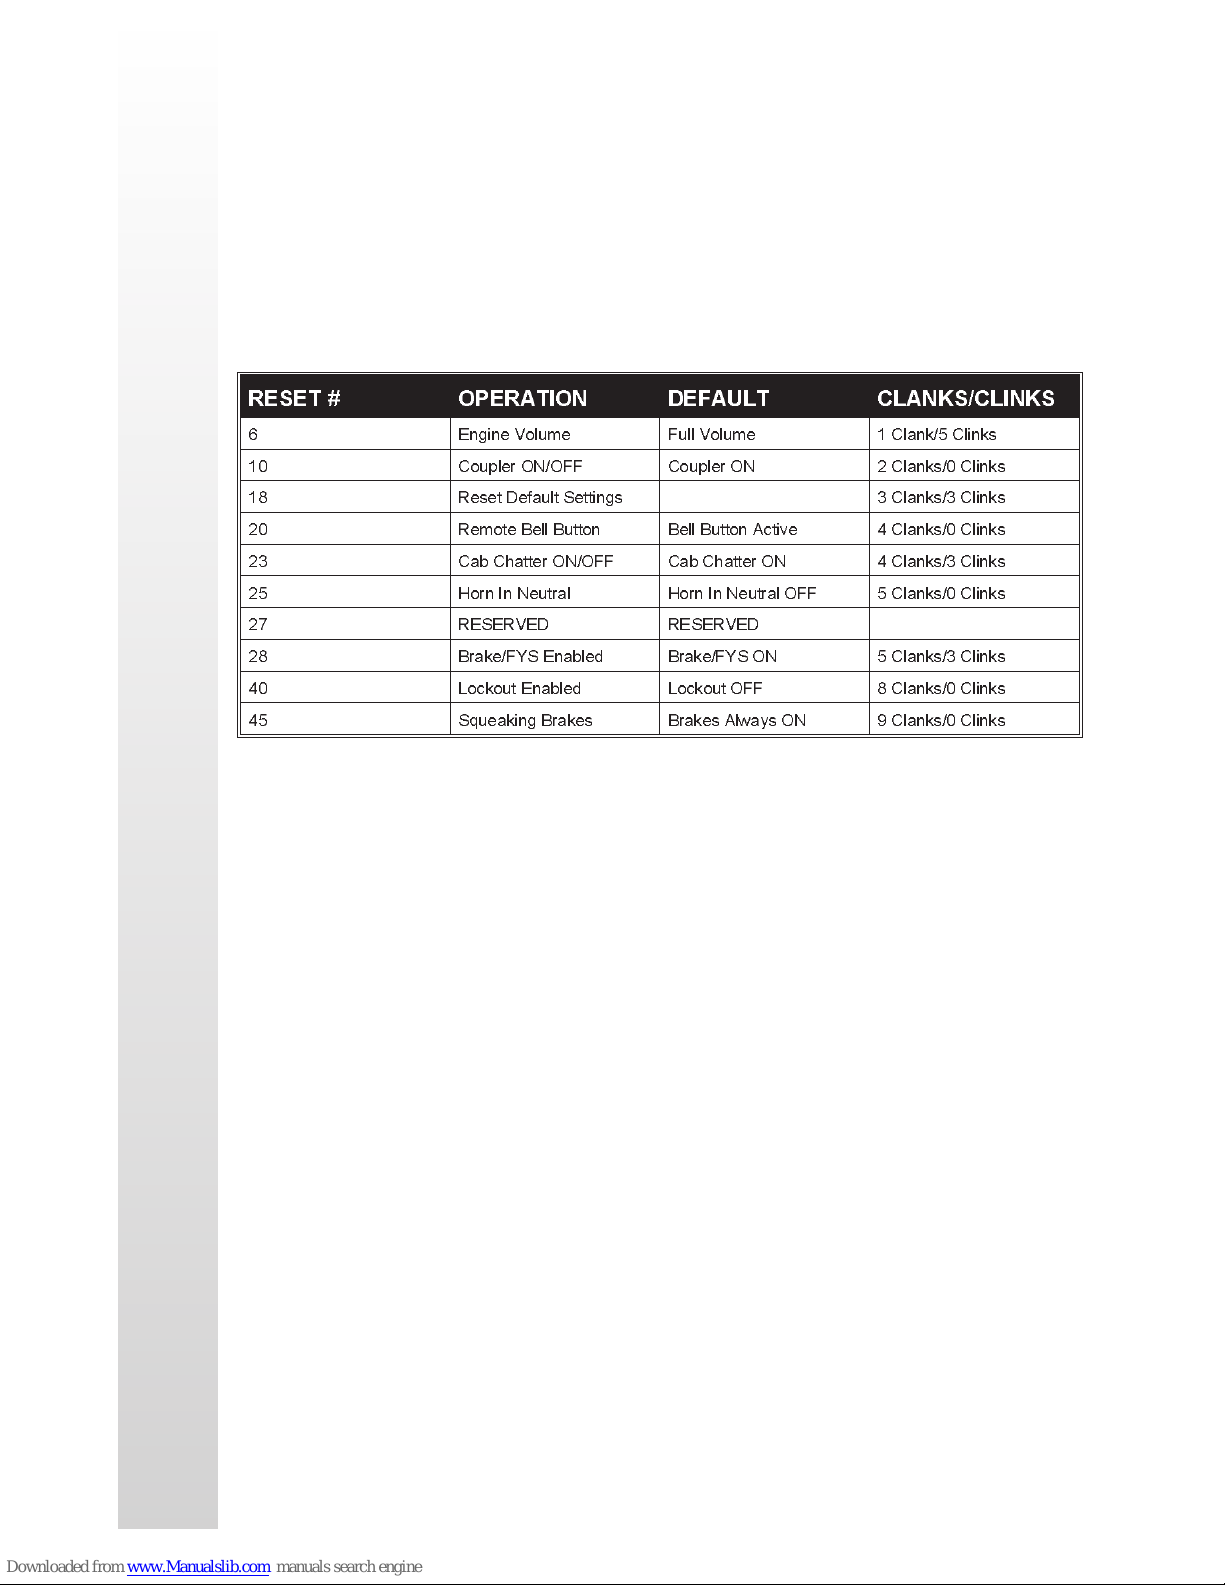
PROTOSOUND RESET FEATURE CHART
The following chart lists the available features found in your ProtoSound®
equipped locomotive. The default settings for each feature as well as the
operation sequence of the feature are listed in separate columns. You can
reset all features to their original factory settings by accessing Feature 18 in
RESET and press and hold the transformer whistle button until you hear a
soft, warbled bell sound.
RESET # OPERATION DEFAULT CLANKS/CLINKS
6 Engine Volume Full Volume 1 Clank/5 Clinks
10 Coupler ON/OFF Coupler ON 2 Clanks/0 Clinks
18 Reset Default Settings 3 Clanks/3 Clinks
20 Remote Bell Button Bell Button Active 4 Clanks/0 Clinks
23 Cab Chatter ON/OFF Cab Chatter ON 4 Clanks/3 Clinks
25 Horn In Neutral Horn In Neutral OFF 5 Clanks/0 Clinks
27 RESERVED RESERVED
28 Brake/FYS Enabled Brake/FYS ON 5 Clanks/3 Clinks
40 Lockout Enabled Lockout OFF 8 Clanks/0 Clinks
45 Squeaking Brakes Brakes Always ON 9 Clanks/0 Clinks
RAILKING
RailKing NW-2 Operating Manual
34
Page 35
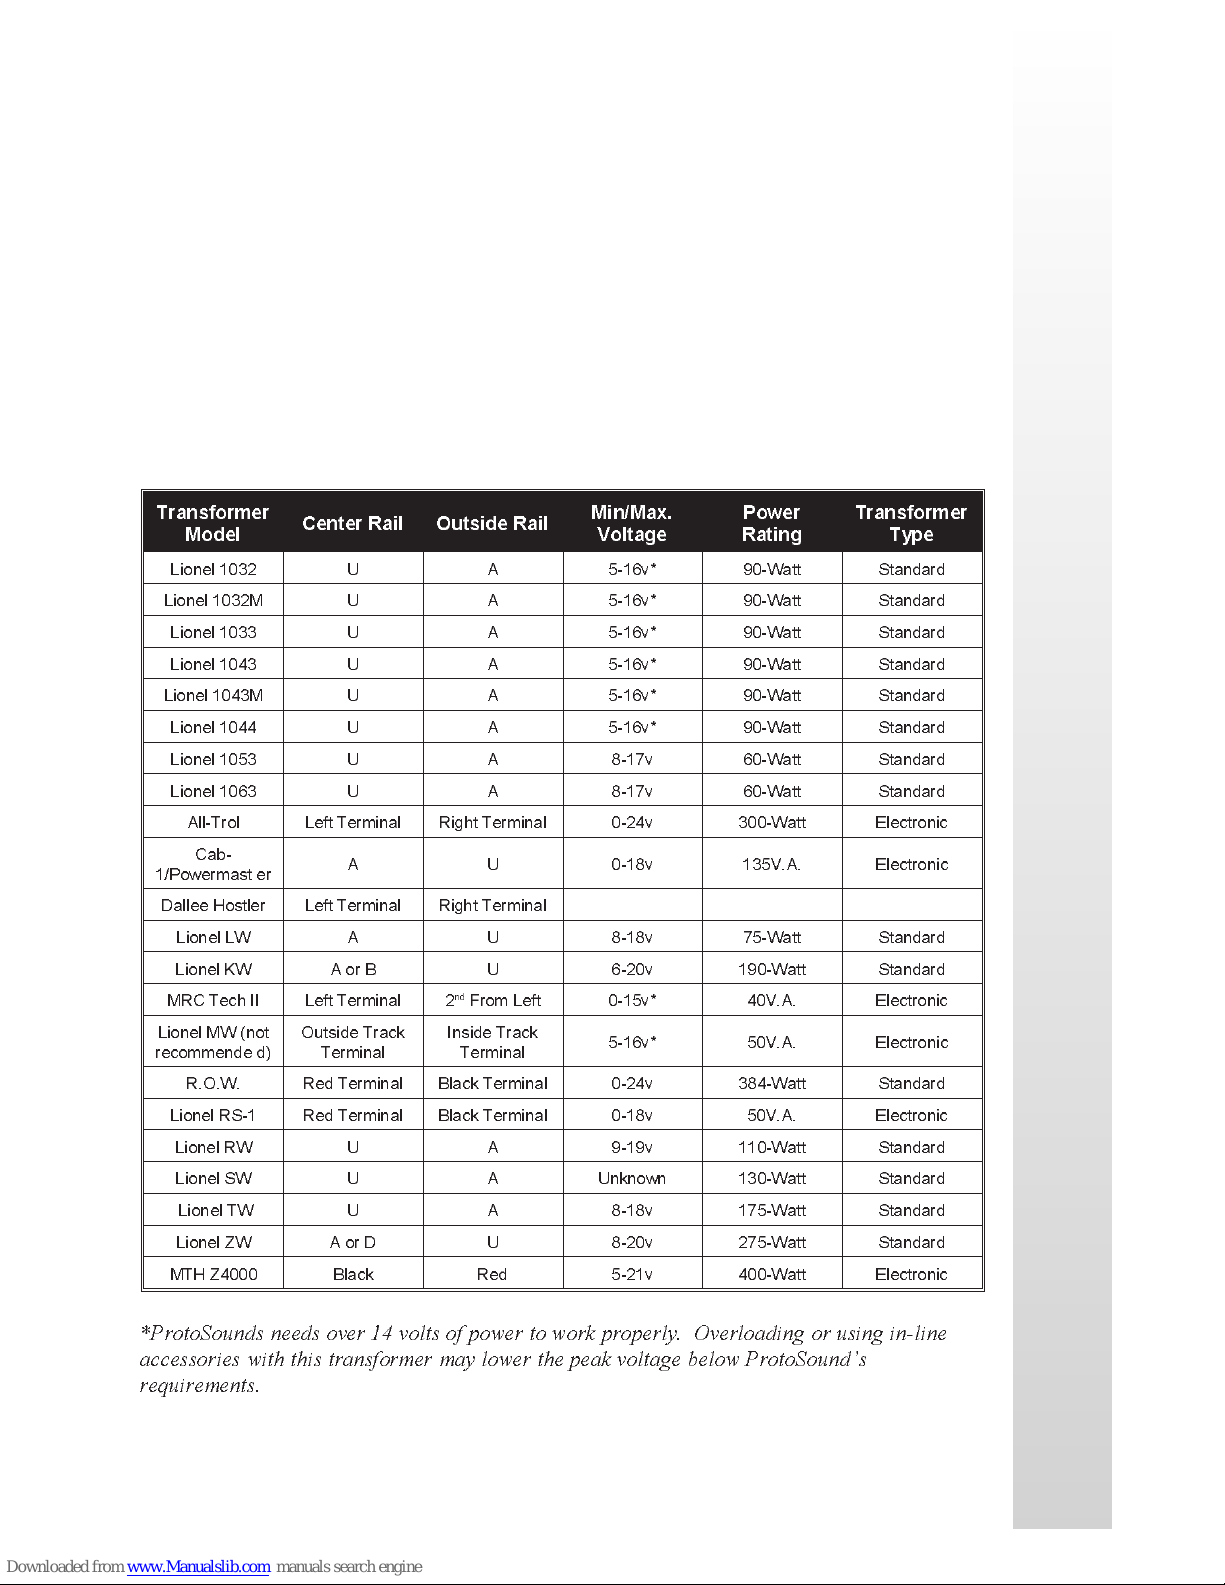
TRANSFORMER WIRING CHART
ProtoSounds® is designed to work with any standard AC transformer that
uses a “Pure Sine-Wave" format. The chart below lists the many Lionel®
compatible transformers, such as the Lionel KW or ZW models. In
addition, the chart details how the terminals on these compatible
transformers should be attached to your layout. The Trainmaster system
from Lionel® (marked with an asterisk below) will not function correctly
with ProtoSounds® without disrupting the sound effects. Therefore,
whenever ProtoSounds® senses that the Trainmaster system is being used,
it automatically disables ProtoSounds® sound effects. The operator retains
control over the engine, but no sound effects will play.
Transformer
Model
Lionel 1032 U A 5-16v* 90-Watt Standard
Lionel 1032M U A 5-16v* 90-Watt Standard
Lionel 1033 U A 5-16v* 90-Watt Standard
Lionel 1043 U A 5-16v* 90-Watt Standard
Lionel 1043M U A 5-16v* 90-Watt Standard
Lionel 1044 U A 5-16v* 90-Watt Standard
Lionel 1053 U A 8-17v 60-Watt Standard
Lionel 1063 U A 8-17v 60-Watt Standard
All-Trol Left Terminal Right Terminal 0-24v 300-Watt Electronic
Cab-
1/Powermast er
Dallee Hostler Left Terminal Right Terminal
Lionel LW A U 8-18v 75-Watt Standard
Lionel KW A or B U 6-20v 190-Watt Standard
MRC Tech II Left Terminal 2
Lionel MW (not
recommende d)
R.O.W. Red Terminal Black Terminal 0-24v 384-Watt Standard
Lionel RS-1 Red Terminal Black Terminal 0-18v 50V.A. Electronic
Lionel RW U A 9-19v 110-Watt Standard
Lionel SW U A Unknown 130-Watt Standard
Lionel TW U A 8-18v 175-Watt Standard
Lionel ZW A or D U 8-20v 275-Watt Standard
MTH Z4000 Black Red 5-21v 400-Watt Electronic
Center Rail Outside Rail
A U 0-18v 135V.A. Electronic
nd
From Left 0-15v* 40V.A. Electronic
Outside Track
Terminal
Inside Track
Terminal
Min/Max.
Voltage
5-16v* 50V.A. Electronic
Power
Rating
Transformer
Type
RAILKING
*ProtoSounds needs over 14 volts of power to work properly. Overloading or using in-line
accessories with this transformer may lower the peak voltage below ProtoSounds
requirements.
RailKing NW-2 Operating Manual
35
Page 36
O-27 OPERATION
While the RailKing NW-2 diesel is more than capable of operating on O27 curves and switches, you may find that certain light freight cars are
prone to derailing when being pulled or pushed by the RailKing NW-2
through O-27 switches. Should this occur, we suggest adding weight to the
cars making them heavier and less likely to derail. In addition, the 6-wheel
version may rub the switch box.
SERVICE & WARRANTY INFORMATION
HOW TO GET SERVICE UNDER THE TERMS OF THE
LIMITED ONE YEAR WARRANTY
For warranty repair, do not return your product to the place of purchase unless it was
purchased from Mikes Train House in Columbia, MD. Instead, follow the instructions below
to obtain warranty service as our dealer network is not prepared to service the product under
the terms of this warranty.
1. First, write, call or FAX MTH Electric Trains, 7020 Columbia Gateway Drive, Columbia,
MD 21046, 410-381-2580 (FAX No. 410-381-6122), stating when it was purchased and what
seems to be the problem. You will be given a return authorization number to assure that your
merchandise will be properly handled upon its receipt.
2. CAUTION: Make sure the product is packed in its original factory packaging including its
foam and plastic wrapping material so as to prevent damage to the merchandise. The shipment
must be prepaid and we recommend that it be insured.
address, daytime phone number, Return Authorization number, a copy of your sales receipt
and a full description of the problem, must be included to facilitate the repairs. Please include
the description regardless of whether you discussed the problem with one of our service
technicians when contacting MTH for your Return Authorization number.
3. Please make sure you have followed the instructions carefully before returning any
merchandise for service.
A cover letter, including your name,
LIMITED ONE YEAR WARRANTY
This item is warranted for one year from the date of purchase against defects in material or
workmanship. We will repair or replace (at our option) the defective part without charge for
parts or labor, if the item is returned to the address below within one year of the original date
of purchase. This warranty does not cover items that have been abused or damaged by careless
handling, light bulbs or traction tires. Transportation costs incurred by the customer are not
covered under this warranty.
This warranty gives you specific legal rights and you may have other rights which vary from
state to state.
ProtoSounds® is a trademark of MTH Electric Trains. DCRU® is a registered copyright of
QS Industries, Inc. Lionel® and Railsound® are registered trademarks of Lionel L.L.C.
RAILKING
 Loading...