

Page 1
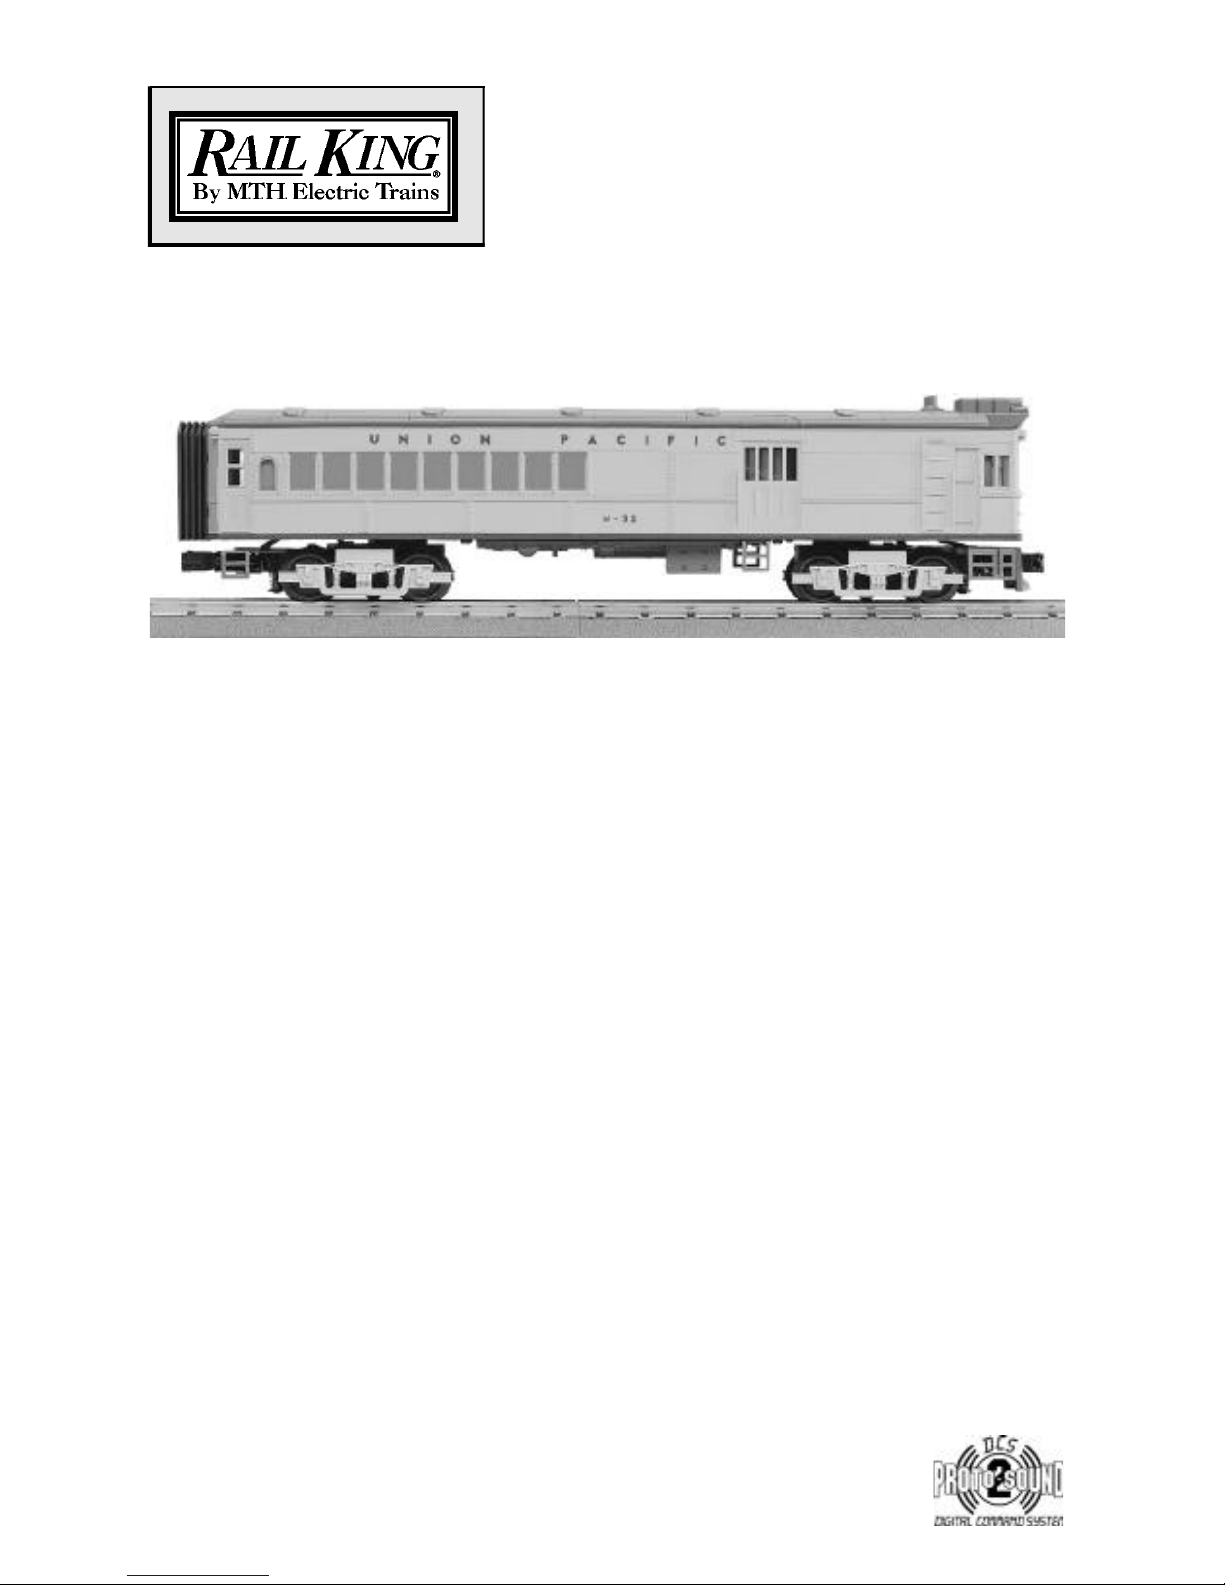
RAILKING DOODLEBUG
DIESEL ENGINE
OPERATING
INSTRUCTIONS
Thank you for purchasing the RailKing Doodblebug Diesel Engine. This RailKing
Diesel Engine contains state-of-the-art electronics with many built-in automatic features
for incredibly realistic operation. Despite these advanced features, the locomotive is
easy to operate with any compatible standard AC transformer (see the compatibility
chart on page 17), and is completely compatible with most other 3-rail locomotives,
rolling stock, and accessories.
This locomotive is equipped with Proto-Sound 2.0 with Digital Command System
(DCS). This new system will allow you to operate your locomotive in Command mode
(when used with the DCS Remote Control System, sold separately) or Conventional
mode. Conventional operating features are described in the following pages, while the
DCS operating features are covered in the set of operating instructions that accompanies
the DCS equipment. Conventional Mode operation of this locomotive is much simpler
than operation of original Proto-Sound engines. For your own safety and that of your
equipment, please read the instructions before you operate this engine.
Page 2

2
RailKing Doodlebug Electric Engine
Table of Contents
Initial Lubrication 3
Basic Operation 3
Throttle 3
Operation Buttons 3
Volume Control 4
Proto-Sound 2.0 Operation 4
Activating Proto-Sound 2.0 Conventional Mode Features 4
Passenger Station Announcements (PSA) 5
Tips on Using PSA 6
Proto-Coupler® Operation 7
Speed Control 7
Lock into a Direction State 8
Reset to Factory Defaults 8
Automatic Sounds 8
Maintenance 9
Lubrication and Greasing Instructions 9
Cleaning the Wheels, Tires and Track 10
Locomotive Traction Tire Replacement 11
Locomotive Light Bulb Replacement 12
Self-Charging Battery Back-Up 13
Troubleshooting 14
Compatibility 16
Transformer Compatibility Chart 17
Additional Features with DCS Remote Control System 18
Safety Precautions 20
Service and Warranty Information 24
Page 3

3
RailKing Doodlebug Electric Engine
INITIAL LUBRICATION
Although the engine was lubricated at the factory, it is important that you
lubricate the chassis before operation. Lightly grease the outside idler and
drive gears (marked “G” in Fig. 3 on page 10) to prevent them from squeaking.
Use light household oil and follow the lubrication points marked “L” in Fig. 2
on page 9. Do not over-oil. Use only a drop or two on each pivot point.
At this point, you are ready to put your engine on the track and begin running
it.
BASIC OPERATION
Throttle – Throttle up the power to your track by either firmly pressing the
Direction button on your transformer or remote once or quickly dropping and
advancing the throttle to put the engine in forward.
Operation Buttons
Use the operation buttons on your transformer or remote as described below.
Horn/Whistle - To sound the horn, firmly press the Horn/Whistle button. The
horn will sound for as long as you continue to depress the button. It will stop
when you release the button.
Bell - To sound the bell, firmly press and release the Bell button. To turn the
bell off, press and release the Bell button again. The bell will continue to ring
from the time your turn it on until you press and release the button again to
turn it off.
Direction – Your train is programmed to start in neutral. To put the engine
into forward and then to change the direction of the train or to put it into
neutral, firmly press and release the Direction button on your transformer. Just
as you must stop your car between forward and reverse, this engine will not go
directly from forward to reverse; it goes into neutral between directions. If the
train has been moving forward, the first press of the Direction button will put
the train from forward into neutral, the second press into reverse, the third
press back into neutral, and the fourth back into forward. To prevent accidental
high-speed start-ups, this engine is programmed to restart in neutral each time
the track voltage is turned off for 10 seconds or more.
Page 4
4
RailKing Doodlebug Electric Engine
PROTO-SOUND
2.0 OPERATING INSTRUCTIONS
Because Proto-Sound 2.0 is an all-new system developed by M.T.H.’s own
research and development team, it operates differently from original
Proto-Sound. Most Proto-Sound 2.0 features are automatically enabled, and the
reset state has been eliminated, so there is no need to program features as with
original Proto-Sound. Although the new system is easier to operate than
original Proto-Sound, you should read these instructions thoroughly before
using Proto-Sound 2.0 features in order to prevent harm to yourself or your
equipment.
Activating Proto-Sound 2.0 Conventional Mode Features:
Proto-Sound 2.0 features are activated by sequences of Bell and Whistle button
pushes described below. Please read the full descriptions of each feature
before using it. To use these buttons to activate features rather than to blow the
whistle or ring the bell, you should press the buttons for a shorter time (½
second); you may need to practice your timing to make this work smoothly.
Feature to Be Activated:
Passenger Station Announcements
Fire the Rear Coupler
Fire the Front Coupler
Speed Control On/Off
Lock into a Direction/Unlock
Reset to Factory Defaults
Button Code:
1 Bell, 2 Whistles
1 Bell, 3 Whistles
1 Bell, 4 Whistles
1 Whistle, 2 Bells (from Neutral only)
1 Whistle, 3 Bells
1 Whistle, 5 Bells (from Neutral only)
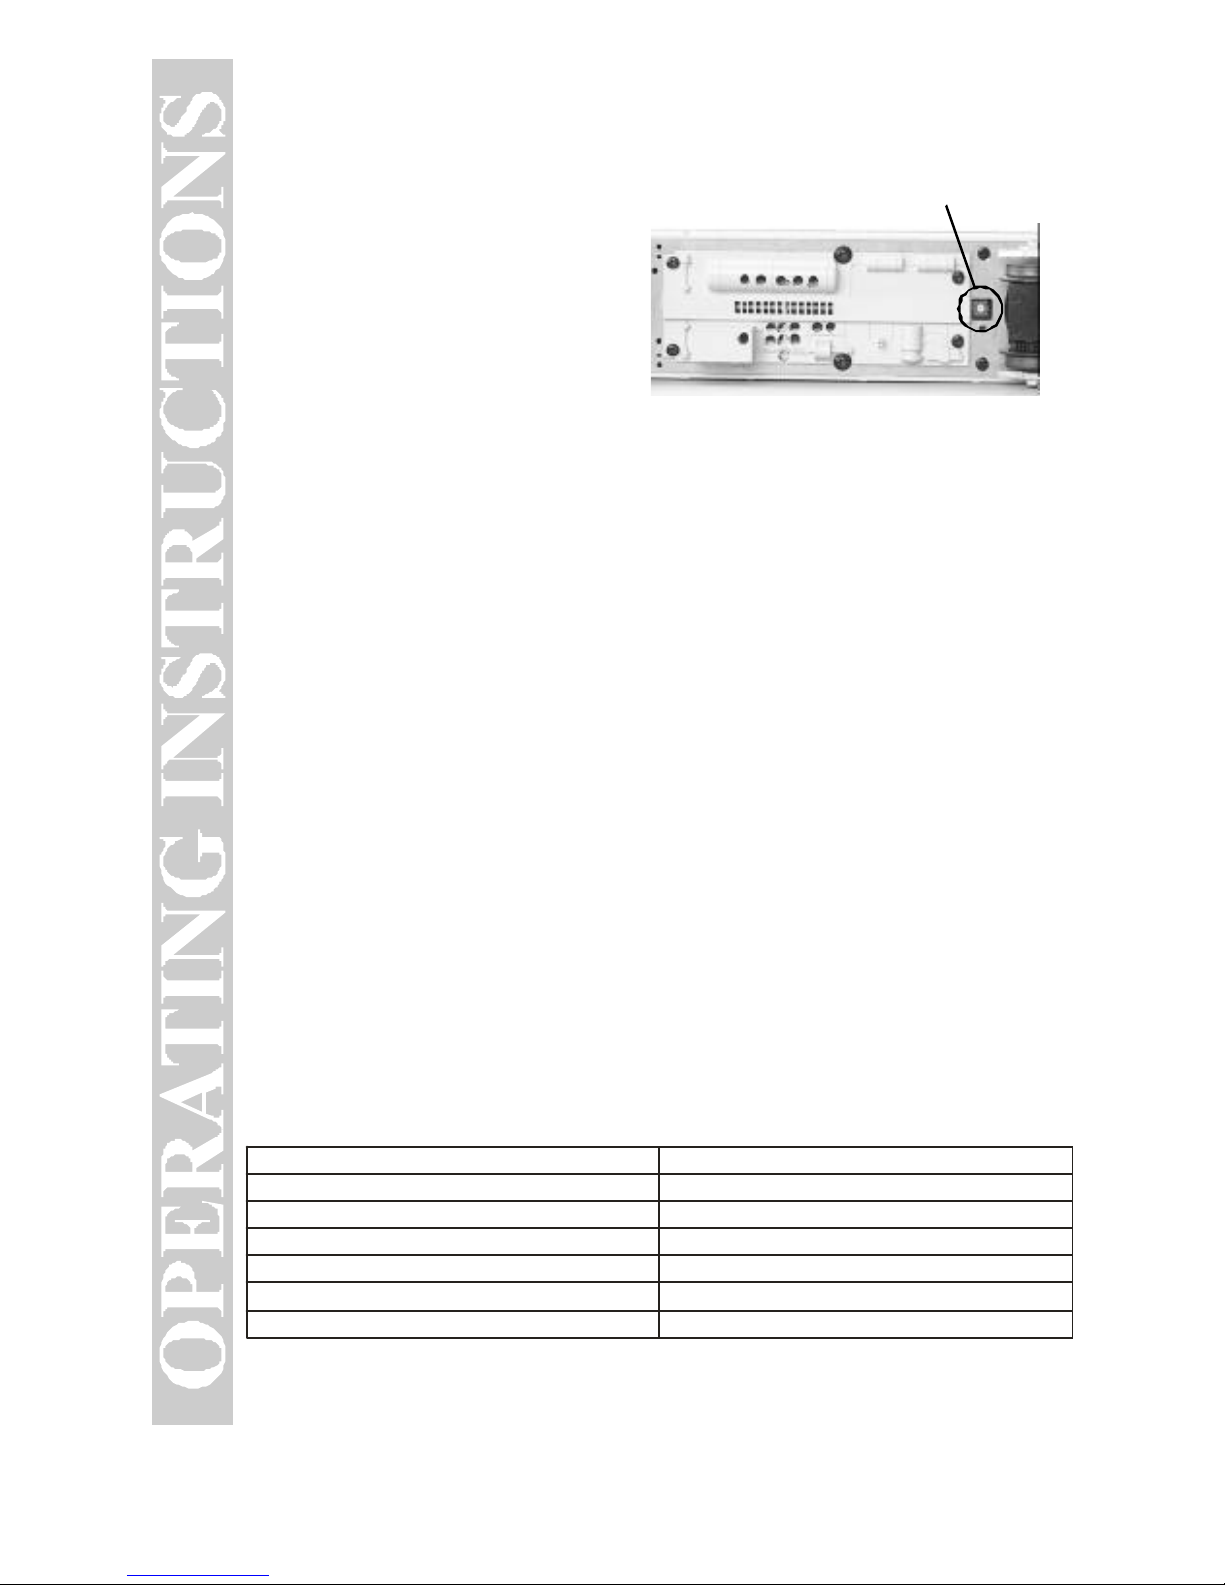
Volume Control
– To adjust the volume of all sounds made by this engine,
turn the master volume control knob located under the engine clockwise to
increase the volume and counter-clockwise to decrease the volume (see Fig. 1).
Volume
Adjustment Knob
Figure 1. Location of the Proto-Sound 2
Volume Adjustment Knob
Page 5

5
RailKing Doodlebug Electric Engine
Passenger Station Announcements (PSA):
Your engine is equipped with a sound package of Passenger Station
Announcements that you can play when you pull into a freight yard. Each
sequence described below will play as long as it is left on, randomly generating
sounds, but be sure to allow time between the button pushes described below
to allow the PSAs sufficient time to run through each sequence.
1. To cue the sound system to play the PSA, quickly but firmly press the Bell
button once followed by 2 quick presses of the Whistle button while the engine
is moving. As soon as you have keyed in this code, you will hear the
announcement for the upcoming stop and the bell will begin to ring.
2. Press the Direction button or drop and advance the throttle once to stop the
engine. This will trigger the first sequence of PSAs. The reverse unit is
temporarily disabled so that the train will not move as you use the Direction
button to trigger the sounds, and Proto-Sound 2.0 has disabled operator control
over the Whistle and Bell buttons until the full PSA sequence is complete.
3. After waiting at least five seconds for that sequence to run, press the
Direction button again to trigger the second sequence of PSAs.
4. After at least another five seconds, press the Direction button again to
trigger the third PSA sequence.
5. Again, after allowing about 5 seconds for the third sequence to run, press
the Direction button one more time to trigger the fourth and final PSA
sequence. You will know it is the final sequence when you hear the “All
Aboard!” call. The bell will begin to chime and within a few seconds, the
engine will start and move out on its own at the current throttle setting, in the
same direction it was traveling when you began the sequence. Once the bell
turns off, the operator regains control of the transformer’s bell and whistle
buttons and can ring the bell or blow the whistle as usual.
Page 6
6
RailKing Doodlebug Electric Engine
Tips on Using PSAs
• You can terminate PSA at anytime by turning off power to the
track for 15 seconds.
• You do not have to be in Forward to use PSA. At the
conclusion of the full sequence, the train will pull away from the
station in whatever direction you were going when you activated
the feature.
• You can use PSA even if you are double-heading with another
engine regardless of whether the second engine is equipped with
a Proto-Sound 2.0 PSA module. If the second engine is not
equipped with PSA at all, you must remember not to leave the
throttle at a high voltage level once you have stopped the engine
to run the PSA. Otherwise, the engine without PSA will begin
vibrating on the track as its motors strain to move the train, since
they cannot be automatically disabled during the PSA cycle. If
the second engine (whether original Proto-Sound or Proto-Sound
2.0) is equipped with PSAs, you may choose to disable it when
used in double-heading operations, so you will not experience
competing PSA sounds. To disable PSAs in an original
Proto-Sound engine, see the operating instructions for that
engine.
Page 7

7
RailKing Doodlebug Electric Engine
Proto-Coupler® Operation
This locomotive is equipped with a coil-wound Proto-Coupler for remote
uncoupling action. Because the Proto-Coupler is controlled through the
Proto-Sound 2.0 microprocessor, it does not require an uncoupling track section
or modification to your layout to function. Use the codes listed below to fire
the coupler.
Rear Coupler:
To fire the rear coupler, quickly press the Bell button once followed
immediately by three pushes of the Whistle button. The sound of the liftbar
and air line depletion will play, and the knuckle will be released.
Front Coupler:
To fire the front coupler, quickly press the Bell button once followed
immediately by four pushes of the Whistle button. The sound of the liftbar and
air line depletion will play, and the knuckle will be released.
Speed Control:
M.T.H. engines equipped with Proto-Sound 2.0 have speed control capabilities
that allow the engine to maintain a constant speed up and down grades and
around curves, much like an automobile cruise control. You can add or drop
cars on the run, and the engine will maintain the speed you set.
While the engine is programmed to start with the speed control feature
activated, you can opt to turn it off. This means the engine’s speed will fall as
it labors up a hill and increase as it travels downward. It is also affected by the
addition or releasing of cars while on the run.
To turn speed control on and off, put the engine in neutral, then press the
transformer’s Whistle button one time then immediately press the Bell button
two times. Two horn blasts will indicate that the engine has made the change.
Repeat the 1 whistle, 2 bells code to return it to the other state. You will want
to do this during the initial neutral upon start-up if you ever couple this
engine to another engine that is not equipped with speed control to avoid
damaging the motors in either engine. Each time you shut down the engine
completely, it will automatically turn speed control on.
Page 8

8
RailKing Doodlebug Electric Engine
Lock into a Directional State:
You can lock your engine into a directional state (forward, neutral, or reverse)
to prevent it from changing directions. To do this, put the engine into the
direction you want or into neutral, to lock it into neutral, run it at a very slow
speed (< 10 scale mph), and quickly but firmly press your remote’s Whistle
button once followed immediately by three presses of the Bell button. Two
horn blasts will indicate that the engine has made the change. The engine will
not change direction (including going into neutral) until you repeat the 1
whistle, 3 bells code to return the engine to its normal state, even if the engine
is kept without power for extended periods of time.
Reset to Factory Defaults:
To override the settings you currently have assigned to the engine and reset it
to its factory defaults, quickly press the Whistle button once, followed
immediately by five quick pushes of the Bell button.
Automatic Sounds:
Certain Proto-Sound 2.0 sound effects automatically play in programmed
conventional mode conditions:
Squealing Brakesplay any time the engine’s speed decreases rapidly.
Cab Chatter plays when the engine idles in neutral.
Engine Start-up and Shut-down sounds play when the engine starts up and
shuts down.
Page 9
9
RailKing Doodlebug Electric Engine
MAINTENANCE
Lubrication and Greasing Instructions
The engine should be well oiled and greased in order to run properly.
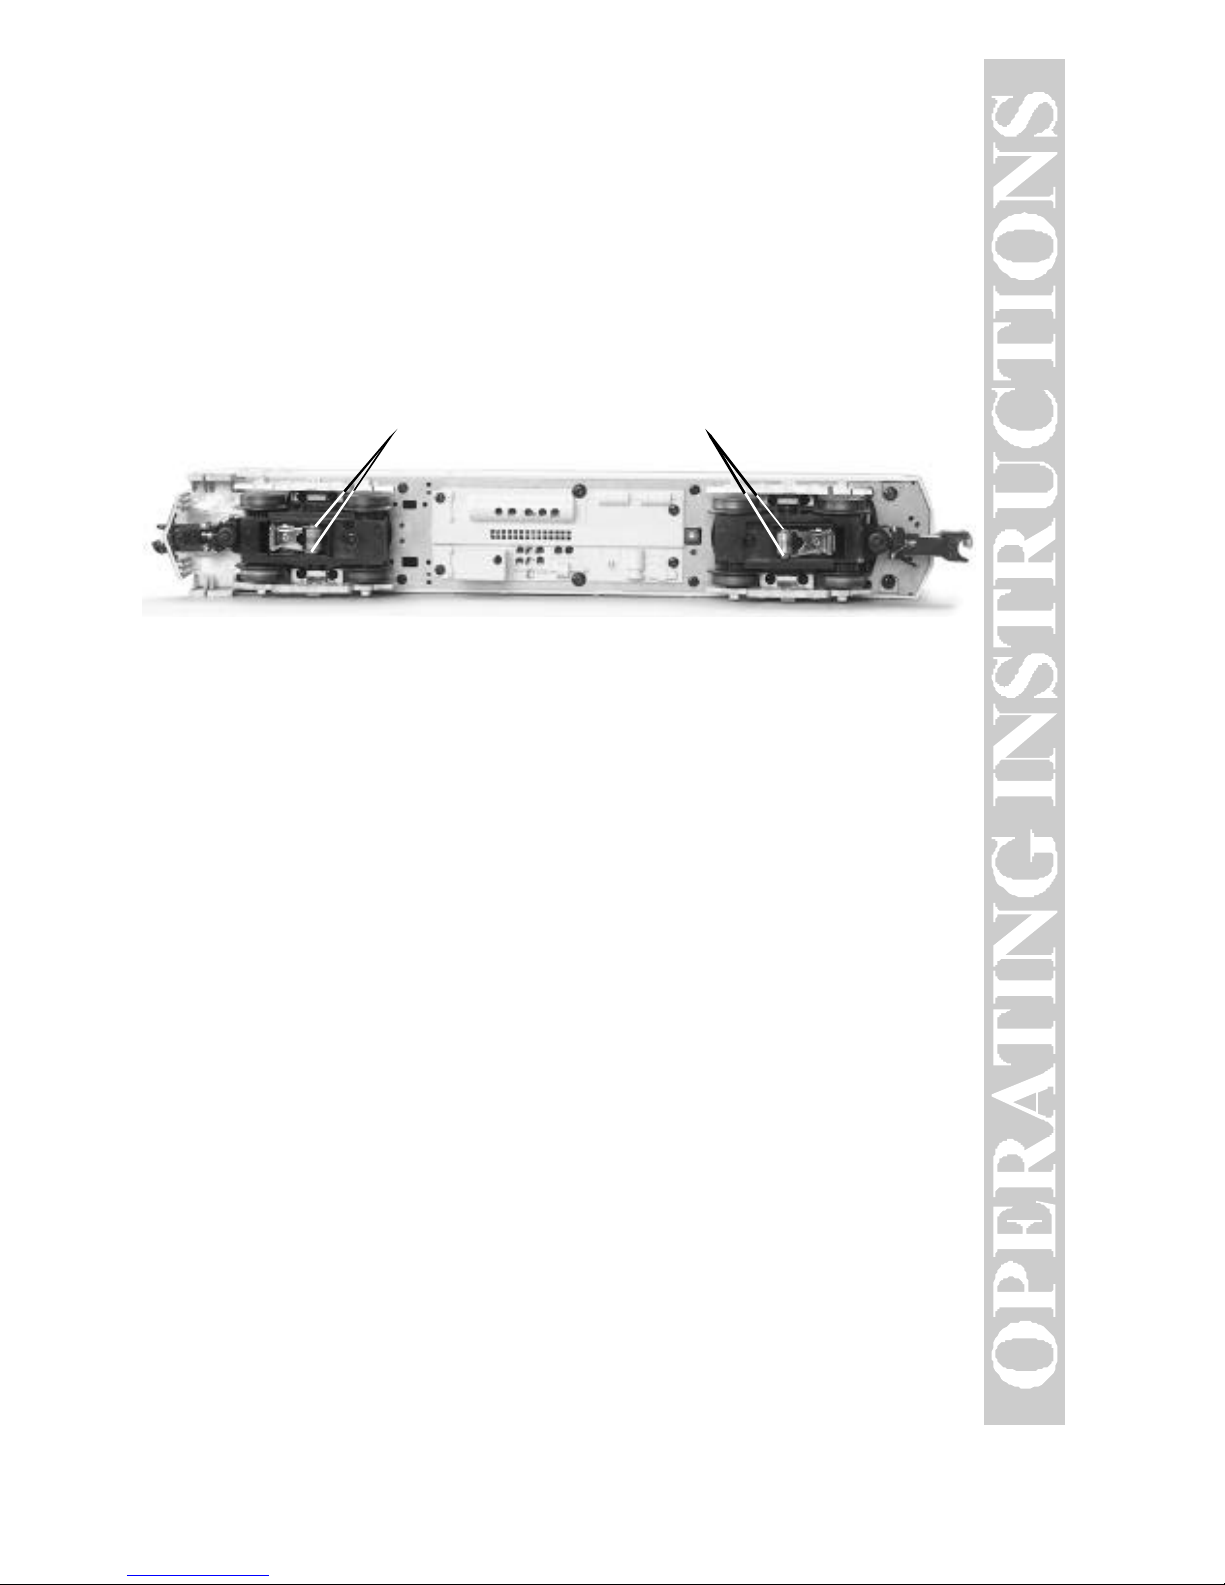
You should regularly lubricate the pickup rollers to prevent them from
squeaking. Use light household oil and follow the lubrication points marked
“L” in Fig. 2. Do not over oil. Use only a drop or two on each pivot point.
The locomotive’s internal gearing was greased at the factory and should not
need additional grease until after 50 hours of operation or one year, whichever
comes first. Follow the greasing instructions below. Note that in some tightly
packed engines you may need to move internal components temporarily in
order to access the gears.
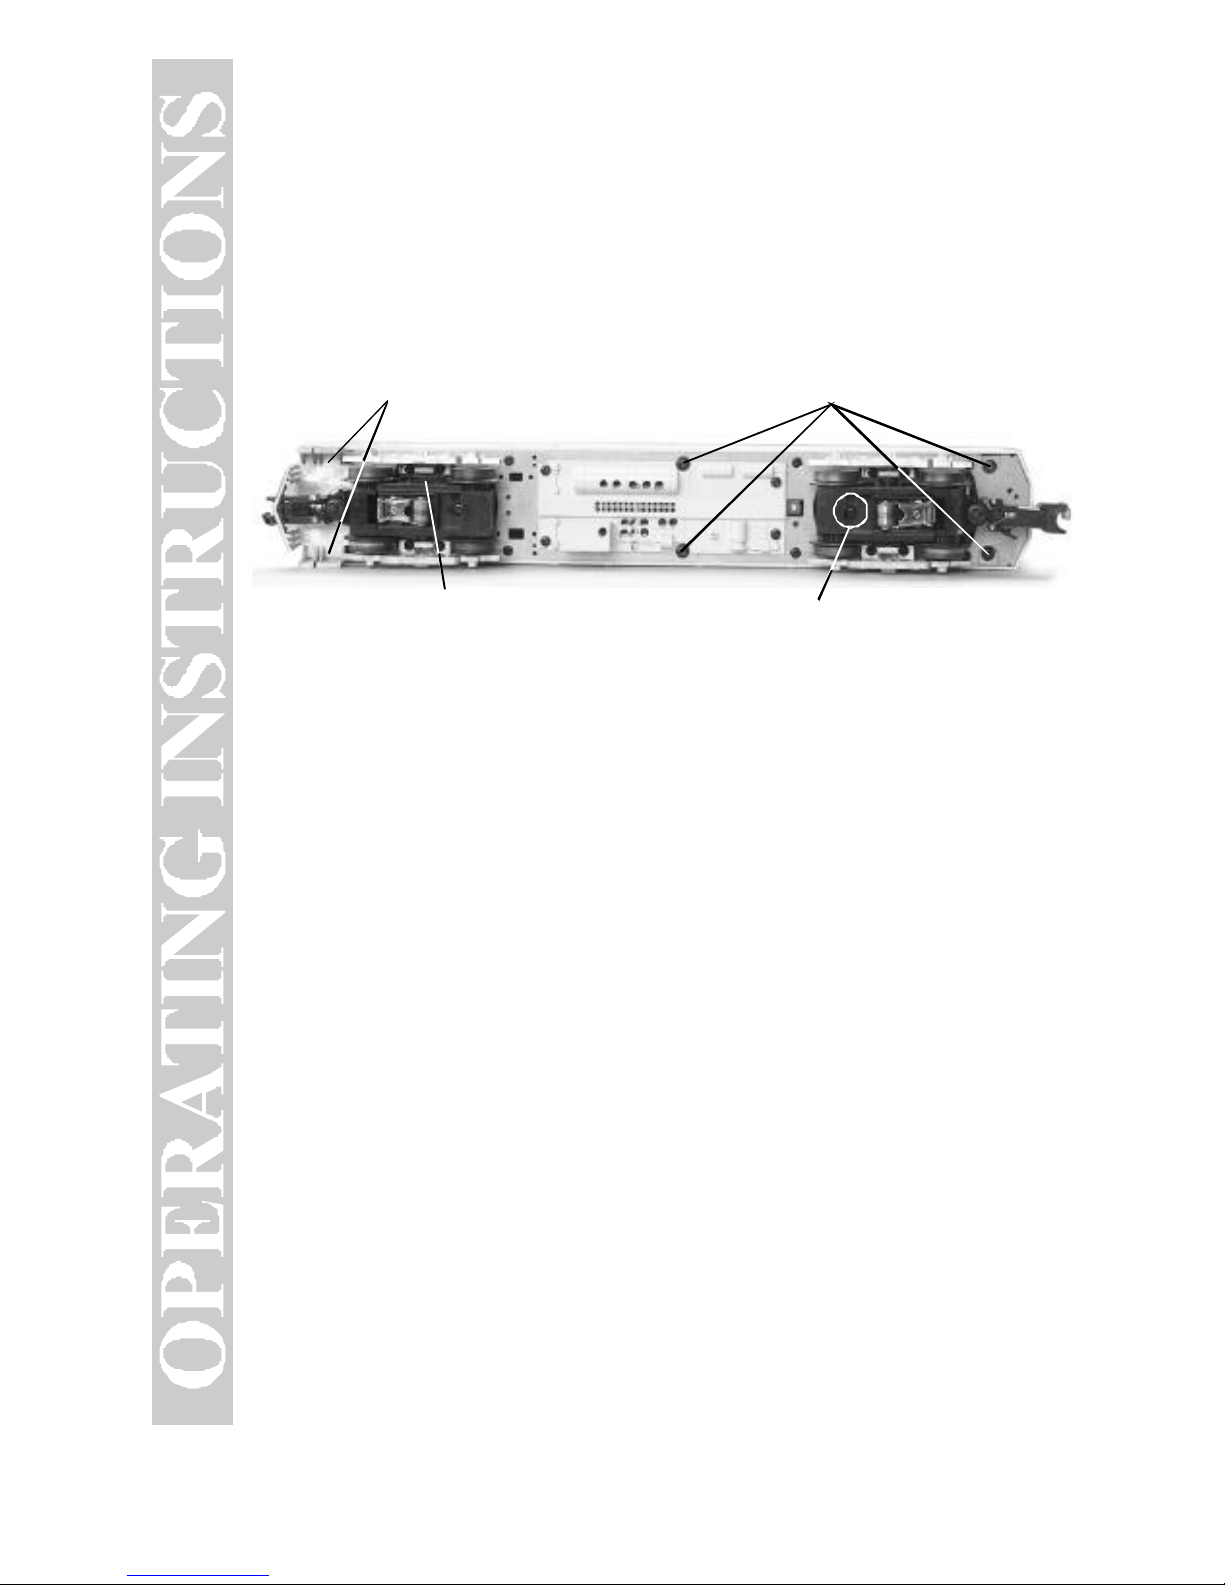
1. Remove the screws from the chassis, as seen in Figure 3, then lift the body
away from the chassis.
2. Remove the black Phillips motor mount screw located on the bottom of the
truck block underneath where the pickup roller sits.
3. Once the motor mount screw has been removed, pull the motor away from
the truck block and lightly coat the motor worm gear and bronze drive gear (in
the truck block) with grease.
4. Reassemble the truck and motor, being careful not to pinch any wires
between the truck block and motor mount.
Lubricate Pick Up Rollers
Lubricate Pick Up Rollers
Figure 2. Lubrication Points on the Locomotive
Page 10
10
RailKing Doodlebug Electric Engine
5. Repeat the procedure for the other motor and truck
6. Reassemble the chassis and body, being careful that the wires are not caught
between the body and chassis, as this can lead to a short that may damage the
electronics beyond repair.
It is also a good idea to lubricate the outside truck block idler and drive gears
with grease occasionally. Add grease to the points marked with “G” in Figure
3.
Cleaning the Wheels, Tires and Track
Periodically check the locomotive wheels and pickups for dirt and buildup,
which can cause poor electrical contact and traction as well as prematurely
wear out the neoprene traction tires. Wheels and tires can be cleaned using
denatured alcohol (not rubbing alcohol), which can be found in home
improvement stores, applied with a cotton swab.
Occasional cleaning of the track will also help to ensure good electrical contact
and to prolong the life of your engine’s tires. To clean the track, use a clean
rag and denatured alcohol (not rubbing alcohol). Unplug the transformer and
wipe the rails of the track, turning the rag frequently to ensure that you are
using clean cloth on the rails.
Body Mount Screws Body Mount Screws
Motor Mount Screw
Grease Gears (G)
Figure 3. Greasing Points on the Locomotive and the Locations of the Body Mounting
Screws.
Page 11
11
RailKing Doodlebug Electric Engine
Traction Tire Replacement Instructions
Your locomotive is equipped with two neoprene rubber traction tires on each
powered truck block. While these tires are extremely durable, you may need to
replace them at some point.
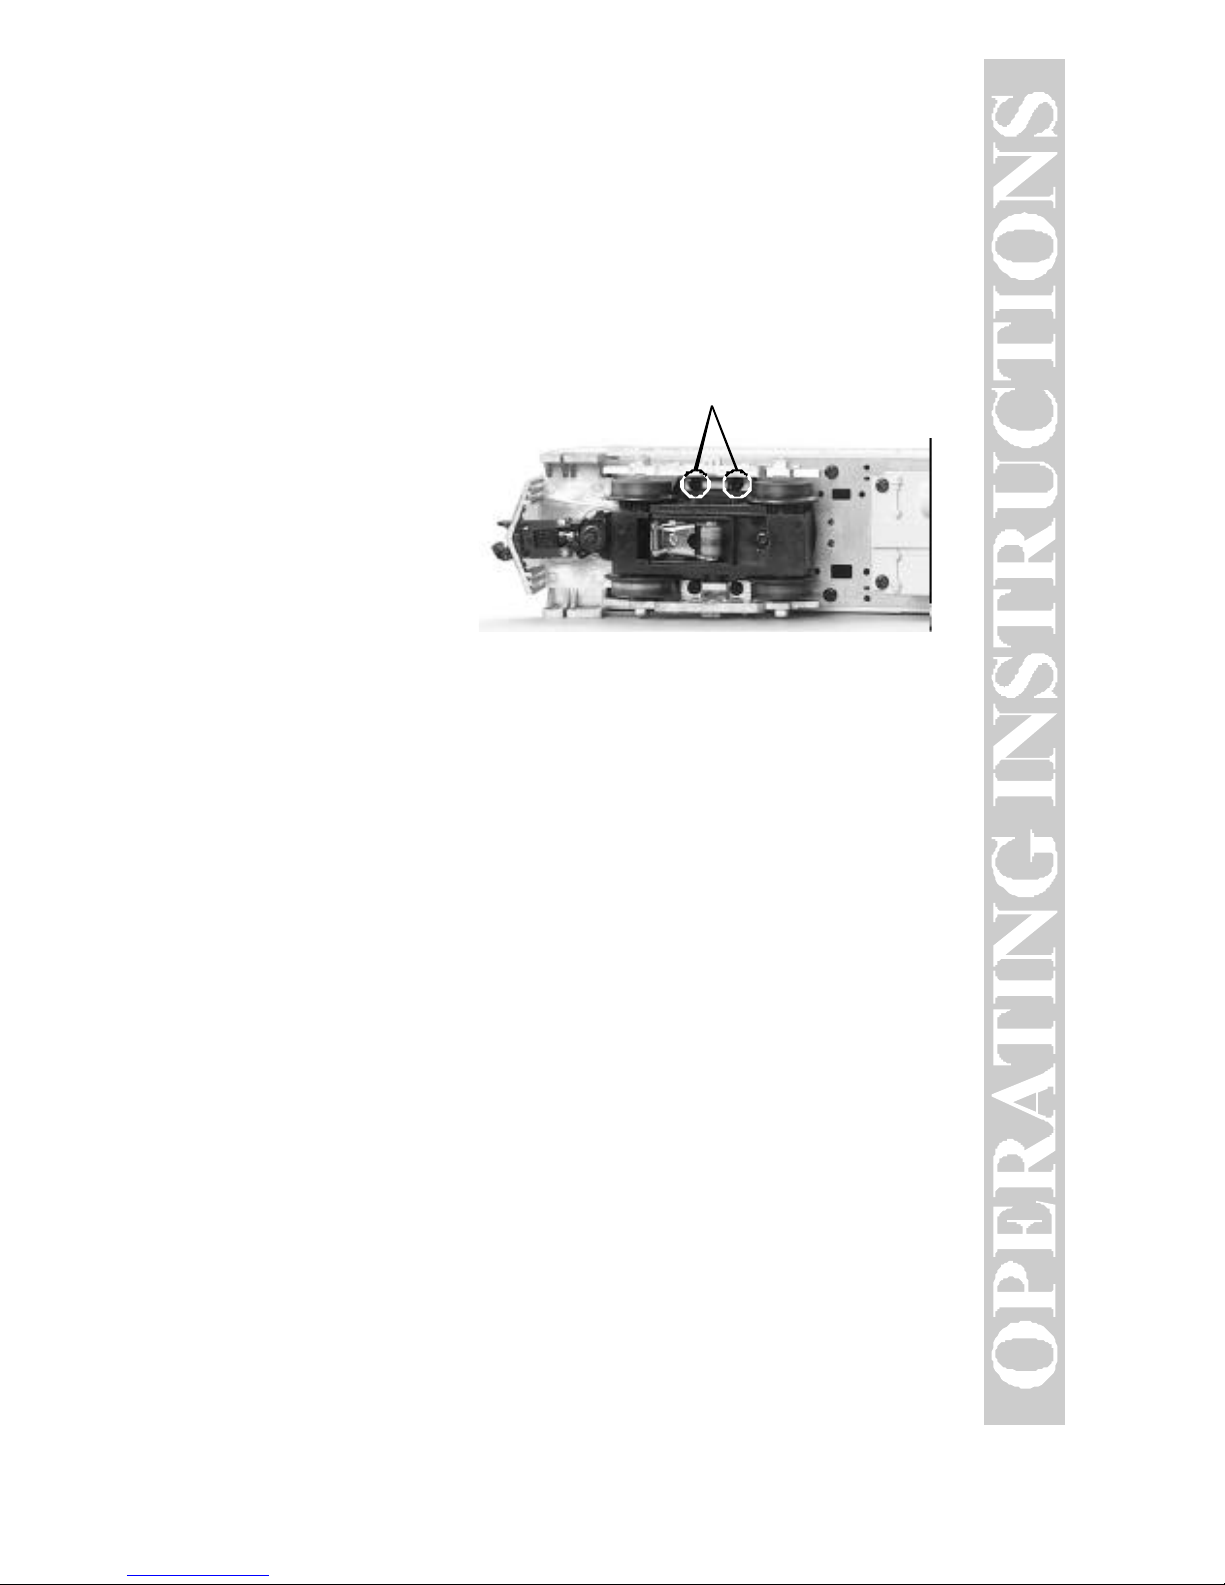
Turn your engine upside down. If there are visible Phillips screw heads
between the truck frame and truck block (see Fig. 4), go to step A. If not, go to
step B.
A. Remove the two
Phillips screws that attach
the truck sides to the truck
block.
B. Remove the trucks
from the chassis and the
truck sides from the trucks
in order to slip the new
tire over the grooved drive
wheel. See Fig. 3 for
which screws you must
remove to do this.
Then:
1. Make sure the old tire has been completely removed from the groove in the
drive wheel, using a razor blade or small flathead screwdriver to pry away any
remains.
2. Slip the new tire onto the wheel. You may find it useful to use two small
flathead screwdrivers to stretch the tire over the wheel.
3. If you twist the tire while stretching it over the wheel, you will need to
remove and reinstall the tire. Otherwise your engine will wobble while
operating.
4. Make sure the tire is fully seated inside the groove. Use a razor blade to
trim away any excess tire that doesn’t seat itself inside the groove properly.
5. Reassemble in the reverse order.
Truck Screws
Figure 4. Area to Look for Screws
Page 12
12
RailKing Doodlebug Electric Engine
One set of replacement tires is packaged with your model. Additional tires are
available directly from the M.T.H. Parts Department (phone: 410-381-2580;
fax: 410-423-0009; e-mail: [email protected]; mail: 7020 Columbia
Gateway Drive, Columbia MD 21046-1532).
Locomotive Light Bulb Replacement
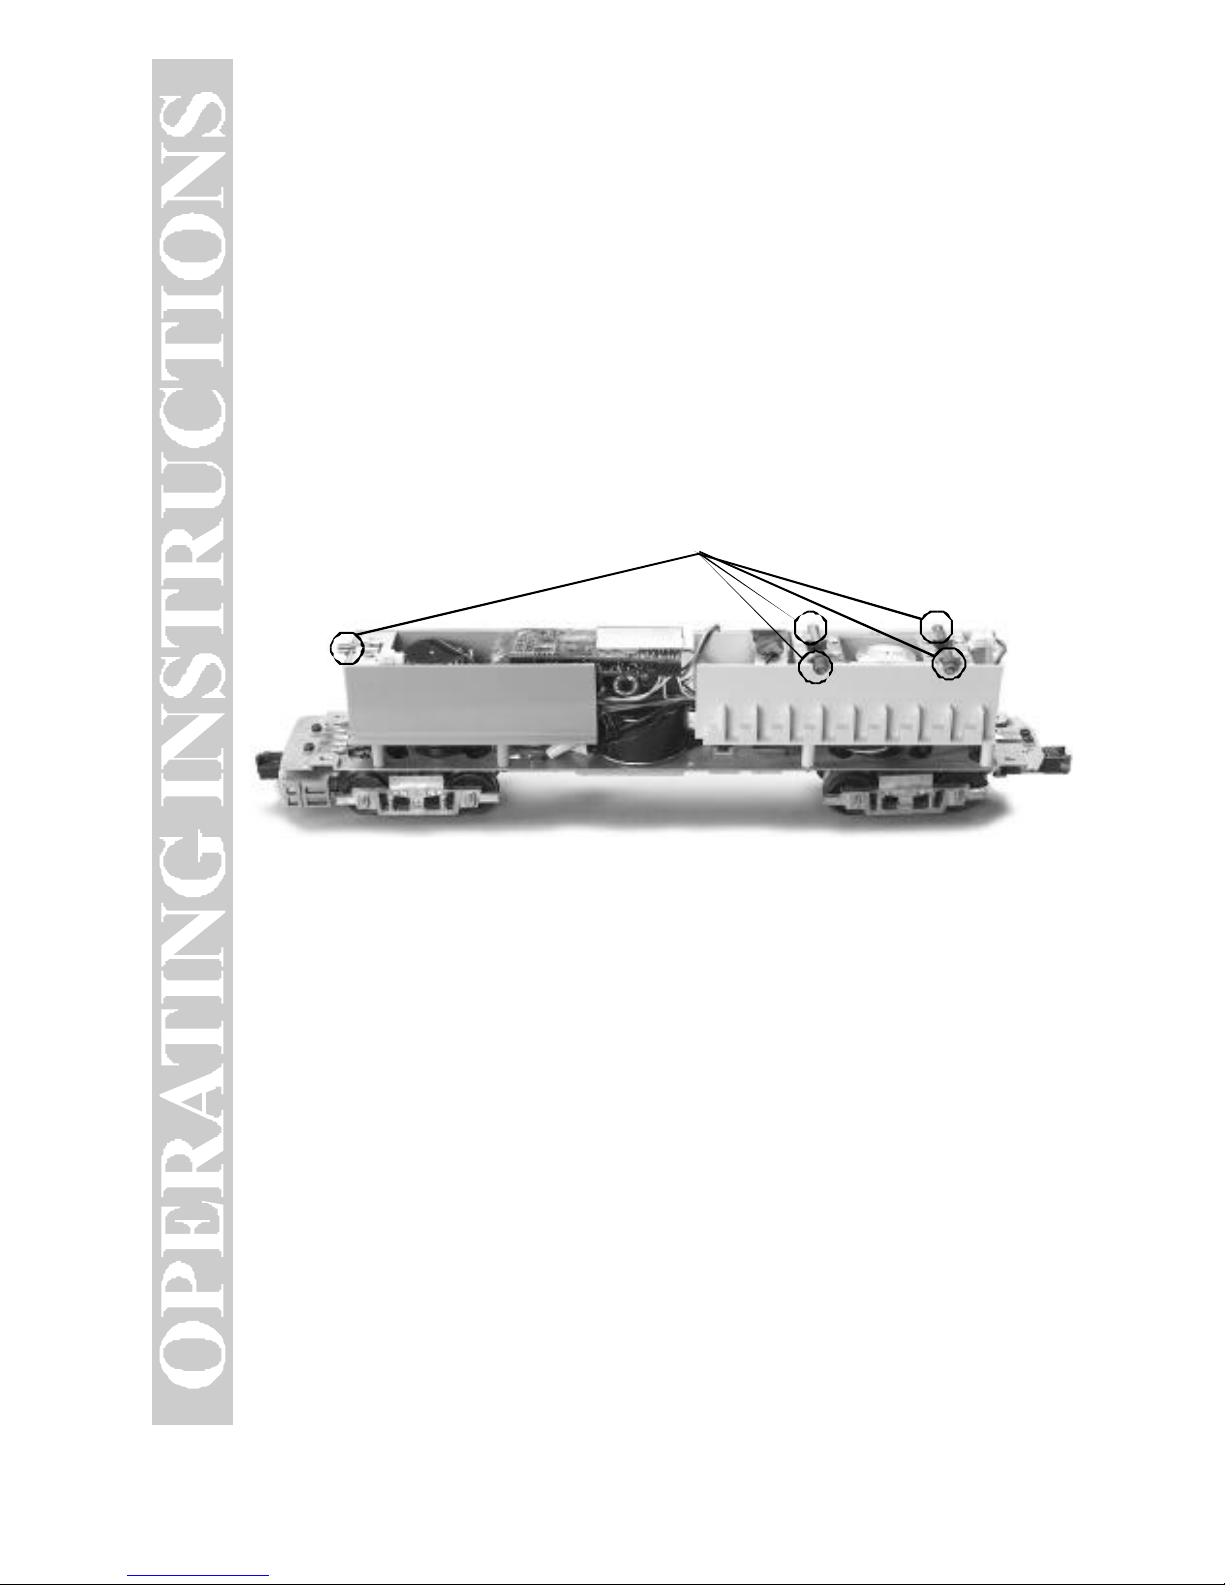
To replace the light bulb in the locomotive, follow these instructions:
Follow the cab removal instructions found in the “Lubrication and Greasing”
section of this booklet. Once the body has been removed, remove and replace
the bulb as shown in Fig. 5.
You can obtain replacement bulbs directly from the M.T.H. Parts Department.
Interior Lamps
Figure 5. Locate the Burned-Out Lightbulbs in the Locomotive. To Replace the Bulb,
Pull the Bulb Out to remove and Install a New One by Reversing the Process
Page 13
13
RailKing Doodlebug Electric Engine
Self-Charging Battery Back-Up
The special NiCad 7-cell 8.4v self-charging battery in this engine improves
performance at any speed. It ensures that power to the sound system will
remain on during directional changes, or when traveling over dirty track or
switches. The self-charging battery system is automatically turned on or off
whenever track power is turned on or off.
Track power (when applied) recharges the battery, which should last for up to
five years, and the special NiCad battery is a dry battery that should not leak or
cause any damage to your engine. However, even this special battery will
eventually wear down and need to be replaced. When you notice that your
engine sounds seem distorted or garbled at low voltages or become silent when
power from the transformer is turned off, test the battery to determine whether
it should be recharged or replaced.
• Put the engine in neutral and leave the track voltage at 12 volts for 15
minutes.
• If the garbled or distorted sounds are reduced, the battery charge has run
down and can be recharged. Do this by leaving the engine in neutral with
track voltage at 12 volts for 6-7 hours so the battery can fully recharge (if your
engine has a smoke unit, be sure it is turned off). Or you can remove the
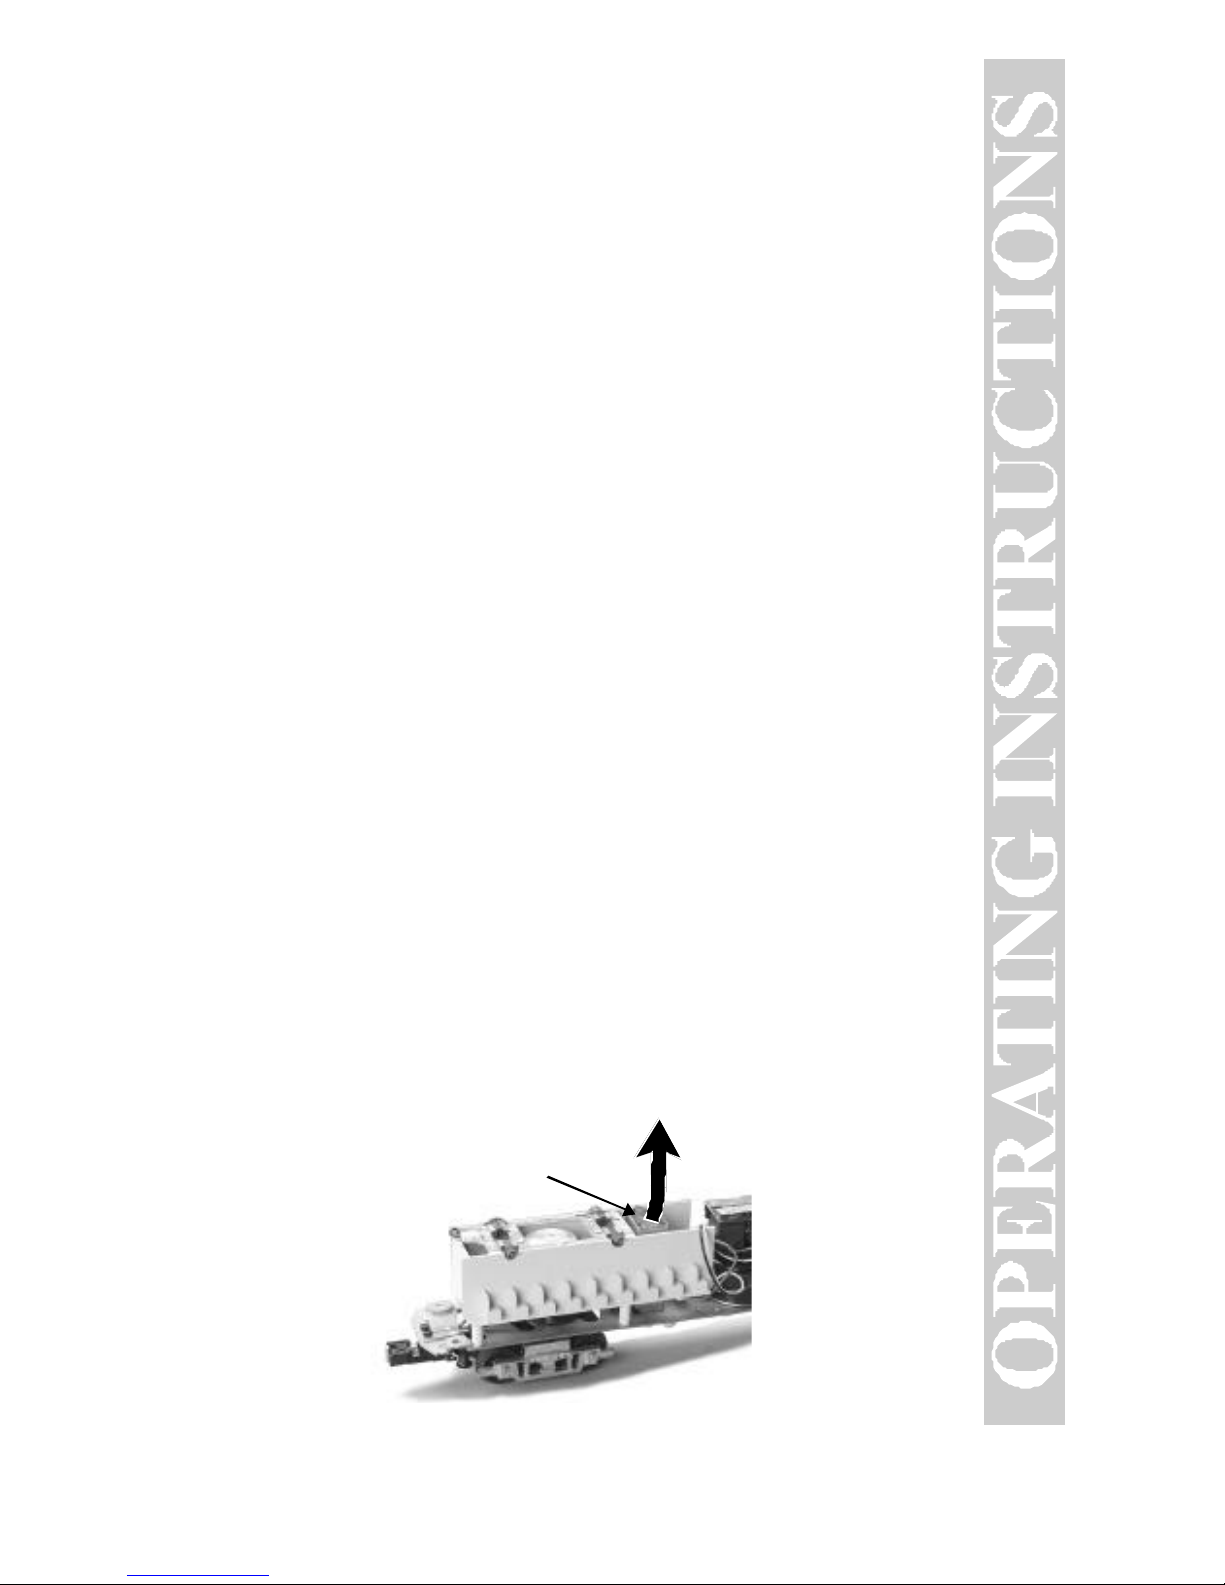
battery (see Fig. 6 below) and charge it in any standard slow charge battery
recharger, following the recharger’s directions.
• If the sounds are not improved at the end of the 15 minute test charge, it is
time to replace the battery (see Fig. 6 below) . Contact the M.T.H. Parts
Department (phone: 410-381-2580; e-mail: [email protected]; mail:
7020 Columbia Gateway Drive, Columbia MD 21046-1532) for a replacement
battery. A standard 9v alkaline battery can be substituted until your
replacement arrives, but since alkaline batteries cannot be recharged, it will
eventually wear down. Do NOT use a 6-cell 7.2v battery like those found in
most convenience stores.
Unhook wires,
remove battery,
and replace
Figure 6. Unhook the Battery Leads, Remove the Battery and Replace with a New One.
Page 14
14
RailKing Doodlebug Electric Engine
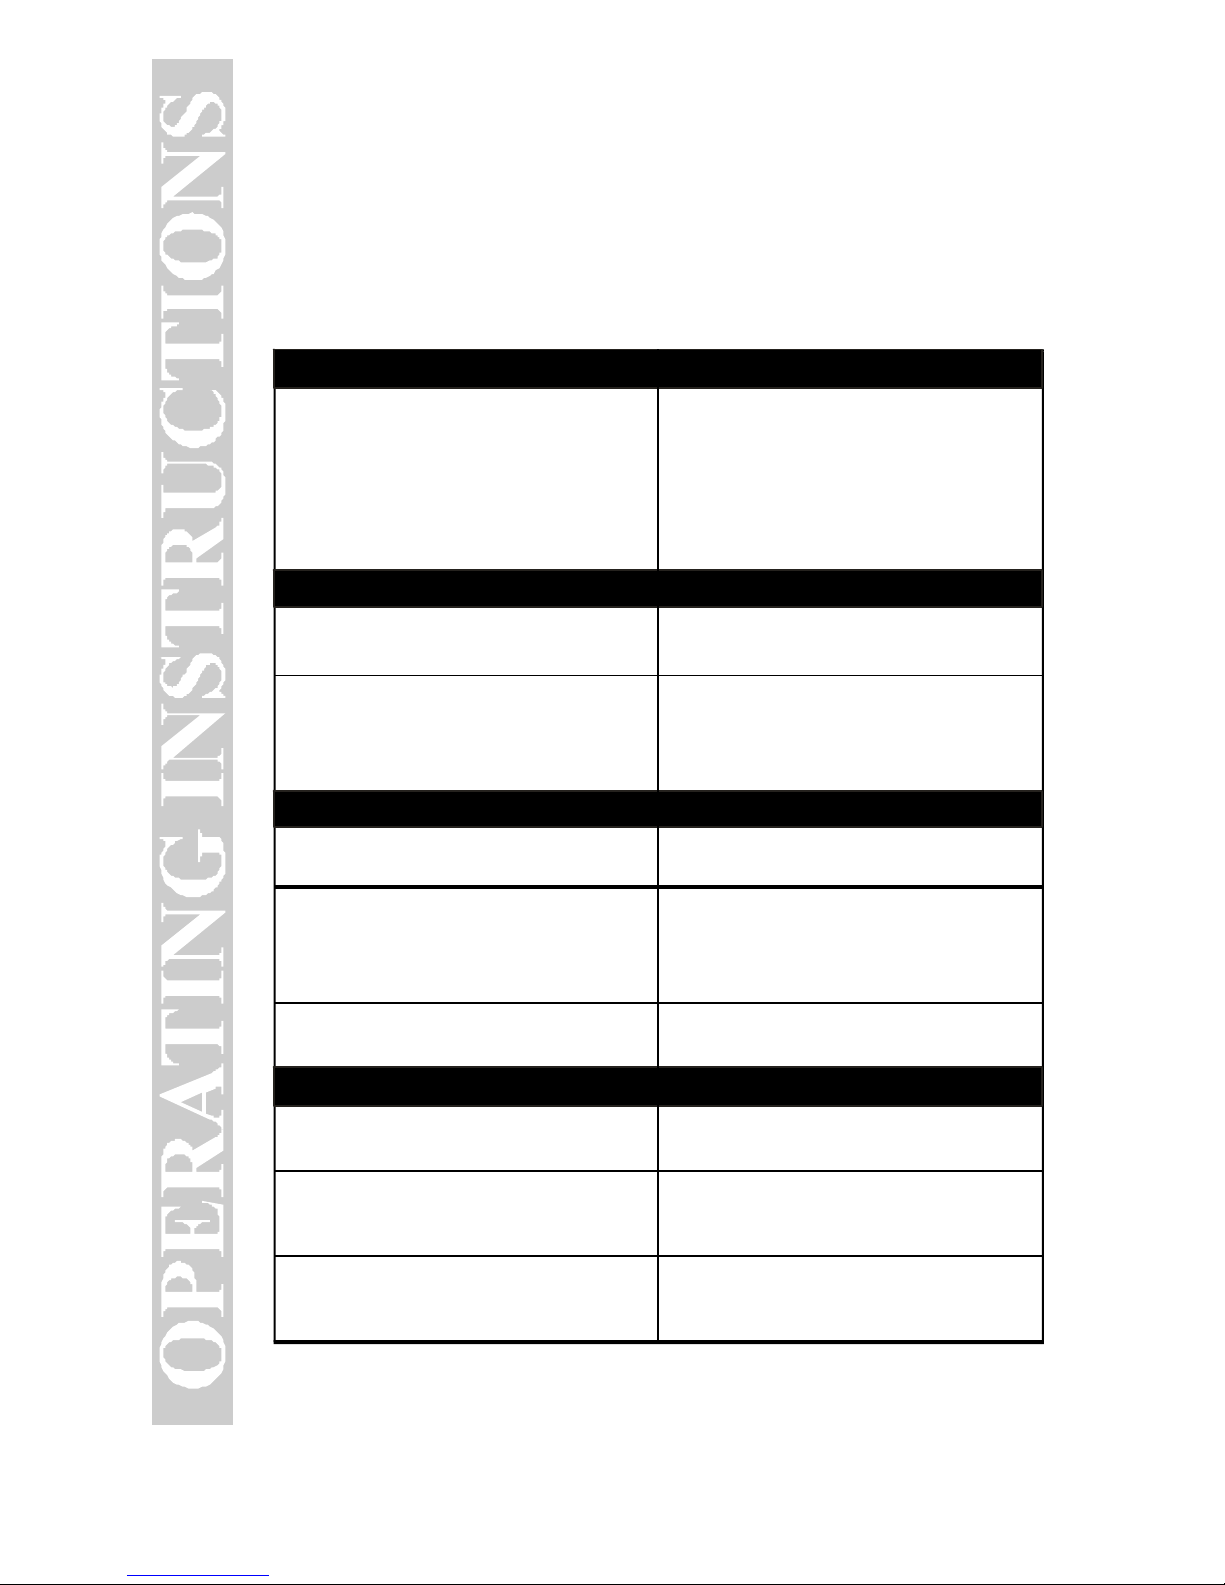
Troubleshooting Proto-Sound® 2.0 Problems
Although Proto-Sound 2.0 has been designed and engineered for ease of use,
you may have some questions during initial operation. The following table
should answer most questions. If your problem cannot be resolved with this
table, contact M.T.H. for assistance (telephone: 410-381-2580; fax:
410-423-0009; [email protected], 7020 Columbia Gateway Drive,
Columbia MD 21046-1532).
Starting Up
Horn
Bell
Coupler
Remedy
Remedy
Remedy
Remedy
Remedy
When I first turn the power on, the
engine will not begin to run. I have to
turn the throttle off and then on again
to get the engine to operate.
When I press the whistle button, the
bell comes on instead.
I can’t get the horn to blow when I
press the whistle button.
I can’t get the bell to ring when I press
the bell button.
The bell won’t work on a separate bell
button.
When I try to fire the coupler, FYS
starts.
The Proto-Coupler won’t let the engine
uncouple on the fly.
The coupler does not fire or stay
coupled.
When I press the whistle button, the
bell sounds.
Reverse the transformer leads.
You may be pressing the button too
quickly. Try pressing the whistle button
more slowly, taking approximately one
full second to fully depress the button.
You may be pressing the button too
quickly. Try pressing the bell button
more slowly, taking approximately one
full second to fully depress the button.
Reverse the transformer leads.
Check the wiring of the separate
button.
You are waiting too long between
whistle button presses.
Try lubricating the coupler knuckle
with a dry graphite lubricant. Do NOT
use oil.
The coupler needs to be cleaned.
Wipe with denatured alcohol (not
rubbing alcohol) and let dry.
This is normal behavior. To prevent
accidental high-speed start-ups, ProtoSound 2.0 is programmed to start up
in neutral anytime track power has
been turned off for several seconds.
See the "Basic Operation" section for
more details.
Page 15
15
RailKing Doodlebug Electric Engine
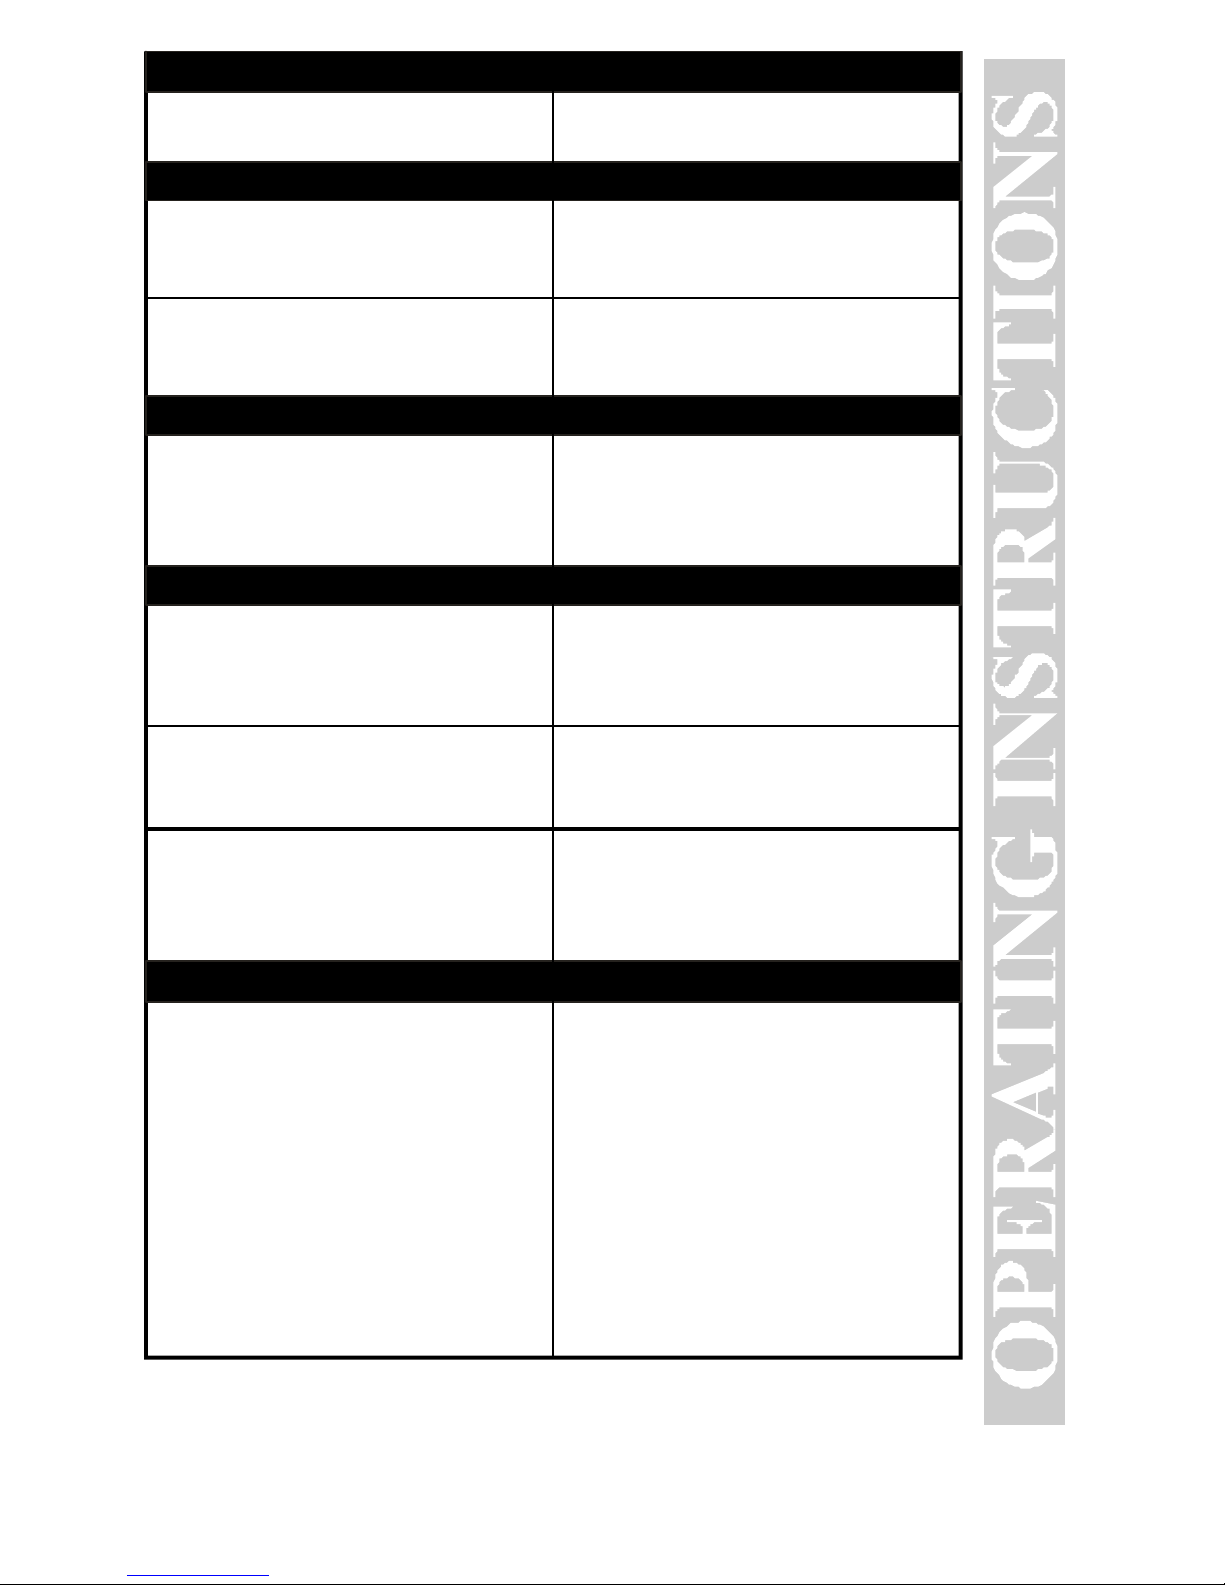
Cab Chatter
Lock-out
Volume
Battery
PSA
Remedy
Remedy
Remedy
Remedy
Remedy
Sometimes the Cab Chatter sounds
don’t play.
I can’t get the engine to run after I
power up the transformer. It sits still
with the engine sounds running.
The engine won’t lock into forward,
neutral, or reverse.
The sounds seem distorted, especially
when the whistle or bell is activated.
The engine will not leave the initial
neutral setting
The PSA sounds occasionally repeat
themselves.
I get no sounds when the engine shifts
between directions.
After I turn off my transformer, my
engine continues to make sounds
before quitting.
Cab Chatter plays only in neutral.
The engine is locked into the neutral
position. Follow the procedure in the
“Lock into a Direction” section.
Engine speed must be below 10 scale
mph (approx. 10 volts or less in
conventional mode).
Proto-Sound 2.0 volume is set too
high. Turn the volume control knob on
the bottom of the chassis counter-
clockwise to reduce the volume.
Check to be sure the battery is
installed and fully charged. See the
“Self-Charging Battery Back-Up”
section.
The battery may be dead or need to
be charged. See the “Self-Charging
Battery Back-Up” section.
Proto-Sound 2.0 is designed to
continue to sound for a few seconds
after power to the track has been shut
off.
Proto-Sound 2.0 has a built-in random
number generator that randomly
selects each sound clip to play.
Because there are a limited number of
sound clips available in each PSA
sequence, it is probable that some of
these sound clips will be repeated
from time to time.
Page 16
16
RailKing Doodlebug Electric Engine
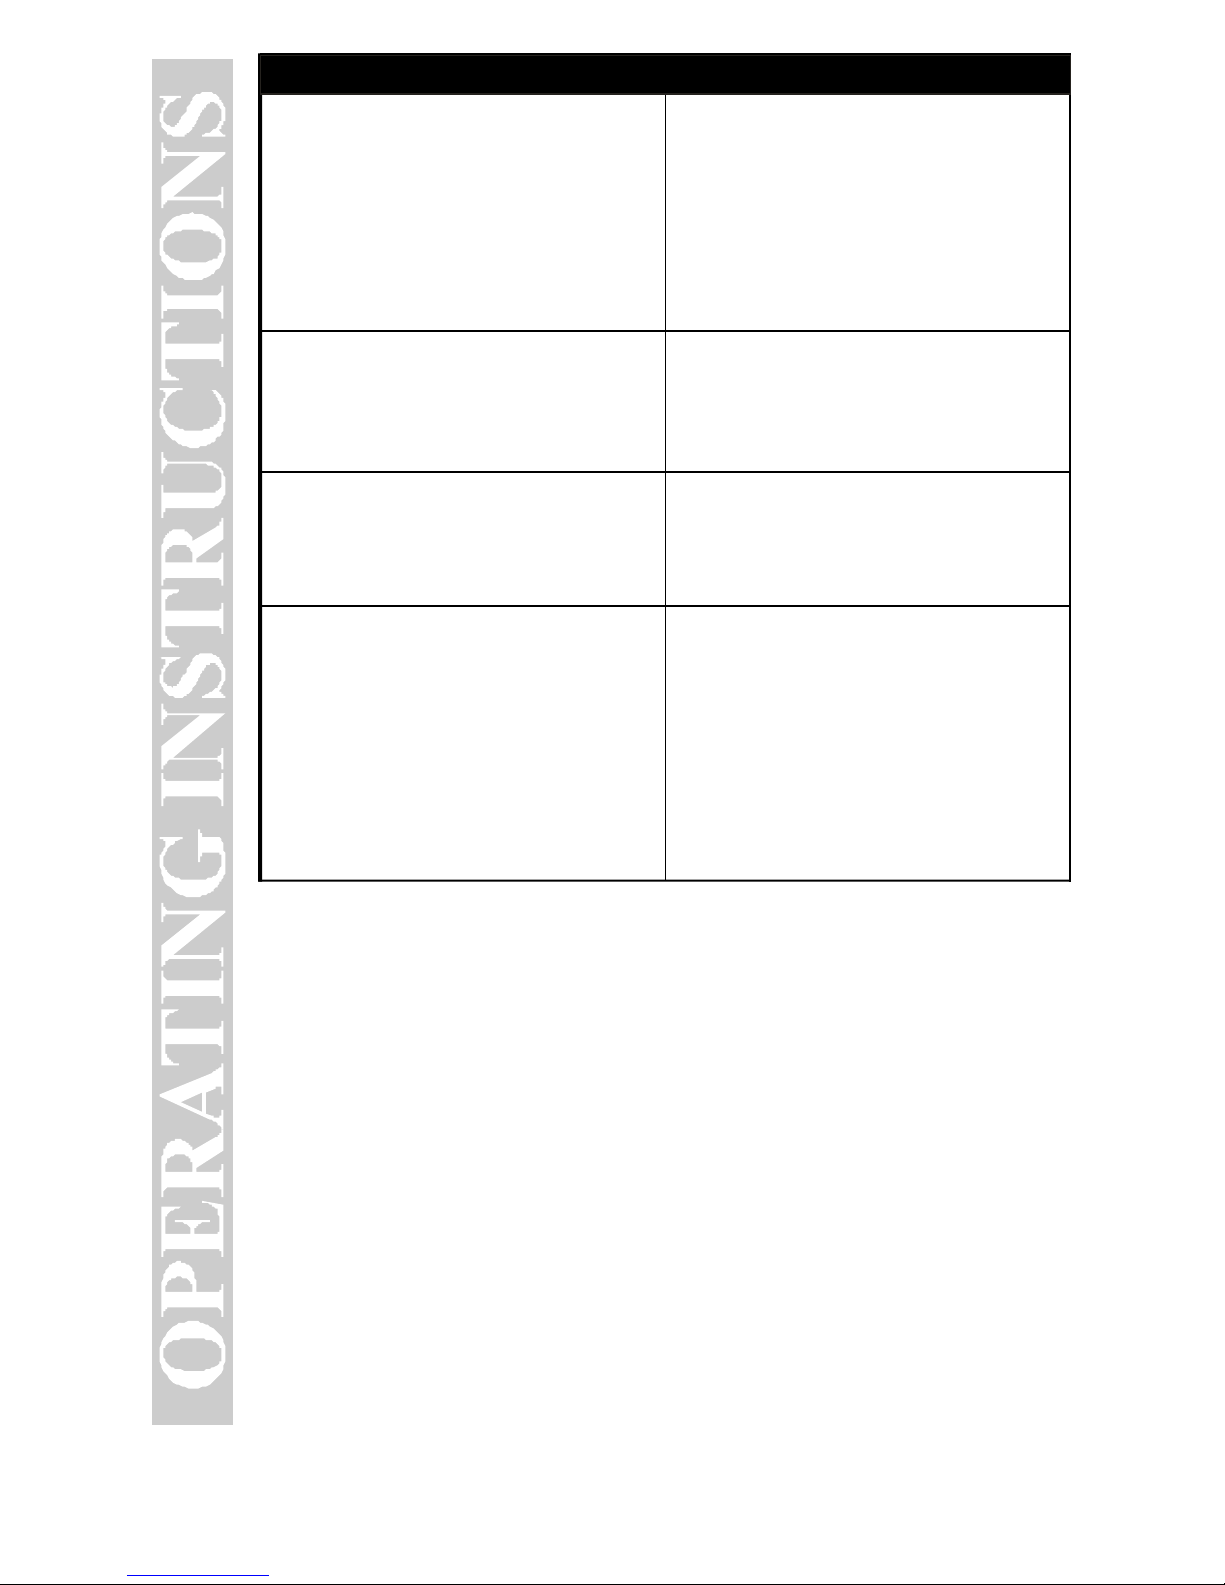
PSA Remedy
Once in PSA, the engine doesn’t go
into reverse.
When the PSA enters its last
sequence the bell automatically
comes on.
When PSA is enabled, pressing the
whistle and bell buttons has no effect.
I push the direction button but the next
sound clip in the sequence does not
play or the engine does not come out
of PSA after fourth press of the
direction button.
So that PSA effects can be as realistic
as possible,
Proto-Sound 2.0
disables the reversing unit
whenever PSA is enabled. This
way the engine remains still at its
stop as the operator cycles
through the PSA sequences.
PSA is programmed to start ringing
the bell at that point. After
approximately 12 rings of the bell, it
will automatically turn off.
Because PSA must control various
effects in each sequence, ProtoSound 2.0 takes control of these
sound effects until you exit PSA.
Each PSA clip must play for approx.
30 seconds before PSA will advance
to the next step in the PSA cycle. Wait
at least 30 seconds in each PSA
sound clip before pressing the
direction button.
Compatibility
This engine will operate on any traditional O-31 or larger O Gauge track
system, including M.T.H.’s RealTrax® or ScaleTrax™ or traditional tubular
track. It is also compatible with virtually most standard AC transformers.
(See page 17 for a complete list of compatible transformers and wiring
instructions.)
Page 17
17
RailKing Doodlebug Electric Engine
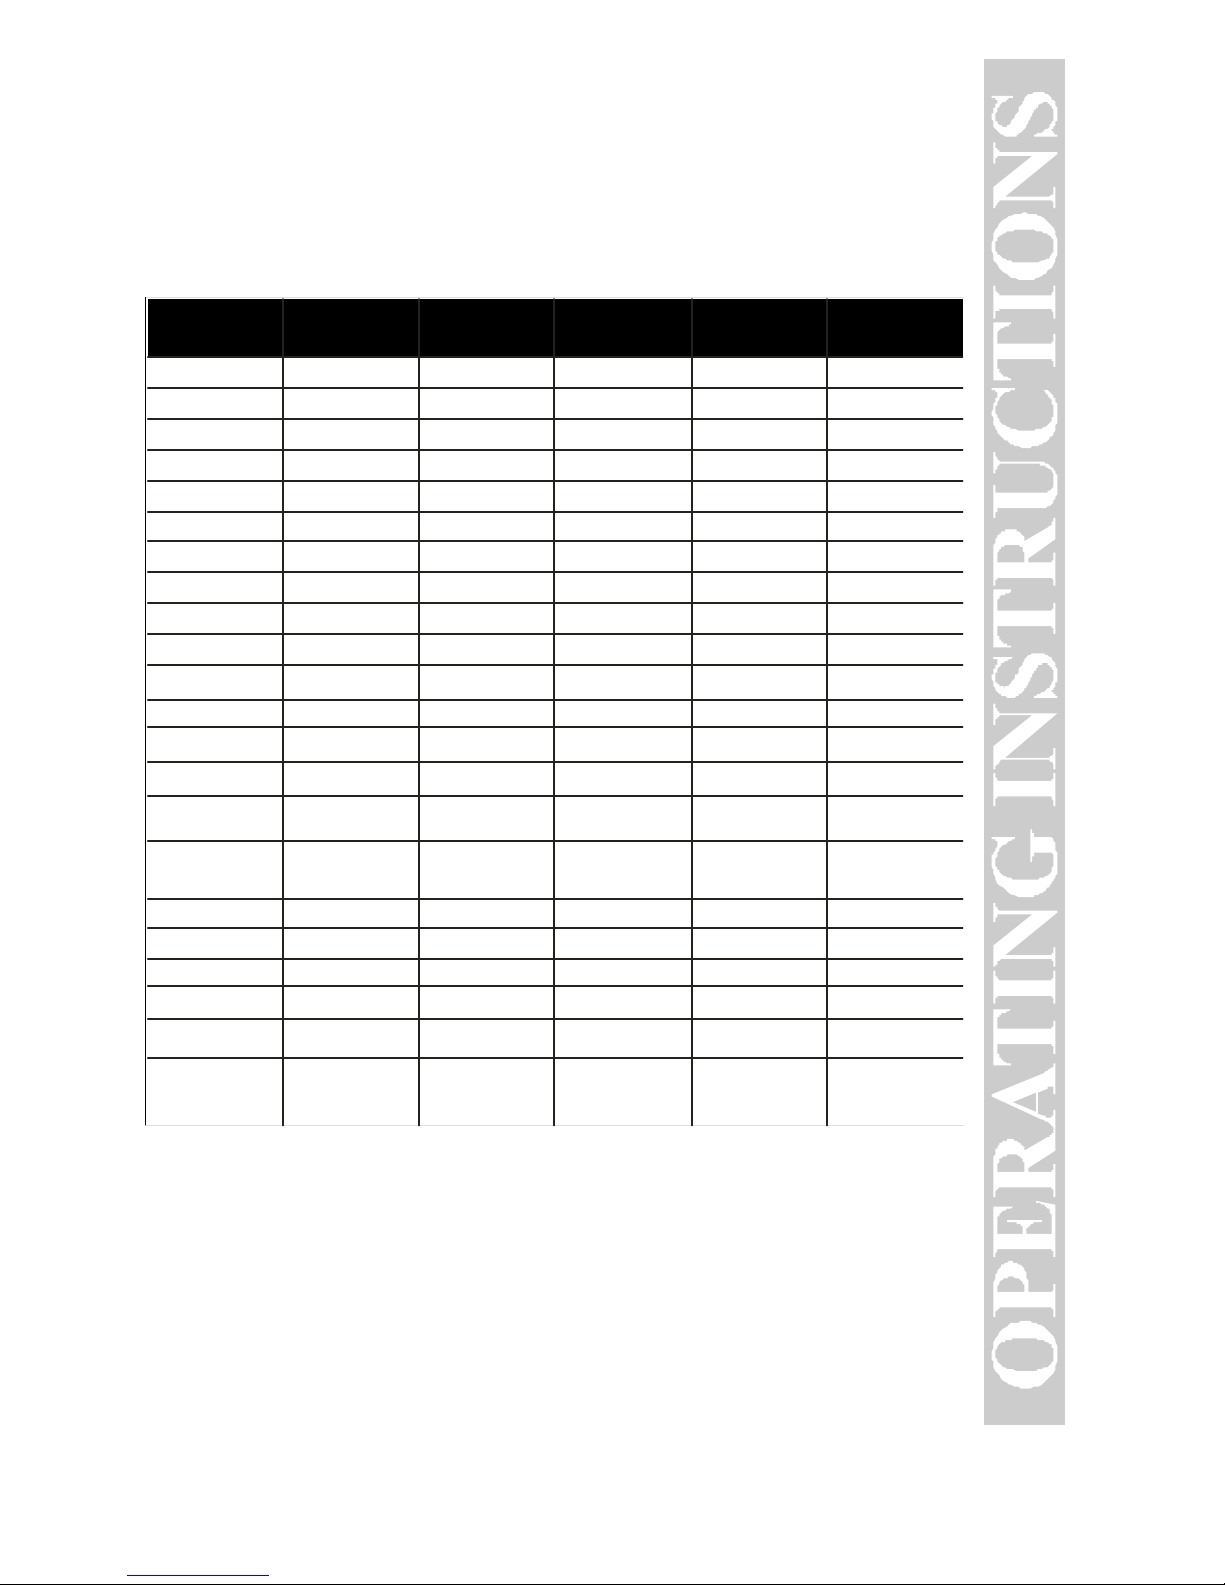
Transformer Compatibility and Wiring Chart
Note that many of the operational commands described in these instructions
require a bell button, so if your transformer does not have its own bell button,
you should consider adding one to get the full benefit of the system.
Transformer
Model
Center Rail Outside Rail
Min/Max.
Voltage
Power
Rating
Transformer
Type
Lionel 1032 U A 5-16v 90-Watt Standard
Lionel 1032M U A 5-16v 90-Watt Standard
Lionel 1033 U A 5-16v 90-Watt Standard
Lionel 1043 U A 5-16v 90-Watt Standard
Lionel 1043M U A 5-16v 90-Watt Standard
Lionel 1044 U A 5-16v 90-Watt Standard
Lionel 1053 U A 8-17v 60-Watt Standard
Lionel 1063 U A 8-17v 60-Watt Standard
All-Trol Left Terminal Right Terminal 0-24v 300-Watt Electronic
Dallee Hostler Left Terminal Right Terminal Electronic
Lionel LW A U 8-18v 75-Watt Standard
Lionel KW A or B U 6-20v 190-Watt Standard
Lionel MW
Outside Track
Terminal
Inside Track
Terminal
5-16v 50V.A. Electronic
Lionel RS-1 Red Terminal Black Terminal 0-18v 50V.A. Electronic
Electronic
Lionel RW U A 9-19v 110-Watt Standard
Lionel SW U A Unknown 130-Watt Standard
Lionel TW
U A 8-18v 175-Watt Standard
Lionel ZW
Lionel Post-War
Celebration
Series ZW
A,B,C or D
A,B,C or D
U
Common
8-20v
0-20v
275-Watt
135/190 Watt
Standard
MTH Z-500 Red Terminal Black Terminal 0-18v 50-Watt Electronic
MTH Z-750 Red Terminal Black Terminal 0-21v 75-Watt Electronic
MTH Z-4000 Red Terminal Black Terminal 0-22v 390-Watt Electronic
* Conventional Mode Only
Page 18

18
RailKing Doodlebug Electric Engine
Additional Features Accessible with the DCS Remote
Control System:
While conventional mode operation of a Proto-Sound 2.0 engine yields
wonderfully realistic sound and several train control features, command mode
operation allows the user to access a world of command functions never before
accessible to O Gauge railroaders. With the addition of the DCS Remote
Control System (including a DCS remote handheld and Track Interface Unit)
users gain many advanced features, including:
• DCS Proto-Speed Control-Establishes desired locomotive speed in scale miles
per hour increments via a thumbwheel control and allows operator to set
maximum speed and acceleration/deceleration rates.
• Locomotive Lighting Control-Independently controls locomotive headlights,
marker and interior lights, and ditch lights.
• Emergency Stop-Single button push deactivates all layout operation.
• One Touch Global Mute/UnMute-Single button mutes or unmutes all
DCS-controlled locomotives’ user-defined actions, including sound, lights, and
smoke.
• Proto-Dispatch Operation-Public Address-like feature allows users to speak
through locomotive speaker during operation .
• Proto-Cast-Allows users to play audio recordings through locomotive speaker
during operation.
• Proto-Doppler Sound Effects Set Up-Users can configure locomotive for
Doppler Operation, including setting distance points for Doppler start, repeat,
and stop modes .
• Independent Volume Control of Engine Sounds, Bell, Horn & Whistle for
each Locomotive .
• Control up to 50 different DCS-equipped locomotives at one time with
multiple TIUs.
• Proto-Effects™ Set Up-User can select individual Proto-Effects™ operations
to be active or inactive, including cab chatter, train wreck sounds, coupler
sounds, and wheel clickety-clack sounds.
Page 19

19
RailKing Doodlebug Electric Engine
• Direction Control Set Up-User can set initial individual start-up direction
(start in forward or reverse) for double-heading operations.
• Locomotive Consist Set-up-User can determine locomotive values for consist
make-ups, allowing multiple locomotives belonging to a consist to operate
together.
• Query Locomotive Information-User can query locomotive programming to
learn locomotive address and engine data information, including scale miles
traveled.
• User Can Query, Set and Operate Track and Accessory Interface Units for
Programming Digital Command Operations for up to 250 Accessories and 250
Individual Switches.
• User Can Script, Record and Playback Train Routes.
Operating instructions for all DCS Command features will accompany the DCS
remote control equipment.
Page 20

20
RailKing Doodlebug Electric Engine
CAUTION: Electrically Operated Product:
Not recommended for children under 10 years of age. M.T.H. recommends
adult supervision with children ages 10 - 16. As with all electric products,
precautions should be observed during handling and use to reduce the risk of
electric shock.
WARNING: When using electrical products, basic safety precautions should
be followed including the following:
Read this manual thoroughly before using this device.
M.T.H. recommends that all users and persons supervising use examine the
hobby transformer periodically for conditions that may result in the risk of fire,
electric shock, or injury to persons, such as damage to the primary cord, plug
blades, housing, output jacks or other parts. In the event such conditions exist,
the transformer should not be used until properly repaired.
Page 21

21
RailKing Doodlebug Electric Engine
Notes:______________________________________________
___________________________________________________
___________________________________________________
___________________________________________________
___________________________________________________
___________________________________________________
___________________________________________________
___________________________________________________
___________________________________________________
___________________________________________________
___________________________________________________
___________________________________________________
___________________________________________________
___________________________________________________
___________________________________________________
___________________________________________________
___________________________________________________
___________________________________________________
___________________________________________________
___________________________________________________
___________________________________________________
___________________________________________________
___________________________________________________
___________________________________________________
___________________________________________________
___________________________________________________
___________________________________________________
___________________________________________________
___________________________________________________
___________________________________________________
___________________________________________________
___________________________________________________
___________________________________________________
___________________________________________________
___________________________________________________
___________________________________________________
___________________________________________________
___________________________________________________
___________________________________________________
___________________________________________________
___________________________________________________
Page 22

22
RailKing Doodlebug Electric Engine
Notes:______________________________________________
___________________________________________________
___________________________________________________
___________________________________________________
___________________________________________________
___________________________________________________
___________________________________________________
___________________________________________________
___________________________________________________
___________________________________________________
___________________________________________________
___________________________________________________
___________________________________________________
___________________________________________________
___________________________________________________
___________________________________________________
___________________________________________________
___________________________________________________
___________________________________________________
___________________________________________________
___________________________________________________
___________________________________________________
___________________________________________________
___________________________________________________
___________________________________________________
___________________________________________________
___________________________________________________
___________________________________________________
___________________________________________________
___________________________________________________
___________________________________________________
___________________________________________________
___________________________________________________
___________________________________________________
___________________________________________________
___________________________________________________
___________________________________________________
___________________________________________________
___________________________________________________
___________________________________________________
___________________________________________________
Page 23

23
RailKing Doodlebug Electric Engine
Notes:______________________________________________
___________________________________________________
___________________________________________________
___________________________________________________
___________________________________________________
___________________________________________________
___________________________________________________
___________________________________________________
___________________________________________________
___________________________________________________
___________________________________________________
___________________________________________________
___________________________________________________
___________________________________________________
___________________________________________________
___________________________________________________
___________________________________________________
___________________________________________________
___________________________________________________
___________________________________________________
___________________________________________________
___________________________________________________
___________________________________________________
___________________________________________________
___________________________________________________
___________________________________________________
___________________________________________________
___________________________________________________
___________________________________________________
___________________________________________________
___________________________________________________
___________________________________________________
___________________________________________________
___________________________________________________
___________________________________________________
___________________________________________________
___________________________________________________
___________________________________________________
___________________________________________________
___________________________________________________
___________________________________________________
Page 24
SERVICE & WARRANTY INFORMATION
HOW TO GET SERVICE UNDER THE TERMS OF THE
LIMITED ONE YEAR WARRANTY
For warranty repair, do not return your product to the place of purchase. Instead,
follow the instructions below to obtain warranty service as our dealer network is not
prepared to service the product under the terms of this warranty.
1. First write, call, email or FAX MTH Electric Trains, 7020 Columbia Gateway Drive,
Columbia, MD 21046, 410-381-2580 (FAX No. 410-423-0009), or on the internet at
[email protected] or our web site, www.mthtrains.com, stating which product
you have, when it was purchased and what seems to be the problem. You will be given
a return authorization number to assure that your merchandise will be properly handled
upon its receipt at MTH.
2. CAUTION: Make sure the product is packed in its original factory packaging
including its foam and plastic wrapping material so as to prevent damage to the
merchandise. The shipment must be prepaid and we recommend that it be insured. A
cover letter, including your name, address, daytime phone number, a copy of your sales
receipt, the Return Authorization number and a full description of the problem, must be
included to facilitate the repairs. Please include the description regardless of whether
or not you discussed the problem with one of our service technicians when contacting
MTH for your Return Authorization number.
3. Please make sure you have followed the instructions carefully before returning any
merchandise for service.
LIMITED ONE YEAR WARRANTY
This item is warranted for one year from the date of purchase against defects in
material or workmanship. We will repair or replace (at our option) the defective part
without charge for parts or labor, if the item is returned to the address below within one
year of the original date of purchase. This warranty does not cover items that have been
abused or damaged by careless handling. Transportation costs incurred by the customer
are not covered under this warranty.
This warranty gives you specific legal rights and you may have other rights which vary
from state to state.
ProtoSounds® is a trademark of MTH Electric Trains. DCRU® is a registered
copyright of QS Industries, Inc. Lionel® and Railsound® are registered trademarks of
Lionel L.L.C.
 Loading...