

Page 1
Manual IB-RD3621U3
USB 3.0 Raid enclosure for 2x 3.5" HDDs
Handbuch IB-RD3621U3
USB 3.0 Raidgehäuse für 2x 3,5" HDDs
IB-RD3621U3
Page 2

Page 3
IB-RD3621U3
1 GENERAL INFORMATION ............................................................................. 4
2 PRODUCT OVERVIEW ................................................................................... 5
3 HDD INSTALLATION .................................................................................... 6-7
4 CONFIGURE THE RAID MODE ....................................................................... 7-8
5 REPAIR OF A FAILED RAID1 ........................................................................ 8
6 REFERENCES ................................................................................................ 9
1 EINFÜHRUNG............................................................................................... 10
2 PRODUKTÜBERSICHT .................................................................................. 11
3 FESTPLATTENINSTALLATION....................................................................... 12-13
4 EINSTELLEN / ÄNDERN DES RAID MODUS ................................................... 13-14
5 ERSETZEN EINER AUSGEFALLENEN FESTPLATTE IM RAID 1 MODUS ............ 14
6 ALLGEMEINE HINWEISE .............................................................................. 15
3
Page 4

IB-RD3621U3
1 GENERAL INFORMATION
1.1 Usage cautions
User should not modify this device. The environmental temperature should be within +5° ~ +35°C.
1.2 Power
Power voltage: DC 12 V.
When using this device, please connect the supplied AC adapter or AC adapter cable to the power jack of device.
When placing the adapter cable, make sure it cannot get damaged or be subject to pressure. To reduce the risk
of electric shock, unplug the adapter rst before cleaning it. Never connect the adapter to the device in a humid
or dusty area. Do not replace the adapter or cable’s wire or connector.
1.3 Radio interference/compatibility
If not properly shielded, almost all electronic devices will get radio interference. Under some conditions, your
player might get interference.
- The design of this device has followed the FCC/CE standard, and has followed the following rules:
(1) This device may not cause harmful interference.
(2) This device could accept some interference received including interference that may cause undesired operation.
1.4 Repair
If the device has a problem, you should take it to an appointed repair center and let the specialists do the repair,
never repair the device yourself, you might damage the device or endanger yourself or your data.
1.5 Disposing of the device
When you dispose of the device, be sure to dispose it appropriately. Some countries may regulate disposal of
electrical device, please consult with your local authority.
1.6 Others
When using this device, please do not let the device come into contact with water or other liquid, if water is
accidentally spilled on the device, please use a dry cloth to absorb the spillage.
Do not disassemble the device; repair the device or change the design of the device, any damage done will not
be included in the repair policy.
Avoid hitting the device with hard object, avoid shaking the device, and stay away from magnetic elds.
During electrostatic discharge and the strong electromagnetic eld, the product will malfunction, and then
unplug the power cable and the product will return to normal performance next time it is powered on.
Note: All the information contained in this manual was correct at the time of publication. However, as our engineers are always updating and improving the product, your device’s software may have a slightly dierent
appearance or modied functionality than presented in this manual.
Please visit our website www.raidsonic.de for updated manuals and rmware.
4
Page 5
2 PRODUCT OVERVIEW
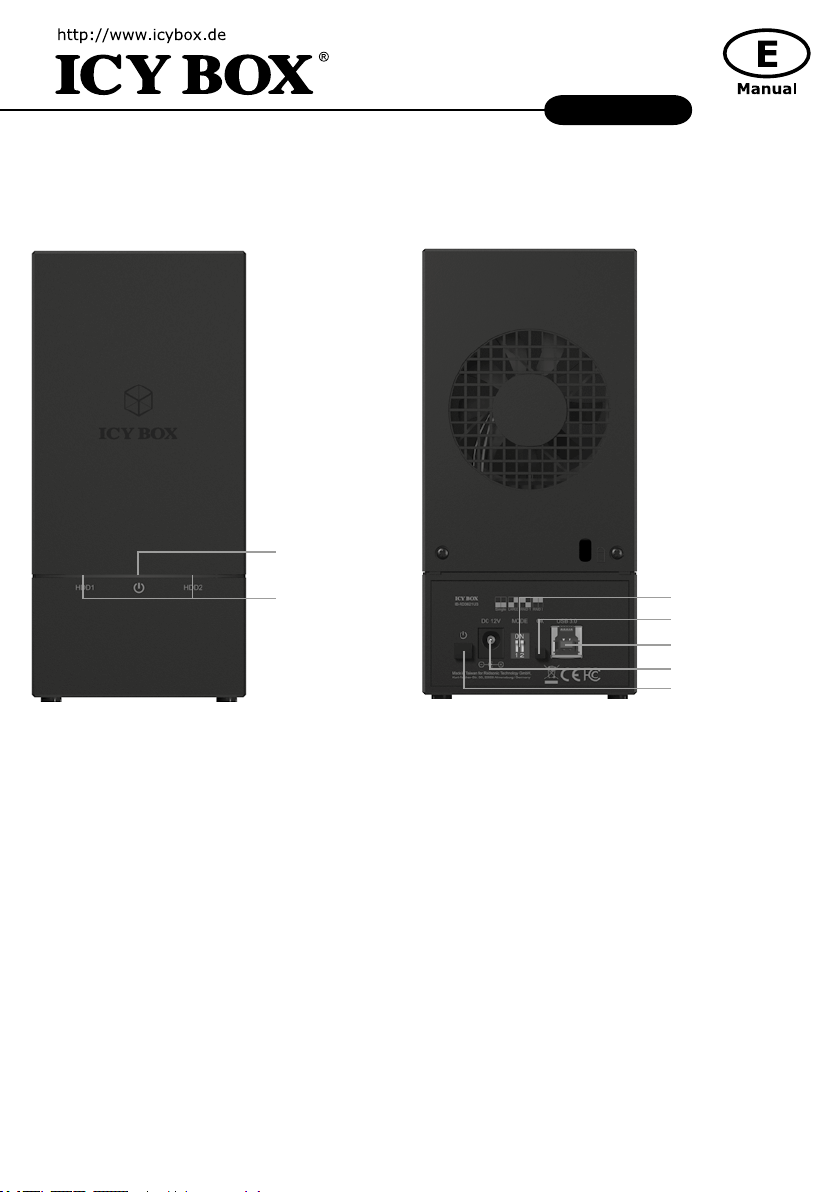
2.1 Front view
IB-RD3621U3
2.2 Rear view
1.
1. LED for power
2. LED for HDD1/HDD2
Blue HDD ready
Purple HDD access
Red HDD failure
Red ashing RAID rebuilding
2.
1. RAID-DIP-Switch
2. RAID conrmation button
3. Host connector USB 3.0 host
4. Power connector
5. Power button
5
1.
2.
3.
4.
5.
Page 6

IB-RD3621U3
3 HDD INSTALLATION
1. Detach the screws on the rear side. Side the cover out and then pull it up
2. Install the hard drives gently
3. Make sure the hard drives are properly installed and then secure them with the provided screws
6
Page 7

IB-RD3621U3
4. Close the cover and secure it with the screws removed in step 1
4 CONFIGURE THE RAID MODE
ATTENTION: Setting or changing the RAID mode requires you to re-format the drives. This will erase all data
on the hard drives that are being formatted. Make sure to backup all existing data rst!
RAID Description:
The following table shows the available RAID options and settings:
1. LARGE:
To be exact LARGE is not a real RAID mode, but could be seen as one. In LARGE Mode, the space of the second
disc is simply appended to the rst disc. So the space of the two disks is added to one big disk.
2. RAID 1:
In RAID 1 mode all data is written identically on both discs. So if one disc fails the other contains all data again.
This provides security against the failure of one disk at the cost of the bigger disks space.
Notice: the RAID 1 mode is NOT a data backup! The thought behind RAID 1 is to have a system you can work
with even when 1 HDD fails!
3. RAID 0
RAID 0 writes data block wise alternating on the two disks. So two data blocks can be written at the same time
which enhances speed. The disk space of the combined volume is twice the smaller disk size.
4. SINGLE
Like LARGE it is not really a RAID mode. This means that both discs are integrated as separate hard drives with
its own content, independent from each other.
ATTENTION: You have to choose a RAID mode as described. In default there is no RAID conguration and the
device shuts down within a few seconds.
7
Page 8

IB-RD3621U3
Make sure the device is connected to a Computer that is ON. To congure the RAID mode you want to use, the
Device has to be turned o. Please choose the RAID mode with the DIP-Switches shown as in the chart above.
Now press and hold the conrmation button while power on the device.
The HDD red indicators will be ashing and the RAID mode setup is completed. Now you just need to initialize
and format the drives and create a partition.
5 REPAIR OF A FAILED RAID1
HDD1 has failed
1. Turn o the power and then remove the failed HDD1.
2. Turn on the power, and wait a few seconds for the system to start up.
3. Install the new drive in the position of the removed HDD1 (the volume of the new HDD1 should be equal
the volume of the HDD2).
4. The rebuilding will start automatically. The left LED of the source drive (HDD2) lights purple. The LED of
the target drive (HDD1) lights red. This indicates that it is now rebuilding the RAID array.
5. Rebuilding of the RAID1 array will take several hours, depending on the drive capacity. When the data has
been restored, the HDD LEDs will turn a steady blue.
HDD2 has failed
1. Turn o the power and then remove the failed HDD2 (right).
2. Remove HDD1 (left) and put it into the slot of HDD2 (right).
3. Turn on the power, and wait a few seconds for the system to start up.
4. Install the new drive in the position of the slot of HDD1 (left) (the volume of the new HDD should be equal
the volume of the other HDD).
5. The rebuilding will start automatically. The left LED of the scource drive (HDD2) lights purple. The LED of
the target drive (HDD1) lights red. This indicates that it is now rebuilding the RAID array.
6. Rebuilding of the RAID1 array will take several hours, depending on the drive capacity. When the data has
been restored, the HDD LEDs will turn a steady blue.
Note: We recommend not turning o the power during the rebuild process but if the process is interrupted, it
will continue rebuilding the data as soon as the power is turned back on.
Note: If necessary, check the device manager and disc manager if the HDDs of the RAID1 array are working.
Note: If necessary, you need to assign a drive letter to the HDDs of the RAID1 array.
About data security
To protect your les and help prevent the loss of your data, we strongly recommend that you keep two copies of
your data, one copy on your IB-RD3621U3 and a second copy either on your internal drive or another storage
media such as CD, DVD, Tape or an additional external drive.
Any loss or corruption of data while using the IB-RD3621U3 is the sole responsibility of the user, and under no
circumstances will the manufacturer be held liable for compensation or the recovery of this data.
8
Page 9

IB-RD3621U3
6 REFERENCES
1. Setting/changing the RAID mode requires formatting the drives. Make sure to backup all existing data rst!
2. Please refer to the instructions when switching the RAID mode, otherwise the execution might fail.
3. When using the RAID function, HDD’s with the same capacity is strong recommended.
4. When using RAID function, more than one HDD partition is not recommended.
5. Under Windows 7/8.1/10, users can enable GPT when initializing HDD with a total capacity of more than 2 TB.
6. Older OS may not recognize the device if you use a dierent operation system than Windows 7/8.1/10.
For more detailed information about GPT, please visit: http://msdn.microsoft.com/en-us/library/windows/
hardware/gg463525.aspx
7. If users enable MBR by mistake, in order to clean the partition table, you have to switch to another RAID
mode and do the RAID mode switch all over again referring to Setup. Then go back to the RAID mode
you want, repeat the previous actions and enable GPT when initializing HDD.
8. For Macintosh users: the total capacity of more than 2 TB could be recognized only for the operation
system 10.4.11 Tiger or later.
9. Rebuild time is based on the capacity, e.g. it takes about 1 hour for 200 GB.
10. USB port of your PC must support power-o function so that the device would go to sleeping mode.
Setting up motherboard‘s power management in S3 is recommended. (For more details refer to the user
guide of motherboard BIOS setting).
11. If the device takes too long to initialize, please check if the HDD is securely installed or update the SATA
host driver version.
12. Temperature 0 ~ 60 °C
Humidity 90 RH
13. Operating System:
Windows 7/8.1/10 (32/64bit) (with GPT enabled, supports total capacity more than 2 TB)
Macintosh 10.X or later
14. Support USB transfer speeds of low speed (up to 1.5 Mbit/s), full speed (up to 12 Mbit/s), high speed (up
to 480 Mbit/s), super speed (up to 5 Gbit/s)
9
Page 10

IB-RD3621U3
1 EINFÜHRUNG
1.1 Hinweise zur Verwendung
Nehmen Sie keine Veränderungen an dem Gerät und dem zugehörigen Netzteil vor. Während des
Betriebes sollte die Umgebungstemperatur die Werte von +5° C ~ +35° C nicht unter- bzw. überschreiten.
1.2 Netzspannung
Die Stromspannung des Gerätes beträgt 12 V Gleichstrom.
Stellen Sie vor der Inbetriebnahme des Geräts sicher, dass die auf dem Typenschild angegebene Spannung
mit der Netzspannung übereinstimmt. Wenn die Netzspannung nicht mit der Spannung auf dem Typenschild
übereinstimmt, wenden Sie sich bitte an Ihren ICY BOX Händler. Vor Arbeiten an dem Gerät entfernen Sie das
Gerät von der Stromzufuhr.
1.3 Funk Interferenz/Kompatibilität
Fast alle elektronischen Einheiten empfangen Funkstörungen. Unter bestimmten Umständen könnte auch dieses
Gerät Funkstörungen empfangen.
Das Gerät entspricht dem FCC/CE Standard und unterliegt folgenden Regeln:
1. Das Gerät darf keine schädlichen Funkstörungen verursachen
2. Dieses Gerät könnte Funkstörungen empfangen einschließlich solcher, die unerwünschte Funktionen ver-
ursachen können.
1.4 Reparaturen
Führen Sie selber nie Reparaturen an dem Gerät durch, Sie könnten es beschädigen oder sich selbst oder Ihre
Daten gefährden.
1.5 Entsorgung des Gerätes
Die Entsorgung des Gerätes muss nach den gesetzlichen Bestimmungen erfolgen.
1.6 Sonstiges
Verwenden Sie das Gerät nicht im Freien.
Das Gerät kann zu Störungen mit anderen Geräten führen. Vergewissern Sie sich, dass keine in der Nähe des
Gerätes installierten Geräte gestört werden.
Das Gerät nie Feuchtigkeit und Wasser aussetzen! Stellen Sie auch keine Objekte auf das Gerät, die Flüssigkei-
ten enthalten (zum Beispiel Vasen).
Das Gerät darf keinen starken Wärmequellen ausgesetzt werden (zum Beispiel Heizgeräte oder direkter Sonneneinstrahlung).
Vergewissern Sie sich, dass das Gerät so aufgestellt ist, dass genügend Raum für die Lüftung vorhanden ist.
Während der Benutzung wird sich das Gerät erwärmen. Dies hat keine Auswirkungen auf das Produkt selbst.
Hinweis: Alle in diesem Handbuch enthaltenen Angaben wurden einer eingehenden Prüfung zur Zeit der Ver-
öentlichung unterzogen. Trotzdem können durch Weiterentwicklungen und Updates Veränderungen eintreten,
die eine andere Funktions- oder Vorgehensweise, als in diesem Handbuch dargestellt, haben.
Überprüfen Sie gegebenenfalls, ob ein angepasstes Handbuch in unserem Servicebereich auf der Homepage
www.raidsonic.de bereitgestellt wird.
10
Page 11

2 PRODUKTÜBERSICHT
2.1 Frontansicht
IB-RD3621U3
2.2 Rückansicht
1.
1. LED für Betrieb
2. LED für HDD1/HDD2
Blau Festplatte betriebsbereit
Lila Festplattenzugri
Rot Festplattenfehler
Rot blinkend RAID Wiederherstellung
2.
1. RAID-DIP Schalter
2. RAID Bestätigungsknopf
3. USB 3.0 Hostanschlussbuchse
4. Strombuchse
5. Netzschalter
11
1.
2.
3.
4.
5.
Page 12

IB-RD3621U3
3 FESTPLATTENINSTALLATION
1. Lösen Sie die Schrauben auf der Rückseite. Ziehen Sie dann die Abdeckung ein Stück nach hinten und
nehmen Sie diese nach oben hin ab.
2. Stecken Sie die Festplatten vorsichtig in die dafür vorgesehenen Schächte.
3. Vergewissern Sie sich, dass die Festplatten richtig sitzen und schrauben Sie sie dann, mit den beiliegenden Schrauben fest.
12
Page 13

IB-RD3621U3
4. Setzen Sie die Abdeckung wieder auf und schrauben Sie diese mit den beiliegenden Schrauben fest.
4 EINSTELLEN / ÄNDERN DES RAID MODUS
Hinweis! Das Einstellen / Wechseln des RAID Modus erfordert ein Neuformatieren der Festplatten. Durch diesen
Vorgang werden alle Daten auf den Festplatten gelöscht. Stellen Sie sicher, dass vorher alle vorhanden Daten
auf einen anderen Datenträger gesichert werden.
Large
Large verbindet mehrere Laufwerke zu einem großen virtuellem Laufwerk und umgeht damit die physische Begrenzung einzeln angeschlossener Festplatten. Die Daten werden fortlaufend von HDD1 bis HDD2 geschrieben.
Es handelt sich hier nicht um ein SINGLE JBOD
RAID0 (RAID0 Striping)
Striping verbindet mehrere Laufwerke zu einem großen virtuellem Laufwerk als eine logische Einheit. Die Daten
werden parallel auf alle Festplatten geschrieben, was zu einer Steigerung der Datentransferrate führt. Bei Ausfall einer Festplatte sind jedoch alle Daten verloren.
RAID1 (RAID1 Mirroring)
Mirroring ist das automatische Spiegeln der Daten auf mehrere Festplatten. Dadurch wird eine hohe Datensi-
cherheit gewährleistet. Bei Ausfall einer Festplatte ist der Zugri weiterhin möglich und nach Austausch der
defekten Festplatte wird der Datenspiegel wieder hergestellt. Der nutzbare Speicher entspricht der kleinsten
Festplatte.
Single
Konguration eines RAID-Controllers mit mehreren Festplatten, die keinen Verbund bilden. Damit werden die
angeschlossenen Festplatten dem Betriebssystem einzeln zur Verfügung gestellt.
Hinweis! Im Auslieferungszustand ist KEIN Raidmodus eingestellt! Bitte wählen Sie einen Raidmode aus. Das
Gerät schaltet sich sonst nach ein paar Sekunden wieder ab.
13
Page 14

IB-RD3621U3
Stellen Sie sicher, dass das Gerät mit einem PC verbunden ist, der in Betrieb ist. Um den RAID-Mode fest zu
legen, bringen Sie die DIP-Schalter in die entsprechende Position (siehe Grak oben). Drücken Sie jetzt den
Bestätigungsknopf und halten diesen gedrückt, während Sie das Gerät starten (Power Knopf drücken).
Die HDD Statusanzeige fängt nun an Rot zu blinken. Sobald Die LEDs durchgehend Blau leuchten, ist das RAID
Setup abgeschlossen. Nun müssen Sie lediglich noch die Festplatten initialisieren und formatieren.
5 ERSETZEN EINER AUSGEFALLENEN FESTPLATTE IM RAID 1 MODUS
Ausfall von Festplatte 1
1. Schalten Sie das Gerät aus und entfernen die fehlerhafte Festplatte 1 (links).
2. Schalten Sie das Gerät wieder ein und warten ein paar Sekunden, bis das Gerät wieder vollständig hochgefahren ist.
3. Setzen Sie die neue Platte an der Position der entnommenen Festplatte 1 (links) ein (die Größe der neuen
Festplatte 1 muss mindestens der Größe der verbliebenen Festplatte 2 entsprechen).
4. Das Rebuilding startet automatisch nach ein paar Sekunden. Die linke LED des Quellaufwerkes (HDD2)
blinkt lila. Die LED des Ziellaufwerkes (HDD1) blinkt rot. Hierdurch wird die Wiederherstellung bis zum
Abschluss des Vorganges angezeigt.
5. Die Wiederherstellung des RAID1 Verbundes kann mehrere Stunden dauern (abhängig von der Festplat-
tengröße). Ist der Vorgang abgeschlossen erlöschen die eben beschriebenen LED’s und beide HDD LED’s
leuchten durchgehend blau.
Ausfall von Festplatte 2
1. Schalten Sie das Gerät aus und entfernen die fehlerhafte Festplatte 2 (rechts).
2. Entfernen Sie nun die Festplatte 1 (links) und stecken diese in den Festplattenschacht von Festplatte 2
(rechts).
3. Schalten Sie das Gerät wieder ein und warten ein paar Sekunden, bis das Gerät wieder vollständig hochgefahren ist.
4. Setzen Sie die neue Platte an der Position der entnommenen Festplatte 1 (links) ein (die Größe der neuen
Festplatte 1 muss mindestens der Größe der verbliebenen Festplatte 2 entsprechen).
5. Das Rebuilding startet automatisch nach ein paar Sekunden. Die linke LED des Quellaufwerkes (HDD2)
blinkt lila. Die LED des Ziellaufwerkes (HDD1) blinkt rot. Hierdurch wird die Wiederherstellung bis zum
Abschluss des Vorganges angezeigt.
6. Die Wiederherstellung des RAID1 Verbundes kann mehrere Stunden dauern (abhängig von der Festplat-
tengröße). Ist der Vorgang abgeschlossen erlöschen die eben beschriebenen LED’s und beide HDD LED’s
leuchten durchgehend blau.
Hinweis! Stellen Sie sicher, dass die Stromversorgung während des Wiederherstellungsprozesses nicht unter-
brochen wird. Sollte dies trotzdem geschehen, wird der Wiederherstellungsprozess nach der Verbindung mit der
Stromquelle fortgesetzt.
Hinweis! Falls notwendig, überprüfen Sie im Geräte-Manager und in der Datenträgerverwaltung ob die HDD(s)
des Raidverbundes angezeigt werden.
Hinweis! Falls notwendig, müssen Sie dem entsprechenden Laufwerk erneut einen Laufwerks-buchstaben hin-
zufügen.
Zur Datensicherheit
Um Ihre Daten zu sichern und Datenverlust zu vermeiden, sollten Sie immer mindestens zwei Kopien Ihre Daten
anlegen. Einmal auf der IB-RD3621U3 und einmal auf einem anderen Laufwerk oder entsprechenden Speichermedien wie CD, DVD, Blu-Ray o.ä.
Jeglicher Datenverlust oder -schaden durch die Benutzung der IB-RD3621U3 liegt in der Verantwortung des
Benutzers und es kann unter keinen Umständen der Hersteller für die Wiederherstellung der Daten oder deren
Kosten zur Verantwortung gezogen werden.
14
Page 15

IB-RD3621U3
6 ALLGEMEINE HINWEISE
1. Ein Wechsel des eingestellten RAID Modus führt zu vollständigem Datenverlust. Sollte dies Notwendig
werden, führen Sie zuvor ein Datenbackup durch.
2. Zur Änderung des RAID Modus gehen Sie bitte genau wie weiter oben beschrieben vor, da sonst die
Änderungen unter Umständen nicht übernommen werden.
3. Bei Betrieb im RAID Modus, empfehlen wir dringendst, nur eine Partition anzulegen.
4. Unter Windows Vista und Windows 7/8.1/10 haben Sie die Möglichkeit die Option GPT zu aktivieren um
Festplatten größer als 2 TB zu initialisieren und zu formatieren.
5. Unter älteren Betriebssystemen kann es allerdings zu Problemen bei der Kompatibilität mit Festplatten
größer als 2 TB kommen. Nähere Informationen zur Verwendung von GPT nden Sie unter: http://msdn.
microsoft.com/en-us/library/windows/hardware/gg463525.aspx
6. Falls Sie aus Versehen den MBR Modus aktiviert haben, aber nur die Partitionstabelle löschen wollten,
aktivieren Sie bitte zunächst einen anderen RAID Modus wie weiter oben beschrieben und führen danach
nochmals die Schritte für den gewünschten RAID Modus aus und aktivieren bei der anschließenden Initialisierung den GPT Modus aus.
7. Macintosh Benutzer können erst ab dem Betriebssystem Tiger 10.4.11 oder höher auf Festplatten größer
2 TB zugreifen.
8. Im RAID 1 Modus müssen die Festplatten HDD1 und HDD2 installiert sein, da sonst das Betriebssystem
Ihres Rechners (Windows / Macintosh) das Gerät nicht erkennen kann.
9. Die Rebuilddauer (Wiederherstellung) ist abhängig von der Kapazität der verwendeten Festplatte. Als
Anhaltspunkt rechnen Sie bitte mit ungefähr 1 Stunde je 200 GB.
10. Wir empfehlen in den BIOS Einstellungen Ihres Mainboards das Power Management auf S3 einzustellen.
(Nähere Informationen entnehmen Sie bitte der Bedienungsanleitung des Mainboardherstellers).
11. Sollte die Initialisierung zu lange dauern, überprüfen Sie bitte, ob die Festplatte korrekt eingebaut wurde
oder führen Sie ein Treiberupdate Ihrer SATA Hosttreiber aus.
12. Wenn Ihnen die Transferrate bei gejumperten Festplatten ungewöhnlich erscheint, überprüfen Sie ob die
entsprechenden Jumper auf 1,5 Gbit/s oder 3,0 Gbit/s gesetzt sind.
13. Sollte der Lüfter oder das Gerät ausfallen, können Sie im Rahmen der Gewährleistungszeit eine Reparatur über Ihren Händler veranlassen.
14. Arbeitsumgebung: Temperatur 0 ~ 60 °C
Relative Luftfeuchtigkeit 90 %
15. Betriebssystem:
Windows 7/8.1/10 (32/64bit) (im GPT Modus: unterstützte Gesamtkapazität größer als 2 TB
Macintosh 10.X oder höher.
16. Je nach Modell werden folgende Datentransferraten über die entsprechenden Schnittstellen unterstützt:
USB Low Speed (bis zu 1,5 Mbit/s), Full Speed (bis zu 12 Mbit/s), High Speed (bis zu 480 Mbit/s), Super
Speed (bis zu 5 Gbit/s).
15
Page 16

The information contained in this manual is believed to be accurate and reliable. RaidSonic Technology GmbH assumes
no responsibility for any errors contained in this manual. RaidSonic Technology GmbH reserves the right to make ch-
anges in the specications and/or design of the above mentioned product without prior notice. The diagrams contained
in this manual may also not fully represent the product that you are using and are there for illustration purposes only.
RaidSonic Technology GmbH assumes no responsibility for any dierences between the product mentioned in this ma-
© Copyright 2016 by RaidSonic Technology GmbH. All Rights Reserved
nual and the product you may have.
 Loading...