

Page 1

IB-564SSK
Manual IB-564SSK
4x 3.5" SATA/SAS HDD trayless Backplane
Handbuch IB-564SSK
4x 3,5" SATA/SAS trägerlose Backplane
Manuel IB-564SSK
4x SATA/SAS Backplane sans tiroir pour disques durs 3.5"
Manuale IB-564SSK
4x 3.5" SATA/SAS HDD Backplane sin bandeja
Manual IB-564SSK
4x 3.5" SATA/SAS HDD Backplane senza vassoio
Instruções IB-564SSK
Rack Removível trayless 4x 3,5" SATA/SAS HDD
Instrukcja IB-564SSK
Bezkieszeniowa szuada na dyski twarde 4x SATA/SAS 3.5"
Руководство IB-564SSK
Используемая без лотка мобильная полка для жёстких дисков 4x 3,5" SATA/SAS
Εγχειρίδιο IB-564SSK
Φορητή βάση στήριξης χωρίς δίσκο για σκληρούς δίσκους 4x 3,5" SATA/SAS
Manuál IB-564SSK
Výměnný rámeček pro 4x 3,5" SATA/SAS HDD
Page 2

2
Page 3
IB-564SSK
Manual IB-564SSK
4x 3.5" SATA/SAS HDD trayless Backplane ...............................................4-5
Handbuch IB-564SSK
4x 3,5" SATA/SAS trägerlose Backplane ................................................... 6-7
Manuel IB-564SSK
4x SATA/SAS Backplane sans tiroir pour disques durs 3.5" ......................... 8-9
Manuale IB-564SSK
4x 3.5" SATA/SAS HDD Backplane sin bandeja ......................................... 10-11
Instruções IB-564SSK
Rack Removível trayless 4x 3,5" SATA/SAS HDD ....................................... 12-13
Manual IB-564SSK
4x 3.5" SATA/SAS HDD Backplane senza vassoio ...................................... 14-15
Instrukcja IB-564SSK
Bezkieszeniowa szuada na dyski twarde 4x SATA/SAS 3.5" ....................... 16-17
Εγχειρίδιο IB-564SSK
Φορητή βάση στήριξης χωρίς δίσκο για σκληρούς δίσκους 4x 3,5" SATA/SAS ...... 18-19
Руководство IB-564SSK
Используемая без лотка мобильная полка для жёстких дисков 4x 3,5" SATA/SAS ...... 20-21
Manuál IB-564SSK
Výměnný rámeček pro 4x 3,5" SATA/SAS HDD ......................................... 22-23
3
Page 4

1. Features
• 4x 3.5" SATA or SAS HDD/SSD in 3x 5,25" bay
• Trayless and easy installation
• Aluminum and Stainless Steel
• Intelligent Fan Control (6x6cm fan)
• Audio + LED Alarm for fan failure and overheating
• Individual Power-Switch
• Hard disk capacity not limited
• SATA I/II/III host interface 6.0 Gbit/s
• With key lock to secure the HDDs
• LED for power, HDD access
• Patented NSS SATA/SAS connector supports 50.000 times Hot Swap
2. Packing Content
IB-564SSK-B, 4x SATA cables, 2x Keys, 8x Screws, 1x Manual
3. Front & Rear Panel
IB-564SSK
1 1 62 3 4 52 3
1. Power Button with LED for power and Access (blue) 1. Power Ports
2. Key Lock 2. Alarm Buzzer
3. Door Handle 3. Temperature Alarm Setting
4. Fan Setting Mode
5. LED indicator switch OFF / ON
6. SATA DATA Connector (7pin)
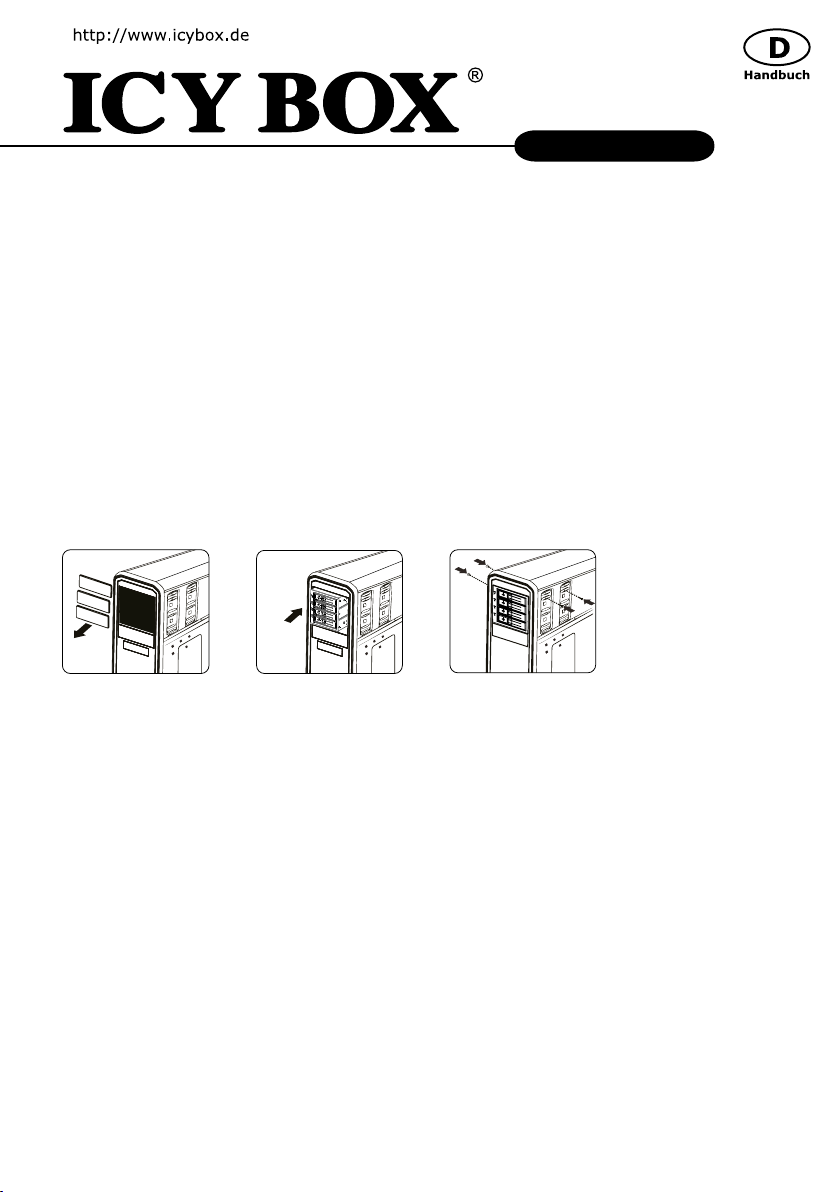
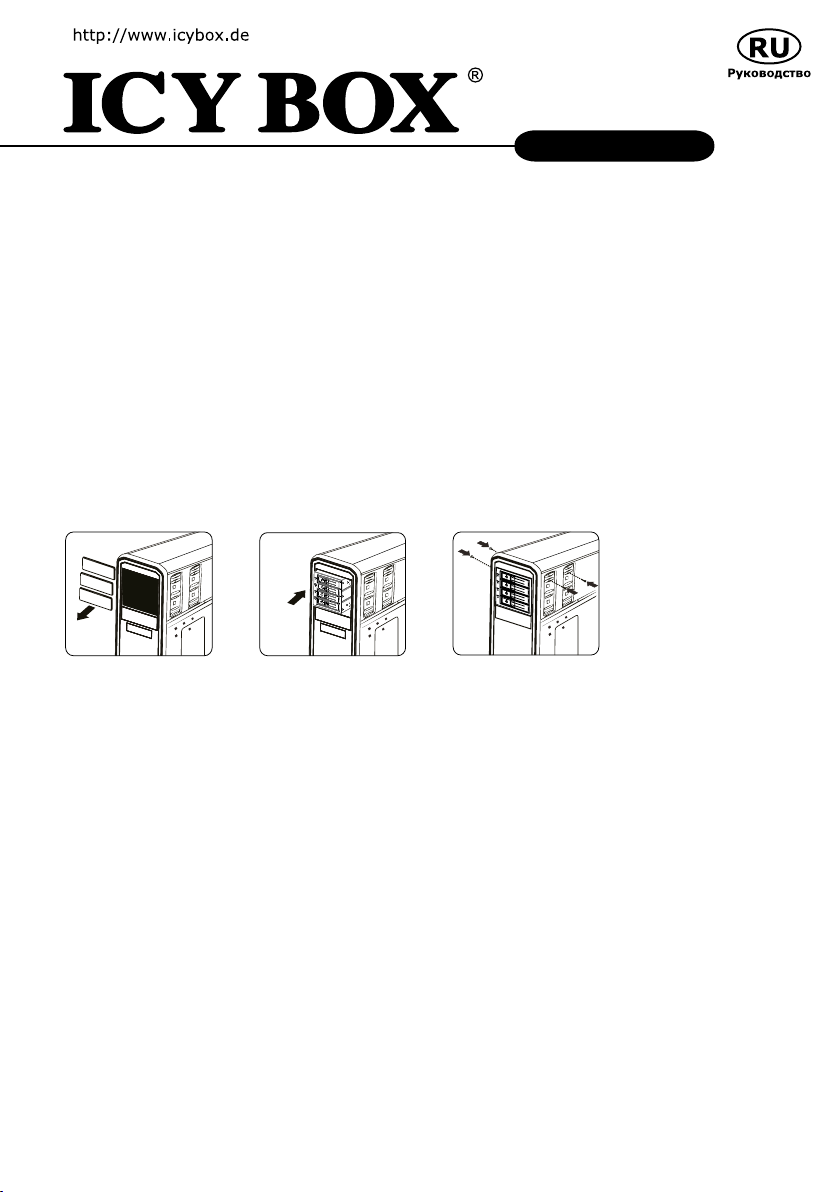
4. Installation
1. Remove the cover of an empty drive bay of 3x 5.25" space. Smoothly insert the IB-564SSK into the bay
and push it inwards until its screw hole is aligned with the hole of the bay. Use two screws on each side
to securely hold the device. The installation-direction must beright: Lock at the left side!
2. Connect the SATA 15Pin power cable or Molex 4 Pin to the power supply of your PC. Connect the SATA
7Pin data cable to the connector on the rear side of the IB-564SSK, another end to the SATA 7Pin data
port on the main board (or SATA RAID card) of your PC.
4
Page 5

IB-564SSK
3. Unlock and pull the door puller. Place the HDD (label side up) into the IB-564SSK. Close the door to push
the HDD into the IB-564SSK until the door is locked.
5. Functions
5.1 Power Button with blue LED for power and access
Pressing the Power button for 3 sec to power on or o the enclosure with HDD!
1. The power will turn o automatically when the HDD is ejected
2. Power On LED: the power button shines in blue color when power is on
3. Access LED: the power button blinks in blue color by HDD access
5.2 Fan Mode
With the Fan Mode Button on the rear side you can choose between "AUTO" and "HIGH"
Mode AUTO:
Temperature Fan speed
1. < 30 °C 0 rpm (doesn´t run)
2. > 30 °C 2000 – 2500 rpm
3. > 40 °C 4500 rpm (highest)
4. Back to 30 °C Fan stops automatically
Mode HIGH:
Temperature Fan speed
1. < 30 °C 0 rpm (doesn´t run)
2. > 30 °C 4500 rpm (highest)
3. Back to 30 °C Fan stops automatically
5.3 Fan Failure Alarm
If the temperature is over 30 °C but the fan is stopped by any reason, the buzzer starts to give audio alarm
"beep", the orange alarm LED in Button 2 will blink. By pushing the Mute Button the buzzer will stop to "beep",
but the orange LED remains blinking. After the fan failure is corrected, both the audio and LED alarm will go o.
5.4 Over Temperature Alarm
If the temperature is above the set temperature (55 °C, 60 °C or 65 °C), the buzzer starts to give an audio
alarm "beep", the red alarm LED in Button 2 will blink. By pushing any Button the buzzer will stop the alarm.
5
Page 6
IB-564SSK
1. Merkmale
• 4x 3,5" SATA oder SAS HDD/SSD in 3x 5,25" Einbauschacht
• Trägerlos und einfache Installation
• Voll-Aluminium und Metall
• Intelligente Lüftersteuerung
• Audio- und LED Alarm für Lüfterausfall und Überhitzung
• Separater Ein-/ Aus- Schalter
• Festplattenkapazität ohne Beschränkung
• SATA I/II/III host interface bis zu 6.0 Gbit/s
• Festplattenträger ist abschließbar
• LED für Power und HDD-Zugri
• Patentierter NSS SAS connector unterstützt 50.000x Hot Swap
2. Verpackungsinhalt:
IB-564SSK-B, 4x SATA Datenkabel mit Sicherheitsclips, 2x Schlüssel, 8x Schrauben
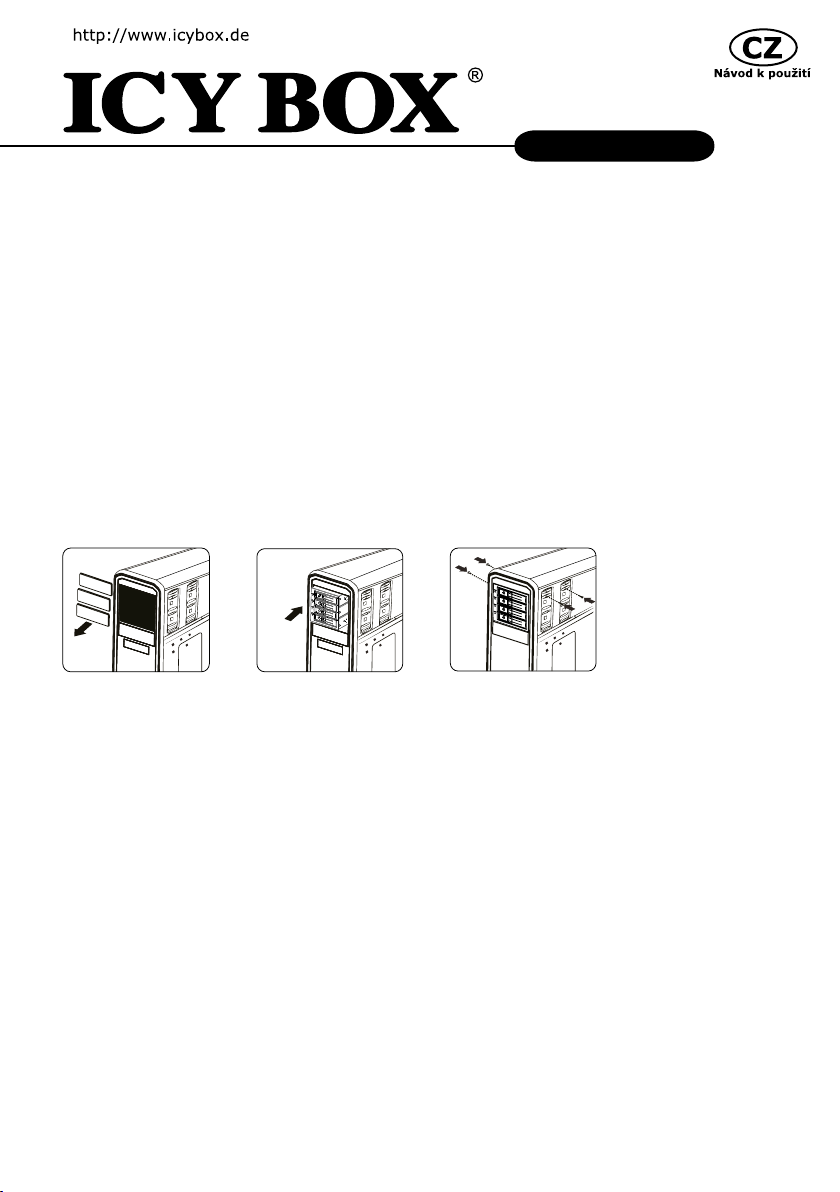
3. Installation
1. Schalten Sie Ihren Computer und alle angeschlossenen Geräte aus.
2. Entfernen Sie das Stromkabel an der Rückseite Ihres Computers und die Gehäuseabdeckung.
3. Setzen Sie das Gerät in einen freien 3x 5,25" Einbauschacht und befestigen diesen mit den
entsprechenden Schrauben.
4. Verbinden Sie das SATA 7pin Daten-Kabel mit dem entsprechenden Anschluss auf dem Mainboard.
5. Verbinden Sie das 15-Pin SATA Stromkabel oder Molex-Kabel mit dem IB-564SSK und das andere Ende
mit dem Netzteils des PCs.
6. Schließen Sie das Computergehäuse und verbinden das Stromkabel wieder.
7. Drücken Sie die Power-Tasten 3 Sekunden, um die einzelnen HDDs ein- oder auszuschalten.
4. Funktionen
4.1 Power Button mit blauer LED für und Strom und Festplattenaktivität
1. Achtung: IB-564SSK-B kann nur angeschaltet werden, wenn sich eine HDD in der Backplane bendet.
2. Drücken Sie den Power Knopf für 3 Sekunden, um die Backplane ein- oder auszuschalten.
3. Sobald die HDD aus der Backplane entnommen wird, schaltet sich diese automatisch ab.
4. Power On LED: leuchtet blau, sobald die Backplane angeschaltet ist.
5. Access LED: Blinkt blau bei HDD Aktivität / Datentransfer
6
Page 7

IB-564SSK
4.2 Lüfter Modi
Mit der Lüfter-Modi-Taste auf der Rückseite können Sie zwischen "AUTO" und "HIGH" wählen
Mode AUTO:
Temperatur Lüfter-Geschwindigkeit
1. < 30 °C 0 rpm (aus)
2. > 30 °C 2000 – 2500 rpm
3. > 40 °C 4500 rpm (Maximum)
4. Zurück zu 30 °C Lüfter stoppt automatisch
Mode HIGH:
Temperatur Lüfter-Geschwindigkeit
1. < 30 °C 0 rpm (aus)
2. > 30 °C 4500 rpm (Maximum)
3. Zurück zu 30 °C Lüfter stoppt automatisch
4.2 Lüfterausfall-Alarm
Wenn die Temperatur über 30 °C kommt, oder der Lüfter aus irgendeinem Grund beendet wird, beginnt der
Audio-Alarm "Signalton", die orangefarbene Alarm-LED in Taste 2 blinkt. Durch Drücken der Mute-Taste wird der
Alarmton gestoppt, die orange LED aber weiterhin blinken. Nach Korrektur des Lüfterausfalls, wird sowohl der
Audio- und LED-Alarm zurückgesetzt.
4.3 Überhitzungs-Alarm
Wenn die Temperatur über die eingestellte Temperatur steigt (55 °C, 60 °C oder 65 °C), beginnt der Summer mit dem
akustischen Signalton, die rote Alarm-LED blinkt. Durch Drücken irgendeiner Taste wird der Audio-Alarm gestoppt.
7
Page 8
IB-564SSK
1. Caractéristiques
• 4x 3.5" disques durs SATA ou SAS dans un baie 3x 5,25"
• Aluminium et métal
• Sans tiroir, installation facile
• Commande de ventilateur intelligent
• Interrupteur d‘alimentation indépendante
• Capacités des disques durs sans limite
• Interface SATA I/II/III 6.0 Gbit/s
• Clé fournie pour la fermeture du rack
• Voyant pour l’accès au DD
• Hot Swap
2. Contenu d‘emballage
IB-564SSK-B, 4x câble de données SATA avec des clips de sécurité, clés 2x, 8x vis
3. Instalacion
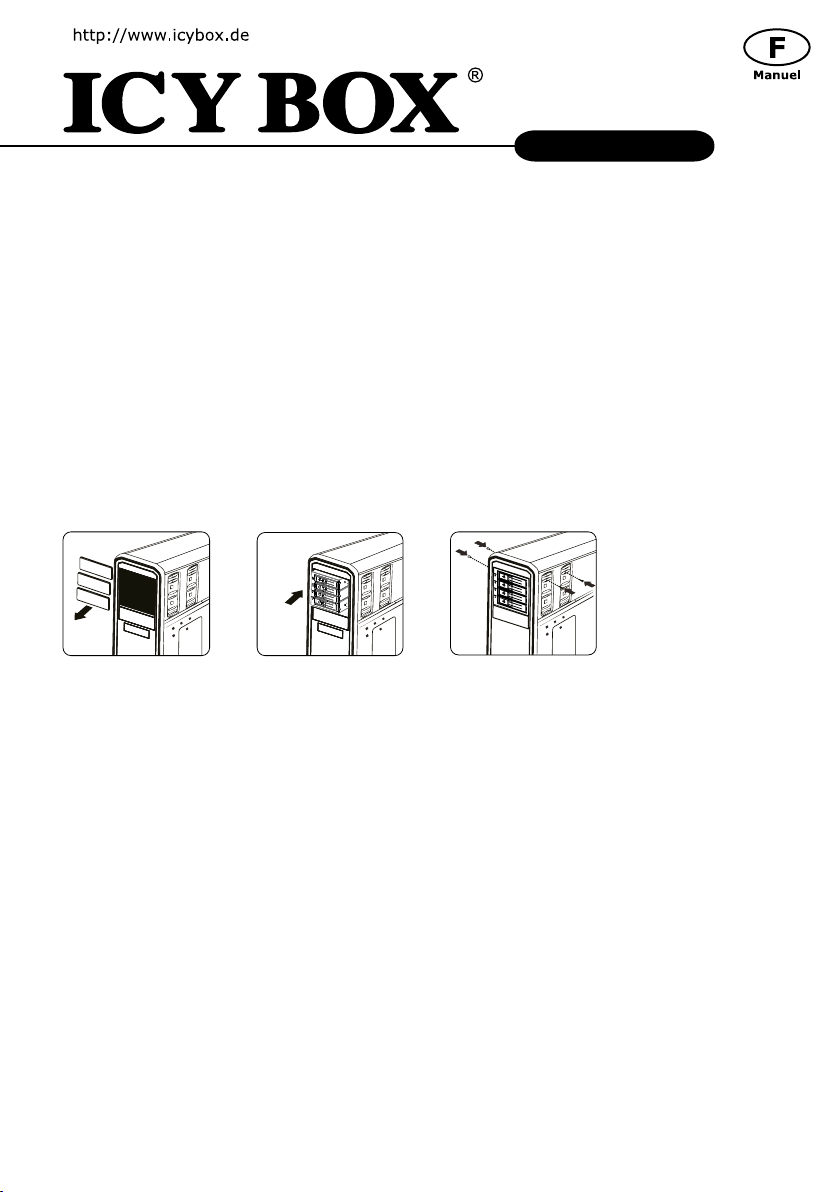
1. Débranchez votre ordinateur et tout périphérique connecté.
2. Débranchez le câble d’alimentation à l’arrière de l’ordinateur et retirez le couvercle de votre ordinateur.
3. Insérez le panneau dans une baie 3x 5.25" pouces disponible et xez-le à l’aide de vis.
4. Connectez le câble interne SATA 7pin broche correspondant sur la carte mère.
5. C o n n e c t e z l e c â b l e d ’ a l i m e n t a t i o n S A T A 1 5 p i n s b r o c h e á l ` I B - 5 6 4 S S K - B e t l a n a v e c l ` a l i m e n t a t i o n d e v o t r e P C
6. Remettez le couvercle de l’ordinateur et rebranchez le câble d’alimentation.
7. Appuyez sur le bouton d‘alimentation pendant 3 secondes pour activer ou désactiver l‘IB-564SSK-B.
4. Fonctions
4.1 Bouton d‘alimentation avec voyant bleu pour la mise sous tension et l‘accès
Appuyez sur le bouton d‘alimentation pendant 3 s. pour mettre sous tension ou hors tension le boîtier du
lecteur de disque dur !
1. L‘alimentation est coupée automatiquement lorsque le disque dur est éjecté.
2. Voyant " Power ON " : bleu lorsque l‘alimentation est sous tension.
3. Voyant d‘accès : lumière clignotante bleue lors de l‘accès au lecteur de disque dur
8
Page 9

IB-564SSK
4.2 Mode du ventilateur
Le bouton Mode du ventilateur à l‘arrière vous permet de sélectionner le mode " AUTO " ou " HIGH "
Mode AUTO :
Température Vitesse du ventilateur
1. < 30 °C 0 tr/m. (ne fonctionne pas)
2. > 30 °C 2000 – 2500 tr/m.
3. > 40 °C 4500 tr/m. (maximum)
4. Retour à 30 °C Le ventilateur s‘arrête automatiquement
Mode HIGH :
Température Vitesse du ventilateur
1. < 30 °C 0 tr/m. (ne fonctionne pas)
2. > 30 °C 4500 tr/m. (maximum)
3. Retour à 30 °C Le ventilateur s‘arrête automatiquement
4.3 Alarme de panne du ventilateur
Si la température dépasse 30 °C et que le ventilateur est arrêté, l‘alarme sonore se déclenche sous la forme d‘un
" bip ", le voyant d‘alarme orange du bouton 2 clignote. Appuyez sur le bouton " Mute " (Silence) pour arrêter
l‘alarme sonore ; le voyant orange continuera de clignoter. Une fois que la panne du ventilateur sera corrigée,
l‘alarme sonore et le voyant de l‘alarme s‘arrêteront.
4.4 Alarme de dépassement de la température
Si la température dépasse 55 °C, 60 °C ou 65 °C, l‘alarme sonore se déclenche sous la forme d‘un " bip ", le
voyant d‘alarme rouge du bouton 2 clignote. Appuyez sur le bouton " Mute " (Silence) pour arrêter l‘alarme sonore.
9
Page 10

IB-564SSK
1. Características
• 4x disco duro 3.5" SATA o SAS en 3x 5,25" bay
• Sin bandeja y instalación facil
• Aluminio y metal
• Control del ventilador inteligente
• Interruptor separado
• Capacidad de discos duros ilimitada
• SATA I/II/III host interface 6.0 Gbit/s
• Cerradura para evitar una manipulacion
• Indicador LED para encendido y acceso al disco duro
• Hot swap
2. Del embalaje
1x IB-564SSK-B, cable de datos 4x SATA con clips de seguridad, claves de 2x, 8x tornillos
3. Instalación
1. Desconecte el suministro eléctrico de su ordenador y el resto de periféricos conectados.
2. Desenchufe el cable de alimentación eléctrica del ordenador y quite la cubierta del ordenador.
3. Coloque el panel en un módulo libre de 3x 5,25" y sujétela con los tornillos.
4. Conecte el cable de datos SATA 7Pin en los conectores pertinentes de la placa base.
5. Conecte el cable SATA 15pin al IB-564SSK y el n con la fuente de alimentación del PC.
6. Vuelva a colocar la cubierta del ordenador y vuelva a conectar el cable de alimentación.
7. Pulse el botón de encendido durante 3 segundos para encender o apagar el IB-564SSK.
4. Funciones
4.1 Botón de conexión con LED azul de alimentación y acceso
¡Pulse el botón de conexión durante 3 seg. para conectar/desconectar la caja con el HDD¡
1. El equipo se desconectará automáticamente al expulsar el HDD.
2. LED de "Conexión": color azul cuando está conectado.
3. LED de acceso: parpadea en color azul para acceso a HDD.
10
Page 11

IB-564SSK
4.2 Modo de ventilador
Le bouton Mode du ventilateur à l‘arrière vous permet de sélectionner le mode " AUTO " ou " HIGH "
Modo AUTO:
Temperatura Velocidad de ventilador
1. < 30 °C 0 r.p.m. (no funciona)
2. > 30 °C 2 000 – 2 500 r.p.m.
3. > 40 °C 4 500 r.p.m. (máxima)
4. Vuelta a 30 °C El ventilador se detiene automáticamente
Modo HIGH:
Temperatura Velocidad de ventilador
1. < 30 °C 0 r.p.m. (no funciona)
2. > 30 °C 4 500 r.p.m. (máxima)
3. Vuelta a 30 °C El ventilador se detiene automáticamente
4.3 Alarma de fallo de ventilador
Si la temperatura es superior a 30 °C pero el ventilador se ha detenido por cualquier motivo, el zumbador co-
menzará a emitir una alarma acústica, un "pitido", y el LED naranja de alarma del Botón 2 parpadeará. Al pulsar
el botón de silenciado "Mute" el zumbador dejará de sonará pero el LED naranja seguirá parpadeando. Tras
solucionar el fallo del ventilador, la alarma acústica y el LED de alarma dejarán de sonar/parpadear.
Alarma de exceso de temperatura
Si la temperatura es superior a 55 °C, 60 °C, 65 °C el zumbador comenzará a emitir una alarma acústica, un
"pitido", y el LED rojo de alarma del Botón 2 parpadeará. Al pulsar el botón de silenciado "Mute" el zumbador
dejará de sonará pero el LED rojo seguirá parpadeando.
11
Page 12

IB-564SSK
1. Características Principais
• 4x 3.5" SATA ou SAS HDD/SSD in 3x 5,25" bay
• instalação trayless e fácil
• De alumínio e metal
• Controle de ventilação inteligente
• Interruptor de alimentação separada
• Capacidade do disco rígido não se limitando
• SATA I/II/III host interface 6.0 Gbit/s
• Bandeja de alumínio estável, com chave para garantir os HDDs
• LED para o poder, o acesso HDD
• Hot Swap
2. Conteúdo da Embalagem
1x IB-564SSK-B, cabo de dados 1x SATA com clips de segurança, 2x chaves, 8x parafusos
3. Instalação
1. Desligue o seu computador e os outros dispositivos periféricos que lhe estejam ligados.
2. Remova o cabo de energia da parte de trás do computador e remova a tampa do computador.
3. Introduza o painel num compartimento de unidade de 3x 5,25" e xe com os parafusos.
4. Ligue o cabo de dados SATA 7Pin aos respectivos conectores da placa principal.
5. Ligue os cabos de energia interno 15 pin SATA à unidade IB-564SSK-B eno nal com da fonte de alimen-
tação de energia do seu PC.
6. Reponha a tampa do computador e volte a ligar o cabo de energia.
7. Pressione o botão Power por 3 segundos para ligar ou desligar o IB-564SSK-B.
4. Funções
4.1 Botão de alimentação com LED azul como indicador de alimentação e acesso
Premir o botão de alimentação durante 3 s para ligar ou desligar a caixa com a unidade de disco rígido!
1. A caixa desligar-se-á automaticamente ao ejetar a unidade de disco rígido.
2. LED "Power ON": azul quando a alimentação está ligada.
3. LED de acesso: pisca a azul em caso de acesso à unidade de disco rígido.
12
Page 13

IB-564SSK
4.2 Modo de ventoinha
Com o botão Modo de ventoinha situado na traseira, pode escolher entre "AUTO" e "HIGH"
Modo AUTO:
Temperatura Velocidade da ventoinha
1. < 30 °C 0 r.p.m. (não trabalha)
2. > 30 °C 2000 – 2500 r.p.m.
3. > 40 °C 4500 r.p.m. (ponto mais alto)
4. Regresso a 30 °C A ventoinha pára automaticamente
Modo HIGH:
Temperatura Velocidade da ventoinha
1. < 30 °C 0 r.p.m. (não trabalha)
2. > 30 °C 4500 r.p.m. (ponto mais alto)
3. Regresso a 30 °C A ventoinha pára automaticamente
4.3 Alarme de avaria na ventoinha
Se a temperatura for superior a 30 °C, mas a ventoinha for parada por um qualquer motivo, o sinal sonoro
começa a emitir um alarme áudio "bip" e o LED cor de laranja de alerta no botão 2 pisca. Ao premir o "Botão
Mute", o sinal sonoro deixa de emitir um "bip", mas o LED cor de laranja continua a piscar. Depois de a avaria
da ventoinha estar resolvida, o alarme áudio e o alarme LED irão parar.
4.4 Alarme de temperatura excessiva
Se a temperatura for superior a 55 °C, 60 °C, 65 °C o sinal sonoro começa a emitir um alarme áudio de "bip",
o LED de alarme vermelho no botão 2 pisca. Ao premir o "Botão Mute", o sinal sonoro deixa de emitir um "bip",
mas o LED vermelho continua a piscar.
13
Page 14

IB-564SSK
1. Caratteristiche
• 4x 3,5" SATA o SAS HDD in 3x 5,25" vani di montaggio
• Installazione trayless e facile
• Alluminio e metallo
• Controllo intelligente della ventola
• Interruttore di alimentazione separato
• Capacità hard disk senza restrizioni
• Interfaccia Host SATA I/II/III no a 6,0 Gbit/s
• Supporto disco rigido chiudibile a chiave
• LED per Power e accesso HDD
• Hot Swap
2. Soddisfare dell‘imballaggio
1x IB-564SSK-B, cavo dati SATA 4x con clip di sicurezza, chiavi 2x, 8x viti
3. Installazione
1. Spegnere il computer e tutte le eventuali periferiche collegate.
2. Slare il connettore di alimentazione dal retro del computer e togliere la copertura del computer.
3. Inserire il pannello in una bay da 3x 5,25" disponibile e ssarlo con le viti.
4. Collegare i cavi SATA 7Pin ai connettori di riferimento della scheda madre.
5. Collegare il cavo di alimentazione 15pin SATA all IB-564SSK-B e all‘alimentazione del PC.
6. Montare la copertura del computer e collegare il cavo di alimentazione.
7. Premere il pulsante di accensione per 3 secondi per attivare o disattivare l‘IB-564SSK-B.
4. Funzioni
4.1 Pulsante ON/OFF con LED blu che indica "unità accesa" e "accesso all‘unità"
Per accendere o spegnere l‘enclosure con disco rigido, premere il pulsante ON/OFF per 3 secondi.
1. L‘alimentazione si disinserisce automaticamente quando il disco rigido viene espulso.
2. LED "unità accesa": blu quando l‘alimentazione è inserita.
3. LED "accesso all’unità": lampeggia in blu quando si accede al disco rigido
14
Page 15

IB-564SSK
4.2 Modalità ventola
Il pulsante modalità ventola (situato sul retro) può essere impostato su "AUTO" o su "HIGH".
Modalità AUTO:
Temperatura Velocità ventola
1. < 30 °C 0 giri al min. (non in uso)
2. > 30 °C 2000 – 2500 rigi al min.
3. > 40 °C 4500 giri al min. (velocità massima)
4. Abbassata a 30 °C La ventola si arresta automaticamente.
Modalità HIGH:
Temperatura Velocità ventola
1. < 30 °C 0 giri al min. (non in uso)
2. > 30 °C 4500 giri al min. (velocità massima)
3. Abbassata a 30 °C La ventola si arresta automaticamente.
4.3 Allarme guasto ventola
Se a temperatura for superior a 30 °C, mas a ventoinha for parada por um qualquer motivo, o sinal sonoro
começa a emitir um alarme áudio "bip" e o LED cor de laranja de alerta no botão 2 pisca. Ao premir o "Botão
Mute", o sinal sonoro deixa de emitir um "bip", mas o LED cor de laranja continua a piscar. Depois de a avaria
da ventoinha estar resolvida, o alarme áudio e o alarme LED irão parar.
4.4 Alarme de temperatura excessiva
Se a temperatura for superior a 55 °C, 60 °C, 65 °C o sinal sonoro começa a emitir um alarme áudio de "bip",
o LED de alarme vermelho no botão 2 pisca. Ao premir o "Botão Mute", o sinal sonoro deixa de emitir um "bip",
mas o LED vermelho continua a piscar.
15
Page 16

IB-564SSK
1. Szczegóły
• 4x 3,5" SATA lub SAS HDD w 3x 5,25" wenęce
• Bezkieszeniowa szuada łatwej instalacji
• Aluminium i metali
• Inteligentne sterowanie wentylatora
• Oddzielny włącznik zasilania
• Pojemność bez limitu
• SATA I/II/III złacze 6,0 Gbit/s
• Możliwość zamknięcia HDD
• LED dla Power i użytku HDD
• Hot Swap
2. Zawartość opakowania
IB-564SSK-B, kabel do transmisji danych 4x SATA z klipami bezpieczeństwa, klucze 2x, 8x śruby
3. Instalacja dysku twardego
1. Wyłącz zasilanie komputera i wszystkich podłączonych do niego urządzeń peryferyjnych.
2. Odłącz kabel zasilania podłączony z tyłu komputera.Zdejmij obudowę komputera.
3. Umieść panel w jednej z wolnych wnęk 3x 5,25" i przymocuj śrubami.
4. Podłącz wewnętrzne kable SATA 7Pin do odpowiednich złączy na płycie głównej.
5. Podłącz wewnętrzny kabel zasilania 15pin SATA do IB-564SSK-B i podłączyć koniec kabla do zasilacza komputera.
6. Załóż obudowę komputera i podłącz kabel zasilania.
7. Naciśnij przycisk zasilania przez 3 sekundy, aby włączyć lub wyłączyć IB-564SSK-B.
4. Funkcje
4.1 Przycisk Power (zasilanie) z niebieską diodą LED do włączania zasilania i uzyskiwania dostępu
Wciśnięcie przycisku Power na 3 sekundy powoduje włączenie lub wyłączenie zasilania obudowy z dyskiem twardym!
1. Zasilanie zostaje wyłączone automatycznie w momencie wysunięcia dysku twardego.
2. Dioda LED "Power ON": świeci na niebiesko, kiedy zasilanie jest włączone.
3. Dioda LED dostępu: miga na niebiesko w momencie uzyskiwania dostępu do dysku twardego.
16
Page 17

IB-564SSK
4.2 Tryb wentylatora
Przy użyciu przycisku trybu wentylatora znajdującego się z tyłu można wybierać między ustawieniami "AUTO" i "HIGH".
Tryb AUTO:
Temperatura Prędkość wentylatora
1. < 30 °C 0 rpm (nie pracuje)
2. > 30 °C 2000 – 2500 rpm
3. > 40 °C 4500 rpm (najwyższe)
4. Powrót do 30 °C Wentylator zatrzymuje się automatycznie
Tryb HIGH:
Temperatura Prędkość wentylatora
1. < 30 °C 0 rpm (nie pracuje)
2. > 30 °C 4500 rpm (najwyższe)
3. Powrót do 30 °C Wentylator zatrzymuje się automatycznie
4.3 Alarm awarii wentylatora
Jeżeli temperatura jest większa niż 30 °C, a wentylator jest zatrzymany z dowolnej przyczyny, brzęczyk zaczyna
generować alarm dźwiękowy, a pomarańczowa dioda LED alarmu w przycisku 2 miga. Naciśnięcie przycisku
"Mute" (Wycisz) powoduje wyłączenie dźwięku brzęczyka, lecz pomarańczowa dioda LED nie przestaje migać.
Po usunięciu awarii wentylatora alarm dźwiękowy i alarm LED zostają wyłączone.
4.4 Alarm zbyt wysokiej temperatury
Jeżeli temperatura jest większa niż 55 °C, 60 °C, 65 °C brzęczyk zaczyna generować alarm dźwiękowy, a czerwona
dioda LED alarmu w przycisku 2 miga. Naciśnięcie przycisku "Mute" (Wycisz) powoduje wyłączenie dźwięku brzęczyka.
17
Page 18
IB-564SSK
1. Χαρακτηριστικά
• 4x 3,5" SATA ή SAS HDD σε υποδοχές επέκτασης 3x 5,25"
• Φορητή βάση στήριξης χωρίς δίσκο για σκληρούς δίσκους, εαση ινσταλάτιον
• αλουμίνιο και μέταλλο
• Ευφυής έλεγχος ανεμιστήρα
• ξεχωριστό διακόπτη τροφοδοσίας
• Η χωρητικότητα του σκληρού δίσκου δεν περιορίζεται
• Κεντρική σύνδεση SATA I/II/III 6.0 Gbit/s
• με κλείδωμα πλήκτρων
• LED λειτουργίας και προσπέλασης HDD
• και άμεση αντιμετάθεση (Hot Swap)
2. Περιεχόμενα συσκευασίας
IB-564SSK-B, 4x καλώδιο δεδομένων SATA με κλιπ ασφαλείας, 2x κλειδιά, 8x βίδες
3. Εγκατάσταση σκληρού δίσκου
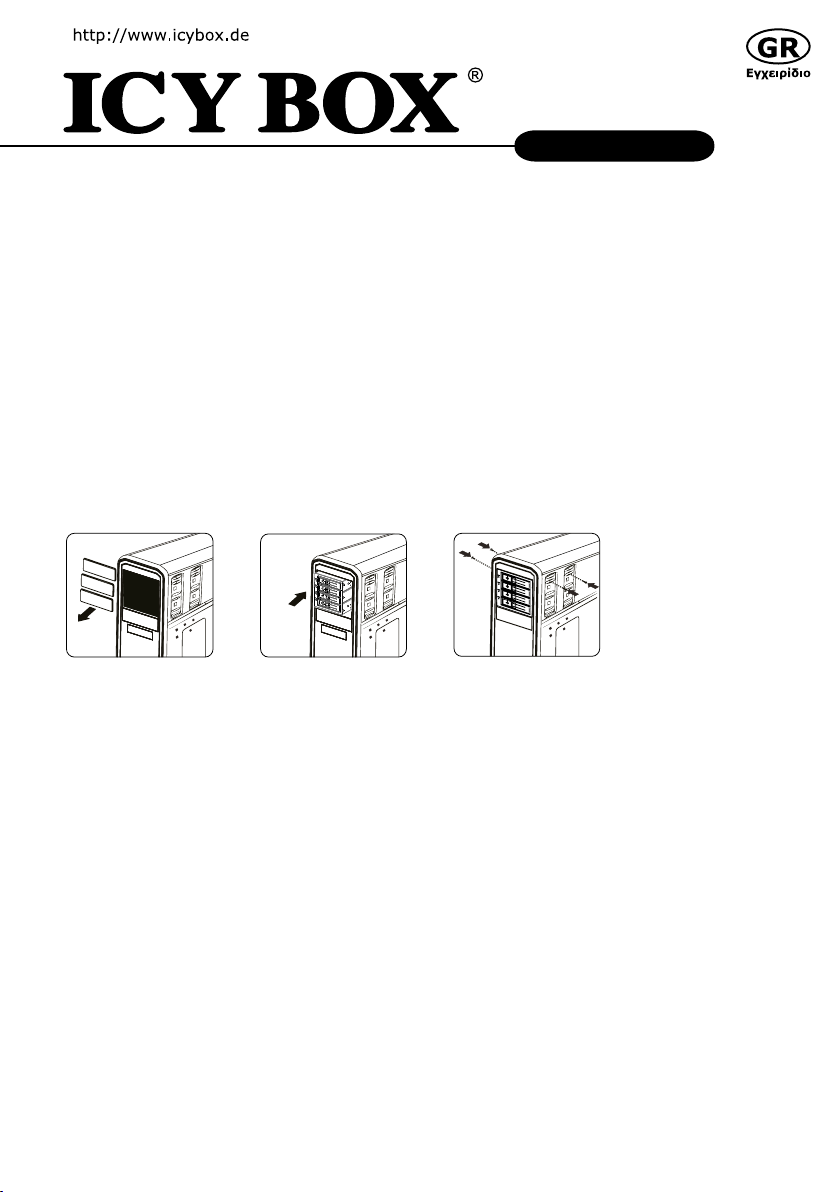
1. Απενεργοποιήστε τον υπολογιστή και άλλες τυχόν συνδεδεμένες περιφερειακές συσκευές.
2. Αποσυνδέστε το καλώδιο ρεύματος που βρίσκεται στην πίσω πλευρά του υπολογιστή. Αφαιρέστε το
πλαίσιο του υπολογιστή.
3. Τοποθετήστε το πλαίσιο σε μια διαθέσιμη υποδοχή 3x 5,25".
4. Συνδέστε τα εσωτερικά καλώδια του διανομέα 1x SATA 7Pin αντίστοιχους συνδέσμους στην κύρια πλακέτα.
5. Συνδέστε το 15 pin καλώδιο τροφοδοσίας SATA στο IB-564SSK-B. Συνδέστε το άκρο του καλωδίου με το
τροφοδοτικό του υπολογιστή σας.
6. Τοποθετήστε το πλαίσιο του υπολογιστή και συνδέστε το καλώδιο ρεύματος.
7. Πατήστε το κουμπί Τροφοδοσίας για 3 δευτερόλεπτα για να ενεργοποιήσετε ή να απενεργοποιήσετε το IB-564SSK-B.
4. Λειτουργίες
4.1 Κουμπί τροφοδοσίας με μπλε λυχνία LED για τροφοδοσία και πρόσβαση
για ενεργοποίηση ή απενεργοποίηση του περιβλήματος σκληρού δίσκου.
1. Μετά την εξαγωγή του σκληρού δίσκου, το περίβλημα απενεργοποιείται αυτόματα.
2. Λυχνία LED ενεργής λειτουργίας: ανάβει σταθερά με μπλε χρώμα όταν είναι ενεργοποιημένο το περίβλημα.
3. Λυχνία LED πρόσβασης: αναβοσβήνει με μπλε χρώμα κατά την πρόσβαση στον σκληρό δίσκο
18
Page 19

IB-564SSK
4.2 Λειτουργία ανεμιστήρα
Το κουμπί της λειτουργίας Ανεμιστήρα στην πίσω πλευρά διαθέτει δύο επιλογές: AUTO (Αυτόματα) και HIGH (Υψηλή)
Λειτουργία AUTO:
Θερμοκρασία Ταχύτητα ανεμιστήρα
1 < 30 °C 0 σ.α.λ. (δεν λειτουργεί)
2 > 30 °C 2000 – 2500 σ.α.λ.
3 > 40 °C 4500 σ.α.λ. (ύψιστη)
4 Επιστροφή στους 30 °C Ο ανεμιστήρας σταματά αυτόματα
Λειτουργία HIGH:
Θερμοκρασία Ταχύτητα ανεμιστήρα
1 < 30 °C 0 σ.α.λ. (δεν λειτουργεί)
2 > 30 °C 4500 σ.α.λ. (ύψιστη)
3 Επιστροφή στους 30 °C Ο ανεμιστήρας σταματά αυτόματα
4.3 Ειδοποίηση αστοχίας ανεμιστήρα
Αν η θερμοκρασία υπερβεί τους 30 °C και ο ανεμιστήρας δεν λειτουργεί για οποιονδήποτε λόγο, ακούγεται μια
ηχητική ειδοποίηση "μπιπ" και αναβοσβήνει η πορτοκαλί λυχνία LED ειδοποίησης στο Κουμπί 2. Αν πατήσετε το
κουμπί Σίγασης, θα σταματήσει να ακούγεται η ηχητική ειδοποίηση, αλλά η πορτοκαλί λυχνία LED θα συνεχίσει
να αναβοσβήνει. Μετά την επιδιόρθωση της αστοχίας του ανεμιστήρα, θα σταματήσει η ηχητική ειδοποίηση και
δεν θα ανάβει πλέον η λυχνία LED ειδοποίησης.
Ειδοποίηση υπερθέρμανσης
Αν η θερμοκρασία υπερβεί τους 55 °C, 60 °C, 65 °C ακούγεται μια ηχητική ειδοποίηση "μπιπ" και αναβοσβήνει η
κόκκινη λυχνία LED ειδοποίησης στο Κουμπί 2. Αν πατήσετε το κουμπί Σίγασης, θα σταματήσει να ακούγεται η
ηχητική ειδοποίηση, αλλά η κόκκινη λυχνία LED θα συνεχίσει να αναβοσβήνει.
19
Page 20
IB-564SSK
1. Основные признаки
• 4x 3,5" SATA или SAS HDD в 3x 5,25" люках
• Используемая без лотка мобильная полка для жёстких дисков, εαση ινσταλάτιον
• с замком
• Интеллектуальное управление вентилятором
• отдельный выключатель питания
• Алюминий и металлообработка
• 1x SATA-разъем с зажимами безопасности
• SATA I/II/III хост порт 6,0 Гбит/с
• С блокировку клавиатуры
• Подсветка для питания и HDD доступа
2. Содержание упаковки:
IB-564SSK-B, 4x SATA кабель для передачи данных с помощью зажимов безопасности, 2x ключей, 8x винтов
3. Установка жёсткого диска
1. Выключить компьютер и периферийные устройства.
2. Вынуть шнур питания на задней панели компьютера. Открыть корпус компьютера.
3. Вставить плату в свободный отсек 3x 5,25" и закрепить винтами.
4. Подключить внутренние кабели концентратора 1x SATA 7 Pin к соответствующим разъёмам главной платы.
5. Подключите 15-контактный SATA кабель питания к IB-564SSK-B и в конце с питания компьютера.
6. Закрыть корпус компьютера и подключить шнур питания.
7. Нажмите кнопку питания в течение 3 секунд, чтобы включить или выключить IB-564SSK-B.
4. Функции
4.1 Кнопка питания с синим индикатором (контроль питания и доступа)
Для включения или выключения корпуса с жёстким диском требуется нажать и удерживать кнопку питания на
протяжении 3 секунд.
1. Питание будет автоматически отключено при извлечении жёсткого диска.
2. Индикатор "Питание": синий, когда питание включено.
3. Индикатор доступа: мигающий синий при доступе к диску.
20
Page 21

IB-564SSK
4.2 Режим вентилятора
С помощью кнопки на задней стороне можно выбрать режим работы вентилятора: "АВТО" или "МАКС."
Режим "АВТО":
Температура Скорость вентилятора
1 < 30 °C 0 об/мин (не работает)
2 > 30 °C 2000 – 2500 об/мин
3 > 40 °C 4500 об/мин (макс.)
4 Понижение до 30 °C Вентилятор автоматически останавливается
Режим "МАКС.":
Температура Скорость вентилятора
1 < 30 °C 0 об/мин (не работает)
2 > 30 °C 4500 об/мин (макс.)
3 Понижение до 30 °C Вентилятор автоматически останавливается
4.3 Предупреждение о неисправности вентилятора
Если температура превышает 30 °C, но вентилятор по какой-то причине не работает, раздаётся звуковой
сигнал, и начинает мигать оранжевый индикатор кнопки 2. При нажатии кнопки отключения звука сигнал
прекратится, однако оранжевый индикатор продолжит мигать. После устранения неисправности звуковой
сигнал и мигание индикатора прекратятся.
4.4 Предупреждение о повышенной температуре
Если температура превышает 55 °C, 60 °C, 65 °C раздаётся звуковой сигнал, и начинает мигать красный
индикатор кнопки 2. При нажатии кнопки отключения звука сигнал прекратится, однако красный индикатор
продолжит мигать. После устранения неисправности звуковой сигнал и мигание индикатора прекратятся.
21
Page 22
IB-564SSK
1. Klíčové vlastnosti
• 4x 3.5" SATA/SAS HDD/SSD v 3x 5,25" bay
• snadná instalace, bez zásobníku
• Hliník a metal
• Inteligentní ovládání ventilátoru
• Samostatný vypínač
• Kapacita pevného disku není omezen
• SATA I/II/III host interface 6.0 Gbit/s
• Se zámkem na klíček
• LED pro napájení, HDD přístupu
• Hot Swap
2. Obsah balení
IB-564SSK-B, 1x SATA datový kabel s bezpečnostními svorkami, 2x klíče, 4x šrouby
3. Instalace
1. Vypněte počítač a veškerá připojená periferní zařízení.
2. Odpojte napájecí kabel ze zadní strany počítače.Sejměte kryt počítače.
3. Panel umístěte do volné 3x 5,25" přihrádky a upevněte ho šrouby.
4. Vnitřní kabely rozbočovače 1x SATA 7 Pin rozhraní připojte k odpovídajícím konektorům na hlavní desce.
5. Připojte 15 pinový SATA napájecí kabel k IB-564SSK-B a konec s napájení počítače.
6. Vraťte zpět kryt počítače a opětovně připojte napájecí kabel.
7. Stiskněte tlačítko napájení po dobu 3 sekund pro zapnutí nebo vypnutí IB-564SSK-B.
4. Funkce
4.1 Tlačítko napájení Power s modrou kontrolkou LED k indikaci napájení a přístupu
Stisknutím tlačítka napájení Power na 3 sekundy se zapne nebo vypne pouzdro s diskem HDD.
1. Po vysunutí disku HDD se napájení automaticky vypne.
2. Modrá kontrolka LED "Napájení ZAP" indikuje zapnuté elektrické napájení.
3. LED k indikaci přístupu bliká při přístupu na HDD modře.
22
Page 23

IB-564SSK
4.2 Režim ventilátoru
S tlačítkem režimu ventilátoru Fan Mode na zadní straně můžete volit mezi "AUTO" a "HIGH".
Režim AUTO:
Teplota Otáčky ventilátoru
1 < 30 °C 0 ot/min (neběží)
2 > 30 °C 2000 – 2500 ot/min
3 > 40 °C 4500 ot/min (nejvyšší)
4 Zpět na 30 °C Ventilátor se automaticky vypne
Režim HIGH:
Teplota Otáčky ventilátoru
1 < 30 °C 0 ot/min (neběží)
2 > 30 °C 4500 ot/min (nejvyšší)
3 Zpět na 30 °C Ventilátor se automaticky vypne
4.3 Alarm závady ventilátoru
Jestliže teplota překročila 30 °C, ale ventilátor se z jakéhokoli důvodu zastavil, bzučák začne vydávat zvukový
alarm v podobě "pípání", začne blikat oranžová kontrolka LED alarmu v tlačítku 2. Po stisknutí tlačítka ztlumení
"Mute" přestane bzučák "pípat", ale oranžová kontrolka LED bliká i nadále. Po opravě závady ventilátoru se
zvukový alarm a alarm indikovaný blikající kontrolkou LED zastaví.
5.4 Alarm nadměrné teploty
Jestliže teplota překročila 55 °C, 60 °C, 65 °C bzučák začne vydávat zvukový alarm v podobě "pípání", začne
blikat červená kontrolka LED alarmu v tlačítku 2. Po stisknutí tlačítka ztlumení "Mute" přestane bzučák "pípat",
ale červená kontrolka LED bliká i nadále.
23
Page 24

The information contained in this manual is believed to be accurate and reliable. RaidSonic Technology GmbH assumes no responsibility for
any errors contained in this manual. RaidSonic Technology GmbH reserves the right to make changes in the specications and/or design of
the above mentioned product without prior notice. The diagrams contained in this manual may also not fully represent the product that you
are using and are there for illustration purposes only. RaidSonic Technology GmbH assumes no responsibility for any dierences between
© Copyright 2015 by RaidSonic Technology GmbH. All Rights Reserved
the product mentioned in this manual and the product you may have.
 Loading...