

Page 1
Manual IB-366-C31
User‘s Manual (English)
USB 3.1 (Gen 2) enclosure for 3.5‘‘ HDD
Handbuch (Deutsch)
USB 3.1 (Gen 2) Gehäuse für 3,5‘‘ Festplatte
Manuel (Français)
USB 3.1 (Gen 2) boîtier pour HDD 3,5‘‘
Manuale (Italiano)
USB 3.1 (Gen 2) box per disco rigido 3,5‘‘
Manual (Español)
USB 3.1 (Gen 2) caja de disco duro 3,5‘‘
Handleiding (Nederlands)
USB 3.1 (Gen 2) behuizingen voor 3,5‘‘ HDD
Podręcznik obsługi (Po Polsku)
USB 3.1 (Gen 2) Obudowa do 3,5‘‘ HDD
Návod k použití (čeština)
USB 3.1 (Gen 2) rámeček pro 3,5‘‘ HDD
Használati utasítás (Magyar)
USB 3.1 (Gen 2) csatlakozású 3,5‘‘ HDD külső ház
Εγχειρίδιο (ελληνικά)
Εξωτερική θήκη USB 3.1 (Gen 2) για 3,5‘‘ HDD
Page 2

Page 3
Safety information
Please read carefully the following information to prevent injuries, damage to
material and device as well as data loss:
Warning levels
Signal words and safety codes indicate the warning level and provide immediate information in
terms of the probability of occurrence as well as the type and severity of the consequences if the
measures to prevent hazards are not complied with.
DANGER
WARNING
CAUTION
IMPORTANT
1. Risk of electrical shock
WARNING
• Read the operating instructions prior to use
• Make sure the device has been de-energised prior to working on it
• Do not remove contact protection panels
• Avoid contact with conducting parts
• Do not bring plug contacts in contact with pointed and metal objects
• Use in intended environments only
• Operate the device using a power unit meeting the specifications of the type plate only!
• Keep the device/power unit away from humidity, liquid, vapour and dust
• Do not modify the device
• Do not connect the device during thunderstorms
• Approach specialist retailers if you require repairs
2. Hazards during assembly (if intended)
CAUTION
• Read the operating instructions prior to assembly
• Avoid coming into contact with sharp edges or pointed components
• Do not force components together
• Use suitable tools
• Use potentially enclosed accessories and tools only
3. Hazards caused by a development of heat
IMPORTANT
• Prevent externally heating up components and ensure an exchange of air
• Do not cover the fan outlet and passive cooling elements
• Avoid direct sunlight on the device/power unit
• Guarantee sufficient ambient air for the device/power unit
• Do not place objects on the device/power unit
Warns of a directly hazardous situation causing death or serious injury.
Warns of a potentially hazardous situation that may cause death
or serious injury.
Warns of a potentially hazardous situation that may cause minor injury.
Warns of a potential situation that may cause material or environmental
damage and disrupt operative processes.
Contact with parts conducting electricity
Risk of death by electrical shock
Sharp components
Potential injuries to fingers or hands during assembly (if intended)
Insufficient device/power unit ventilation
Overheating and failure of the device/power unit
Page 4

4. Hazards caused by very small parts and packaging
WARNING
Risk of suffocation
Risk of death by suffocation or swallowing
• Keep small parts and accessories away from children
• Store/dispose of plastic bags and packaging in an area that is inaccessible to children
• Do not hand over small parts and packaging to children
5. Potential data loss
IMPORTANT
Data lost during commissioning
Potentially irreversible data loss
• Always comply with the information in the operating instructions/quick installation guide
• Exclusively use the product once the specifications have been met
• Back up data prior to commissioning
• Back up data prior to connecting new hardware
• Use accessories enclosed with the product
6. Cleaning the device
IMPORTANT
Harmful cleaning agents
Scratches, discolouration, damage caused by moisture or short circuit in the device
• Disconnect the device prior to cleaning
• Aggressive or intense cleaning agents and solvents are unsuitable
• Make sure there is no residual moisture after cleaning
• We recommend cleaning devices using a dry, anti-static cloth
7. Disposing of the device
IMPORTANT
Environmental pollution, unsuitable for recycling
Potential environmental pollution caused by components, recycling circle interrupted
This icon on product and packaging indicates that this product must not be disposed of as
part of domestic waste. In compliance with the Waste Electrical and Electronic Equipment Directive (WEEE) this electrical device and potentially included batteries must not be disposed
of in conventional, domestic waste or recycling waste. If you would like to dispose of this
product and potentially included batteries, please return it to the retailer or your local waste
disposal and recycling point.
If you have any questions, please do not hesitate to contact our support at support@raidsonic.de
or visit our website at www.raidsonic.de.
Page 5
Sicherheitshinweise
Zur Vermeidung körperlicher Schäden, sowie von Sach-, Geräteschäden und
Datenverlust beachten Sie bitte folgende Hinweise:
Warnstufen
Signalwort und Sicherheitszeichen kennzeichnen die Warnstufe und geben einen sofortigen Hinweis
auf Wahrscheinlichkeit, Art und Schwere der Folgen, wenn die Maßnahmen zur Vermeidung der
Gefahr nicht befolgt werden.
GEFAHR
WARNUNG
VORSICHT
ACHTUNG
1. Gefahren durch elektrische Spannung
WARNUNG
• vor Benutzung Betriebsanleitung lesen
• vor Arbeiten am Gerät, Spannungsfreiheit sicherstellen
• Kontaktschutzblenden nicht entfernen
• Kontakt mit Spannungsführenden Komponenten vermeiden.
• Steckkontakte nicht mit spitzen und metallischen Gegenständen berühren
• Verwendung nur in dafür vorgesehenen Umgebungen
• Gerät ausschließlich mit Typenschildkonformen Netzteil betreiben!
• Gerät/Netzteil fern von Feuchtigkeit, Flüssigkeit, Dampf und Staub halten
• Eigenständige Modifikationen sind unzulässig
• Gerät nicht während eines Gewitters anschließen
• Geben Sie Ihr Gerät im Reparaturfall in den Fachhandel
2. Gefahren während Montage (wenn vorgesehen)
VORSICHT
• vor Montage, Betriebsanleitung lesen
• Kontakt mit scharfen Kanten oder spitzen Bauteilen vermeiden
• Bauteile nicht mit Gewalt zusammensetzen
• geeignetes Werkzeug verwenden
• nur gegebenenfalls mitgeliefertes Zubehör und Werkzeug verwenden
3. Gefahren durch Wärmeentwicklung
ACHTUNG
• externe Erwärmung vermeiden und Luftaustausch zulassen
• Lüfter-Auslass und passive Kühlkörper freihalten
• direkte Sonneneinstrahlung auf Gerät/Netzteil vermeiden
• ausreichend Umgebungsluft für Gerät/Netzteil sicherstellen
• keine Gegenstände auf dem Gerät/Netzteil abstellen
warnt vor einer unmittelbar gefährlichen Situation, die zum Tod
oder zu schweren Verletzungen führen wird.
warnt vor einer möglicherweise gefährlichen Situation,
die zum Tod oder zu schweren Verletzungen führen kann.
warnt vor einer möglicherweise gefährlichen Situation,
die zu leichten Verletzungen führen kann.
warnt vor einer möglichen Situation, die zu Sach- und Umweltschäden
führen und den Betriebsablauf stören kann.
Kontakt mit elektrisch leitenden Teilen
Lebensgefahr durch Stromschlag
Scharfkantige Bauteile
Finger- oder Handverletzungen bei Zusammenbau (wenn vorgesehen) möglich
Mangelhafte Belüftung des Geräts/Netzteils
Überhitzung und Ausfall des Geräts/Netzteils
Page 6
Sicherheitshinweise
4. Gefahren durch Kleinstteile und Verpackung
WARNUNG
• Kleinteile, Zubehör für Kinder unzugänglich verwahren
• Plastiktüten und Verpackung für Kinder unzugänglich verwahren/entsorgen
• Kleinteile und Verpackungen nicht in Kinderhände geben
5. Möglicher Datenverlust
ACHTUNG
• Unbedingt Hinweise in der Bedienungsanleitung/Schnellinstallationsanleitung beachten
• Produkt nur verwenden, wenn Spezifikationen erfüllt sind
• Datensicherung vor Inbetriebnahme durchführen
• Datensicherung vor Anschluss neuer Hardware durchführen
• dem Produkt beiliegendes Zubehör verwenden
6. Reinigung des Gerätes
ACHTUNG
• vor Reinigung, das Gerät außer Betrieb nehmen
• aggressive bzw. scharfe Reinigungs- und Lösungsmittel sind ungeeignet
• nach der Reinigung sicherstellen, dass keine Restfeuchtigkeit vorhanden ist
• Reinigung der Geräte am besten mit trockenem Antistatiktuch durchführen
7. Entsorgung des Gerätes
ACHTUNG
Bei Fragen kontaktieren Sie gerne unseren Support unter support@raidsonic.de
oder besuchen Sie unsere Internetseite www.raidsonic.de.
Erstickungsgefahr
Lebensgefahr durch Ersticken oder Verschlucken
Datenverlust bei Inbetriebnahme
Unwiederbringlicher Datenverlust möglich
Schädigende Reinigungsmittel
Kratzer, Farbveränderungen, Feuchteschäden oder Kurzschluss am Gerät
Umweltverschmutzung, Wiederverwertung nicht möglich
Mögliche Umweltbelastung durch Bestandteile, Recyclingkreislauf unterbrochen
Dieses auf dem Produkt und der Verpackung angebrachte Symbol zeigt an, dass dieses
Produkt nicht mit dem Hausmüll entsorgt werden darf. In Übereinstimmung mit der Richtlinie
über Elektro- und Elektronik-Altgeräte (WEEE) darf dieses Elektrogerät und ggf. enthaltene
Batterien nicht im normalen Hausmüll oder dem Gelben Sack entsorgt werden. Wenn Sie
dieses Produkt und ggf. enthaltene Batterien entsorgen möchten, bringen Sie diese bitte zur
Verkaufsstelle zurück oder zum Recycling-Sammelpunkt Ihrer Gemeinde.
Page 7

Manual IB-366-C31
Package content
External case, power adapter, USB 3.1 Type-C™ cable, stand foot, manual
Main Features
• For 3.5‘‘ SATA I, II, III (6 Gbit/s) HDDs
• Interface to PC: USB 3.1/Type-C™, UASP, up to 10 Gbit/s
• HDD capacity unlimited
• Easy Swap® - HDD exchange without tools
• Enclosure material: aluminium, inclusive stand
• Plug & Play and Hot Swap
• Usable horizontally and vertically
• AC Power Adapter (100 –240 V), 12 V/2 A, 24 W
3. Application
3.1 Driver Software - USB 3.1 Interface
The use of the USB 3.1 interface requires an installed USB 3.1 (Gen 2) controller on your system.
Please install the USB 3.1 driver software for the controller.
By connecting to a USB 3.1 host interface the IB-366-C31 normally will be automatically detected.
Windows ≥8 has integrated drivers for the USB 3.1 interface. By connecting the device, the OS will
update the driver and connect the USB 3.1 device automatically. After the device installation has
been completed, you can access the new device. For older operating systems (e.g. Win 7), you need
to install the USB 3.1 driver first.
3.2 Starting up
You need a power supply to get enough electricity for the HDD. With the Type-C™ USB 3.1 data
cable you can connect the IB-366-C31 to Type-C™ USB 2.0, USB 3.0 or USB 3.1 interfaces.
3.3 Using the external drive
Connect the device via the USB cable to the computer. Then connect the power adapter and switch
the power button on.
3.4 LED-Function
The LED shines blue for power and blinks purple for HDD Read/Write.
Attention: Before usage a new HDD has to be initialised, partitioned and formatted by the operating system to be displayed by the system.
Attention: Please wait till the end of reading/writing operations before disconnecting the HDD to
avoid data lost. If the hard disc is not recognised instantly by the operating system, please check:
• If the driver software has been installed.
• If the HDD has been initialised, partitioned and formatted.
Page 8
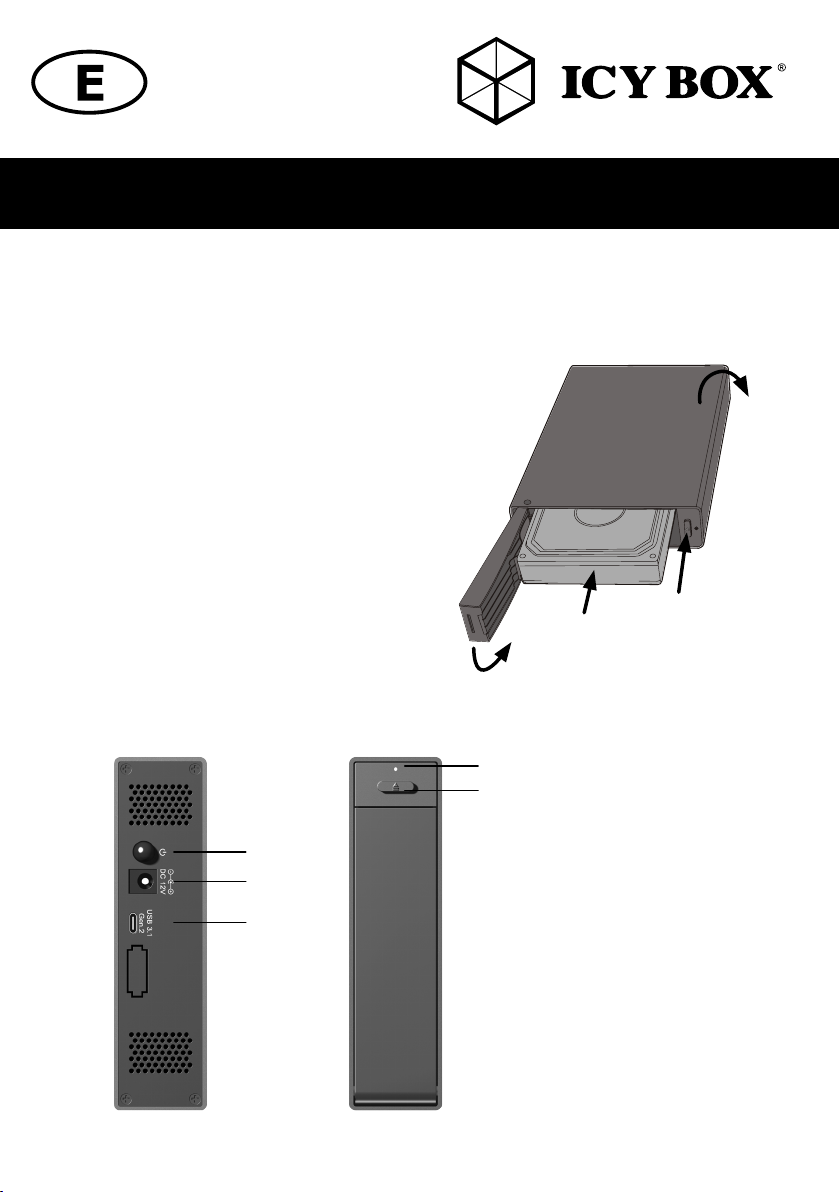
3.5 HDD Installation
During the HDD assembly, all cables must be
disconnected from the computer.
1) Push the button and open the front door.
2) Put the case in the horizontal position
like showed in the picture.
3) Slide the HDD with the controller board downsides
into the case.
4) Close the door carefully until it has locked.
2)
3.6 Overview
3)
1)
4)
4
5
1
2
3
1. Power button
2. Power jack
3. USB Type-C
4. LED
™
interface
5. Unlock
Page 9

Handbuch IB-366-C31
Verpackungsinhalt
Externes Gehäuse, Netzteil, USB 3.1 Type-C™ Kabel, Standfuß, Handbuch
Merkmale
• Für 3,5'' SATA I, II, III (6 Gbit/s) Festplatten
• Anschluss zu PC: USB 3.1 (Gen 2)/Type-C™, UASP, bis zu 10 Gbit/s
• Laufwerkskapazität unbeschränkt
• Easy Swap® - HDD Wechsel ohne Werkzeug
• Gehäusematerial: Aluminium, inklusive Standfuß
• Plug & Play und Hot Swap
• Vertikal und horizontal verwendbar
• Netzteil (100 –240 V), 12 V/2 A, 24 W
3. Anwendung
3.1 Treibersoftware - USB 3.1 Schnittstelle
Die Nutzung an einer Type-C™ USB 3.1-Schnittstelle setzt einen installierten USB 3.1 Controller in
Ihrem System voraus. Bitte installieren Sie die USB 3.1 Treiber Software für den Controller.
Beim Anschließen wird das IB-366-C31 in der Regel automatisch erkannt und ist betriebsbereit.
Windows ≥ 8 hat integrierte Treiber für die USB 3.1-Schnittstelle. Beim Anschluss des Gerätes aktualisiert das Betriebssystem automatisch seine Treiber und erkennt das neue Gerät.
Bei älteren Betriebssystemen (z.B. Win 7) ist es notwendig, zuerst die entsprechenden USB 3.1-Treiber zu installieren.
3.2 Inbetriebnahme
Um die Festplatte mit Energie zu versorgen, ist das Netzteil anzuschließen.
Mit dem beigefügten Type-C™ USB 3.1 Kabel können Sie das Gerät sowohl an Type-C™ USB 2.0,
USB 3.0 als auch an USB 3.1 Schnittstellen anschließen.
3.3 Anwendung − Betrieb
Das Gehäuse wird über das USB-Kabel mit dem Computer verbunden. Dann schließen Sie das
Gerät mittels des Netzteils an eine Stromquelle an und schalten das Gerät ein..
3.4 LED-Funktion
Die LED leuchtet blau für die Stromversorgung und blinkt lila für einen Festplattenzugriff.
Achtung: Eine neue Festplatte muss vom Betriebssystem erst initialisiert, partitioniert und formatierwerden um vom System angezeigt zu werden.
Achtung: Bitte das Ende von Schreib- und Lesevorgängen abwarten bevor ein angeschlossenes
Gehäuse vom Rechner getrennt wird, um Datenverlust zu vermeiden.
Wenn die Festplatte nicht sofort vom System erkannt wird bitte prüfen:
• Ob die Treibersoftware installiert ist
• Ob die Festplatte initialisiert, partitioniert und formatiert ist.
Page 10

Handbuch IB-366-C31
3.5 Festplattenmontage
Beim Ein- und Ausbau der Festplatte müssen
alle Kabelverbindungen zum Computer gelöst werden.
1) Öffnen Sie die Fronttür mit einem leichten Druck
auf den Knopf.
2) Legen Sie das Gehäuse flach in die gezeigte Position.
3) Schieben Sie die Festplatte mit der Platine nach unten ein.
4) Schließen Sie die Tür bis sie einrastet.
2)
3.6 Übersicht
4)
4
5
1
2
3
1. EIN-/AUS-Taste
2. Netzteilanschluss
3. USB Type-C
4. LED
5. Entriegelung
3)
1)
™
Schnittstelle
Page 11

Manuel IB-366-C31
Contenu de la livraison
Boîtier externe, adaptateur secteur, câble USB 3.1 Type-C™, support, manuel
Caractéristiques
• Pour 3,5'' SATA I, II, III (6 Gbit/s) disque dur
• L’interface pour PC : USB 3.1 (Gen 2)/Type-C™, UASP, jusqu'à 10 Gbit/s
• Disque dur à capacité illimitée
• Easy Swap® - HDD échange sans outil
• Matériau du boîtier : aluminium, support inclus
• Plug & Play et Hot Swap
• Utilisation verticale et horizontale
• Adaptateur (100 –240 V), 12 V/2 A, 24 W
Utilisation
Pilotes - Interface USB 3.1
L'utilisation de la connexion USB 3.1 requiert la présence d'un contrôleur USB 3.1 installé sur votre
système. Vous devez installer le logiciel pour le contrôleur USB 3.1. Les OS Windows ≥ 8 ont des
drivers intégrés pour les ports USB 3.1. En connectant le périphérique, l'OS va connecter de manière
automatique celuici.
aAprès la complète installation du périphérique, vous pouvez utiliser celui-ci. Pour tous les anciens
OS (ex : Win 7), vous devez préalablement installer le driver.
Démarrage
Vous aurez besoin de l'adaptateur secteur afin d'alimenter correctement le disque dur. Vous pouvez
communiquer IB-366-C31 à l'USB 2.0, USB 3.0 et USB 3.1 Type-C™ interface via Type-C™ USB 3.1
câble.
Application – Utilisation
Raccordez le boîtier à l'ordinateur par le câble USB. Puis raccordez-le par le bloc d'alimentation à
une prise de courant et mettez-le sous tension.
Attention: Avant tout, un disque dur nouvel doit être initialisé, partitionné, et formaté par le système
d'exploitation pour être indiqué par le système.
Attention: Attendez le complètement des écritures et des lectures avant de déconnecter un boîtier
branché à l'ordinateur pour éviter une perte de données.
Si le disque dur n'est pas reconnu immédiatement par le système, il faut vérifier:
• Si le logiciel de pilotes est installé
• Si le disque dur est initialisé, partitionné, et formaté.
Page 12

Manuel IB-366-C31
Fonctionnement des Diodes lumineuses
La LED brille le bleu pour la puissance et clignote le violet pour la lecture/écriture de disque dur.
Installation HDD
Devant l'installation ou la désinstallation d'un disque dur il faut débrancher tous câbles de connexion
à l'ordinateur.
1) Appuyez sur le bouton et ouvrez la porte.
2) Poser le boîtier horizontalement (voir le dessin).
3) Glissez le côté connectique du HDD à l'intérieur du boîtier.
4) Avec précaution, fermez la façade jusqu'à son complet verrouillage.
2)
4)
1)
3)
Page 13

Manuale IB-366-C31
Contenuto della confezione
Contenitore esterno, adattatore di alimentazione, cavo USB 3.1 Type-C™, base di supporto, manual
Caratteristiche
• Per 3,5'' SATA I, II, III (6 Gbit/s) disco rigido
• Interfaccia per PC: USB 3.1 (Gen 2)/Type-C™, UASP, fino a 10 Gbit/s
• Capacità del disco rigido illimitata
• Easy Swap® - disco rigido scambio senza utensile
• Materiale della cassa: alluminio, stand incluso
• Plug & Play e Hot Swap
• Installabile verticalmente e orizzontalmente
• Adattatore di alimentazione (100 –240 V), 12 V/2 A, 24 W
Applicazione
Driver (software) - Interfaccia USB 3.1
L'utilizzo dell'interfaccia USB 3.1 richiede che nel sistema posseduto sia
installato un controller USB 3.1. In Windows ≥8 sono integrati driver per l'interfaccia USB 3.1. Collegando il dispositivo, il sistema operativo aggiorna i driver, collegan-do automaticamente il dispositivo USB 3.1. Una volta completata l'installazione è possibile accedere al nuovo dispositivo. In caso
di sistemi operativi meno recenti (ad es. Win 7) è necessario installare innanzitutto i driver USB 3.1.
Messa in funzione
Vous aurez besoin de l'adaptateur secteur afin d'alimenter correctement le disque dur. Vous pouvez
communiquer IB-366-C31 à l'USB 2.0, USB 3.0 et USB 3.1 Type-C™ interface via Type-C™ USB 3.1
câble.
Applicazione − Funzionamento
Collegare al computer il case per mezzo del cavo USB, quindi collegare l'unità all'alimentazione
elettrica per mezzo dell'alimentatore e accendere l'unità.
Attenzione: Ogni nuovo disco fisso deve venir inizializzato, partizionato e formattato dal drive,
prima di poter essere indicato dal sistema.
Attenzione: Attendere la fine di funzioni di lettura e di scrittura prima di staccare un contenitore
esterno collegato al computer, per evitare perdite di dati.
Se il disco fisso non viene riconosciuto all'istante dal sistema, controllare:
• se il software di drive relativo è installato
• se il disco fisso è stato inizializzato, partizionato e formattato.
Page 14

Manuale IB-366-C31
Funzione LED
La LED luce blu per Potere and lampeggia viola per HDD lettura/csrittura.
HDD installazione
Staccare tutti i cavi di connessione con il computer durante il montaggio e lo smontaggio del disco
fisso.
1) Spinge il pulsante e Apre la porta.
2) Metti il caso in posizione orizzontale, come mostrato in figura.
3) Far scorrere il disco rigido con la scheda verso il basso fino a battuta.
4) Chiudere lo sportellino.
2)
4)
1)
3)
Page 15

Manual IB-366-C31
Contenido del embalaje
Carcasa externa, fuente de alimentación, cable USB 3.1 Type-C™, soporte, manual
Características
• Para disco duro de 3,5'' SATA I, II, III (6 Gbit/s)
• Interfaz de PC: USB 3.1 (Gen 2)/Type-C™, UASP, hasta 10 Gbit/s
• Capacidad del disco duro ilimitado
• Easy Swap® - intercambio del disco sin herramientas
• Material de la caja: aluminio, Soporte de caja incluido
• Plug & Play y Hot Swap
• Posicionable: vertival y horzontal
• Fuente de alimentación (100 –240 V), 12 V/2 A, 24 W
Aplicación
Driver Software - Interfáz USB 3.1
Para utilizar el interfáz USB 3.1 es necesario tener un controlador USB 3.1 instalado en el sistema.
Windows ≥8 tienen integrados los driver para el interfáz USB 3.1. En cuando el adaptador es
conectado el sistema operativo actualiza los drivers y conecta al adaptador automáticamente. Si
utiliza un sistema operativo viejo (por ejemplo Win 7) necesita instalar los driver USB 3.1.
Poner en marcha
Necesita la fuente de energía para tener suficiente corriente para el disco duro.
Puede conectar IB-366-C31 a USB 2.0, USB 3.0 y USB 3.1 Type-C™ interfaz con cable Type-C™
USB.
Aplicación – Funcionamiento
Conecte el dispositivo con el cable USB al ordenador. A continuación, conecte el adaptador de
potencia y conecte el suministro con el interruptor.
Atención: En primer lugar, un nuevo dicso duro debe estár inicializado, compartimentado y formateado por el sistema operativo para estar indicado por el sistema.
Atención: Espere el fin de escrituras y lecturas antes de desenchufar una carcasa conectada del
ordenador para evitar pérdidas de datos.
Si el sistema no reconocería el disco duro inmediatamente: Por favor compruebe:
• Si el programa de control está instalado (W98)
• Si el disco duro está inicializado, compartimentado y formateado.
Page 16

Manual IB-366-C31
Funcionamiento de los diodos luminosos
El LED brilla azul para potencia y parpadea púrpura para lectura/escritura de HDD.
Ensamblaje de disco
Antes de instalar o desinstalar un disco duro se debe desdesconectar los cables de conexión/alimentación al ordenador.
1) Empuje el botón y abra la puerta.
2) Ponga la caja el la posicíon mostrada.
3) Introduzca el disco duro con la platina hacia abajo.
4) Cierre la puerta hasta que está cerrado.
2)
4)
1)
3)
Page 17

Handleiding IB-366-C31
Inhoud pakket
Externe behuizing, voedingsadapter, USB 3.1 Type-C™-kabel, standaard, handleiding
Belangrijkste kenmerken
• Geschikt voor 3,5'' SATA I, II, III (6 Gbit/s) HDD
• Interface naar PC: USB 3.1 (Gen 2)/Type-C™, UASP, tot 10 Gbit/s
• HDD capaciteit onbeperkt
• Easy Swap® - HDD te wisselen zonder gereedschap
• Behuizing: aluminium, inclusief behuizing stand
• Plug & Play en Hot Swap
• Verticaal en horizontaal te gebruiken
• AC-voedingsadapter (100 -240 V), 12 V/2 A, 24 W
Toepassing
Driver-software - USB 3.1 interface
Om de USB 3.1 interface te kunnen gebruiken, moet er een USB 3.1 controller op uw computer
geïnstalleerd zijn. Installeer indien nodig de USB 3.1 driver-software om deze controller te kunnen
gebruiken. Als u de IB-366-C31 aansluit op een USB 3.1 host-interface, wordt het oplaadstation
automatisch herkend. Windows 8 of hoger beschikt over een geïntegreerde driver voor een USB
3.1 interface. Als u het apparaat aansluit, zal OS de driver updaten en automatisch op de USB 3.1
aansluiten. Zodra het oplaadstation is geïnstalleerd, hebt u toegang tot dit nieuwe apparaat. Bij
oudere besturingssystemen (bijv. Win 7) moet u eerst de USB 3.1 driver installeren.
Ingebruikneming
Om de HDD te kunnen aansturen, is er stroomtoevoer nodig. Met een Type-C™ USB datakabel kunt
u de IB-366-C31 aansluiten op een Type-C™ USB 2.0, USB 3.0 of een USB 3.1 interface.
Toepassing - het externe station gebruiken
Sluit het apparaat via de USB Type-C™-kabel op de computer aan. Sluit vervolgens de voedingsadapter aan en schakel de aan-/uit-knop in.
Let op: Er moet een nieuwe HDD worden geïnitialiseerd, gepartitioneerd en geformatteerd door het
besturingssysteem alvorens de HDD zichtbaar is.
Let op: Wacht tot de read/write beëindigd is alvorens de HDD los te koppelen om te vermijden dat
er gegevens verloren gaan.
Indien de harde schijf niet direct wordt herkend door het besturingssysteem, controleer dan:
- of de driver software is geïnstalleerd
- of de HDD is geïnitialiseerd, gepartitioneerd en geformatteerd.
Page 18

Handleiding IB-366-C31
Led-functie
Het led-lampje is blauw om aan te geven dat het apparaat voeding krijgt, en knippert paars voor
HDD lezen/schrijven.
HDD-installatie
Tijdens de installatie van HDD mogen er geen kabels in de computer zitten.
1) Druk op de knop om de voorste klep te openen.
2) Leg de behuizing in horizontale positie zoals te zien in de afbeelding.
3) Schuif de HDD met het controller board naar beneden in de behuizing.
4) Sluit de klep voorzichtig tot hij vergrendeld is.
2)
4)
1)
3)
Page 19

Podręcznik obsługi IB-366-C31
Zawarcie pudełka
Obudów zewnętrznych, zasilacz, kabel USB 3.1 Type-C™, stojak, instrukcja obsługi
Funkcje
• Dla 3,5'' SATA I, II, III (6 Gbit/s) HDD
• Interfejs do PC: USB 3.1 (Gen 2)/Type-C™, UASP, do 10 Gbit/s
• HDD pojemność nieograniczona
• Easy Swap® - Wymiana dysku twardego bez użycia narzędzi
• Materiał obudowy: aluminium, w zestawie stojak dla obudowy
• Plug & Play i Hot Swap
• Możliwość ustawienia vertykalnie i horyzontalnie
• zasilacz ( 100-240 V ), 12 V/2 A, 24 W
Aplikacja
Software sterowników - USB 3.1 Interface
Korzystanie z USB 3.1 interface wymaga zainstalowania kontrolera USB 3.1 w systemie.
Windows ≥8 posiada integrowany sterownik interfejsu USB 3.1. Podczas podłączania urządzenia
system operacyjny zaktualizuje sterownik i podłączy urządzenie USB 3.1 automatycznie. Po zakończeniu instalacji, można przyłączyć nowe urządzenie. W starszych systemach operacyjnych (np. Win
7) trzeba zainstalować najpierw sterownik USB 3.1.
Uruchomienie
Aby uruchomić stację dokującą podłącz zasilacz. Możesz skontaktować się IB-366-C31 do Type-C™ USB 2.0, USB 3.0 i USB 3.1 za pośrednictwem kabla Type-C™ USB.
Aplikacje − Używanie dysku zewnętrznego
Proszę podłączyć urządzenie z komputerem za pomocą kabla USB. Następnie proszę podłączyć
zasilacz i włączyć urządzenie.
Uwaga: Aby nowy dysk twardy został wyświetlony w systemie, powinien wcześniejZzostać zainicjalizowany, podzielony na partycje oraz sformatowany przez system operacyjny.
Uwaga: Zanim obudowa zostanie odłączona od komputera, należy zaczekać na zakończenie
procesów zapisu oraz odczytu danych. W przeciwnym przypadku istnieje niebezpieczeństwo utraty
danych.
Jeżeli dysk twardy nie został rozpoznany w systemie, proszę upewnić się:
• czy oprogramowanie sterowników zostało zainstalowane
• czy dysk twardy został zainicjalizowany, podzielony na partycje oraz sformatowany.
Page 20

Podręcznik obsługi IB-366-C31
Funkcje LED'ów
LED świeci na niebiesko dla zasilania i mruga na fioletowo dla HDD Odczytu/Wpisu.
Instalacja twardego dysku
Podczas montażu oraz demontażu dysku twardego okablowanie powinno być odłączone od komputera.
1) Naciśnij przycisk i otwórz drzwi.
2) Połóż obudowę w pozycji poziomej tak jak przedstawia obrazek.
3) Wsuń HDD do obudowy i podłącz odpowiednio.
4) Zamknij i zaklucz drzwiczki.
2)
4)
1)
3)
Page 21

Návod k použití IB-366-C31
Obsah balení
Externí pouzdro, napájecí adaptér, USB 3.1 Type-C™ kabel, stojan, návod
Hlavní vlastnosti
• Pro 3,5'' SATA I, II, III (6 Gbit/s) HDD
• Rozhraní k PC: USB 3.1/Type-C™, UASP, až 10 Gbit/s
• HDD kapacita neomezená
• Easy Swap® - výměna HDD bez použití nářadí
• Materiál pouzdra: hliník, včetně zastřešení stojánek
• Plug & Play a Hot Swap
• Vertikální a horizontální nastavitelná
• Napájecí adaptér AC (100–240 V), 12 V/2 A, 24 W
Aplikace
Softwarové ovladače - USB 3.1 rozhraní
Použití USB 3.1 rozhraní vyžaduje nainstalovaný USB 3.1 řadič ve vašem systému.
Windows ≥8 má vestavěné ovladače pro rozhraní USB 3.1. Při připojení zařízení operační systém
automaticky aktualizuje své ovladače a automaticky rozpozná nové zařízení. Pro starší operační
systémy (např. Win 7), je nutné nejprve nainstalovat příslušný USB 3.1 ovladač.
Uvedení do provozu
Připojte napájecí zdroj. Můžete conntect IB-366-C31 na Type-C™ USB 2.0, USB 3.0 a USB 3.1
rozhraní přes Type-C™ USB kabel.
Aplikace – Používání externího disku
Jednotku připojte k počítači prostřednictvím kabelu typu USB Type-C™. Poté připojte napájecí adaptér a tlačítkem zapněte napájení.
Nový pevný disk musí být předem naformátovaný aby se zobrazíl na pracovní ploše.
Prosím, vyčkejte vždý na ukončení přenosu dat před odpojením, aby nedošlo ke
ztrátě dat.
Nový pevný disk musí být předem naformatovaný (i případně partice) aby byl zobrazen v systému.
Nerozezná-li systém jednotku, zkontrolujte:
- Zda USB řadič je nainstalová.
- Zda je pevný disk rozdělený a formatovaný.
Page 22

Návod k použití IB-366-C31
Funkce LED
Modrá kontrolka LED signalizuje zapnuté napájení a červené blikání kontrolky znamená čtení/zápis
na pevném disku.
Instalace pevného disku
V průběhu montáže pevného disku musí být všechny kabely odpojeny od počítače.
1) Stiskněte tlačítko a otevřete přední dvířka.
2) Pouzdro položte vodorovně naplocho podle obrázku.
3) Pevný disk zasuňte do pouzdra řídicí deskou směrem dolů.
4) Pečlivě zavřete dvířka, až zaklapnou.
2)
4)
1)
3)
Page 23

Használati utasítás IB-366-C31
A csomag tartalma
Külső ház, hálózati adapter, USB 3.1 Type-C™-kábel, állvány, kézikönyv
Fő funkciók
• 3,5'' SATA I, II, III (6 Gbit/s) HDD-hez
• PC-csatlakozás: USB 3.1/Type-C™, UASP, akár 10 Gbit/s -ig
• HDD kapacitás korlátlan
• Easy Swap® - HDD cseréje szerszám nélkül
• Ház anyaga: alumínium, tartozék ház tartó állvány
• Plug & Play és Hot Swap
• Vízszintesen és függőlegesen is használható
• Hálózati tápadapter (100 – 240 V), 12 V/2 A, 24 W
Alkalmazás
Vezérlőszoftver - USB 3.1 interfész
Az USB 3.1 interfész használatához az Ön rendszerének rendelkeznie kell USB 3.1 vezérlővel.
Kérjük, telepítse a vezérlőhöz tartozó USB 3.1 vezérlőszoftvert. Az USB 3.1 hoszt interfészhez csatlakoztatva az IB-366-C31 alapesetben automatikusan felismerésre kerül.
A Windows ≥8 vagy magasabb integrált vezérlőszoftverrel rendelkezik az USB 3.1 interfészhez.
A készülék csatlakoztatásával az operációs rendszer frissíti a vezérlőszoftvert, és automatikusan
csatlakozik az USB 3.1 eszközhöz. A telepítést követően az új eszköz használatba vehető. Régebbi
operációs rendszerek (pl. Win 7) esetében előbb telepíteni kell az USB 3.1 drivert.
Indítás
A merevlemez megfelelő áramellátásához szükség van egy tápegységre. Az Type-C™ USB kábellel
az B-366-C31 egy USB 2.0, USB 3.0 vagy Type-C™ USB interfészhez csatlakoztatható.
Merevlemez inicializáció
Egy új merevlemezt előbb inicializálni, particionálni és formázni kell az operációs rendszerben
ahhoz, hogy a rendszerben láthatóvá váljon.
Kérjük várja a vége írási/olvasási műveletek kihúzása előtt a HDD elkerülése érdekében az adatok elvesznek. Az új HDD először kezdeményezhető, megosztjuk és
formázott az operációs rendszer által megjelenített rendszer.
Ha a merevlemez nem ismeri azonnal az operációs rendszer kérem ellenőrizze:
- Ha a vezető szoftver telepítése (USB),
- Ha a HDD inicializálása, particionálva és formázva.
Page 24

Használati utasítás IB-366-C31
LED-funkció
A LED kéken világít bekapcsolt állapotban, és lilán villog a merevlemez olvasása/írása közben.
Merevlemez telepítése
A merevlemez beszerelése során minden vezetéket ki kell húzni a számítógépből.
1) Nyomja meg a gombot az elülső ajtó kinyitásához.
2) Helyezze a házat vízszintes helyzetbe a képen látható módon.
3) Csúsztassa a merevlemezt a vezérlőkártyával lefelé a házba.
4) Óvatosan bepattanásig zárja be az ajtót
2)
4)
1)
3)
Page 25

Εγχειρίδιο IB-366-C31
Περιεχόμενο συσκευασίας
Εξωτερική Θήκη, προσαρμογέας ρεύματος, καλώδιo USB 3.1 Type-C™, Στήριγμα
κατακόρυφης τοποθέτησης, Εγχειρίδιο Χρήσης
Κύρια χαρακτηριστικά
• Για 3,5'' SATA I, II, III (6 Gbit/s) HDD
• Σύνδεση με PC: USB 3.1/Type-C™, UASP, έως 10 Gbit/s
• HDD απεριόριστη χωρητικότητα
• Easy Swap® - εναλλαγή HDD χωρίς εργαλεία
• Υλικό κατασκευής: αλουμίνιο, Συμπεριλαμβάνεται βάση στήριξης
• Plug & Play και Hot Swap
• Δυνατότητα κατακόρυφης και οριζόντιας τοποθέτησης
• Τροφοδοτικό (100 –240 V), 12 V/2 A, 24 W
Εφαρμογή
Λογισμικό προγράμματος οδήγησης - Διεπαφή USB 3.1
Η χρήση της διεπαφής USB 3.1 απαιτεί την παρουσία εγκατεστημένου ελεγκτή USB
3.1 στο σύστημά σας. Τα Windows ≥ 8 διαθέτει ενσωματωμένο πρόγραμμα οδήγησης
για τη διεπαφή USB 3.1. Μετά από τη σύνδεση της συσκευής, το λειτουργικό
σύστημα θα ενημερώσει το πρόγραμμα οδήγησης και θα συνδέσει τη συσκευή USB
3.1 αυτομάτως. Όταν ολοκληρωθεί η εγκατάσταση της συσκευής, μπορείτε να
προσπελάσετε τη νέα συσκευή. Για παλαιότερα λειτουργικά συστήματα (π.χ. Win 7)
θα πρέπει πρώτα να εγκαταστήσετε το πρόγραμμα οδήγησης USB 3.1.
Έναρξη λειτουργίας
Απαιτείται τροφοδοσία ρεύματος για την τροφοδοσία της μονάδας σκληρού δίσκου.
Μπορείτε να συνδέσετε το IB-366-C31 σε Type-C™ USB 2.0, USB 3.0 και USB 3.1
interface μέσω Type-C™ USB καλώδιο.
Εφαρμογή − Λειτουργία
Συνδέστε τη συσκευή μέσω του καλωδίου USB στον υπολογιστή. Στη συνέχεια
συνδέστε τον προσαρμογέα ρεύματος και πιέστε το πλήκτρο ενεργοποίησης.
Προσοχή: Προκειμένου ο νέος σκληρός δίσκος να εμφανίζεται στο σύστημα, πρέπει
πρώτα να γίνει εγκατάσταση, δημιουργία διαμερισμάτων και διαμόρφωση από το
λειτουργικό σύστημα.
Προσοχή: Για την αποφυγή απώλειας δεδομένων, περιμένετε να ολοκληρωθούν
οι διαδικασίες εγγραφής/ανάγνωσης, πριν αποσυνδέσετε το περίβλημα από τον
υπολογιστή.Εάν ο σκληρός δίσκος δεν αναγνωρίζεται αμέσως από το σύστημα ελέγξτε
τα εξής:
• Εάν το λογισμικό προγράμματος οδήγησης είναι εγκατεστημένο (Win98)
• Εάν έχει γίνει εγκατάσταση, δημιουργία διαμερισμάτων και διαμόρφωση του
σκληρού δίσκου.
Page 26

Safety informationΕγχειρίδιο IB-366-C31
Λειτουργία Ενδεικτικής Λυχνίας LED
Το LED γίνεται μπλε για το ηλεκτρικό και αγνογεί το μωβ φως όταν διαβάζει/γράφει
στο HDD.
Εγκατάσταση σκληρού δίσκου
Πριν από την τοποθέτηση ή την εξαγωγή του σκληρού δίσκου πρέπει να
αποσυνδεθούν όλα τα καλώδια από τον υπολογιστή.
1) Πιάξε το κουπί να ανοίξει την πρότα.
2) Τοποθετήστε τη θήκη σε οριζόντια θέση, όπως φαίνεται στην εικόνα.
3) Σύρετε τον οδηγό σκληρού δίσκου μέσα στη θήκη με την κάρτα του ελεγκτή να
βρίσκεται πίσω.
4) Κλείστε τη θυρίδα προσεκτικά μέχρι να κλειδώσει.
2)
4)
1)
3)
Page 27

Page 28

© Copyright 2017 by RaidSonic Technology GmbH. All Rights Reserved.
The information contained in this manual is believed to be accurate and reliable. RaidSonic Technology GmbH assumes
no responsibility for any errors contained in this manual. RaidSonic Technology GmbH reserves the right to make changes
in the specifications and/or design of the above mentioned product without prior notice. The diagrams contained in this
manual may also not fully represent the product that you are using and are there for illustration purposes only. RaidSonic
Technology GmbH assumes no responsibility for any differences between the product mentioned in this manual and the
product you may have.
 Loading...