

Page 1

Manual IB-121CL-C31
Cloning station for 2x 2.5", 3.5" HDDs/SSDs
Handbuch IB-121CL-C31
Klonstation für 2x 2,5" und 3,5" Festplatten/SSDs
Station d’accueil pour deux disque dur/SSDs SATA 2,5" et 3,5"
Adaptador para dos discos duros/SSDs 2,5" y 3,5"
Docking station per due dischi /SSDs rigidi da 2,5" e 3,5"
Klónozó állomás 2,5"-os, 3,5"-os merevlemezekhez
Σταθμός σύνδεσης για δυο μονάδες σκληρών δίσκων/SSDs SATA 2,5" και 3,5"
Dockingstation pro 2x 2,5" a 3,5" SATA HDDs/SSDs
Manuel IB-121CL-C31
Manual IB-121CL-C31
Manuale IB-121CL-C31
Használati utasítás IB-121CL-C31
Podręcznik obsługi IB-121CL-C31
Stacja dokująca 2x 2,5" i 3,5" HDDs/SSDs
Εγχειρίδιο IB-121CL-C31
Handleiding IB-121CL-C31
Kloonstation voor 2,5" en 3,5" HDDs/SSDs
Návod k použití IB-121CL-C31
Page 2

Page 3
Manual IB-121CL-C31
Safety instructions .............................................................................................................................4-5
Sicherheitshinweise ...........................................................................................................................6-7
Overview ...........................................................................................................................................8
Übersicht ............................................................................................................................................8
User‘s Manual (English) IB-121CL-C31 ..........................................................................................9-10
Handbuch (Deutsch) IB-121CL-C31 ................................................................................................11-12
Manuel (Français) IB-121CL-C31 ....................................................................................................13-14
Manual (Español) IB-121CL-C31 ....................................................................................................15-16
Manuale (Italiano) IB-121CL-C31...................................................................................................17-18
Használati utasítás (Magyar) IB-121CL-C31 .................................................................................19-20
Podręcznik obsługi (Po Polsku) IB-121CL-C31 ...............................................................................20-21
Εγχειρίδιο (ελληνικά) IB-121CL-C31 ........................................................................................22-23
Handleiding (Nederlands) IB-121CL-C31......................................................................................24-25
Návod k použití (čeština) IB-121CL-C31
................................................................26-27
3
Page 4
Please read carefully the following information to prevent injuries, damage to material and device
as well as data loss:
Warning levels
Signal words and safety codes indicate the warning level and provide immediate information in terms of the probability of occurrence as well as the type and severity of the consequences if the measures to prevent hazards are not
complied with.
DANGER
WARNING
CAUTION
IMPORTANT
1. Risk of electrical shock
WARNING
• Read the operating instructions prior to use
• Make sure the device has been de-energised prior to working on it
• Do not remove contact protection panels
• Avoid contact with conducting parts
• Do not bring plug contacts in contact with pointed and metal objects
• Use in intended environments only
• Operate the device using a power unit meeting the specifications of the type plate only!
• Keep the device/power unit away from humidity, liquid, vapour and dust
• Do not modify the device
• Do not connect the device during thunderstorms
• Approach specialist retailers if you require repairs
2. Hazards during assembly (if intended)
CAUTION
• Read the operating instructions prior to assembly
• Avoid coming into contact with sharp edges or pointed components
• Do not force components together
• Use suitable tools
• Use potentially enclosed accessories and tools only
3. Hazards caused by a development of heat
IMPORTANT
Warns of a directly hazardous situation causing death or serious injury.
Warns of a potentially hazardous situation that may cause death or serious injury.
Warns of a potentially hazardous situation that may cause minor injury.
Warns of a potential situation that may cause material or environmental damage and
disrupt operative processes.
Contact with parts conducting electricity
Risk of death by electrical shock
Sharp components
Potential injuries to fingers or hands during assembly (if intended)
Insufficient device/power unit ventilation
Overheating and failure of the device/power unit
4
Page 5
Safety instructions IB-121CL-C31Safety instructions IB-121CL-C31
• Prevent externally heating up components and ensure an exchange of air
• Do not cover the fan outlet and passive cooling elements
• Avoid direct sunlight on the device/power unit
• Guarantee sufficient ambient air for the device/power unit
• Do not place objects on the device/power unit
4. Hazards caused by very small parts and packaging
WARNING
• Keep small parts and accessories away from children
• Store/dispose of plastic bags and packaging in an area that is inaccessible to children
• Do not hand over small parts and packaging to children
5. Potential data loss
IMPORTANT
• Always comply with the information in the operating instructions/quick installation guide
• Exclusively use the product once the specifications have been met
• Back up data prior to commissioning
• Back up data prior to connecting new hardware
• Use accessories enclosed with the product
6. Cleaning the device
IMPORTANT
• Disconnect the device prior to cleaning
• Aggressive or intense cleaning agents and solvents are unsuitable
• Make sure there is no residual moisture after cleaning
• We recommend cleaning devices using a dry, anti-static cloth
7. Disposing of the device
IMPORTANT
This icon on product and packaging indicates that this product must not be disposed of as part of domestic
waste. In compliance with the Waste Electrical and Electronic Equipment Directive (WEEE) this electrical
device and potentially included batteries must not be disposed of in conventional, domestic waste or
recycling waste. If you would like to dispose of this product and potentially included batteries, please
return it to the retailer or your local waste disposal and recycling point.
If you have any questions, please do not hesitate to contact our support at
support@raidsonic.de or visit our website at www.raidsonic.de.
Risk of suffocation
Risk of death by suffocation or swallowing
Data lost during commissioning
Potentially irreversible data loss
Harmful cleaning agents
Scratches, discolouration, damage caused by moisture or short circuit in the device
Environmental pollution, unsuitable for recycling
Potential environmental pollution caused by components, recycling circle interrupted
5
Page 6
Zur Vermeidung körperlicher Schäden, sowie von Sach-, Geräteschäden und Datenverlust beachten Sie bitte folgende Hinweise:
Warnstufen
Signalwort und Sicherheitszeichen kennzeichnen die Warnstufe und geben einen sofortigen Hinweis auf Wahrscheinlichkeit, Art und Schwere der Folgen, wenn die Maßnahmen zur Vermeidung der Gefahr nicht befolgt werden.
GEFAHR
WARNUNG
VORSICHT
ACHTUNG
1. Gefahren durch elektrische Spannung
WARNUNG
• vor Benutzung Betriebsanleitung lesen
• vor Arbeiten am Gerät, Spannungsfreiheit sicherstellen
• Kontaktschutzblenden nicht entfernen
• Kontakt mit Spannungsführenden Komponenten vermeiden.
• Steckkontakte nicht mit spitzen und metallischen Gegenständen berühren
• Verwendung nur in dafür vorgesehenen Umgebungen
• Gerät ausschließlich mit Typenschildkonformen Netzteil betreiben!
• Gerät/Netzteil fern von Feuchtigkeit, Flüssigkeit, Dampf und Staub halten
• Eigenständige Modifikationen sind unzulässig
• Gerät nicht während eines Gewitters anschließen
• Geben Sie Ihr Gerät im Reparaturfall in den Fachhandel
2. Gefahren während Montage (wenn vorgesehen)
VORSICHT
• vor Montage, Betriebsanleitung lesen
• Kontakt mit scharfen Kanten oder spitzen Bauteilen vermeiden
• Bauteile nicht mit Gewalt zusammensetzen
• geeignetes Werkzeug verwenden
• nur gegebenenfalls mitgeliefertes Zubehör und Werkzeug verwenden
3. Gefahren durch Wärmeentwicklung
ACHTUNG
• externe Erwärmung vermeiden und Luftaustausch zulassen
warnt vor einer unmittelbar gefährlichen Situation, die zum Tod oder zu schweren
Verletzungen führen wird.
warnt vor einer möglicherweise gefährlichen Situation, die zum Tod oder zu schweren
Verletzungen führen kann.
warnt vor einer möglicherweise gefährlichen Situation, die zu leichten Verletzungen
führen kann.
warnt vor einer möglichen Situation, die zu Sach- und Umweltschäden führen und den
Betriebsablauf stören kann.
Kontakt mit elektrisch leitenden Teilen
Lebensgefahr durch Stromschlag
Scharfkantige Bauteile
Finger- oder Handverletzungen bei Zusammenbau (wenn vorgesehen) möglich
Mangelhafte Belüftung des Geräts/Netzteils
Überhitzung und Ausfall des Geräts/Netzteils
6
Page 7
Sicherheitshinweise IB-121CL-C31Sicherheitshinweise IB-121CL-C31
• Lüfter-Auslass und passive Kühlkörper freihalten
• direkte Sonneneinstrahlung auf Gerät/Netzteil vermeiden
• ausreichend Umgebungsluft für Gerät/Netzteil sicherstellen
• keine Gegenstände auf dem Gerät/Netzteil abstellen
4. Gefahren durch Kleinstteile und Verpackung
WARNUNG
• Kleinteile, Zubehör für Kinder unzugänglich verwahren
• Plastiktüten und Verpackung für Kinder unzugänglich verwahren/entsorgen
• Kleinteile und Verpackungen nicht in Kinderhände geben
5. Möglicher Datenverlust
ACHTUNG
• Unbedingt Hinweise in der Bedienungsanleitung/Schnellinstallationsanleitung beachten
• Produkt nur verwenden, wenn Spezifikationen erfüllt sind
• Datensicherung vor Inbetriebnahme durchführen
• Datensicherung vor Anschluss neuer Hardware durchführen
• dem Produkt beiliegendes Zubehör verwenden
6. Reinigung des Gerätes
ACHTUNG
• vor Reinigung, das Gerät außer Betrieb nehmen
• aggressive bzw. scharfe Reinigungs- und Lösungsmittel sind ungeeignet
• nach der Reinigung sicherstellen, dass keine Restfeuchtigkeit vorhanden ist
• Reinigung der Geräte am besten mit trockenem Antistatiktuch durchführen
7. Entsorgung des Gerätes
ACHTUNG
Produkt nicht mit dem Hausmüll entsorgt werden darf. In Übereinstimmung mit der Richtlinie über Elektround Elektronik-Altgeräte (WEEE) darf dieses Elektrogerät und ggf. enthaltene Batterien nicht im normalen
Hausmüll oder dem Gelben Sack entsorgt werden. Wenn Sie dieses Produkt und ggf. enthaltene Batterien entsorgen möchten, bringen Sie diese bitte zur Verkaufsstelle zurück oder zum Recycling-Sammelpunkt Ihrer Gemeinde.
Bei Fragen kontaktieren Sie gerne unseren Support unter support@raidsonic.de oder besuchen Sie unsere
Internetseite www.raidsonic.de.
Erstickungsgefahr
Lebensgefahr durch Ersticken oder Verschlucken
Datenverlust bei Inbetriebnahme
Unwiederbringlicher Datenverlust möglich
Schädigende Reinigungsmittel
Kratzer, Farbveränderungen, Feuchteschäden oder Kurzschluss am Gerät
Umweltverschmutzung, Wiederverwertung nicht möglich
Mögliche Umweltbelastung durch Bestandteile, Recyclingkreislauf unterbrochen
Dieses auf dem Produkt und der Verpackung angebrachte Symbol zeigt an, dass dieses
7
Page 8
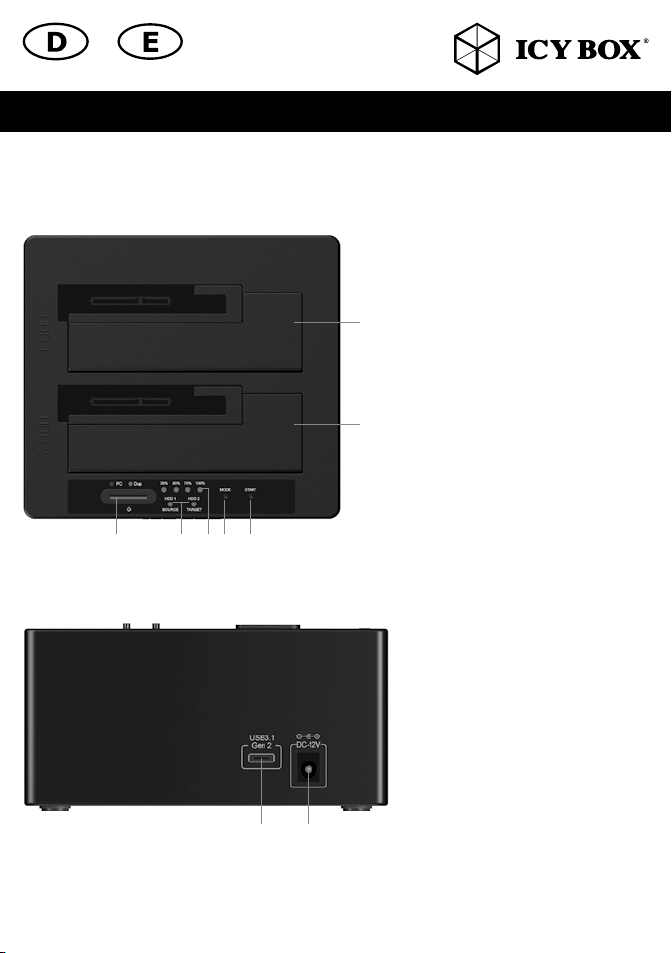
Overview / Übersicht
Top view / Draufsicht
1 2 4 53
Rearside / Rückseite
6
1. Power button / AN/AUS Taste
2. Drive LED / Laufwerks LED
7
3. Clone progress LED /
Klonefortschritts LED
4. Mode button / Modustaste
5. Start button / Starttaste
6. HDD 1 (Source/Quelle)
7. HHD 2 (Target/Ziel)
1 2
1. USB 3.1 (Gen 2) Type-C™
interface / Schnittstelle
2. Power jack / Stromanschluss
8
Page 9
Manual IB-121CL-C31Manual IB-121CL-C31
1. Model – HDD – Host Interface – Colour
Model IB-121CL-C31
HDD/SSD 2.5", 3.5" SATA, Seagate GoFlex 2.5"
Host Interface USB 3.1 (Gen 2), Type-C™
Colour Black
2. Package Content
Cloning Station, power adapter, USB Type-C™ cable, manual
3. Key Features
• 2 bay docking station: the computer detects 2 independent drives
• HDD-cloning function without PC: Create an identical copy of your hard disk drive
• Create a bootable copy of system drives without software or professional knowledge
• Premium aluminium case
• Support both 2.5" and 3.5" SATA HDDs/SSDs, capacity unlimited
• Support Seagate GoFlex 2.5" external HDDs
• Type-C™ USB 3.1 (Gen 2) host interface up to 10 Gbit/s
• LED Display for power, HDD access and HDD-cloning progress
• Supports USB 2.0 Host: PC and Mac (Windows 7/8/10, MAC OS ≥ 9.1)
• Supports USB 3.0 Host: PC and Mac (Windows 7/8/10, MAC OS X ≥10.8)
• Plug & Play and Hot Swap (docking mode)
4. Application
4.1 Driver Software - USB 3.1 Interface
The use of the USB 3.1 interface requires an installed USB 3.1 (Gen 2) controller on your system. Please install the
USB 3.1 driver software for the controller. By connecting to a USB 3.1 host interface the IB-121CL-C31 normally will
be automatically detected.
Windows ≥8 has integrated driver for the USB 3.1 interface. By connecting the device, the OS will update the driver
and connect the USB 3.1 device automatically. After the device installation has completed, you can access the new
device. For older operating systems (e.g. Win 7), you need to install the USB 3.1 driver at first.
4.2 Starting up
You need power supply to get enough electricity to drive the HDDs. With the Type-C™ USB 3.1 data cable you can
connect the IB-121CL-C31 to Type-C™ USB 2.0, USB 3.0 or USB 3.1
interfaces.
4.3 HDD Initialization
A new HDD must first be initialized, partitioned and formatted by the operation system to be displayed
by the system.
4.4 SINGLE function
The IB-121CL-C31 allows you to run 2 different HDDs regardless their brands, models, or capacities via one USB
connection. Just connect the IB-121CL-C31 to the computer and the HDDs will be detected as independent drives.
Thanks the hot-plug supporting you can exchange the HDDs by running system (not recommended).
9
Page 10

Manual IB-121CL-C31 Handbuch IB-121CL-C31
4.5 HDD cloning-function
• Before the cloning process, please remove the USB cable from the device.
• Insert the source drive into slot HDD1 (source) and the target drive to slot HDD2 (target).
• Press Power button to power on the device. Power LED will lit in blue as PC mode.
• Press and hold the MODE button for 3 seconds to change to clone mode. Power LED will
• change from Blue to Red.
• Press the Start button. Both HDD1 and HDD2 LED will start to blink. The first LED of progress indicator (25%)
will start to blink as well. The cloning is in process.
• When the status indicator reaches 100% and stops blinking, your cloning process is completed.
• Press power button to turn off the power then remove the HDDs.
4.6 Advices to the cloning-function
The clone function creates an identical copy of your hard drive – no need to connect to any computer. You can copy a bootable system disk without additional software or professional skills.
Since the cloning process copies every single byte of the source HDD the process may take several hours depending
on the HDD capacity.
After the cloning process is completed, in some cases the computer may not be able to identify
both drives since they are assigned to the same drive letter. To separate the drives, you must assign
one drive to a new drive letter under "disk management" (Windows).
If only one drive is plugged into HDD1 (source), there will be no action when you press the start button.
The target HDD (HDD2) must be of the same size or bigger than the source HDD (HDD1).
If the targets drive (HDD2) is smaller than the source drive (HDD1), after pressing the start button, both HDD1 and
HDD2 LED will blink in high frequency. Please press the power button to turn off the power and remove the HDDs.
You may create a new volume with the remaining space on the target HDD after cloning.
10
Page 11

1. Modell – Festplatte – Schnittstelle – Farbe
Modell IB-121CL-C31
Festplatte/SSD 2,5", 3,5" SATA, Seagate GoFlex 2,5"
Schnittstelle USB 3.1 (Gen 2), Type-C™
Farbe Schwarz
2. Verpackungsinhalt
Klonstation, Netzteil, USB Type-C™ Kabel, Bedienungsanleitung
3. Merkmale
• Zweifach Dockingstation-Funktion: Betriebssystem erkennt 2 einzelne Laufwerke
• Festplatten-Klon-Funktion: Erstellt eine identische Kopie ihrer Festplatte ohne Computer
• Ohne Zusatzsoftware oder Profikenntnisse eine bootfähige Systemplatte kopieren
• Hochwertiges Gehäuse aus Aluminium
• Unterstützt 2,5" und 3,5" Festplatten/SSDs, Kapazität ohne Limit
• Unterstützt externe 2,5" Seagate GoFlex Festplatten
• Type-C™ USB 3.1 (Gen 2) Hostanschluss bis zu 10 Gbit/s
• LED Display für Betrieb, Festplattenaktivität und Festplatten-Klon-Vorgang
• Unterstützt USB 2.0: PC und Mac (Windows ≥ XP/7/8/10, MAC OS ≥ 9.1)
• Unterstützt USB 3.0: PC und Mac (Windows ≥ XP/7/8/10, MAC OS X ≥10.8)
• Plug & Play
4. Anwendung
4.1 Treibersoftware - USB 3.1 Schnittstelle
Die Nutzung an einer Type-C™ USB 3.1-Schnittstelle setzt einen installierten USB 3.1 Controller in Ihrem System
voraus. Bitte installieren Sie die USB 3.1 Treiber Software für den Controller.
Beim Anschließen wird das IB-121CL-C31 in der Regel automatisch erkannt und ist betriebsbereit. Windows ≥ 8 hat
integrierte Treiber für die USB 3.1-Schnittstelle. Beim Anschluss des Gerätes aktualisiert das Betriebssystem automatisch seine Treiber und erkennt das neue Gerät.
Bei älteren Betriebssystemen (z.B. Win 7) ist es notwendig, zuerst die entsprechenden USB 3.1-Treiber zu installieren.
4.2 Inbetriebnahme
Um die Festplatte mit Energie zu versorgen, ist das Netzteil anzuschließen.
Mit dem beigefügten Type-C™ USB 3.1 Kabel können Sie das Gerät sowohl an Type-C™ USB 2.0, USB
3.0 als auch an USB 3.1 Schnittstellen anschließen.
4.3 Festplatteninstallation
Eine neue Festplatte muss zunächst vom Betriebssystem initialisiert, partitioniert und formatiert werden, bevor sie im
Arbeitsplatz dargestellt wird.
4.4 SINGLE-Funktion
Die IB-121CL-C31 ermöglicht es Ihnen zwei Festplatten über eine USB Verbindung unabhängig voneinander zu
verwenden. Verbinden Sie einfach die IB-121CL-C31 mit Ihrem Computer per USB und die entsprechenden Platten
werden als einzelne Laufwerke dargestellt. Dank der Hot-Plug Unterstützung können die Festplatten bei laufendem
11
Page 12

Handbuch IB-121CL-C31
Gerät gewechselt werden (nicht empfohlen).
4.5 Festplatten-Klon-Funktion
Die Klon-Funktion erstellt eine identische Kopie ihrer Festplatte – ohne dass das Gerät an einen Computer angeschlossen werden muss.
Ohne Zusatzsoftware oder Profikenntnisse können Sie eine bootfähige Systemplatte kopieren.
• Trennen Sie vor dem Klonprozess das USB-Kabel vom Gerät.
• Stecken Sie die Quellfestplatte in Schacht HDD1 (Source) und die Zielfestplatte in Schacht HDD2 (Target) ein.
• Schalten Sie das Gerät nun ein. Die Power LED leuchtet nun blau wie im PC Modus.
• Drücken Sie die Menütaste für 3 Sekunden um in den Klonmodus umzuschalten. Die Power LED verändert
ihre Farbe von blau zu rot.
• Drücken Sie die Starttaste. Beide LEDs für HDD1 und HDD2 beginnen zu blinken. Die erste LED der Klonever-
laufsanzeige (25%) beginnt ebenfalls zu blinken.
• Erreicht die Verlaufsanzeige 100% und stoppt zu blinken, ist der Klonprozess beendet.
• Drücken Sie die Powertaste zum Ausschalten des Gerätes und entnehmen die Festplatten.
4.6 Hinweise zur Klon-Funktion
Da die Cloning-Funktion jedes einzelne Byte der Quellfestplatte kopiert, kann dieser Vorgang
abhängig von der Festplattenkapazität mehrere Stunden dauern.
• Nach Beendigung des Klonvorgangs kann es vorkommen, dass der Computer nicht beide Laufwerke
• Identifizieren kann, da sie dem gleichen Laufwerksbuchstaben zugeordnet sind. Um dies zu beheben
• muss mindestens einer Festplatte ein anderer Laufwerksbuchstabe zugewiesen werden. (Windows: Datenträ-
gerverwaltung).
• Ist nur eine Festplatte in Schacht HDD1 (Source) eingesetzt, kann der Klonprozess durch Drücken der START
Taste nicht begonnen werden.
• Die Zielfestplatte (HDD2) muss gleichgroß oder größer als die Quellfestplatte (HDD1) sein.
• Sollte die Zielfestplatte (HDD2) kleiner als die Quellfestplatte (HDD1) sein, blinken die HDD1/HDD2 LED’s
nach dem Einschalten in schneller Frequenz. Schalten Sie dann das Gerät aus und entnehmen die Festplatten.
• Sollte die Zielfestplatte größer sein als die Quellfestplatte, so bleibt nach dem Klonprozess freie Kapazität für
weitere Partitionen.
12
Page 13

1. Modèle – Disque dur – Interface – Couleur
Modèle IB-121CL-C31
Disque dur/SSD 2,5", 3,5" SATA, Seagate GoFlex 2,5"
Interface USB 3.1 (Gen 2), Type-C™
Couleur Noir
2. Contenu
Station d’accueil, Adaptateur secteur, Câble Type-C™ USB, manuel
3. Caractéristiques
• Fonction d’accueil à deux baies: L’ordinateur détecte 2 lecteurs indépendants
• Fonction de clonage HDD sans PC : Créez une copie identique de votre lecteur de disque dur
• Créez une copie amorçable des lecteurs du système sans logiciel ni connaissances professionnelles
• Botîer en aluminium prime
• Compatible disque dur/SSD 2,5" et 3,5" SATA, capacité illimitée
• Prend en charge les disques durs externes Seagate GoFlex 2,5"
• Type-C™ USB 3.1 (Gen 2) jusqu’à 10 Gbit/s en transfert
• LED en façade indiquant la mise sous tension et les accès disques
• Voyant LED pour la progression du clonage HDD
• Compatible USB 2.0 : PC & Mac (Windows 7/8/10, OS> 9.1)
• Compatible USB 3.0 : PC & Mac (Windows 7/8/10, OS X >10.8)
• Plug & Play et Hot Swap
4. Utilisation
4.1 Pilotes - Interface USB 3.1
L‘utilisation de la connexion USB 3.1 requiert la présence d‘un contrôleur USB 3.1 installé sur votre système. Vous
devez installer le logiciel pour le contrôleur USB 3.1. Les OS Windows ≥ 8 ont des drivers intégrés pour les ports
USB 3.1. En connectant le périphérique, l‘OS va connecter de manière automatique celuici.
Après la complète installation du périphérique, vous pouvez utiliser celui-ci. Pour tous les anciens OS (ex : Win 7),
vous devez préalablement installer le driver.
4.2 Démarrage
Vous aurez besoin de l‘adaptateur secteur afin d‘alimenter correctement le disque dur. Vous pouvez communiquer
IB-121-C31 à l‘USB 2.0, USB 3.0 et USB 3.1 Type-C ™ interface via Type-C ™ USB 3.1 câble.
4.3 Installation du disque dur
Un nouveau disque dur se doit d‘être initialisé, partitionné et formaté par le système d‘exploitation afin d’être
reconnu par celui-ci.
4.4 Fonction d’accueil à deux baies
L’IB-121CL-C31 vous permet d‘exécuter deux disques durs différents, quels que soient leur marque,
leur modèle ou leur capacité via une connexion USB. Connectez-le simplement à l’ordinateur et les lecteurs de
disque dur seront détectés comme des lecteurs indépendants. Grâce à la prise en charge de l’enfichage à chaud,
vous pouvez échanger les lecteurs HDD par système actif.
13
Page 14

Manuel IB-121CL-C31 Manual IB-121CL-C31
4.5 Fonction de clonage HDD
• Avant le processus de clonage, retirez le câble USB du périphérique.
• Insérez le lecteur source dans l’emplacement HDD1 (source) et le lecteur cible dans l’emplacement HDD2
(cible).
• Appuyez sur le bouton d’alimentation pour mettre l’appareil sous tension. Le voyant LED d’alimentation
s’allumera en bleu en mode PC.
• Appuyez sur le bouton MODE et maintenez-le enfoncé pendant 3 secondes pour basculer en mode de
clonage. Le voyant LED d’alimentation passera de bleu à rouge.
• Appuyez sur le bouton démarrer. Les voyants LED HDD1 et HDD2 commenceront à clignoter. Le premier
voyant LED d’indication de progression (25 %) se mettra à clignoter également. Le clonage est en cours.
• Quand l’indicateur de statut atteint 100 % et s’arrête de clignoter, cela signifie que votre
• processus de clonage est terminé. Appuyez sur le bouton d’alimentation pour mettre hors tension, puis retirez
les disques durs.
4.6 Conseils pour la fonction de clonage
Comme le processus de clonage copie chaque octet du lecteur HDD source, le processus peut prendre plusieurs heures en fonction de la capacité du lecteur.
• Une fois le processus de clonage terminé, dans certains cas, l‘ordinateur peut ne pas être en en mesure
d’identifier les deux lecteurs car ils ont été affectés à la même lettre de lecteur. Pour distinguer les lecteurs,
vous devez affecter un lecteur à une nouvelle lettre sous " gestion des disques " (Windows).
• Si un seul lecteur est branché à l’emplacement HDD1 (source), aucune action ne se produira lorsque vous
appuierez sur le bouton démarrer.
• Le lecteur HDD (2) cible doit être d’une taille identique ou supérieure à celle du lecteur HDD source (1).
• Si le lecteur cible (HDD2) est plus petit que le lecteur source (HDD1), une fois que vous aurez appuyé sur le
bouton démarrer, les deux voyants LED HDD1 et HDD2 se mettront à clignoter à haute
• fréquence. Appuyez sur le bouton d’alimentation pour mettre hors tension, puis retirez les disques durs.
14
Page 15

Manual IB-121CL-C31
1. Modelo – Disco duro – Interfaz – Color
Modelo IB-121CL-C31
Disco duro/SSD 2,5", 3,5" SATA, Seagate GoFlex 2,5"
Interfaz USB 3.1 (Gen 2), Type-C™
Color Negro
2. Contenido del embalaje
Adaptador IB-121CL-C31, fuente de alimentación, cable Type-C ™ USB, manual
3. Características
• Función de acoplamiento de dos módulos: el ordenador detecta dos unidades de disco independientes
• Función de clonación HDD sin PC: crea una copia idéntica de la unidad de disco
• Crea una copia de arranque de las unidades de disco del sistema sin software ni conocimientos profesionales
• Caja de aluminio
• Soporta discos duros de 2,5" y 3,5", capacidad ilimitada
• Admite HDD externos Seagate GoFlex de 2,5"
• Type-C™ USB 3.1 (Gen 2) Host hasta 10 Gbit/s
• Indicación para corriente y acceso al disco duro con LED
• Pantalla LED para indicación de progreso de clonación HDD
• Capacidad de disco duro sin límite
• Soporta USB 2.0: PC y Mac (Windows 7/8/10, MAC OS ≥ 9.1)
• Soporta USB 3.0: PC y Mac (Windows 7/8/10, MAC OS X ≥10.8)
• Plug & Play y Hot Swap
4. Aplicación
4.1 Driver Software - Interfáz USB 3.1
Para utilizar el interfáz USB 3.1 es necesario tener un controlador USB 3.1 instalado en el sistema.
Windows ≥8 tienen integrados los driver para el interfáz USB 3.1. En cuando el adaptador es conectado el sistema
operativo actualiza los drivers y conecta al adaptador automáticamente. Si utiliza un sistema operativo viejo (por
ejemplo Win 7) necesita instalar los driver USB 3.1.
4.2 Poner en marcha
Necesita la fuente de energía para tener suficiente corriente para el disco duro.
Puede conectar IB-121CL-C31 a USB 2.0, USB 3.0 y USB 3.1 Type-C™ interfaz con cable Type-C ™ USB.
4.3 Instalación del disco duro
Un disco duro nuevo debe ser inicializado, particionado y formateado para ser visible en el sistema
operativo.
4.4 Función de acoplamiento de dos módulos
El IB-121CL-C31 le permite usar dos HDD distintos a través de una única conexión USB independiente- mente de
su marca, modelo o capacidad. Basta con conectar el IB-121CL-C31 al ordenador y los HDD se detectarán como
unidades de disco independientes. Gracias a la conexión en caliente, es posible inter-cambiar los HDD con el
sistema en ejecución.
15
Page 16

Manual IB-121CL-C31
4.5 Función de clonación HDD
• Antes de iniciar el proceso de clonación, desconecte el cable USB del dispositivo.
• Introduzca la unidad de origen en la ranura HDD1 (origen) y la unidad de destino en la ranura HDD2 (destino).
• Pulse el botón de conexión para conectar el dispositivo. El LED de alimentación se iluminará en color azul en
el modo PC.
• Pulse y mantenga pulsado durante tres segundos el botón MODE para cambiar el modo de clonación.
• El LED de alimentación cambiará la luz de color azul a rojo.
• Pulse el botón de inicio. Tanto el LED del HDD1 como el del HDD2 comenzarán a parpadear. El primer LED
del indicador de progreso (25%) también comenzará a parpadear. La clonación está en marcha.
• Cuando el indicador de estado llegue al 100% y deje de parpadear, habrá finalizado el proceso de clona-
ción. Pulse el botón de conexión para desconectar el equipo y retirar los HDD.
4.6 Recomendaciones para la función de clonación
Como en el proceso de clonación se copia absolutamente todo el contenido del HDD de origen,
el proceso puede tardar horas en completarse dependiendo de la capacidad del HDD.
• Una vez finalizado el proceso de clonación, es posible que, en algunos casos, el ordenador no sea capaz
de reconocer ambas unidades de disco ya que se ha asignado a ambas la misma letra de unidad. Para
distinguir las unidades deberá asignar una nueva letra de unidad a una de las unidades de disco en "Administración de discos" (Windows).
• Si solo se ha conectado una unidad a HDD1 (origen), no ocurrirá nada al pulsar el botón de inicio.
• El HDD de destino (HDD2) debe tener el mismo tamaño, o mayor, que el HDD de origen (HDD1).
• Si la unidad de destino (HDD2) tiene un tamaño inferior a la unidad de origen (HDD1), los LED del HDD1 y
del HDD2 comenzarán a parpadear a alta frecuencia tras pulsar el botón de inicio.
• Pulse el botón de conexión para desconectar el equipo y retirar los HDD.
16
Page 17

Manuale IB-121CL-C31
1. Modello – HDD – Interfaccia – Colore
Modello IB-121CL-C31
HDD/SSD 2,5", 3,5" SATA, Seagate GoFlex 2,5"
Interfaccia USB 3.1 (Gen 2), Type-C™
Colore Nero
2. Contenuti dell‘imballo
Docking station, adattatore di rete, cavo Type-C™ USB, manuale
3. Caratteristiche principali:
• Funzione dual bay docking: il computer identifica 2 dischi rigidi indipendenti
• Funzione di "clonazione disco rigido" senza PC: consente di creare una copia identica del contenuto
del disco rigido
• Create una copia bootable dei drive di sistema senza necessità di software o conoscenze professionali
• Corpo in alluminio
• Disco rigido SATA da 2,5" e 3,5" compatibile, capacità illimitata
• Supporta i dischi rigidi esterni Seagate GoFlex da 2.5"
• Interfaccia host Type-C™ USB 3.1 (Gen 2) fino a 10 Gbit/s
• LED di funzionamento e di attività disco rigido
• Display a LED per l‘indicazione dell‘avanzamento della clonazione del disco rigido
• Compatibile USB 2.0: PC e Mac (Windows 7/8/10, MAC OS ≥ 9.1)
• Compatibile USB 3.0: PC e Mac (Windows 7/8/10, MAC OS X ≥10.8)
• Connessione Plug & Play e Hot Swap
4. Applicazione
4.1 Driver (software) - Interfaccia USB 3.1
L‘utilizzo dell‘interfaccia USB 3.1 richiede che nel sistema posseduto sia
installato un controller USB 3.1.
In Windows ≥8 sono integrati driver per l‘interfaccia USB 3.1. Collegando il dispositivo, il sistema operativo aggiorna i driver, collegan-do automaticamente il dispositivo USB 3.1. Una volta completata l‘installazione è possibile
accedere al nuovo dispositivo. In caso di sistemi operativi meno recenti (ad es. Win 7) è necessario installare
innanzitutto i driver USB 3.1.
4.2 Messa in funzione
Per alimentare di corrente il disco rigido è necessario collegare un alimentatore.
È possibile collegare IB-121CL-C31 a USB 2.0, USB 3.0 e USB 3.1 Type-C™ tramite cavo Type-C ™ USB
3.1.
4.2 Inizializzazione del disco rigido
Un disco rigido nuovo va innanzitutto inizializzato, partizionato e formattato dal sistema operativo per poter essere
visualizzato dal sistema.
4.3 Funzione dual bay docking
IB-121CL-C31 consente l‘esecuzione, attraverso una connessione USB, di due HDD differenti a prescindere dalla
17
Page 18

Manuale IB-121CL-C31 Használati utasítás IB-121CL-C31
marca, dal modello o dalle capacità dei medesimi. Collegando l‘IB-121CL-C31 al PC, il sistema identifica i dischi
rigidi come dischi indipendenti. Grazie al supporto hot-plug, i dischi rigidi possono essere sostituiti anche quando il
sistema è in funzione.
4.4 Funzione di clonazione del disco rigido
• Prima di avviare il processo di clonazione, rimuovere il cavo USB dal dispositivo.
• Inserire il disco rigido sorgente nello slot HDD1 (sorgente) e il disco rigido di destinazione nello slot HDD2
(destinazione).
• Premere il pulsante ON/OFF per accendere il dispositivo. Il LED ON/OFF si accende di luce blu (modalità
PC).
• Premere (e tenere premuto) il pulsante MODE per 3 secondi al fine di passare alla modalità clonazione. La
luce del LED ON/OFF cambia da blu a rossa.
• Premere il pulsante Start. I LED HDD1 e il LED HDD2 iniziano a lampeggiare. Il primo LED dell‘indicatore di
avanzamento (25%) comincia a lampeggiare. La clonazione è in corso.
• Quando lo stato dell‘indicatore di stato raggiunge il 100% e cessa di lampeggiare, la clonazione è comple-
tata. Premere il pulsante ON/OFF per disinserire l‘alimentazione e quindi rimuovere i dischi rigidi.
4.5 Suggerimenti relativi alla funzione di clonazione
Poiché il processo di clonazione copia ogni singolo byte del disco rigido sorgente, esso può durare
alcune ore a seconda della capacità del disco stesso.
• Al termine del processo di clonazione può accadere che il PC non sia in grado di identificare ambedue i
dischi, in quanto ad essi risulta assegnata la stessa lettera di unità. Pertanto sarà necessario assegnare ad un
disco una nuova lettera di unità in "Gestione Disco" (Windows).
• Se si collega solo un drive, ovvero allo slot HDD1 (sorgente), al premere il pulsante Start non avviene alcuna
clonazione.
• Il disco di destinazione (HDD2) deve avere la stessa capacità (o superiore) di quello sorgente (HDD1).
• Se i drive di destinazione (HDD2) hanno una capacità più piccola del drive sorgente (HDD1), al premere il
pulsante Start, sia il LED HDD1 che quello HDD2 lampeggiano velocemente. Premere il pulsante ON/OFF
per disinserire l‘alimentazione e quindi rimuovere i dischi rigidi.
18
Page 19

Használati utasítás IB-121CL-C31
1. Típus - HDD/SSD – Interfész - Szín
Típus IB-121CL-C31
HDD/SSD 2,5", 3,5" SATA, Seagate GoFlex 2,5"
Interfész USB 3.1 (Gen 2), Type-C™
Szín Fekete
2. A csomag tartalma
Klónozó állomás, tápegység, Type-C™ USB kábel, használati utasítás
3. Fő jellemzők
• Kétnyílásos dokkoló állomás: a számítógép 2 független meghajtót lát
• Merevlemez klónozás számítógép nélkül: pontosan egyező másolatot készít az Ön merevlemezéről
• Készítsen indítható másolatot rendszermeghajtóiról, szoftver és szakértelem nélkül
• Prémium alumínium ház
• 2,5"-os és 3,5"-os SATA merevlemezhez, kapacitáskorlát nélkül
• Támogatja a Seagte GoFlex 2,5"-os külső merevlemezeket
• USB 3.1 (Gen 2) és C-típusú interfész 10 Gbit/s-ig és UASP-vel
• LED kijelző az áramellátás, a merevlemez elérés és a merevlemez klónozás számára
• USB 2.0 hoszt: PC & Mac (Windows 7/8/10 vagy magasabb, OS X 9.1 vagy magasabb)
• USB 3.0 hoszt: PC & Mac (Windows 7/8/10 vagy magasabb, OS X 10.8 vagy magasabb)
• Plug & Play és Hot Swap
4. Alkalmazás
4.1 Vezérlőszoftver - USB 3.1 interfész
Az USB 3.1 interfész használatához az Ön rendszerének rendelkeznie kell USB 3.1 vezérlővel. Kérjük, telepítse a
vezérlőhöz tartozó USB 3.1 vezérlőszoftvert.
Az USB 3.1 hoszt interfészhez csatlakoztatva az IB-121CL-C31 alapesetben automatikusan felismerésre kerül.
A Windows ≥8 vagy magasabb integrált vezérlőszoftverrel rendelkezik az USB 3.1 interfészhez. A készülék csatlakoztatásával az operációs rendszer frissíti a vezérlőszoftvert, és automatikusan csatlakozik az USB 3.1 eszközhöz.
A telepítést követően az új eszköz használatba vehető. Régebbi operációs rendszerek (pl. Win 7) esetében előbb
telepíteni kell az USB 3.1 drivert.
4.2 Indítás
A merevlemez megfelelő áramellátásához szükség van egy tápegységre. Az Type-C™ USB kábellel az
IB-121CL-C31 egy USB 2.0, USB 3.0 vagy Type-C™ USB interfészhez csatlakoztatható.
4.3 Merevlemez inicializáció
Egy új merevlemezt előbb inicializálni, particionálni és formázni kell az operációs rendszerben ahhoz, hogy a
rendszerben láthatóvá váljon.
4.4 Dokkoló funkció
Az IB-121CL-C31-hez 2 különböző merevlemez csatlakoztatható, márkától, modelltől, illetve kapacitástól függetlenül, egy USB-csatlakozón keresztül. Csak csatlakoztassa az IB-121CL-C31-t a számítógéphez, és a merevlemezek független meghajtóként felismerésre kerülnek. A hot plug támogatásnak köszönhetően a merevlemezek a
számítógép leállítása nélkül cserélhetők.
19
Page 20

Használati utasítás IB-121CL-C31 Podręcznik obsługi IB-121CL-C31
4.5 Merevlemez klónozási funkció
• A klónozási folyamat előtt távolítsa el az USB-kábelt az eszközből.
• Helyezze be a forrás merevlemezt a HDD1 (forrás) aljzatba, a cél merevlemezt pedig a HDD2 (cél) aljzatba.
• Nyomja meg a Power gombot az eszköz bekapcsolásához. PC módban az áramforrás LED-je kéken világít.
• Nyomja meg és tartsa 3 másodpercig nyomva a MODE gombot a klónozási módra történő átváltáshoz. Az
áramforrás LED kékről pirosra vált.
• Nyomja meg a Start gombot. A HDD1 és a HDD2 LED villogni kezd. Az első folyamat indikátor LED (25%) is
villogni kezd. A klónozás folyamatban van.
• Amikor az állapot indikátor eléri a 100%-ot, abbamarad a villogás, és a klónozás befejeződött.
• Nyomja meg a Power gombot a kikapcsoláshoz, és távolítása el a merevlemezeket.
4.6 Tanácsok a klónozási funkcióhoz
A klónozási funkció pontos másolatot készít a merevlemezről – nincs szükség számítógépre. Indítható rendszerlemezről is készíthet másolatot, külön szoftver vagy szakértelem nélkül.
• Mivel a klónozási folyamat minden egyes bájtot átmásol a forrás merevlemezről, a folyamat több órát is
igénybe vehet a merevlemez kapacitásától függően.
• A klónozási folyamat befejezése után egyes esetekben előfordulhat, hogy a számítógép nem tudja azo-
nosítani a két merevlemezt, mivel ugyanazt a betűjelet kapják. A meghajtók szétválasztásához
• az egyik merevlemezhez új betűt kell rendelnie a "Lemezkezelés" alatt (Windows).
• Ha csak egy merevlemez csatlakozik a HDD1 (forrás) aljzathoz, akkor a Start gomb hatására nem történik semmi.
• A cél merevlemeznek (HDD2) ugyanakkorának vagy nagyobbnak kell lennie, mint a forrás merevlemez (HDD1).
• Amennyiben a cél merevlemez (HDD2) kisebb, mint a forrás merevlemez (HDD1), akkor a start gomb a
HDD1 és a HDD2 LED gyorsan fog villogni. Nyomja meg a Power gombot a kikapcsoláshoz,
• és távolítsa el a merevlemezeket.
• A klónozást követően a fennmaradó szabad helyből új kötet készíthető a cél merevlemezen.
20
Page 21

Podręcznik obsługi IB-121CL-C31
1. Model – HDD – interfejs – kolor
Modelo IB-121CL-C31
HDD 2,5", 3,5" SATA, Seagate GoFlex 2,5"
Interface USB 3.1 (Gen 2), Type-C™
Kolor Czarny
2. Części Paczki
Stacja dokująca, zasilacz, kabel Type-C™ USB 3.1, instrukcja
3. Cechy kluczowe
• Dokowanie 2-kieszeniowe: komputer wykrywa 2 niezależne dyski
• Klonowanie dysku twardego bez komputera PC: tworzenie identycznej kopii dysku twardego
• Tworzenie kopii dysków systemowych z możliwością rozruchu bez oprogramowania i specjalistycznej wiedzy
• Aluminiowa obudowa
• Obsługa 2.5" i 3.5" SATA HDD, nieograniczone możliwości
• Obsługuje zewnętrzne dyski twarde Seagate GoFlex 2.5"
• Type-C™ USB 3.1 (Gen 2) Host Interface, aż do 10 Gbit/s
• Diody LED wskazuje zasilanie oraz pracę HDD
• Wyświetlacz LED klonowania dysku twardego
• Wspiera USB 2.0: PC i Mac (Windows 7/8/10, MAC OS ≥ 9.1)
• Wspiera USB 3.0: PC i Mac (Windows 7/8/10, MAC OS X ≥10.8)
• Plug & Play i Hot Swap
4. Aplikacja
4.1 Software sterowników - USB 3.1 Interface
Korzystanie z USB 3.1 interface wymaga zainstalowania kontrolera USB 3.1 w systemie.
Windows ≥8 posiada integrowany sterownik interfejsu USB 3.1. Podczas podłączania urządzenia system operacyjny zaktualizuje sterownik i podłączy urządzenie USB 3.1 automatycznie. Po zakończeniu instalacji, można
przyłączyć nowe urządzenie. W starszych systemach operacyjnych (np. Win 7) trzeba zainstalować najpierw
sterownik USB 3.1.
4.2 Uruchomienie
Aby uruchomić stację dokującą podłącz zasilacz. Możesz skontaktować się IB-121CL-C31 do Type-C™ USB 2.0,
USB 3.0 i USB 3.1 za pośrednictwem kabla Type-C™ USB.
4.3 Instalacja HDD
Nowy dysk HDD musi zostać najpierw zainicjowany, podzielony na partycje i sformatowany przez system operacyjny, aby mógł być wyświetlony w systemie.
4.4 Dokowanie 2-kieszeniowe
IB-121CL-C31 umożliwia uruchamianie dwóch różnych dysków twardych niezależnie od marki, modelu lub
pojemności przez jedno połączenie USB. Wystarczy podłączyć koncentrator IB-121CL-C31 do komputera, aby
dyski twarde zostały wykryte jako niezależne napędy. Dzięki funkcji hot-plug dyski twarde można wymieniać przy
uruchomionym systemie.
21
Page 22

Podręcznik obsługi IB-121CL-C31
4.5 Klonowanie dysków twardych
• Przed klonowaniem wyjmij przewód USB z urządzenia.
• Włóż dysk źródłowy do kieszeni HDD1 (źródło) a dysk docelowy do kieszeni HDD2 (docelowy).
• Naciśnij przycisk zasilania, aby włączyć urządzenie. Dioda LED podświetli się na niebiesko, informując o
trybie PC urządzenia.
• Naciśnij i przytrzymaj wciśnięty przycisk MODE przez 3 sekundy, aby przejść do trybu klonowania.
• Dioda LED zasilania zmieni kolor z niebieskiego na czerwony.
• Naciśnij przycisk Start. Diody LED HDD1 i HDD2 zaczną migać. Pierwsza dioda LED wskaźnika postępu
(25%) również zacznie migać. Trwa klonowanie.
• Gdy wskaźnik stanu osiągnie 100% i przestanie migać, oznacza to, że klonowanie jest zakończone. Na-
ciśnij przycisk zasilania, aby wyłączyć zasilanie, a następnie wyjmij dyski twarde.
4.6 Wskazówki dotyczące klonowania
Ponieważ podczas klonowania ze źródłowego dysku twardego zostają skopiowane wszystkie
jego bajty, proces może trwać kilka godzin w zależności od pojemności dysku.
• Po zakończeniu klonowania w niektórych przypadkach komputer może nie rozróżniać obu napędów ze
względu na ich przypisanie do tej samej litery dysku. Aby oddzielić dysku, jeden z nich należy przypisać do
nowej litery w przystawce "Disk Management" ("Zarządzanie dyskami" w syste mie Windows).
• Jeżeli do kieszeni HDD1 (źródło) jest podłączony tylko jeden dysk, naciśnięcie przycisku Start nie spowodu-
je żadnej reakcji.
• Rozmiar docelowego dysku twardego (HDD") musi być taki sam lub większy niż rozmiar dysku źródłowego (HDD1).
• Jeżeli dysk docelowy (HDD2) jest mniejszy niż dysk źródłowy (HDD1), po naciśnięciu przycisku Start obie
diody LED HDD1 i HDD2 zaczną migać z dużą częstotliwością. Naciśnij przycisk zasilania, aby wyłączyć
zasilanie, a następnie wyjmij dyski twarde.
22
Page 23

Εγχειρίδιο IB-121CL-C31
1. Mοντέλο – Μονάδα σκληρού δίσκου – Διασύνδεση – Χρώμα
Μοντέλο IB-121CL-C31
HDD/SSD 2,5", 3,5" SATA, Seagate GoFlex 2,5"
Διασύνδεση USB 3.1 (Gen 2), Type-C™
Χρώμα Μαύρο
2. Περιεχόμενα
Σταθμός σύνδεσης, προσαρμογέας ρεύματος, καλώδιο Type-C™ USB, οδηγίες χρήσης
3. Βασικά χαρακτηριστικά
• Λειτουργία σύνδεσης 2 υποδοχών: ο υπολογιστής εντοπίζει 2 ανεξάρτητες μονάδες δίσκου
• Λειτουργία κλωνοποίησης μονάδας σκληρού δίσκου χωρίς υπολογιστή: Δημιουργία ενός
πανομοιότυπου αντιγράφου της μονάδας σκληρού δίσκου
• Δημιουργία ενός αντιγράφου των μονάδων δίσκου συστήματος, με δυνατότητα εκκίνησης, χωρίς
γνώση λογισμικού ή επαγγελματική γνώση
• Αλουμίνιο περίβλημα
• Υποστηρίζει σκληρούς δίσκους SATA 2,5" και 3,5", ικανότητας απεριόριστη
• Υποστηρίζει εξωτερικούς δίσκους GoFlex 2,5" Seagate
• Διασύνδεση κεντρικού υπολογιστή USB 3.1 (Gen 2) έως 10 Gbit/δευτ.
• Ενδεικτική λυχνία LED τροφοδοσίας και προσπέλασης μονάδας σκληρού δίσκου
• Οθόνη LED για πρόοδο κλωνοποίησης σκληρού δίσκου
• Υποστηρίζει USB 2.0: PC και Mac (Windows 7/8/10, MAC OS ≥ 9.1)
• Υποστηρίζει USB 3.0: PC και Mac (Windows 7/8/10, MAC OS X ≥10.8)
• Δυνατότητες Hot Plug & Play (Τοποθέτηση και άμεση λειτουργία) και Hot Swap (Εναλλαγή κατά
τη λειτουργία)
4. Εφαρμογή
4.1 Λογισμικό προγράμματος οδήγησης - Διεπαφή USB 3.1
Η χρήση της διεπαφής USB 3.1 απαιτεί την παρουσία εγκατεστημένου ελεγκτή USB 3.1 στο σύστημά
σας.
Τα Windows ≥ 8 διαθέτει ενσωματωμένο πρόγραμμα οδήγησης για τη διεπαφή USB 3.1.
Μετά από τη σύνδεση της συσκευής, το λειτουργικό σύστημα θα ενημερώσει το πρόγραμμα οδήγησης
και θα συνδέσει τη συσκευή USB 3.1 αυτομάτως. Όταν ολοκληρωθεί η εγκατάσταση της συσκευής,
μπορείτε να προσπελάσετε τη νέα συσκευή. Για παλαιότερα λειτουργικά συστήματα (π.χ. Win 7) θα
πρέπει πρώτα να εγκαταστήσετε το πρόγραμμα οδήγησης USB 3.1.
4.2 Έναρξη λειτουργίας
Απαιτείται τροφοδοσία ρεύματος για την τροφοδοσία της μονάδας σκληρού δίσκου.
Μπορείτε να συνδέσετε το IB-121-C31 σε Type-C™ USB 2.0, USB 3.0 και USB 3.1 interface μέσω
Type-C™ USB καλώδιο.
4.3 Αρχικοποίηση μονάδας σκληρού δίσκου
Η νέα μονάδα δίσκου πρέπει πρώτα να αρχικοποιηθεί, να διαμερισματοποιηθεί και να διαμορφωθεί από
το λειτουργικό σύστημα για να εμφανίζεται από το σύστημα.
4.4 Λειτουργία σύνδεσης 2 υποδοχών
Το IB-121CL-C31 επιτρέπει την εκτέλεση 2 διαφορετικών σκληρών δίσκων ανεξάρτητα από τις
επωνυμίες, τα μοντέλα ή τις δυνατότητές τους μέσω μίας σύνδεσης USB. Απλώς συνδέστε το IB121CL-C31 στον υπολογιστή και οι σκληροί δίσκοι θα εντοπιστούν ως ανεξάρτητες μονάδες δίσκου.
Χάρη στην υποστήριξη hot-plug (Τοποθέτηση εν ώρα λειτουργίας), μπορείτε να κάνετε εναλλαγή των
σκληρών δίσκων κατά την εκτέλεση του συστήματος.
23
Page 24

Εγχειρίδιο IB-121CL-C31
4.5 Λειτουργία κλωνοποίησης σκληρού δίσκου
• Πριν από τη διαδικασία κλωνοποίησης, αφαιρέστε το καλώδιο USB από τη συσκευή.
• Εισαγάγετε τη μονάδα προέλευσης στην υποδοχή HDD1 (προέλευση) και τη μονάδα προορισμού
στην υποδοχή HDD2 (προορισμός).
• Πατήστε το κουμπί τροφοδοσίας για να ενεργοποιηθεί η συσκευή. Η λυχνία LED ρεύματος θα
ανάψει με μπλε χρώμα υποδηλώνοντας τη λειτουργία του υπολογιστή.
• Πιέστε παρατεταμένα το κουμπί MODE για 3 δευτερόλεπτα για να γίνει εναλλαγή στη λειτουργία
κλωνοποίησης. Το χρώμα της λυχνίας LED ρεύματος θα αλλάξει από μπλε σε κόκκινο.
• Πατήστε το κουμπί εκκίνησης. Οι λυχνίες LED των υποδοχών HDD1 και HDD2 θα αρχίσουν
να αναβοσβήνουν. Η πρώτη λυχνία LED της ένδειξης προόδου (25%) θα αρχίσει επίσης να
αναβοσβήνει. Η κλωνοποίηση βρίσκεται σε εξέλιξη.
• Όταν η ένδειξη προόδου φτάσει στο 100% και σταματήσει να αναβοσβήνει, η διαδικασία
κλωνοποίησης ολοκληρώνεται.
• Πατήστε το κουμπί τροφοδοσίας για να απενεργοποιηθεί η τροφοδοσία ρεύματος και μετά
αφαιρέστε τους σκληρούς δίσκους.
4.6 Συμβουλές για τη λειτουργία κλωνοποίησης
Καθώς η διαδικασία κλωνοποίησης αντιγράφει κάθε ένα byte της μονάδας σκληρού δίσκου
προέλευσης, μπορεί να διαρκέσει μερικές ώρες, ανάλογα με τη χωρητικότητα του σκληρού
δίσκου.
• Αφού η διαδικασία κλωνοποίησης ολοκληρωθεί, σε ορισμένες περιπτώσεις ο υπολογιστής δεν
μπορεί να αναγνωρίσει και τις δύο μονάδες δίσκου, καθώς έχει αντιστοιχιστεί σε αυτές το ίδιο
γράμμα μονάδας δίσκου. Για να ξεχωρίσετε τις μονάδες δίσκου, πρέπει να αντιστοιχίσετε στη μία
μονάδα ένα νέο γράμμα, μεταβαίνοντας στη διαχείριση δίσκων (Windows).
• Εάν είναι τοποθετημένη μόνο μία μονάδα δίσκου στην υποδοχή HDD1 (προέλευση), δεν θα
χρειαστεί να κάνετε κάτι άλλο αφού πατήσετε το κουμπί εκκίνησης.
• Ο σκληρός δίσκος προορισμού (HDD2) πρέπει να έχει το ίδιο ή μεγαλύτερο μέγεθος από τον
σκληρό δίσκο προέλευσης (HDD1).
• Εάν η μονάδα δίσκου προορισμού (HDD2) έχει μικρότερο μέγεθος από τη μονάδα δίσκου
προέλευσης (HDD1), μετά το πάτημα του κουμπιού εκκίνησης και οι δύο λυχνίες LED HDD1
και HDD2 θα αναβοσβήνουν με υψηλή συχνότητα. Πατήστε το κουμπί τροφοδοσίας για να
απενεργοποιηθεί η τροφοδοσία ρεύματος και μετά αφαιρέστε τους σκληρούς δίσκους.
24
Page 25

Handleiding IB-121CL-C31
1. Type – SSD/HDD – Host-interface – Kleur
Type IB-121CL-C31
HDD/SSD 2,5", 3,5" SATA, Seagate GoFlex 2,5"
Host-interface USB 3.1 (Gen 2), Type-C™
Kleur Zwart
2. Inhoud verpakking
Kloonstation, voedingsadapter, Type-C™ USB kabel, handleiding
3. Belangrijkste kenmerken
• Dubbel oplaadstation: de computer herkent 2 onafhankelijke schijven
• Kloonfunctie voor de HDD zonder pc: om een identieke kopie van uw harde schijf te maken
• U kunt een opstartbare kopie van een systeemschijf maken zonder dat u hiervoor speciale software of
vakspecifieke kennis nodig hebt
• Premium aluminium behuizing
• Ondersteunt 2.5" en 3.5" SATA HDD, onbeperkte capaciteit Ondersteunt Seagate GoFlex 2.5" externe HDD’s
• USB 3.1 (Gen 2) en Type-C™ interface voor maximaal 10 Gbit/s en met UASP LED-display voor stroom,
toegang tot de HDD en de voortgang van het kloonproces
• USB 2.0 host: PC & Mac (Windows 7/8/10 of hoger, OS X 9.1 of hoger),
• USB 3.0 host: PC & Mac (Windows 7/8/10 of hoger, OS X 10.8 of hoger)
• Plug & play en hot swap (oplaadmodus)
4. Toepassing
4.1 Driver-software - USB 3.1 interface
Om de USB 3.1 interface te kunnen gebruiken, moet er een USB 3.1 controller op uw computer geïnstalleerd zijn.
Installeer indien nodig de USB 3.1 driver-software om deze controller te kunnen gebruiken.
Als u de IB-121CL-C31 aansluit op een USB 3.1 host-interface, wordt het oplaadstation automatisch herkend.
Windows 8 of hoger beschikt over een geïntegreerde driver voor een USB 3.1 interface. Als u het apparaat aansluit, zal OS de driver updaten en automatisch op de USB 3.1 aansluiten. Zodra het oplaadstation is geïnstalleerd,
hebt u toegang tot dit nieuwe apparaat. Bij oudere besturingssystemen (bijv. Win 7) moet u eerst de USB 3.1 driver
installeren.
4.2 Ingebruikneming
Om de HDD te kunnen aansturen, is er stroomtoevoer nodig. Met een Type-C ™ USB datakabel kunt u de IB121CL-C31 aansluiten op een Type-C™ USB 2.0, USB 3.0 of een USB 3.1 interface.
4.3 Initialisatie van de HDD
Een nieuwe HDD moet eerst door het besturingssysteem worden geïnitialiseerd, gepartioneerd en geformatteerd
voordat deze kan worden weergegeven door het systeem.
4.4 Dubbele oplaadfunctie
Met de IB-121CL-C31 kunt u via één enkele USB-verbinding 2 verschillende HDD’s gebruiken, ongeacht het merk,
het type of de capaciteit.
U hoeft alleen maar de IB-121CL-C31 op uw computer aan te sluiten en de HDD’s worden herkend als onafhankelijke schijven. Dankzij de hot-plug-ondersteuning kunt u van HDD wisselen als uw computersysteem actief is.
25
Page 26

Handleiding IB-121CL-C31 Návod k použití IB-121CL-C31
4.5 Kloonfunctie HDD
• Voordat u de HDD gaat klonen, moet u de USB-kabel uit het apparaat trekken.
• Stop het bronstation in gleuf HDD1 (bron) en het doelstation in gleuf HDD2 (doel).
• Druk op de aan/uit-knop om het apparaat in te schakelen. Het aan/uit-lampje wordt blauw om de PC-mo-
dus aan te geven.
• Druk op de MODE-knop en houdt deze 3 seconden lang ingedrukt om over te schakelen naar de kloonmo-
dus. Het aan/uit-lampje verandert van blauw naar rood.
• Druk op de START-knop. Zowel HDD1 als HDD2 LED gaan nu knipperen. Het eerste LED-lampje, het voort-
gangslampje (25%), gaat ook knipperen. De HDD wordt nu gekloond.
• Als het statuslampje de 100% heeft bereikt en niet meer knippert, is het kloonproces voltooid.
• Druk op de aan/uit-knop om de stroom uit te schakelen. Verwijder vervolgens de HDD’s.
4.6 Opmerkingen betreffende de kloonfunctie
Door de kloonfunctie kunt u een identieke kopie van uw harde schijf maken – u hoeft de HDD dus
niet aan te sluiten op een andere computer. U kunt een opstartbare systeemschijf kopiëren, zonder
dat u daarvoor extra software of vakspecifieke kennis nodig hebt.
• Tijdens het klonen wordt elke afzonderlijke byte van de bron-HDD gekopieerd; het kloonproces kan dus een
aantal uren duren, afhankelijk van de capaciteit van de HDD.
• Als het kloonproces is voltooid, kan het in sommige gevallen voorkomen dat de computer
• beide schijven niet kan identificeren omdat ze zijn toegewezen aan dezelfde stationsletter. Om de schijven
te scheiden, moet u via ‘disk management’ (Windows) een van de schijven toewijzen aan een nieuwe
stationsletter.
• Als er maar één schijf in HDD1 (bron) zit, zal het systeem niet reageren als u op de
• START-knop drukt.
• De capaciteit van de doel-HDD (HDD2) moet gelijk zijn aan of groter zijn dan de capaciteit van de bron-
HDD (HDD1).
• Als de doelschijf (HDD2) een kleinere capaciteit heeft dan de bronschijf (HDD1), zullen zowel HDD1 als
HDD2 LED sneller gaan knipperen nadat u op de START-knop hebt gedrukt. Druk op de aan/uit-knop om de
stroomtoevoer uit te schakelen en de HDD’s te verwijderen.
• Door de resterende ruimte op de doel-HDD kunt u na het klonen eventueel meer inhoud aanmaken.
26
Page 27

Návod k použití IB-121CL-C31
1. Model – pevný disk – konektór – barva
Model IB-121CL-C31
pevný disk 2,5", 3,5" SATA, Seagate GoFlex 2,5"
konektór USB 3.1 (Gen 2), Type-C™
barva černý
2. Obsah balení
Dokovací stanice, AC adaptér, Type-C™ USB kabel, uživatelský manuál
3. Funkce
• Funkce dokování se dvěma šachtami: počítač detekuje 2 nezávislé jednotky
• Funkce klonování HDD bez PC: vytvoření identické kopie pevného disku
• Vytvoření kopie systémových jednotek k zavedení systému bez softwaru nebo profesionálních znalostí
• Vyrobeno z kvalitního hliníku
• Podporuje 2,5" a 3,5" SATA pevné disky, Kapacita bez omezení
• Podporuje externí pevné disky Seagate GoFlex 2,5"
• Type-C™ USB 3.1 (Gen 2) připojení až 10 Gbit/s
• LED displej indikuje chod a aktivitu pevného disku
• LED indikátor k zobrazení průběhu klonování pevného disku
• Podpora USB 2.0: PC a Mac (Windows 7/8/10, MAC OS ≥ 9.1)
• Podpora USB 3.0: PC a Mac (Windows 7/8/10, MAC OS X ≥10.8)
• Plug & Play a Hot Swap
4. Aplikace
4.1 Softwarové ovladače - USB 3.1 rozhraní
Použití USB 3.1 rozhraní vyžaduje nainstalovaný USB 3.1 řadič ve vašem systému.
Windows ≥8 má vestavěné ovladače pro rozhraní USB 3.1. Při připojení zařízení operační systém automaticky
aktualizuje své ovladače a automaticky rozpozná nové zařízení. Pro starší operační systémy (např. Win 7), je nutné
nejprve nainstalovat příslušný USB 3.1 ovladač.
4.2 Uvedení do provozu
Připojte napájecí zdroj. Můžete conntect IB-121-C31 na Type-C™ USB 2.0, USB 3.0 a USB 3.1 rozhraní přes
Type-C™ USB kabel.
4.3 HDD instalace
Nový pevný disk musí být předem naformátovaný aby se zobrazíl na pracovní ploše.
4.4 Funkce dokování se dvěma šachtami
Přístroj IB-121CL-C31 umožňuje používat 2 různé pevné disky bez ohledu na jejich značku, model nebo kapacitu
prostřednictvím jednoho USB připojení. Jednoduše připojte IB-121CL-C31 k počítači a disky HDD budou detekovány jako nezávislé jednotky. Díky podpoře připojování za chodu systému lze vyměňovat pevné disky u běžícího
systému.
27
Page 28

Návod k použití IB-121CL-C31
4.5 Funkce klonování pevných disků
• Před zahájením klonování odpojte od přístroje USB kabel.
• Vložte zdrojovou jednotku do slotu HDD1 (zdroj) a cílovou jednotku do slotu HDD2 (cíl).
• Jednotku zapněte stisknutím tlačítka Power. Kontrolka LED napájení se rozsvítí modře jako v režimu s PC.
• Ke změně režimu klonování stiskněte dlouze na 3 sekundy tlačítko MODE. Barva kontrolka LED napájení se
změní z modré na červenou.
• Stiskněte tlačítko start. Kontroly LED šachet HDD1 a HDD2 začnou blikat. První kontrolka LED indikátoru
průběhu (25%) rovněž začne blikat. Probíhá klonování.
• Jakmile indikátor stavu dosáhne 100 % a přestane blikat, proces klonování je dokončen.
• Stiskem tlačítka napájení vypněte napájení a poté vyjměte pevné disky.
4.6 Informace k funkci klonování
Protože proces klonování kopíruje jednotlivé bajty zdrojového disku HDD, podle kapacity dis- ku
HDD může proces trvat několik hodin.
• Po dokončení procesu klonování se může v některých případech stát, že počítač nebude schopen identifiko-
vat obě jednotky, protože mají přiřazeno stejné písmeno jednotky. Aby bylo možné jednotky oddělit, musíte
přiřadit jedné jednotce nové písmeno jednotky nástrojem
• "Správce disků" (Windows).
• Je-li zapojena pouze jedna jednotka do šachty HDD1 (zdroj), nedojde po stisknutí tlačítka Start k žádné akci.
• Cílová jednotka pevného disku (HDD2) musí být stejné velikosti nebo větší než zdrojová jednotka pevného
disku (HDD1).
• Je-li cílová jednotka (HDD2) menší než zdrojová (HDD1), po stisknutí tlačítka Start začnou kontrol ky LED
obou pozic HDD1 i HDD2 rychle blikat. Stiskem tlačítka napájení vypněte napájení a poté pevné disky
vyjměte.
28
Page 29

Page 30

Page 31

Page 32

The information contained in this manual is believed to be accurate and reliable. RaidSonic Technology GmbH assumes
no responsibility for any errors contained in this manual. RaidSonic Technology GmbH reserves the right to make changes
in the specifications and/or design of the above mentioned product without prior notice. The diagrams contained in this
manual may also not fully represent the product that you are using and are there for illustration purposes only. RaidSonic
Technology GmbH assumes no responsibility for any differences between the product mentioned in this manual and the
© Copyright 2017 by RaidSonic Technology GmbH. All Rights Reserved
product you may have.
 Loading...