

Raidon iR2880-8S-U5, GR2880-8S-U5 User Manual
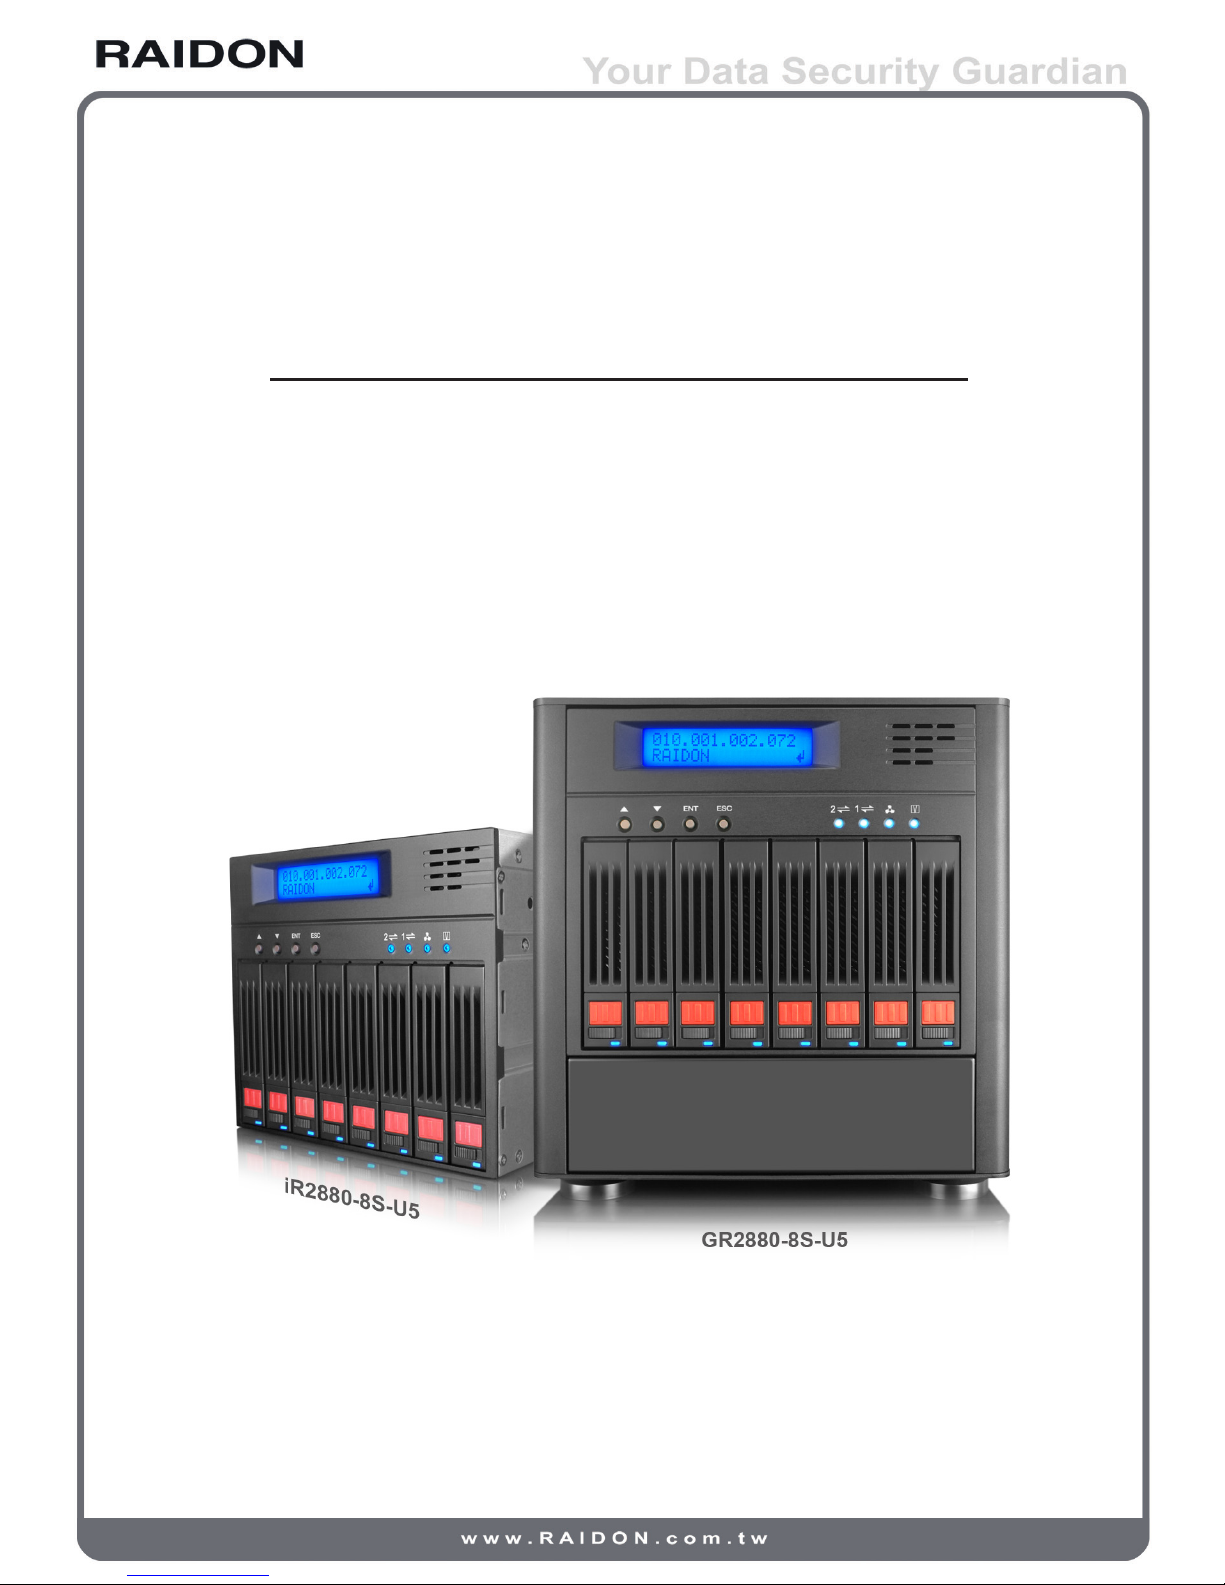
GR/iR2880-8S-U5
User Manual
v.1.1 (November, 2010)

Introduction
About this Manual
Thank you for using products of the RAIDON Technology Inc.
This manual introduces the RAIDON GR/iR2880 SAS series products and briefs you about the
operations of disk array (RAID) systems. Actual specications of your products are subject to the
physical ones shipped to you in spite of that contents of the Manual have been thoroughly reviewed
before release. Updates of products specications and/or any products related information may be
made at any time without notice. Please visit our web site at www.raidon.com.tw or contact with local
sales representatives for latest information.
If you have any question with products of the RAIDON Technology Inc. or you need the latest product
information, user’s manual and rmware please contact us at supporting@raidon.com.tw. We’ll reply
you as soon and fast as possible.
NOTE: the RAIDON Technology Inc. only provides technical support and services to direct customers. For
consumers and/or customers who bought our products at retailers or our dealers please contact them for
better supports and faster services. If your products are not purchased directly from the
RAIDON Technology Inc. please do not contact us for supports as you may get no response from us.
Related product information in this Manual is copyright © RAIDON Technology Inc. All rights reserved.

Contents
Chapter 1 Introduction to disk array (RAID).......................................... 5
1.1 Disk array (RAID)........................................................................... 5
1.2 Functions of disk array.................................................................... 5
1.3 Terminology.................................................................................... 5
Chapter 2 Installation................................................................................... 7
2.1 Pre-cautions................................................................................... 7
2.1.1 Features of the RAIDON SAS series products............................... 7
2.1.2 Conrmation of related items......................................................... 7
2.1.3 Inside the box................................................................................. 8
2.2 Installation...................................................................................... 8
2.2.1 Hardware........................................................................................ 8
2.2.2 LED indications.............................................................................. 9
2.2.3 Hardware installation...................................................................... 10
2.3 Log into the administration interface.............................................. 11
2.3.1 Web GUI........................................................................................ 12
2.3.2 RS232 (Super Terminal)................................................................. 13
2.3.3 Secure Shell................................................................................... 15
2.4 Embedded controlse...................................................................... 16
2.4.1 LCM................................................................................................ 16
2.4.2 System buzzer................................................................................ 18
2.4.3 LED................................................................................................ 18
Chapter 3 Introduction to the GUI............................................................ 19
3.1 Structure of the GUI....................................................................... 19
3.2 Login............................................................................................... 20
3.3 Quick installation............................................................................ 21
3.4 System conguration...................................................................... 22
3.4.1 System setting................................................................................ 23
3.4.2 IP address...................................................................................... 23
3.4.3 Login setting................................................................................... 24
3.4.4 Mail setting..................................................................................... 25
3.4.5 Notication setting.......................................................................... 25
3.5 Disk drive conguration.................................................................. 26
3.5.1 Volume creation wizard.................................................................. 26
3.5.2 Physical disk................................................................................... 27
3.5.3 RAID group..................................................................................... 29
3.5.4 Virtual disk...................................................................................... 31
3.5.5 Snapshot........................................................................................ 35
3.5.6 Logical unit..................................................................................... 37
3.6 Enclosure management................................................................. 37
3.6.1 SES conguration.......................................................................... 37
3.6.2 Hardware monitor........................................................................... 38
3.6.3 S.M.A.R.T....................................................................................... 38
3.6.4 UPS................................................................................................ 38
3.7 System maintenance...................................................................... 39
3.7.1 System information......................................................................... 39
3.7.2 Upgrade.......................................................................................... 40
3.7.3 SAS................................................................................................ 40
3.7.4 Reset to factory default.................................................................. 40
3.7.5 Import and export........................................................................... 41
3.7.6 Event log........................................................................................ 41
3.7.7 Reboot and shutdown.................................................................... 41
3.8 Logout............................................................................................ 41
Chapter 1 Introduction to disk array (RAID)
1.1 Disk array (RAID)
Individual hard disk, either SCSI or IDE type, is subject to the matching problems between revolution
speed of driving motor and transmission interface. Transmission speed of an Ultra 160 SCSI or ATA100
IDE hard disk may have a limit of 30MB/Sec at the bandwidth of 100MHz. With limited lifespan any
disk failure may lead to the disaster of system broken and data loss. Both are critical to any network
environment. A new device, the so called Redundant Arrays of Inexpensive / Independent Disks (RAID)
is then created by combining several independent disks into a hard disk group for better transmission
and storage performance.
A disk array combines two or more than two physical disk drives into a virtual/logical disk system with
on-line, fast access, large capacity and fault tolerant features by Striping, Mirroring and Parity Checking
mechanism. A disk array then may continue its normal operation without causing any system failure or
data loss when any one drive in the array is out of work.
In short the RAID technique improves efciency and data integrity for any network conguration.
1.2 Functions of disk array
• Enhance storage capacity
• Improve data access speed
• Reduce cost
• Inherent fault tolerance
• Hot swap
• Auto data rebuilding
• Hot spare
• On-line capacity expansion
1.3 Terminology
The following terms are used in this Manual:
RAID Redundant Array of Independent Disks
PD Physical Disk
RG Raid Group
VD Virtual Disk
LUN Logical Unit Number
GUI Graphic User Interface
WT Write-Through
Introduction to disk array (RAID) 5
WB Write-Back
RO Read-Only
DS Dedicated Spare disks
GS Global Spare disks
DC Dedicated Cache
GC Global Cache
DG DeGrade mode
S.M.A.R.T. Self-Monitoring Analysis and Reporting Technology.
WWN World Wide Name
HBA Host Bus Adapter
MPIO Multi-Path Input/Output
6 Introduction to disk array (RAID)
Chapter 2 Installation
2.1 Pre-cautions
2.1.1 Features of the RAIDON SAS series products
Features of the RAIDON SAS series products:
• Employs 2.5” SATA HDD
• Dual SAS tunnel
• Support RAID 6
• Support hot swap
• N-way mirroring
• Snapshot function
• GUI
• Volume based share/exclusive cache configuration
• Support S.M.A.R.T
• Support SAF-TE
• Disk roaming
The RAIDON SAS series products may provide non-stop services with high fault tolerance when
installed properly.
The RAIDON SAS series products connect to related system via the SAS interface and can be
configured at any RAID level for reliable data protection. At RAID 6 level there can be 2 failed disks
without damaging existing data. Data stored in the damaged hard disk(s) can be recovered from that
kept in the normal running hard disks.
The RAIDON SAS series products are the best and most economical data storage backup solution for
small and medium enterprise users.
2.1.2 Conrmation of related items
Before installing your product please ensure the following items:
• When removing objects out of the shipping carton please ensure that all the items are in there and
not damaged
• Please read the latest release before updating your firmware
• Ensure your server is equipped with a SAS HBA card
• A piece of CAT 5e or CAT 6 network cable for the GUI administration port
• Ready your storage system configuration plan
• Network data of the GUI administration port. For fixed IP please make the data of your IP address,
sub-network mask and default gateway available in advance. (Contact your MIS personnel for above
data.)
• Make all the hardware, power and wires for COM port and Administration port (LAN or RS232), ready
before powering on your system.
Installation 7
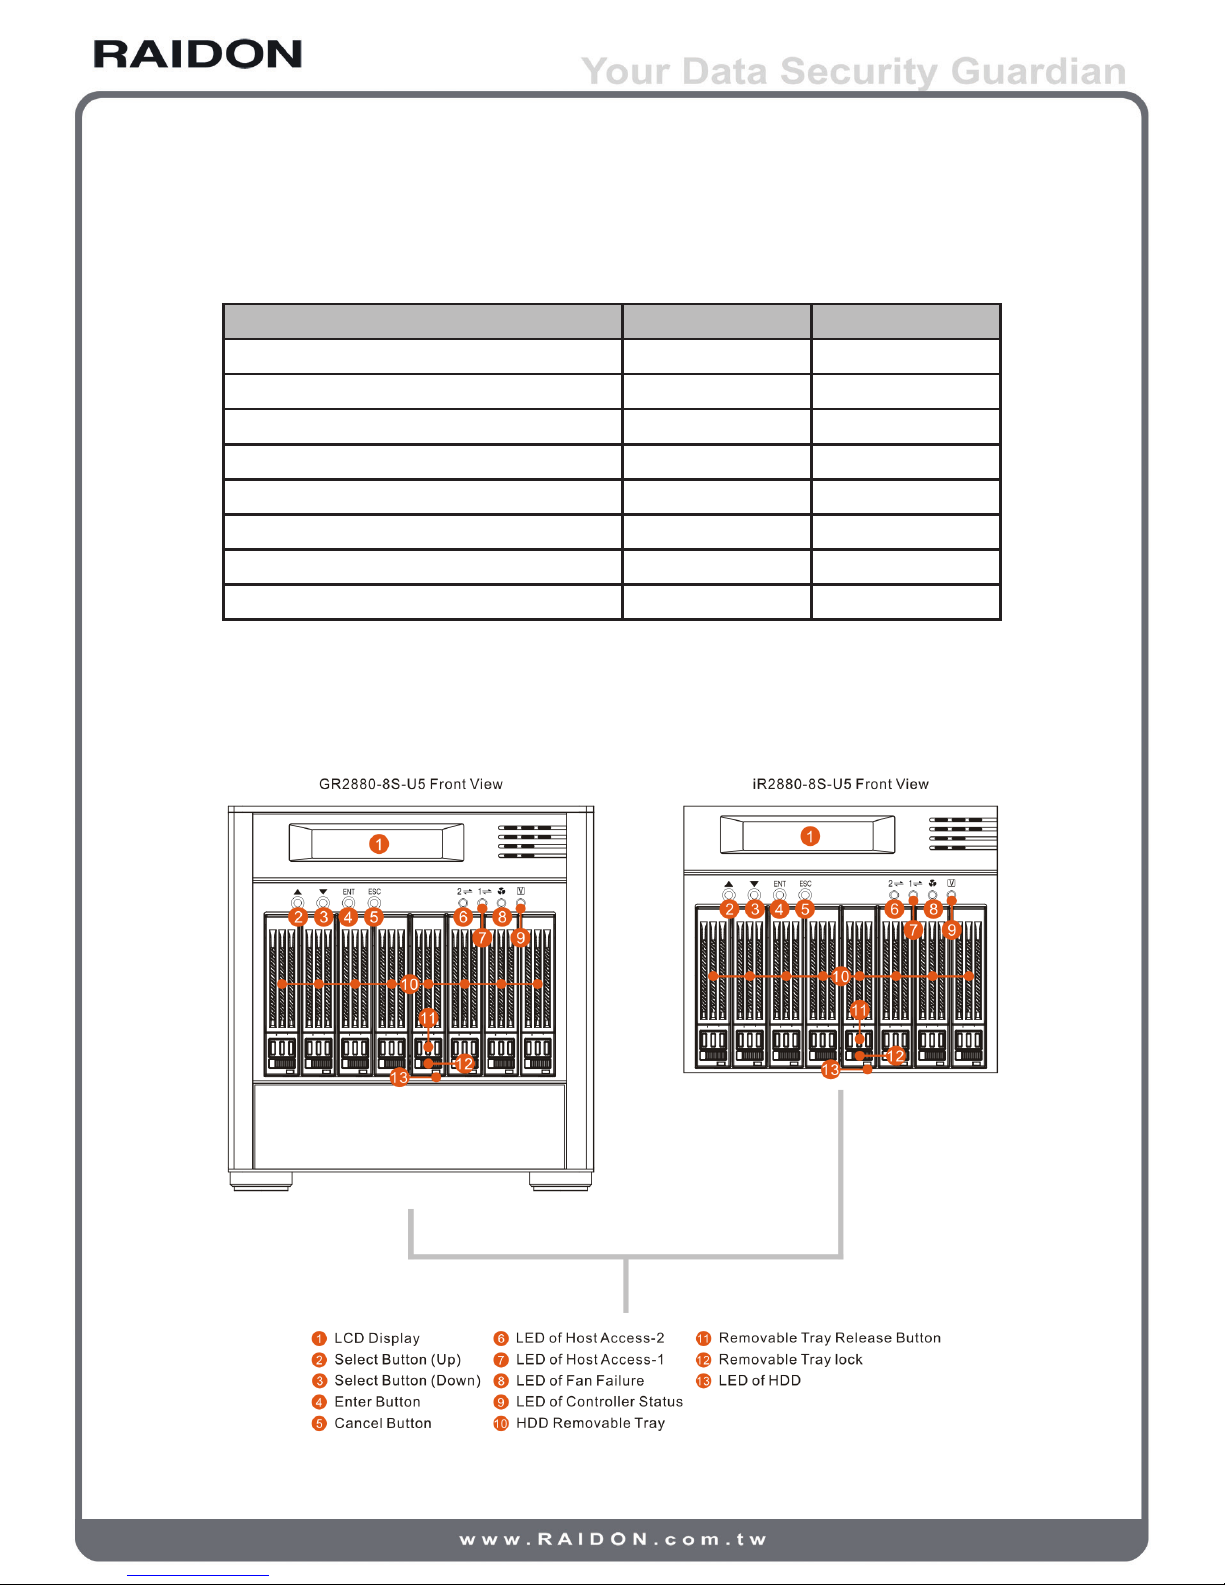
2.1.3 Inside the box
Items contained in the shipping carton are listed below:
Item iR2880-8S-U5 GR2880-8S-U5
Main body • •
External RS232 cable • •
Internal RS232 cable • ▬
MiniSAS cable (MiniSAS to MiniSAS) ▬ •
AC Power cable ▬ •
Quick installation guide • •
CD (the User’s Manual included) • •
Accessory kit • •
2.2 Installation
2.2.1 Hardware
8 Installation
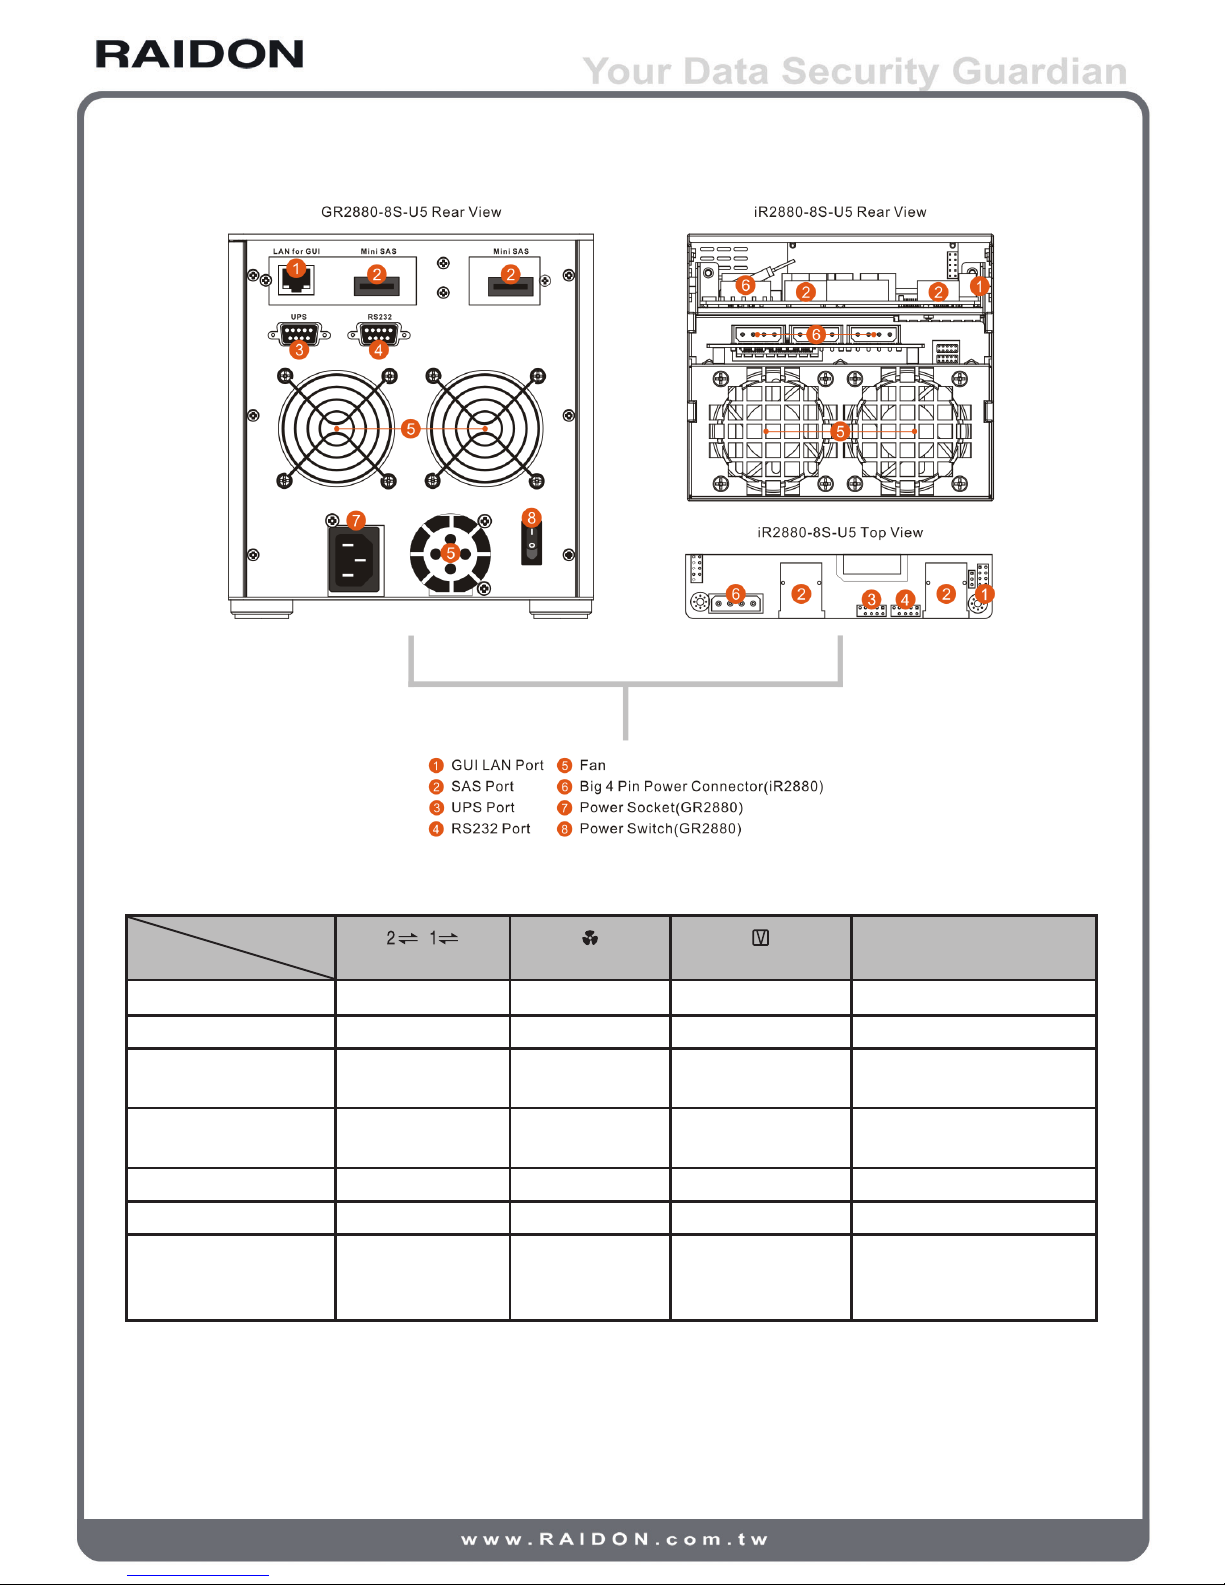
2.2.2 LED indications
LED
Status Host Access-1/2 Fan Failure Controller Status HDD
Power on (booting) ▬ Red / Lights On Blue / Lights On Red / Lights On
RAID building Blue / Lights On ▬ Blue / Lights On Blue / Blinks
Fan Failure Blue / Lights On
Red / Lights On
& Buzzer Alarm
Red / Lights On ▬
Accessing
Blue & Purple /
Blink Alternatively
▬ Blue / Lights On Blue / Blinks
HDD Idling Blue / Lights On ▬ Blue / Lights On ▬
HDD failure Blue / Lights On ▬ Red / Lights On ▬
Rebuilding Blue / Lights On ▬ Red / Lights On
Source : Blue / Blinks
Target : Blue & Purple /
Blink Alternatively
Installation 9
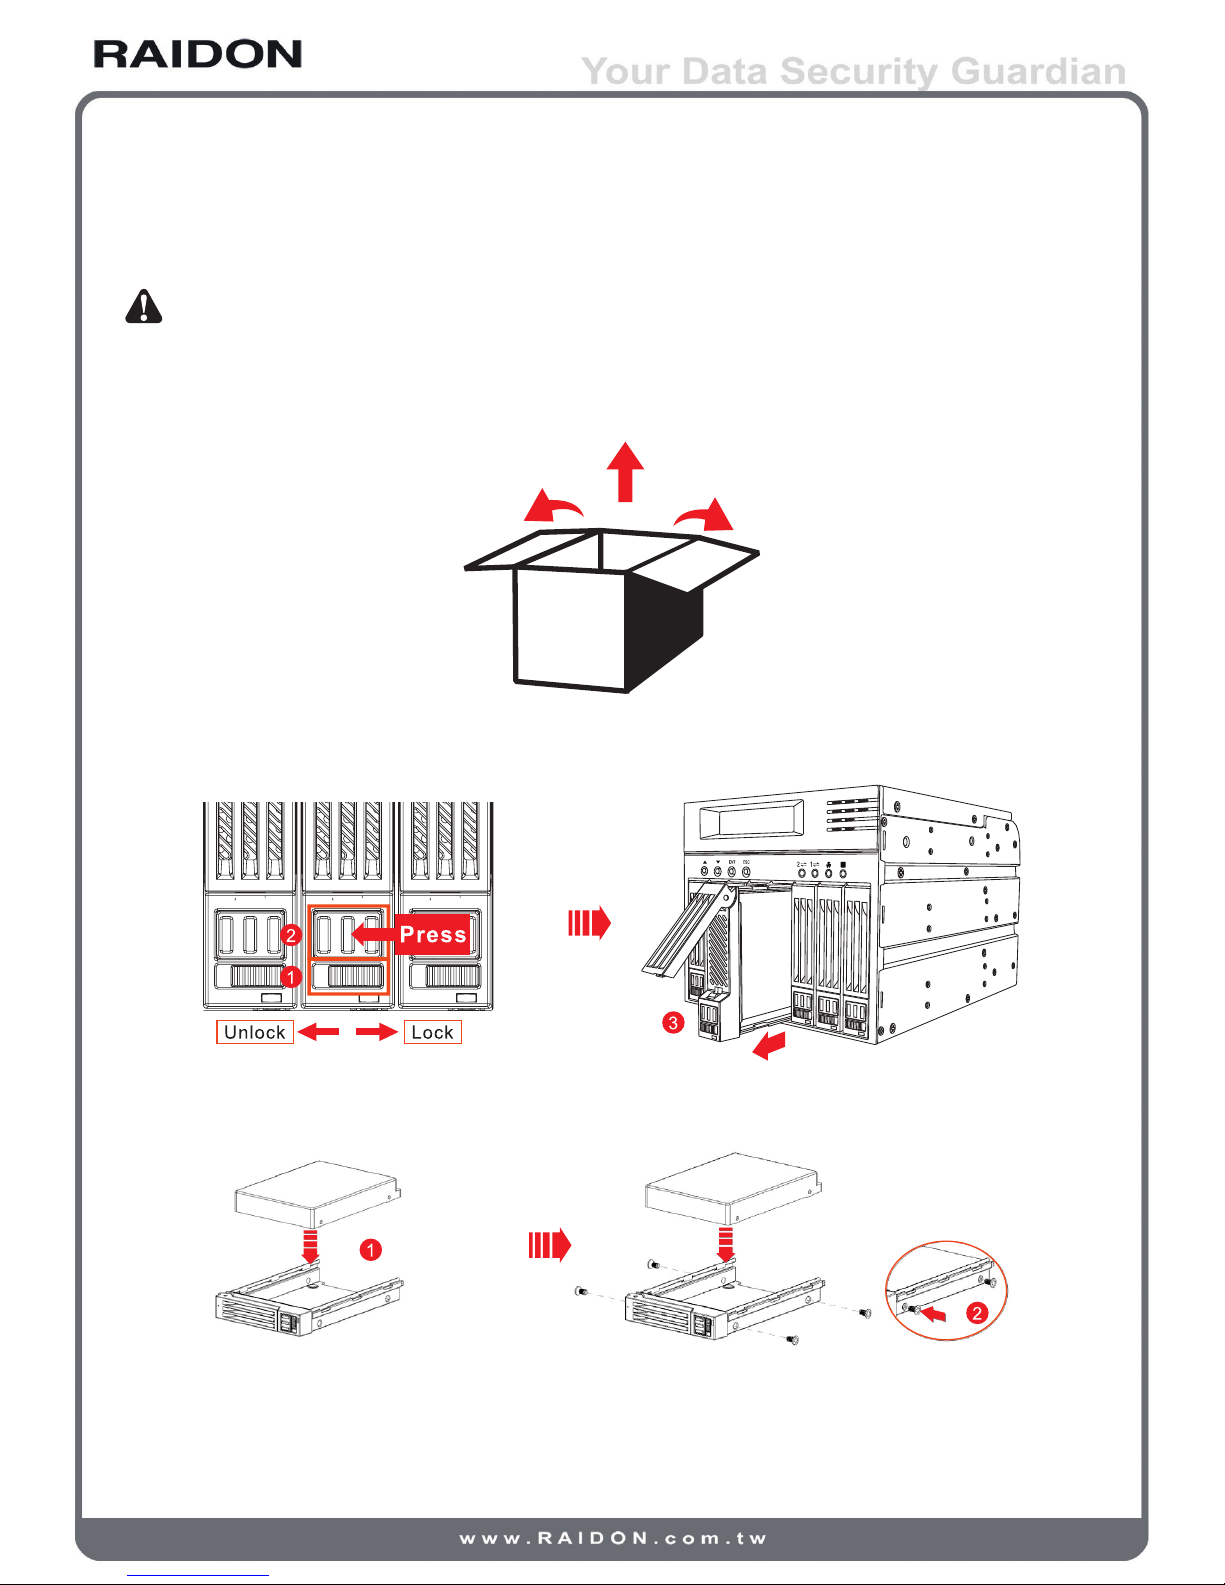
2.2.3 Hardware installation
Please install your RAIDON SAS series product by following steps listed below:
Note : The following steps are for the iR2880-8S-U5 model. For GR2880-8S-U5 model please skip Step 5.
Step 1 Open the shipping carton, remove the main body of your product out of the carton and place it
on a working bench. (Please make sure that no item is missed or damaged. If there is any doubt
please contact with your dealer or sales representative.)
Step 2 Unlock the HDD removable tray by pressing the removable tray lock leftwards (press left to
unlock and right to lock). Press and push the removable tray release button to remove the tray.
Step 3 Insert the SATA disk drive in the HDD removable tray and ensure the disk fastening screws are
securely locked to prevent disk damage caused by un-intentional movements from happening.
10 Installation
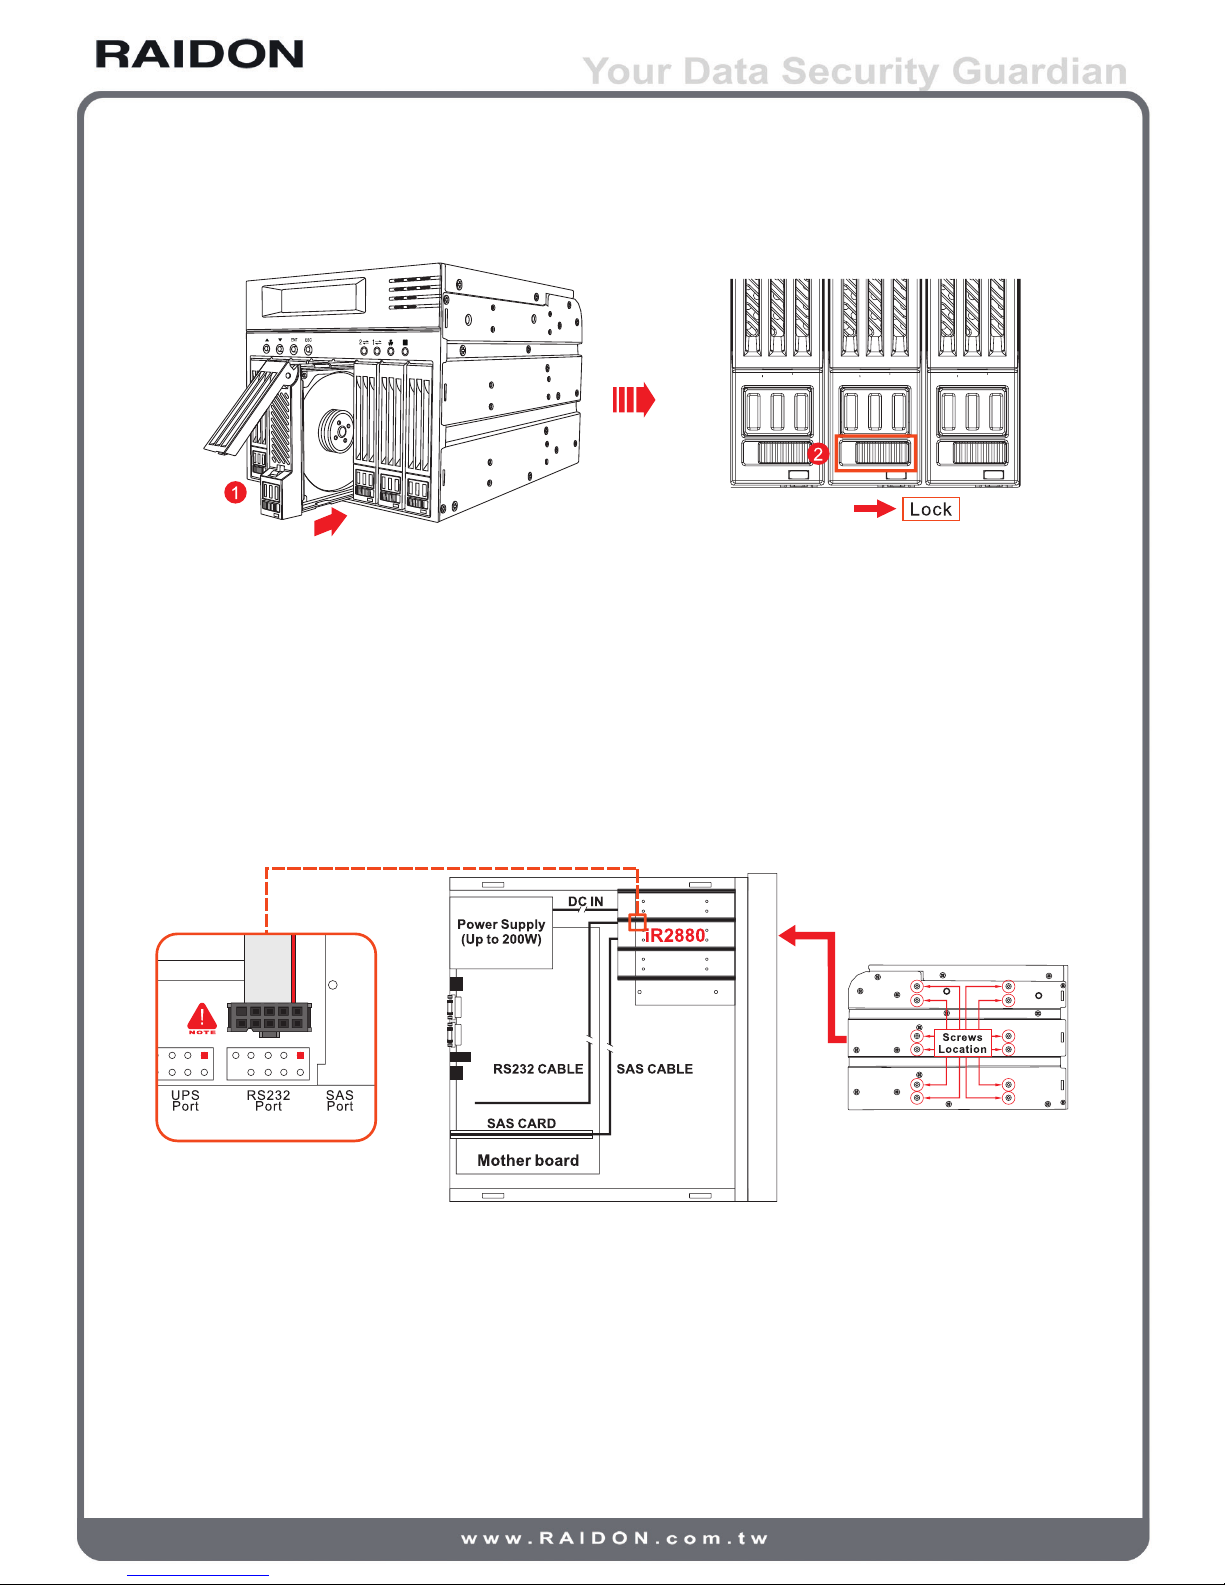
Step 4 Insert the disk-installed-tray back in the main body. Make sure that it is inserted completely and
press the removable tray lock on top of it to the LOCK position.
Step 5 Make sure there is adequate space for three CD-ROM drives inside your computer case. Install
the full iR2880 main body within the case and fix it with supplied fastening screws. (You may
have to bend the battle between CD-ROM drives to horizontal position for proper iR2880
installation.)
Step 6 Insert connecting cables to corresponding connectors respectively. Make sure that the two SAS
ports and the four power ports are connected to proper cables and devices. Note: the GR2880
model needs connecting to external power line only. Both the LAN and RS232 ports are for GUI
connection. You can select either one for installation.
(Check the adequacy of your power supply wattage to ensure successful operation of your
iR2880 product.)
Step 7 The installation is completed. You may power on your computer system for setup and
application.
2.3 Log into the administration interface
You may login and manage your RAIDON SAS series products by following three steps described
below:
Installation 11
2.3.1 Web GUI
The RAIDON SAS series products support GUI for system management. Make sure that related LAN
port is connected in advance.
For network environment with a DHCP server your RAIDON SAS series products can get IP address
automatically. You may get the IP address through LCM of the equipment. See Chapter 3 for required
settings.
For network environment without a DHCP server your RAIDON SAS series products can be connected
by specifying an IP address manually. See descriptions below for required settings. (The default IP
address of your RAIDON SAS series product is 192.168.0.1.)
Step 1 Check for IP address conflict in advance. Please contact your system administrator for
confirmation.
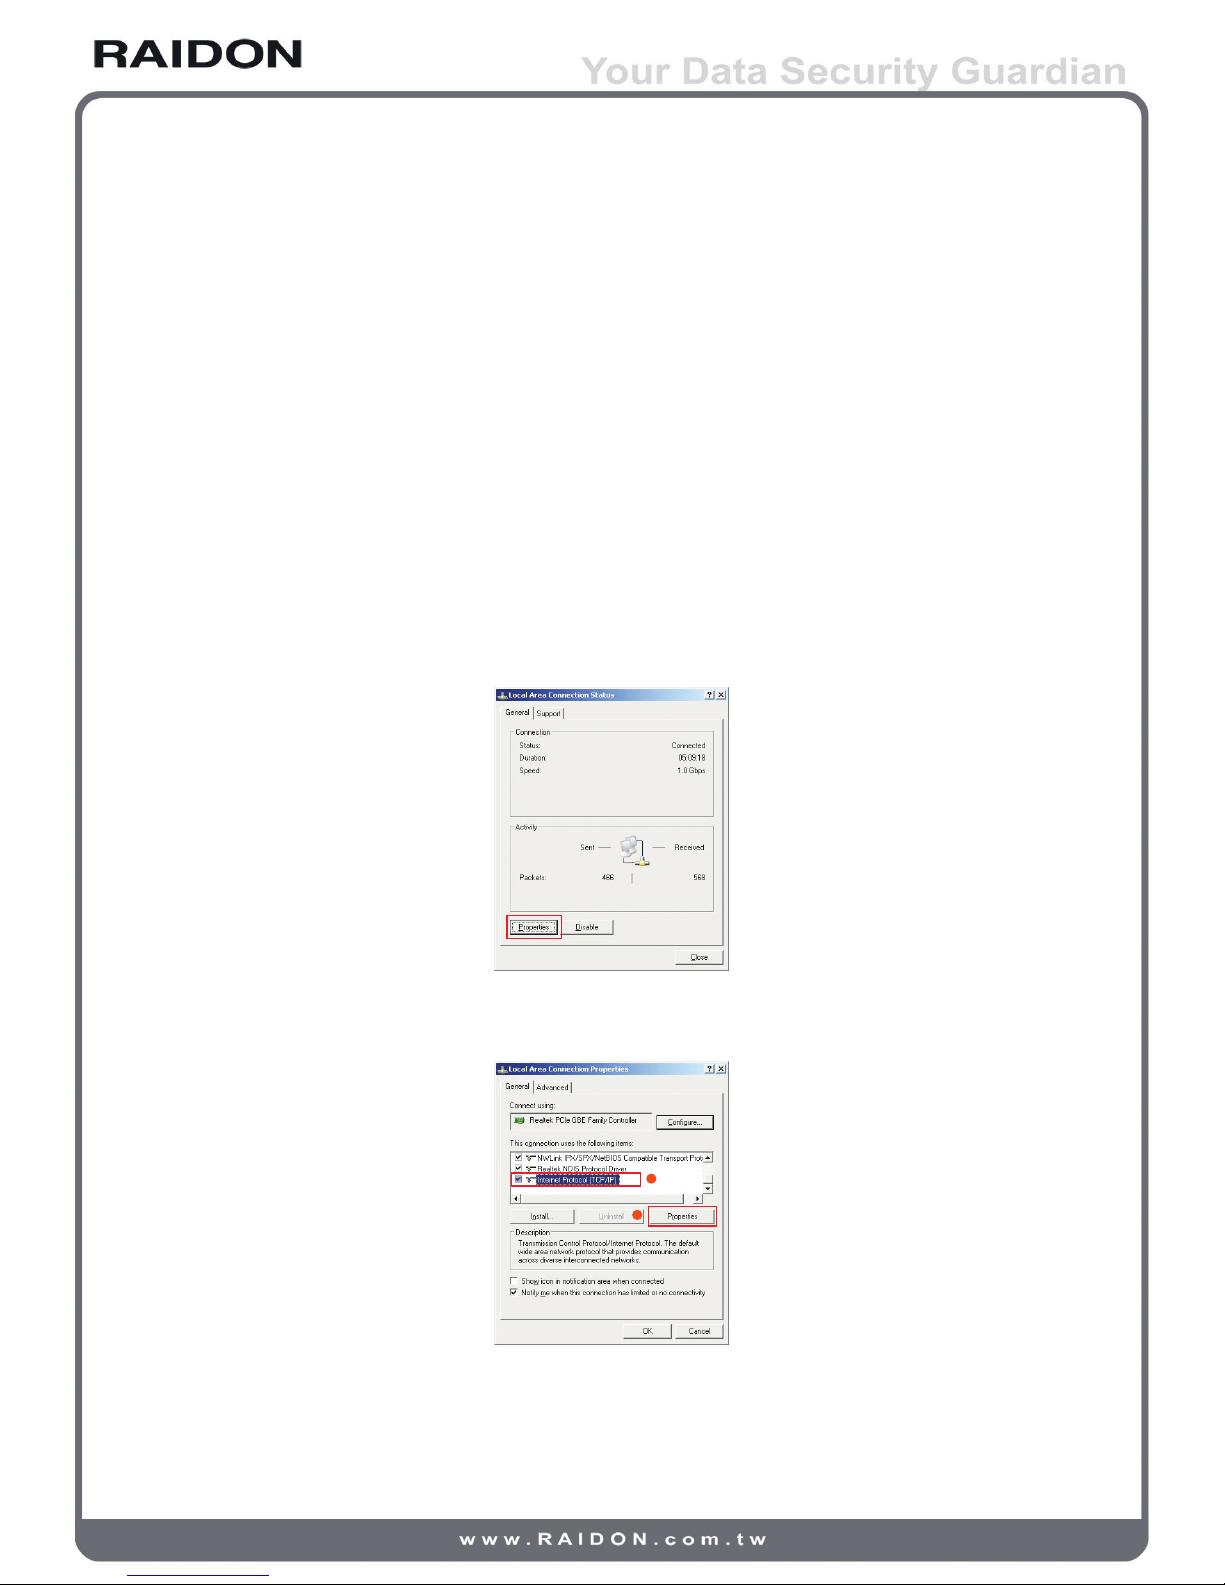
Step 2 Local area network (LAN) setup. Select the Local Area Connection Status dialog box by click
the Control Panel → Network connection → Local Area Connection items. Click the Properties
icon to select it.
Step 3 Select Internet Protocol (TCP/IP) and click the Properties icon. The Internet Protocol (TCP/IP)
setup screen displays.
2
1
12 Installation
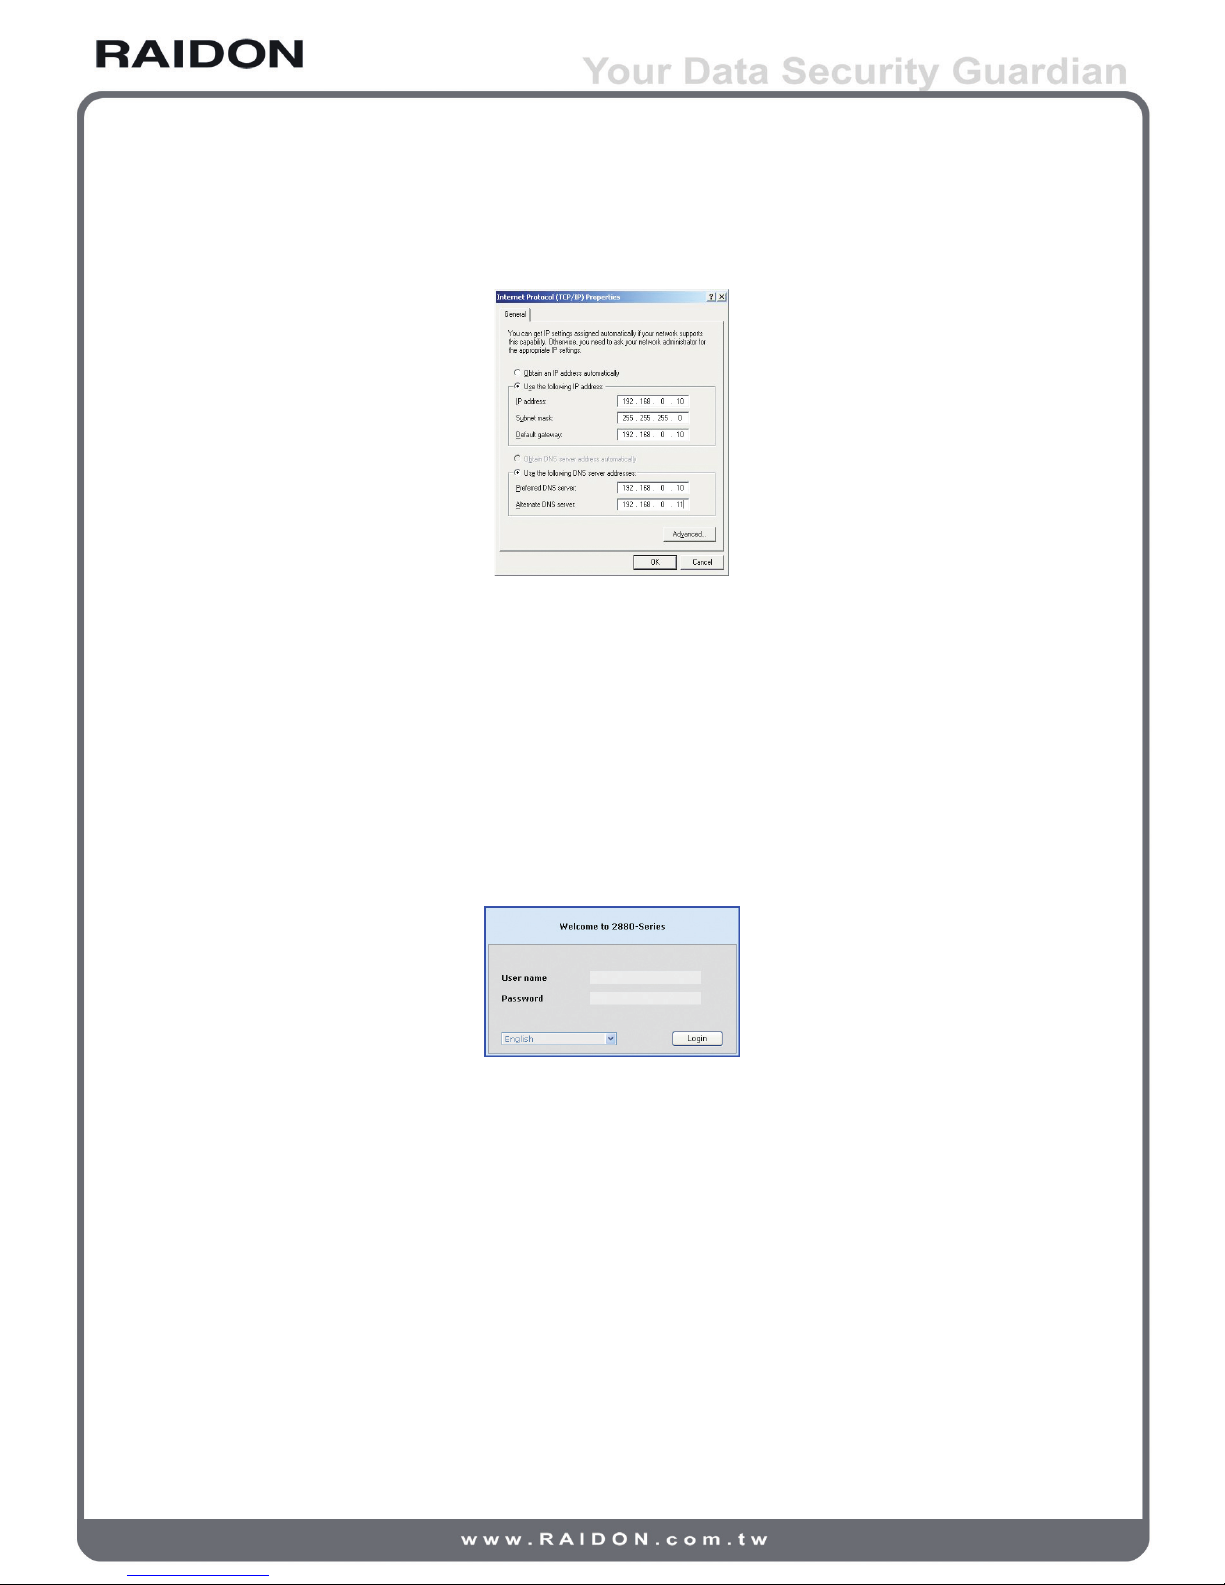
Step 4 Set up the IP address, Subnet mask, Default gateway and DNS. The IP address and Default
gateway must be in the same domain (192.168.0.xxx) of your 2880 series product (Please
contact your system administrator for confirmation.)
Step 5 Click OK after you have filled in required values. (The IP address of your RAIDON SAS
series product must remain in the same segment after any IP address change for successful
system operation.)
Step 6 Open your web browser and type http://192.168.0.1 in the URL field.
You may type in https://192.168.0.1 to connect product in encrypted data transmission mode in
the Secure Sockets Layer for better security at the expense of transmission speed.
Step 7 A login dialog box displays after successful connection. Please enter your account name and
password as required. (The default account/password is: admin / 1234.)
Click the Login button to login the system. Refer to Chapter 3 for subsequent setup steps.
2.3.2 RS232 (Super Terminal)
You may manage and set up the system with the Super Terminal function by connecting directly to the
RS232 COM port. The same function can be used for system setup when the original IP address to
your systen is lost. See steps below for operations at the Windows XP environment.
Step 1 Connect to your system with the RS232 cable in the accessory kit supplied with your product.
Turn on related power supply after successful connection.
Step 2 Open your Super Terminal function by clicking the icons of Start → Programs → Accessories →
Communication → Super Terminal. Start setting up your Super Terminal. The first step is to
name this terminal.
Installation 13
 Loading...