

RADWAG WLX series, WTX series User Manual
Manual number:
LTI-01-08/03/08/A
Precision balances:
• WLX series
• WTX series
MANUFACTURER OF ELECTRONIC
WEIGHING EQUIPMENT
RADWAG, 26 – 600 Radom, Bracka 28 Street - POLAND
phone +48 48 38 48 800, phone/fax. +48 48 385 0 0 10
Sales Department +48 48 366 80 06
www.radwag.pl

MARCH 2008
- 2 -

Table of contents
1. INTENDED USE....................................................................................................................5
2. PRECAUTIONARY MEASURES..........................................................................................5
3. WARRANTY CONDITIONS..................................................................................................6
4. UN ACKING OF THE BALANCE ........................................................................................6 P
4.1.
WTX series.....................................................................................................................6
4.2. WLX series .....................................................................................................................7
5. GETTING STARTED.............................................................................................................7
5.1. Conditions of appropriate use.........................................................................................7
5.2. Time of warming up........................................................................................................8
5.3. Balance levelling.............................................................................................................8
6. BALANCE DESCRIPTION....................................................................................................8
6.1. Graphic display...............................................................................................................8
6.2. Keyboard ........................................................................................................................9
6.3.
7.
USER MENU .......................................................................................................................10
Connecting sockets ........................................................................................................9
7.1. Overview of parameters................................................................................................10
7.2. Menu - graphic version.................................................................................................12
7.3. Navigating within the menu...........................................................................................13
7.3.1. By means of balance keyboard ...........................................................................13
7.3.2. By means of PC keyboard...................................................................................14
7.4. Return to weighing........................................................................................................15
8. WEIGHING ..........................................................................................................................15
8.1. Tarring ..........................................................................................................................16
8.2. Manual inscribing of tare value.....................................................................................16
8.3. Automatic tare...............................................................................................................17
8.4. Zeroing..........................................................................................................................18
8.5. Functions of keys..........................................................................................................18
9. BALANCE CALIBRATION .................................................................................................18
10. SETTING OF PRINTOUTS CONTENTS FOR GLP PROCEDURES...............................19
11. TIME AND DATE SETTING..............................................................................................20
12. SETTING THE PARAMETERS.........................................................................................23
12.1. ilter.............................................................................................................................23 F
12.2.
.................................................................................................................23 Median filter
12.3.
ro operating ......................................................................................23 Setting of autoze
12.4.
......................................................................................................................24 Autozero
12.5.
......................................................................................................................24 Last digit
12.6.
......................................................................................................................24 Negative
12.7.
Automatic tare.............................................................................................................24
13. FUNCTIONS CONNECTED WITH RS 232 USE ..............................................................25
14. PRINTOUTS......................................................................................................................26
15. SETTING ACCESSIBILITY OF WEIGHT UNITS..............................................................26
16. SETTING ACCESSIBILITY OF WORK MODES ..............................................................27
17. OTHER PARAMETERS ....................................................................................................27
18. USING WORK MODES.....................................................................................................29
18.1. Counting pieces of the same mass.............................................................................29
18.1.1. Counting pieces after writing piece mass..........................................................30
18.1.2. Counting through determine singular element mass from the standard batch..31
18.1.3. Select an item from the database......................................................................33
- 3 -

18.2. eighing............................................................................................................33 Checkw
18.3.
illing...........................................................................................................................35 F
18.4.
......................................................................................................................36 Percents
18.5.
........................................................................................................38 Weighing animals
18.6.
Density of solids and liquids........................................................................................39
18.6.1. Density of liquids................................................................................................40
18.6.2. Density of solids.................................................................................................40
18.7. ..................................................................................................................40 Formulation
1 .8.
Statistics......................................................................................................................45 8
19.
TYPES OF PRINTOUTS ...................................................................................................47
19.1. rintout.........................................................................................................47 Standard p
19.2.
Non-standard printout..................................................................................................48
19.2.1. Inscribing texts...................................................................................................50
19.2.2. Select non-standard printouts............................................................................53
20. ADDITIONAL ID’S.............................................................................................................54
21. COOPERATION WITH PRINTER OR COMPUTER.........................................................55
21.1. Connections.................................................................................................................55
22. TRANSMISSION POTOCOL.............................................................................................56
22.1. mation...............................................................................................56 Some basic infor
22.2.
............................................................................................56 Transmission parameters
22.3.
ypes of transmission..................................................................................................57 T
22.4.
Transmission characteristics.......................................................................................57
22.4.1. Types of printouts ..............................................................................................57
22.4.2. Continuous transmission....................................................................................57
22.4.3. Continuous transmission „with pauses”.............................................................58
22.4.4. Stable result transmission..................................................................................58
22.4.5. Survey of automatic printouts ............................................................................59
22.5. Command and response syntax..................................................................................60
22.5.1. Command syntax...............................................................................................60
22.5.2. Response syntax...............................................................................................60
22.6. List of commands computer - balance ........................................................................61
23. UNDER-FLOOR WEIGHING.............................................................................................64
24. TECHNICAL PARAMETERS............................................................................................65
24.1. ies..................................................................................................................65 WLX ser
24.2.
WTX series ..................................................................................................................65
25. ERROR MESSAGES ........................................................................................................66
- 4 -
1. INTENDED USE
The balances are used to do precise measurements in laboratories.
It is possible to do the zero function in all measure range.
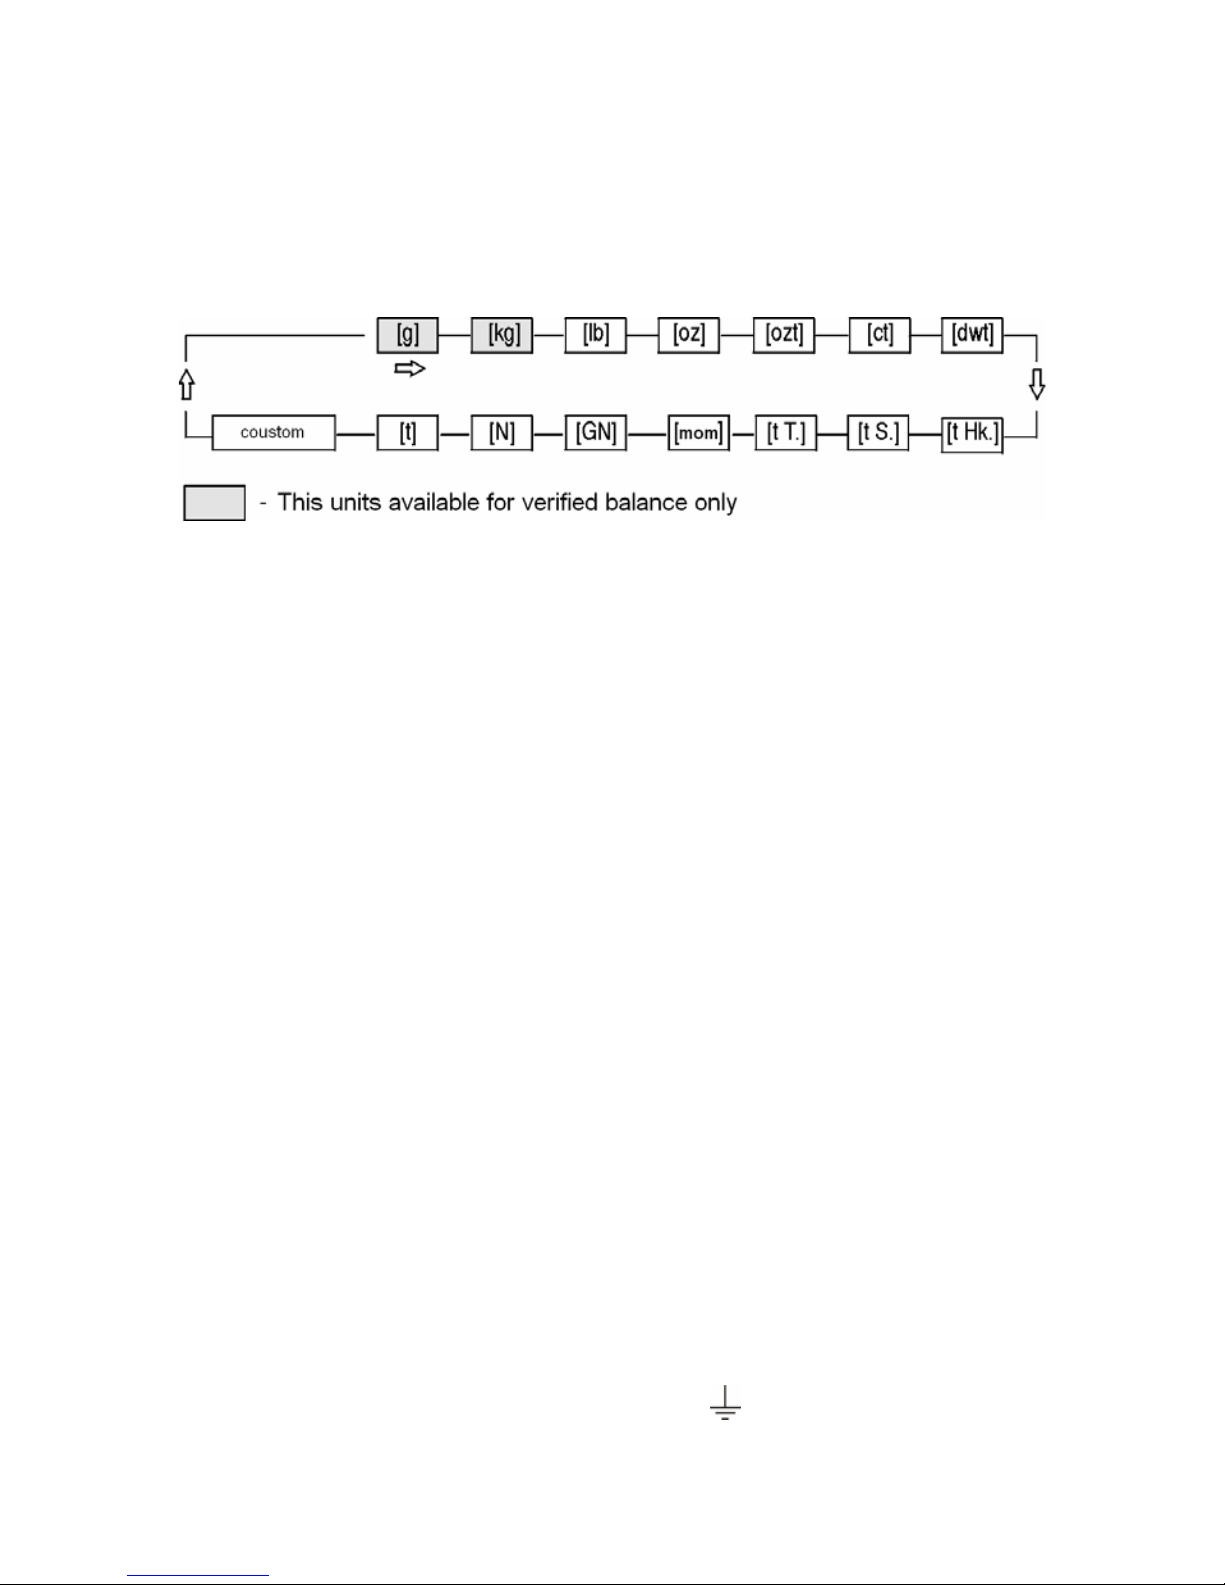
The balance weights in following units:
Measure units
Apart from weighing in various measure units the balance also:
• counts pieces
• weights
• filling
• percent
• weights animals
• determines liquids and solids density
• formulation
• creates statistics
Measure units and particular functions can be inaccessible for u ser.
It is possible to adapt the balance to individual needs and access
functions and units which are necessary at this moment.
It is possible to define accessible or no-accessible in user menu
and it is described in further part of the manual.
2. PRECAUTIONARY MEASURES
A. Please, read carefully this user manual before and use the device
according to its intended use.
B. If the device is about to operate in a strong electrostatic field
(e.g. printing houses etc.) it should be connected to the earthing.
Connect it to the clamp terminal signed
.
- 5 -

3. WARRANTY CONDITIONS
A. RADWAG is obliged to repair or change those elements that appears
to be faulty because of production and construction reason,
B. Defining defects of unclear origin and outlining methods of
elimination can be settled only in participation of a user and the
manufacturer representatives,
C. RADWAG does not take any responsibility connected with
destructions or losses derives from non-authorized or inappropriate
(not adequate to manuals) production or service procedures,
D. Warranty does not cover:
• Mechanical failures caused by inappropriate maintenance of the
device or failures of thermal or chemical origin or caused by
atmospheric discharge, overvoltage in mains or other random
event,
• Inappropriate cleaning.
E. Loss of warranty appears after:
• Access by an unauthorized service,
• Intrusion into mechanical or electronic construction of
unauthorized people,
• Removing or destroying protection stickers.
F. The detailed warranty conditions one can find in warranty certificate.
G. Contact with the central authorized service:+48 48 384 88 00 ext.
106 or 107.
4. UNPACKING OF THE BALANCE
4.1. WTX series
Cut open tape protecting the box. Take out the balance of factory package
and place it on a stable base. Take out all
components and assemble them
according to below drawings:
- 6 -
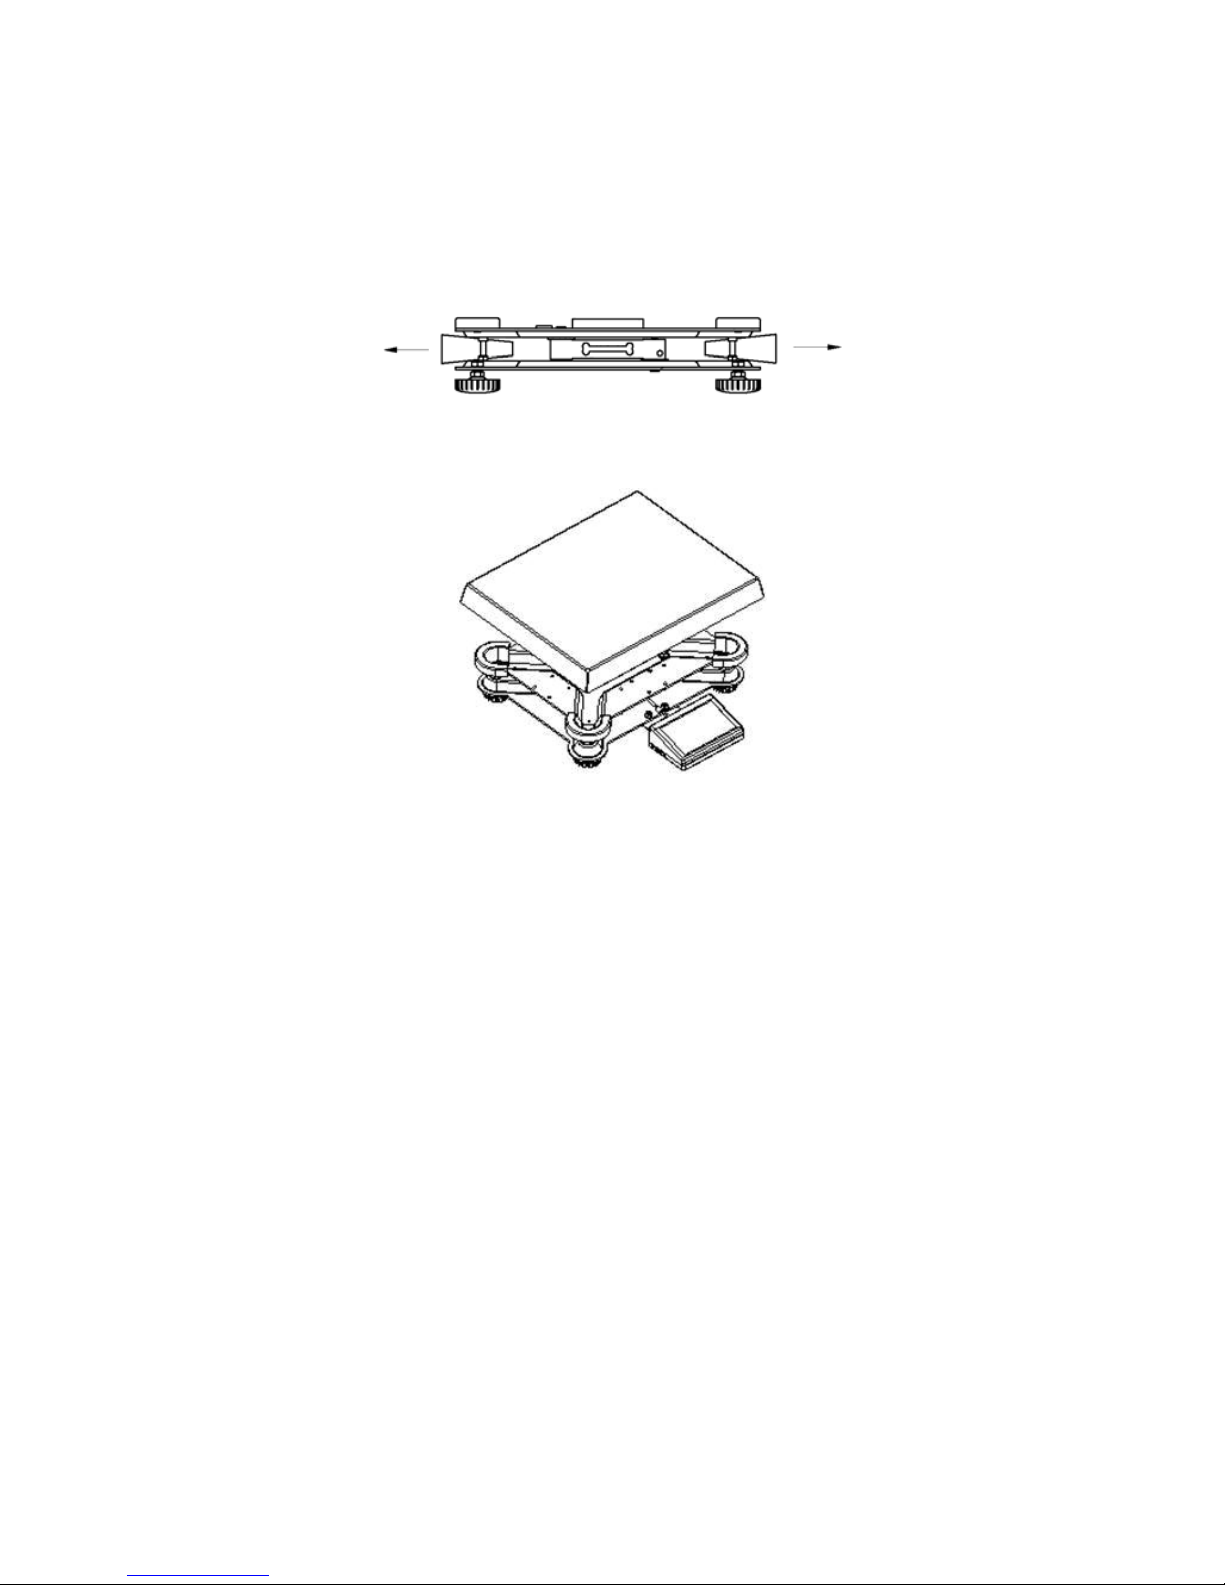
4.2. WLX series
Unpack and put the scale on a flat even stable surface far away from
sources of heat and then:
• Remove transport protections
• Install the weighing pan according to the drawing below:
5. GETTING STARTED
5.1. Conditions of appropriate use
• Place balance on a stable and flat table or free from vibrations
• Bbalance should not be exposed to draughts and sudden air
movements
• Balance should be placed in room of stable temperature and humidity
• Balance should be placed far from heat sources
• If static electricity influence balances, indications, its base should be
earthed. Earthing clamp is in the back part of balance base
• Balances should be levelled according to a level condition indicator
to guarantee the appropriate weighing accuracy.
- 7 -
5.2. Time of warming up
To do the measurements correctly level the scale. Take the pan off
carefully (without rapid pulls and hits) and turn the legs in order to level
the balance, air bubble should be place in the centre of level condition
indicator.
1 - correct levelling
2 - incorrect levelling
5.3. Balance levelling
Before performing measurements wait until balance reaches temp erature
stabilization. It is so-called warm-up time. It takes about 15 minutes.
For weighing instruments that have been stored in low tempe ratures
(e.g. during winter) the warm-up time is about 2 hours.
6. BALANCE DESCRIPTION
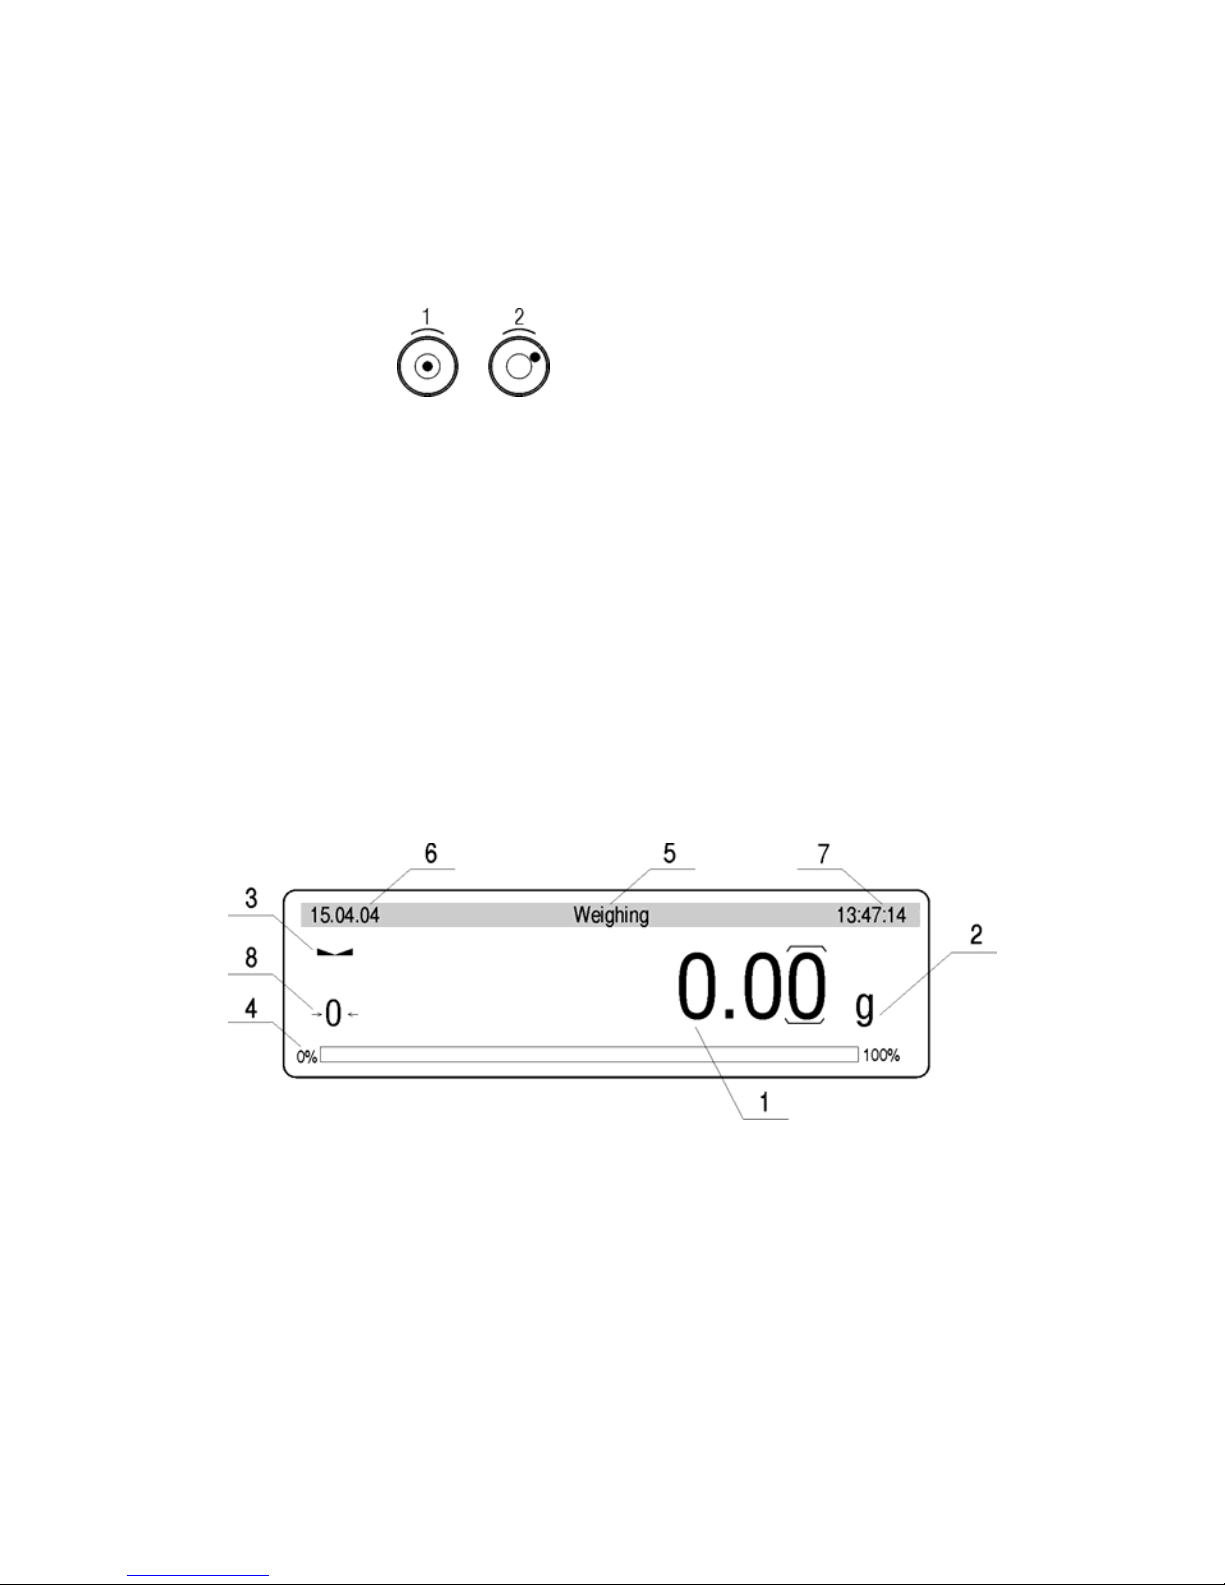
6.1. Graphic display
Graphic display
1 Load mass
2 Measure unit
3 The result is stable
4 Line of max range of the balance
5 Work mode
6 Date
7 Time
8 ZERO indication
- 8 -
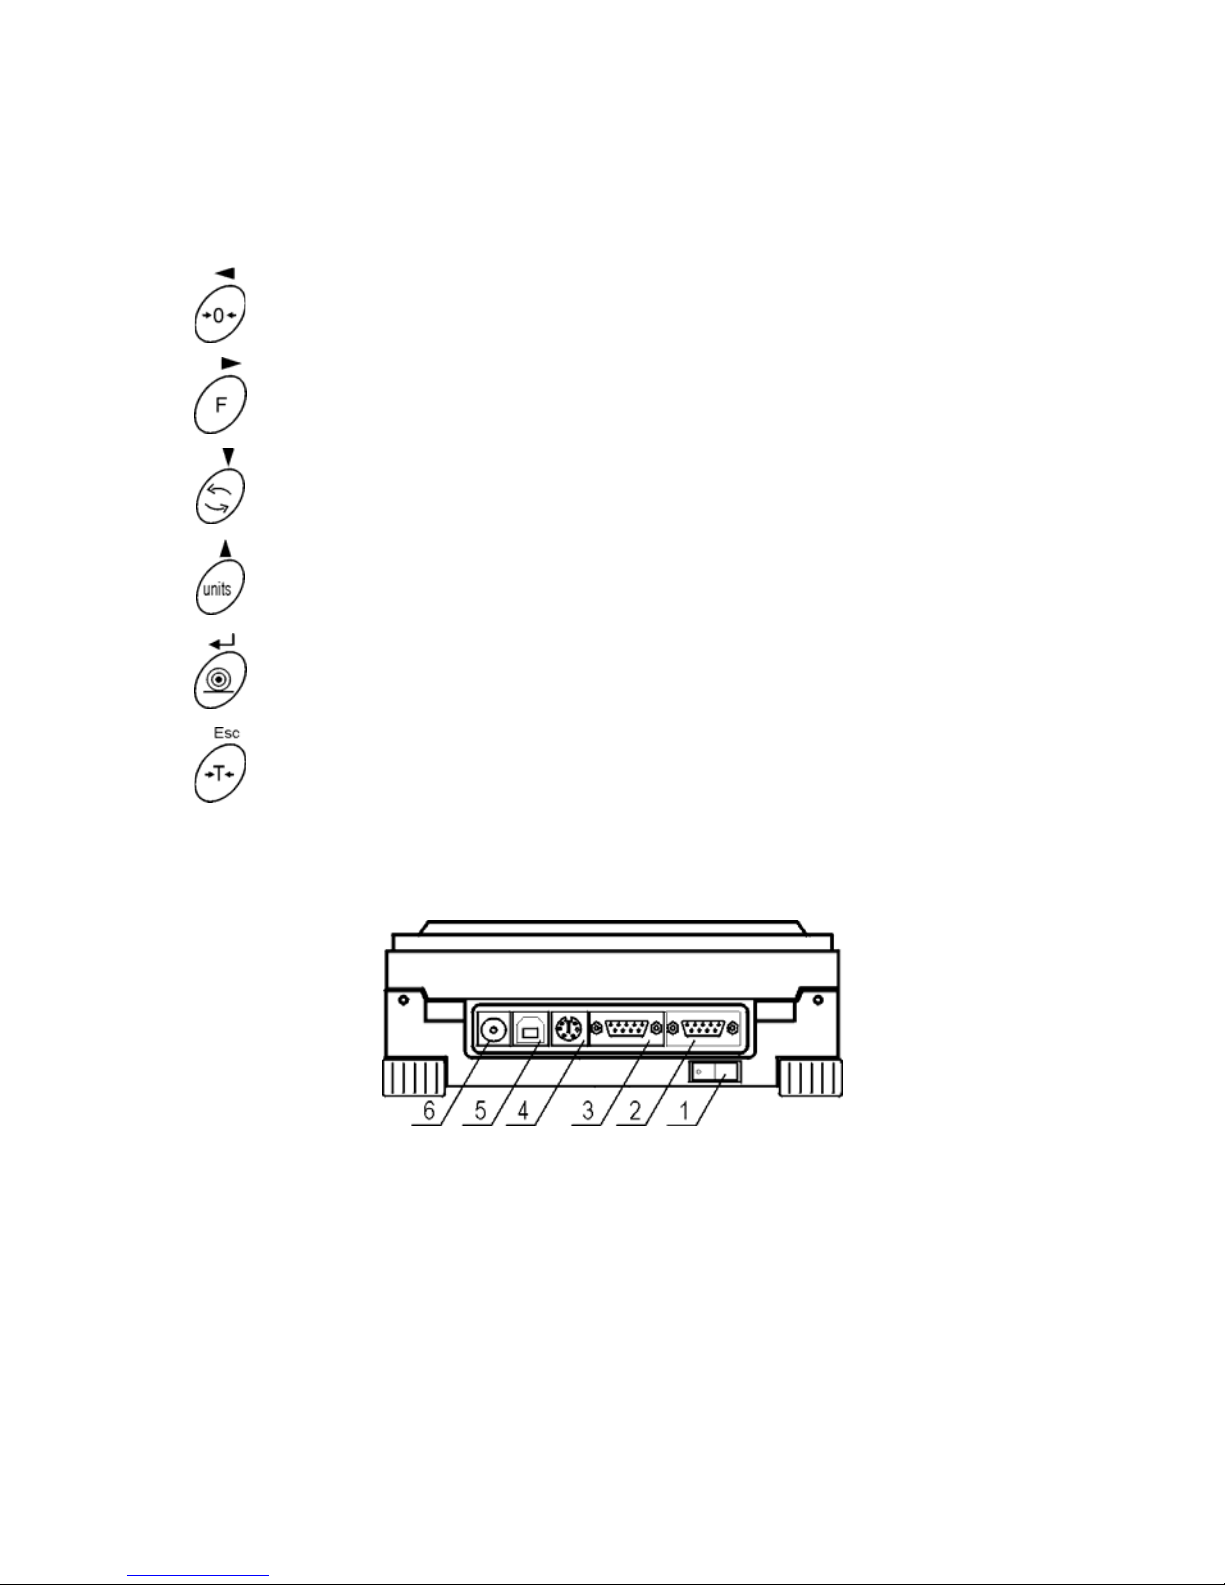
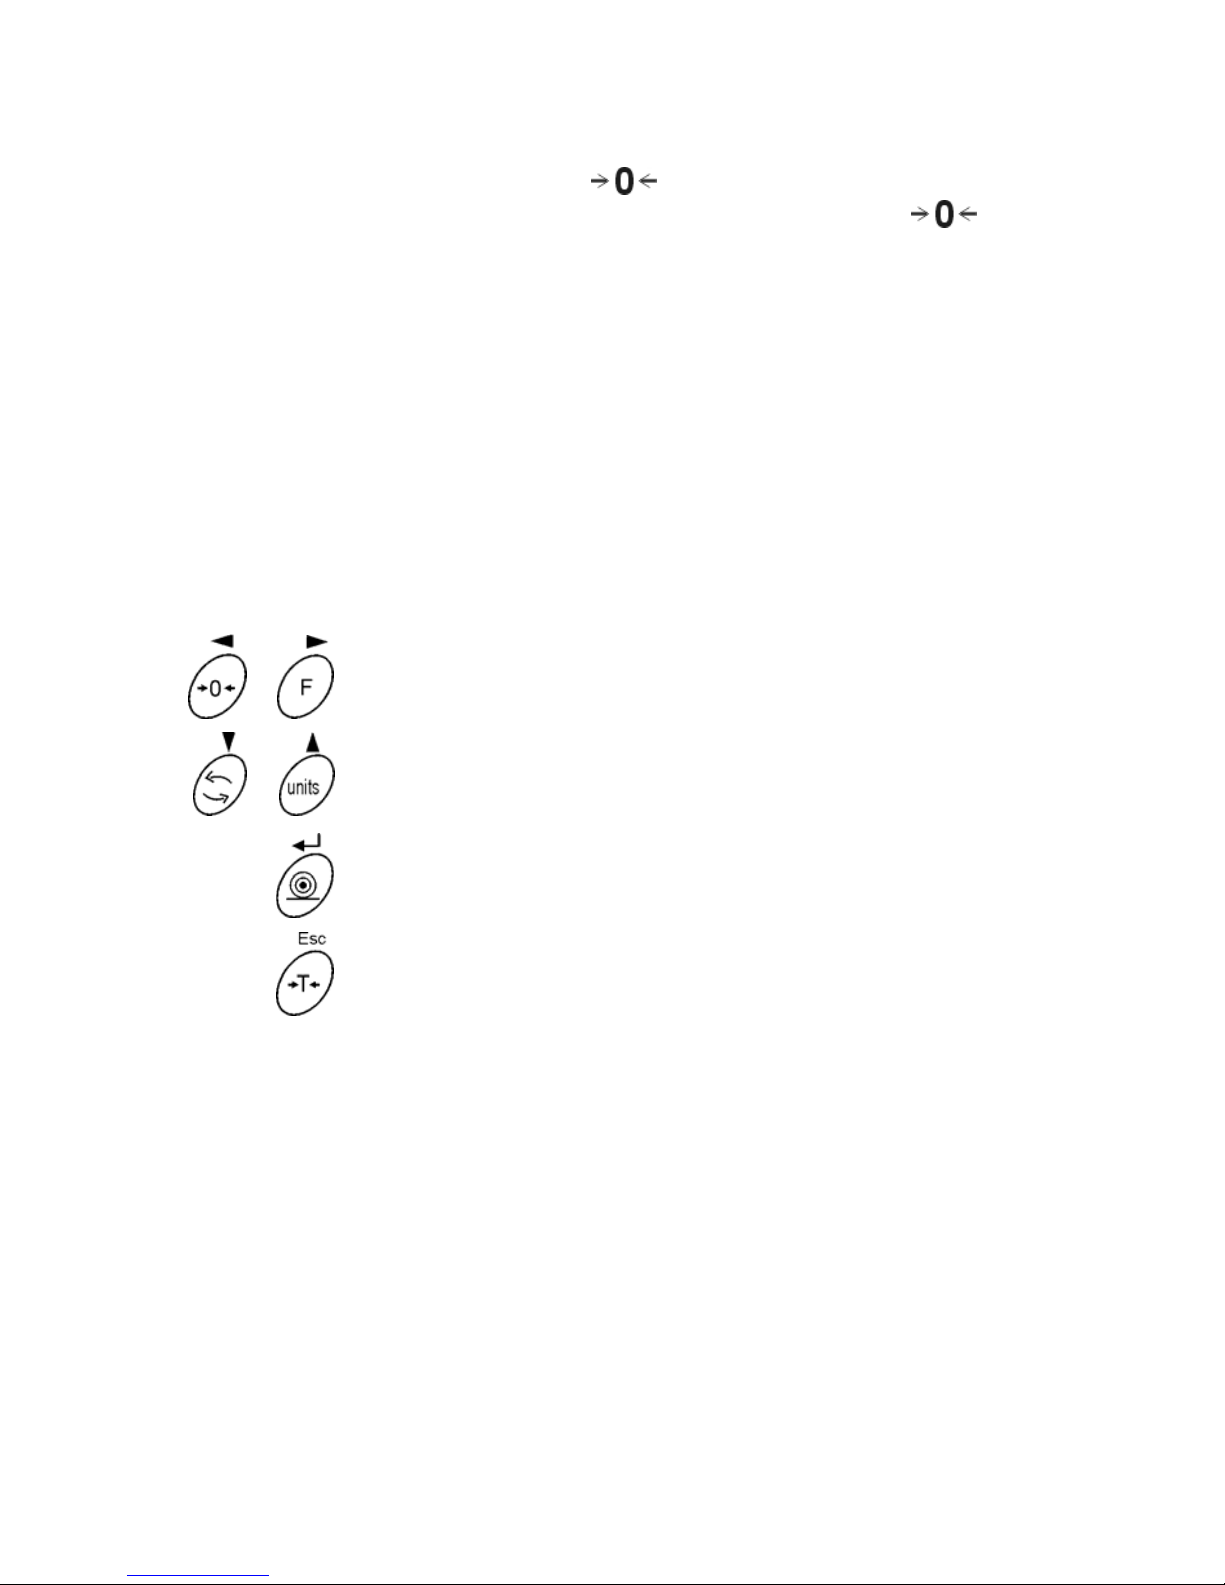
6.2. Keyboard
Each key is dual-function key. Particular function can be done through.
User also can move in the balance menu.
Zeroing
Function key
Selects the work mode
Changes measure units
Sends information to external instrument (PRINT)
or confirms parameter value or function (ENTER).
Tarring
6.3. Connecting sockets
Sockets of the WTX
1 Power adapter socket
2 Add display connector
3 RS 232 port
4 PS keyboard connector
5 RS 485 port
6 Power supply
- 9 -

Sockets of the WLX
1 – Add display connector
2 – PS/2 port
Sockets of the WLX
1 – Power supply
2 – RS 232 port
7. USER MENU
7.1. Overview of parameters
User’s menu comprises 9 groups of parameters signed by P.
Below you can see listed groups and parameters.
P1 Calibration
01 Ext. calibr.
|
********
|
function
02 User calibr.
|
********
|
function
03 Print report
|
1
|
on
P2 GLP
01 User
|
Nowak Jan
|
02 Project
|
AR - 65 / 04
|
03 Time print
|
0
|off
04 Date print
|
0
|off
05 User print
|
0
|off
06 Project print
|
0
|off
07 Id print
|
0
|off
08 Last cal print
|
0
|off
P3 Date/ Time
01 Date format | 0 | DA/MO/YR
02 Time format | 0 | 24 hours
03 Time |
********
| function
04 Date |
********
| function
05 Disp. Time | 1 |
on
06 Disp. Date | 1 |
on
P4 Readout
01 Filter | 3 | normal
02 Median filter | 3 | normal
03 Disp. refresh | 1 | 0.1s
04 Autozero | 1 | on
05 Last digit | 1 |
always
06 Negative
|
0
|
no
- 10 -

07 Aut. tare
|
0
|
no
P5 RS - 232
01 Baud rate
|
1
|
9600
02 Parity
|
0
|
none
03 Data bits
|
2
| 8 bit
s
1 bit
04 Stop bits
|
1
|
05 Handshake
|
0
| none
06 Auto print
|
0
| none
07 Interval
|
1
| * 0.1 s
08 Min. mass
|
4
| 10 d
09 Print on stab
|
1
| enabled
10 Pause
|
0
| * 0.1 s
P6 Printout
01 Printout mem
|
0
|
function
02 Printout dest.
|
0
|
RS
03 Printout No.
|
0
|
Standard
04 Pr. mem. No.
|
0
|
Standard
05 Pr. 1 start
|
1
|
06 Pr. 1 stop
|
1
|
07 Pr. 2 start
|
1
|
08 Pr. 2 stop
|
1
|
.... ……........
|
|
13 String 1
|
|
14 String 2
|
|
.... ……........
|
|
92 String 80
|
|
P7 Units
01 Grams
|
1
|
enabled
02 Kilograms
|
0
| disabled
03 Pounds
|
0
| disabled
04 Ounces
|
0
|
disabled
05 Ounces troy
|
0
| disabled
06 Carats
|
0
| disabled
07 Dwt
|
0
| disabled
08 Taele Hk.
|
0
| disabled
09 Taele S.
|
0
| disabled
10 Taele T.
|
0
| disabled
11 Momms
|
0
| disabled
12 Grains
|
0
| disabled
13 Newtons
|
0
| disabled
14 Tical’ e
|
0
| disabled
15 Custom
|
0
| disabled
16 Custom factor
|
1
|
P8 Work modes
01 Parts Counts
|
1
|
enabled
02 Checkweighing
|
1
|
enabled
03 Filling
|
1
|
enabled
04 Percent
|
1
|
enabled
05 Animal
|
1
|
enabled
06 Density
|
1
|
enabled
07 Formulation
|
1
|
enabled
- 11 -
08 SQC
|
1
|
enabled
09 Statistics
|
1
|
enabled
P9 Globals
01 ID setting
|
********
|
function
02 ID autoprint
|
0
|
off
03 Beep
|
1
|
enabled
04 Language
|
********
|
function
05 Backlight
|
1
|
on
06 Contrast
|
********
|
function
07 Screenserver
|
0
|
enabled
08 Balance ID
|
214493
|
09 Software rev.
|
MBT e31
|
10 Par. Printout
|
********
|
function
11 Par .receive
|
********
|
function
12 Factory deff.
|
********
|
function
13 Password
|
0
|
Parameters in user’s menu are:
• functional – for particular activity e.g. the balance calibration
• selectable – selects one of few values from the balance memory
• noted – changes sets in the balance memory e.g. Date, time, user
number, texts
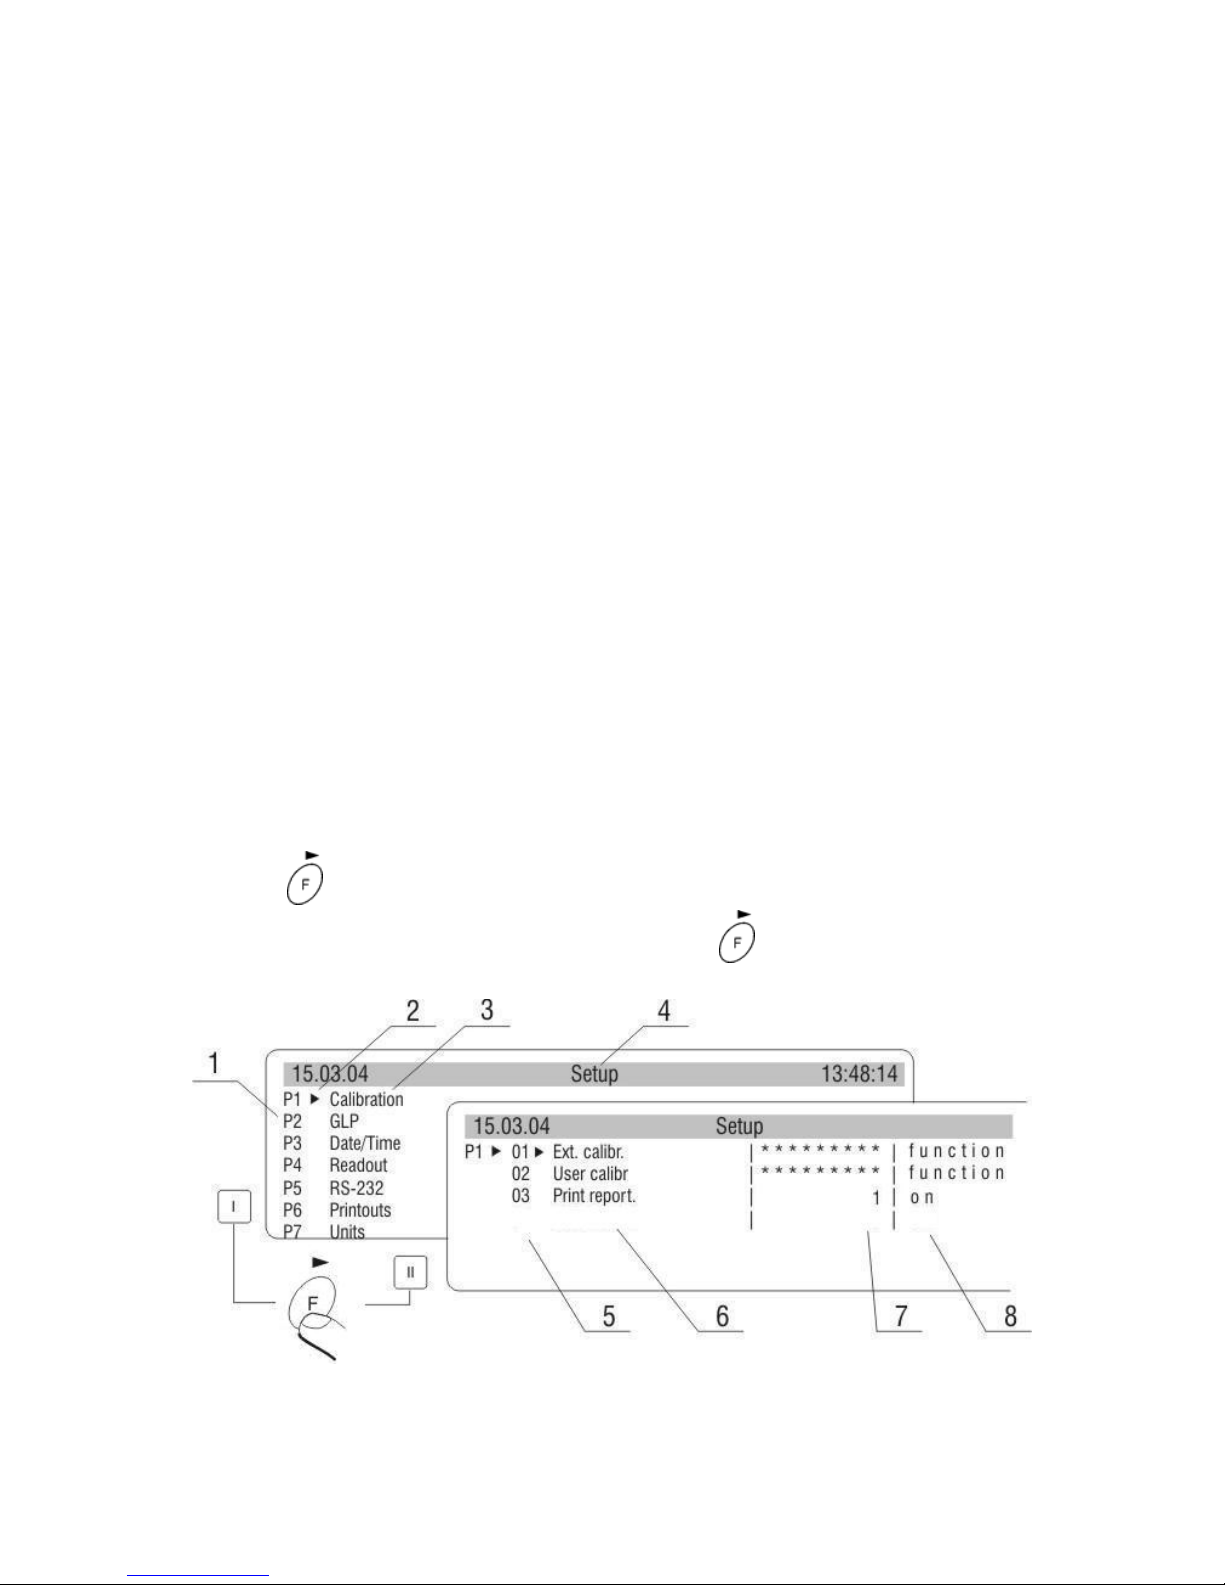
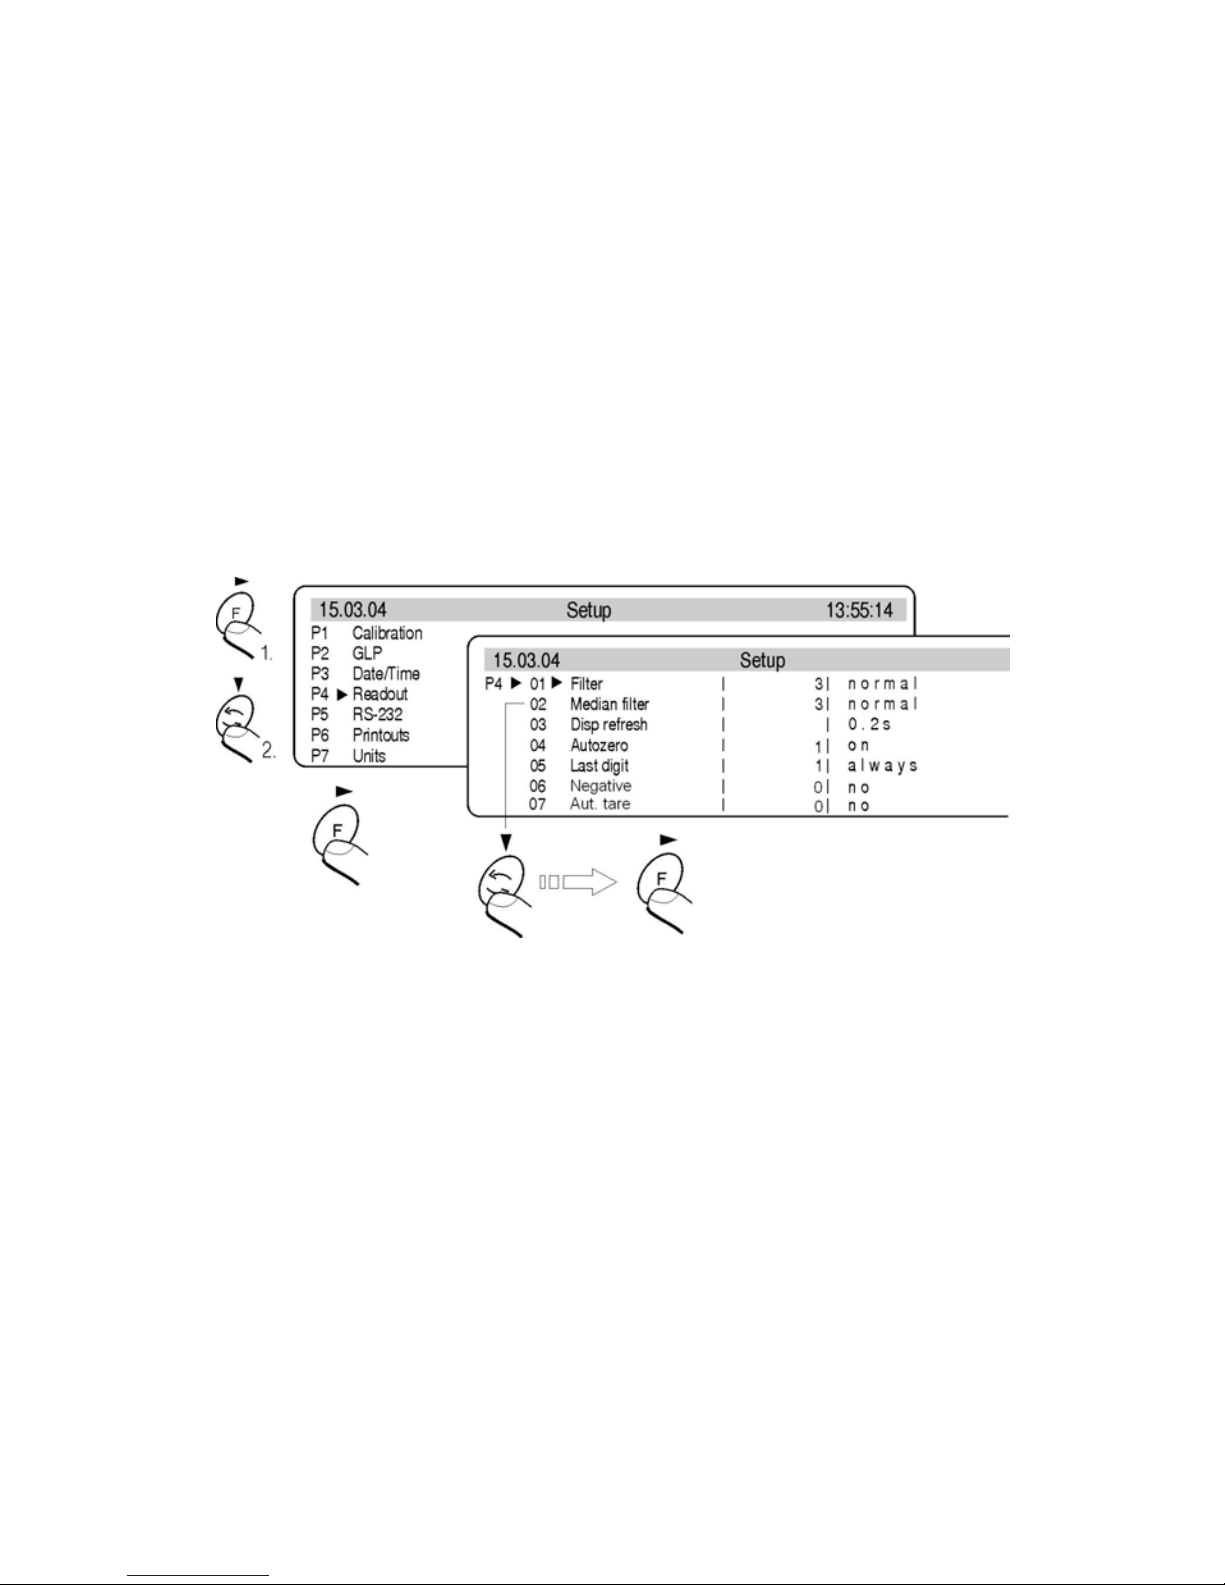
7.2. Menu - graphic version
Press the key to display main menu of the balance. Select the submenu
whose contents is displayed after pressing the
key.
View of balance menu
- 12 -
1 Number of main menu
2 Choice of function marker
3 Name of function
4 Name of currently performed activity
5 Number of submenu
6 Name of submenu
7 Attribute of submenu
8 Value referring to attribute
Press the key. Selected menu appears on the display. Select what will
be changed in this submenu (activate). Select through keys presented on
the drawing above. Press the
key. Reaction of the balance:
• Activity of the balance (e.g. the balance calibration) is done from
submenu described as Function,
• Attribute activation for submenu which is indicated (digit flashing
means the value can be changed and some characters can be
written).
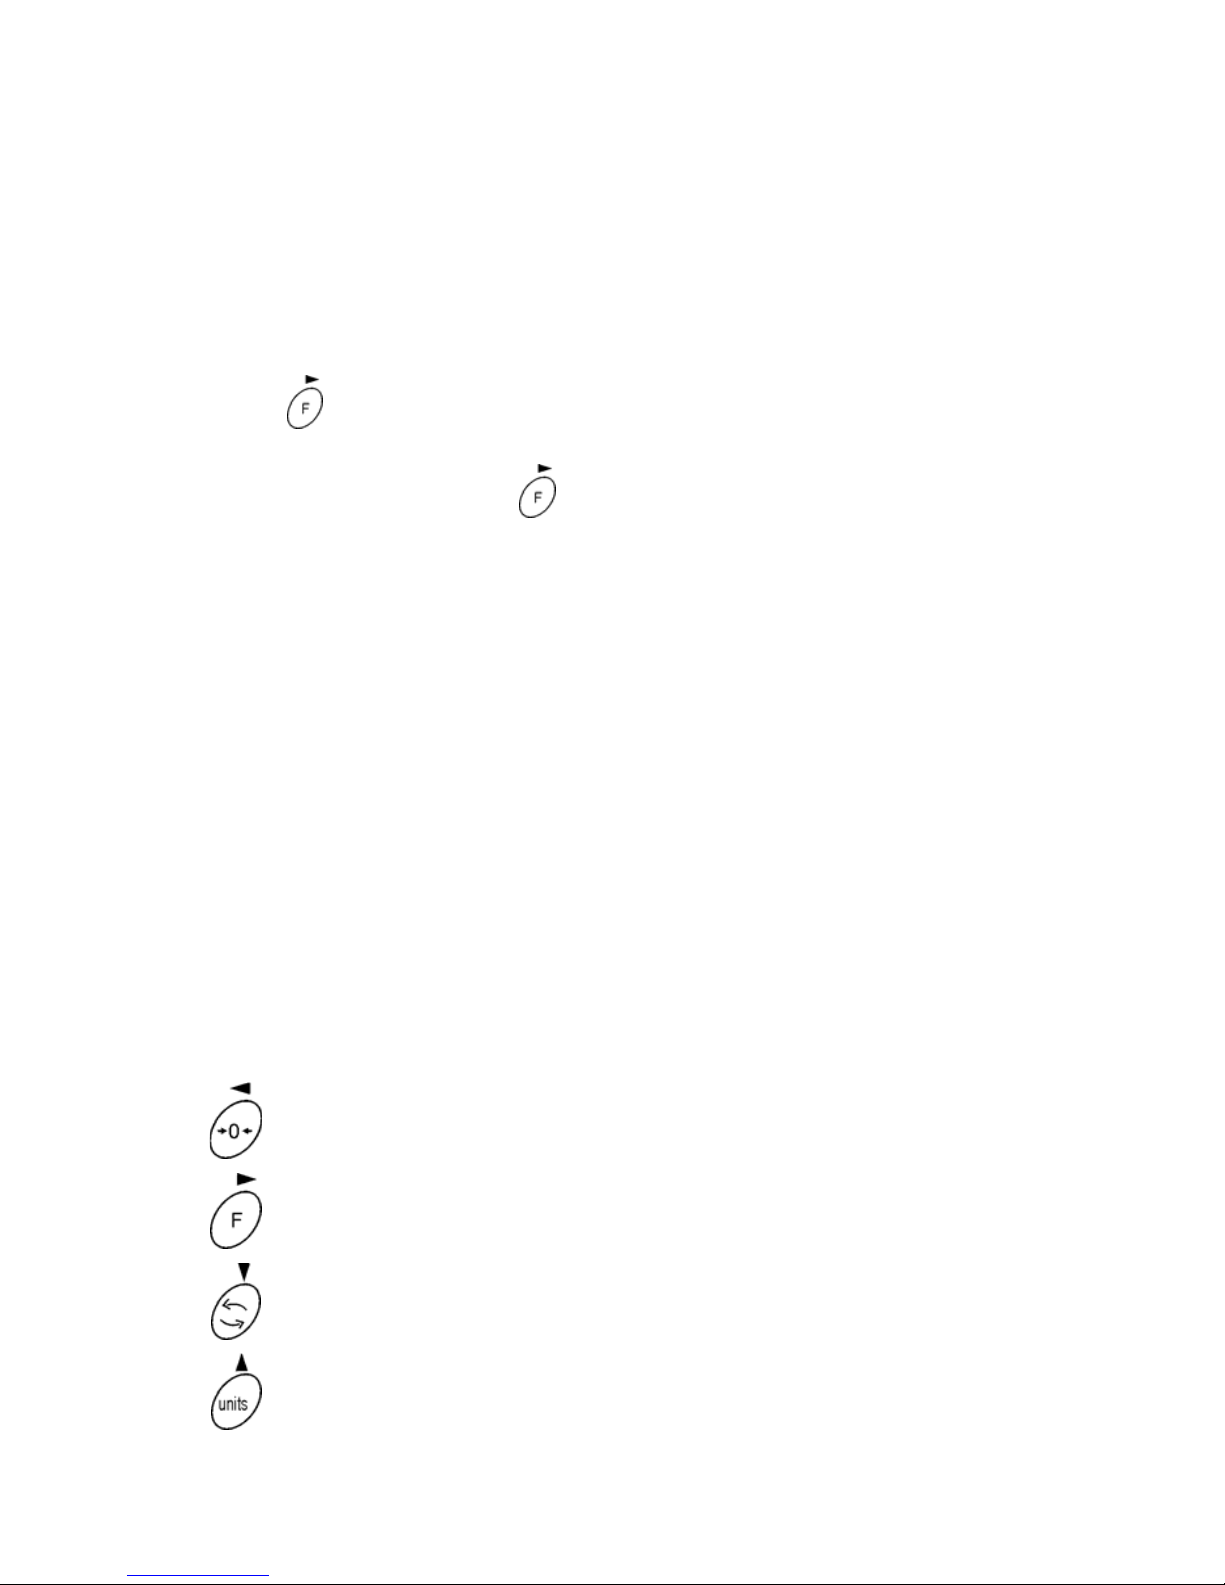
7.3. Navigating within the menu
User moves in the menu by:
• the balance keyboard,
• PS keyboard.
7.3.1. By means of balance keyboard
Exit to one step higher level to menu
Entering parameter edition
Moving cursor downwards
Moving cursor upwards
- 13 -

Confirmation of introduced values
Cancellation of changes, menu exit
7.3.2. By means of PC keyboard
Every operation that can be made from the level of the balance keyboard
Has its equivalent on the PC keyboard level:
Move to the balance menu
Selects work mode
Selects measure unit
PRINT
TARE
Move up
Move to level up
Sets selected parameter
Move down
Confirm changes
Cancel and leave function without changes
- 14 -
7.4. Return to weighing
Introduced changes in settings will be saved after return to
weighing mode with procedure of saving changes. After
introducing all changes in parameters settings press several
times ESC key. When display indicates message, choose
one of two options:
ENTER – save changes
ESC – without saving
8. WEIGHING
Following conditions must be fulfilled to get reliable results:
• Stable temperature
• Stable ground
• Proper parameters for external conditions
Before measurements load the pan and check if the balance show
„precise zero” – displayed
in down left corner of the display
(only if the parameter <P4 06 Autozero> has the value 1: yes) and
check if the measurement is stable –
is displayed in right up
corner of the display. If the balance does not show zero press
the key
If the conditions are unfavourable (no stable result) lines appear on
the display. After settled time the balance returns to weighing mode
without set up to zero. In this case wait until the conditions stabilize
and press Esc again.
By the Units key select measure unit. Put the load on the pan and
after stabilization read out the result. If measure unit user wants to
use is not displayed during pressing the Units key check if it has
access attribute.
The indication can be set to zero many times. Sum of loads noted
in the balance memory cannot be higher than max capacity.
Between following measurements do not unplugged the balance.
The balance should be switched off by the ON/OFF key. After
pressing the key again the balance is ready to work without warm
stabilization.
- 15 -
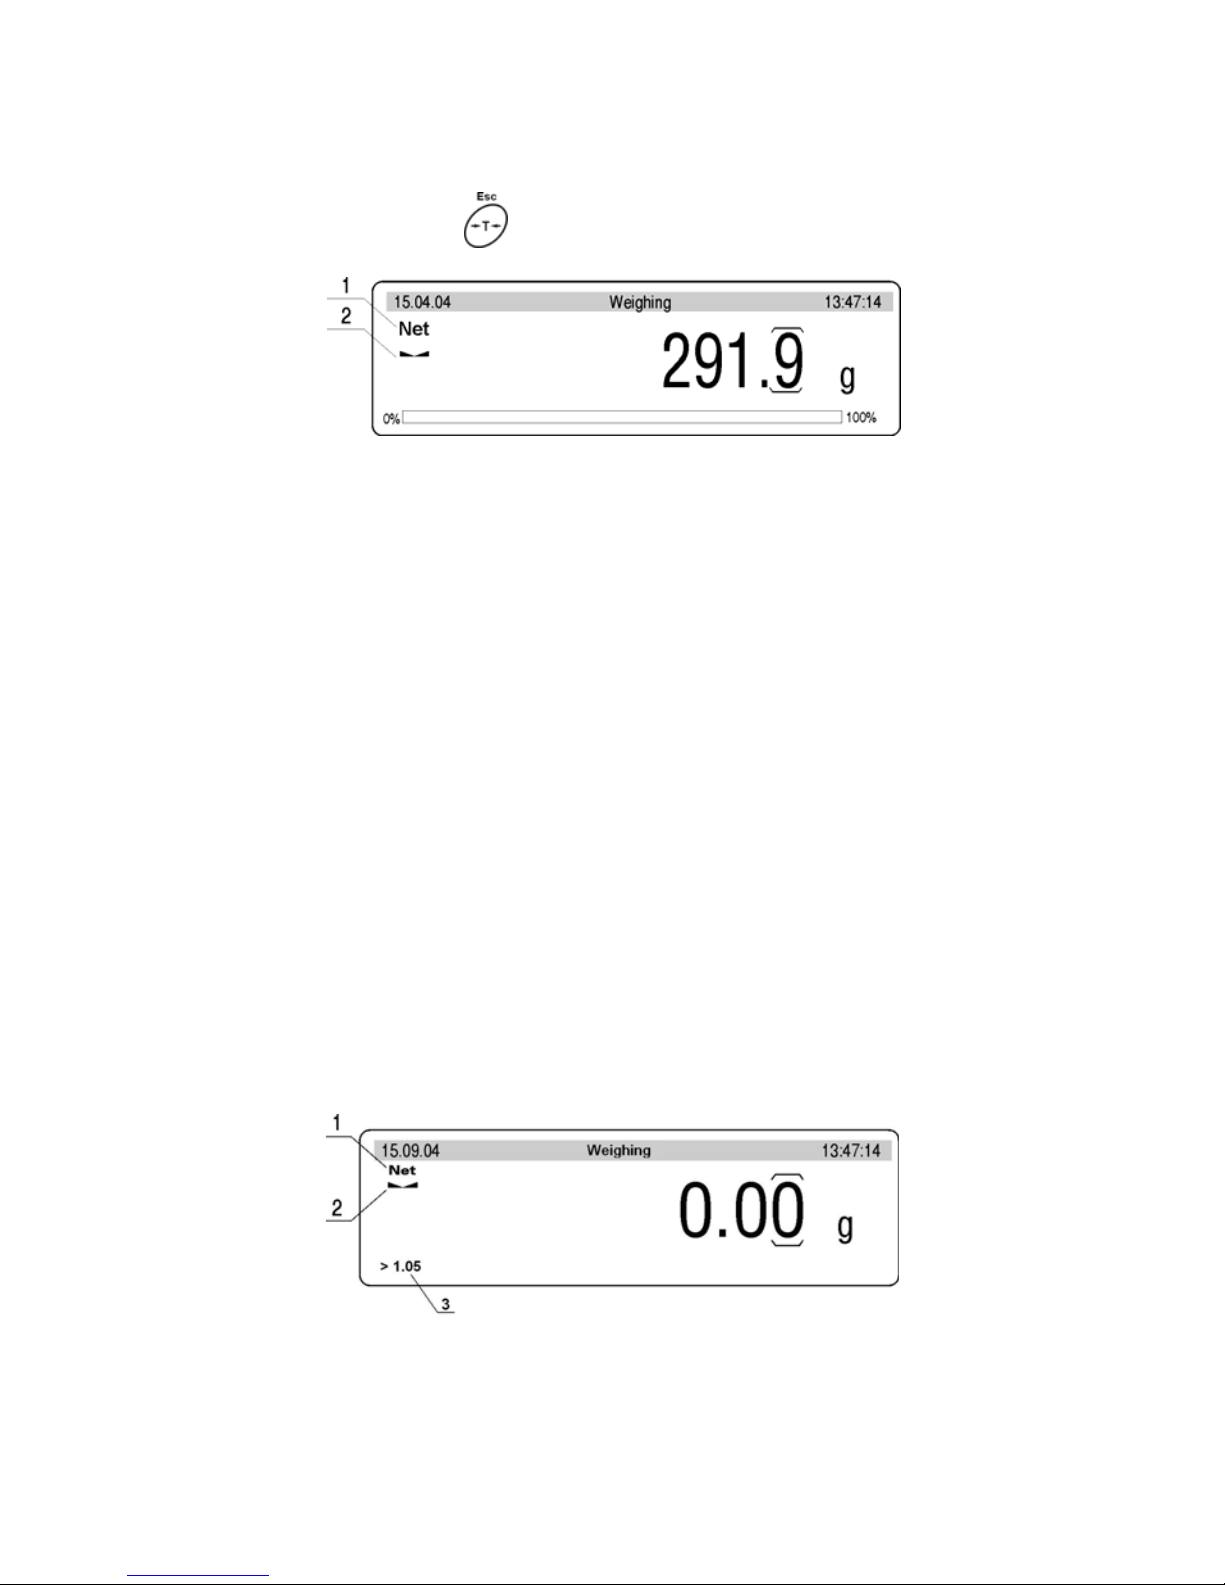
8.1. Tarring
For determining net mass place on the pan package of load and when
indication is stable press
key.
Tarring – display view
1 TARE signature (NET is being displayed)
2 stable result signature
Tarring can be performed repeatedly in the whole balance weighing range.
Using tare function pay attention not to exceed the maximum weighing
range. After removing the load and package display will indicate mass
equal to mass of tare with minus sign.
Notice:
Tare value is not stored in balance memory and is deleted after
disconnecting from mains
8.2. Manual inscribing of tare value
Inscribing the tare value in weighing mode:
• Inscribe a tare value in a display format e.g. if a basic unit is „kg”
with a division 0,005kg and you want to enter 1.05kg as a tare value,
inscribe it as: 1.050,
• After pressing the first digit you can see an editing field in the last line.
Inscribing tare value – display view
1 TARE value entered
2 stable measurement pictogram
3 inscribed tare value
- 16 -
• Press T key
• You will see the tare value with “– “ sign on the display
• Tare value can be inscribed any time during weighing
Notice
Use “point” for decimal fractions.
8.3. Automatic tare
This function is useful for quick determining net mass of weighed goods
when tare values are different for each weighings. It is accessible in
<P4 Readout> parameters group.
Enabling function:
Automatic tare – enabling
After setting an appropriate value of the parameter return to weighing
7.4. of this manual.
The way of operation:
• Press ZERO button when the pan is empty,
• Put a package on the pan,
• After stabilizing tarring is performed (Net designator is displayed
in the top left corner of the display),
• Put an article on the pan,
• The display shows the net mass of the article,
• Unload the pan,
• Indication returns to zero,
• Put the next package … and the cycle repeats.
- 17 -
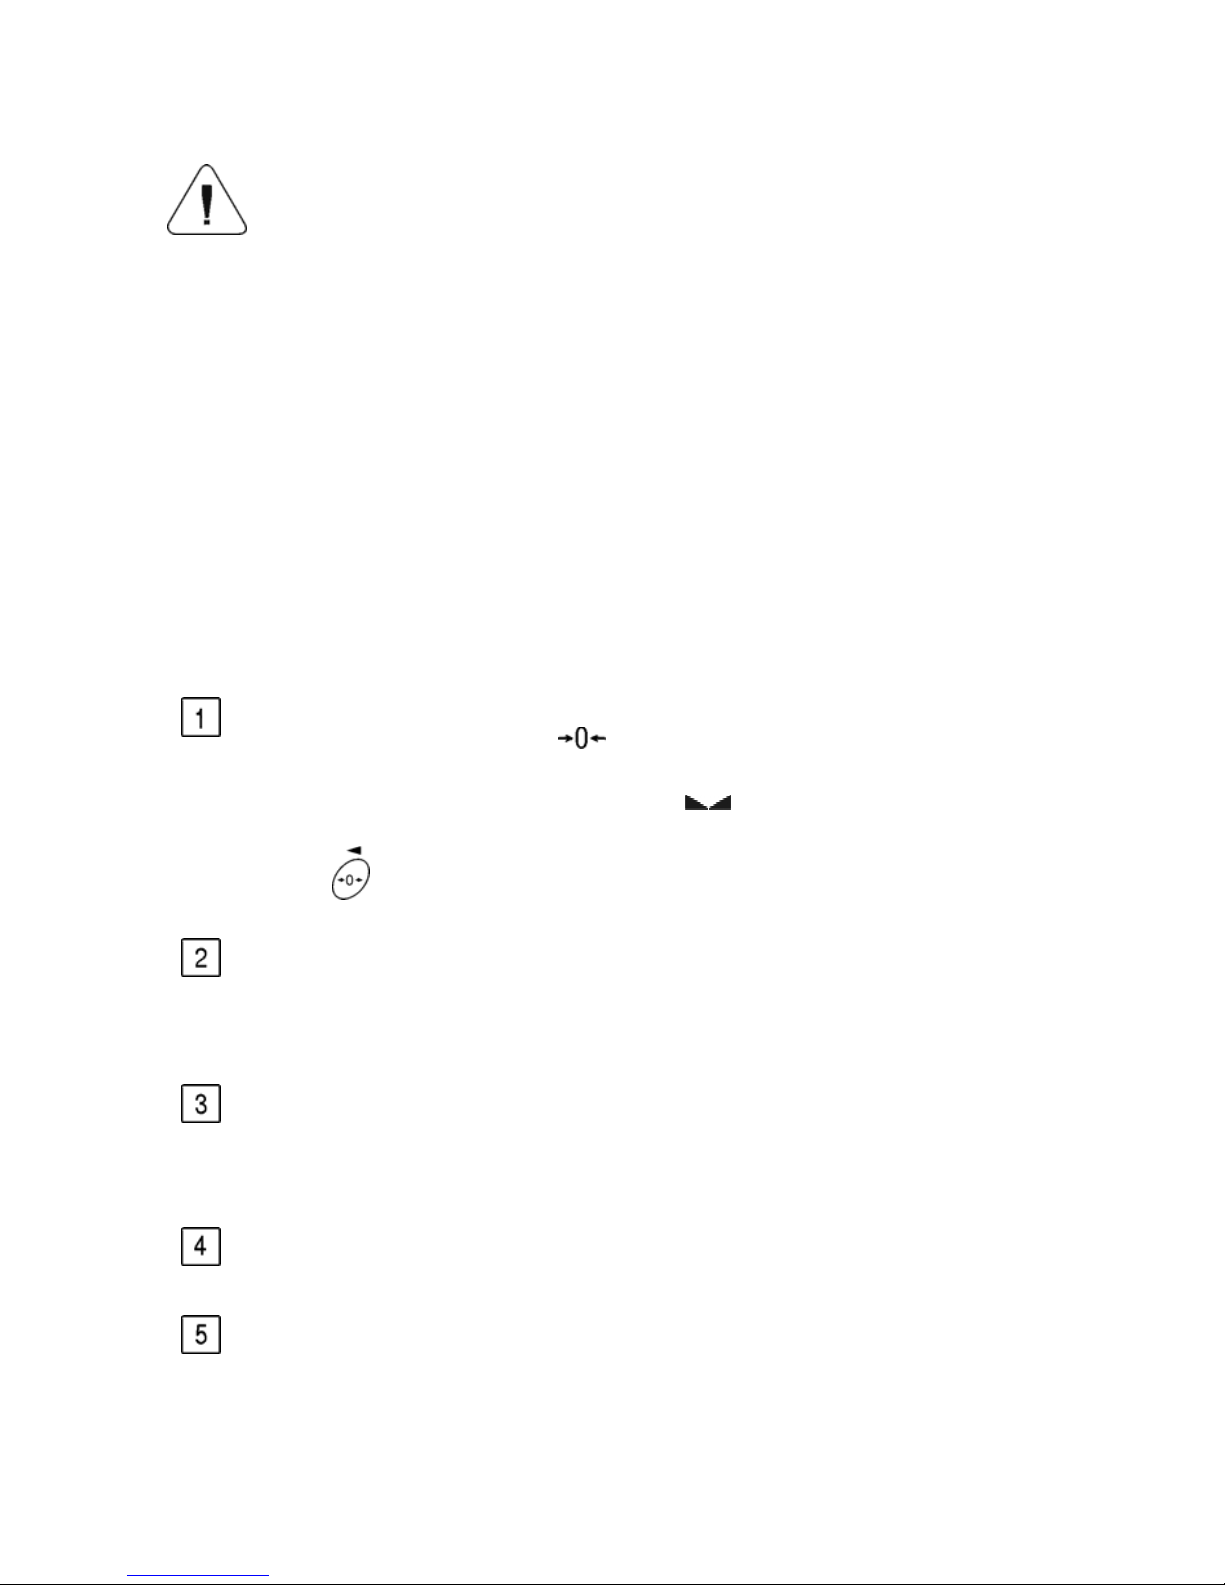
8.4. Zeroing
For zeroing display indication press
key. Indication will return to zero
and display will indicate a graphic signature in left lower corner
.
Zeroing of indication is possible only in range of 2% of maximum capacity
currently displayed balance/platform. If zeroed value is bigger than 2% of
maximum capacity display will indicate error message and return to
displaying previous value – for main balance or displayed mass will
not change.
Notice:
Balance zeroing determines a new zero point treated by balance as precise
zero. Zeroing is possible only in stable states of the indication.
8.5. Functions of keys
+
Select field (digit) to change
+
Change value of selected field
Confirm value
Canceling
9. BALANCE CALIBRATION
To ensure very high accuracy of weighing, periodical entering to memory
correction factor of balance indication referring to standard mass is
required; it is so called balance calibration. The procedure of calibration
can be performed only by authorized services of the manufacturer.
- 18 -
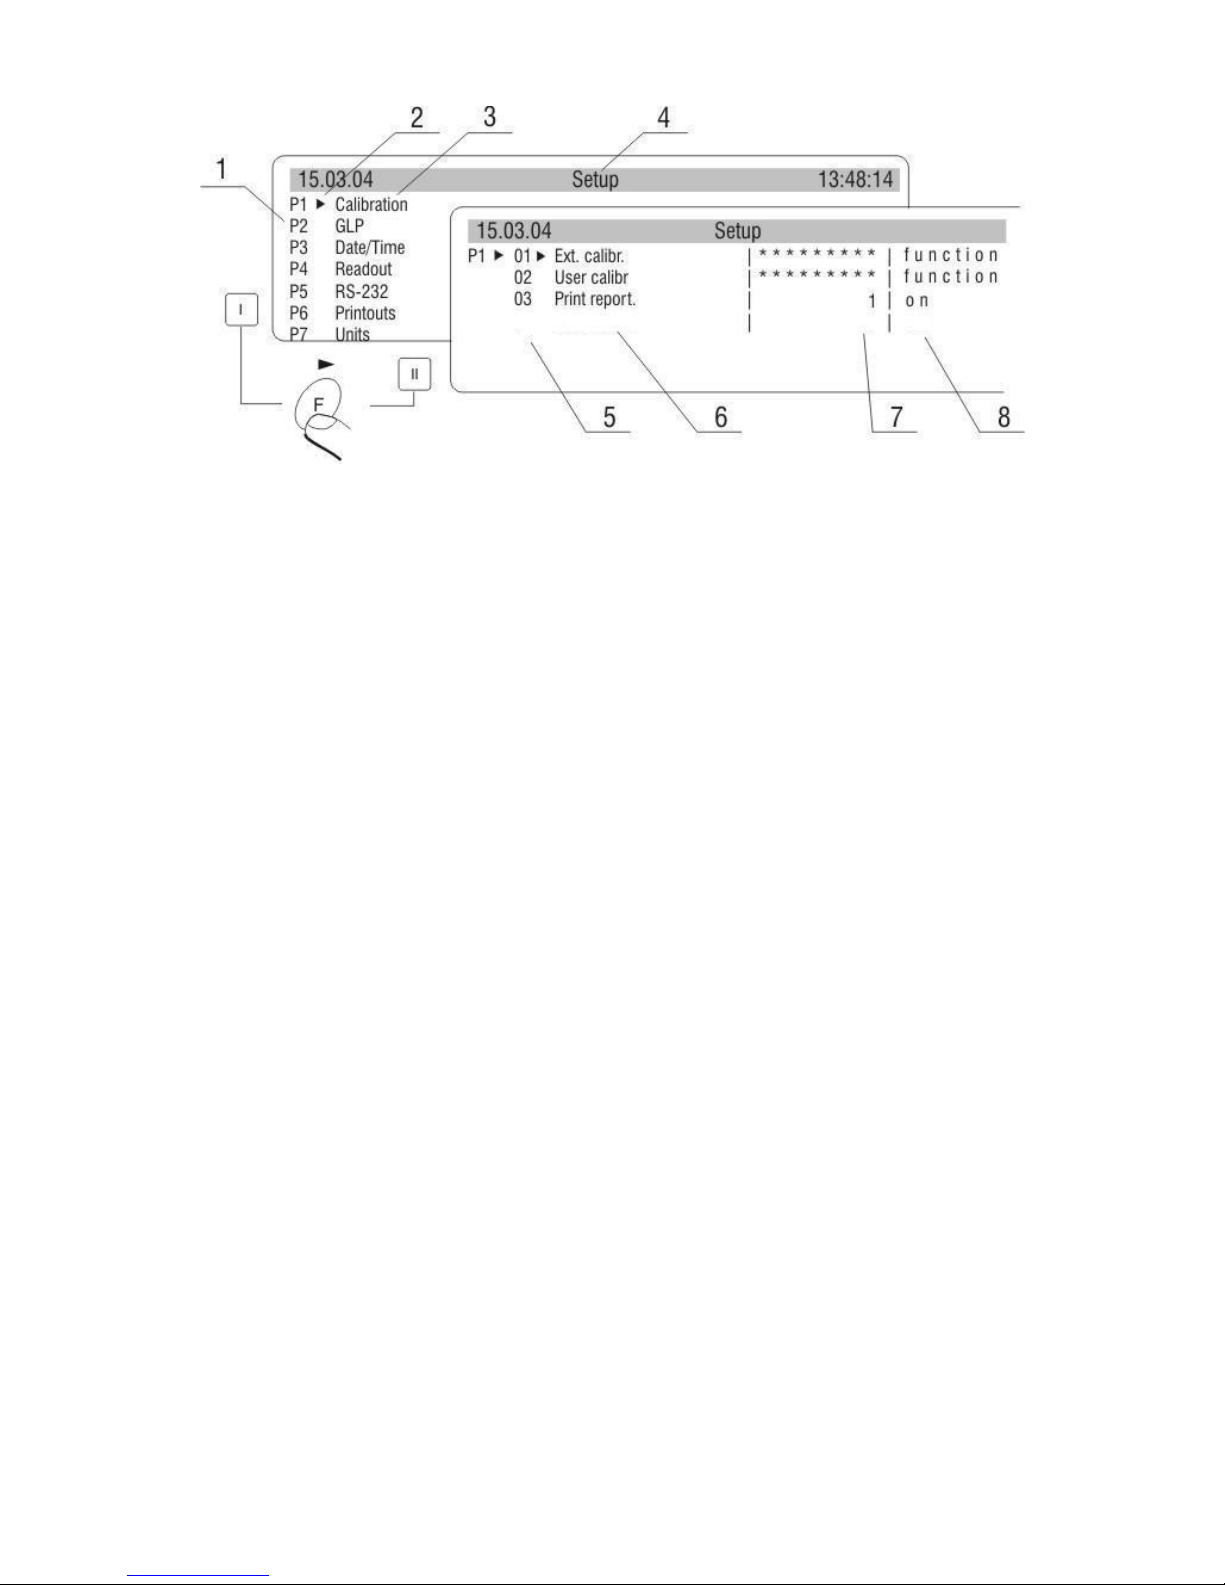
Internal setting of calibration
1 Main menu number
2 Cursor
3 Group of parameters
4 Status bar
5 Parameter number
6 Parameter name
7 Parameter value
8 Parameter description
Notice:
In verified scales calibration can be accessed from the user’s menu.
Calibration should be performed with no load on the pan.
10. SETTING OF PRINTOUTS CONTENTS FOR GLP PROCEDURES
P2 GLP his group of parameters allows to enable/disable printing some
variables on the standard printout and calibration report.
For variables:
User and project name (max 8 alphanumerical characters) enter na mes
with balance keyboard or with PS/2 keyboard.
For remaining fields, select digits:
• 0 no (do not print during report)
• 1 yes (p rint during report)
- 19 -
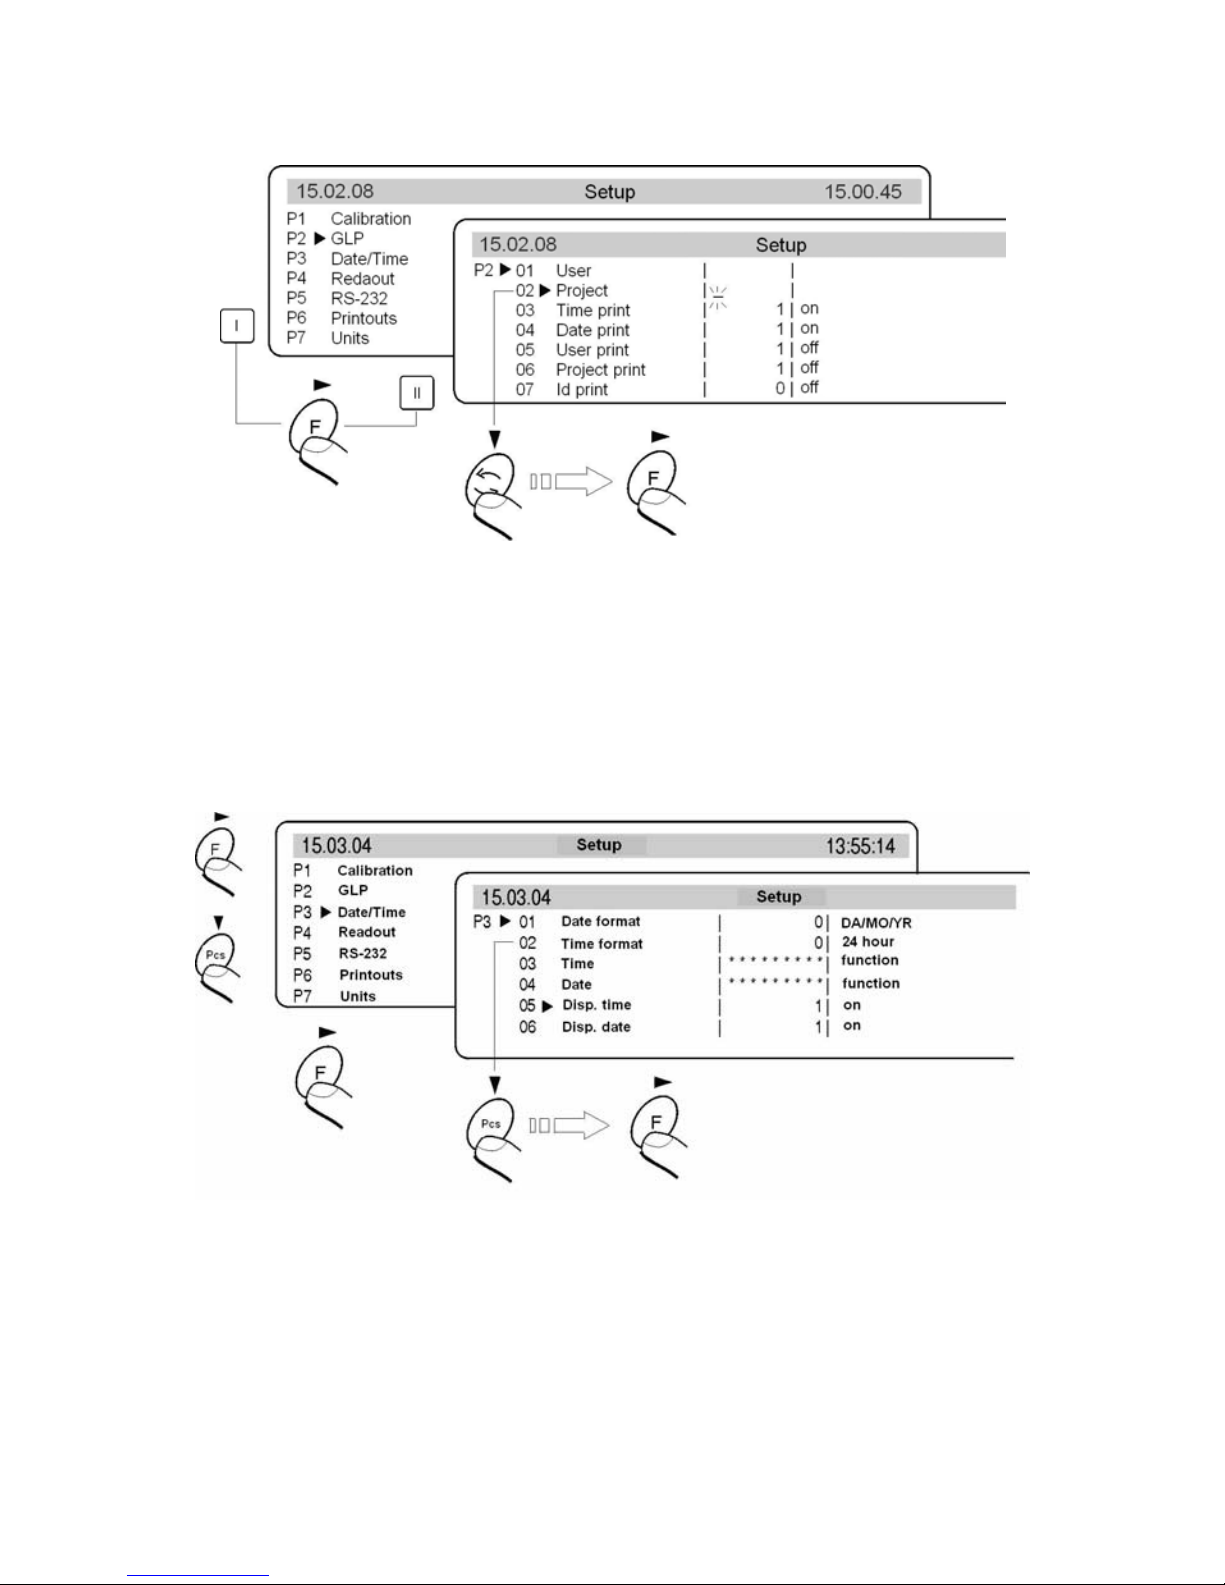
Main view of GLP parameters:
GLP submenu
11. TIME AND DATE SETTING
Balances have a real time clock, which can be modified. Enter menu
group <P3 Date/Time> according to the below scheme:
Date/Time submenu
01 Date format
Has doublestate choice according to below dependance:
1 date format Month/Day/Year
0 date format Day/Month/Year
After choice of appropriate value confirm with ENTER key.
- 20 -

02 Time format
Has doublestate choice according to below dependance:
1 time format 12 hours
0 time format 24 hours
After choice of appropriate value confirm with ENTER key. Format 12
hours is diffrentiated by placing letters PM or AM on printouts.
03 Time
With F key enter parameter <03 Time> setting according to below scheme.
Submenu Date / Time – time setting
Set cursor next to value which os to be changed (Hour, Minute, Second).
Confirm choice pressing F key. Using keys Pcs and n change values.
Submenu Date/Time – time setting – steering keys
- 21 -
 Loading...