

Page 1
882438304A Version 1.0
Page 2

9.7 REC-TIME .............................................................. 19
9.6 STOP ......................... 19
DDDD
DTR 9000TWINDTR 9000TWIN
1. Einführung ...................................................... 2
2. Ausstattungsmerkmale ..................................... 3
3. Sicherheitshinweise .......................................... 4
4. Das Gerät und seine Funktionen ..................... 5
4.1. Funktionen der Fernbedienung ..................... 5
4.2. Bedienelemente auf der Frontbedienung ...... 6
4.3. Anschlüsse an der Geräterückseite .............. 7
5. Inbetriebnahme .................................................. 8
5.1. Inbetriebnahme des Receivers ..................... 8
5.2. Allgemeine Einstellungen ............................. 8
6. Schnellstart ........................................................ 9
6.1. Einschalten des Receivers ............................ 9
6.2. Neuinstallation ............................................. 9
6.3. Programmauswahl ....................................... 10
6.4.
Lautstärkeregelung / Stummschaltung des Tons
... 10
6.5. Radiobetrieb ................................................ 10
6.6. Auswahl des Audio-Modus .......................... 10
6.7. Programmlisten und Sortiermanager ............ 11
6.8. Programminformationen ............................... 11
6.8.1 EPG-Taste ........................................... 11
6.8.2 INFO-Taste .......................................... 12
6.9. Untertitel und Videotext ............................... 12
7. Erweiterte Bedienung ........................................ 13
7.1. Programmsuchlauf ....................................... 13
7.1.1 Automatischer Suchlauf ...................... 13
7.1.2 Manueller Suchlauf .............................. 13
7.2. Programmlisten ............................................ 14
7.3. Timer-Aufnahme .......................................... 15
8. Hauptmenü-Anleitung ....................................... 17
8.1. Allgemeine Einstellungen ............................. 17
8.2. Programmlisten ............................................. 17
8.3. Programm-Manager ..................................... 17
8.4. Zugangsberechtingung ................................. 18
8.5. Geräte - informationen .................................. 18
9. Videorecorder-Aufnahme ........................................... 19
9.4 Timer-Aufnahme .................................................... 19
9.5 EPG-Aufnahme ...................................................... 19
...................................................................... 19
9.1 Tuner 2(VCR)-Kanal-Anzeige.............................................. 19
9.2 Direkt-Aufnahme .................................................... 19
9.3 Aufnahmestatus ..................................................... 19
10. Zusatzinformationen ................................................. 20
10.1 Upgrade der Receiver-Software ........................... 20
10.2
Software-Übertragung (von Receiver zu Receiver)
...... 20
10.3 Master-Passwort .................................................. 20
11. Problembehebung ................................................... 21
12. Recycling und Entsorgung ...................................... 21
13. Technische Daten ................................................... 22
INHAL T
Page 3

Einführung
Ausstattungsmerkmale
2 3
1. Einführung
DD D
DIGITALER TERRESTRISCHER RECEIVERDIGITALER TERRESTRISCHER RECEIVER
DTR 9000TWINDTR 9000TWIN
Vielen Dank, dass Sie sich für den Kauf dieses digitalen terrestrischen Receivers entschieden haben. Unsere
Fertigungsstätten garantieren bei der Receiver-Herstellung den strengen Qualitätsstandard nach ISO 9002.
Sie sollen so schnell wie möglich Ihre Lieblingsprogramme sehen können - deshalb haben wird das Menü
ganz nach Ihren Bedürfnissen gestaltet. Damit Sie sich mit Ihrem Gerät gründlich vertraut machen und alle
gebotenen Möglichkeiten zum Bedienen und Programmieren nutzen konnen, lesen Sie bitte diese
Bedienungsanleitung sorgfältig.
Vielen Dank, dass Sie sich für diesen digitalen terrestrischen Receivers entschieden haben. Mit dem Kauf
dieses Gerätes haben Sie sich auf die Zukunft eingestellt und können von einer Vielzahl von übertragbaren
Programmen und zusätzlichen Diensten, wie z. B. elektronischen Programmführern, profitieren, die sich als
Standard durchsetzen und die herkömmliche analoge Übertragung ersetzen werden.
Ist eine Einsendung des Receivers erforderlich, verwenden Sie bitte die Originalverpackung, und senden Sie
das Gerät vollständig mit Zubehör. Legen Sie eine Kopie der Rechnung oder des Kassenzettels sowie eine
genaue Fehlerbeschreibung bei. Senden Sie bitte das Gerät vollständig frankiert und frei Haus ein, und
lassen Sie alle Reparaturarbeiten von einem autorisierten Fachhändler durchführen.
Wir wünschen Ihnen viel Freude mit diesem Produkt.
2. Ausstattungsmerkmale
Grundlegende Ausstattungsmerkmale
• Einfache Bedienung über Bildschirmmenu (OSD)
• 2 SCART-Anschlüsse fur Fernseher und Videorecorder
• Cinch-Audioausgänge für HiFi-Verstärker und Digital Audio
• Infrarot-basierte Fernbedienung
• RS232 - Serielle Schnittstelle für den Anschluss eines PCs
• Anzeige für Signalstärke zur einfachen Setup-Programmierung
• Audio-Wiedergabe in CD-Qualität
• Lautstärkeregelung (in 32 Stufen)
• Videotext, von interner Software unterstützt
• Untertitelfunktion (digitales Fernsehen DVB und Videotext)
• Favoritenprogramm-Funktion
• Vorheriger-Kanal-Aufruf-Funktion
• Veränderliches Bildformat (4:3,16:9)
• Elektronischer Programmführer (EPG) für 7 Tage
• Multi-Sprachfunktion
• S-Video Ausgang
• Digital Audio (AC3) SPDIP mit cinch und optischer Steckfassung
• 2 x Tuner
• VPS Funktion
• Netzschalter(Rückwandblech)
• Ereignis-Timer für zehn Sendungen
• Kindersicherung für Programm- und Receiverzugang
• Fünf Sortiermethoden (Normal, alphabetisch, Pay-TV/frei empfangbar)
Page 4

Das Gerät und seine Funktionen
5
Sicherheitshinweise
4
4. Das Gerät und seine Funktionen
4. 1 Funktionen der Fernbedienung
4.1.1 Grundlagen
When inserting batteries into the remote control unit.
make sure that polarities match (+/-)!
Taste Funktion
Receiver (Set Top Box) ein- oder in Standby-Modus schalten
Zifferntasten (0-9)
Programme im Fernsehmodus aufrufen; numerische Werte innerhalb des
Menüs eingeben
EPG
Programminformationen eines Senders oder elektronischen Programmführer
(EPG) anzeigen
TV/RADIO Zwischen Fernseh- und Radiosendern umschalten
MUTE (Stumm) Ton stummschalten oder wiederherstellen
EXIT (Ende) Menü beenden
MENU (Menü) Fernsehmodus verlassen und Menü aufrufen
BACK (Zurück) Zum vorherigen Menü zurückkehren
INFO Aktuelle Programminformationen anzeigen
3. Sicherheitshinweise
Dieses Gerät dient ausschließ lich zum Empfang terrestrischer Signale und darf nur, wie in dieser
Bedienungsanleitung beschrieben, bestimmungsgemäß verwendet werden. Achten Sie darauf, dass das
Gerät für Kinder nicht erreichbar ist. Um Verletzungen zu vermeiden und Ihren Receiver vor Schaden zu
bewahren, beachten Sie bitte Folgendes:
WARNUNG:
Entfernen Sie niemals das Gehäuse oder Teile davon!
Vermeiden Sie jegliches Eindringen von Flüssigkeiten oder Fremdkörpern in den Receiver!
GEFAHR:
Decken Sie auf keinen Fall die Belüftungsöffnungen ab. Es besteht Brandgefahr durch
Überhitzung des Receivers!
GEFAHR:
Verwenden Sie ausschließ lich Original- oder vom Fachhandel empfohlene Ersatzteile.
Andernfalls kann es zu Sachschaden oder Verletzungen kommen. Bei Nichtbeachtung
erlischt die Garantie.
VORSICHT:
Schalten Sie das Gerät bei Gewitter oder längerer Nichtbenutzung aus.
Trennen Sie bei Gewitter zusätzlich das Antennenkabel.
ACHTUNG:
Zum Reinigen des Receivers ein sauberes, mit reinem Wasser leicht angefeuchtetes Tuch
benutzen. Verwenden Sie keine chemischen Zusätze!
ACHTUNG:
Stellen Sie das Gerät an einem gut belüfteten und kühlen Ort auf.
ACHTUNG:
Stellen Sie keine schweren oder nassen Gegenstände auf den Receiver. Sie können das
Gerät beschädigen.
ACHTUNG:
Vermeiden Sie das Folgende bei der Aufstellung des Gerätes:
- direkte Sonneneinstrahlung
- hohe bzw. sehr hohe Luftfeuchtigkeit
- zu hohe oder zu niedrige Temperaturen.
D D
DTR 9000TWINDTR 9000TWIN
POWER (Ein/Aus)
DIGITALER TERRESTRISCHER RECEIVERDIGITALER TERRESTRISCHER RECEIVER
Page 5
RF2 Eingang UHF/VHF-Antenneneingang für regionalen Fernsehempfang
Netzschalter Haupt- AN/AUS
RF2 Durchschleif Ausgang Antennen-Durchschleifausgang
RF1 Eingang UHF/VHF-Antenneneingang für regionalen Fernsehempfang
RF1 Durchschleif Ausgang Antennen-Durchschleifausgang
Ausgang für Digital Audio (optisch)
Optischer Digital-Ausgang zum Anschluss von HiFi- und Heimkino-Anlagen
mit integriertem Digital-Decoder (Dolby Digital und Linear PCM).
D
DIGITALEN TERRESTRISCHEN RECEIVERDIGITALEN TERRESTRISCHEN RECEIVER
Anschlüsse an der Geräterückseite
7
Bedienelemente auf der Frontbedienung
6
4.3 Anschlüsse an der Geräterückseite
Bezeichnung Funktion
Netzanschluss
Sie das Netzkabel erst nach dem Anschluss aller anderen Geräte an
eine Netzsteckdose an (95-250 V Wechselstrom, 50/60 Hz).
TV SCART-Anschluss Zum Anschluss Ihres Fernsehers über ein SCART-Kabel
VCR SCART-Anschluss Zum Anschluss Ihres Videorecorders über ein SCART-Kabel
VIDEO-Anschluss für
FBAS-Videoausgang zum Anschluss eines AV-Monitors usw
Videorecorder oder Fernseher
AUDIO-Anschluss für
Audioausgänge zum Anschluss einer HiFi-Anlage
HiFi-Anlage
RS-232-Schnittstelle Zum Anschluss an Ihren PC, wenn Sie ein Upgrade der System-Software
zum PC durchführen möchten.
4.2 Bedienelemente auf der Frontbedienung
STOP Aufnahme stoppen
REC-TIME Endzeit für die laufende oder eine vorgemerkte Aufnahme einstellen
REC Direkte Aufnahme
A/B Zum Master- oder Slave-Bild umschalten
Taste Funktion
CH UP und CH DOWN Im Menü zwischen den einzelnen Menüpunkten navigieren; Programme im
(Programm auf/ab) Fernsehmodus wählen
PAGE UP und PAGE DOWN
Durch die Seiten der Programmliste blättern
(Seiten auf/ab)
LEFT/RIGHT (links/rechts)
Einstellungen innerhalb des Menüs ändern; Programme im Fernsehmodus
wählen
VOL UP und VOL DOWN
Lautstärke einstellen
(Lautstarke auf/ab)
OK
Vom aktuellen Menu aus ein Untermenü aufrufen oder eine gewählte Menü-
Option ausführen;
im Fernsehmodus Programmliste anzeigen
AUDIO Audiosprache und Audio-Modus wählen
TIMER
Ortszeit einstellen oder Aufnahmeliste aufrufen, in der die Timer-Aufnahme
eingestellt werden kann
LAST (Letztes) Zum zuletzt gesehenen Programm zurückkehren
SUBTITLE (Untertitel)
Anzeige von Untertiteltext ein- oder ausschalten, wenn das Programm über
Untertitelinformationen verfügt (Untertitel für Hörgeschädigte)
TTX Videotext mithilfe der internen Software anzeigen
DTR 9000TWINDTR 9000TWIN
DD
Die Grundfunktionen dieses Gerätes (Ein-/ Ausschalten, Menü, Exit, OK, Cursor-Funktionen) können sowohl
mit der Fernbedienung als auch mit den entsprechenden Tasten am Gerät selbst bedient werden.
Der Infrarot-Sensor dient dem Empfang der Fernsteuersignale. Das aktuell empfangene TV- oder
Radioprogramm wird als vierstellige Nummer der Programmliste in der LED-Anzeige dargestellt.
DIGITALER TERRESTRISCHER RECEIVERDIGITALER TERRESTRISCHER RECEIVER
S-Video Ausgang
Analoger Video-Ausgang zum Anschluss von Heimkino-Anlagen mit
entsprechenden Eingangsbuchsen.
OPTICAL
1
10
11
12
13
6
7
14 8
9
2
345
PAUSE(Standbild)
Live- oder Wiedergabebildschirm vorübergehend anhalten
F1
Tuner ----------------
Ausgang für Digital Audio(koaxial)
Digital Audio(koaxial)
1
1
2
2
Schliesen
Page 6
98
die
9
Der
Je nach Receivermodell sind Ihre lokalen Fernsehsender möglicherweise nicht im Receiver vorprogrammiert.
Page 7
Programmauswahl
11
10
6.3 Programmauswahl
In den folgenden Schritten wird beschrieben, wie ein vorprogrammiertes Programm aufgerufen wird .
Zur Auswahl des gewünschten Programms haben Sie folgende Möglichkeiten.
• Wählen Sie das Programm mit den Zifferntasten.
• Wählen Sie das Programm mit den CH Auf- und CH Ab-Tasten auf der Fernbedienung oder am Receiver.
• Drücken Sie die OK-Taste und wählen Sie ein Programm aus der Programmliste aus.
Wählen Sie das gewünschte Programm und drücken Sie die OK-Taste. Das von Ihnen gewählte Programm
erscheint zusammen mit der Info-Box auf dem Fernsehbildschirm .
• Um zum zuletzt gesehenen Programm zurückzukehren, drücken Sie die LAST-Taste.
• Info-Box
Dieses Feld erscheint unten auf dem Fernsehbildschirm und liefert Informationen zum aktuellen Programm.
Angezeigt werden z. B. der Titel der laufenden und der nachfolgenden Sendung sowie die Qualität des
terrestrischen Empfangs und die Signalstärke. Wenn Sie ausführlichere Informationen wunschen, wählen Sie den
Titel der Sie interessierenden Sendung und drücken dann die INFO-Taste.
6.4 Lautstärkeregelung / Stummschaltung des Tons
Drücken Sie die VOL Auf- und VOL Ab- Tasten auf der Fernbedienung, um die Lautstärke
des Fernsehers einzustellen.
Wenn eine der beiden Tasten gedrückt wird, erscheint die Lautstärkeanzeige auf dem
Fernsehbildschirm:
Nach Beendigung der Einstellung wird die Lautstarkeanzeige automatisch ausgeblendet .
Drücken Sie die MUTE-Taste auf der Fernbedienung, um den Ton vorübergehend auszuschalten. Drücken Sie die
MUTE-Taste erneut, um die Stummschaltung rückgängig zu machen (Ton einschalten).
6.5 Radiobetrieb
Zusätzlich zu den Fernsehprogrammen können Sie mit dem Receiver auch Radiosender empfangen.
Um Radio zu hören, drücken Sie die -Taste auf der Fernbedienung.
Wenn Sie wieder fernsehen möchten, drücken Sie die -Taste erneut .
6.6 Auswahl des Audio-Modus
Dies umfasst die Einstellung der Audiosprache und des Audio-Modus. Die Audiosprache ist auf die als HauptAudiosprache unter “Allgemeine Einstellungen” gewählte Sprache eingestellt. Das heißt, Sie können diese Option nutzen,
um eine Fernsehsendung in einer anderen als der eingestellten Haupt-Audiosprache zu sehen. Wenn Sie nach dem
Ausschalten des Receivers die AUDIO-Taste nochmals drücken, erfolgt die Audiowiedergabe wieder in der HauptAudiosprache.
Drücken Sie die AUDIO-Taste auf der Fernbedienung
Zur Änderung der Audiosprache drücken Sie die LINKS/RECHTS -Tasten und wählen eine der vom Sender
angebotenen Sprachen.
Wählen Sie mit den LINKS/RECHTS-Tasten den gewünschten Audio-Modus. Die folgenden Modi stehen zur
Verfügung:
• Stereo : Der Ton kommt aus beiden Lautsprechern.
• Mono(L): Der Ton kommt nur aus dem linken Lautsprecher .
• Mono(R): Der Ton kommt nur aus dem rechten Lautsprecher .
• AC-3 : Dolby Digital (Zur Wiedergabe von Dolby Digital schließen Sie einen Verstärker mit Dolby-DigitalDecodierung an den SPDIF-Ausgang an.)
Um in den Fernsehmodus zurückzukehren, drücken Sie die AUDIO-Taste erneut oder drücken Sie die EXIT-Taste.
DTR 9000TWINDTR 9000TWIN
DD
Programmlisten und Sortiermanager
6.7 Programmlisten und Sortiermanager
Digitales Fernsehen bietet hunderte von Programmen.
Deshalb ist es sinnvoll, alle verfügbaren Programme in Listen
zu verwalten. In diesem Abschnitt wird behandelt, wie die
gewünschte Liste angezeigt und der Inhalt solcher Listen
sortiert wird. Dies ist besonders praktisch, wenn Sie rasch
zur Liste oder zum Programm Ihrer Wahl gelangen wollen.
Um die Liste anzuzeigen, drücken Sie die OK-Taste im
Fernseh- oder Radiobetrieb.
Zur Verwaltung der Programmlisten dienen 3 farbig e
Tasten.
• ROTE Taste:
Zum Erstellen einer benutzerdefinierten Liste. Drücken Sie
die GRÜNE Taste auf der Fernbedienung, um die von Ihnen
erstellte Liste aufzurufen.
• GRÜNE Taste:
- Gesamtliste: Zum Hinzufügen eines Programms zu einer anderen Liste.
Drücken Sie die GRÜNE Taste, um die Benutzerlisten in der rechten Ecke des Fensters anzuzeigen.
Wählen Sie eine bevorzugte Liste aus und drücken Sie die OK-Taste.
• Benutzerliste: Zum Entfernen eines Programms aus der Liste.
• GELBE Taste: Zum Sortieren oder Filtern der Programmliste.
Drücken Sie die GELBE Taste, um das Sortierfenster aufzurufen.
Legen Sie alle Sortieroptionen (alphabetisch, verschlusselt und gesperrt) und den Filter fest und drücken Sie die OKTaste.
Wählen Sie die Sortierfunktion aus, indem Sie die CH Auf/Ab- und die Rechts/Links-Tasten auf der Fernbedienung oder
am Receiver drucken.
Wenn Sie die GELBE Taste drücken, ohne eine Option gewählt zu haben, wird zur Standardeinstellung zurückgekehrt.
6.8 Programminformationen
Bitte beachten Sie, dass nicht alle Sender Informationen zum Programminhalt übertragen. In Abhängigkeit vom Sender
stehen diese Informationen u. U. nicht immer zur Verfugung. Zur Anzeige der Programminformationen dienen die EPGund die INFO-Taste.
6.8.1 EPG-Taste (Electronic Programme Guide, dt. elektronischer Programmführer)
Durch Drücken dieser Taste können Sie Programmtitel,
Programmvorschauen, Übersichten usw. anzeigen, die
von der Sendeanstalt des gerade laufenden
Programms bereitgestellt werden.
Drücken Sie die EPG-Taste, während Sie fernsehen.
Wählen Sie das Programm aus, über das Sie sich
näher informieren möchten. Drücken Sie die CH Aufund CH Ab-Tasten, um durch die verschiedenen
Programme zu navigieren, und die LINKS/
RECHTS-Tasten,
um zwischen
den Wochentagen
zu wechseln.
Drücken Sie die OK-Taste. Daraufhin erscheint eine
Drucken Sie die grune Taste "EPG Aufnahme" fur den Videorecorder.
Übersicht über das gewählte Programm.
DIGITALER TERRESTRISCHER RECEIVERDIGITALER TERRESTRISCHER RECEIVER
Page 8

Suchlauf”
Untertitel und Videotext
1312
6.8.2 INFO-Taste
Mit dieser Taste erhalten Sie Informationen zum laufenden Programm.
Drücken Sie die INFO-Taste, während Sie
fernsehen oder Radio hören. Durch
einmaliges Drücken der Taste werden
Programminformationen in der Info-Box
angezeigt.
Die Info-Box erscheint. Auf diese Weise
können Sie sich über das Programm, z. B.
über den Titel des laufenden Programms
und der darauf folgenden Sendungen, die
Signälstarke und die Qualität des
Empfangs informieren.
Drücken Sie die INFO-Taste nochmals, um
zusätzliche Informationen, wie z. B. eine
Zusammenfassung der laufenden Sendung usw. anzuzeigen. Drücken Sie die LINKS/RECHTS
-Tasten, um Informationen zur nachfolgenden Sendung abzurufen.
Um in den Fernsehmodus zurückzukehren, drücken Sie die INFO-Taste erneut oder drücken
Sie die EXIT-Taste.
6.9 Untertitel und Videotext
Der Receiver kann Untertitel und Videotext empfangen. In Abhängigkeit vom terrestrischen Sender
kann es vorkommen, dass Untertitel und Videotext nicht zur Verfügung stehen.
• Untertitel
- Zur Anzeige des Untertiteltextes drücken Sie die SUBTITLE-Taste auf der Fernbedienung.
- Drücken Sie die SUBTITLE-Taste nochmals, um die Anzeige der Untertitel auszublenden.
• Videotext mittels interner Software
- Mit hilfe der internen Software des Receivers ist die Einblendung von Videotext möglich, unabhängig
davon, ob das Fernsehgerät Videotext unterstutzt.
(Wenn das Fernsehgerat Videotext unterstutzt, kann dieser auch unabhangig von der internen
Software angezeigt werden.)
Durch Drücken der TTX-Taste wird die Seite 100 (Hauptseite) angezeigt.
Wechseln Sie mit den Zifferntasten oder den AUF/AB-Tasten zu einer anderen Seite. Falls eine
bestimmte Seite nicht vorhanden oder noch nicht vollständig geladen ist, wird zur nächsten
verfügbaren Seite gesprungen.
Wenn die Seite mehrere Unterseiten umfasst, wechseln diese i. d. R. automatisch. Sie können
aber auch mit den LINKS/RECHTS-Tasten zur jeweiligen Unterseite gelangen.
(Die erste und die letzte Seitenzahl der Unterseiten wird unten links angezeigt.)
Schließen Sie den Videotext mit der EXIT-Taste.
Die drei farbigen Tasten haben im Videotext-Anzeigebildschirm die folgende Funktion.
GRÜN: Standardseite (100) aufrufen
GELB: Die zuletzt angezeigte Seite aufrufen.
BLA U: Den Videotext-Bildschirm transparent machen.
DTR 9000TWINDTR 9000TWIN
DD
Erweiterte Bedienung
7. Erweiterte Bedienung
Dieses Kapitel enthält Anweisungen zur Verwendung der am häufigsten genutzten Funktionen des Receivers.
7.1 Programmsuchlauf
Digitales Fernsehen bietet
eine Vielzahl
von Programmen. Deshalb ist es wichtig, dass Sie nach allen Programmen,
die Ihrer Umwelt und Ihrem Geschmack entsprechen, suchen können. Für die Suche nach Programmen gibt
drei verschiedene Möglichkeiten: die automatische Suche, die manuelle Suche.
Normalerweise wird die automatische Suche am häufigsten verwendet.
Drücken Sie die MENU-Taste auf der Fernbedienung, um das Hauptmenü aufzurufen.
Wählen Sie Programm-Manager und drücken Sie die OK-Taste. Im Bildschirm Programm-Manager
Sie verschiedene Untermenüs, darunter Automatische Suche und Manuelle Suche .
7.1.1 Automatischer Suchlauf
Verwenden Sie diese Suchmethode, um den
Receiver automatisch nach sämtlichen
Programmen suchen zu lassen.
Wählen Sie “Automatischer und drücken
Sie die OK-Taste. Daraufhin beginnt die Suche
nach den Fernseh- und Radioprogrammen.
Die Namen der Programme erscheinen in einer Liste.
Drücken Sie die EXIT-Taste, um in den
Fernsehmodus zurückzukehren, und überprüfen Sie,
ob der Empfang des gewählten Programms gut ist.
7.1.2. Manueller Suchlauf
Bei dieser Suchmethode müssen Sie die TP-Daten manuell in den Receiver eingeben. Die manuelle
Programmsuche wird oft dazu verwendet, um nach einem bestimmten Programm zu suchen oder um
Programme zu finden, die vom automatischen Suchlauf nicht erkannt wurden. Die Einstellungen in diesem
Menü erfordern jedoch vergleichsweise viel Fachwissen.
Wählen Sie “Manueller Suchlauf” und drücken Sie
die OK-Taste.
Bewegen Sie den Auswahlbalken zum
gewünschten Kanal und drücken Sie die
OK-Taste; es erscheint eine Markierung.
Drücken Sie die ROTE Taste, um die Suche zu
starten.
Die Namen der Programme erscheinen in einer
Liste. Drücken Sie die EXIT-Taste, um in den
Fernsehmodus zurückzukehren, und überprüfen
Sie, ob der Empfang des gewählten Programms
DIGITALER TERRESTRISCHER RECEIVERDIGITALER TERRESTRISCHER RECEIVER
Page 9

der Liste geändert werden soll, und drucken Sie die OK-Taste. Ändern Sie die Reihenfolge mit den CH
Programmlisten
1514
7.2 Programmlisten
Die Favoritenliste ist eine Zusammenstellung Ihrer Lieblingsprogramme.
Digitales Fernsehen bietet hunderte von Programmen. Damit Sie nicht den Überblick verlieren und
vor allem rasch zum Programm Ihrer Wahl gelangen, können Sie die gewünschten Programme in
einer Liste anordnen. Diese Funktion bietet Ihnen eine komfortable Programmverwaltung.
Drücken Sie die MENU-Taste auf der
Fernbedienung, um das Hauptmenü
aufzurufen.
Wählen Sie erst “Programmlisten” und dann
“Liste umbenennen”.
Erstellen Sie Listennamen. Ein Listenname
wird einer Programmenliste gegeben, die
individuell zusammengestellt wurde. Das
heißt, wenn eine Familie digitales Fernsehen
empfängt, kann jedes Familienmitglied seine
eigene Programmgruppe erstellen. Es können
zum Beispiel Namen wie “Vater” , “Mutter”
usw. zugewiesen werden. Die Listennamen sind frei wählbar. Folgen Sie zur Erstellung der Listennamen
den Anweisungen auf dem Bildschirm.
Nachdem Sie der Liste einen Namen
gegeben haben, drücken Sie die ROTE
Taste.
Wählen Sie “Programme hinzufügen/
löschen” und drücken Sie die OK-Taste.
Wählen Sie den von Ihnen erstellten
Listennamen aus.
Fügen Sie Ihrer Favoritenliste Programme
aus der Gesamtliste hinzu. Sie können
auch Programme aus der Favoritenliste
entfernen. Folgen Sie den Anweisungen
auf dem Bildschirm.
Drücken Sie die OK-Taste, um das Menü
zu verlassen.
Der Programmlisten bietet die folgenden Zusatzfunktionen.
• Programmnamen editieren
So editeren Sie Programmnamen. Wählen Sie den zu ändernden Programmnamen in der
Gesamtliste aus und nehmen Sie die Änderung vor.
Drücken Sie die CH Auf- und CH Ab-Tasten, um “Programmnamen editieren” zu wählen.
Wählen Sie mit den LINKS/RECHTS-Tasten die Liste aus, die das Programm enthält, dessen
Namen Sie ändern möchten.
Wählen Sie das Programm und drücken Sie die OK-Taste.
Zur Bearbeitung des Programmnamens folgen Sie den Anweisungen auf dem Bildschirm.
Drücken Sie die OK-Taste.
DTR 9000TWINDTR 9000TWIN
DD
Timer-Aufnahme
• Programmreihenfolge ändern
So ändern Sie die Reihenfolge der Programme. Wählen Sie den Programmnamen, dessen Position in
Auf- und CH Ab-Tasten und drücken Sie die OK-Taste nochmals.
Drücken Sie die CH Auf- und CH Ab-Tasten, um “Programmreihenfolge ändern” zu wählen.
Wählen Sie mit den LINKS/RECHTS-Tasten die Liste aus, die das Programm enthält, dessen
Position Sie innerhalb der Liste ändern möchten.
Wählen Sie das Programm und drücken Sie die OK-Taste. Das gewählte Programm wird blau
markiert.
Drücken Sie die LINKS/RECHTS, CH Auf und CH Ab und PAGE Auf und PAGE Ab, um das markierte
Programm an die gewünschte Position zu verschieben.
Drücken Sie die OK-Taste.
• Programme von Gesamtliste löschen
So entfernen Sie Programme von
Gesamtliste löschen.
Wählen Sie das aus der Liste zu entfernende
Programm aus und drücken Sie die OK-Taste.
Drücken Sie die CH Auf- und CH Ab-Tasten, um “Programme von Gesamtliste löschen” zu wählen,
und drücken Sie die OK-Taste.
Wenn der Bildschirm “Programme von Gesamtliste löschen” erscheint, wählen Sie das
Programm bzw. die Programme aus, das/die Sie aus der Gesamtliste entfernen möchten, drücken
die OK-Taste und verschieben Sie sie mit der RECHTS-Taste in den Papierkorb.
Die zu löschenden Programme erscheinen im “Papierkorb”. Drücken Sie die EXIT-Taste.
Wenn die Meldung "Programme im Papierkorb endgültig löschen?” erscheint, drücken Sie die
OK-Taste. Daraufhin werden die Programme gelöscht.
7.3 Timer-Aufnahme
So machen Sie eine Timer-Aufnahme. Es können bis zu 10 Programme aufgezeichnet werden.
Mithilfe der Timer-Aufnahmefunktion können Sie Ihre bevorzugten Fernsehprogramme auf
Videorecorder oder Festplatte aufzeichnen.
Drücken Sie die TIMER-Taste auf der
Fernbedienung
Es erscheint die Meldung “Bitte zuerst
Uhrzeit einstellen”, gefolgt vom Bildschirm
“Datum/Zeit ein stellen”. Stellen Sie die
Benutzerzeit auf die aktuelle Uhrzeit ein. Ist die
Benutzerzeit bereits eingestellt, wird dieser
Schritt übersprungen.
Wenn der Bildschirm “Aufnahmeliste” erscheint,
drücken Sie die OK-Taste, um die erforderlichen
Informationen einzugeben.
Rufen Sie das Menü
“Einstellung” mit der “OK”-Taste
auf.Zur Aufnahme eines Programms geben Sie
das Programm, Start Datum,Start zeit, die Dauer,Modus (einmal ig, täglich, wöchentlich,...).
DIGITALER TERRESTRISCHER RECEIVERDIGITALER TERRESTRISCHER RECEIVER
Page 10

17
DTR 9000TWINDTR 9000TWIN
DD
Timer-Aufnahme
16
• Programm
Wählen Sie das aufzunehmende Programm. Benutzen Sie dazu die LINS/RECHTS-Tasten.
• Startdatum
Legen Sie das Datum (Tag/Monat/Jahr) der Aufnahme fest. Benutzen Sie dazu die Zifferntasten.
• Startzeit
Stellen Sie die Anfangszeit (Stunde/Minute) der Aufnahme ein. Benutzen Sie dazu die Zifferntasten.
• Dauer
Drücken Sie die Zifferntasten, um die Dauer der Aufnahme festzulegen.(Stunde/Minute)
• Typ
Bestimmen Sie den Typ (einmalig/täglich/wöchentlich) der Aufnahme. Sie können das Programm
einmalig oder täglich bzw. wöchentlich zur selben Zeit aufnehmen. Wahlen Sie den Aufnahmetyp nach
Bedarf. Benutzen Sie dazu die LINS/RECHTS-Tasten.
• Aufnahme
Aktiviert den Timer entsprechend der obigen Einstellungen.
Nach Beendigung der Einstellungen wählen
Sie “Aufnahme” und drücken die OK-Taste.
Wenn das gewählte Programm gesperrt ist,
erscheint der Bildschirm zur Eingabe des
Passworts. Geben Sie das Passwort ein.
Die Einstellungen für die Timer-Aufnahme
können Sie in der Aufnahmeliste überprüfen.
• 1 Minute vor Beginn der Aufnahme erscheint eine Meldung, die Sie fragt, ob mit der Aufnahme
fortgefahren werden soll. Um mit der Aufnahme fortzufahren, drücken Sie die OK-Taste. Andernfalls
drücken Sie die Exit-Taste.
• Auch wenn der Receiver ausgeschaltet ist, schaltet er sich automatisch zur Startzeit der Aufnahme ein.
Nach Beendigung der Aufnahme kehrt er in seinen vorherigen Zustand zurück.
• Sobald die Aufnahme begonnen hat, wird nur das Programm gezeigt, das gerade aufgenommen wird.
Während der Aufnahme sind alle Tasten außer der Ein/Aus-Taste unwirksam. Im Display auf der
Frontbedienung des Receivers erscheint “REC”.
• Wurde der Programmtyp auf “Einmalig” eingestellt, wird die Programmierung nach Beendigung der
Aufnahme aus der Aufnahmeliste gelöscht.
Wenn der Programmtyp auf “Täglich” oder “Wöchentlich” eingestellt wurde, werden die
Aufnahmeinformationen auf das nächste Datum gesetzt und dann gespeichert.
Hauptmenü-Anleitung
• EPG-Aufnahme
Mit dieser Funktion können Sie die EPG-Zeitangaben nutzen, um eine Aufnahme vorzumerken auf dem VCR.
Drücken Sie die EPG-Taste.
Wählen Sie mit den CH Auf- und CH Ab-Tasten und den LINKS/RECHTS-Tasten die Uhrzeit und
das Programm aus.
Drücken Sie die TIMER-Taste. Die gewünschte Aufnahme wird zur Timer-Liste hinzugefügt.
8. Hauptmenü-Anleitung
8.1 Allgemeine Einstellungen
Einzelheiten finden Sie in Abschnitt 5.2 “Allgemeine
Einstellungen”.
8.2 Programmlisten
Einzelheiten finden Sie in Abschnitt 7.2 “Programmlisten ”.
8.3 Programm-Manager
Einzelheiten zur automatischen und manuellen
Suche finden in Abschnitt 7.1 “Programmsuchlauf”.
Im Folgenden werden weitere Funktionen behandelt.
Neuinstallation
Bei Bedarf können Sie alle Einstellungen auf die werkseitigen Vorgabewerte zurücksetzen.
Drücken Sie die MENU-Taste auf der Fernbedienung
Wählen Sie “Programm-Manager”.
Wählen Sie “Neuinstallation”.
Wenn die Meldung “Passwort eingeben” erscheint, geben Sie das Passwort ein.
Die Einstellungen (wie z. B. Programminformationen und Sprache) des Receivers werden auf die
Standardvorgaben zurückgesetzt. Der Receiver kann jedoch nicht in die Ausgangsstellung gebracht
werden, wenn das Passwort geändert wurde.
Bei der Neuinstallation wird der Receiver auf zwei verschiedene Arten zurückgesetzt. Dies geschieht in
Abhängigkeit vom jeweiligen Receivermodell.
• Die Einstellungen werden auf die werkseitigen Standardvorgaben zurückgesetzt und die ab Werk
programmierten Kanalinformationen bleiben unverändert.
• Die Einstellungen werden auf die werkseitigen Standardvorgaben zurückgesetzt und die ab Werk
programmierten Kanalinformationen werden ebenfalls gelöscht.
DIGITALER TERRESTRISCHER RECEIVERDIGITALER TERRESTRISCHER RECEIVER
Page 11

Zugangsberechtigung
19
18
Alle Programme löschen
Nutzen Sie diese Option, wenn es notwendig ist, alle Ihre Programme zu löschen. Dabei werden nur
Programme gelöscht, ohne dass sich dies auf die vorhandenen Einstellungen auswirkt.
Drücken Sie die MENU-Taste auf der Fernbedienung
Wählen Sie “Programm-Manager”.
Wählen Sie Alle Programme löschen .
Wenn die Meldung Passwort eingeben erscheint, geben Sie das Passwort ein.
Wenn Sie eine Meldung zur Bestätigung des Löschvorgangs auffordert, drücken Sie die OK-Taste.
8.4 Zugangsberechtigung
Diese Funktion erlaubt Ihnen die Sperrung einzelner Programme oder des ganzen Receivers. So können
Sie beispielsweise verhindern, dass Ihre Kinder Erwachsenenprogramme sehen.
Drücken Sie die MENU-Taste auf der Fernbedienung
Wählen Sie “Zugangsberecchtingung”.
Wenn die Meldung “Passwort eingeben” erscheint,
geben Sie das Passwort ein. Das werkseitig
eingestellte Benutzerpasswort ist “0000”.
Wenn der Bildschirm “Zugangsberecchtingung”
erscheint, stellen Sie die folgenden Punkte ein.
• Programmsperre
Wählen Sie das zu sperrende Programm aus.
Bei Anwahl eines gesperrten Programms erscheint
der Passwortbildschirm.
• Zugangssperre
Legen Sie fest, ob beim Einschalten das Receivers nach dem Passwort gefragt werden soll. Diese Option
kann aktiviert oder deaktiviert werden.
• Passwort ändern
Hier ändern Sie das Passwort. Bei Anwahl eines gesperrten Programms erscheint der Passwortbildschirm.
8.5 Geräte-informationen
Unter diesem Menüpunkt finden Sie kurze Angaben
zur Software des Receivers.
Hier können Sie die Software-Version oder das
Freigabedatum der aktuellen Software vor einem
Upgrade überprüfen.
Folgende Systeminformationen werden angezeigt:
• Datum
• Software-Version
• Firmware
9. Videorecorder-Aufnahme
9.1 Tuner 2(VCR)-Kanal-Anzeige
Drücken Sie die A/B-Taste auf der Fernbedienung, um den Slave-Bildschirm aufzurufen.
Wählen Sie mit den CH Auf/Ab-Tasten einen Kanal aus.
Wenn Sie den Slave-Kanal ausgewählt haben, wird dies am Gerät angezeigt.
Bei einer Aufnahme mit dem Videorecorder wird der Status am Gerät angezeigt
9.3 Aufnahmestatus
Sie können festlegen, wann die Aufnahme einer Sendung enden soll. Stellen Sie die Endzeit der
Aufnahme mit den Zifferntasten ein.
9.7 REC-TIME
Wenn Sie die Aufnahme beenden möchten,
drücken Sie die Stopptaste auf der OK oder
die Exit-Taste.
9.6 STOP
Einzelheiten zur EPG-Aufnahme finden Sie in
Abschnitt 7.3.
9.5 EPG-Aufnahme
Einzelheiten zur Timer-Aufnahme finden Sie in
Abschnitt 7.3.
9.4 Timer-Aufnahme
9.2 Direkt-Aufnahme
DTR 9000TWINDTR 9000TWIN
DD
DIGITALER TERRESTRISCHER RECEIVERDIGITALER TERRESTRISCHER RECEIVER
In diesem Kapitel wird die Einstellung der Videorecorder-Aufnahme am Videorecorder beschrieben.
Videorecorder-Aufnahme
Mit dieser Funktion wird der Tuner 2 automatisch auf den selben Programmplatz umgeschaltet wie Tuner
1, um das programm welches gerade geschaut wird, auf zunehmen.
Drücken Sie die REC-Taste auf der Fernbedienung für eine direkte Aufnahme.
Die Meldung “Video-Aufzeichnung beginnt jetzt” wird angezeigt.
Die Aufnahme mit dem Videorecorder beginnt automatisch.
Page 12

DTR 9000TWINDTR 9000TWIN
DD
Problembehebung
21
20
11. Problembehebung
Bei der digitalen Empfangstechnik werden große Datenmengen gleichzeitig übertragen und verarbeitet.
Das Umschalten von einem Programm in ein anderes kann deshalb etwas länger dauern, als Sie das
von Analoggeräten gewohnt sind.
12. Recycling und Entsorgung
Das Gerät, die Verpackung (z. B. Styropor) und die Batterien dürfen nicht mit dem Hausmüll entsorgt
werden. Entsorgen Sie alle Stoffe vorschriftsmaßig getrennt an den dafür ausgewiesenen Stellen.
Bitte informieren Sie sich uber die geltenden Vorschriften bei Ihrem Umweltamt o. ä.
Problem Lösung
1) Kein Bild
- Programmdaten haben sich geändert
- Neuinstallation oder manuellen/automatischen Programmsuchlauf
durchführen (Näheres dazu finden Sie in der Bedienungsanleitung.).
2) Kein Ton
- Tonstummschaltung überprüfen -Audiosprache überprüfen; Audio-Taste
drücken und Sprache ändern oder Haupt-Audiosprache im Menü
“Allgemeine Einstellungen” ändern
3) Receiver lässt sich nicht - Gerätestecker ziehen und wieder einstecken - Kundendienst wenn das
neu booten Problem wiederholt auftritt.
4) Programmsuchlauf
- Anschluss des Signalkabels prüfen
fehlgeschlagen
5) Bildschirm zeigt fortwährend
- Anschluss des Signalkabels prüfen
Kein Signal
6) Bild
eingefroren
- Schlechter Signalstrom oder schlechter Kanal; anderen Kanal wählen
- Gerätestecker ziehen und wieder einstecken
7) Fernbedienung reagiert nicht
- Ev. Störung des Receivers durch andere elektrische Haushaltsgerate.
Receiver an einem anderen Ort aufstellen.
- Prüfen, ob die Batterie der Fernbedienung leer ist.
8) Vorprogrammiertes
- Neuinstallation oder manuelle/automatische Suche durchführen.Programm kann nicht
eingestellt werden
9) Kein OSD-Menü
- SCART-Kabel überprüfen, auf den richtigen Anschluss am Receiver und
am Fernsehgerät achten
10) Download über serielle
-
PC232-Anschlussproblem
Schnittstelle fehlgeschlagen
DIGITALER TERRESTRISCHER RECEIVERDIGITALER TERRESTRISCHER RECEIVER
[http://www.radix-sat.de]
10. Zusatzinformationen
10.1 Upgrade der Receiver -Software
Sie können die Software des Receivers aktualisieren. Zur Durchführung eines Upgrades wenden Sie
sich an die Verkaufsstelle, in der Sie den Receiver erworben haben. Um die Software-Version
festzustellen, wählen Sie im Hauptmenü “Geräte-informationen” und drücken dann die OK-Taste. Nach
dem Software-Upgrade müssen Sie u. U. eine Neuinstallation des Receivers durchfuhren.
Informationen zur Neuinstallation finden Sie im Abschnitt 8.3 “Programm-Manager”.
[Achtung]
Bei einer Neuinstallation gehen alle vorhandenen Daten verloren.
Schließen Sie das Kabel an.
Führen Sie das Programm auf Ihrem PC aus.
Schalten Sie den Receiver aus und wieder ein.
10.2 Software-Übertragung (von Receiver zu Receiver)
Software-Übertragungsfunktion von einem Receiver zu einem anderen Receiver
1. Schließen Sie das Netzkabel an den sendenden Receiver an, um die Software zu übertragen, und
ziehen Sie den Netzstecker am empfangenden Receiver.
2. Verbinden Sie den sendenden Receiver über das RS232-Kabel mit dem empfangenden Receiver.
3. Stellen Sie am sendenden Receiver den Systeminformationsbildschirm ein.
4. Drücken Sie die Taste [TIMER] des sendenden Receivers. (Auf dem Bildschirm wird ein
"Fortschrittsbalken" angezeigt.)
5. Schließen Sie das Netzkabel an den empfangenden Receiver an.
6. Wenn der Fortschrittsbalken abgelaufen ist, warten Sie, bis die Meldung "Complete" angezeigt wird.
7. Nach Abschluss der Übertragung booten Sie den empfangenden Receiver neu, um die erhaltene
Software zu übernehmen.
Hinweis
: Die Einwirkung von Elektrizität kann die Übertragung behindern. In diesem Fall sollten Sie den
Anschluss mehrmals wiederholen.
Wenn möglich, benutzen Sie bitte nicht die Fernbedienung beim Herunterladen der Software.
10.3 Master - Passwort
Das Master-Passwort ist das Hauptpasswort, das Sie zum Zugriff auf Ihren Receiver brauchen, wenn
Sie das Benutzerpasswort vergessen haben. Die folgende vierstellige Zahl ist das Master-Passwort.
Es empfiehlt sich, Ihr Benutzerpasswort auf dem darunter frei gelassenen Platz zu notieren.
Das Benutzerpasswort ist standardmäßig auf “0000” eingestellt.
• Master-Passwort
• Benutzerpasswort
9815
Zusatzinformationen
Page 13

23
22
Technische DatenTechnische Daten
Datendienst-Anschluss
Anschluss 9-polige D-Buchse
Protokoll RS-232 Asynch
Datengeschwindigkeit Max. 115200 bps
Frontbedienung
4-stellige LED-Anzeige Programmnummernanzeige
8 Tasten
Ein/Aus, Auf, Ab,OK,MENÜ,Exit,LINKS / RECHTS
IR-Sensor 38 KHz
Geräterückseite
RF2-Eingang FEMALE
RF2-Durchschleifausgang MALE
RF1-Eingang FEMALE
RF1-Durchschleifausgang MALE
Cinch-Ausgang Audio (Links, Rechts), Video,
Digitalausgang (SPDIF)
S-VIDEO -Ausgänge S-VIDEO
Optischer-Ausgänge Digital Audio
2 SCART-Ausgänge 1 TV, 1 Videorecoder
RS232 Serielle Schnittstelle 9-polige D-Buchse
Netzkabel Europe Flexible Leitung
Fernbedienung
Typ IR (Trägerfreq. 38 KHz)
Batterie 2 x 1.5 V, Typ AAA
37 Tasten Ein/Aus, 0~9, Stummschaltung, Info, Auf, Ab,
Links, Rechts,
Zurück, Radio, OK, Menü, Ende, EPG,PAUSE
A/B, REC, REC_TIME,STOP
Timer, Letztes, Seite auf/ab, Untertitel, Audio,
Lautstärke auf/ab,TTX
Allgemeine Daten
Eingangsspannung Wechselstrom 95 ~ 250 V, 50/60 Hz
Leistungsaufnahme Max. 30 W (Standard)
Abmessungen (B x T x H) 340 x 255 x 69 mm
Gewicht 2.5 kg
Temperatur bei Betrieb 0 ~ 40
o
C
DTR 9000TWINDTR 9000TWIN
DD
DIGITALER TERRESTRISCHER RECEIVERDIGITALER TERRESTRISCHER RECEIVER
13. Technische Daten
Tuner / Front-End-Demodulator
RF1,2 -Eingangsfrequenz 174MHz ~ 230MHz, 470MHz ~ 862MHz
RF1,2 -Durchschleifausgang 47 ~ 862MHz
Eingangsimpedanz 75Ohm
Eingangssignalpegel -80dBm ~ -20dBm
Kanalbandbreite 7MHz, 8MHz
Demodulation entsprechend DVB-T
Typ COFDM 2K, 8K
Modus QPSK, 16QAM, 64QAM
Viterbi-Decodierrate 1/2,2/3,3/4,5/6,7/8
Schutzintervallmodi 1/32, 1/16, 1/8, 1/4 aktive Symboldauer
Reed Solomon Decodierung FEC: 204,188, t=8
Transport-Demultiplexer
Demultiplex Gemaß ISO/IEC 13818-1
Max. Eingabestrom 60MHz (seriell)/7.5MHz (parallel)
PID-Arbeitskapazität 32PID
SI-Filterung Nach DVB-SI spec (ETS 300 468)
Video-Decodierungsparameter
Video-Decodierung ISO/IEC 13818-2 MP@ML
Bildformat 4:3 16:9
Auflösung Max. 720 x 576
Audio-Decodierungsparameter
Audio-Decodierung ISO/IEC 13818-3 Layer I & II
Betriebsmodus Mono, Stereo, AC3
Abtastfrequenz 32, 44.1, 48 kHz
Basisband-Video/Audio-Ausgang
Video-Ausgangsimpedanz 75Ohm
Video-Ausgangspegel 1Vp_p
Audio-Ausgangsimpedanz 600Ohm unsymmetrisch
Audio-Ausgangspegel 3.0Vp_p mit Lautstärkeregelung
Mikroprozessor und Hauptspeicher
Mikroprozessortyp ST20-C1 (STi5518) x 2
Flash ROM (für Programmspeicher) 1M x 16 bit
SDRAM (für Decodierung) 4M x 16 bit
Page 14

1. Introduction ..........................................................
2
2. Features ................................................................
...........................................
.......................................
........................
......................................................
......................................................
19
9.7 REC-TIME
...............................................................
19
9.6 STOP
................................................
19
9.5 EPG Recording
..............................................
..............................................
................................................
19
9 VCR Recording
19
9.1 Tuner 2 (VCR) channel viewing
19
9.2 Direct recording
19
9.3 Recording status
19
9.4 Timer Recording
......................................
..............................................
............................................
7. Advanced Operation
................................................
.............................................
......................................
.................................................
....................................
...............................................
.............................................
20
10.3 Master Password
........
20
10.2 Software Transfer (Receiver to Receiver)
.....................
.........................................
.........................................
..................................
............................................
..............................................
.....................................
............................................
............................................
........................................
..................
...............................
..................................
..........................
...................................................
..........................................
............................
............................................................
..............................................
................................
....................................
.................................
........................................
................................
........................
..........................................................
3
3. Safety Notes
4
4. Your Receiver and it's Functions
5
4.1 Remote Control Functions
5
4.2 Front Panel Controls
6
4.3 Rear Panel Connections
7
85. Setting Up Your System
8
5.1 Setting Up Your Receiver
8
5.2 General Settings
9
6. Quick Start
9
6.1 Switching Your Receiver On
9
9
6.2 Reinstallation
6.3 Selecting Channels
10
6.4 Volume Control / Mute Sound
10
6.5 Listening to the Radio
10
6.6 Selecting the Audio Mode
11
6.7 Programme List and Sort Manager
11
6.8 Channel Information
11
6.8.1 EPG Button
12
12
6.8.2 INFO Button
13
6.9 Subtitles and Teletext
13
7.1 Channel Search
13
7.1.1 Auto Search
13
7.1.2 Manual Search
14
7.3 Timer Recording
7.2 Favorite List Manager
15
17
8. Main Menu Guide
17
8.1 General Settings
17
8.2 Favorite List Manager
17
8.3 Channel Manager
18
8.4 Parental Lock Manager
18
8.5 System Information
20
10. Additional Information
20
10.1 Upgrading the Receiver Software
21
11. Trouble Shooting
21
12. Recycling and Disposal
22
13. Technical data
Contents
DTR 9000TWINDTR 9000TWIN
GBGB
Page 15

DIGITAL TERRESTRIAL RECEIVERDIGITAL TERRESTRIAL RECEIVER
Introduction Features
2 3
1. Introduction
Thank you for purchasing your digital terrestrial receiver. ALL Receiver products are manufactured to the
highest standards at our ISO 9002 accredited manufacturing plants.
You naturally want to begin viewing your favorite programmes as quickly as possible - this is why we have
designed the menu to fully meet your requirements. To ensure that you get to know your unit properly and
that you can use and programme all features, please read this manual carefully.
Thank you for purchasing your Receiver digital terrestrial receiver. In doing so you have chosen an appliance
built for the future, allowing you to take advantage of numerous programmes and additional services such
as electronic programme guides which will eventually replace conventional analogue transmissions.
If it is necessary to return your receiver, please send it together with all accessories and in its original
packaging. Include a copy of your invoice or receipt as well as a detailed description of the problem.
Please ensure that you affix adequate postage to the parcel and refer all repairs to an authorized retailer.
We hope you enjoy using this product.
2. Features
Basic Features
• Simple Operation through On Screen Display
• 2 SCARTS for TV and VCR
• Audio cinch-connection for HiFi amplifier
• Fully Infrared based Remote Control
• RS232 Serial Link for Interaction with personal computer
• Display Signal Strength Meter for easy initial set up
• CD Quality Audio
• Volume control (32 Steps)
• Teletext supported by internal software
• Subtitle function
• Favorite channel function
• Last channel recall function
• Variable aspect ratio (4:3,16:9)
• Display 7days Electronic Programme Guide (EPG)
• Multi-Lingual function
• Ten events timer
• Parental Lock Facility for Channel and Receiver Access
• VPS function
• 2 x Tuner
• AC Power Switch (Rear panel)
• Digital Audio (AC3) SPDIF with cinch and optical jack
• S-VIDEO Output connector
• Five Sorting methods (Alphabet, scrambled/free, normal/locked)
GBGB GBGB
DIGITAL TERRESTRIAL RECEIVERDIGITAL TERRESTRIAL RECEIVER DTR 9000TWINDTR 9000TWIN
Page 16

Your Receiver and it’s Functions
5
Safety Notes
4
4. Your Receiver and it’s Functions
4.1 Remote Control Functions
4.1.1 Basics
When inserting batteries into the remote control unit.
make sure that polarities match (+/-)!
Name Function
POWER button
Use to switch the Receiver (Set-Top Box) between Standby Mode and
Operation Mode.
Numeric buttons (0-9)
Use to switch channels in Viewing Mode; use to enter numeric values
in Menu Mode.
EPG button
Displays a channel’s programme information or EPG
(Electronic Programme Guide).
TV/RADIO button Switches between TV and radio services.
MUTE button Enables/Disables the Sound
EXIT button Exits from a Menu .
MENU button Exits from Viewing Mode to Menu Mode.
BACK button Returns to the previous menu in Menu Mode.
INFO button Shows the information of the current channel.
TTX button Shows Teletext using internal software.
3. Safety Notes
This appliance is designed exclusively for receiving terrestrial signals as described in this guide. It must not
be used for any other purpose. Keep the appliance out of reach of children. To avoid injury or damage to
your receiver, please note the following:
WARNING:
Never remove the cover or any part of it!
Do not allow liquids or objects to get into the receiver!
DANGER:
Do not cover ventilation holes - there is a risk of fire if receiver over heats!
DANGER:
Use only original or professionally recommended spare parts.
Failure to do so may result in damage or injury and will invalidate the guarantee.
CAUTION:
Switch off the appliance during electrical storms or if it is not to be used for long periods.
Disconnect the antenna cable during an electrical storm.
ATTENTION:
Only ever use a clean cloth slightly moistened with clean water to clean the receiver; do not
use any chemical additives!
ATTENTION:
Place the unit in a well-ventilated and cool environment.
ATTENTION:
Do not put heavy or wet items on the receiver. They may damage the unit.
ATTENTION:
Do not install the unit in the following conditions:
- Where it is exposed to direct sunlight.
- Where the atmosphere is humid or wet.
- Where the temperature is too high or too low.
DIGITAL TERRESTRIAL RECEIVERDIGITAL TERRESTRIAL RECEIVER DTR 9000TWINDTR 9000TWIN
GBGB GBGB
Page 17

14
13
12
11
F1 button Use Trans..........
STOP button Use to recording stop.
The basic control functions of this unit (power on/off, menu, exit, OK, cursor functions) can be carried out
by remote control and by front panel operations as well.
Infrared (IR) signals are being received through the front panel IR sensor. The 4-digit LED display is
indicating the actual TV / Radio channel number of the according channel list.
Rear Panel Connections
7
Front Panel Controls
6
4.3 Rear Panel Connections
Name Function
Main Connection
Optical Output
Connect this lead to the mains outlet (95V~250V AC 50/60 Hz) after all other
connections have been made.
Optical for Digital Audio
RF2 IN UHF/VHF ANT in for Local TV reception
Main Switch Main Power On/Off
RF2 OUT Antenna Loop Out
RF1 IN UHF/VHF ANT in for Local TV reception
RF1 OUT Antenna Loop Out
TV SCART Connection Connect your TV via a SCART cable to this connector.
VCR SCART Connection Connect your VCR via a SCART cable to this connector.
VIDEO Connection for
Connect an S-VIDEO cable for S-Video output.
Composite video output for connecting to an AV monitor etc.
Digital Audio output for connecting to system.
VCR or TV
S/PDIF(Coaxial)
AUDIO Connection for
Audio outputs for connecting to a HiFi system.
HiFi System
S-VIDEO Output
RS-232 Connection to PC
Connect your PC via this connector when you wish to upgrade the system
software.
4.2 Front Panel Controls
Name Function
CH UP and DOWN Use to navigate through menu items in Menu Mode; use to switch
buttons between channels in Viewing Mode.
PAGE UP and
Use to scroll through pages of channel list.
DOWN buttons
LEFT / RIGHT buttons
Use to change settings in Menu Mode; use to switch between channels
in Viewing Mode.
VOL UP and
Increases or decreases the volume.
DOWN buttons
OK button
Moves from the current menu to a submenu in Menu Mode or executes
the action corresponding to the selected menu item.
Displays the channel list in Viewing Mode.
AUDIO button Use to select audio language and Audio Mode.
TIMER button
Use to set the local time or to move to the Recording List from which
you can set the timer recording.
LAST button Returns to the previously watched channel.
SUBTITLE button
REC_TIME button Use to current recording stop or reservation stop time.
REC button Use to Recording directly.
A/B button Change to Master Picture or Slave Picture.
PAUSE button
Turns the display of subtitle text ON or OFF for a programme with
subtitle information (subtitles for hearing-impaired viewers).
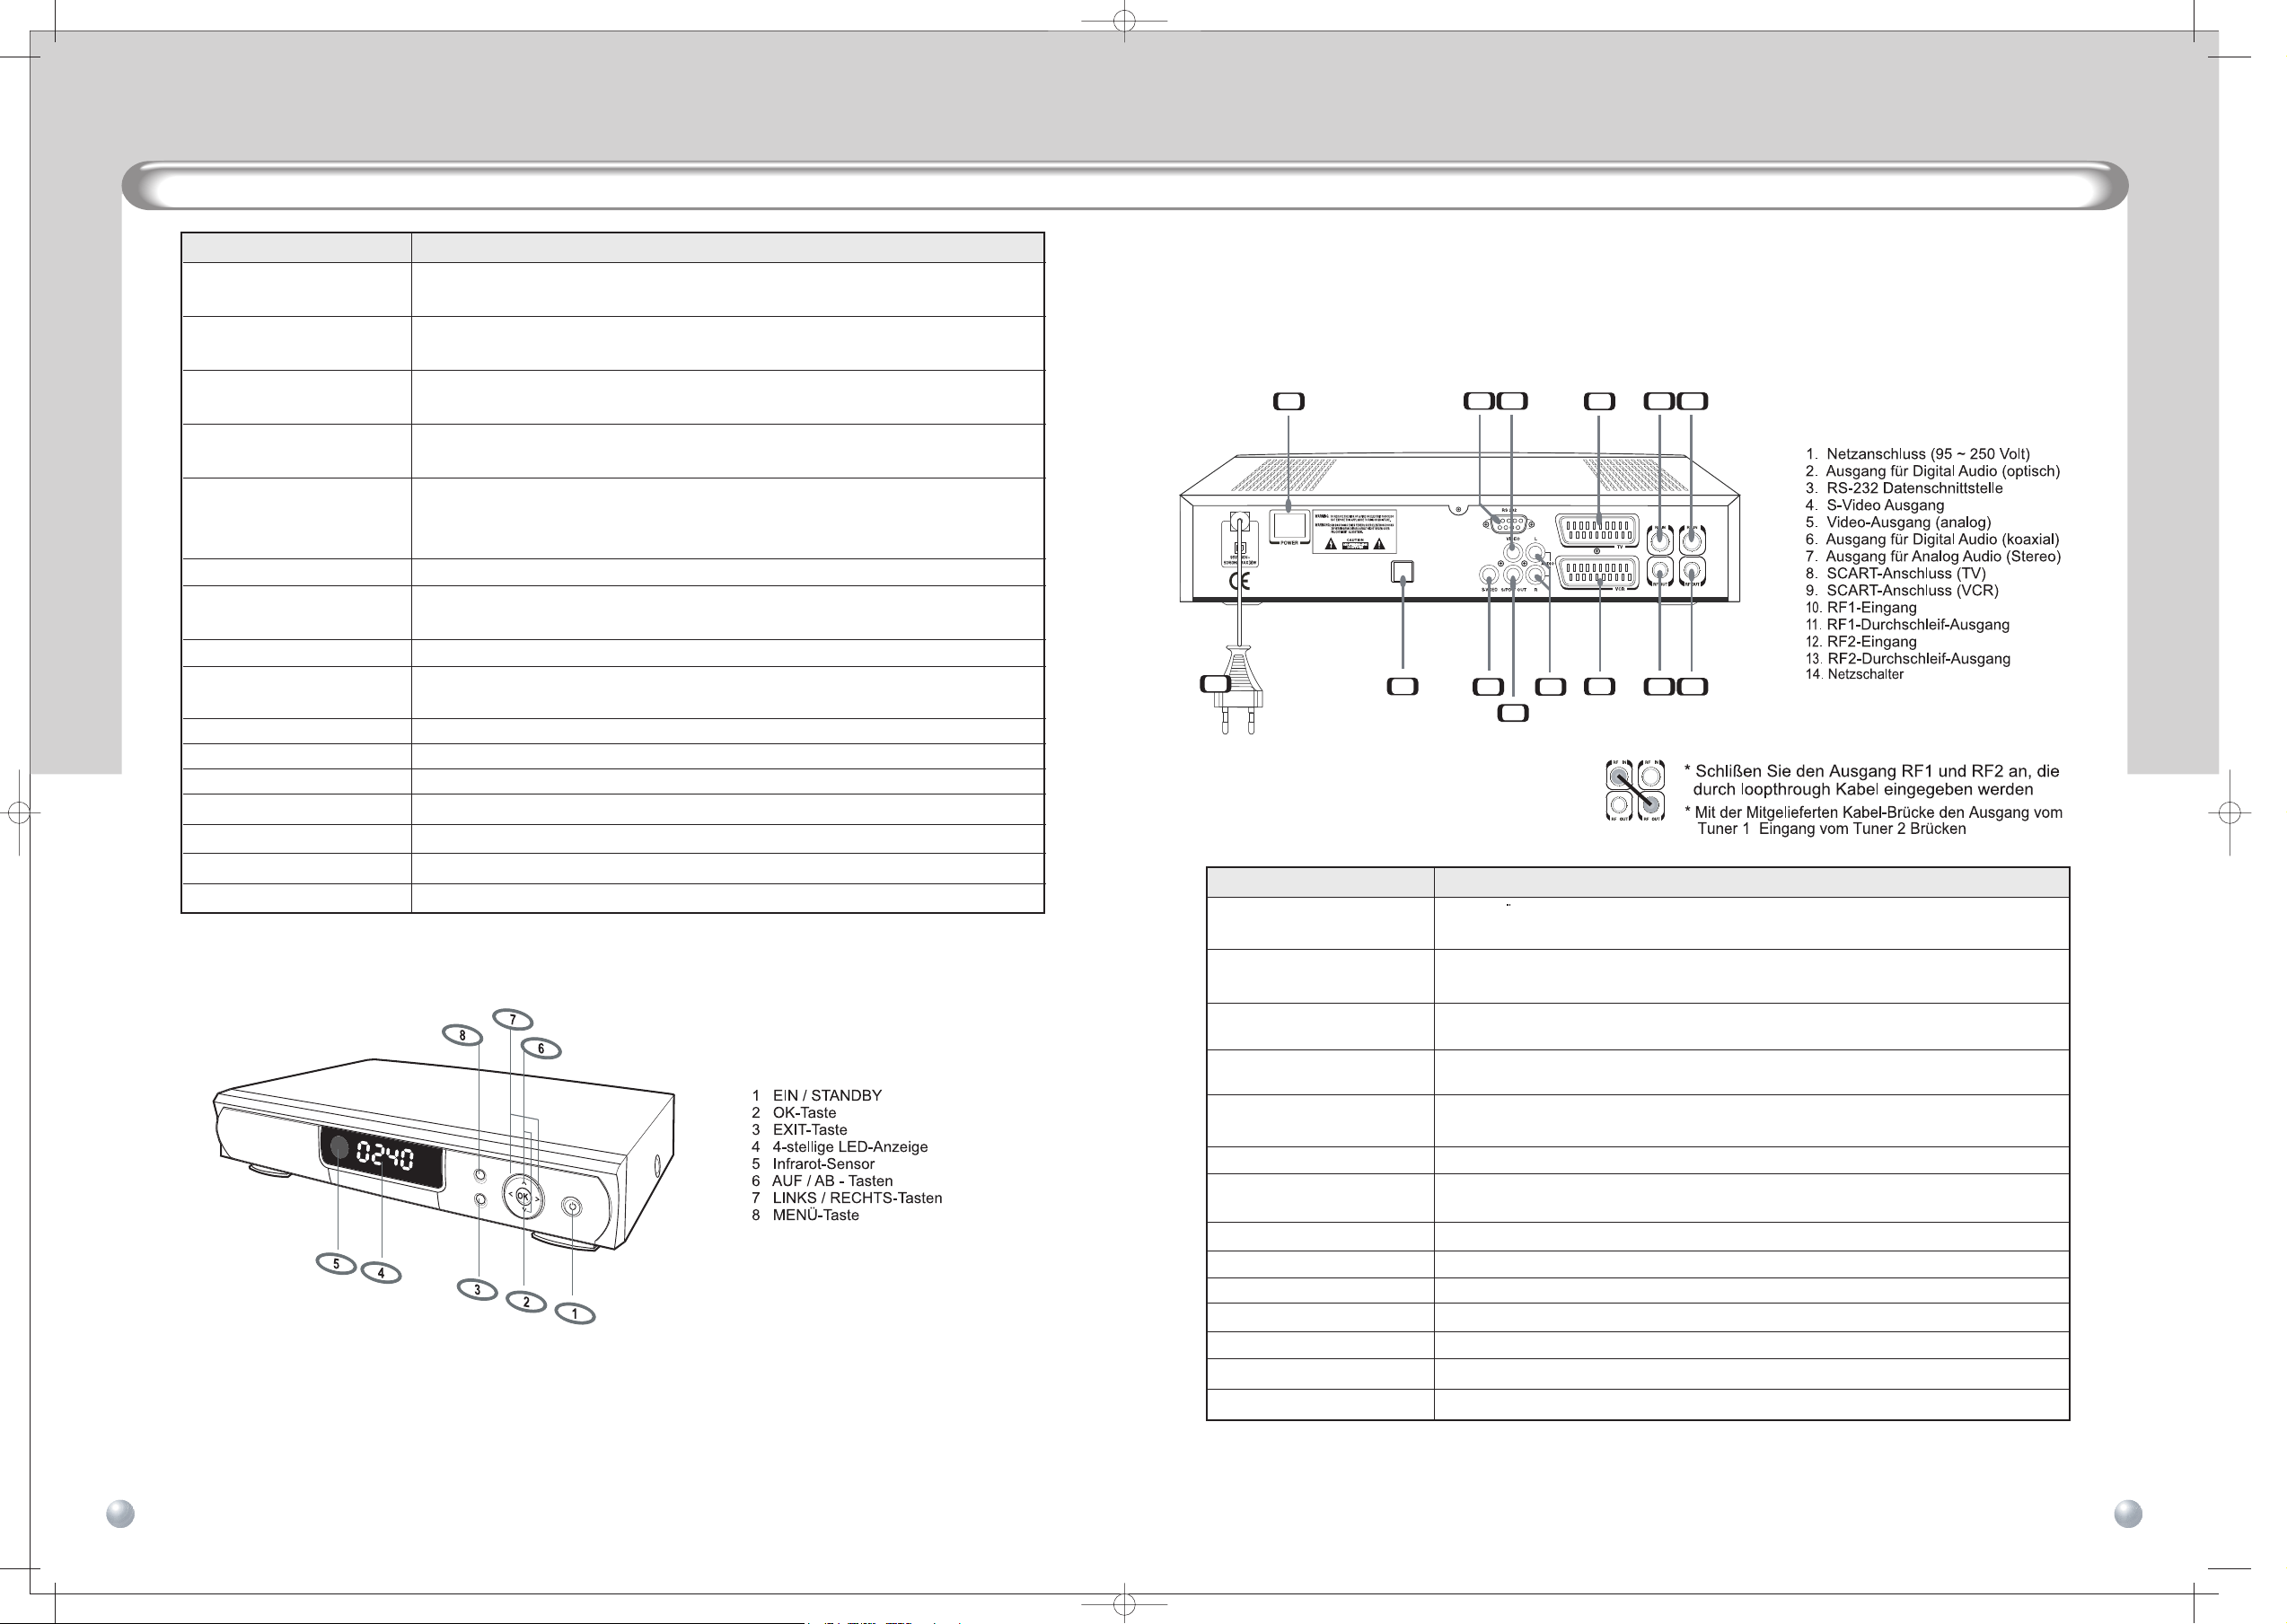
1. Power button
2. OK button
3. Exit button
4. 4 Digit LED display
5. IR Sensor
6. CH UP/DOWN button
7. Left/Right button
8. Menu button
1. Mains connection (95 ~250V)
2. Optical Output
3. RS-232 connection to PC
4. S-VIDEO Output
5. VIDEO Connection
for VCR or TV
6. S/PDIF (Coaxial)
7. AUDIO Connection
for HiFi System
8. SCART Connector (TV)
9. SCART Connector (VCR)
10
. RF1 IN
11
. RF1 OUT
12.
RF2 IN
13.
RF2 OUT
14.
Main Switch
N0
1
2
3
4
5
6
7
8
9
10
DIGITAL TERRESTRIAL RECEIVERDIGITAL TERRESTRIAL RECEIVER DTR 9000TWINDTR 9000TWIN
GBGB GBGB
Use to pause the current picture or return to normal TV mode.
* Connect RF1 output and RF2 input
by loopthrough cable
OPTICAL
1
10
11
12
13
6
7
8
9
2
345
14
1
1
2
2
Page 18

Setting Up Your System
98
5. Setting Up Your System
This chapter explains the settings you will need to make before using the Receiver (Set-Top Box) for the first
time.
5.1 Setting Up Y
our Receiver
Connect the Receiver to your TV. Refer to Section
4.3 on Rear Panel Connections for more details.
Press the POWER button on the remote control or
on the Receiver. “ON” message appears on the
front display of the Receiver and the Language
Selection menu appears on your TV.
Use the CH UP and CH DOWN buttons on the
remote control or on the Receiver to select the
language of your choice and then press the OK
button. The Auto search menu appears.
The receiver starts automatically tuning the
channels. When the tuning has finished and all the
channels are visible on the list, the TV display
appears automatically.
In the General Settings menu, you can set the Time
Zone and other settings for the Receiver. In
general, if you purchased the Receiver from your
local vendor, these settings will already be as
appropriate for your area.
There are several items in the General Settings menu.
You can use these to set the various settings of the
Receiver. Use the CH UP and CH DOWN buttons or
the LEFT / RIGHT buttons to make a selection and
then press the OK button.
• Time Zone
Select the time zone for your location.
• Summer Time
Select “ON” to set Summertime or “OFF” to
set Wintertime.
• TV Aspect Ratio
Select the aspect ratio for your TV (4:3 or 16:9).
• TV Signal
Select the video for your TV (CVBS / RGB).
• Menu Language
Select the menu language.
• Main Audio Language
Select the audio language for multi-language channels.
• Logical Channel Number
You can select On/Off of local channel number
• Main Subtitle Language
Select the subtitle language for subtitle text.
5.2 General Settings
Quick Start
6. Quick Start
This chapter provides you with instructions on the basic operations of the Receiver. As mentioned
previously, the general settings and channels will already have been set for your area. That is, you should be
able to operate the Receiver without referring to the instructions in Section 5.
6.1 Switching Your Receiver On
Press the POWER button on the Receiver or on the remote control to power on the Receiver. Press the
POWER button on the Receiver or on the remote control again to switch to Standby Mode.
6.2 Reinstallation
In general, the Receiver is already set up for you to watch the TV programmes available in your area. To
watch a preset TV programme, you will need to perform the following steps.
Press the MENU button on the remote control to go to the Channel Manager.
Select Reinstallation and then press the OK button.
When the Enter Password message appears,
enter the password and then press the OK
button.
Once the Reinstallation is initiated, you will be
taken to the Language Selection screen. (See 5.1
Setting Up Your Receiver.) Select the language of
your choice.
You will automatically be taken to the Auto
Search screen. Use the EXIT button on the
remote control to switch to Viewing Mode.
Now you should be able to see a TV programme
on your TV screen.
Depending on the model of your Receiver, your local TV programmes may not have been set on the
Receiver.
6.3 Selecting Channels
The following steps are for viewing a preset channel.
To select the channel you want to watch, use one of the following methods.
• Select the channel using the Numeric buttons.
• Select the channel using the CH UP and CH DOWN buttons on the remote control or on the
Receiver.
• Press the OK button and select a channel from the Total list.
Select the desired channel and then press the OK button. Your selected channel appears on the TV
screen.
DTR 9000TWINDTR 9000TWIN
GBGB GBGB
• Antenna Booster Power
You can choose ON/OFF of 5V power supply to Antenna
DIGITAL TERRESTRIAL RECEIVERDIGITAL TERRESTRIAL RECEIVER
Page 19

Press the OK button. A synopsis of the
Volume Control / Mute Sound
11
10
• To return to the last channel you were watching, press the LAST button.
• Info Box
This is the box that appears at the bottom of your TV screen and displays information on the current
channel.
It displays information such as the titles of the current and next programmes as well as the quality of
terrestrial reception and signal strength. For more detailed information, select the title of the programme
you want to learn more about and then press the INFO button.
6.4 Volume Control / Mute Sound
Use the VOL UP and VOL DOWN buttons on the remote control to adjust the volume of the TV.
When either button is pressed, the volume indicator appears on the TV screen.
When you have finished adjusting the volume, the volume indicator disappears automatically.
Press the MUTE button on the remote control to disable the sound temporarily.
Press the MUTE button again to restore the sound.
6.5 Listening to the Radio
The Receiver also enables you to listen to radio stations.
To listen to the radio, press the button on the remote control.
To return to TV viewing, press the button again.
6.6 Selecting the Audio Mode
This involves setting the audio language and the Audio Mode. The audio language is set to the
language you selected as Main Audio Language in General Settings. That is, you can use this mode to
watch a TV programme in a language other than the language you set as the Main Audio Language. If
you press the AUDIO button again after the Receiver has been turned OFF, you can again watch the TV
programme in the Main Audio Language.
Press the AUDIO button on the remote control.
To change the audio language, use the LEFT / RIGHT buttons to select one of the languages provided by
the broadcaster.
Use the LEFT / RIGHT buttons to select the Audio Mode you want. Available modes are as follows:
• Stereo: Sound comes from both speakers.
• Mono (L): Sound comes only from the left speaker.
• Mono (R): Sound comes only from the right speaker.
• AC-3: Dolby Digital (To listen to Dolby Digital, connect an amplifier with Dolby Digital decoding to the
SPDIF output.)
To return to Viewing Mode, press the AUDIO button again or press the EXIT button.
Programme List and Sort Manager
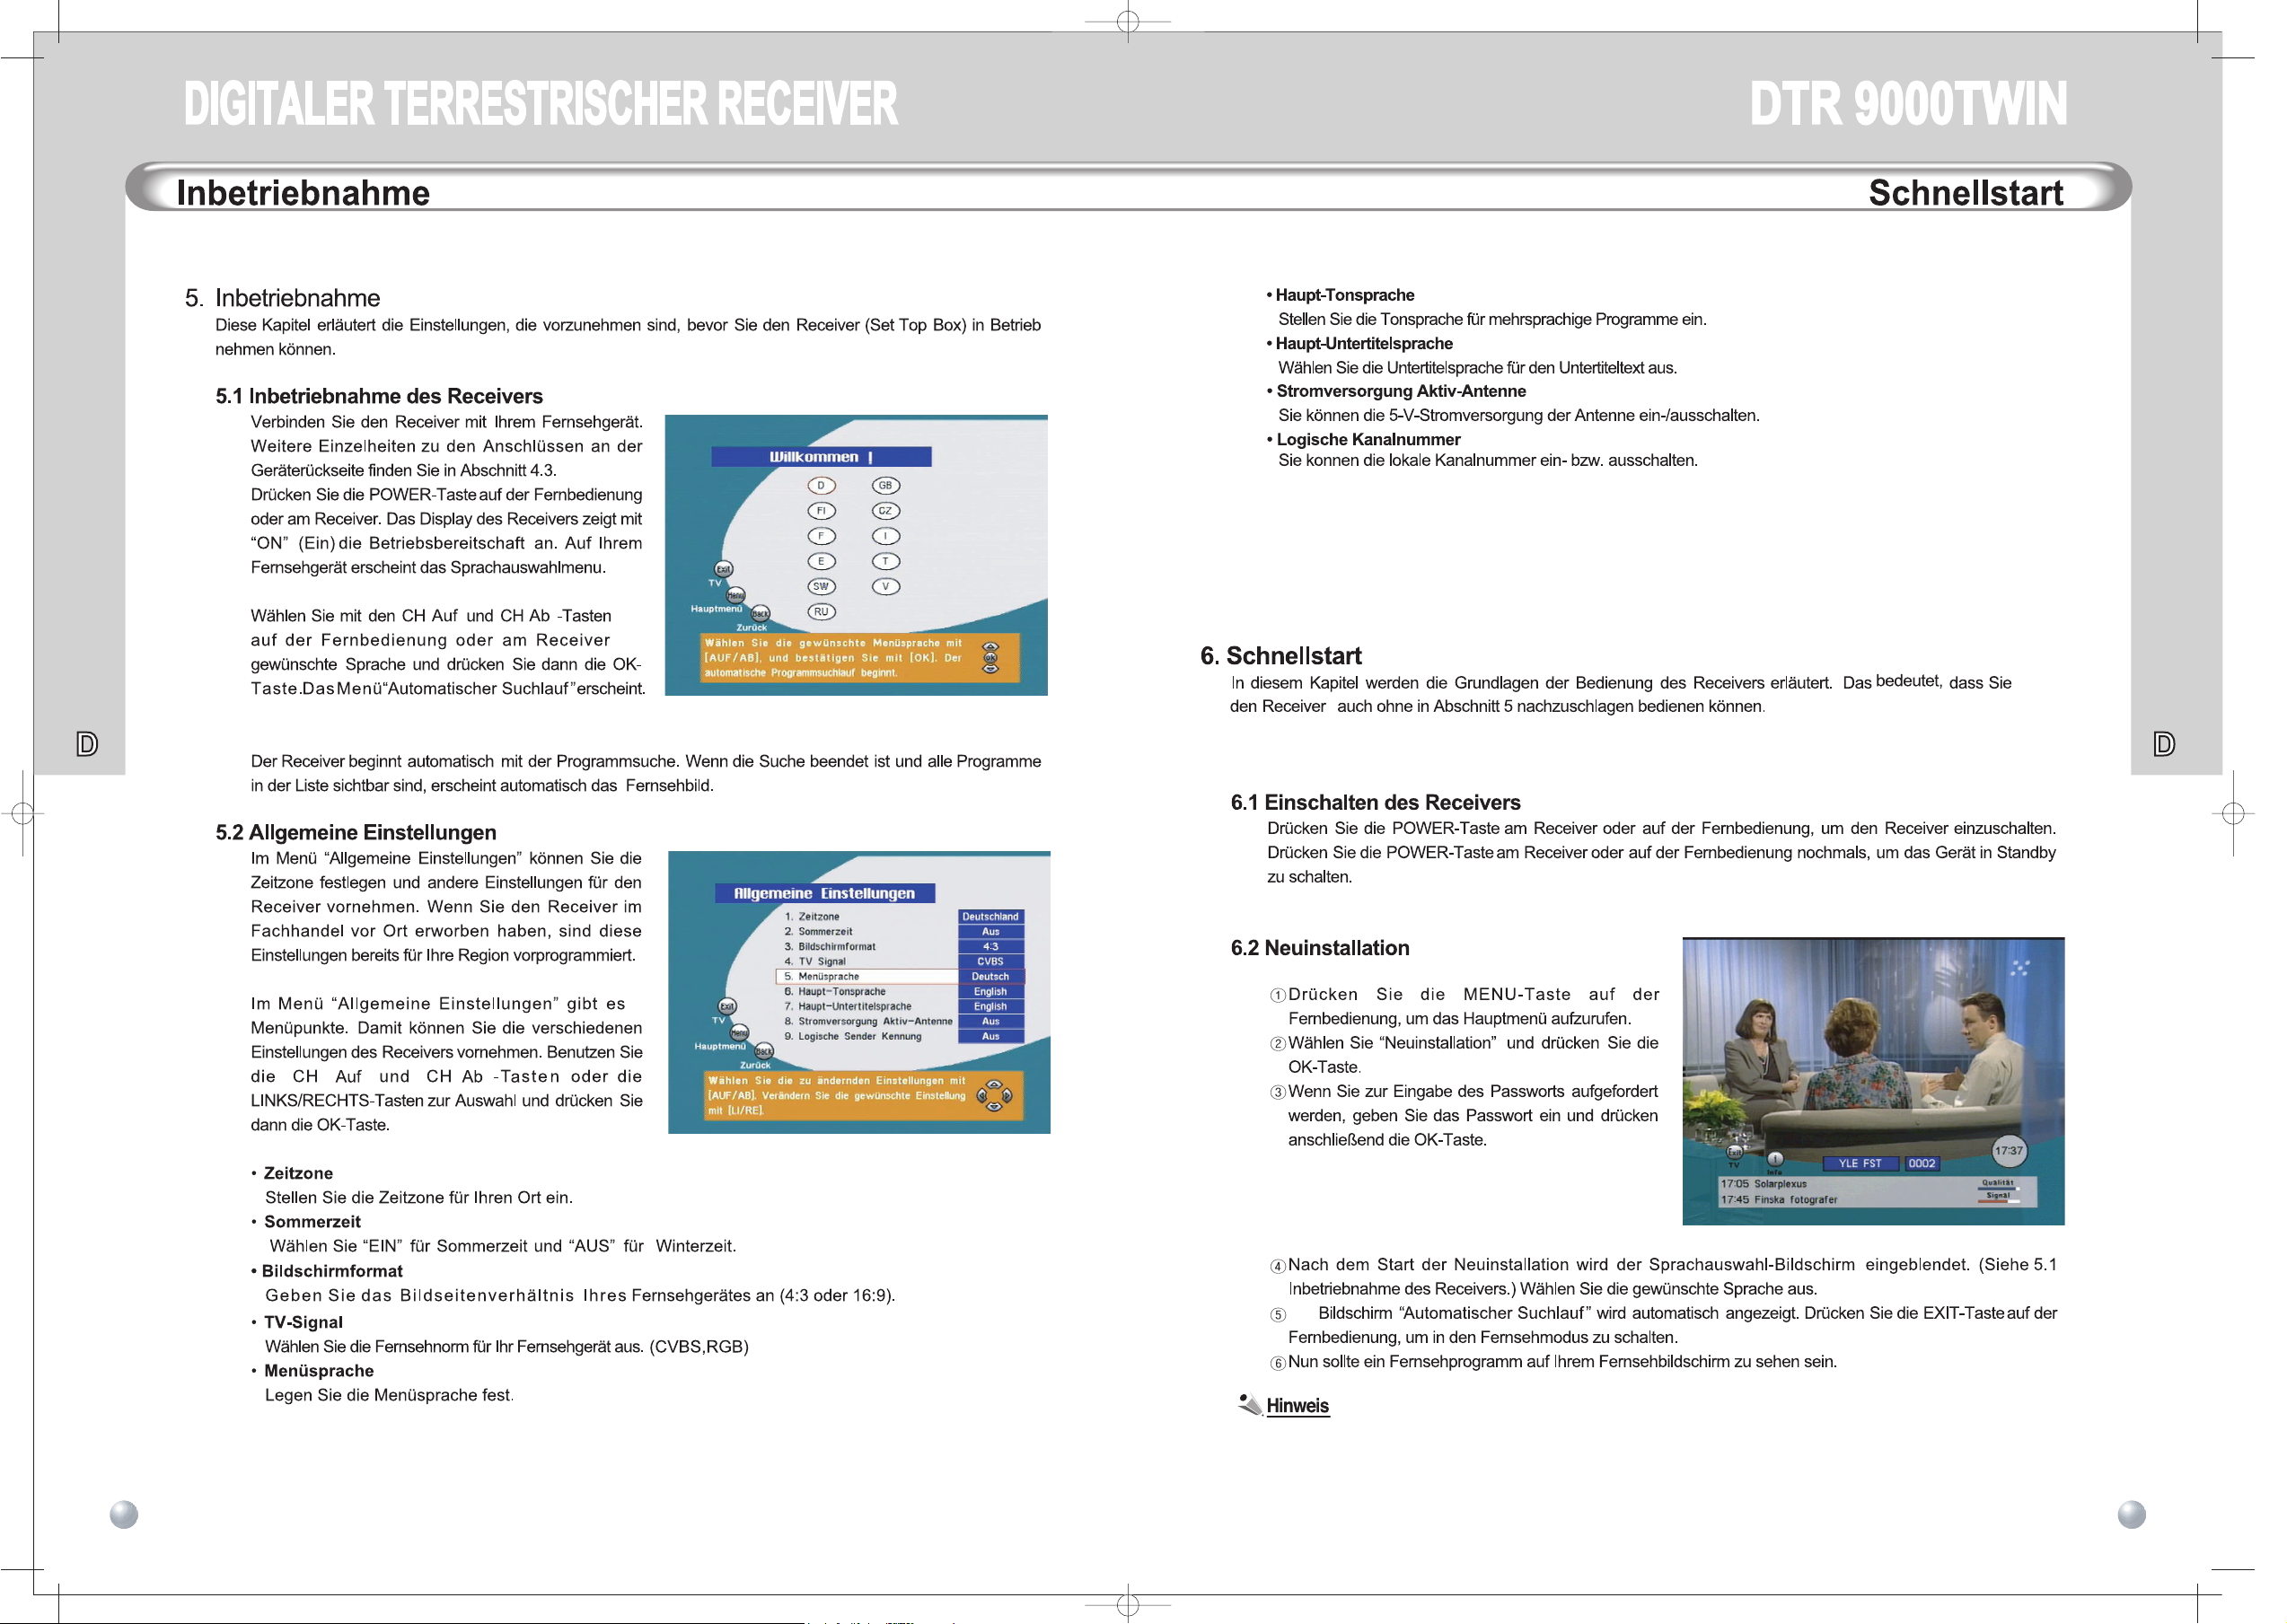
6.7 Programme List and Sort Manager
Digital TV offers hundreds of channels. Therefore,
all the available channels are managed as a list. In
this section, we will take a look at how to display
the list you want and how to sort such lists. This is
convenient when searching for the list or channel
you want.
To view this list, press the OK button while
watching TV or listening to the radio.
3 coloured buttons are used to manage the
Programme List.
• RED button: Use this to create a user-defined list.
Press the GREEN button on the remote control to
switch to the list you created.
• GREEN button:
Total List : Use to add selected channel to other list.
Press the GREEN button to display User lists at the right corner of the window.
Select preferred list and press the OK button.
• User List : Use to remove selected channel from the list.
• YELLOW button: Use this to sort or filtering the Programme List.
Press YELLOW button to display Sorting window.
Set each option of Sorting (Alphabet, Scramble and Locked) and Filter and press the OK button.
6.8 Channel Information
No comma all broadcasters provide channel information. Depending on the broadcaster, channel
information may not always be available. You can use the EPG and INFO buttons to view the channel
information.
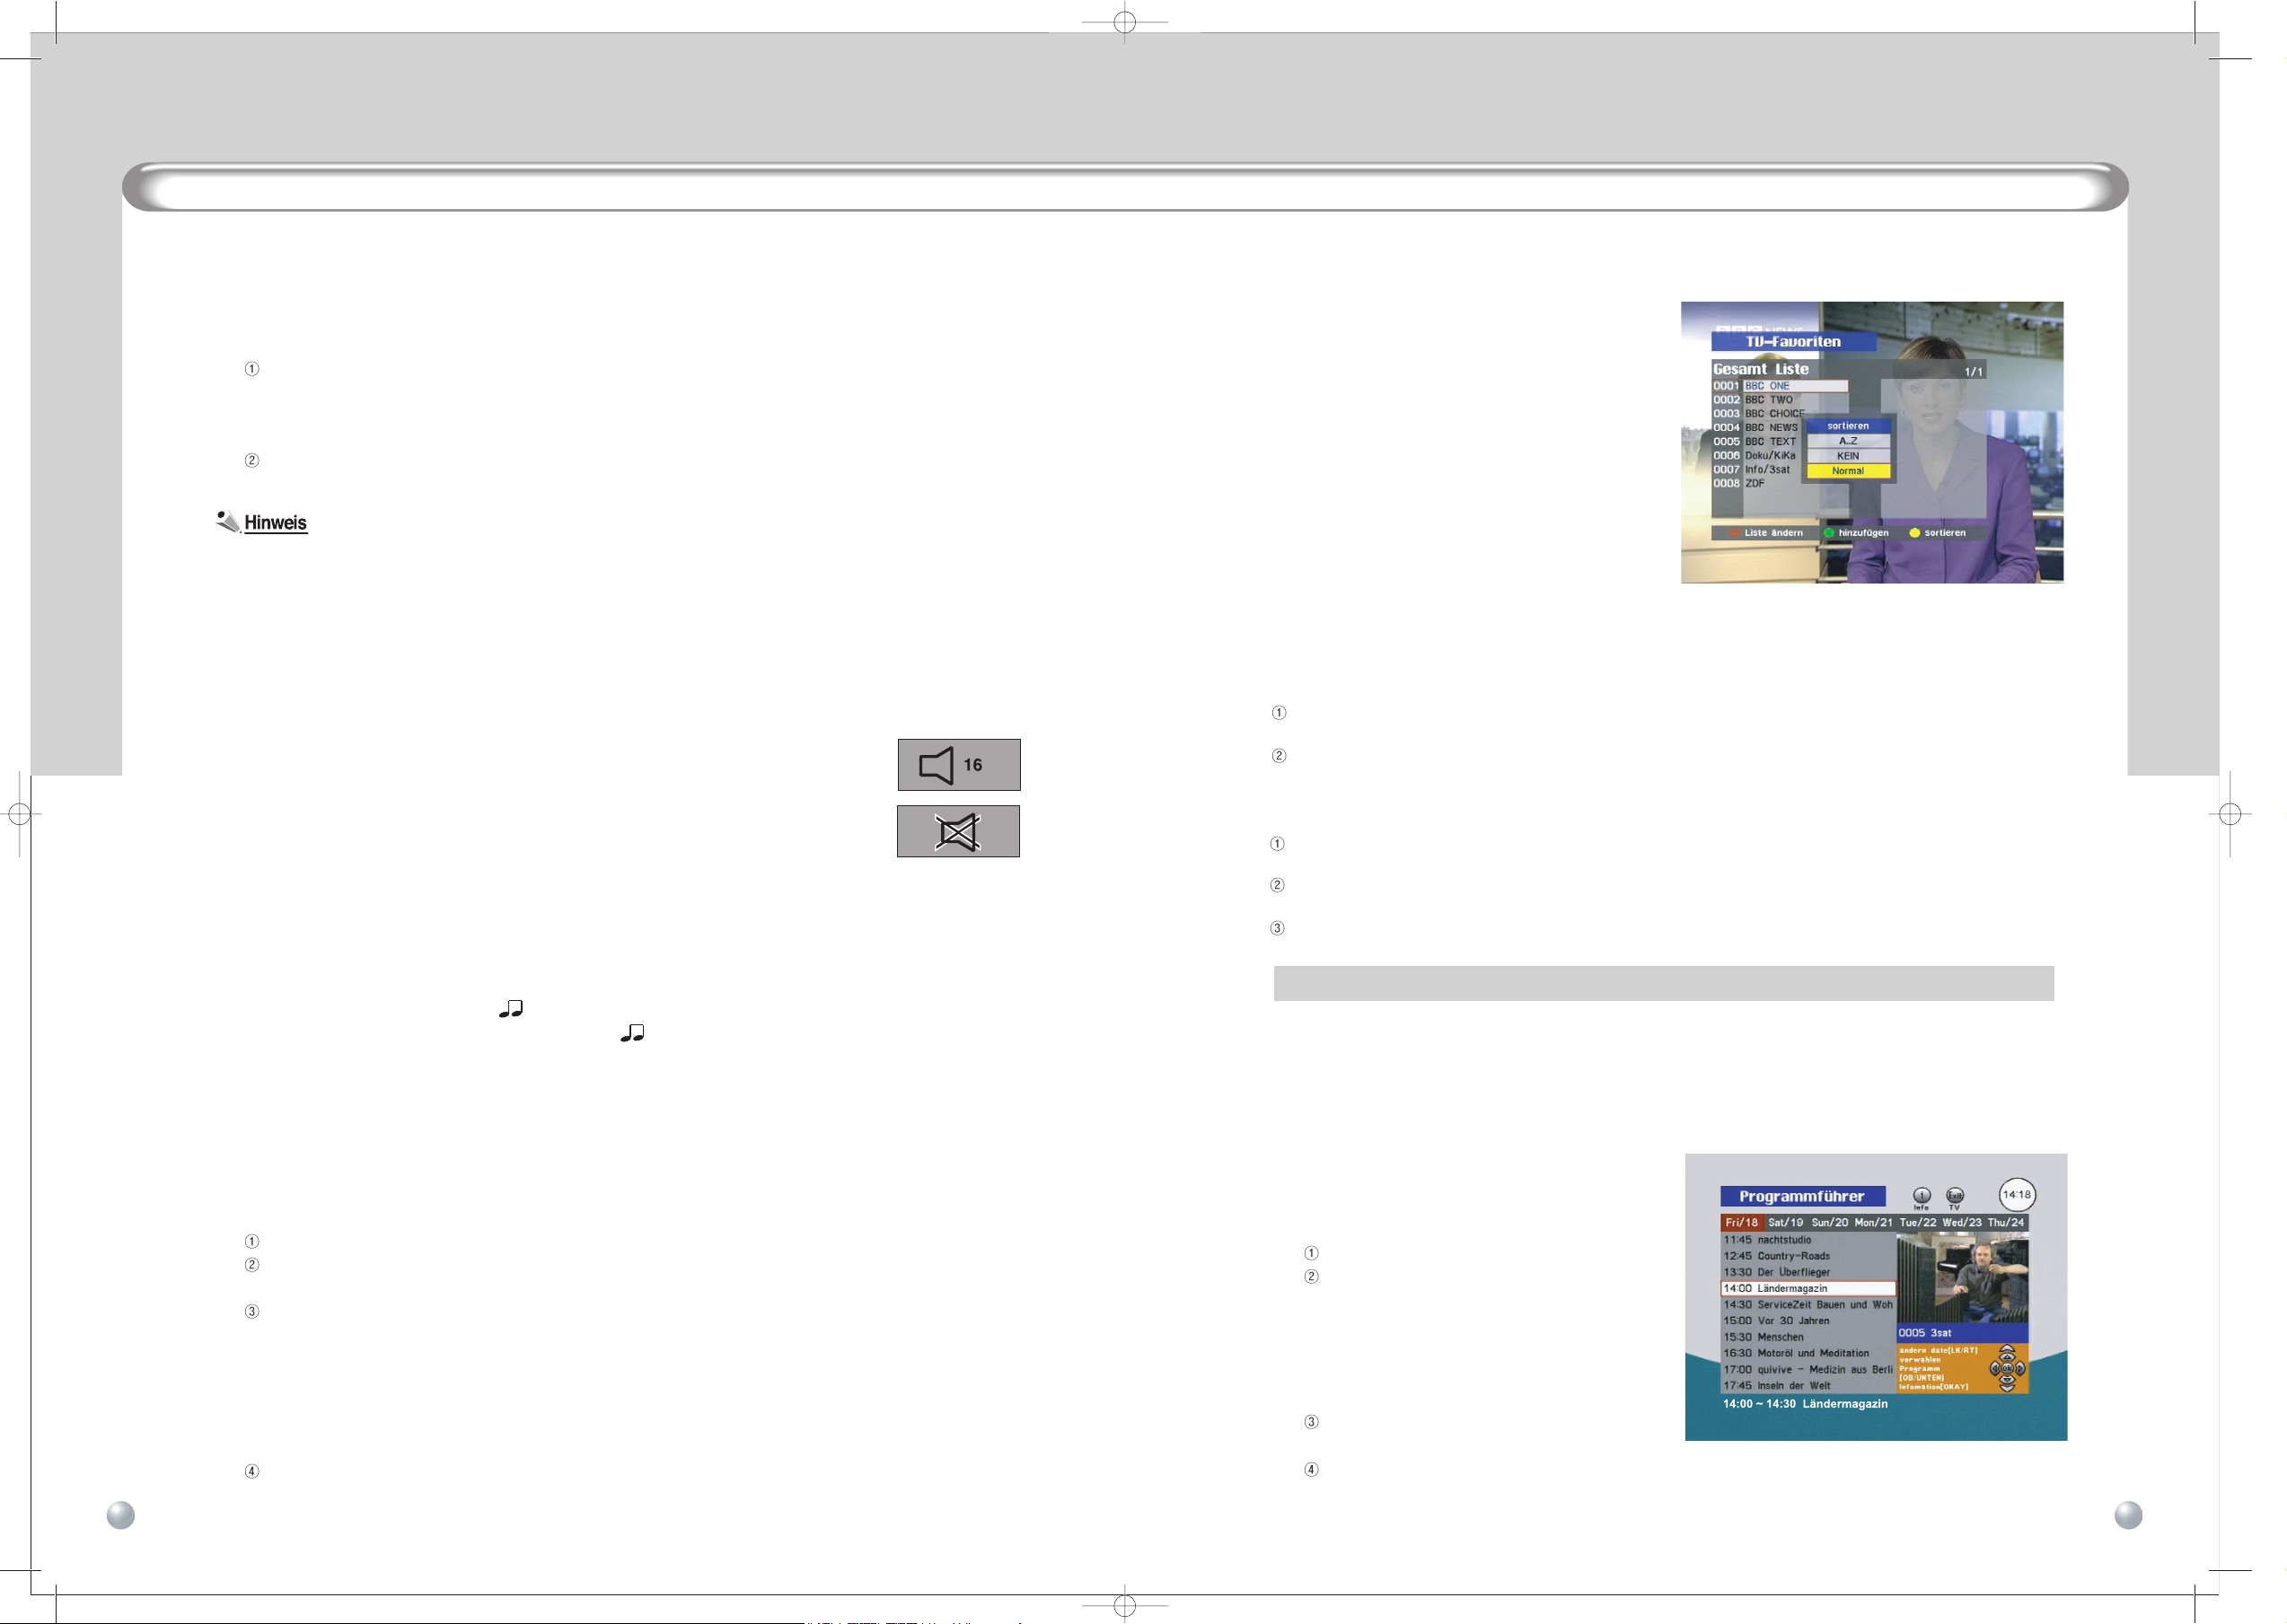
6.8.1 EPG (Electronic Programme Guide) Button
Use this button to view information on programme titles, broadcast schedule, programme
synopsis, etc., which are provided by the broadcaster of the current channel.
While watching TV or listening to the RADIO,
press the EPG button.
Select the programme you want to learn
more about. Use the CH UP and CH
DOWN buttons to navigate through
different programmes and use the LEFT /
RIGHT buttons to navigate through the
days of the week.
Press the Green button "EPG Record"
for VCR
selected programme appears.
If you press the YELLOW button and do not select a Sort option then the list order will return to the default setting.
DIGITAL TERRESTRIAL RECEIVERDIGITAL TERRESTRIAL RECEIVER DTR 9000TWINDTR 9000TWIN
GBGB GBGB
Select the sorting function, using the CH Up/Down buttons
and Left/Right buttons
on the Remote Control Unit or on the Receiver
Page 20

Subtitles and Teletext
1312
6.8.2 INFO Button
Use this button to obtain information about
the current programme.
While watching TV or listening to the radio,
press the INFO button. When the button is
pressed once, channel information will be
displayed in the Info Box.
The Info Box appears. You can check the
information on the channel, such as the
titles of the current and next programmes,
signal strength, and quality of reception.
Press the INFO button again to display
additional information, such as a synopsis
of the current programme, theme, etc. To
display information about the next scheduled programme, press the LEFT /RIGHT button.
To return to Viewing Mode, press the INFO button again or press the EXIT button.
6.9 Subtitles and Teletext
The Receiver is capable of receiving subtitles and Teletext. Subtitles and Teletext may not be available
depending on the terrestrial broadcaster.
• Subtitles
- To display subtitle text, press the SUBTITLE button on the remote control.
- Press the SUBTITLE button again to clear the display of subtitle text.
• Teletext by internal software
It’s possible to see the teletext by oneself using internal software in the receiver regardless of supporting
teletext on TV(In case of teletext supporting on TV, it’s possible to see the teletext regardless of using
internal software.)
Show page 100 when the TTX button is pressed (basic page)
Move to another page using the numeric keypad or up/down buttons. Skip to the nearest page incase
a page does not exist or the download is incomplete.
In case several subpages are combined, it changes automatically. But it is possible to move to a
subpage using the LEFT/RIGHT buttons (The first number and the last number of the subpage will
appear at the lower left hand side of the screen)."
Close Teletext using the Exit button.
The three coloured button functions are as follows:
- Green : Move to default (page 100)
- Yellow : Move to most recently watched page
- Blue : Change from display screen from teletext to translucent
DIGITAL TERRESTRIAL RECEIVER
DIGITAL TERRESTRIAL RECEIVER
DTR 9000TWIN
GB
GB
DTR 9000TWIN
Advanced Operation
7. Advanced Operation
This chapter provides instructions on using some of the most frequently used features of the Receiver.
7.1 Channel Search
Digital TV offers hundreds of channels. Therefore, it is important for you to be able to search for all the
channels that suit your environment and preferences. There are 2 different methods of channel search:
Auto Search, Manual Search. In general, Autosearch is one of the most frequently used search functions.
Press the MENU button on the remote control to go to the Main Menu.
Select Channel Manager and then press the OK button. You will see different submenus, including
Auto Search and Manual Search, on the Channel Manager screen.
7.1.1 Auto Search
Use this search to have the Receiver
automatically search all the channels
GB
Select Auto Search and then press the
OK button. TV and radio broadcast
channels will be searched.
The names of the channels will be listed.
Press the EXIT button to return to Viewing
Mode and check that the reception of the
selected channel is good.
7.1.2 Manual Search
Use this channel search by entering the TP information manually to the Receiver. This channel
search is often used to search for a particular channel or those channels that Auto Search has
missed, but requires comparatively more expertise.
Select Manual Search and then press
the OK button.
Move scroll bar to your preferred Channel
and press the OK button and there will be
Check mark.
Press the RED button to start search.
The names of the channels will be listed.
Press the EXIT button to return to Viewing
Mode and check that the reception of the
selected channel is good.
GB
Page 21

Favorite List Manager
1514
7.2 Favorite List Manager
The Favorite List is a collection of your favorite channels.
Digital TV offers hundreds of channels. Therefore, it is almost impossible to select channels by pressing
the actual channel number each time you want to watch a different channel. You should group the
desired channels into a list. Use this feature for convenient channel management.
Press the MENU button on the remote control to
go to the Main Menu.
Select Favorite List Manager and then select
Edit List Name .
Create list names. A list name is the name given
to a list of channels that is grouped by an
individual. That is, if digital TV is enjoyed by a
family, each member of the family can create their
own channel group. For example, when creating
list names, you can assign names like
Father ,
Mother , etc. The list names can be anything you
like. Follow the on-screen instructions to create
them.
After creating a list name, press the RED button.
Select Add/Remove Channels and then press
the OK button.
Select the list name you have created.
Add channels from the Total List to your
Favorite List. You can also remove channels
from your Favorite List. Follow the on-screen
instructions.
Press the OK button to exit the menu.
The Favorite List Manager provides the following additional functions.
• Edit Channel Name
Use this to edit channel names. Select the channel name you want to change from the Total List and
then change it.
Use the CH UP and CH DOWN buttons to select Edit Channel Name .
Use the LEFT / RIGHT buttons to select the list containing the channel for which you want to
change the name.
Select the channel and then press the OK button.
When the screen changes to allow you to change the channel name, follow the on-screen
instructions to change the name.
Press the OK button.
Timer Recording
• Re-arrange Channels
Use this to change the order of the channels. Select the name of the channel that you want to change
the order in the list, press the OK button, use the CH UP and CH DOWN buttons to change the order,
and then press the OK button.
Use the CH UP and CH DOWN buttons to select Re-arrange Channels.
Use the LEFT / RIGHT buttons to select the list containing the channel whose order you want to
change within that list.
Select the channel and then press the OK button. The selected channel will be highlighted in blue.
Use the LEFT / RIGHT buttons, CH UP and CH DOWN buttons, and PAGE UP and PAGE DOWN
buttons to move the highlighted channel to the desired position.
Press the OK button.
• Remove Channels of Total List
Use this to remove the selected channels of Total List. Select the channel you want to remove
of the list and then press the OK button.
Use the CH UP and CH DOWN buttons to select Remove Channels of Total List and then
press the OK button.
When the Remove Channels of Total List screen appears, select the channel(s) you want to
delete from the Total List, using the OK button, and the more them to the Recycled pressing a
Right button.
The channel(s) you want to delete should appear in the Recycled. Press the EXIT button.
When the message Do you want to delete channels from the Recycled? appears, press the OK
button. The selected channel(s) will be deleted.
7.3 Timer Recording
Use this to make a timer recording. You can record up to 10 programmes.
Using the Timer Recording feature, you can record your favorite TV programmes on the VCR.
Press the TIMER button on the remote control to
go to the Recording List.
The message “Please set Clock time first”
appears followed by the User Time Setting
screen. Set user time according to the current
time. If the user time is already set, this step will
be skipped.
When the Recording List screen appears, press
the OK button to enter necessary information.
Move to the Recording Setting menu. To record a programme, enter information such as, channel, start
time, Duration, programme type (Once, Daily, Weekly), etc.
DIGITAL TERRESTRIAL RECEIVERDIGITAL TERRESTRIAL RECEIVER DTR 9000TWINDTR 9000TWIN
GBGB GBGB
Page 22

17
Timer Recording
16
• Channel
Select the channel you want to record. Use the LEFT / RIGHT buttons to select the channel.
• Start Date
Set the start date (Day/Month/Year) of the program you want to record. Use the Numeric buttons to set
the recording start date.
• Start Time
Set the start time (Hour/Minute) of the program you want to record. Use the Numeric buttons to set the
recording start time.
• Duration
Use the Numeric buttons to set the recording time duration.(Hour/Minute)
• Type
Set the type (Once/Daily/Weekly) of the program you want to record. You can record the program once
or daily at the same time or weekly at the same time. Select the type accordingly. Use the LEFT /
RIGHT buttons to select the program type.
• Recording
Starts the recording according to the above
settings. Press the OK button.
After the settings are completed, select
Recording and then press the OK button. If
the channel you selected has been locked, the
Password Input screen appears. Enter the
password.
You can check the timer recording settings
from the Recording List.
• A message appears 1 minute before the recording start time, asking you whether or not to proceed
with the recording. To proceed with the recording, press the OK button. Otherwise, press the Exit button.
• Even if the power is turned off, the Receiver will automatically power on at the recording start time to
proceed with the recording. When the recording ends, it will return to its previous state.
• Once the recording has started, only the channel that is currently being recorded will be shown. During
recording, none of the buttons except the POWER button will respond.
REC appears on the front
panel display of the Receiver.
• If the programme type is set to
Once , it will be deleted from the Recording List after the recording
ends.
If the programme type is set to
Daily or Weekly , the channel recording information will be changed
to the next scheduled date and then stored.
Main Menu Guide
• EPG Recording
This function enables you to use the EPG time information to
book a recording on the VCR.
Press the EPG button.
Use the CH UP and CH DOWN buttons and the LEFT / RIGHT buttons to select the time and the
channel.
Press the TIMER button. The selected recording is added to the Timer List.
8. Main Menu Guide
8.1 General Settings
Refer to Section 5.2 on General Settings for details.
8.2 Favorite List Manager
Refer to Section 7.2 on Favorite List Manager for
details.
8.3 Channel Manager
Refer to Section 7.1 on Channel Search for details
on Auto Search, and Manual Search.
We will take a look at other functions.
Reinstallation
Use this to restore all settings to their default values.
Press the MENU button on the remote control.
Select Channel Manager .
Select Reinstallation .
When the Enter Password message appears, enter the password.
The settings (such as channel information and language) on the Receiver will be restored to their
defaults. However, the Receiver cannot revert to its default state if the password has been changed.
When you perform Reinstallation of the Receiver, the Receiver will be initialized in one of two ways. The
difference is determined by the Receiver model type .
• Settings will be restored to their factory default settings and channel information programmed at the
factory will remain unchanged.
• Settings will be restored to their factory default settings and channel information programmed at the
factory will also be deleted.
DIGITAL TERRESTRIAL RECEIVERDIGITAL TERRESTRIAL RECEIVER DTR 9000TWINDTR 9000TWIN
GBGB GBGB
Page 23

Parental Lock Manager
1918
Delete All Channels
Use this if necessary to delete all your channels . If you use this, channels only will be deleted without
affecting your existing settings .
Press the MENU button on the remote control.
Select Channel Manager .
Select Delete All Channels .
When the
Enter Password
message appears, enter the password.
When the message asking you to confirm the delete operation appears, press the OK button.
8.4 Parental Lock Manager
This allows you to lock particular channels or the Receiver itself. For example, you can prevent your children
from accessing adult programme using this function.
Press the MENU button on the remote control.
Select Parental Lock Manager .
When the Enter Password message appears,
enter the password. The factory default user
password is
0000 .
When the Parental Lock Manager screen appears,
set the following items.
• Channel Lock
Select the channel you want to lock. When
someone switches to the locked channel, the
password screen will appear.
• Access Lock
Enable or disable whether to ask for the password when the Receiver is powered on. This may be set to
On or Off.
• Change Password
Select this to change the password. When someone switches to the locked channel, the password
screen will appear.
8.5 System Information
This displays brief information on the Receiver’s
software.
Use this to check the software version or release
date of the current software before upgrading
System information is as follows:
• Date
• Software Version
• Firmware
DIGITAL TERRESTRIAL RECEIVERDIGITAL TERRESTRIAL RECEIVER DTR 9000TWINDTR 9000TWIN
GBGB GBGB
9. VCR Recording
Automatically, it will start recording on VCR.
The massage " VCR Recording Start Now" display on the screen.
Press the REC button on the Remote Control Unit to record directly.
Set the "Stop Time" at the recording program you want to stop recording,
use the numeric button to set the recording Stop Time.
9.7 REC-TIME
Press the stop button on the RCU.
If you want to stop Recording, Prees the OK button
else Press the Exit button.
9.6 STOP
Refer to EPG recording, Section 7.3 describe
it in details.
9.5 EPG Recording
Refer to timer recording, Section 7.3 describe
it in details.
9.4 Timer Recording
When you are recording on the VCR, it will be displayed in the front.
9.3 Recording Status
This function allows to record the same channel through tuner2 which is watching through tuner1.
9.2 Direct Recording
If you select "Slave Channel", it will be displayed in the front.
Use the CH Up and CH Down buttons to select channel.
Press the A/B button on the Remote Control Unit to go to slave screen.
This chapter explains the settingof VCR Recording on the VCR
9.1 Tuner 2(VCR) Channel Viewing
VCR Recording
Page 24

Parental Lock Manager
1918
Delete All Channels
Use this if necessary to delete all your channels . If you use this, channels only will be deleted without
affecting your existing settings .
Press the MENU button on the remote control.
Select Channel Manager .
Select Delete All Channels .
When the
Enter Password
message appears, enter the password.
When the message asking you to confirm the delete operation appears, press the OK button.
8.4 Parental Lock Manager
This allows you to lock particular channels or the Receiver itself. For example, you can prevent your children
from accessing adult programme using this function.
Press the MENU button on the remote control.
Select Parental Lock Manager .
When the Enter Password message appears,
enter the password. The factory default user
password is
0000 .
When the Parental Lock Manager screen appears,
set the following items.
• Channel Lock
Select the channel you want to lock. When
someone switches to the locked channel, the
password screen will appear.
• Access Lock
Enable or disable whether to ask for the password when the Receiver is powered on. This may be set to
On or Off.
• Change Password
Select this to change the password. When someone switches to the locked channel, the password
screen will appear.
8.5 System Information
This displays brief information on the Receiver’s
software.
Use this to check the software version or release
date of the current software before upgrading
System information is as follows:
• Date
• Software Version
• Firmware
DIGITAL TERRESTRIAL RECEIVERDIGITAL TERRESTRIAL RECEIVER DTR 9000TWINDTR 9000TWIN
GBGB GBGB
9. VCR Recording
Automatically, it will start recording on VCR.
The massage " VCR Recording Start Now" display on the screen.
Press the REC button on the Remote Control Unit to record directly.
Set the "Stop Time" at the recording program you want to stop recording,
use the numeric button to set the recording Stop Time.
9.7 REC-TIME
Press the stop button on the RCU.
If you want to stop Recording, Prees the OK button
else Press the Exit button.
9.6 STOP
Refer to EPG recording, Section 7.3 describe
it in details.
9.5 EPG Recording
Refer to timer recording, Section 7.3 describe
it in details.
9.4 Timer Recording
When you are recording on the VCR, it will be displayed in the front.
9.3 Recording Status
This function allows to record the same channel through tuner2 which is watching through tuner1.
9.2 Direct Recording
If you select "Slave Channel", it will be displayed in the front.
Use the CH Up and CH Down buttons to select channel.
Press the A/B button on the Remote Control Unit to go to slave screen.
This chapter explains the settingof VCR Recording on the VCR
9.1 Tuner 2(VCR) Channel Viewing
VCR Recording
Page 25

Trouble Shooting
21
20
11. Trouble Shooting
Note:
Digital communications involve the simultaneous transfer and processing of large amounts of data.
Changing channels may take longer in comparison to analogue devices.
12. Recycling and Disposal
Please dispose of the device, packaging such as polystyrene and all batteries in accordance with your local
regulations and recycle wherever possible, Follow all relevant regulations and dispose of the materials at
the correct locations. Consult the relevant regulations available from your local environmental protection
agency or similar.
Problem Solution
1) No Video
- Channel Data changed. - Execute Re-Installation or Manual/Auto Channel
Search (Please refer to the Manual for details).
2) No Audio
- Check the audio mute controls- Check Audio Language; Press Audio Key and
try to change the language or change Main Audio language on general
settings menu.
3) Fail to boot receiver. - Reapply AC power- Contact A/S Center if this problem occurs continuously.
4) Fail to search channel - signal Line connection
5) Screen shows No Signal
- signal Line connection
continuously
6) Video Freeze
- Bad Signal stream or bad channel; move to another channel.
- Reapply AC power
7) Remote control
- Receiver could be interfered with Noise from other electric home appliances.
does not respond
Put the receiver in some other place.
- Check if the battery of Remote Control is empty.
8) Fail to catch Preprogram - Execute the Re-Installation process or Manual/Auto Search.
channel
9) No OSD MENU - Check SCART, ensure it is connected to your receiver and TV correctly
10) Fail to Download
- PC232 Port problem
through Serial
DIGITAL TERRESTRIAL RECEIVERDIGITAL TERRESTRIAL RECEIVER DTR 9000TWINDTR 9000TWIN
GBGB GBGB
10. Additional Information
10.1 Upgrading the Receiver Software
You can upgrade the software on the Receiver. To upgrade the software on the Receiver, contact the
store where you purchased the set. To check the software version, select “System Information” from
the Main Menu and then press the OK button. After the software upgrade, you may need to perform
Reinstallation on the Receiver. Refer to Section 8.3 on Channel Manager for information on
Reinstallation.
Caution
When you perform Reinstallation, all existing data will be lost.
Connect the cable.
Run the programme from your PC.
Turn off the Receiver and then turn it back on.
Please visit our website
[http://www.radixworld.com/korea/product/download.asp and click Download Guide]
[http://www.radix-sat.de]
10.2 Software Transfer(Receiver to Receiver)
The S/W transfer function from receiver to another receiver.
1. Plug the power cable in the forwarding Receiver in order to transmit S/W and take out the power plug
from receiving receiver.
2. Connect forwarding receiver with receiving receiver by the RS232 cable.
3. Set the forwarding receiver on the system information screen.
4. Press [TIMER]key of forwarding receiver.(Find "Progress bar" on the screen)
5. Plug the power cable in the receiving receiver.
6. After "progress bar" is full, wait until the "complete" message shown.
After complete transmission, you need to reboot the receiving receiver in order to apply received
software.
Attention: It will be possible to lose transmission by electricity effect.
And then, you may be able to install several times.
If possible, please avoid to use the RCU while the software is downloading.
10.3 Master Password
The Master Password is the general password you will need to use to access the Receiver if you have
forgotten your User Password. The following 4-digit number is the Master Password. It is
recommended that you record your User Password in the space provided below. The User Password is
set to “0000” by default.
• Master Password
• User Password
9815
Additional Information
Page 26

23
22
Technical Data Technical Data
Data Service Port
Connector 9 Pin D-Female Type
Protocol RS-232 Asynch
Data Rate Max 115200 bps
Front Panel
4 Digit LED Display Channel Numbers Display
8 Buttons Power, Up, Down, Left, Right, OK, Menu, Exit
IR Sensor 38KHz
Rear Panel
RF2 Input FEMALE
RF2 Loop through output MALE
RF1 Input FEMALE
RF1 Loop through output MALE
Cinch output Audio (Left, Right), Video,
Digital Audio Out(SPDIF)
S-VIDEO Output
Digital Audio Output
2SCART Output
S-VIDEO
Optical
1TV, 1VCR
RS232 Serial Port 9 Pin D-Female Type
Power Cord Europe Flexible Cord
Remote Control Unit
Type IR (Carrier Freq. 38KHz)
Battery 2 X 1.5V AAA
39 Keys Power, 0~9, Mute, Info, Up, Down, Left, Right,
Back, Radio, OK, Menu, Exit, EPG, Pause
Timer, Last, Page Up/Down, Subtitle, Audio,
Volume Up/Down,TTX,A/B,REC,REC_TIME,
STOP, F1
General Data
Input Power Voltage AC 95 ~ 250V, 50/60Hz
Power Consumption Max 30Watts (Standard)
Dimension (W X D X H) 340 X 255 X 69mm
Weight 2.5Kg
Operation Temperature 0 ~ 40 Deg.
DIGITAL TERRESTRIAL RECEIVERDIGITAL TERRESTRIAL RECEIVER DTR 9000TWINDTR 9000TWIN
GBGB GBGB
13. Technical data
Tuner / Front-End Demodulator
RF1,2 Input Frequency 174MHz~230MHz, 470MHz~862MHz
RF1,2 Loop through output 47 ~ 862MHz
Input Impedance 75ohms
Input Signal Level -80dBm ~-20dBm
Channel Bandwidth 7MHz, 8MHz
Demodulation According DVB-T
Type COFDM 2K, 8K
Mode QPSK, 16QAM, 64QAM
Viterbi Decoding Rate 1/2,2/3,3/4,5/6,7/8
Guard Interval Modes 1/32,1/16,1/8,1/4 active symbol duration
Reed Solomon Decoding FEC: 204,188,t=8
Transport Demultiplexer
Demultiplex According to ISO/IEC 13818-1
Max. Input Stream 60MHz(Serial)/7.5MHz(Parallel)
PID Handling Capability 32 PID
SI Filtering According to DVB-SI spec (ETS 300 468)
Video Decoding Parameters
Video Decoding ISO/IEC 13818-2 MP@ML
Aspect Ratio 4:3 16:9
Resolution MAX. 720 X 576
Audio Decoding Parameters
Audio Decoding ISO/IEC 13818-3 Layer I & II
Operating mode Mono, Stereo,AC3
Sampling Frequency 32, 44.1, 48KHz
Baseband Video/Audio Output
Video Output Impedance 75ohms
Video Output Level 1Vp_p
Audio Output Impedance 600ohms Unbalanced
Audio Output Level 3.0Vp_p With Volume Control
Microprocessor and Main Memories
Microprocessor Type ST20-C1(STi5518) x 2
1M X 16bit
SDRAM(for decoding) 4M X 16bit
 Loading...