

Page 1

Users Guide
GB
Read these instructions carefully before using this appliance. • Retain for future reference.
RADIX shall not be liable for damages resulting from improper use of this appliance.
RADIX Electronic Vertriebs-GmbH • D-61381 Friedrichsdorf • F.R. Germany
Version 1.0 Page 19
Page 2

Introduction
1 Introduction
Thank you for purchasing your RADIX digital satellite receiver. All RADIX products are manufactured to the highest standards at our ISO 9002 accredited manufacturing plants.
You naturally want to begin viewing your favourite programmes as quickly as possible - this is
why we have designed the menu to fully meet your requirements. To ensure that you get to
know your unit properly and that you can use and program all functions, please read these
instruction carefully.
If it is necessary to return your receiver, please send it together with all accessories and in its
original packaging. Include a copy of your invoice or receipt as well as a detailed description
of the problem. Please ensure you affix adequate postage to the package or refer all repairs to
an authorised retailer.
Thank you for purchasing your DT-10S digital satellite receiver. In doing so you have chosen
an appliance built for the future, allowing you to take advantage of numerous programmes
and additional services such as electronic programme guides which will eventually replace
conventional analogue transmissions.
We hope you enjoy using this product.
Print:
Users Guide DT-10S
RADIX Electronic Vertriebs-GmbH • D-61381 Friedrichsdorf • F.R. Germany
© RADIX Electronic Vertriebs-GmbH, 2000
Subject to change without notice
Issue 09/2000, Version 1.0
Printed in Korea
Technical Documentation: Bartha Docuteam GmbH • D-64625 Bensheim
Page 20 Version 1.0
Page 3

2 Contents
Chapter Content Page
1 Introduction ................................................................................................. 20
2 Contents...................................................................................................... 21
3 Important Safety Notes ............................................................................ 22
4 Your Receiver and its Functions ................................................................. 23
4.1 Remote Control ........................................................................................... 23
4.2 Connecting the Antenna and Other Devices .............................................. 24
5 Installing Your Receiver .............................................................................. 25
6 Setting Up Your Receiver ............................................................................ 26
7 Using Your Receiver .................................................................................... 27
7.1 Switching your Receiver On ....................................................................... 27
7.2 Selecting Channels ..................................................................................... 27
7.3 Volume Control / Mute Sound .................................................................... 27
7.4 Selecting the Audio Mode .......................................................................... 28
7.5 Selecting the Audio Mode (incl. Digital)...................................................... 28
8 Channel Lists and Information .................................................................... 29
Contents
GB
8.1 Channel Lists .............................................................................................. 29
8.2 Channel Guides and Information on Channel Contents ............................ 30
8.2.1 Comprehensive Information on Channel Contents .................................... 30
8.2.2 Information on the Content of the Current Channel ................................... 30
9 Programming Your Receiver in the Main Menu .......................................... 31
9.1 General Settings ......................................................................................... 31
9.2 Preference Lists .......................................................................................... 31
9.3 Channel Manager ........................................................................................ 32
9.3.1 Automatic Search ....................................................................................... 33
9.3.2 Manual Search ............................................................................................ 33
9.3.3 Programme Data Transfer ........................................................................... 34
9.3.4 Reinstallation .............................................................................................. 34
9.3.5 Transponder Editor ..................................................................................... 34
9.3.6 Delete all Channels ..................................................................................... 34
9.4 Access Manager ......................................................................................... 34
9.5 Antenna Control .......................................................................................... 35
9.6 System Information ..................................................................................... 35
10 Trouble Shooting ......................................................................................... 36
11 Recycling and Disposal .............................................................................. 36
Technical data ................................................................................. Appendix
Version 1.0 Page 21
Page 4

Important Safety Notes
3 Important Safety Notes
This appliance is designed exclusively for receiving satellite signals as described in this guide. It must
not be used for any other purpose. Keep the appliance out of reach of children. To avoid injury and to
avoid damaging your receiver, please note the following:
WARNING:
Never remove the cover or any parts of it!
Do not allow liquids or objects to fall into the receiver!
DANGER:
Do not cover ventilation holes – risk of fire through overheating!
DANGER:
Only use original spare parts or professionally recommended spare parts.
Failure to do so may result in damage or injury and will cancel the
guarantee.
CAUTION:
Switch the appliance off during electrical storms or if it not used for long
periods.
Disconnect the antenna cable in an electrical storm.
CAUTION:
To clean the receiver, lightly dampen a cloth with clean water
Do not use any chemicals or detergents!
Page 22 Version 1.0
Page 5

4 Your Receiver and its Functions
4.1 Remote Control
Your Receiver and its Functions
ON/OFF Button
Menu Button
Electronic Program Guide
Exit menu
Mute Button
Select button (back)
OK Button
Audio Mode (Channel assignment)
No function
on this model
Number buttons
Radio button
Back
Continous Page (preference list)
Program information
Select button (up)
Volume button
Select button (continue)
Select button (down)
Previous Page (preference list)
No function
on this model
Last channel
GB
NOTE:
When inserting batteries into the remote control unit,
make sure that the polarities match (+/-)!
Version 1.0 Page 23
Page 6
Your Receiver and its Functions
WARNING:
WARNUNG:
CAUTION
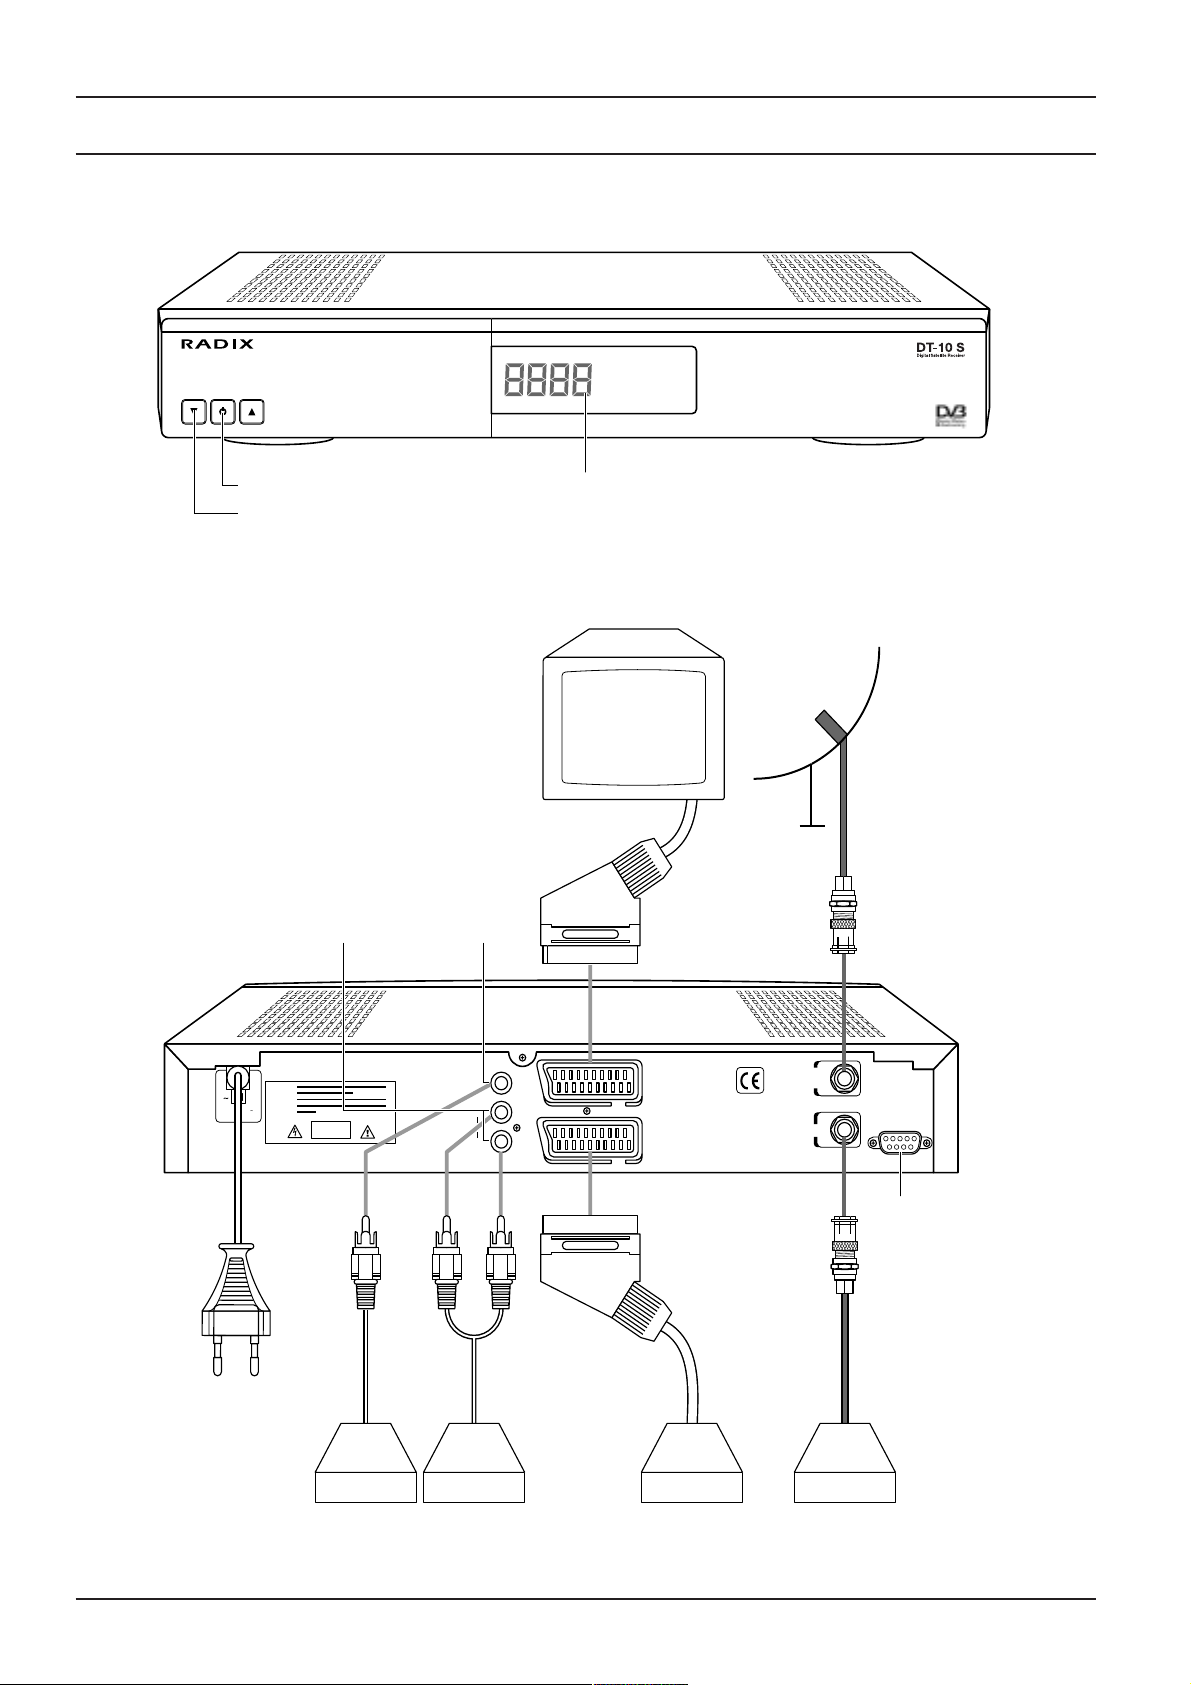
4.2 Connecting the Antenna and Other Devices
ON/OFF Switch LED (four digit display)
Selector Switch (Channel)
Front of Receiver
Audio conection
for HiFi system
(analog)
Video
connection
Displays channel number
TV
Scart Connection
Antenna
IF-Input –
Antenna cable
(coaxial)
for digital
signal
F-type connector
IF
IN
P
U
T
+
1
3
V
/+
1
8
V
D
V
ID
E
W
A
R
N
IN
G
:
W
A
R
N
U
N
G
:
9
5
V
-
2
6
4
V
5
0
/
6
0
H
z
M
A
X
3
5
W
CAUTION
O
T
L
A
U
D
IO
R
V
V
C
R
C
4
0
0
m
A
M
A
X
.
R
S
2
3
IF
O
U
T
P
U
T
2
RS 232 for
IF Output for
Analog Receiver
connection
to PC
F-type connector
SCART Connection
Video-Recorder
Mains connection
(95 V-264 V~)
Video
Recorder
HiFi
system
Video-
Recorder
Receiver
extern
(analog)(analog)
Rear of unit, connection to other devices
Page 24 Version 1.0
Page 7

5 Installing Your Receiver
CAUTION:
Do not place the receiver near any heat sources or in strong sunlight.
Protect all cables from damage caused, for example, by sharp edges.
This appliance must only be used with a mains voltage of 230 V (± 10%), 50 Hz.
CAUTION:
Do not connect the receiver to the mains until you have correctly connected your
VCR, TV and any other analogue receiver you may have to the mains.
Installing Your Receiver
• Use double shielded coaxial cable for connecting the LNB to the receiver.
CAUTION:
When assembling the F-type connector, make sure that no part of the inner wiremesh sheath touches the inner core (see diagram below). Failure to do so can
cause a short-circuit and damage your receiver.
Wire mesh
Bent Wire
Core
• Tighten the safety nut on the F-type connector by hand only. Do not over
tighten!
The receiver is pre-programmed at our factory to immediately provide you with
hundreds of different channels. Of course you can change these channels or
replace them completely. In order to take advantage of all of the user guides such
as programme, you will need to make a number of settings which are described
in the following chapters.
GB
Version 1.0 Page 25
Page 8

Setting Up Your Receiver
6 Setting Up Your Receiver
• Switch your television on and set it to receiver-receive (AV or SCART input).
• Press the Power button on your receiver or on your remote control unit.
The ON message appears on the receivers display
and the following screen appears.
The Main Menu appears on your TV screen:
• Select the language of your choice.
Instructions on what you need to do and which
buttons on the remote control should be used are
contained in the orange dialog box.
Welcome !
D
GB
F
I
E
TR
Select the language of your choice [UP/DN]
and press [OK] to confirm selection.
The following screen tells you how to proceed.
Welcome !
Your Digital Satellite Receiver is
factory pre-programmed.
After you have adjusted several settings
in the GENERAL SETTINGS
you have to press [EXIT] for loading
the pre-programmed channeldata.
If you don´t want to use this data
press [MENU] and select CHANNEL MANAGER
to start your own searching.
Press [OK] to enter the General Settings menu.
General Settings
When you press OK, the “General Settings” menu
appears.
The screen shows you which buttons you can use
and which functions are available.
Example:
“BACK” – return to the previous menu.
“Exit” – return to the television picture.
“Menu” – return to the Main Menu.
• Enter your time zone by selecting a country in your
time zone under section 1.
• Under item 2, select ON to choose Summer Time or
General Settings
1. Time Zone
2. Summer Time
3. TV aspect Ratio
4. TV Signal
Exit
TV
Main menu
Choose the setting you wish to change [UP/DN].
Change the setting by toggling with [LT/LR].
5. Menu Language
6. Main Audio Language
7. DiSEqC 1.2
Menu
Back
Go Back
Germany
ON
4:3
CVBS
English
English
OFF
OFF to choose Winter Time.
• Under item 3, specify the TV Aspect Ration of your television set.
• Under item 4 select the optimum video format for your television.
• Under items 5 and 6, select the desired language.
• If your parabolic antenna is fitted with a control motor which can receive and convert the receivers
control signal, select “7. DiSEqC 1.2” ON (this is described in more detail in section 9.5 Antenna
Control).
CAUTION:
If DiSEqC 1.2 is set to ON, the DiSEqC 1.0 function (A, B, C, D) is no longer assured!
Page 26 Version 1.0
Page 9

When you have completed these settings, you are ready to begin viewing the pre-programmed chan-
20:20
Pro 7 0001
Exit
20:15 Südseeparadies
22:00 News
nels. To do this you must first activate the factory presets:
• Press the Exit key to download the channel data. After a few moments you will receive a television
programme.
If you do not want to use the factory presets, you can open the Main Menu by pressing the Menu key
(see Section 9) and make all of the necessary changes yourself.
7 Using your Receiver
7.1 Switching your Receiver On
Press the ON/OFF button on either your receiver or the remote control unit to switch the receiver
between on (“ON” or channel number on the display) and Standby modes (dot on display).
7.2 Selecting a Channel
• Use the number keys to select the channel of your
choice or select one from a preference list.
Using Your Receiver
GB
NOTE:
The program number consists of three digits. You can
also enter a one or two-digit number.
(for example 1, 13) and press the OK button to
confirm.
• Use the UP button to move up one channel; use the
DOWN button to move down one channel.
• Press the LAST button to return to the last channel
you viewed.
Each time you change channels, the channel name and number, the time and the current programme as
well as the following programme are displayed along with their times for a number of seconds. You can
display this information at any time by pressing the INFORMATION button.
7.3 Volume Control / Mute Sound
• Use the volume buttons on the remote control
to adjust the volume.
The on-screen display disappears after a few
seconds if no changes have been made.
15
• To turn off the sound, press the MUTE button (see Section 4.1):
• Press the MUTE button again to restore the sound.
Version 1.0 Page 27
Page 10

Using Your Receiver
7.4 Listening to the Radio
In addition to television programmes, many broadcasters transmit their radio programmes in digital HIFI
format.
• Press the RADIO key (see Section 4.1) to toggle between TV and Radio mode.
• Press the Radio key to switch from Radio to TV mode.
7.5 Selecting the Audio Mode
• Press the AUDIO button. Use the UP/DOWN keys to select one of the languages (BL) provided by the
broadcaster.
• Press the > button and select one of the following options:
Stereo – sound from right and left
Mono (L) – sound from left only
Mono (R) – sound from right only
• Press the AUDIO button again or press the EXIT button to exit this menu.
NOTE:
The actual purpose of this function is to transmit various language channels to the TV picture. Some
programme operators use this option, however, to transmit various radio program. This can cause
restrictions on reception.
Page 28 Version 1.0
Page 11

8 Programme Lists and Information
P.001 Pro 7
P.002 SAT 1
P.003 ZDF
P.004 ARD
P.005 SW3
P.006 BR1
P.007 VH1
P.008 MTV
P.009 BBC 1
P.010 ABSAT
Programme video
ALPHA
P.001 Pro 7
P.002 SAT 1
P.003 ZDF
P.004 ARD
P.005 SW3
P.006 BR1
P.007 VH1
P.008 MTV
P.009 BBC 1
P.010 ABSAT
Programme video
ALPHA
DiSEqC:
Polarity:
Frequency:
Symbol Rate:
Video PID:
Audio PID:
PCR PID:
A
H
11837
27.500
201
202
201
8.1 Preference Lists
Digital television offers you hundreds of channels and it’s easy to lose track of your favourites. To help
you find your favourite programmes quickly and easily, you can create preference lists.
Several hundred broadcasters are preset into the receiver at the factory - these are listed in the Complete Video List and the Complete Radio List. In addition to the complete lists, you can also create your
own preference lists which you can name as you wish. You can program preference lists easily - the
instructions for doing this are contained in section 9.2. To change from one list to another while watching a programme, do the following:
• Press the OK key while watching a programme:
(Press the button again to remove the onscreen
display)
• Press the > button to change the programme list.
If one of the programme lists is displayed, the current
programme is selected. If you use the UP/DOWN
buttons to change the broadcaster, the programme
and TV picture also change.
Using Your Receiver
GB
• Press the INFO key while watching a programme
and programme list.
Technical information now appears relating to the
current broadcaster and the TV screen returns to
minimised view.
• Press the INFO key again to return to TV mode.
Version 1.0 Page 29
Page 12

Using Your Receiver
8.2 Channel Guides and Information on Channel Contents
NOTE:
Information on programme content is not broadcast by all TV broadcasters!
8.2.1 Comprehensive Information on Channel Contents
• Press the EPG key while watching a program (EPG: Electronic Program Guide).
In the program guide you see a list containing the entered broadcasters as well as the names and start
time of the current program.
• Use the UP/DOWN keys to select the desired
program.
• Press the INFO key to obtain more comprehensive
information (see Diagram Section 7.2).
8.2.2 Information on the Content of the Current
and Program and the Next Program
• Press the INFO key while watching a program:
The program name and number, the time as well as
the current and next programs are displayed along
with start times on the screen (as described in Section 7.2).
• Press the INFO key again to obtain more compre-
hensive information about the current program.
Channel Guide
JOHN
P.001 Pro 7
P.002 SAT 1
P.003 ZDF
P.004 ARD
P.005 SW3
P.006 BR1
P.007 VH1
P.008 MTV
P.009 BBC 1
P.010 ABSAT
Now
20:15 Südseeparadies
A content indication for the
current program item
is shown here.
Exit
20:15 Südseeparadies
22:00 News
Info TV
09.00 The comedy Show
09.05 The News
08.50 Dr Who
08.55 Wild Things
09.05 Back Waters
08.15 Top of the Pops
08.50 Go West
09.00 Into the night
09.30 Police Watch
08.55 The real x 25 lett
Pro 7 0001
09:10
Now
20:20
Next
20:15 Südseeparadies
• Press the > key to obtain information this informa-
tion for the next program.
• Press the INFO or EXIT button to exit this menu.
A brief summary of contents
for the next program item
is shown here.
Exit
20:15 Südseeparadies
22:00 News
Pro 7 0001
20:20
Page 30 Version 1.0
Page 13

Favorite List Manager
Exit
Menu
Back
Choose the setting you wish to change [UP/DN].
Change the setting by toggling with [LT/RT].
TV
Main menu
Go Back
1. Rename List
2. Add/Delete Programme
3. Edit Programme
4. Change Programme Sequenze
5.
Delete Entire List
List A
List A
Entire List
Entire List
Programming Your Receiver
Choose the setting you wish to change
with [UP/DN] and select with [OK].
TV
Main menu
Main menu
Go Back
1. General Settings
2. Favorite List Manager
3. Channel Manager
4. Access Manager
5. Antenna Positioner
6. System Information
Exit
Menu
Back
P.001 Pro 7
P.002 SAT 1
P.003 ZDF
P.004 ARD
P.005 BBC 1
Add/RemoveChannels
List A Total List (P001)
Select list with [LT/RT].
Select channels with [UP/DN].
Press [OK] to confirm.
P001 ARD
P002 SAT 1
P003 ZDF
P004 Pro 7
P005 SW3
P006 BR1
P007 VH1
P008 MTV
P009 BBC 1
P010 ABSAT
9 Programming Your Receiver in the Main Menu
If you want to receive additional or other programs to
those which were preset, you can program
,01 the new broadcaster yourself. You can also use a variety of
service functions ranging from antenna positioning to prefer-
ence lists and access control.
9.1 General Settings
You already used this menu item when you set up your receiver (Section 5).
You can, of course, change the settings at any time if, for example, you want to adapt the receiver to a
new location.
NOTE:
When the changeover between Summer and Winter Time occurs, you must make the appropriate
changes under menu item 2.
9.2 Preference Lists
You need to programme a personal list in order to use all of the available functions of your receiver.
There are 5 lists named A to E already installed.
Under point ”1. Rename List” specify a name for the
list. You should name it according to its contents, for
example ”News”” or ”Sport”, or according to the
person who uses that list – be creative!
Menu item 1 allows you to change the names at any
time.
GB
Use “2 Add/Delete Program” to create your list.
• Use the UP/DOWN buttons to select the desired
program in the complete video list (right) and
confirm your choice with OK.
The program is now included in your personal list. It
now has the current list number (three digit) and has
a “P” to identify it as a TV program.
Version 1.0 Page 31
Page 14

Programming Your Receiver
In order to include a radio station in your personal list, switch from the complete video list to the complete radio list using the RADIO button. The procedure is the same as above. Radio programs which
have been included in your personal list are identified with an “A”.
If you want to delete a program from your list:
• Press the < button to access the personal list and use the UP/DOWN buttons to select the desired
program. Press the OK button to confirm that you want to delete the program.
If the name of a station does not match you presets, you can change it using menu item 3 as often as
you wish.
To change the order of the programs in a list, use menu item 4. To do this, select a program and move it
to the new position. Confirm the move by pressing OK.
To create space for a new broadcaster, you can move broadcasters you no longer need to the “recycle
bin”. To do this, use “5 Delete Program from Complete List”.
9.3 Channel Manager
Using the program manager you can load new broadcasters into your receivers memory.
In order to make these settings you will need certain
information which is available from your local specialist or in specialist magazines.
DiSEqc-Control and 22 kHz-Switch Signal
DiSEqC Settings
Polarisation:
Vertical/Horizontal
1 2 3 4 5 6 7 8 9 10 11 12 13 14
SAT A SAT B SAT C SAT D
14 V 14 V 18 V 18 V 14 V 14 V 18 V 18 V 14 V 14 V 18 V 18 V 14 V 14 V 18V 18 V
Channel Manager
1. Auto Search
2. Manual Search
3. Channel Data Transfer
4. Reinstallation
Exit
TV
Main menu
Choose the setting you wish to change
with [UP/DN] and select with [OK].
5. Transponder Editor
6. Delete All Channels
Menu
Back
Go Back
15 16
LNB Band: 9,75/10,6 GHz
DiSEqC Sound
OPTION:
9,75 10,6 9,75 10,6 9,75 10,6 9,75 10,6 9,75 10,6 9,75 10,6 9,75 10,6 9,75 10,6
AAAABBBBAAAABBBB
1111111122222222
If no DiSEqC controlled satellite system is used, the “upper/lower band” must be set to “manual”.
This occurs when you activate/deactivate “22 kHz”.
Page 32 Version 1.0
Page 15

9.3.1 Automatic Search
Press [EXIT] to abort Auto Search.
Auto Search
Exit
Menu
Back
Exit
TV
Main menu
Go Back
1. Satellite 1
2. LNB Local Frequency
3. DiSEqC
4. 22 kHz
5. 0/12 Volt Output
6. Satellite 2
7. LNB Local Frequency
8. DiSEqC
9. 22 kHz
10. 0/12 Volt Output
11. Start Search
DF: 12226
SR: 27.500
58/79
New:0
HOTBIRD
Manual Search
TV
Exit
Menu
Back
Choose the setting you wish to change [UP/DN].
Change the setting by toggling with [LT/RT].
Main menu
Go Back
Horizontal
11837
27.500
OFF
AUTO
AUTO
AUTO
ASTRA
Universal
A
AUTO
1. Satellit 1
2. LNB Local Frequency
3. DiSEqC
4. 22 kHz
5. 0/12 Volt Output
Next
6. Polarity
7. Down Frequency
8. Symbol Rate
9. Network Search
10. Start Search
11. Video PID
12. Audio PID
13. PCR PID
During automatic search, certain data is already
pre-programmed. Standard satellite systems use
Universal-LNBs with a local oscillator frequency of
9750 MHz for the lower band and 10600 MHz for the
lower band. The basic setting for this receiver contains this data except the ASTRA and HOTBIRD
satellites. You should only change these settings if
your satellite system deviates from this or if you
specifically want different settings.
While the receiver is searching a progress bar
appears on which you can follow the frequency
search. In addition, the following information is also
displayed:
DF: - Satellite frequency
SR: - Symbol rate
.../... - Number of transponders found / possible
New: - Number of stored programmes
Programming Your Receiver
GB
If the search fails, check and correct all settings.
Points 5 and 10 ”0/12 Volt Output” have no function in this model.
9.3.2 Manual Search
(This menu is presented in two sections which are
accessed using the Continue and BACK buttons)
These settings should only be changed by qualified
personnel or very advanced users.
Network Search:
Each transponder offers information for the complete
satellite system (Requirement: The provider must
keep the list as up-to-date as possible). When you
enter a transponder and activate the network search,
the receiver automatically searches all transponders
which belong to the network. The definition of the
network varies according to different satellite operators with the result that all channels on a satellite or
only some are examined.
PID (Packed Identifier):
The PID number is the identification for video and audio signals in the digital data flow of DVB MPEG-2
signals.
Version 1.0 Page 33
Due to inadequate labelling, many programs may not be recognised during either automatic or manual
searches. In such cases, you can enter the PID numbers to receive these programs.
Point 5 ”0/12 Volt Output” has no function in this model.
Page 16

Programming Your Receiver
9.3.3 Programme Data Transfer
This menu item is included to support specialist retailers. In this way a desired preset can be transferred from a master device to several slave devices. This pre-setting serves the common interests of a
group of customers, for example regional or ethnic interests.
Master and slave receivers are linked together using as RS 232 interface.
NOTE:
All receiver functions are locked while the receiver is in data transfer mode. The transfer of data can
only be interrupted by removing the mains cable.
9.3.4 Reinstallation
If you changed or deleted the preset data, you can reset the receiver to the factory settings. To do this
you will need the password (Section 9.4).
9.3.5 Transponder Editor
You can change, add or delete all satellite data. This function is intended only for servicing purposes
and has no effect whatsoever on the operation of your receiver.
NOTE:
If you delete all of the data for a satellite, the satellite itself is also deleted.
9.3.6 Delete all Channels
CAUTION:
When you carry out this function (password needed) all settings are deleted and you will need to
reprogram your receiver!
If you want to replace the entire program information, delete all programs. Your receiver now displays
the “Welcome” menu as described in Section 6.
9.4 Access Manager
Several functions on your receiver can only be
accessed using a password – the factory default is
0 0 0 0.
In order to prevent unauthorised access to your
receiver, you can protect it with an access lock.
• Under menu item 4, enter the password and
activate the access control.
When you do this, you will need to enter the password each time you turn the receiver on.
Access Manager
1. Lock Programme
2. Access Lock
Exit
TV
Main menu
Choose the setting you wish to change
with [UP/DN] and select with [OK].
3. Change Password
Menu
Back
Go Back
Entire List
OFF
In order to prevent the viewing of certain
programmes, you can activate an programme lock under point 1 which is similar to the access lock.
Once this lock has been set, you will need to enter your password each time you change programme in
order to remove the lock.
If necessary you can change the password using menu item 3.
Page 34 Version 1.0
Page 17

NOTE:
Signal Strength
SNR 99
Weak Middle Strong
Antenna Positioner
TV
Exit
Menu
Back
1. Set-up Limit
2. Select Satellite
3. Nudge East/West
4. Store Satellite
5. Recalculate Position
ASTRA
Main menu
Go Back
Choose the menu you wish to change.
Follow the directions within the menu boxes.
Set-up Limit
TV
1. Move East/West
2. Set East Limit
3. Set West Limit
4. Disable Limits
5. Go to Reference
Main menu
Go Back
Move East West with [LI/RT].
Stop with [OK].
Exit
Menu
Back
In case of emergency: If you forget your password, your local stockist can request a general password
for your receiver from the factory.
9.5 Antenna Control
The following settings require highly specialised
knowledge and skills. If in doubt, you should have
this work carried out by an experienced professional.
Requirements:
The parabolic antenna must feature a control motor
which receives and uses the signal from the receiver.
The mechanical settings for the antenna must be
carried out correctly so that the satellites orbit can be
properly tracked. This is the only way to ensure that
the strongest possible signal is received.
In the “General Settings” menu, “7. DiSEqC” must be
set to ON.
Programming Your Receiver
GB
The satellite receiver “knows” the position of each
satellite in relation to each other. As a result, it is
sufficient to select and find just one satellite in the
“Antenna Positioner” menu and set it to maximum
strength and store it. All other known satellites are
configured and stored using the calculate command.
You can of course search for new satellites – you
must only use menu items 1-4.
In the submenu “1 Set Limits”, the physical limits are
set within which the parabolic antenna can move
without obstruction.
To do this, move the antenna as far east as possible and this position should be stored using “Set East
Limit”. After this, the antenna moves westwards using menu item 1 and the west limit is set. If the
structural surroundings change, you can delete the limits and recreate them to match the new surroundings.
Menu item “5 Reference Position” resets the antenna control motor to the delivery position (dead
centre).
NOTE:
If your motor does not have a motor, you can use the Antenna positioner menu to check the signal
strength.
9.6 System Information
Version 1.0 Page 35
Use this menu item to get manufacturers information on the software version for your receiver.
Page 18

Trouble Shooting
10 Trouble Shooting Your digital Receiver
NOTE:
Digital communications involve the simultaneous transfer and processing of large amounts of data.
Changing channels may takes longer in comparison to analogue devices.
An hourglass appears on screen with the message “Please Wait” while the receiver changes channel.
Problem Possible Causes Solution
Noise, but Satellite system is faulty Check cables and
screen menu or incorrectly set up, antenna, set up antenna
available faulty LNB again, check LNB
High levels of signal loss Replace cables or use a
in cable signal booster
Faulty LNB Replace LNB
Faulty connection Repair connection
(Water/corrosion
damage)
No stereo sound Wrong cable connecting Check SCART cable
TV and receiver
Remote control Batteries exhausted Replace batteries
does not respond
Remote control not Hold remote control in
pointed at receiver correct position
11 Recycling and Disposal
Please dispose of the device, packaging such as polystyrene and all batteries in accordance with your
local regulations and recycle wherever possible. Follow all relevant regulations and dispose of the
materials at the correct locations. Consult the relevant regulations available from your local
environmental protection agency or similar.
Page 36 Version 1.0
Page 19

Technische Daten • Technical Data • Caractéristiques Techniques
Datos Técnicos • Dati Tecnici • Teknik Özellikler
Tuner Microprocessor and Main Memories
IF Input Frequency 920 ~ 2150MHz Microprocessor Type ST20-C2(STI5512)
IF Loop through output 920 ~ 2150MHz Flash ROM
IF Bandwidth 8/55MHz, automatical switching (for program memory) 512K x 16 bit
according to symbol rate DRAM 1M x 16 bit
Input Impedance 75ohms SDRAM (for decoding) 4M x 16 bit
Input Signal level -65dbm ~ -25dbm
LNB Polarization Data Service Port
Switching Voltage 13/18VDC@max400mA,
Short Circuit Protection Connector 9 Pin D-Female Type
Band Switching 22KHz Tone Protocol RS-232 Asynch
I/Q Output Unbalanced Output, Controlled Data Rate Max 115200 bps
by AGC Input
Front Panel
Front-End Demodulator
4 Digits LED Display Channel Numbers Display
Demodulation Capacity QPSK Demodulation 3 Buttons Power, Down, Up
Symbol Rate 1 ~ 45Msps IR Sensor 38KHz
Viterbi Decoding Rate 1/2, 2/3, 3/4, 5/6, 7/8, 8/9
Reed Solomon Decoding FEC : 204, 188, t=8 Rear Panel
Transport Demultiplexer IF Input F-Female Type
IF Loop through output F-Female Type
Demultiplex According to ISO/IEC 13818-1 Cinch Output AUDIO(Left, Right), VIDEO
Max. Input Stream 60MHz(Serial)/7.5MHz(Parallel) 2SCART Output 1TV, 1VCR
PID Handling Capability 32 PID RS232 Serial Port 9 Pin D-Female Type
SI Filtering According to DVB-SI spec Power Cord Europe Flexible Cord
(ETS 300 468)
Remote Control Unit
Video Decoding Parameters
Type IR (Carrier Freq. 38KHz)
Video Decoding ISO/IEC 13818-2 MP@ML Battery 2 x 1.5V AA
Aspect Ratio 4:3, 16:9, Pan&Scan, LetterBox
Resolution Max.720 x576 General Data
Audio Decoding Parameters Input Power Voltage AC 95~264V, 50/60Hz
Power Consumption Max 35Watts
Audio Decoding ISO/IEC 13818-3 Layer I & II Dimension(W x D x H) 377 x 240 x 69mm
Operating Mode Mono, Dual, Stereo, Joint Stereo Weight 2.5Kg
Sampling Frequency 32, 44.1, 48KHz Operation Temperature 0 ~ 40 Deg.
Baseband Video/Audio Output
Video Output Impedance 75ohms
Video Output Level 1Vp_p
Audio Output Impedance 600ohms Unbalanced
Audio Output Ievel 3.0Vp_p With Volume Control
Version 1.0 Anhang • Appendix • Appendice • Apéndice • Appendice • Ek
 Loading...