

Radius W-300 User Manual
1
2
3
4
6
5
7
8
13
12
9
10
11
14 15
Battery Safety Precautions
Do not burn, disassemble, mutilate, or puncture. Like other batteries of this type, toxic materials
could be released which can cause injuryy.
To reduce the risk of fire or personal injuryy, use only the battery listed in User’s Guide.
Keep batteries out the reach of children.
Remove batteries if storing for over 30 days.
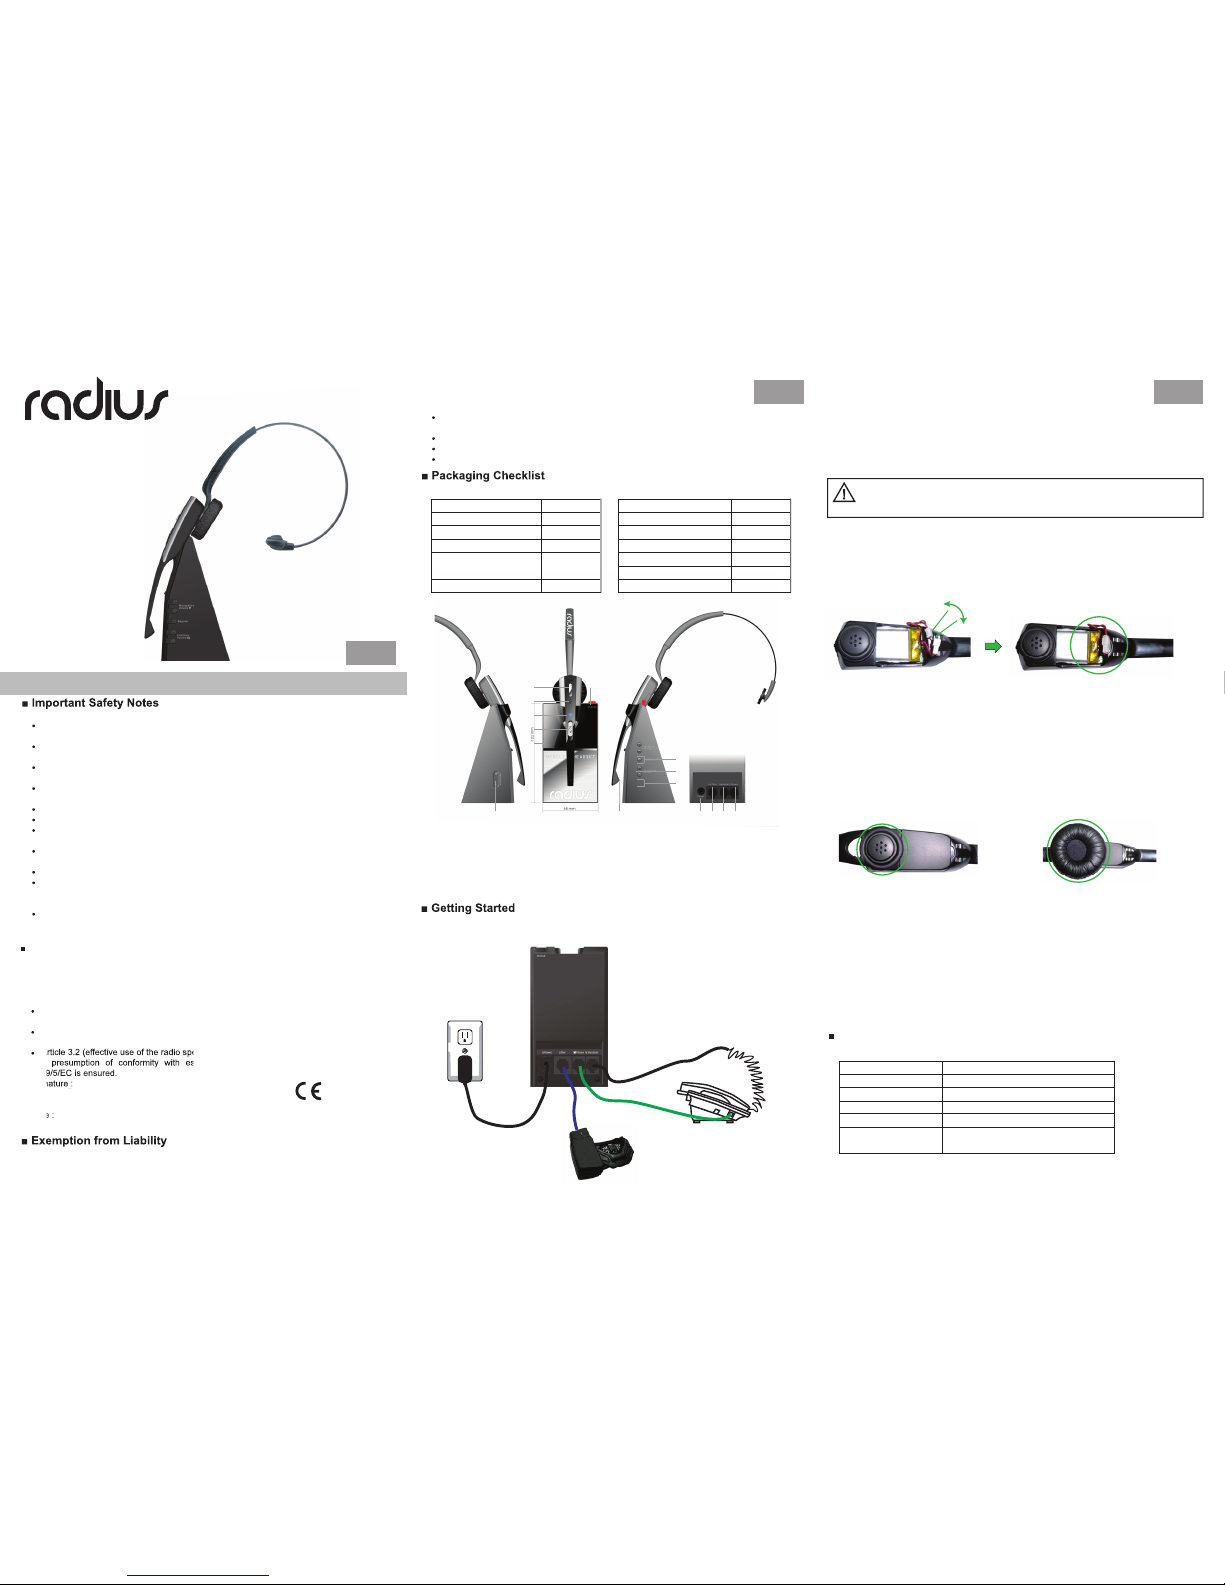
Make sure your package includes the following items:
We cannot guarantee the information which relates to the technical properties or that contained
in this document is correct. The product and its accessories described in this document are
subject to constant improvement and further development. For this reason, we reserve the right
to modify components, accessories, technical specifications and related documentation of the
product described herein without notification.
1. Unplug the handset cord from phone.
2. Plug the phone cord that is connected to the base into the handset jack on the phone.
CAUTION: Your phone may have two similar jacks. Put the cord only in the jack from which the
handset came.
3. Plug the handset cord into the handset jack in the bottom of the base.
4. Plug the AC charger into an outlet and into the base’s AC charging jack.
NOTE: Place the Base unit apart the Desktop Phone at least 15cm to avoid interference.
Warning: The headset does not work and damaged if the wrong battery are inserted. Risk of
explosion if battery is replaced by an incorrect type. Dispose of used batteries according to the
instruction.
CAUTION:
1 2 3
English
E
E E
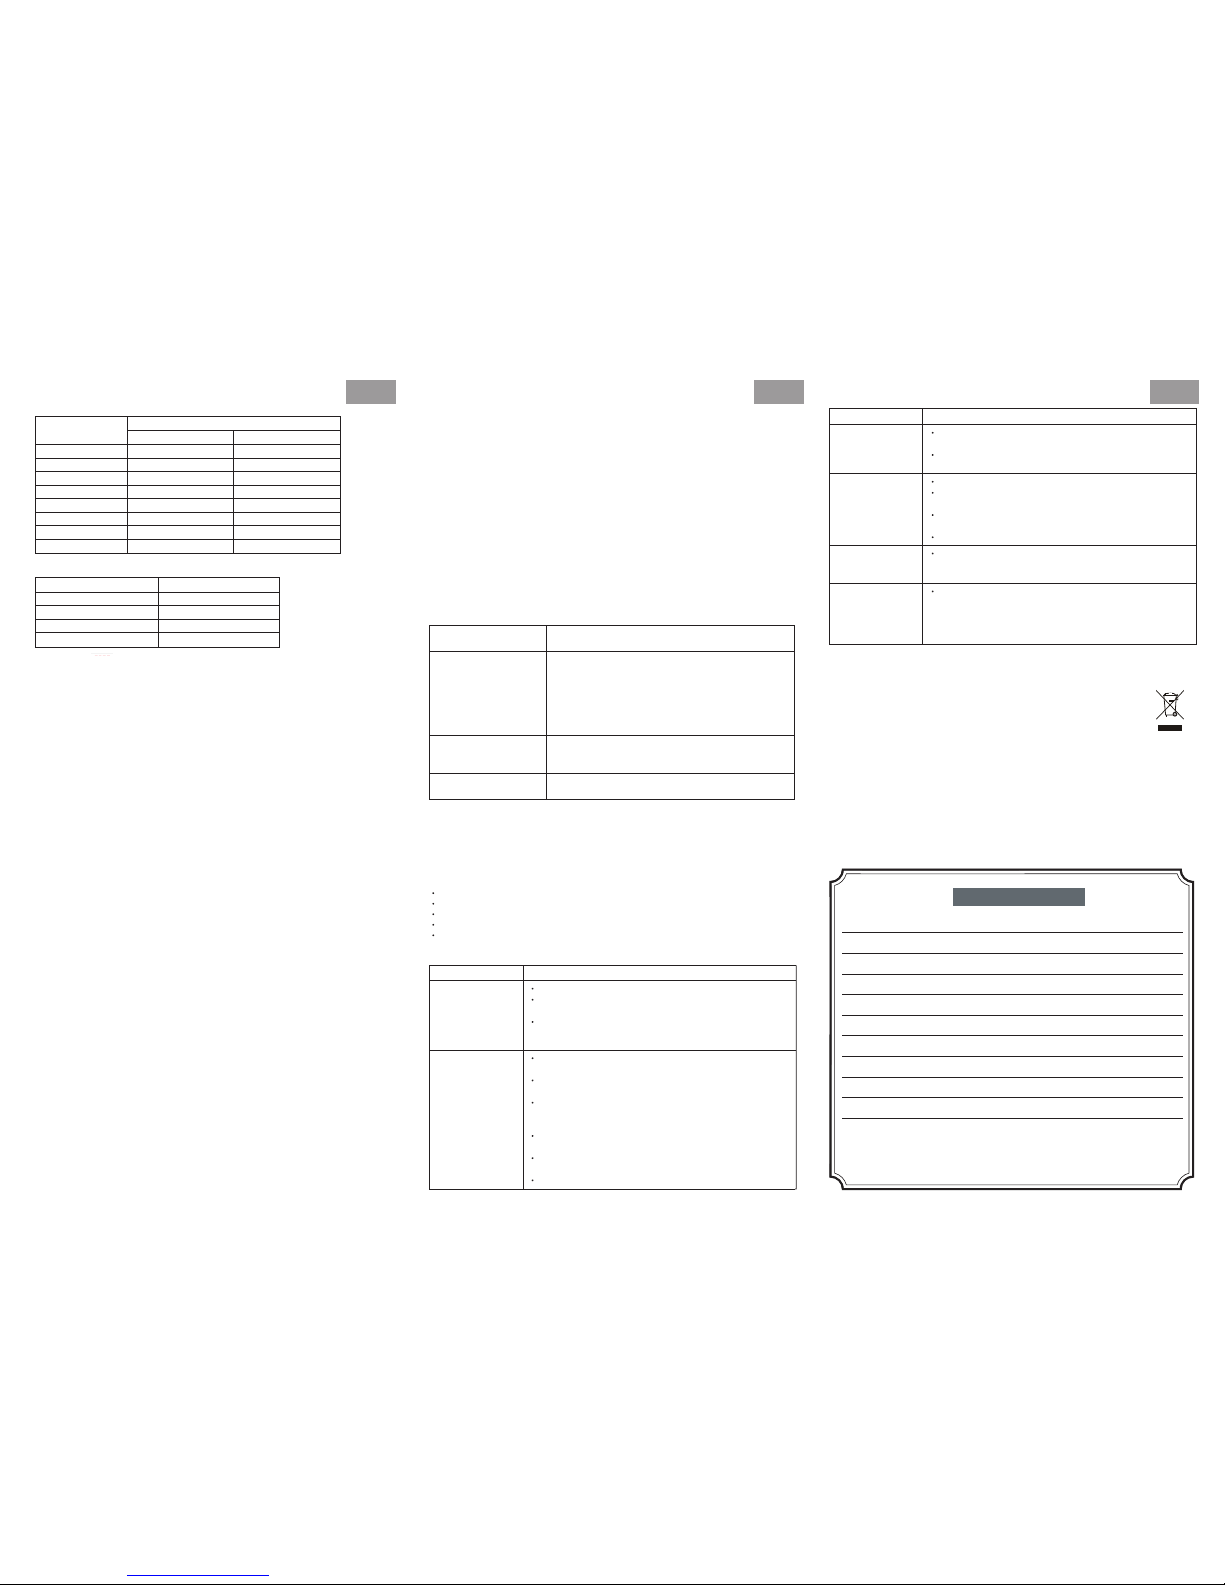
Install Headset battery
1. Lift up the door of battery on the headset.
2. Connect the battery plug to the headset plug.
Note: 1. The headset battery is disconnected before shipment.
2. Connect the battery plugs carefully without removing the battery out from the Headset.
Install Headband and headset cushion
NOTE:
1. The retaining ring is made with rapid prototype plastic. Adjust the headband slowly and
carefully.
2. Please do not swap Headset and headband. Each headband is fit for the paired Headset only.
Setup Handset Lifter (Optional)
1. Plug handset lifter power cord into handset lifter jack on base. Push firmly into base.
2. Position handset lifter under the handset on your phone. Verify that the lifter is located on top
of the telephone speaker.
LED state
1. LED Flashing Pattern
Introduction
Please observe the following to ensure reliable operation of the headset:
Read this manual thoroughly and observe the operating instructions and information
provided.
Place the base station on a non-slip surface and lay the connection cables so they cannot be
the source of an accident.
Do not expose the equipment to extreme temperatures or high relative humidity and protect
it from direct sunlight and dusty conditions.
Clean the equipment with a soft, damp cloth. Do not use any solvents or aggressive cleaning
agents.
Only connect approved accessories.
Only use the adapter supplied.
Never open the unit. Opening the unit annuls claims under the terms of guarantee and
exposes the person to the risk of an electric shock.
Repairs to defective units should only be carried out by service centres recommended by the
sales outlet.
We recommend removing the batteries if the equipment is not to be used for longer periods.
Only replace the batteries with types recommended by us. Dispose of defective batteries
according to the applicable local laws (not in household waste). We assume no liability for
damage caused by using the equipment for unintended purposes.
European Communities (EC) RF Radiation Exposure Statement: The installation of the base
unit should allow at least 20 centimetre between the base and persons in compliance with
EC RF exposure Council Recommendation
Headset and Base Layouts
Setup the wireless headset
1 Slide Switch
2 Talk/End key
3 Mute key
4 LED
5 Name Card
6 LED
7 LED
8 Microphone
9 Microphone +/- key
10 Register key
11 Listening +/- key
12 Power jack
13 Lifter
14 Phone
15 Handset
Base unit
Electrical outlet
AC-DC adaptor for base unit
Desktop phone
Lifter
2. Place the headset cushion onto the
headset speaker.
1. Snap the headset speaker into the retaining
ring of desired wearing position.
KEM-ML33803B
Flashing Pattern LED ON-OFF sequence
Normal flashing ON (1 sec), OFF (1 sec)
Fast flashing ON (250 ms), OFF (250 ms)
Moderate Flashing ON (500 ms), OFF (500 ms)
Slow flashing ON (2 sec), OFF (2 sec)
Very slow flashing OFF (8 sec), ON (2 sec), OFF (2 sec) ,
ON (2 sec)
Packing contents Solo pack
Base Station 1
Wireless Headset 1
AC-DC adaptor 1
Li-Polymer battery pack
for the Wireless Headset
1
Head Band 1
Telephone Handset Lifter
Optional
Packing contents Solo pack
Name Tag
1
EU adaptor transform plug
1
UK
adaptor transform plug
Manual
2
4
1
Headset Cushion
Wireless Headset
User Guide
Plug the adapter into the nearest mains socket. USE ONLY WITH PROVIDED
ADAPTER. Using other power supplies may damage the unit and voids warranty.
W-300
Declaration of conformity
Company:
Address:
Declare that the product DECT W300 is in compliance with the Annex III of the R&TTE-Directive
1999/5/EC and then with the following essential requirements:
Article 3.1.a (protection of the health & the safety of the user) : EN60950-1:2006+A11: 2009
+A1:2010
Article 3.1.b (prot ection requirements with respect to electromagnetic compatibility : ETSI
EN301489-6 V1.3.1 (2008-08 ) & ETSI EN301489-1 V1.8.1 (2008-04 )
Article 3.2 (effective use of the radio spectrum) EN301406 V2.1.1(2009-07)
The presumption of conformity with essential requirements regarding Council Directive
1999/5/EC is ensured.
Signature :
Date :
DECLARATION OF CONFORMITY
4 5 6
E E
* For guidance only, depends on initial battery charge.
Your headset is a technically advanced device containing circuit boards and fine mechanics,
made from top grade component. To increase reliability and life span, always treat your headset
with care.
Do not expose the headset to moisture, liquids, rain or dust.
Store the product in a dry and dust-free location.
For cleaning, use a dry cloth.
Do not store a fully charged headset in the charging stand for extended periods of time.
Replacement ear cushions are available as spare parts.
E
2. Headset LED Display
Basic Operation
Switch on/off the Headset
1. To switch on the Headset, press and hold the "Talk" button until the Headset LED light on.
2. To switch off the Headset, press and hold the "Talk" button until the Headset LED turn off.
Charging Headset
1. Slide headset into charging cradle on the Base Station.
2. Gently press down on the headset to ensure that headset is in correct position. The battery
indicatory LED on base will turn on while charging.
Headset Registration
1. Press and hold the “Register” button on the Base station for 5 seconds until the in use LED
flashes.
2. Press and hold the “Mute” button on the Headset unit for 3 second until blue and red colour
LED flash.
3. After registration, LED on the base station and Headset will be off.
Adaptation to different host telephone
Slide the host phone cable selection switch from “A” to “G” until both the headset listening and
speaking volume have good sound quality. Position “A” is standard.
Answer Call
Ringing tone will be heard on headset receiver during incoming call. There is no ringtone on the
headset if you have not installed a lifter or EHS to your base station.
The handset lifter is not connected:
1. Take the handset off-hook.
2. Press the “Talk” button on the headset to answer a call.
The handset lifter is connected:
1. Press the “Talk” button on the headset to answer incoming call. in use LED on Base Station
will flash.
2. Press the “Talk” button again or place the headset into the charger to disconnect the call.
Make Call
The handset lifter is not connected:
1. Take your handset off-hook. Dial tone should sound through the handset.
2. Press the “Talk” button on the headset. The in use LED on both the base and the headset
should go on, indicating a successful link. Dial tone should sound through headset.
3. Dial using the telephone keypad.
4. Press the “Talk” button again or place the headset into the charger to disconnect the call.
The handset lifter is connected:
1. Press the “Talk” button on the Headset to connect to the Base Station. In use LED on Base
Station will flash.
2. Dial using the telephone keypad.
3. Base Station LED Display
Technical Specifications
Troubleshooting Guide
3. Press the “Talk” button again or place the headset into the charger to disconnect the call.
Note:Headset automatically enters off hook status when off cradle,just need entering the number to
dial out.
Adjusting microphone volume
Press the “Microphone Volume +/-” button to increase / decrease the speaking volume.
NOTE: You must be in talk mode (i.e. on a call) to adjust.
Adjusting base listening volume
Press the “Listening Volume +/-” button to increase / decrease the listening volume.
NOTE: You must be in talk mode (i.e. on a call) to adjust.
Muting the headset microphone
1. Press the “Mute” button on the headset, the microphone will be switched off. In use LED on base
will fast flash and beep tone will be heard on headset every 5 seconds while muted.
2. Press again the “Mute” button, the microphone will be switched on.
NOTE: You must be in talk mode (i.e. on a call) to adjust.
Adjusting headset listening volume
Rock the volume control switch + or – (on the top of the headset) to adjust the listening volume.
NOTE: You must be in talk mode (i.e. on a call) to adjust.
Used equipment an d used headset batteries must be disposed of in complia nce with current
environmenta l protection regu lations. You shou ld return them to your reseller or dispose of
them a t an approved r ecycling cen tre.
Do not attempt to open the batteries, as they contain chemical substance. In
the event of
leakage, avoid contact with the skin, eyes and mouth. In the event
of contact, rinse the affected part for several minutes in running water. Clean
the product with absorbent paper or a dry cloth and contact your reselle r for
replacement batteries.
We wil l repair or repla ce, at our discretio n, this produ ct if foun d defectiv e due to m aterials or
workmanship within the warranty period beginning from t he original date of purchas e. This
product is warranted by authorized representative
for the period spec ified. The Original dated
purchase receipt must be presented t o the authorized service centre when service is rendered.
On all carry-in models, transportation to and from the service station is the responsibility of the
purcha ser. This warranty does not cover damages due t o accident , fire, fl ood, earthqu ake
and/or other act s of God; misuse, incorre ct line vo ltage, improper installat ion, improper or
unauthorized
repairs, commercia l use or damages occurre d in shipping. Exterior and interior
finish, lamps, glass, plastics parts and temperature probes are not covered under this warranty.
Customer adjustment accordin g to the owner’s manual are not co vered under this warranty.
This warranty is automatically void if the serial number is missing or altered.
Environment
Maintenance
Headset Operating Time:
(average values*)
AC / DC Adapter (For Base)
Telephone connection
Rechargeable Battery
Approx. 7 hours talk time
Approx. 120 hours standby time
For EU
INPUT: 100-240V
OUTPUT: 7.5Vdc 800mA
Single-phase AC excluding IT installations defined by the
EN60950 standard.
Caution: the network voltage is classified as a hazard by the
criteria of this standard.
Appliance designed for connection to an analogue telephone
line class TNV3 (telecommunications network voltage) as
defined by the EN60950 standard.
3.7Vdc / 320mAh
Event
Headset On cradle
Registration
In-use
Muting (In-use)
IN-USE LED indicator
Steady On
Moderate Flashing
Normal Flashing
Fast flashing
LED Indicators
Event
eulBdeR
Slow Flashing
Steady On
Steady On
Alternate Red/Blue Alternate Red/Blue
Normal Flashing
Normal Flashing
Fast Flashing
Standby
Charging
Charged
Registration
In-use
Out of Range
Ringing Signal
gnihsalfwolSyreVyrettaBwoL
WARRANTY CARD
Note: THIS WARRANTY CARD WILL BE VOID IF IT IS NOT MAILED BACK TO OUR
COM PANY WI THIN 10 D AYS FR OM DATE OF PURC HASE, WARRA NTY
CONDITIONS (PLEASE SEE OVERLEAF)
Mr./Mrs./Miss/Co.
Telephone No.
Address
Model No.
Brand
Serial No.
Invoice No.
Dealer
Date of Purchase
SNOITULOSSMELBORP
The callers cannot
hear me.
Headset is muted. Press the"Mute" button on headset to unmute
the microphone.
Microphone volume is too low. Increase the microphone volume
by the "Microphone +" buttons on the base unit.
Sound in headset is
distorted/hear echo
in headset.
Reduce Microphone volume .
Listening volume too high onphone. If your phone has a handset
volume control, lower this until the distortion disappears.
If the distortion is still present, lower the listening volume adjust
button on the headset.
Base is too close to computer or phone.
I can hear too much
background
conversation, noise.
Speaking volume is too high. Lower the speaking volume.
Battery talk time
performance is
significantly
degraded even after
a full recharge.
Battery is going bad. Replace the battery with a new battery
pack.
SNOITULOSSMELBORP
The base station
does not work.
Check that the AC charger jack is connected to the base unit.
Check that the AC charger is securely connected to a working
outlet.
Check that the AC charger is the model supplied.
My headset does not
work.
Check that the phone is connected tothe base unit’s phone cord
jack and it is pushed in firmly.
Check that the phone handset is connected to the base’s phone
handset jack and it is pushed in firmly.
Headset may be out of range of the base. Move closer to base
unit unti the headset is within range. Range varies with office
environment.
Headset battery is dead. Recharge the battery by placing the
headset in the Base Station.
Listening volume too low. Rock the volume up button on the
headset.
You may have to re-register your headset with the base.
Remark: A battery indicatory LED will flash once when inserting
the power into the base station.
The warranty period is 24 months.
The headset battery charging stays bar on the base station. This indicates the battery power status for the headset, the
battery power status is only displayed while headset is o the cradle. When the headset is docked on the cradle in the
charging position the four battery status LEDs on the base station will ash from green to red until the headset battery
is fully charged. Once the battery is fully charged all four battery status LEDs will be turned on constantly indicating the
battery is now fully charged. (Remarks: In order to have the battery level indicator on base station showing correctly.
your headset must be within operational range with the base station).
All 4 LEDs ON = Headset battery at full capacity.
Only 3 LEDs ON = Headset battery is above half capacity.
Only 2 LEDs ON + Headset battery is about half capacity.
Only 1 LED ON = Headset battery is low capacity.
The green LED on the base station indicates headset is almost fully charged. As soon as you remove the headset from
the base station, it is normal for the green LED to change to orange.
4.
 Loading...