

Radius RWB36 Operating Instructions Manual
https://harrissupplyind.com - To Order Parts Call 608-268-8080
WALK BEHIND SWEEPER
MODELS: RWB36
Operating Instructions (ENG)
B
980200 03/11/08
Read instructions before operating the machine.

https://harrissupplyind.com - To Order Parts Call 608-268-8080
MACHINE DATA LOG/OVERVIEW
Name: __________________________________________________________________________________________________
Address: _______________________________________________________________________________________________
Phone Number: _________________________________________________________________________________________
MODEL _______________________________________
DATE OF PURCHASE __________________________
SERIAL NUMBER ______________________________
SALES REPRESENTATIVE # _____________________
YOUR DEALER
2
980200 05/28/04

https://harrissupplyind.com - To Order Parts Call 608-268-8080
3
Machine Data Log/Overview................................2
Table of Contents.................................................3
HOW TO USE THIS MANUAL
How to use this Manual........................................1-1
SAFETY
Safety Instructions................................................2-1
Hazard Intensity Level..........................................2-2
Security Warning..................................................2-3
OPERATIONS
Unpacking the machine........................................3-1
Preparing for Operation........................................3-1
Controls................................................................3-2
Machine Operation...............................................3-2
Starting Machine...............................................3-2
Tips for Operation. ............................................3-2
Cleaning Waste Bins.........................................3-2
MAINTENANCE
Batteries...............................................................4-1
Battery Maintenance.........................................4-1
Battery Recharge..............................................4-1
Filter Maintenance................................................4-1
Cleaning Filter...................................................4-1
Replacing Filter.................................................4-1
Brush Maintenance..............................................4-2
Replacing/Adjusting Side Brush........................4-2
Replacing/Adjusting Main Brush.......................4-2
Belt Maintenance. ................................................4-2
Replace Main Brush Belt. .................................4-2
Replace Side Brush Belt...................................4-3
Replace Drive Belt. ...........................................4-3
Flap Maintenance.................................................4-3
Replace Outer Side Flap. .................................4-3
Replace Inner Side Flap...................................4-3
Replace Center Flap.........................................4-3
Cable Maintenance..............................................4-4
Replace Traction Cable. ...................................4-4
Replace Side Brush Lifting Cable.....................4-4
Motor Fan Maintenance.......................................4-4
Service Schedule.................................................4-5
Machine Troubleshooting.....................................4-5
Scrapping the Machine ........................................4-5
TABLE OF CONTENTS
GROUP PARTS LIST
Frame/Body Group...............................................5-1
Brush/Belt Group..................................................5-3
Motor/Drive Group................................................5-7
Battery/Filter Group............................................5-11
Brake Group.......................................................5-13
EC Declaration of Conformity.............................5-15
Warranty.............................................................5-16
980200 05/28/04
https://harrissupplyind.com - To Order Parts Call 608-268-8080
HOW TO USE THIS MANUAL
This manual contains the following sections:
- HOW TO USE THIS MANUAL
- SAFETY
- OPERATIONS
- MAINTENANCE
- PARTS LIST
The HOW TO USE THIS MANUAL section will tell
you how to find important information for ordering
correct repair parts.
Parts may be ordered from authorized dealers.
When placing an order for parts, the machine model
and machine serial number are important. Refer to
the MACHINE DATA log which is filled out during the
installation of your machine. The MACHINE DATA
log is located on the inside of the front cover of this
manual.
MODEL _____________________________________
DATE OF PURCHASE ________________________
SERIAL NUMBER ____________________________
SALES REPRESENTATIVE # ___________________
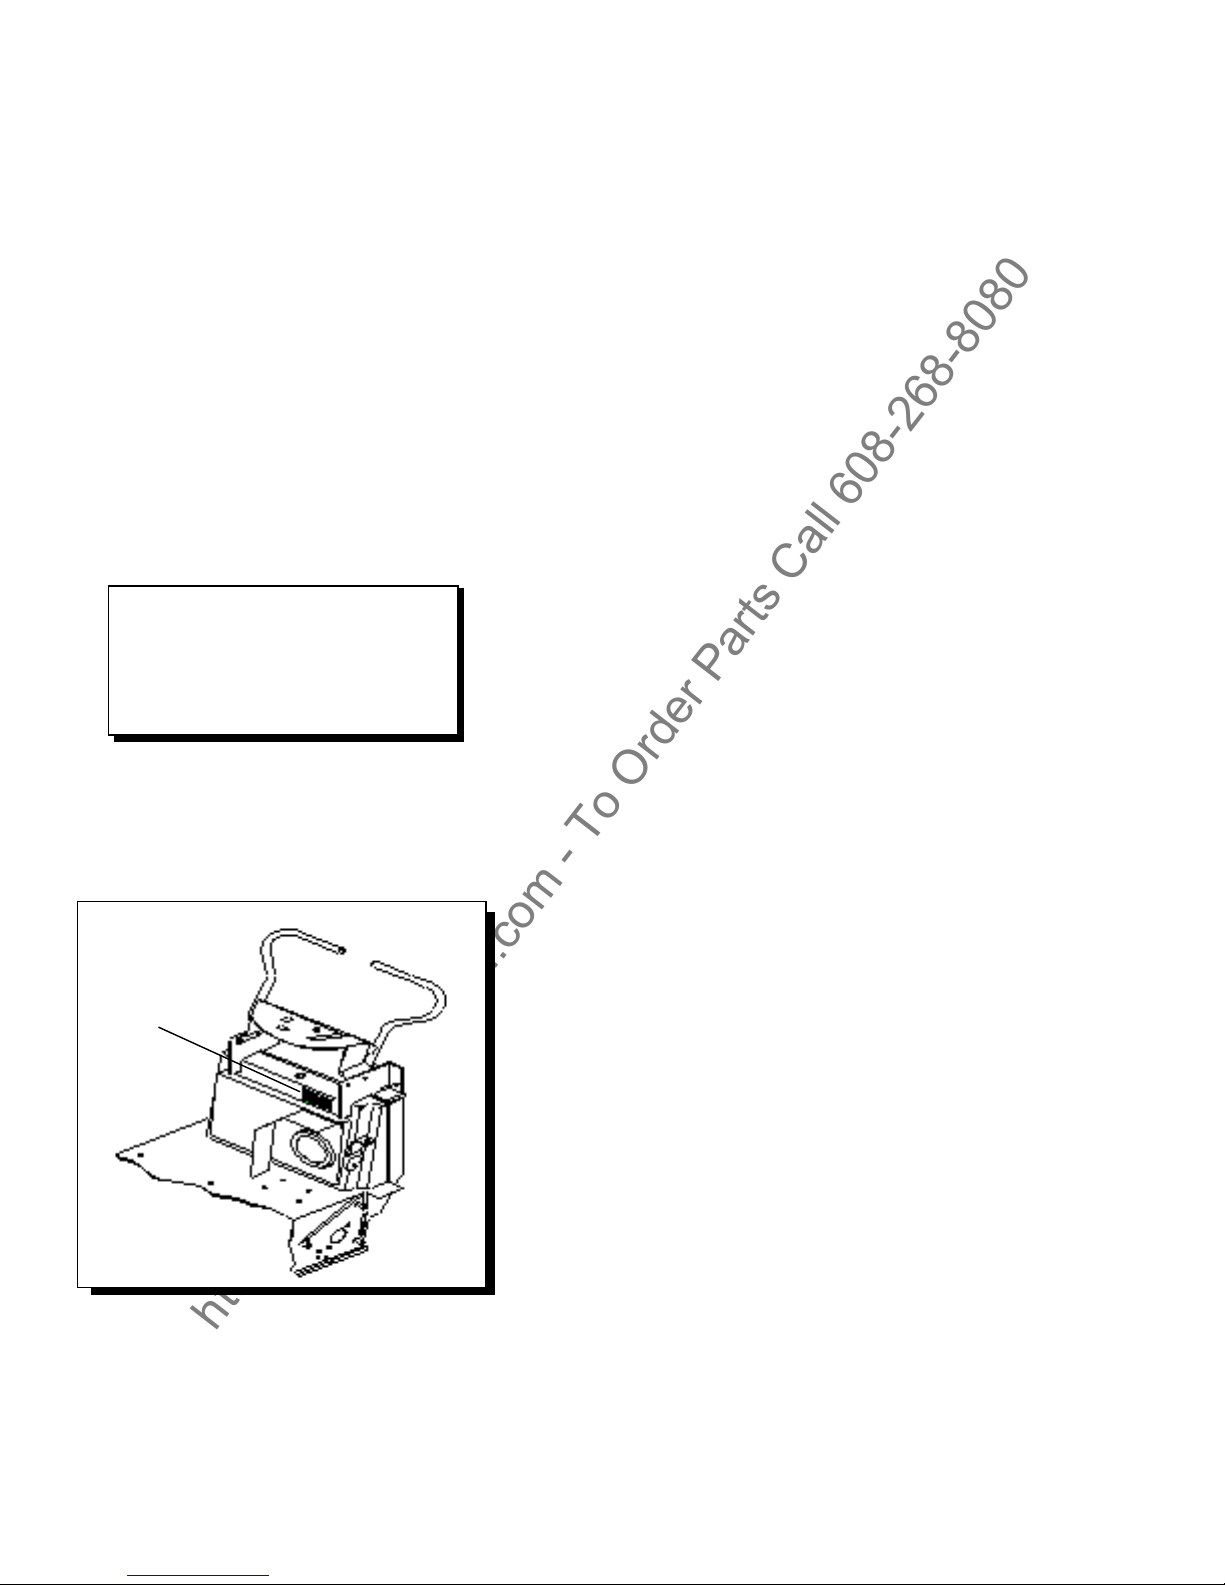
Always ensure that the machine is provided with a
nameplate giving the Serial Number and CE
marking in the position shown. If missing, please
contact your dealer immediately.
Data
Plate
The SAFETY section contains important information
regarding hazard or unsafe practices of the machine.
Levels of hazards is identified that could result in
product or personal injury, or severe injury resulting
in death.
The OPERATIONS section is to familiarize the
operator with the operation and function of the
machine.
The MAINTENANCE section contains preventive
maintenance to keep the machine and its
components in good working condition. They are
listed in this general order:
- Batteries
- Brushes
- Belts
- Service Schedule
- Machine Troubleshooting
The PARTS LIST section contains assembled parts
illustrations and corresponding parts list. The parts
lists include a number of columns of information:
- REF – column refers to the reference
number on the parts illustration.
- PART NO. – column lists the part
number for the part.
- QTY – column lists the quantity of the
part used in that area of the machine.
- DESCRIPTION
– column is a brief
description of the part.
- SERIAL NO. FROM – column indicates
the first machine the part number is
applicable to. When the machine design
has changed, this column will indicate
serial number of applicable machine.
The main illustration shows the most
current design of the machine. The
boxed illustrations show older designs. If
column has an asterisk (*), call
manufacturer for serial number.
- NOTES – column for information not
noted by the other columns.
NOTE: If a service or option kit is installed on your
machine, be sure to keep the KIT INSTRUCTIONS
which came with the kit. It contains replacement
parts numbers needed for ordering future parts.
NOTE: The 98# on the lower left corner of the front
cover is the part number for this manual.
1-1
980200 05/28/04

https://harrissupplyind.com - To Order Parts Call 608-268-8080
IMPORTANT SAFETY INSTRUCTIONS
!
When using a battery powered appliance, basic precaution
must always be followed, including the following:
READ ALL INSTRUCTIONS BEFORE USING THIS MACHINE.
WARNING:
To reduce the risk of fire, electric shock, or injury:
Use only indoors. Do not use outdoors or expose to rain.
Use only as described in this manual. Use only manufacturer’s recommended components a nd attachments.
If the machine is not working properly, has been dropped, damaged, left outdoors, or dropped into water, return
it to an authorized service center.
Do not operate the machine with any openings blocked. Keep openings free of debris that may reduce airflow.
This machine is not suitable for picking up hazardous dust.
Machine can cause a fire when operating near flammable vapors or materials. Do not op erate this machine near
flammable fluids, dust or vapors.
This machine is suitable for commercial use, for example in hotels, schools, hospitals, factories, shops
and offices for more than normal housekeeping purposes.
Maintenance and repairs must be done by qualified personnel.
Disconnect battery before cleaning or servicing.
Before the machine is discarded, the batteries must be removed and properly disposed of.
During operation, attention shall be paid to other persons, especially children.
Before use all covers and doors shall be put in the positions specified in the instructions.
When leaving unattended, secure against unintentional movement.
The machine shall only be operated by instructed and authorized persons.
When leaving unattended, switch off or lock the main power switch to prevent unauthorized use.
This appliance has been designed for use with the brushes specified by the manufacturer. The fitting of other
brushes may affect its safety.
Do not use on surfaces having a gradient exceeding 2% unless the optional parking brake is installed on the
machine. Do not leave unattended on such surface.
Do not use the machine to soak up liquid, toxic substances, or bio-hazardous materials.
Do not use a jet of water in order to wash the machine.
Do not use the machine to sweep up cables, straps, wires, or similar materials.
SAVE THESE INSTRUCTIONS
980200 05/28/04
2-1

https://harrissupplyind.com - To Order Parts Call 608-268-8080
HAZARD INTENSITY LEVEL
The following symbols are used throughout this guide as indicated in their descriptions:
HAZARD INTENSITY LEVEL
There are three levels of hazard intensity identified by signal words -WARNING and CAUTION and FOR
SAFETY. The level of hazard intensity is determined by the following definitions:
! WARNING
WARNING - Hazards or unsafe practices which COULD re sult in severe personal injury or death.
! CAUTION
CAUTION - Hazards or unsafe practices which could result in minor personal injury or product or property
damage.
FOR SAFETY: To identify actions which must be followed for safe operation or equipment.
Report machine damage or faulty operation immediately. Do not use the machine if it is not in proper operating
condition. Following is information that signals some potentially dangerous conditions to the operator or the
equipment. Read this information carefully. Know when these conditions can exist. Locate all safety devices on
the machine. Please take the necessary steps to train the machine operating p ersonnel.
FOR SAFETY
DO NOT OPERATE MACHINE:
Unless Trained and Authorized.
Unless Operation Guide is Read and understood.
In Flammable or Explosive areas.
In areas with possible falling objects.
WHEN SERVICING MACHINE:
Avoid moving parts. Do not wear loose clothing; jackets, shirts, or sleeves when working on the
machine. Use manufacturer approved replacement parts.
! WARNING
Batteries emit hydrogen gas. Explosion or fire can result. Keep sparks and open flame away. Keep
solution tank in raised position when charging. Keep sparks and flames away from the batteries. Do not
smoke around batteries.
! WARNING
Disconnect batteries before working on machine. Only qualified personnel should work inside machine.
Always wear eye protection and protective clothing when working on or near batteries. Avoid skin
contact with the acid contained in the batteries.
! WARNING
Never allow metal to lie across battery tops.
2-2
980200 05/28/04

https://harrissupplyind.com - To Order Parts Call 608-268-8080
SECURITY WARNING
3
IMPORTANT NOTE
Precautions to be taken before attempting to start machine:
To facilitate transport, the side brush, the handlebar and the upper casing have not been assembled in their
actual work position. Therefore before using he machine, assemble them as shown in this manual.
IMPORTANT:
The Manufacturer cannot and will not be held responsible for damage in the event the machine is used for
purposes other than those it was designed for. The machine must never be tampered with for any reason
whatsoever; In this event, the manufacturer will void all warranties and will accept NO responsibility for improper
use or damage to the machine.
The machine, composed of a brush and a suction system, is to be used EXCLUSIVELY to clean DRY surfac es.
Any other use could cause damage to people and/or property and is therefore PROHIBITED.
FOREWARD:
The purpose of this manual is to inform the operator of the basic rules, safety rules and criteria which must be
observed when using, adjusting and maintaining the machine. The machine has been developed and
manufactured to ensure an excellent performance and the utmost comfort and ease of operation in a variety of
working conditions. Before delivery, the machine has been checked at our factory and by our dealer to make sure
it is handed over to you in perfect working order. To maintain the machine in this condition and ensure problem
free operation, it is essential to follow the routine maintenance instructions given in this manual.
980200 05/28/04
2-

https://harrissupplyind.com - To Order Parts Call 608-268-8080
OPERATIONS
UNPACKING THE MACHINE
Unpack the machine with the utmost care; avoid
carrying out any operation that could damage your
unit.
Once it has been unpacked, check for damage of
any visible component. If you notice damage, DO
NOT operate your machine and contact your dealer
immediately.
For packaging and transport purposes, some parts
and accessories are supplied disconnected from the
machine. To assemble them, carefully follow the
instructions given in following sections.
Contents of package:
• Machine
• Side Brush
• Manual
• Ignition keys (set of 2)
• Declaration of Conformity
• Warranty Registration
NOTE: In the case one of the above mentioned
items is missing, please inform your dealer
immediately for replacement.
NOTE: For security reasons during the transport, the
ignition keys are attached to the handle.
! CAUTION
Take care to keep packaging materials (bags,
cartons, pallets, hooks, etc) out of reach of
children.
PREPARING THE MACHINE FOR OPERTION
Mounting the Side Brush:
1. Switch the brush lift lever to OFF.
2. Remove the screw from the side brush drive
shaft.
3. Fit the brush on the shaft.
4. Screw on the screw and washer.
Mounting the Handlebar:
1. Loosen the handlebar fixing screws.
2. Put the handlebar in most comfortable work
position.
3. Tighten the handlebar fixing screws.
Fixing
Screws
Mounting the Bonnet:
Prepare the battery motor before proceeding to the
assembly of the cover. Once you have done this:
1. Loosen the bonnet fixing handwheels.
2. Position the bonnet on machine.
3. Tighten the handwheels.
PREPARING THE BATTERY
The battery must be prepared before it is mounted
on the machine. This simple precaution will prevent
the machine from being damaged by the electrolytic
liquid of the battery.
! WARNING
Always prepare the battery in a sufficiently ventilated
environment. DO NOT smoke or use flame during
this operation.
To prepare the battery:
1. Remove the caps from the battery cells.
2. Fill with Distilled water.
3. Plug the battery into the on-board charger of
machine.
Wait for the charge indicator light to be GREEN. This
indicates a full charge.
Position 1
Position 2
3-1
980200 05/28/04
https://harrissupplyind.com - To Order Parts Call 608-268-8080
2
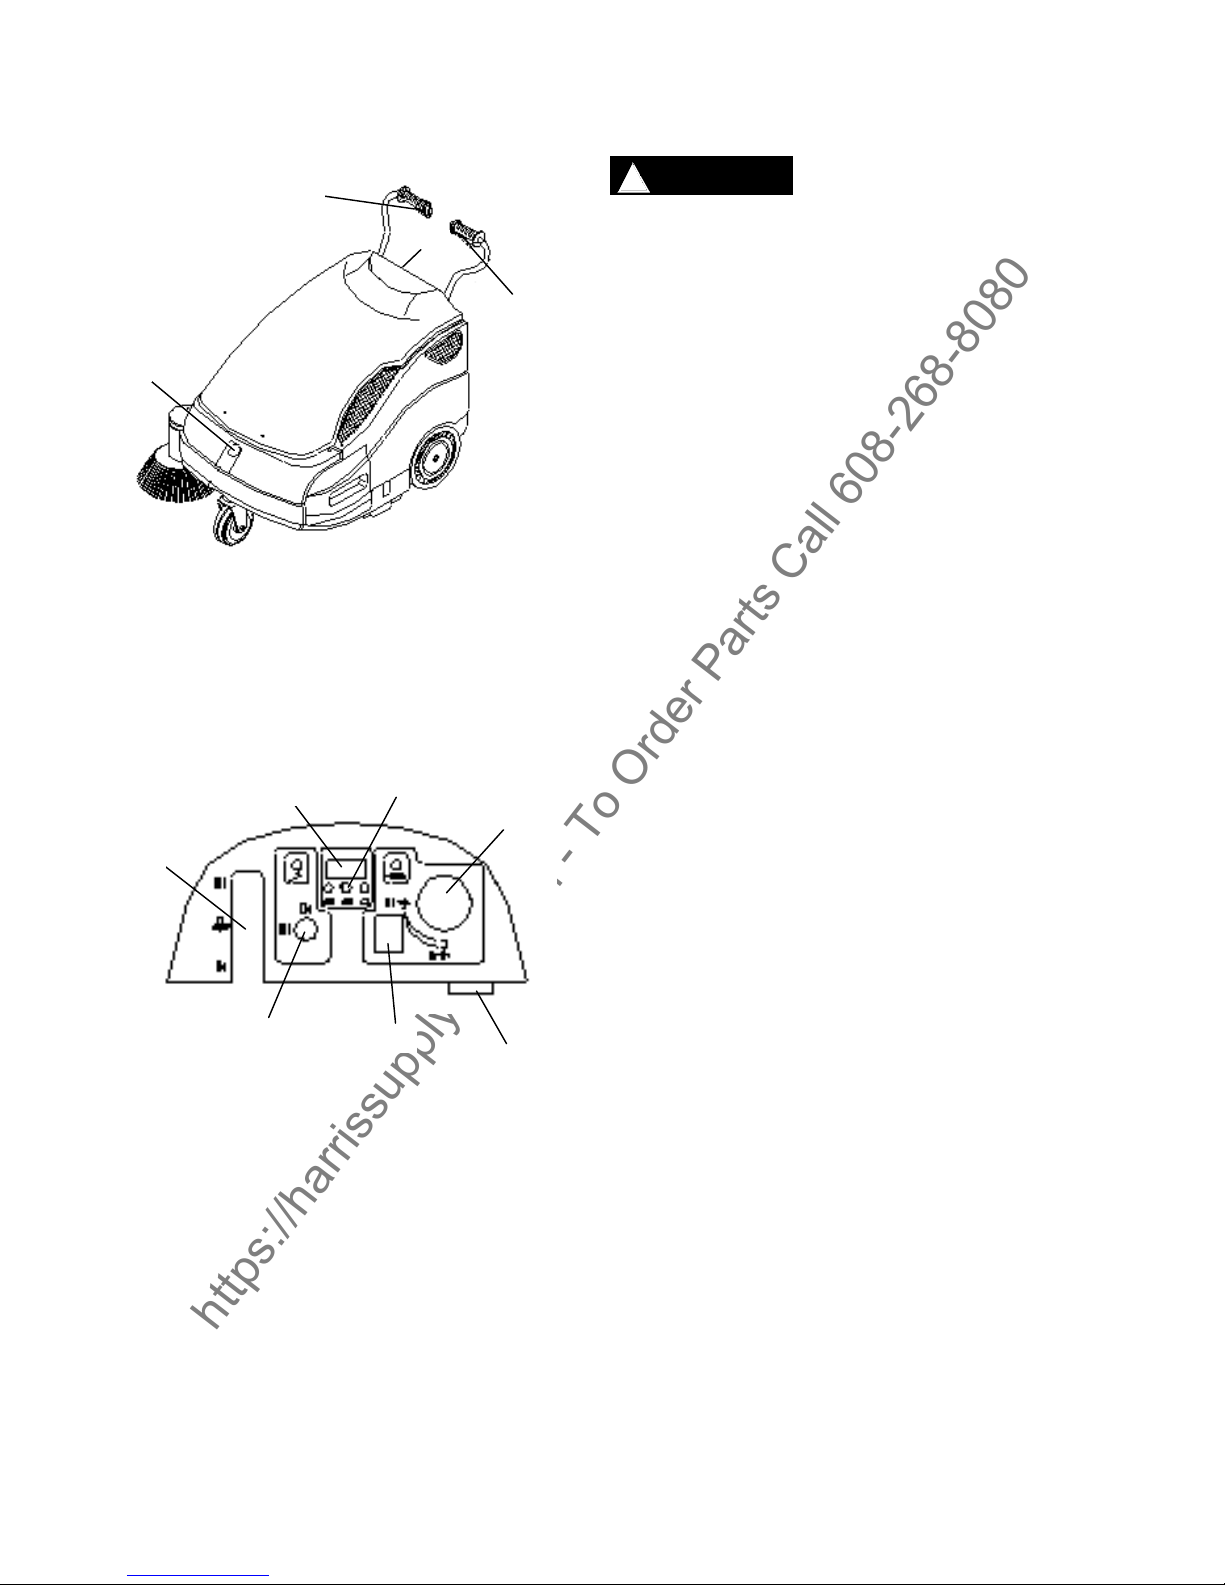
CONTROLS
1.
2.
4.
1) Traction Lever: by pressing this lever, the
machine will start moving forwards.
2) Filter Shaker Lever: This lever operates the
filter shaker to clean the filter.
3) Flap Raise Lever
4) Front Hopper Unlocking Lever
6.
7.
5.
5) Side Brush Control
Lever: switch the lever to ON and the side
brush will move to work position and start
spinning. To stop the brush, switch the lever
to OFF.
6) Timer: Displays the total amount of work
hours of the machine.
7) Charge Indicator Light: Light indicates the
state of battery during operation.
8) Air Suction Inlet Knob: (located under the
cover) this opens or closes the suction valve.
9) Battery Charge Connector: Connector
allows the battery to be charged.
10) Suction Switch
11) Key Switch: Starts and stops all of machine
functions.
11.
10.
8.
9.
STARTING THE MACHINE
The machine must be used by authorized personnel only.
DO NOT leave the machine UNATTENDED when it is
running. Turn off power and remove the key before leaving
the machine.
3.
To start the machine carry out the following steps:
NOTE: This unit has an automatic device built in to prevent
usage of the machine beyond a certain battery charge limit.
The machine will not function until the battery has been fully
charged.
TIPS FOR OPERATION
After you have become acquainted with the start up
procedure, the following are tips to ensure the best results
from your sweeper. These tips will also help reduce damage
to your machine.
980200 05/28/04
OPERATIONS
! CAUTION
1. Make sure the side brush is OFF.
2. Turn the power switch to the ON position. Wait 10
seconds before moving the machine.
3. Check the battery indicator to assess whether the
battery is fully charged or not. If you do not have
enough battery power to operate the machine, turn
power of to machine and proceed to recharging the
battery. (see section on re-charging battery)
4. Pull the traction lever to start cleaning.
NOTE: if you wish to engage the side brush at this
time, make sure to switch to the ON position for the
side brush.
• DO NOT use the machine to clean up wires, ropes
or straps.
• DO NOT use the machine to soak up or clean up
liquids of any kind.
• When using the machine on light but bulky material
(sheets of paper, leaves, etc.), raise the front part of
the machine by pressing down the handlebar so that
the machine may tackle the debris easier.
• Operate the filter shaker at the end or your work
session. (see the panel filter section)
• Make sure the center brush is correctly adjusted.
(see adjusting the center brush)
3-

https://harrissupplyind.com - To Order Parts Call 608-268-8080
OPERATIONS
CLEANING THE WASTE BINS
Before cleaning of waster bins, make sure all
pertinent parts are off the machine.
! CAUTION
Wastes must be disposed of strictly in accordance to
local, state or governing law in your area.
Front Bin
1. Lift and turn the two bin locks.
2. Grasp the handle/s and remove the bin by
pulling it upwards.
3. Empty the bin.
4. Put the bin back in the machine from the top
5. Turn and lower the two bin locks.
Rear Bin
1. Lift and turn the two bin blocks.
2. Grasp the handle and remove the bin.
3. Empty the bin.
4. Put the bin back in the machine.
5. Turn and press the two locks.
3-3
980200 05/28/04
 Loading...