

Page 1
© 2015 RadioShack Corporation.
All rights reserved. RadioShack is a registered trademark used by RadioShack Corporation.
04A15
6001357, 6001376
Printed
in China
Vektor Drone
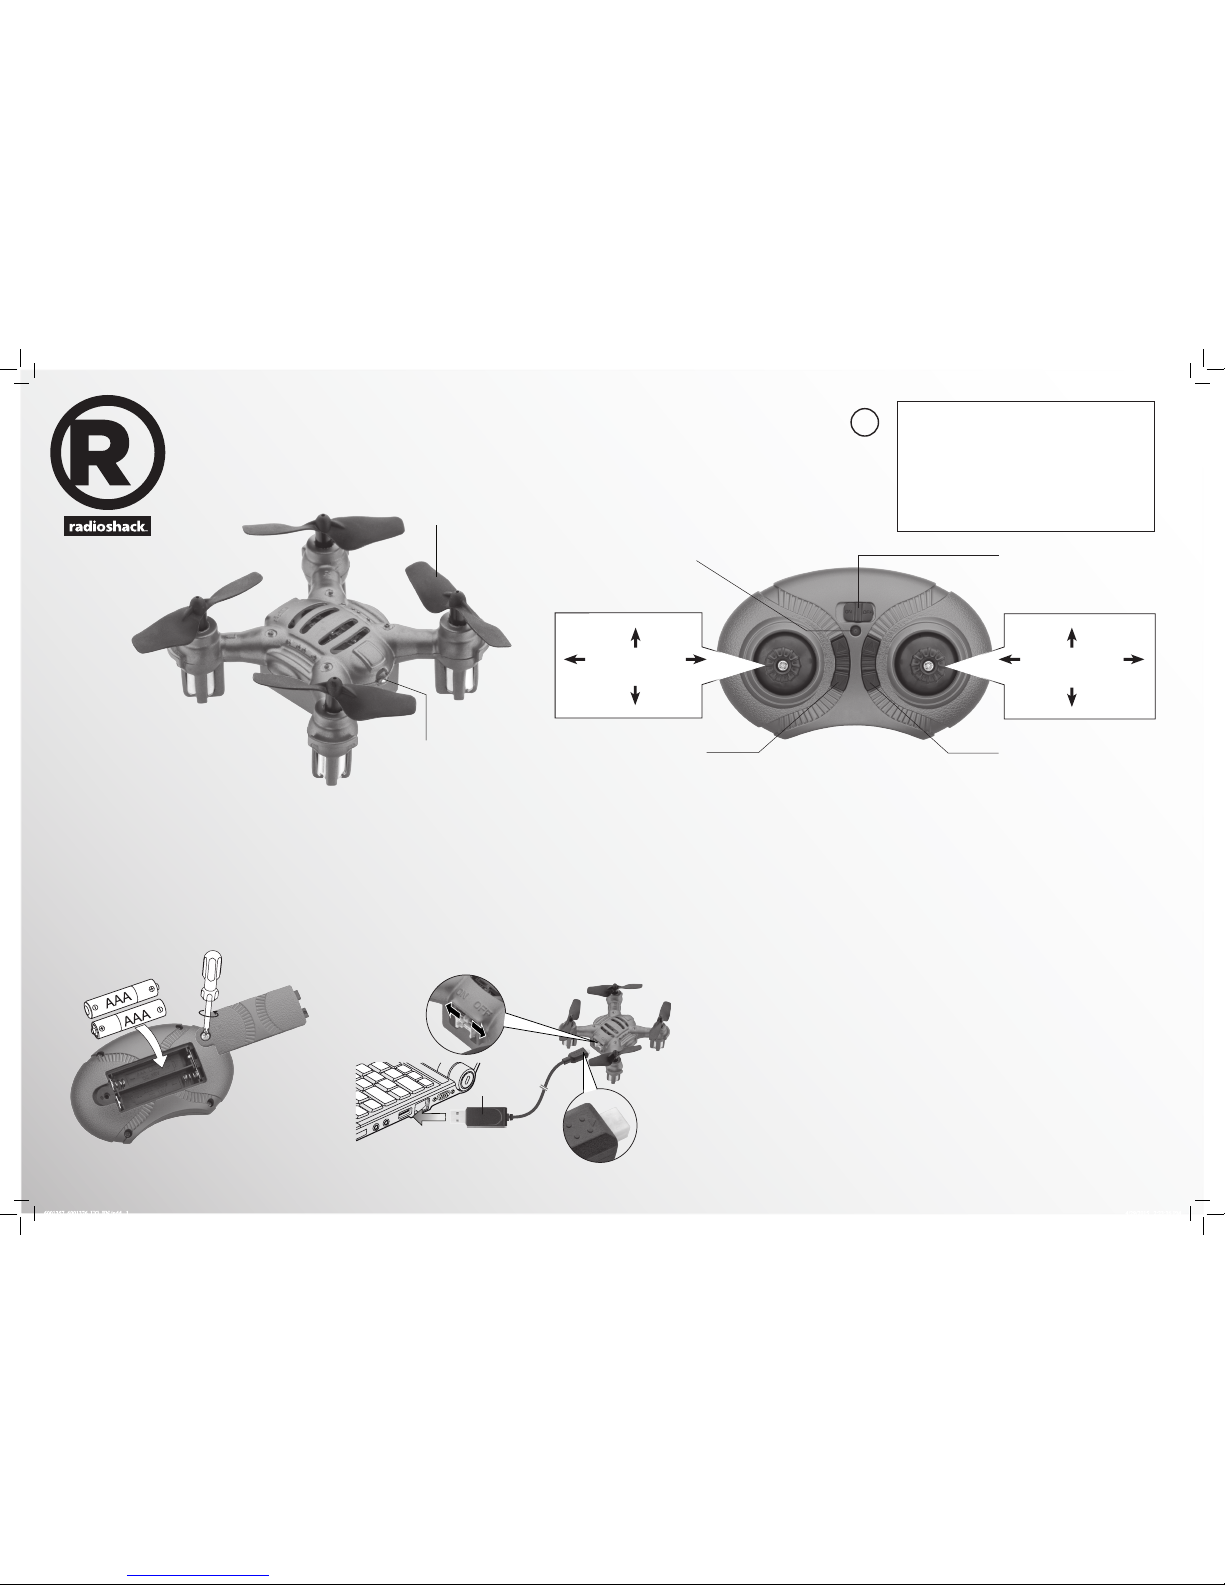
Install Batteries in the Remote
Control
1.
On the remote control, set the ON/OFF switch to OFF.
2.
Use a screwdriver to open the battery compartment.
3.
Insert two AA A batteries (not included), matching
the polarities (+ and –) marked inside. Use alkaline
batteries for optimal performance. Replace the cover.
Note: If the remote control’s LED ashes during use, the
batteries are low and should be replaced.
Age 12+
Get Ready to Fly
1. Turn on the drone. The LED ashes green.
2. Place the drone on level ground.
3.
Turn on the remote control. The remote control's LED ashes.
4.
Move the throttle all the way up and then down to pair the remote control with the drone.
The drone’s blades remain still during pairing. When pai red, the LEDs on both the remote
control and drone light steadily.
Note:
If pairing fails, turn o the drone and remote control and repeat the steps above, or change
locations to avoid electrical interference.
Fly Your Drone
1. After pairing, push the steering control in to switch between hig h speed (double beep) and low
speed (single beep).
2. With the drone on the ground, move the throttle forward to ascend. To avoid ground air
turbulence, y the drone at least 1 ft. (30cm) o the ground.
For advanced users: Hold the remote control with one hand, resting your thumb on the throttle.
Throw the drone about 9 ft. (3m) away from you, and move the throttle forward to y. The drone
adjusts itself automaticall y and ies smoothly.
IMPORTANT: If your drone crashes upside down, pull the throttle down and switch o the remote
control rst. Never touch the drone when blades are still moving.
We hope you enjoy your Vektor Drone from
RadioShack. Please read this user’s guide before
setting up and using your drone.
What’s Included
• Vektor Drone • Remote Control
• USB Charging Cable • Spare Blades (4)
• 3.7V Drone Battery • User’s Guide
Charge the Drone
Your drone uses a built-in lithium polymer battery for power.
1.
Use the USB charging cable to connect the battery to a USB power
source (such as a laptop). The LED on the USB connector lights red
during charging, and turns o when charging is complete.
A full charge takes about 35 minutes. A fully charged battery
provides up to 4 minutes of ight time.
2. After charging, unplug the USB charging cable. Do n ot attempt to
overcharge the battery.
Caution: Use only the included USB charging cabl e to charge the
drone's battery. Using any other cable may damage the drone.
LED ON/OFF
LED
Arrow
side up
LED
Rotor Blades (4)
Left/Right Slide Trim
Forward/Reverse Movement Trim
Throttle Steering
Forward
Ascend
Backward
Descend
Slide rightTurn right Slide leftTurn left
Push
(Stunt mode)
Push
(High/low
speed)
BC
ON/OFF
6001357, 6001376_UG_EN.indd 1 4/29/2015 2:23:36 PM
Page 2

Trim Your Drone
Move the throttle forward and see how the drone
reacts.
Forward/Reverse Movement Trim: If the drone
tends to move forward, press 6; if it tends to
move backward, press 5.
Left/Right Slide Trim: If the drone tends to slide
right, press 5; if it tends to slide left, press 6.
Note: The remote control beeps when you press
a trim control but stops beeping when you reach
maximum trim adjustment.
Land Your Drone
1. Slowly move the throttle backward to descend.
Avoid moving the throttle too quickly, as it can
stop the blades instantly and cause the drone to
crash.
2. When you nish ying, turn o the remote control
and drone.
Perform Stunts
1. Push the throttle control in so that the remote
control beeps repeatedly, indicating the drone is in
stunt mode.
2. Use the steering control to perform stunts:
• Frontip: Move steering forward
• Backip: Move steering backward
• Barrel roll: Move steering rig ht or left
3. The drone automatically exits stunt mode af ter
performing a stunt, or you can push in the t hrottle
control again to exit immediately.
IMPORTANT: Make sure there is enough space for the
drone to perform stunts without crashing into objec ts
or people.
Calibrate the Drone
If controlling the drone becomes dicult, use
the following steps to calibrate the drone.
1. Select an open location withou t strong
magnetic interference and place the drone
on level ground.
2. Turn on the drone and the remote control,
then pair the remote control with the
drone.
3. With the throttle all the way down, move
the steering control all the way up until the
drone's LED ashes rapidly.
4. When the drone's LED lights steadily, your
drone is calibrated and should y smoothly.
Fly Safely
• When ying outdoors, keep the d rone away
from power lines, t rees, weeds, and wate r.
• When ying indoors, keep the dron e away
from walls, air con ditioning, ai r vents, fans,
breakable obje cts, and other ob stacles.
• Do not y the drone near or at other peopl e
or animals.
• Keep eyes, hands, hair, and loose clothing
away from moving bla des.
• Adult supervision is recommen ded at all
times.
CHOKING HA ZARD! Small pa rts. Not for
children under 3 ye ars.
Specications
Power ..............................................................................
Dron e .........................................................................
........... 3.7V 100 mAh li thium polymer b attery
Remote C ontrol ....................2 × AAA batteri es
Remote Control ........................4 chann el, 2.4GHz
Control Distance ................................... 65 ft. (20m)
Specicat ions are subjec t to change and
improvement wi thout notice. A ctual produc t may
vary from the i mages found in t his document .
Troubleshooting
Drone does not respond
• Make sure the drone and remote control are
switched on and pa ired. When paired, t he
LEDs of the drone and rem ote control light
steadily.
• The drone battery may be low. Fully charge
the battery. See “C harge the Drone.“
• Remote control batteries may be low.
Replace the batte ries.
• Make sure the drone is within the control
range (65 ft./20 m) and in line of sight.
Dronediculttocontrol
• The blades may be deformed due to a
crash. Adjust defo rmed blades by hand . If
you cannot adjust t hem, replace with t he
spare blades.
• The throttle control is very sensit ive. Use
small, ne movem ents to control.
• If you are a beginner, set to low speed mode.
See “Fly Your Drone.“
Battery Notes
• Always let the drone battery cool b efore
recharging.
• Dispose of old batteries promptly an d
properly. Do not burn o r bury them. Use
only fresh batter ies of the required size and
recommended ty pe.
• Do not mix old and new batteries, di erent
types of batteri es (standard, alka line, or
rechargeable), or recharg eable batteries of
dierent capacit ies.
• If you do not plan to use the drone for a
long period, rem ove the batteries fro m the
remote control. Batter ies can leak chemic als
that can damage e lectronic par ts.
Lithium Battery Notes
• Do not puncture or crush. D o not disassemble.
• Do not dispose of lithium bat teries in the trash .
• If the electrolyte in t he cells should get on
your skin, thorou ghly wash with soa p and
water. If in the eyes, rinse th oroughly with coo l
water. Immediately see k medical attenti on.
• Follow the manu facturer’s instr uctions
for charging the dron e and do not charge
longer than recom mended. Unpl ug the
charging cable w hen the drone is charge d.
• Do not attempt to charge or operate
damaged toys.
FCC Information
This equipm ent has been teste d and found to
comply with t he limits for a C lass B digita l device,
pursuant to Par t 15 of the FCC Rules. Th ese limits a re
designed to provi de reasonable p rotection aga inst
harmful inter ference in a resi dential inst allation . This
equipment ge nerates, uses , and can radia te radio
frequency en ergy and, if not in stalled an d used in
accordance with t he instruc tions, may ca use harmful
interference to r adio commun ications. H owever,
there is no guara ntee that inter ference will n ot occur
in a particul ar install ation. If thi s equipment d oes
cause harmfu l interferenc e to radio or telev ision
reception, wh ich can be determ ined by turni ng the
equipment o a nd on, the user is e ncouraged to t ry
to correct the int erference by on e or more of the
following mea sures:
• Reori ent or relocate t he receiving a ntenna.
• Increa se the separat ion between t he equipmen t
and receiver.
• Conn ect the equi pment into an out let on a
circuit diere nt from that to whic h the receiver is
connected.
• Consu lt your local Ra dioShack store o r an
experienced r adio/TV te chnician for h elp.
If you cannot eli minate the inte rference, th e FCC
requires that you s top using your eq uipment.
Changes or mod ications n ot expressly app roved by
the party res ponsible for com pliance coul d void the
user’s author ity to operate t he equipmen t.
This device comp lies with Par t 15 of the FCC Rules.
Operation is su bject to the fo llowing two co nditions:
(1) this device may not cau se harmful inte rference,
and (2) this device m ust accept any inte rference
received, incl uding inter ference that may c ause
undesired ope ration.
Limited Warranty
RadioShack wa rrants this p roduct agai nst defects
in materials an d workmanshi p under norm al use
by the origina l purchaser for ni nety (90) days a fter
the date of purchas e from a RadioShac k-owned
store or an autho rized RadioShac k franchisee o r
dealer. RADIOS HACK MAKES NO OTHE R EXPRESS
WARRANTIES .
This warrant y does not cover: (a) dam age or failure
caused by or attr ibutabl e to abuse, misuse, f ailure
to follow instr uctions, im proper inst allation or
maintenance, a lteration, a ccident, Act s of God (such
as oods or ligh tning), or excess vo ltage or curre nt;
(b) improper or inco rrectly per formed repa irs by
persons who are n ot a RadioShack Au thorized Ser vice
Facility; (c) consum ables such as fu ses or batterie s;
(d) ordinary wea r and tear or cosmeti c damage; (e)
transport ation, ship ping or insur ance costs; (f) co sts
of product remova l, install ation, set-up serv ice,
adjustment o r reinstalla tion; and (g) clai ms by persons
other than the o riginal pu rchaser.
Should a probl em occur that is cove red by this
warranty, take t he product an d the RadioSha ck sales
receipt as proof of purc hase date to any Radi oShack
store in the U.S . RadioShack wi ll, at its opt ion, unless
otherwise prov ided by law (a) repla ce the product w ith
the same or a compa rable produ ct, or (b) refund th e
purchase price. A ll replaced pro ducts, an d products
on which a refund i s made, become t he propert y of
RadioShack.
RADIOSHACK E XPRESSLY DISCL AIMS ALL
WARRANTIES A ND CONDITIO NS NOT STATED
IN THIS LIMIT ED WARRANT Y. ANY IMPLIED
WARRANTIES T HAT MAY BE IMPOSED BY
LAW, INCLUDING T HE IMPLIED WARR ANTY
OF MERCHANTABIL ITY AND, IF APP LICABLE,
THE IMPLIED WAR RANTY OF FI TNESS FOR A
PARTICULAR PUR POSE, SHALL E XPIRE ON THE
EXPIRATION OF T HE STATED WARRANTY PERIO D.
EXCEPT AS DESCR IBED ABOVE, R ADIOSHACK
SHALL HAVE NO LIA BILITY OR R ESPONSIBI LITY
TO THE PURCHASER O F THE PRODUCT O R ANY
OTHER PERSON OR ENTI TY WITH RES PECT TO ANY
LIABILIT Y, LOSS OR DAMAGE CAUSED DI RECTLY
OR INDIRECTLY BY USE OR PER FORMANCE
OF THE PRODUCT O R ARISING OU T OF ANY
BREACH OF THI S WARRANTY, INCLU DING, BUT
NOT LIMITED TO, ANY DAM AGES RESULTING
FROM INCONVEN IENCE AND AN Y LOSS OF
TIME, DATA, PROPERTY, REVEN UE, OR PROFIT
AND ANY INDI RECT, SPECIAL, INCIDE NTAL,
OR CONSEQUENTI AL DAMAGES, EV EN IF
RADIOSHACK H AS BEEN ADVISED O F THE
POSSIBILIT Y OF SUCH DAMAG ES.
Some states do n ot allow limit ations on how lo ng an
implied war ranty lasts o r the exclusion o r limitatio n of
incidental o r consequenti al damages, s o the above
limitatio ns or exclusions may n ot apply to you. T his
warranty gi ves you specic l egal right s, and you may
also have other ri ghts which va ry from state to s tate.
You may contact Radio Shack at:
RadioShack Cus tomer Relatio ns
300 RadioSha ck Circle
Fort Worth, T X 76102 02/14
www.radi oshack.com
Replace Damaged Blades
The left and right blades of the drone are dierent (see A and B
markings on the drone and blades). Make sure you insert the correct
blade in the correct location to y properly. If you need additional bl ades,
visit your local RadioShack store for help.
To replace a damaged blade, remove the old one and press the new
one onto the blade axle. If you cannot remove the old blade by hand,
use pliers.
WARNING:
• To avoid injury and damage, inspect the blades for nicks and breaks
and make sure they are securely attached before and after each
ight. Replace nicked, chipped, cracked or broken blades.
• Use only the supplied blades. Do not alter, modify, or customize the
blades.
A
B
A
B
Complies wit h the Europea n
Union’s “Rest riction of
Hazardous Subs tances
Directive,” wh ich protects t he
environment by re stricti ng
specic hazar dous materia ls
and product s.
6001357, 6001376_UG_EN.indd 2 4/29/2015 2:23:37 PM
 Loading...