

Page 1
User’s GUide
6001435
VEGADRONE
HD VIDEO STREAMING DRONE
BC
Age 14+
Page 2

2 3
Contents
Features ........................................................................................................................3
Package Contents .......................................................................................................3
About VegaDrone App ................................................................................................3
Compatibility ...............................................................................................................................3
Specications ..............................................................................................................4
Fly Safely .......................................................................................................................4
Charge the Drone Batter y ..........................................................................................4
Lithium Battery Notes .............................................................................................................5
Install Batteries in the Remote Control ....................................................................5
Battery Notes ..............................................................................................................................5
Drone Design Over view .........................................................................................6-7
Remote Control Design Over view ........................................................................8-9
Pairing ........................................................................................................................ 10
Multiple Player Pairing ...........................................................................................................10
Fly Your Drone ........................................................................................................... 10
Land Your Drone ....................................................................................................... 10
Trim Your Drone .........................................................................................................11
Fly in "Headless" Mode ..............................................................................................11
Perform Stunts: "360 ° Air Flip" .................................................................................11
Using the Camera .................................................................................................... 12
Taking Photos and Videos ................................................................................................... 12
Download VegaDrone Ap p ...................................................................................... 12
App Controls Over view ........................................................................................... 13
Playback Photos/ Video ........................................................................................... 14
Replace Damage d Propellers .................................................................................. 14
Troubleshooting ....................................................................................................... 15
Need Spare Part s? .................................................................................................... 15
FCC Information ....................................................................................................... 16
Limited Warranty ...................................................................................................... 16
We hope you enjoy your VegaDrone HD Video Streaming Drone from
RadioShack. Congratulations! No FAA Registration is required for this drone.
Please read this user’s guide before setting up and using your drone.
Features
• 2 ways to y, control and shoot video/ pictures using remote control or
Wi-Fi app
• Air pressure sensor for enhanced hovering
• Built-in HD camera • Digital proportional control
• USB charging • 6-axis gyro stablilization
Package Contents
• VegaDrone • Remote Control
• USB Charging Cable • Mobile Device Holder
• Spare Propeller with screw (4) • 3.7V, 850mAh Drone Battery (2)
• User’s Guide
About VegaDrone App
Functions and controls are basically the same as those on the included remote
control, but the app has a few extra tricks to enjoy:
• You can leave the remote control at home, because you want to travel light
and cannot bear to separate from your smart device...
• You prefer touch screen controls, plus there's a cool motion sensor
navigation option
• You can stream photo/ video footage live to your friends on social media
• Last but not least, for remote control users, the app allows quick access to
view photos/ video shot using the included remote control and a SD card
(not included) loaded in your drone. Snap the device holder onto the remote
to use your device as a monitor (see page 9). This conveniently eliminates
transferring the SD card to your device or a card reader.
VegaDrone pilots, you have nothing to lose, the world is your
oyster! Master ight rst by getting to grips with the remote
control, and then discover the extras oered in app control.
Download the free VegaDrone app from App Store
®
or
Google Play
TM,
Compatibility
• iOS8 or above
• Android 4.0 or above. Note, app functions and compatibility may vary
depending on device brand and models
Page 3
4 5
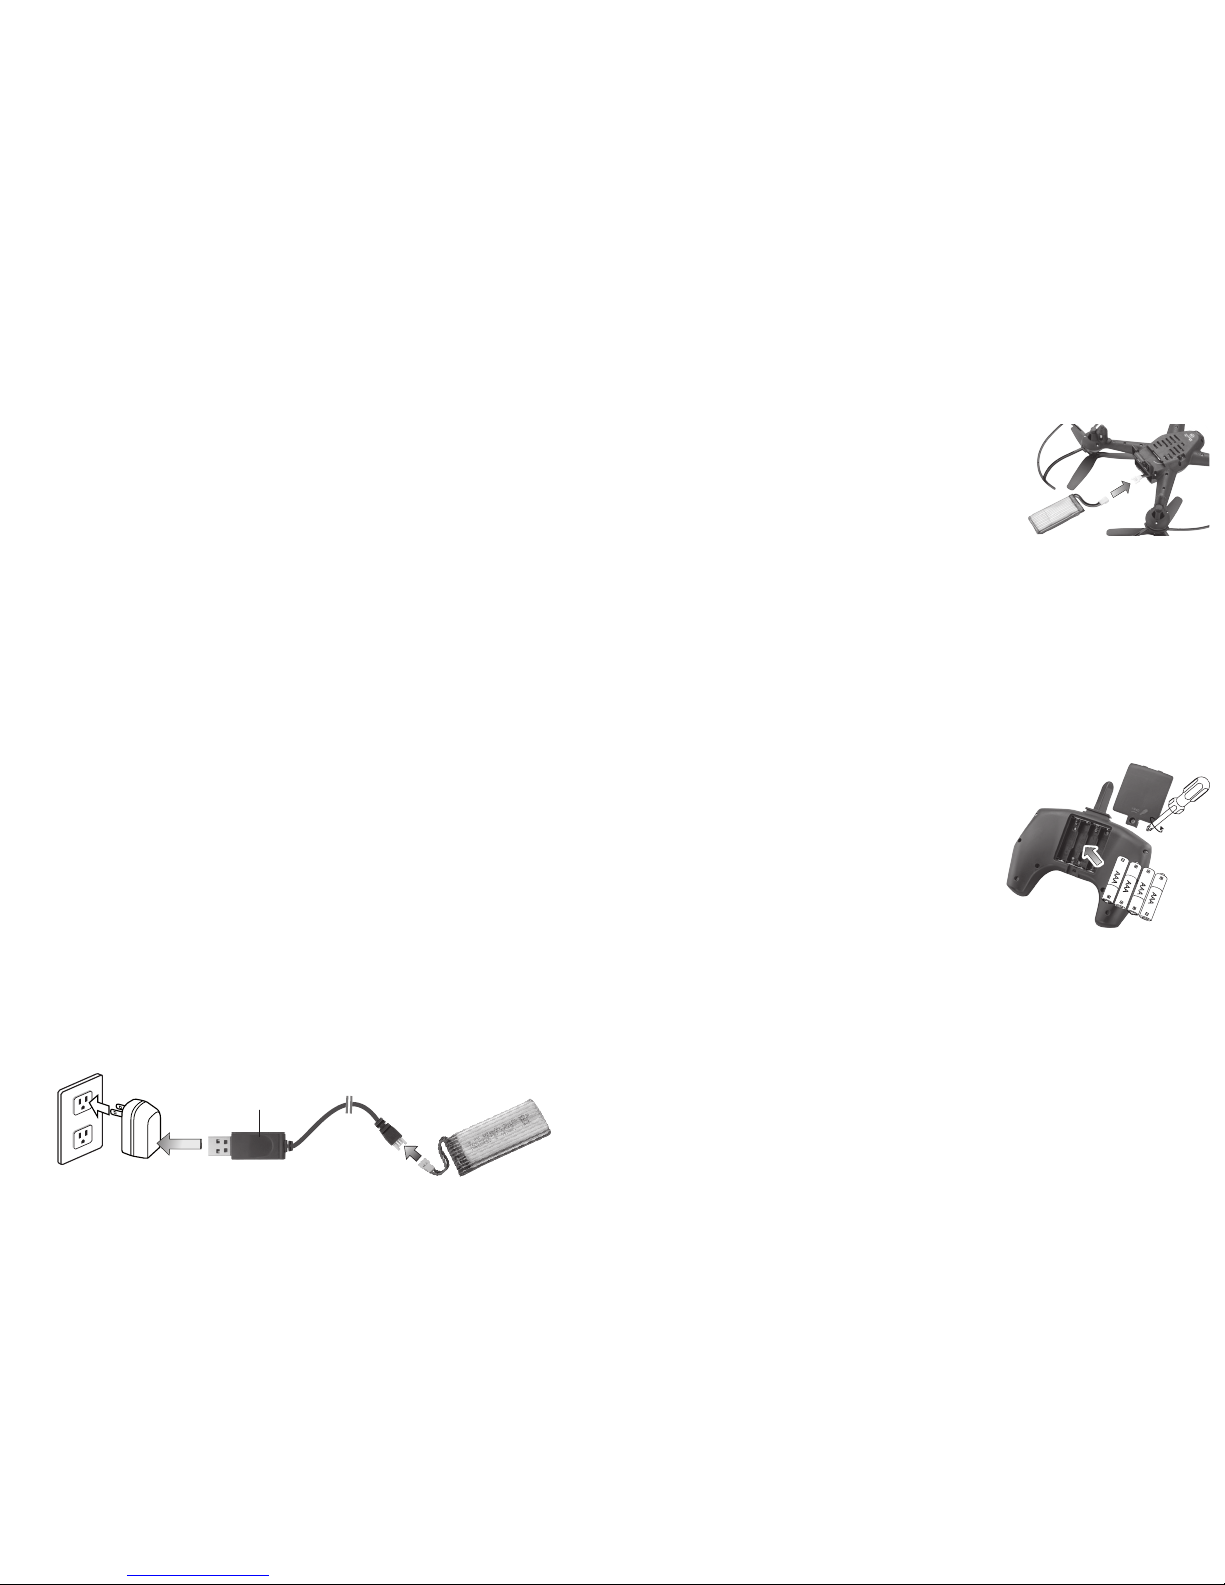
3. To install the battery, plug the two ends of the white battery connectors.
They only t one way, so do not use force. Neatly slot the battery and
cables into the drone's battery compartment.
CAUTION:
• After playin g, let the built-in batter y cool before charging
again.
• Alway s unplug the d rone's batter y when not in u se.
Lithium Battery Notes
• Do not charge longer than recommended. Unplug
the charging cable whe n the battery is charged.
• Do not attempt to charge or operate damaged toys.
• Do not puncture or crush. Do not disassemble.
• Do not dispose of lithium bat teries in the trash.
• If the elec trolyte in the cells should get on your skin, thoroughly wash with soap
and water. If in the eyes, rinse thoroughly with cool water. Immediately seek
medical attention.
Install Batteries in the Remote Control
1. Make sure the remote control is turned o.
2. Use a screwdriver to open the battery compartment. Then insert four
AAA batteries (not included), matching the polarities (+ and –) marked
inside. Use alkaline batteries for optimal
performance. Replace the cover.
Note: If the remote control’s LED ashes during
use, the batteries are low and should be replaced.
Battery Notes
• Dispose of old batteries prom ptly and properly. Do
not burn or bury them . Use only fresh batter ies of
the required size and recommende d type.
• Do not mix old and new batteries , dierent typ es
of batteries (stand ard, alkaline, or rechargeable), or
rechargeable bat teries of dierent capacities.
• Remove batteries dur ing longer storage periods . Batteri es can leak chemic als that
can damage elec tronic parts.
Specifications
Power ...............................................................................................................................................
Drone ........................................................... 3.7V, 850mAh lithium polymer battery
Remote Control ................................................................................ 4 × AAA batteries
Control Distance .................................................................................... max. 190 ft. (58m)
App Distance .............................................................................................max. 130 ft (40m)
Camera ...........................................................................................................................................
Lens Resolution (video) .......................................................................1280 × 720 MP4
Photo Resolution ................................................................................1280 × 720 JPEG
Maximum SD card support ......................................................................................32G
Specic ations are subject to change and improvement wit hout notice. Actual product
may vary from the imag es found in this docum ent.
Fly Safely
• This drone is designed for ind oor and outdoor play. However, the drone is neithe r
waterproof nor weathe rproof. Do not play in rain, snow, or windy condit ions.
• Do not y the drone near or at other people or anim als.
• Do not y your drone where emergency respo nders are working, or emergency
aircraft are opera ting.
• When ying out doors, keep the drone away from power lines, trees, weeds, and wate r.
• Do not y your drone over private proper ty where you are not welcomed.
• When ying in doors, keep the drone away from walls, air condition ing, air vents, fans,
breakable obj ects, and other obstacles .
• Keep eyes, hands, hair, and loose clothing away from movi ng propellers.
• Fly safely. If the drone crashes, the SD card may fall ou t.
• Adult super vision is recommended at all times.
Charge the Drone Battery
Make sure you use the supplied battery and battery charging cable, or one
of the same type: 3.7 V, 850mAh lithium polymer.
1. Use the USB charging cable to connect the battery to a USB power
source. The LED on the USB connector lights red during charging, and
turns o when charging is complete.
A full charge takes about 100 minutes. A fully charged battery provides up
to 6 minutes of ight and camera time.
2. After charging, unplug the USB charging cable. Do not attempt to
overcharge the battery.
LED
Page 4

6 7
ON/OFF
Back LED (blue)
Camera Lens
Front LED (white)
Propeller
Wi-Fi Antenna
Drone Design Overview
Detachable Protection Guard
Page 5

8 9
LED
Trim Control
Forward
Left Right
Reverse
6
Steering
Forward
Backward
Slide rightSlide left
Headless navigation
mode on/o
Take a photo
Start/ stop video recording
Remote Control Overview
One-touch takeo
º
Power on /o
Using the Detachble Device Holder
1. Slot holder onto antenna's groove until
it clicks.
2. Pull up holder bracket to extend and
insert your smart device (max. screen
width 3 inches).
3. Rotate lock to adjust and lock holder at
desired viewing angle.
4. Push holder up and o the groove with
both hands to release.
Antenna/ Support for
Device Holder
Start/ stop recording
video in beeline cruise
mode
Start/ stop recording
video in auto 360°
rotation mode
One-touch landing
1
3
2
Throttle
Ascend
Descend
Turn rightTurn left
Push
(Stunt
mode)
Push
(High/low
speed)
Page 6

10 11
Pairing
Beforeeachight,alwayschecktheprotectionguards:
• are properly inserted
• are in good shape with clearance between the propellers. During handling or
after a crash the guards may be dislocated or deformed. If necessary, gently
bend by hand and then re-insert the guard(s). Check no guard parts touch and
potentially obstruct propeller movement.
1. Turn on the drone. The LEDs on the drone ash.
2. Place the drone on level ground.
3. Turn on the remote control. The remote control's LED lights up.
4. Move the throttle all the way up and then down to pair the remote control
with the drone. The drone’s propellers remain still during pairing. When
paired, all LEDs on both the remote control and drone light steadily.
Note: If pairing fails, turn o the drone and remote control and repeat the steps
above, or change locations to avoid electrical interference.
Multiple Player Pairing
You can play together with friends to y up to 6 VegaDrones side by side. Before
pairing, make sure all players have switched o their VegaDrones and remotes.
Players must pair their unit separately to avoid interference. Once paired, keep
your unit switched on, until the other players have also completed pairing .
Fly Your Drone
1. There are 2 ways to take o. Place your drone on the ground and then either:
• Press the
button. The drone will automatically take o, ascending
about 5 ft (150cm) and then hover.
• Move the throttle forward to ascend. To avoid ground air turbulence, y
the drone at least 1 ft. (30cm) o the ground.
2. For speed options, push the steering control in to switch between high
speed (double beep) and low speed (single beep).
IMPORTANT: If your drone crashes upside down, pull the throttle all the way
down. Wait till the propellers have stopped still before you handle the drone.
Land Your Drone
Automatically: Press and the drone will steadily descend and land.
Manually: Slowly move the throttle backward to descend. Avoid moving the
throttle too quickly, as it can stop the propellers instantly and cause the drone to
crash.
• When you nish ying the drone, turn o the remote control and drone.
Trim Your Drone
Push the throttle forward and observe how the drone reacts.
Forward/Reverse Movement Trim: If the drone tends to move forward, press
6
; if it tends to move backward, press .
Left/Right Slide Trim: If the drone tends to slide right, press
; if it tends to
slide left, press
.
Note: The remote control beeps when you press a trim control but stops
beeping when you reach maximum trim adjustment.
Fly in "Headless" Mode
Featuring an integrated true-north compass, the drone can automatically align
to y "headless". This simplies steering:
1. During ight, press
on the remote. The drone's front LEDs ash when
headless mode is activated.
2. The drone will now y according to steering, regardless which way the
drone's head faces.
3. Press
again to exit headless mode.
Perform Stunts: 360° Air Flip
1. Push the throttle control to activate stunt mode. The remote control
beeps repeatedly.
2. Move the steering lever to perform stunts:
• Frontip: Move steering forward
• Backip: Move
steering backward
• Barrel roll: Move
steering right or left
3. The drone automatically exits stunt mode after per forming a stunt, or
push in the throttle control again to exit immediately.
IMPORTANT: Make sure there is enough space, at least 6 feet in the air and
minimum clearance of 6 feet in all directions for the drone to perform stunts
without crashing into object s or people.
Page 7

12 13
Using the Camera
For good pictures, use the camera in daylight or well-lit environments.
1. For players using the remote control, align and insert
a Micro SD card (not included) into the card slot in the
direction as marked. Push the SD card in until it clicks.
2. To remove the SD card, press it to eject.
Taking Photos and Videos
When the drone ies stably, on the remote control:
• Press
once to take a photo. The remote control beeps and the drone's
back LEDs ash once.
• Press
to record a video. Press again to stop recording and save
your le recording.
• To y and shoot video in a beeline, press
.
• To shoot video in 360° panoramic view, press
and the drone will
automatically steadily rotate whilst hovering. Press
again to stop
shooting and return to normal ight mode.
Note:
• Video recordings are without audio, in order to omit the roaring drone motor.
• The remote control beeps and the drone's back LEDs ash repea tedly during
recording.
• The video recorded may fail to play in some vid eo applic ations if (1) the SD card falls
out due to a crash; (2) you remove the SD card before stopping recordi ng; (3) battery
power was too low during recording .
Download VegaDrone App
1. For Android and iOS users, go to Google Play
TM
or App Store® respectively
to download VegaDrone app.
2. Follow screen instructions to install the app.
3. After installation, turn on the drone. The drone's LEDs start ashing
indicating pairing mode.
4. On your smart device, open the Wi-Fi setting to start searching for the list
of available Wi-Fi networks. Select the network named RS-xxxxxx (where
x represents an unique code.)
5. On your smart device, tap on
VegaDrone
app icon to open the app. When the
main menu screen appears, select "TAP TO BEGIN" to enter the app
control screen.
6. Upon successful connection with your drone, the drone LEDs stop
ashing and light up steadily.
7. Familiarize yourself with the onscreen app controls. Have fun ying!
App Controls Overview
KEY
1 Go to previous page
2 Take a photo
3 Start/ stop video recording
4 Start/ stop recording video in auto 360° rotation mode
5 Start/ stop recording video in beeline cruise mode
6 Enter folder view for playback of photos/ video. See page 14, "Playback
Photos/ Video."
7 Speed setting: 30/60/100%. Default 30% .
8 Activate/ deactivate headless mode
9 Activate/ deactivate stunt mode
10 Show/ hide throttle, steering and trim controls. But ton icon toggles when
touched
11 Trim control: adjust forward
12 Steering control: forward/backward/slide left/ slide right
13 Trim control: adjust backward
14 Trim control: adjust right
15 Trim control: adjust left
16 Act ivate/ deactivate motion sensor control
17 Onebuttontakeo/landing: button icon toggles when touched
18 STOP: acti vate emergency landing. Motors will stop immediately and cause
the drone to fall in a hard landing. Avoid using STOP if drone is ying above 10
feet in the air to reduce damage from crash impact.
19 Throttle control: ascend/ descend/turn lef t/ turn right
1 2 3 4 5 6 7 8 9 10
11
12
13
18 17 16 15 14
19
Page 8

14 15
Playback Photos/ Video
VegaDrone photo and video shoots are stored in the app's 3 playback folders:
PICTURES, VIDEO and VIDEO Card.
• To playback, tap on the relevant folder to access content.
Note:
• For easy folder manageme nt, operate the camera either wit h the app controls on
your smart device, or wit h the remote control buttons .
• Remote control pilot s: need to insert a SD card in the drone. Your media is stored in
the folder VID EO Card.
• App pilots: the re is no need to insert a SD card into the drone, unless you like to use
a SD card as backup.To view SD card content, th e drone needs to be switched on .
Follow your device screen to access and view.
• For remote control pilots with sma rt device in holder: use your device for instant
playback . As well as shooting vid eo and photos with your remote control, you can
also use the app's camera control but tons. In mixed control mode shoots, app screen
control shoots prio ritize over remote control shoots for storag e.
Replace Damaged Propellers
The left and right propellers of the drone are
dierent (see A/B orientation marking on
propellers and on the rotor axles). You must use
the correct propeller in the correct location,
otherwise the drone will fail to take o.
WARNING:
• To avoid injur y and damage, inspect the propell ers for nicks and breaks and make
sure they are securely attach ed before and after each i ght. Replace nicked, chipped,
cracked or broken propellers .
• Use only the suppli ed propellers. Do not alter, modify, or customize.
Troubleshooting
Drone does not respond
• Make sure the drone and remote control are switched on and paired.
• The drone battery may be low. Fully charge the battery. See “Charge the
Drone Battery.“
• Remote control battery may be low. Replace the batteries. For app pilots,
recharge your smart device if the battery status is low.
• Make sure the drone is within the control range and in line of sight.
Drone difficult to control
• The propellers or protection guards may be deformed due to a crash. Adjust
deformed propellers/ guards by hand. If you cannot adjust the propellers,
replace with the spare propellers. In case of the guards, detach and remove
both guards if you cannot bend the guard(s) back into normal shape.
• The throttle control is very sensitive. Use small, ne movements to control.
• If you are a beginner, set to low speed, use the takeo and landing buttons
, and select headless mode.
Drone swerves or moves erratically before taking off
• After a crash, the gyroscope inside your drone may need calibrating. On the
remote control, do the following:
1. Switch on your drone and remote control, and pair them.
2. Move the throttle all the way down and the steering
forward at the same time. Hold this position until the
drone LEDs start to blink rapidly. Then release the
controls.
3. The drone LEDs light steadily. Calibration is successfully
completed, and you are now ready for takeo.
• See “Trim Your Drone" to further ne tune and improve
control of your drone after calibration, if necessary.
• For app pilots, calibration is similar to the above. Move and hold the app's
onscreen throttle and steering controls for 3 seconds, and then observe
the drone LED status described in steps 2-3.
Need Spare Parts?
Need more spare propellers, or lost some of the accessories? Consult your
dealer for details on the 6001461 Crash Pack for 6001435 VegaDrone.
B
B
A
A
To replace a damaged propeller, use a screwdriver
to remove the old propeller. Insert a new matching
propeller onto the propeller axle, then screw securely,
but do not overtighten otherwise the propeller won't
turn.
Page 9

16
© 2016 General Wireless Operations Inc.
All rights reserved. RadioShack is a registered trademark
used by General Wireless Operations Inc. dba RadioShack.
radioshack.com
Printed
in China
09A16
6001435
Complies with the European Union’s “Restriction of
Hazardous Substances Directive,” which protects
the environment by restricting specic hazardous
materials and products.
iPod, iPhone, iPad, iPad mini, iPad Air and iPod touch are trademarks of Apple Inc.
App Store is a service mark of Apple Inc.
Google Play and Android are trademarks of Google Inc.
FCC Information
This equipment has been tested and found to comply with the limits for a Class B digital
device, pursuant to Part 15 of the FCC Rules. These limits are designed to provide
reasonable protection against harmful interference in a residential installation. This
equipment generates, uses and can radiate radio frequency energy and, if not installed
and used in accordance with the instructions, may cause harmful interference to radio
communications. However, there is no guarantee that interference will not occur in a
particular installation. If this equipment does cause harmful interference to radio or
television reception, which can be determined by turning the equipment o and on, the user
is encouraged to try to correct the interference by one or more of the following measures:
• Reorient or relocate the receiving antenna.
• Increase the separation between the equipment and receiver.
• Connect the equipment into an outlet on a circuit dierent from that to which the
receiver is connected.
• Consult your dealer or an experienced radio/TV technician for help.
If you cannot eliminate the interference, the FCC requires that you stop using your
equipment. Changes or modications not expressly approved by the party responsible for
compliance could void the user’s authority to operate the equipment.
This device complies with Part 15 of the FCC Rules. Operation is subject to the following
two conditions: (1) this device may not cause harmful interference, and (2) this device
must accept any interference received, including interference that may cause undesired
operation.
FCC Radiation Exposure
This equipment complies with FCC radiation exposure limit set forth for an uncontrolled
environment. This equipment should be installed and operated with minimum distance
20cm between the radiator and your body.
Limited Warranty
Go to www.radioshack.com/help for details.
RadioShack Customer Relations
300 RadioShack Circle, Fort Worth, TX 76102
CHOKING HAZARD! Small parts. Not for children under 3 years.
 Loading...