

Page 1

Attach the WRIST STRAP as shown below to prevent dropping your
CONTROLLER. Thread the string through the hole on the left side of the
CONTROLLER as shown, and then thread the strap through the ring of
the string.
O
N
O
F
F
O
N
O
F
F
O
N
O
F
F
ON
O
F
F
O
P
E
N
OPEN
O
P
E
N
O
P
E
N
Performance Gears
Performance Motors
7
Attach the Wrist Strap
Customize your ZipZaps micro RC
with performance, body and power
upgrade kits, available at your
nearby RadioShack.
!
!
!
!
!
!
!
Keep your ZipZaps micro RC dry; if it gets wet,wipe it dry immediately.
Use and store your micro RC only in room-temperature environment.
Running your micro RC continuously for long periods can generate high heat levels.
Handle your micro RC carefully and do not drop it.
Keep your micro RC away from dust and dirt – you can wipe it with a damp cloth occasionally to
keep it looking new.
Modifying or tampering with your ZipZaps micro RC’s internal components can cause a malfunction
and might invalidate its warranty and void your FCC authorization to operate it.
If your micro RC is not performing as it should, take both the car and the CONTROLLER to your local
RadioShack store for assistance.
9
Zip Tips
LIMITED NINETY (90) DAY WARRANTY This product is warranted by RadioShack against manufacturing defects in material and
workmanship under normal use for ninety (90) days from the date of purchase from RadioShack company-owned stores and authorized
RadioShack franchisees and dealers. EXCEPT AS PROVIDED HEREIN, RadioShack MAKES NO EXPRESS WARRANTIES AND ANY IMPLIED
WARRANTIES,INCLUDING THOSE OF MERCHANTABILITYAND FITNESS FOR A PARTICULARPURPOSE, ARE LIMITED IN DURATIONTO THE
DURATION OF THE WRITTEN LIMITED WARRANTIES CONTAINED HEREIN. EXCEPT AS PROVIDED HEREIN, RadioShack SHALL HAVE NO
LIABILITY OR RESPONSIBILITY TO CUSTOMER OR ANY OTHER PERSON OR ENTITY WITH RESPECT TO ANY LIABILITY, LOSS OR DAMAGE
CAUSED DIRECTLYOR INDIRECTLY BY USE OR PERFORMANCE OFTHE PRODUCT OR ARISING OUT OF ANY BREACH OFTHIS WARRANTY,
INCLUDING, BUT NOT LIMITED TO,ANY DAMAGES RESULTING FROM INCONVENIENCE, LOSS OF TIME, DATA, PROPERTY,REVENUE, OR
PROFIT OR ANY INDIRECT, SPECIAL, INCIDENTAL, OR CONSEQUENTIAL DAMAGES, EVEN IF RadioShack HAS BEEN ADVISED OF THE
POSSIBILITYOF SUCH DAMAGES.Somestates do notallow limitations onhow long animplied warrantylasts or theexclusion or limitationof
incidentalor consequential damages,so the abovelimitations or exclusions maynot apply toyou. In theevent of a productdefect during the
warrantyperiod, takethe product and theRadioShack sales receiptas proof ofpurchase date to anyRadioShack store.RadioShack will, atits
option,unless otherwise provided by law:(a) correct thedefect by product repair withoutcharge for parts and labor;(b) replace theproduct
with one ofthe same or similar design; or (c) refund the purchaseprice. All replaced parts andproducts, and products on which a refund is
made,become the property of RadioShack. New or reconditioned parts and products may be usedin the performance of warranty service.
Repaired or replaced parts and productsare warranted for the remainder of the original warranty period. Youwill be charged for repair or
replacementof the productmade after theexpiration of thewarranty period.This warrantydoes not cover:(a) damage orfailure caused byor
attributable to acts of God, abuse, accident, misuse, improper or abnormal usage, failure to follow instructions, improper installation or
maintenance,alteration, lightning orother incidence of excessvoltage or current;(b) any repairs otherthan those provided bya RadioShack
AuthorizedService Facility;(c) consumablessuch as fusesor batteries;(d) cosmeticdamage; (e) transportation,shipping orinsurance costs;or
(f)costs of productremoval, installation,set-up serviceadjustment or reinstallation.This warrantygives youspecific legal rights,and youmay
alsohave other rightswhich varyfrom stateto state.
RadioShack Customer Relations,200 Taylor Street, 6th floor,Fort worth, TX 76102 12/99
©2003. RadioShack Corporation.All rights reserved. RadioShack and ZIpZaps are trademarks of RadioShack Corporation.
Warrranty
2
0
5
25
75
95
100
0
5
25
75
95
100
Page 2
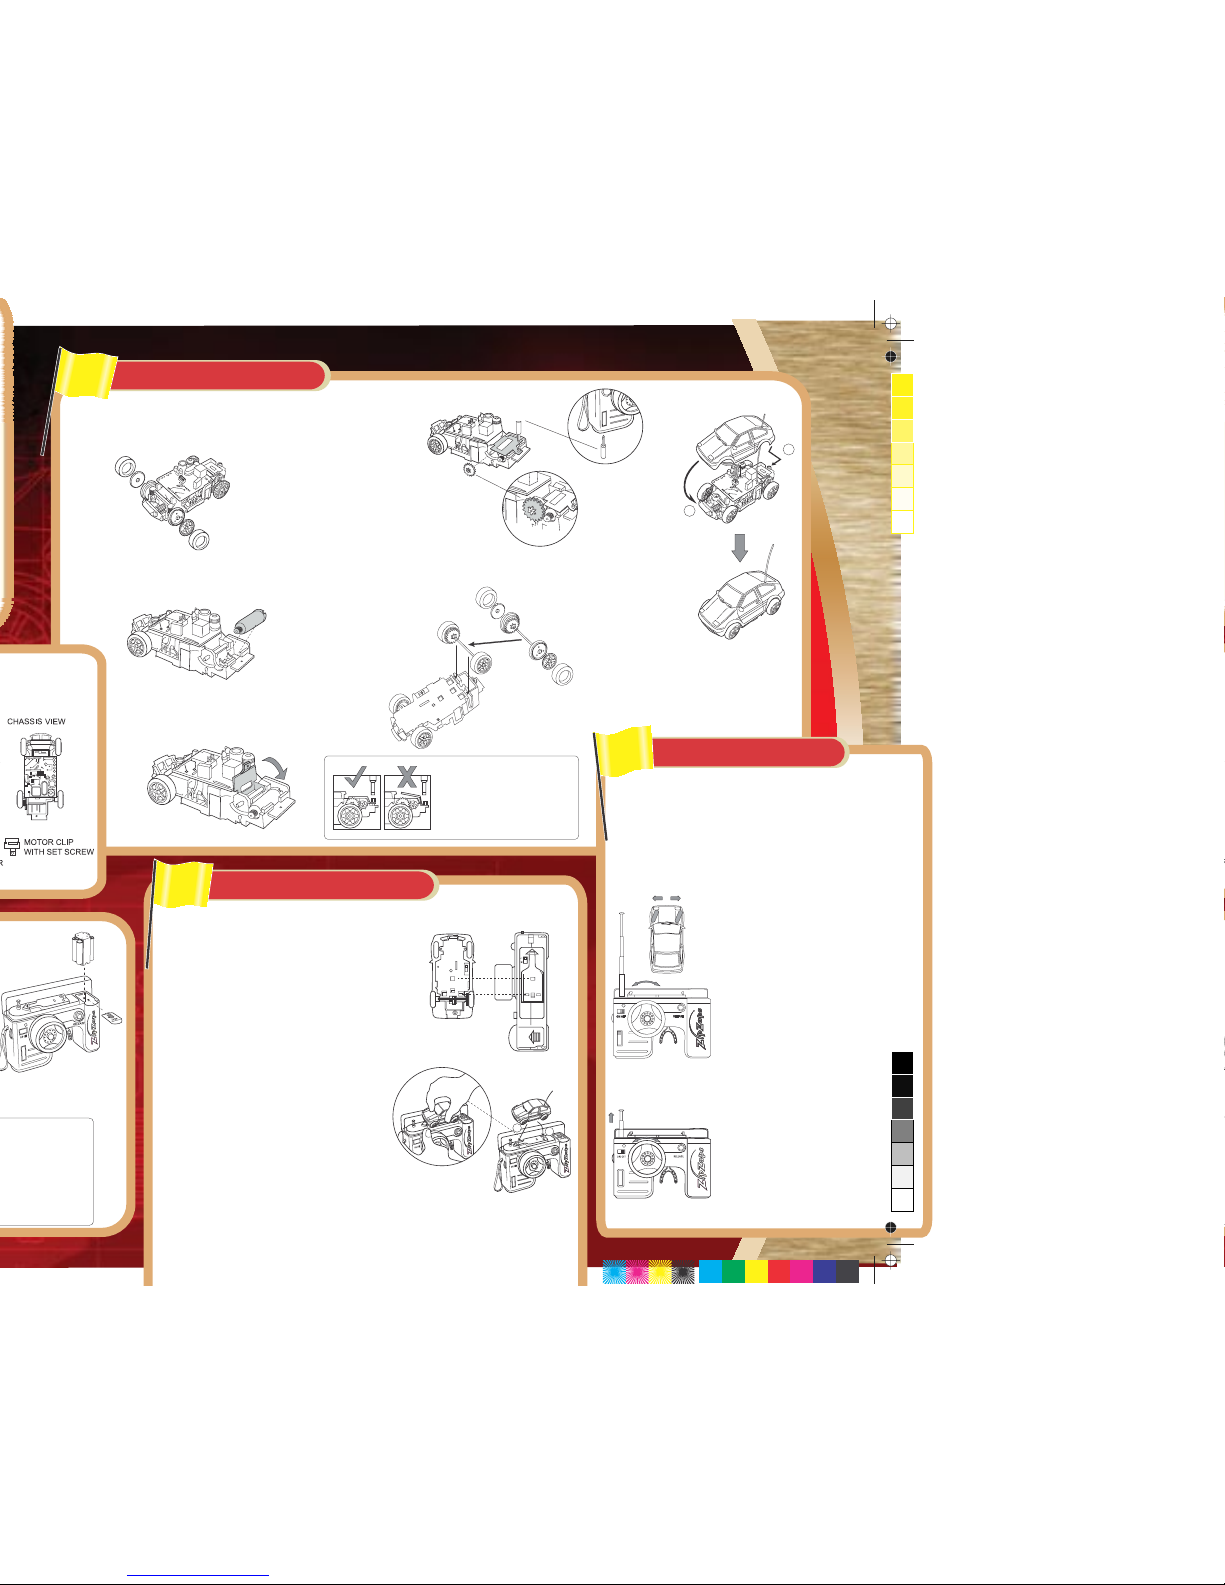
1. Align the tabs on the HUBCAPS with the
notches in the front axle wheels, and then
stretch the TIRES over the HUBCAPS.
2. Install the MOTORWITH DRIVE GEAR in the
groove on the back of the CHASSIS.
3. Carefully hook the MOTOR CLIP onto
the TRANSFER GEAR AXLE and swing
the MOTOR CLIPWITH SET SCREW flat
against the chassis.
4. Tighten the SET
SCREW in the
MOTOR CLIP using
the SCREWDRIVER
5. Push the TRANSFER GEAR onto the
axle as shown. Be sure the
TRANSFER GEAR meshes with the
DRIVE GEAR on the STOCK MOTOR.
6. Align the tabs on the HUBCAPS with the
notches in the REAR AXLE, and then stretch
the TIRES over the HUBCAPS.
7. Snap the REAR AXLE
GEAR assembly to the
CHASSIS as shown. Be
sure the REAR AXLE
GEAR meshes with the
TRANSFER GEAR.
stored in the
bottom of the CONTROLLER.
1
2
8. Plug the LED
connector of the
car top into the
male
connector on the
.
9. Thread the ANTENNA
through the hole in
the BODY TOP.
10. Place the tab at the
rear of the CHASSIS
into the slot on the
rear of the BODY TOP.
Secure the BODY TOP by gently pushing the
BODY TOP onto the CHASSIS until the
CHASSIS’ front tab clicks into the front slot of
the BODY TOP as shown.
car chassis’
circuit board
as shown
1. Turn on the CONTROLLER.The LED lights green.
2. Turn on your ZipZaps micro RC.
3. Open the cover on top of the CONTROLLER. Point
your car to the left and align the metal contacts
underneath the car with the metal contacts on top
of the CONTROLLER until your car clicks into place.
4. To change the racing channel of your micro RC,
select one of the six channels on the front left side
of the CONTROLLER, while t
5. When the channel has been successfully changed,
the LED stops blinking and charging begins until
complete. If programming fails,the LED turns
amber.Detach your car to clear the failed
programming. After verifying you turned your micro
RC on, place it back on the CONTROLLER until
programmed and fully charged.
6. The LED turns green after your micro RC has been
fully charged.
Press RELEASE to unlock the micro RC.
he LED blinks red. You
have about 10 seconds to change channels before
charging begins.
OPEN
1
2
4
Zap It On the Charger
For optimum racing conditions drive on a smooth, flat
surface.
Open the removable cover on top of the CONTROLLER.
Fully extend the antenna. Turn the CONTROLLER on.The
ON/OFF LED lights green.
Trigger Control
Designed for easy operation with
either hand, you can reverse the
direction of the throttle control
using the left/right switch on the
top of the CONTROLLER. If you hold
the CONTROLLER in your right
hand, set the switch to R and your
micro RC moves forward as you pull
the trigger left and moves
backward as you push the trigger
right.
If you hold the CONTROLLER in
your left hand, set the switch to L
and your micro RC moves forward
as you pull the trigger right and
moves backward as you push the
trigger left.
Release the trigger to the center
position to stop your Micro RC. If it
continues to move, see Performance
Adjustments.
Roll the steering knob left to turn
left, right to turn right, and release
to go straight.
Steering Control
5
Zoom Away
Caution: Do not overtighten
set screw causing MOTOR
CLIP to angle away from
chassis. MOTOR CLIP should
be horizontal to chassis.
Caution: Always use RELEASE when
removing the car from the charger.
3
Zip Your Car
0
5
25
75
95
100
0
5
25
75
95
100
 Loading...