

Page 1

17-800 3.fm Page 1 Thursday, July 22, 1999 9:4 7 A M
Cat. No.
17-8002/8003/8032/8033
OWNER’S MANUAL
PGL-302 Ultra Express
Numeric Local Pager
Please read before using this pager.
TM
Page 2

17-800 3.fm Page 2 Thursday, July 22, 1999 9:4 7 A M
INTRODUCTION
Your PGL-302 Ultra Express Numeric
Local Pager lets you keep in touch with
the office and with family and friends
anywhere around to wn. It can st ore up to
16 messages and alerts yo u with either a
gentle vibration or one of five beep patterns. It also has these features:
Daily Alarm—
lets you set the pager to
sound an alarm at a set time .
Low Battery Indicator —
lets you know
when the battery is low.
Clock—
displays the current date and
time, when you are not viewing a message.
Message Protect—
lets you protect up
to eight messages from accidental deletion.
©
1995 Tandy Corporation.
Ultra Express is a trademark of Motorola, Inc.
Radio Shack is a registered trademark used by
All Rights Reserved.
Tandy Corporation.
2
Page 3

17-800 3.fm Page 3 Thursday, July 22, 1999 9:4 7 A M
Automatic Page Reset —stops a page
after 20 seconds if you do not press a
button.
Page Reminder— beeps or vibrates every 2 minutes to remind you to view unread pages.
Automatic Pager Power —lets you set
the pager to turn on and off at specific
times every day.
Be sure you thoroughly read these instructions to ensure that you fully understand your pager’ s operation.
Note: You need one AAA batter y to power your pager.
3
Page 4

17-800 3.fm Page 4 Thursday, July 22, 1999 9:4 7 A M
GETTING STARTED
SUBSCRIBING TO
SERVICE
You must subscribe to local paging service through a local provider. Contact
your local Radio Shack store to find out
how to contact the service provider in
your area.
Your service provider will give you instructions for how to page your pager
and send numbers to it.
4
Page 5

17-800 3.fm Page 5 Thursday, July 22, 1999 9:4 7 A M
INSTALLING A BATTERY
Your pager requires one AAA battery.
For the best performance, we recommend an alkaline battery such as Radio
Shack Cat. No. 23-555.
1. Slide off the battery cover in the
direction of the ar row.
2. Remove the old battery, if necessary, and dispose of it properly.
5
Page 6

17-800 3.fm Page 6 Thursday, July 22, 1999 9:4 7 A M
3. Insert the new battery as indicated
by the polarity symbols (+ and –)
marked beside the compartment.
4. Replace the batte ry cover.
Notes:
• The built-in memory saver stores
messages and settings for a short
time while you change the battery.
• Turn off the pager when you are not
using it. See “Automatic Operation.”
• A battery should last for 850 to 950
hours of use.
When battery power becomes low, the
pager displays . You have about 1
week’s battery power left when this
warning first appears.
6
Page 7
17-800 3.fm Page 7 Thursday, July 22, 1999 9:4 7 A M
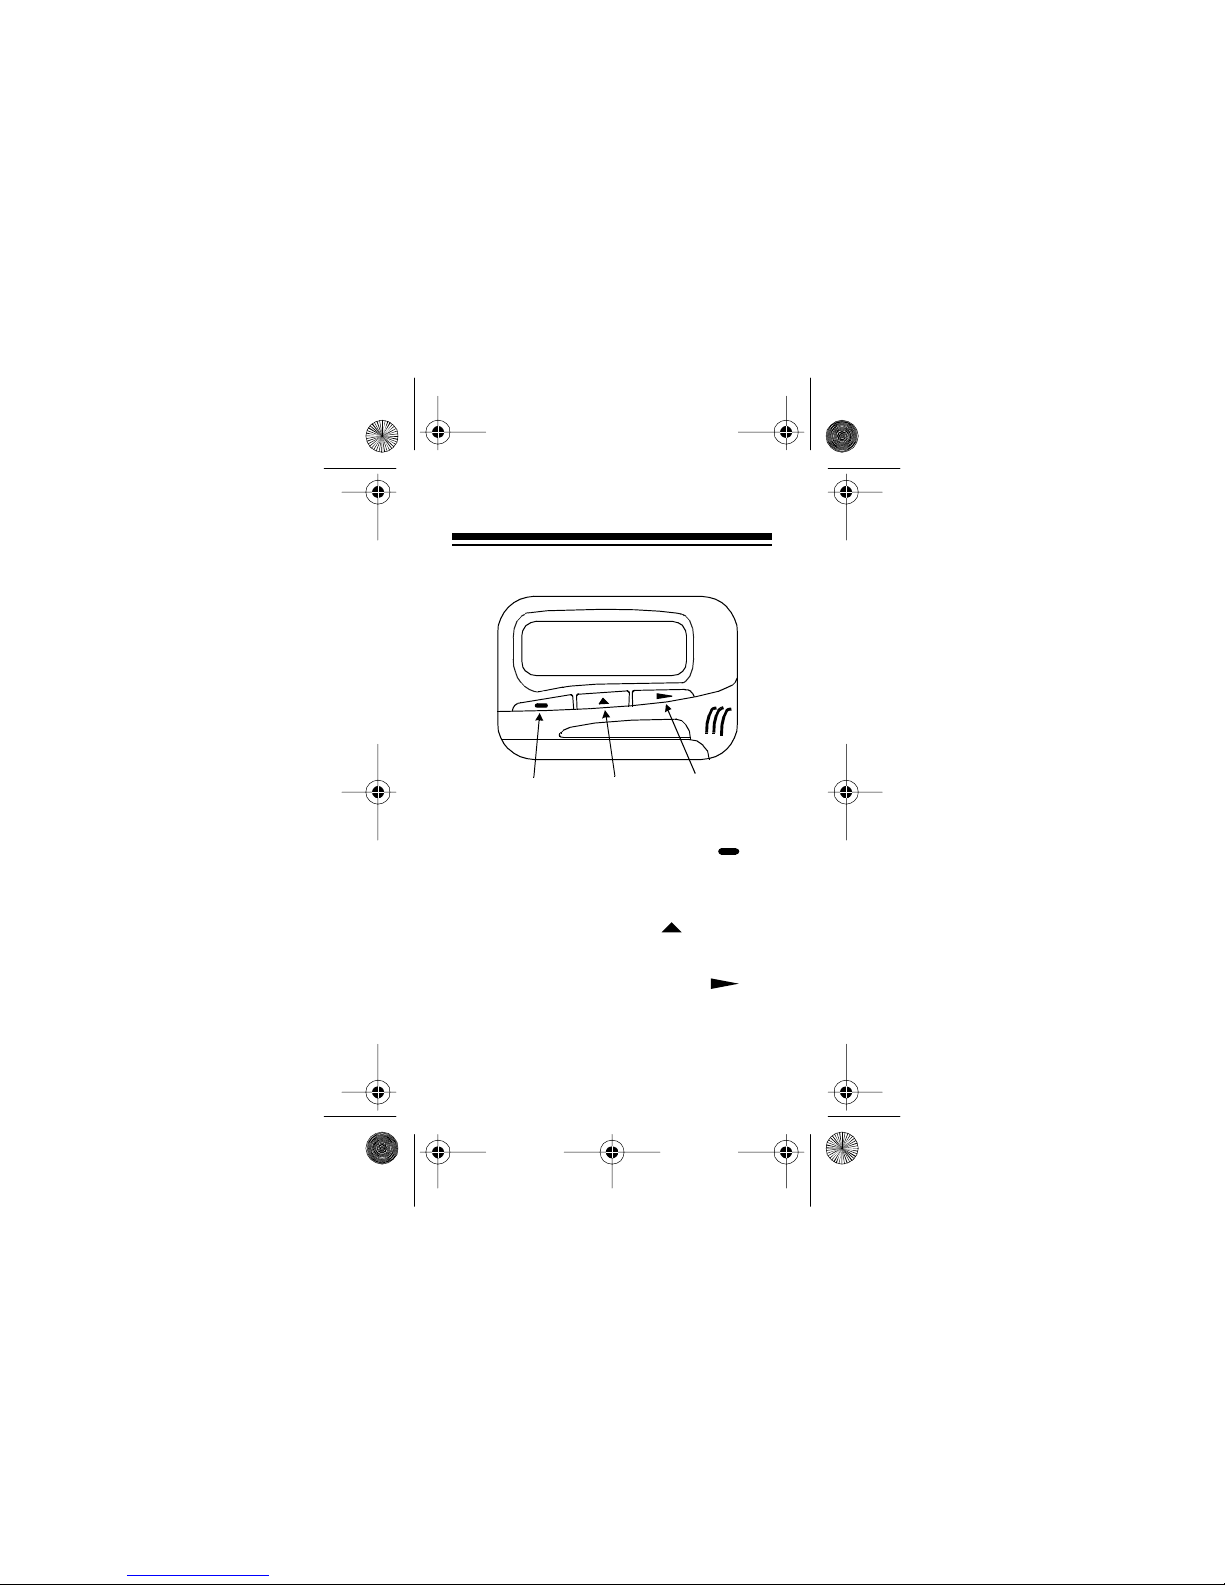
PAGER QUICK GUIDE
Read/Select
Button
Press the read/select button
Mode
Button
Light/Reset
Button
() to
turn on the p ager, vie w pages, and se lect
menu options.
Press the mode button
( ) to access
the pager’s menus.
Press the light/reset button
() to
turn on the light. Press it twice to return
to the time/date display.
7
Page 8
17-800 3.fm Page 8 Thursday, July 22, 1999 9:4 7 A M
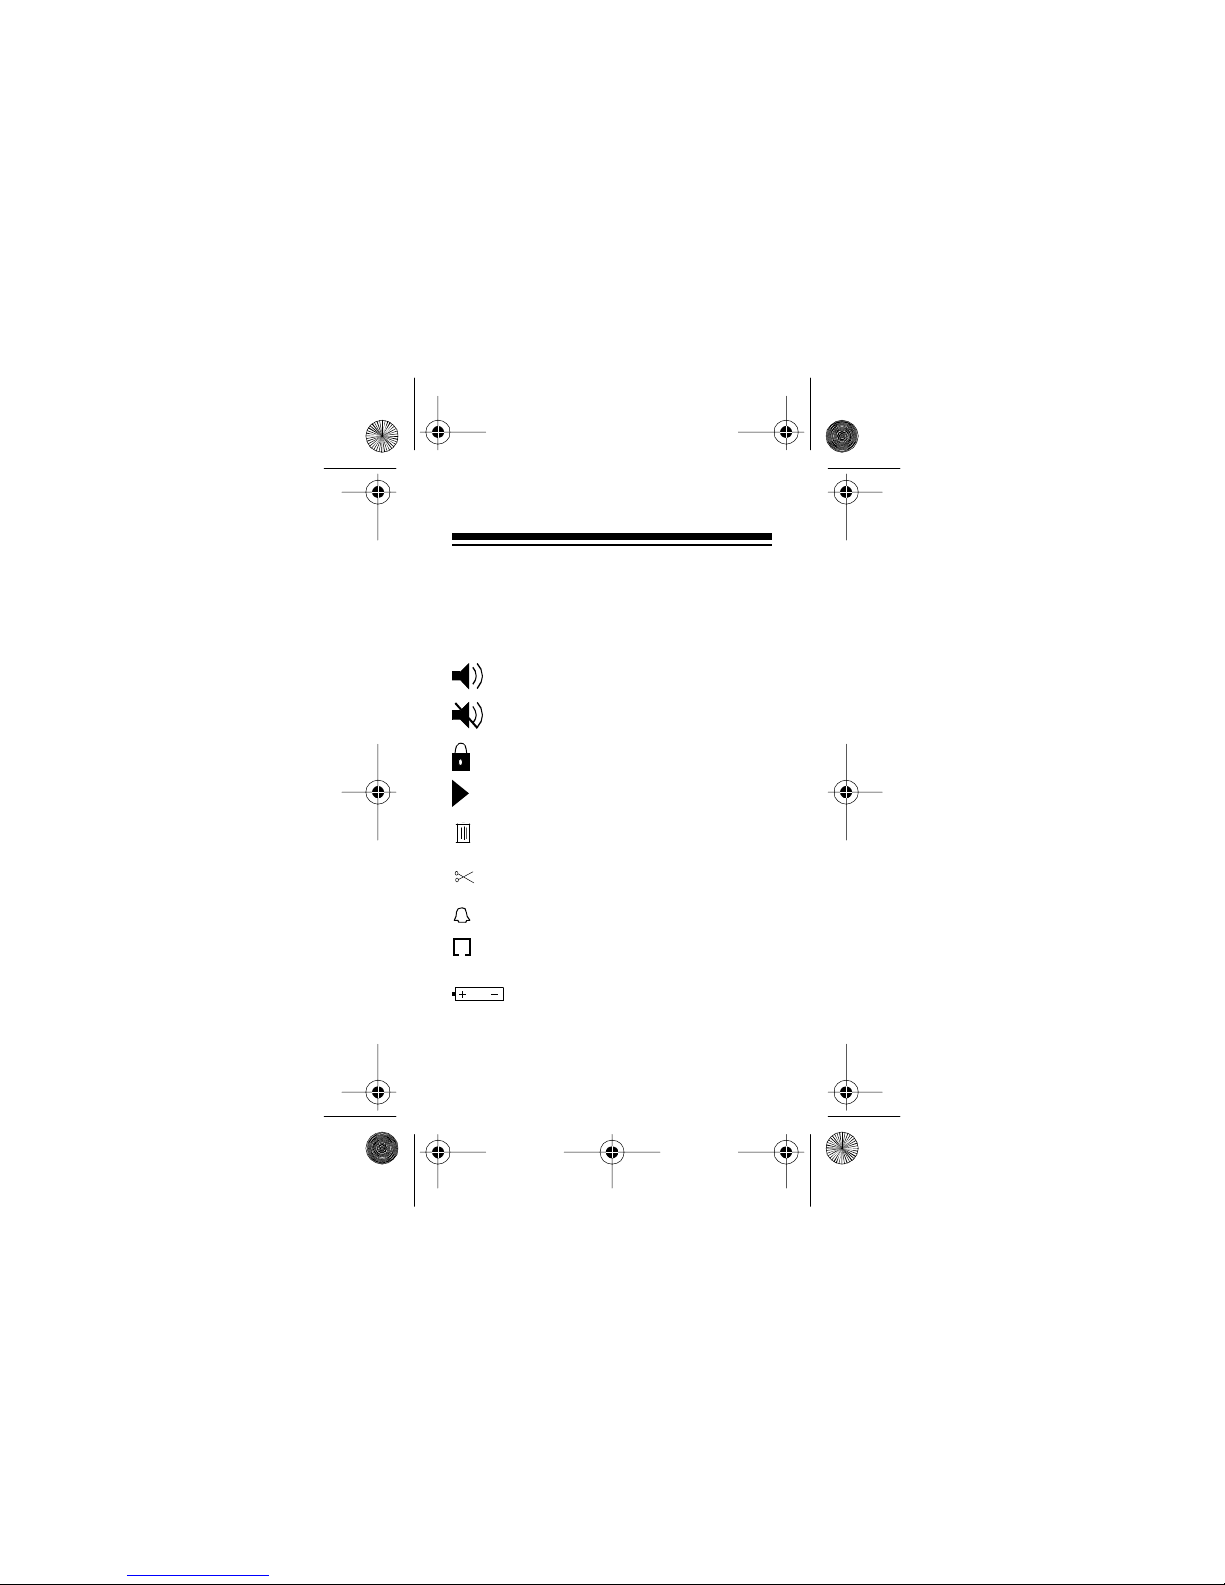
INDICATORS
The following indicators appear on your
pager’s displ ay.
Audible mode
Vibrate (silent) mode
Protected message
Message continuation
Erase all messages
Delete individual message
Pager alarm activ ated
Automatic power fe ature
Low battery indicator
8
Page 9

17-800 3.fm Page 9 Thursday, July 22, 1999 9:4 7 A M
PREPARATION
SETTING THE DATE
Press to turn on the pager, then follow these steps to set the current date.
Note:
If you do not press a button within
10 seconds, the pager returns to the
time/date di splay.
1. At the time/date display, repeatedly
press until the pager displays
SET dATE?
2. Press . The month digits flash .
3. Repeatedly press to select the
current month.
4. Press . The day digits flash.
5. Repeatedly press to select the
current day.
6. Press twice to return to the
time/date di splay .
.
9
Page 10

17-800 3.fm Page 10 Thursday, July 22, 1999 9: 47 AM
SETTING THE TIME
Press to turn on the pager, then follow these steps to set the current time.
Note:
If you do not set the time, the pager incorrectly reports the times of your
pages.
1. At the time/date display, repeatedly
press until the pager displays
SET TIME?
2. Press . The hour digits flash.
3. Repeatedly press to select the
current hour.
4. Press . The first minute digit
flashes.
5. Repeatedly press to select the
correct digit.
6. Press . The second minute digit
flashes.
.
10
Page 11

17-800 3.fm Page 11 Thursday, July 22, 1999 9: 47 AM
7. Repeatedly press to select the
correct digit.
8. Press .
pager is set to the 12-hour format.
9. Press to select the desired time
of day (
10. Press . The pager displays
HOURS
11. Press to select the desired time
format (12-hour with AM/PM or 24hour).
12. Press twice to return to the
time/date di splay .
or P flashes if the
A
for AM or P for PM).
A
or
24 HOURS
.
12
11
Page 12

17-800 3.fm Page 12 Thursday, July 22, 1999 9: 47 AM
SELECTING SILENT OR
TONE ALERT
You can have your pager alert you by vibrating or by sounding one of five tone
patter ns.
To have the pager vibrate when you receive a page, at the time/date display,
press . If the pager is currently set to
sound tones, it displays
Press to switch to silent alerts. The
pager vibrat es bri efly, and the indicator turns on.
To have the pager sound tones when
you receive a page, at the ti me/date display, press . If the pager is currently
set to vibr ate, it di sp lays
to switch to tone alerts. The pager
beeps, and the indicator turns on.
SILENT?
AUdIO?
. Press
.
12
Page 13

17-800 3.fm Page 13 Thursday, July 22, 1999 9: 47 AM
Selecting the Tone Pattern
When you set the pager to sound tones
for pages, you have a ch oice of five t one
patterns. To select a tone pattern:
1. Select tone alert (see “Selecting
Silent or Tone Alert”).
2. Repeatedly press until the
pager displays
3. Press to hear the currently
selected pattern.
4. Repeatedly press to select a
different pattern. Each time you
press , the pager sounds the
selected pattern and displays
SET ALERT?
ALERT 1, ALERT 2, ALERT 3
ALERT 4
5. When you hear the pattern you
want, press twice to return to
the time/date display.
, or
ALERT 5
.
.
,
13
Page 14

17-800 3.fm Page 14 Thursday, July 22, 1999 9: 47 AM
OPERATION
TURNING THE PAGER
ON AND OFF
Press to turn on the pager. The pager sounds an alert tone or vibrates and
briefly turns on all indicators.
To turn off the pager, repeatedly press
until the pager displays
. Then press . The or in-
OFF?
dicator turns off.
Notes:
• The pager displays the time and
date, even when it is tur ned off.
• The pager does not receive pages
when it is turned off .
TURNING ON THE LIGHT
To turn on the light , press . The pager’s light turns on for 8 seconds. Press
again to turn it off soon er.
14
PAGER
Page 15

17-800 3.fm Page 15 Thursday, July 22, 1999 9: 47 AM
RECEIVING AND
READING MESSAGES
When the pager recei ves a page, it alerts
(beeps or vibrates) for 8 seconds. Press
any button to stop the alert sooner. The
pager displays the number of unread
pages.
The pager briefly alerts every 2 minutes
until you view the message.
Press to display the message. If it
contains more than 12 digits, repeatedly
press to see the rest of the message.
The last screen of the page gives the
message’s number and time.
To read additional messages, press
again.
15
Page 16

17-800 3.fm Page 16 Thursday, July 22, 1999 9: 47 AM
Tone Only Messages
If your pager receives a message that
does not have any numbers, it displays
TONE ONLY
.
Unreadable Messages
If your pager receives a message that is
partially or to tally unre adable, it does not
display the unreadable parts.
16
Page 17

17-800 3.fm Page 17 Thursday, July 22, 1999 9: 47 AM
PROTECTING AND
UNPROTECTING
MESSAGES
Follow these steps to protect a message
so you cannot delete it.
1. Repeatedly press until the
pager displays the message you
want to protect.
2. Repeatedly press until the
pager displays
3. Press to protect the message.
To unprotect the message, follow the
above steps. In Step 2, the pager displays
UNPROTECT?
PROTECT?
.
.
17
Page 18

17-800 3.fm Page 18 Thursday, July 22, 1999 9: 47 AM
DELETING MESSAGES
You can delete single messages, or all
unprotected me ssages.
Deleting Individual Messages
1. Repeatedly press until the
pager displays the message you
want to delete.
2. Press until the pager displays
dELETE?
3. Press to delete the message.
Deleting All Unprotected
Messages
1. At the time/date display, repeatedly
press until the pager displays
ERASE ALL?
2. Press to delete the messages.
18
.
.
Page 19

17-800 3.fm Page 19 Thursday, July 22, 1999 9: 47 AM
AUTOMATIC OPERATION
You can set your pager to automatically
turn on and off at specific times every
day. To do so, select automatic operation and set th e desire d on and off t imes.
Selecting Automatic Operation
Follow these steps to select automatic
operation.
1. At the time/date display, repeatedly
press until the pager displays
PAGER AUTO?
2. Press to select automatic operation.
To return to manual operation, repeat
these steps. The pager displays
MANUAL?
in Step 1.
.
PGR
19
Page 20

17-800 3.fm Page 20 Thursday, July 22, 1999 9: 47 AM
Setting the Automatic On and
Off Times
1. At the time/date display, repeatedly
press until the pager displays
SET AUTO?
2. Press . The pager displays the
currently set on and off times with
the on time’s hou r fl ashing.
3. Repeatedly press until the
pager displays the desired time.
Then press to make the next
digit flash.
Repeat this step until the pager displays the desired on and off times.
4. Press twice to return to the
time/date di splay .
Note:
The pager only turns on and off
automatical ly if you turn on this function.
See “Selecting Automatic Operation.”
.
20
Page 21

17-800 3.fm Page 21 Thursday, July 22, 1999 9: 47 AM
SETTING THE ALARM
Follow these steps to set your pager to
alert you at a specific time.
1. At the time/date display, repeatedly
press until the pager displays
SET ALARM?
2. Press . The pager displays the
currently set alarm time with either
or
ON
OFF
3. To have the alarm sound, press
until
ON
until
. The hour flashes.
4. Repeatedly press until the
pager displays the desired time.
Then press to make the next
digit flash.
Repeat this step until the pager displays the desired alarm time.
5. Press twice to return to the
time/date di splay .
.
flashing.
flashes. Otherwise, press
flashes. Then press
OFF
21
Page 22

17-800 3.fm Page 22 Thursday, July 22, 1999 9: 47 AM
The pager alerts for 20 seconds at the
set alarm time. Press any button to stop
the alert sooner.
PAGER IDEAS
Include your pager number in your answering machine or voice mail messages. This way, you can receive important
messages immediately.
Give your pager number to friends, family members, and business associates.
When they page you, they can use their
telephone’s keypad to enter a number
where you can reach them. Your pager
displays this number when you receive
the page.
Leave your pager number at your children’s school and with the babysitter so
you can always be reached in an emergency.
22
Page 23

17-800 3.fm Page 23 Thursday, July 22, 1999 9: 47 AM
Establish
code
messages wi th your family or friends. For example, your children
can include the code 3333 to tell you
they are home from sc hool . Your sp ouse
can send 07734 to say hell o! (Read it upside-down.)
If you have a cellular phone, give your
pager number instead of your cellular
number. You can deci de who to call back
on your cellular phone, without paying
for incoming cellular calls. This can drastically reduce your monthly cellular bill!
23
Page 24

17-800 3.fm Page 24 Thursday, July 22, 1999 9: 47 AM
CARE
To enjoy your pager for a long time:
• Keep the pager dry. If it gets wet,
wipe it dry immediately.
• Use and st ore the pager only in normal temperature environments.
• Handle the pager gently and carefully. Don’t drop it.
• Keep the pager away from dust and
dirt.
• Wipe the pager with a damp cloth
occasionally to keep it looking new.
FCC INFORMATION
Your pager might cause TV or radio interference even when it is operating
properly. To determine whether your
pager is causi ng the interf erence, tur n off
the pager. I f the interfe rence goes away,
your pager is causing the interference.
Try to eli minate the inter ference by moving the pager away from the receiver.
24
Page 25

17-800 3.fm Page 25 Thursday, July 22, 1999 9: 47 AM
If you cannot eliminate the interference,
the FCC requires that you stop using
your pager.
Modifying or tamperi ng wit h you r pager’ s
internal components can cause a malfunction and might void your FCC authorization to operate it. If your pager is not
performing as it should, contact your local Radio Shack store for assistance or
send it to:
MobileComm Personal Page r Div ision
403 East Ramsey, Suite 202
San Antonio, TX 78216
This device complies with Part 15 of
Rules
. Operation is subject to t he follow-
FCC
ing conditions:
(1) This dev ice may not cause an y ha rm-
ful interference, and
(2) This device must accept interference
received, incl udi ng int erfer ence tha t may
cause undesired operation.
25
Page 26

17-800 3.fm Page 26 Thursday, July 22, 1999 9: 47 AM
NOTES
26
Page 27

17-800 3.fm Page 27 Thursday, July 22, 1999 9: 47 AM
27
Page 28

y
y
g
y
y
y
j
g
y
y
y
17-800 3.fm Page 28 Thursday, July 22, 1999 9: 47 AM
RADIO SHACK LIMITED WARRANTY
This product is warranted against defects for 1
ear from date of purchase from Radio Shack
compan
-owned stores and authorized Radio
Shack franch isees and dea lers. Withi n th is per i od,
we will repair it with out cha r
Simpl
bring your Radio Shack sales slip
proof of p urchase date to an
Warrant
does not cov er transpor tation costs. N or
does it cover a product sub
accidental dama
EXCEPT AS PROVIDED HEREIN, RADIO
SHACK MAKES NO EXPRESS WARRANTIES
AND ANY IMPLIED WARRANTIES ARE LIMITED
IN DURATION TO THE DURATION OF THE
WRITTEN LIMITED WARRANTIES CONTAINED
HEREIN. Some s tates do not perm it limitation or
exclusion of implied warranties; therefore, the
aforesaid limitation(s) or exclusion(s) ma
appl
to the purchaser.
This warranty gives you specific legal rights and you ma
also have other rights which vary from state to state.
e.
We Service What We Se ll
e for parts and labor.
Radio Shack store.
ected to misuse or
as
not
9/94
RADIO SHACK
A Division of T andy Corporation
Fort Worth, Texas 76102
8/95 Printed in the USA
 Loading...