

Page 1
43-974 .fm Page 1 Monday, August 16, 1999 4:27 PM
Cat. No. 43-974
OWNER’S MANUAL
Please read before using this equipment.
System 440
99-Number Memory
Call Waiting Caller ID
With 100 Caller ID Memo-
ries
Page 2
43-974 .fm Page 2 Monday, August 16, 1999 4:27 PM
Warning:
To prevent fire or shock haz ard, do not expose this product to
rain or moisture.
This symbol is intended to alert you to the presence of uninsulated
dangerou s volt age wi thin the pr odu ct’s enclo sure th at mi ght be of suf ficien t magni tud e to co nsti tute a ris k of e lect ric sho ck. D o no t open t he
product’s case.
This symbol is intended to inform you that important operating and
maintenance in structions are included in the literature accompanying
!
this product.
RadioShack is a trademark used by Tandy Corporation.
2
CAUTION
RISK OF ELECTRIC SHOCK.
DO NOT OPEN.
CAUTION
ELECTRIC SHOCK, DO NOT REMOVE
COVER OR BACK. NO USER-SERVICEABLE PARTS INSIDE. REFER SERVICING
TO QUALIFIED PERSONNEL.
: TO REDUCE THE RISK OF
©
1996 Tandy Corporation.
All Rights Reserved.
!
Page 3

43-974 .fm Page 3 Monday, August 16, 1999 4:27 PM
FEATURES
Your RadioShack System 440 99-Number Memory Call Waiting Caller ID
module lets you decide whether or not to interrupt your current call when a
new call comes in. If Call Waiting/Caller ID service is available in your area
and you subscribe to it, you can see information about your incoming call
and choose whether or not you want to answer it.
The telephone company sends the caller’s telephone number (and name, if
available in your area) and the date and time of the call between the f irst
and second rings. During an incoming call, a Call Waiting signal sounds if
you are already on another call and the module displays the Caller ID information to help you identify the caller and avoid unwanted calls.
The module stores and displays up to 99 single (number only) or multiple (name and number) Calle r ID re cords.
Your module includes these features:
Easy Installation
so you can quickly begin using it.
Call Summary
Large Display
time and date.
— the module easily connects to your telephone line
— displays the number of new calls you received.
— makes it easy to se e c aller inform a tion and the cu rren t
3
Page 4

43-974 .fm Page 4 Monday, August 16, 1999 4:27 PM
Clock and Date Display — displays the current time and date as provided to Caller ID service subscribers by your local telephone company.
Message R eceived Indi cator — flashes w hen you get an an onymous
call, when you have at least one new call you have not reviewed, or when
you have received a v oice mail message (i f you have message w aiting
service).
Biling ual Ope ration — lets you set the modul e to display messag es in
English or Spanish.
Contrast Control — lets you adjust the display contrast for the best readability.
Two Mounting Options — you can place the module on a desk, shelf,
or table, or mount it on a wall.
You need one 9-volt battery (not supp li ed) to protect t he module’s memory if power fails.
We recommend you record the module’s serial number here. The number
is on the module’s bottom panel.
Serial Number: _________________________
4
Page 5

43-974 .fm Page 5 Monday, August 16, 1999 4:27 PM
This module has been tested and found to comply wit h all applicable UL
and FCC standards.
Important Information:
• To use this module, you must be in an area where Caller ID service
is available, and you must subscribe to the servic e.
• Your module displays the caller’s name only if this feature is available in your area and you subscribe to it.
• You must connect t he supplied AC adapter to the module to receive
Caller ID/Call Waiting information.
5
Page 6
43-974 .fm Page 6 Monday, August 16, 1999 4:27 PM
FCC INFORMATION
We have designed your module to conform to federal regulations, and
you can connect it to most telep hone li nes. However, each module (and
each device, such as a telephone or answering machine) that you connect to the telephone line draws power from the line. We refer to this
power draw as the module’s ringer equivalence number or REN. The
REN is shown on the bottom of the module.
If you use more than one telephone or other device on the line, add up
all of the RENs. If the total is more than five, your telephone might not
ring. In rural areas, a total REN of three might impair ringer operation. If
ringer operation is impaired, remove a device from the line.
Your module complies with Part 68 of
quest, provide the Federal Communications Commission (FCC) registration number and the REN to your telephone company. Both numbers
are shown on the bottom of the mo dule.
Note:
You must not connect your module to:
• Coin-operated systems
• Party-li ne systems
• Most electroni c key telephone system s
6
FCC Rules
. You mus t, upon re-
Page 7
43-974 .fm Page 7 Monday, August 16, 1999 4:27 PM
In the unlikely event that your module causes problems on the phone line,
the phone company can temporarily disconnect your service. If this happens, the phone company attempts to notify you in advance. If advance notice is not practical, the phone company notifies you as soon as possible
and advises you of your right to file a complaint wit h the FCC.
Also, the phone company can make changes to its lines, equipment, operations, or procedures that could affect the operation of this module. The
phone company notifies you of these changes in advance, so you can take
the necessary steps to prevent interruption of your telephone service.
This module complies with the limits for a Class B device as specified in
Part 15 of
FCC Rules
. These limits provide reasonable protection against
radio and TV interference in a residential area. However, your module
might cause TV or radio interference even when it is operating properly.
To eliminate interf erence, you can try one or more of the fol lowing:
• Reorient or relocate the radio or TV receiving antenna
• Increase the distance between the module and the radi o or TV
• Use outlets on different electrical circuits for the module and the
radio or TV
Consult your local Ra dioShack store if the problem conti nues.
7
Page 8

43-974 .fm Page 8 Monday, August 16, 1999 4:27 PM
CONTENTS
Preparation ......................................................................................... 9
Connecting the AC Adapter .......................................................... 9
Installing the Battery ................................................................... 10
Adjusting the Display Contrast ................................................... 12
Connecting to a Phone ........................................................... .... 13
Connecting to an Answering Machine ........................................ 14
Checking the Connections/Selecting the Language ................... 15
Adding Additional Modules ......................................................... 16
Mounting the Module .................................................................. 17
Operation ......................................................................................... 19
Receiving and Storing Calls ....................................................... 19
Reviewing Calls .......................................................................... 20
Displayed Call Information .......................................................... 21
Display Light ............................................................................... 23
Deleting Calls ............................................................................. 24
Deleting a Single Call .......................................................... 24
Deleting All Calls ................................................................. 24
Troubleshooting ............................................................................... 25
Care and Maintenance ..................................................................... 30
Lightning ..................................................................................... 31
8
Page 9
43-974 .fm Page 9 Monday, August 16, 1999 4:27 PM
PREPARATION
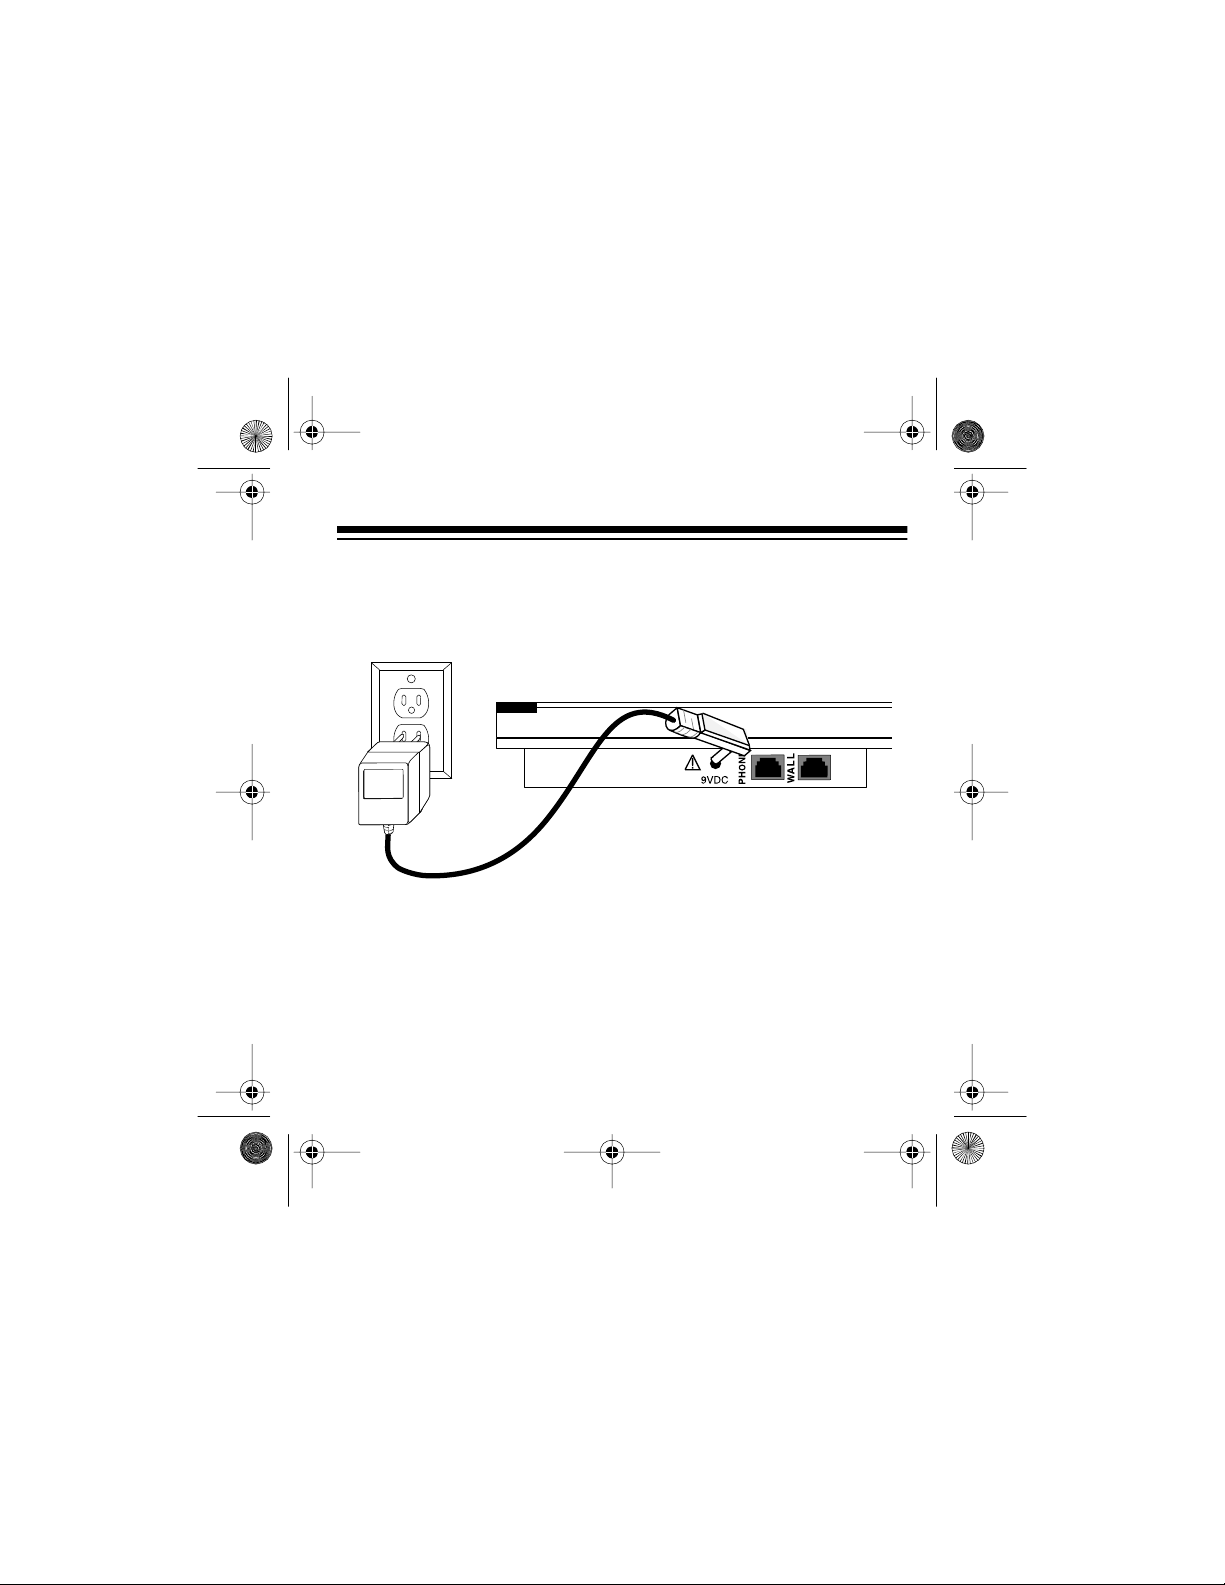
CONNECTING THE AC ADAPTER
The module does not receive Caller ID/Call Waiting information unless
you connect the suppli ed AC adapter.
Caution:
for your module. Use only the supplied adapter.
1. Plug the adapter tip into the
2. Plug the large square end of the adapter into a standard AC outlet.
The supplied RadioShack adapter was designed specifically
9VDC
jack on the back of the module.
9
Page 10
43-974 .fm Page 10 Monday, August 16, 1999 4:27 PM
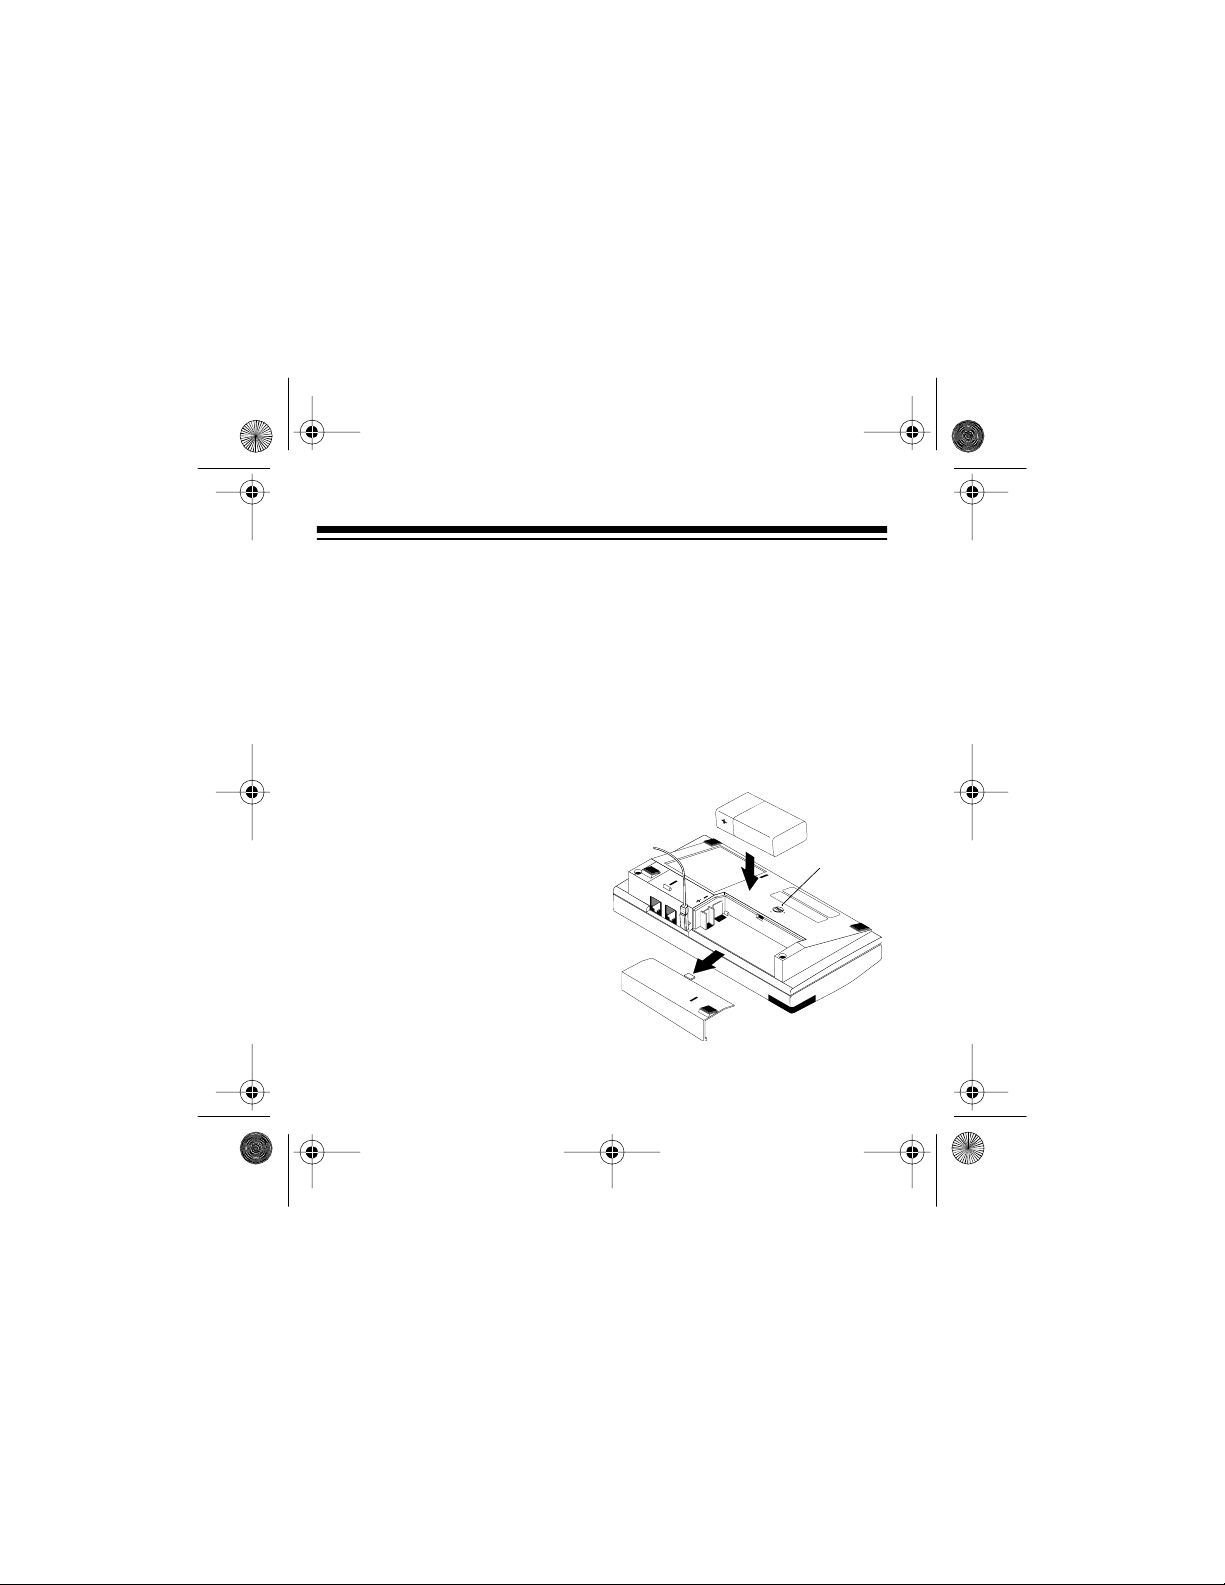
INSTALLING THE BATTERY
You need one 9-volt battery (not supplied) to protect the module’s me mory if power fails. We recommend an alkaline battery, such as RadioShack Cat. No. 23-553.
Note:
You must also connect the supplied AC adapter to use the mod-
ule.
Follow these steps to install the battery.
1. If the phone lines are already
connected, unplug them from
the module.
2. Use a coin to turn the lock on
the bottom of the module to
OPEN
, then slide off the battery
compartment cover.
3. Insert the fresh battery into the
compartment, aligning the + on
the battery with the
+
on the
case.
WALL
PHONE
9VDC
!
OPEN/
LOCK
OPEN
AVANT DE REMPLACER LES PILES
ATTENTION: DEBRANCHER LE TELEPHONE
LINE BEFORE CHANGING BATTERIES
CAUTION: DISCONNECT TELEPHONE
LOCK
10
Page 11

43-974 .fm Page 11 Monday, August 16, 1999 4:27 PM
4. Replace the battery cover and turn the lock on the bottom of the
module to
LOCK
to secure it. Then reconnect the phone lines, if
necessary.
When appears in the upper left corner of the display, replace the
batte ry.
Warning:
To reduce the risk of electric shock, disconnect the phone line
cord between the phone jack and the module before replacing the battery.
Caution:
To avoid deleting stored Caller ID information, do not remove
the AC adapter while you replac e the bat tery.
11
Page 12
(
)
43-974 .fm Page 12 Monday, August 16, 1999 4:27 PM
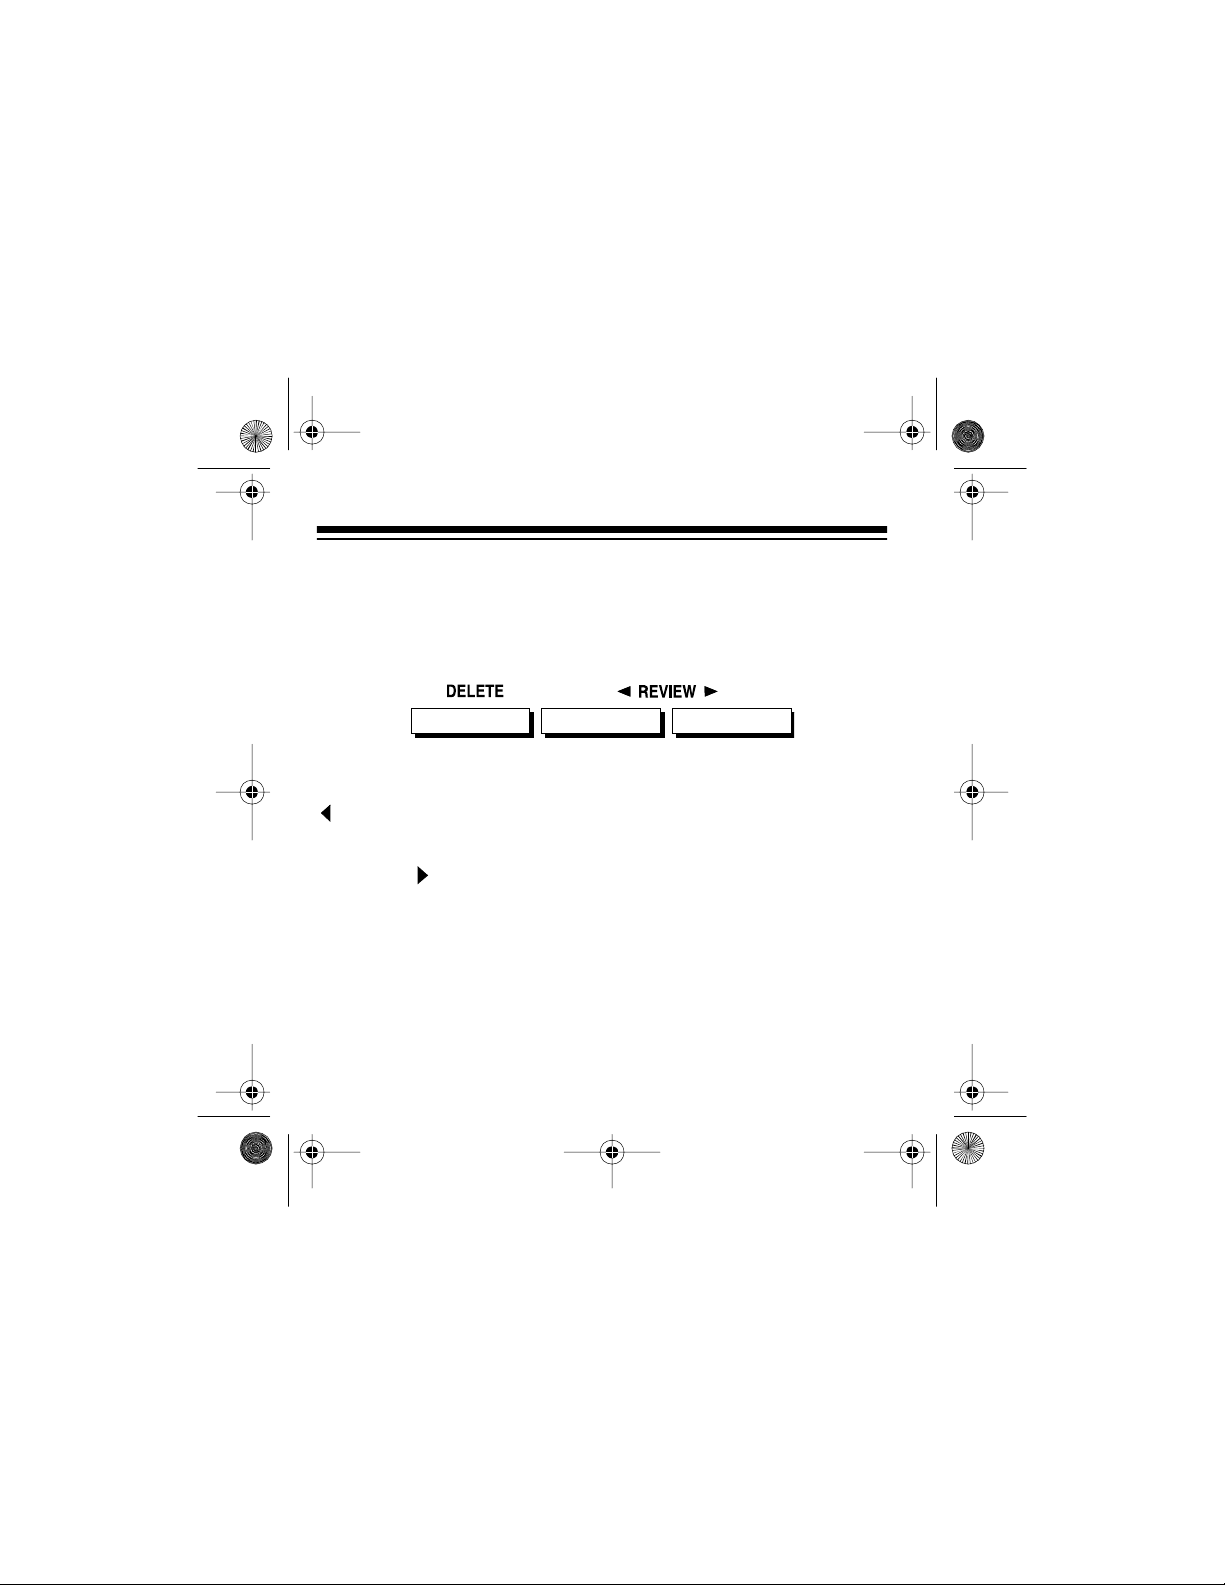
ADJUSTING THE DISPLAY CONTRAST
Note:
Do not press and hold
REVIEW
only
keys. You could accidentally erase the call memory if you press
DELETE
.
DELETE
DELETE
(Lighten)
To lighten the display, pr ess and hold
REVIEW
.
To darken the display, press and hold
REVIEW
ing
.
12
without also pressing one of the
REVIEW
Darken
DELETE
while repeat edly pressing
DELETE
while repeatedly press-
Page 13
43-974 .fm Page 13 Monday, August 16, 1999 4:27 PM
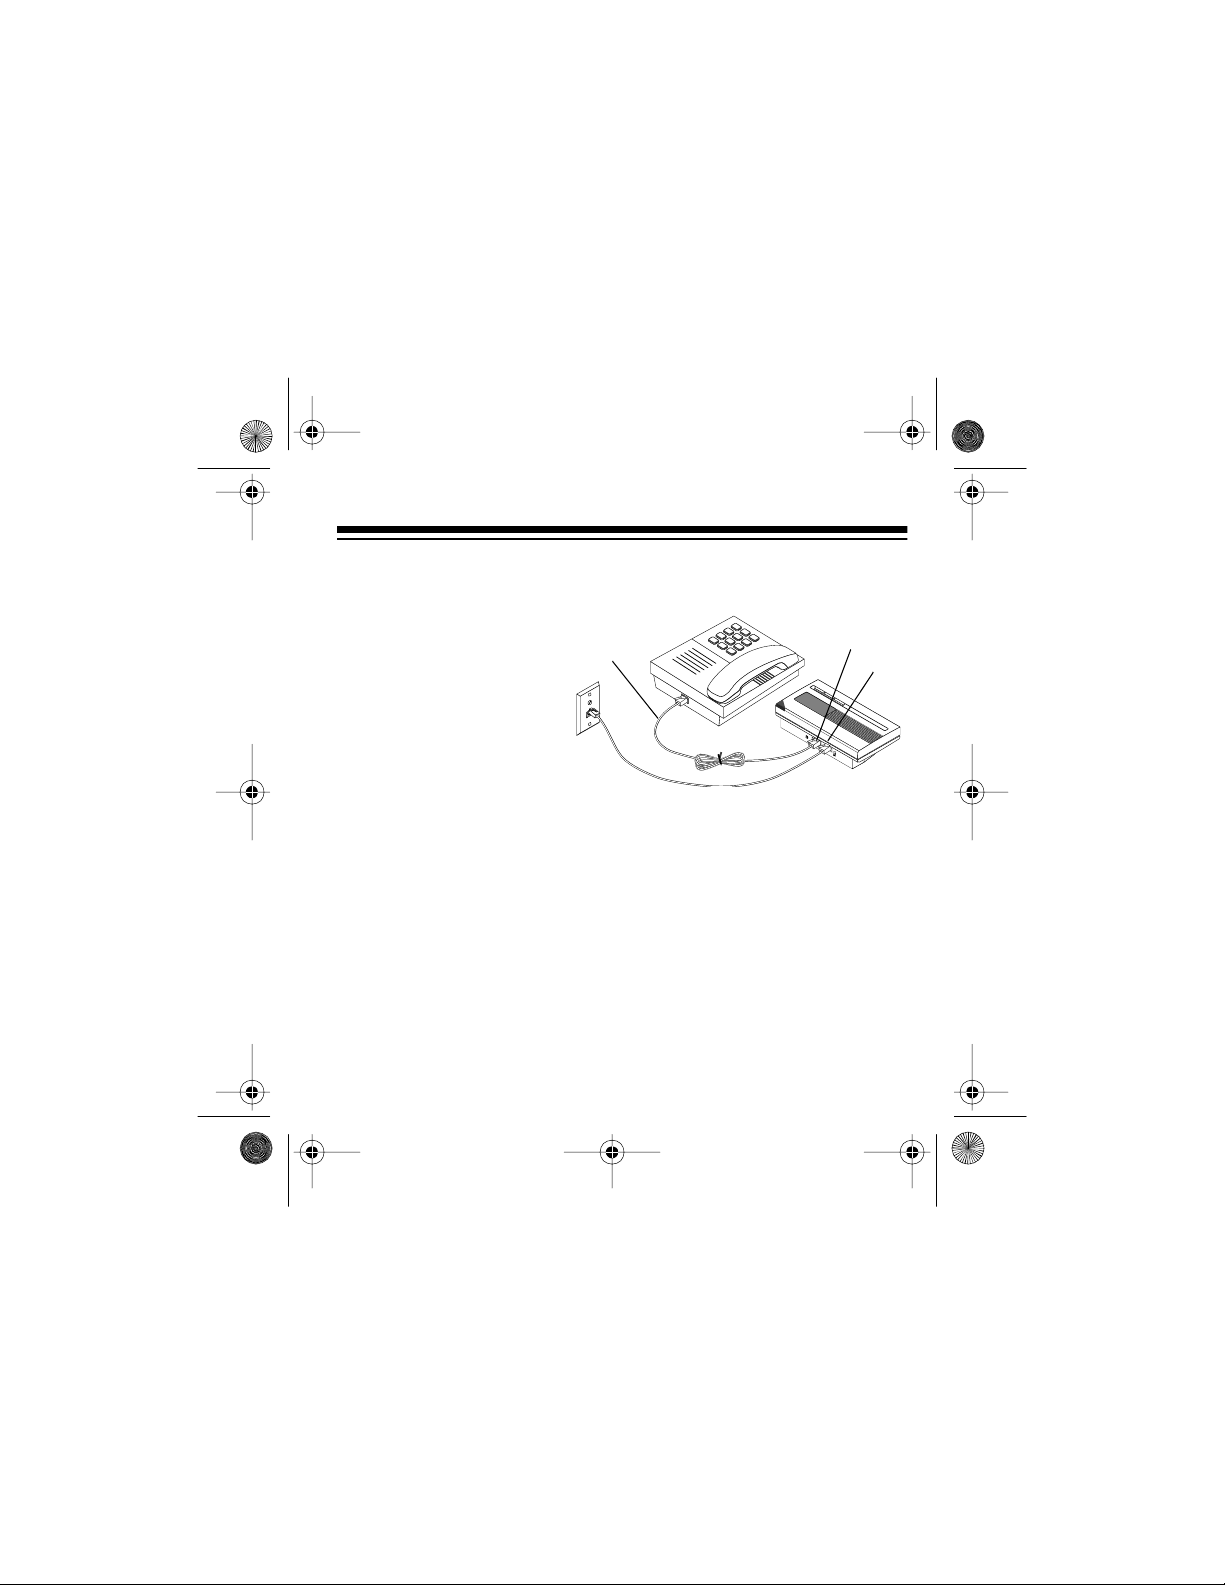
CONNECTING TO A PHONE
1. Disconnect the telephone line cord from
the phone.
Supplied
Line
Cord
2. Plug the line cord into
the module’s
WALL
jack.
3. Plug one end of the
supplied line cord into
the module’s
PHONE
jack.
4. Plug the other end into the phon e’s jack.
Note:
If this is not your only Caller ID product, see “Adding Additional
Modules” on Page 16.
PHONE
WALL
13
Page 14

43-974 .fm Page 14 Monday, August 16, 1999 4:27 PM
CONNECTING TO AN ANSWERING MACHINE
1. Disconnect the line
cord that connects
your answering
machine to your
phone from the
answering machine’s
PHONE
jack. Then plug the
cord into the module’ s
PHONE
jack.
Supplied
Line Cord
2. Plug one end of the supplied line cord into the module’s
3. Plug the cord’s other end into the answering machine’s jack.
4. Set your answerin g mac hine to answer after 2 or more rings.
WALL
WALL
jack.
Some answering machines block Caller ID information from the
module. If you have problems receiving Caller ID
information, try setting up
your equipment this way:
14
PHONE
Supplied
Line C or d
WALL
Page 15

43-974 .fm Page 15 Monday, August 16, 1999 4:27 PM
If this module is not your only Caller ID product, see “Adding Additional
Modules” on Page 16.
CHECKING THE CONNECTIONS/SELECTING
THE LANGUAGE
When your module is correctly connected to your phone or answering
machine, you see
your line cord connections are secure and correct.
If you have not connected your module correctly, you might see one of
the following messages:
CONNECTIONS OK
-CHECK POWER-
HANG UP PHONE & CHECK ALL CORDS
-SWAP JACKS-
See “Troubleshooting” on Pages 26–27 for how to solve these problems.
. This display tells you that all
15
Page 16

43-974 .fm Page 16 Monday, August 16, 1999 4:27 PM
After seeing the
screen appears:
Note:
If you selected the wrong lang uage, or want to change it later, you
must unplug the phone line connections , wait 30 seconds, reconnect the
module, then select the language.
After you select the language, the screen stays blank until the first Caller
ID call arrives.
CONNECTIONS OK
This display asks you to choose between
English and Spanish.
•Press
•Press
message, the language selection
REVIEW
DELETE
to select English
to select Spanish
ADDING ADDITIONAL MODULES
If you have several phones and want to receive Caller ID information on
every phone, you must connect a module to every phone.
Note:
If you connect other Caller ID modules, you do not receive Call
Waiting information while you are on another call.
16
Page 17

43-974 .fm Page 17 Monday, August 16, 1999 4:27 PM
All System 440 modules are set up as the
additional modules, you must program each additi onal modul e as an extension (
these steps to program an additional module as an extension (
module:
1. Hold down both
seconds until this display appears:
2. Release the
DELETE
The asterisk moves next to
) module, or incoming calls might be disconnected. Follow
EXT
REVIEW
REVIEW
to set the module as an ext ension.
keys for over 8
keys and press
.
EXT
module. If you install
MAIN
EXT
MOUNTING THE MODULE
You can place the module directly on a desk, shelf, or table, or mount it
on a wall. To mount the module on the wall, you need two screws (not
supplied) with heads larger than the holes on the back of the supplied
mounting bracket.
17
)
Page 18

43-974 .fm Page 18 Monday, August 16, 1999 4:27 PM
Follow these steps to mount the module on a wall.
1. Using the round holes in the
mounting bracket as a template, mark the mounting
screw locati ons on the wall.
Hooks
Holes
2. Drill two holes in the wall at the
marked locations.
3. While holding the bracket
against the wall, thread a
screw through each round hole
Mounting Bracket
in the bracket, then tighten the
screws.
4. Route the cords through the openings in the bracket, then align the
slots on th e back of the module with the hooks on t he bracket. Gently push the module down on the bracket to secure it.
To remove the m odule from the bracket, pres s up from the bottom of the
module until it snaps off the wall.
18
Page 19

43-974 .fm Page 19 Monday, August 16, 1999 4:27 PM
OPERATION
RECEIVING AND STORING CALLS
Your System 440 allows you to see information about an incoming call
whether or not you are on the phone.
As you rece ive each call, your module saves a call record so you can review it later. Your module saves up to 99 call records before it begins to
replace the oldest call record with a new one.
Each call record in cludes:
• Date and time of the call
• Call number (or der the call
is received)
• Telephone number
• Caller’s name (if available)
Note:
If you have a telephone that has a HOLD feature, we do not recommend using HOLD for very long. A caller on hold might be disconnected if a new call comes in.
19
Page 20

43-974 .fm Page 20 Monday, August 16, 1999 4:27 PM
REVIEWING CALLS
As your module receives calls, it saves the call records so you can review and delete them at your convenience.
1. Press
REVIEW
2. Press
20
DELETE
REVIEW
to see the most recent call records.
REVIEW
to see earlie r ca ll re c or d s.
Page 21

43-974 .fm Page 21 Monday, August 16, 1999 4:27 PM
DISPLAYED CALL INFORMATION
You see: It means:
ANONYMOUS CALL
-END OF LIST-
LINE ERROR
or
-- -- -- --
-NO DATA SENT-
The caller has blocked the Caller ID
information from being sent.
You have reached the end of your call
records. Press either of the
keys to see other records.
Call information was di storted before
reaching the module. Norm al static on
the telephone line can cause a
message. If this condition per-
ERROR
sists, check with your local phone company to be sure that there is not a
problem with your phone li ne.
The module did not receive a message.
For more information, see “Troubleshooting” on Page 25.
REVIEW
LINE
21
Page 22

43-974 .fm Page 22 Monday, August 16, 1999 4:27 PM
You see: It means:
LONG DISTANCE
# NEW CALLS
-NO CALLS-
MESSAGE WAITING
-UNAVAILABLE-
22
The incoming cal l i s long dist ance . If the
call is
ANONYMOUS
, the display alternates between
ABLE
LONG DISTANCE
message.
The number of new call s recei ved sinc e
you last checked t he mod ule.
There are no call records stored in
memory.
(For message wa it ing se rvice only. ) You
have a voice messag e in your mai lbox.
The incoming call is f rom an area that
currently does not support Caller ID.
or
UNAVAIL-
and the appropriate
Page 23

43-974 .fm Page 23 Monday, August 16, 1999 4:27 PM
DISPLAY LIGHT
Display Light
If the light on your module flashes slowly and
the display shows the number of the new calls
received, you have received new calls since
the last time you checked the modul e. Press ei-
REVIEW
ther
turns off the light.
If the light on your module flashes slowly and
you see
voice message in your mailbox (if you subscribe to message wait ing service).
If the light on your module flashes rapidly while
the phone is ringing and you see
CALL
phone number from being sent.
key to review the new call(s). This
MESSAGE WAITING
, you have a
ANONYMOUS
, the caller is blocking their name or tele-
23
Page 24

43-974 .fm Page 24 Monday, August 16, 1999 4:27 PM
DELETING CALLS
DELETE
Deleting a Single Call
REVIEW
DELETE
REVIEW
twice.
1. Press either
appears on the displ ay.
2. Press
Deleting All Calls
1. Repeatedly press either
appears on the displ ay.
2. While
24
-END OF LIST-
DELETE
until
-NO CALLS-
key until the call record you want to erase
REVIEW
key until
appears on the display, press and hold
appears on the display.
-END OF LIST-
Page 25

43-974 .fm Page 25 Monday, August 16, 1999 4:27 PM
TROUBLESHOOTING
Having a problem? Here are some of the most common problems and
how to resolve them.
Problem Solution
Blank screen
You have an incoming
call, but do not receiv e
any Caller ID information.
Battery installation
stall the battery, as descr ibed in “Installing
the Battery” on Page 10.
AC power
adapter is plugged into an outlet that is
controlled by a sw it ch, turn on the switch.
Contrast control
as described in “Adjusting the Display
Contrast” on Page 12.
• You picked up a telephone that is not
• No data was sent by the phone com-
— Plug in the adapter. If the
connected to your module.
pany with the call (
appears on the display). This
SENT-
is not a malfunction.
— Replace or rein-
— Adjust the contrast
-NO DATA
25
Page 26

43-974 .fm Page 26 Monday, August 16, 1999 4:27 PM
Problem Solution
You are not hear ing t he
Call-Waiting signal or
do not see Caller ID
informati on at any time.
You do hear the Call
Waiting signal, but do
not receive Caller ID
data while on the
phone.
Module displays
CHECK POWER
26
Verify that all Caller ID/Call Waiting services are activated with your local phone
company.
Verify that you have connected the AC
adapter.
Verify that the line cord from the phone
jack is inserted into the jack marked
WALL
and that the telephone or answering machine is inserted into the jack marked
.
PHONE
Verify that only one module is set to
. All other System 440 modules
MAIN
must be set to
EXT
.
Verify that the AC adapter is firmly
plugged into the module and the AC outlet.
Page 27

43-974 .fm Page 27 Monday, August 16, 1999 4:27 PM
Problem Solution
Module displays
SWAP JACKS
Module displays
HANG UP PHONE &
CHECK ALL CORDS
Module displays
POWER FAILURE
Module displays
NO DATA SENT
Verify that t he line cords ar e in the correct
jacks.
• Verify that all telephones are onhook.
• Check that all telephone line cords
are secure.
• Verify that the AC adapter is firmly
installed in the module.
• Verify that there is power at the AC
outlet.
• The module is not receiving information from the phone company. Make
sure the telephone company has
started your Caller ID/Call Waiting
services.
(Continued on next page)
27
Page 28

43-974 .fm Page 28 Monday, August 16, 1999 4:27 PM
Problem Solution
Module displays
NO DATA SENT
28
• The line cords going into the module
are swapped.
• Your answering machine might be
blocking Caller ID information:
— Set the machine to answer after
2 rings.
— Use the alternative answering
machine set-up. See “Connecting to an Answering Machine” on
Page 14.
• Wai t at least 2 rings bef ore answering
the incoming call.
• If you subscribe to Call Forwarding
service, it might be activated. Turn off
your Call Forwarding.
(Continued on next page)
Page 29

43-974 .fm Page 29 Monday, August 16, 1999 4:27 PM
Problem Solution
Module displays
NO DATA SENT
• If the problem continues for more
than 24 hours, contac t your loca l telephone company.
Disconnected callers You are using the HOLD feature on a tel e-
phone while caller information is being
received. Do not use the HOLD feature.
If your module i s not performing as it should and none of these solutions
correct the problem , check its connection to your phones and the phone
lines. If you are unable to locate the problem, take your module to your
local RadioShack store for assistance.
29
Page 30

43-974 .fm Page 30 Monday, August 16, 1999 4:27 PM
CARE AND MAINTENANCE
Your R adioShack System 440 99 -Number M emory Call Wai ting Caller ID
module is an example of superior design and craftsmanship. The following suggestions will help you care for the module so you can enjoy it for
years.
• Keep the module dry. If it gets wet, wipe it dry immediately. Liquids
can contain miner als that can corrode the elect ronic circuits.
• Handle the module gently and carefully. Dropping it can damage
circuit boards and case s and can cause the modul e to work imp roperly.
• Use and store the module only in normal temperature environments. Temperature extremes can shorten the life of electronic
devices, damage batteries, and distort or melt plastic parts.
• Keep the module away from dust and dirt, which can cause premature wear of parts.
• Wipe the module with a damp cloth occasionally to keep it looking
new. Do not use harsh chemicals, cleaning solvents, or strong
detergents to clean it.
30
Page 31

43-974 .fm Page 31 Monday, August 16, 1999 4:27 PM
Modifying or tampering with your module’s internal components can
cause a malfunction and might invalidate the module’s warranty and
void your FCC authorization to operate it. If your module is not opera ti ng
as it should, take it to your local RadioShack store for assistance. If the
trouble is harming the telephone lines, the telephone company might
ask you to disconnect yo ur module until you have resolved the problem.
LIGHTNING
Your module has built-in protection cir cuits to reduce the risk of damage
from surges in telephone line current. These protection circuits meet or
exceed the FCC requirements. However, lightning striking the telephone
lines can damage your module.
Lightning damage is not common. However, if you live in an area that
has severe electrical storms, we suggest you unplug your module during storms to reduce the possibility of damage.
31
Page 32

y
y
y
g
g
y
g
y
y
y
y g
y
43-974 .fm Page 32 Monday, August 16, 1999 4:27 PM
RadioShack Limited Warranty
This telephone p rod uct is wa rrante d against manufactu ring defects in materia l and workmanship for one ( 1)
stores and authorized RadioShack franchisees and dealers. Within this period bring your
RadioShack sales slip as proof-of-purchase date to an
This warrant
abuse, misuse, improp er or abnormal usa
li
htning or other incidence of excess voltage, or any repairs other than those provided b
a RadioShac k Authorized Servi ce Facility, or tran sportation costs. RadioShack is not
responsible or liable for indirect, special, or consequential damages arising out of
or in connecti on with the use or performance of the product or other damages with
respect to loss of property, loss of revenue or profit, or costs of removal, installation or reinstallation.
EXCEPT AS PROVID ED HERE IN, Radi oShack M AKES NO EXPRESS WARRANTI ES
AND ANY IMPLIED WARRANTIES ARE LIMITED IN DURATION TO THE DURATION
OF THE WRITTEN LIM ITED WARRANTIES CONTAINED HEREIN. Some states do not
allow the lim itation or ex clus ion of inci dental or co nsequenti al d ama
do not allow limitatio n or e xclusion of implied wa rranties; the refore, the aforesai d limitation(s) or exclusion(s ) ma
repairs to the product made after the ex piration of the aforesaid one (1)
period.
This warrant
from state to state.
var
ear from the date of purchase from Radi oShack company owned
does not cover damage or failure caused by or attributable to Acts of God,
e, faulty installation, imprope r maintenance,
not apply to the purchaser. There will be charges rendered for
ives you specific l egal rights and you may also have o ther rights which
We Service What We Sell
RadioShack store.
es and some states
ear warrant
10/95
RadioShack
A Division of Tandy Corporation
Fort Worth, Texas 76102
12A6 Printed in Thailand
 Loading...