


CONTENTS
Important Safeguards . . . . . . . . . . . . . . . . . . . . . . . . . . . . . . . . . . . . . . . . . 3
FCC Regulations . . . . . . . . . . . . . . . . . . . . . . . . . . . . . . . . . . . . . . . . . . . . 5
DigitalSatelliteSystem ........................................ 6
WhatistheDSS®System?................................... 6
ControlsandFunctions ........................................ 7
RemoteControl ......................................... 7
Front Panel . . . . . . . . . . . . . . . . . . . . . . . . . . . . . . . . . . . . . . . . . . . 8
Rear Panel . . . . . . . . . . . . . . . . . . . . . . . . . . . . . . . . . . . . . . . . . . . . 9
Included with Your DSS System . . . . . . . . . . . . . . . . . . . . . . . . . . . . . . . . . . . . 10
Preparation . . . . . . . . . . . . . . . . . . . . . . . . . . . . . . . . . . . . . . . . . . . . . . 11
Installing Batteries in Your Remote . . . . . . . . . . . . . . . . . . . . . . . . . . . . . . . 11
Basic Operation . . . . . . . . . . . . . . . . . . . . . . . . . . . . . . . . . . . . . . . . . . . . 12
PowerOn ............................................12
AdjustingtheVolume ......................................12
Changing Channels . . . . . . . . . . . . . . . . . . . . . . . . . . . . . . . . . . . . . . . 12
Channel Banner . . . . . . . . . . . . . . . . . . . . . . . . . . . . . . . . . . . . . . . . . 13
Channel Information . . . . . . . . . . . . . . . . . . . . . . . . . . . . . . . . . . . . . . . 13
On-Screen Programming . . . . . . . . . . . . . . . . . . . . . . . . . . . . . . . . . . . . . . . 14
What is On-Screen Programming? . . . . . . . . . . . . . . . . . . . . . . . . . . . . . . . 14
HowItWorks:HighlightingandSelecting............................15
TheMainMenu ............................................18
Features.............................................18
TheTimer ............................................19
ListGuides............................................26
Purchases............................................27
DataServices ..........................................29
OtherGuides ..........................................30
Lock/Unlock ...........................................30
Mailbox .............................................34
Options .............................................36
Help ...............................................36
TheOptionsMenu...........................................37
Features.............................................37
Selecting a Channel List . . . . . . . . . . . . . . . . . . . . . . . . . . . . . . . . . . . . . 38
Channel List/Lock . . . . . . . . . . . . . . . . . . . . . . . . . . . . . . . . . . . . . . . . 38
Limits ..............................................41
Changing the Default Text Size . . . . . . . . . . . . . . . . . . . . . . . . . . . . . . . . . 43
Install Screen . . . . . . . . . . . . . . . . . . . . . . . . . . . . . . . . . . . . . . . . . . 43
SettingthePicture’sAspectRatio................................45
Alternate Audio . . . . . . . . . . . . . . . . . . . . . . . . . . . . . . . . . . . . . . . . . 46
Updating a New Access Card . . . . . . . . . . . . . . . . . . . . . . . . . . . . . . . . . . 47
Help ...............................................48
Optimus
System 5100 Owner's Manual 1

CONTENTS
The Program Guide . . . . . . . . . . . . . . . . . . . . . . . . . . . . . . . . . . . . . . . . . . 49
TheGridGuide .........................................49
The Closed Program Guide . . . . . . . . . . . . . . . . . . . . . . . . . . . . . . . . . . . 55
Single Channel Guide . . . . . . . . . . . . . . . . . . . . . . . . . . . . . . . . . . . . . . 57
Favorites................................................61
FavoriteProfiles.........................................61
StoringFavorites ........................................61
Making Changes to a Favorite . . . . . . . . . . . . . . . . . . . . . . . . . . . . . . . . . . 64
RecallingFavorites .......................................65
Themes ................................................67
SelectingaTheme........................................67
UsingtheThemeGuide.....................................69
Pay-Per-View (PPV) . . . . . . . . . . . . . . . . . . . . . . . . . . . . . . . . . . . . . . . . . . 70
WhatisPay-Per-View(PPV)?..................................70
Programming Your Remote Control . . . . . . . . . . . . . . . . . . . . . . . . . . . . . . . . . . 74
Setting the TV/VCR Modes . . . . . . . . . . . . . . . . . . . . . . . . . . . . . . . . . . . 74
Setting the AUX Mode . . . . . . . . . . . . . . . . . . . . . . . . . . . . . . . . . . . . . . 75
Setting the DSS Mode . . . . . . . . . . . . . . . . . . . . . . . . . . . . . . . . . . . . . . 76
Appendix . . . . . . . . . . . . . . . . . . . . . . . . . . . . . . . . . . . . . . . . . . . . . . . . 78
Remote Control Codes . . . . . . . . . . . . . . . . . . . . . . . . . . . . . . . . . . . . . 78
Notes .................................................81
Notes .................................................82
Notes .................................................83
Notes .................................................84
Notes .................................................85
2 Optimus
System 5100 Owner's Manual

Important Safeguards
This product has been designed and manufactured to assure your personal safety. Improper use can
result in potential electrical shock or fire hazards. Carefully observe and comply with all warnings, cautions
and instructions placed on the product, or described in this operating guide or service manual.
WARNING
To guard against injury, these safety precautions should be observed during
the installation, use, and servicing of this product.
Read Instructions – All the safety and operating
instructions should be read before the appliance is
operated.
Retain Instructions – The safety and operating
instructions should be retained for future reference.
Heed Warnings – All warnings on the appliance
and in the operating instructions should be
followed.
Cleaning – Unplug this video product from the wall
outlet before cleaning. Do not use liquid cleaners
or aerosol cleaners. Use a damp cloth for cleaning.
Attachments – Do not use attachments not
recommended by the video product manufacturer
as they may cause hazards.
Water and Moisture – Do not use this video
product near water – for example, near a bath tub,
wash bowl, kitchen sink, or laundry tub, in a wet
basement, or near a swimming pool, and the like.
Object and Liquid Entry – Never push objects of
any kind into this video product through openings
as they may touch dangerous voltage points or
short-out parts that could result in a fire or electric
shock. Never spill liquid of any kind on the video
product.
Ventilation – Slots and openings in the cabinet
are provided for ventilation to ensure reliable
operation of the video product and to protect it
from overheating. The openings must not be
blocked or covered by placing the video product on
a bed, sofa, rug, or other similar surface. This
video product should never be placed near or over
a radiator or heat register. This video product
should not be placed in a built-in installation such
as a bookcase or rack unless proper ventilation is
provided or the manufacturer’s instructions have
been adhered to.
Accessories – Do not place this video product on
an unstable cart, stand, tripod, bracket, or table.
The video product may fall, causing serious injury
to a child or adult, and serious damage to the
appliance. Use only with a cart, stand, tripod,
bracket, or table recommended by the
manufacturer, or sold with the video product. Any
mounting of the appliance should follow the
manufacturer’s instructions, and should use a
mounting accessory recommended by the
manufacturer.
An appliance and cart combination should be
moved with care. Quick stops, excessive force,
and uneven surfaces may cause the appliance and
cart combination to overturn.
Power Sources – This video product should be
operated only from the type of power source
indicated on the marking label. If you are not sure
of the type of power supply to your home, consult
your appliance dealer or local power company. For
video products intended to operate from battery
power, or other sources, refer to the operating
instructions.
Power-Cord Protection – Power supply cords
should be routed so that they are not likely to be
walked on or pinched by items placed upon or
against them, paying particular attention to cords
at plugs, convenience receptacles, and the point
where they exit from the appliance.
Optimus
System 5100 Owner's Manual 3
Important Safeguards
Grounding or Polarization – This video product is
equipped with a polarized alternating-current (AC)
line plug (a plug having one blade wider than the
other). This plug will fit into the power outlet only
one way. This is a safety feature. If you are unable
to insert the plug fully into the outlet, try reversing
the plug. If the plug should still fail to fit, contact
your electrician to replace your obsolete outlet. Do
not defeat the satety purpose of the polarized plug.
Overloading – Do not overload wall outlets
extension cords as this can result in a risk of fire or
electric shock.
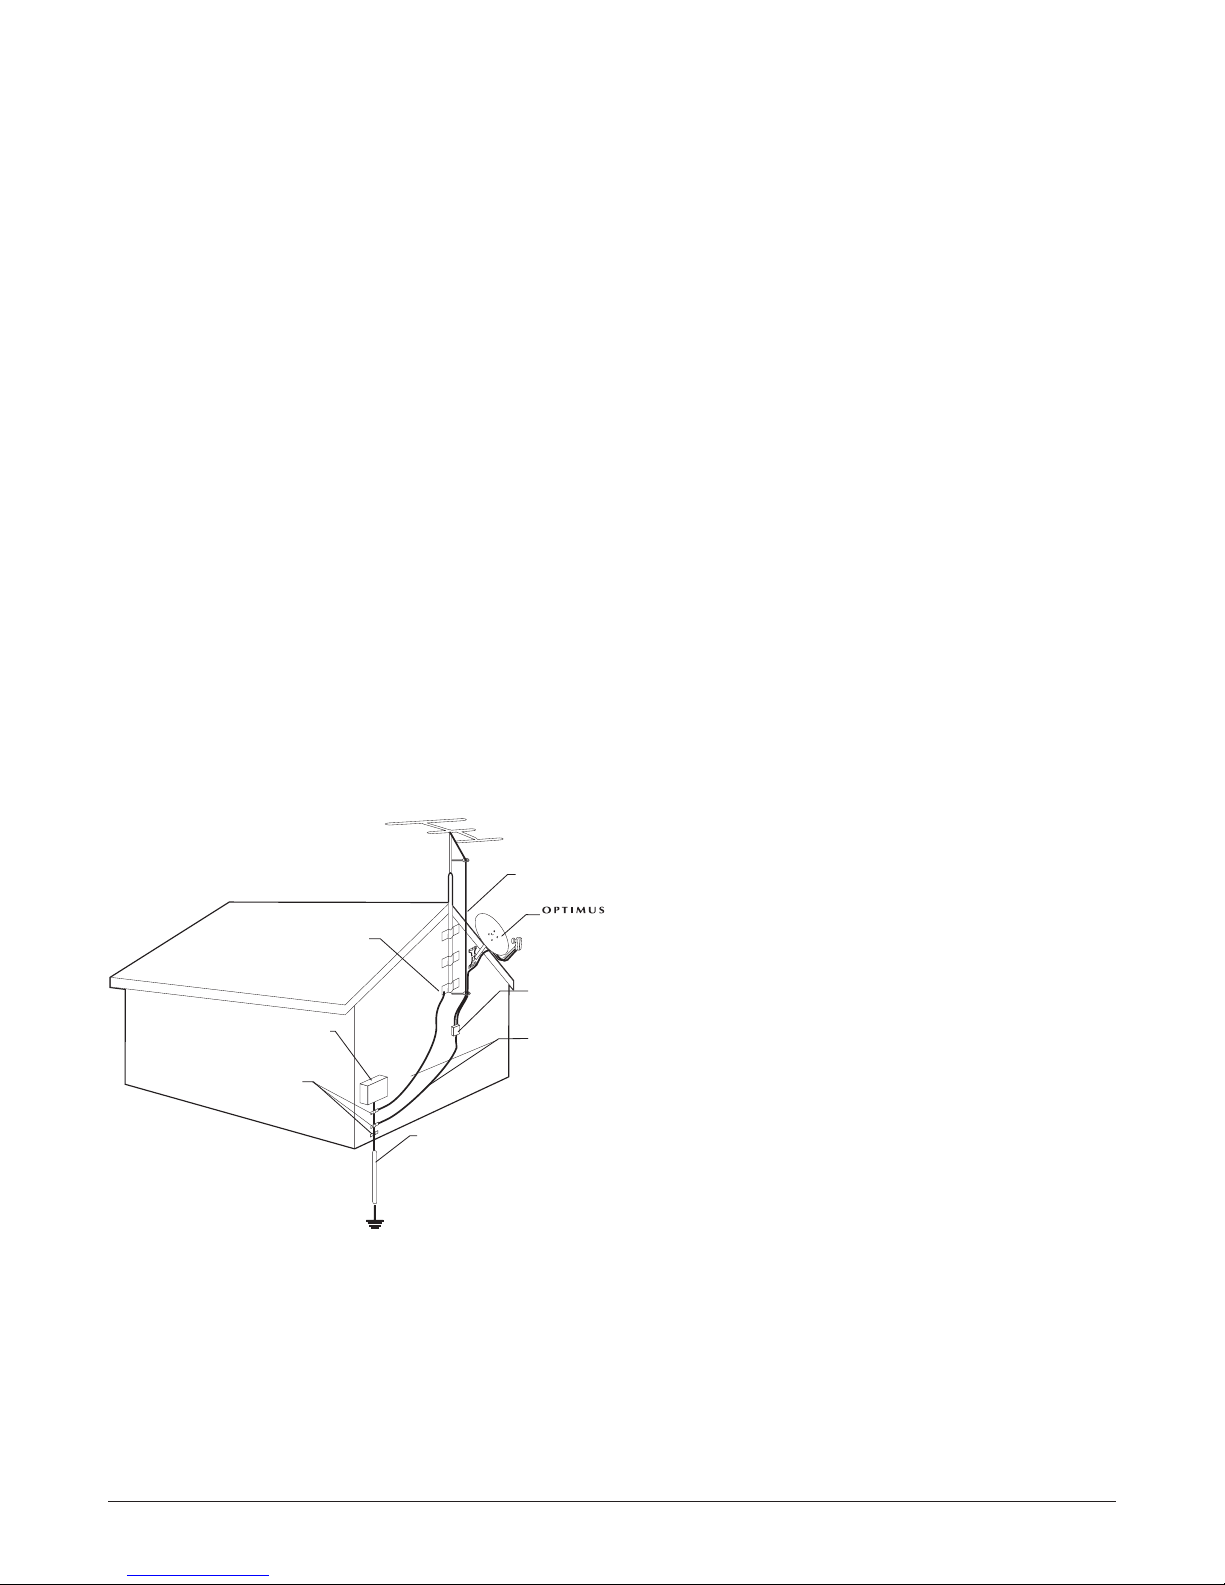
Outdoor Antenna Grounding – If an outside
antenna or cable system is connected to the video
product, be sure the antenna or cable system is
grounded so as to provide some protection against
voltage surges and built-up static charges. Section
810 of the National Electrical Code, ANSI/NFPA
No. 70-1984, provides information with respect to
proper grounding of the mast and supporting
structure, grounding of the lead-in wire to an
antenna discharge unit, size of grounding
conductors, location of antenna-discharge unit,
connection to grounding electrodes, and
requirements for the grounding electrode. See the
National Electrical Code example below.
ANTENNA
LEAD-IN
WIRE
DSS ANTENNA
DSS
ANTENNA
DISCHARGE
UNIT (NEC
SECTION 810-20)
GROUNDING
CONDUCTORS
(NEC SECTION
810-21)
GROUND CLAMP
NEC - NATIONAL ELECTRICAL CODE
GROUND CLAMP
ELECTRIC
SERVICE
EQUIPMENT
POWER SERVICE
GROUNDING ELECTRODE
SYSTEM
(NEC ART 250, PART H)
Power Lines – An outside antenna system should
not be located in the vicinity of overhead power
lines or other electric light or power circuits, or
where it can fall into such power lines or circuits.
When installing an outside antenna system,
extreme care should be taken to keep from
touching such power lines or circuits as contact
with them might be fatal.
Servicing – Do not attempt to service this video
product yourself as opening or removing covers
may expose you to dangerous voltage or other
hazards. Refer all servicing to qualified service
personnel.
Replacement Parts – When replacement parts
are required, be sure the service technician has
used replacements parts specified by the
manufacturer or have the same characteristics as
the original part. Unauthorized substitutions may
result in fire, electric shock, or other hazards.
Damage Requiring Service – Unplug this video
product from the wall outlet and refer servicing to
qualified service personnel under the following
conditions:
A. When the power-supply cord or plug is
damaged.
B. If liquid has been spilled, or objects have
fallen into the video product.
C. If the video product has been exposed to
rain or water.
D. If the video product does not operate
normally by following the operating
instructions. Adjust only those controls
®
that are covered by the operating
instructions. Improper adjustment of
other controls may result in damage
and will often require extensive work by
a qualified technician to restore the
video product to its normal operation.
E. If the video product has been dropped or
the cabinet has been damaged.
F. When the video product exhibits a distinct
change in performance, this indicates a
need for service.
Safety Check – Upon completion of any service or
repairs to this video product, ask the sercice
technician to perform safety checks to dertermine
that the video product is in proper operating
condition.
Lighting – For added protection for this video
product during a lightning storm, unplug it from the
wall outlet and disconnect the antenna or cable
system. This will prevent damage to the video
product due to lightning and power-line surges.
4 Optimus
System 5100 Owner's Manual

FCC Regulations
FCC Registration Information
Your DSS equipment is registered with the Federal
Communications Commission and is in compliance
with parts 15 and 68, FCC Rules and Regulations.
Notification to the Local
Telephone Company
On the bottom of this equipment is a label
indicating, among other information, the FCC
Registration number and Ringer Equivalence
Number (REN) for the equipment. You must, upon
request, provide this information to your telephone
company.
The REN is useful to determine the number of
devices you may connect to your telephone line
and still have these devices ring when your
telephone number is called. In most (but not all)
areas, the sum of the REN’s of all devices
connected to one line should not exceed 5. To be
certain of the number of devices you may connect
to your line as determined by the REN, you should
contact your local telephone company.
Note: This equipment may not be used on coin
service equipment provided by the telephone
company.
Party lines are subject to state tariffs, and
therefore, you may not be able to use your own
telephone equipment if you are on a party line.
Check with your local telephone company.
Rights of the Telephone
Company
Should your equipment cause trouble on your line
which may harm the telephone network, the
telephone company shall, where practicable, notify
you that temporary discontinuance of service may
be required. Where prior notice is not practicable
and the circumstances warrant such action, the
telephone company may temporarily discontinue
service immediately. In case of such temporary
discontinuance, the telepone company must (1)
promptly notify you of such temporary
discontinuance (2) afford you the opportunity to
correct the situation and (3) inform you of your
right to bring a compliant to the Commission
pursuant to procedures set forth in Subpart E of
Part 68, FCC Rules and Regulations.
The telephone company may make changes in its
communications facilities, equipment, operations or
procedures where such action is required in the
operation of its business and not inconsistent with
FCC Rules and Regulations. If these changes are
expected to affect the use or performance of your
telephone equipment, the telephone company
must give you adequate notice, in writing, to allow
you to maintain uninterrupted service.
Radio Interference
This equipment has been tested and found to
comply with the limits for a Class B Digital Device
in accordance with the specification in Part 15 of
FCC Rules. These rules are designed to provide
reasonable protection against radio and television
interference in a residential installation. This
equipment generates, uses and can radiate radio
frequency energy and, if not installed and used in
accordance with the instructions, may cause
harmful interference to radio communications.
However, there is no guarantee that interference
will not occur in a particular installation.
If this equipment does cause interference to radio
or television reception (which you can determine
by unplugging the unit), try to correct the
interference by one or more of the following
measures:
o
Reorient or relocate the receiving antenna
(that is, the antenna for the radio or television
that is “receiving” interference).
o
Change the position of the DSS satellite
receiver with respect to the radio or television
equipment that is receiving interference.
o
Move the DSS satellite receiver away from
the equipment that is receiving interference.
o
Plug the DSS satellite receiver into a different
wall outlet so that the DSS satellite receiver
and the equipment receiving interference are
on different branch circuits.
If these measures do not eliminate the
interference, please consult your dealer or an
experienced radio/television technician for
additional suggestions. Also, the Federal
Communications Commission has prepared a
helpful booklet, “How to Identify and Resolve
Radio/TV Interference Problems.” This booklet is
available from the U.S. Government Printing
Office, Washington, D.C. 20402. Please specify
stock number 004-000-00345-4 when ordering
copies.
Optimus
System 5100 Owner's Manual 5

Digital Satellite System
What is the DSS®System?
Welcome to the high-tech, sophisticated world of digital satellite
system television, often just called DSS
broadcasting technology, providing a picture and audio quality
once only available with laser discs or CDs. There are many
advantages to DSS, such as the small dish antenna, digital quality,
and hundreds of program choices. And your new System 5100 also
offers you features not commonly found on other receivers.
System 5100 Features
o
StarSight™ Direct Tuning — Tune directly to a desired channel
by program title.
o
One Touch Record — Just press one button t o easily set the
timer to record or view a program.
o
Theme Search — Easy search by category and sub-category.
o
60 Favorite Channels — Program up to 60 channels for instant
access.
o
Single Channel Guide — From most guides, you can bring up a
list of programs for a desired channel.
o
Open/Closed Program Guide — Quickly puts the program guide
into a “channel surf” mode which allows you to see what is
currently on a channel.
o
Information Key — With the touch of a button, display information
about the current program or about a program in the guide.
o
Parental Lock, Rating, and Spending Limits — Using a password
for access, you can lock out unwanted channels or set rating and
spending limits.
o
Universal Remote Control — The supplied remote control can
also control your television, VCR, and cable box, or laser disc
player.
o
Receiver Control Codes — Your remote control can be
programmed so you can use multiple DSS receivers in your
home.
o
S-Video & A/V Outputs — Your receiver has both types of
standard outputs so it can easily be integrated with other home
equipment, including home theater equipment.
o
Wide Band Data Port — This port allows you to connect the DSS
system to future services and accessories as they become
available. Some additional equipment may be necessary.
®
. This is the ultimate in
6 Optimus
System 5100 Owner's Manual
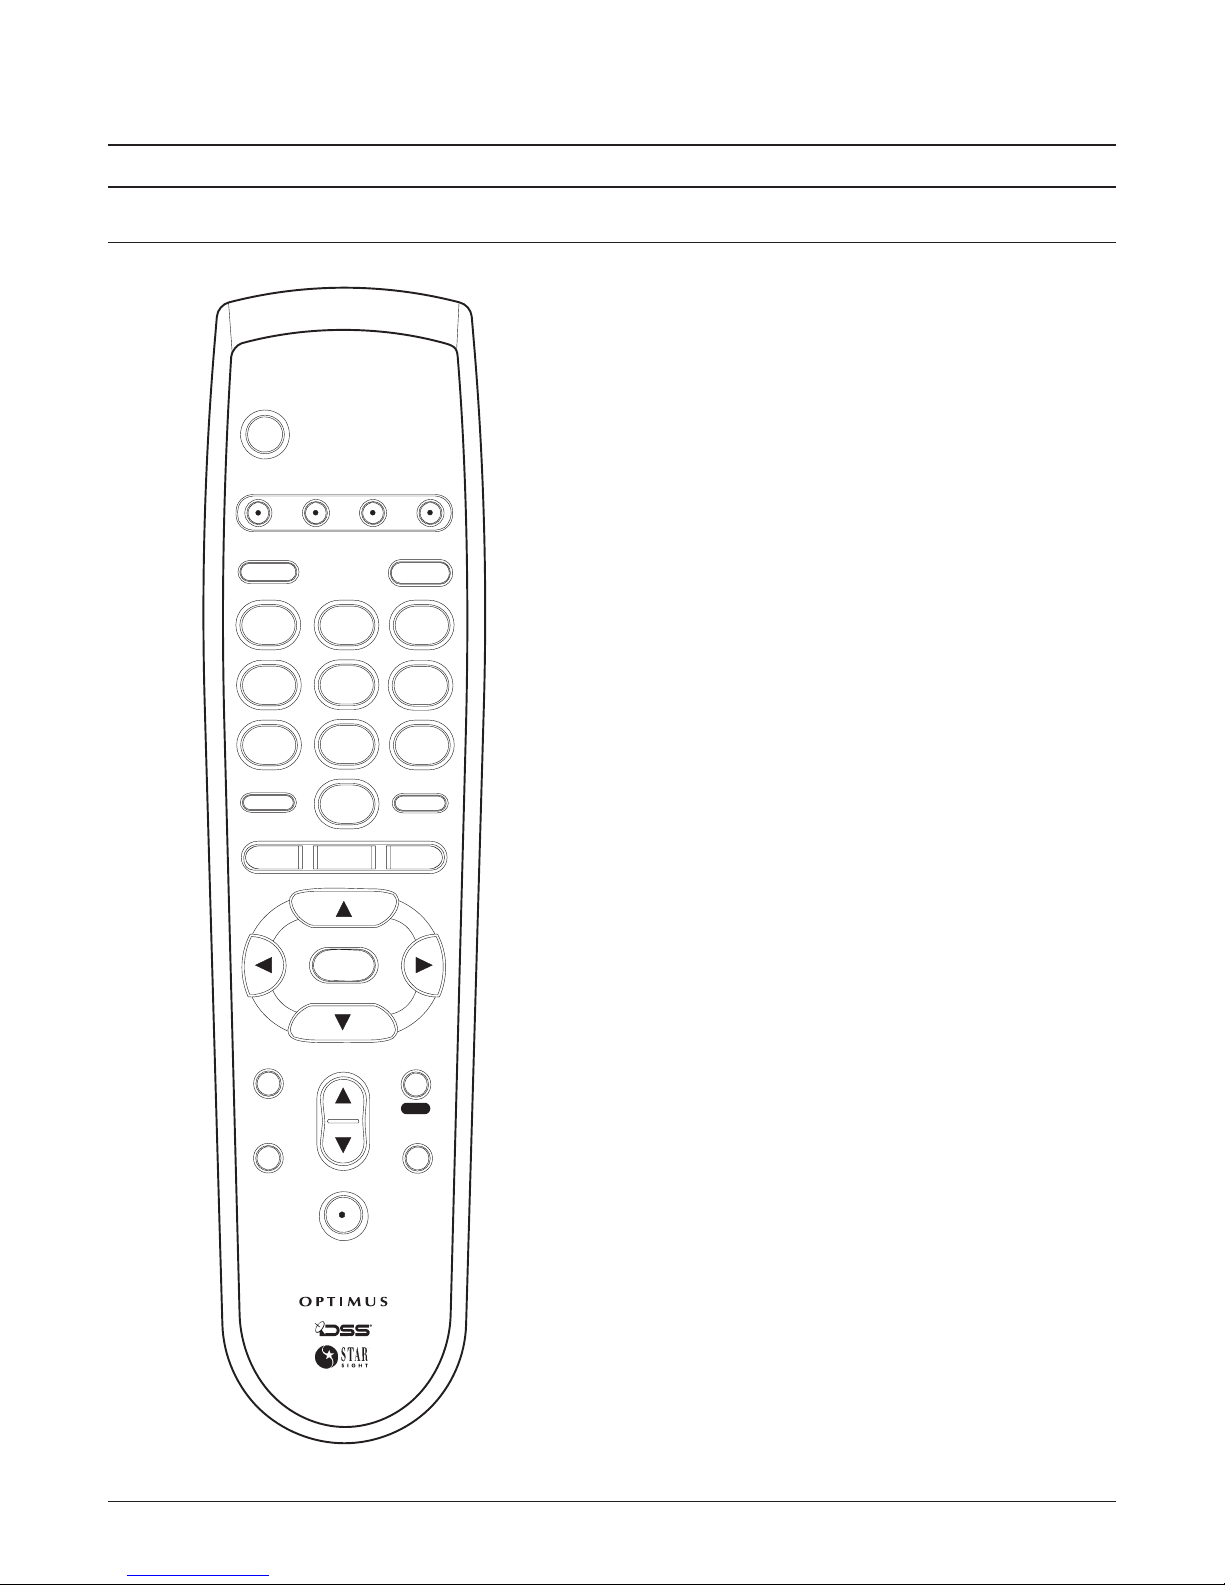
Remote Control
Controls and Functions
POWER
DSS VCR AUX TV
LAST PROG
1
4
7
TV/DSS
TV/VCR
GUIDE FAV THEME
REW
INFO
PAUSE
EXIT
STOP
2
5
8
0
SELECT
VOLUME
MUTE
3
6
9
ALT AUD
INPUT
PAGE
REC
MENU
PLAY
POWER
DSS
VCR
AUX
Turns a selected device on/off.
Select this mode to control your satellite receiver.
Select this mode to control your VCR.
Select this mode to control an auxiliary device
such as a cable box, second VCR, or second TV.
TV
Select this mode to control your TV.
LAST
Switches to the previous channel, or changes
between channel numbers and channel letters
when a guide is displayed.
PROG
Use to enter the remote codes for TV, VCR,
and AUX devices.
DIGIT KEYS (0-9)
Use to enter numbers, such as
channels or passwords.
TV/DSS (TV/VCR)
Switches the TV output between
DSS and TV, and, while in VCR mode, switches
between the VCR and TV.
ALT AUD (INPUT)
Changes to alternate audio in DSS
mode, or selects TV input in TV mode.
GUIDE
FAV
Displays the Program Guide.
Displays the Favorite List for quickly selecting
your favorite channels.
THEME
Displays the Themes List for selecting
programs from specific categories.
FF
ARROW KEYS
Change channels in normal viewing,
or move the cursor while in the program guides or
menus. In VCR mode, fast forwards or rewinds a
VCR or laser disc player.
SELECT
Confirms menu choices, stores screen or
program changes you’ve made, and advances to
other options or screens.
INFO (PAUSE)
Displays information about a program,
or pauses a VCR or laser disc while in VCR mode.
PAGE (REC)
Displays the paging screen or starts
One-Touch Record while in DSS mode. It starts
your VCR’s record feature while in VCR mode.
EXIT (STOP)
Cancels all screen s and return s to
normal viewing in DSS mode, or stops a VCR
while in V CR mode.
MENU (PLAY)
Displays the Main Menu in DSS
mode, or plays a VCR in VCR mode.
VOLUME (MUTE)
Controls the Volume in all modes
when programmed.
MUTE Controls Mute in all modes when
programmed.
Optimus
System 5100 Owner's Manual 7
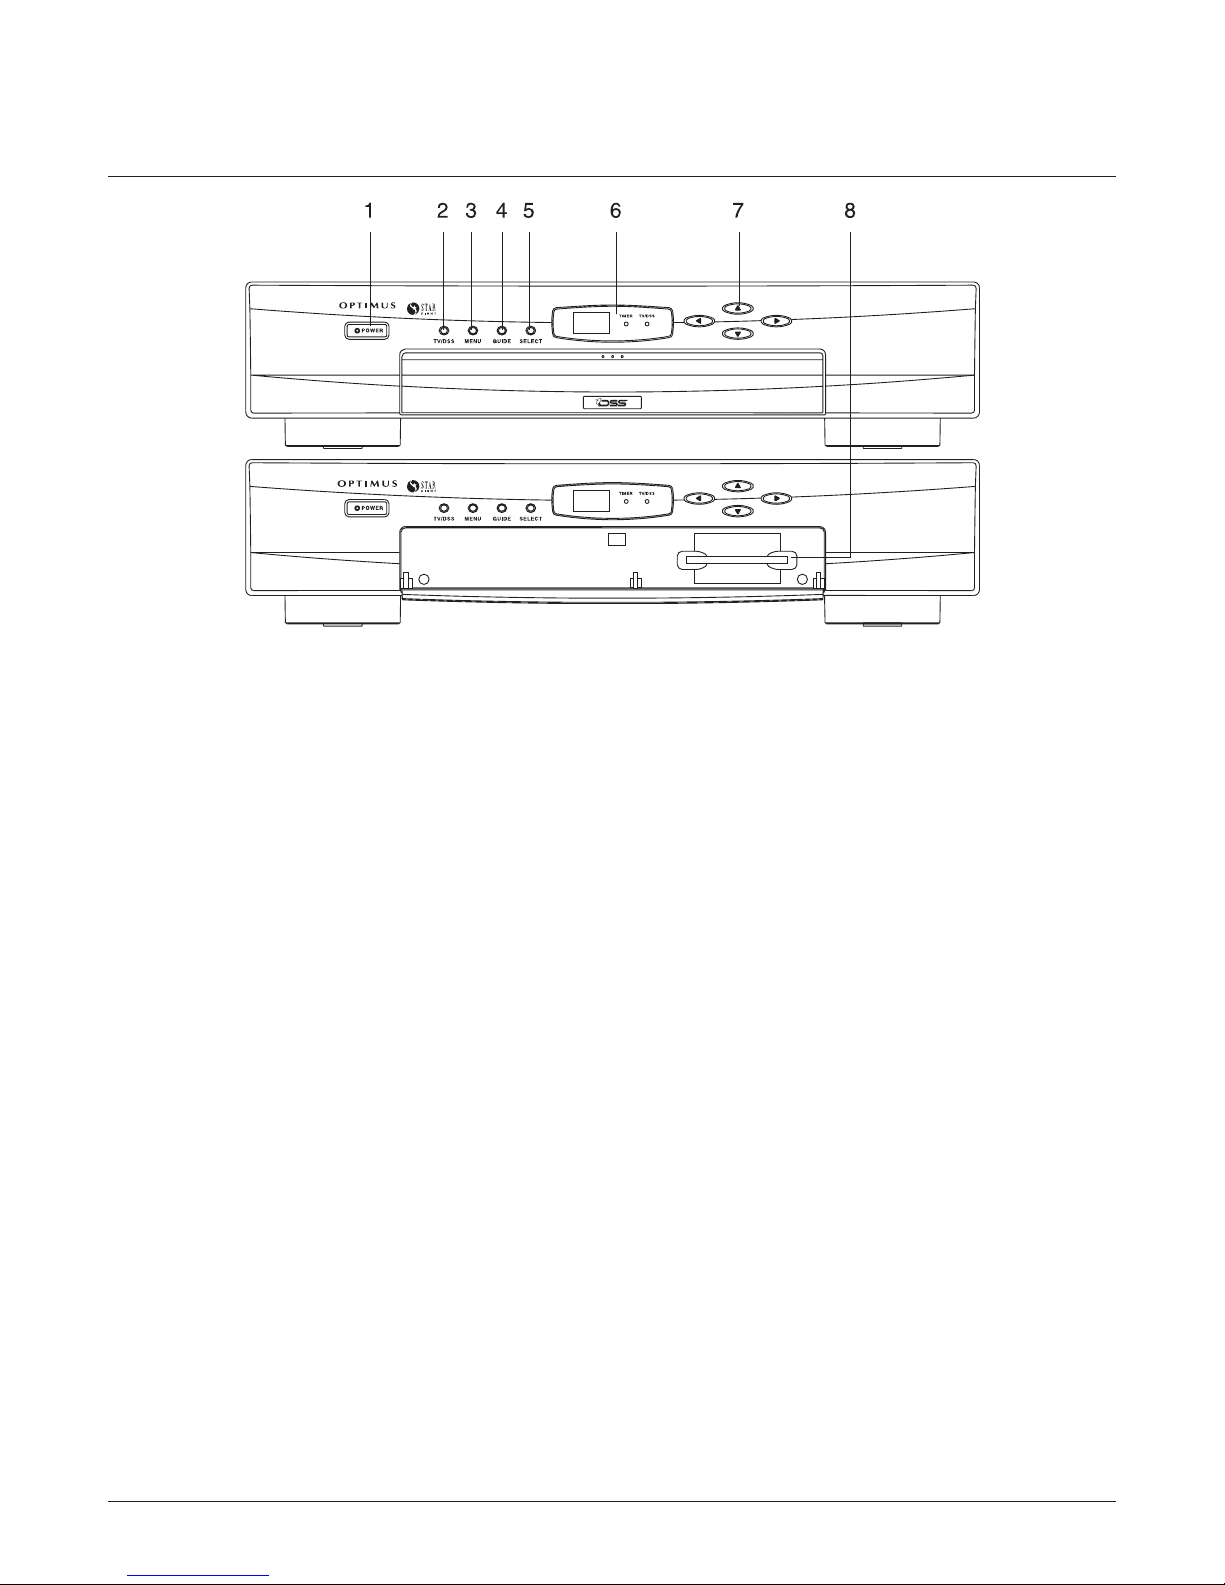
Front Panel
1.
POWER
LED is green when the receiver is on, and it
is red when the receiver is on and you have
messages.
2.
TV/DSS
signal and the DSS signal.
3.
MENU
access DSS system features.
4.
GUIDE
Guide, and press again to display the Single
Channel Guide.
Turns the receiver on/off. The
Switches between the TV
Displays the Main Menu so you can
Press once to display the Program
5.
SELECT
screen or program changes you’ve made,
and advances to other options or screens.
6.
TIMER and TV/DSS LEDs
lights when a program is set up in memory.
The TV LED lights when the TV signal is
selected and the DSS receiver is on.
7.
ARROW KEYS
change channels, select a program from a
guide, or enter information.
8.
ACCESS CARD
system security and authorization to a DSS
program provider.
Confirms menu choices, stores
The Timer LED
These keys can be used to
Your Access Card provides
8 Optimus
System 5100 Owner's Manual
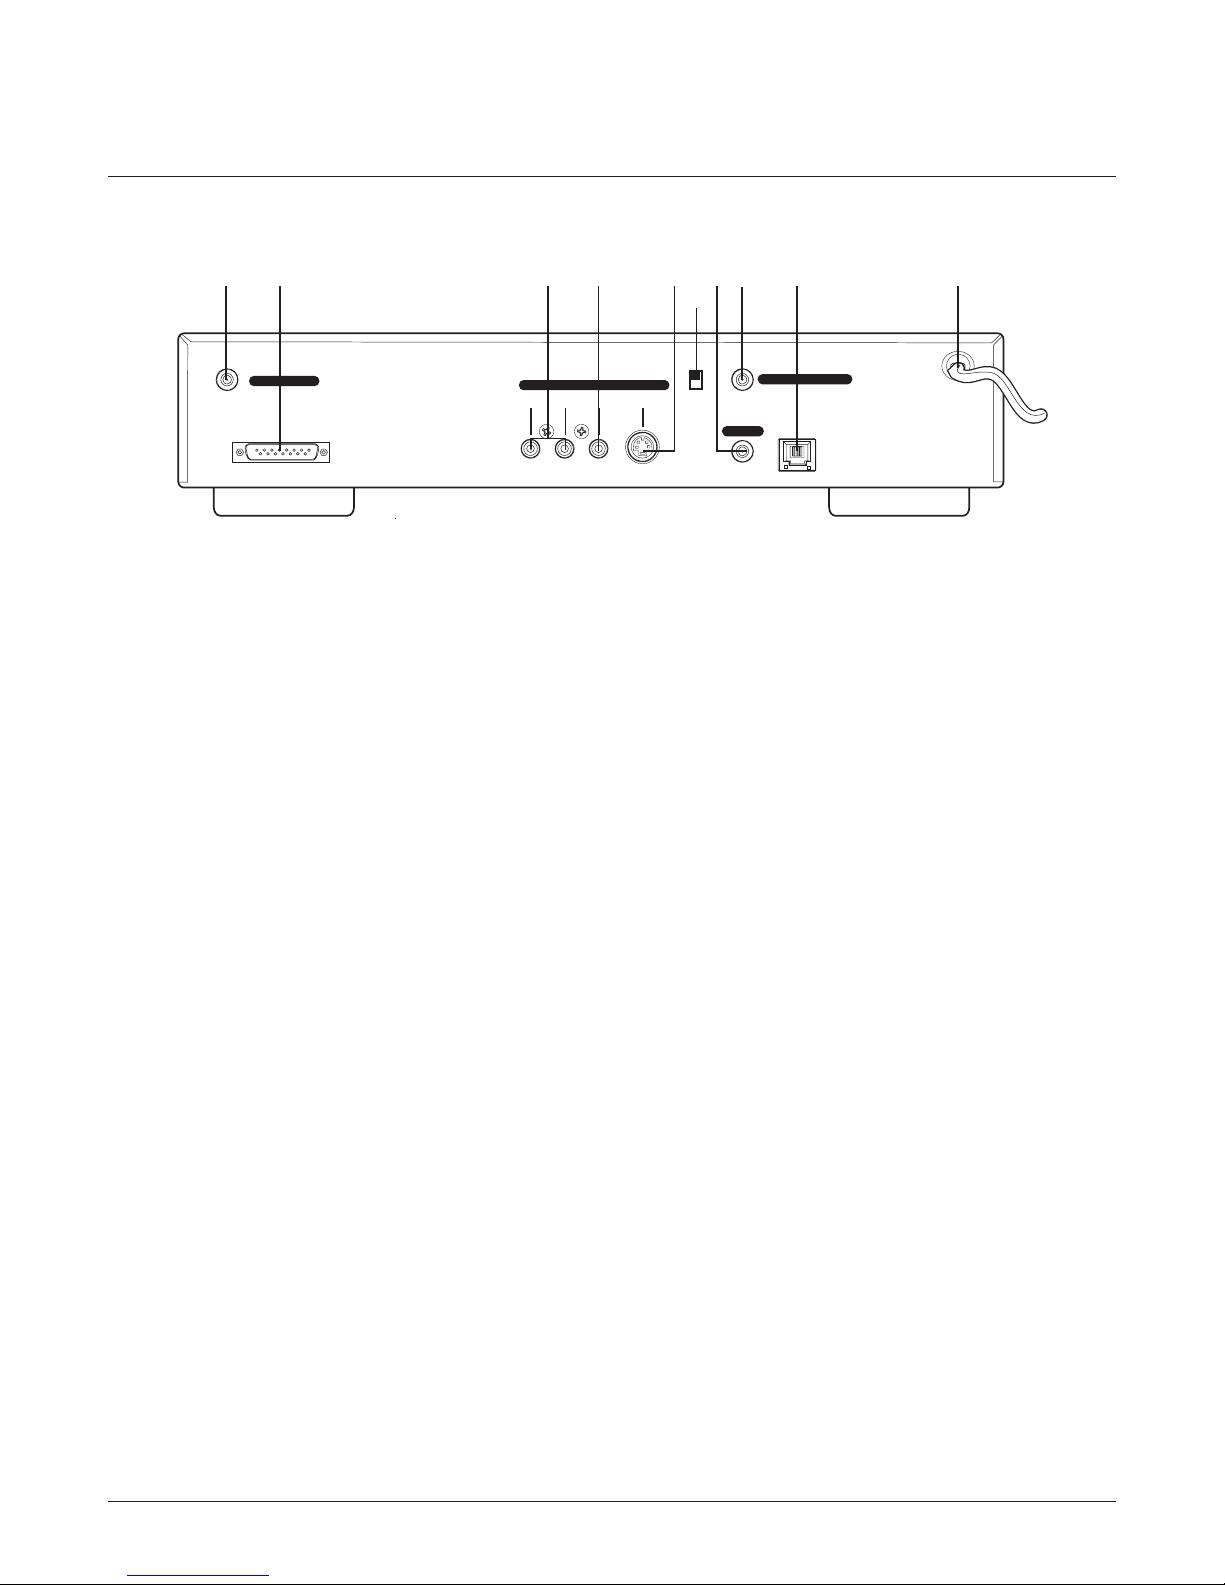
Rear Panel
1 2 3 4 5 6 7 8 9 10
Controls and Functions
1.
SATELLITE IN
SATELLITE IN
18V 250mA MAX
Class 2 Wiring
WIDE BAND DATA
Where the satellite antenna
AUDIO / VIDEO OUT
R AUDIO L VIDEO S-VIDEO
cable plugs into the DSS receiver.
WIDE BAND DATA PORT
2.
This port allows
you to connect the DSS system to future
services and accessories as they become
available.
3.
AUDIO OUT
Left and right channel audio
outputs. These provide better sound quality
than
TV OUT
. Use with
VIDEO OUT
if your TV
has audio/video capability.
4.
VIDEO OUT
Connects your DSS receiver to
your TV or VCR. This jack provides better
picture quality than
if your TV has audio/video capabilty.
OUT
5.
S-VIDEO
Video output connector which
TV OUT
. Use with
AUDIO
offers a high-quality video link between your
DSS receiver and a TV or VCR. If your TV
has
S-VIDEO
capability, use this jack with the
audio/video outputs to connect your DSS
receiver to your TV.
CHANNEL
6.
CHANNEL
3
4
TV OUT
CABLE / VHF/UHF IN
TEL LINE
Sets the channel the receiver
AC120V60Hz
transmits the DSS signals on while using
the receiver.
7.
TV OUT
Connects the modulated RF
output to the VHF input on your TV or VCR.
8.
CABLE/VHF IN
Connects your cable signal
or off-air antenna signal to your DSS
receiver.
TEL LINE
9.
Modular phone plug that
connects your DSS receiver to your
telephone system. The DSS system
requires a phone line to communicate with
your service provider.
10.
AC CORD
A polarized power cord that
supplies AC power to your DSS system.
Optimus
System 5100 Owner's Manual 9
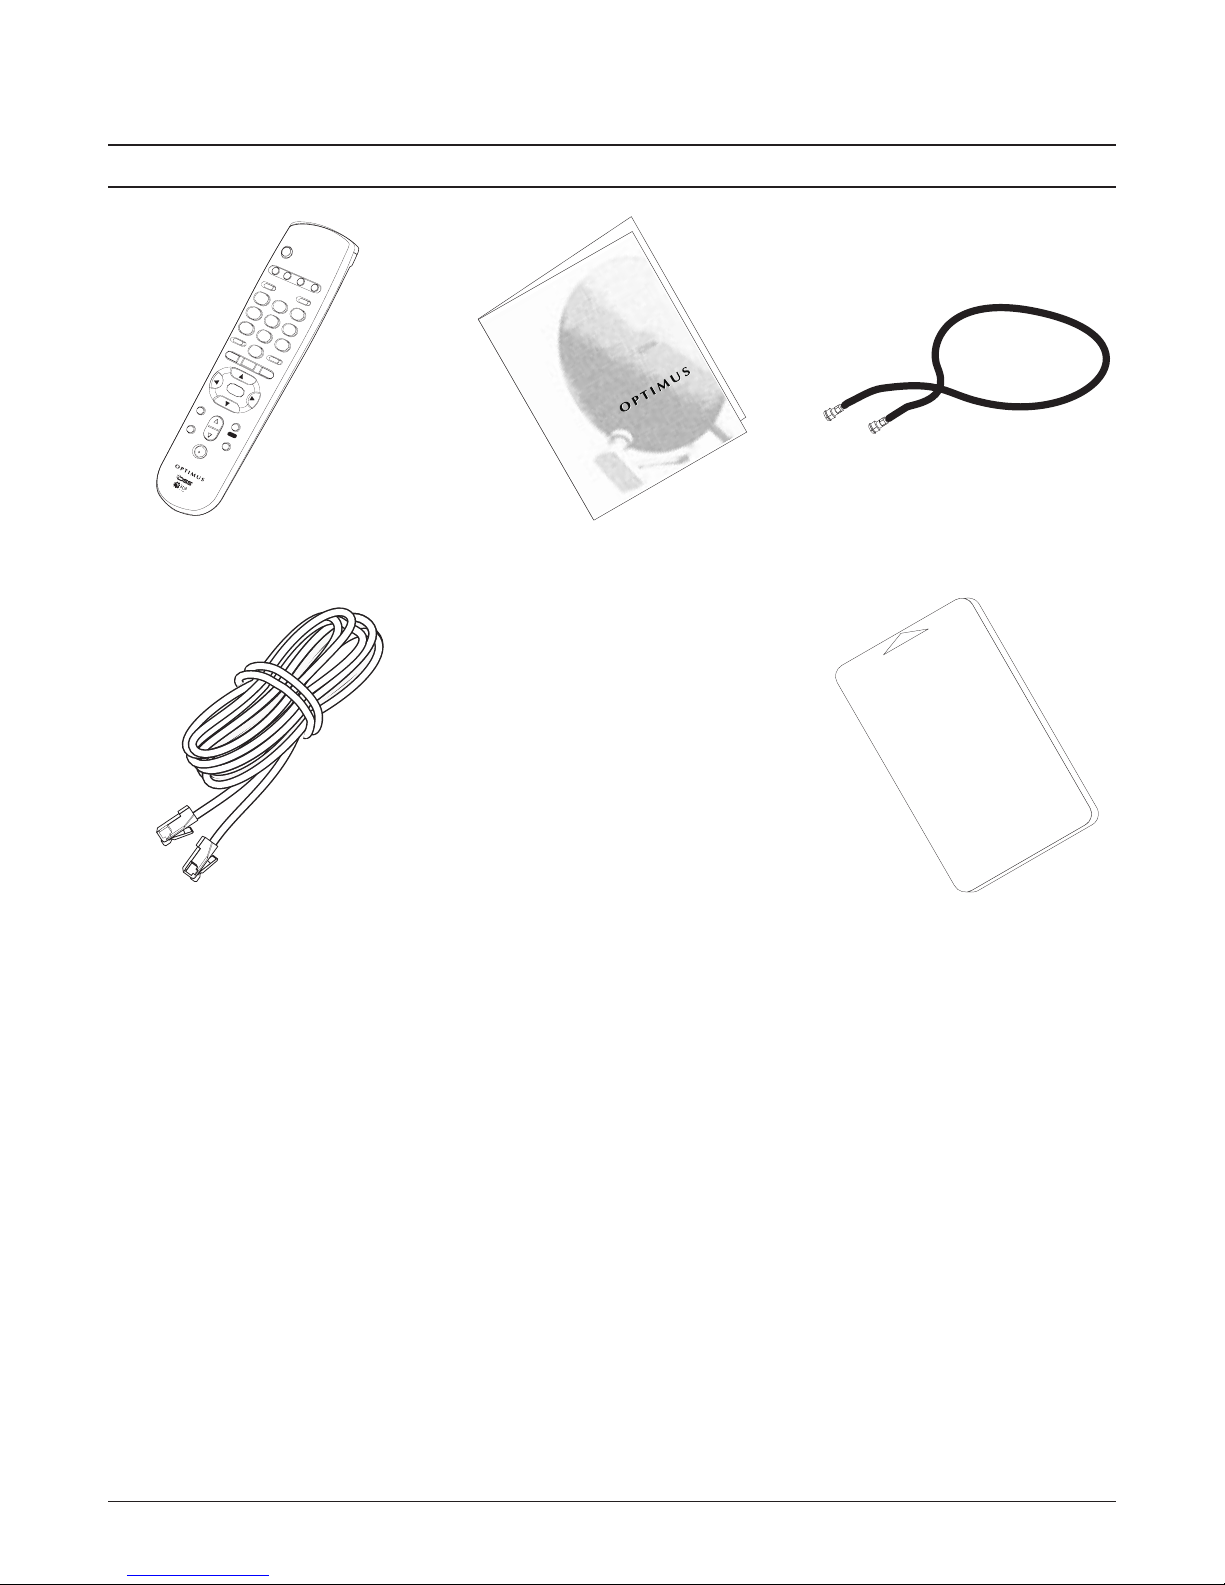
Included with Your DSS System
POWER
DSS
VCR
AUX
LAST
TV
PROG
1
2
4
3
5
7
6
TV/DSS
8
TV/VCR
9
ALTAUD
0
GUIDE FAV THEME
INPUT
REW
FF
SELECT
INFO
VOLUME
PAUSE
PAGE
EXIT
STOP
REC
MENU
MUTE
PLAY
Cat. No. 16-2575
Owner's ManualOwner's Manual
Owner's Manual
®
System 5100
System 5100
Digital Satellite System
Digital Satellite System
Remote Control
Phone Line
Owner’s Manual Coaxial Cable
INSERT THIS END
THISSIDEUP
ACCESS
CARD
Access Card
10 Optimus
System 5100 Owner's Manual
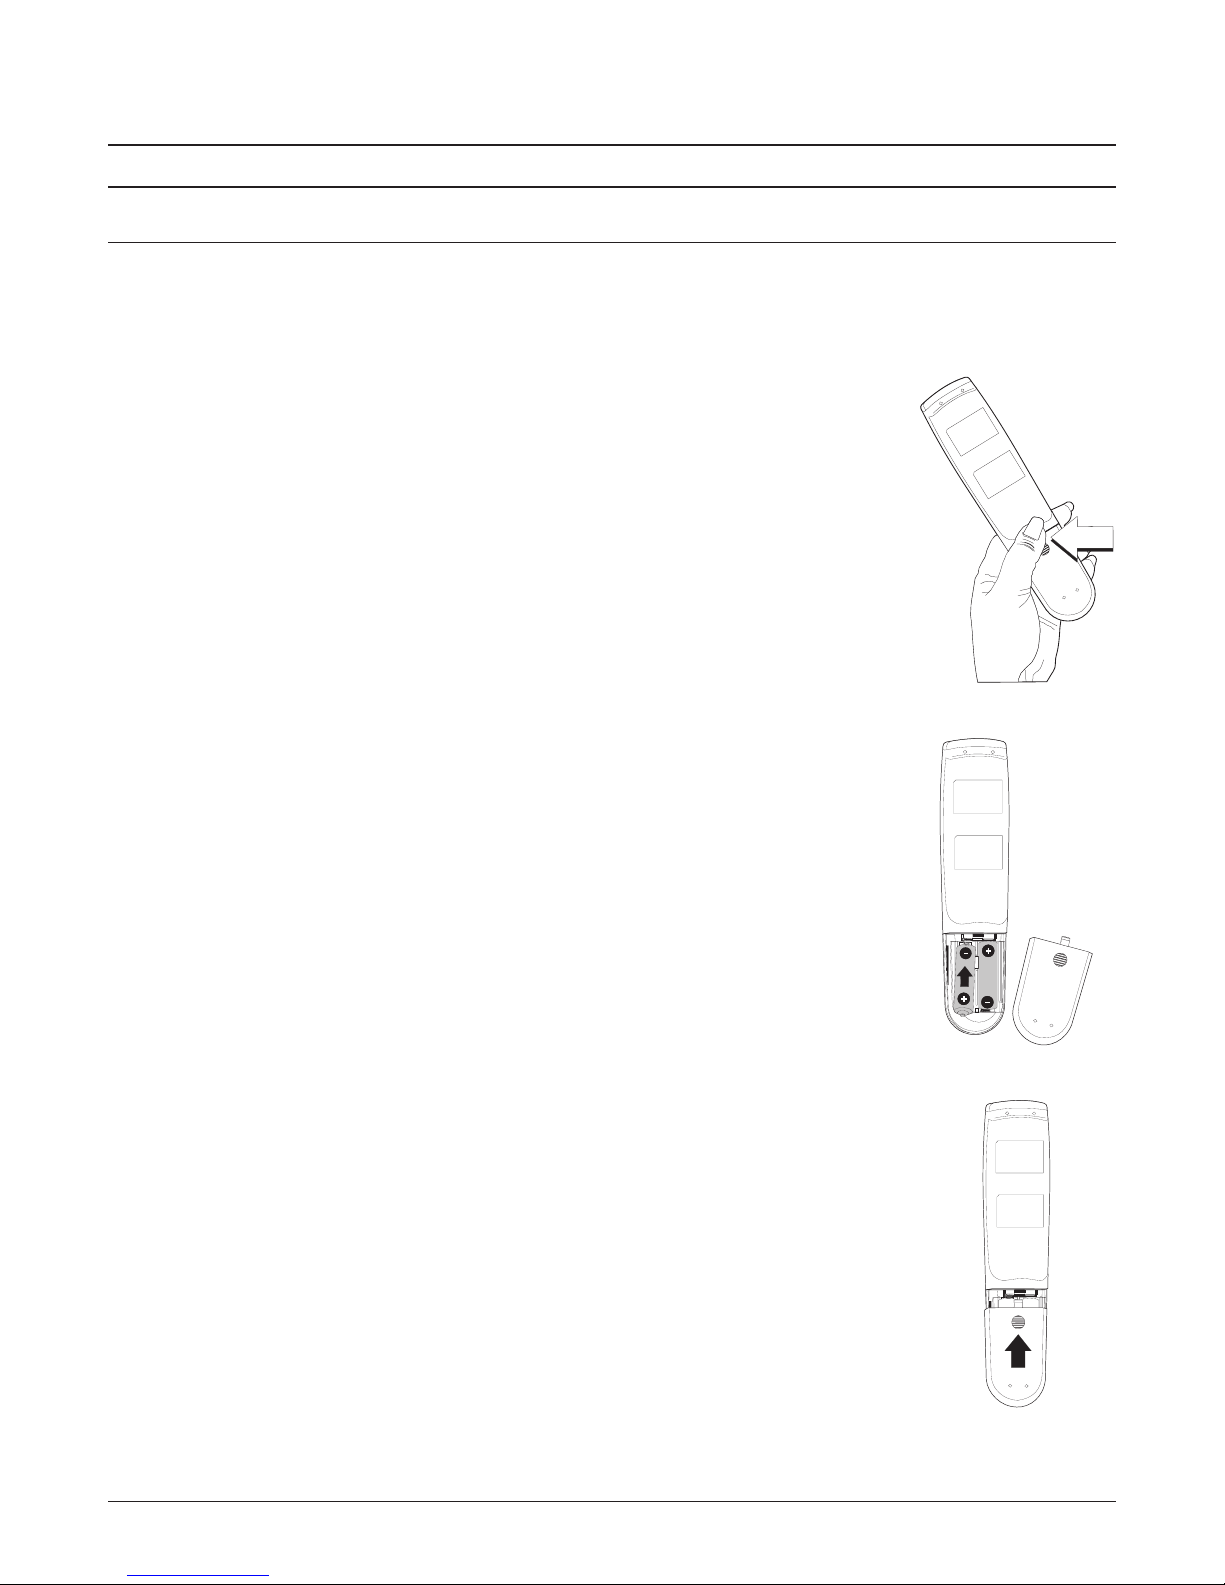
Preparation
Installing Batteries in Your Remote
Note: Your remote requires two AA batteries. For the best
performance and longest life, we recommend alkaline batteries
(such as RadioShack Cat. No. 23-557).
Follow these steps to install batteries in your remote:
1. Press on the cover and
slide it down.
2. Remove the cover, and
place the batteries in the
compartment.
Press and
Slide Down
Note: Insert the “–” and
“+” ends according to the
diagram.
3. Replace the battery
cover, and slide it into
place.
Optimus
System 5100 Owner's Manual 11

Power On
Adjusting the Volume
Note: See “Programming Your Remote” on page 74 for more information
Changing Channels
Basic Operation
There are two ways to turn on your DSS receiver:
o
Press the Power button on the front of the receiver
o
Press the Power button on the remote control
If your remote control is programmed to control your TV, then the
Volume and Mute control your TV while the remote is in the DSS
mode.
about setting your remote to control your TV.
There are two ways to change channels while watching your DSS
receiver:
o
Press the Channel:and;keys
o
Enter the channel number using the remote’s keypad
Using the Arrow Keys
If you press either the:or;key to change channels, your receiver
tunes to each channel sequentially.
Press the Channel:key once to select the next higher active
channel,
—or—
Press the Channel;key to choose the next lower active channel.
If you press and hold the:or;key, the receiver will change
channels quickly.
Using the Remote’s Keypad
You can also tune directly to a channel by entering its number on
the remote’s keypad. For example, to change to channel 221,
press 2, 2, 1 on your remote. Once the last digit is entered, your
receiver immediately tunes to the channel.
If you only enter the first digit of the channel and press S, your
receiver will tune to the first available channel above what you
selected.
For example, if channel 203 is the first channel after channel 200,
and you press 2 and S, the receiver changes to channel 203. The
same happens when only two digits are entered, followed by S.
12 Optimus
System 5100 Owner's Manual

Channel Banner
Basic Operation
Each time you change
the channel, the Channel
banner appears which
True Lies
DIRECTV
123 R
7:00pm - 9:00pm
shows the current
channel, program, time
and date. To display this
screen in Normal
INFO
Viewing, press
on
your remote.
ch_id5.*
The Channel Banner contains useful information:
o
Channel Logo — The logo matches the channel tuned.
o
Program Title, Time, and Rating — The Channel Banner shows
the program’s title, its start and stop times, and its MPAA rating.
o
Alternate Audio Icon — This icon displays when the program
you’re watching is broadcasting alternate audio.
o
Data Services Icon — This icon displays when the program
you’re watching is broadcasting data services for a computer.
o
Message Icon — The message icon displays when you have
received mail from your service provider.
o
System Lock Icon — This icon indicates if your system is
unlocked, locked, or is in temporary session unlock.
o
Current Time — The current time is displayed in the upper right
corner of the Channel Banner.
8:25p
D
Channel Information
Optimus
System 5100 Owner's Manual 13
You can find out more
information about most
programs using
Press
INFO
INFO
.
to display the
Channel Banner.
INFO
Then press
again to
display the program
description, when
available.
INFO
Press
to return to
Normal Viewing.
True Lies
DIRECTV
123 R
7:00pm - 9:00pm
1994, Action/Adventure. Arnold Scwarzenengger, Jamie
Lee Curtis. The wife of America's top agent thinks he is
a boring salesman and the confusion leads them into a
global crisis involving a terrorist plot. (L, V) (CC,ST)
D
ch_info5.*
8:25p

On-Screen Programming
What is On-Screen Programming?
You have probably heard this term many times, but you may not be
really familiar with what it means. Simply, On-Screen Programming
makes it easier for you to do the things you want without having to
read through lots of information. Just press a button on your
remote, read the screen, and select what you want. It’s that easy!
For example, let’s say you want to know what’s on tonight. You
could get your daily newspaper or TV magazine, find the right
section or day, and then try to find the program you want. Or, you
could just turn your TV and DSS system on, take your remote, and
press G. Every program available from your service provider can
be displayed on-screen. You just scan through the easy-to-read
program guide.
If you see something you want to watch, but want to know more
about it or who is in it, just press
its time, who’s in it, and its rating immediately displays. Your DSS
System 5100 will save you time and make choosing what you want
as simple as pressing a button.
Note: The System 5100 usually displays a menu or guide screen
immediately after you press the key on the remote control. With
some selections, however, you might have to wait a moment for
the system to recall information and display the selected screen.
This is normal.
INFO
. The description of the show,
14 Optimus
System 5100 Owner's Manual

How It Works: Highlighting and Selecting
You’re probably thinking it’s going to take a long time to learn this,
right? Well, if you’ll remember one simple tip — Highlight and
Select — you’ll be an expert as soon as you point your remote at
your DSS system! There are only a few buttons on your remote that
you’ll need to learn, then you’ll have mastered “Highlight and
Select.”
The Arrow Keys and Select
On-Screen Programming
On your remote there are five keys grouped together,
which allow you to quickly choose any on-screen item. You just
press the arrow keys to highlight an item you want on a screen. If
you want to move the highlight up, press the:key. To move the
highlight down, press the;key. Each time you press a key, the
on-screen highlight moves in the direction of the arrow. Once
something is highlighted, press Sto choose it. Selecting an item tells
your receiver to go ahead and make the change you’ve indicated.
That’s it! That’s all there is to On-Screen Programming.
Direct Entry Method
To make it even faster to highlight certain choices, some items on a
screen are numbered, such as Menu Items or Channels. To
highlight a numbered item, press that number on your remote’s
keypad. When the number is entered, the highlight moves directly
to the entry and selects it. This is a big help if you’re changing
channels, for example.
Let’s say you pressed G and the on-screen Program Guide is
displayed. Now you have highlighted channel 202, but you want to
skip to Channel 740. You could press the down arrow;and scroll
through many channels to get there, or just press 7, 4, 0 on the
keypad and the on-screen highlight would move directly to Channel
740, we refer to this helpful time-saver as “Direct Channel Entry.”
:;< >
and S,
Optimus
System 5100 Owner's Manual 15
On-Screen Programming
Paging through Menus
One of the great things
about a DSS system is
that there are lots and
lots of programs! But,
they can’t always fit on
one screen, so you may
see a guide with arrows
pointing off the screen or
a “window indicator.”
These indicators just
mean there is more to
see.
DIRECTV
DTV
CNN
TBS
TNT
TMC
HBO
HB2W
DTV
VH1
COM
147
Program Guide
8:00pm 8:30pm 9:00pm
Species Species
Financial News TalkBack Live
Bugs Bunny Adams Family Munsters
New Watch Movie of the Week
TommyBoy IQ
Batman Forever Comedy Hour
Judas Project
True Lies
Country Class Hip Hop Jam Videos
Quick TalkComedy More Laughs
7:00pm - 8:45pm
Mon
8:25p Mon Sep 7
PG13
D
open4pge.*
Consider the example above about changing channels. You can
use Direct Channel Entry, or you can use the Page Feature. Press
PAGE
on your remote. Now each time you press:or;, the screen
moves nine channels at a time instead of just one. If you press the
>
key, the Program Guide displays upcoming programs. You can
find any program, on any channel, quickly and easily.
Getting Help
“What if I forget?" or “What if I’m not sure what to do?” Well,
is usually a choice on any screen. There are two types of help
information:
o
Quick Instructions
o
Help Screens
Quick Instructions
Your DSS receiver is programmed to provide you with the
information you need to answer most of your questions right on
each screen, so you don’t have to look somewhere else. If you’re
not sure what something is or what it does, highlight the item and
look at the yellow help bar at the bottom of the screen. There will
usually be a short instruction telling you what the option does.
Quick Instructions change automatically and can usually answer
your question without having you display another Help Screen.
HELP
16 Optimus
System 5100 Owner's Manual

Help Screens
On-Screen Programming
If you want more information about the screen or feature you’re
working with, notice the Help Button at the bottom right corner of
the screen. This button typically reads (
HELP
). If you highlight this and press S, a new help screen displays.
(
9-HELP
), or it may just read
For example, you can get
more information about
the timer feature by using
Help. If you select the
Help Button, you would
see this screen.
?
Help Screen Timer
This allows you to setup your receiver to tune to
a particular channel at a certain time in the future
for viewing a show or for recording a show on
your VCR.
Use # or, , , or , and Select.
Select the topic to get more information.
Main Menu Help
t
t
s
8:25p Mon Sep 7
0-Return
0-Return
t
?
9-Help
To exit the help screen and return to where you were, simply press S
or 0 on your remote’s keypad.
Return to Normal Viewing
You can return to Normal Viewing anytime you want. Just press
EXIT
on your remote to cancel all screens and return to the last
channel you were watching. So, don’t hesitate to explore each
menu or screen. If you’re not sure what to do, press
again. Remember, most changes are not stored until you press S,
and you’ll always be able to return to any screen and cancel any
change you don’t want.
hlp2m_ti.*
EXIT
and start
Optimus
System 5100 Owner's Manual 17

Features
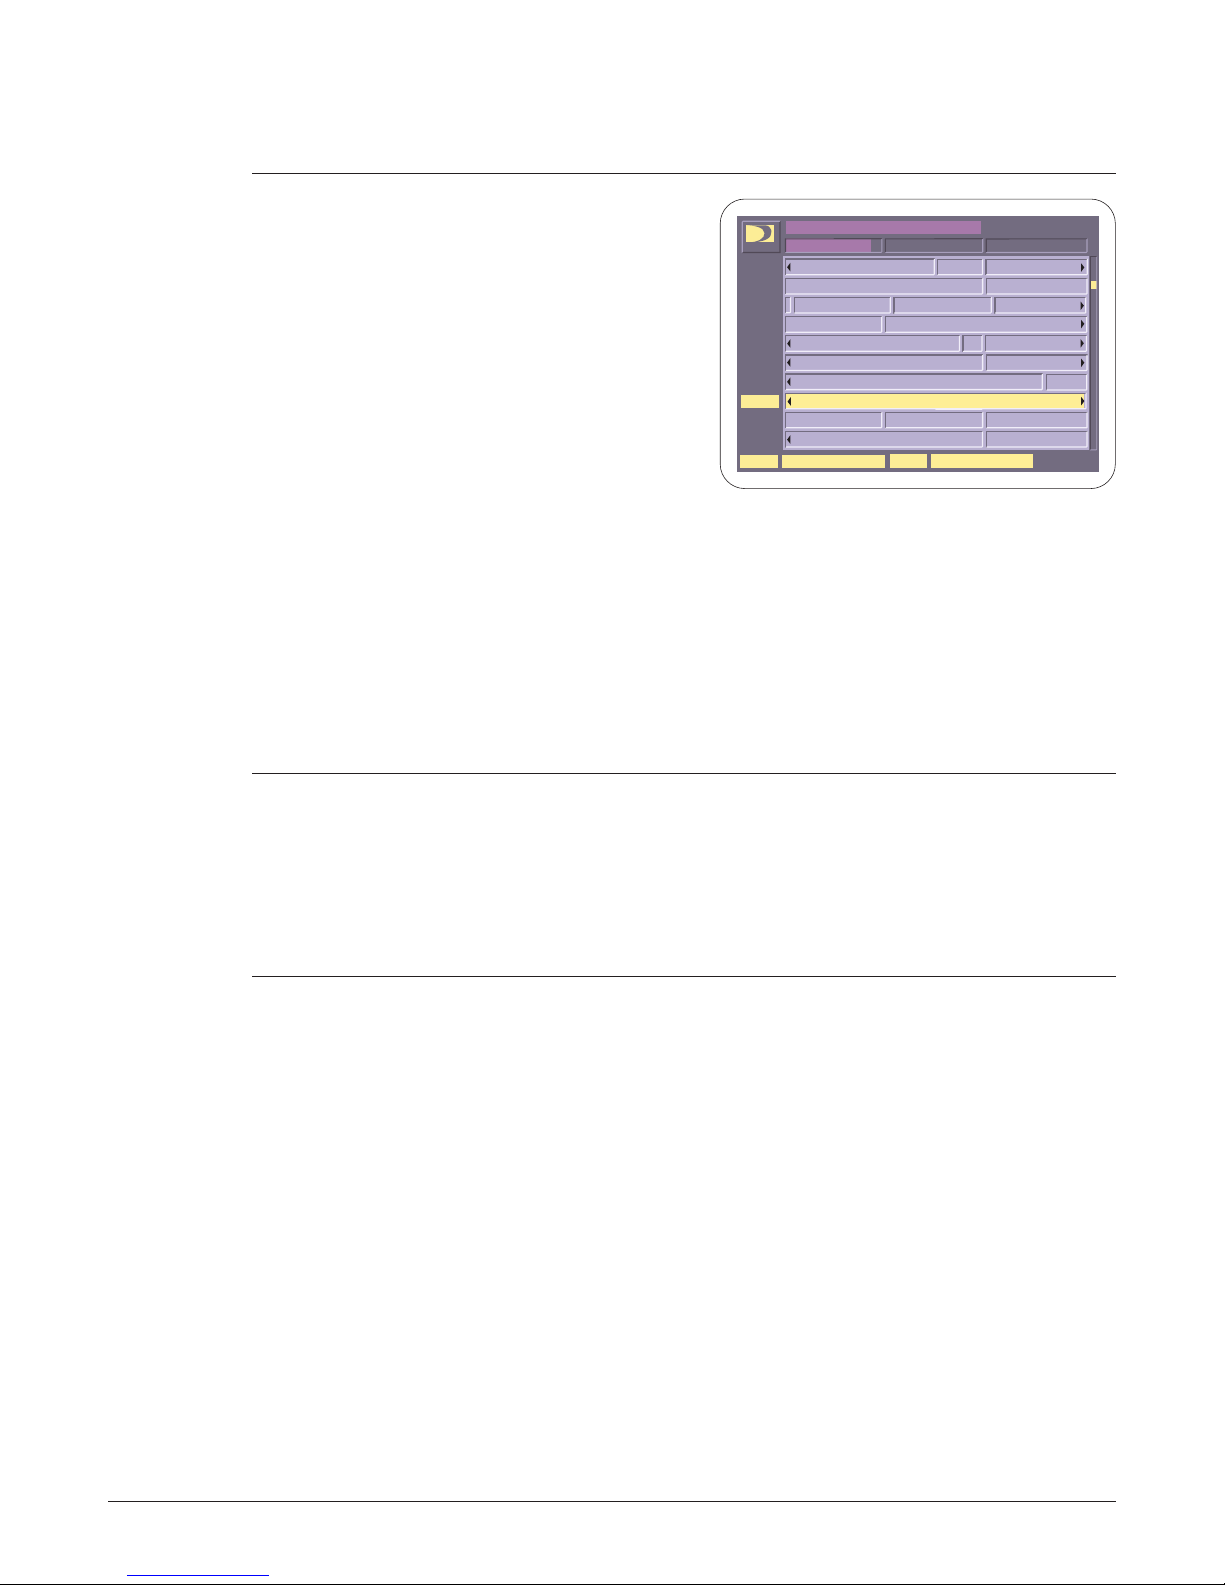
The Main Menu
The Main Menu provides you access to many of the special
features of your System 5100 receiver, such as the Timer Screen,
Password Setting, and Options Menu.
To display the Main Menu:
Press
Panel or the remote
control.
MENU
on the Front
Main Menu
1
Timer
4
D
Data Services
7
Mailbox
Use # or, , , or , and Select.
Return to normal viewing.
2
A~Z
List Guide
5
Other Guides
8
Options
0
Return
8:25p Mon, Sep 7
3
$
Purchases
6
Lock System
9
?
Help
main4.*
The following is a list of features available on the Main Menu.
o
Timer—Set your receiver to automatically tune to upcoming
programs.
o
List Guide—Display the programs you select in alphabetical
order.
o
Purchases—Review your past and future purchases.
o
Data Services—Select and receive data services provided by
your program provider.
o
Other Guides—Display other types of program guides.
o
Lock/Unlock System—Enable or disable your lock and limits.
o
Mailbox—Read and delete messages sent to you by your service
provider.
o
Options—Select the Options Menu
o
Help—Display the Help Menu Screen.
o
Return—Return to Normal Viewing.
18 Optimus
System 5100 Owner's Manual

The Timer
Programming the Timer
The Main Menu
The Timer Feature is used to store up to 8 upcoming events. The
timer knows when the program starts and ends and what channel it
will be shown on.
Note: The timer feature controls only the System 5100’s receiver—it does
not control your VCR. To record an event you store as a timer
entry, you must set your VCR separately.
Timer Entry
To manually enter a program in the Timer, follow these steps:
1. Press
2.
Highlight
MENU
on your remote.
Timer
on the Main Menu and press S, or press 1.
3. If the system is locked,
the Password Screen
displays before a
program is stored
because ALL LOCKS
AND LIMITS ARE
DISABLED for Timer
events (see Lock/Unlock
on Page 30). So, if the
program is shown on a
channel which is locked,
or if the program exceeds
your rating or spending
limit, the Timer will still
tune to the channel at the
selected date and time.
Enter your personal
4-digit password to
continue.
Timer Set
Todisable all locks and limits
for Timer, enter password:
s
t
Start Stop
t
ContinueCancel
t
t
Use # or, , , or .
Timer
NameMoDay
Ch
1
2
3
4
5
6
7
8
Use # or, , , or , and Select.
Enter the channel number of the event.
t
t
s
8:25p Mon, Sep 7
tim_pass.*
8:25p Mon, Sep 7
0-Return
OK
Type
9-Help
?
Optimus
System 5100 Owner's Manual 19
tim1_ev.*

The Main Menu
4. Highlight one of the 8
events you want to
program and press
S,
,
or enter the event
number directly.
Ch
1
200
2
3
4
5
6
7
8
Use # or, , , or , and Select.
Enter the channel number of the event.
Timer
NameMoDay
t
t
s
Start Stop
t
8:25p Mon, Sep 7
0-Return
OK
Type
?
?
9-Help
?
tim1sel.*
Note: If that event is already stored, the Delete, Change, Disable Screen
displays. See “Changing the Event” on Page 23.
5. Enter the channel number of the program you want to store in the
timer, then press>to advance to the Month Field.
Note:
6.
Note: The channel
number of the last
channel tuned
automatically displays. To
select this channel, just
>
press the
key until the
Month Field is highlighted.
Timer
NameMoDay
Ch
1
96_
2
3
4
5
6
7
8
Use # or, , , or , and Select.
Enter the channel number of the event.
t
t
s
Start Stop
t
8:25p Mon, Sep 7
0-Return
OK
Type
?
?
9-Help
?
tim1ch.*
You can use:and;to enter numbers in a field, but you must
remember to press>to continue. For example, in the channel
field, if you press:until 2 displays, you must press>before
entering the next digit of the channel number. After entering all the
digits, you must press>again to advance to the next field.
Use the:or;keys to
choose the Month, and
press>to advance to
the Day Field.
Ch
1
967 Sep
2
3
4
5
6
7
8
t
Use , , or , and Select.
s
Enter the month of the event.
Timer
NameMoDay
HBO2
t
t
Start Stop
8:25p Mon, Sep 7
0-Return
OK
Type
?
9-Help
?
20 Optimus
tim1_mo.*
System 5100 Owner's Manual

7.
Use the:and;keys or
the number keys on your
remote to enter the day.
Press>to Highlight the
next field.
8. When the Start Entry
Field is highlighted, your
receiver automatically
rounds the current time to
the next half-hour and
displays this. For
example, if it’s 8:20p,
then 8:30p automatically
displays.
Use the:and;keys or
the number keys on your
remote to enter the start
time, and Highlight the
am/pm designator.
Timer
NameMoDay
Ch
1
HBO2
967 Sep 7
2
3
4
5
6
7
8
Use # or, , , or , and Select.
Enter the day of the event.
Ch
1
967 Sep 7 8:30p
2
3
4
5
6
7
8
Use # or, , , or , and Select.
Enter the start time of the event.
t
t
s
NameMoDay
HBO2
t
t
s
Start Stop
t
Timer
Start Stop
t
The Main Menu
8:25p Mon, Sep 7
0-Return
OK
Type
?
9-Help
?
tim1_da.*
8:25pm Mon Sep 7
0-Return
OK
Type
?
9-Help
?
tim1_st.*
9.
Change the a/p designator with either the:or;keys, and Highlight
Stop Entry Field
the
.
10. When the Stop Entry
Field is selected, your
receiver automatically
displays the next
half-hour after the Start
time. For example, if
8:30p is the Start time,
then 9:00p appears.
Use the:or;keys or the
number keys on your
remote to enter the stop
Ch
1
967 Sep 7
2
3
4
5
6
7
8
Use # or, , , or , and Select.
Enter the stop time of the event.
Timer
NameMoDay
HBO2
t
t
s
Start Stop
8:30p 9:00p
t
time, and Highlight the
a/p designator.
11.
Change the a/p designator with either the:or;keys, and Highlight
the Type Entry Field.
8:25p Mon, Sep 7
0-Return
OK
Type
?
9-Help
?
tim1_sp.*
Optimus
System 5100 Owner's Manual 21

The Main Menu
12.
Use the:or;keys to
choose the type of event,
and press S.
There are three types of
events:
Once
—This type of event
only occurs one time.
After the event has been
completed, the event
information is removed
Ch
1
967 Sep 7 Once
2
3
4
5
6
7
8
Use # or, , , or , and Select.
Enter the type of the event.
Timer
NameMoDay
HBO2
t
t
s
Start Stop
8:30p 9:00p
t
from the Timer screen.
Daily
—This type of event occurs each weekday–Monday through
Friday. The event information is not removed from the Timer
Screen after the event occurs.
Weekly
—This type of event occurs one day every week. The event
information is not removed from the Timer Screen after the event
occurs.
8:25p Mon, Sep 7
0-Return
OK
Type
?
9-Help
?
tim1_ty.*
13. A checkmark appears
next to the event to
indicate the program is
stored and enabled,
provided there are no
errors. After the event is
stored, the standard
Timer screen returns.
Ch
1
206
Do you want to:
2
3
4
5
6
7
8
:
Use #, , , or , and Select.
Choose the event number and press select.
Timer
NameMoDay
ESPN
DTV127
Delete
HBO2967 Sep 7 8:30P
Change
Disable
Return
;<
Start Stop
Dec
31 11:30A 9:00p Once
Feb
5
4:30P
this Event
this Event
this Event
>
If there are errors in the timer information, then a question mark
(?)appears next to the event and a warning displays. The event is
disabled and the receiver will not tune to the program until the error
or conflict is corrected.
After a program is saved in the Timer, you can make changes,
delete the event, or disable the event.
8:25p Mon, Sep 7
0-Return
OK
Type
4
9-Help
?
tim1chk.*
22 Optimus
System 5100 Owner's Manual

Changing a Timer Entry
To make a change to a Timer Entry, follow these steps:
1. Display the Timer Screen, and Highlight the event you want to
change.
2.
Press Sto display a
Change Screen similar to
this.
The Main Menu
Timer
NameMoDay
Ch
1
206
ESPN
Do you want to:
2
3
4
5
6
7
8
Choose the event number and press select.
DTV127
Delete
HBO2967 Sep 7 8:30P
Change
Disable
Return
:
;<
Use #, , , or , and Select.
Start Stop
Dec
31 11:30A 9:00p Once
Feb
5
4:30P
this Event
this Event
this Event
>
8:25p Mon, Sep 7
0-Return
OK
Type
4
9-Help
?
100tmrp.*
3. Highlight
Delete,Change,Disable/Enable
Deleting the Event
If you select
the information for the
event is cleared, and the
event number is
highlighted so you can
make another entry.
Delete
,allof
Changing the Event
If you select
of the information is
cleared, and the Timer
Screen returns. The
checkmark changes to
“?.”
Change
, none
,or
Return
.
Timer
NameMoDay
Ch
1
2
3
4
5
6
7
8
Use # or, , , or , and Select.
Enter the channel number of the event.
Ch
1
206
2
3
4
5
6
7
8
Use # or, , , or , and Select.
Delete the selected event.
t
t
s
NameMoDay
ESPN
Do you want to:
DTV127
Delete
HBO2967 Sep 7 8:30P
Change
Disable
Return
t
t
s
Start Stop
t
Timer
Start Stop
Dec
31 11:30A 9:00p Once
Feb
5
4:30P
this Event
this Event
this Event
t
8:25p Mon, Sep 7
0-Return
OK
Type
9-Help
?
tim1_ev.*
8:25p Mon, Sep 7
0-Return
OK
Type
4
9-Help
?
Optimus
System 5100 Owner's Manual 23
100tmcg.*

The Main Menu
Make the changes you want following the steps in “Programming
the Timer” on Page 19. After the changes are made, press Sto store
the new information. If there are no conflicts, a checkmark displays
next to the event.
Disabling/Enabling the Event
You can Disable/Enable any event stored in the Timer.
1. Display the Timer Screen
then Highlight and Select
the event you want to
change.
Ch
1
206
Do you want to:
2
3
4
5
6
7
8
Use # or, , , or , and Select.
Delete the selected event.
Timer
NameMoDay
ESPN
DTV127
Delete
HBO2967 Sep 7 8:30P
Change
Disable
Return
t
t
s
Start Stop
Dec
31 11:30A 9:00p Once
Feb
5
4:30P
this Event
this Event
this Event
t
8:25p Mon, Sep 7
Type
0-Return
OK
9-Help
?
4
100tmrp.*
2. If the event has a
and
OK
and
OK
field,
Timer
NameMoDay
Ch
1
206
ESPN
Do you want to:
2
3
4
5
6
7
8
Choose the event number and press select.
DTV127
Delete
HBO2967 Sep 7 8:30P
Change
Disable
Return
:
;<
Use #, , , or , and Select.
Start Stop
Dec
31 11:30A 9:00p Once
Feb
5
4:30P
this Event
this Event
this Event
>
8:25p Mon, Sep 7
Type
100tmds.*
question mark in the
field, Enable displays.
Highlight
Enable
press Sto enable the
event.
—or—
If the event has a
checkmark in the
Disable displays.
Highlight
Disable
press Sto disable the
event.
When you disable an event, you’re not deleting it, you’re simply
telling the Timer to ignore the event. It remains stored until you
decide to enable it later or delete it from the Timer. Remember,
though, a disabled event takes up one of the eight available stored
events.
0-Return
OK
9-Help
?
4
24 Optimus
System 5100 Owner's Manual

Program Start Announcement
When a Timer event is
about to start, the system
turns on (if it is off) and a
warning message
displays one minute
before the Event starts.
If you don’t interrupt the
Timer function, the
program starts as
scheduled. Highlight
Continue
clear the warning from
the screen.
and press Sto
The Main Menu
Your Program is about to start!
The program
is going to start at 8:30pm.
You have configured your receiver to record this
program onto your VCR. To continue with this
event select Continue or do nothing.
To cancel this event, select Cancel.
Use or , and Select.
t
True Lies
t
Continue
Cancel
tim_war1.*
You can cancel the the event by Highlighting
If you select
Cancel
, this cancels the Start Warning Screen and the
program will not display.
During the Event
During an event, you cannot control any functions on the receiver.
All remote control keys as well as the Front Panel keys are blocked.
You can, however, press
EXIT
canceled.
At the end of a timed event, the system returns to normal viewing
(and turns off, if it was off before the event started).
Program Guide for Timer Events
If an event is programmed in the Timer, then the Program Guide
will show a timer icon in the program’s time slot. This indicates that
that program is stored in the Timer.
. If you press
Cancel
EXIT
, the event is
and pressing S.
Optimus
System 5100 Owner's Manual 25

The Main Menu
List Guides
The List Gui deallows you to selecta category and one or more
sub-categories for programs and displays themin alphabetical order.
This is helpful if you’re trying to find out if your all-time favorite movie is
showing!
To set up the List Guide, follow these steps:
1. Press
2.
Highlight
MENU
on your remote.
List Guide
on the Main Menu and press Sor press 2.
3. Highlight the category
you want and press S.
OK
Highlight
and press S
again.
4.
Highlight and Seach
sub-category you want,
then HighlightOKand
press Sagain.
List Guide
Movies
Sports
Specials
Series
Music
PPV
News
Misc
:
;<
Use #, , , or , and Select.
Save selection and continue..
List Guide
Action/Adventure
Children
Comedy
Drama
Fantasy
Horror
Musical
Romance
:
;<
Use #, , , or , and Select.
Save selection and continue..
4
>
4
4
4
>
Other
Science Fiction
Western
Other
Movies
8:25p Mon, Sep 7
0-Return
OK
List
4
9-Help
?
lstg_cat.*
8:25p Mon, Sep 7
0-Return
OK
All
None
List
4
9-Help
?
26 Optimus
lstg_c_s.*
System 5100 Owner's Manual

5. A guide similar to this
displays.
DIRECTV
DTV
DTV
HBO2
DTV
TMC
HBO
SHOE
DTV
DTV
AMC
178
Movies
3:00pm - 4:30pm
List Guide
A View to a Kill
Alice in Wonderland
Anne of Green Gables
Ben Hur
Blown Away
Blue Chips
Brigadoon
Charley's Way
Die Hard
Down and Out in Beverley Hills
Mon
When the List Guide displays, you can:
o
Highlight and tune to a program
o
Get more Information about a program
o
Page through the programs or page through upcoming events
o
Display a Single Channel Guide for a Highlighted channel.
The Main Menu
8:25p Mon Sep 7
0-Return
PG13
D
lst2guid.*
Purchases
The Purchases feature allows you to review the purchases you
made or cancel purchases if they have not been viewed.
To review your purchases, follow these steps:
1. Press
2. Highlight
press S, or press 3.
3.
Highlight either
MENU
on your remote.
Purchases
and
1
2
Use # or, , , or , and Select.
s
Select Purchase List.
FutureorPast Purchases
Purchases
Past Purchase List
Future Purchase List
t
t
t
and press S.
8:25p Mon, Sep 7
0-Return
9-Help
?
purl2sel.*
Optimus
System 5100 Owner's Manual 27
 Loading...