

Page 1
14-1045reimage.fm Page 1 Friday, January 12, 2001 3:56 PM
MICRO-33
Voice-Activated
Microcassette Tape
Recorder
Owner’s Manual
Please read before using this equipment.
Page 2
14-1045reimage.fm Page 2 Friday, January 12, 2001 3:56 PM
ˆ
Contents
Features ................................................... 3
A Quick Look at Your Recorder ............. 4
Preparation .............................................. 5
Connecting Power ............................. 5
Using Batteries .......................... 5
Using AC or DC Power .............. 6
Connecting an Earphone .................. 8
Operation ............................................... 10
Loading a Microcassette Tape ........ 10
Recording ................................ ... ... .. 11
Using an External
Microphone .............................. 14
Playing a Tape ................................. 14
Using FAST-F and
REWIND .................................. 15
Quick Record .................................. 15
Using the Tape Counter .................. 15
Tape Tips ............................................... 16
Storing Cassette Tapes ................... 16
Preventing Accidental Erasure ........ 16
Erasing a Cassette Tape ................. 17
Care ........................................................ 17
Cleaning the
Tape-Handling Parts ........................ 17
Specifications ....................................... 19
©
2001 RadioShack Corporation. All Rights Reserved.
RadioShack, RadioShack.com and Adaptaplug are
registered trademarks used by RadioShack Corporation.
2
Contents
Page 3
14-1045reimage.fm Page 3 Friday, January 12, 2001 3:56 PM
ˆ
Features
Your RadioShack MICRO-33 Voice-Activated Microcassette Tape Recorder is
ideal for quick note-taking. Its compact
size makes it easy to slip into a pocket or
briefcase. You can use it at school, at
business conferences, for dictation in the
office, or anywhere on the go!
Voice-Actuated Circuitry (VOX)
gins recording when the recorder picks up
sound and stops a few seconds after the
sound stops.
External Microphone Jack
use an external microphone, so you can
extend your recording range.
Fast Play
about 30% faster than normal speed, to
save time when listening to a tape.
— lets you play a tape back
Features
— be-
— lets you
3
Page 4
14-1045reimage.fm Page 4 Friday, January 12, 2001 3:56 PM
ˆ
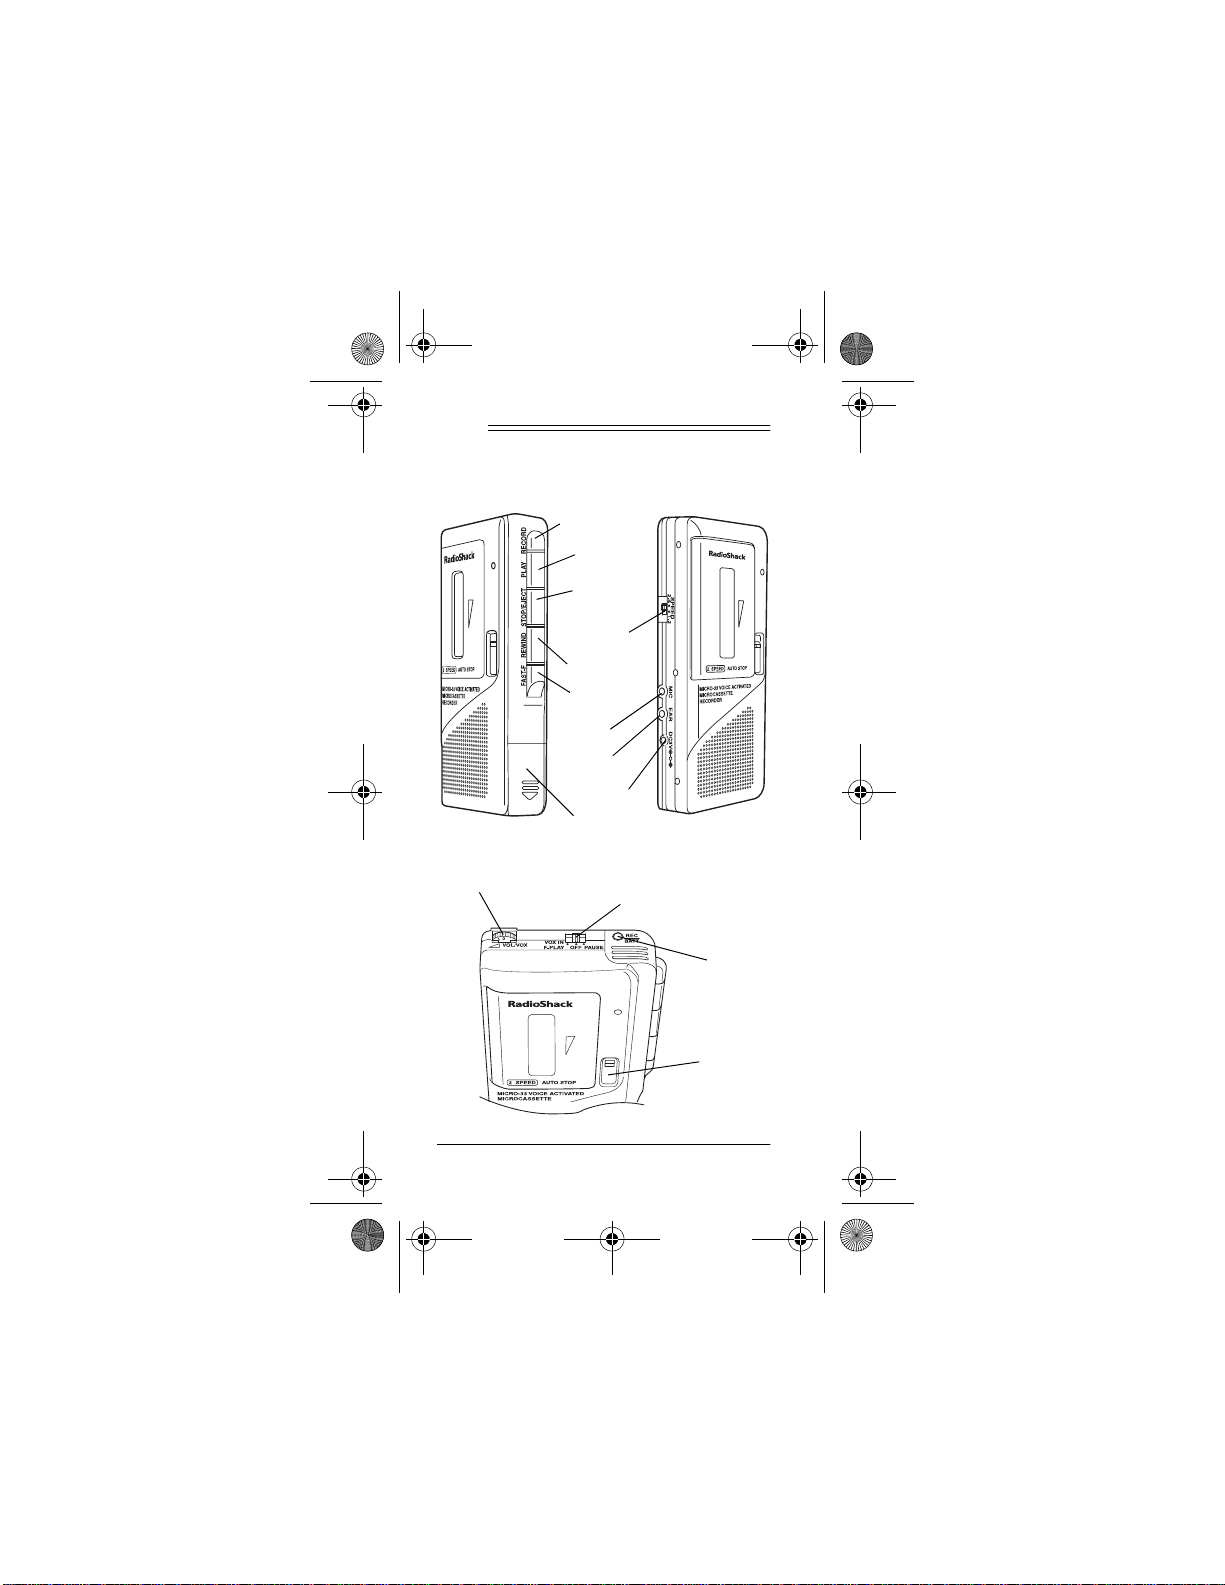
A Quick Look at
Y our Recorder
RECORD
PLAY
STOP/
EJECT
SPEED
REWIND
FAST-F
MIC
EAR
DC3V
Battery
Compartment
VOL/VOX
4
A Quick Look at Your Recorder
F-PLA Y/OFF/PAUSE
VOX IN
REC/
BATT
Tape
Counter
Page 5
14-1045reimage.fm Page 5 Friday, January 12, 2001 3:56 PM
ˆ
Preparation
CONNECTING POWER
You can power your recorder from internal
battery power, AC power (with an optional
AC adapter), or your vehicle’s battery
(with an optional DC adapter).
Using Batteries
You can use two AAA batteries (not supplied) to power your recorder. For the best
performance and longest life, we recommend RadioShack alkaline batteries.
Warning:
promptly and properly. Do not burn or
bury them.
Cautions:
• Use only fresh batteries of the
required size and recommended
type.
• Do not use rechargeable batteries in
the recorder.
• Do not mix old and new batteries or
different types of batteries (standard
or alkaline).
Dispose of old batteries
Preparation
5
Page 6
14-1045reimage.fm Page 6 Friday, January 12, 2001 3:56 PM
• If you do not plan to use the recorder
with batteries for several days or
more, remove the batteries. Batteries
can leak chemicals that can destroy
electronic parts.
When the REC/BATT indicator does not
light, lights dimly during manual recording,
or the recorder stops operating properly,
replace the batteries.
1. Slide the battery compartment cover
in the direction of the arrow until it
stops, then lift up the cover.
Caution:
The battery compartment
cover is attached to the recorder. Do
not try to remove it.
2. Insert the batteries into the compartment as indicated by the polarity symbols (+ and –) marked on the back of
the recorder.
3. To close the battery compartment
cover, hold the cover down against
the recorder and slide it in the opposite direction of the arrow.
Using AC or DC Power
To power the recorder from an AC outlet
or your vehicles battery power, you need
6
Preparation
Page 7
14-1045reimage.fm Page 7 Friday, January 12, 2001 3:56 PM
an AC or DC adapter and an Adaptaplug
(neither supplied, available at your local
RadioShack store).
Cautions:
You must use a (Class 2 for
AC) power source that sup-
!
plies 3 volts DC power and
delivers at least 200 mA. The center
tip of the Adaptaplug must be set to
positive, and the plug must properly
DC3V
fit the recorder’s
AC adapter and plug that do not meet
these specifications could damage
the recorder, the adapter, or the plug.
• Always connect the adapter to the
recorder before you plug it into the
power source, and unplug the
adapter from the power source before
you unplug it from the recorder.
1. If necessary, set the adapter’s voltage switch to 3V.
2. Attach the Adaptaplug to the
adapter’s cord with the tip set to positive (+).
jack. Using an
Caution:
ity to positive (+). If the polarity is
Be sure to set the tip polar-
Preparation
7
Page 8
14-1045reimage.fm Page 8 Friday, January 12, 2001 3:56 PM
reversed, the recorder, adapter, or
plug might be damaged.
3. Insert the barrel plug into the
DC3V
recorder’s
jack. This discon-
nects the internal batteries.
4. Plug the other end of the adapter into
the power source.
CONNECTING AN
EARPHONE
You can use an optional earphone with a
3
/32-inch plug to listen to a tape in privacy.
You can also use an earphone to listen to
what the recorder picks up through the internal microphone or an external microphone. Your local RadioShack store
carries a wide selection of earphones.
Plug the earphone’s plug into the record-
EAR
er’s
matically disconnects.
jack. The built-in speaker auto-
Listening Safely
To protect your hearing, follow these
guidelines when you use an earphone.
• Set the volume to the lowest setting
before you begin listening. After you
8
Preparation
Page 9
14-1045reimage.fm Page 9 Friday, January 12, 2001 3:56 PM
begin listening, adjust the volume to a
comfortable level.
• Do not listen at extremely high vol-
ume levels. Extended high-volume
listening can lead to permanent hearing loss.
• Once you set the volume, do not
increase it. Over time, your ears
adapt to the volume level, so a volume level that does not cause discomfort might still damage your
hearing.
Traffic Safety
Do not wear an earphone while operating
a motor vehicle or riding a bicycle. This
can create a traffic hazard and could be illegal in some areas.
Even though some earphones let you
hear some outside sounds when listening
at normal volume levels, they still can
present a traffic hazard.
Preparation
9
Page 10
14-1045reimage.fm Page 10 Friday, January 12, 2001 3:56 PM
ˆ
Operation
Although the recorder’s auto shut-off feature stops the recorder’s tape drive motor
when the tape reaches the end, the recorder continues to use power, and its
tape-handling parts continue to touch the
tape until you press
ommend you press
as the tape reaches the end. This helps to
save power and reduces the possibility of
damaging the tape.
STOP/EJECT
STOP/EJECT
. We rec as soon
LOADING A
MICROCASSETTE TAPE
We recommend MC-60 microcassette
tapes for up to 2 hours of recording/playback time, or MC-90 microcassette tapes
for up to 3 hours of recording/playback
time.
1. Use a pencil to turn the cassette’s
hub and remove any tape slack.
Avoid touching the tape.
2. Press
10
STOP/EJECT
sette compartment door.
to open the cas-
Operation
Page 11
14-1045reimage.fm Page 11 Friday, January 12, 2001 3:56 PM
3. Insert the microcassette into the
door’s guides so the microcassette’s
open edge faces out.
Note:
The arrow on the cassette
compartment door indicates tape
travel direction. Be sure the tape’s full
reel is in the opposite direction of the
arrow.
4. Close the cassette compartment
door.
RECORDING
When you use the VOX feature, recording
begins when the recorder picks up sound
and stops a few seconds after the sound
stops.
The
VOL/VOX
setting determines the
sound level that activates the VOX circuit
and starts recording. At higher settings, a
softer sound starts VOX recording. At lower settings, a louder sound starts VOX recording. Use a low
VOL/VOX
setting in a
high-noise environment such as in a plane
or vehicle.
Note:
You can monitor the sound level by
connecting an optional earphone.
1. Load the microcassette tape.
Operation
11
Page 12
14-1045reimage.fm Page 12 Friday, January 12, 2001 3:56 PM
SPEED
2. Set
on the side of the recorder
as follows:
• To double the tape’s recording/
playback time, set
SPEED
to
1.2
.
This setting allows 120 minutes
total recording/playback time on an
MC-60 tape, or 180 minutes on an
MC-90 tape.
• For better sound quality, set
SPEED
2.4
to
. This setting allows
60 minutes total recording/playback time on an MC-60 tape, or 90
minutes on an MC-90 tape.
3. Set the function switch as follows:
• To manually start and stop record-
OFF
ing, set the switch to
.
• To use voice-actuated recording,
set the switch to
Note:
The voice-activation feature
VOX IN.
saves power and tape if there are
long or frequent pauses in the material you are recording.
4. Press
RECORD
RECORD
to begin recording.
PLAY
and
both lock down,
and the REC/BATT indicator lights.
12
Operation
Page 13
14-1045reimage.fm Page 13 Friday, January 12, 2001 3:56 PM
If the function switch is set to
recording begins immediately. If
the function switch is se t to
VOX IN
recording begins and the REC/BATT
indicator lights steadily only when the
recorder picks up sound.
Cautions:
• Do not force down
cannot easily press
RECORD
RECORD
. If you
check the microcassette tape’s
erase-protection tabs (see “Preventing Accidental Erasure” on
Page 16).
• To protect the recorder, press
RECORD
only when a microcas-
sette tape is loaded.
Note:
To pause recording, slide the
PAUSE
function switch to
. To resume
operation, slide the function switch to
the previous position.
5. If you set the function switch to
IN
, adjust
VOL/VOX
to set the sound
level at which recording begins.
OFF
VOX
,
,
,
6. Press
Note:
STOP/EJECT
To record on the other side of the
to stop the tape.
tape, unload the tape, turn it over, and reload it.
Operation
13
Page 14
14-1045reimage.fm Page 14 Friday, January 12, 2001 3:56 PM
Using an External Microphone
You can use an external microphone to
make high-quality recordings. Plug a mi-
3
crophone with a
corder’s
Note:
MIC
You can use a unidirectional micro-
/32-inch plug into the re-
jack.
phone with your recorder (not supplied,
available at your local RadioShack store).
PLAYING A TAPE
1. Load the microcassette tape.
SPEED
2. Set
the tape was recorded.
3. To listen to the tape at normal speed,
set the function switch to
T o listen to the tape at about 30% faster
than normal, set the function switch to
F-PLAY
to the speed used when
OFF
(fast play).
.
4. Press
5. Adjust
PLAY.
VOL/VOX
to a comfortable lis-
tening level.
6. Press
Note:
STOP/EJECT
To play the other side of the tape,
to stop playback.
unload the tape, turn it over, and reload it.
14
Operation
Page 15
14-1045reimage.fm Page 15 Friday, January 12, 2001 3:56 PM
Using FAST-F and REWIND
REWIND
Press
tape. Press
tape.
to rapidly rewind (review) a
FAST-F
to fast-forward (cue) a
If you press
FAST-F
or
REWIND
during
playback, you can hear the tape at a faster speed as it cues or reviews. If you release
FAS T - F
or
REWIND
, the recorder
resumes normal playback.
If you press
FAS T-F
or
REWIND
when the
tape is stopped, the button locks down.
The tape fast-forwards or rewinds until
you press
STOP/EJECT
or the tape reach-
es the end.
QUICK RECORD
During playback, you can press
to begin recording without pressing
EJECT
first.
RECORD
STOP/
USING THE TAPE COUNTER
You can use the tape counter to mark locations of specific sections of tape so you
can easily return to them.
Press the reset button next to the tape
333
333
counter to set the counter to
beginning of a tape. As the tape plays or
333333
at the
Operation
15
Page 16
14-1045reimage.fm Page 16 Friday, January 12, 2001 3:56 PM
records, note the counter reading at the
position(s) where you want to return.
ˆ
T ape Tips
STORING CASSETTE TAPES
Do not expose cassette tapes to high temperatures, high humidity, dust or dirt, or
motors, transformers, or other sources
with strong magnetic fields.
PREVENTING ACCIDENTAL
ERASURE
Most microcassette tapes have an eraseprotection tab for each side of the tape. To
protect your recordings from being accidentally erased or recorded over, use a
screwdriver to carefully break off the
erase-protection tabs.
If you later decide to erase or record over
the tape, place a piece of strong tape over
the holes.
Caution:
tabs does not prevent a tape from being
erased by a bulk tape eraser.
16
Removing the erase-protection
Tape Tips
Page 17
14-1045reimage.fm Page 17 Friday, January 12, 2001 3:56 PM
ERASING A CASSETTE T APE
If you no longer want a recording, you can
record over it or erase it.
To record over a cassette tape, be sure
the erase-protection tabs are in place.
Then simply record as usual. The recorder
records over the previous recording.
You might prefer to use a bulk tape eraser
which erases both sides of a tape in just a
few seconds.
ˆ
Care
Modifying or tampering with the recorder’s
internal components can cause a malfunction and might invalidate its warranty.
If your recorder is not performing as it
should, take it to your local RadioShack
store for assistance.
CLEANING THE TAPEHANDLING PARTS
Dirt, dust, or particles of the tape’s coating
can accumulate on the tape heads and
other parts that the tape touches. This can
greatly reduce the performance of the recorder. Use the following cleaning proce-
Care
17
Page 18
14-1045reimage.fm Page 18 Friday, January 12, 2001 3:56 PM
dure after every 20 hours of recorder
operation.
1. Press
STOP/EJECT
, remove the batteries, and disconnect any power
source.
PLAY
2. Press
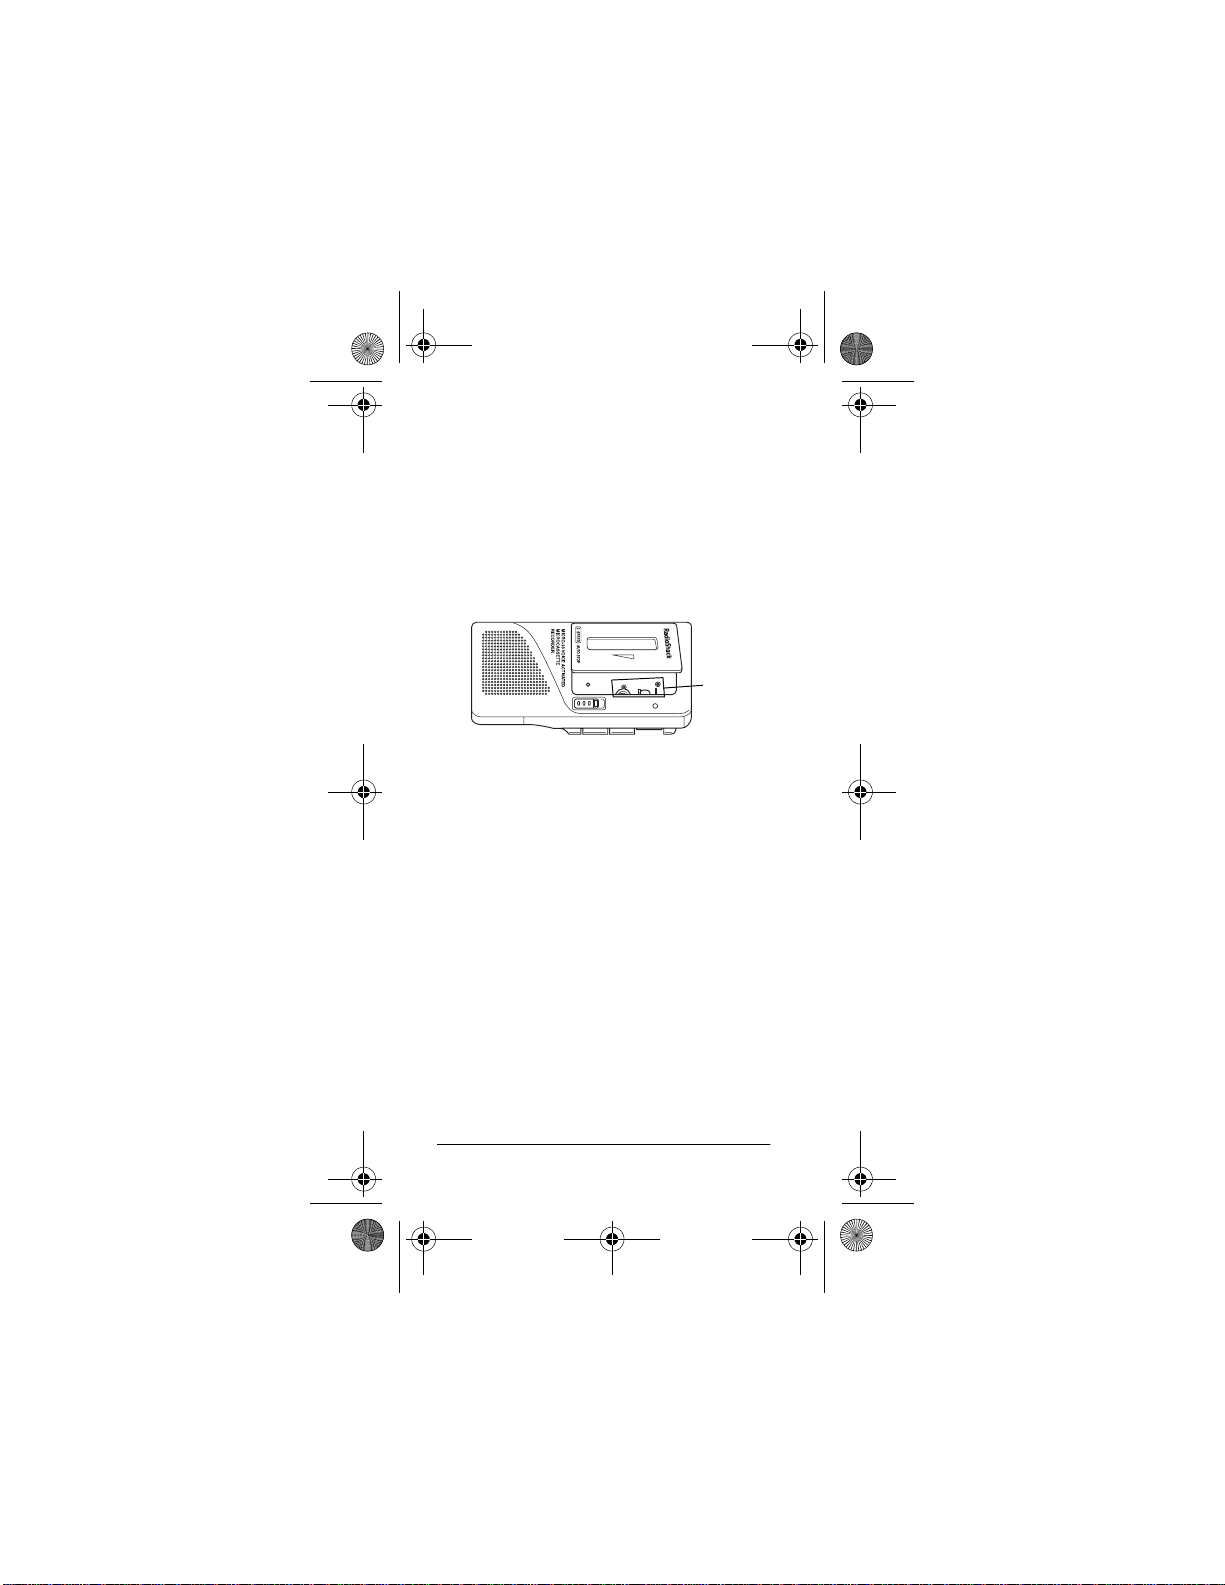
to expose the tape-han-
dling parts.
TapeHandling
Parts
3. Use a cotton swab dipped in tape
head cleaning solution or denatured
alcohol to gently clean the tape-handling parts.
4. Press
STOP/EJECT
to release the
tape-handling part s.
Note:
For easier cleaning, you can use a
microcassette cleaner kit, which includes
a special cleaning cassette. Your local
RadioShack store carries a full line of microcassette cleaning supplies.
18
Care
Page 19
14-1045reimage.fm Page 19 Friday, January 12, 2001 3:56 PM
ˆ
Specifications
Tape Type.............................................. Microcassette
Tracks............................2 Tracks,1 Channel Monaural
Drive System .........................................Capstan Drive
Tape Speed ..............................2.4 cm/sec. (
1.2 cm/sec. (
Recording
(with MC-60):
Practical Max. Output ....................................125 mW
Frequency Response ......400-4,000 Hz at 2.4 cm/sec.
Fast Play.......................................Approx. 30% Faster
Microphone Sensitivity............ Continuous Adjustment
Power Sources:
Internal Batteries ............................Two AAA Batteries
AC Power ..................................120V with AC adapter
Vehicle Battery............................12V with DC adapter
Typical Cassette Recording Time
(alkaline batteries) ........................... 8 hours (approx.)
Dimensions (HWD): ...................47/16 × 21/4 × 3/4 In.
Weight (with batteries) ......................................4.2 oz.
Specifications are typical; individual units might vary.
Specifications are subject to change and impr ovement
without notice.
............. 30 min. (2.4 cm/sec.) per side
60 min. (1.2 cm/sec.) per side
Than Normal Speed
VOL/VOX
Using
(112.5 × 57 × 19 mm)
15
/16 ips)
15
/32 ips)
in Record Mode
(3 Volts DC)
(119 g)
Specifications
19
Page 20
14-1045reimage.fm Page 20 Friday, January 12, 2001 3:56 PM
This product is warranted by RadioShack against manufacturing defects in
Limited Ninety-Day Warranty
material and workmanship under normal use for ni nety (90) d ay s from the
date of purchase from RadioShack company-owned stores and authorized RadioShack franchisees and dealers. EXCEPT AS PROVIDED
HEREIN, RadioShack MAKES NO EXPRESS WARRANTIES AND ANY
IMPLIED WARRANTIES, INCLUDING THOSE OF MERCHANTABILITY
AND FITNESS FOR A PARTICULAR PURPOSE, ARE LIMITED IN DURATION TO THE DURATION OF THE WRITTEN LIMITED WARRANTIES CONTAINED HEREIN. EXCEPT AS PROVIDED HEREIN,
RadioShack SHALL HAVE NO LIABILITY OR RESPONSIBILITY TO
CUSTOMER OR ANY OTHER PERSON OR ENTITY WITH RESPECT
TO ANY LIABILITY, LOSS OR DAMAGE CAUSED DIRECTLY OR INDIRECTLY BY USE OR PERFORMANCE OF THE PRODUCT OR ARISING OUT OF ANY BREACH OF THIS WARRANTY, INCLUDING, BUT
NOT LIMITED TO, ANY DAMAGES RESULTING FROM INCONVENIENCE, LOSS OF TIME, DATA, PROPERTY, REVENUE, OR PROFIT
OR ANY INDIRECT, SPECIAL, INCIDENTAL, OR CONSEQUENTIAL
DAMAGES, EVEN IF RadioShack HAS BEEN ADVISED OF THE POSSIBILITY OF SUCH DAMAGES.
Some states do not allow limitations on how long an implied warranty lasts
or the exclusion or limitation of incidental or cons equential damages, so
the above limitations or exclusions may not apply to you.
In the event of a product defect during the warranty period, take the product and the RadioShack sales receipt as proof of purchase date to any
RadioShack store. RadioShack will, at its option, unless otherwise provided by law: (a) correct the defect by product repair without ch arge for
parts and labor; (b) replace the product with one of the same or similar design; or (c) refund the purchase price. All replaced parts and products, and
products on which a refund is made, become the property of Ra dioShac k .
New or reconditioned parts and products may be used in the performance
of warranty service. Repaired or replaced parts and products are warranted for the remainder of the original warranty period. You will be
charged for repair or replacement of the product made after the expira tion
of the warranty period.
This warranty does not cover: (a) dama ge or fai lure ca use d by o r attrib utable to acts of God, abuse, accident, misus e, improper or abnormal usage, failure to follow instructions, improper installation or maintena nce,
alteration, lightning or other incidence of excess voltage or current; (b) any
repairs other than those provided by a RadioShack Authoriz ed Service
Facility; (c) consumables such as fuses or batteries; (d) cosmetic damage;
(e) transportation, shipping or insurance costs; or (f) co sts of product removal, installation, set-up service adjustment or reinstallation.
This warranty gives you specific legal rights, and you may also have other
rights which vary from state to state.
RadioShack Customer Relations, 200 Taylor Street, 6th Floor, Fort Worth,
TX 76102
We Service What We Sell
12/99
RadioShack Corporation
Fort Worth, Texas 76102
14-1045
BZ2261-03
01A01
Printed in Japan
 Loading...