

Page 1
4GOQVG"%QPVTQN"-G[EJCKP
www.radioshack.com
OWNER’S MANUAL —
Please read before using this equipment.
™
63-1166
Thank you for purchasing the RadioShack Remote Control Keychain. It’s simple design and
advanced technology can replace up to two infrared remote controls, and lets you operate most
of the same functions as the original remote. It is compatible with up to 378 types of common
TV devices and 117 common Cable TV devices. The remote is preprogrammed before you
purchase it. Input the correct code for your device, and the remote is ready to use.
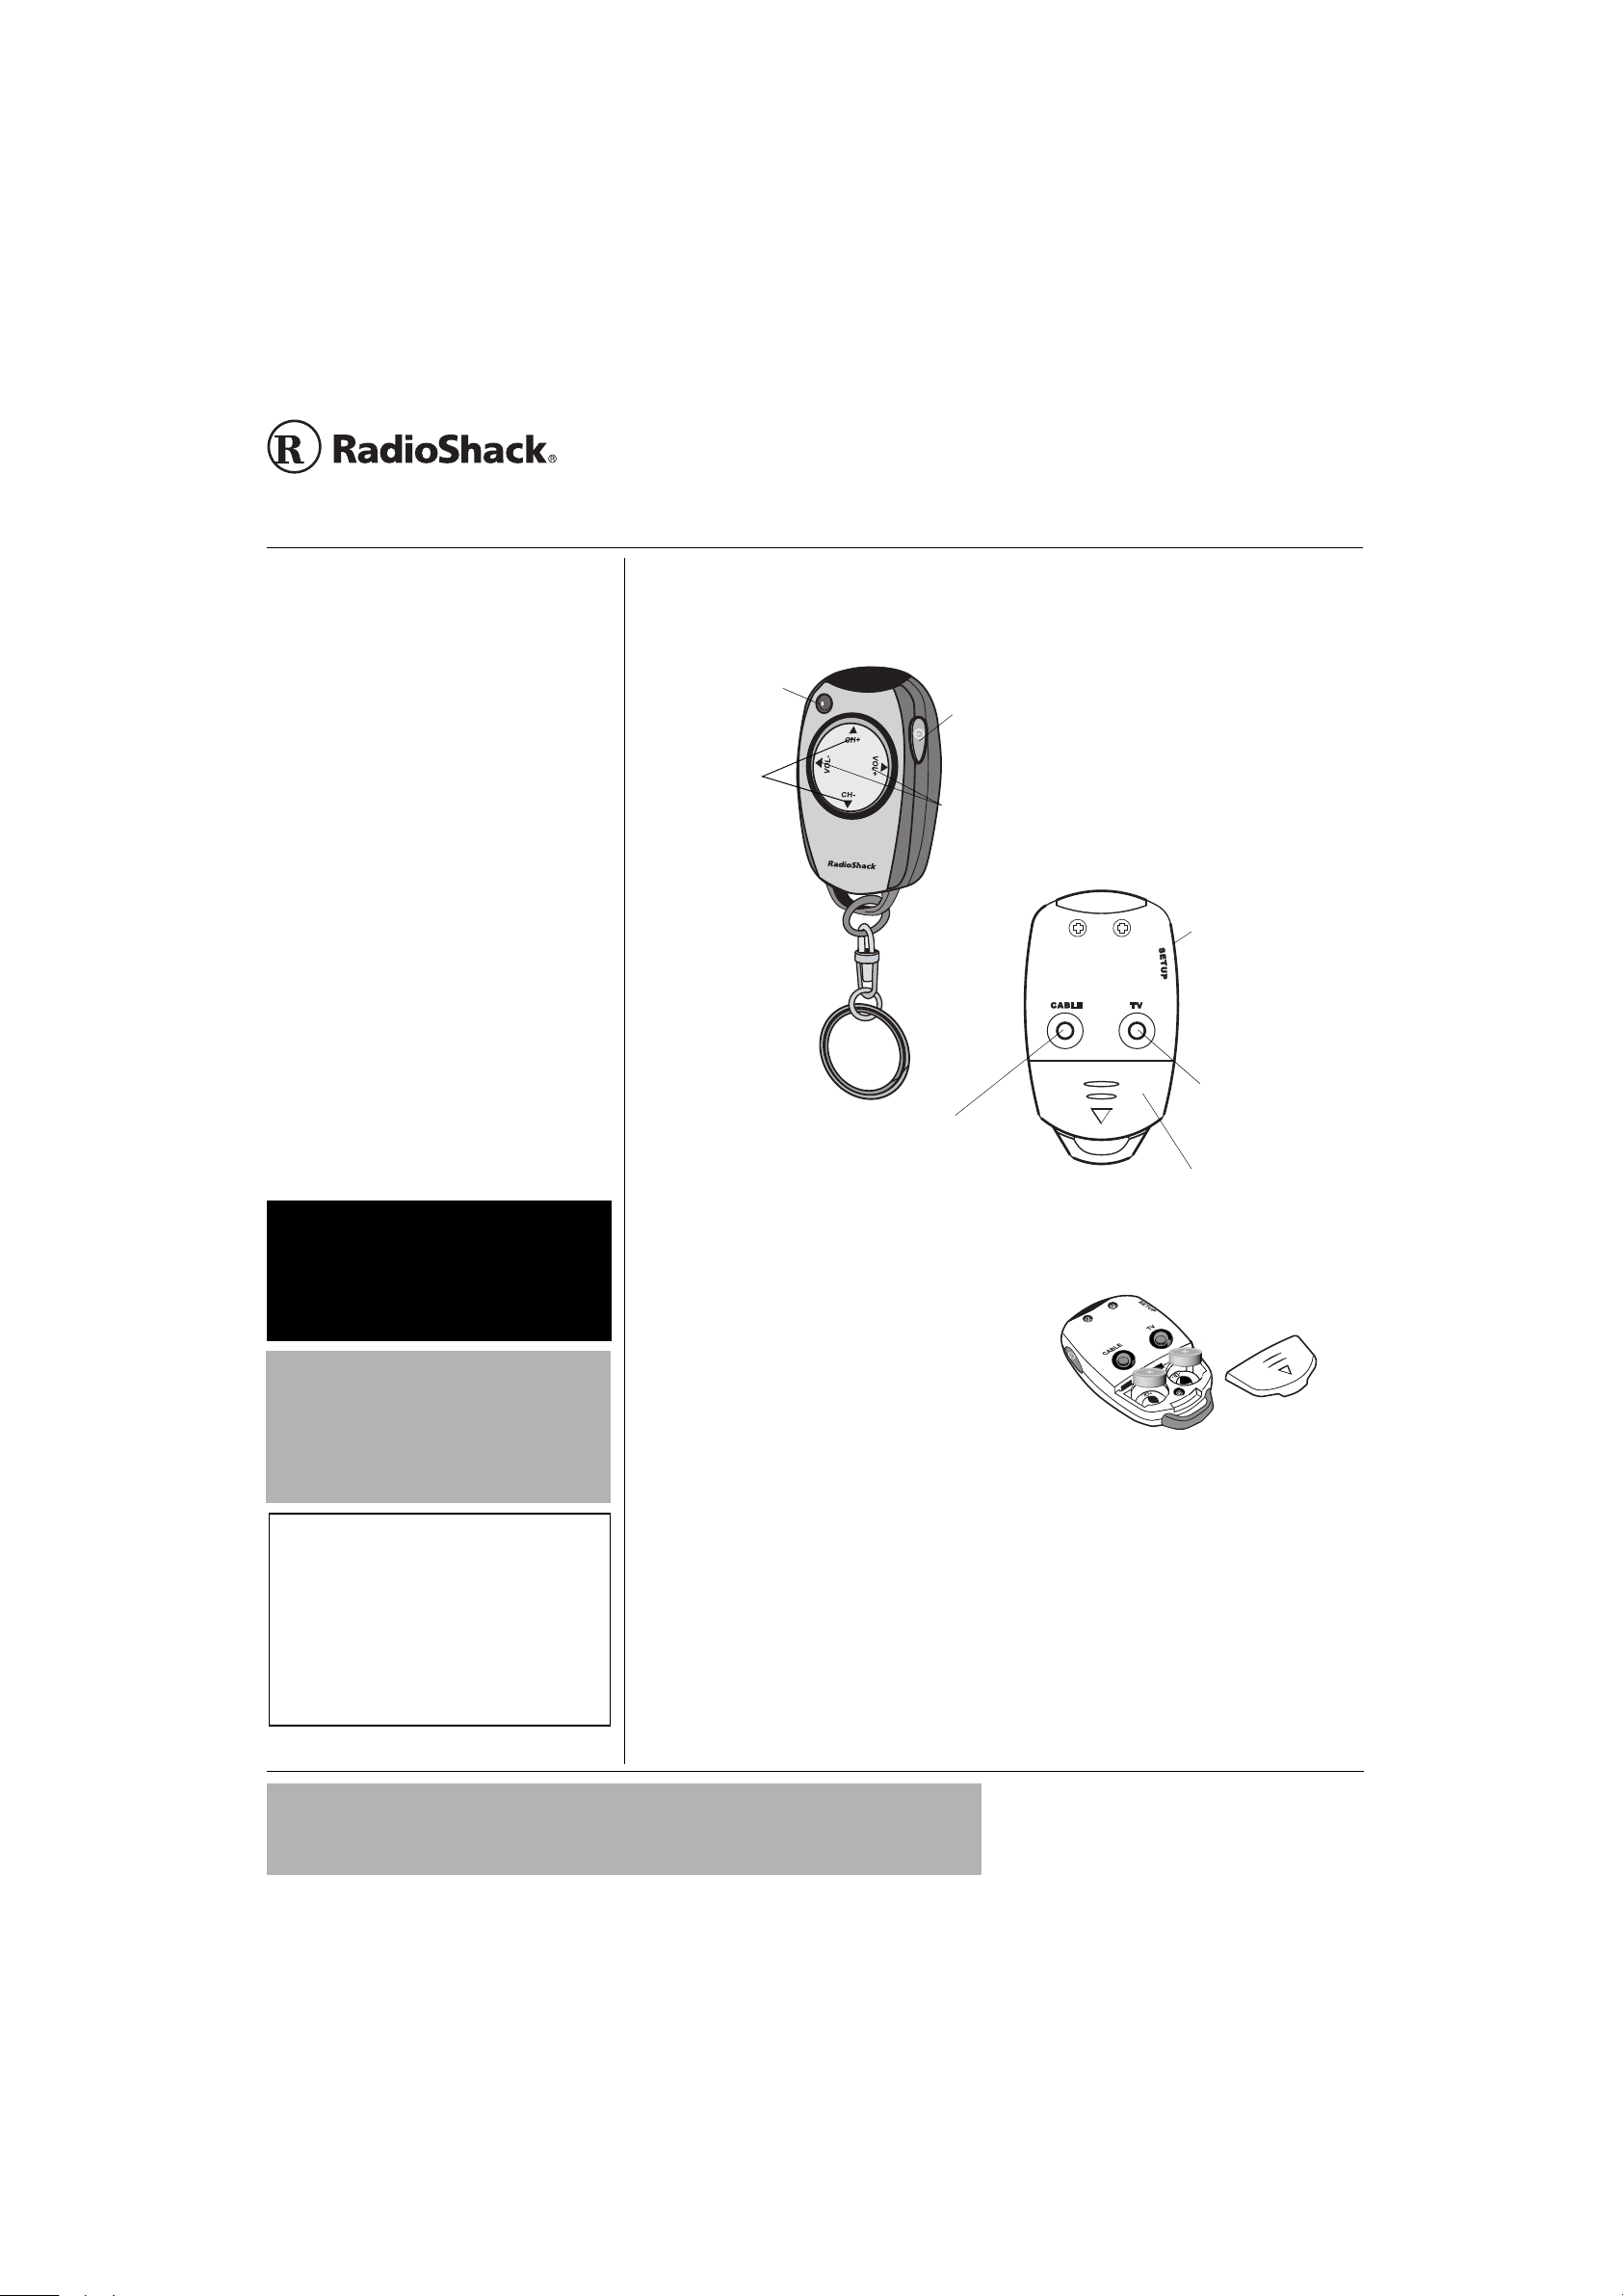
LED — Lights when
the remote control
is sending a signal.
++++
CH
and CH– —
Press to adjust the
channel upwards or
downwards.
— Turns your devices on and off.
ìììì
++++
VOL
and VOL– — Press to adjust
the volume higher or lower.
REAR VIEW
SETUP — Press to
enter programming
mode.
"9#40+0)"R"
• Keep batteries out of reach of children.
Swallowing a button-cell battery can be fatal.
• Do not mix old and new batteries.
• Dispose of old batteries promptly and
properly. Do not burn or bury them.
• Use only fresh batteries of the required size
and recommended type.
• If you do not plan to use your remote control
for a month or more, remove the batteries.
Batteries can leak chemicals that can destroy
electronic parts.
• Do not place objects on the top of the remote
control after you have installed the batteries.
This can reduce battery life.
• Although the remote control has a built-in
memory backup, we recommend you have
fresh batteries ready to install as soon as you
remove the old ones.
• When the remote control stops operating
properly, replace the batteries.
R
"%#76+10"
.
±"016'"±"
.
CABLE — Press to select
your cable device.
4'/18+0)"6*'"
+057.#6+10"564+25
Before using the remote control, you must
remove the protective insulation strip from
inside the battery compartment. Grasp the
strip and gently pull on it to remove it.
4'2.#%+0)"$#66'4+'5
Your remote control comes with two LR 44
(3-Volt) button-cell batteries for power. For
the best performance and longest life, we
recommend RadioShack button cell
batteries. ý
1. Slide the battery compartment cover in
the direction of arrow to remove it.
RRRRý
....
TV — Press to select
your television.
Battery Compartment Cover
2. Remove the old batteries and insert two
new LR 44 button-cell batteries with the
positive (+) side up.
3. Replace the cover. ±
241)4#//+0)"6*'"
4'/16'
Make sure to aim the remote at the device
and that the distance between the remote
and device is no more than 16 feet.
1. Refer to the Code list and write down the
codes for your device.
2. Manually turn on your TV or cable
converter.
"+/2146#06"
If an icon appears at the end of a paragraph, go to the box on that page with the corresponding icon for
#
pertinent information.
— Warning
RRRRý
— Important
#
±±±±
— Note
#
....
— Caution
°°°°
— Hint
2002 RadioShack Corporation.
©
RadioShack and RadioShack.com are trademarks
All Rights Reserved.
used by RadioShack Corporation.
Page 2

±"016'"±"
Programming the Remote
• If you enter the code incorrectly, the LED
blinks each time you press a key.
• If the remote control does not operate your
device, try the other codes listed in the Code
List for your device until you find one that
works.
Operation
• The remote’s function keys work the same as
the ones on the original remote control
supplied with your device. However, certain
function keys, such as
work correctly depending on the type of device
you are using.
• Press each key within 10 seconds after the
previous entry. Otherwise, the remote exits
programming mode.
• Do not press and hold any key for 30 seconds,
otherwise, the remote control will stop until all
the keys are released.
CH+
and
CH-
, might not
3. Press TV or
on the back of the
CABLE
remote to select the desired device type.
The LED blinks once.
4. Hold down
until the LED blinks
SETUP
twice.
5. Use
VOL+,VOL–, CH+
, and
CH–
to enter
the 4-digit code for your brand of TV or
cable device. Press
2,
for 3, and
CH+
CH-
for 1,
VOL+
VOL-
for 4. For example,
to set up the remote control of a SHARP
TV (manufacturer’s code is 2242), press
VOL-, VOL-, CH-, VOL-
. If the LED blinks
twice, the remote control accepted the
code. ±
6. Aim the remote control at the device and
press *. The device should turn on.
7. Press
VOL+
or
to increase or
VOL-
decrease the sound volume of the
or
device. Press
CH+
to select the
CH-
next or previous channel.
8. Repeat steps 2–7 to program other
devices.
12'4#6+10
1. Point the remote at the device and press
to turn it on.
*
2. Press the desired function keys. ±
for
52'%+(+%#6+105
Power ............ 3V, T wo LR 44 button cell batteries
(supplied)
Control Range (IR)………………………… .16 feet
1
Dimensions (HWD)……… 23
Weight (not including package)…………..0.81 oz.
Specifications are typical; individual units might
vary. Specifications are subject to change and
improvement without notice.
/4 x 13 x 41/3 inches
%#4'
Keep the remote control dry; if it gets wet,
wipe it dry immediately. Use and store the
remote control only in normal temperature
environments. Handle the remote control
carefully; do not drop it. Keep the remote
control away from dust and dirt, and wipe it
with a damp cloth occasionally to keep it
looking new.
5'48+%'"#0&"4'2#+4
If your remote control is not performing as it
should, take it to your local RadioShack store
for assistance. Modifying or tampering with
the remote control’s internal components can
cause a malfunction and might invalidate its
warranty.
3. Press * to turn on the last selected
device. To turn on other devices, press
the desired device keys, then press *.
Limited Ninety-Day Warranty
This product is warranted by RadioShack against manufacturing defects in material and workmanship under normal
use for ninety (90) days from the date of purchase from RadioShack company-owned stores and authorized
RadioShack franchisees and dealers. EXCEPT AS PROVIDED HEREIN, RadioShack MAKES NO EXPRESS WARRANTIES AND ANY IMPLIED WARRANTIES, INCLUDING THOSE OF MERCHANTABILITY AND FITNESS FOR A
PARTICULAR PURPOSE, ARE LIMITED IN DURATION TO THE DURATION OF THE WRITTEN LIMITED WARRANTIES CONTAINED HEREIN. EXCEPT AS PROVIDED HEREIN, RadioShack SHALL HAVE NO LIABILITY OR
RESPONSIBILITY TO CUSTOMER OR ANY OTHER PERSON OR ENTITY WITH RESPECT TO ANY LIABILITY,
LOSS OR DAMAGE CAUSED DIRECTLY OR INDIRECTLY BY USE OR PERFORMANCE OF THE PRODUCT OR
ARISING OUT OF ANY BREACH OF THIS WARRANTY, INCLUDING, BUT NOT LIMITED TO, A NY DAMAGES RESULTING FROM INCONVENIENCE, LOSS OF TIME, DATA, PROPERTY, REVENUE, OR PROFIT OR ANY INDIRECT, SPECIAL, INCIDENTAL, OR CONSEQUENTIAL DAMAGES, EVEN IF RadioShack HAS BEEN ADVISED
OF THE POSSIBILITY OF SUCH DAMAGES.
Some states do not allow limitations on how long an implied warranty lasts or the exclusion or limitation of incidental
or consequential damages, so the above limitations or exclusions may not apply to you.
In the event of a product defect during the warranty period, take the product and the RadioShack sales receipt as
proof of purchase date to any RadioShack store. RadioShack will, at its option, unless otherwise provided by law:
(a) correct the defect by product repair without charge for parts and labor; (b) replace the product with one of the
same or similar design; or (c) refund the purchase price. All re placed par ts and prod ucts, an d p rodu cts on which a refund is made, become the property of RadioShack. New or reconditioned parts and products may be used in the performance of warranty service. Repaired or replaced parts and products are warranted for the remainder of the
original warranty period. You will be charged for repair or replacement of the product made after the expiration of the
warranty period.
This warranty does not cover: (a) damage or failure caused by or attributable to acts of God, abuse, accident, misuse, improper or abnormal usage, failure to follow instructions, improper installation or maintenance, alteration, lightning or other incidence of excess voltage or current; (b) any repairs other than those provided by a RadioShack
Authorized Service Facility; (c) consumables such as fuses or batteries; (d) cosmetic damage; (e) transportation,
shipping or insurance costs; or (f) costs of product removal, installation, set-up service adjustment or reinstallation.
This warranty gives you specific legal rights, and you may also have other rights which vary from state to state.
RadioShack Customer Relations, 200 Taylor Street, 6th Floor, Fort Worth, TX 76102
12/99
RadioShack Corporation
Fort Worth, Texas 76102
63-1166
08A02
Printed in China
Page 3

www.radioshack.com
™
.NCXGTQ"FG"%QPVTQN"4GOQVQ
MANUAL DEL PROPIETARO— Les suplicamos
leer el manual antes de utilizar este equipo.
63-1166
Le agradecemos la compra del llavero de control remoto RadioShack. Su sencillo diseño y su avanzada
tecnología pueden remplazar hasta dos controles remotos de rayos infrarrojos y le brinda la mayoría de las
mismas funciones encontradas en el control remoto original. Es compatible con 378 tipos de aparatos de
TV comunes y con 117 dispositivos de TV por cable. El control remoto ya viene programado cuando usted
lo compra. Sólo introduzca la clave correspondiente al dispositivo, y el control remoto está listo para
utilizarse.
Diodo luminiscente
— Se enciende
cuando el control
remoto está enviando
una señal.
CH+ [CANAL
SIGUIENTE] CH–
[CANAL ANTERIOR]
— Se oprimen para
avanzar o retroceder
de canal.
— Sirve para encender y apagar los
ìììì
dispositivos.
VOL+ [SUBIR VOLUMEN] y
VOL– [BAJAR VOLUMEN] — Se oprimen
para subir o bajar el volumen.
VISTA POSTERIOR
SETUP [PREPARAR] —
Se oprime para activar
el modo de
programación.
"#&8'46'0%+#"
• Mantenga las pilas fuera del alcance de los niños.
• No mezcle pilas nuevas y viejas.
• Deseche las pilas viejas con prontitud y de
• Solamente utilice pilas nuevas del tamaño
• Si no tiene pensado utilizar el control remoto
R
La deglución de una pila tipo botón puede causar la
muerte.
manera adecuada. No las queme ni las entierre.
.
"24'%#7%+¦0"
requerido y del tipo recomendado.
durante un mes o más, retire las pilas.
Las pilas pueden despedir compuestos
químicos capaces de destruir componentes.
RRRR
.
"
±±±±"016#"±±±±"
• No coloque objetos en la parte superior del control
remoto después de haber instalado las pilas. Esto
puede reducir la duración de las pilas.
• Aunque el control remoto dispone de memoria de
seguridad, le recomendamos tener pilas nuevas
listas para ser instaladas tan pronto como retire las
viejas.
• Cuando el control remoto deje de funcionar
adecuadamente cambie las pilas.
CABLE — Se oprime para
seleccionar el dispositivo de
cable.
4'/1%+¦0"&'".#5"
6+4#5"#+5.#06'5
Para poder utilizar el control remoto debe retirar la
tira protectora de material aislante situada en el
interior del compartimiento de las pilas. Sujete la
tira y tire levemente de la misma para retirarla.
4''/2.#<#0&1".#5"
2+.#5
El control remoto viene con dos pilas tipo botóncelula LR 44 (3 voltios) para el suministro de
energía. Para lograr un funcionamiento óptimo y
una larga duración, le recomendamos usar pilas
RadioShack tipo botón.
1. Para retirar la tapa del compartimiento de las
pilas, deslícela en la dirección de la flecha.
Rý
Rý
RýRý
....
TV — Se oprime para
seleccionar la
televisión.
Tapa del compartimiento de las
pilas
2.
Recoje las pilas viejas tipo botón-celula y
inserta dos pilas nuevas tipo botón-celula
LR44 con el lado positivo (+) hacia arriba.
3.
Coloque de nuevo la tapa.
±±±±
241)4#/#%+¦0"&'."
%10641."4'/161
Asegúrese de que apunta el control remoto en la
dirección del dispositivo y de que la distancia
existente entre ambos no sea más de 16 pies.
1. Consulte la lista de claves y escriba las
correspondientes al dispositivo en cuestión.
2.
Encienda manualmente la televisión o el
convertidor de la señal de cable
.
"+/2146#06'"
Si aparece un icono al final del párrafo, diríjase al cuadro de esa página con el icono correspondiente para
#
encontrar la información pertinente.
Rý
Rý
RýRý
Advertencia
—
#
—
Importante
±±±±
—
Nota
#
....
Precaución
—
°°°°
— Sugerencia
2002 RadioShack Corporation.
©
RadioShack y RadioShack.com son marcas comerciales
Todos los derechos reservados.
empleadas por RadioShack Corporation.
Page 4

±±±±"016#"±±±±"
Programación del control remoto
• Si programa de forma incorrecta la clave, el diodo
luminiscente destella cada vez que oprime una
tecla.
• Si el control remoto no acciona el dispositivo,
pruebe las otras claves correspondientes a tal
dispositivo en la lista de claves hasta que encuent re
la que sirva.
Funcionamiento
• Las teclas de función del control remoto funcionan
de la misma manera que las del control remoto
original suministrado con el dispositivo. No
obstante, ciertas teclas de función como
pudiesen no funcionar correctamente según el
dispositivo que esté utilizando.
• Oprima cada tecla dentro de un período de 10
segundos después de la previa opresión de tecla.
De lo contrario se desactiva el modo de
programación del control remoto.
• No oprima ninguna tecla sin soltarla durante más de
30 segundos, o de lo contrario el control remoto
deja de funcionar hasta que se suelten todas las
teclas.
CH+
CH-
y
3.
Para seleccionar el tipo de dispositivo
deseado, oprima uno de los botones, TV o
CABLE
, los cuales están situados en la parte
posterior del control remoto. El diodo
luminiscente destella una vez
4. Mantenga apretado el botón
.
SETUP
[PREPARAR] hasta que el diodo luminiscente
destelle dos veces.
5.
Con los botones
VOL+, VOL–, CH+ y CH–
introduzca la clave de 4 dígitos
correspondiente a la marca de su televisión o
de su dispositivo de cable.
para el 1,
CH-
VOL-
para el 2,
para el 4. Por ejemplo, para preparar el
Oprima
CH+
para el 3 y
control remoto para una televisión SHARP (la
clave del fabricante es 2242), oprima
VOL-, CH-, VOL-
. Si el diodo luminiscente
destella dos veces, significa que el control
remoto aceptó la clave.
±±±±
6. Apunte el control remoto hacia el dispositivo y
oprima *. El dispositivo se prenda.
7. Para aumentar o disminuir el volumen de
sonido del dispositivo oprima uno de los
botones,
canal siguiente o el anterior, oprima
CH-
VOL+
, según corresponda.
VOL-
o
. Para seleccionar el
8. Para dispositivos adicionales, repita los
pasos 2 al 7.
(70%+10#/+'061
1.
Para encender el dispositivo, apunte el
control remoto hacia el mismo y oprima *.
VOL+
VOL-
CH+
o
'52'%+(+%#%+10'5
Energía......……................3V Dos pilas tipo botón-
Alcance del control (IR).……………...…….16 pies
Dimensiones (AAP).……........23¼ x 13 x 4
Peso (sin incluir el paquete)………….......0.81 oz.
Estas especificaciones son estándar; pueden
variar en ciertas unidades. Las especificaciones
están sujetas a cambios y mejoras sin previo
aviso.
celula LR44 (vienen incluidas)
%7+&#&1"&'".#"
70+&#&
Mantenga seco el control remoto; si se moja,
,
séquelo de inmediato. Utilice el control remoto y
guárdelo solamente en entornos con temperatura
normal. Maneje con cuidado el control remoto; no
lo deje caer. Mantenga el control remoto alejado
del polvo y la suciedad, y límpielo ocasionalmente
con un trozo de tela húmedo para mantenerlo con
aspecto nuevo.
5'48+%+1";"
4'2#4#%+¦0
Si el control remoto no funciona como debiera,
llévelo a un establecimiento RadioShack de la
localidad para que lo revisen. Cualquier
modificación o alteración de los componentes
internos del control remoto puede causar una falla
e incluso la anulación de la garantía.
1
/3 pulg
2. Oprima las teclas de función deseadas.
±±±±
3. Para encender el último dispositivo
seleccionado, oprima *. Para encender otros
dispositivos, oprima las teclas
correspondientes a los dispositivos deseados
y después oprima *.
Garantía limitada de noventa días
Este producto está garantizado por RadioShack contra defectos de fabricación en el material y mano de obra bajo condiciones nor-males
de uso durante noventa (90) días a partir de la fecha de compra en tiendas propiedad de la empresa RadioShack, franquicias y
distribuidores autorizados de RadioShack. EXCEPTUANDO LO AQUÍ ESTABLECIDO, RadioShack NO OFRECE GARANTÍAS
EXPLÍCITAS Y LAS GARANTÍAS IMPLÍCITAS, INCLUYENDO LA GARANTÍA DE QUE EL PRODUCTO PODRÁ SER COMERCIAL-IZADO
Y QUE ES ADECUADO PARA UN FIN ESPECÍFICO, TIENEN UNA DURACIÓN LIMITADA AL PERÍODO DE VIGENCIA DE
LAS GARANTÍAS LIMITADAS AQUÍ EXPUESTAS POR ESCRITO. EXCEPTUANDO LO AQUÍ ESTABLECIDO, RadioShack NO TEN-DRÁ
RESPONSABILIDAD NI OBLIGACIÓN ALGUNA HACIA EL CLIENTE U OTRA PERSONA O ENTIDAD CON RESPECTO A LAS
RESPONSABILIDADES, PÉRDIDAS O DAÑOS CAUSADOS DIRECTA O INDIRECTAMENTE POR EL USO U OPERACIÓN DEL
PRODUCTO O RESULTANTES DE UNA VIOLACIÓN DE ESTA GARANTÍA, INCLUYENDO PERO SIN LIMITARSE A, DAÑOS
CAUSADOS POR INCONVENIENCIA, PÉRDIDA DE TIEMPO, DATOS, BIENES, INGRESOS O GANANCIAS, O DAÑOS INDIREC-TOS,
ESPECIALES, INCIDENTALES O CONSECUENCIALES, AÚN SI SE HA NOTIFICADO A RadioShack DE LA POSIBILIDAD DE
TALES DAÑOS.
Algunos estados no permiten limitantes a la duración de una garantía implícita ni la exclusión o limitación de los daños incidentales o
consecuenciales, por lo que es posible que las limitaciones o exclusiones mencionadas más arriba puedan no ser de aplicación.
En caso de defecto del producto durante el período de garantía, lleve el producto y el recibo de compra que sirve de comprobante de la
fecha de compra a cualquier tienda RadioShack. Salvo si la ley dispone lo contrario, RadioShack a su opción: (a) corregirá el defecto
reparando el producto sin cargo alguno por componentes y mano de obra; (b) reemplazará el producto por otro igual o de característi-cas
similares; o (c) reembolsará el precio de compra. Todos los productos y componentes reemplazados, así como los
productos cuyo costo es reembolsado, pasan a ser propiedad de RadioShack. Pueden utilizarse componentes y productos nuevos o
reacondicionados para llevar a cabo el servicio de garantía. Los componentes y productos reparados o reemplazados están garantiza-dos
por el período remanente de la garantía original. La reparación o sustitución del producto no serán gratuitas después de la expi-ración
del período de garantía.
Esta garantía no cubre: (a) daños o averías causadas por o atribuibles a causa fortuita, abuso, accidente, mal uso, uso anormal o
impropio, falta de atención a las instrucciones, instalación o mantenimiento impropio, alteración, caída de rayos u otra incidencia de
excesivo voltaje o corriente; (b) reparaciones no efectuadas por un taller autorizado por RadioShack; (c) consumibles tales como fusi-bles
o pilas; (d) daños a la apariencia; (e) costos de transporte, envío o seguro; o (f) costos de recogida, instalación, servicio de ajuste
o reinstalación.
Esta garantía le otorga derechos legales específicos, si bien también puede tener otros derechos que varían de un estado a otro.
La traducción al español se provee solamente para su conveniencia. En caso de discrepancias entre las versiones en inglés y en
español, prevalecerá la versió n en inglés.
RadioShack Customer Relations, 200 Taylor Street, 6th Floor, Fort Worth, TX 76102
12/99
RadioShack Corporation
Fort Worth, Texas 76102
63-1166
08A02
Impreso en China
Page 5

$4#0&"0#/'"#0&"%1&'".+56
68"$4#0& %1&'*5+ 68"$4#0& %1&'*5+
A-MARK 1114 MOTOROLA 1424 2242
ADC 1114 1214 1243 MTC 1214 1243 1431 1441
ABEX 1311 MULTITECH 3421
ADMIRAL 2242 NAD 3241 3323 3413
ADVENTURA 1343 NEC 1243 1214 1431
AIKO 2241 NIKKO 1243 2241 3413
AKAI 1243 NOSHI 1213
ALARON 3414 NTC 2241
AMBASSADOR 3412 ONWA 3421
AMPRO 1134 OPTIMUS 3233 3323 4433
ANAM 3421 OPTONICA 2242 3322
ANAM NATIONAL 1424 ORION 1122 3414 4341
ARCHER 1114 PANASONIC 4433 1414 1424
AUDIOVOX 1114 1121 1131 2241 3421 PENNEY 1114 1213 1214 1222 1243 1311
BAYSONIC 3421 1324 1344 1414 1431 1441 3124
BELCOR 1214 PHILCO 1122 1423 1214 1243 3212
BELL&HOWELL 1211 3233 PHILIPS 1423
BRADFORD 3421 PILOT 1214 1243 1324
BROCKWOOD 1214 PIONEER 3323
BROKSONIC 1114 1122 4341 PORTLAND 1214 1324 2241
CANDLE 1243 1343 1431 PRISM 1414
CARNIVALE 1243 PROSCAN 1344
CARVER 1423 PROTON 1114 1123 3413
CELEBRITY 1111 PULSAR 1212 1214
CINERAL 1121 2241 QUASAR 1414 1424 3322 4433
CITIZEN 1112 1243 1324 1343 1431 1441 RADIO SHACK 1214 1243 1311 1324 1344 1431
2341 3233 3322 3413 3421
CONCERTO 1431 RCA 1213 1214 1344 1414 2233 2242
CONTEC 3421 3124
CRAIG 3421 REALISTIC 1214 1243 1311 1324 1431 3233
CROSLEY 1423 3322 3413 3421
CROWN 1324 3421 RUNCO 1124 1212 1243
CURTIS MATHES 1121 1123 1211 1243 1324 1344 SAMPO 1243 1311 1324
1414 1423 1431 1441 2242 3212 SAMSUNG 1214 1243 1311 1431 1441 3413
CXC 3421 SAMSUX 1324
DAEWOO 1121 1131 1132 1214 1324 2241 SANSEI 1121
DAYTRON 1214 SANSUI 1122
DENON 3212 SANYO 3233 3244
DUMONT 1212 1214 SCIMITSU 1214
DWIN 1133 1141 SCOTCH 3413
ELECTROBAND 1111 SCOTT 1214 3413 3414 3421 4341
EMERSON 1112 1113 1122 1131 1132 1214 SEARS 1344 1423 1431 3233 3241 3244
1324 3233 3412 3413 3414 3334 3413 3414
ENVISION 1243 SEMIVOX 3421
FISHER 3233 3244 SEMP 3241
FUJITSU 3414 3334 3414 SHARP 2242 3322 1324
FUTURETECH 3421 SHOGUN 1214
GE 1113 1121 1344 1222 1414 1424 SIGNATURE 1211
2242 3124 3413 SIMPSON 3434
GIBRALTER 1212 1214 1243 SONY 1111
GOLDSTAR 1431 1214 1243 1311 SOUNDESIGN 3413 3414 3421
GRADIENTE 1422 1431 SPECTRICON 1114
GRUNPY 3414 3421 SQUAREVIEW 3334
HALLMARK 3413 SSS 1214 3421
HARLEY DAVIDSON 3414 STARLITE 3421
HARMAN / KARDON 1423 SUPRE-MACY 1343
HARVARD 3421 SUPREME 1111
HITACH 1311 1431 3212 3224 SYLVANIA 1423 1243
INFINITY 1423 SYMPHONIC 3334
INTEQ 1212 TANDY 2242
JBL 1423 TATUNG 1114 1424
5
Page 6

68"$4#0& %1&'*5+ 68"$4#0& %1&'*5+
JCB 1111 TECHNICS 1414 4433
JVC 1422 TECHNOLACE 3414
JANEIL 1343 TECHWOOD 1114 1414 1431
KEC 3421 TEKNIKA 1211 1214 1324 1423 1431 1441
KENWOOD 1214 1243 2241 3223 3414 3421
KLOSS 1343 TELEFUNKEN 1431
KTV 1112 1243 1324 3421 TMK 1431 3412 3413
LG 1431 TOSHIBA 1441 3233 3241
LOGIK 1211 TOTEVISION 1324
LUXMAN 1431 VECTOR RESEARCH 1243
LXI 1344 1423 3233 3241 3413 VICTOR 1422
MAGNAVOX 1423 1243 3414 3434 VIDIKRON 1423
MAJESTIC 1211 VIDTECH 1214 3413
MARANTZ 1243 1423 VIKING 1343
MATSUSHITA 4433 WARDS 1211 1214 1222 1243 1423 1431
MEGATRON 1114 3212 3413 3322 3413 3414
MEMOREX 1211 1431 3223 3233 4333 WHITE WESTINGHOUSE 1131 1132
MGA 1214 1243 3223 3413 YAMAHA 1214 1243
MIDLAND 1212 1311 1324 1344 1414 3124 ZENITH 1212 1211 2241
MINUTZ 1222 ZONDA 1114
MITSUBISHI 3223 1214 2242 3413
%#$.'"68"$4#0& %1&'*5+ %#$.'"68"$4#0&"""""""""""""""""""""""""""""""""""""""%1&'*5+
ABC 1114 1124 1131 1134 1142 1143 PHILIPS 3232
1212 PIONEER 1233 3211
ALLEGRO 1133 3232 POPULAR MECHANICS 1211
ANTRONIX 1223 4144 PULSAR 1111
ARCHER 1223 1234 3232 4144 QUASAR 1111
BELL & HOWELL 1143 RADIO SHACK 1133 1144 1234 1242
CABLETENNA 1223 RCA 1222
CABLEVIEW 1223 REALISTIC 4144
CENTURY 3232 RECOTON 1211
CITIZEN 1133 3232 REGAL 1122 1221
COMTRONICS 1331 REGENCY 1113
CONTEC 1214 REMBRANDT 1134
EASTERN 1113 RUNCO 1111
EMERSON 1234 SAMSUNG 1331 3211
EVERQUEST 1144 1331 SCIENTIFIC ATLANTA 1131 1212 1224
FOCUS 1211 SIGNATURE 1134
GC ELECTRONICS 4144 SL MARX 1331
GARRARD 3232 SPRUCER 1222
GEMINI 1144 STARCOM 1114 1144
GENERAL INSTRUMENT 1123 1134 1213 1241 STARGATE 1144 1234 1331
GOLDSTAR 1331 3211 STARQUEST 1144
GOODMIND 1234 TELEVIEW 1331
HAMLIN 1122 1132 1221 1313 TOCOM 1141 1142
HITACHI 1134 TOSHIBA 1111
HYTEX 1124 TUSA 1144
JASCO 1133 1144 3232 TV86 1444
JERROLD 1114 1123 1134 1141 1143 1144 UNIKA 1223 3232 4144
1213 UNITED ARTISTS 1124
MEMOREX 1111 UNIVERSAL 1223 3232 3444 4144
MOVIE TIME 1444 VIEWSTAR 1444
NSC 1444 ZENITH 1111 1231
OAK 1124 1214 ZENTEX 1211
OPTIMUS 1222
PANASONIC 1111 1222 2334
PARAGON 1111
6
 Loading...