

Page 1
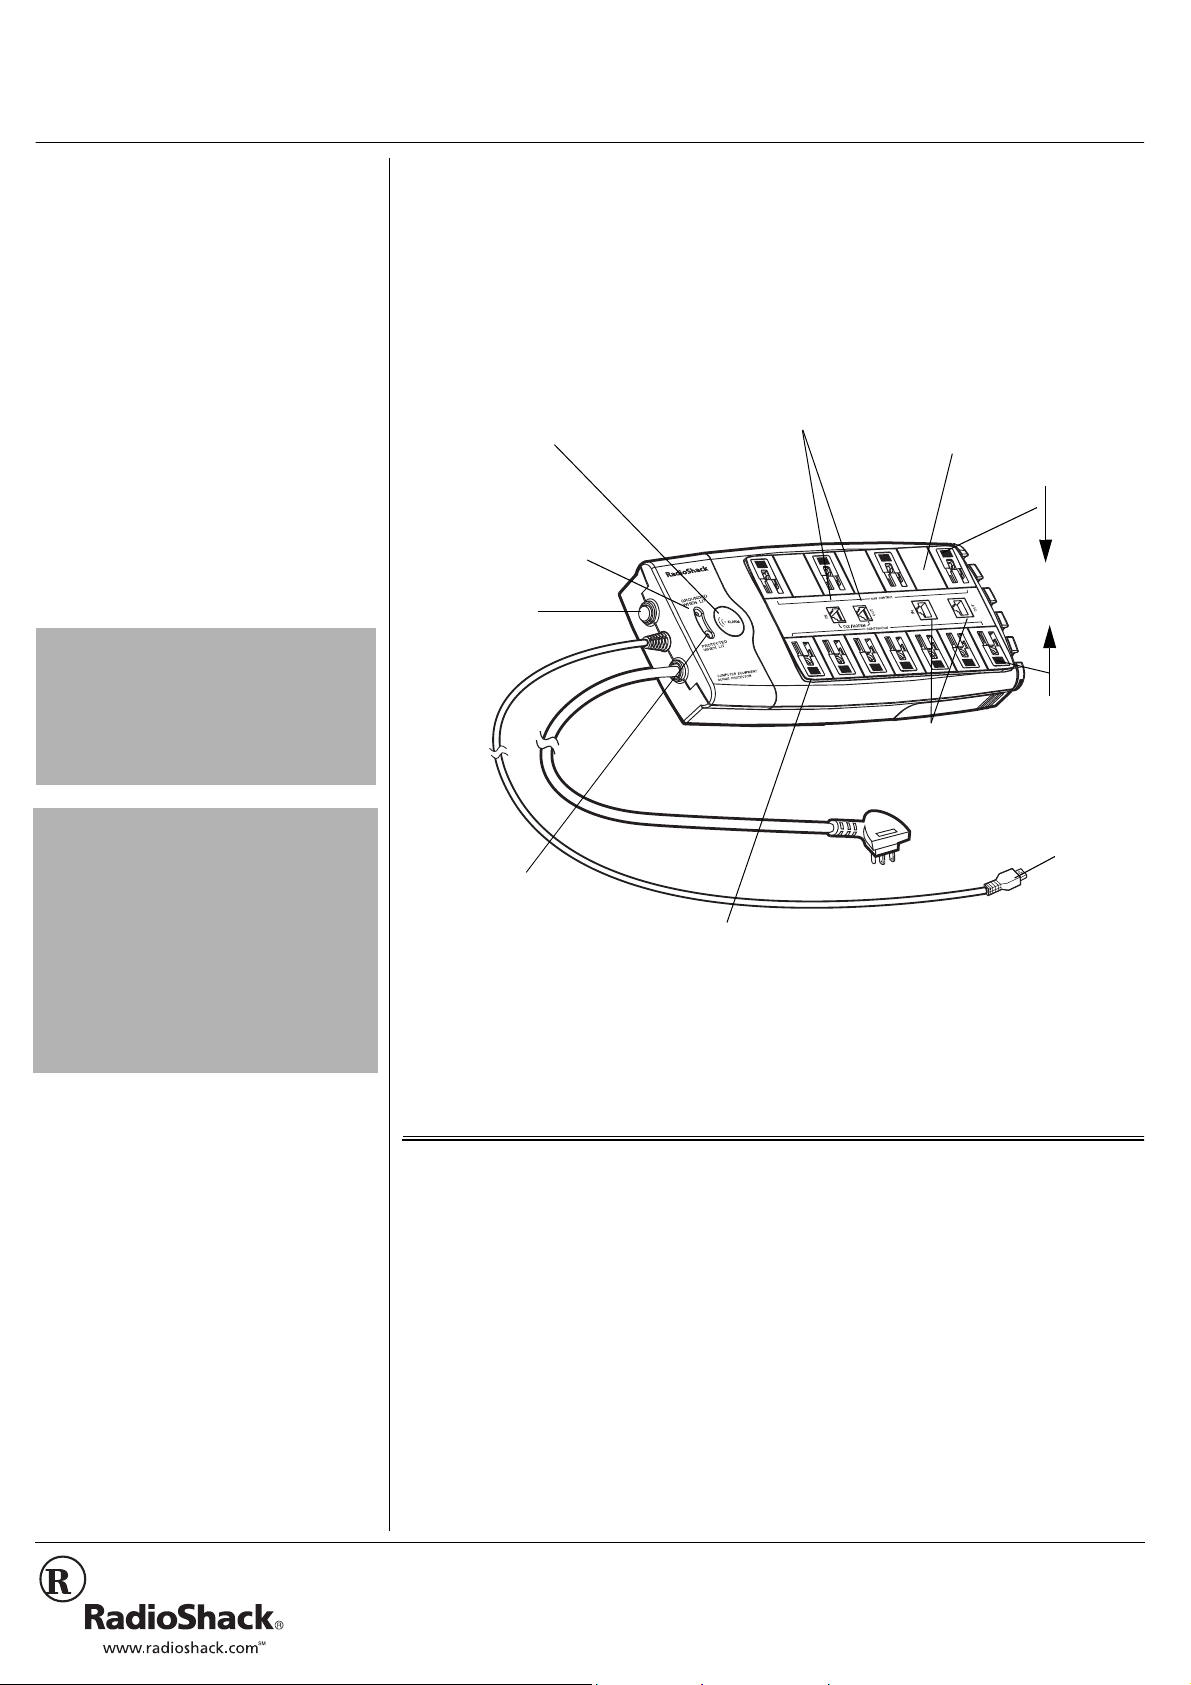
PROTECTED WHEN
LIT Indicator — Lights
when the connected
devices are protected.
Swift Detection and Protection — Detects and protects against a power surge of up to 6,000 volts
and 135,000 amps within 1 nanosecond (1 billionth of a second).
Surge Protected Modular
Phone Jacks — RJ-11
connections provide
protection against surges from
a connected fax/ modem.
GROUNDED WHEN LIT
Indicator — Lights when
the connected devices
are properly grounded.
Safety Alarm — Alerts you
when the AC line is no
longer protected (surge
protector stops conducting
power).
Power Shutdown Protection — Protects the connected appliances
from being damaged by shutting down power when surge protection is
depleted (see “Troubleshooting” on Page 3).
Indication Tags — Identify
which device’s power cord is
connected to which AC
socket, so you can avoid
disconnecting the wrong
device.
Safety Slide Covers — Prevent
children from inserting metal objects into
the unused AC socket(s).
4 AC Adapter Spacing —
Lets you plug in up to four
AC adapters into your
surge protector.
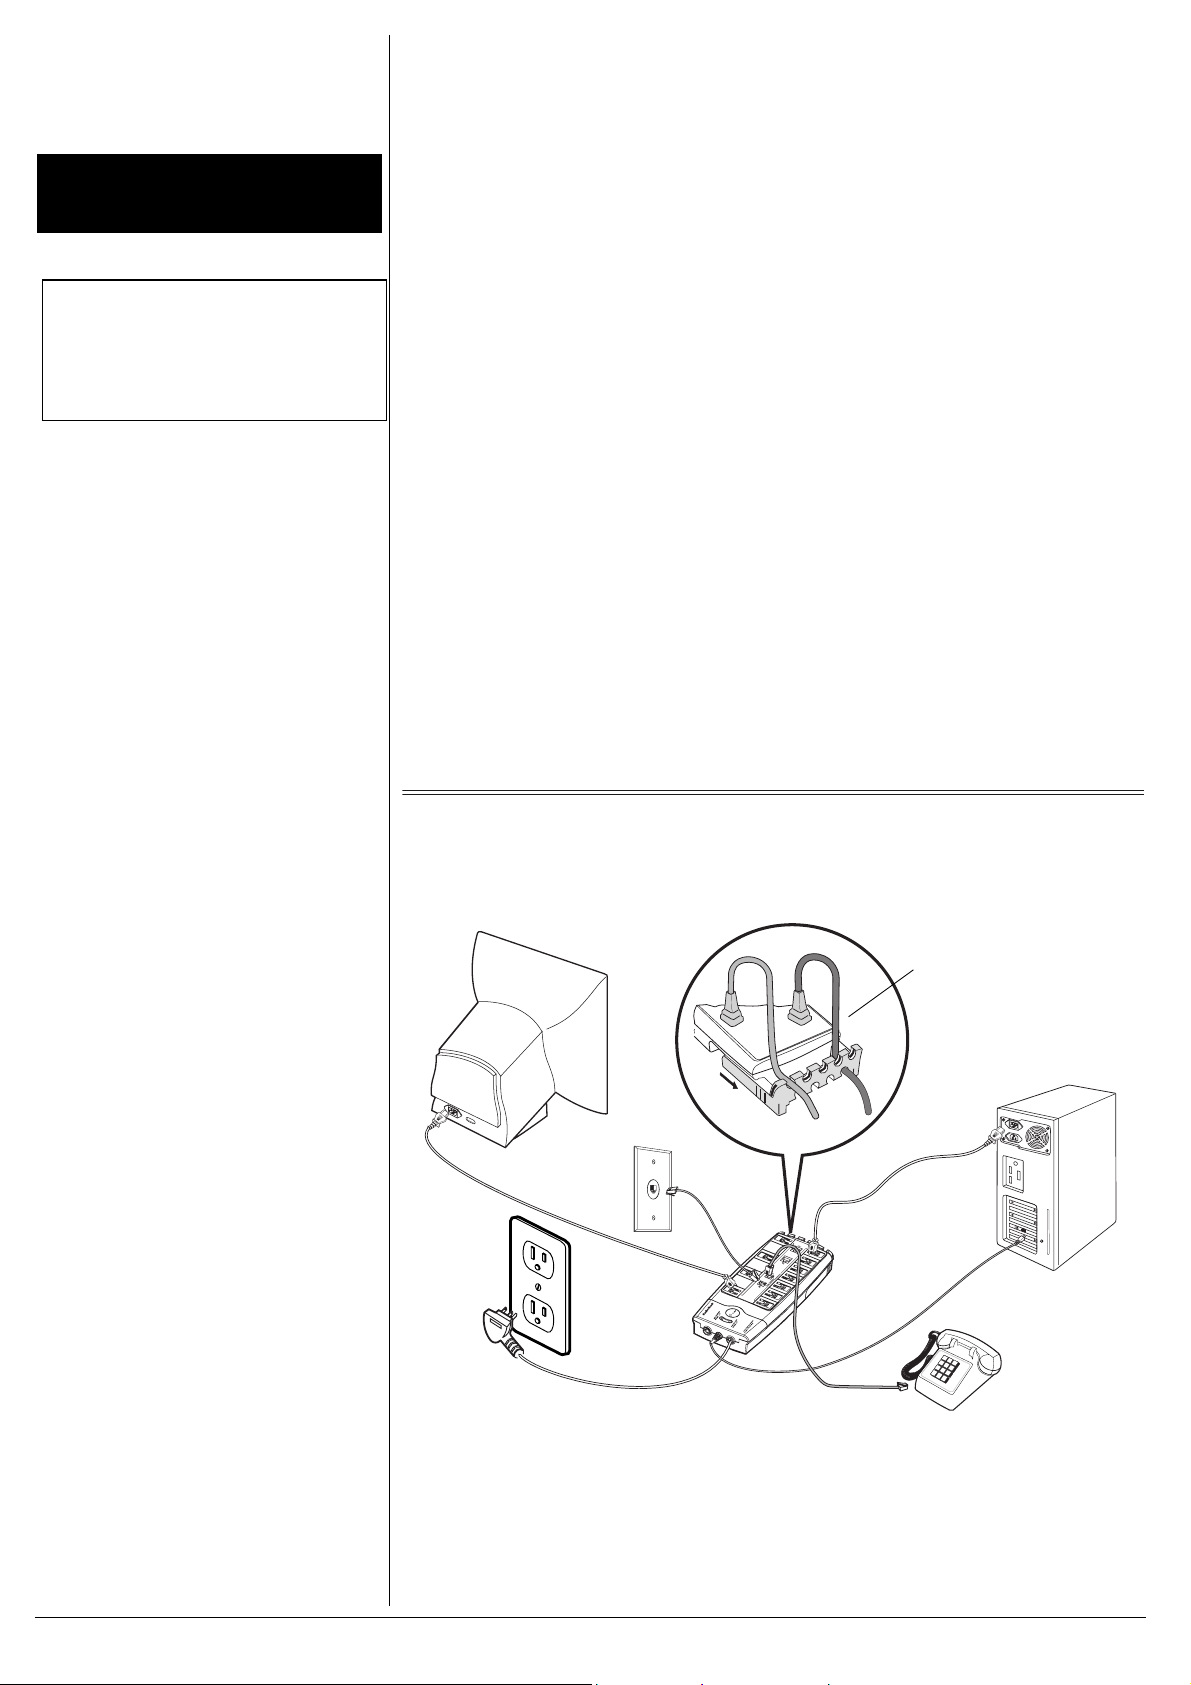
Cable Management Rack — lets you easily route the connected cables (see “Using the Cable
Management Rack” on Page 2).
Surge Protected LAN Jacks —
RJ-45 connections provide
protection against surges from
the connected LAN cable.
RESET — See
“Troubleshooting” on
Page 3.
USB Cable
33/1WVNGV"%QORWVGT"0GVYQTM"'SWKROGPV"5WTIG"2TQVGEVQT
61-2424
%106'065
The FCC Wants You to Know ..................... 1
Safety Precautions ...................................... 2
Mounting the Surge Protector ..................... 2
Using the Cable Management Rack ........ 2
Connections ................................................ 2
Connecting a Telephone Line .................. 2
Connecting the Computer’s
LAN Cable .......... ........................... ........... 3
Connecting the USB Control Adapter
Sockets .................................................... 3
Connecting the Computer Network Device’s
AC Power Cord(s) ................ ............... ..... 3
Operation ..................................... ............... 3
Using the Safety Slide Cover ................... 3
Using the Indication Tags ......................... 3
Troubleshooting .......................................... 3
Care ............... ............................ ................. 4
Service and Repair ...................................... 4
Specifications ...................... ............... ......... 4
"+/2146#06"
#
If an icon appears at the end of a paragraph,
go to the box on that page with the
corresponding icon for pertinent information.
— Warning # — Important
Rý
.... — Caution
#
±
— Note
OWNER’S MANUAL — Please read before using this equipment.
Thank you for purchasing the RadioShack 11-Outlet Computer Network Equipment Surge
Protector. It protects your valuable computer network equipment from damage caused by
sudden electrical spikes and surges. Your surge protector absorbs electrical spikes and
power surges, and ensures steady performance of the connected devices by filtering
electromagnetic and radio frequency interference.
....
Safety
ON
Safety
ON
.
• This product is intended for indoor use only.
• This surge protector is not a lightning
arrestor and might not protect against
lightning-induced voltage surges.
• Be sure the total wattage of all connected
devices does not exceed 1,875 watts.
• Use the surge protector only with a three-
prong standard AC plug. The surge protector
cannot provide protection without a
grounded AC source.
"%#76+10"
.
6*'"(%%"9#065";17"
61"-019
Your surge protector complies with Part 68
FCC Rules
of
provide the FCC regist ration number and the
REN to your telephone company.
You must not connect your surge protector
to:
• coin-operated systems
• party-line systems
• most electronic key telephone systems
. You must, upon request,
2002 RadioShack Corporation.
©
RadioShack and RadioShack.com are trademarks
All Rights Reserved.
used by RadioShack Corporation.
We have designed your surge protector to
conform to fe deral regulations, and you can
connect it to mo st telepho ne lines . However,
each surge protector that you connect to the
telephone line draws power from the
telephone line. We refer to this power draw
as the device's ringer equivalence number,
or REN.
If you use more than one phone or other
device on the line, ad d up all of th e R EN s. I f
the total is more than five (three in rural
areas), your telephones might not ring. If
ringer operation is impaired, remove a
device from the line.
Page 2
"9#40+0)
Cable Management Rack
Do not use the surge protector with an
aquarium or near wet locations.
• Use appropriate mounting anchors if you are
mounting the surge protector to drywall.
• The appropriate screw size is shown on the
mounting template.
R
"016'"±"
±
ý
R
"
5#('6;"24'%#76+105
Your surge protector connects your fax,
modem or other da ta line to a telephone l ine.
When using telephone lines, it is important
to follow these safety precautions.
• Never install telephone wiring during a
lightning storm.
• Never install a telephone jack in wet
locations unless the jack is specifically
designed for use in wet locations.
• Never touch uninsulated telephone
wires or terminals unless the telephone
line has been disconnected at the
network interface.
• Use caution when installing or
modifying telephone lines.
R
2. Drive in two wood screws (not sup plied)
with heads that fit into the keyhole slots
on the bottom of the surge protector.
3. Align the surge protec tor’s keyho le slots
with the wood screws, then press the
surge protector down to secure it.
±
75+0)"6*'"%#$.'"
/
#0#)'/'06"4#%-
The five cable groov es o n the top cable rack
and the four cable g rooves on the bottom let
you place the related cable groups together
for easy identification. (See inset illustration
below.)
1. Slide the cable management ra ck all the
way out until it stops.
/1706+0)"6*'"
574)'"2416'%614
You can place the surge protec tor on a l evel
surface or mount it on a wall. Select a
location that is:
• near a grounded AC outlet
• near a telephone wall jack
• out of the way of normal activities
1. Use the supplied mounting template to
mark the holes on the selected location.
%100'%6+105
%100'%6+0)"#"6'.'2*10'".+0'
2. To snap cables into the grooves at the
top of the cable management rack,
connect the cables to the surge
protector then snap the cables into the
top grooves.
To snap cables into the grooves at the
bottom of the management rack, route
the cables below the rack’s frame and
connect the cables to the surge
protector, then snap the cables into the
bottom grooves.
1. Connect one end of a modular
telephone cord (not supplied) to the
surge prote c tor's
and the other end to a telephone wall
jack.
2. Connect one end of an existing
telephone cord (not supplied) to the
2
FAX/MODEM IN
jack,
surge protector's
and the other end to your fax, modem,
or telephone.
FAX/MODEM OUT
jack,
Page 3

%100'%6+0)"6*'"%1/276'4N5".#0"%#$.'
±
"016'"±"
Do not connect your computer’s AC plug to the
USB CONTROL sockets. The power on and
off for these sockets is controlled by the
computer.
#
"+/2146#06"
#
Operating this surge protector from a nongrounded outlet will invalidate your “Connected
Equipment Guarantee” and puts your valuable
equipment at risk.
LIMITED FIVE-YEAR WARRANTY
AND CONNECTED EQUIPMENT GUARANTEE
LIMITED WARRANTY — This surge protec tor product is warranted by RadioShac k to the original purchas er against manufacturing defects in mater ial an d workm ans hip under nor mal us e
for five (5) years from the date of purchase (the “Warranty
Period”) from Rad ioShack company owned stores and authorized Radi oShack franchisees and dea lers. In the e v ent of a covered product defect during the Warranty Period, RadioShack will,
at its option, unles s otherwise provide d by law: (a) correct t he
defect by surge protect or repair without charge for parts and
labor; (b) replace the surge protector with one of the same or
similar design; or (c) refund the purchase price of the surge protector.
CONNECTED EQU IPMENT GU ARANTE E — RadioSha ck warrants to the original purchas er of the surge protec tor that if any
electronic equipment (the “Connected Equipment”), which is
properly installe d and connected (as defined below) t o t he surge
protector and is dam aged d uring th e Warranty Pe riod by a transient voltage surge /sp ike f rom the AC p owe r line, tel ephon e l ine
or coaxial line that en ters th e Co nn ected Equ ipm ent thro ug h the
surge protector, RadioS hack will reimburs e to the original p urchaser of the surge prot ector the lower of the: (a) Connected
Equipment repair charges; (b) purchase price of equipment comparable (as determined by RadioShack) to the Connected Equipment; or (c ) original purchase price of the Co nnected Equip m ent,
up to a maximum of fifty thousand U . S. dollars ($50,000.0 0) (the
“Equipment Limit”). The Connected Equipment Guarantee does
not cover data l oss or any other da mages excluded in t he all
capitalized paragra ph below. In order to qualify for C onnected
Equipment reimbursement, the surge protector must be returned
to RadioShack an d inspec tion of t he surg e protect or must show
its protection capacity was exhausted by a surge. “Properly
installed and connec ted” means the surge pr otector must be
plugged directly in to a properly wired and grou nded AC out let;
no extension cord s, adapters, other ground w ires or electrical
connections may be used to connect the surge protector to AC
power and no more t han one piece of Connected Equip ment
may be connecte d to any o ne surg e protec tor outle t. The w iring
in the building must comply with all applicable codes (NEC, CSA,
etc.), and all wires (power, telephone and coaxial) leading into
the Connected E quipment must pass through the surge p rotector. To claim damage to Connected Equipment as a result of telephone line transients, the surge protector must provide
telephone line protection, and y our telephone serv ic e equipment
must include a properly installed and operating “primary protection” device at the servi ce entrance. Prim ary protection dev ices
are normally availab le from the telephone co mpany and added
during telephone line installation. To claim damage to Connected
Equipment as a result of coaxial line transients, the surge protector must provide coa xial line protection.
This Limited Warranty and Connected Equipment Guarantee
applies only to the orig inal purchaser of the su rge protector.
EXCEPT AS PROVIDED HEREIN, RADIOSHACK MAKES NO
EXPRESS WARRANTIES AND ANY IMPLIED WARRANTIES,
INCLUDING THOSE OF MERCHANTABILITY AND FITNESS
FOR A PARTICULAR PURPOSE, ARE LIMITED IN DURATION
TO THE DURATION OF THE WRITTEN LIMITED WARRANTIES CONTAINED HEREIN. EXCEPT AS PROVIDED HEREIN,
RADIOSHACK SHALL HAVE NO LIABILITY OR RESPONSIBILITY TO CUSTOMER OR ANY OTHER PERSON OR
ENTITY WITH RESPECT TO ANY LIABILITY, LOSS OR DAMAGE CAUSED DIRECTLY OR INDIRECTLY BY USE OR PERFORMANCE OF THE PRODUCT OR ARISING OUT OF ANY
BREACH OF THIS LIMITED WARRANTY OR CONNECTED
EQUIPMENT GUARANTEE, INCLUDING, BUT NOT LIMITED
TO, ANY DAMAGES RESULTING FROM INCONVENIENCE,
LOSS OF TIME, DATA, PROPERTY, REVENUE, OR PROFIT
OR ANY INDIRECT, SPECIAL, INCIDENTAL, OR CONSEQUENTIAL DAMAGES, EVEN IF RADIOSHACK HAS BEEN
ADVISED OF THE POSSIBILITY OF SUCH DAMAGES.
Continued
1. Connect your computer’s LAN OUT
cable to the surge protector’s
LAN IN
jack.
2. Connect the surge protector’s
to your computer equipment’s RJ45 IN
jack using a LAN cable with RJ45 plug
at two ends (not supplied).
%100'%6+0)"6*'"75$"
10641."#'4"51%-'65
%
Your surge protector’s convenient
CONTROL ADAPTER
your computer to tu rn any devic e conn ected
to these sockets on or off instead of turning
the devices on and off individually. When
you turn your computer on or off, the
connected
are also turned on and off.
1. Connect your computer to one of the
2. Connect the AC adapter plug of the
3. Connect the surge protector’s USB plug
%100'%6+0)"6*'"%1/ 276'4 "
'6914-"&'8+%'N5"#%"
0
2
19'4"%14&*5+
Connect your computer network devices’
grounded AC power cords (up to seven) to
the surge protector’s AC sockets and AC
adapters (up to four) to the su rge protecto r’s
USB CONTROL
connect extra grounded AC plugs (excludi ng
the computer’s) to the
USB CONTROL ADAPTER
surge protector’s
sockets.
±
devices (compute r peripher als) that yo u
want to be turned on or off by the
computer to the surge protector’s
USB CONTROL
to the computer’s USB port.
sockets let you use
CONTINUOUS
sockets.
sockets. You can also
USB CONTROL
LAN OUT
USB
sockets
sockets if you want their power to be
controlled by the connected computer.
12'4#6+10
After you complete all the connections, plug
the surge protector’s AC power cord into a
three-prong standard grounded AC outlet.
The GROUNDED WHEN LIT and
PROTECTED WHEN LIT indicators light.
If any of the indicator lights fail, see
“Troubleshooting”.
75+0)"6*'"5#('6;"5.+&'"
18'4
%
Your surge protector is e quippe d w ith safe ty
slide cover s on each of its 11 AC sockets .
Slide the cover up to protect each unused
AC socket.
75+0)"6*'"+0&+%#6+10"6#)5
Your surge protector comes with pairs of
indication tags to identify which device’s
power cord is connected to which AC
socket. Stick a large color tag on the power
cord at th e rear of the d evice and th e same
color small tag next to the surge protector’s
target AC socket.
6417$.'5*116+0)
Condition
The GROUNDED WHEN LIT indicator do es
not light.
Solution
Your surge protector is not grounded. You
must move it to a different grounded, threeprong AC outlet.
If the GROUNDED WHEN LIT still does not
light after moving the surge protector to a
#
3
Page 4

.
"%#76+10"
.
Retain Instr uctions— Retain the safety and
operating instructions for future reference.
Damage — Unplug this appliance from the wall
outlet and replace it:
• When the power cord or plug is damaged.
• If liquid has been spilled or objects have
fallen into the appliance.
• If the appliance has been exposed to rain or
water.
• If the appliance has been dropped or
damaged in any way.
• When the PROTECTED WHEN LIT indicator
fails to ligh t.
LIMITED FIVE-YEAR WARRANTY
AND CONNECTED EQUIPMENT GUARANTEE
(Continued)
Some states do no t allo w li mit ation s o n how lon g an im plied wa rranty lasts or the exclusion or limitation of incidental or consequential damages, so the ab ov e limitations or exclusions may not
apply to you.
To make a claim for surge-induced damag e to Conn ected Equipment, you must:
1. Call RadioShack at 1-888-353-1560 for a return authorization
number during the Warranty Period. Unde r no circumstances
will a claim for surge-induced damage to Connected Equip ment be accepted w it hout a return authorizat ion number;
2. Have any su rge-induce d, dama ged Conn ected Equ ipment re -
paired (or get an estimate fo r repair) by a service center autho rized by the man ufac tur er of the Co nn ected Eq uipm ent unles s
the servic e center determines t hat the Connec ted Equipme nt is
not repairable o r that the c ost of repa ir will be mo re than th e
purchase price of comp arable replacement equip ment. If the
Connected Equi pment is n ot to be repair ed, get a written quo tation for the purchase price of comparable replacement equipment. In no event will RadioShack reimburse more than the
Equipment Limit. The repair bill or estimate from the authorized
service center must indicate that the damage to the Connected
Equipment was s urge-induced; and
3. Ship the original surge protector, postage prepaid to: Ra-
dioShack, 7020 Koll Center Pkwy, Suite 136, Pleasanton, California, 94588. Include: (a) your name, address and daytime
telephone num ber; (b) the or igin al o r a pho toc opy of the sa les
receipt for the surge prot ector; (c) a brief description of any
problem with the surge protector; (d) a brief description of how
the damage to the Connected Equipment occurred; (e) the
original authorize d service center repair bill or estima te documenting that the da mage to the Connected Eq uipment was
surge-induced; an d (f) if replac ement equip ment is to be purchased, the original or a ph otocopy of th e quotation for comparable replacement equipment and the authorized service
center repair estimate must contain a statement that the Connected Equi pment is no t r epairable or that the cost of rep air will
be more than the pu rchase price o f comparable repl acement
equipment.
If RadioShack dete rmines that damage to Co nnected Equ ipment
is covered, RadioSh ack will reimb ur se, up t o th e Equip men t Lim it
amount defined above, to the original purc haser of the su rge protector the lower of the : (a) repair charge s; (b) purchase pric e of
comparable repla cement equipm ent; or (c) the orig inal purchase
price of the Conn ected Equipm ent. In addit ion, in the ev ent of a
covered product defect duri ng the Warranty P eriod, Radi oShack
will, at its option, unless ot herwise provided by law: (a) correct the
defect by surge protector repair without charge for parts and
labor; (b) replace the surge protector with one of the same or similar design; or (c) refund the purchase price of the surge protector.
To make a warranty claim for a defe ct in the surge protector with out a claim for surge-induced damage to Connected Equipment,
you must, during the Warranty Period, take the surge protector
and the RadioSh ack sales receipt as proof of purchase date to
any RadioShack s t ore.
All replaced parts, products, and Connected Equipment and products and Connected Equipment on which a refund is made,
become the property of RadioShack. New or reconditioned parts
and products ma y be used in the per formance of warran ty service. Repaired or replace d parts in s urge pr otect ors and replace ment surge protect ors are warranted for the remainder of the
Warranty Period. You will be charg ed fo r repa ir o r repla cem ent of
the product made aft er the expiration of the Warrant y Period.
This Limited Warranty and Connected Equipment Guarantee
does not cover: (a) da mag e o r failu re ca use d by o r attribu tab le to
acts of God, abuse, accident, misuse, improper or abnormal
usage, failure to follow inst ructions , imprope r installa tion or maintenance, alteration, lightning; (b) any repairs other than: (i) surge
protector repairs provided by a RadioSha ck Authorized Service
Facility ; and (ii) reimbursement of t he cost of initial repairs to Connected Equipment performed by a service center au thorized by
the manufacture r of the Connecte d Equipment; (c) consumables
such as fuses or batteries; (d) cosmetic damage; (e) transportation, shipping or insuran ce costs; or (f) costs of produc t or Connected Equipment removal, installation, set-up service adjustment
or reinstallation.
This warranty gives you specific legal rights, and you may also
have other rights which vary from state to state.
RadioShack Cus t omer Relations, 200 Taylor Street, Sixth Floor,
Fort Worth, Texas 76102
grounded oultet, return the product to
RadioShack for assistance.
allowed to pass beyond the alarm. When th e
surge protector receives an unu sually strong
surge, the built-in protection absorbs the
If the surge protector proves to be working
properly, you may need to contact a
professional electric ian to check yo ur outlets
for proper grounding.
Condition
The PROTECTED WHEN LIT and
GROUNDED WHEN LIT indicators turn off,
RESET
and
pops out.
Solution
Your surge protector received a current that
exceeded its capacity due to overload.
When this happens, the 15-amp circuit
breaker (located on the side of the case)
trips to prevent possible damage, and
RESET
pops out. To reset the surge
protector, disconnect one or more of the
connected devices and allow the surge
protector to cool down . The n p ush
RESET
Condition
The PROTECTED WHEN LIT and
GROUNDED WHEN LIT indicators turn off,
and the surge protector sounds an alarm.
Solution
Your surge protector's AC line is no longer
protected from surges and power is not
surge to protect your equipm ent. If the surge
is strong enough, it diminishes the pro tection
circuitry’s ability and the surge protector
sounds an alarm. If the PROTECTED
WHEN LIT and GROUNDED WHEN LIT
indicators will not light, replace the surge
protector.
....
%#4'
Keep the surge protector dry; if it gets wet,
wipe it dry immediately. Use and store the
surge protector only in normal temperature
environments. Handle the surge protector
carefully; do not drop it. Keep the surge
protector away from dust and dirt, and wipe
it with a damp cloth occasionally to keep it
looking new .
in.
5'48+%'"#0&"4'2#+4
If your surge protector is not performing as it
should, take it to your local RadioShack
store for assistance. Modifying or tampering
with the surge protector’s internal
components can cause a malfunction and
might invalidate its warranty.
52'%+(+%#6+105
Line Voltage .................................. ........................................ ........................... ................. .... .... ......... ..125V
Line Current ............... ........................... ............................ ........................... ........................................ ..1 5 A
Frequency ............................................................................................................................................60Hz
Number of AC Outlets ...........................................................11 (4 USB-Controlled and 7 Regular Outlets)
Cord Length/Plug Type .................................................................................................8ft, right angle plug
Circuit Breaker ........................ ........................................ ........................... ............................................15A
Housing Material ............................................................................................................................... Plastic
PROTECTED WHEN LIT Indicator .......................................... Lights green when the AC line is protected
GROUNDED WHEN LIT Indicator ....................Lights green when the ground wire is securely connected
Noise Frequency Range .............................................................................................. 100 kHz – 100 MHz
Noise Attenuation Level .............................................................................................................Up to 55dB
Maximum Surge Voltage ........................................................................................ ......... .. .... ............6,000V
Composite Maximum Surge Current ......................................................................120VAC Line 135,000A
Phone Line ......................................................................................................................................10,500A
Total Maximum Surge Current ......................................................................................................145,500A
Composite Maximum Energy Dissipation:
120 VAC Line................................................................ ..... .. .. .. .. .... .. .. ..... .. .. .. .. .. .... .. ..... .. .. .. .. .. .. .. .. ......2,421J
Phone Line............................................................................................................................................180J
Total Maximum Energy Dissipation ........................................... ............... ........................... ..............2,601J
Modes of Protection. ......................................................Three (Hot-Neutral, Hot-Ground, Neutral-Ground)
Clamping Time .................................................................................................................... <1 nanosecond
Clamping Voltage .................................................................................................................................330V
Additional Protect .....................................................................LAN (1 in, 1 out), protects pin 1, 2 and 3, 6
Operation Temperature ..........................................................................................32 to 122
UL Approvals .................................... ........................... ............................ ......................UL1449 & UL1363
FCC Certification ............................ .......................................... ............... ........................................ Part 68
Specifications are typical; individual units might vary. Specifications are subject to change and
improvement without notice.
Fax/Modem (1 in, 1 out) Tip-Ground, Ring-Ground, Tip-Ring
°F (0 to 50°C)
RadioShack Corporation
Fort Worth, Texas 76102
61-2424
04A02
Printed in China
 Loading...