

Page 1
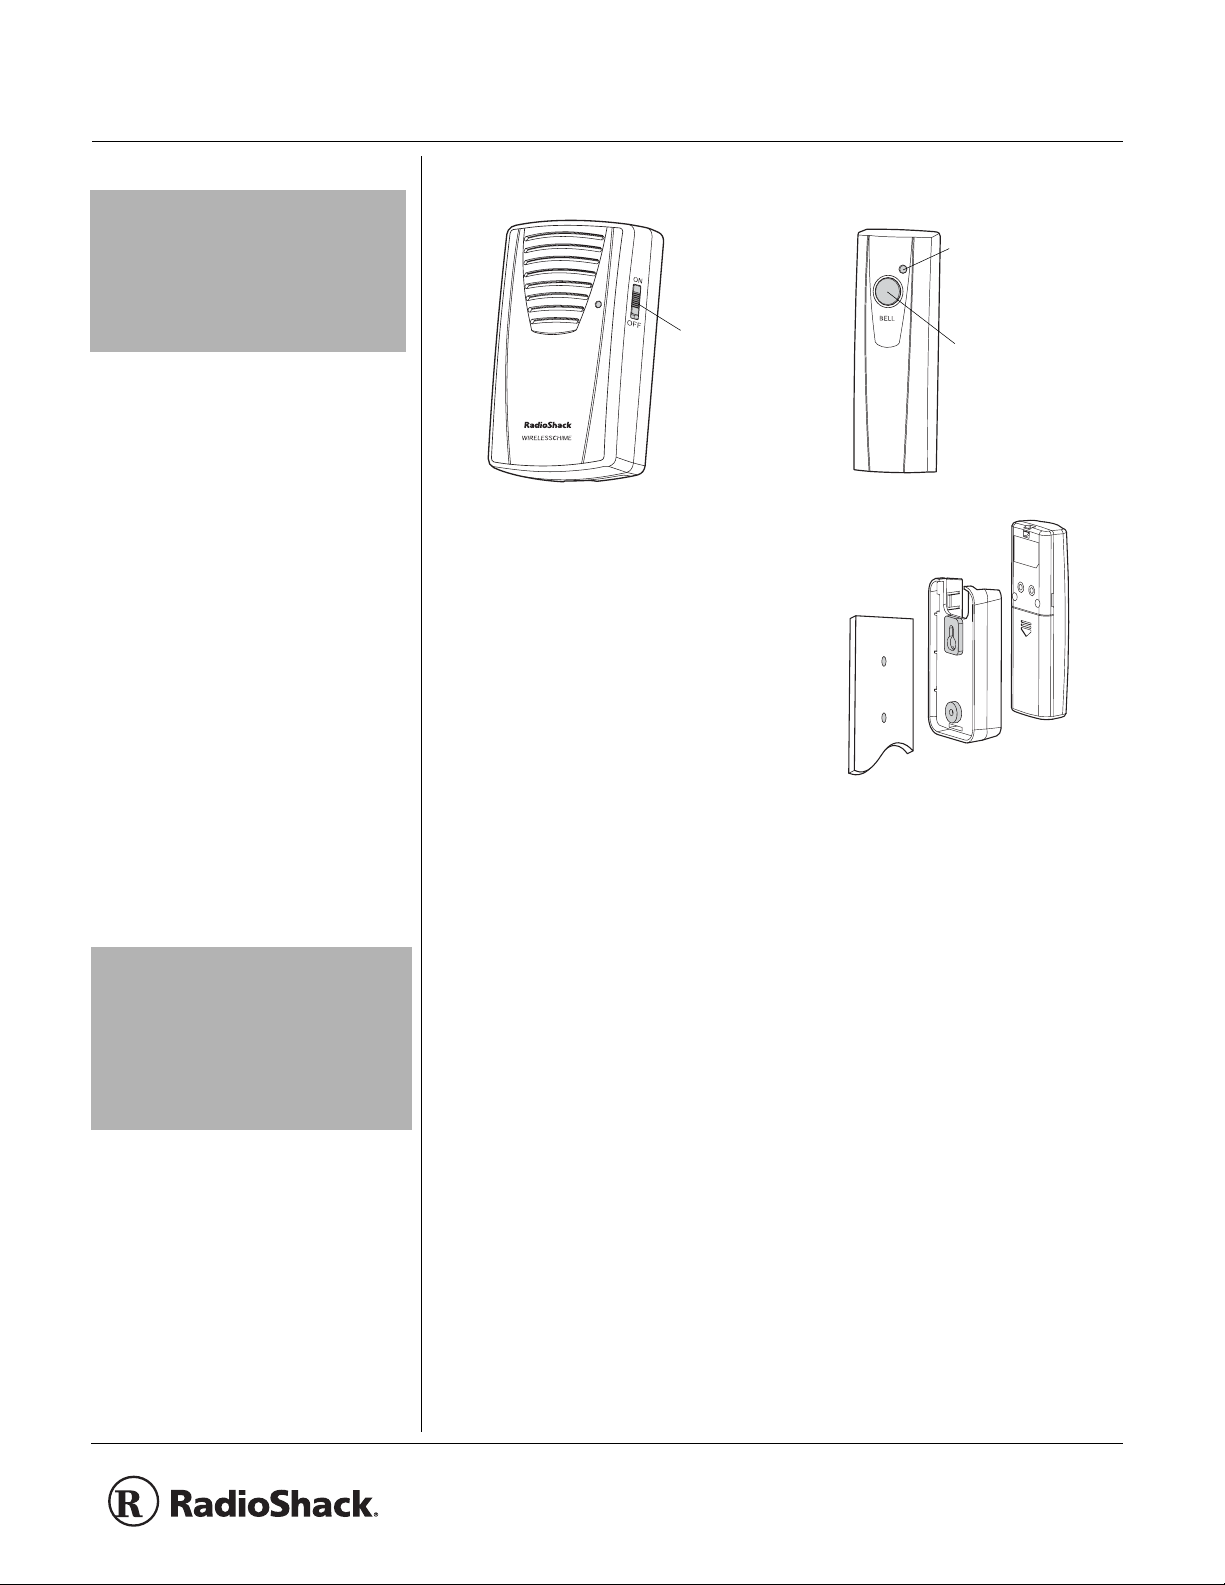
Receiver
Transmitter (two included)
Two Bell Wireless Door Chime
61-2117 OWNER’S MANUAL — Please read before using th is equipment.
IMPORTANT
!
If an icon appears at the end of a paragraph,
go to the box on that page with the
corresponding icon for pertinent information.
— Warning Ó — Hint
o
— Caution Ô — Note
— Important
!
!
Indicator — Lights
when BELL is
pressed.
Slide ON/OFF to
ON so that w hen
BELL is pressed
on one of the
transmitters, a
door chime
sounds.
Thank you for purchasing the RadioShack
Two Bell Wireless Door Chi me. It works as a
doorbell, a remote pager, or an alert. You
can add an optional external sensor to have
a chime that alerts you when someone
walks into a room. The wireless door
chime’s three-position channel switch
prevents other transmitters or radio devices
from sounding the chime.
BELL — Press
BELL to hear the
door chime.
CAUTION
• Use only fresh batteries of the required siz e
and type. Always remove old or weak
batteries. They can leak chemicals that
destroy electronic circuits
• Do not mix old and new batteries, different
types of batteries (standard, alkaline, or
rechargeab le), or rechargeable batteri es of
different capacities.
MOUNTING THE
RECEIVER
ON A FLAT SURFACE
Pull out the wire stand on the back of the
receiver and set it on a table or other flat
surface.
ON A WALL
1. Drill one 3/16-inch diameter hole and
insert one of the supplied an c h ors.
2. Drive the supplied M3.5 screw into the
hole until the screw' s head extends
1
/8 inch from the wall.
about
3. Align the keyhole slot on the bottom of
the receiver with the screw in the wall,
then slide it down to secure it.
MOUNTING THE
TRANSMITTER
1. Remove the transmitter fr om the holder.
2. Use the holder as a template to mark
two screw hol es on the wall.
3. Remove the holder from the mounting
surface and drill two
holes. Insert one of the supplied
anchors into each hole.
1
/4 inch diameter
4. Drive a screw through the holders.
5. The transmitter can b e sl id i n an d out of
the holder . To lock the transmitter in the
holder, fix it with a size M2.6 screw at
the bottom of the holder.
INSTALLING
BATTERIES AND
SELECTING CHANNELS
The wireless door chime require s thre e AAA
size batteries in both tr ansmitters and three
C size batteries in the receiver. For best
performance and longest life, we
recommend RadioShack alkaline batteries.
IN THE TRANSMITTER
1. Slide the transmitter's battery
compartment door in th e direction of the
arrow to remove it.
2. Use a sm al l flat-blade screwdriver to
slide the switch inside the battery
compartment to the d esired channel for
the transmitt er.
© 2003 RadioShack Corporation.
RadioShack and RadioShack.com are trademarks
All Rights Reserved.
used by RadioShack Corporation.
Page 2

Ô NOTE Ô
The transmitter’s channel setting must be the
same as the rece iver set ti ng . If th e do or chime
occasionally sounds without anyone pressing
BELL, this indicates that the channel settings
are different. Change the channel settings so
both the transmitter and the receiver match.
Ô NOTE Ô
• Press BELL until the indicator lights.
Otherwise, the receiver may not work
properly.
• If you don't want to be bothered by the door
chime, slide ON/OFF on the re ceiver to OFF.
Limited One-Year Warranty
This product is warranted by RadioShack against man ufact uring defects in material and workmanship under normal use for
one (1) year from the date of purchase from RadioShack
company-owned stores and authorized RadioShack franchisees and dealers. EXCEPT AS PROVIDED HEREIN, RadioShack MAKES NO EXPRESS WARRANTIES AND ANY
IMPLIED WARRANTIES, INCLUDING THOSE OF MERCHANTABILITY AND FITNESS FOR A PARTICULAR PURPOSE, ARE LIMITED IN DURATION TO THE DURATION OF
THE WRITTEN LIMITED WARRANTIES CONTAINED
HEREIN. EXCEPT AS PROVIDED HEREIN, RadioShack
SHALL HAVE NO LIABILITY OR RESPONSIBILITY TO CUSTOMER OR ANY OTHER PERSON OR ENTITY WITH RESPECT TO ANY LIABILITY, LOSS OR DAMAGE CAUSED
DIRECTLY OR INDIRECTLY BY USE OR PERFORMANCE
OF THE PRODUCT OR ARISING OUT OF AN Y BREACH
OF THIS WARRANTY, INCLUDING, BUT NOT LIMITED TO,
ANY DAMAGES RESULTING FROM INCONVENIENCE,
LOSS OF TIME, DATA, PROPERTY, REVENUE, OR PROFIT
OR ANY INDIRECT, SPECIAL, INCIDENTAL, O R CONSEQUENTIAL DAMAGES, EVEN IF RadioShack HAS BEEN
ADVISED OF THE POSSIBILITY OF SUCH DAMAGES.
Some states do not allow limitations on how long an implied
warranty lasts or the exclusion or limitation of incidental or
consequential damages, so the above limitations or exclusions may not apply to you.
In the event of a product defect during the warranty period,
take the product and the RadioShack sales receipt as proof of
purchase date to any RadioShack store. RadioShack will, at
its option, unless otherwise provided by law: (a) correct the
defect by product repair without charge for p arts and labor; (b)
replace the product with one of the same or similar design; or
(c) refund the purchase price. All replaced p ar t s and product s ,
and products on which a refund i s mad e, becom e the property
of RadioShack. New or reconditioned parts and products may
be used in the performance of warranty service. Repaired or
replaced parts and products are warranted for the remainder
of the original warranty period. You will be charged for repair
or replacement of the product made after the expiration of the
warranty period.
This warranty does not cover: (a) damage or failure caused
by or attributable to acts of God, abuse, accident, misuse, improper or abnormal usage, failure to follow instructions, improper installation or maintenance, alteration, lightning or
other incidence of excess voltage or current; (b) any repairs
other than those provided by a RadioShack Authorized Service Facility; (c) consumables such as fuses or batteries; (d)
cosmetic damage; (e) transportation, shipping or insurance
costs; or (f) costs of product remo val, installation, set-up service adjustment or reinstallation.
This warranty gives you specific legal rights, and you may
also have other rights which vary from state to state.
RadioShack Customer Relations, 200 Taylor Street, 6th Floor,
Fort Worth, TX 76102
12/99
3. Install thre e AAA batteries as indicated
by the polarity symbols (+ and –)
marked inside.
4. Replace the compartment door.
5. Repeat St eps 1-4 for the other
transmitter. If the transmitter's LED
indicator dims, replace its batteries.
IN THE RECEIVER
1. Slide the receiver's battery
compartment door in the d irect ion of th e
arrow to remove it.
2. There are two channel swit ches inside
the battery compartment —
BELL 2. Slide the channel switches so
BELL 1 and
that they are on the same chan nel as
the transmitter. Ô
3. Install three C si ze batteries as
indicated by the pola rit y symbols (+ and
–) marked inside the compartment.
4. Replace the compartment door. If the
receiver's LED flashes with a short
beep tone, replace its batteries.
OPERATION
1. Slide ON/OFF on the receiver to ON.
2. Press and hold down
1 transmitter. Transmit begins, the
indicator light s, and the recei ver sounds
the door chime twice. Ô
3. When
BELL is pressed on the BELL 2
transmitter, it’s indicator lights and the
door chime sounds “Home sweet
home”.
USING THE CHIME AS AN
ENTRY CHIME
1. Connect the transmitter to a normally
open alarm sensor. You need 2conductor wire (not supplied) to make
this connection.
2. Split the ends of the wire, then con nect
the wire from the sensor 's switch to the
screw holes on the back of the
transmitter, using the two supplied
machine screws. If the sensor you are
using has both normally open and
normally closed contacts, be sure to
connect to the sensor's normally open
contacts.
3. Slide
ON/OFF on the receiver to ON.
BELL on the BELL
THE FCC WANTS YOU
TO KNOW
This equipment has been tested and found
to comply with the limits for a Class B digital
device, pursuant to Part 15 of the FCC
Rules. These limits are designed to provide
reasonable protection against harmful
interference in a re siden ti al inst alla ti on. Th is
equipment generate s, uses and can radiate
radio frequency energy and, if not installed
and used in accordance with the
instructions, may cause har mful interfer ence
to radio communications.
However, there is no guar antee that
interference will not occur in a particular
installation. If this equipment does cause
harmful interference to radio or television
reception, which can be determined by
turning the eq uipm ent of f an d on, th e u ser i s
encouraged to try to corr ect the int erfe rence
by one or more of the following measures:
• Reorient or relocate the receiving
antenna.
• Increase the separation between the
equipment and receiver.
• Consult your local RadioShack store or
an experienced radio/TV technician for
help.
• If you cannot eliminate t he inte rferen ce,
the FCC requires that you stop using
your door chime.
Changes or modificati ons not expressly
approved by RadioShack may cause
interference and void the user’s authorit y to
operate the equipment.
This device complie s with Part 15 of the
FCC Rules. Operation is subject to the
following two condi tions : ( 1) this devi ce may
not cause harmful interference, and (2) this
device must accept any interference
received, including interference that may
cause undesired operati on.
SPECIFICATIONS
Frequency ........................433.92 MHz ± 600KHz
Transmitter current consumption...............<10mA
Receiver current consumption...<2mA @ standby
Receiver battery low.......................... 2.4V
Receiver audio power...............> 80dBA @ 25cm
Transmitter operatin g
temperature..................................–20
Specifications are typical; individual units might
vary. Specifi cat io ns a re su b ject to c han ge with ou t
notice.
< 130mA @ sound playing
± 0.1V
°C to 60 °C
°F to 140°F)
(–4
RadioSha ck Corporation
Fort Worth, Texas 76102
61-2117
AO0185AAA1
11A03
Printed in China
Page 3

Receptor
Transmisor (vienen dos incluidos)
.
Timbre Inalámbrico de Dos Tonos para Puertas
61-2117 MANUAL DEL PROPIETARIO — Le suplicamos leer el manual antes de utilizar este equipo.
¡ IMPORTANTE
Si aparece un icono al final del párrafo, diríjase
al cuadro de esa página con el icono
correspondiente para encontrar la información
pertinente.
— Advertencia Ó — Sugerencia
o
— Precaución Ô — Nota
— Importante
!
!
El botón ON/OFF
[ENC./APAG.] se
coloca en ON para
que al oprimir el
botón BELL en uno
de los transmisores,
suene el timbr e
de la puerta.
Le agradecemo s la compr a del timb re inal ámbrico
de dos tonos para puertas de la mar ca
RadioShack. Funciona como timbre de la puerta,
radiolocalizador o timbre de alerta. Puede
instalarle un sensor externo optativo para tener
un timbre que le alerte cuando alguien entre a un
cuarto. El selector de canales de tres posiciones
del timbre inalámbrico para puertas impide que
otros transmisores o dispositivos de radio
accionen el timbre.
MONTAJE DEL
RECEPTOR
Indicador — Se
enciende cuando se
oprime el botón BELL
BELL [TIMBRE] —
El botón BELL se
oprime para oír el
timbre de la
puerta.
PRECAUCIÓN
• Solamen te utilice pilas ca rgadas, del t amaño
y tipo requeridos. Siempre retire de la unidad
las pilas si están viejas o bajas. Pueden
despedir compuestos químicos capaces de
destruir circuitos electrónicos.
• No mezcle pilas nuevas y viejas, diferentes
tipos de pilas (estándar, alcalinas
o recargables) o pilas recargables de
diferente capacidad.
COLOCACIÓN EN UNA
SUPERFICIE HORIZONTAL
Extraiga la bas e de alambre de la parte posterior
del receptor y colóquela en una mesa u otra
superficie horizontal.
MONTAJE EN LA PARED
1. Taladre un agujero de
de diámetro e in troduzca una de las anclas
suministradas.
2. Enrosque el tornillo de tamaño M3.5 en
el agujero, dejando la cabeza del mismo
aproximadamente a
de la pared.
3. Alinee la ranura de la parte inferior del
receptor con la cabeza del tornillo
introducido en la pared, y deslícelo hacia
abajo para asegurar lo .
MONTAJE DEL
TRANSMISOR
1. Retire del soporte el transmisor.
2. Uitilice el soporte como plan tilla pa ra marc ar
en la pared dos agujeros para tornillo.
3. Retire de la superficie de montaje el soporte
y taladre dos tornillos de
de diámetro. Introduzca en cada agujero una
de las anclas suministradas.
4. Enrosque los tornillos a través del soporte.
5. El transmisor puede montarse
y desmontarse del soporte con un
movimiento de deslizamiento. Para asegurar
permanentemen te el tran s mis o r en el
soporte, fíjelo con un tornillo de tamaño
M2.6 en la parte inferior del soporte.
3
/16 pulg. (4.8 mm)
INSTALACIÓN DE LAS
PILAS Y SELECCIÓN
DE CANALES
1
/8 pulg. (3.2 mm)
1
/4 pulg. (6.3 mm)
© 2003 RadioShack Corporation.
RadioShack y RadioShack.com son marcas comerciales
Todos los derechos reservados.
empleadas por RadioShack Corporation.
El timbre de puer ta in alám brico r equiere tre s pilas
de tamaño AAA en ambos transmisores y tres
pilas de tamaño C en el receptor. Para lograr un
funcionamiento óptimo y una larga duración, le
recomendamos us ar pilas alca linas RadioShac k.
EN EL TRANSMISOR
1. Para retirar la tapa del compartimiento de las
pilas del transmisor, deslícela en la dirección
de la flecha.
2. Con un destornillador de punta plana ponga
el selector situad o dentro de l comparti miento
de las pilas en el cana l de s ead o para el
transmisor.
Page 4

Ô NOTA Ô
l
El canal del transmisor debe ser igual al del
receptor. Si el timbre suena ocasionalmente sin
que nadie oprima el botón BELL, esto indica que
están en diferentes canales. Cambie el ajuste del
canal de manera que tanto el transmisor como el
receptor estén en el mismo canal.
Ô NOTA Ô
• Oprima el botón BELL hasta que se encienda
el indicador. De lo contrario, podría no
funcionar correctamente el receptor.
• Si no desea oír el timbre de la puerta, deslice e
botón ON/OFF del receptor a la posición OFF
[APAGADO].
Este producto está garantizado por RadioShack contra defectos de
fabricación en el material y man o de obra bajo condiciones nor males de
uso durante un año a partir de la fecha de compra en tiendas propiedad de
la empresa RadioShack, franquicias y distribuidores autorizados de
RadioShack. EXCEPTUANDO LO AQUÍ ESTABLECIDO, Radi oShack NO
OFRECE GARANTÍAS EXPLÍCITAS Y LAS GARANTÍAS IMPLÍ CITAS,
INCLUYENDO LA GARANTÍA DE QUE EL PROD UCTO PODRÁ SER
COMERCIALIZADO Y QUE ES ADECUADO PARA UN FIN ESPECÍFICO,
TIENEN UNA DURACIÓN LIMITADA AL PERÍODO DE VIGENCIA DE
LAS GARANTÍAS LIMITADAS AQUÍ EXPUESTAS POR ESCRITO.
EXCEPTUANDO LO AQUÍ ESTABLECIDO, RadioShack NO TENDRÁ
RESPONSABILIDAD NI OBLIGACIÓN ALGUNA HACIA EL CLIENTE U
OTRA PERSONA O ENTIDAD CON RESPECTO A LAS
RESPONSABILIDADES, PÉRDIDAS O DAÑOS CAUSADOS DIRECTA O
INDIRECTAMENTE POR EL USO U OPERACIÓN DEL PRODUCTO O
RESULTANTES DE UNA VIOLACIÓN DE ESTA GARANTÍA,
INCLUYENDO PERO SIN LIMITARSE A, DAÑOS CAUSADOS POR
INCONVENIENCIA, PÉRDIDA DE TIEMPO, DATOS, BIENES,
INGRESOS O GANANCIAS, O DAÑOS INDIRECTOS, ESPECIALES,
INCIDENTALES O CONSECUENCIALES, AÚN SI SE HA NOTIFICADO A
RadioShack DE LA POSIBILIDAD DE TALES DAÑOS.
Algunos estados no permiten limitantes a la d uración de una garantía
implícita ni la exclusión o limitación de los daños incidentales o
consecuenciales, por lo que es posible que las limitaciones o exclusiones
mencionadas más arriba puedan no ser de aplicación.
En caso de defecto del producto dur ante el período de garantía, lleve el
producto y el recibo de compra que sirve de comprobante de la fecha de
compra a cualquier tienda RadioShack. Salvo si la ley dispo ne lo con trario,
RadioShack a su opción: (a) correg irá el def ect o r eparando el producto sin
cargo alguno por componentes y mano de obra; (b) reemplazará el
producto por otro igual o de car acterísticas similares; o (c) r eembolsar á el
precio de compra. Todos los productos y componentes reemplazados, así
como los productos cuyo costo es ree mb olsad o, pasan a ser propiedad de
RadioShack. Pueden utilizarse componentes y productos nuevos o
reacondicionados para llevar a cabo el servicio de garantía. Los
componentes y productos reparado s o reemplazados están garantiza dos
por el período remanente de la garantía original. La reparación o
sustitución del producto no serán gratu itas después de la expiración del
período de garantía.
Esta garantía no cubre: (a) daños o ave rías causadas por o atr ibuibles a
causa fortuita, abuso, accidente, mal uso, uso anormal o impropio, falta de
atención a las instrucciones, instalación o mantenimiento impropio,
alteración, caída de rayos u otra incidencia de excesivo voltaje o corriente;
(b) reparaciones no efectuadas por un taller autorizado por RadioShack;
(c) consumibles tales como fusibles o pilas; (d) daños a la apariencia; (e)
costos de transporte, envío o seguro; o (f) costos de recogid a, instalación,
servicio de ajuste o reinstalación.
Esta garantía le otorga derechos legales específicos, si bien también
puede tener otros derechos que varí an de un es tado a ot ro. La tra ducción
al español se provee solamente para su conveniencia. En caso de
discrepancias entre las versiones en inglés y en español, prevalecerá la
versión en inglés.
RadioShack Customer Relations, 200 Taylor Street, 6th Floor,
Garantía limitada de un año
Fort Worth, TX 76102
12/99
3. Instale tres pilas AAA en el compartimiento,
de la forma indicada por los símbolos de
polaridad (+ y –) marcados en el interior
del mismo.
4. Vuelva a colocar la tapa del comp artimiento.
5. Para el otro transmisor, repita los pasos del
1 al 4. Si se oscurece el diodo luminiscente
del transmisor, cambie las pilas de éste.
EN EL RECEPTOR
1. Para reti r ar la tapa del com part im i en to de
las pilas del receptor, deslícela en la
dirección de la flecha.
2.
Hay dos selectores de canal dentro del
compartimiento de las pilas,
[TIMBRE 1]
y
BELL 2 [TIMBRE 2].
BELL 1
Ajuste los
selectores de canal de manera que no estén
en el canal en que está el transmisor.
Ô
3. Instale tres pilas de tamaño C en el
compartimiento, de la forma indicada por los
símbolos de polaridad (+ y –) marcados en
el interior del mismo.
4. Vuelva a colocar la tapa del comp artimiento.
Si el diodo luminiscente comienza
a destellar, con un pitido corto del receptor,
cambie las pilas de éste.
FUNCIONAMIENTO
1. Ponga el botón ON/OFF [ENC./APAG.] del
receptor en l a posición ON.
2. Opri m a y no suelte el botón BELL del
transmisor BELL 1. La transmisión
comienza, el indicador se enciende
y el receptor suena el timbre de la puerta
dos veces. Ô
3. Cuando se oprime el botón BELL del
transmisor BELL 2, se enciende el indicador
del mismo, y el timbre toca la melodía
“Home, sweet home” (Hogar, dulce hogar).
UTILIZACIÓN DEL TIMBRE
COMO TIMBRE DE ENTRADA
1. Conecte el transmisor a un sensor de alarma
normalmente abierto. Para hacer esta
conexión se requiere un cable de dos
conductores (no viene incluid o).
2. Separe los extremos del cable, después
conecte el cable provenien te del interruptor
del sensor en los agujeros par a t ornillo de la
parte posterior del transmisor, con los dos
tornillos de máquina suministrados. Si el
sensor que va a utiliza r tien e ambo s tipos de
contactos, normalmente abiertos
y normalmente c errados, asegúrese de
conectarlo a los contactos normalmente
abiertos del senso r.
3. Ponga el botón ON/OFF del receptor en la
posición ON.
INFORMACIÓN DE
LA FCC PARA USTED
Este equipo ha sido pro bad o y se h a deter minad o
su cumplimiento con respecto a los límites
correspondientes a los dispositivos digitale s
de Clase B, de conformidad con la Parte 15 de
las Reglas de la FCC (Comisión Federal de
Comunicaciones de EE.UU.). Estos límites están
establecidos para proporcionar una protección
razonable contra interferencias dañinas en las
residencias. Este equi po genera, utiliza y puede
emitir energía de radiofrecuencia por lo cual, si no
se instala y se emplea de conformidad con las
instrucciones, puede causar interferencia dañina
en las comunicaciones de radio.
No obstante, no hay garantía de que tal
interferencia no vaya a ocurr ir en alguna
instalación en particular. Si este equipo causa
interferencia dañina en la recepción de las ondas
de radio o de televisión, lo cual puede
determinarse apagando y encendiendo el equipo,
se exhorta al usuario a tratar de corregir la
interferencia con una o más de las siguientes
medidas:
• Cambie la orientación o la ubicación de
la antena receptora.
• Aumente la separación entre el equipo
y el receptor.
• Consulte al personal de una tienda
RadioShack de la localidad o a un técnico
de radio y televisión.
• Si no puede eliminar la interf er en cia , la FCC
requiere que deje de utilizar el timbre para
puertas.
Todo cambio o modificación no aprobado
expresamente por RadioShack puede causar
interferencia y anular la autorización de l usuario
de utilizar este equipo.
Este dispositivo cum pl e con la P ar te 15 de las
Reglas de la FCC. La utilización de este equipo
está sujeta a las dos siguientes condiciones:
(1) este dispositivo no puede causar interferencia
dañina, y (2) este dispositivo debe aceptar
cualquier int erferencia rec i bida, incluyendo toda
interferencia que pueda causar un
funcionamiento indeseado.
ESPECIFICACIONES
Frecuencia........................433.92 MHz ± 600KHz
Consumo de corriente del transmisor .......<10mA
Consumo de corriente
del transmisor........................ <2mA @ en espera
Carga baja de las pilas del receptor.. 2.4V
Potencia de son i do del receptor>80dBA @ 25cm
Temperatura de funcionamiento
del transmisor................................–20
Estas especif icaciones son estándar; pueden
variar en ciertas unidades. Las especificaciones
están sujetas a cambios sin previo aviso.
<130mA @ emitiendo sonido
°C a 60 °C
(–4
°F a 140°F)
± 0.1V
RadioSha ck Corporation
Fort Worth, Texas 76102
61-2117
AO0185AAA1
Impreso en China
11A03
 Loading...