

Page 1
www.radioshack.com
OWNER’S MANUAL —
Please read before using this equipment.
Thank you for purchasing a
RadioShack Slim Flatbed
Scanner. Your scanner is
designed for notebook or
desktop PCs that have a
universal serial bus (USB)
port. You can use the
scanner to quickly scan
documents and
photographs in color, grayscale, or black-and-white at
up to 15 pages per minute.
The supplied software lets
you convert the scanned
images to electronic files.
™
5NKO"(NCVDGF"5ECPPGT
25-3097
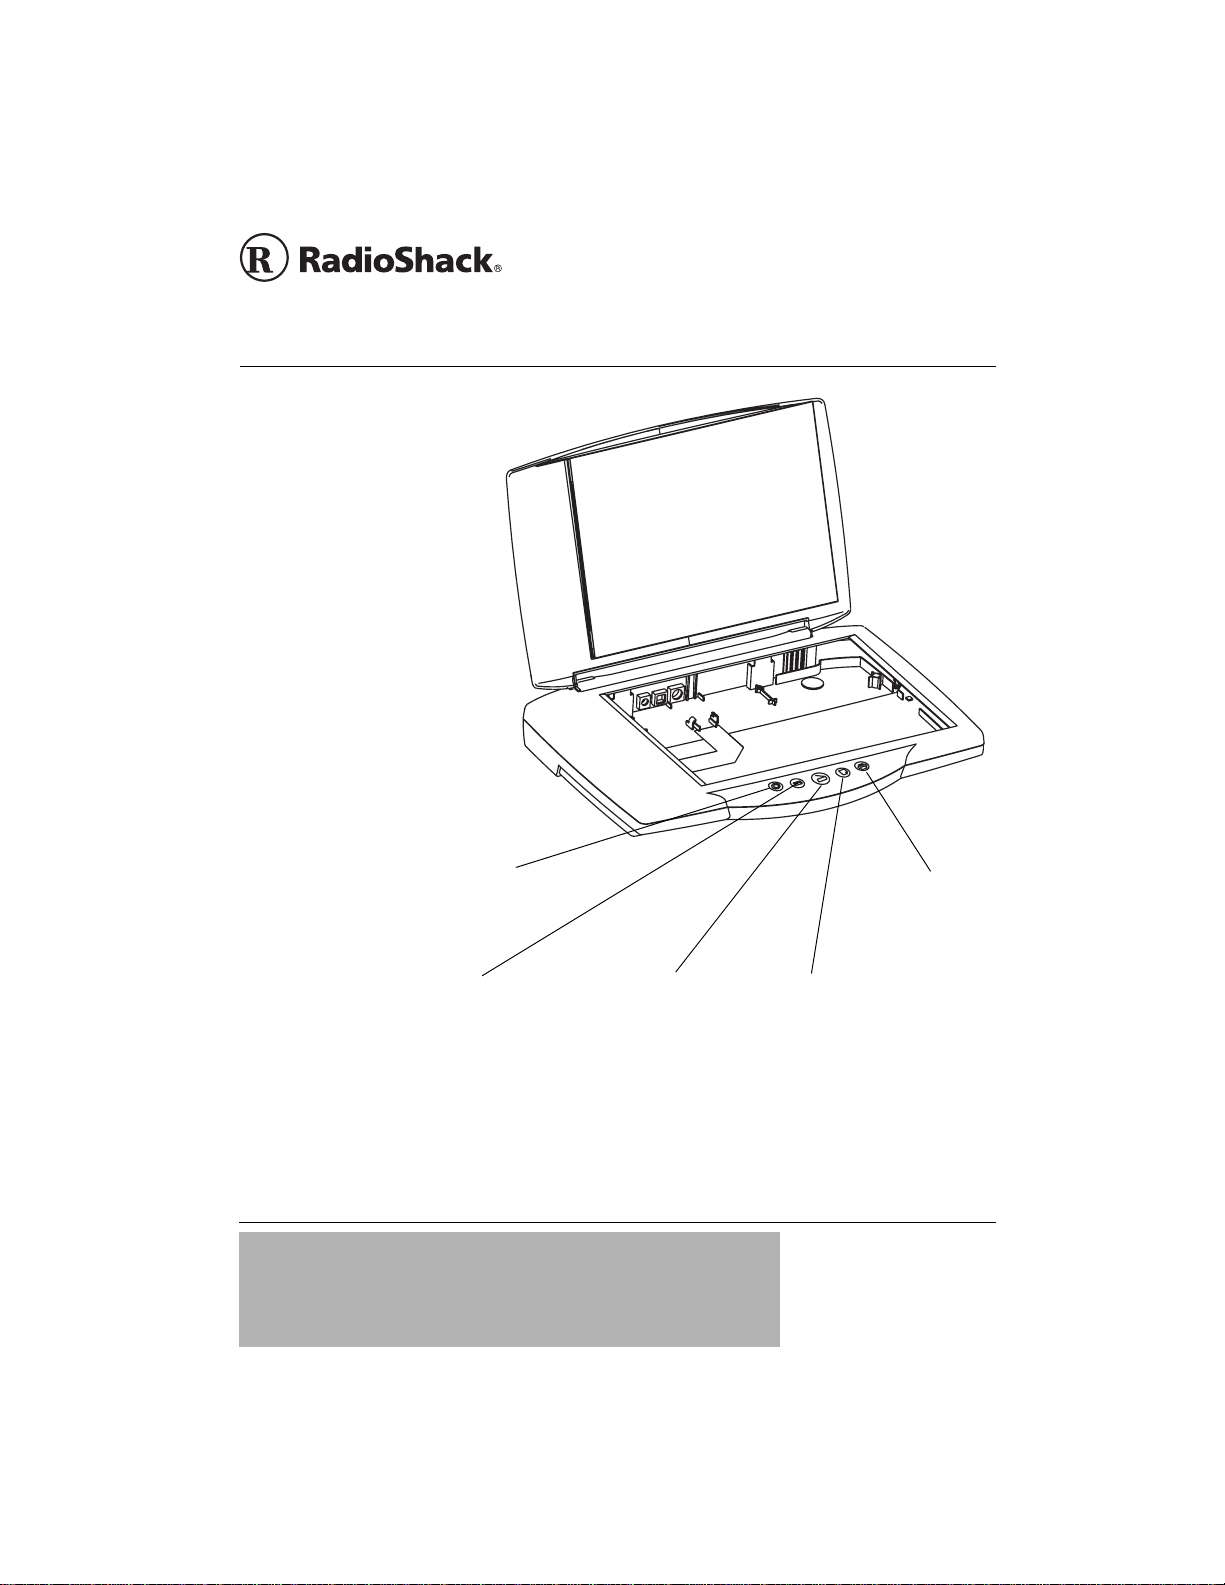
(Custom) —
UUUU
lets you assign a
custom function.
YYYY
(E-Mail) —
V
V
VV
displays the scanned
object in a new e-mail
message for your
e-mail application.
These buttons have the same functions as those in the onscreen
scanner control pad. For detailed operating information, see
“Using the Onscreen Scanner Control Panel” on Page 6.
"+/2146#06"
If an icon appears at the end of a paragraph, go to the box on that page
with the corresponding icon for pertinent information.
— Warning
RRRR
ý
.... — Caution
#
°°°°
#
— Important
— Hint
#
(Scan) — scans
the image and
displays the
scanned image in an
onscreen TWAIN
window for editing.
— Note
±±±±
(Copy/Print) —
XXXX
prints the scanned
image to your
printer or copier.
(OCR) — (
WWWW
Character Recognition)
converts the scanned text to
a Windows Notepad file so
you can import it into many
word processing programs.
2002 RadioShack Corporation.
©
RadioShack and RadioShack.com
Optical
All Rights Reserved.
are trademarks used by
RadioShack Corporation.
Page 2

Important Safety Instructions
2CEMCIG"%QPVGPVU
• USB 2.0 Scanner
• AC adapter (Input: 120V AC;
Output: 12V DC, 15 W max.)
• USB cable
• Software CD
• This Owner's Manual
5[UVGO"4GSWKTGOGPVU
Operating System
• Windows 98
• Windows 2000
• Windows ME
• Windows XP
Hardware
IBM PC or compatible, with:
• VGA or SVGA monitor
• CD-ROM drive
• one available USB port
• 128 MB RAM
• 200 MB free hard disk space (for
installing the supplied software)
This scanner is not compatible with
Microsoft Windows 3.1 or 95.
%106'065
Preparation ........................................... 4
Locking/Unlocking the scanner ......... 4
Connecting AC Power ....................... 4
Installing Software and Hardware ......... 4
Software Installation .......................... 4
Using the Onscreen Scanner Control
Panel ................................................. 6
Preparation ........................................... 6
About TWAIN Interface ..................... 6
Initiating TWAIN ................................ 7
Operation ............................................ 12
Scanning ......................................... 12
Copying/Printing .............................. 12
Custom ............................................ 13
OCR ................................................ 13
E-Mail .............................................. 14
Preferences ..................................... 14
Function Settings ............................ 15
Select Menu .................................... 15
Add Application ............................... 15
About Included Software ..................... 16
Correcting Scanned Images ............... 17
Scanning Night Shots ...................... 17
Scanning Snow Shots ..................... 18
Scanning Text for OCR ................... 18
Scanning Line Art Drawings ............ 18
Care .................................................... 18
Service and Repair ............................. 18
Specifications .................................. 18
Troubleshooting .................................. 19
FCC Declaration of Conformity ........... 20
The FCC Wants You to Know ............. 20
2
+/2146#06"5#('6;"
+05647%6+105
1. Read Instructions — All the safety and operating
instructions should be read before the product is
operated.
2. Retain Instructions — The safety and operating
instructions should be retained for future reference.
3. Heed Warnings — All warnings on the product and in
the operating instructions should be adhered to.
4. Follow Instructions — All operating and use
instructions should be followed.
5. Water and Moisture — Do not use this product near
water (for example, near a bath tub, wash bowl, kitchen
sink, or laundry tub; in a wet basement; or near a
swimming pool; and the like).
6. Carts and Stands — Use only with a cart, stand, tripod,
bracket, or table recommended by the manufacturer.
7. Ventilation — Slots and openings in the cabinet are
provided for ventilation and to ensure reliable operation
of the product and to protect it from overheating, and
these openings must not be blocked or covered. The
openings should never be blocked by placing the
product on a bed, sofa, rug, or other similar surface.
8. Heat — The product should be situated away from heat
sources such as radiators, heat registers, stoves, or
other products (including amplifiers) that produce heat.
9. Power Sources — The product should be connected to
a power source only of the type described in the
operating instructions or as marked on the scanner.
10. Power-Cord Protection — Power-supply cords should
be routed so that they are not likely to be walked on or
pinched by items placed upon or against them, paying
particular attention to cords at plugs, convenience
receptacles, and the point where they exit from the
product.
TO REDUCE THE RISK OF
To reduce
WARNING:
the risk of fire or shock
hazard, do not expose this
product to rain or moisture.
The lightning symbol is intended to alert you to the presence of
uninsulated dangerous volta ge withi n this pr oduct’s enclosure that
might be of sufficient magnitude to constitute a risk of electric
shock. Do not open the produc t’s case.
CAUTION
RISK OF ELECTRIC
SHOCK DO NOT OPEN
CAUTION:
ELECTRIC SHOCK, DO NOT REMOVE COVER
OR BACK. NO USER-SERVICEABLE PARTS
!
INSIDE. REFER SERVICING TO QUALIFIED
PERSONNEL.
The exclamation symbol is intended to inform
you that important operating and maintenance
!
instructions are incl uded in the literature
accompanying this product.
Page 3

11. Servicing — Do not attempt to service this product
yourself as opening or removing covers may expose
you to dangerous voltage or other hazards. Refer all
servicing to qualified service personnel.
12. Damage Requiring Service — Unplug this product from
the wall outlet and refer servicing to qualified service
personnel under the following conditions:
• When the power-supply cord or plug is damaged.
• If liquid has been spilled, or objects have fallen into
the product.
• If the product has been exposed to rain or water.
• If the product does not operate normally by following
the operating instructions.
• If the product has been dropped or damaged in any
way.
• When the product exhibits a distinct change in
performance - this indicates a need for service.
13. Overloading - Do not overload wall outlets, extension
cords, or integral convenience receptacles as this can
result in a risk of fire or electric shock.
14. Object and Liquid Entry - Never push objects of any
kind into this product through openings as they may
touch dangerous voltage points or short-out parts that
could result in a fire or electric shock. Never spill liquid
of any kind on the product.
Important Safety Instructions
5#8'"6*'5'"
+05647%6+105
3
Page 4
24'2#4#6+10
Y
We recommend you connect only one scanner at a time to
your computer. Connecting two or more fast USB devices
(such as CD-ROMs, CD rewriters, scanners, printers or
hard disk drives) at the same time degrades performance.
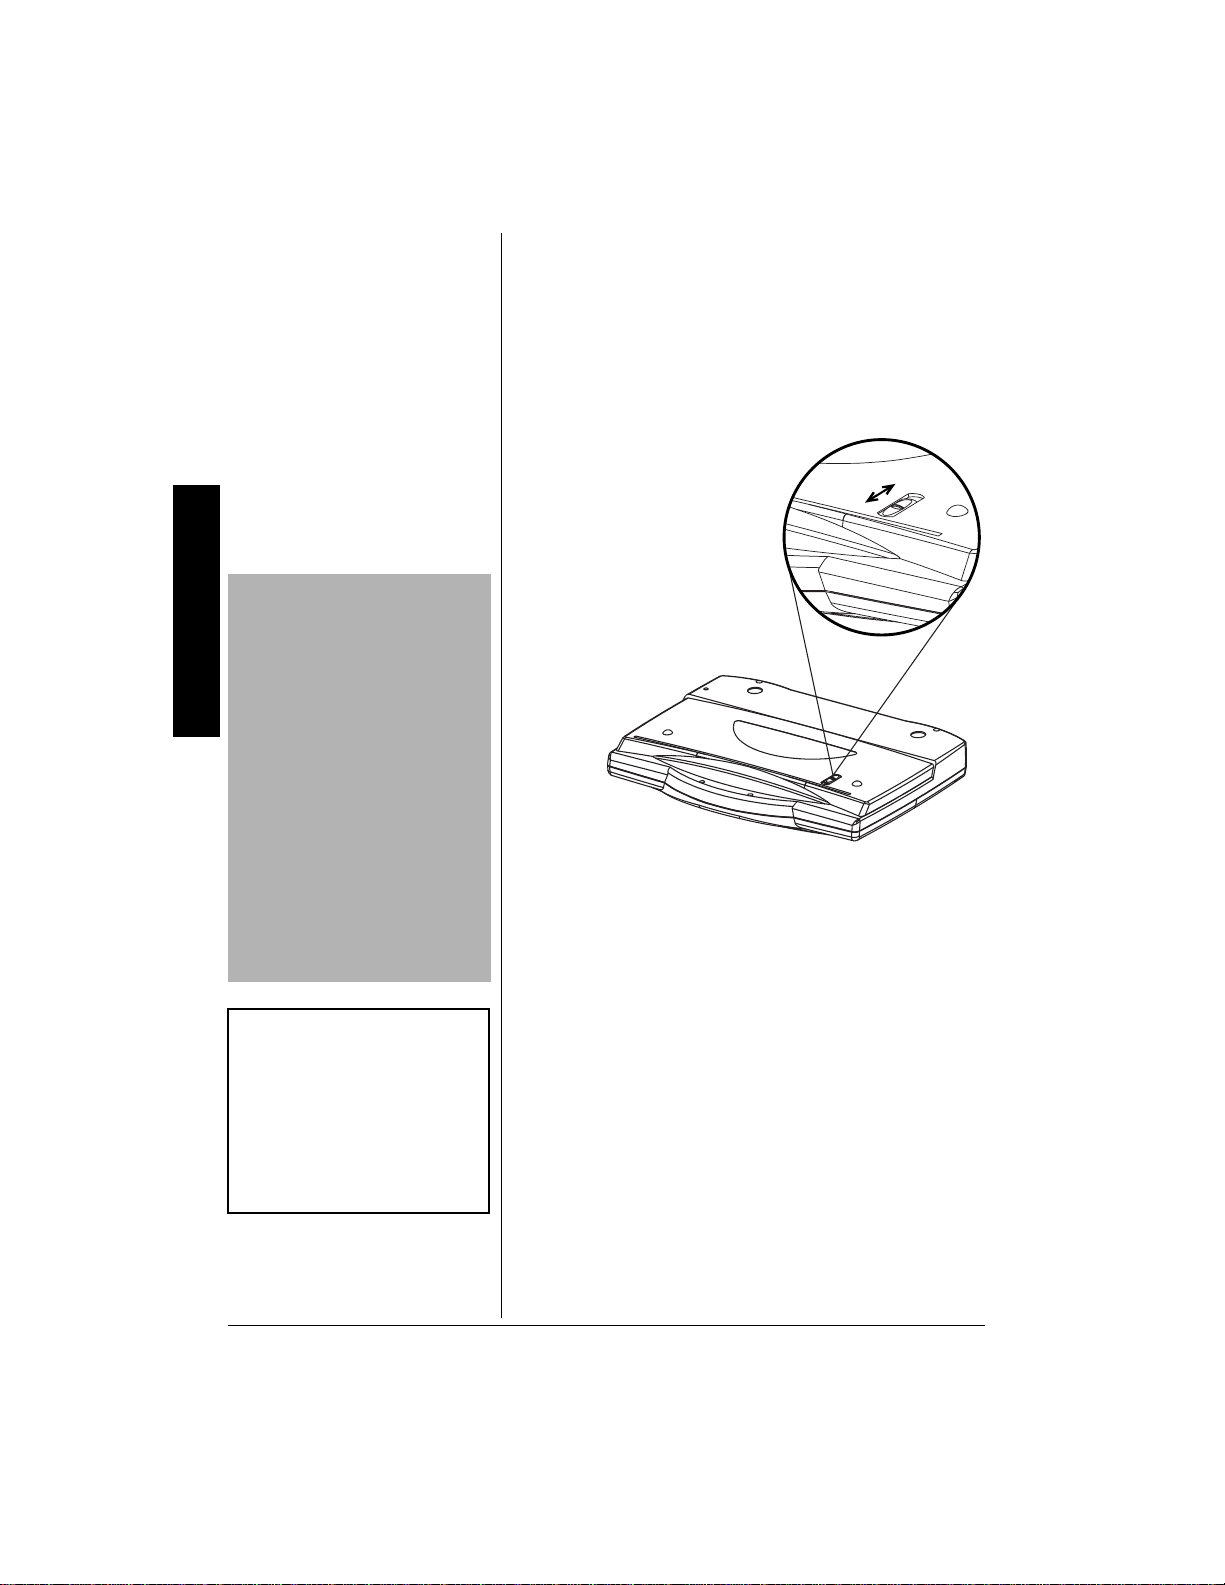
.1%-+0)170.1%-+0)"6*'"5%#00'4
our scanner has a locking
mechanism to protect it from
vibration during shipment or
while you move it.
Before you use the scanner,
slide the lock on the bottom
Preparation
.
"%#76+10"
• You must use a Class 2 power
source that supplies 12V DC
and delivers at least 1250 mA.
Its center tip must be set to
positive and its plug must fit the
scanner's power jack. The
supplied adapter meets these
specifications. Using an adapter
that does not meet these
specifications could damage the
scanner or the adapter.
• Always connect the AC adapter
to the scanner before you
connect it to AC power. When
you finish, disconnect the
adapter from AC power before
you disconnect it from the
scanner.
"016'"±"
±
The scanning lamp under the glass
remains lit between scans so you
do not have to warm up the
scanner each time you want to
scan. To conserve electricity and
prolong the scanner's life, the lamp
automatically turns off after about 5
minutes.
.
of the scanner toward
To protect the scanner
mechanism when you move
or ship it, slide the lock
••••
.
toward
Bottom View
%100'%6+0)"#%"219'4
The scanner uses the supplied 12V, 1250 mA AC adapter
for power.
Plug the supplied AC adapter's barrel plug into the power
jack on the back of the scanner. Then plug the other end of
the AC adapter into a standard AC outlet. The LED on the
front of the scanner lights when the scanner is turned on.
.
+056#..+0)"51(69#4'"#0&"
*#4&9#4'
51(69#4'"+056#..#6+10
The supplied software CD provides many convenient
interfaces for accessing this scanner's advanced functions.
With this software, you can quickly scan documents or
images, make a quick copy of a document and send it to the
printer, scan an image and send it directly to your e-mail
client, scan text documents and edit them with word
ŽŽŽŽ
.
±±±±
4
Page 5

processing software, or define a default application to send
your scanned document for post processing.
1. Start Windows (98 or later) and quit all other
applications.
2. Insert the software CD into your CD-ROM drive. The
CD starts automatically.
±±±±
3. Follow the onscreen instructions to install the following
interfaces included on the CD:
T wain, Dr ivers an d Utility —
TWAIN interface lets you
operate with any other application that accepts scans
through TWAIN. It is used with most major scanning
and image software programs, such as MGI Photo
Suite, CorelDraw, I photo Plus, Painter, Photo Deluxe,
Photo Impact, PhotoShop, and Text Bridge.
Adobe Acrobat Reader 5.0 —
lets you read the
instructions of the supplied application software.
TextBridge PRO 8.0 —
lets you convert the scanned
text to editable text.
Presto! PageManager —
lets you organize, sort and
link graphics files to other applications.
Presto! Image Folio 4.2
— provides several tools for
importing, editing and managing the scanned images.
4. After you complete installing the interfaces, Windows
prompts you to restart your computer by clicking
Finish
5. Plug the USB cable's flat plug into your computer's
USB port and the square plug into the USB port on the
back of the scanner.
±±±±
6. After you connect the scanner to your computer,
Windows operating system (except Windows XP)
automatically installs this scanner's software to your
computer and
Windows taskbar.
qqqq
(scanner icon) appears on the
±±±±
Once you have connected the scanner through the USB
port, the onscreen scanner control panel automatically
connects to the scanner.
"016'"±"
±
• If the CD does not start
automatically, make sure the
CD-ROM's door is completely
shut. If the CD still does not
start, the auto run option on
your computer might be turned
off. If this happens, click My
Computer. The window shows
the available drives on your
computer. Then double-click the
icon for your CD-ROM drive and
double-click Setup.exe. The CD
starts.
• This scanner uses the USB
interface, which is supported
only by Microsoft Windows 98/
ME, 2000 or XP. Plug & Play
devices are supported by the
USB interface. To verify
whether your computer
supports USB, first make sure
there is a USB port on the back
.
of your PC (some computers
have USB ports in other
locations, such as on the
monitor or keyboard).
• If your computer does not have
USB ports, you need to install a
USB interface card (check your
computer User's Manual for
USB support information).
• If you are a Windows XP user,
follow the onscreen instructions
to install the scanner's software.
• If you have installed the scanner
software, but the scanner is not
connected to the computer, the
scanner disconnected icon
appears.
Installing Software and Hardware
5
Page 6
oý
oý
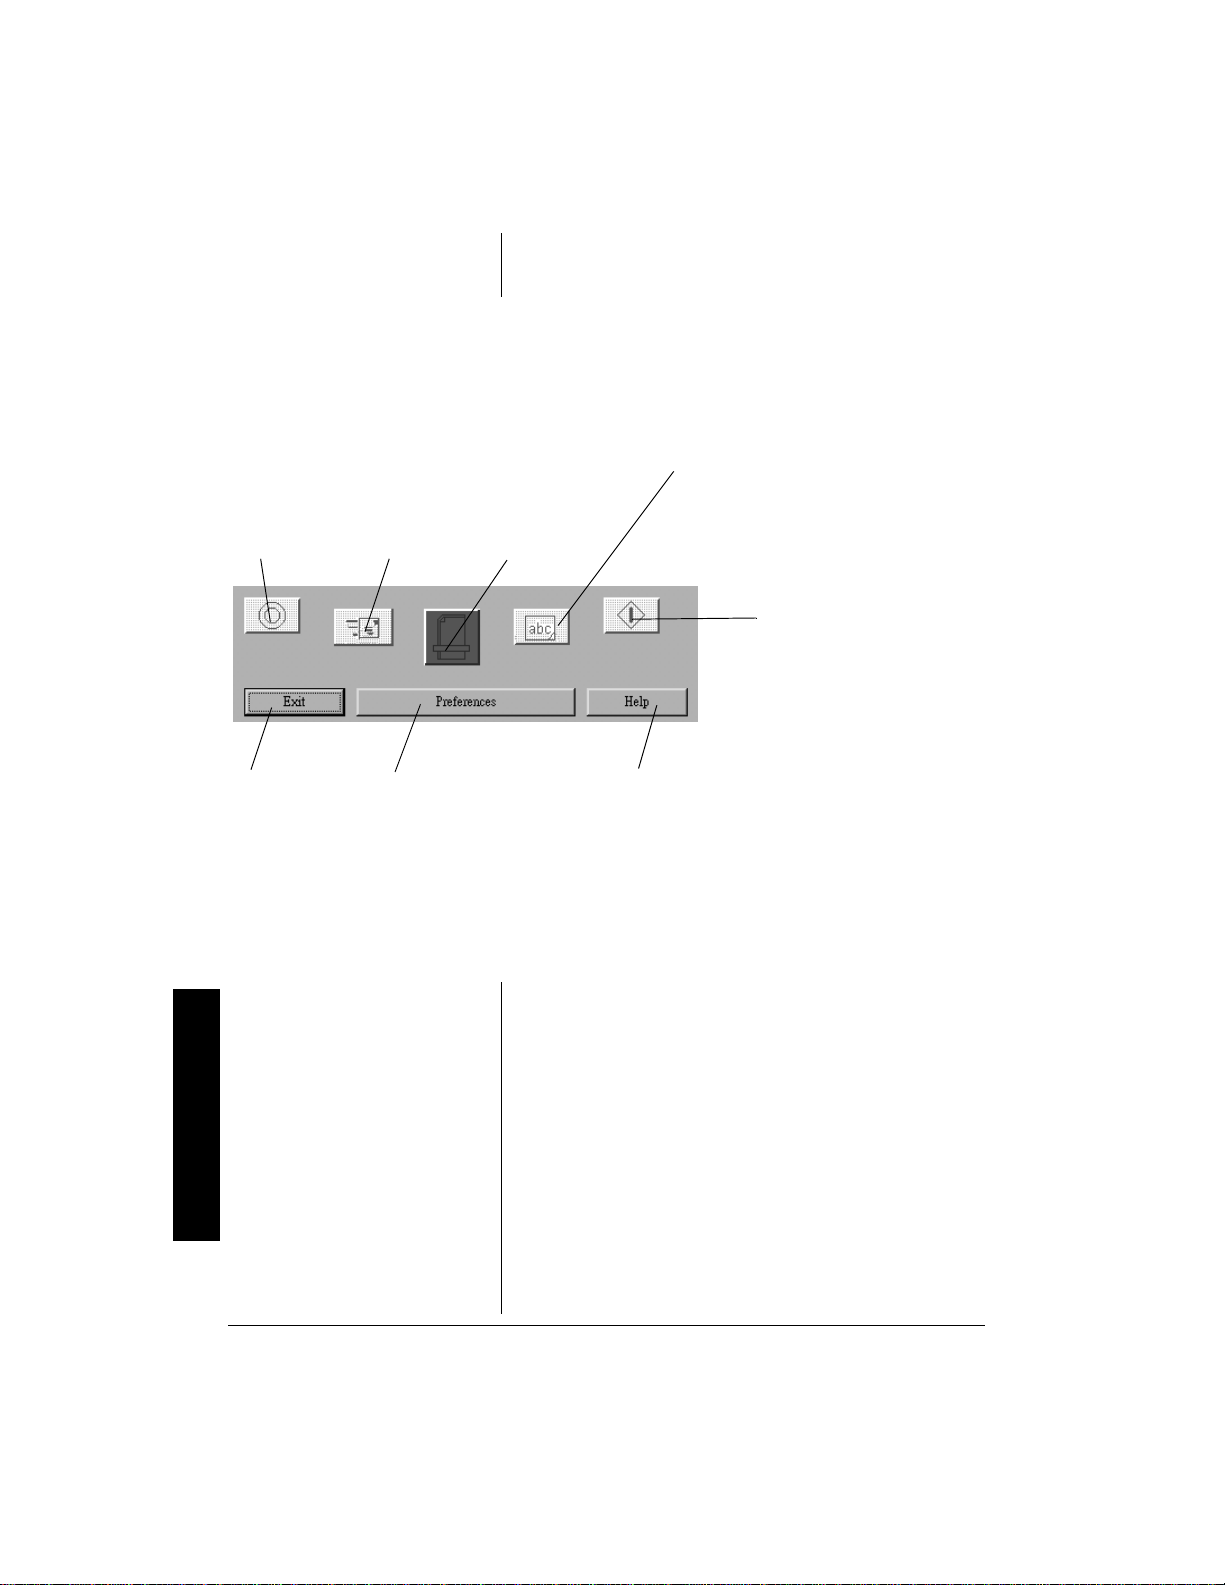
Custom —
oýoý
click to send a
scanned
image or
document
directly to a
pre-selected
application.
ýýýý
E-Mail —
rrrr
click to send a
scanned image
or document
directly to an
e-mail program.
75+0)"6*'"105%4''0"5%#00'4"
%
10641."2#0'."
To display the onscreen
scanner control panel,
pppp
Scan — click to
scan documents and
images. The images are
sent to post image
editing for post
processing. You can
change the default post
processing application
by clicking Preferences
and selecting a different
program.
ssss
(OCR) — click to
convert a scanned item
to black and white text
for use with word
processing software.
click
the Windows taskbar.
(Copy/Print) —
tttt
click to send a scanned
image or document
directly to a printer or
printer application.
(scanner icon) on
qqqq
Exit — click to
send the
onscreen
scanner control
panel icon back
to the Taskbar.
Preparation
6
Preferences — click to set
the preferences for each
button. You can add and
choose settings for post
processing applications, set
scanner status display
options, and set advanced
properties such as image
mode, color control and
resolution.
24'2#4#6+10
#$176"6*'"69#+0"+06'4(#%'
The TWAIN (Technology Without An Important Name)
interface lets you operate with any other application that
accepts scans through TWAIN besides the included Presto!
Page Manager scanning software. The TWAIN interface is
used with most major scanning and image software
programs such as MGI Photo Suite, CorelDraw, I photo
Plus, Painter, Photo Deluxe, Photo Impact, PhotoShop,
Text Bridge, and many more.
Help — click to
display the online
help for the
onscreen scanner
control panel.
Page 7

+0+6+#6+0)"69#+0"
After installing the scanner and associated software, follow
these steps to find the scanner commands.
1. Open your TWAIN
application, select
and then
Source
Select
to open the
Select Source
box. Select
6FDQQHU
6FDQQHU
6FDQQHU6FDQQHU
Select
86%#
86%#
86%#86%#
, and then click
to finish
selecting the source.
File
dialog
2. Select
File
and then
Acquire
to open
the
TWAIN
Scanner
Settings
window.
Message Bar
General
Advanced
Ruler Type
Ruler Button
Preview Window
Preparation
Exit
S
can
Preview
elp
H
Crop Box
7
Page 8

Ruler Button —
scanned. Click the Ruler Type button at the top left
corner of the preview window to toggle between inches,
centimeters, or pixels.
Preview Window —
selected item. You can then view the image to be
scanned and change the scan settings to achieve the
desired result.
Crop Box —
inside the preview window to define the area to be
scanned. Adjust the scan area's size by dragging the
crop box's handles. Adjust its position by clicking on it
and dragging it.
— click to open TWAIN online help.
Help
Message bar —
your scan, the current scan configuration and the
amount of free memory space on your hard disk. The
preview size changes if you change the scan area size,
scan mode and/or resolution. If the image size exceeds
the amount of free hard disk memory space, you will
not be able to complete the scan. In this case, reduce
the scan mode, resolution or scan area, or create more
memory space on your hard disk.
3. Select
General
configuration.
lets you measure the size to be
click
Preview t
Click and drag the left mouse button
The message bar indicates the size of
to adjust the scanning options and
o preview the
Preparation
4. Under
Scan Page For:
options:
(GLWLQJ#7H[W#+2&5,#³
(GLWLQJ#7H[W#+2&5,#³
(GLWLQJ#7H[W#+2&5,#³(GLWLQJ#7H[W#+2&5,#³
software (such as the included TextBridge PRO 080)
for converting image text to editable text. It creates
larger and better quality files than the Faxing, Filing, or
Copying setting.
)D[LQJ/#)LOLQJ#RU#&RS\LQJ#³
)D[LQJ/#)LOLQJ#RU#&RS\LQJ#³
)D[LQJ/#)LOLQJ#RU#&RS\LQJ#³)D[LQJ/#)LOLQJ#RU#&RS\LQJ#³
time and the smallest file size. This is the best setting
for faxing, filing, or copying the scanned images.
%ODFN#)#:KLWH#3KRWR#³
%ODFN#)#:KLWH#3KRWR#³
%ODFN#)#:KLWH#3KRWR#³%ODFN#)#:KLWH#3KRWR#³
the most optimal configuration for scanning black and
white photos.
&RORU#'RFXPHQW#²#)DVWHU#³
&RORU#'RFXPHQW#²#)DVWHU#³
&RORU#'RFXPHQW#²#)DVWHU#³&RORU#'RFXPHQW#²#)DVWHU#³
Provides the ideal configuration for scanning color
photographs or art, or to work with items for image
editing or desktop publishing. Results in a reasonably
high-quality (1 million color) image, in a file that is not
too large.
, select from the following
enhances the function of OCR
provides the fastest scan
256-color gray scale provides
the default setting.
8
Page 9

&RORU#'RFXPHQW#²#%HWWHU#4XDOLW\#³
&RORU#'RFXPHQW#²#%HWWHU#4XDOLW\#³
&RORU#'RFXPHQW#²#%HWWHU#4XDOLW\#³&RORU#'RFXPHQW#²#%HWWHU#4XDOLW\#³
configuration for color photographs or art, or scan
images for image editing, desktop publishing or highquality output. Results in a slower scan time and a
larger file size due to a higher (300 dpi) resolution.
&XVWRP111
&XVWRP111
&XVWRP111&XVWRP111
type and resolution. You can define a new scanning
configuration with customized settings, and enter a
personalized name for the new configuration.
5.
Under
Size:
Mode:
information collected from your original. Choose this
option based on whether the original is color or black &
white, and on the purpose of the scanned image (i.e.,
color display, black & white printing, OCR, etc.). Truecolor occupies the largest amount of memory space,
grayscale occupies a medium amount, and black &
white occupies the smallest amount. When you change
these options, notice the projected file size in the
message bar: true-color images' memory space are
three times larger than grayscale and twenty-four times
larger than black & white!
•
— lets you manually set the scan image's
Scan Configuration:
.
— Scan mode determines the amount of color
7UXH0FRORU#³
7UXH0FRORU#³
7UXH0FRORU#³7UXH0FRORU#³
amount of color information from the original, up to
around 16.7 million colors! Choose this option for an
original that you want to display, print or edit in color.
This scan mode collects the maximum
select the
Provides the ideal
Mode:, Res:
, and
•
*UD\VFDOH#³
*UD\VFDOH#³
*UD\VFDOH#³*UD\VFDOH#³
or for scanning color material to print on a black &
white printer.
•
%ODFN#)#:KLWH#³
%ODFN#)#:KLWH#³
%ODFN#)#:KLWH#³%ODFN#)#:KLWH#³
drawings - a picture or text containing black lines
only, with no colors or gray shades.
Resolution:
detail collected from an original image. Higher
resolution produces greater detail. Generally, we
recommend you keep the resolution as low as possible,
because higher resolution slows scan time and
increases file size. When using True Color or Gray
scale, a lower resolution (100-200dpi) captures more
color and detail than most printers or monitors do.
When you adjust the resolution, watch the projected file
size in the message bar. See the Default Scan
Resolution table for recommended settings for various
scan types.
Use this mode for black & white photos
Use this mode to scan text or line
— Resolution determines the amount of
Default Scan Resolutions
5ECP"6[RG 4GUQNWVKQP
Text (printed) 300 dpi
Text (fax) 200 dpi
Text for OCR 300 dpi
Black & White or
gray scale image
Color photo or
image
150 dpi
150 dpi
Preparation
9
Page 10

•
433#GSL#³#
433#GSL#³#
433#GSL#³#433#GSL#³#
about the same size as the original in a presentation
or on your web page. Also, use this for larger images
that you will reduce in size to include in a report or
presentation and print out on a normal color or black
& white printer with 300~360dpi resolution.
select to display images onscreen at
"016'"±"
±
When scanning an image that will
result in a file size larger than
25MB, a warning screen appears
giving you the option to cancel.
•
533#GSL#³
533#GSL#³
533#GSL#³533#GSL#³
onscreen, or for any image to be printed out at
original size on a color or black & white printer with
up to 720dpi print resolution. Also, use 200dpi (with
black & white scan mode) for clear OCR text (larger
than 10pt); for smaller text, use 300dpi.
•
633#GSL#³
633#GSL#³
633#GSL#³633#GSL#³
resolution is inadequate. Choose 300dpi for any size
image and for any use (to determine if the resolution
is too low, look for squares in the image; see below).
Also, use 300dpi (with black & white scan mode) for
optimum OCR results.
•Over
for selecting a higher resolution, we suggest you do
not do so, as the resulting file size may be very large
and take up a lot of your hard disk space. For
example, a 3" x 5" photograph scanned at 2400dpi,
true-color will result in a file over 240MB in size.
Size:
— lets you adjust the scan size in the preview
window, enter a width and length in the horizontal and
vertical size boxes, or select a fixed size from the list
box. You can scale the area by dragging the crop box.
The orientation option swaps the width and height
values.
select to display images at a larger size
select when quality is critical and a lower
— Unless you have a specific reason
633#GSL
633#GSL
633#GSL633#GSL
±±±±
Preparation
10
AutoCrop
default. Select this option to let the scanner
automatically determine the size of the image being
scanned. When AutoCrop is checked, the scanner
makes two passes. The first pass detects the image
size and the second pass scans the image.
Scan Task
scan areas (maximum 10 task areas). To remove a
scan task, select the appropriate number of scan areas
and click
— The AutoCrop function is disabled by
— shows the number of previously selected
Remove
.
Page 11

6. Select
Advanced
to configure the Gamma, Sharpness,
Brightness, Contrast, Saturation, and Hue.
Gamma/Sharpness
Channel
The mixed color appears in black. ±
Gamma
image colors.
Sharpness —
— select all, red, green, or blue color curve.
±
"016'"±"
Changing the color curve affects the
results of all scanner output.
— move the slider to change the onscreen
slide to make the image sharper or fuzzier.
Brightness/Contrast
Brightness —
to make the image
brighter or darker.
slide
Saturation/Hue
Contrast —
the image contrast.
slide to adjust
Saturation
change the intensity of
color in the image.
Hue
the image’s color.
Moiré Reduction
overlaid patterns from your image. Use higher levels of moiré reduction for
objects printed in matte finish or on plain paper, while lower levels can be
used for originals such as gloss finish photographs.
— slide to
— slide to adjust
— select to remove waves, ripples, dots, and other
Preparation
11
Page 12

12'4#6+10
Operation
"016'"±"
±
You can select images to be sent
to any available post processing
application in the TWAIN Scanner
Setting window. See “Preferences”
on Page 14 for more inf ormation
about the settings.
5%#00+0)
1. Place the paper face down on the scanner. Line up the
corner of the paper with the arrow at the inside corner
of the scanner’s glass. Be sure to keep it within the
correct document size marker.
2. Double-click
onscreen scanner control panel appears.
3. Click
press
appears.
4. Under
adjustments under
5. Click
To send the scanned image to another application after
scanning, you must wait at least ten seconds for the postprocessing application to load.
on the onscreen scanner control panel, or
pppp
YYYY
Scanner Settings
Scan
on the Windows taskbar. The
qqqq
on the scanner. The
, make any necessary
General
to scan the image.
and
±±±±
USB Scanner
Advanced
box
.
%12;+0)124+06+0)
Use the Copy/Print function to scan images or documents
and send them to the printer.
1. Place the paper face down on the scanner. Line up the
corner of the paper with the arrow at the inside corner
of the scanner’s glass. Be sure to keep it within the
correct document size marker.
12
2. Double-click
onscreen scanner control panel appears.
3. Click
press
image.
4. After the image is scanned, wait at least ten seconds
for the
5. Set the
3LFWXUH#LQ#WKH#&HQWHU
3LFWXUH#LQ#WKH#&HQWHU
3LFWXUH#LQ#WKH#&HQWHU3LFWXUH#LQ#WKH#&HQWHU
the paper.
3LFWXUH#)XOO#3DJH
3LFWXUH#)XOO#3DJH
3LFWXUH#)XOO#3DJH3LFWXUH#)XOO#3DJH
entire page length or width.
on the onscreen scanner control panel or
tttt
on the scanner's control pad to scan the
XXXX
Print
Picture Position
on the Windows taskbar. The
ý
qqqq
box to appear.
and the number of
— prints the image in the center of
— resizes the image to print on the
Copies:
.
Page 13

3LFWXUH#0$;#6WUHWFK#
3LFWXUH#0$;#6WUHWFK#
3LFWXUH#0$;#6WUHWFK#3LFWXUH#0$;#6WUHWFK#
the entire page.
— resizes the image to print over
3LFWXUH#LQ#WKH#8SSHU#/HIW
3LFWXUH#LQ#WKH#8SSHU#/HIW
3LFWXUH#LQ#WKH#8SSHU#/HIW3LFWXUH#LQ#WKH#8SSHU#/HIW
upper left corner of the paper.
6. To select your printer, click
desired printer.
7. Click
. The document is sent to your printer.
OK
— prints the image in the
and select the
Printer
±±±±
%7561/
Use the Custom function to scan images and documents
and send them to a user-defined application for post
processing.
Be sure to assign a default application for post processing
by clicking
panel to define a default post processing application.
1. Place the paper face down on the scanner. Line up the
2. Double-click
3. Click
Preferences
corner of the paper with the arrow at the inside corner
of the scanner’s glass. Be sure to keep it within the
correct document size marker.
onscreen scanner control panel appears.
on the onscreen scanner control panel or
oooo
press Uon the scanner's control pad for more than
one second to open the
in the onscreen scanner control
on the Windows taskbar. The
ý
qqqq
TWAIN Scanner
box.
"016'"±"
±
The scanner is set to automatically
send the scanned image directly to
the selected printer without
opening the TWAIN Scanner
dialog box.
Operation
4. Under
After the image is scanned, it is sent to the assigned
application for post processing.
Scanner Settings
adjustments under
click
Scan
.
, make any necessary
General
and
Advanced
, and then
1%4"
26+%#."%*#4#%6'4"4'%1)0+6+10+
*1
OCR allows you to scan text or documents and send them
to your default word processing application.
Before you can use OCR, you must assign a default
application for post processing. Refer to “Preferences” on
Page 14 for more information.
1. Place the paper face down on the scanner. Line up the
corner of the paper with the arrow at the inside corner
13
Page 14

of the scanner’s glass. Be sure to keep it within the
correct document size marker.
Operation
2. Double-click
onscreen scanner control panel appears.
3. Click
4. Under
After the image is scanned, wait at least ten seconds for the
word processing application to load.
ssss
in the onscreen scanner control panel or
press
image. The
adjustments under
click
on the scanner's control pad to scan the
WWWW
Scanner Settings
Scan
on the Windows taskbar. The
ý
qqqq
TWAIN Scanner
General
.
box appears.
, make any necessary
and
Advanced
, and then
'//#+."
You can scan images or documents and then send them to
your e-mail program.
1. Place the paper face down on the scanner. Line up the
corner of the paper with the arrow at the inside corner
of the scanner’s glass. Be sure to keep it within the
correct document size marker.
2. Double-click
onscreen scanner control panel appears.
3. Click
rrrr
press
V
V
VV
one second to scan the image.
on the Windows taskbar. The
ý
qqqq
on the onscreen scanner control panel or
on the scanner's control pad for more than
14
4. The scanned image is sent to your default e-mail
program and attached to a blank e-mail, ready to be
addressed and sent. Wait at least ten seconds for the
e-mail program to load.
24'('4'0%'5
1. Double-click
onscreen scanner control panel appears.
2. Click
Preferences
Preferences
check the boxes next to the desired settings for each
button on the onscreen scanner control panel, or the
scanner's control panel to applications for post
processing.
on the Windows taskbar. The
ý
qqqq
to open the
box, select the
Flatbed Scanner Utility
Preferences
tab, and then
Page 15

check this
Display USB Scanner status message
box to confirm whether or not the scanner is activated.
Show scan progress dialog when TWAIN is
— check this box to display a scan progress
disabled
window when the TWAIN box is disabled.
—
Temp Folder
files are stored. Set this folder on a drive with sufficient
disk space for large image files. Click
IROGHU#ILOHV#
IROGHU#ILOHV#
IROGHU#ILOHV#IROGHU#ILOHV#
Show all applications for each scanner button
uncheck this box to display only the applications that
were assigned to the button when you installed the
software.
Holding scanner button activates Preferences
window
buttons on the scanner to open the onscreen scanner
control panel
— lets you select the folder where image
&OHDQ#WHPS#
&OHDQ#WHPS#
&OHDQ#WHPS#&OHDQ#WHPS#
to delete the files in the temp folder.
—
— with this box selected, hold down any of the
USB Scanner Utility Preferences
box.
(70%6+10"5'66+0)5
Click
Function
box, and then select the desired function button under
Select Menu
on the
.
Flatbed Scanner Utility Preferences
5'.'%6"/'07
Select Menu
control panel you want to configure and set preferences for.
Choose a button from the drop-down menu. After selecting
a button, you can add or remove an application to be
associated with it, set advanced properties, or reset the
button to the default values.
lets you choose which button on the scanner
Operation
#&&"#22.+%#6+10
Use
Add Application
selected button for post processing scanned images or
documents.
1. Select a button from the
The button's default application list appears.
2. Click
3. Browse for the location of the desired application. Click
Add Application
appears.
to add the application to the default application list.
OK
to associate an application to the
Select Menu
. The
Open Application
drop down list.
dialog box
15
Page 16

4. Select the application and click
Properties
the following items for outputting image:
box appears so, if necessary, you can set
Adv. Properties
. The
About Included Software
Image Mode
(B/W) image.
Color Control —
Resolution
drop-down menu. You can select a resolution from 75
to 600 dpi.
Disable TWAIN, using auto-crop box —
images directly to the application without appearing in
TWAIN
the
cropped before opening the application.
Resolution
5. Click
onscreen scanner control panel
click
Cancel
To remove an application from the
Application
Application
To return the button's application list to the default settings,
select the application and click
— select color, gray, or black and white
set brightness, contrast, and gamma.
— select the output resolution from the
lets you scan
window first. The image is automatically
— select the appropriate value.
to save your changes and return to the
OK
Preferences
to exit without saving changes.
Select Default
menu, select the application and click
.
Reset to Default.
box, or
Remove
#$176"+0%.7&'&"51(69#4'
Please refer to the online HELP files included with each
software application for complete information.
16
Presto! PageManager
graphics files to other applications.
Presto! Image Folio 4.2
editing and managing the scanned images.
TextBridge Pro 8.0
editable text.
— lets you organize, sort and link
— provides tools for importing,
— lets you convert the scanned text to
Page 17

%144'%6+0)"5%#00'&"
+/#)'5"
The above options are for advanced users and users
already familiar with image editing tools. We strongly
recommend that beginners do not use these tools until they
have become familiar with the scanner and the technical
terminology related to image creation. Many image editing
software applications also include these functions. If you
must adjust image color levels, please choose the
appropriate options before you begin adjusting. Following
are a few practical tips for your reference.
Also known as Tone Correction Commands, these settings
adjust images as they are scanned. For example, if you
have a photo that is over-exposed (too light) you can
decrease the brightness or color correction to darken the
photo. Contrast makes the difference be tw e en da rk an d
light areas more or less obvious. Increasing it increases the
difference, while decreasing it reduces the difference. Try
small changes at first and watch the effect. For most photos
and documents, you will not need to adjust these values.
The Color Correction Control also allows you to adjust the
gamma. If you have an “off-color” original, for example, one
in which skin tones are a little green, try reducing green
gamma and/or increasing red gamma. Gamma may be
adjusted either by increasing/reducing the gamma of the
color, or by reducing/increasing its complementary colors.
After previewing your scan, changes made to these settings
are reflected in the preview window. Making changes this
way allows you to experiment without having to scan again
to check the results every time.
Adjusting brightness or contrast makes an image lighter or
darker, actually reducing the amount of information
collected from the original. Adjusting gamma collects more
information from the darker or lighter areas.
5%#00+0)"0+)*6"5*165
If you have particularly dark photos (that are correctly
exposed) try increasing the gamma a l ittle (maybe up to 1.4)
to bring out details in the shadowed areas without affecting
the overall tonal range in the image.
Correcting Scanned Images
17
Page 18

52'%+(+%#6+105
Bit Depth ........ 48-Bit Color (24-bit output)
16-Bit Grayscale .................. 1-Bit Line Art
Scanning Resolution
Optical Resolution ..... 1200
Maximum Resolution
(interpolated) ................ 4800
Maximum Scanning
Size ...................... ... .. .. 8. 5
Operating Systems .... Windows 98, 98SE
Operating Temperature
(without condensation) .......... 41° to 91° F
Relative Humidity
(without condensation).......... 20% to 80%
Input Voltage ......... .......... 120V AC, 60 Hz
Output Voltage ...... 12V DC, 15 Watt Max.
Safety and Agency Certifications . UL, GS,
Dimensions
(HWD) ................ 2
Weight ............................ 6.28 lb (2.85 kg)
Accessories ....... USB Cable, AC Adapter,
Specifications are typical; individual units
might vary. Specifications are subject to
change and improvement without notice.
1
/4 × 165/8 × 10 Inches
(83 × 42.3 × 25.2 cm)
4800 DPI
×
4800 DPI
×
11.70 Inches
×
29.7 cm)
(21.6
×
2000, ME, XP
(5° C to 35° C)
at 95° F (35° C)
CSA, FCC Class B,
VCCI Class 2, CE
Software CD
5%#00+0)"5019"5*165
For very light photos, for example from a skiing trip in bright
sunlight, reduce the gamma (maybe down to 0.8) to bring
out details in the bright areas. This again does not affect the
overall tonal range in the image.
5%#00+0)"6':6"(14"1%4
If your OCR result is not satisfactory, it may be because the
original is unclear. First, adjust the brightness. Try
bolder text, or
for lighter text. With this you can
.43
.43
.43.43
043
043
043043
for
increase the contrast slightly f or b ol d er te xt or decrease the
contrast for lighter text.
5%#00+0)".+0'"#46"&4#9+0)5
If the lines in your drawing fade out after scanning, you can
reduce the brightness and/or decrease the contrast as you
did for scanning text. If the scanned lines appear bolder,
reduce the brightness and/or increase the contrast.
%#4'
Keep the scanner dry; if it gets wet, wipe it dry immediately.
Use and store the scanner only in normal temperature
environments. Handle the scanner carefully; do not drop it.
Keep the scanner away from dust and dirt, and wipe it with a
damp cloth occasionally to keep it looking new.
Care
5'48+%'"#0&"4'2#+4
If your scanner is not performing as it should, take it to your
local RadioShack store for assistance. Modifying or
tampering with the scanner’s internal components can
cause a malfunction and might invalidate its warranty and
void your FCC authorization to operate it.
18
Page 19

6417$.'5*116+0)
If your scanner is not working as it should, these suggestions might help you eliminate the
problem. If the scanner still does not operate properly, take it to your local RadioShack store for
assistance.
2TQDNGO 4GCUQP15QNWVKQP
Scanner does not respond. Problems with connections. Make sure all connections are secure and correct.
Restart the computer and try again.
Reinstall the software, restart your computer and then try again.
Check if your computer's USB port is enabled or not. This setting (Universal Serial Bus
Controller) can be found under the System option in your Control Panel in the Device
Manager (if in doubt, check Windows Help).
Setup wizard does not
autostart.
Cannot find program icons
after restarting the computer.
Setup wizard crashes during
installation.
The scanner's scanning
lamp does not light up.
Scanner scans very slowly. Make sure the resolution of the scanner is not set too high (preferably 300 dpi or lower).
Error: Scanner not found.
The TWAIN window does not
appear after choosing
Acquire.
Unable to scan to application
software.
The scanned image is too
light or too dark.
Moiré patterns appear on the
scanned image.
Transitions in color are very
abrupt (after scanning in true
color mode).
Problems with installation. Check your computer system to see if Auto-start is available.
Under Windows, be sure your CD-ROM is set to
be found under the System option in your Control Panel in the properties of your
particular CD-ROM model (if in doubt, check Windows Help).
If program icons do not appear in the Start menu under Programs, try reinstalling.
Reinstall the software.
Make sure the TWAIN window appears onscreen. If not, reselect the TWAIN source and
activate the TWAIN Scanner Setting dialog box again.
Make sure all connections are secure and correct.
Check your connections (see Problems with connections above).
There is a problem communicating with the scanner. This may be caused by a power
outage, incorrect connection or an installation problem.
First check your connections and check that your wall socket and power switches are all
turned on.
Make sure USB setting is enabled, the power adapter is plugged into the scanner
connector, and the USB cable is properly connected from the scanner to your PC.
Make sure all connections are secure and correct.
Check that the scanner is selected in the Select Source dialog box.
Reinstall the software.
Check your connections (see Problems with connections above).
Check that the scanner is selected in the Select Source dialog box.
Make sure all connections are secure and correct.
Close all open programs and Windows. Restart your computer and try again.
Check if the Scan Window is clean.
Adjust the brightness or color gamma settings and try again.
The original image is commercially printed. Try reducing the resolution by a small
amount, for example from 200 dpi to 190 dpi; keep reducing until the patterns disa ppear.
Or you may check
This is normal if you are using a display mode that can only display 256 or 16 colors. Try
using a high-color or true-color mode instead. Refer to the Windows Manual and your
display card guide for more information.
Descreen
under
Advanced
Auto Insert Notification
in the
TWAIN Scanner Setting
. This setting can
box.
Troubleshooting
19
Page 20

Limited Ninety-Day Warranty
This product is warranted by RadioShack against manufacturing defects in material and workmanship under
normal use for ninety (90) days from the dat e of purchase from RadioShack company-owned stores and authorized RadioShack franchisees and deal ers. EXCEPT
AS PROVIDED HEREIN, RadioShack MAKES NO EXPRESS WARRANTIES AND ANY IMPLIED WARRANTIES, INCLUDING THOSE OF MERCHANTABILITY
AND FITNESS FOR A PARTICULAR PURPOSE, ARE
LIMITED IN DURATION TO THE DURATION OF THE
WRITTEN LIMITED WARRANTIES CONTAINED
HEREIN. EXCEPT AS PROVIDED HEREIN, RadioShack SHALL HAVE NO LIABILITY OR RESPONSIBILITY TO CUSTOMER OR ANY OTHER PERSON OR
ENTITY WITH RESPECT TO ANY LIABILITY, LOSS
OR DAMAGE CAUSED DIRECTLY OR INDIRECTLY
BY USE OR PERFORMANCE OF THE PRODUCT OR
ARISING OUT OF ANY BREACH OF THIS WARRANTY, INCLUDING, BUT NOT LIMITED TO, ANY
DAMAGES RESULTING FROM INCONVENIENCE,
LOSS OF TIME, DATA, PROPERTY, REVENUE, OR
PROFIT OR ANY INDIRECT, SPECIAL, INCIDENTAL,
OR CONSEQUENTIAL DAMAGES, EVEN IF RadioShack HAS BEEN ADVISED OF THE POSSIBILITY
OF SUCH DAMAGES.
Some states do not allow limitations on how long an implied warranty lasts or the exclusio n or limita tion of in cidental or consequential damages, so the above
limitations or exclusions may not apply to you.
In the event of a product defect during the warranty period, take the product and the RadioShack sales receipt
as proof of purchase date to any RadioSha ck stor e. Ra dioShack will, at its option, unless otherwise provided by
law: (a) correct the defect by product repair without
charge for parts and labor; (b) replace the product with
one of the same or similar design; or (c) refund the purchase price. All replaced parts and pro ducts, and products on which a refund is made, become the property of
RadioShack. New or reconditioned parts and products
may be used in the performance of warranty service.
Repaired or replaced parts and products are warranted
for the remainder of the original warranty period. You will
be charged for repair or replacement of the product
made after the expiration of the warranty period.
This warranty does not cover: (a) damage or failure
caused by or attributable to acts of God, abuse , accident, misuse, improper or abnormal usage, failure to follow instructions, improper install ation or maintenance,
alteration, lightning or other incidence o f excess vol tage
or current; (b) any repairs other than those provided by a
RadioShack Authorized Service Facility; (c) consumables such as fuses or batteries; (d) cosmetic damage;
(e) transportation, shipping or insurance costs; or (f)
costs of product removal, installation, set-up service adjustment or reinstallation.
This warranty gives you specific legal rights, and you
may also have other rights which vary from state to
state.
RadioShack Customer Relations, 200 Taylor Street, 6th
Floor, Fort Worth, TX 76102
12/99
(%%"&'%.#4#6+10"1("
%10(14/+6;
This device complies with Part 15 of the
Operation is subject to the following two conditions: (1)
this device may not cause harmful interference, and (2)
this device must accept any interference received,
including interference that may cause undesired operation.
Product: USB 2.0 Slim Flatbed
Model: 25-3097
Responsible Party: RadioShack
Phone: 817-415-3200
FCC Rules
.
Scanner
100 Throckmorton
Fort Worth, TX 76102
6*'"(%%"9#065";17"61"
-019
This equipment has been tested and found to comply with the limits
for a Class B digital device, pursuant to Part 15 of the
These limits are designed to provide reasonable protection against
harmful interference in a residential installation. This equipment
generates, uses and can radiate radio frequency energy and, if not
installed and used in accordance with the instructions, may cause
harmful interference to radio communications.
However, there is no guarantee that interference will not occur in a
particular installation. If this equipment does cause harmful
interference to radio or television reception, which can be
determined by turning the equipment off and on, the user is
encouraged to try to correct the interference by one or more of the
following measures:
• Reorient or relocate the receiving antenna.
• Increase the separation between the equipment and receiver.
• Connect the equipment into an outlet on a circuit different from
that to which the receiver is connected.
• Consult your local RadioShack store or an experienced radio/
TV technician for help.
• If you cannot eliminate the interference, the FCC requires that
you stop using your scanner.
Changes or modifications not expressly approved by RadioShack
may cause interference and void the user’s authority to operate the
equipment.
FCC Rules
.
RadioShack Corporation
Fort Worth, Texas 76102
25-3097
08A02
Printed in China
 Loading...