

Page 1

OWNER’S MANUAL
PLL ALL-BAND PORTABLE RECEIVER
WITH CASSETTE RECORDER
Please read before using this equipment.
DX-392
Cat. No. 20-219B
Page 2

FEATURES
g
g
g
y
g
y
y
Your Radio Shack DX-392 PLL AllBand Portable Receiver with Cass ette
Recorder brings the voices of the world
to you. In the 13 international shortwave (SW) bands, y ou can hear news
broadcasts and other programs from
sources such as the British Broadcasting Company, Radio Cairo, and Radio
Moscow .
You can get emergency information
firsthand by listening to amateur radio
broadcasts, which include sing le sideband (SSB) voice transmissions and
continuous wave (CW) Morse code
transmissions.
In the longwave (LW) band, you
sometimes hear hurricane reports,
ship-to-shore calls, and other marine
and aeronautical services. You can
tune to local broadcasts in the FM and
medium-wave (MW) bands. (In the
United States, we commonly call the
MW band the AM band.) In addition,
you can use the built-in cassette recorder to record your favorite programs live or at a preset time.
Special features include:
Dual Time
— lets you set a primary
clock to your local time and a seco ndary clock to another time zone so y ou
can quickly check the time in another
part of the world.
Scan Tunin
— lets you quickly find
stations.
Memor
Tuning
— stores up to 54 frequencies in memory so you can quickly select your favorite stations.
Direct-Access Tunin
— lets you use
the keypad to directly ent er a frequency you want to listen to.
Rotar
Tuning Adjustment
— lets
you select a higher tuning increment
for faster tuning, select a lower tuning
increment for fine tuning, or lock the rotary tuning dial to prevent you from accidentally changing the frequency.
Control Lock
— prevents you from
accidentally changing a setting.
Alarm (Standb
— lets you set the
)
buzzer to sound or the receiver to turn
on to wake you at a specified time.
Di
ital Synthesized Receiver
ensures accurate, drift-free tuning.
e, Fast-Response Display
Lar
lets you quickly and easily view the
time, band and frequency, signal
strength, and other indicators.
Radio Shack is a registered trademark used by Tandy Corporation.
2
—
Sleep Timer
er to turn off after a preset length of
—
time (15, 30, 60, or 90 minutes), so you
can fall asleep as you listen to it.
© 1997 Tandy Corporation.
All Rights Res erv ed.
— lets you set the receiv-
Page 3

MW Step Setting — lets you choo se
the correct setting for w hatever part of
the world you are in.
Battery Power Indicator — lets you
know when the batteries need to be repl aced.
AM RF Gain Control — lets you adjust the receiver’s sensitivity when you
listen to SW t o provide the be st possible reception.
Narrow/Wide Contro l — lets you reduce interference from other stations
when you listen to SW, MW (AM), and
LW broadcasts.
BFO Controls — let you tune to stations that transmit in continuous wave
(CW) and single sideband (SSB).
Built-In Cassette Recorder — lets
you record and play back programs.
Standby Recording — lets you record
your favorite program at a preset time.
Back-Up Battery Power — keeps the
clock running, protects the stations
stored in memory, and powers the display if the receiver’s primary power
source is interrupted.
Memo Pad — lets you record helpful
information such as the memory location numbers of your favorite stations.
We recommend you record the serial
number of your receiver here. The
number is inside the battery compartment.
Serial Number_________ _______ _
Beat Cut Switch — reduces the hum
or whistling sound sometimes heard
when recording AM broadcasts.
Built-In Condenser Microphone —
lets you make live recordings.
Three Power Options — let you
choose from internal batteries, standard household AC power (requires an
AC adapter), or DC vehicle battery
power (requires a DC adapter) so you
can use the receiver just about anywhere.
3
Page 4

CONTENTS
g
g
g
Preparation............................................................................................................ 6
Setting the MW (AM) Tuning Increment........................................................... 6
Install ing Back-Up Batteries ............................................................................. 6
Connecting to Primary Power........................ ....... .. ....... .......... ....... .. .......... ...... 7
Internal Battery Power .............................................................................. 7
AC Power .................................................................................................. 8
DC Power .................................................................................................. 8
Using the Folding Stand and Memo Pad. ......................................................... 9
Usin
Usin
the Receiver.............................................................................................. 10
Turning the Receiver On/Off........................................................................... 10
Tuning............................................................................................................. 10
Selecting the Band .................................................................................. 10
Direct-Access Tuning .............................................................................. 10
Using th e Rotary Dial .............................................................................. 11
Tuning with the Arrow Keys ..................................................................... 12
Scanning ................................................................................................. 12
Memory Tuning ....................................................................................... 13
Adjusting the Antenna .................................................................................... 13
Connecting an External Antenna.................................................................... 14
Adjusti ng Special Tuning Controls.................................................................. 14
FM Mono/F M Stereo ............................................................................... 14
AM Narrow/AM Wide .............................................................................. 14
AM RF Gain ............................................................................................ 15
BFO Switch and BFO Dial ...................................................................... 15
Tone ........................................................................................................ 15
the Clock Radio........................................................................................ 16
Setting the Clocks........................................................................................... 16
Changing the Clock Display .................................................................... 17
Using the Alarm (Standby) Feature................................................................ 17
Setting the Alarm .................................................................................... 17
Silencing the Alarm ................................................................................. 18
Turning the Alarm Off/On ........................................................................ 18
Using th e Sleep Timer.................................................................................... 18
Makin
4
a Recording............................................................................................ 19
Loading a Cassette Tape.................................................................. .............. 19
Playing a Casse tte Tape ................................................................................. 19
Fast-Forward and Rewind ....................................................................... 20
Cue and Review ...................................................................................... 20
Page 5

Recording ....................................................................................................... 20
Recording from the Radio ....................................................................... 20
Recording from the Radio Using the Standby Feature . .......................... 21
Recording AM Broadcasts ............... ....... ....... .. .......... ....... .. .......... ....... ... 22
Recording Using the Built-In Microphone ............................................... 22
Additional Features............................................................................................ 23
Connecting Headphones ............................................................................... 23
Listening Safely ...................................................................................... 23
Lighting the Display........................................................................................ 24
Locking the Controls ...................................................................................... 24
Listening Hints.................................................................................................... 25
Reference Sources ........................................................................................ 25
Frequency Conversion................................................................................... 25
Band Allocations ............................................................................................ 25
Amateur Radio Frequencies ................................................................... 25
International Frequencies ....................................................................... 26
Aircraft Frequencies ................... ....... ....... ....... .......... ....... .. ............ ..... ... 27
Ships and Coastal Station Frequencies ................................................. 27
Time Standard Frequencies .... ............................................................... 27
Longwave Band ...................................................................................... 27
Listening Guide .................................................................................................. 28
Birdies ............................................................................................................ 33
Tape Tips and Techniques................................................................................. 34
Storin g Your Cassettes ................................................................................. 34
Erasing Tapes ............................................................................................... 34
Accidental Erasure Pre vention ...................................................................... 34
Tape Tension ................................................................................................. 35
Cleaning the Tape Mechanism ...................................................................... 35
Troubleshooting ................................................................................................. 36
Resettin g the Radio ....................................................................................... 37
Maintenance........................................................................................................ 38
Caring for the Receiver.................................................................................. 38
The FCC Wants You to Know ........................................................................ 38
Specifications..................................................................................................... 39
5
Page 6

PREPARATION
SETTING THE MW (AM)
TUNING INCREMENT
In the United States, the Federal Communications Commission (FCC) assigns frequencies for stations in the
MW band in 10-kilohertz increments.
(In the United States, we commonly
call the MW band the AM band.) In Europe and some other parts of the
world, MW frequencies are assigned in
9-kilohertz increments.
INSTALLING BACK-UP
BATTERIES
Back-up batteries power the receiver’s
clock and the display and save the stations stored in memory if the receiver’s
primary power source is interrupted.
The receiver uses three AA batteries
for back-up power. For the best performance, we recommend alkaline batteries, such as Radio Shack Cat. No.
23-552.
Note:
using only the back-up batteries. If you
press
teries are the only available power
source,
You cannot operate the receiver
POWER
E
when the back-up bat-
flashes on the display.
The MW STEP switch is located inside the battery compartment. Before
you install the back-up batteries, set
the switch to
lowing guidelines:
• If you are in the United States,
Canada, or another North or
South American country, be sure
the switch is set to
• If you are in a country where
the AM frequency increments
are 9 kHz, set the switch to
9k
or
10k
using the fol-
10k
.
9k
.
Follow these steps to install the backup batteries.
1. Remove the battery compartment’s cover by pushing the cover
in the direction of the arrow.
2. Install three AA batteries, according
to the polarity symbols (+ and –)
marked next to the compartment.
For easy removal, place the batteries on top of the lift-out ribbon.
6
Page 7

3. Replace the cover, or install additional batteries for primary power
as described in “Internal Battery
Power.”
To check the back-up batt eries’ power
level, disconnect the receiver from the
primary-power source. Then look at
the receiver’s display. If it is dim, replace the back-up batteries.
CONNECTING TO
PRIMARY POWER
You can power the receiver from internal batteries, standard AC power, or
your vehicle’s battery.
3. Replace the cover.
To chec k t he pri ma ry- powe r batt er ies ,
turn off the receiver. The b a ttery power indicator appears on the display for
several seconds. Fresh batteries
show a power level of 7. If the indicator s hows a power level of 2 or below,
replace the primary-power batteries.
Internal Battery Power
Your receiver uses four D batteries.
For the best performance, we recommend alkaline batteries, such as Radio
Shack Cat. No. 23-550.
Follow these steps to install batteries
for use as the primary power source.
1. Remove the battery compartment’s cover by pushing the cover
in the direction of the arrow.
2. Slide four D batteries into the
compartment, according to the
polarity symbols (+ and –) ma rked
next to the compartment. For easy
removal, place the batteries on
top of the lift-out ribbon.
Note:
turn on the receiver when the primarypower batteries are dead,
the display if back-up batteries are installed.
If you press
RADIO POWER
E
flashes on
to
AC Power
With an optional AC adapter, such as
Radio Shack Cat. No. 273-1664, you
can power the receiver from standard
AC power.
Caution:
that supplies 6 volts with the center tip
set to negative. It must deliver at least
400 milliamps, an d it s p lug mus t p ro perly fit the receiver’s
ing an adapter that does not meet
these specifications could da mage the
You must use an AC adapter
DC IN 6V
jack. Us-
7
Page 8

receiver or the adapter.
Follow these steps to use AC power.
1. Set the adapter’s voltage switch to
6V
.
2. Line up the 5.5 mm outer diameter/2.1 mm inner diameter
barrel plug with the adapter’s
socket so it reads
, and insert
–TIP
the plug.
least 400 milliamps, and its plug
must properly fit the recei ver ’s
IN 6V
jack. Using an adapter that
DC
does not meet these specifications could damage the receiver
or the adapter .
• To protect your vehicle’s electrica l
system, be sure the adapter is
connected to the cigarette-lighter
socket only when it is also connected to the receiver.
3. Insert the barrel plug into the receiver’s
DC IN 6V
jack.
4. Plug the adapter into a standard
AC outlet.
Note:
Using an adapter disconnects
the primary power batteries.
DC Power
With an optional DC ad apter, such as
Radio Shack Cat. No. 270-1562, you
can power the receiver from your vehicle’s battery.
Cautions:
• You must use a DC adapter that
supplies 6 volts with the center tip
set to negat ive. It must deliver at
• Follow these steps to use DC
power.
1. Set the adapter’s voltage switch to
6V
.
2. Line up the 5.5 mm outer diameter/2.1 mm inner diameter
barrel plug with the adapter’s
socket so it reads
, and insert
–TIP
the plug.
3. Insert the adapter’s barrel plug
into the rece iv er’s
DC IN 6V
jack.
4. Insert the adapter’s plug into the
vehicle’s cigarette-lighter socket.
Note:
Using an adapter disconnects
the primary-power batteries.
8
Page 9

USING THE FOLDING
STAND AND MEMO PAD
You can position the receiver more securely and possibly improve the sound
by resting the receiver on its stand.
Lift the latch on the back of the receiver
to open the stand. You can use the
memo pad under t he receiver’s stand
to record helpful information, such as
the memory location numbers of your
favorite s ta tions.
The display shows the band, frequ ency, and signal strength. (A reading of 7
indicates the strongest signal.)
Press
the receiver.
RADIO POWER
again to turn off
USING THE RECEIVER
TURNING THE
RECEIVER ON/OFF
Press
ceiver, then adjust the volume.
RADIO POWER
to turn on the re-
TUNING
Selecting the Band
Press FM,
band. (Press
smaller band within the SW band,
press
band by pressing its labe led b utton on
the keypad.
Direct-Access Tuning
Follow these steps to directly tune to a
station.
MW, LW
METER
, or SW to select the
MW
for AM.) T o select a
, then enter the desired
1. Press
play disappears.
FREQ
. The frequency dis-
9
Page 10
2. Press the number buttons (and
decimal button where appropriate)
to enter the frequency.
If you make a mistake, press
C
(cancel) to erase the last digit.
If you wait more than 15 seconds
to press a button, the previous frequency returns to the display and
you must begin again at Step 1.
3. Press
ENTER
. The selected fre-
quency appears.
Using the Rotary Dial
You can select a higher or lower frequency by turning the
knob up or down.
ROT ARY TUNI NG
er so you can fine tune the frequen cy,
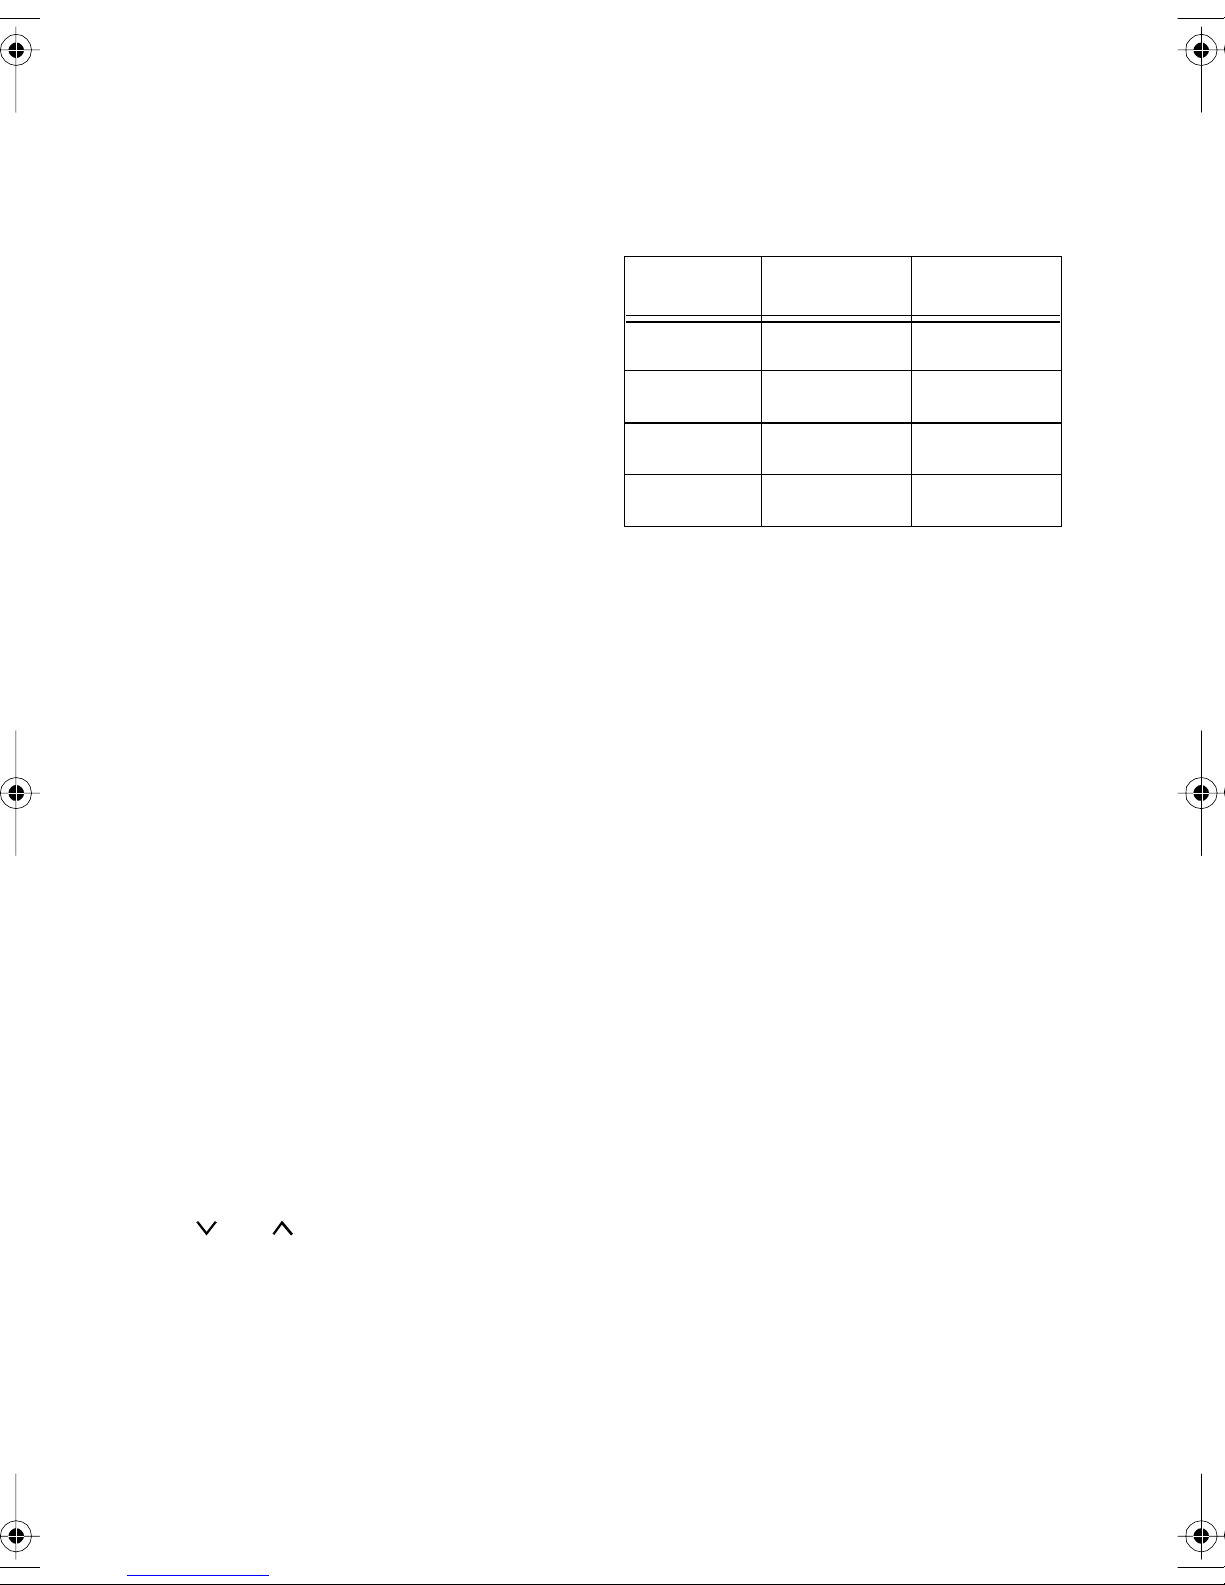
as shown in the following table.
Band Fast Fine
FM 0.1 MHz 0.05 MHz
L W 9 kHz 1 kHz
MW (AM) 9/10 kHz 1 kHz
SW 0.005 MHz 0.001 MHz
You can also set
lock the
ROTARY TUNING
FAST/FINE/LOCK
dial. This
to
prevents you fr om acc ide ntally cha nging the frequency.
FAST/FINE/LOCK
Set
ry tuning increments or to lock the
TARY TUNING
dial. If you select
to sele ct th e rota-
RO-
FAST
the rotary tuning increments are the
same as when you use the
AUTO
FINE
or keys. If you select
, the tuning increments are small-
MANUAL/
Note:
TUNING
This locks only the
dial. For information about
ROTARY
locking the front-panel buttons, see
“Locking the Controls” on Page 22.
,
10
Page 11

Tuning with the Arrow Keys
You can select a lower or higher frequency by pressing
or . The frequency changes in
the following increments.
MANUAL/AUTO
To scan for a frequency in one of 13
shortwave bands, pres s
METER
. Then
press the correct button on the numeric keypad to select the shortwave
band.
Band Tuning Increment
FM 0.1 MHz
LW 9 kHz
MW
(AM)
9 or 10 kHz (see
“Setting the MW (AM)
Tuning Increment” on
Page 6)
SW 0.005 MHz
Scannin g
To automatically tune up or down to
the next active frequency in the selected band, press and hold down
MANUAL/AUTO
seconds. The receiver scans up or
down the selected band and tunes to
the first frequency it finds with a strong
signal.
or for about 2
When scanning in a smaller band, t he
receiver searches only within the selected band and stops at the upper and
lower limits of the band.
See “International Frequencies” on
Page 23 for a list of the shortwave
bands.
Note:
When scanning, the receiver
only searches for frequencies with
strong signals. To search for stations
with weaker signals, use one of the
manual tuning methods.
11
Page 12

Memory Tuning
ADJUSTING THE
For easy selection, you can store the
frequencies of your f avorite st ations in
memory. You can store up to 18 SW
and 18 FM frequencies, and up to 9
frequencies in each of the other bands.
Follow these steps to store a frequency into memory.
1. Use direct-access or ma nual tuning to tune to the frequency you
want to store.
2. Press
3. While
location code using the numeric
keypad. For SW and FM bands,
select from 1–9 and 01–09. For
other bands, select f rom 1– 9. The
frequency is stored,
ing, and the display shows the
memory location code
M
.
M
flashes, enter a memory
M
stops flash-
ANTENNA
For the best recept ion, ad just the telescoping antenna for the band you want
to listen to.
— Fully extend the antenna and
FM
rotate it for the best reception.
LW and MW (AM)
ceiver. The receiver uses the i nterna l
antenna for the LW and MW (AM)
bands.
— Rotate the re-
Note:
onds to press a memory location code
number,
begin again at Step 2.
To select a stored frequency, press
FM, MW, LW
Then enter the memory location code.
12
If you wait more than 15 sec-
M
stops flashing and you must
, or SW to select the band.
Page 13

SW — Fully extend the antenna and
point it straight up.
CONNECTING AN
EXTERNAL ANTENNA
ADJUSTING SPECIAL
TUNING CONTROLS
Several controls affect the receiver’s
sound. This section explains how to
adjust these controls.
To improve SW reception, you can
connect a portable external antenna
(such as Radio Shack Cat. No. 278-
1374) directly to the telescoping antenna or you can make an antenna
using a shortwave antenna kit (such
as Radio Shack Cat. No. 278-758).
Follow the antenna’s supplied instruc tions to connect the receiver to the antenna.
FM Mono/FM Stereo
To improve reception for weak FM stereo stations, set
FM MONO
to
monaural, but the sound might improve. To return to a stereo signal, set
FM MONO/FM STEREO
FM MONO/FM STEREO
. The signal becomes
FM STEREO
to
AM Narrow/AM Wide
To reduce interference from adjacent
stations in the SW, MW, or LW bands,
AM NARROW/AM WIDE
set
ROW
.
AM NAR-
to
.
13
Page 14

AM RF Gain
AM RF GAIN
The
strength for SW reception. If the signal
is weak, turn
If the sound is distorted, turn
GAIN
toward
control affects signal
AM RF GAIN
MIN
.
toward
MAX
AM RF
For the FM and MW bands and for SW
stations that do not transm it in S SB or
BFO
CW, set the
BFO
dial has no effect when the
.
switch is set to
switch to
OFF
.
OFF
. The
BFO
Tone
BFO Switch and BFO Dial
Some SW an d LW stations transm it in
Morse Code using a form o f transmission called continuous wave (CW).
Some SW stations use a special type
of voice transmission called single
sideband (SSB).
To tune to a CW or SSB station, select
the band and frequency and adjust the
BFO
BFO
dial
antenna. In addition, set the
switch to ON. Then, beginning at its
midpoint, slowly adjust the
until the reception becomes clear.
In all bands, adjust
TONE
for the best
sound.
Silencing the Alarm
When the display shows the alarm
time, the radio turns on or the buzzer
sounds and flashes on the display.
After several seconds, the buzzer’s
volume increases. After a few more
seconds, the volume increases again.
The buzzer automat ically stops or the
receiver automati cally turns off aft er 60
minutes. To silence the ala rm sooner,
press
again the next day at the set time.
RADIO POWER
. The flashing
disappears and the al arm sounds
14
Turning the Alarm Off/On
To turn off the alarm so it does not
sound again, press
STANDBY
flashes, press C.
STANDBY
. While
Page 15

If you then want to set the alarm again,
press
flashes, press
STANDBY
. While
ENTER
.
STANDBY
MAKING A RECORDING
LOADING A CASSETTE
TAPE
USING THE SLEEP
TIMER
The sleep timer sets the receiver to
turn off after a length of time you set,
so you can fall asleep as you listen to
the receiver.
1. When the receiver is off, press
SLEEP
2. Repeatedly press
desired amount of sle ep time (15,
30, 60, or 90 minutes) ap pears on
the display.
. The receive r tu rns on, and
appears on the display.
SLEEP
until the
1. Press
cassette compartment’s door.
2. Use your finger or a pencil to turn
the cassette’s hub and take up
any slack.
Note:
prints attract dust and dirt that can affect sound quality.
3. Insert the cassette into the compartment with the open side up,
full reel to the right, and the
desired tape side facing you.
STOP/EJECT
Avoid touching the tape. Finger-
to open the
3. Tune to the desired station.
After the amount of time you set in
Step 2, the receiver turns itself off. To
turn off the receiver soo ner, press
DIO POWER
.
RA-
4. Close the compartment’s door.
15
Page 16

USING THE CLOCK RADIO
Your receiver ha s t wo clocks. We rec ommend you set the primary clock for
local time and the sec ondary clock for
UTC (Coordinated Universal Time —
formerly called Greenwich Mean
Time), because most shortwave stations announce broadcast times in
UTC.
The time zone ma p on the back o f the
receiver shows the di fference in hours
between UTC a nd each time zone. To
determine your local time, tune your
receiver to a time st andard frequency
(see “Time Standard Frequencies” on
Page 24) and get the current UTC
time. Then ad d or subtract the specified number of hours from UTC time.
During Daylight Saving Time, subtract
1 more hour.
2. Press
flashes on the display.
3. While
the correct time by pressing the
number buttons. Do not precede
single-digit hours with a 0. For
example, enter
TIME SET
TIME SET
TIME SET
.
flashes, set
930
for 9:30 AM.
SETTING THE CLOCKS
Follow these steps to set each clock.
Both clocks display the time in the 24hour f ormat ( 0: 0 0–23 :59).
1. Repeatedly press the right
TIME
button to select the clock
you want to set. appears when
the secondary clock is selected
and disappears when the primary
clock is selected.
DUAL
If you make a mistake, press
(cancel) to erase the last digit.
Note:
seconds to press a button,
SET
begin again at Step 2.
4. Press
running from the time you set.
If you wait more than 15
stops flashing and you must
ENTER
. The clock starts
C
TIME
16
Page 17

Changing the Clock Display
set the alarm for the UTC broadcast
time, and be sure the display shows
the secondary clock.
Setting the Alarm
To change from one clock display to
the other, press the right
button. appears or disappears to
show you which clock you are viewing.
To briefly change the clock display,
hold down the left
Release the left
return to the previous clock display.
DUAL TIME
DUAL TIME
DUAL TIME
button.
button to
USING THE ALARM
(STANDBY) FEATURE
You can set a buzzer to sound or have
the radio turn on at a specified time.
The alarm sounds when the current
clock display (either primary or secondary) shows the alarm time. Be sure
the clock display is set to show the desired clock when the alarm time arrives.
1. Press
es on the display and the current
alarm time appears.
2. Wh ile
the number buttons to enter the
alarm time.
If you make a mistake, press
(cancel) to erase the last digit.
Note:
seconds to press a button,
STANDBY
must begin again at Step 1.
3. Press
The clock display returns after a
few seconds.
flashing and remains on the display.
4. Set
BUZZER
sound or to
to turn on at the alarm time.
STANDBY
STANDBY
If you wait more than 15
stops flashing and you
ENTER
STANDBY BUZZER/RADIO
to set the buzzer to
RADIO
STANDBY
.
flashes, press
.
STANDBY
to set the radio
stops
flash-
C
to
For example, you can use the alarm to
remind you to tune to a foreign broa dcast. Set the secondary clock for UTC,
17
Page 18

PLAYING A CASSETTE TAPE
1. Set
2. Set
MAL
STANDBY REC
TAPE SELECT
CrO2
or
according to the type
OFF
to
to either
of tape you are going to play.
3. Press
PLAY
. The PLAY indica-
tor lights .
.
NOR-
• To temporarily stop playback,
press
back, press
PAUSE
. To resume play-
PAUSE
again.
• At the end of a tape, the tape
motor automatically stops and the
selected button (
RECORD
REVIEW/REWIND
CUE/FAST- F
,
PLAY
, or
) pops up.
• To play the other side, turn the
cassette tape over.
Fast-Forward and Rewind
Press
vance a tape. Press
tape reaches the desired point, press
STOP/EJECT
CUE/FAST-F
to rapidly ad-
REVIEW/REWIND
to quickly rewind a tape. When the
.
,
4. Adjust
VOLUME
to a comfortable
listening level.
5. To stop the tape, press
EJECT
. Press
STOP/EJECT
again to open the cassette compartment’s door and remove the
cassette tape.
Notes:
STOP/
Caution:
To avoid damaging the tape,
do not go directly from rewind to fastforward or from fast-forward to rewind
without pressing
STOP/EJECT
first.
Cue and Review
Holding down
playing a cassette tape lets you cue
(play the cass ette tape at high speed)
so you can qui ckly locate any de sired
section on the tape. When you release
CUE/FAST-F
to normal play.
Holding down
after you press
view (play the cassette tape in reverse at high speed). When you
release
REVIEW/REWIND
corder returns to normal play.
CUE/FAST-F
while
, the recorder returns
REVIEW/REWIND
PLAY
lets you re-
, the re-
18
Page 19

RECORDING
Recording from the Radio
1. Set
STANDBY REC
2. Load the cassette tape you want
to record on.
3. Set
TAPE SELECT
NORMAL
according to the tape
you loaded.
4. Tune to the desired station.
5. Adjust
VOLUME
to a comfortable
listening level.
Note:
The Automatic Level Control automatically adjusts the volume recorded on the tape.
6. Press
recording.
RECORD
PLAY
goes down and the RECORD indicator lights.
OFF
to
to either
.
CrO
to begin
automatically
2
or
Caution:
down
Never attempt to force
RECORD
. If you have
removed your cassette’s eraseprotection tabs, you cannot press
RECORD
. See “Accidental Era-
sure Prevention” on Page 32.
7. To temporarily stop recording,
press
PAUSE
. Press
PA U S E
again to resume recording.
8. When the recording is complete,
press
STOP/EJECT
twice, and
remove the cassette from the
recorder.
Recording from the Radio
Using the St andby Feature
This feature lets you record your favorite program at a preset time.
The DX-392 automatically stops
when the tape reaches the end.
To record the other side, turn the
tape over.
1. Turn on the receiver and tune to
the desired station.
2. Turn off the receiver.
3. Set
4. Set
STANDBY REC
STANDBY BUZZER/RADIO
RADIO
5. Press
.
STANDBY
to ON.
to
.
19
Page 20

6. While
STANDBY
flashes, enter the
starting time of the program you
want to record. Then press
ENTER
Note:
STANDBY
.
stops flashing.
Be sure the clock display is
set to show the desired clock
when the alarm time arrives.
7. Load a tape with adequate length
for the period you are going to
record. For instance, load a C-60
tape for recording a 30-minute
program.
8. Set
NORMAL
TAPE SELECT
to either
according to the type of
CrO
2
or
tape you loaded.
9. Press
RECORD
PLAY
(
automatically goes down). The radio
turns on at the preset time and the
recorder starts recording. The
tape stops automatically at the
end of the tape, but the radio
keeps playing until you turn it off.
Recording AM Broadcasts
Sometimes you might hear a hum or
whistling sound when recording an AM
broadcast. To reduce or eliminate this
sound, set the
BEAT CUT
switch to the
position that gives you the best recording.
Recording Using the Built-In
Microphone
Your cassette recorder has a built-in
condenser microphone on the front. To
record with the built-in m icrophone, follow the steps in “Recording from the
Radio” on Page 19. But, instead of tuning to a radio st ation in Step 4, simply
position the DX-392 near the source
you are recording. Then continue with
Step 6.
20
Page 21

ADDITIONAL FEATURES
CONNECTING
HEADPHONES
For private listening and for stereo
sound during FM stereo broadcasts,
you can connect optional stereo headphones with a
Radio Shack store se lls a wide selection of stereo headphones.
1
/8-inch plug. Your local
Listening Safely
To protect your hearing, follow these
guidelines when you use headphones.
• Set the volum e to the l owest setting before you begin listening.
After you begin listening, adjust
the volume to a comfortable level.
• Do not listen at extremely high
volume levels. Extended highvolume listening can lead to permanent hearing loss.
• Once you set the volume, do not
increase it. Over time, your ears
adapt to the volume level, so a
volume level that does not cause
discomfort might still damage your
hearing.
Insert the headphones’ plug into the
receiver’s jack. This disconnects
the receiver’s internal speaker.
When you connect stereo headphones
and tune to a stereo broadcast,
ST
appears on the display. For the best
reception, fine tune the receiver until
ST
remains steady.
LIGHTING THE DISPLAY
Press
The display li ght automatical ly turns off
about 15 seconds after you release
LIGHT
sooner.
LIGHT
. Press
to briefly light the display.
LIGHT
again to turn it off
21
Page 22

LOCKING THE
CONTROLS
Th e lo c k f ea tu r e prevents you from accidentally turning the receiver on or off,
changing the band or frequency, or selecting front-panel buttons.
Set the lock switch to to lock all
the front-panel buttons and the
RY TUNING
VOLUME, TONE
Set the switch to the other position to
unlock the buttons.
dial. You can still adjust
, and other controls.
ROTA-
REFERENCE SOURCES
Many books and magazines about
shortwave listening are available
through your local library or newsstand. Consult sources such as the
World Radio Handbook, Radio Amateur’s Handbook
Band Radio
Popular Comm unications
lications can help you learn about the
conditions that make lo ng-dist ance reception possible and provide up-todate listings for shortwave broad casts
in English and in other languages.
,
Passport to World
,
Monitoring Times
. These pub-
, and
FREQUENCY
Note:
ING
Page 10.
To lock only the
dial, see “Using the Rotary Dial” on
ROTARY TUN-
LISTENING HINTS
Shortwave listening is a hobby with
thousands of participants worldwide. It
requires no special knowledge or
skills, but your enjoyment increases as
you gain experience an d develop sp ecial listening techniques.
The information in this section can help
you make the most of your DX-392.
CONVERSION
A band is a group of frequencies.
Sometimes, bands are grouped according to their wavelengths, in
meters. The tuning location of a station
can be expressed as a frequency (kHz
or MHz) or a wavelength (meters).
Amateur radio operators gene rally refer to the frequencies they operate on
using the freq uency ’s wavelength. For
example, the 19-meter band refers to
the range of frequencies with waves
about 19 meters long.
Use the following equations to convert
kHz, MHz, and meters.
22
To convert MHz to kHz, multiply by
1,000. For example:
9.62 MHz ¥ 1000 = 9,620 kHz
Page 23

To convert kHz to MHz, divide by
1,000. For example:
2780 kHz ³ 1000 = 2.780 MHz
To convert MHz to meters, divide 300
by the number of MHz. For example:
300 ³ 7.1 MHz = 42.25 meters
To convert meters to MHz, divide 300
by the number of meters. For example:
300 ³ 42.25 meters = 7.1 MHz
BAND ALLOCATIONS
Certain bands are set aside for specific
purposes.
Amateur Radio Frequencies
3,800–4,000 kHz: SSB
40 meters:
7,000–7,150 kHz: CW
7,150–7,300 kHz: SSB
20 meters:
14,000–14,200 kHz: CW
14,200–14,350 kHz: SSB
15 meters:
21,000–21,250 kHz: CW
21,250–21,450 kHz: SSB
10 meters:
28,000–28,500 kHz: CW
28,500–29,700 kHz: SSB
Tuning to the amateur radio frequencies can be interesting and helpful, because amateur radio operators often
broadcast emergency information
when other means of communication
break down.
Amateur radio operators use the following bands. Portions of these ban ds
are set aside for continuous wave
(CW) Morse code communication or
for single sideband (SSB) voice communication, as shown below.
160 meters:
1,800–2,000 kH z: SSB
80 meters:
Note:
observed everywhere in the world.
These ranges are not precisely
INTERNATIONA L
FREQUENCIES
International commercial broadcasts
are found in the following shortwave
bands. Programs (often in English)
usually contain news, commentaries,
music, and special features reflecting
the culture of the broadcasting country.
Reception for this range is best be-
tween 6:00 PM and midnight (your
3,500–3,800 kHz : CW
23
Page 24

time).
y
Band
(in meters)
120
90
75
60
4,650–4,750 kHz
6,545–6,765 kHz
Frequenc
(in MHz)
*
*
*
*
Range
2.300–2.495
3.200–3.400
3.900–4.000
4.750–5.060
8,815–9,040 kHz
11,175–11,400 kHz
13,200–13,360 kHz
15,010–15,100 kHz
17,900–18,030 kHz
49 5.900–6.200
**
41
31 9.400–9.990
25 11.600–12.100
21 13.600–13.800
19 15.100–15.800
16 17.480–17.900
13 21.450–21.750
11 25.600–26.10 0
*
These bands are reserved for sta-
tions in tropical areas.
**
Interference is heavy in the 41m
band (7.100–7.300 MHz) because amateur radio operators and international
stations share this range.
7.100–7.350
Ships and Coastal Station
Frequencies
Most transmissions from ships and
coastal stations are in SSB and CW.
You can hear these transmissions in
the following bands.
2,000–2,300 kHz
4,063–4,139 kHz
4,361–4,438 kHz
8,195–8,181 kHz
12,330–12,420 kHz
13,107–13,200 kHz
16,460–16,565 kHz
*
The Coast Guard and small boats
use this band, with 2,182 kHz set aside
as the international distress and emergency channel.
*
Aircraft Frequencies
Aircraft on international routes sometimes use SW. Most transmissions are
in SSB, although you can still hear
some AM transmissions. Here are
some bands where you might hear aircraft communi ca ti o n s.
24
Time Standard Fre quenc ies
The following frequencies announce
the exact time of day at specified intervals.
WWV in Fort Colli n s , Colo ra do:
Page 25

2,500 kHz
5,000 kHz
10,000 kHz
15,000 kHz
20,000 kHz
CHU in Canada: 7,335 kHz
VNG in Australia: 4,500 and
12,000 kHz
Longwave Band
The 150–519 kHz range is known as
the longwave band. Most stations in
this range serve as beacons for aircraft
and marine navigation by continuously
transmitting their call letters. Reception for this range is best between 6:00
PM and midnight (your time).
Most stations in this range use CW
(Morse code), although some use AM
voice transmission for weather broadcasts.
LISTENING GUIDE
The following list contains some of the
more frequently heard stations. All stations broadcast in English unless otherwise specified.
You can hear these stations throughout North America. However, reception varies based o n the season, tim e
of day, and a number of other conditions.
Some ships also use this range, with
500 kHz set aside as an international
distress and emergency station.
kHz Station Location Remarks
3,223 Radio SR Swaziland
3,265 R adio Mozamb ique Maputo, Mozambique
3,300 Radio Cultural Guatemala City,
Guatemala
3,380 Radio Iris Esm eralda s, Ecuador Programs in Spanish
3,385 FR3 Cayenne,
French Guiana
3,396 Radio Kaduna Kaduna, Nigeria
This information can change at any
time. For sources of yearly, up-to-date
listings, see “Reference Sources” on
Religious Programs
Programs in French
4,750 Radio Bertoua Bertoua, Cameroon
25
Page 26

kHz Station Location Remarks
4,755 Imo Regional
Imo, Nigeria
Radio
kHz Station Location Remarks
4,777 Radio/TV Gabon Libreville, Gabon Programs in French
4,795 Radio Nueva
La Paz, Bolivi a Programs in Spanish
America
4,820 Radio Paz y Bien Ambala, Ecuador Programs in Spanish
4,832 Radio Reloj San Jose, Costa Rica Programs in Spanish
4,855 Radio Clube do
Para
Bele m , Brazi l Prog rams in
Portugese
Page 22.
kHz Station Location Remarks
4,890 National
Papua New Guinea
Broadcasting
Commission
4,915 Voice Kenya Nairobi, Kenya
4,920 Australian
Brisbane, Australia
Broadcasting
Commission
4,945 Radio Colosal Neiva, Colombia Prog rams in Spanish
4,965 Radio Santa Fe Bogota, Colombia Programs in Spanish
4,980 Ecos del Torbes San Cristobal,
Programs in Spanish
Venezuela
5,020 Solomon Islands
Broadcasting
Honiara, Solomon
Islands
Service
5,057 Radio Gjirokaster Gji rokaster, Albania Programs in Albanian
5,950 Guyana
Georgetown, Guyana
Broadcasting
Service
26
Page 27

kHz Station Location Remarks
5,954 Radio Casino Puerto Limon,
Costa Rica
kHz Station Location Remarks
5,960 Radio Canada
Montreal, Canada
International
5,980 Radio RSA Johannes burg , South
Africa
6,005 CFCX Montreal, Canada
6,025 Radio Malaysia Kuala Lumpur,
Programs in Chinese
Malaysia
6,045 Radio Australia Ly ndh urst, Australia
6,055 Nihon Shortwave
Tokyo, Japan Programs in Japanese
Broadcasting
Company
kHz Station Location Remarks
6,060 Radio Nacional Buenos Aires,
Programs in Spanish
Argentina
6,075 Radio Sutatenza Bogota, Colombia Prog rams in Sp anish
6,090 Radio
Luxembourg
Ville Louvigny,
Luxembourg
6,095 P olskie Radio Warsaw, Poland
6,105 Radio New
Zealand
7,140 Trans World
Wellington, New
Zealand
Monte Carlo, Monaco
Radio
7,170 Radio Noumea Noumea, New
Programs in French
Caledonia
7,300 Radio Tirana Tirana, Albania
9,475 Radio Cairo Cairo, Egypt
9,515 Voice of Greece Athens, Greece
9,525 Radio Korea Seoul, South Korea
27
Page 28

kHz Station Location Remarks
9,530 Spanish Foreign
Madrid, Spain
Radio
kHz Station Location Remarks
9,535 Swiss Radio
Berne, Switzerland
International
9,540 Radio Prague Prague,
Czech Republic
9,570 Radio Bucharest Bucharest, Romania
9,575 Italian Radio and
Rome, Italy
Television
Service
9,610 Radio-TV Algeria Algiers, Algeria Programs in Arabic
9,620 Radio Berlin
Berlin , Germ a ny
International
kHz Station Location Remarks
9,645 Radio Norway Oslo, Norway
9,720 Radio Iran Tehran, Iran Programs in Farsi
9,745 HCJB Quito, Ecuador
9,770 Austrian Radio Vienna, Austria
9,800 Radio Kiev Kiev, Ukraine
9,835 Radio Budapest Budapest, Hungary
10,040 Voice of Vietnam Hanoi, Vietnam
11,655 Israel Radio Jerusalem, Israel
11,690 Radi o Kuwait Kuwait City, Kuwait
11,705 Radio Sweden Stockholm, Sweden
11,720 Radio Moscow M oscow, Russia
11,735 Radio Sofia Sofia, Bulgaria
28
Page 29

kHz Station Location Remarks
11,745 V oi ce of Free
Taipei, Taiwan
China
kHz Station Location Remarks
11,815 Radio Japan Tokyo, Ja pan
11,825 Radio Tahiti Papeete, Tahiti Programs in Tahitian
11,835 4VEH Cap Haitien, Haiti
11,845 Radio Canada
Montreal, Canada
International
11,850 Deutsche Welle Cologne, Germany
11,890 Voice of Chile Santiago, Chile
11,900 Radio RSA Johannesburg, South
Africa
11,910 BBC London, England
kHz Station Location Remarks
11,930 Radio Havana
Havana, Cuba
Cuba
11,935 Radio Portugal Lisbon, Portugal
11,945 R a dio B eijing Beijing, China
11,955 Voice of Turkey Ankara, Turkey
11,980 Radio Moscow Moscow, Russia
15,038 Saudi Arab ian
Riyadh, Saudi Arabia Programs in Arabic
Broadcasting
Service
15,084 Voice of Iran Tehran, Iran Prog rams in Farsi
15,135 Radio Moscow Moscow, Russia
15,165 HCJB Quito, Ecuador
15,190 ORU Brussels, Belgium
29
Page 30

kHz Station Location Remarks
15,205 All India Radio New Delhi, India
kHz Station Location Remarks
15,260 BBC London, England
15,265 Finnish Radio Helsinki, Finland
15,275 Radio Sweden Stockholm, Sweden
15,305 Swiss Radio
Berne, Switzerland
International
15,310 Radio Japan Tokyo, Japan
15,320 Radio Austral ia Melbourne, Australia
15,400 BBC London, England
15,430 Radio Mexico Mexico City, Mexico Programs in
Spanish
15,465 Radio Pakista n Islamabad, Pakistan Programs in Urdu
30
Page 31

kHz Station Location Remarks
17,720 Radio France
International
17,825 Vatican Radio Vatican City
17,860 Austrian Radio Vienna, Austria
21,495 Israel Radio Jerusalem, Israel
21,525 Radio Australia Melbourne, Australia
21,625 Israel Radio Jerusalem, Israel
21,645 Radio France
International
21,735 Radio-TV
Morocco
25,790 Radio RSA Johannesburg, South
Paris, France
Paris, France
Rabat, Morocco Programs in Arabic
Africa
BIRDIES
Birdies are the products of i nt ernally generated signals t hat make s ome frequencies
difficult or impossible to receive. If you program one of these frequencies, you hear
only noise on that frequency. The most common birdies to watch for are listed below.
450 kHz 18,000 kHz
3,844 kHz 20,490 kHz
9,000 kHz 21,835 kHz
10,250 kHz 21,868 kHz
31
Page 32

TAPE TIPS AND TECHNIQUES
The following suggestions will help you get the best performance from your cassettes and casse tte deck.
STORING YOUR CASSETTES
• Keep them away from excessive dust and dirt.
• Do not expose them to moisture or high humidity.
• Keep them away from strong magnetic fields that can be generated by other
electronic devices (transformers, motors, and so on).
• Store them in protec tive plastic containers. Y our local Radio Shack store offers a
complete selec tion of tape storage containers.
ERASING TAPES
Each time you record on a cass ette tape, the previous recordin g is automatically
erased.
If you want to erase a tape without making a new recording, load the tape into the
casse tte compart ment and press
tape passes the record head. I f you want to quickly eras e a t ape, you mi ght prefer
to use a b ulk tape eraser , avail able at you r l ocal Rad io Shack store. It erases both
sides of an entire tape in a few seconds.
Note:
record. Be sure to place the radio in a quiet a rea if you want to erase a t ape by recording over it.
The built-in microphone records any sounds in the area onto the tape as you
RECORD
. The deck er ases the tape as the
ACCIDENTAL ERASURE PREVENTION
All cassettes have erase-protec tion tabs. When i n place, these tabs l et you record
on the tape. Once you remove these tabs, you cannot press
erasing or recording over Side A (or 1), break off the Side A (or 1) tab with a screw
RECORD
. To avoid
32
Page 33

driver. If you wish to protect Side B (or 2), remove the Side B (or 2) tab.
To record on the tape again, place a piece of strong plastic tape over the erase-pro-
tection tab holes.
Note: Removal of the erase-protection tab does not prevent a bulk eraser from erasing the tape.
Caution: When using a cassette that has had the erase-protection tabs broken off,
do not try to force down
RECORD
. Doing so migh t dama ge t he recordi ng m ec h-
anism.
TAPE TENSION
After you play a cassette tape several times, the tape might become tightly wound
on the reels. This can cause playback sound quality to deteriorate.
To restore the sound quality, fast-forward the tape from the be ginning to the end of
one side, then completely rewind it. Then lo osen the tape reels by gently tapping
each side of the cassette’s outer shell on a flat surface.
Caution: Be careful not to damage the cas sette when t apping it. Do not touch the
exposed tape or allow any sharp objects near the cassette.
33
Page 34

CLEANING THE TAPE MECHANISM
After repeated use, dust, lint and tape
oxides accumulate on the tape-handling mechanisms. For the best performance and sound quality, clean the
record/play heads, pinch rollers, capstans, and erase head after approximately every 20 hours of use. You can
use recorder cleaner and cleaning
swabs or a convenient head-cleaner
cassette. All these cleaning products
are available at your local Radio Shack
store.
34
Page 35

TROUBLESHOOTING
Your receiver should give you years of
trouble-free service if you follow the instructions given in t his manual. If you
have problems, the chart below might
If you still have problems af ter following the suggestions below, take the receiver to your local Radio Shack
storefor assistance.
help.
Problem Cause
Weak or intermittent sound. • The primary-power batteries are
weak.
• Antenna needs adjusting.
• Metal is blocking the signal. Move
the receiver near a window when
you use it inside a vehicle or metal
frame building.
• Frequency needs fine tuning. See
“Tuning” on Page 9.
Scan stops when there is no clear signal.
Frequency does not change when you
ROTARY TUNING
turn
ROTARY TUNING
.
and front panel but-
tons do not respond.
This is caused by birdies. See “Birdies” on Page 31. Using an outdoor antenna might reduce these signals.
FAST/FINE/LOCK
LOCK
.
switch is set to
If appears on the display, the l ock
switch is s et to .
35
Page 36

RESETTING THE RADIO
If the radio displays random characters or t he display does not work properly, you
might need to reset it.
Important:
This procedure clears al l in formation you stored in the radio’s m emo ry.
Reset the radio only when you are sure it is not working properly.
1. Remove the bat tery com partm ent’s cover by pushi ng t he c over in t he d irection
of the arrow.
2. Insert a pointed objec t, such as a straight ened paper clip , into the
inside the battery compartment. Then gently press then release
RESET
RESET
hole
.
36
Page 37

MAINTENANCE
CARING FOR THE
RECEIVER
Your Radio Shack DX-392 PLL AllBand Portable Receiver with Cass ette
Recorder is an example of superior design and craftsmanship. Th e following
suggestions will help you care for your
receiver so you can enjoy it for years.
Use only fresh batteries of
the recommended size and
type. Never leave dead or
weak batteries in the receiver. They might leak
chemicals that can damage
the receiver.
Keep the receiver d ry. If it
gets wet, wipe it dry imm ediately. Liquids can contain
minerals that can corrode
the electronic circuits.
Handle the receiver gently
and carefully. Dropping it
can damage circuit boards
and can cause the receiver
to work improperly.
Wipe the receiver with a
damp cloth occasionally to
keep it looking new. Do not
use harsh chemicals,
cleaning solvents, or strong
detergents to clean your receiver.
Modifying or tampering with your receiver’s internal components can
cause a malfunction and might invalidate the receiver’s warranty and void
your FCC authorization t o operate t he
receiver. If your receiver is not performing as it should, t ake it to your local Radio Shack store for assistance.
THE FCC WANTS YOU
TO KNOW
Your receiver might cause interference
on other radio/TV devices even when it
is operating properly. To determine
whether your receiver is causing the
interference, turn off your receiver. If
the interference goes away, your receiver is causing it.
Use and store the receiv er
only in normal temperatu re
environments. Temperature extremes can shorten
the life of electronic devices, damage batteries, and
distort or melt plastic parts.
Keep the receiver away
from dust and dirt, which
can cause prem ature wear
of parts.
Try to eliminate the interference by:
• Moving your receiver away from
the other device.
• Connecting your receiver to an
outlet that is on a different electrical circuit from the other device.
• Contacting your local Radio
Shack store for help.
37
Page 38

SPECIFICATIONS
y
Circuit:
FMHeterodyne
LW/MW/SWDual-Conversion Het-
erodyne
Frequenc
Range:
FM87.5–108 MHz
LW150–519 kHz
MW520–1,710 k Hz
SW1.711–29.999 MHz
SW Sub-Bands:
2.300 – 2.495 MHz (120 meters)
11.600 – 12.100 MHz (25
meters)
3.200 – 3.400 MHz (90 meters)
13.570 – 13.870 MHz (21
meters)
3.900 – 4.000 MHz (75 meters)
15.100 – 15.800 MHz (19
meters)
4.750 – 5.060 MHz (60 meters)
17.480 – 17.900 MHz (16
meters)
5.900 – 6.200 MHz (49 meters)
21.450 – 21.750 MHz (13
meters)
7.100 – 7.350 MHz (41 meters)
25.600 – 26.100 MHz (11
meters)
9.400 – 9.990 MHz (31 meters)
Tape Speed1
7
ips (4.76 cm/s) ±
8
/
3%
Recording SystemAC Bias
Erasing SystemMagnetic Erasing
Frequency Response1 25–8000 Hz
Signal to Noise Ratio (Play)Normal
46 dB, Limit 40 dB
Jacks:
External PowerDC IN 6V
Stereo Headphones
1
8
/
-Inch
Power Sourc es:
Back-Up3 AA Batteries
Primary(4) D Batteries
AC (Requires Optional Ad apter) 6V/
400mA, Center Tip Negative
DC (Requires Optional Adapter)6V/
400mA, Center Tip Negative
Antenna:
LW/M WBui lt-In Ferrite
SWTelescoping or Optional Exter-
nal
FMTelescoping
Output700 mW @ 10% THD
Recorder:
38
Page 39

Battery Life (Alkaline Batteries):
Back-Up (Radio Off).................................................................... Up to 375 Days
Primary............................................. 75 Hours Continuous Operation @ 50 mW
Dimensions (HWD)................... .........7
1
/
2 ¥
11
7
7
¥ 2
8
/
Inches (192 ¥ 300 ¥ 75 mm)
8
/
Weight. ...................................................................3.2 lbs (1.4 kg without batteries)
Specifications are typical; individu al units might vary. Specifications are s ubject to
change and improvement without notice.
39
Page 40

Limited Ninety-Day Warranty
This product is wa rrante d by Radio Sha ck again st man ufactur ing defect s in mater ial and w orkm anship und er
normal use for ninety (90) days from the date of purchase from Radio Shack company-owned stores and authorized Radio Shack fr an chise es and deal ers. E XCE PT AS PROV IDED HER EIN, Radi o S hack MA KE S NO
EXPRESS WARRANTIES AND ANY IMPLIED WARRANTIES, INCLUDING THOSE OF MERCHANTABILITY AND FITNESS FOR A PARTICULAR PURPOSE, ARE LIMITED IN DURATION TO THE DURATION OF
THE WRITTEN LIMITED WARRANTIES CONTA INED HEREIN. EXCEPT AS PROVIDED HEREIN, Radio
Shack SHA LL HAVE NO LI A BIL I TY O R RESP O N SIB IL IT Y TO CU S TOM ER O R AN Y O THE R PE R SO N O R
ENTITY WITH RESPECT TO ANY LIABILITY, LOSS OR DAMAGE CAUSED DIRECTLY OR INDIRECTLY
BY USE OR PERFORMANCE OF THE PRODUCT OR ARISING OUT OF A NY BREACH OF THIS WARRANTY, INCLUDING, BUT NOT LIMITED TO, ANY DAMAGES RESULTING FROM INCONVENIENCE,
LOSS OF TIME, DATA, PROPERTY, REVENUE, OR P ROFIT OR ANY INDIRECT, SPECIAL, INCIDENTAL,
OR CONSEQUENTIAL DAMAGES, EVEN IF Radio Shack HAS BEEN ADVISED OF THE POSSIBILITY OF
SUCH DAMAGES.
Some states do not allow the limitations on how long an implied warranty lasts or the exclusion of incidental or
consequential damages, so the above limitations or exclusions may not apply to you.
In the event of a produc t defect du ring the warrant y period, take the p roduct a nd the Radio Shac k sales receipt as proof of purchase date to any Radi o Shack store. Radio Shack wil l, at its option, unless otherwise
provided by law : (a) c orrect the defect by produc t repair without charge for parts and labor; (b) repla ce the
product with one of th e sam e or similar design; o r (c) r efund the purc hase price. Al l repla ced par ts and products, and products on which a refund is made, become the property of Radio Shack. New or reconditioned
parts and products may be used in the performance of warranty service. Repaired or replaced parts and products are warranted for the remainder of the original warranty period. You will be charged for repair or replacement of the product made after the expiration of the warranty period.
This warranty does not cover: (a) damage or failure caused by or attributable to acts of God, abuse, accident,
misuse, improper or abnormal usage, failure to follow instructions, improper installation or maintenance, alteration, lightning or other incidence of excess voltage or current; (b) any repairs other than those provided by a
Radio Shack Autho rized Service Facility; (c) consuma bles such as fuse s or batteries; (d) cosmetic damage;
(e) transportat ion, ship ping or insu rance cos ts; or (f ) costs of produc t remov al, inst allatio n, set-up service adjustment or reinstallation.
This warranty gives y ou s pecific legal rights, and you may also have other right s which vary from state to
state.
Radio Shack Customer Relations, Dept. W, 100 Throckmorton St., Suite 600, Fort Worth, TX 76102
A Division of Tan dy Corporation
12A6 Printed in Ta iw a n
We Service What We Sel l
RADIO SHACK
Fort Worth, Texas 76102
3/97
3816526A
 Loading...