

Page 1
19-902 .fm Page 1 Tuesday, August 3, 1999 2:03 PM
Cat. No.
OWNER’S MANUAL
Please read before using this equipment.
19-902
PRS-102 UHF
10-Channel
Personal Radio Service Transceiver
Page 2
19-902 .fm Page 2 Tuesday, August 3, 1999 2:03 PM
CAUTION
RISK OF ELECTRIC SHOCK.
DO NOT OPEN.
!
CAUTION
ELECTRIC SHOCK, DO NOT REMOVE
COVER OR BACK. NO USER -SERVICEABLE PARTS INSIDE. REFER SERVICING TO QUALIFIED PERSONNEL.
!
RadioShack is a trademark used by Tandy Corporation.
: TO REDUCE THE RISK OF
This symbol is intended to alert you to the presence o f uninsulate d dangerous voltage w ithin
the produ ct’s encl osure that mig ht be of sufficient m agnitude to constitut e a risk of elect ric
shock. Do not open the product’s case.
This sym bol is inten ded to in form y ou that important operating and maintenance instructions
are included in the l iterature accompanying this
product.
1996 Tandy Corporation.
All Rights Reserved.
2
Page 3

19-902 .fm Page 3 Tuesday, August 3, 1999 2:03 PM
FEATURES
Your RadioShack PRS-102 10-Channel Personal
Radio Service Transceiver is a portable, two-way
GMRS (General Mobile Radio Service) transceiver
that you can carry almost anywhere. The transceiver
is compact and li ght, makin g it an ideal ch oice for yo ur
personal needs.
Your transceive r has t he following featur es:
Ten Frequencies
— you can set the transceiver to
operate on any of these frequencies:
Channel Frequenc y
1 462.5625 MHz
2 462.5875 MHz
3 462.6125 MHz
4 462.6375 MHz
5 462.6625 MHz
6 462.6875 MHz
7 462.7125 MHz
8 462.5750 MHz
9 462.6250 MHz
10 462.6750 MHz
Note:
Operation on GMRS frequencies requires a
Federal Communicat ions Co mmissi on (FCC) l icense .
PLL (Phase-Locked Loop)-Controlled Circuitry
—
provides accurat e and stable channel selection.
Built-In Modulati on Limiter Circuit
— automatically
adjusts for a wide vari ety of voice levels to ensure an
understandable transmission.
3
Page 4

19-902 .fm Page 4 Tuesday, August 3, 1999 2:03 PM
Rugged Design — built to stand up to daily use in a
wide range of environm ents.
Battery Low and Transmit Indicator — shows the
battery pac k’s con diti on an d lig hts when y ou tra nsmi t.
Supplied Battery Charger — conveniently recharges your transceiver’s supplied battery pack up to several hundred tim es for reduced operating costs.
Earphone Jack and External Microphone Jack —
let you use an earphone or external microphone to
help ensure unde rstand abl e communi cati ons in noi sy
areas.
CTCSS (Continuous Tone Coded Squelch System) Option ( not supplied) — helps reduce interfer-
ence from other nearby systems operating on the
same frequency.
We recommend you record your transceiver’s serial
number here. The num ber is on the back of the tr ansceiver.
Serial Number ____________________________
4
Page 5

19-902 .fm Page 5 Tuesday, August 3, 1999 2:03 PM
CONTENTS
FCC Regulations . . . . . . . . . . . . . . . . . . . . . . . . . 6
FCC License Required . . . . . . . . . . . . . . . . . . 6
FCC Rules Part 95, Subpart A . . . . . . . . . . . . 7
Preparation . . . . . . . . . . . . . . . . . . . . . . . . . . . . . 10
Installing and Removing the Battery Pack . . 10
Installing the Antenna . . . . . . . . . . . . . . . . . . 11
Charging the Battery Pack . . . . . . . . . . . . . . 12
Checking the Battery Power . . . . . . . . . 14
Attaching and Removing the Bel t Cl ip . . . . . 15
Connecting Audio Acces sories . . . . . . . . . . . 16
Operation . . . . . . . . . . . . . . . . . . . . . . . . . . . . . . 17
Operational Hints . . . . . . . . . . . . . . . . . . . . . 18
CTCSS Option . . . . . . . . . . . . . . . . . . . . . . . . . . 19
Why Use CTCSS? . . . . . . . . . . . . . . . . . . . . 19
Setting the CTCSS Tone . . . . . . . . . . . . . . . 20
Optional Accessories. . . . . . . . . . . . . . . . . . . . . 24
Trou bleshooting . . . . . . . . . . . . . . . . . . . . . . . . . 25
Maintenance . . . . . . . . . . . . . . . . . . . . . . . . . . . . 29
Specifications . . . . . . . . . . . . . . . . . . . . . . . . . . 31
5
Page 6

19-902 .fm Page 6 Tuesday, August 3, 1999 2:03 PM
FCC REGULATIONS
FCC LICENSE REQUIRED
Before you operate the transceiver, you must obtain
your licen se. It is illegal to transm it without the appropriate licen se, which you c an get by subm itting a com pleted Federal Communications Commission (FCC)
Form 574.
You can get the latest FCC forms and instructions
from several sources:
• To have the forms faxed to you by the FCC, call
the FCC Fax-On-Demand system at 202-4180177 from your fax machine and request Document 000574 for all forms and instructions, or
Document 005741 for instructions onl y.
• To have the forms mailed to you, call the FCC
Forms Hotline at 800-418-FORM.
For questions concerning the license application,
contact t he FCC at 717 -337-12 12 o r 1-80 0-3 22-1117.
6
Page 7

19-902 .fm Page 7 Tuesday, August 3, 1999 2:03 PM
FCC RULES P ART 95, SUBP ART A
You must be familiar with Part 95, Subpart A of
Rules and Regulati ons
ceiver. The opera ti on instructions i n this manual conform to Part 95, but do not cover all items in Part 95.
In part, Part 95, Subpart A, states that:
• You must be 18 years of age, or older, and not a
representative of a foreign government to get a
license.
• Businesses or associations cannot qualify for a
GMRS license.
• A licensee can let immediate family members
operate under GMRS Rules and Regulations.
• Channels or channel pairs assigned to GMRS
systems are avail able on a shared basis and wil l
not be assigned for the exclusive use of any licensee.
• As licensee, you are responsible for proper
operation of all transceivers operating under
your license.
• You must take reasonable precautions to pre-
vent harmful interference to others operating on
the same frequency.
before you operat e your trans -
FCC
7
Page 8

19-902 .fm Page 8 Tuesday, August 3, 1999 2:03 PM
• You must not transmit program material of any
kind used in connection with commercial broadcasti ng.
• You must not provide a service that is normally
handled by telephone or telegraph unless such
broadcasts involve the safety of life or property
or in emergencies such as an earthquake, hurricane, flood, or a similar disaster where normal
communication channels are disrupted.
Violating any of the pr ovisions of Part 95 can r esult in
fines and/or confi scation of equipm ent.
The General Mobile Radio Service is under the jurisdiction of the Federal Communications Commission
(FCC). Any adjustm ents or altera tions that would alter
the performance of the transceiver so it no longer
meets the original FCC type acceptance or would
change the frequency -determin ing method are strict ly
prohibite d.
Replacement or substitution of crystals, transistors,
ICs, regulator diodes, or any other component that is
of a unique natur e, with com ponents ot her than those
recommended, can violate the technical regulations
of
FCC Rules and Regulations
or violate type accep-
tance requirements of the rules.
8
Page 9

19-902 .fm Page 9 Tuesday, August 3, 1999 2:03 PM
Your transcei ver mi ght c ause TV or rad io i nte rfere nce
even when it is operating properly. To determine
whether your transceiver is causing the interference,
turn off your transceiver. If the interference goes
away, your transceiver is causing it. Try to eliminate
the interference by:
• Moving your transceiver away from the TV or
radio
• Contacting your local Radi oShack store for help
If you cannot eliminate the interference, the FCC requires that you st op using your transce iver.
9
Page 10
19-90 2. fm Page 10 Tuesday, Au gu st 3, 19 99 2:03 PM
PREPARATION
Before you use the transceiver, you must be properly
licensed by the FCC. If you already have a GMRS license, you can immed iat ely use the transceiver.
INSTALLING AND REMOVING
THE BATTERY PACK
Caution:
battery pack. Doing so can permanently damage the
battery.
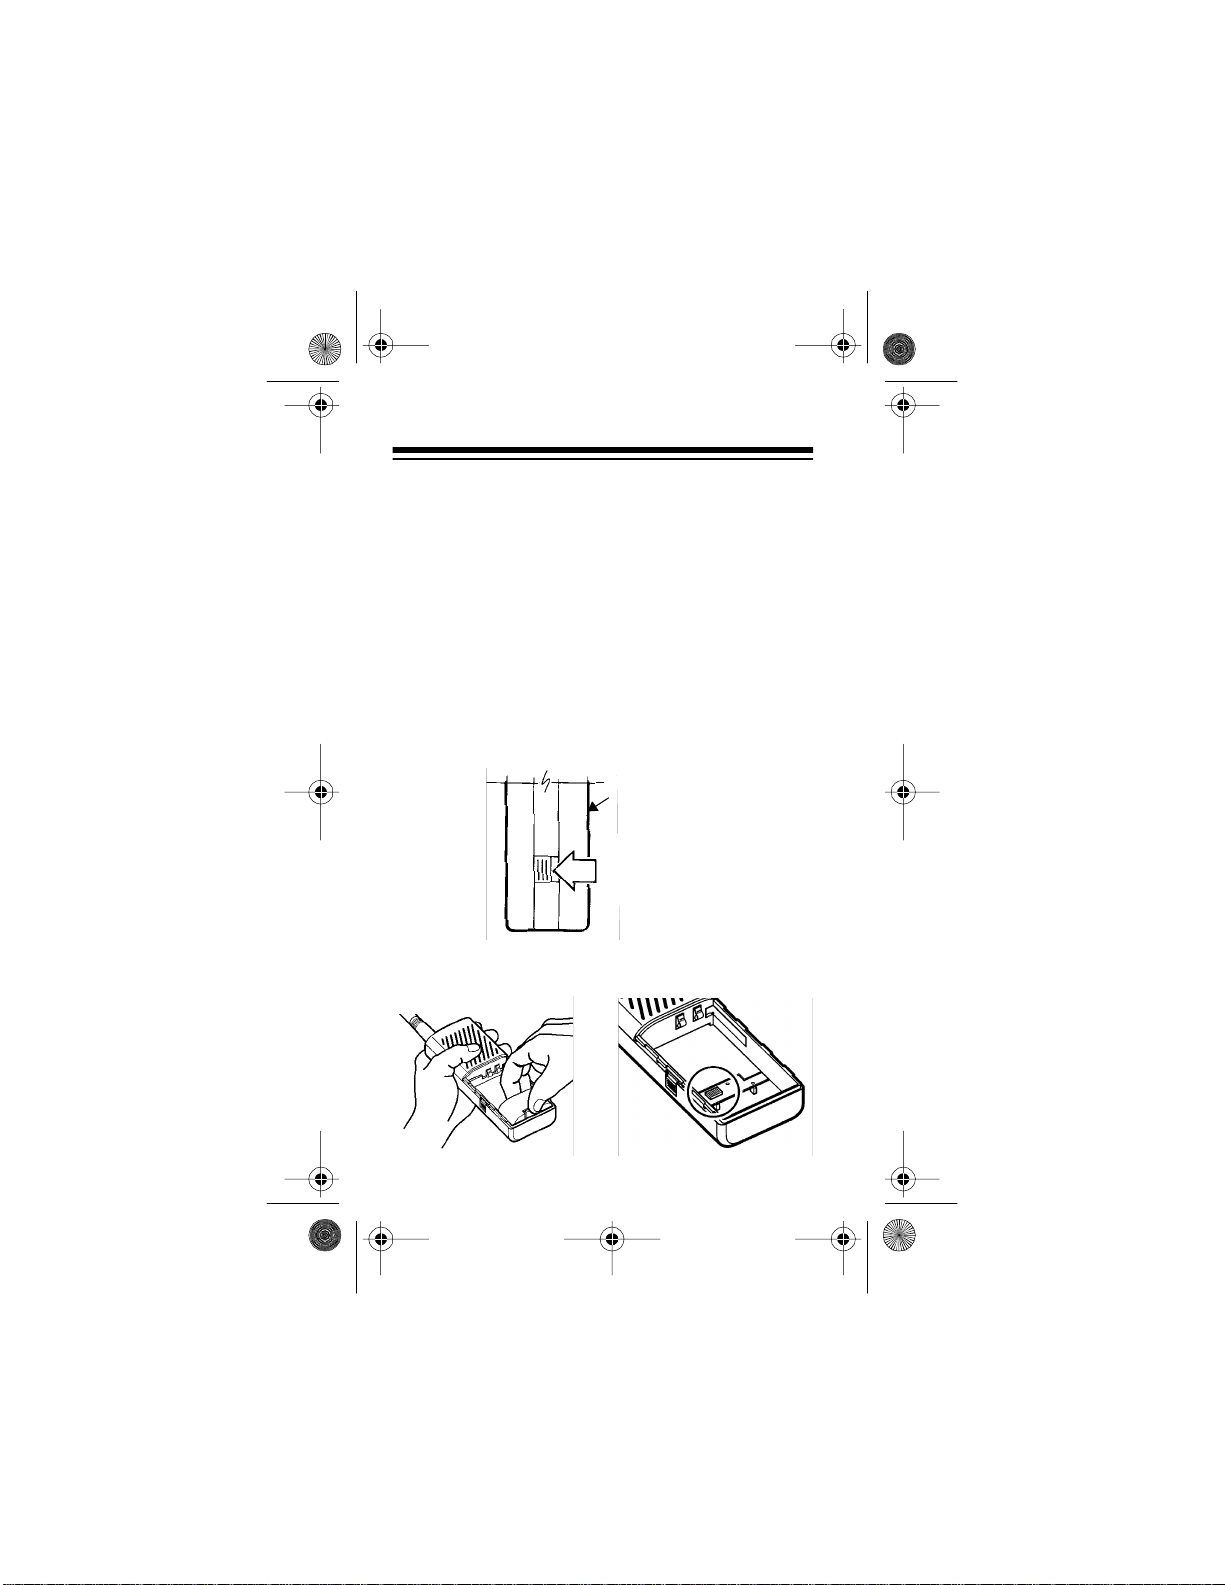
1. Be sure the transce iver is turned off .
2. Unlock the battery compartment cover latch on
10
Do not remove the plastic wrap from the
each side. (The orange tabs should be visible.)
Then slide the cove r down and l ift it off.
Battery
Compartment
Cover
Cover
Latch
Page 11

19-90 2. fm Page 11 Tuesday, Au gu st 3, 19 99 2:03 PM
3. With the battery label facing up, align the battery
pack and radio’s battery contacts. Apply slight
pressure to the bottom of the battery pack and
press it into the compartment, as shown.
4. Slide the battery cover back into place and lock
it with the latches.
To remove the battery pack, unlock t he com partment
and remove the cover. Then turn the transceiver face
down and gently tap the batter y pack into your palm.
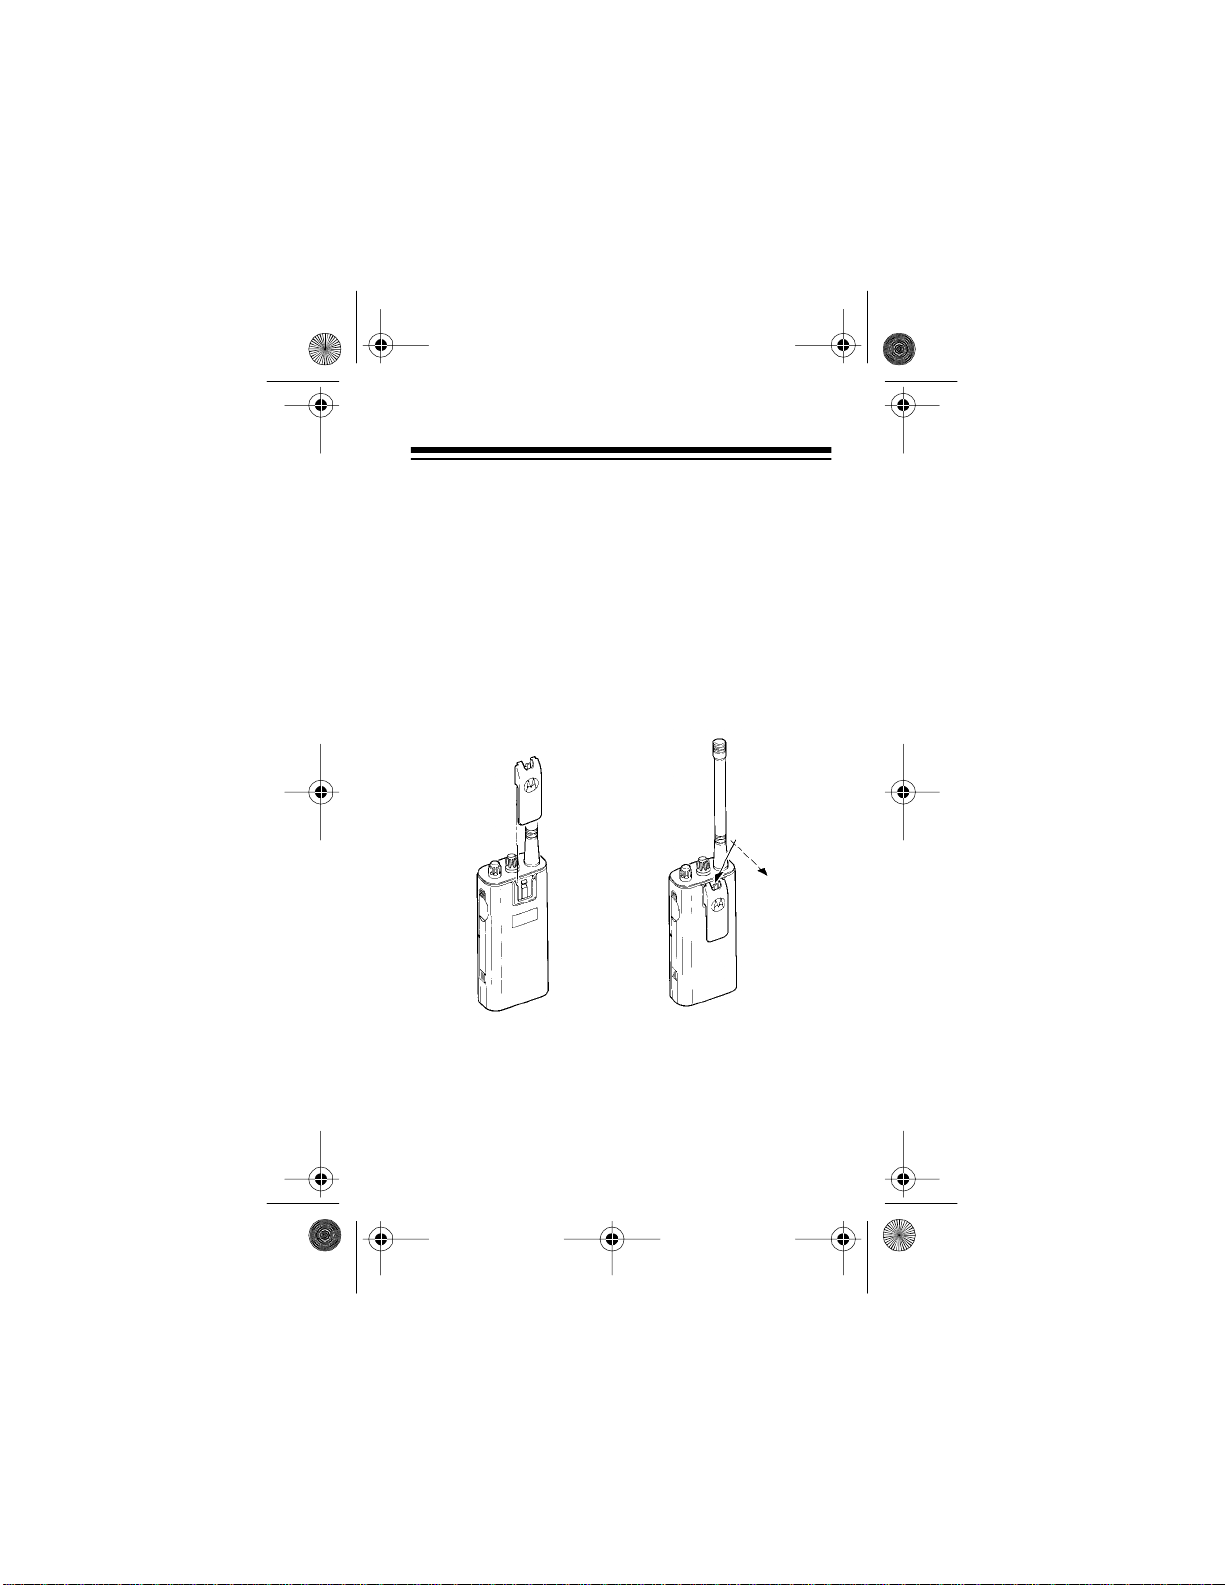
INSTALLING THE ANTENNA
To install the antenna, place the threaded end of the
antenna over the antenna connector on top of the
tranceiver and sc rew i t in to place.
11
Page 12

19-90 2. fm Page 12 Tuesday, Au gu st 3, 19 99 2:03 PM
CHARGING THE BATTERY PACK
You must charge the battery pack with the supplied
battery charger or with an optional charger (see “Optional Accessories” on Page 24) before you use the
tranciever for the first time and whenever the battery
becomes low.
Follow these steps to charge the battery pack using
the supplied cha rger.
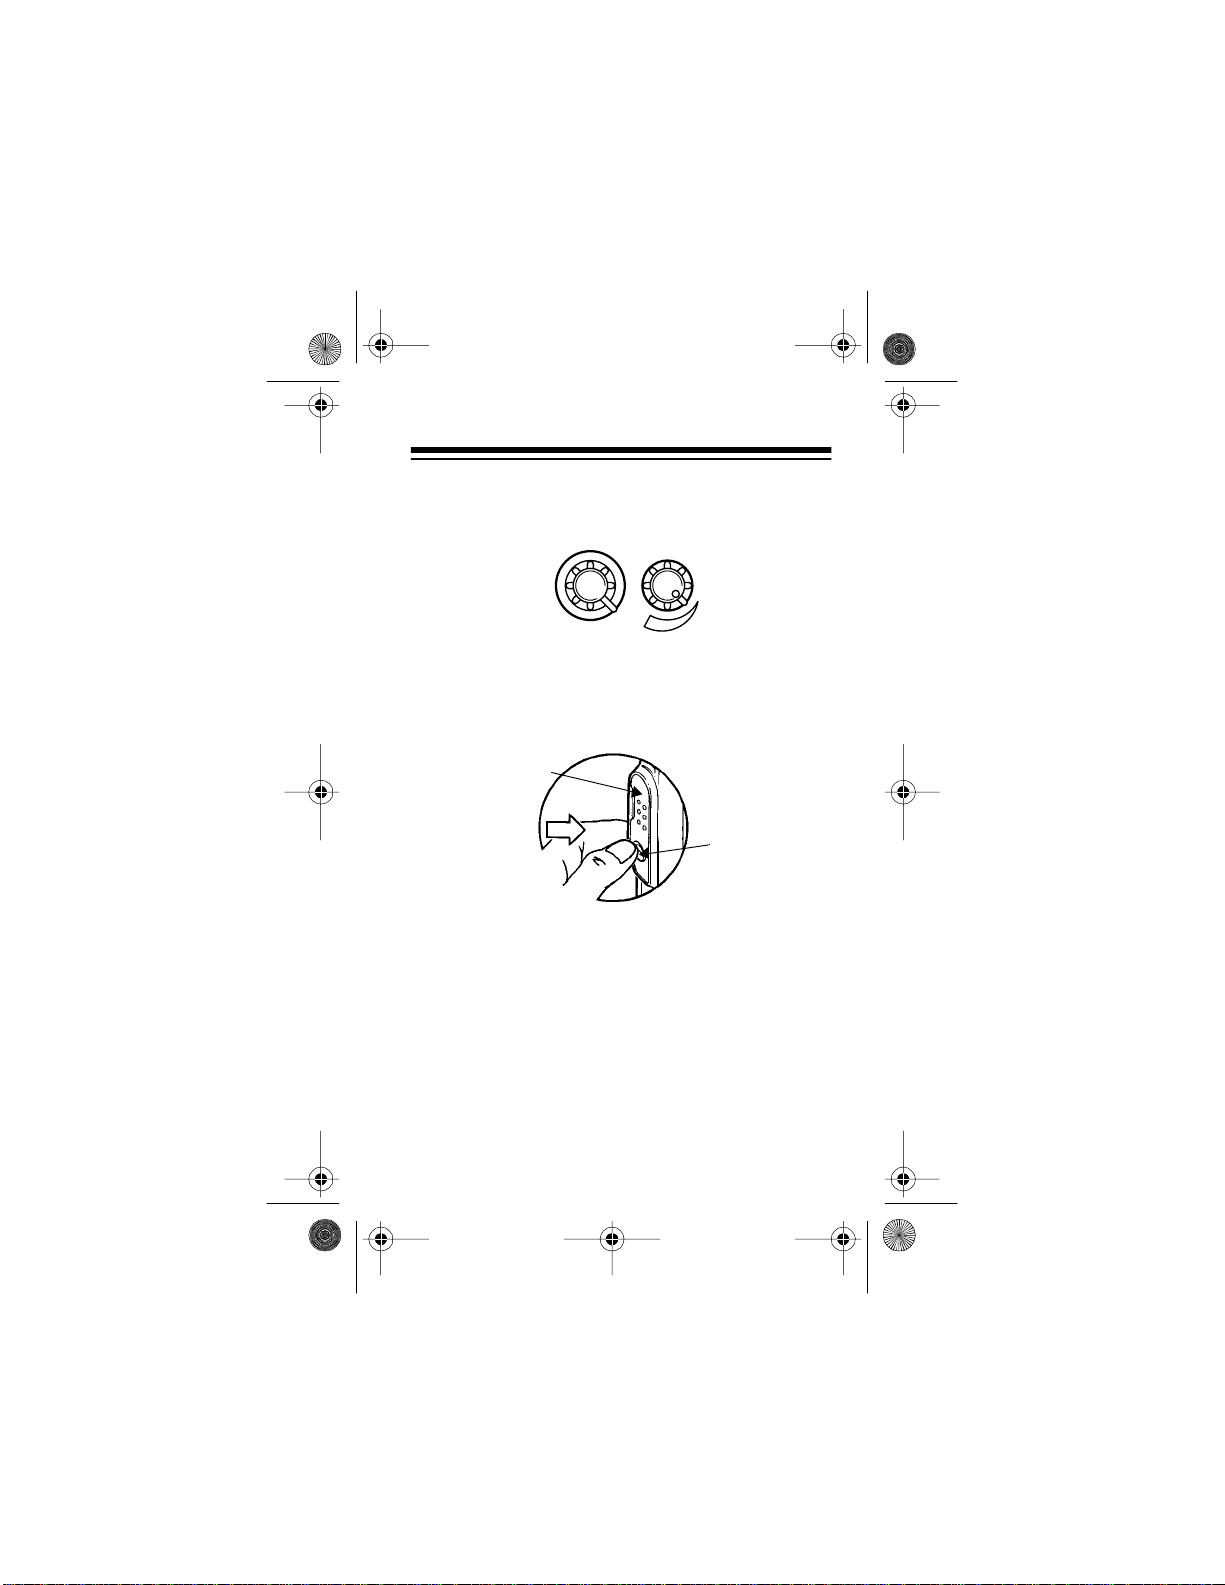
1. If the transceiver is on, turn
clockwise to turn it off.
2. Lift the protective cover away from the accessory jacks.
3. Plug the charger int o the small (lower) j ack, then
connect the charger to a standard AC outlet.
The charger’s charge indicator lights.
VOL•OFF
Charger
counter-
Note:
Charging takes about 10 hours.
12
Charge
Indicator
Page 13

19-90 2. fm Page 13 Tuesday, Au gu st 3, 19 99 2:03 PM
Cautions:
• Do not operate the transceiver while you charge
the battery pack. Using the battery charger
mutes the transceiver’s speaker .
• To ensure a full charge, do not charge the bat-
tery pack in an area where the temperature is
above 95°F. To prevent permanent battery
power loss, do not charge the battery at temperatures below 43°F.
• Use only the supplied or recommended charg-
ers to recharge the transceiver’s battery pack.
Using any other charger could permanently
damage your transceiver or the battery pack.
• A fully charged battery will last about 8 hour s in
the PRS-102.
Important: This transceiver uses a rechargeable
nickel-cadmi um battery pa ck. At the e nd of the bat tery
pack’s useful life, it must be recycled or disposed of
properly. Contact your local, county, or state hazardous waste m anagement authorities for information on
recycling or disposal programs in your area. Some
options that might be available are: muni cipal curbside collection, drop-off boxes at retailers, r ecycling
collection centers, and mail- back programs.
13
Page 14
19-90 2. fm Page 14 Tuesday, Au gu st 3, 19 99 2:03 PM
Checking the Battery Power
1. Rotate
VOL•OFF
clockwise to turn on the trans-
ceive r.
2. Press the push-to-talk button on the left side of
the transceiver. If the indicator next to the
antenna lights red, there is sufficient battery
power for transmissi on. If the indicator does not
light, you need to rec harge the battery pack.
0
1
9
8
7
1
6
2
5
3
4
VOL • OFF
Battery Low/Transmit
Indicator
Top View
14
Page 15
19-90 2. fm Page 15 Tuesday, Au gu st 3, 19 99 2:03 PM
A TT ACHING AND REMOVING THE
BELT CLIP
To attach the belt clip, align it with the rails on the
back of the t ransceiver and slide the clip down until it
snaps into place.
To remove the belt clip, lift t he rel ease tab away from
the radio. While holding the tab, slide the belt clip up
off the mount ing rails.
Release
Tab
15
Page 16
19-90 2. fm Page 16 Tuesday, Au gu st 3, 19 99 2:03 PM
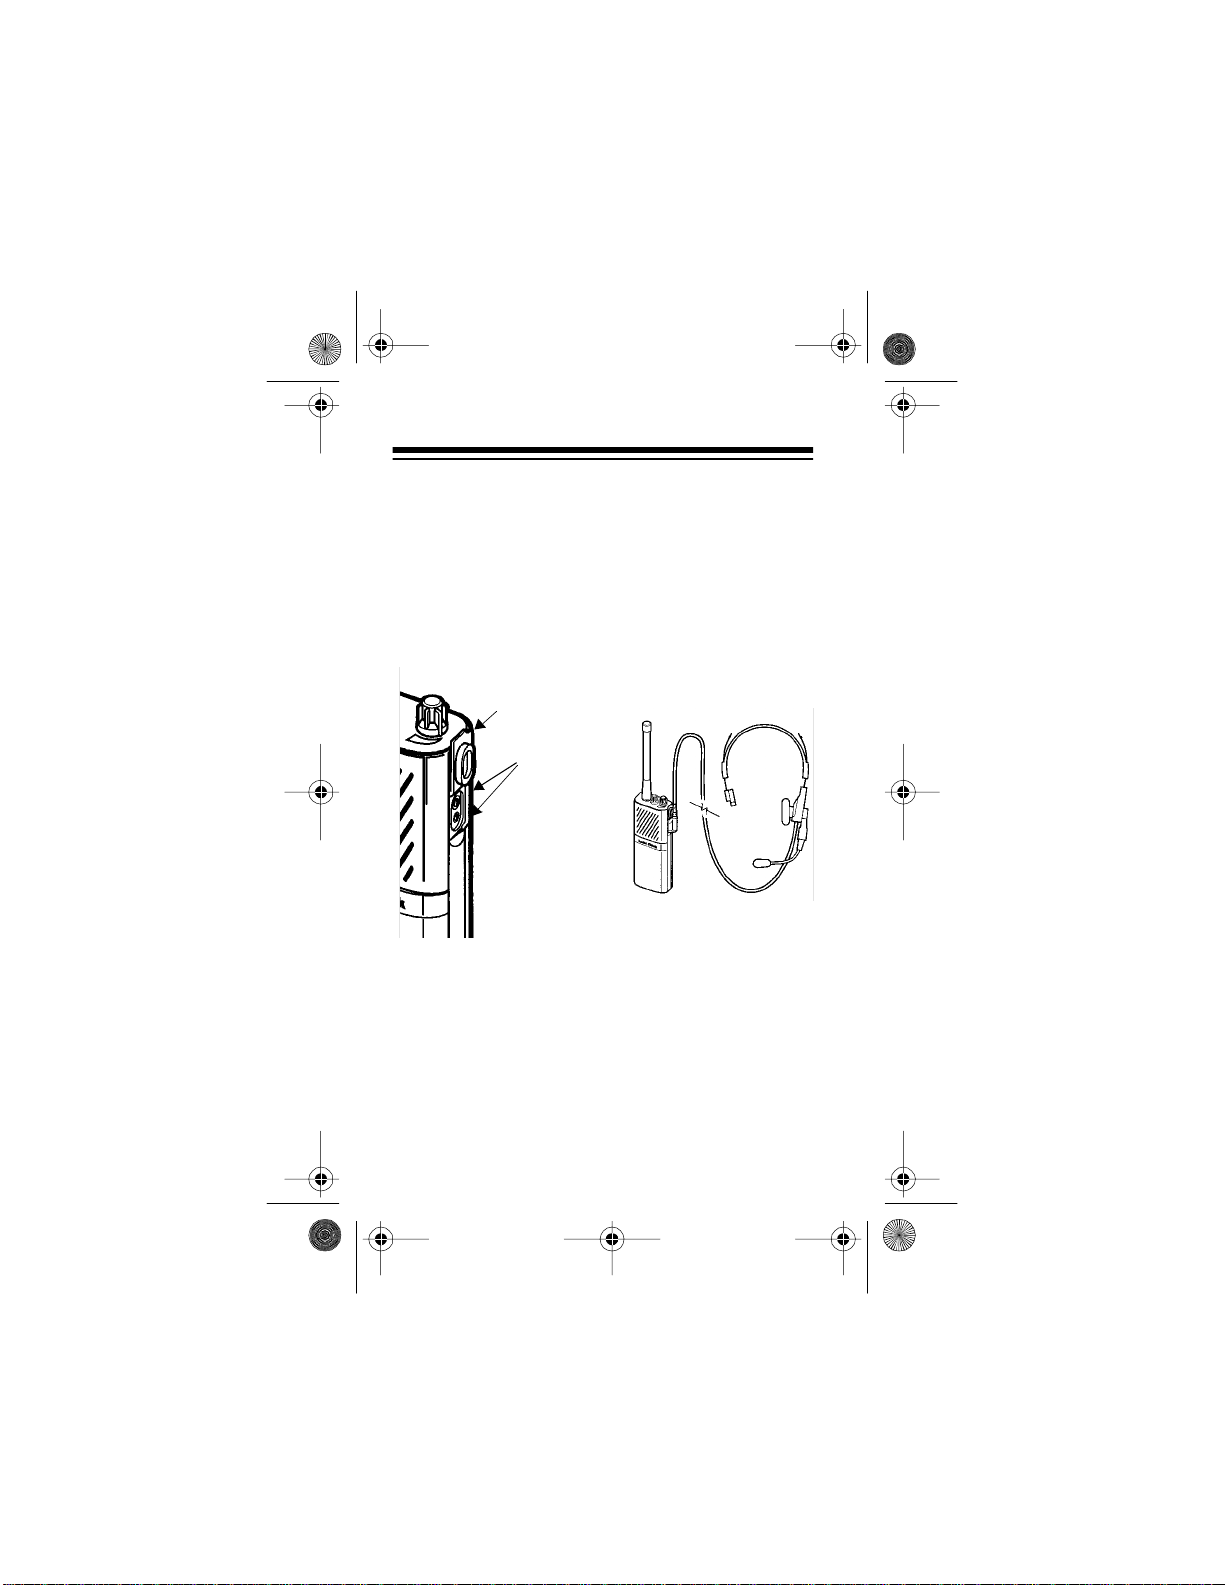
CONNECTING AUDIO
ACCESSORIES
You can order a wide varie ty of audio acc essories for
your transceiver from your local RadioShack store.
See “Optional Accessories” on Page 24.
Follow these ste p s to connect an audio acces sory.
Protective
Cover
Audio
Accessory
Jacks
1. Turn off the transceiver.
2. Lift the protective cover away from the accessory jacks.
3. If the accessory has two plugs, align the smaller
plug with the small jack and the larger plug with
the large jack and plug them in. If the accessory
has a single plug, plug it into the matching jack.
16
Page 17
0
19-90 2. fm Page 17 Tuesday, Au gu st 3, 19 99 2:03 PM
OPERATION
1. Turn
VOL•OFF
clockwise to turn on the transceiver, then rotate the channel knob to select the
desired channel.
1
9
8
7
1
6
2
5
3
4
•
2. Press the transceiver’s monitor button, below
the push-to-talk button. While you hold the m onitor button, adjust the volume to a comfortable
level.
Push-to-Talk
Button
Monitor
Button
3. To transmit, press and hold the push-to-talk button, then hold your transceiver about 3 inches
from your mouth and speak clearly in a norm al
tone of voice. The indicator next to the antenna
lights red when you hold down the push-to-talk
button.
4. When you finish speaking, release the push-totalk button to hear a response.
5. To turn off the transceiver, turn
VOL•OFF
coun-
terclockwise.
17
Page 18

19-90 2. fm Page 18 Tuesday, Au gu st 3, 19 99 2:03 PM
OPERATIONAL HINTS
Your transcei ver’s range varies depending on factors
such as position, terrain, and battery condition.
Range can best be described as
fewer obstr uctions yo u have between t wo trancei vers,
the better range you can expect. Buildings absorb
transmitted signals and, if they contain metal, might
completely bl ock the signals. Trees and heavy cloud
formations have a si milar effect, though not as severe. If you are near a lake or the ocean, you might
get excellent range.
To ensure maximum range, operate the transceiver
with the bat tery p ack ful ly char ged. As t he voltag e decreases, the ra nge decreases.
line of sight
. The
18
Page 19

19-90 2. fm Page 19 Tuesday, Au gu st 3, 19 99 2:03 PM
CTCSS OPTION
WHY USE CTCSS?
CTCSS (Continuous Tone-Coded Squelch System)
is availa ble as an optional add-on to your transceiver.
When CTCSS is turned on, the transceiver transmits
a selected tone with your transmission. This tone is
too low for you to hear, but other t ranscei vers can detect it. I f CTCSS i s tur ned on a nd s et to the s ame t one
on the receivin g transceiv er, it only re ceives tran smissions that include the tone. This way, CTCSS can
help keep you from hearing other users on the same
frequency.
For example, if two different groups operate transceivers in the same area on the same frequency but
use a different CTCSS tone, they only hear their own
broadcasts.
Note:
CTCSS does not make yo ur conversations private. Other users can still hear your tr ansmissions if
they use the same frequency.
19
Page 20
19-90 2. fm Page 20 Tuesday, Au gu st 3, 19 99 2:03 PM
SETTING THE CTCSS TONE
Notes:
• If you are a part of a tal k group, be sure all of the
radios in the talk group use the same tone.
• You must install the CTCSS option before you
can set the CTCSS tone.
1. Turn off the radio.
2. Unlock the battery compartment cover latch on
each side. (The orange tabs should be visible.)
Then slide the cove r down and l ift it off.
Battery
Compartment
Cover
Cover
Latch
3. Remove the battery pack and tray. This exposes
the bank of CTCSS switches.
20
Page 21
19-90 2. fm Page 21 Tuesday, Au gu st 3, 19 99 2:03 PM
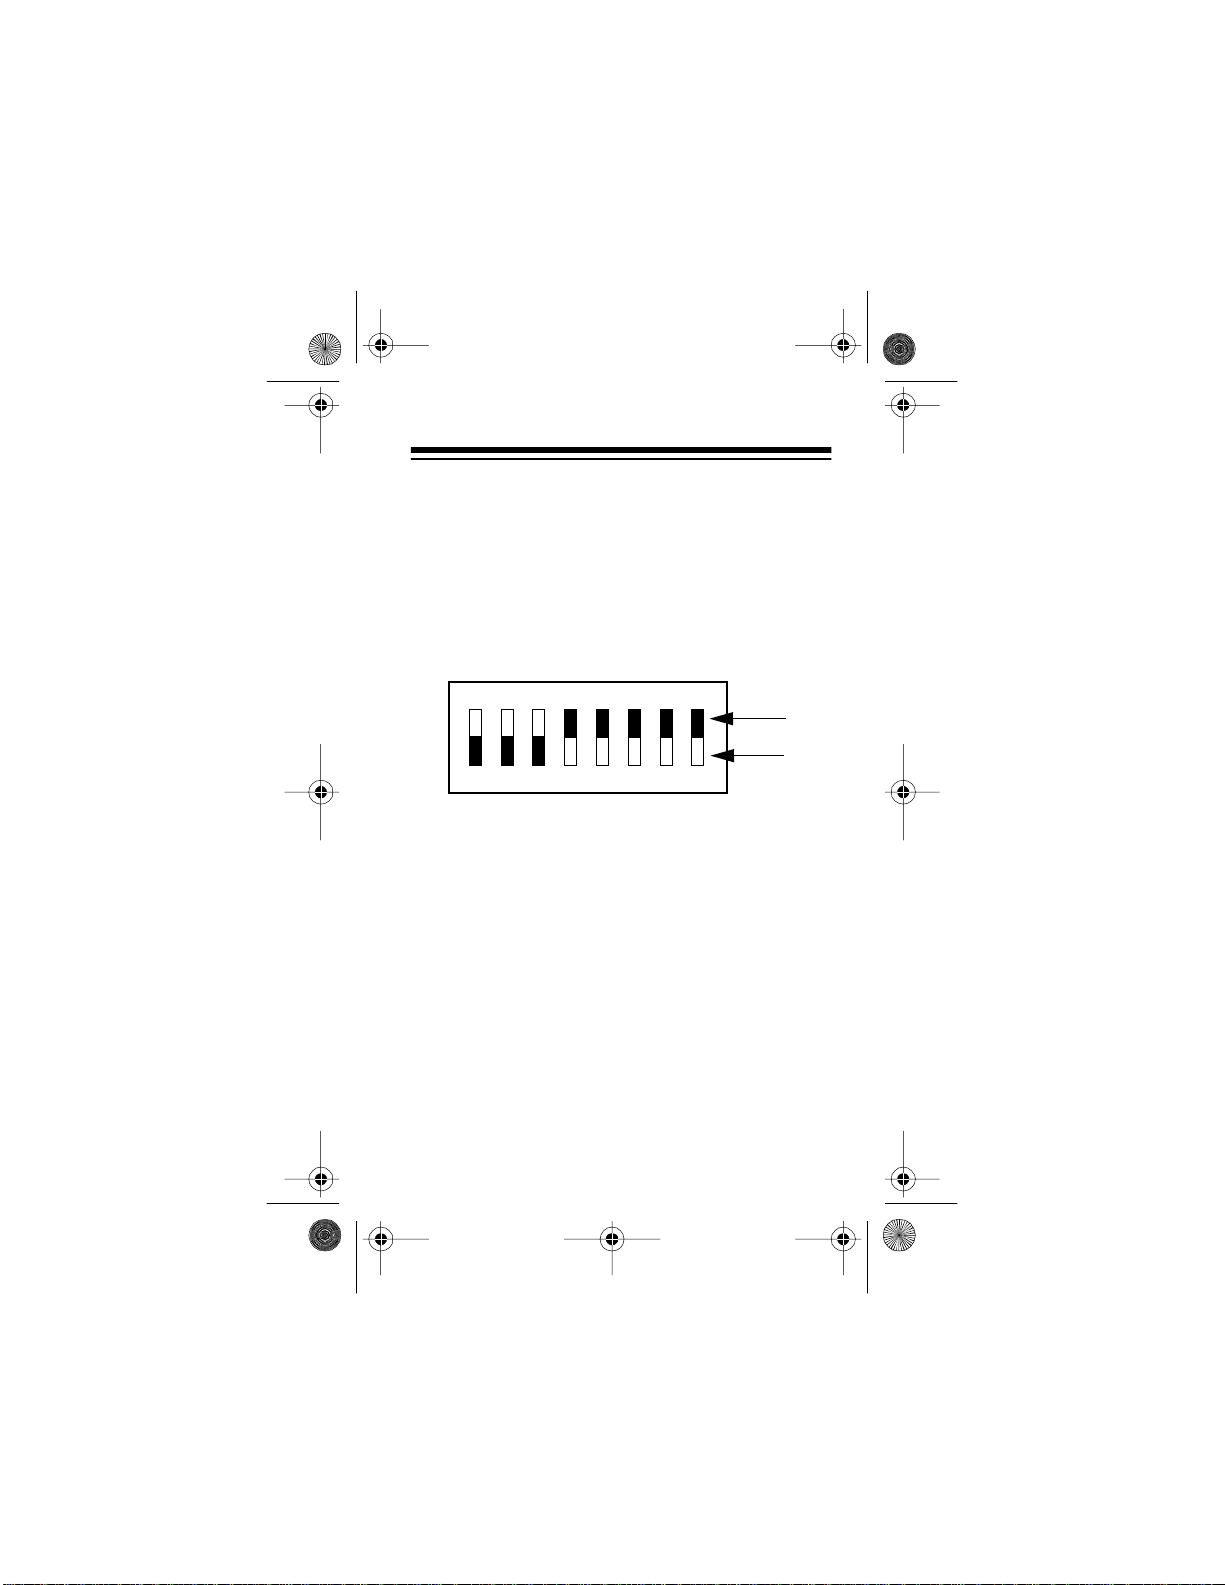
4. Select any one CTCSS code found in the table
on Pages 22 and 23, then find the corresponding switch positions in the tables.
5. With a pointed instrument, such as a pin, place
the dip switches in the positions that match the
desired tone.
For example:
1
2
3
45
6
78
Up
Position
Down
Position
Note: Setting Switch 8 to the down position dis-
ables the CTCSS feature. You must set the
switch to the up position to turn on CTCSS.
6. After setting your CTCSS code, r eplace the battery tray, battery pack, and battery compart ment
cover, then turn on the transceiver.
21
Page 22
19-90 2. fm Page 22 Tuesday, Au gu st 3, 19 99 2:03 PM
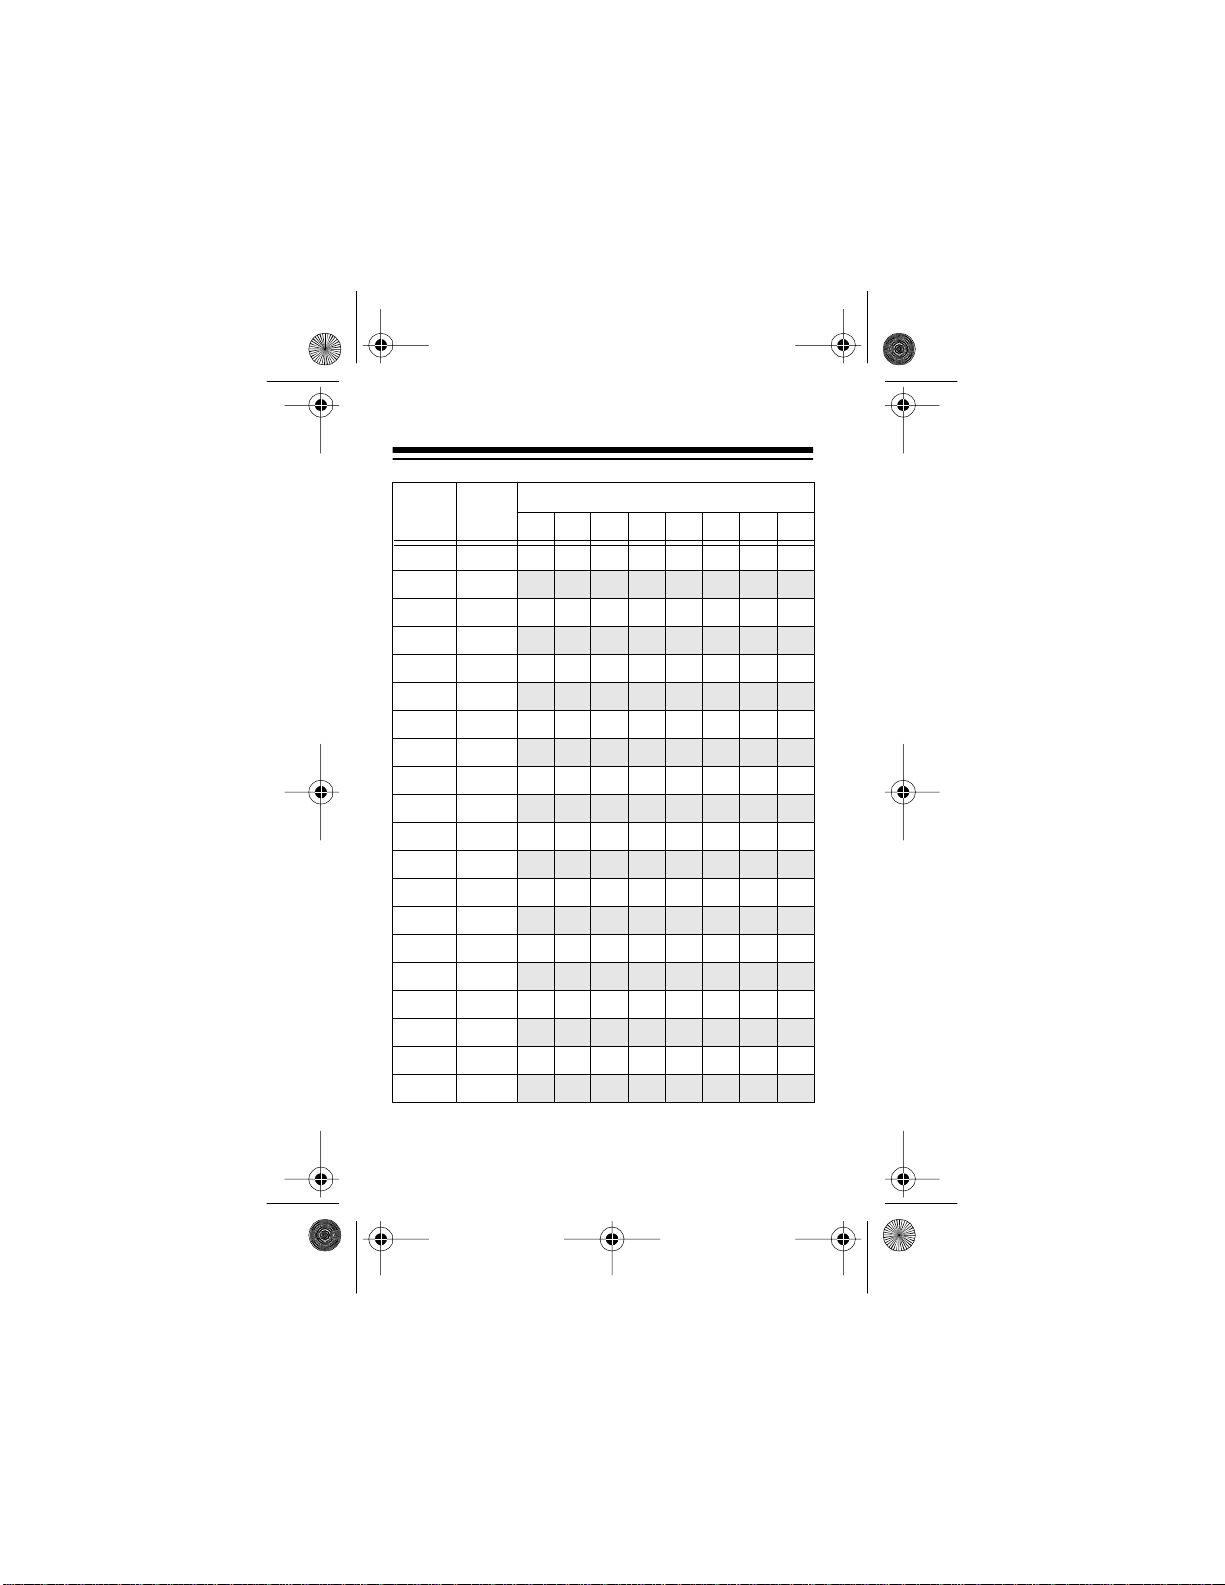
CTCSS
CODE
FREQ
(Hz)
XZ 67.0 DDDDDDUU
XA 71.9
WA 74.4 DDDDDUUU
XB 77.0 U U D D D D U U
WB 79.7 DDDDUDUU
YZ 82.5
YA 85.4 DDDDUUUU
YB 88.5
ZZ 91.5 DDDUDDUU
ZA 94.8 U D D D U D U U
ZB 97.4 DDDUDUUU
1Z 100.0
1A 103.5 U D D D U U U U
1B 107.2
2Z 110.9 U D D U D D U U
2A 114.8 U U D U D D U U
2B 118.8 U D D U D U U U
3Z 123.0
3A 127.3 U D D U U D U U
3B 131.8
SWITCH POSITION (U=Up, D=Down)
1234567 8
U D D D D D U U
U D D D D U U U
U U D D D U U U
U U D D U D U U
U U D D U U U U
U U D U D U U U
U U D U U D U U
22
Page 23
19-90 2. fm Page 23 Tuesday, Au gu st 3, 19 99 2:03 PM
CTCSS
CODE
FREQ
(Hz)
4Z 136.5UDDUUUUU
4A 141.3
4B 146.2 U D U D D D U U
5Z 151.4 U U U D D D U U
5A 156.7 U D U D D U U U
5B 162.2
6Z 167.9UDUDUDUU
6A 173.8
6B 179.9 U D U D U U U U
7Z 186.2 U U U D U U U U
7A 192.8 U D U U D D U U
M1 203.5
M2 210.7UDUUDUUU
M3 218.1
M4 225.7UDUUUDUU
M5 233.6 U U U U U D U U
M6 241.8UDUUUUUU
M7 250.3
Disable
CTCSS
SWITCH POSITION (U=Up, D=Down)
1234567 8
U U D U U U U U
U U U D D U U U
U U U D U D U U
U U U U D D U U
U U U U D U U U
U U U U U U U U
XXXXXXXD
X = either Up or Down
Note:
23
Page 24
19-90 2. fm Page 24 Tuesday, Au gu st 3, 19 99 2:03 PM
OPTIONAL ACCESSORIES
RadioShack
Cat. No.
19-351 Remote Speaker Microphone
These items are available by special order from
your local RadioShack store:
19-352 Earpiece w/Microphone
19-353 External VOX Adapter
19-354 Earbud
19-355 Headset w/Swivel Boom Microphon e
19-356 Earbud w/Clip Microphone and PTT
19-357 Flexible Ear Receiver
19-358 Leather Carry Case with Belt Loop
19-359 Nylon Carry Case
19-360 Spring Action 3-Inch Belt Clip
19-361 Ni-Cd Battery Pack
19-362 120 Volt 3-Hour Desk top Charger
19-363 120 Volt 10-Hour Desk top Charger
19-364 CTCSS Kit
19-365 BNC Adapter
19-367 UHF Stubby Antenna
Description
24
Page 25
19-90 2. fm Page 25 Tuesday, Au gu st 3, 19 99 2:03 PM
TROUBLESHOOTING
If you have a problem oper atin g your tra nsceiv er, fi rst
review this manual and be sure that you understand
and have followed all instructions. If you still have
problems, revi ew the followi ng troubl eshoot ing guide .
If the radio still does not work properly aft er you f ollow
the troubleshooting guide, contact your local RadioShack store for additional assis tance.
Note:
Do not disassemble the radio in any way. The
radio contains no user-serviceabl e components.
Symptom
Radio does
not op erate.
Possible
Problem Solution
• Battery pack is
dead.
• Battery pack is
not positioned
correctly in the
transceiver.
• Press and hold the
push -to-talk but to n
while loo k ing at the
indicator. If the indicator does not light
or turns off, charge
the battery pack.
• Correctly install the
batte ry pack.
25
Page 26

19-90 2. fm Page 26 Tuesday, Au gu st 3, 19 99 2:03 PM
Symptom
Battery pack
does not
charge or
last long
enough.
Possible
Problem Solution
• Battery pack
incorrectly
charged.
• If you us e an
optional charger, be
sure the battery
pack is correctly
positioned. If you
use the supplied
battery charger, be
sure the charger’s
indicator turns on.
• Batter y pack not
fully ch ar g ed.
• Do not turn on the
transceiver while
charging the battery
pack . It takes longer
to charg e the batt ery
pack if the transceiver is on.
• Heav y us ag e.
• Usage beyond the
standard duty cycle
of 5% transmitting,
5% receiving, and
90% idl e might
require a spare battery pack or
recharging during
the day.
26
Page 27

19-90 2. fm Page 27 Tuesday, Au gu st 3, 19 99 2:03 PM
Symptom
Other users
do not hear
your transmissions or
you do not
hear other
transmissions .
You hear
other conversa tions or
noise.
Possible
Problem Solution
• Transceivers
are on different
frequencies.
• CTCSS settings are different.
• Have all transceivers set to the same
frequency.
• If you use the
CTCSS option, verify that other transceivers are set t o
the same CTCSS
code (see “CTCSS
Option”).
• Transceivers
with and without the CTCSS
opti on are b eing
used.
• Oth er users are
licensed to use
the same frequency in your
area.
• CTCSS must be disabled to hear transceivers not using
CTCSS (see
“CTCSS Option”).
• Users do not have
excl us iv e us e of fr e quencies. Adding
CTCSS screens out
other users’ conv ersations on your
transc eiver, but your
conversations are
still heard by others
sharing your frequency (see
“CTCSS Option”).
• You might have
a CTCSS board
installed that is
not activated.
• Check CTCSS
Switch 8 to verify
that it is in the UP
position (see
“CTCSS Option”).
27
Page 28

19-90 2. fm Page 28 Tuesday, Au gu st 3, 19 99 2:03 PM
Symptom
Limited talk
range.
You hear
constant
static.
Possible
Problem Solution
• You are using
the transceiver
in a basement,
steel st ructure,
concrete building, vehicle, or
heavy f oliage.
• Move to a different
location. For the
best range, always
use the supplied
longer an t e nn a. A n
optional stubby
antenn a r ed uc es
talk range by 50%.
• The radio is
located low or
very close to
your body, as in
a pocket or on a
• The higher you hold
the radio, and the
further away from
your body, the better
the range.
belt.
• Battery pack
power is low.
• The battery
pack is not full y
charged.
• Charge the battery
pack.
• Press and hold the
push-to-talk button
while looking at the
indicator on top of
transceiver. If the
indicator does not
light or turns off,
charge the battery
pack .
• You are using
the transceiver
near computers
or elec tronic
• You can add the
CTCSS option to
screen out this type
of interference.
equipment.
28
Page 29

19-90 2. fm Page 29 Tuesday, Au gu st 3, 19 99 2:03 PM
MAINTENANCE
Your RadioShack PRS-102 UHF 10- Channel Pe rsonal Radio Service Transceiver is an exam ple of superior design and craftsmanship. The following
suggestions will help you care for the transceiver so
you can use it for years.
Keep the transcei ver dry. If it gets wet , immediately wipe it dry. Some liquids contain minerals that can corrode the
electronic circuits.
Use and store the transceiver only in normal temperature environments. Temperature extremes can shorten the life of
electronic devices, damage batteries,
and distort or melt pla stic parts.
Handle the tra nsceiver ge ntly and ca refully. Dropping it can damage the circuit
boards and can cause the transceiver to
work improperly.
Keep the transceiv er away from dust and
dirt, which can cause premature wear of
parts.
29
Page 30

19-90 2. fm Page 30 Tuesday, Au gu st 3, 19 99 2:03 PM
Wipe the transceiver with a damp cloth
CLEANER
occasionally to keep it looking new. Do
not use harsh chemicals, cleaning solvents, or strong detergents to clean the
transceiver. Use of chemicals or detergents could da mage th e plast ic case , an d
leak into the transceiver.
Modifying or tamper ing with the transceiver’ s int ernal
components (unless otherwise st ated in this manual)
can cause a malfunction and might invalidate its warranty and void your FCC authorization to operate it. If
your transcei ver is not performi ng as it should, take it
to your local RadioShack store for assistance.
30
Page 31

19-90 2. fm Page 31 Tuesday, Au gu st 3, 19 99 2:03 PM
SPECIFICATIONS
General
Channels ............................................................. 10
Size ... ..... .. ..... ..... .. ..... ..... .. ..... . 6
Weight (with battery pack) .................... 11.5 ounces
Power ............ Nickel Cadmium Battery Pack (7.5V)
Average Battery Life .................................... 8 Hours
Transmitter
RF Power Output ......................................... 2 Watts
Spurious/Harmonic Emissions ................... 50 µVolts
Frequency Stability .............................. .... ±0.0005%
Maximum Frequency Separ ation ............. ...... 8 MHz
Audio Distortion ................................................ <5%
FM Noise ...................................................... –40 dB
TIA/EIA Audio Response .......................... +1, –3 dB
Receiv er
Channel Spacing ............ .......... .. .......... ........ 25 kHz
Sensitivity (12 dB SINAD) ....................... 0.25 µVolts
Selectivity ...................................................... –50 dB
Intermodulation ............................................. –50 dB
Spurious & Image Reject ion ........ .. ............... –50 dB
Frequency Stability (–22 to 140°F) .......... ±0.0005%
Maximum Frequency Separ ation ............. ...... 8 MHz
Audio Output (@ 1 kHz, 60% Dev.)
EIA (@ <5% Dist.) ........... .. .. ............ .... 250 mW
7
/8 × 29/16 × 13/8 Inches
Specifications are typical; individual units might vary.
Specifications are subject to change and improvement without notice.
31
Page 32
g
19-90 2. fm Page 32 Tuesday, Au gu st 3, 19 99 2:03 PM
RadioShack Limited Warranty
This product is warranted against defects for 1 year from
date of purchase from RadioShack c ompany-owned stores
and authorized RadioShack franchisees and dealers.
Within this period, we will repair it without charge for parts
and labo r. Simply
proof of purchase date to any RadioShack store. Warranty
does not cover transportation costs. Nor does it cover a
product subjected to misuse or accidental damage .
EXCEPT AS PROVIDED HEREIN, RadioShack MAKES
NO EXPRESS WARRANTIES AND A NY IMPLIED WARRANTIES ARE LIMITED IN DURATION TO THE DURATION OF THE WRITTEN LIMITED WARRANTIES
CONTAINED HEREIN. Some states do not permit limitation or exclus ion of implied warranties; theref ore, the afore said limitation(s) or exclusion(s) may not apply to the
purchaser.
This warranty gives you specific legal rights and you may also other
ri
hts which vary from state to state.
bring your RadioShack sales slip
We Service What We Sell
as
10/95
RadioShack
A Division of Tandy Corporation
Fort Worth, Texas 76102
5/96 Printed in the USA
6880904Z78-O
 Loading...