


RADIOSHACK CORPORATION
FCC ID : AAO1900903
OWNER’S MANUAL
EXHIBIT # : 7
19-903
INTRODUCTION
!
Your Radio Shack 19-903 GMRS band transceiver is a portable, easy-to-use, two-way radio that you c an
carry almost anywhere. It is approved with commercial-grade standards to give you clear and reliable
communication. This transceiver consists of 15 channels – 7 GMRS Channels, 1 Emergency Channel and
7 Interstitial Channels.
Your 19-903 transceiver operates in the General Mobile Radio Service, which is a personal radio service
available for personal communications with family members or other licenses. You can use the 19-903 for
recreational communications while you hike, ski, or fish. You can even use the 19-903 to coordinates
your personal or business activities with other family members. When you get a license to operate the
radio, you can let other members of your family living in the same household operate the radio.
Your t ransceiv er is equipped with the follow ing f ea tures :
PLL-Controlled Circuitry
Adjustable Sque lch
38 CTCSS (Continuous Tone Control Squelch System)
systems in the area operating on the same frequency.
Built-in Modulation Limiter Circuit
an effective transmission.
High/Low Power
of distance.
Battery Low and Transmit Indicator
is on when you transmit or receive.
Supplied Battery Charger
Flexible Antenna with BNC Connector
desi gned i n a way tha t y ou can easily attach and re move the s upplie d ant enna or an o pti ona l one .
Earphone Jack and External Microphone Jack
help ensure effective communications in noisy areas.
---- helps yo u save power by choos ing a suita ble transmitting power fo r different ra nge
---- provides ac curate and stable channel selection.
---- helps eliminate noise between transmis sions.
---- helps reduce interference from other
---- automatic ally adjusts for a wide range of vo ice levels to e nsure
---- indicates the battery pack’s c urrent condition and the backlight
---- conveniently recharges your transceiver’s battery pack.
---- provides excellent reception. The BNC connector is
---- let you use an earphone or e xternal microphone to
Belt Clip
JIS le vel 4
W e re c o mmend y ou t o dr op do w n the t r a ns c ei v e r ’ s s er i a l number her e fo r y o ur r eco rd. F or t he numbe r,
pleas e refer to the transceiv er’s back panel.
Serial Number_______________________
!
A. DISPLAY
Your radio comes with a multifunctional di splay and backlight. By pressing any button except the PTT, the
bac kli ght will appe a r for 5 se c o nds . The li qui d c r y s ta l di s pla y ha s be en e nla r ge d in t he f o llow i ngs to s ho w
all of the operating modes.
---- let you attac h the transce iver to your belt or waistband.
---- offers you with excellent water-resistance.
USING THE RADIO
1
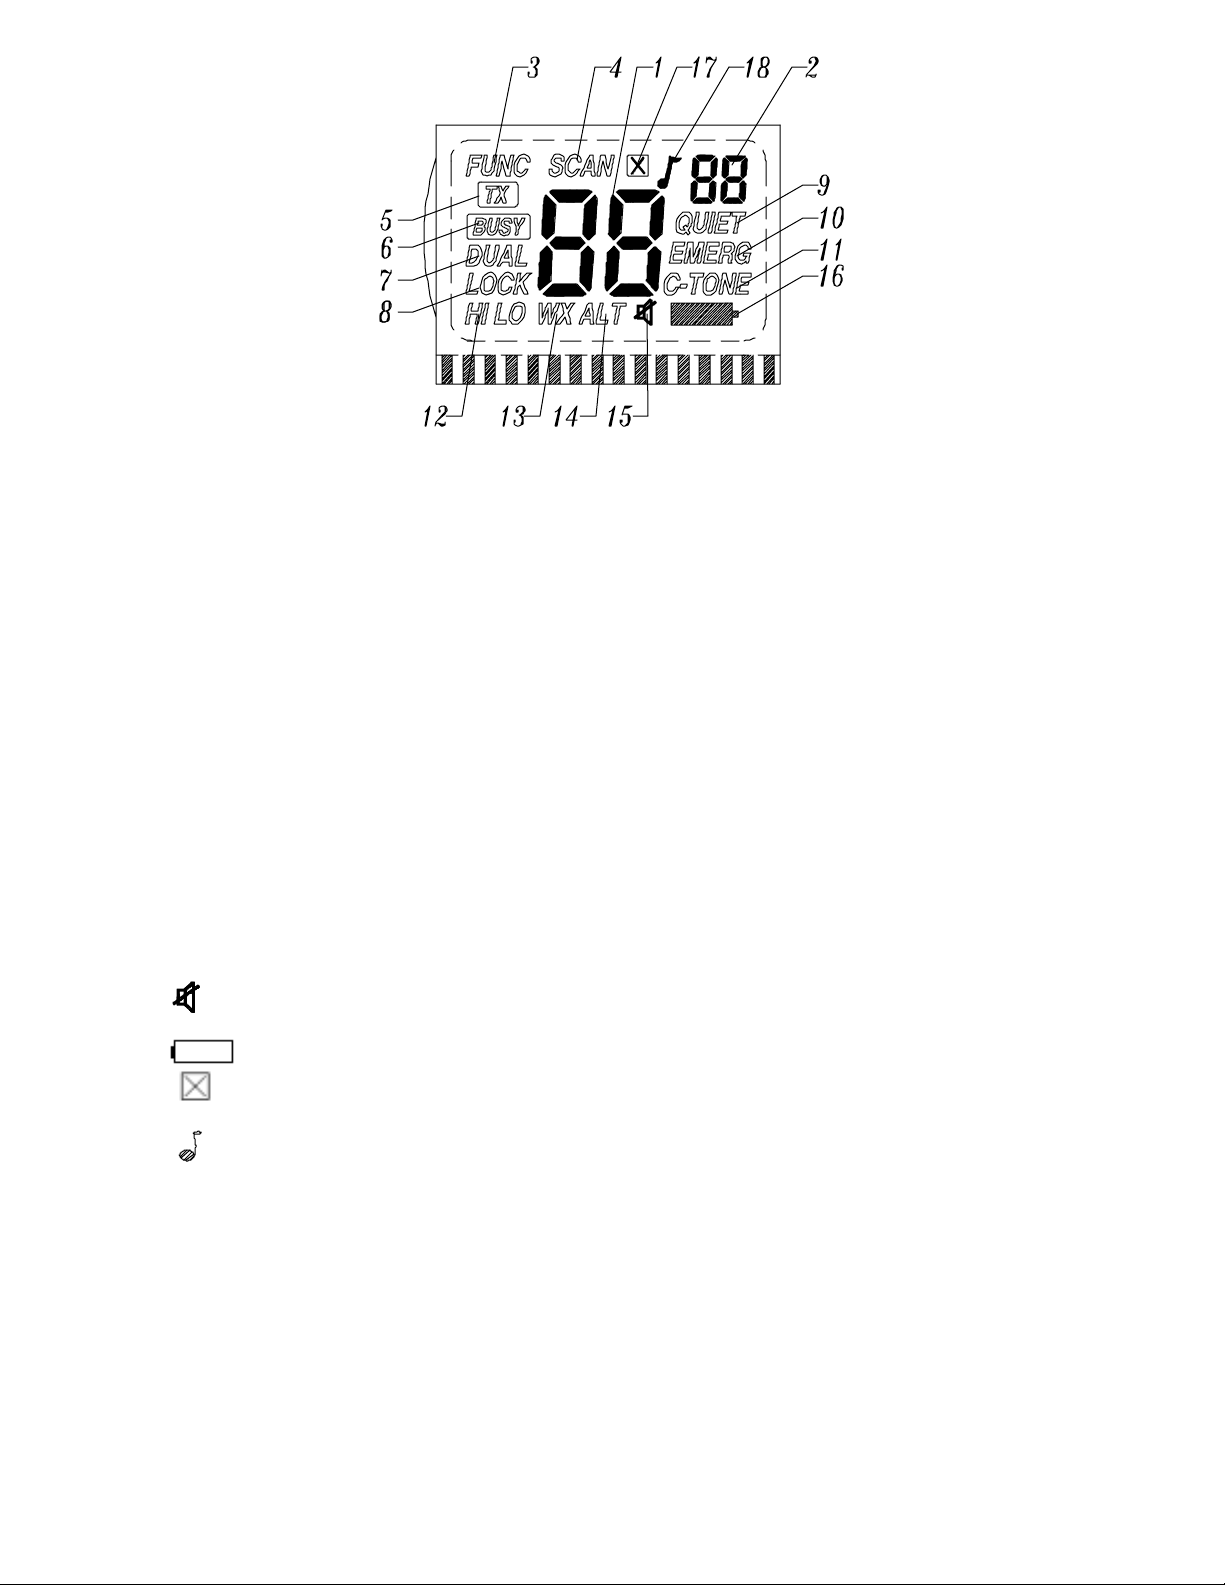
1. Shows the selected channel number.
2. Shows the selected privacy code number.
3.
“FUNC
4.
“SCAN
5.
“TX”:
6.
“BUSY
7.
“DUAL
8.
“LOCK”
9. “
10. “
11. “
12.
“HI LO”
13.
“WX”
14.
15.
“
16.
17.
“ ”
QUIET”:
“ALT”
“
”: Displays when the secondary function is enabled.
”: Displays when the scan mode is activated.
Displays when your radio is transmitting.
”: Displays when a call is being received.
”: Displays when the dual-watch function is activated.
: Displays when the keypad lo ck is activated.
Displays when the QUIET mode is enabled.
EMERG”:
C-TONE”:
Displays when the Emergency channel is selected.
Displays when the Roger Beep function is acti vated.
: Displays when the Hi/Lo transmit power is toggled.
: Displays when the weather broadcast is listened.
: Displays when the WX alert signal is received.
: Displays when WX MUTE mode is enabled.
”
Indicates the batteries are low. Repla ce the batteries when this signal is on.
”:
Displays when the working channel is set to be skipped.
:
18.
: Displays when the key tone function is activa te d.
“ ”
2

B. FUNCTION AND L OCAT ION OF THE CONT ROL S
1. “ON/OFF” Volum e Control.
Your transceive r is off whenever the knob points to the ‘OFF’ position. Rotate this control clockwise to
turn on your radio and adjus t the volume.
2. SQL Knob
Rotate the
3. CH
Press
VOL/SW Knob
/Key Tone Button
to s e le c t a c ha nne l upwa r dly . Pr e s s and ho ld CH continuously for more than 1.5sec to
CH
ent e r int o the s c a n upwa rdly mo de. P re s s CH
to obtain the squelch sensitivity at threshold.
wi ll c ha nge t he s c a nni ng di re c t i on do w nwa r dly . D uri ng
the scanning, press a ny key will exi t the scanning mo de.
Key Tone
Pr ess and hold
F UNC
key, then press
CH
key to activate o r deactivate the Key Tone function. Icon “
” will be shown if activated.
4.
CH
Press CH
scan downwardly mode. Press CH
/ Skip
to move one cha nnel do wn. P res s a nd hold
wi ll c ha nge t he s c a nni ng di re c t i on upw a rdly . D uri ng t he s c anni ng,
CH
for more than 1.5sec to enter into the
press any key will exit the scanning mode.
3

Skip
User can cho ose a desire d channel from being scanned. Press
Pr ess and hold
F UNC
key for, then press
CH
key to s kip this channel from scanning. Icon “ ” is on to
CH
or to go to the desired channel.
indic ate t his wo rking channel is set to be skipped. Repe at t he abo ve steps will canc el the skip function of
the channel.
5. Hi/Low / Automatic Power Off Button
Press this button to toggle the high or low RF po wer.
Automatic Power off Button
Press and hold
FUNC/MON
function. The display will show “
button, then press
” or “
AP
ON
AP
OF
button to enable or disable the auto power off
HI/LO
” for one second, when the timer is ac ti vated/deactiv a te d.
The timer auto matically turns off the unit when it is idle for 2 hours.
6. QUIET /QUIET Scan Button / Reset
Press
a)
b)
c)
QUIET
Hold down
Repe atedly press (or hold down)
Press
To turn on the quiet feature, press
QUIET
disa ppea rs .
button to enable or disable the
QUIET
button for 1.5 se conds until
CH
QUIET
button to store the code.
QUIET
QUIET
or
until
privacy mode operation.
QUIET
CH
QUIET
is di splayed and the quie t code flashes.
until you see the c ode numbe r y ou want to use.
appears. To turn off the feature, press
QUIET
unti l
Note:
abo ve t hat ra nge, y ou must wai t 1 to 2 se conds after ho lding down
W e r ec omme nd yo u to s ele ct a qui et co de fr om the range 7 -3 0. I f yo u s ele ct a co de belo w o r
PUSH-TO-TALK
before you start
talking.
QUIET Scanning (Only available under QUIET mode)
Pr es s a nd ho ld
key, and then press the QUIET key to enter into the QUIET Scan mode, and icons
FUNC
“SCAN” and “QUIET” will appear on LCD. When matching with an appropriate QUIET code, the scanning
stops and the ic on ‘QUIET’ flashes. Scanning goes on after the signal disappears. Press any key, except
the ‘Q UIET’ k ey, will qui t scanning and stay on the channel just s canned.
Reset
To reset the unit, press and hold the QUIET
key and turn on the unit. Reset operation will clean all the set
channe ls and restore the current channe l to CH0 with QUIET off, and Dual Watch CH0. Power is toggled
to low mode, key tone and C-tone function are activ a te d.
7. WX Button
Press WX button to enable or disable the weather mode.
8. DUAL Button
I n mai n mod e, p r ess
the current channel as the dual watch c hanne l; In weather mode, press
butt on t o ent er GMRS dua l wa tch mo de, pr es s a nd hold
DUAL
DUAL
button to set
DUAL
button to enter weather dual
watch. D uring the dual watchi ng, pres s any key wi ll exit the scanning mode.
9. Push-To-Talk button / Keylock /C-Tone
Speak and communicate with the others by pressing the
Push-To-Talk
button. Speak into the
microphone in a normal tone of voice when the TX ic o n i s di s pla y e d. Whe n y o u f i ni s h s pe a ki ng, re le a s e
the
Push-To-Talk
button.
Yo ur c a n a ls o lo c k y o ur r a di o s et t i ng to a v o i d a c c i de nta l pr es s i ng o f ke y s by a c t i v a ti ng t he ke y pad lo c k.
Pr ess and hold the
Pr es s a nd ho ld t he
button, then press the
FUNC
Push-To-Talk
button to activate or deactiva te the keypad lo ck.
PTT
while turning on the radio will enable or disable the courtesy tone (C-
Tone) function.
4

1 0. MON/FUNC B utt on
To hear eve rythi ng happe ning on a channel, including w ea k trans mi ssion, hold do wn
more than 1.5 sec. Release the
11. External MIC/Speaker Jack
Connect an optional speaker/microphone or earphone in this jack.
12. Charger Jack
Yo u c a n re c ha r ge t he ba t te r y pa c k us i ng the s uppli e d ba t te r y c ha rge r . P lug t he c ha r ge r’ s ba r re l plug i nt o
the CHRG jack on the side of the unit, then conne ct the charger to a standard AC outlet.
13. Rechargeable Ni-Mi battery pack
14. Belt Clip
To attach the belt clip, plac e it over the locking pin and align the screw hole. Fix it with a screwdriver.
15. Antenna
Provides excellent reception.
C. OPERATION
1. Please charge the battery pack with the supplied charger.
2. Turn VOL control knob to the unit “on”. Turn the SQL knob c ountercloc kwise to the end, and adjust the
volume t o a norma l listening level.
MON/FUNC
button to turn the auto-squelch back on.
MON/FUNC
button for
3. Turn
4. Select the desired channel a nd/or
5. Press
6. To receive, simply release
: Y ou c an o nly c ommunica te wit h the othe r ra dio s us ing t he s ame c hanne l and/ or t he s ame
Note
privacy code as yo ur radio.
TECHNICAL SPECIFICATIONS
!
Frequency Range GMRS……………....……...................……………....462.6750~462.7250 MHz
Weather channel………………………………..………….……………….162.400~163.275MHz
Channels GMRS…………………...................………………..…………..…………….……….15
Weather channel…………………………...............……...............………........………………..10
Powe r supply...........................................…. ……...............………………....………………8.4V
Sensitivity at 1 2 dB Sinad...........................................................…….......…...………….......0.5µV
Adjacent Channel Rejection.................................................………………..........................45dB
Audio Distortio n .............................................................………….……..................................7%
RF Output Power.....................................................……………...………… 1W / 5W @ 8.4VDC
Harmonic Emissions..............................................………………......................... 55dB Hi , 4 8 dB Lo
Dimensions (HW D).................................…..………….……………...............….135*54*33 mm
Wei ght (without batteries).......................................……….....………..………..… approx. 150g
knob clockwise until background nois e is just quie ted.
SQL
privacy code.
button.
Push-To-Talk
QUIET
button to transmit.
Push-To-Talk
QUIET
5

Attachment
GMRS Channel Frequency
Channel Channel
Number
Frequency
MHz
TX Power
0 EMERGENCY 462.6750 5W/1W
1 Interstitial 1 462.5625 5W/1W
2 Interstitial 2 462.5875 5W/1W
3 Interstitial 3 462.6125 5W/1W
4 Interstitial 4 462.6375 5W/1W
5 Interstitial 5 462.6625 5W/1W
6 Interstitial 6 462.6875 5W/1W
7 Interstitial 7 462.7125 5W/1W
8 GMRS 1 462.5500 5W/1W
9 GMRS 2 462.5750 5W/1W
10 GMRS 3 462.6000 5W/1W
11 GMRS 4 462.6250 5W/1W
12 GMRS 5 462.6500 5W/1W
13 GMRS 6 462.7000 5W/1W
14 GMRS 7 462.7250 5W/1W
Weather Channel Frequency
Channel Frequency•MHz
•
WX 1 162.400
WX 2 162.425
WX 3 162.450
WX 4 162.475
WX 5 162.500
WX 6 162.525
WX 7 162.550
WX 8 161.650
WX 9 161.775
WX 10 163.275
Hi/Lo
QUIET Privacy Codes Frequency: Hz
01=67.0 11=97.4 21=136.5 31=192.8
02=71.9 12=100.0 22=141.3 32=203.5
03=74.4 13=103.5 23=146.2 33=210.7
04=77.0 14=107.2 24=151.4 34=218.1
05=79.7 15=110.9 25=156.7 35=225.7
06=82.5 16=114.8 26=162.2 36=233.6
07=85.4 17=118.8 27=167.9 37=241.8
08=88.5 18=123.0 28=173.8 38=250.3
09=91.5 19=127.3 29=179.9
10=94.8 20=131.8 30=186.2
6
 Loading...