

Page 1
y
)
y
y
y
q
(8)
)
17-741.fm Page 1 Thursday, July 22, 1999 9:34 AM
Cat. No.
17-741
Handsfree Speakerphone Car Kit
Your RadioShack Handsfree Speakerphone Car Kit lets you mount and operate
our CT-355 Mini Handheld Flip Style Cellular Phone (RadioShack Cat. No. 171068 or 17-1168
automaticall
Important:
our local RadioS hack store).
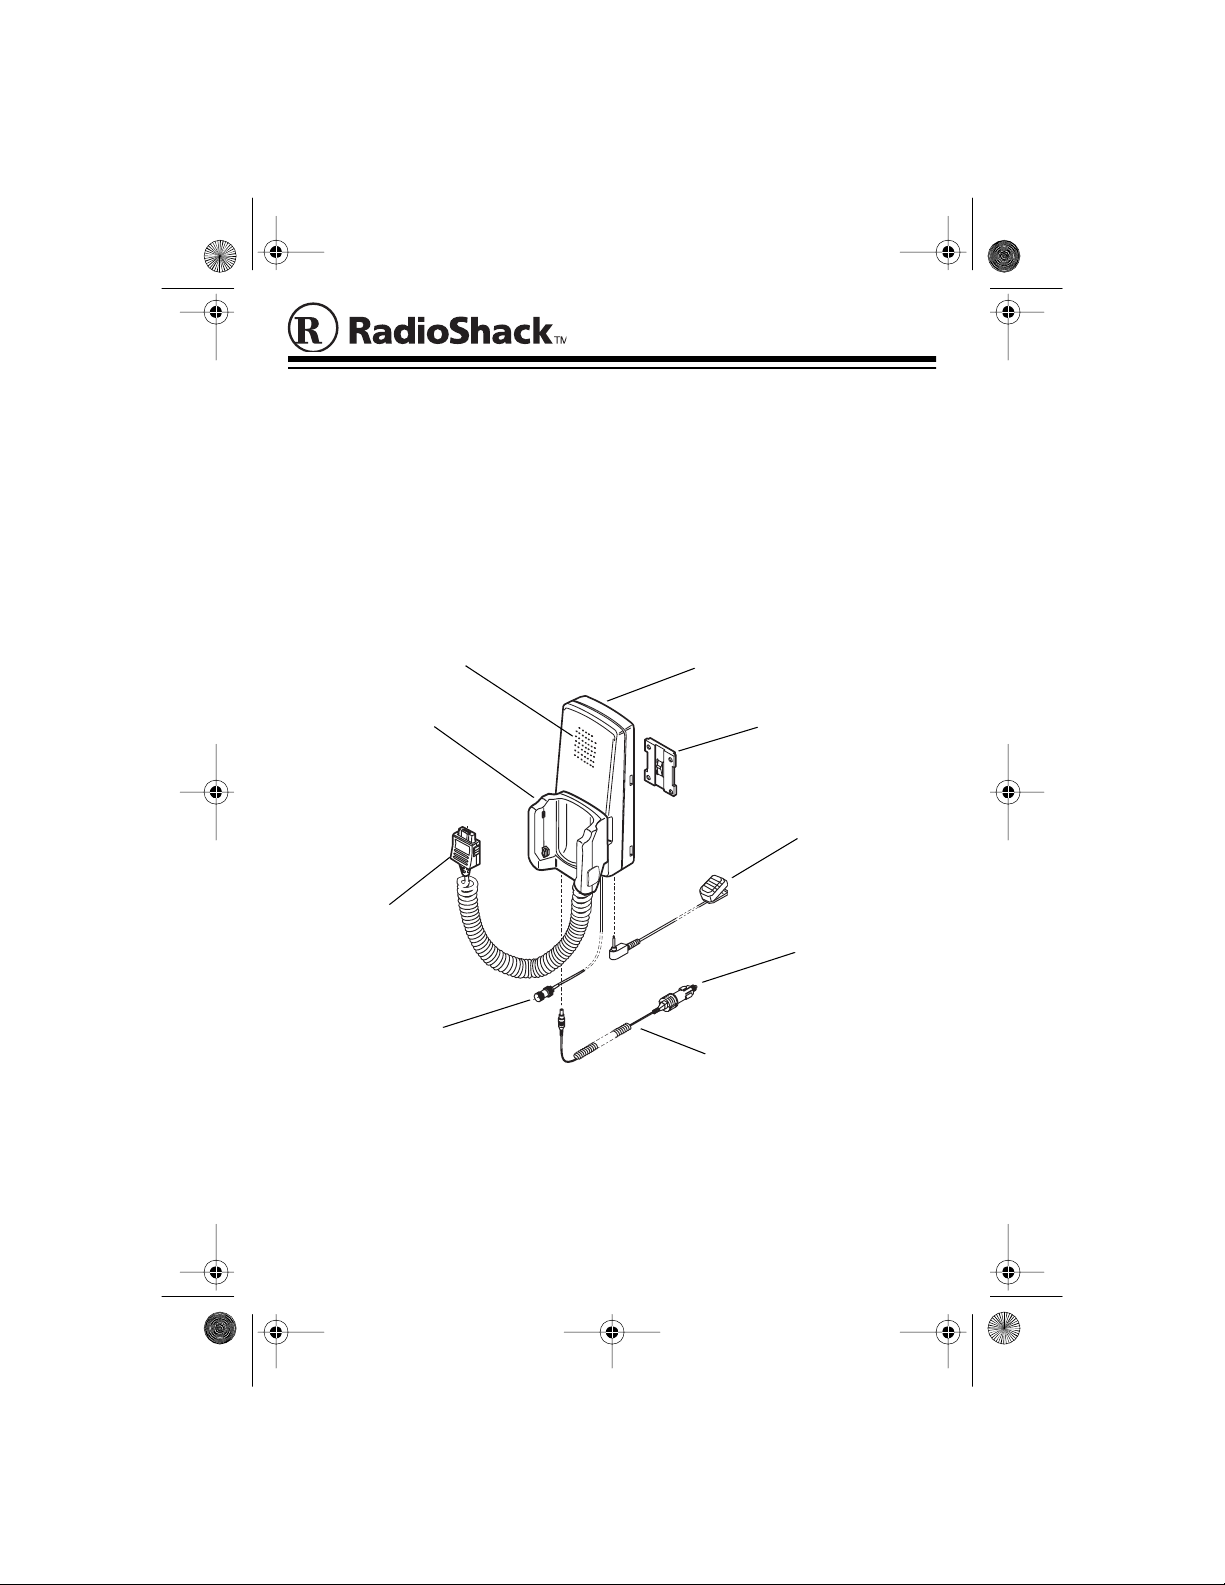
Your car kit includes the e
Phone Hol d er
(can be detach ed
and mounted
separately)
Coil Cord
Connector
(to phone)
Antenna Lead
in your vehicle, while keeping your hands free f or driving. It also
charges your phone’s battery.
To use this car kit,
ou need an external mobile antenna (available at
uipment shown here:
Speaker
Speakerphone Unit
Mounting Plate (2)
Microp hone
Lighter Socket
Connector
(contains replace-
able fuse)
Power Cable
Note:
The kit also includes this equipment (not shown):
• Flat-Back Microphone Plate
• Screws — M3 × 8
, M3 × 16 (8), 3.5 × 13 (8), 3.5 × 16 (8), 3.5 × 25 (8
• M3 Nuts and Washers (8 each) — for use with M3 × 8 or M3 × 16 scr ew s
© 1997 Tandy Corporation.
All Rights Reserved.
RadioShack is a trademark used by Tandy Corporation.
Page 2

17-741.fm Page 2 Thursday, July 22, 1999 9:34 AM
INSTALLATION
The kit’s speakerphone unit comes
with the phone holde r attached, so you
can easily mount the combination in
one location. However, you can remove the phone holder from the
speakerphone, so you can mount
them in separate locations.
Mounting with the Phone
Holder Attached
1. Choose a mounting location in
your vehicle for the speakerphone/phone holder combination
that is flat, easy to reach, and not
in the way of passenger/driver
movement or normal vehicle
operation.
2. Based on the depth of the mounting surface, choose a set of four
screws (and washers/nuts if the
back of the surface is accessible)
for securing the speakerphone’s
mounting plate .
3. Using the mounting plate as a
template, mark the screw locations on the mounting surface.
Then at each location drill a hole
slightly smaller than the selected
screws. Attach the mounting plate
using the supplied screws.
Caution:
or damage objects behind the
mounting surface.
Tak e care not to drill into
4. Slide the speakerphone’s mounting bracket over the mounting
plate to s ecure the speakerphone.
5. Clip the microphone to a location
(such as the sun visor) where it
will be in front of you as you
speak, but where it does not block
your vision or movement. To
reduce background noise during
phone conversations, try to
choose a location that does not
vibrate (while the car is running,
for example).
Note:
You can replace the clip
assembly on the back of the
microphone with the supplied flatback plate, then use a hook and
loop fastener (not supplied) to
attach the microphone to a cloth
surface. Simply remove the
screws and clip assembly from
the back of the microphone, then
attach the flat-back plate using
those screws.
Mounting with the Phone
Holder Removed
1. Slide the mounting bracket off the
back of the speakerphone.
2. Remove the screws from t he back
of the speakerphone to separate
the phone holder and the speakerphone.
2
Page 3

17-741.fm Page 3 Thursday, July 22, 1999 9:34 AM
3. The mounting plate has nuts in its
recessed screw areas. Slide the
mounting plate off the back of the
phone holder, taking care not to
lose the nuts.
4. Follow the same process
described in Steps 1–3 in “Mounting with the Phone Holder
Attached” to mount both the
phone holder and the speakerphone in separate locations, then
follow Step 4 in that section to
mount the microphone.
Making the Connections
Caution:
kit or phone, only use your car kit in
vehicles that have a negative ground
chassis and supply a maximum power
of 14.4 volts.
1. Connect the microphone’s plug to
2. Connect the antenna lead to the
To avoid damaging your car
the microphone jack on the bottom of the speakerphone.
matching connector on the external antenna’ s wir e.
3. Slide a thin, flat object (such as
your fingernail) under a corner of
the protective cover on your
phone’s power socket (on the
base of the phone) and pull up on
the cover to remove it. Then connect the speakerphone’s coil cord
connector to the soc ket.
4. With the phone’s antenna facing
up and the display facing out,
slide your phone into the holder
until it clicks.
5. Connect the power cable’s barrel
plug to the DC jack on the speakerphone.
6. Make sure the tip of the power
cable’s lighter socket connector is
tightly connected, then insert the
connector into your vehicle’s cigarette lighter socket. Your phone
beeps and turns on its charging
display to indicate that its battery
is charging (see the section on
charging the battery in your
phone’s Owner’s Manual).
Caution:
from your vehicle’s cigarettelighter socket when you turn off
the ignition. This prevent s vehicle
battery drain if you leave the
phone on when you turn off the
ignition.
Unplug the power cord
3
Page 4

17-741.fm Page 4 Thursday, July 22, 1999 9:34 AM
OPERATION
With your phone properly mounted
and connected to the speakerphone,
you make, answer, and end calls on
your phone as usual (for example, by
dialing the number and pressing
to place the call, and by pressing
to end the call).
During a call, simply talk in your normal speaking voice. The microphone
picks up your voice, and you hear the
caller on the other end of the line
through the speakerphone.
To remove the phone from the holder
at any time (even during a call) and
operate the phone by hand, firmly
squeeze then release the buttons on
the side of the holder so the phone
pops up slightly, then pick it up. The
speakerphone automatically turns off
and you can use the phone as usual.
Notes:
• For maximum efficiency, we recommend you turn on y our phone’s
Auto Answer feature, so it automatically answers an incoming
call after the first ring.
• Please refer to the telephone’s
Owner’s Manual for complete
instructions on the telephone’s
operation, care and maintenance, and important safety information.
SEND
END
Disconnectin g Y our Phone
from the Speakerphone
Follow these steps to disconnect the
speakerphone and remove your
phone from the holder (so you can
take the phone with you when you
leave the vehicle, for example).
1. Hold down the tabs on the side of
the coil cord connector and pull
the connector away from the
phone to unplug it. Your phone’s
charging display turns off to indicate that battery charging has
stopped.
2. To release the phone from the
holder, firmly squeeze then
release the buttons on the side of
the holder so the phone pops up
slightly.
3. Lift the phone out of the holder.
4
Page 5

17-741.fm Page 5 Thursday, July 22, 1999 9:34 AM
CARE AND
MAINTENANCE
Your RadioShack Handsfr ee Speakerphone Car Kit is an example of superior design and craftsmanship. The
following suggestions will help you
care for your speakerphone so you
can enjoy i t for years.
• Keep the speakerphone away
from dust and dirt, which can
cause premature wear of parts.
• Keep the speakerphone dry. If it
gets wet, wipe it dry immediately.
Liquids might contain minerals
that can corrode the electronic circuits.
• Use and store the speakerphone
only in normal temperature environments. Temperature extremes
can shorten the life of electronic
devices, and distort or melt plastic
parts.
• Handle the speakerphone gently
and carefully. Dropping it can
damage circuit boards and cases
and can cause the speakerphone
to work improperly.
• Wipe the speakerphone with a
damp cloth occasionally to keep it
looking new. Do not use harsh
chemicals, cleaning solvents, or
strong detergents to clean the
speakerphone.
Modifying or tampering with the
speakerphone’s internal components
can cause a malfunction and might invalidate your speakerphone’s warranty. If your speakerphone is not
performing as it should, take it to your
local RadioShack store for assistance.
Checking/Replacing the
Fuse
The speakerphone’s power cable contains a 2-amp fuse. If your speakerphone stops working properly, follow
these steps to check/replace the fuse.
1. Disconnect the lighter socket connector from the vehicle’s lighter
socket, then unscrew and remove
the tip on the end of the connector.
2. Pull out and check the fuse. If it is
blown (or if you are unsure),
replace it with a new 2-amp, 125V
fuse (available at your local
RadioShack store).
Caution:
same type and rating as the one
supplied with the connector .
3. Securely screw the tip back on
the connector.
Use only a fuse of the
5
Page 6

17-741.fm Page 6 Thursday, July 22, 1999 9:34 AM
Limited Ninety-Day W arranty
This product is warranted by RadioShack against man ufacturing defects in material and
workmanship under normal use for nine ty (90) days from the date of purchase from RadioShack compan y-owned stores and aut horized RadioShack f ranchisees and dealers. In
the event of a product defect during the warranty period, take the product and the RadioShack sales receipt as proof of purchase date to any RadioShack store. RadioShack will,
at its option, unle ss othe rwise provi ded by law: (a ) correct the d efec t by pr oduc t repai r with out charge for parts and labor; (b) replace the product with one of the same or similar design;
or (c) refund the purchase price. All replaced parts and products, and products on which a refund is made, become the property of RadioShack. New or reconditioned parts and products
may be used in the p erformance of war ranty serv ice. Repaired or replaced pa rts and products are warr anted for the rem ainder of t he or igina l warr anty per i od. You will be char ged fo r
repair or replacement of the product made after the expiration of the warranty period.
This warranty does not cover: (a) damage or failure caused by or attributable to acts of God,
abuse, accident, misuse, improper or abnormal usage, failure to follow instructions, improper
installation or mai ntenan ce, alter ation, l ig htning o r othe r inc idenc e o f ex cess v ol tage or c urrent; (b) any repairs oth er than thos e pr ovided by a RadioSh ack Author ized Serv ice Fa cility;
(c) consumable s such as fuses or ba tteries; (d) cosmetic damage ; (e) t ransportation, s hipping or insura nce costs; or (f) costs of product removal, instal lation, set-up serv ice adjustment or reinstallation.
EXCEPT AS PROVIDED HEREIN, RadioShack MAKES NO EXPRESS WARRANTIES AND
ANY IMPLIED WARRANTIES, INCLUDING THOSE OF MERCHANTABILITY AND FITNESS FOR A PARTICULAR PURPOSE, ARE LIMITED IN DURATION TO THE DURATION
OF THE WRITTEN LIMITED WARRANTIES CONTAINED HEREIN. EXCEPT AS PROVIDED HEREIN, RadioShack SHALL HAVE NO LIABILITY OR RESPONSIBILITY TO CUSTOMER OR ANY O THER PERSON OR ENTITY WITH RESPECT TO ANY LIABILITY,
LOSS OR DAMAGE CAUSED DIRE CTLY OR INDIRECTLY BY USE OR PERFORMANCE
OF THE PRODUCT OR ARISING OUT OF ANY BREACH OF THIS WARRANTY, INCLUDING, BUT NOT LIMITED TO, ANY DAMAGES RESULTING FROM INCONVENIENCE,
LOSS OF TIME, DATA, PROPERTY, REVENUE, OR PROFIT OR ANY INDIRECT, SPECIAL, INCIDENTAL, OR CONSEQUENTIAL DAMAGES, EVEN IF RadioShack HAS BEEN
ADVISED OF THE POSSIBILITY OF SUCH DAMAGES.
Some states do n ot allow t he li mi tations on how long an i mplied wa rrant y l asts or the exc lusion of incidental or co nsequenti al damag es, so the abo ve l imitati ons or ex clusions may not
apply to you. This warranty gives you specific legal rights, and you may als o have other
rights which vary from state to state.
RadioShack Customer Relations, Dept. W, 100 Throckmorton St., Suite 600
Fort Worth, TX 76102
We Service What We Sell
1/97
RadioShack
A Division of Tandy Corporation
Fort Worth, Texas 76102
NMP # 9358049
3A7 Printed in the USA
 Loading...