

Page 1
T H E P E R F O R M A N C E Y O U N E E D
TM
19” LCD HDTV
User’s Guide 16-912
Please read this user’s guide before using your new TV.
Page 2

Contents
Important Safety Instructions .............................................................................................4
Overview ..............................................................................................................................6
Features ..........................................................................................................................6
Package Contents ...........................................................................................................6
Setup .....................................................................................................................................9
Install Remote Control Batteries ...................................................................................9
Connect AC power .........................................................................................................9
Connecting an Antenna ...............................................................................................10
Indoor Antenna .......................................................................................................10
Outdoor Antenna ....................................................................................................10
Connecting an HDMI Device .......................................................................................10
Connecting a Component Video Device ..................................................................... 11
Connecting an S-Video Device .................................................................................... 11
Connecting a Composite Video Device ......................................................................11
Connecting a PC ...........................................................................................................12
Connecting to a Home Theater ....................................................................................13
Basic Operation ..................................................................................................................14
Initial Setup Menu ........................................................................................................14
Adjust the Volume ........................................................................................................ 14
Change Channels .........................................................................................................14
Closed Captions ...........................................................................................................14
Advanced Settings .............................................................................................................15
Picture Settings ............................................................................................................15
Use Preset Picture Settings ...................................................................................15
Customize Picture Settings ....................................................................................15
Advanced Video Settings .......................................................................................15
Audio Settings ..............................................................................................................16
Use Preset Audio Settings .....................................................................................16
Customize Audio Settings ......................................................................................16
Advanced Audio Settings ......................................................................................17
Channel Settings ..........................................................................................................17
Set the Tuning Band ...............................................................................................17
Search for Channels Automatically .......................................................................17
Search for Channels Manually ..............................................................................18
View the Channel List.............................................................................................18
Add or Delete Favorites .........................................................................................18
Edit a Channel Label ..............................................................................................18
General Settings ...........................................................................................................19
Parental Control Options ....................................................................................... 19
Set the Time and Date ............................................................................................20
Set Closed Captions ...............................................................................................21
Change Menu Settings ...........................................................................................21
Change Input Labels ..............................................................................................22
Reset to Factory Defaults .......................................................................................22
Change PC Settings .....................................................................................................22
Additional Information ......................................................................................................23
Troubleshooting ...........................................................................................................23
Specifications ...............................................................................................................24
FCC Information ...........................................................................................................24
Limited Warranty ..........................................................................................................25
2
3
Page 3
Important Safety Instructions
1. Read these instructions. All the safety and operating instructions should be read before
this product is operated.
2. Keep these instructions. The safety and operating instructions should be retained for
future reference.
3. Heed all warnings. All warnings on the appliance and in the operating instructions
should be adhered to.
4. Follow all instructions. All operating and use instructions should be followed.
5. Do not use this apparatus near water. The appliance should not be used near water or
moisture, for example, in a wet basement or near a swimming pool, and the like.
6. Clean only with dry cloth.
7. Do not block any ventilation openings. Install in accordance with the manufacturer’s
instructions.
8. Do not install near any heat sources such as radiators, heat registers, stoves, or other
apparatus (including amplifiers) that produce heat.
9. Do not defeat the safety purpose of the polarized or grounding-type plug. A polarized
plug has two blades with one wider than the other. A grounding type plug has two
blades and a third grounding prong. The wide blade or the third prong are provided for
your safety. If the provided plug does not fit into your outlet, consult an electrician for
replacement of the obsolete outlet.
10. Protect the power cord from being walked on or pinched particularly at plugs,
convenience receptacles, and the point where they exit from the apparatus.
11. Only use attachments/accessories specified by the manufacturer.
12. Use only with the cart, stand, tripod, bracket, or table specified by the
manufacturer, or sold with the apparatus. When a cart is used, use
caution when moving the cart / apparatus combination to avoid injury
from tip-over.
13. Unplug this apparatus during lightning storms or when unused for
long periods of time.
14. Refer all servicing to qualified service personnel. Servicing is required when the
apparatus has been damaged in any way, such as power-supply cord or plug is
damaged, liquid has been spilled or objects have fallen into the apparatus, the apparatus
has been exposed to rain or moisture, does not operate normally, or has been dropped.
15. Please keep the unit in a good ventilation environment.
16. WARNING: To reduce the risk of fire or electric shock, do not expose this apparatus to
rain or moisture. The apparatus shall not be exposed to dripping or splashing and that no
objects filled with liquids, such as vases, shall be placed on apparatus.
17. WARNING: The mains plug/appliance coupler is used as disconnect device, the
disconnect device shall remain readily operable.
18. The batteries shall not be exposed to excessive heat such as sunshine, fire or the like.
19. The apparatus shall be connected to a mains outlet with a protective earthing
connection.
WARNING: To reduce the risk of fire or shock hazard, do not
expose this product to rain or moisture.
CAUTION
RISK OF ELECTRIC SHOCK.
DO NOT OPEN.
CAUTION: TO REDUCE THE RISK OF ELECTRIC SHOCK, DO
NOT REMOVE COVER OR BACK. NO USER-SERVICEABLE
PARTS INSIDE. REFER SERVICING TO QUALIFIED PERSONNEL.
This symbol is intended to alert you to the presence
of uninsulated dangerous voltage within the product’s
enclosure that might be of sufficient magnitude to constitute
a risk of electric shock. Do not open the product’s case.
This symbol is intended to inform you that important
!
operating and maintenance instructions are included in the
literature accompanying this product.
!
w Child Safety w
Severe injuries can occur if children climb, grab, or jostle an improperly secured TV. To
significantly reduce the risk of injury, proper steps should be taken.
Displaying on a TV Stand/Entertainment Center:
1. Make sure your TV is situated on an appropriately-sized TV
stand, generally one that is larger than the TV.
2. Do not place the TV on anything that can easily be used as
stairs, such as dressers.
3. Keep children from climbing on or playing with the TV
stand/entertainment center.
4. Consider purchasing a TV lock or furniture bracket to
secure your TV to a wall even if it is not wall mounted.
Mounting on a wall:
1. Make sure the mount you purchase works with UL-approved vesa mounts that match
the size, make, and model of your TV.
2. Pick a wall mount that works with the type of wall you have. Some wall mounts are
designed specifically for steel or cinder block, whereas others are only for wood or
drywall.
3. Follow ALL instructions supplied by the wall mount manufacturer.
4
5
Page 4

Overview
Features
Built-in HDTV processor receives HD signals from a satellite receiver, cable box, over-
the-air antenna, or from any other HD source
Provides dramatic 720p images with deep color, enhanced contrast, crisp detail, and
superb brightness
Equipped with HDMI and component video inputs for receiving HD signals
Composite video and RCA audio inputs for connecting multiple components
VGA input allows using the TV as a computer monitor
Package Contents
CHANNEL +/–
Browse through channels.
On the main menu and source screens,
press to go and .
MENU
Access and navigate the
TV menu.
SOURCE
Toggle between all
available input sources.
On the main menu, press
to confirm selections.
VOL +/VOL –
Increase or decrease volume.
On the main menu and source
screens, press to go
POWER – Turn the TV on or to
standby.
and .
n Note: To turn power off
completely, unplug the TV.
IR Receiver
Power Indicator
Overview
TV Remote Control
AC Power Cord AV Cable
User’s
Guide
6
Quick Start
Back View
AV-IN (Composite)
Connect A/V composite
video and audio signal (R/L)
cables. Match the colors on
your cable connections with
the colors on the jacks.
TUNER
Connect an
antenna or
cable for TV
reception.
*
Connect
headphones.
Component Video
Connect to A/V devices
using component video
cables. Match the colors on
your cable connections with
the colors on the jacks.
S-VIDEO
Connect S-Video
signal from a
camcorder or VCR.
7
PC AUDIO
Connect to the
audio output of
a computer.
PC-RGB
Connect to the
VGA port on a
computer.
SERVICE
For service personnel
use only.
HDMI
Connect to HDMI
devices via HDMI
cables to transmit
audio and video.
Page 5
S. MODE
Select an audio preset.
Overview
POWER – Turn the TV
on or to standby.
P. MODE – Select a
video preset.
EPG
View scheduled programming
for the current channel.
MTS – Select alternate audio if
available.
LED Indicator – Blinks red
while remote is in use.
SLEEP – Set the sleep timer.
Number Buttons (0-9)
Set the channel or enter
password.
– Dash
Use for multicast channels.
f
– Return to the previous
channel.
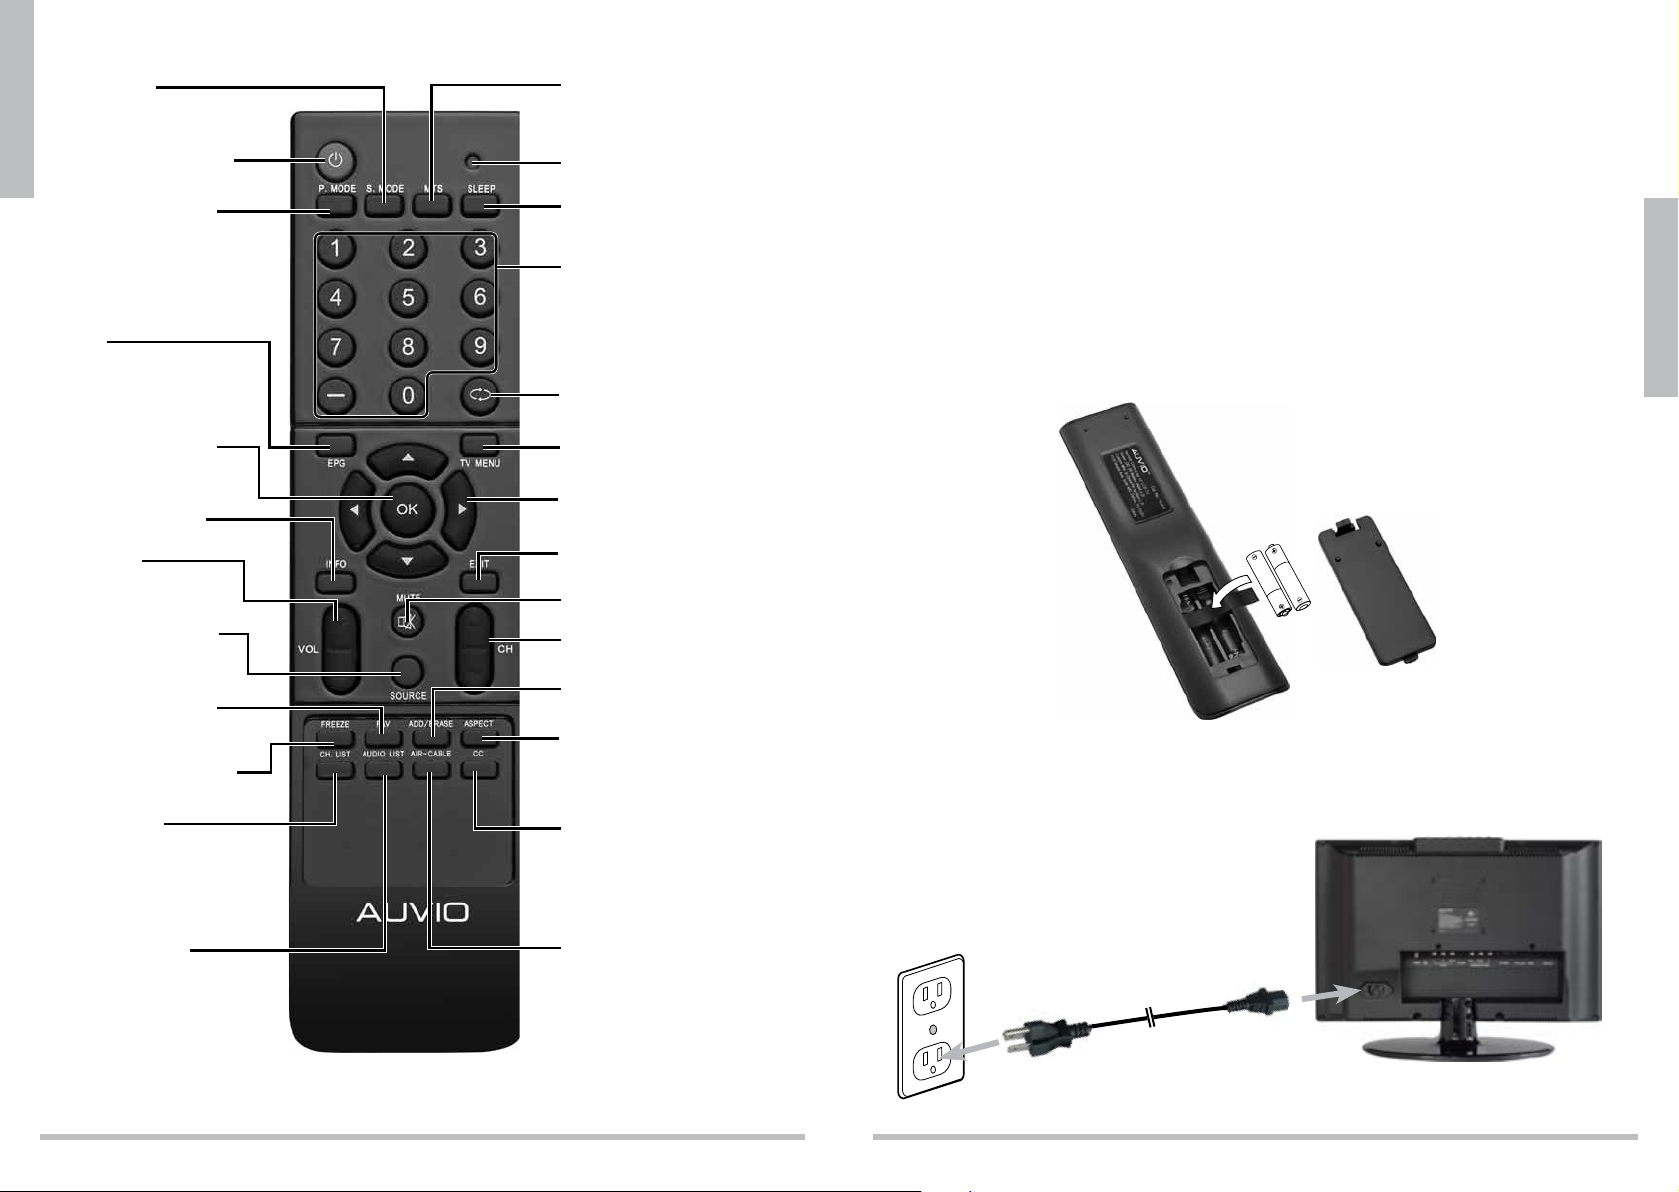
Setup
Install Remote Control Batteries
1. Press the tab to remove the battery cover.
2. Insert two AAA batteries (not supplied) as indicated by the polarity symbols (+ and –)
marked on the remote control.
3. Replace the battery cover.
b Battery Notes:
Dispose of batteries promptly and properly. Do not burn or bury them.
Use only fresh batteries of the required size and type.
Do not mix old and new batteries, different types of batteries (alkaline, or rechargeable),
or rechargeable batteries of different capacities.
If you do not plan to use the remote control for a long time, remove the batteries.
Batteries can leak chemicals that can damage electronic parts.
Setup
OK – Make selections.
INFO – Turn show
information on or off.
VOL +/–
Decrease or increase the
volume.
SOURCE – Select an
available video input
source.
FAV –
Display a list of
favorite channels.
FREEZE – Pause live TV.
CH. LIST
Display a list of channels saved in
Tuner memory.
AUDIO LIST
Switch between audio channels,
if available.
MENU – Access the TV menu.
– Navigate menus.
EXIT – Exit the menu.
MUTE – Turn sound off or on.
CH
Select next /previous channel.
ADD/ERASE
Add or delete a Favorite channel.
ASPECT – Select the screen size.
CC – Turn closed captions on/off.
AIR–CABLE
Switch broadcast type.
AAA
A
A
A
Connect AC power
Connect your TV to a standard wall outlet using the supplied AC power cord.
nNote: The remote works best within of 20 ft (6 m) of the TV.
8
9
Page 6

Connecting an Antenna
Indoor Antenna
Plug one end of a 75-ohm coaxial cable with an F connector (not supplied) to the TUNER
jack on back of the TV, and its other end to the antenna (not supplied).
Outdoor Antenna
Setup
For best reception, use a high-quality outdoor antenna (not supplied).
Plug one end of a 75-ohm coaxial cable with an F connector (
jack on the back of the TV, and the other end to the antenna’s wall outlet. If your outdoor
antenna uses a 300-ohm coaxial cable, plug it into the TUNER jack using a 300-to-75-ohm
transformer.
If you have separate UHF and VHF antennas, connect the separate antenna cables to a
VHF/UHF combiner, then connect the combiner’s output to the TUNER jack on the TV.
VHF Antenna
VHF/UHF Combiner
not supplied)
UHF Antenna
to the TUNER
Connecting a Component Video Device
1. Connect the device’s component outputs (Y/Pb/Pr) to the COMPONENT jacks on the
back of the TV. Match the colors on the connection cables with the colors on the jacks. For
component cables and jacks, Green = Y, blue = Pb, and red = Pr.
Use an audio cable (not supplied) to connect a device’s audio output jacks to the AV-IN
2.
audio jacks on the back of the TV. Red jacks are for right audio, and white jacks are for
left audio.
nNote: Component cables do not provide audio. Use component cables for video and
composite L/R audio cables for audio.
Connecting an S-Video Device
1. Use a S-video cable (not supplied) to connect a device’s S-Video output to the TV’s
S-VIDEO jack.
2. Use an audio cable (not supplied) to connect a device’s audio output jacks to the AV-IN
audio jacks on the back of the TV. Red jacks are for right audio, and white jacks are for
left audio.
Audio Cables
Setup
wWarning: When you install an outdoor antenna, use extreme caution. If the antenna starts
to fall, let it go! It could contact overhead power lines. If the antenna touches the power line,
contact with the antenna, mast, cable, or guy wires could cause electrocution and death. Call
the power company to remove the antenna. DO NOT attempt to remove it yourself!
Connecting an HDMI Device
Use a standard high speed HDMI cable (not supplied) to connect to the HDMI port. The
HDMI connection supports HD video signal up to 720p.
10
S-Video Cable
Connecting a Composite Video Device
1. Use a video cable (not supplied) to connect each device’s video output to the TV’s
COMPOSITE video jack.
2. Use an audio cable (not supplied) to connect a device’s audio output jacks to the AV-IN
audio jacks on the back of the TV. Red jacks are for right audio, and white jacks are for
left audio.
nNotes: Both S-Video and COMPOSITE share the same set of audio jacks on the back of
the TV.
11
Page 7

Connecting a PC
1. Your TV automatically adjusts the screen resolution and saves it when receiving a VGA
signal from a PC. If the receiving signal is not the standard mode signal, refer to the
table to set your PC’s resolution.
Resolution Vertical Frequency Horizontal Frequency
640 x 480 (VGA) 60 Hz – / –
72 Hz – / –
75 Hz – / –
720 x 400 70 Hz – / +
800 x 600 60 Hz 48.363 KHz
1024 x 768 (XGA) 60 Hz 63.974 KHz
Setup
2. Use a VGA cable (not supplied) to connect the PC RGB port on the back of the TV to the
VGA port on your PC.
3. Use a PC audio cable (not supplied) to connect the PC-AUDIO jack on the back of the
TV to the audio out jack on your PC.
1360 x 768 (recommended) 60 Hz 47.7 KHz
PC Audio Cable
VGA Cable
Connecting to a Home Theater
Connect audio and video through your A/V receiver/amplifier
1. Connect audio and video cables from your DVD player or other device to your A/V
receiver/amplifier, then connect the receiver/amplifier to the TV.
2. Refer to the instructions from your A/V receiver/amplifier or speaker system to make
speaker connections.
n Note: For best results, use the highest quality of audio/video cables that your devices
will accept. Use the same type of audio and video cables to go from the device to the
receiver/amplifier and from the receiver/amplifier to the TV.
TV
Video In
Audio
Optimal Speaker Layout
A/V Receiver/
Amplifier
AM
FM UNBAL
ANTENNA
Ω
LOOP
75
Video Out
S-VIDEO
Out
Y Pb Pr
In
Component Video
Audio Out
Audio In
R
S
Coaxial
Digital
K
E
R
S
CENTER
FRONT
SURROUND
SUB WOOFER
L
R
L
Setup
12
DVD Player or
Other Device
Y
PB
L
Video
PR
R
Audio
S-VideoCoaxialHDMI
13
Page 8

Basic Operation
Advanced Settings
Initial Setup Menu
1. Plug the TV’s power cord into a standard AC outlet, then
press POWER. The Initial Setup Menu appears when
you first turn on the TV.
2. Press or to select a language: English, French, or
Spanish and press to go to the next setting.
3. Press or to select Air for over-the-air broadcast or
Cable for paid cable or satellite input.
4. For over-the-air broadcasts, press
Channel Search, then press to begin.
5. When the search completes, you can watch TV.
to highlight Auto
nNotes:
To turn off the TV completely, press POWER, then
unplug the TV. To put the TV in standby mode, just press
POWER. Weak electric power is consumed in standby
mode.
After 5 minutes with no signal or a blank screen, the TV
automatically goes to standby mode.
See page 18 for manual channel search instructions.
Press SOURCE to select input sources: TV, Composite,
Basic Operation
S-Video, Component, VGA/PC, or HDMI/DVI.
Adjust the Volume
Press VOL+ and VOL– to increase or decrease the volume.
Press MUTE on the remote control to temporarily silence the sound. To restore the
sound, press VOL+, VOL–, or MUTE.
Change Channels
To cycle through channels, press CH or CH.
To directly select a channel, press the number buttons and – on the remote control for
the desired channel. Wait for 5 seconds, or press OK to confirm the channel change. For
example, to select channel 5, press 5, OK. To select the multicast channel 22-1, press
2 2 – 1 OK.
To switch between the current and previous channel, press
f
.
Closed Captions
Press CC on the remote control to cycle through available captions:
•CCOff
•CCOn
•CCOnMute
Picture Settings
Use Preset Picture Settings
1. Press MENU on the TV or remote control. The main
menu displays.
2. Press or on the TV or remote control to select
Picture, then press OK or .
3. Press or to highlight Picture Mode, press ,
and select Standard, Vivid, Bright, or User.
n Note: The Standard setting is recommended for most viewing environments.
Depending on the ambient light level in the room, you may find one of the other options
is better for viewing.
4. Press MENU to accept changes and go back to the menu.
Customize Picture Settings
1. Follow Steps 1 through 4 under “Use Preset Picture Settings.” Set Picture Mode to User.
2. Press or to select Brightness, Contrast, Color, Tint or Sharpness, then press .
3. Press or to adjust the picture settings.
4. Press MENU to go back to the previous menu.
Advanced Video Settings
1. Follow Steps 1 through 4 under “Use Preset Picture Settings.” Set Picture Mode to
User.
2. Press or to select Advanced Video. Press OK
or to go to the next screen.
3. Press or to select Aspect Ratio, Color
Temperature, Noise Reduction, 3D Y/C, Gradient
Enable, or Blue Screen, then press or to
adjust settings (explained below).
4. Press MENU to accept changes and go back to the
previous menu.
Aspect Ratio
Normal – Recommended for viewing content broadcast in 4:3 wide screen. Adds black
bars on either side of the image to avoid image distortion.
Zoom – Stretch an image vertically and horizontally to fill the screen while viewing 4:3
wide screen content. No distortion, but parts of the image may be cut off.
Wide – Stretch some 4:3 content. Reduces or eliminates black bars, but may distort image.
Cinema – Fills the entire screen and eliminates black bars. May cut off parts of images,
but will not distort or stretch the picture.
Advanced Settings
n Note: To set Analog, Digital , and Advanced CC Settings, see “Set Closed Captions” on
page 21.
14
15
Page 9

n Note: You can also use the ASPECT button on the remote control to cycle through the
aspect ratio options.
Color Temperature
Normal – Does not enhance colors for warmth or coolness.
Cool – Provides more blue/green tones.
Warm – Provides more yellow/orange/red tones.
n Note: The tones in the Warm setting are considered the most accurate for viewing
standard broadcasts.
Noise Reduction
Use this setting to change the level of noise reduction on the TV. These levels are subjective.
What works for one person may not work for another.
Off
Low (Default setting)
Medium
High
3D Y/C settings:
Setting the 3D Y/C filter to On prevents the degradation and warping of regular analog
signals sent through Composite or RF cables.
Gradient Enable
Turn this setting On to allow for the gradual blending of colors. Turn it Off to reduce
blending.
Blue Screen
Turn this setting On to show a blue screen when a channel is not receiving an adequate
signal. Turn Off to show a black screen when the signal is inadequate. Defaults to On.
Audio Settings
Use Preset Audio Settings
1. Press MENU on the TV or remote control. The main menu displays.
2. Press or to select Sound, then press OK or .
Advanced Settings
3. Press or to highlight Equalizer Mode, then press and select User, Standard,
Movie, Music, or News.
4. Press MENU to accept changes and go back to the previous menu.
Customize Audio Settings
1. Follow Steps 1 through 3 under “Use Preset Audio
Settings.” Choose User.
2. Press or to highlight Balance, Audio Channel,
Audio Language 1, Audio Language 2, or
Advanced Audio.
3. Press OK or to change settings (explained below),
and use
4. Press MENU to accept changes and go back to the previous menu.
or
to navigate.
Balance
Use to move the sound to the right speaker and to move sound to the left speaker.
Defaults to 0.
Audio Channel
Mono
Stereo (default)
SAP (second audio program)
Audio Language 1 and 2
Set up to two different languages for alternate language broadcasts: English, Spanish, or
French. Not every program will have an alternate language. Audio Language 1 defaults to
English, Audio Language 2 defaults to Spanish.
Advanced Audio Settings
1. Follow steps 1 through 3 under “Use Preset Audio Settings.” Choose User.
2. Press or to highlight Advanced Audio and press OK or .
3. Use or to choose 5-band Equalizer Set or Audio Only (explained below).
4. Press MENU to accept changes and go back to the previous menu.
5-Band Equalizer Set
To achieve better sound quality, use
results.
120Hz
500Hz
1.5KHz
5KHz
10KHz
Audio Only
1. Press to highlight and OK to change this setting
to Yes. The screen goes blank.
2. To exit audio only mode, press and hold the POWER button on the TV or remote for 3
seconds.
to adjust each band until you achieve the best
Channel Settings
Set the Tuning Band
1. Press MENU on the TV or remote control. The main menu displays.
2. Press or on the TV or remote control to select Channels, then press OK or .
3. Press to choose Cable (for satellite or cable
broadcasts) or Air (for over-the-air antenna).
Search for Channels Automatically
1. Follow steps 1 and 2 under “Set the Tuning Band.”
2. Press or to select Auto Channel Search, then
press .
3. Wait for the progress bar to reach 100%, then press
MENU to exit.
Advanced Settings
16
17
Page 10

Search for Channels Manually
1. Follow steps 1 and 2 under “Set the Tuning
Band.”
2. Press or to select Manual Add Channel, then
press OK or .
3. Press to highlight Channel Type, then press to
select Analog or Digital channel type.
4. Press again to highlight Physical CH, then use
the or buttons to select the channel number you want to add.
5. Press MENU to accept changes and go back to the previous menu.
View the Channel List
1. Follow steps 1 and 2 under “Set the Tuning Band.”
2. Press
3. Press or to select a channel you want to view
4. Press MENU to accept changes and go back to the
or
press OK or .
and press OK to select.
previous menu.
to select Manual Channel Set, then
Add or Delete Favorites
1. Follow steps 1 and 2 under “Set the Tuning Band.”
2. Press
3. Use
4. Press MENU to accept changes and go back to the previous menu.
Edit a Channel Label
Advanced Settings
Channels are automatically labeled with their number and call sign when first added. You can
change how the channel appears when you press the INFO button on your remote.
1. Follow Steps 1 and 2 under “Set the Tuning
2. Press or to select Channel Labels, then press
3. Press or to select the channel you want to
4. Press or to enter letters or numbers, then
5. Press OK or MENU to accept changes and go back to the previous menu.
6. To view the channel label you set, press INFO while on that channel.
or
press OK or .
or
OK to place a marker next to the ones you want to
add to the favorites list. Press OK again to remove
marker.
Band.”
OK. The Channel Labels Menu displays.
edit, then press OK.
press or to go to the next or previous space.
to select Favorite Channels, then
to scroll through the channel list. Press
Settings
Parental Control Options
To prevent children from viewing adult programs, you
can block specific shows or age ratings.
1. Press MENU on the TV or remote control. The main
menu displays.
2. Press or to select Settings, then press OK
or .
3. Press or to select Parental Control Menu, then press OK. The “Enter
Password” screen displays.
4. Use the number buttons to enter your 4-digit password, then press OK.
nNote: The password is preset to “0000”.
Set US Ratings
1. Follow Steps 1 through 4 under “Parental Control
Options.”
2. Press or to select US Ratings, then press OK
or .
3. Use
4. Highlight the rating label for programming you want
to block and press OK. This will block that rating
and all below it (i.e. when R is blocked, NC-17 and
X are also blocked). To unblock ratings, press OK again. You can block all or some TV
programming based on age and additional qualifiers. See chart below for qualifiers.
5. Press MENU to accept changes and go back to the previous menu.
FV
L
S
V
D
Set Canadian Ratings
1. Follow Steps 1 through 4 under “Parental Control
Options.”
2. Press or to select Canadian Ratings, then
press OK or .
3. Use
4. Highlight the rating label for programming you want
to block and press OK.
5. Press MENU to exit.
to navigate through rating options.
Fantasy Violence – no real violence, but animated violence is depicted (TV-Y7 only)
Language – infrequent to heavy of coarse language based on age level
Sexual Situations – moderate or intense sexual situations based on age level
Violence – moderate or intense violence based on age level
Suggestive Dialogue – moderately or intensely suggestive dialogue based on age level
Canadian Rating Menu
to navigate through rating options.
Advanced Settings
18
19
Page 11

Set Advanced Parental Lock Ratings
1. Follow Steps 1 through 4 under “Parental Control Options.”
2. Press or to select Advanced Rating, then
press OK or . Select ON and press .
3. Press or to select Advanced Parental Lock,
then press OK or .
4. Use or to choose Humor Level, Intelligence
Level, or Erotic Level 20CHARS. Press OK or .
5. Use or to choose the level you want to block,
then press OK. Press OK again to unblock.
6. Repeat steps 4 and 5 for each level you wish to block or unblock.
7. Press MENU to accept changes and go back to the previous menu.
n Note: Advanced Parental Lock Ratings will not appear if the TV is not receiving a signal.
Set the Password
Your TV comes with a default password of 0000. Follow
these steps to change it.
1. Follow Steps 1 through 4 under “Parental Control
Options.”
2. Press or to select Password Set, then press .
3. Use the number keys to enter 4 digits in New Password.
4. After you enter the last digit, enter the same 4 digits in the Confirm Password boxes.
5. Press MENU to accept changes and go back to the previous menu.
n Note: If you have changed and forgotten your password, enter 8899. Then, set a new password.
Set the Time and Date
1. Press MENU on the TV or remote control. The main menu displays.
2. Press or to select Settings, then press OK or .
3. Press or to select Time Set, then press OK or .
Advanced Settings
Automatically Set the Date and Time
1. Follow steps 1 through 3 under “Set the Time and Date.”
2. Press or to select Time Set Menu, then press .
3. Choose Auto, and press OK or . The time and date automatically update based on the
Time Zone selected.
4. Press or to select Time Zone, then press or . Choose Eastern, Central,
Mountain, Pacific, Alaska, or Hawaii, and press OK.
5. Wait a few moments, then press OK or MENU to exit.
Manually Set the Date and Time
1. Follow steps 1 through 3 under “Set the Time and Date.”
2. Press or to select Time Set Menu, then press .
3. Navigate to Manual, and press .
4. Press or to select Time Zone, Year, Date, and Time, then press .
5. Repeat steps 2 and 3 to set the time. Press MENU
when finished.
Set Closed Captions
Closed Captions (CC) are subtitles that display the
dialogue, narration, and sound effects of a TV program. You
can select whether or not to display them and whether
or not to mute the sound while they’re displayed. Closed
Captions are not available for all channels.
Press CC on the remote to choose CC Off to hide captions, CC On to display captions,
or CC On Mute to show captions and mute audio. TV defaults to CC Off.
To set specific CC channels:
1. Press MENU on the TV or remote control. The main menu displays.
2. Press or to select Settings, then press OK or .
3. Press or to select Closed Caption, then press .
4. Press or to choose CC Mode, Analog CC, or Digital CC, then press to enter
settings. Press or to navigate.
CC Mode: CC Off, CC On, and CC On Mute
Analog CC: CC1, CC2, CC3, CC4, TEXT1, TEXT2, TEXT3, and TEXT4
Digital CC: CS1, CS2, CS 3, CS4, CS5, and CS6
5. Press to choose an option and return to the menu.
To change the way digital closed captions display:
1. Follow steps 1 through 3 under “To set specific CC
channels.”
2. Press or to choose Advanced CC Settings,
then press .
3. Press or to choose Style, Size, Font,
Text Color, Text Opacity, Background Color,
Background Opacity, Edge Effect, or Edge Color
and press or to cycle through options. A preview
appears at the bottom of the screen each time you change an option.
4. Press MENU to save changes and return to the previous menu.
Change Menu Settings
1. Press MENU. The main menu displays.
2. Press or to select Settings, then press OK or to select Menu Setting.
3. Press or to select Language, Transparency, or Sleep Timer, then press .
Language: English, Spanish, French.
Transparency: choose how translucent or opaque the on-screen menu appears
Sleep Timer: choose to have the TV automatically turn off in 5 to 240 minutes. Press
OK to change settings.
4. Press or to highlight options, then press OK or MENU to accept and go back to
the previous menu.
Advanced Settings
20
21
Page 12

Change Input Labels
To specify which type of input goes to which device:
1. Press MENU. The main menu displays.
2. Press or to select Settings, then press OK or .
3. Press or to highlight Input Labels, then press .
4. Use or to select an input source (Composite,
S-Video, Component, etc.), then press or to chose
the type of device connected to that source.
VCR DVD Set Top Box Satellite Cable Box Game PC Others
5. Repeat step 4 for each input source you want to label, then press MENU to go back to
the previous menu.
Reset to Factory Defaults
1. Press MENU. The main menu displays.
2. Press or to select Settings, then press OK or .
3. Press or to select Reset, then press OK or .
4. Press or to choose Yes or No, then press OK.
default.
n Note: Resetting to factory defaults will not erase
channel settings. See “Channel Settings” on page 17.
Change PC Settings
n Note: These steps will only work if a PC is connected, and the Source is set to VGA/PC.
1. Press SOURCE and scroll to VGA, then press OK.
2. Press MENU. The main menu displays.
3. Press or to select Settings, then press OK or .
4. Press or to select PC Settings, then press OK
Advanced Settings
or .
5. Press or to choose Horizontal Position,
Vertical Position, Phase, Clock, or Auto
Adjustment, then press or to change settings.
Press or to adjust the horizontal and vertical position of the screen, image
stability and focus (phase), and the clock size, then press MENU to return.
Press to begin auto adjustment. The message “Auto Adjustment in progress.
Please wait...” appears. Once the message is gone, press MENU to return.
Troubleshooting
Problem Possible Solution
No picture Make sure the power cord is plugged in.
The batteries in the remote may be dead. Replace the
batteries and try again.
The power outlet may be faulty. Plug in another device. If it
does not work, have an electrician inspect the outlet.
Check all wire connections. See page 9-13.
Make sure the TV is not set to “Audio Only.” See “Advanced
Audio Settings” on page 17. Press and hold Power button for
3 seconds to get out of “Audio Only” mode.
Picture, but no sound Adjust VOL +, VOL – or MUTE to check if the speaker is
Poor picture The antenna cable may not be connected securely.
Remote control does not
work.
Picture is too light or too
dark.
Black box on bottom of
screen
muted.
Check audio connections to make sure all cables are
plugged in.
Be sure the TV is away from appliances that might cause
interference.
In areas with poor reception, it might be impossible to get a
clear picture or any picture at all. Try moving the TV to another
room.
Try another channel. The signal might be stronger.
Replace batteries in the remote control.
Be sure batteries are installed with correct polarity.
Operate the remote control at a distance of no more than
20 ft (6 m).
Remove any obstacles between the remote control and TV.
Adjust the picture settings. See “Customize Picture
Settings” on page 15.
If Closed Captions are turned on, the program you are watching
does not have CC available. See page 21 to turn off CC.
Additional Info
22
23
Page 13

Specifications
LCD Panel
Active Screen Size ...........................................................................................................................18.5 in.
Aspect Ratio .........................................................................................................................................16:9
Resolution ....................................................................................................................... 1366 (H) × 768 (V)
Color Depth ...........................................................................................................................16.7M Colors
Brightness ..................................................................................................................................250 cd/m2
Contrast Ratio (Static) ......................................................................................................................1000:1
Viewing Angle ................................................................................................. 170º horizontal, 160º vertical
Response Time (Gray to Gray) .............................................................................................................5 ms
Inputs ................. Composite, S-video, Component, VGA, Tuner (RF), HDMI, USB (firmware updates only)
Tuner .........................................................................................................................................ATSC/NTSC
DTV .............................................................................................................................................Air / Cable
PC-RGB (Optimum) .......................................................................................................1360 × 768 @60Hz
Speaker ...............................................................................................................................2.8W × 2 RMS
Dimensions (L × D × H) ..................................................................18 x 7.9 x 13.1 in (45.6 x 20 x 33.4 cm)
Weight ...................................................................................................................................10 lbs (4.5 kg)
Specifications are subject to change and improvement without notice. Actual product may vary from the
images found in this document.
FCC Information
This equipment has been tested and found to comply with the limits for a Class B digital device, pursuant
to Part 15 of the FCC Rules. These limits are designed to provide reasonable protection against harmful
interference in a residential installation. This equipment generates, uses and can radiate radio frequency
energy and, if not installed and used in accordance with the instructions, may cause harmful interference
to radio communications. However, there is no guarantee that interference will not occur in a particular
installation. If this equipment does cause harmful interference to radio or television reception, which can
be determined by turning the equipment off and on, the user is encouraged to try to correct the interference by one or more of the following measures:
Reorient or relocate the receiving antenna.
Increase the separation between the equipment and receiver.
Connect the equipment into an outlet on a circuit different from that to which the receiver is connected.
Consult the dealer or an experienced radio/TV technician for help.
Changes or modifications not expressly approved by Ignition L.P. may cause interference and void the
user’s authority to operate the equipment.
This device complies with Part 15 of the FCC Rules. Operation is subject to the following two conditions:
(1) This device may not cause harmful interference, and (2) this device must accept any interference
received, including interference that may cause undesired operation.
Limited Warranty
This product is warranted against defects in materials and workmanship under normal use by the original
purchaser for one (1) year after the date of purchase from an authorized retailer. THERE ARE NO OTHER
WARRANTIES.
This warranty does not cover: (a) damage or failure caused by or attributable to abuse, misuse, failure to
follow instructions, improper installation or maintenance, alteration, accident, or excess voltage or current;
(b) improper or incorrectly performed repairs by non-authorized service facilities; (c) consumables such as
fuses or batteries; (d) ordinary wear and tear or cosmetic damage; (e) transportation, shipping or insurance
costs; (f) costs of product removal, installation, set-up service, adjustment or reinstallation; and (g) claims
by persons other than the original purchaser.
Should a problem occur that is covered by this warranty, take the product and the original sales receipt
as proof of purchase date to the place of purchase. The product, at the warrantor’s option, unless
otherwise provided by law: (a) be repaired without charge for parts and labor within 90 days from the date
of purchase from an authorized retailer; (b) be replaced with the same or a comparable product; or (c) a
refund of the purchase price will be provided. All replaced parts and products, and products on which a
refund is made, become the property of the warrantor. New or reconditioned parts and products may be
used in the performance of warranty service. Repaired or replaced parts and products are warranted for
the remainder of the original warranty period. You will be charged for repair or replacement of the product
made after the expiration of the warranty period.
ALL IMPLIED WARRANTIES, INCLUDING THE IMPLIED WARRANTY OF MERCHANTABILITY AND, IF
APPLICABLE, THE IMPLIED WARRANTY OF FITNESS FOR A PARTICULAR PURPOSE, SHALL EXPIRE
ON THE EXPIRATION OF THE STATED WARRANTY PERIOD.
EXCEPT AS DESCRIBED ABOVE, THE WARRANTOR SHALL HAVE NO LIABILITY OR RESPONSIBILITY
TO THE PURCHASER OF THE PRODUCT OR ANY OTHER PERSON OR ENTITY WITH RESPECT TO
ANY LIABILITY, LOSS OR DAMAGE CAUSED DIRECTLY OR INDIRECTLY BY USE OR PERFORMANCE
OF THE PRODUCT OR ARISING OUT OF ANY BREACH OF THIS WARRANTY, INCLUDING, BUT NOT
LIMITED TO, ANY DAMAGES RESULTING FROM INCONVENIENCE AND ANY LOSS OF TIME, DATA,
PROPERTY, REVENUE, OR PROFIT AND ANY INDIRECT, SPECIAL, INCIDENTAL, OR CONSEQUENTIAL
DAMAGES, EVEN IF THE WARRANTOR HAS BEEN ADVISED OF THE POSSIBILITY OF SUCH DAMAGES.
You may contact the warrantor at:
Omni Warranty International Corp.
Midwest Division, 4141 East 96th Street, Indianapolis, IN 46240
Hotline: 1-866-358-6049
License Notice: Manufactured under license from Dolby Laboratories.
Trademark Acknowledgment: ”Dolby” and the double-D symbol are trademarks of Dolby Laboratories.
Additional Info
Product 19” LCD HDTV
Model 16-912
Additional Info
Responsible
Party
Phone 866-315-0426
Ignition L.P.,
3102 Maple Ave. Suite 450
Dallas, TX 75201
24
25
Page 14

T H E P E R F O R M A N C E Y O U N E E D
TM
19” LCD HDTV
Protect the environment by recycling used electronics. Go to
E-CyclingCentral.com to find an electronic recycling center near you.
User’s Guide 16-912
Get more from your audio and video equipment. See
what you’ve been missing. With Auvio, you control the
experience.
Auvio was established by a group of technophiles to
provide high quality audio and video products without
the high sticker price. The Auvio philosophy is for you
to experience audio and video as it was intended to be:
pure and distortion free.
We know electronics can be intimidating. Auvio simpli-
fies your experience by providing the right products,
with the right specs, to work with your equipment.
Be confident about your purchase: your new Auvio product
incorporates the latest technology, is built to the highest
quality standards, and reduces environmental impact by
complying with RoHS environmental restrictions.
© 2009. Ignition L.P. All rights reserved. Auvio is a trademark used by Ignition L.P.
Package and user’s guide are recyclable. User’s guide contains recycled material.
Please read this user’s guide before using your new TV.
Printed
in China
10A09
16-912
 Loading...