

Page 1

16-830 .fm Page 1 Wednesday, July 21, 1999 9:32 AM
Cat. No. 16-830
OWNER’S MANUAL
Please read before using this equipment.
MODEL 130 MOVIECORDER
Camcorder
‰
Page 2

g
j
g
y
y
g
g
g
g
y
y
g
y
g
g
y
g
y
y
ying
y
g
g
g
y
g
g
y
g
y
y
g
g
g
g
g
y
y by
g
y
y
y
g
g
y
y
16-830 .fm Page 2 Wednesday, July 21, 1999 9:32 AM
FEATURES
Your Optimus Model 130 MovieCorder camcorder combines all the features of a video
camera and a portable VCR in one lightweight
package. Using standard V HS cas set tes, you
can record and play back home movie s anywhere. The low-light (1 lux) CCD imager
makes special lighting unnecessary in most
situations.
You can also use t he c am corder as a VCR to
play back a tape or copy to a VCR.
This camcorder has many special features
that make operation simple, convenient, and
versatile. Be sure to read this manual carefully
and completely so you can understand and
enjoy all of your camcorder’s features.
The camcorder has these features.
CCD Ima
tion picture, even in low-light conditions (down
to 1 lux ) .
Electronic Viewfinder with Ad
— lets you monitor th e picture during re-
cus
cording and playback.
12-to-1 Power Zoom
from wide-angle to telephoto shots. You con trol the zoom rate by the am ount of pressure
you place on the buttons.
Di
ital Zoom Enhancement
magnification of the power zoom up to 2 times
(to 24-to-1).
Fuzz
corder to focus and adjust to different lighting
conditions, much like the human eye.
Automat ic Focusin
full-range focusing from
sharp, clear picture in almost all situations.
You can also focus the camcorder on close
objects for stunning detail.
Zoom Autom atic Fo cusin
— provides a clear, high-resolu-
er
— lets you go smoothly
— increases the
Logic Circuitr
— enables the cam-
— provides automatic,
3
/8 inch to infinity for a
— automatically
ustable Fo -
Power Sources
source in dicated o n its ma rkin
home's power t
compan
Polarization
plu
(a plug having one blade wider than the other). Thi s plug will
fit in the power outlet onl
cannot in sert the plu
the plu
still doesn't fit, contact your electrician to replace your ob solete outlet. Do not defeat the safet
plu
. If you need an extension, use a pol arized cord.
Power-Cord Protection
not likel
them, pa
ceptacles, and the point where the
Lightning
storm, or when it is left unat t ended and unused for l ong peri-
nin
ods of time, unplu
na or cable s
htning and power- l i ne surges.
li
Overloadi ng
ral convenience receptacles, as this can result in a risk of fire
inte
or electric shock.
Objects and Liquids
product t hrou
points or short out parts that could result in a fire or electric shock.
Never spill liquid of an
Servicing
or removing covers may expose you to dangerous voltage
openin
or other hazards. Refer all servicin
Damage Requiring Service
outlet an d refe r serv icin
followin
• When the power-suppl
• If liquid has been spilled or objects have fallen into the product.
• If the product has been exposed to rain or water.
• If the product does not operate nor m al l
atin
instructions. Adjust only those c ontrols tha t are cover ed
the operating instructions, as an improper adjustment of
b
other controls ma
extensiv e work b
to normal operatio n.
• If the prod uct has been dropped or dama
• When the product exh ib i ts a di stinct chan
Replacem ent P art s
sure the servic e technician uses replacement parts specified b
the manufacturer or having the same characteristics as the original
part. Unaut horized su bstitut ions ma
or other hazards.
— Operate this product usin
pe, consult your product dealer or local power
.
— This product is equipped with a polarized AC line
fully into the outlet, try revers ing the plug. If
to be walked on or pinched by items plac ed on or against
particular attention to cords at plugs, convenience re-
— For add ed prot ectio n for t his p rod uct duri n
it from the wall outlet and disconnect the anten-
stem. This will prevent damage to the product due to
— Do not ov er load wall outle ts, exte nsi on co rds, or
— Never push ob jects of an
h openings, as they may touch dangerous voltage
— Do not attempt to service this product
conditions:
result in damage and will often require
a qua lified tec hnic ian to r esto re the p roduc t
— When replac eme nt par ts ar e re quired, be
label. If you are not s ure of your
one way. This is a safety feature. I f you
purpos e of the polari zed
— Rou te po we r-s up pl
exit from the product.
kind on the product.
to qualified service personnel.
—Unplu
to qualifie d se rvi ce per sonne l under t he
cord or plug is damaged.
this product from th e wall
result in fire, electric shock,
only the power
cords so they are
a light-
kind into this
ourself, as
following the oper-
ed in any way.
e in performance.
!
2
CAUTION
!
Page 3
y
g
g
y
g
g
y
y
g
g
g
g
g
g
y
g
g
g
g
y
g
y
g
g
g
g
y
y
y
g
y
y
y
g
y
y
g
y
16-830 .fm Page 3 Wednesday, July 21, 1999 9:32 AM
Safety Che ck
product, ask the se rvice t echn icia n t o perf orm safe t
determine that the product is in proper operatin
Wall or Ceiling Mount
wall or ceilin
Heat
— The product should be situated awa
such as r ad iators , he at r e
cludin
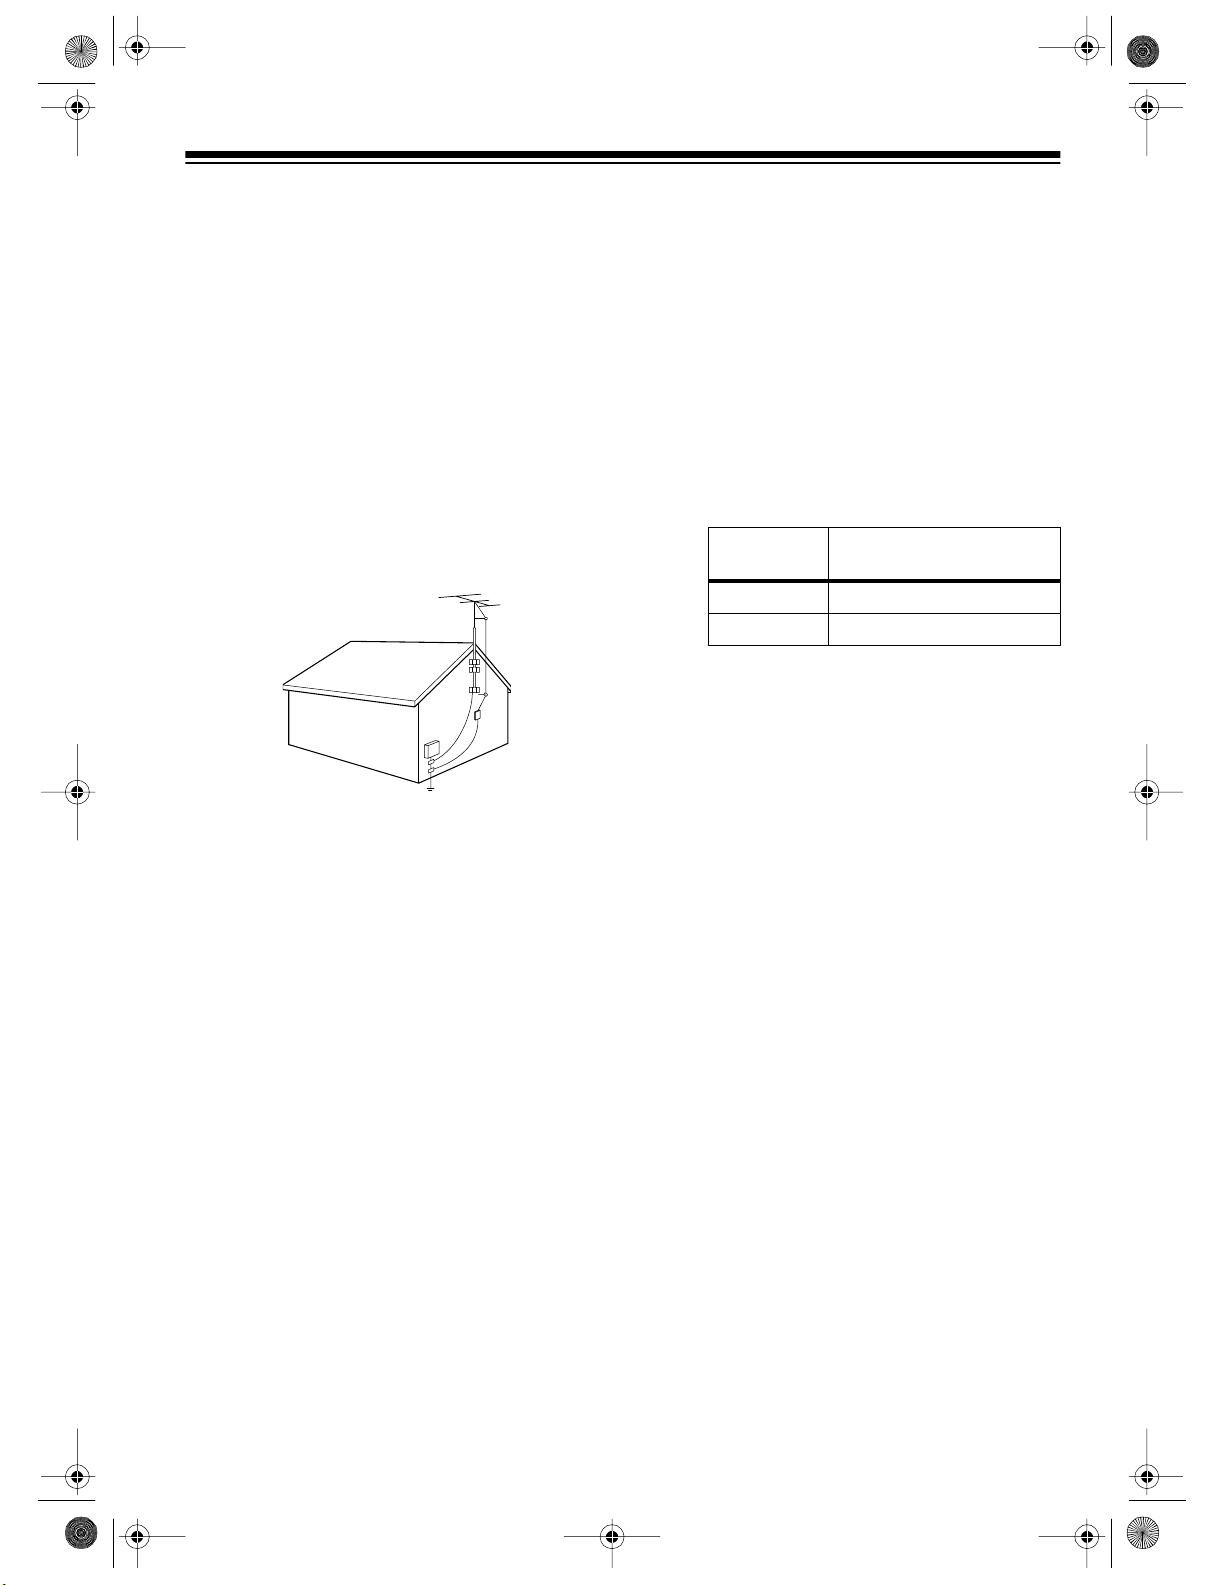
Outdoor Antenna Grounding
stem is con nec ted t o the vid eo pro duc t, be s ure the a ntenn a
s
or cable s
a
ainst voltage surges and built-up st at i c charges. Section 810
of the Nati onal Elect rical Code ,
mation with respect to pro per
portin
dischar
nas-disc har
quirements for the
Power Lines
ed in the vicinit
— Upon com pletion of ser vice or repairs to th is
checks to
condition.
— The produc t should be mounted to a
only as recommended by the manufacturer.
from heat sources
isters, stoves, or other products (in-
amplifiers) that produce heat.
— If an outside antenna or cable
stem is grounded so as to p rovide some pr otectio n
ANSI/NFPA 70
, provides inf or-
rounding of the mast and sup-
structure, grounding of the lea d-in wire to an a ntenna
e unit, size of grounding conductors, location of anten-
e unit, connection to grounding electrodes, and re-
rounding electrode. See the example below.
— An outside antenna system should not be locat-
of overhead power lines or other electric light or
power ci rcuits or wh ere it c an fal l into such power lines or cir cuits. When installin
should be taken to keep from touchin
power line s or circui ts as conta ct wit h them mi
stallin
an outdoor antenna can be hazardous and should be left
an outside ant enna system, ext rem e care
or ap proaching such
ht be fa tal. In -
to a professional antenna installer.
Do not operate the A C adapter/charger with a dam-
5.
aged power-supply cord or pl ug.
vice technician replace them immediatel
Do not us e an ext ension c ord unl ess abs olutely ne c-
6.
essary.
Use of an improper exten si on cord could re sult in
a risk of fire a nd elect ric shock. If
Have a qualified ser-
.
ou use an extensi on
cord, make sure t hat:
A. The pins on the extension cord’s plu
are the same
number, size , and shap e a s th ose o f th e p ower- su p-
plug on the AC adapter/charger.
pl
B. The extension cord is properl
wired and in good
electric al condition.
C. You use an extension cord with the followin
sizes:
MINIMUM SIZE
(AWG GAUGE)
18 Equal to or less than 100
16 Equal to or less than 150
Do not operate the AC adapter/charger if it has
7.
LENGTH OF EXTENSION CORD
(FEET)
received a sharp blow, been dropped, or otherwise
damaged in any way.
Take it to a qualified service techni-
cian.
Do no t disassemble th e AC adapter/charger.
8.
a qualified service technician when service or repair is
required. Incorrect reassembl
may result in a risk of elec-
tric shock or fire.
9. To reduce risk of ele ctric shoc k,
unplug the AC adapter/
charger from the wall outlet before attempting any
mainten an ce or cleanin g .
wire
Take i t to
AC ADAPTER/CHARGER
Save these instructions
1.
and operati ng instructions for the video produc t’s
safet
supplied A C adapter/char
Before using the video product’s AC adapter/ charger
2.
— read all instructions and cautionar
adapter/char
usin
To reduce risk of injury —
3.
to char
batter
batteries ma
To reduce risk of damage to the power-supply cord or
4.
plug —
er, battery pack, and the video product
the batte ry pack.
e only the suppl i ed batte ry pack or a replacem ent
pack VM-BP64/BP65/BP66/BP67. Other types of
burst caus i ng person al in j ury and damage.
do not p ull the pow er-supp l
the AC adapter/char
power-suppl
plug.
— This page contain s im portant
er.
markings on the AC
use the A C adapt er/cha r
cord to disconnect
er from the wall outlet. Pull the
er
3
Page 4

g
g
g
g
16-830 .fm Page 4 Wednesday, July 21, 1999 9:32 AM
CONTENTS
Before Yo u Begin ........................................................................................................................... 8
Supplied Accessories ................................................................................................................ 8
Optional Accessories ................................................................................................................ 8
Moisture Condensation ............................................................................................................. 9
Quick Start ................................................................................................................................... 10
Viewfinder Playback ............................................................................................................ .... 11
Selectin
Preparin
Special Video Recordin
a Power Source .......................................................................................................... 12
Using the Battery Pack .......................................................................................................... . 12
Charging the Battery Pack ............................................................................................... 12
Attaching the Battery Pack To The Camcorder ................................................................ 13
Removing the Battery Pack From The Camcorder ........................................................... 13
Battery Status Indicators .................................................................................................. 13
Replacing the Battery Pack While Recording ................................................................... 13
Battery Usag e Hint s ....... ......... .......................... ............................................................... 14
Using the AC Adapter/Charger ............................................................................................... 14
Using an Optional DC Adapter ................................................................................................ 15
the Camcorder for Use .............................................................................................. 16
Inserting/Removing a Video Cassette ..................................................................................... 16
Setting the Power Switch ........................................................................................................ 16
Preparing/Adjusting the Viewfinder ......................................................................................... 16
Setup ................................................................................................................................ 17
Adjustment ....................................................................................................................... 17
Setting/Changing the Date and Time ...................................................................................... 18
Attaching the Shoulder Strap .................................................................................................. 19
Features ............................................................................................ 20
Auto Focusing ..................................................................................................................... .... 20
Variable Speed Power Zoom .................................................................................................. 20
Macro Focusing ...................................................................................................................... 20
Digital Zoom ............................................................................................................................ 21
Fade In and Fade Out ............................................................................................................. 21
Review .................................................................................................................................... 22
Camera Search .................. .......... ......... .................................................................................. 22
Auto Exposure ........................................................................................................................ 22
Automatic In d ex .......... .......... ......... .......... ......... ...................................................................... 22
Recording the Date and Time on a Tape ................................................................................ 23
Digital Counter ........................................................................................................................ 23
Counter Memory ............................ .. ..... ..... ..... .... ..... .. ..... ..... .. ..... .. ..... ..... .. ..... .. ..... .. ..... ..... ...... 23
Tape Remaining ...................................................................................................................... 24
Titler .................................................................................................................................. ...... 24
Creating Titles .................................................................................................................. 24
Editing Titles ..................................................................................................................... 25
Adding Titles While Recording ......................................................................................... 25
Hints for Makin
Lighting ............................................................................................................................. ...... 26
Typical Brightness of Common Situations ........................................................................ 26
Camcorder Moveme n t ................... .......... ........................................................... .................... 27
Zoom In and Zoom Out ........................................................................................................... 27
4
Better Video Tapes ......................................................................................... 26
Page 5

16-830 .fm Page 5 Wednesday, July 21, 1999 9:32 AM
Special VCR Features ................................................................................................................. 28
Visual Search .......................................................................................................................... 28
Fast Forward and Rewind ....................................................................................................... 28
Freeze Frame ......................................................................................................................... 28
Auto Tracking .......................................................................................................................... 28
Dubbing (Copying) a Tape ......................................................................... ....... ....... ....... ..... ... 29
Dubbing to the Camcorder ......................................................................... ....... ....... ..... ... 29
Dubbing from the Camcorder ............................................. ..... ....... ....... ....... ..... ....... ....... . 30
Adding Titles onto an Existing Recording ......................................................................... 31
Audio Editing ........................................................................................................................... 31
Audio/V i d e o Editing ...... ............................................................................................ ............... 32
Connecting the Camcorder to a TV ........................................................................................... 34
Using a TV for Playback ........................................................................................................ 34
TV With Audio/Video (A/V) Jacks ............. ..... .. ... .. ..... .. ... .. .. ..... ... .. .. ..... .......................... .. . 34
Standard TV ..................................................................................................................... 35
Playback ............................................................................................................................... ........ 36
Additional Information ............................................................................................................. ... 37
Troubleshooting ...................................................................................................................... 37
Care and Maintenance ................................................................................................................ 40
Handling .................................................................................................................................. 41
Servicing Your Camcorder ...................................................................................................... 41
Cleaning the Video Heads ...................................................... ....... ....... ....... ....... .......... ....... .. . 42
Erase Protection ..................................................................................................................... 42
Storing Your Video Cassettes ................................................................................................. 42
The FCC Wants You to Know ................ ......... .......... ......... .......... ........................................... 43
Specifications ......................................................................................................................... ..... 44
5
Page 6
y
g
y
y
g
16-830 .fm Page 6 Wednesday, July 21, 1999 9:32 AM
BEFORE YOU BEGIN
Please read this owner’s manual carefully. It has
been prepared to help you with initial setup procedures and in the e veryday operation of y our
camcorder.
SUPPLIED ACCESSORIES
Your camcorder includes the following accessories. Be sure to remove these items before you
store the packing material.
OPTIONAL ACCESSORIES
DC Adapter (CMC No. T16-CC70A
plies power to the camcorder from your vehicle’s
battery. Use it only in vehicles that have a 12volt negative-ground electrical system.
) — sup-
Batter
and playback during portable operation.
AC Adapter/Char
when used with the auxiliary power cord, supplies power to the camcorder from an AC outlet.
Auxiliar
camcorder to the AC adapter/charger to operate
the camcorder from AC power.
Shou lder St rap
to carry the camcorder.
— supplies power for recording
Pack
— charges the battery or,
er
Power Cord
— lets you connect t he
— provides a convenient way
RF Adapter Kit (CMC No. T16-RF71A)
you play back a tape from the camcorder
through a TV that does not have separate audio/
video input jacks. The RF adapter kit includes:
• One RF converter
• One 300- to 75-ohm matching transformer
• One 75-ohm antenna cable
Spar e Batter
Telephoto/Wide An
2339)
Filter Kit (CMC No. (please add))
Pack (CMC No. T16-BP67)
le Lens (CMC No. 16-
— lets
6
Page 7

16-830 .fm Page 7 Wednesday, July 21, 1999 9:32 AM
MOISTURE CONDENSATION
Condensation inside the camco rder can cause
tape jams or vi deo head damage. If the camcorder senses moisture,
viewfinder.
TAPE
If
first use your camcorder after moving it from a
cold area to a warm one, follow these steps.
1. Eject the cassette if one is installed.
flashes in the viewfinder, or when you
TAPE
flashes in the
2. If necessary, slide
3. Let the camcorder sit for about 1 hour
before you begin operation.
Caution:
sively hu mid areas.
Avoid using the camcorder in exces-
POWER
to
OFF
.
7
Page 8
16-830 .fm Page 8 Wednesday, July 21, 1999 9:32 AM
QUICK START
To eliminate complicated adjustments in most
situations, this camcorder has fully automatic
features for focus, white balance, and shutter
speed. All you need to do is press
The following steps outline the basic procedures
for making a recording. In many of the steps,
you are directed to a specific section of this
manual that contains more detailed information.
When operating the camcorder for the first time,
read all the steps and the suggested detailed information before you actually begin.
1. Choose and connect a power source. See
“Selecting a Power Source” on Page 10.
REC/PAUSE
.
6. Remove the lens cap and hang it on the
hand strap clip.
2. Press
STOP/EJECT
to open the cassette
compartment. Insert a standard VHS cassette, and close the compartment. See
“Inserting/Removing a Video Cassette” on
Page 16.
3. Slide
POWER
to
CAMERA
. The POWER
indicator lights. See “Setting the Power
Switch on Page 17.
If there is no cassette in the cam-
Note:
corder,
NO TAPE
appears in the viewfinder. If the cassette has its eraseprotection tab broken off,
TAPE
appears in
the viewfinder. See “Erase Protection” on
Page 39.
4. Adjust the viewfinder’s position until you
can look into it comf ortably when the back
of the camcorder rests on your right shoulder. Then adjust the focus control on the
eyepiece for the sharpest picture in the
viewfinder. See “Preparing/Adjusting the
Viewfinder” on Page 14.
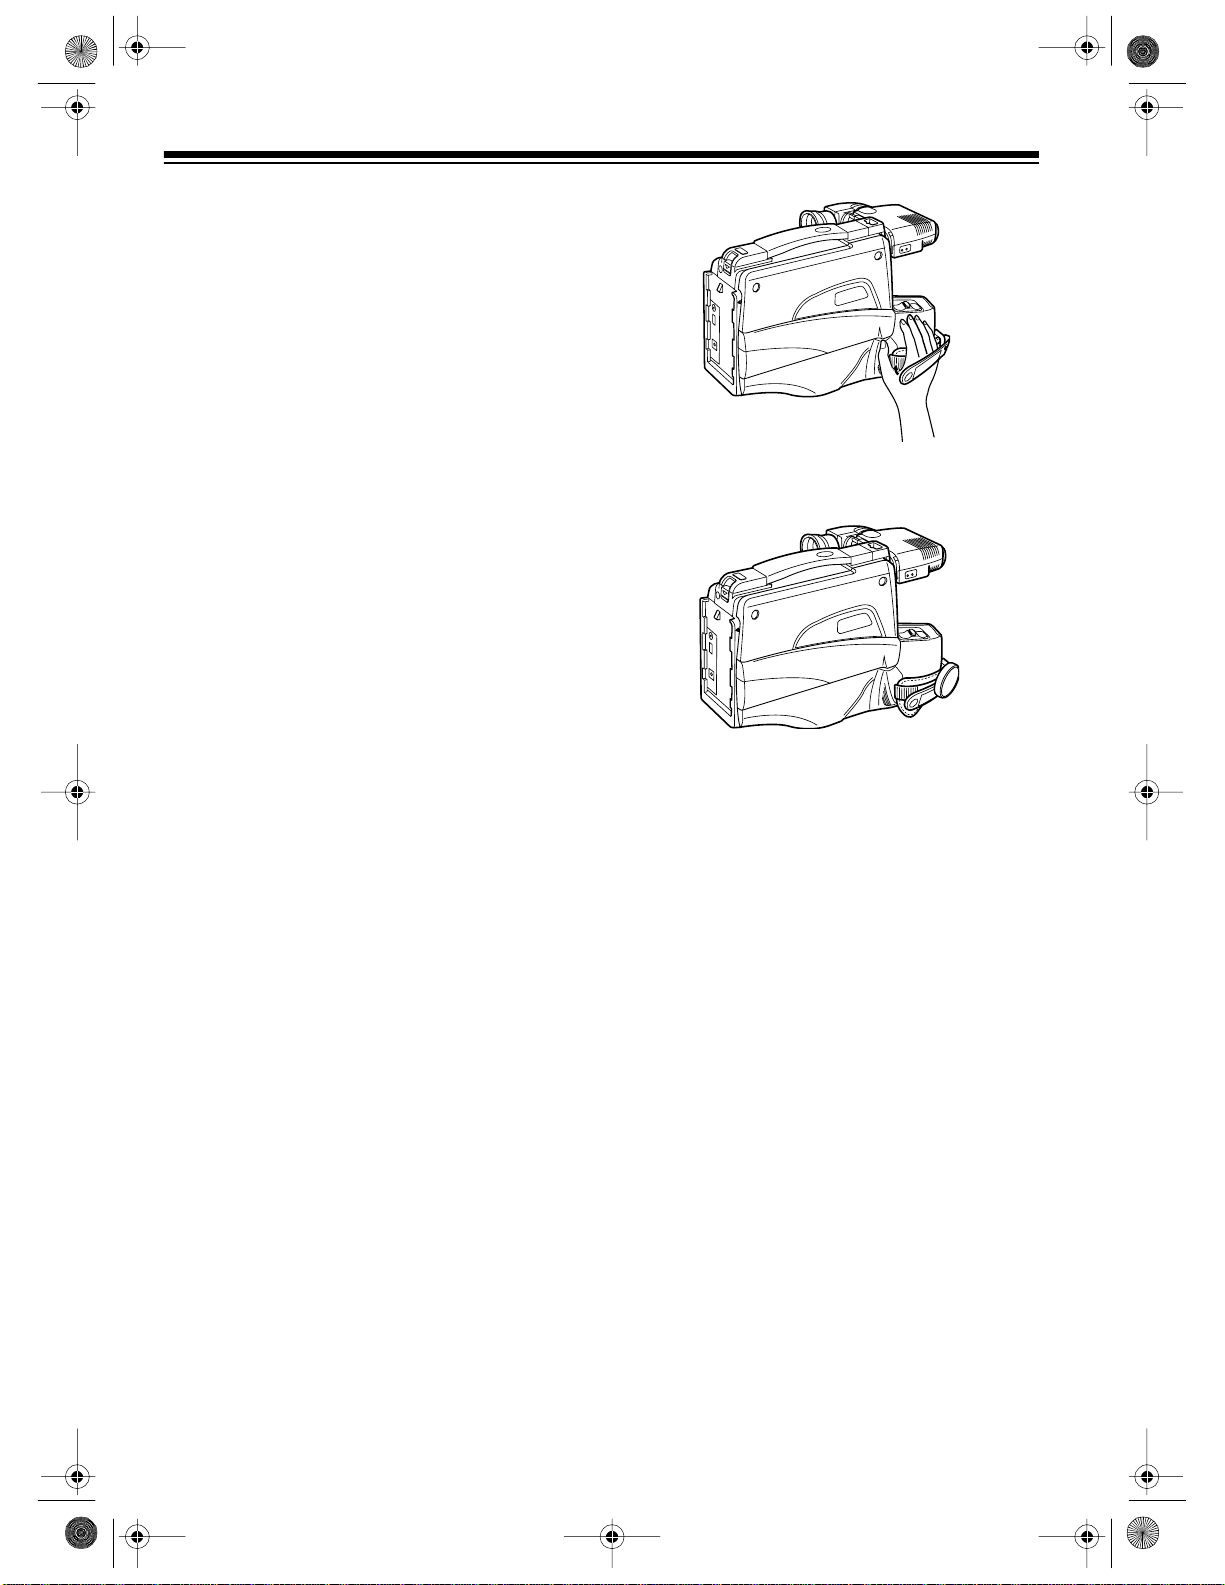
5. Place your right hand between the hand
strap and the camcorder. Then adjust the
hand strap so it fits tightly over your hand.
If the strap is too loose, the cam-
Note:
corder is difficult to handle.
7. Point the camcorder at the desired subje ct,
then press
W
or T on the power zoom control until you see the de sired picture in the
viewfinder. See “Variable Speed Power
Zoom” on Page 21.
8. To begin recording, press
REC/PAUSE
with
your right middle finger. During recording,
REC
appears in the viewfinder with arrows
above it to show the direction of tape travel.
When about 5 minutes or less
Note:
remain on the tape,
TAPE END
flashes in
the viewfinder.
9. To pause the tape, press
REC/PAUSE
again. The tape pauses, t he arrows disappear, and appears in the viewfinder.
To continue recording, press
REC/PAUSE
again.
8
Page 9

16-830 .fm Page 9 Wednesday, July 21, 1999 9:32 AM
Notes:
• To protect the tape and conserve battery
power, the camcorder turns itself off if you
pause the tape for mo re th an 5 minutes. To
turn the camcorder back on, press
PAUSE
.
REC/
• For more information about recording with
your camcorder, be sure to read all the sections under “Special Video Recording Features” on Page 18.
VIEWFINDER PLAYBACK
After you make a recording, you can play it back
through the viewfinder. (Of course, you can also
STOP/EJECT
press
in any VHS VCR).
, remove the tape, and play it
1. Slide
POWER
to
VCR
. The POWER indica-
tor lights.
2. Press
REWIND
to return the tape to the
beginning or to the place where you want to
begin playback. See “Digital Counter” on
Page 21.
3. Press
PLAY
and watch the picture in the
viewfinder. See “Special VCR Features” on
Page 26.
Note: You cannot hear the tape’s audio
recording during viewfinder playback. To
hear sound, play the tape through a TV/
monitor or on a VCR. See “Connec ting the
Camcorder to a TV” on Page 32.
4. Press
5. To remove the cassette, press
STOP/EJECT
to end playback.
STOP/EJECT
again.
Note: Except when you are recording, you
can eject a cassette any time power is connected to the camcorder, whether or not the
POWER indicator is lighted.
9
Page 10
16-830 .fm Page 10 Wednesday, July 21, 1999 9:32 AM
SELECTING A POWER SOURCE
You can power the camcorder from any of three
sources — the sup plied battery pack, the supplied AC adapter/charger, or your vehicle’s battery (with an optional DC adapter, not supplied).
Your camcorder has a built-in recharge-
Note:
able battery in addition to the battery pack. This
battery protects the camcorder’s date and time
and any titles you created (see “Titler” on Page
22.). You should recharge this battery about every 2 months. To recharge the battery, slide
POWER to OFF
nected to the camcorder for about 24 hours.
and leave a powe r source con-
USING THE BATTERY PACK
You can power the camcorder using the supplied battery pack. Howe ver, you must charge
the battery pack before you use it.
Charging the Battery Pack
Caution:
charger to charge the battery pack. Use of any
other adapter/charger could damage the battery
pack. Also, do not use the AC adapter/charger
to charge any battery pack other than the type
supplied.
Follow these steps to charge the battery pack
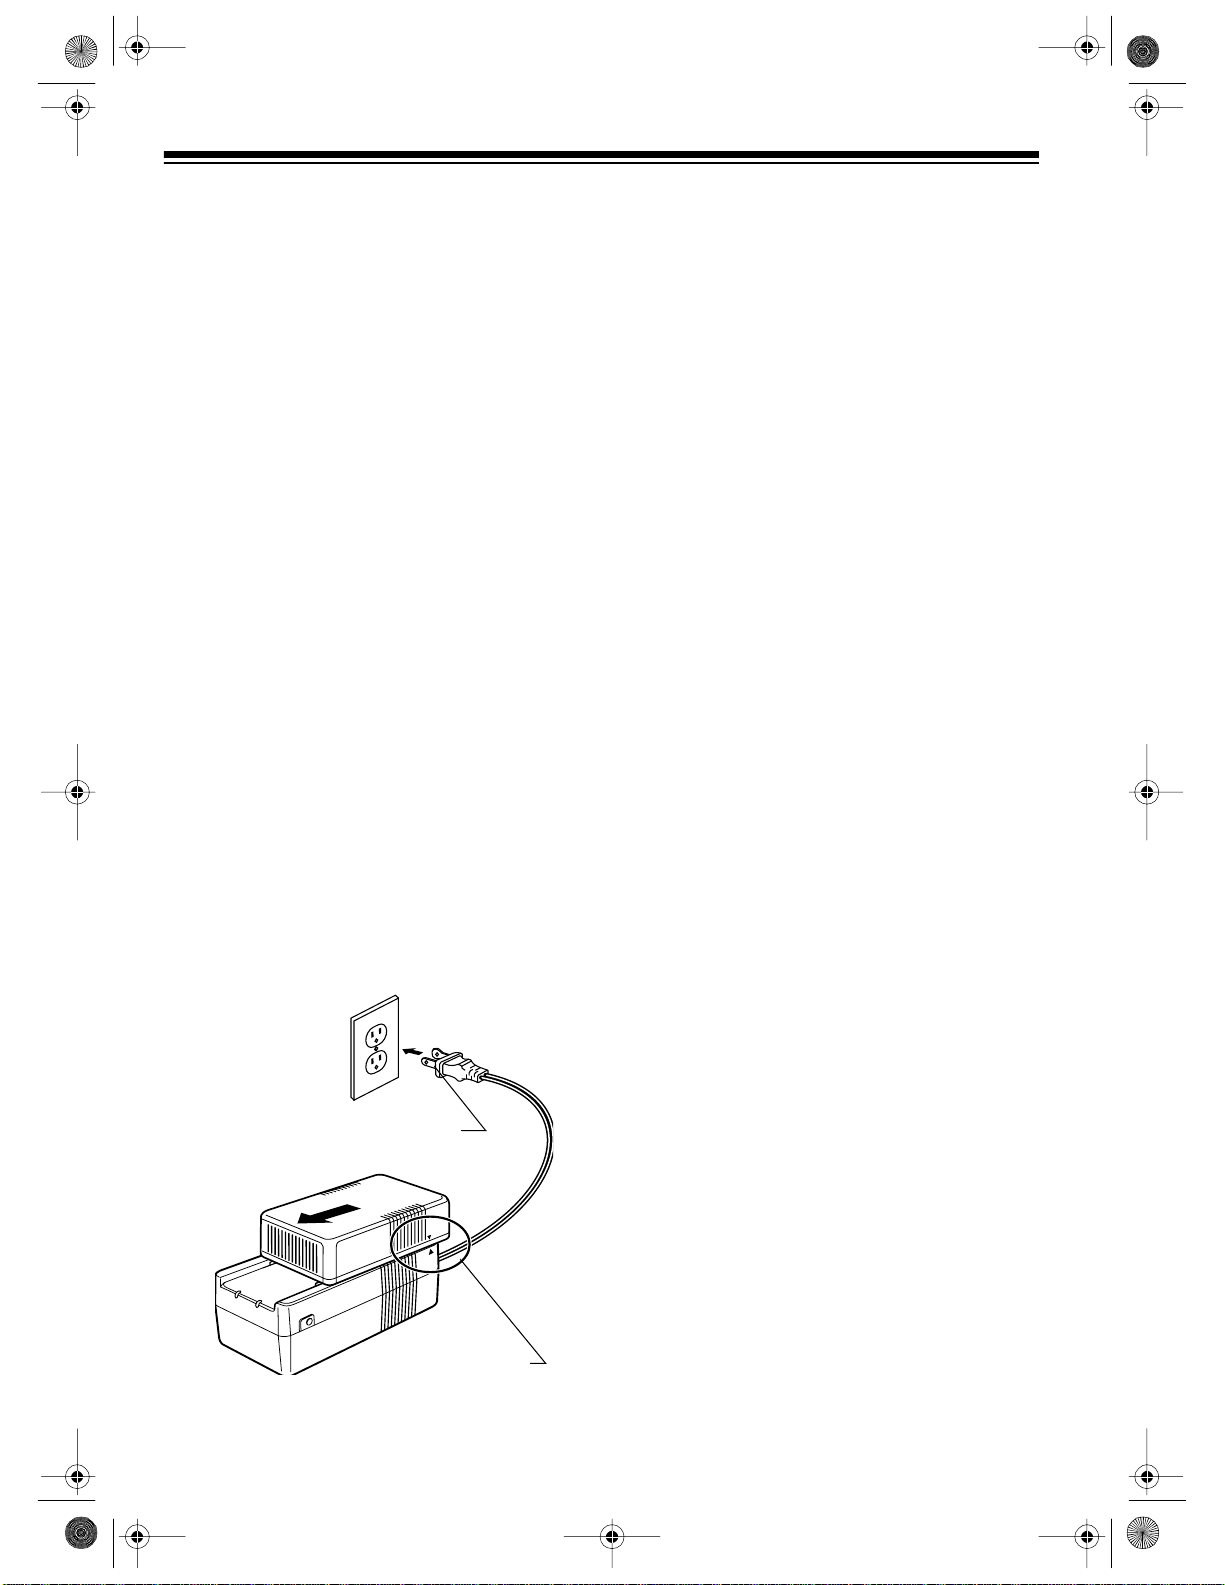
with the supplied AC adapter/charger.
Use only the supplied AC adapter/
1. Make sure the auxiliary power cord is not
connected to the AC adapter/charger.
The battery pack will not charge if the
Note:
auxiliary power cord is connected to the AC
adapter/charger.
2. Align the marks on both sides of the battery
pack with the marks on both sides of the
AC adapter/charger.
3. Gently press the battery pack against the
AC adapter/charger, then slide the battery
pack toward you until it locks into place.
Caution:
way onto the AC adapter/charger. Do not
force it.
4. Plug the AC adapter/charger ’s power cord
into a standard AC outlet. The POWER and
CHARGE indicators on the AC adapter/
charger light, and charging begins. When
the battery pack is fully charged, the
CHARGE indicator turns off.
Caution:
it cools before connecting it to the AC
adapter/charger. Otherwise, the CHARGE
indicator might not light.
Notes:
• If the POWER and CHARGE indicators
on the AC adapter/charger flash, remo ve
the battery pack from the AC adapter/
charger, then re-attach it. If both indicators continue to flash, you need a new
battery pack.
The battery pack fits only one
If the battery pack is hot, wait until
10
To AC Outlet
Alignment Marks
• It takes about 2 ho urs to fully charge the
battery pack, but th e exac t c harging time
depends on the ambient temperature
and the condition of the battery pack.
5. When the battery pack is fully charged,
remove it from the AC a dapter/charger by
sliding it away from you. Then disconnect
the AC adapter/charger from the AC outlet.
Page 11

▲
▲
▲
▲
▲
▲
▲
▲
▲
▲
▲
▲
16-830 .fm Page 11 Wednesday, July 21, 1999 9:32 AM
Attaching the Battery Pack to the
Camcorder
Alignment Marks
1. Align the marks on both sides of the battery
pack with the marks on the sides of the
camcorder.
2. Gently press the battery pack against the
camcorder, then slide the battery pack
down until it clicks and locks in place.
Caution:
way onto the camcorder. Do not force it.
The battery pack fits only one
tery pack. You might damage the tape if
you remove the battery pack during rec ording or playback.
Battery Status Indicators
120050345089
When the battery pack is fully charged,
appears in the viewfinder when you slide
CAMERA
ER
to
.
As the battery’s power is used, appears in
the viewfinder. When the battery is low,
blinks in the viewfinder. Then, after a few seconds, the camcorder turns itself off. Recharge
the battery pack or power the cam corder from
the supplied AC ad apter/charger or an opt ional
DC adapter.
You can order additional battery packs
Note:
from your local Radio Sha ck store so you can
use one battery while you charge another.
▲
▲
▲
▲
▲
▲
POW-
▲
▲
▲
Removing the Battery Pack
from the Camcorder
BATTERY
1. Slide
POWER
corder.
2. While pressing and holding down
slide the battery pack up to remove it.
Caution:
Always stop the t ape and turn off
the camcorder before you remove t he bat-
to
OFF
to turn off the cam-
BAT TERY
Replacing the Battery Pack
While Recording
You can replace the battery pack with a fresh
one while recording.
1. If flashes in the viewfinder during
2. If the camcorder is still on, slide
3. Remove the old battery pack and attach a
4. Slide
,
5. Press
▲
recording, press
REC/PAUSE
recording.
OFF
. The POWER indicator turns off.
Caution:
Be sure the POWER indicator is
off before you remove the battery pack.
fresh one.
POWER
to
CAMERA
. The POWER
indicator turn s o n.
REC/PAUSE
to continue recording
from the same place as before.
to stop
POWER
to
11
Page 12
16-830 .fm Page 12 Wednesday, July 21, 1999 9:32 AM
Battery Usage Hints
• Recording with many starts and stops, frequent zooming, and recording in low temperatures might shorten battery life. Be
sure to slide
OFF
when not recording.
• Do not use the camcorder with a low or discharged battery pack attached. This might
cause the camcorder to automatically stop
during recording or playback, possibly
damaging the tape, battery pack, and ca mcorder.
• The c amcorder consumes a small am ount
of battery power even when
OFF
to
. If you are not going to use the ca mcorder for a long time, remove the battery
pack from the camcorder.
• Recharge the battery pack immediately
after you record. Leaving the battery discharged can damage it, preventing further
recharging and use.
• If you recharged the battery pack then
stored it for a long period of time, recharge
it again before you con nect it to the camcorder. Batteries stored for an extended
time lose some power, resulting in
decreased battery life and recording time.
POWER
on the camcorder to
POWER
is set
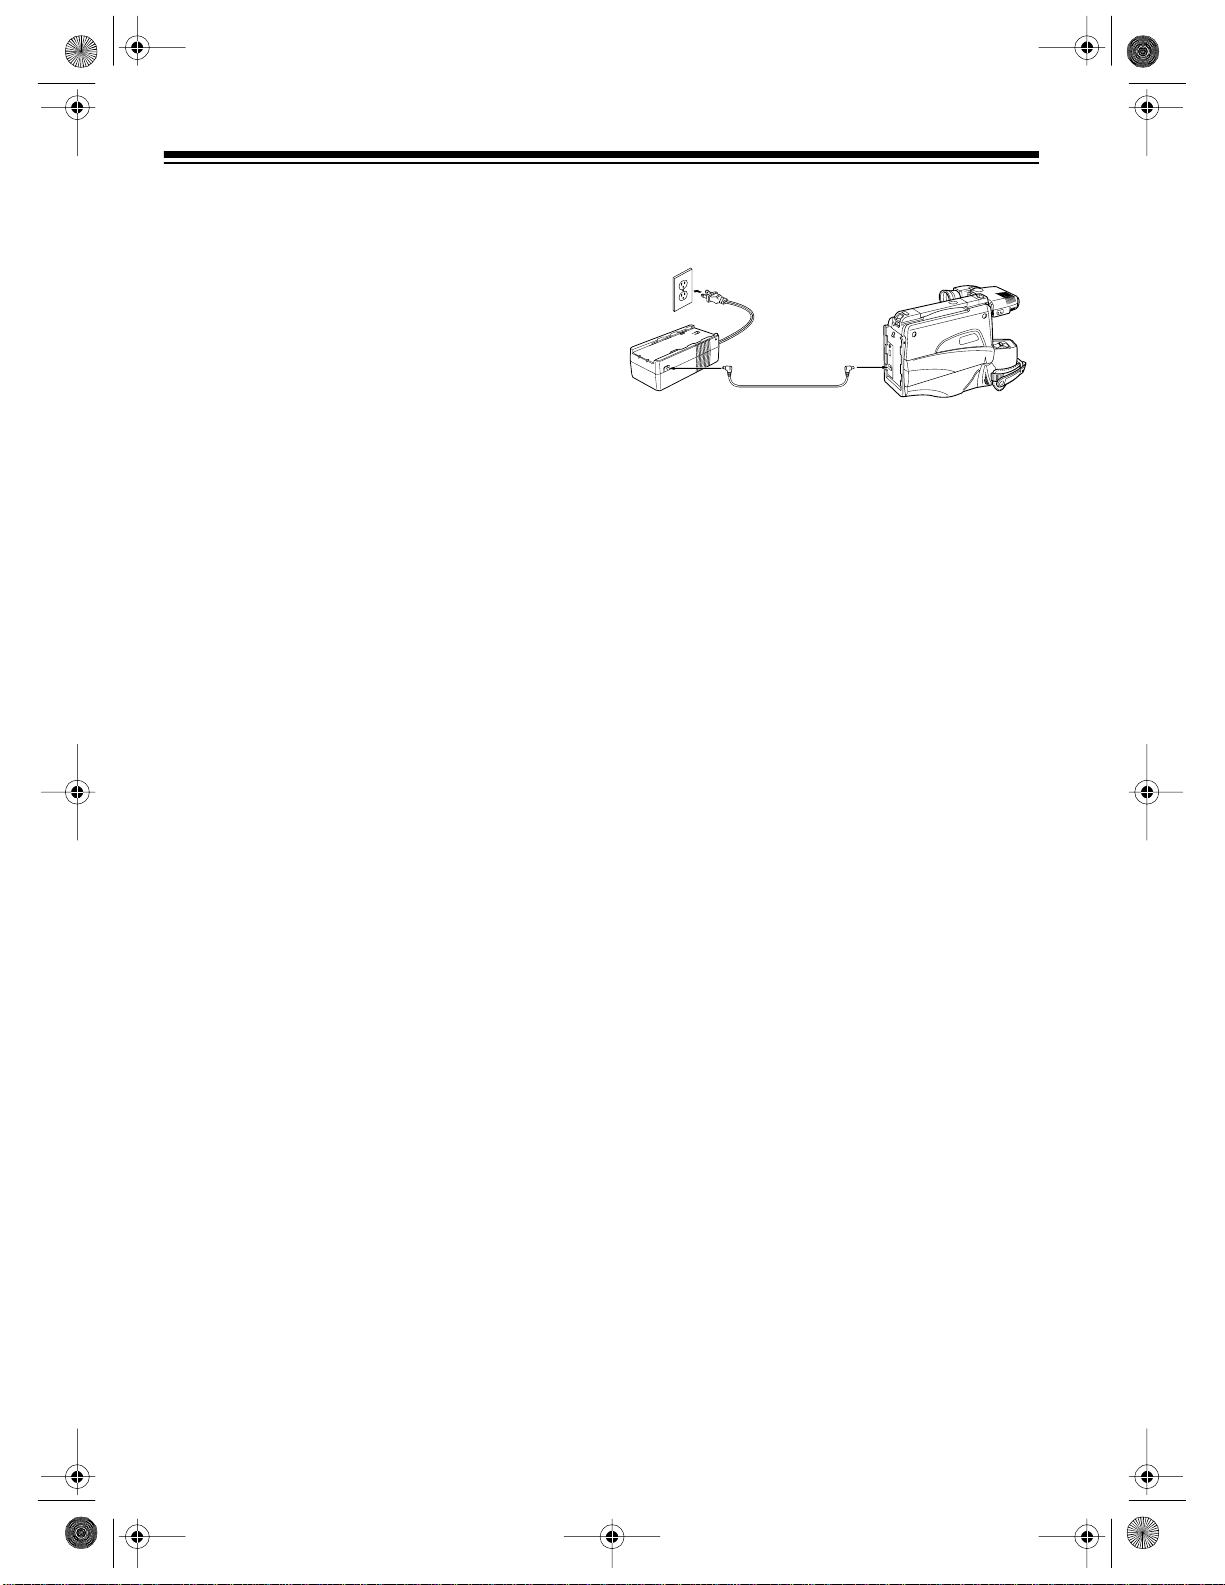
USING THE AC ADAPTER/
CHARGER
1. Connect one end of the supplied auxiliary
power cord to t he AC adapter/charger’s
OUTPUT
2. Connect the other end of the auxiliary
power cord to the
the camcorder.
3. Plug the AC adapter/charger ’s power cord
into an AC outlet.
Caution:
specially designed for use with your camcorder.
Never use it to power any other device
jack.
DC IN
jack on the back of
The supplied AC adapter/charger is
DC
• Recharge the battery pack at least once
every 6 months, even when it is not used.
• Store the battery pack in a dry, cool place.
Important:
able lead-acid battery. At the end of the battery’s
useful life, it must be recycled or disposed of
properly. Contact your local, county, or state
hazardous waste management authorities for
information on recycling or disposal programs in
your area. Some options that might be available
are: municipal curb-side collection, drop-off boxes at retailers, recycling collection c enters, and
mailback programs.
12
This product contains a recharge-
Page 13

16-830 .fm Page 13 Wednesday, July 21, 1999 9:32 AM
USING AN OPTIONAL DC
ADAPTER
You can use a DC adapter (CMC No. T16CC70A, not supplied) to power your camcorder.
Cautions:
• Your vehicle must have a 12-volt, negat iveground electrical system.
• The recomm ended DC adapter is specially
designed for use with your camcorder.
Never use it to power any other device.
• Use only the re commended D C adapter to
power the camcorder from your vehicle.
Using a DC adapter other than the recommended DC adapter could seriously damage your camcorder and the DC adapter.
• Always connect the DC adapter to the camcorder before you plug it into your vehicle’s
cigarette-lighter socket, and unplug the DC
adapter from the cigarette-lighter socket
before you unplug it from the camcorder.
Follow these steps to power the camcorder from
your vehicle’s battery:
1. Connect the DC adapter’s barrel plug to the
DC IN
jack on the back of the camcorder.
2. Plug the DC adapter into your vehicle’s cigarette-lighter socket.
Notes:
• Be sure to p ush the plug c ompletely into
the cigarette-lighter socket.
• Be sure the socket is free from ashes
and other debris.
13
Page 14
16-830 .fm Page 14 Wednesday, July 21, 1999 9:32 AM
PREPARING THE CAMCORDER FOR USE
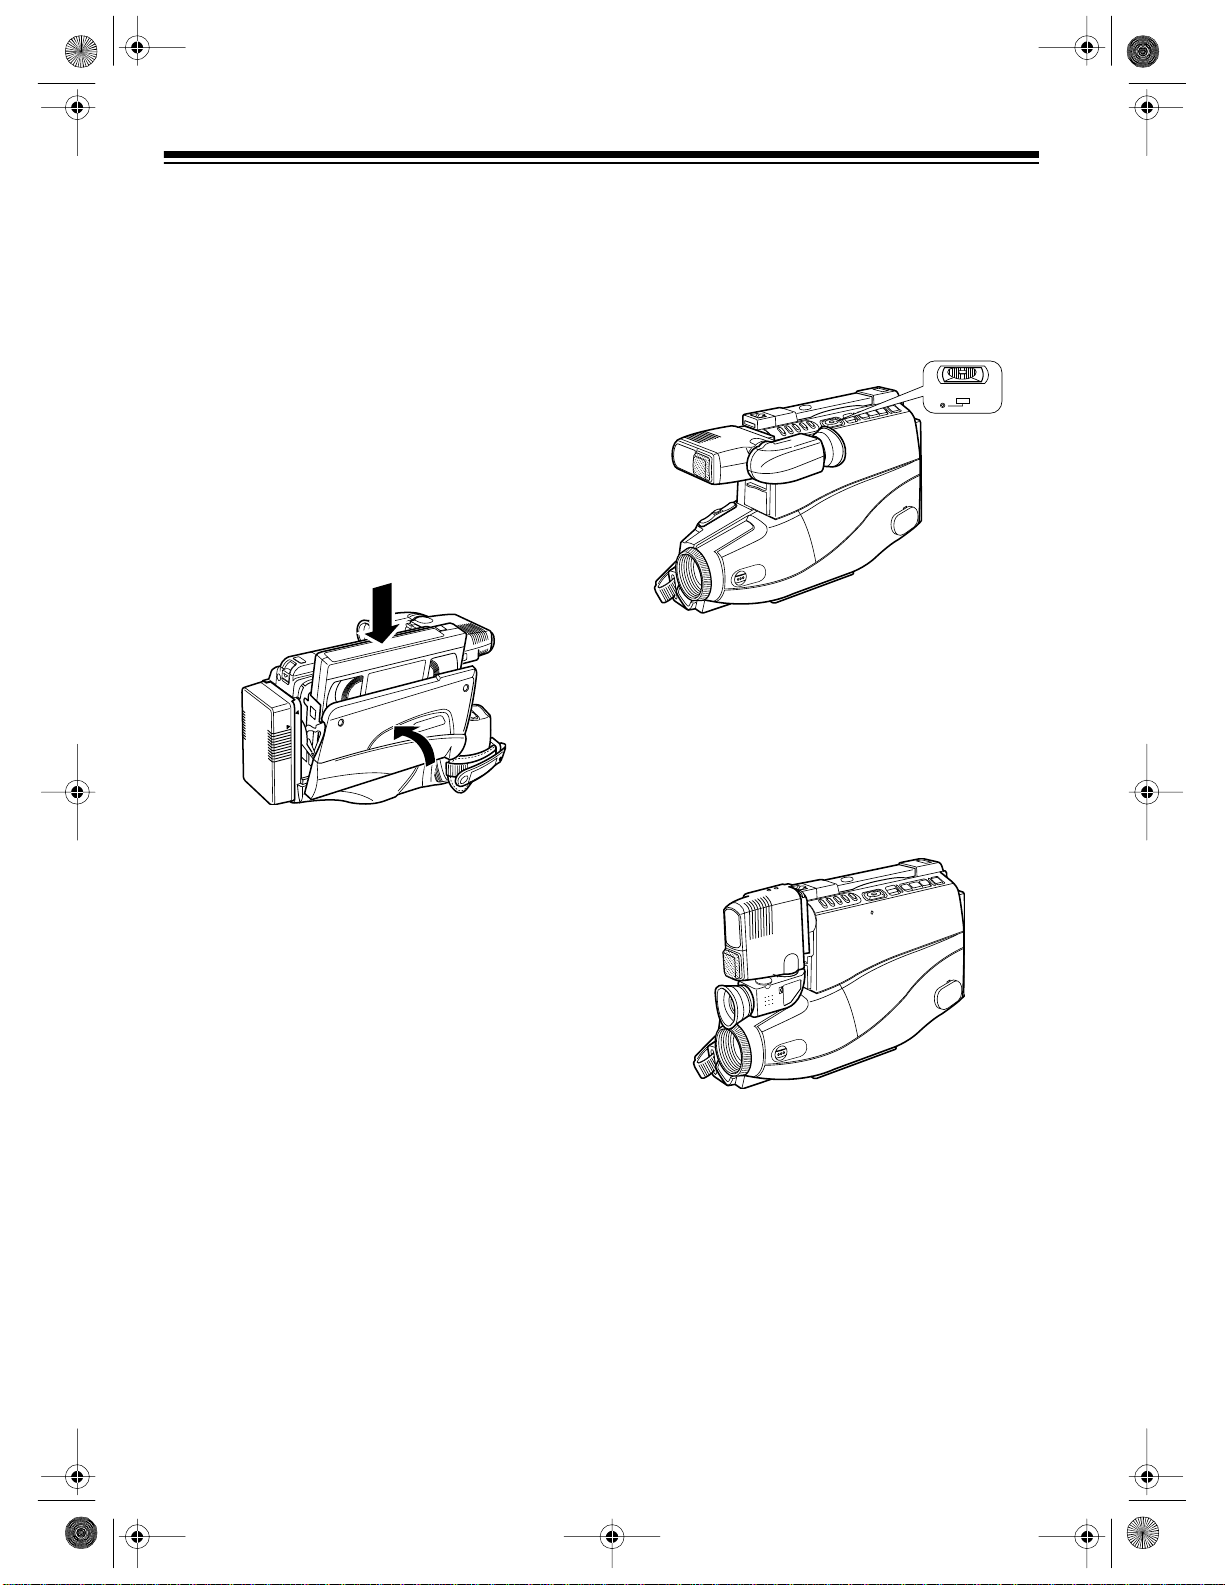
INSERTING/REMOVING A
VIDEO CASSETTE
You can open the cassette compartm ent to insert/remove a video cassette whenever a power
source is connected to the camcorde r, whether
or not the camcorder is turned on.
1. Press
compartment.
2. Insert a VHS cassette into the cassette
compartment with the side label facing you
and the spine label facing up, then gently
press the cassette c ompartment door until
it closes.
STOP/EJECT
to open the cassette
SETTING THE POWER SWITCH
While pressing and holding down the red button
in the center of
video recording or to
POWER indicator lights.
POWER
Slide
POWER
to
OFF
to turn off the camcorder.
, slid e it to
VCR
for playback. The
CAMERA
OFF VIDEOCAM
POWER
for
PREPARING/ADJUSTING THE
VIEWFINDER
Caution:
VHS video cassette into the cassette compartment.
To remove a cassette, press
for the cassette compartment door to open, and
pull out the cassette.
Caution:
storing the camcorder.
Never insert anything except a
STOP/EJECT
Always remove the cassette before
, wait
The camcorder’s viewfinder is s et to this position at the factory.
Before you carry the camc order by its shoulder
strap or store it, return the viewfinder to this position (see “Setup” on Page 17).
14
Page 15

16-830 .fm Page 15 Wednesday, July 21, 1999 9:32 AM
Setup
Before you can use the camcorder, you must set
up the viewfinder.
1. Rotate the viewfinder support until it stops,
as shown.
Caution:
only 90°. Do not force it past this point.
2. Rotate the eyepiece about 180° until it
stops, as shown.
The viewfinder support rotates
Adjustment
Once you set up the viewfin der, you can adjust
the position of the viewfinder support and angle
of the eyepiece, so you can see through the
eyepiece easily.
1. Slide
POWER
2. To adjust the viewfinder support, slide it to
the left or right until the eyepiece i s directly
in front of your right eye.
3. To adjust the ey epie ce, rotate it up or down
until you can see through it.
4. Turn the focus control on the right side of
the eyepiece until the image is clear and
sharp.
CAMERA
to
or
VCR
.
Caution:
The eyepiece rotates only about
225°. Do not force it past this point.
Focus C ont rol
15
Page 16

16-830 .fm Page 16 Wednesday, July 21, 1999 9:32 AM
SETTING/CHANGING
THE DATE AND TIME
1. Slide
POWER
indicator lights.
2. If the currently set date does no t appear in
the viewfinder, repeatedly press
until the date appears and the mon th’s digit
flashes.
If the month’s digit does not flash, press
and hold down
STOP/EJECT
to
once.
CAMERA
DATE/TIME
. The POWER
▲
▲
195191
▲
▲
DATE/TIME
A
M
002:1
, then press
4. When the viewfinder shows the correct
month, press
STOP/EJECT
. The day’s digit
flashes.
A
M
002:1
▲
▲
19519
1
1
▲
▲
5. Repeat Steps 3-4 to set the correct day,
year, hour, minute, and AM (if the hour is an
AM hour) or PM (if the hour is a PM hour).
6. When you have set the date and time,
repeatedly press
DATE/TIME
to confirm the
information you set.
7. To change the displayed date and time,
repeat Steps 2-6.
3. Repeatedly press
FAST-F
or
REWIND
move forward or backward through the
months until the viewfinder shows the correct month. To quickly move forward or
backward through the months, press and
hold down
FAST-F or REWIND
.
to
16
Page 17

16-830 .fm Page 17 Wednesday, July 21, 1999 9:32 AM
ATTACHING THE SHOULDER
STRAP
The shoulder strap provides a convenient way
to c a rr y t he c am c o rd e r w hen i t is not in use. You
can also use it as a safety strap when you use
the camcorder.
To attach the shoulder strap, slide
OFF
, then attach each end of the strap as
shown.
POWER
to
Cautions:
• Use only the supplied shoulder strap with
this camcorder.
• Do not swing the camcorder from the
shoulder strap.
• Replace the lens cap while carrying the
camcorder with the shoulder strap.
17
Page 18

16-830 .fm Page 18 Wednesday, July 21, 1999 9:32 AM
SPECIAL VIDEO RECORDING FEATURES
AUTO FOCUSING
The automatic focusing feature lets you concentrate on recording great videos without having to
worry about whether or not they are properly focused.
The camcorder detects the distance from the
camcorder to the object you see in the center of
the viewfinder, then sets the focus for that distance. When you move the camcorder, the camcorder continuously adjusts the focus to
maintain the sharpest picture. Try to keep your
desired subject in the middle of the viewfinder.
Notes:
• If the lens gets dirty, clean it with a soft tissue and lens-cleaning fluid.
• If the lens gets damp, dry it with a soft cloth
or wait until the moisture evaporates.
• Always replace t he lens cap when you finish recording.
• The auto-focus sensor m ight not be abl e to
focus on a subject when:
VARIABLE SPEED
POWER ZOOM
W
T
The power-zoom feature lets you go from wideangle to telephoto shots at the touch of a button.
During recording, press
of your right hand. Press
zoom out and
As you zoom out or in, a bar with an indicator appears on the left side of the viewfinder. The indicator moves up and down the ba r, showing the
relative zoom position. The pressure you pla ce
W
on
and T controls the speed of the zoom. The
harder you press
corder zooms.
T
(telephoto) to zoom in.
W
or T with the fing ers
W
(wide-angle) to
W
and T, the faster the cam-
— You are taping in extremely low light.
— You are taping in snow or fog.
— Close and distant obj ects are both near
the center of the viewfinder.
— You are taping a long obj ect (such as a
fence rail) from its end.
— The scene includes several objects
equal distances apart.
— Light reflects off the subject.
— The focus point moves rapidly.
— You are taping through a window.
MACRO FOCUSING
The camcorder’s macro focusing feature lets
you shoot close up pictures (as little as 1
es away) of objects such as flowers, printed material, or photos in your family album.
To use macro focus, press and hold down
(see “Variable Speed Power Zoom” above) until
you see the widest p ossible angle in the viewfinder, then aim the camcorder at the object you
are shooting. In most cases, the ca mcorder a utomatically focuses on the subject.
:
Notes
• Since macro focus exaggerates even the
slightest movement of the camcorder or
subject, we recommend that you set the
camcorder on a tripod while using macro
focus.
1
/4 inch-
W
18
Page 19

16-830 .fm Page 19 Wednesday, July 21, 1999 9:32 AM
• For the be st possib le resolution while us ing
macro focus, be sure to shoot in a welllighted area.
DIGITAL ZOOM
The camcorder’s dig ital zoom feature automatically doubles the magnification of telephoto
shots while you use variable speed power
zoom.
To use digital zoom, simply continue to press
and hold down
press and hold down
bles and
the left side of the viewfinder.
Notes:
• The su bject yo u are m agni fying while us ing
digital zoom might appear coarse. This is
normal.
• Since digital zoom exaggerates even the
slightest movement of the camcorder or
subject, we recommend that you set the
camcorder on a tripod while using digital
zoom.
T
while you are zooming. As you
T
, the magnification dou-
ZOOM
appears above the in dicator on
The camcorder has the following fade options:
White fade:
The picture fades in/out from/to a
white screen. When you select this option,
appears in the upper left corner of the
viewfinder.
Fade In
Wipe fade:
The picture op ens/closes gradual ly
from/to the center of a black screen. When you
select this option, appears in the upper
left corner of the viewfinder.
Fade In
Zoom fade:
The picture fades in/out while
zooming from/to a white screen. When you select this option, appears in the upper left
corner of the viewfinder.
Fade In
FADE IN AND FADE OUT
To give your recordings a professional look, the
camcorder has three fade options.
To select a fade option and fade in or out, repeatedly press
the camcorder is paused until the icon for the
option you want appears. Then press
PAUSE
Note:
.
During fade, the recorded audio also
fades in/out along with the video.
FADE
during recording or while
REC/
19
Page 20

16-830 .fm Page 20 Wednesday, July 21, 1999 9:32 AM
REVIEW
This feature lets you quick ly review the last few
seconds of a recording.
1. During recording, press
the tape.
2. Press
REVIEW
appears in the viewfinder.
. The tape rewinds and pla ys
REC/PAUSE
to stop
the last few seconds of the tape, then stops
the tape where the recording ends.
3. Press
REC/PAUSE
to resume recording
from that point.
CAMERA SEARCH
The camera search feature lets yo u review recorded portions of a tape and resume recording
at the desired point on the tape. This lets you
smoothly connect recorded scenes.
1. During recording, press
the tape.
appears in the viewfinder.
2. Press and hold down
ward, or
REWIND
3. When you see the approximate place on
the tape where you want to start recording,
continue to press and hold down
REWIND
release
for a few seconds more, then
FAST-F
or
REC/PAUSE
FAST-F
to stop
to se ar ch for -
to search backward.
FAST-F
REWIND
.
or
AUTO EXPOSURE
Depending on the brightness of the subject, the
camcorder automatically sets it s shutter speed
to one of the following speeds:
•1/60
•1/100
•1/120
•1/180
•1/250
•1/350
•1/500
•1/750
•1/1000
•1/1500
•1/2000
•1/4000
The iris in the camcorder’s lens also adjusts automatically in response to the shutter speed.
The camcorder displays
AE
and the current
shutter speed in the upper left corner of the
viewfinder.
AUTOMATIC INDEX
Indexing makes it easy to find each recording on
a tape using a VCR with the VHS Index Search
System (VISS) feature.
PLAY
4. Press and hold down
to position the
tape at the exact place where you want to
start recording. When you locate the exact
place, release
5. Press
REC/PAUSE
PLAY
to stop the tape.
to start recording at the
desired position on the tape.
20
Note
: For more information about VISS, refer to
your VCR’s owner’s manual.
The camcorder automatically records VISS in-
dex signals when:
• You turn on the camcorder’s power within
about 4 hours after you last turned it off,
then start recording.
• You turn on the camcorder’s power after
the date changed to the next day while the
power was off, then start recording.
When the cam corder rec ords a VISS index si g-
INDEX
nal,
appears in the viewfinder until you
start recording.
Page 21

16-830 .fm Page 21 Wednesday, July 21, 1999 9:32 AM
RECORDING THE DA TE
AND TIME ON A TAPE
You can select a date /time recording option by
repeatedly pressing
DATE/TIME
press
DATE/TIME
. Each time you
, you see one of the following
options:
•
and the date
— the camcorder
automatically records the date on the first
10 seconds of the first recording of the day.
Date only
•
— the camcorder continuously
records the date.
No date/time display
•
— the camcorder
does not record the date or time.
Time and date
•
— the cam corder continu-
ously records the date and time.
Notes:
• The camcorder records the same date
when:
– You replace the cassette
– You select another date/time opt ion, then
select the auto date option
– The previous recording was less than 10
seconds long
• If the date changes whi le recording con-
tinues for more than 10 seconds, the
new date is recorded at the beginning of
the next recording.
DIGITAL COUNTER
The camcorder displays a digital tape counter in
the upper right corner of the viewfinder during
recording or playback. You can use this counter
to mark and return to specific locations on a
tape. The camcorder does not record the digital
counter onto the tape.
3. Begin recording or playback of the tape.
4. Wh ile recording or playing back, if you see
a place on the tape you might want to
return to, note the counter reading at that
point.
COUNTER MEMORY
This feature lets you rewind or fast-forward the
tape to a specific point where you reset the tape
counter to
1. Load a cassette into the camcorder, then
slide
counter appears in the viewfinder.
2. P ress
counter in the viewfinder.
3. Begin recording or playback of the tape.
When you see a scene you might want to
return to, press
to
4. Wh en you are ready to return to the location on the tape where y ou pressed
follow these steps if you are recording:
a. Press
b. Slide
c. Press
If you are pla ying b ac k a t ape , pres s
EJECT
The tape rewinds or fast-forwards, then
stops when the counter reaches
To rewind or fast-forward past the location on
the tape where you pressed
WIND
0000
POWER
0000
, then press
FAST-F
or
.
DISPLAY
.
REC/PAUSE
POWER
REWIND
again.
CAMERA
to
or
VCR
. The
. M appears next to the
RESET
. The counter resets
RESET
VCR
to
FAST-F.
or
STOP/
REWIND
FAST-F
or
RESET
.
0000
, press
.
RE-
,
1. Load a cassette into the camcorder, then
slide
POWER
to
CAMERA
or
VCR
. The
counter appears in the viewfinder.
2. Rewind the tape in the camcorder, then
press
RESET.
The counter resets to
0000
.
21
Page 22

P
H
16-830 .fm Page 22 Wednesday, July 21, 1999 9:32 AM
TAPE REMAINING
9089
During recording and playback, the camcorder
displays a bar below the tape counter in the
viewfinder showing the amount of tape left on
the loaded cassette. The camcorder displays remaining tape information in ranges from
(the tape is at or near the beginning),
(the tape is in or near the middle), to
(the tape is at or near the end).
The titler contains 47 different characters you
can use to create titles.
Creating Titles
Follow these steps to create titles and save
them in the camcorder’s mem ory (one title per
page).
Note:
You cannot load or eject a cassette while
creating a title.
1. S lide
2. P r es s
POWER
TITLE
A flashing cursor appears in the viewfinder.
to
.
CAMERA
REVIEW DISPLAY RESET DATE
VCR
or
TITLE OFF VIDEOCAM DUBBING
/TIME
POWER
.
AUDIO/VIDEO
REW-PLAY
F.FWD+STO
PAGE
S
Notes:
• When there is less than 5 minutes of tape
TAPE END
left,
also flashes in the view-
finder.
• When you first record or play back a cassette, the camcorder displays for
about 10 seconds. Then the bar changes to
show the remaining amount of tape.
• The remaining tape bar disappears when
you eject the cassette.
TITLER
You can easily c reate and record personalized
titles on your recordings using the camcorder’s
title r.
The camcorder stores up to two title “page s” in
its memory. Once y ou st ore a title, you can display and record it onto a tape any time. Each title
page can contain up to two lines of 16 characters each.
SHIFT
3. Rep eatedly press
to move the flas hing cursor to the place where you want to
begin your title.
4. Select the first character of your title by
repeatedly pressing
–
or + to move backward or forward through the characters until
the viewfinder shows the correct character.
To quickly move backward or forward
through the characters, press and hold
+
– or
down
.
22
Page 23

(sp
P
H
16-830 .fm Page 23 Wednesday, July 21, 1999 9:32 AM
The characters appear in this order as you
+
press
(or in reverse order as you press –).
A B C D E F G H I J K L M N O P Q R S T
U V W X Y Z 0 1 2 3 4 5 6 7 8 9? ’. / , -; : < >!
)
ace
5. After you have selected the f irst character,
SHIFT
press
to move the flashing cursor to
the place where you want the next character.
6. Repeat Steps 4 and 5 until you complete
the title.
The last character you select might
Note:
flash in the viewfinder, but it will not flash
when you save it.
PAGE
7. If you like, you can press
then repeat
Steps 3-6 to create another title.
REVIEW DISPLAY RESET DATE
TITLE OFF VIDEOCAM DUBBING
/TIME
REW-PLAY
AUDIO/VIDEO
POWER
F.FWD+STO
PAGE
Editing T itl es
Follow these steps to change a title.
TITLE
1. P ress
. Then, if the title page you
want to correct does not appear, press
PAGE
to select the other title page.
SHIFT
2. Repeatedly press
to move forward
through the characters until the incorrect
character flashes.
–
3. Rep eatedly press
or + to move backward
or forward through the characters until the
viewfinder shows the correct character. To
quickly move backward or forward through
the characters, press and hold down
4. I f necessary, repeat Steps 2 and 3 to select
and correct other characters.
Adding Titles While Recording
You can use the camcorder to superimpose
(add) titles to your recordings while you record.
S
–
or +.
8. To save and review the titles you created,
TITLE
press
. The last title page you created
appears, and the first character of the title
flashes. To view the other title page (if you
created one), press
PAGE
.
Notes:
• Your camcorder ’s built-in rechargeable battery protects the titles you created (see
“Selecting a Power Source” on Page 12).
• The ca mcorder saves the t itles y ou creat ed
when it automatically stops and turns itself
off afte r 5 mi nute s.
You cannot use these steps to superim-
Note:
pose titles over material previously recorded.
You can do this while you dub a tape. See “Adding Titles onto an Existing Recordi ng” on Page
31.
1. S lide
POWER
to
VCR
.
2. Locat e the position on the tape where you
want to record a title.
3. S lide
4. P r es s
POWER
TITLE
CAMERA
to
.
. Then, if the title page you
want to record does not appear, press
PAGE
to select the other title page.
5. Press
REC/PAUSE
to start the title record-
ing.
The camcorder sup erimposes the title you
selected over the scene you are recording.
6. When you want to stop recording the title
TITLE
onto the tape, press
. The title disap-
pears.
23
Page 24

16-830 .fm Page 24 Wednesday, July 21, 1999 9:32 AM
HINTS FOR MAKING BETTER VIDEO T APES
If you are not familiar with camera techniqu es,
there are many books ab out the subject available at your local library. However, because the
camcorder is so simple to use and tape can be
used again and again, it is inexpensive to experiment and learn as you go.
The following information will get you started.
LIGHTING
Lighting should be u niform. T he camcorder can
record in low-light conditions, but more light is
usually better. The optimum brightness for topquality pictures is between 500 and 100,000 lux.
Caution:
camcorder. The heat can damage the camcorder.
The chart at right shows you the approximate
brightness in different situations or from different light sources.
Do not place a light source near the
Typical Brightness
of Common Situations
Brightness
(LUX)
100,000 Clear day at noon
65,000 Clear day at 10:00 AM
35,000 Clear day at 3:00 PM
32,000 Cloudy day at noon
25,000 Cloudy day at 10:00 AM
2,000 Cloudy day, one hour
after sunrise
1,000 Clear day, one hour
before sunset
1,000 Fluorescent light near
window
700-800 Factory floor
Situation
500-700 Sales counter in depart-
ment store
500 Bowling alley
400-500 Library
400-500 Office with fluorescent
lighting
400 Fluorescent desk lamp
250 Flashlight at 3 feet
100 Factory stairway
15-35 During intermission at
mov ie th eater
15-20 Cigarette lighter at 1 foot
10-15 Candles on birthday
cake at 8 inches
24
Page 25

16-830 .fm Page 25 Wednesday, July 21, 1999 9:32 AM
CAMCORDER MOVEMENT
When you move the camcorder while recording,
do so slowly and steadily. Too much movement
or fast movement make your recordings look
awkward. A video camera tripod (such as Radio
Shack Cat. No. 16-2017, not supplied) is a
worthwhile investment for top-quality movie
making.
ZOOM IN AND ZOOM OUT
As with mov ement, too much use of the camcorder’s zoom features can detract from your recordings. When you use variabl e speed power
zoom and/or digital zoom, it is best to zoom in or
zoom out in o ne smooth mot ion, not in several
jerky motions.
If you use them sparingly, movements from side
to side combined with zooms can be very effective in your video tapes.
25
Page 26

16-830 .fm Page 26 Wednesday, July 21, 1999 9:32 AM
SPECIAL VCR FEATURES
This section describes some of your camcorder’s special VCR features and functions.
Unless otherwise noted, you can use
Note:
these features only when
POWER
is set to
VCR
VISUAL SEARCH
Visual search lets you view a recording either
forward or backward at a faster speed so you
can find a specific section of the tape.
To search forward during playback, press
F
. To search backward during playback, press
REWIND
To stop visual search and p lay the tape, press
PLAY
Note:
visual search.
.
.
You cannot hear the tape’s sound during
FAST-
You cannot view the tape or hear the
Note:
tape’s so und w hil e y ou fas t- for war d a nd rewi nd
it.
.
FREEZE FRAME
Freeze-frame lets you stop the tape to view a
single frame.
To freeze a frame during playback, press
PAUSE
press
Notes:
. To return to the normal playback speed,
REC/P AUSE
• During freeze-frame, the picture quality is
lower than during normal playback.
• If you leave the VCR in the freeze-frame
mode for 5 minutes, the camcorder automatically stops playback to protect the
tape.
again.
REC/
FAST FORWARD AND REWIND
To advance the tape quickly when it is stopped,
FAST-F
press
it is stopped, press
. To rewind the tape quickly when
REWIND
.
FAST-F
REWIND
AUTO TRACKING
The camcorder automatically adjusts tracking
when you play a tape. However, you can manually adjust the tracking if the camcorder’s picture
is poor. Repeatedly press
back to manually adjust the tracking.
The camcorder resets to auto tracking
Note:
when you load another tape.
W
or T during play-
26
Page 27

16-830 .fm Page 27 Wednesday, July 21, 1999 9:32 AM
DUBBING (COPYING) A TAPE
AUDIO
R L/MONO VIDEO
IN
OUT
IN FROM
ANT
IN
OUT TO
CH4
TV
CH3
OUT
The process of recording from one audio/video device to another is called dubbing.
You can connect the camcorder and the VCR together, then either:
• Use your camcorder to record the signal from the VCR
• Use your VCR to record the signal from the camcorder
Notes:
• Always use video quality shielded cables with phono-type connectors (such as Cat. No. 151540, not supplied) to connect the camcorder’s
AUDIO/VIDEO OUT/IN
jacks to your VCR.
• Do not use standard audio cables for this connection.
• You can monitor the dubbing on the T V connected to your VCR. See your VCR’s owner’s
manual for more information.
If you want to use your camcorder to record from the VCR, see “Dubbing to the Camcorder” on Page
27. If you wa nt to use your VCR to record from the camc order, s ee “Dubbing from the Camcorder”
on Page 28.
Dubbing to the Camcorder
Follow these steps to connect the camcorder to the VCR and copy a tape from the VCR to the camcorder.
Note:
You can also use this procedure t o rec ord broa dc asts from your c abl e box, satel lite receiver,
or other audio/video source. Simply connect the camcorder’s
jacks on the audio/video source (instead of the VCR) in Step 3.
AUDIO
and
VIDEO
jacks to the out put
27
Page 28

16-830 .fm Page 28 Wednesday, July 21, 1999 9:32 AM
1. Use a fingernail to pull down the cover on
the camcorder ’s
AUDIO/VIDEO OUT/IN
jack
compartment to open it.
Caution:
OUT/IN
The cover on the
jack compartment is attached t o t he
AUDIO/VIDEO
camcorder. Do not try to remove it.
2. Connect the white plug on one end of the
AUDIO
cable to the camcorder’s
jack, then
connect the yellow plug on the same end of
the cable to the camcorder’s
VIDEO
jack.
3. Connect the whit e plug on the other end of
the cable to the VCR’s
AUDIO OUT
jack.
Then connect the yel low plug on the sam e
end of the cable to the VCR’s
VIDEO OUT
jack.
6. Ins ert a cassette into the camcorder.
7. B egin playback on the VCR or audio/video
source.
8. P ress
REC/PAUSE
on the camcorder to
start dubbing.
9. P ress
REC/PAUSE
on the camcorder to stop
dubbing.
Dubbing from the Camcorder
Follow these steps to connect the camcorder to
the VCR and copy a tape from the camcorder to
the VCR.
1. Use a f ingernail to pull down the cover on
the camcorder ’s
compartment to open it.
AUDIO/VIDEO OUT/IN
jack
4. Set
OUT/IN
5. Slide
28
AV OUT/IN
inside the
jack compartment to
IN OUT
POWER
CAMERA
to
AUDIO/VIDEO
IN
.
.
Caution:
OUT/IN
jack compartment is attached to the
The cover on the
AUDIO/VIDEO
camcorder. Do not try to remove it.
2. Con nect the white plug on on e end of the
AUDIO
cable to the camcorder’s
jack, then
connect the yellow plug on the same end of
the cable to the camcorder’s
VIDEO
jack.
3. Con nect the white plug on the other end of
the cable to the VCR’s AUDIO IN jack. If
your VCR is a stereo VCR, use a Y-adapter
(such as Cat. No. 42-2435) t o connect the
white plug to both audio outputs. Then connect the yellow plug on the same end of the
cable to the VCR’s VIDEO IN jack.
Page 29

16-830 .fm Page 29 Wednesday, July 21, 1999 9:32 AM
4. Set
OUT/IN
5. Slide
AV OUT/IN
inside the
jack compartment to
POWER
to
VCR
.
AUDIO/VIDEO
OUT
.
6. Insert a cassette into the camcorder.
7. Set your VCR to its audio/video mode.
Some VCRs have a manual input-
Note:
select switch, while others automatically
“sense” when you connect another audio/
video source to the VCR’s audio/video
input jacks. Check your VCR’s owner’s
manual for more information about your
VCR.
PLAY
8. Press
on the camcorder to find the
portion of the tape you want to dub. Then
REC/PAUSE
press
to pause it.
9. Set the VCR to record, then press the
VCR’s record button to begin recording.
10. Press
REC/PAUSE
on the camcorder to play
the portion of the tape you want to dub.
11. Press
REC/PAUSE
on the camcorder to stop
dubbing.
Adding Titles onto an Existing
Recording
6. When you see the scene where you want to
record the title, press
TITLE
. The camcorder plays the title and superimposes it
over the recording.
7. When you want to stop recording the title
onto the tape, press
TITLE
. The title disap-
pears.
AUDIO EDITING
The camcorder’s audio e diting feature lets you
record a new soundtrack onto a previously recorded tape without erasing the original picture.
When you use audio editing, you replace the audio on the tape with new sound. You can use
sounds picked up by the camcorder’s built-in microphone or signals from an audio sourc e connected to the camcorder’s
Notes:
• If you connect an audio source, alway s use
video quality shielded cables with phonotype connectors (such as Cat. No. 15-1540,
not supplied) to connect the camcorder’s
AUDIO
jack to the audio source’s AUDIO
OUT jack.
AUDIO
jack.
You need a separate VHS VCR to super-
Note:
impose titles over an existing recording.
1. Connect the camcorder and VCR (see
“Dubbing from the Camcorder” on Page
28.).
TITLE
2. Press
to select the title you want to
record. Then, if the title you want to record
does not appear, press
PA GE
to select the
other title page.
TITLE
3. Press
to remove the title from the
viewfinder. The title disappears.
4. Load a blank cassette, or o ne you want to
record onto, into the VCR. Then set the
VCR to its recording mode.
5. Load the cassette you want to record from
PLAY
into the camcorder, then press
to play
it back.
29
• Do not use a s tandard audio cable for this
connection.
1. If you are n ot usin g the camcorder’s built-in
microphone as an audio source, connect
the audio source’s AUDIO OUT jack to the
camcorder’s
AUDIO
jack.
Page 30

16-830 .fm Page 30 Wednesday, July 21, 1999 9:32 AM
2. Set
OUT/IN
AV OUT/IN
inside the
jack compartment for the audio
AUDIO/VIDEO
source you chose:
IN OUT
• If you are using the built-in microphone,
AV OUT/IN
set
to
OUT
.
• If you are using an audio source con-
AUDIO
nected to the camcorder’s
AV OUT/IN
set
3. Slide
POWER
to
to IN.
VCR
.
jack,
4. Insert a cassette into the camcorder.
PLAY
5. Press
on the camcorder to find the
portion of the tape where you want to start
audio dubbing. Then press
REC/PAUSE
pause it.
6. Press
PLAY
DUBBING AUDIO/VIDEO
and
together once. appears in the
viewfinder.
Note:
viewfinder, press
PLAY
If does not appear in the
STOP/EJECT
DUBBING AUDIO/VIDEO
and
, then press
together
once to continue.
7. If you are not using the camcorder’s built-in
microphone as an audio source, start the
audio source.
8. To start audio dubbing, press
REC/PAUSE
on the camcorder.
9. Press
STOP/EJECT
on the camcorder to
stop dubbing.
Notes:
• To set the position where you want to end
audio dubbing, start playback of the tape,
DISPLAY
press
on the camcorder at the
to
point where you want to end audio, then
start the dubbing process.
• To prevent feedback squeals, turn down the
volume control on any TV or TV/monitor
connected to the camcorder.
AUDIO/VIDEO EDITING
When you use audio/v ideo editing, you can replace the audio and vi deo on a tape with new
sound and pictures.
You can use sounds picked up by the camcorder’s built-in microphone or signals from an audio
source connected to the camcorder’s
jack. You can use pictures taken by the camera
or signals from a video source connected to the
camcorder’s
VIDEO
jack.
Notes:
• If you connect an audio/video source,
always use video quality shielded cables
with phono-type connectors (such as Cat.
No. 15-1540, not supplied) to conn ect the
camcorder’s
AUDIO
and
VIDEO
source’s AUDIO OUT and VIDEO OUT
jacks.
• Do not use standard audio cables for this
connection.
1. If you are n ot usin g the camcorder’s built-in
microphone as an audio source, connect
the audio source’s AUDIO jack to the camcorder’s
2. S et
OUT/IN
AUDIO
jack.
AV OUT/IN
inside the
jack compartment for the video
source you chose.
• If you are using the camcorder’s lens, set
AV OUT/IN
to
OUT
.
• If you are using a video source con-
nected to the camcorder’s
AV OUT/IN
set
3. S lide
POWER
to
to IN.
VCR
.
AUDIO
jacks to the
AUDIO/VIDEO
VIDEO
jack,
30
Page 31

16-830 .fm Page 31 Wednesday, July 21, 1999 9:32 AM
4. Insert a cassette into the camcorder.
PLAY
5. Press
on the camcorder to play the
tape to the point where you want audio/
video dubbing to end. Then press
PAUSE
to pause it.
6. Press
DISPLAY
M
.
appears in the view-
finder next to the tape counter. Then press
RESET
7. Press
to reset the tape counter to
REWIND
to rewind the tape pas t the
0000
point where you want to start audio/video
dubbing, then press
PLAY
. When you see
the point of the tape where you want to
start audio/video dubbing, press
PAUSE
.
8. Press
PLAY
DUBBING AUDIO/VIDEO
and
together twice. and the picture you
are dubbing appear in the viewfinder.
If you accidentally press
Note:
DUBBING AUDIO/VIDEO
together only
PLAY
once, appears in the viewfinder
instead. If this happens, s imply press
DUBBING AUDIO/VIDEO
and
together again.
REC/
.
REC/
and
PLAY
9. Press
REC/PAUSE
on the camcorder.
Audio/video dubbing begins.
When the tape counter shows
0000
camcorder automatically stops the tape,
and video and audio dubbing stop.
Notes:
• To prot ect the tape and c onserve ba ttery
power, the camcorder automatically
stops and turns itself off if left in the
record/pause mode for more than 5 minutes.
• To p revent feedback squeals, turn down
the volume control on any TV or TV/
monitor connected to the camcorder.
10. Press
STOP/EJECT
on the camcorder to
stop audio/video dubbing at any time.
, the
31
Page 32

16-830 .fm Page 32 Wednesday, July 21, 1999 9:32 AM
CONNECTING THE CAMCORDER TO A TV
USING A TV FOR PLAYBACK
There are many different types of TVs and ways
to connect them to your camcorder. This section
describes the most common set ups.
Notes:
• If your TV doesn’t m atch any of the examples provided, contact your local Radio
Shack store for assistance.
• Turn off power to the camcorder and TV
when making connections. Do not power
the camcorder until you complete all other
connections.
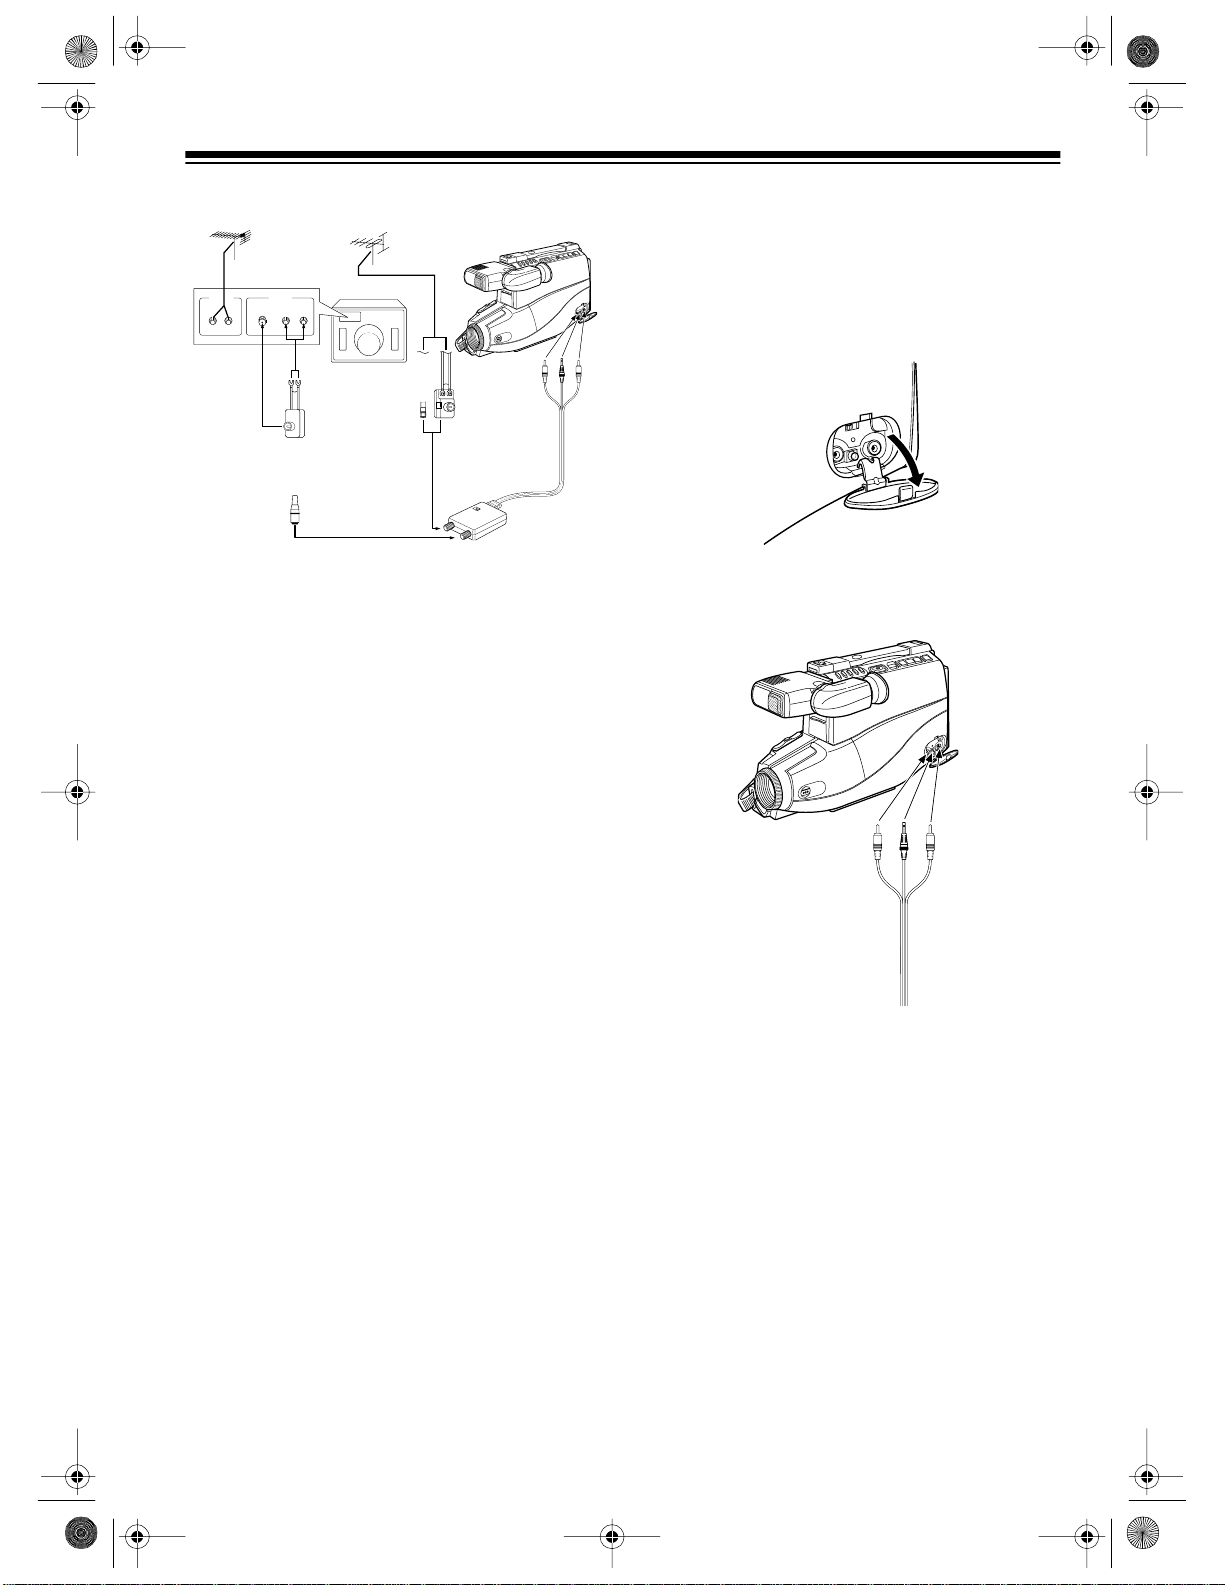
TV with Audio/Video (A/V) Jacks
Caution:
OUT/IN
The cover on the
jack compartment is attached to the
AUDIO/VIDEO
camcorder. Do not try to remove it.
2. Con nect the white plug on on e end of the
AUDIO
cable to the camcorder’s
jack, then
connect the yellow plug on the same end of
the cable to the camcorder’s
VIDEO
jack.
3. Con nect the white plug on the other end of
the cable to the TV’s AUDIO IN jack. If your
TV is a stereo TV, use a Y-adapter (such as
Cat. No. 42-2435) to connect the white plug
to both audio inpu ts. Then conne ct the yel low plug on the s ame end of the cable to
the TV’s VIDEO IN jack.
4. S et
AV OUT/IN
IN
jack compartment to
inside the
AUDIO/VIDEOOUT/
OUT
.
If your TV has audio/video (A/V) input jacks, you
can connect your camcorder directly t o the TV
so you can play and watch video tapes.
If your TV does not have audio/video jacks, see
“Standard TV” on Page 33.
Use video quality shielded cables with phonotype connectors (such as Cat. No. 15-1540, not
supplied) to connect the camcorder’s
VIDEO IN/OUT
Do not use standard audio cables for this
Note:
jacks to your TV’s input jacks.
AUDIO/
connection.
Follow these steps to connect the camcorder to
the TV.
1. Use a fingernail to pull down the cover on
the camcorder’s
AUDIO/VIDEO OUT/IN
jack
compartment to open it.
32
Page 33
16-830 .fm Page 33 Wednesday, July 21, 1999 9:32 AM
Standard TV
UHF IN VHF IN
75-ohm 300-ohm
To connect the camcorder to a standard TV
(with only VHF and UHF terminals), you need an
RF adapter kit (CMC No. T16-RF71A, not supplied). The RF adapter kit includes:
• RF converter
• 300-to 75-ohm matching transformer
• 75-ohm ante nna cable
1. Use a f ingernail to pull down the cover on
the camcorder ’s
AUDIO/VIDEO OUT/IN
jack
compartment to open it.
Caution:
OUT/IN
The cover on the
jack compartment is attached to the
AUDIO/VIDEO
camcorder. Do not try to remove it.
2. Connect the RF converter’s plug to the
camcorder’s
VIDEO, RF DC OUT
, and
AUDIO
jacks.
Cautions:
• Use on ly the recommended RF adapter kit
with this camcorder. You ca n order the kit
from your local Radio Shack store.
• The RF converter is a sealed uni t. Do not
attempt to open or modify it.
• Do not damage or drop the RF converter or
subject it to mechanical vibration.
• Unplug the RF converter during lightning
storms.
Notes:
• You do not have to disconnect the RF converter when you watch TV broadcasts. Simply set the TV’s tuner as usual.
• Unless your antenna is VHF-only (you
receive Channels 2-13 only), you also need
a band-splitter (such as Cat. No. 15-1252,
not supplied) to connect your cam corder to
separate TV VHF/UHF terminals.
3. Set
OUT/IN
AV OUT/IN
inside the
jack compartment to
AUDIO/VIDEO
OUT
.
4. Disconnect the VHF antenna/cable wire
from your TV and connect it to the RF co nverter’s
IN FROM ANT
jack:
• If the antenna/cable wire is the round,
75-ohm type, connect it directly to the
jack.
• If the antenna/cable wire is the flat, 300-
ohm type, use another 300- to 75-ohm
matching transformer (such as Ca t. No.
15-1253, not supplied) to connect the
wire to the jack.
33
Page 34

16-830 .fm Page 34 Wednesday, July 21, 1999 9:32 AM
5. Using the supplied 7 5-ohm antenna cable ,
connect the RF converter’s
OUT TO TV
jack
to the TV’s VHF antenna terminal.
• If the TV’s VHF antenna terminal is the
round, 75-ohm type, connect the cable
directly to the terminal.
• If the TV’s VHF antenna terminal is the
flat, 300-ohm type, use another matching
transformer (such as Cat. No. 15-1253,
not supplied) to connect the cable to the
termi na l.
PLAYBACK
After you connect the camcorder to your TV, follow these steps to play a tape.
1. Turn on the TV, then:
• If you are using a TV with audio/video
(A/V) ja cks, set it to the video mode.
• If you are using a standard TV, set the
TV’s tuner to the same channel where
you set
CHANNEL
or 4).
2. S lide
POWER
on the camcorder to
3. Ins ert a cassette into the camcorder.
PLAY
4. P ress
on the camcorder. The tape
plays on your TV .
5. Press
STOP/EJECT
STOP/EJECT
again to remove the cassette.
on the RF converter (
VCR
.
to stop playback. Press
3
6. Set
CHANNEL
CHANNEL
on the RF converter to 3 or 4.
34
Page 35

16-830 .fm Page 35 Wednesday, July 21, 1999 9:32 AM
ADDITIONAL INFORMATION
TROUBLESHOOTING
If you follow the instructions in this manua l and still have t rouble operating your camcorder, refer to
the following troubleshooting chart. If you still cannot solve the problem, take your camcorder to your
local Radio Shack store for assistance.
FUNCTION PROBLEM POSSIBLE REASON SUGGESTION
POWER No power. • Safety devices are
functioning.
• The battery pack is not
charged.
• The AC adapter/
charger is not correctly
connected.
The camcorder turns
off soon after you turn
The battery pack might be
weak.
it on.
RECORDING Power on, but no
• Lens cap on. • Remove the lens
image in viewfinder.
Cannot record.
POWER
•
A/V OUT/IN
•
POWER
set to
VCR
set to
IN
set to
VCR
. Slide
• Disconnect the AC
adapter/charger’s
power cord, then
plug it into the AC
outlet again.
• Charge the battery
pack.
• Reconnect the AC
adapter/charger.
Recharge the battery
pack and try again.
cap.
.
.
• Slide
•Set
ERA.
POWER
CAMERA.
A/V OUT /IN
OUT
.
POWER
to
to
to
CAM-
Poor color when tape
TV not properly adjusted. Adjust the TV.
is played on a TV/
monitor.
Recording is fuzzy. • Poor lighting. • Use additional light-
ing.
• Dust or other foreign
• Clean the lens.
matter on lens.
35
Page 36

16-830 .fm Page 36 Wednesday, July 21, 1999 9:32 AM
FUNCTION PROBLEM POSSIBLE REASON SUGGESTION
PLAYBACK Image in viewfinder is
fuzzy.
No image appears on
TV.
• Focu s control on the
viewfinder must be
adjusted.
• Viewfinder mu s t be
reset.
• Camc order improperly
connected to TV.
AV OUT/IN
•
set to IN.•Set
• TV’s tuner or TV/video
switch not properly set.
• Adjust the focus
control.
• Turn off the camcorder and disconnect the power
sour c e . T h en, af te r
about 1 minute,
reconnect the power
source. When the
characters displayed in the viewfinder are clear, set
the date and time.
• Reconnect properly.
AV OUT/IN
OUT
.
to
• Set TV’s tuner to
channel 3 or channel 4 (if RF converter connected).
36
• Set TV’s TV/video
switch to VIDEO (if
A/V input used).
Poor color. TV not properly adjusted. Adjust the TV.
Camcorder does not
play back in color on
• Tracking not properly
adjusted.
• Adjust the tracking.
your TV.
• Old or worn tape. • Use a new tape.
Broken image. • The battery pack might
be weak.
• Recharge the battery pack.
• Old or worn tape. • Use a new tape.
Cassette cannot be inserted.
• Cassette is not right
side up or is backwards.
• Another cassette already loaded in camcorder.
• Check cassette
positioning and reinsert.
• Eject the cassette
and insert the new
cassette.
Page 37

16-830 .fm Page 37 Wednesday, July 21, 1999 9:32 AM
FUNCTION PROBLEM POSSIBLE REASON SUGGESTION
PLAYBACK
(continued)
Cassette will n ot eject
and power will not turn
off.
No tape movement in
fast-forward mode.
No tape movement in
rewind mode.
Camcorder is recording. Press
stop the tape and try
again.
Tape is already completely
wound.
Tape is already completely
wound.
Rewind the tape to the
desired point.
Fast-forward the tape to
the desired point.
REC/PAUSE
to
37
Page 38

16-830 .fm Page 38 Wednesday, July 21, 1999 9:32 AM
CARE AND MAINTENANCE
Your Optimus Model 130 MovieCorder camcorder is an example of superior design and
craftsmanship. The following suggestions will
help you care for the camcorder so you can enjoy it for years.
Keep the camcorder dry. If it gets
wet, wipe it dry immediately. Liquids can contain minerals that
corrode electronic circuits.
Use and store the camcorder
only in normal temperature environments. Temperature extremes can shorten the life of
electronic devices, damage b atteries, and distort or melt plastic
parts.
Handle the camcorder gently and
carefully. Dropping it can damage circuit boards and cases,
and cause it to work improperly.
Keep the camcorder away from
dust and dirt, which can cause
premature wear of parts.
Wipe the camcorder with a damp
CLEANER
cloth occasionally to keep it looking new. Do not use harsh chemicals, cleaning solvents, or strong
detergents to clean it.
HANDLING
• Remove the cas sette tape and turn off the
power when the camcorder is not in use.
• Avoid shocks and drops. Do not drop or
otherwise subject the camcorder to hard
shocks or strong vibrations. Bumping or
striking the unit during recording g enerates
noise in the recorded image.
• To protect the lens, always replace the le ns
cap when the camcorder is not in use. Do
not touch the lens surface with your hand.
• Do not point the camcorder lens or the
viewfinder eyepiece at the sun, whether
recording is in progress or not. Direct sunlight can make recording impossible, burn
the CCD imager, and damage the camcorder beyond repair. Be particularly careful when recording outside.
• Do not use the camcorder in excessive
temperatures and humidity. You can use
the camcorder between 32° F and 104 ° F
and between 35% and 80% relative humidity.
• Do not store the unit in an unventilated car
in the summer, in direct sunlight, or near
strong heat sources. This can result in
severe damage to the camcorder’s case
and electronic circuits.
• Avoid magnetic sources. Using the camcorder near strong fluorescent lights,
motors, televisions, or other magnetic
sources can adversely affect recorded
images.
• Avoid situations where water, sand, dust or
other foreign matter could get on or inside
the camcorder. Such substances could
cause malfunctions.
Modifying or tampering with the camcorder’s internal components can cause a malfunction and
might invalidate its warranty and void your FCC
authorization to operate it. If your camcorder is
not performing as it should, tak e it to your local
Radio Shack store for assistance.
38
• Do not use or leave the camcorder in areas
with excessive smoke, steam, dust, or
moisture. Such environments can cause
dew to form on the camcorder’s lenses. Be
sure to provide ample ventilation.
Page 39

16-830 .fm Page 39 Wednesday, July 21, 1999 9:32 AM
• Do not use the cam corder on its side. The
tape might not wind properly and might
jam.
• Some small, portable tripods migh t be di fficult to connect and might not be sturdy
enough to support your camcorder. Be sure
to use only a strong, stable tripod.
SERVICING YOUR
CAMCORDER
Except as noted in this owner’s manual, there
are no user-serviceable parts inside your camcorder. If you encounter a problem that you cannot correct using this owner’s manual and its
troubleshooting guide or the sections below,
take the camcorder to your local Radio Shack
store for assistance.
• To clean the camcorder’s lens and optical
elements, use air blowers and lens papers
designed for photographic lenses.
• To clean the picture tube face and lens
inside the eyepiece, press a nd hold down
the cover’s tab on the back of the eyepiece,
then open the cover.
though the audio signal is clear. Head cl eaning
must be done by an experienced camcorder
technician. If the camcorder’s heads become
dirty, contact your local Radio Shack store for
assistance.
ERASE PROTECTION
Video cassettes have an erase-protection tab to
prevent accidental erasure of a tape. If the
erase-protection tab is missing, the camcorder
cannot record on the tape.
If you try to record on a tape with the erase-protection tab missing,
finder.
If you want to record on a video cass ette that
has had its tab removed, put a piece o f heavy
plas tic tape over the erase-protection tab hole.
TAPE
appears in the view-
Caution:
able. Do not try to remove it from the eyepiece.
Clean the picture tube face and lens using a soft
non-abrasive cloth, swab, or lens cleaning paper. When you finish cleaning, close the cover.
The eyepiece’s cover is not remov-
CLEANING THE VIDEO HEADS
The camcorder’s video heads require cleaning
from time to time. Dirty video heads can cause
the playback picture to become blurred even
STORING YOUR VIDEO
CASSETTES
Eject and store the cassette when you finish using it. This helps protect the cassette and the
camcorder’s internal mechanisms from dust.
Place your video cassettes in their protective
boxes and store them in a cool, dry, dust-free
environment. Store the cassettes on end, not on
their sides. This prevents improper settling of
the cassette’s spools.
Note:
Tape can become wound too tightly
around the cassette’s spools after numerous recordings and playbacks. This can cause the
cassette to improperly load when you insert it.
39
Page 40

16-830 .fm Page 40 Wednesday, July 21, 1999 9:32 AM
On most cassettes there is a brake-release
plunger on the bottom center of the cassette.
Use the tip of a pen or pencil to press the plunger. This loosens the tape.
Brake-Release Plunger
THE FCC WANTS YOU TO
KNOW
This device complies with Part 15 of
Operation is subject to the following two conditions: (1) This device may not cause harmful interference, and (2) this device must accept any
interference received, including interference
that may cause undesired operation.
FCC Rules
• Reorient or relocate the receiving antenna
• Increase the distance between the equipment and the radio or TV
• Use outlets on different electrical circuits for
the equipment and the radio or TV
Consult your local Radio Shack store if the problem still e xis ts .
You must use shielded interface cables with this
equipment.
Modifying or tampering with the camcorder’s internal components can cause a malfunction and
might invalidate the camcorder’s warranty and
void your FCC authorization to operate it. If your
camcorder is not performing as it should, take it
to your local Radio Shack Store for assistance.
.
This equipment complies with the limits for a
Class B digital device as specified in Part 15 of
FCC Rules
protection against radio and TV interference in a
residential area. However, your equipment
migh t ca us e TV or radi o int erf e renc e ev en whe n
it is operating properly. To eliminate interference, you can try one or more of t he following
corrective measures:
40
. These limits provide reasonable
Page 41

16-830 .fm Page 41 Wednesday, July 21, 1999 9:32 AM
SPECIFICATIONS
Signal System ....................................... ....... ....... .......NTSC-Type Standard Color and Monochrome
Recording System........................................................................................................VHS Standard
Tape Width ............................................................................................................ 1/ 2 Inch (12.7 mm)
Tape Speed ....................................................................................SP (1.31 Inch/sec... (33.35 mm/s)
Maximum Recording/Playback Time...................................................160 Minutes (with T-160 Tape)
Pickup Device...........................CCD Image Sensor (approx. 270,000 pixels including optical black)
Lens.................................................. ....... .........F1.6-F3.2 12x Power Zoom, Full-Range Auto-Focus
Lens Filter Diameter.................................................................................................................46 mm
Viewfinder...........................................................................................0.6 Inch B/W CRT with Diopter
Microphone.................................................................................Omnidirectional Electret Condenser
Color Temperature Compensation ..............................Auto White Balance with White Balance Lock
Minimum Ill u mi nation............... ......... .......... .......................................... ........................ .............. 1 Lux
Video Output Level..............................................................................1 .0 Vp-p Comp osite, 75 Ohm s
Audio Output Level.................................................................................316 mV, less than 1 K Ohms
Power Requireme n t............ .......... ........................................................... ....................... .......9.6 Volts
Battery Power Supplied............................................ .. ....... .......... ....... .. .......... ....... .. ....... ........10 Volts
DC Power Consumption..........................................................................................................7 Wat ts
Dimensions (approx.) ............................................. 8
Camcorder Weight (approx.)........................................................ 4 lbs 3 oz (2.0 kg) (without battery)
Battery Weight (approx.)................................................................ .................................1 lb (0.56 kg)
1
/2 x 4 3/8 x 12 1/4 Inches HWD (without battery)
(205 x 111 x 311 mm)
Specifications are typical; individual units might vary. Specifications are subject to change and improvement without notice.
41
Page 42

16-830 .fm Page 42 Wednesday, July 21, 1999 9:32 AM
NOTES
42
Page 43

16-830 .fm Page 43 Wednesday, July 21, 1999 9:32 AM
43
Page 44

g
g
16-830 .fm Page 44 Wednesday, July 21, 1999 9:32 AM
RADIO SHACK LIMITED WARRANTY
This product is warranted against defects for 90 days from date of purchase from Radio Shack company-owned stores and authorized Radio
Shack fra nchis ees and dealer s. Withi n this pe riod, we will repa ir it without char
slip
not cover transportation costs. Nor does it cover a product subjected to
misuse or accidental dama
EXCEPT AS PROVIDED HEREIN, RADIO SHACK MAKES NO
EXPRESS WARRANTIES AND A NY IMPLI ED WARRANTIES ARE LIMITED IN DURATION TO THE DURATION OF THE WRITTEN LIMITED
WARRANTIES CONTAINED HEREIN. Some states do not permit limitation or exclusion of implied warranties; therefore, the aforesaid limitation(s) or ex clusion(s) may not appl y to the purchaser.
This warranty gives you spe cific legal rights and you m ay also h ave other rights which vary
from state to state.
e for parts and labor. Simply
as proof of purchase date to any Radio Shack store. Warranty does
bring your Radio Shack sales
e.
We Service W hat We Sell
9/94
RADIO SHACK
A Division of Tandy Corporation
Fort Worth, Texas 76102
6A5 Printed in Mal aysia
 Loading...