

Radio Shack 14 Minute Owner's Manual
www.radioshack.com
36//KPWVG"&KIKVCN
SM
#PUYGTKPI"5[UVGO
OWNER’S MANUAL —
Please read before using this equipment.
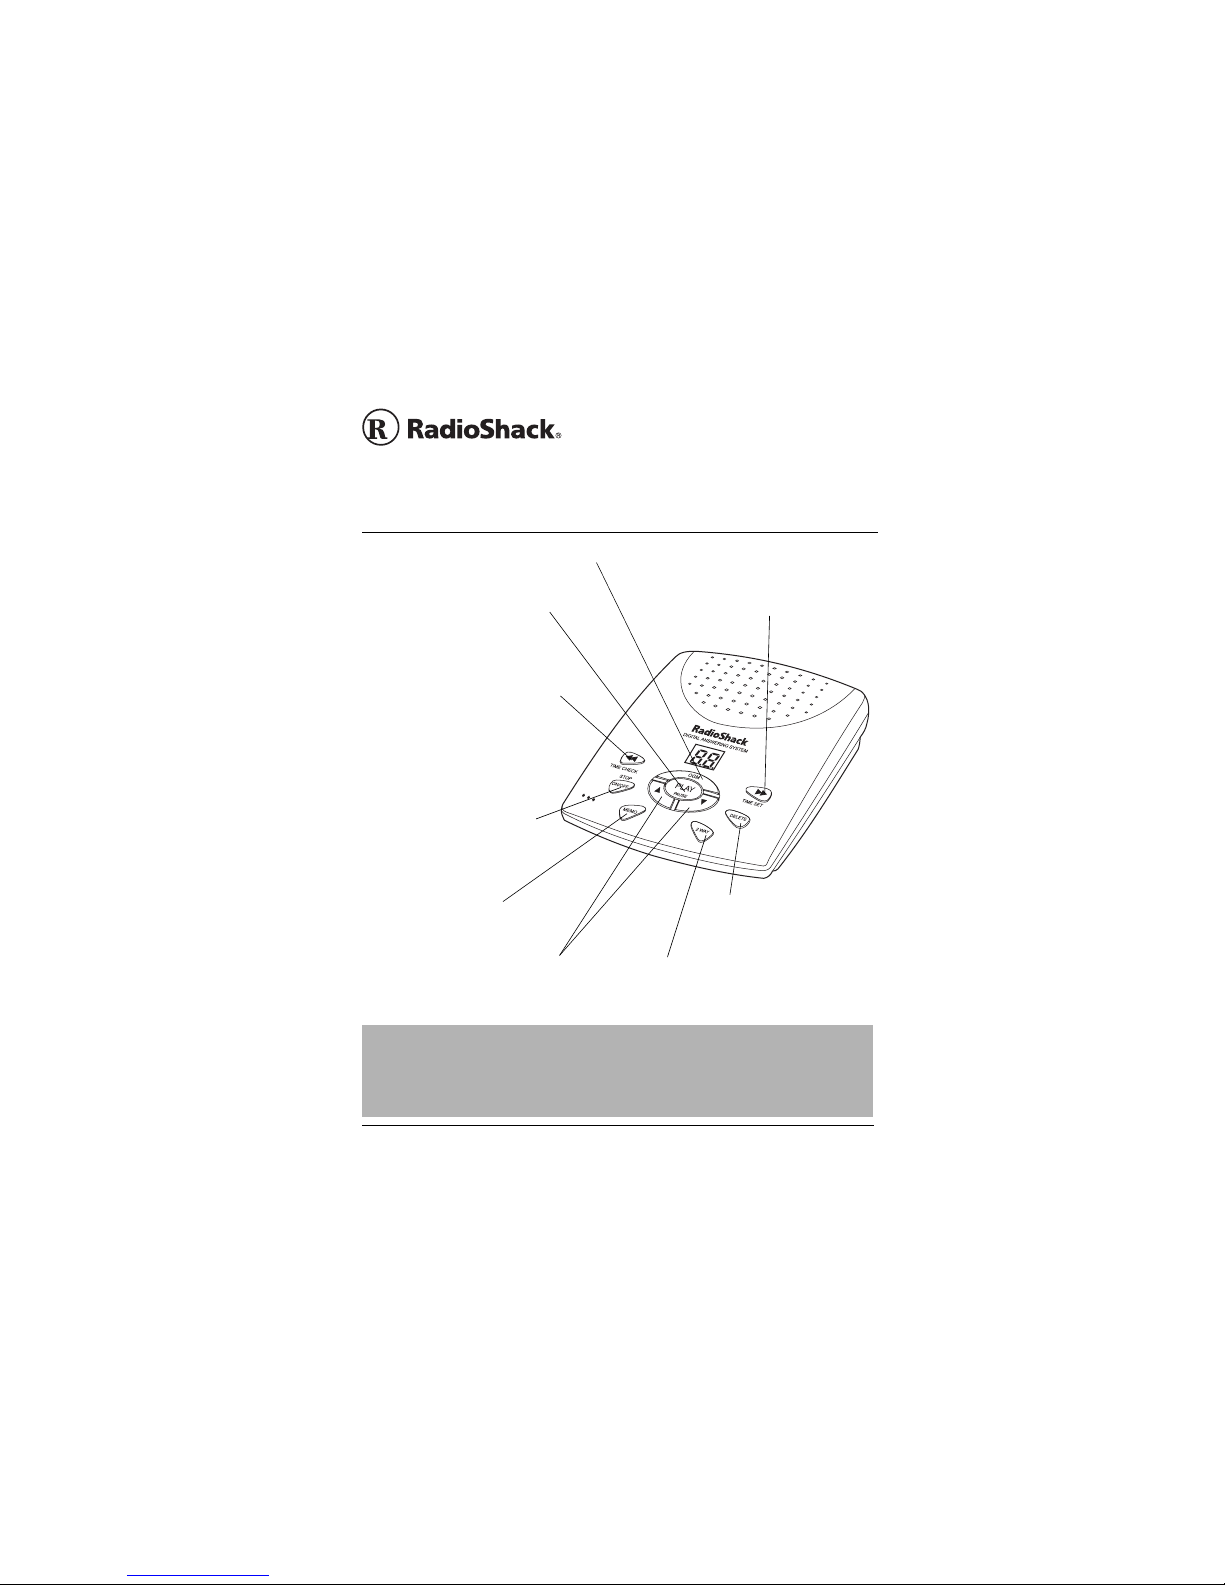
OGM —
an outgoing message.
PLAY/PAUSE —
all messages, memos, and 2way recordings. Press while
playing to pause.
/TIME CHECK —
####
the current day and time.
Press during playback to repeat the
current message. Hold down
during playback to repeat the
previous message.
STOP/ON/OFF —
turn the system on and off,
or during playback to stop.
MEMO —
record messages for
yourself or others.
Hold down to
If an icon appears at the end of a paragraph, go to the box on that page with the
corresponding icon for pertinent information.
— Warning# — Important
Rý
Rý
RýRý
Hold down to record
Press to play
Press to hear
Press to
—
and
HHHH
playback volume higher or
lower.
Adjust message
GGGG
"+/2146#06"
#
2002 RadioShack Corporation. All Rights Reserved.
©
RadioShack and RadioShack.com are trademarks
used by RadioShack Corporation.
/TIME SET —
,,,,
playback to skip to the next
message. Hold down while
stopped to enter day/time setting
mode.
2 WAY —
telephone conversation.
— Caution
....
Press during
DELETE —
playback to delete a
message.
Press during
Press to record a
#
— Hint
°°°°
43-3822
— Note
±±±±

%106'065
Read This Before
Installation .................. 3
Installation ...................... 4
Installing the Backup
Battery ........................ 4
Connecting the System
to a Phone Line .......... 5
Connecting AC
Power ......................... 6
Preparation .................... 7
Turning the System
On/Off ......................... 7
Adjusting the Volume .. 7
Setting the Day
and Time .................... 7
Setting the Number of
Rings and Incoming
Message ..................... 9
Recording the Outgoing
Message ................... 10
Recording an Announce
Only Outgoing
Message ................... 10
Operation ..................... 11
Setting the System to
Answer Calls ............ 11
Using the Announce-
Only Feature ............. 12
Screening Calls ........ 13
Recording a Memo ... 13
Recording a 2-Way
Phone Conversation . 14
(continued)
Your RadioShack 14 Minute Digital
Answering System is a sophisticated,
fully digital message center. All
messages are stored on a chip, so
there are no tape mechanisms to wear
out and no tapes to bother with. You
can record up to 14 minutes of a
message, memo, or two-way phone
conversation.
Call Screening — Listen to incoming
calls so you can decide whether or not
to answer.
Phone Pick-Up Detection — Stops
recording a message when you pick up
any phone on the same line.
Multiple Outgoing Message — Set the
system to play your message, the
prerecorded message, or play your
announcement without recording the
caller’s message.
Voice Activated Recording (VOX)
Detection — The systems stops
recording after seven seconds of
silence or when the caller hangs up.
Remote Operation — Use a touch-tone
phone (or rotary phone and pocket tone
dialer) to operate the system while you
are away.
2

Remote Answer-On — Call the system
from a remote location and set it to
answer calls.
Adjustable Ring Number — Set the
system to answer after two, four, or
seven rings.
Your system is ETL listed to UL
standards and meets all applicable
FCC standards.
WARNING:
hazard, do not expose this product to rain or moisture.
CAUTION:
SHOCK, DO NOT REMOVE COVER OR BACK. NO
USER-SERVICEABLE PARTS INSIDE. REFER
SERVICING TO QUALIFIED PERSONNEL.
To reduce the risk of fire or shock
CAUTION
..
RISK OF ELECTRIC SHOCK
DO NOT OPEN
TO REDUCE THE RISK OF ELECTRIC
The lightning symbol is intended to alert you to the
presence of uninsulated dangerous voltage within this
product’s enclosure that might be of sufficient
magnitude to constitute a risk of electric shock. Do not
open the product’s case.
The exclamation symbol is intended to inform you that
important operating and maintenance instructions are
included in the literature accompanying this product.
!
..
!
4'#&"6*+5"$'(14'"
+
056#..#6+10
Your system conforms to federal
regulations, and you can connect it to
most telephone lines. However, each
device that you connect to the phone
line draws power from the phone line.
We refer to this power draw as the
device’s ringer equivalence number, or
Playing Messages/
Memos/Two-Way Phone
Conversations ........... 14
Deleting Messages ... 15
Remote Operation ........ 16
Operating the System
from a Remote
Location .................... 16
Remote Commands .. 17
FCC Statement ............. 18
3
REN. The REN is on the bottom of the
system.
If you use more than one phone or
other device on the line, add up all the
RENs. If the total is more than five (or
three in rural areas), your phone might
not ring and your TAD might not
answer. If ringer operation is impaired,
remove a device from the line.
+056#..#6+10
Installation
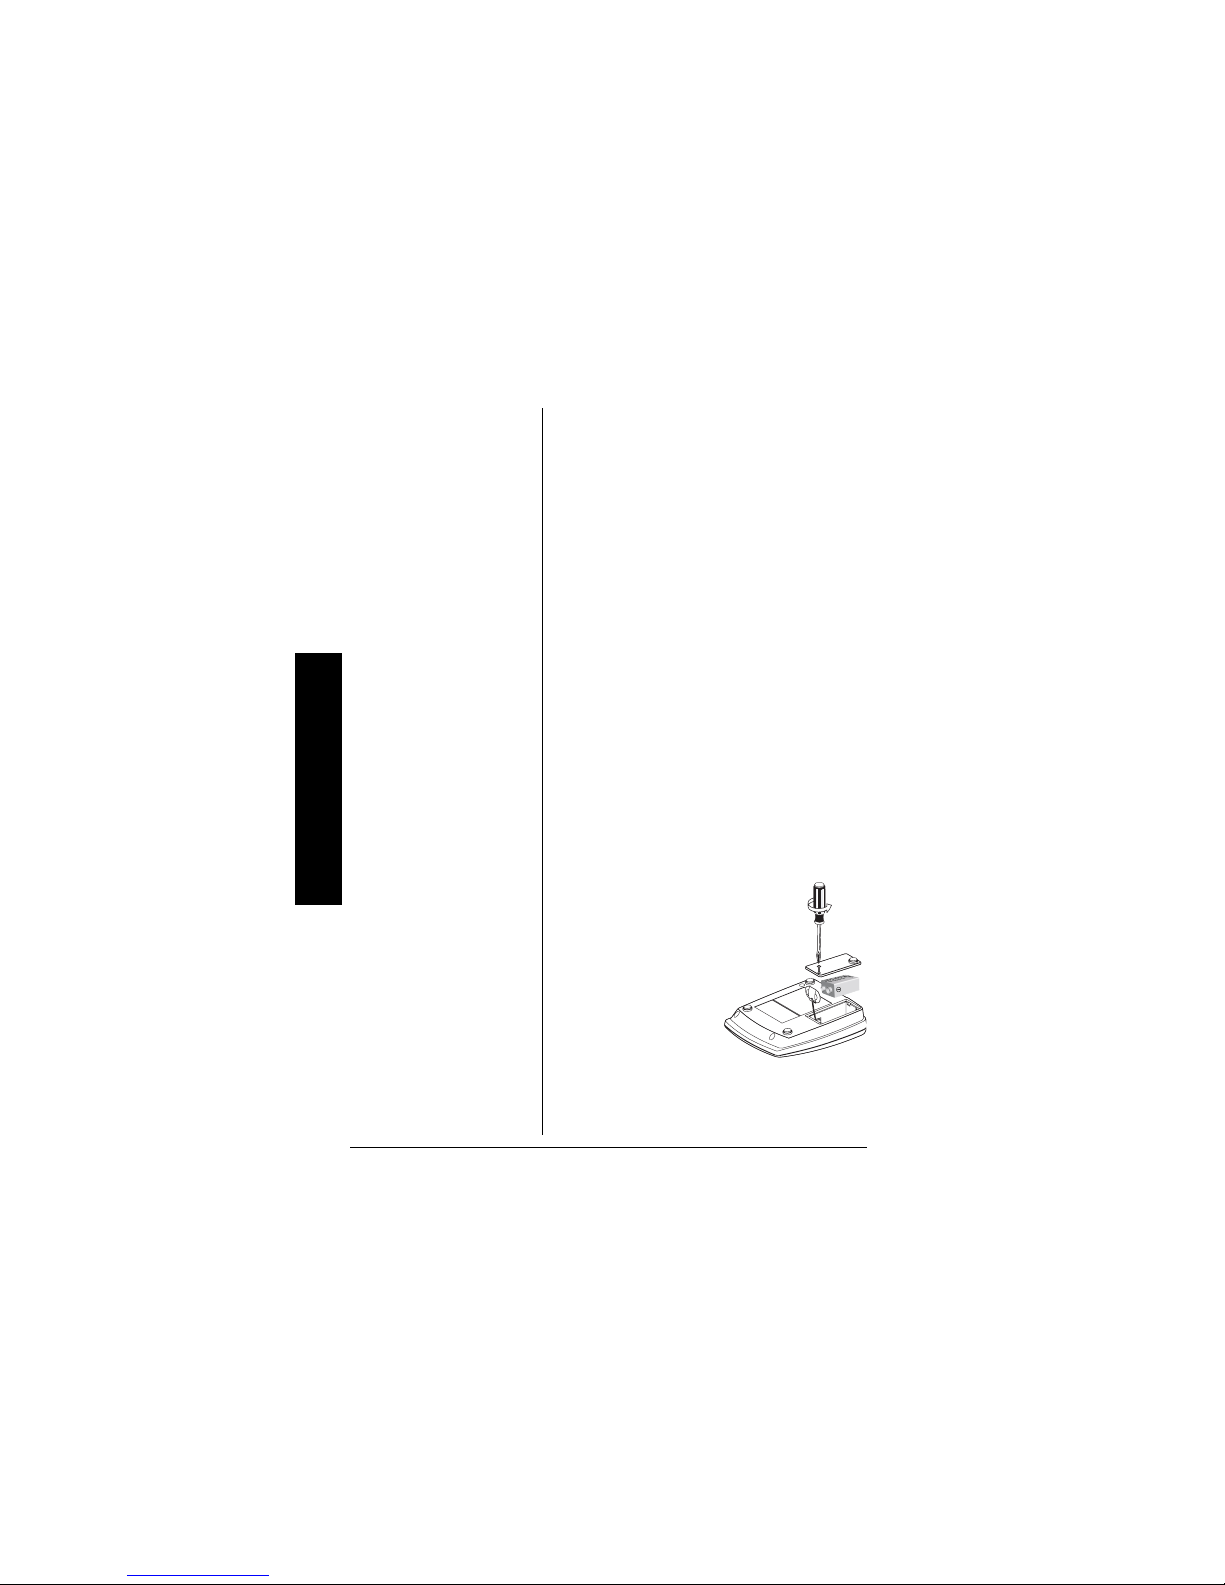
+056#..+0)"6*'"$#%-72"
$
#66'4;
If AC power fails or you unplug the
system, one 9V alkaline battery (not
supplied) is required to save recorded
messages and day/time settings.
1. Use a Philips
screwdriver to
remove the
screw from the
battery
compartment
cover.
2. Attach a 9V
alkaline battery to the terminals
and place the battery in the
compartment.
4

3. Replace the cover and secure it
±±±±
$#66'4;"016'5"
±±±±
"
• Listen to new
messages before
replacing the battery,
since removing the
battery erases all
messages.
• You must reset the
clock after replacing
the battery.
• Dispose of old
batteries promptly and
properly. Do not burn
or bury batteries.
• Use only a fresh
battery of the required
size and
recommended type.
• If you do not plan to
use the system for a
month or longer,
remove the battery.
Batteries can leak
chemicals that can
destroy electronic
parts.
Connecting the
System to a Phone
Line
The USOC number of the
jack to be installed is
RJ11C (or RJ11W for a
wall plate jack).
with the screw.
4. Replace the battery when
appears on the display. Unplug the
AC adapter and disconnect the
phone from the phone line before
replacing the battery. After
installing the new battery,
reconnect to AC power and the
phone line.
%100'%6+0)"6*'"5;56'/"
61"#"2*10'".+0'
Select a location near a telephone jack,
an easily accessible AC outlet, and out
of the way of normal activities. You
must use compatible modular jacks that
are compliant with Part 68 of
and the requirements adopted by
Rules
the ACTA. The telephone cord and
modular plug provided is Part 68
compliant for connecting to the
telephone company network. If your
home has specially wired alarm
equipment connected to the telephone
line, be sure that installing the system
does not disable your alarm equipment.
If you have questions about what will
disable your alarm equipment, contact
your telephone company or a qualified
installer.
±±±±
±±±±
Beý
Beý
BeýBeý
FCC
Installation
5
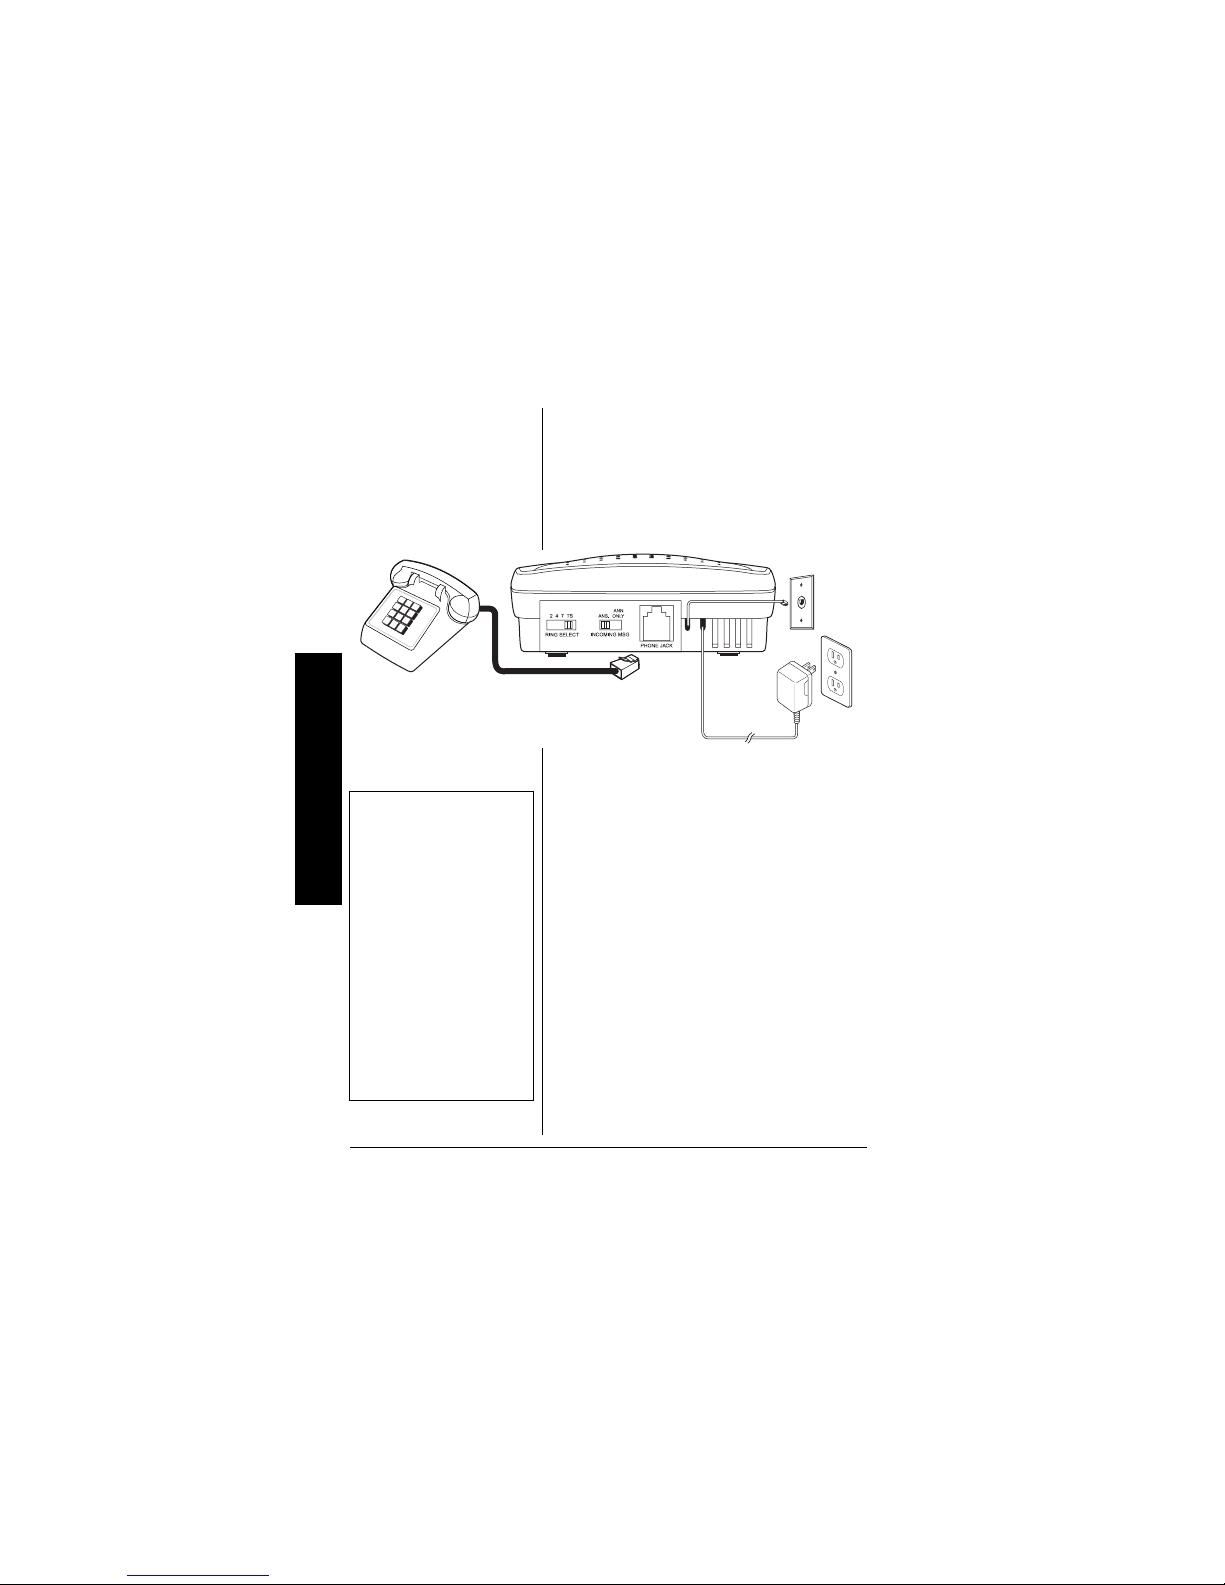
Installation
1. Plug the system’s modular phone
line cord into the wall jack.
2. Plug your phone’s modular phone
line cord (not supplied) into the
PHONE JACK
.
"016'"±"
±
• Do not press any
buttons while
plugging the adapter
into the AC outlet. If
you accidentally
press a button, reset
the system by
unplugging the
adapter from the AC
outlet and reinsert it.
• The system cannot
operate without AC
power.
6
%100'%6+0)"#%"219'4
Plug the AC adapter into a standard AC
outlet. The display lights and numbers
to
appear sequentially on the
&'
&'
'&ý
'&ý
&'&'
'&ý'&ý
display. A long beep sounds and
appears. If you did not install a backup
battery,
±±±±
Be
Be
BeBe
and
alternately appear.
&&ý
&&ý
&&ý&&ý
&&
&&
&&&&
 Loading...