

Page 1

Radiolink Electronic Limited
www.radiolink.com
RADIOLINK F110
User Manual
Radiolink Electronic Limited
www.radiolink.com
Page 2

Radiolink Electronic Limited
www.radiolink.com
1
Introduction
Thank you for purchasing Radiolink little racing drone -- F110.
F110 is R&D by RadioLink, it can throw and start to fly in any angle, fly in cycle mode
just controlled by rudder stick, also can keep head front forward point without
compass.
F110, controlled by Radiolink brand new mini racing drone flight controller CS360,
different from other flight controllers that need to set PID tuning before use, gets the
perfect parameters and flight angle automatically, is the best choice for the RC
beginners.
Suggestion: In order to fully enjoy the benefits of this racing drone and ensure flight
safety, please read the instructions carefully and set up the device as described below,
when we write this instruction, we try our best to use the familiar and simple words
to make it easy for beginners to understand the name and formulation.
Please refer to the manual or call our after-sales (+86-0755-88361717) or log in BBS
(such as www.rcgroups.com,
https://www.facebook.com/Radiolink-1455452961436694/) to check the issues
related answer to questions if you have any questions.
Due to unforeseen changes in production procedures, the information contained in
this manual is subject to change without notice.
More information please check our website as below:
http://www.radiolink.com
After-Sales Information
Any technical updates and manual corrections will be available on our website. If you
do not find the answers to your questions there, please via email for the most rapid
and convenient response.
FOR AFTER-SALES SERVICE:
Please start here for getting more service.
www.radiolink.com
Phone:+86-755-88361717
Email:after_service@radiolink.com.cn/after_service1@radiolink.com.cn
FOR TECHNIQUE SUPPORT:
Please start here for answers to technique questions:
www.radiolink.com
Phone:86-755-88361717
Email: alice@radiolink.com.cn
Page 3

Radiolink Electronic Limited
www.radiolink.com
2
Note: About flying
While you are getting ready to fly, if you place your transmitter on the ground, be
sure that the wind won’t tip it over. If it is knocked over, the throttle stick may be
accidentally moved, causing the engine to speed up. Also, damage to your
transmitter may occur.
Warning!!!
This product is not a toy and is not suitable for children under the age of 18. Adults
should keep the product out of the reach of children and exercise caution when
operating this product in the presence of children.
Please don't fly in the rain!
Rain or moisture may enter the transmitter internal through gaps in the antenna or
joystick flight and cause your flight to instability even out of control. If inevitable will
fly in the wet weather (such as game), please be sure to use plastic bags or
waterproof cloth to cover your transmitter, please don't flight if there is lightning.
This device complies with part 15 of the FCC Rules. Operation is subject to the
following two conditions:
(1) This device may not cause harmful interference, and
(2) This device must accept any interference received, including interference that
may cause undesired operation.
Any Changes or modifications not expressly approved by the party responsible for
compliance could void the user's authority to operate the equipment.
Page 4

Radiolink Electronic Limited
www.radiolink.com
3
Contents
1. Features Highlights....................................................................................................4
2. Compatible with Remote Controllers........................................................................4
3. Preparing Before Flight..............................................................................................4
3.1 Charge.................................................................................................................4
3.2 Remote Controller Setup.....................................................................................5
3.3 Power On and Bind..............................................................................................7
3.3.1 Power On....................................................................................................7
3.3.2 Bind.............................................................................................................8
3.4 How to Disarm.....................................................................................................9
3.5 How to Arm.......................................................................................................10
4. Low Voltage alarm..................................................................................................10
5. Flight Controller CS360 Introduction......................................................................10
6. Read Before Use.....................................................................................................11
6.1 Read Before Start to Flight................................................................................11
6.2 Read Before try the Throw and Fly Mode.........................................................12
7. Flight Mode............................................................................................................12
7.1 Stabilize Mode...................................................................................................12
7.2 Auto Mode.........................................................................................................12
8. Calibration..............................................................................................................12
9. Components...........................................................................................................13
10. Details about FPV..................................................................................................14
Page 5

Radiolink Electronic Limited
www.radiolink.com
4
1. Features Highlights
(1) Can Throw and Start to Fly in Any Angle
(2) Cycle Mode Just Controlled by Rudder Stick
(3) Head Front Forward Point Without Compass: Drone head always towards the
same direction if not move rudder stick, otherwise the head direction will change
according to rudder stick move.
(4) PID Parameter Tune Automatically: F110, controlled by Radiolink brand new mini
racing drone flight controller CS360, different from other flight controllers that need
to set PID tuning before use, gets the perfect parameters and flight angle
automatically.
Specification
(1) Weight (include packing box): 170g
(2) F110 Size (without propeller): 110mm*44mm
(3) Packing Box Size: 225*125*55mm
(4) Flight Controller CS360 size: 32.5*21.5mm
(5) R6DSM Size: 15*13mm
(6) Propeller diameter: 55mm
(7) Flight Time : 6 to 8 min(1S 600mA, 25C Li-Po battery)
(8) Operating Temperature : depends on your battery
(9) Control distance: 600 meters air(with R6DSM)
(10) Support Transmitters: all transmitters that support S-BUS receiver
(11) Coreless Motor: 8520
(12) O-ring for Motor Size: 8*15*6mm, rubber
2. Compatible with Remote Controllers
F110 compatible with RadioLink remote controllers AT10, AT10II, AT9, AT9S and T8FB.
F110 will sell with receiver R6DSM or R8FM (you can buy F110 with R6DSM or F110
with R8FM from our dealer).
R6DSM compatible with RadioLink remote controllers AT10, AT10II, AT9, AT9S.
R8FM compatible with RadioLink remote controller T8FB.
3. Preparing Before Flight
3.1 Charge
First, please keep your battery is 4.2V to ensure your F110 with enough power to fly,
you can charge your battery by CM120 if not fully charged.
Professional Designed LiPo Battery Charger CM120
Energy Supply Station
Brand new designed LiPo battery charger CM120, designed for 1S LiPo battery.
Inherit the high precision of CB86PLUS, make the charging more safe, battery which
Page 6

Radiolink Electronic Limited
www.radiolink.com
5
charged by CM120 is more powerful can flight about five to eight minutes.
Charging current can setup 1A or 2A by toggle the switch as you need.
Red LED indicate charging mode and green LED indicate the battery is fully charged.
CM120 use universal USB connector, so you can use computer or power bank for
mobile phone as the power supply for CM120.
Pay attention: ensure the voltage output of power supply is not higher than 5V.
3.2 Remote Controller Setup
Setup If Controlled by AT9S/AT9/AT10/AT10II
(1) Please turn on AT9S/AT9(DC 7.4~18V) or AT10/AT10II(DC 7.4~15V) first.
(2) Make sure the model type of AT9S/AT9/AT10/AT10II is multirotor model,
and the CH3(throttle) is reverse.
Setup in BASIC MENU--MODEL TYPE--MULTIROTOR
Back to BASIC MENU---REVERSE--setup 3: THRO REV
Page 7

Radiolink Electronic Limited
www.radiolink.com
6
Setup in ADVANCE MENU--ATTITUDE--CH:CH5, SW3:SwC
Setup both up and center position of SwC STABL. Model and down position AUTO
model or other mode.
AT9S/AT9/AT10/AT10II: SwC at the up or center position shows that F110 will flight
in Stabilize Mode while SwC at the bottom position shows that F110 flight in Low
Speed Mode.
Setup If Controlled by T8FB
(1) Please turn on T8FB(DC 4.8~18V) first.
(2) Make sure the model type of T8FB is multirotor model, and the CH3(throttle) is
reverse.
Page 8

Radiolink Electronic Limited
www.radiolink.com
7
If you need change parameters, please connect T8FB and computer via a universal
android USB cable, setup details please read the T8FB user manual(you can
download from our website www.radiolink.com).
T8FB: SwB at the up or center position shows that F110 will flight in Stabilize Mode
while SwB at the bottom position shows that F110 flight in Low Speed Mode.
3.3 Power On and Bind
3.3.1 Power On
(1) Orange propellers default indicate the head direction, if you change the
propellers, you can make sure the head direction by check the flight controller
CS360(like the picture), make sure before power F110 on.
Page 9

Radiolink Electronic Limited
www.radiolink.com
8
(2) Please put the F110 on a level surface, the green LED will blinking after power
on about 2 seconds, do not move F110 when green LED blinking.
(3) F110 finished the calibration after green LED off.
Attention: Head direction have been determinate, if you put not same as the
direction that when you calibrate, it will back to the same direction automatically
when F110 start to fly, that we called Head Front Forward Point Without Compass.
3.3.2 Bind
F110 sells with receiver R6DSM or R8FM .
(1) Place the transmitter and the receiver close to each other within 1 meters.
(2) Turn on the transmitter, then power on the R6DSM or R8FM.
(3) Connect R6DSM or R8FM to flight controller CS360(it default connect).
(4) There is a black button on the R6DSM and R8FM, press the binding button twice
in two seconds and release, receiver light start blinking, after about 8 times blinking,
match code success when receiver signal LED always on!
Attention: If your transmitter is AT10II, it will default that the channel is setup 12CH,
you have to setup channel from 12CH to 10CH in SYSTEM menu because R6DSM is
a 10 channels receiver.(AT9, AT9S and AT10 are the same)
F110 now just support S-BUS signal, both R6DSM and R8FM support S-BUS and
PPM signal, please make sure that the LED of R6DSM/R8FM is blue which shows
R6DSM/R8FM output S-BUS signals.
Both R6DSM and R8FM can recognize signal by check the bind LED. Blue/purple LED
indicates S-BUS signal and red LED indicates PPM signal.
If you need change signal from PPM to S-BUS, please short press the ID SET switch
two times within 1 second, the signal is changed from SBUS to PPM. The red LED
indicates the PPM and blue/purple indicates S-BUS.
Page 10
Radiolink Electronic Limited
www.radiolink.com
9
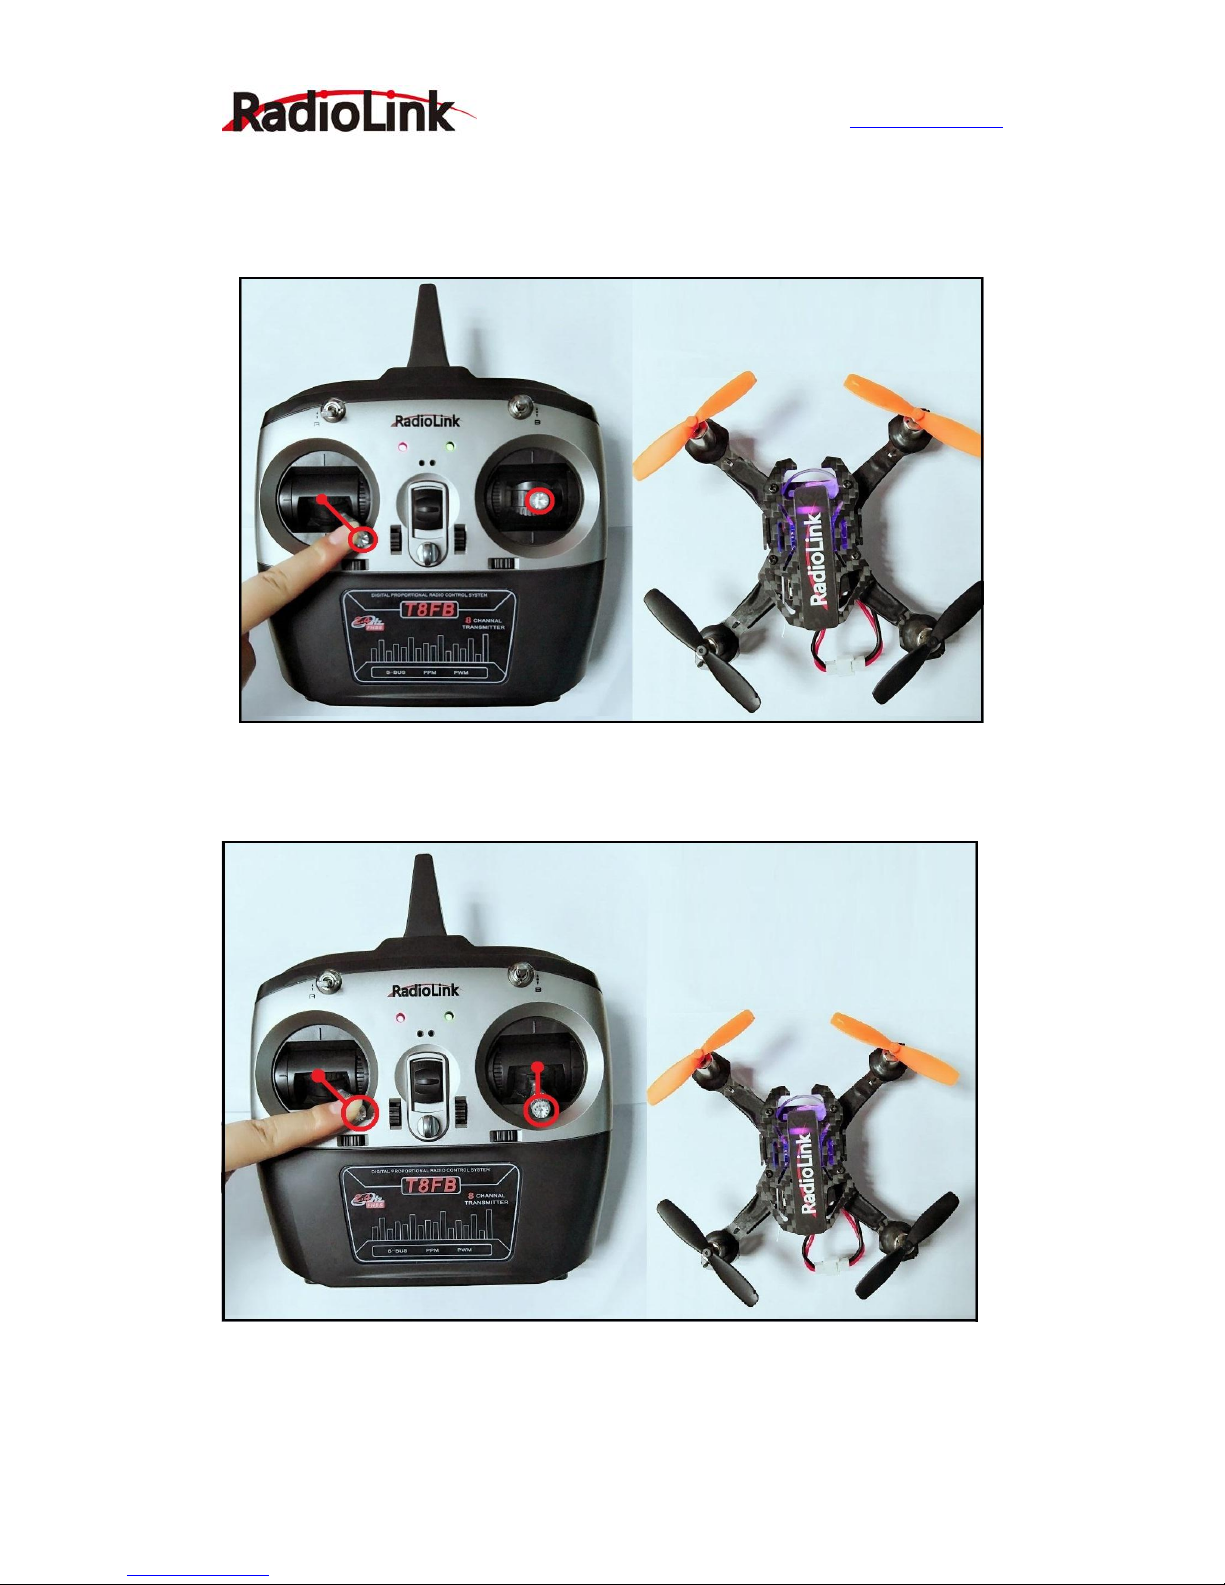
3.4 How to Disarm
(Use T8FB as an example)
Throttle on left stick: move the left stick to the lower right corner, keep about 2
seconds till green LED on.
Throttle on right stick: move the left stick to the lower right corner and the
right(throttle) stick to the lower position, keep about 2 seconds till green LED on.
Disarm Gesture
Page 11

Radiolink Electronic Limited
www.radiolink.com
10
3.5 How to Arm:
Move the throttle stick to the lower position and rudder stick, keep about 2 seconds
till green LED off.
Arm Gesture
4. Low Voltage Alarm
The green LED of flight controller CS360 is blinking all the time indicate that the
voltage of F110 is lower than 3.8V(we default F110 is ready to alarm if the battery
lower than 3.8V), please prepare for charge your battery.
5. Flight Controller CS360 Introduction
Brand new self-developed flight controller system CS360, breaking the defects of
Euler angles singular value, using rotation vector algorithms ensure the F110 can fly
in angle mode even under high-speed.
CS360 support both coreless and brushless motor, compatible all kinds of
quadcopters.
There’s six output port, including a battery voltage testing port and a buzzer
connect port to indicate disarm or low voltage.
The power supply of CS360 support 1S(4.2V) or 2S(8.4V) or BEC(+5V). Power
supply with a 2S battery will make the F110 more powerful, but you have to change
the motors that support 2S battery.
When use 1S battery: the camera will powered by the 1S battery directly.
When use 2S battery: the current of camera is 0.5A, the voltage is 5V, camera you
bought from Radiolink, come with F110 is not support 2S battery.
BL(bonding pad): short circuit the bonding pad indicates the CS360 is brush mode
while without short circuit indicates brushless mode(use brushless BEC). CS360
Page 12

Radiolink Electronic Limited
www.radiolink.com
11
support almost all kinds of coreless motors including 1020.
Size of PCBA: 21*32* 1.2mm.
Attention: Please make sure the voltage of battery before power on your F110,
choose BL 1S or BL 2S if you want to DIY, do not short circuit the three BL at the
same time.
6. Read Before Use F110
6.1 Read Before Start to Flight
(1) Since F100 have not Altitude Hold so far, keep the throttle stick smoothly to avoid
F110 suddenly drastically up and down.
(2) Put the throttle stick to the lower position immediately to let motor stop work
when F110 knock something.
(3) Let the motor be perpendicular to F110 plate.
Page 13

Radiolink Electronic Limited
www.radiolink.com
12
6.2 Read Before try the Throw and Fly Mode
(1) Make sure you can control F110 skillful and at a pretty wide open space to try the
Throw and Fly Mode.
(2) Make sure the head direction and then throw and fly the F110.
(3) Push the throttle stick as soon as throw your F110 and try your best throw it
upward.
(4) F110 can correct attitude and direction automatically. If you throw F110 too hard,
it may fly to a direction all the time because of the inertia, you can correct the
direction by move sticks.
7. Flight Mode
RadioLink racing drone F110 have Stabilize Mode and Low Speed Mode so far.
7.1 Stabilize Mode
AT9S/AT9/AT10/AT10II: Move SwC to the up or center position that keep F110 work
in Stabilize Mode.
T8FB: Move SwB to the up or center position that keep F110 work in Stabilize Mode.
7.2 Low Speed Mode
AT9S/AT9/AT10/AT10II: Move SwC to the bottom position that keep F110 work in
Low Speed Mode.
T8FB: Move SwB to the bottom position that keep F110 work in Low Speed Mode.
Low Speed Mode will slower than Stabilize Mode and with and less angular variation
when flight, suggest that RC beginners control with Stabilize Mode.
8. Calibration
Level calibration have finished when you received the F110, you can re-calibrate if
you need.
Level Calibration: Please put the F110 on a level surface, the left stick to the lower
left position and the right stick to the lower right position, keep about 3 seconds, the
green LED will blinking once, power on again, then calibrate success.
Page 14

Radiolink Electronic Limited
www.radiolink.com
13
9. Components
Without FPV
With FPV
Page 15

Radiolink Electronic Limited
www.radiolink.com
14
10. Details about FPV
 Loading...