

Page 1

Radio Infinity
NR413-SA 3G Mobile Router
USER MANUAL
2011‐01‐06,V0.6
Page 2

1
Federal Communication Commission Interference Statement
This equipment has been tested and found to comply with the limits for a Class B digital device, pursuant to Part 15 of
the FCC Rules. These limits are designed to provide reasonable protection against harmful interference in a
residential installation. This equipment generates, uses and can radiate radio frequency energy and, if not installed
and used in accordance with the instructions, may cause harmful interference to radio communications. However,
there is no guarantee that interference will not occur in a particular installation. If this equipment does cause harmful
interference to radio or television reception, which can be determined by turning the equipment off and on, the user is
encouraged to try to correct the interference by one of the following measures:
- Reorient or relocate the receiving antenna.
- Increase the separation between the equipment and receiver.
- Connect the equipment into an outlet on a circuit different from that to which the receiver is connected.
- Consult the dealer or an experienced radio/TV technician for help.
This device complies with Part 15 of the FCC Rules. Operation is subject to the following two conditions: (1) This
device may not cause harmful interference, and (2) this device must accept any interference received, including
interference that may cause undesired operation.
FCC Caution: Any changes or modifications not expressly approved by the party responsible for compliance could
void the user's authority to operate this equipment.
IEEE 802.11b or 802.11g operation of this product in the U.S.A. is firmware-limited to channels 1 through 11.
IMPORTANT NOTE:
FCC Radiation Exposure Statement:
This equipment complies with FCC radiation exposure limits set forth for an uncontrolled environment. End users must
follow the specific operating instructions for satisfying RF exposure compliance. To maintain compliance with FCC RF
exposure compliance requirements, please follow operation instruction as documented in this manual.
This transmitter must not be co-located or operating in conjunction with any other antenna or transmitter.
Note to US model owner: To comply with US FCC regulation, the country selection function has been
completely removed from all US models. The above function is for non-US models only.
Page 3

2
TableofContents
Package Contents ……………………………………………………………………………………………………..…………... 3
Charging Methods ……………………………………………………………………………………………………..…………... 4
NR413-SA 3G Mobile Router Overview …………………………………………………………………………………………. 5
Light-Indicators ……………………………………………………………………………………………………..……………… 5
LED Status ……………………………………………………………………………………………………..…………………… 6
Battery Guide & Charging Tips ……………………………………………………………………………..……………………. 7
User Warning ……………………………………………………………………………………………..………………………... 8
Quick Connection & Setup ………………………………………………………………………………………………………... 9
Quick & Advanced Configuration …………………………………………………………………………..…………………… 10
Quick Configuration Settings …………………………………………………………………………..…………………… 11-13
Accessing the Advanced Configuration Settings ……………………………………………………………………………... 14
Advanced Wireless Settings
………………………………………………………………………………………………
15-20
i. Wireless Network (SSID & Wireless Channels) ………………………………………………………………………… 16
ii. Wireless Security Policy (WEP, WPA, WPA-PSK) ……………………………………………..…………………… 17-18
iii. DHCP Settings …………………………………………………………………………………..…………………………. 19
iv. Power Saving Settings …………………………………………………………………………………………………….. 20
Advanced 3G Modem Settings
…………………………………………………………………………..…………………… 21
i. Pin Code Protect ………………………………………………………………………………………..…………………… 21
ii. Dial Code ………………………………………………………………………………………………..…………………… 21
iii. APN Service …………………………………………………………………………………………..……………………. 21
iv. 3G Username & Password …………………………………………………………………………..…………………… 21
Advanced Firewall Settings
………………………………………………………………………..………………………
22-26
i. Firewall Settings ……………………………………………………………………………………………………..……… 23
ii. IP/Port Filtering ……………………………………………………………………………………………………………… 24
iii. MAC Filtering …………………………………………………………………………………………..…………………… 25
iv. VPN Pass-Through …………………………………………………………………………………..……………………. 26
SMS
……………………………………………………………………………………………………..………………………….
27
Administrator Options
……………………………………………………………………………………………………..…... 28
i. Language …………………………………………………………………………………………………………………..... 29
ii. Change Password ………………………………………………………………………………………..………………… 30
iii. Firmware Upgrade ………………………………………………………………………………………..……………….. 31
iv. Settings Management ………………………………………………………………………………………..……………. 32
Page 4
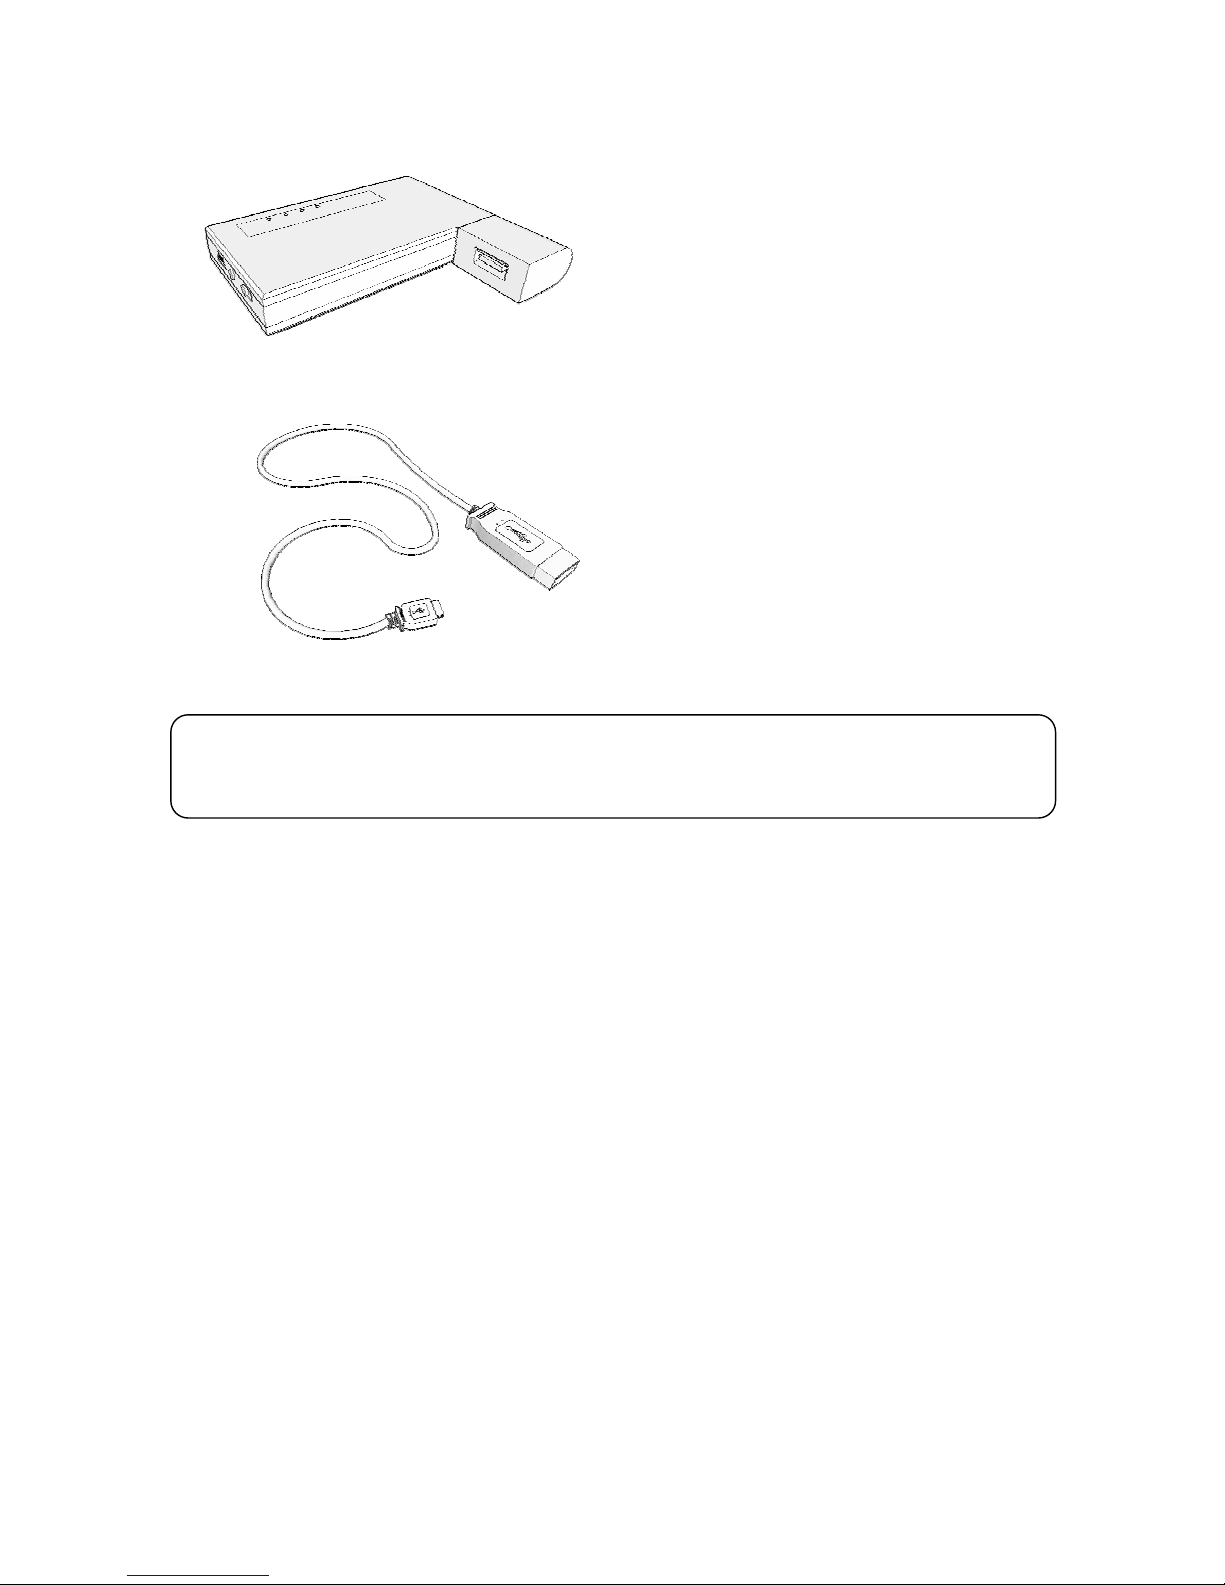
Package Contents
NR413-SA 3G Mobile Router
USB to mini-USB cable
CAUTION
Using a power supply with a different voltage rather than the one included with the NR413-SA will da mage and
void the warranty for this product.
3
Page 5
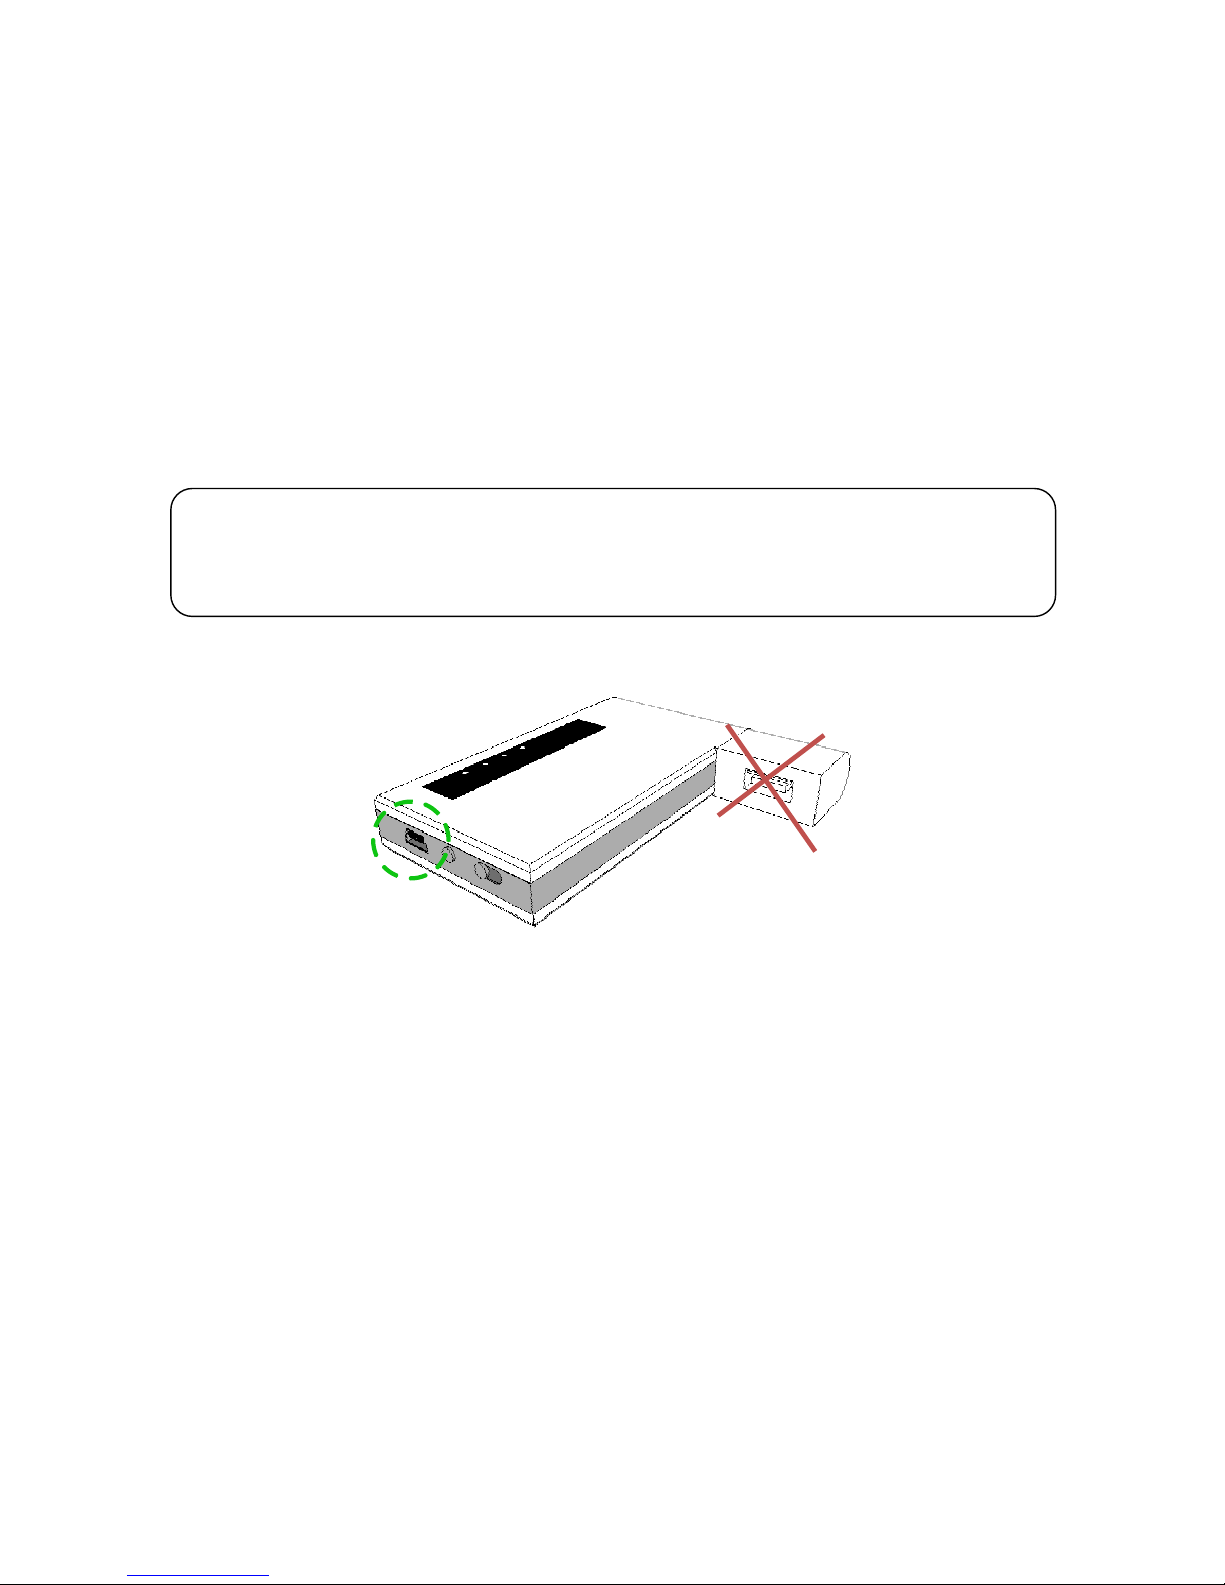
Charging Methods
Power Adapter
Attach the USB end of the cable into the port of the power adapter and the other end into the Mini-B
USB port of the NR413-SA Mobile Router, and then plug the power adapter into a wall socket.
PC or Laptop
To charge via PC or laptop, attach the cable into the USB port of your computer and the other end
into the mini-USB port of the NR413-SA 3G Mobile Router.
Car Adapter
Use the optional car adapter to charge the NR413-SA 3G Mobile Router in your vehicle. Attach the
cable into the mini-USB port of router and then plug the car adapter into the socket of the vehicle.
WARNING!
Do not attempt to charge the router via the USB dongle port!
This will cause damage to the router and void the warranty for this product.
Always
charge
via the mini-USB port using the cable provided.
4
Page 6
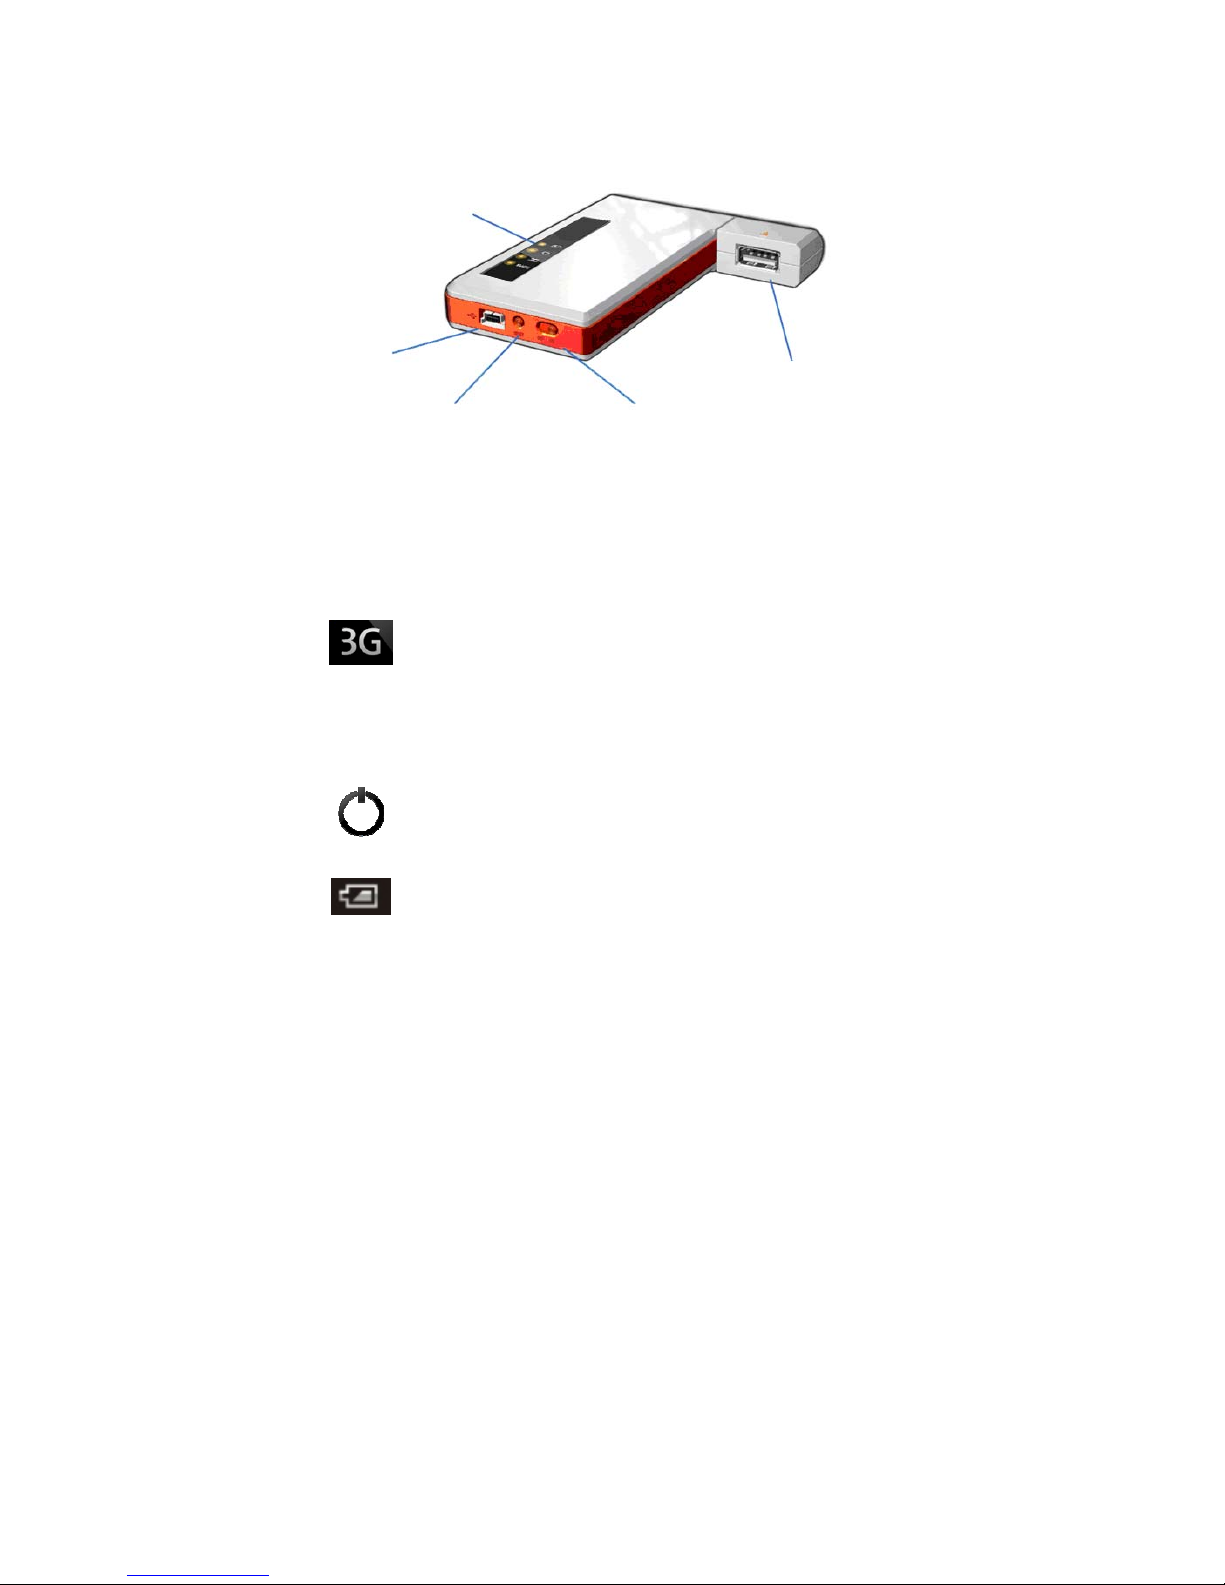
NR413-SA 3G Mobile Router
Light Indicators
On/Off Switch
Wake Button
Dongle USB
Port
Mini-B USB Power Input
(PC or power adapter)
Light Indicators
Indicates 3G Connection Sstatus
WIFI
Indicates Wi-Fi Connection Status
Power Status
Charging Indicator
5
Page 7
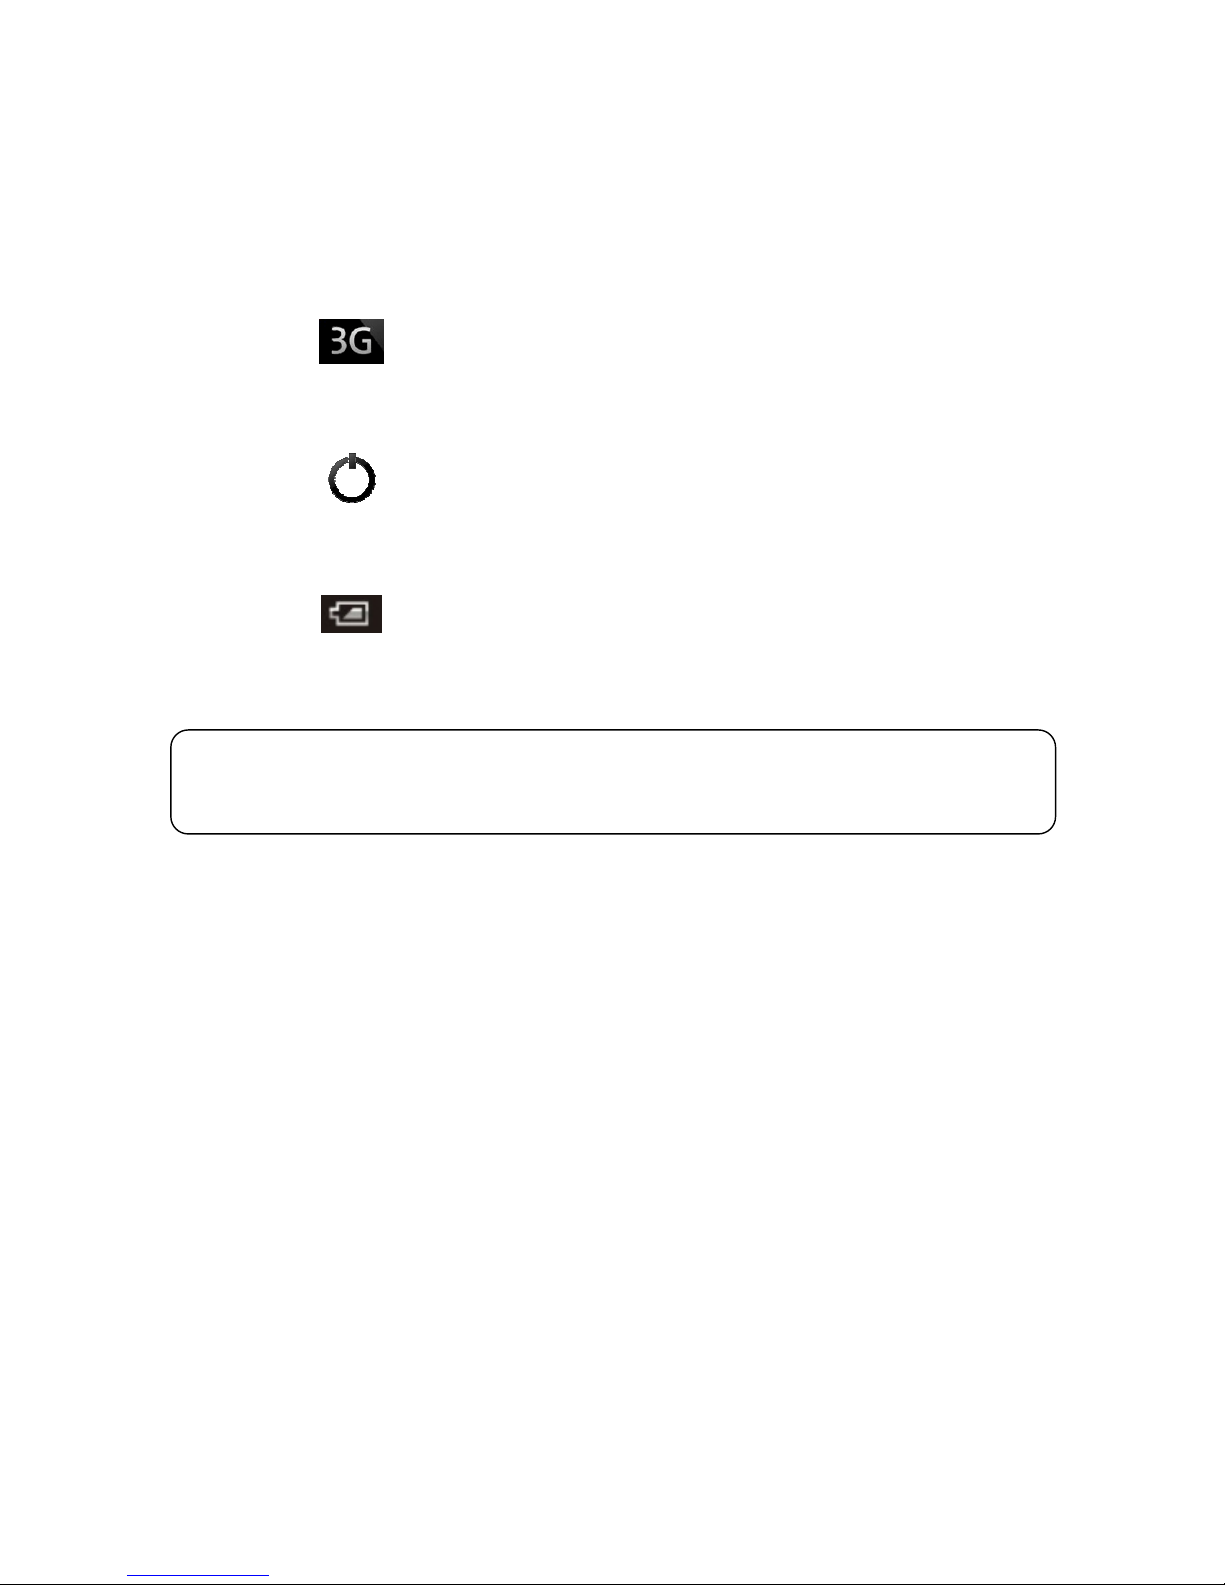
LED Status
WIFI
Blinking
On
Searching Network
Connected to Wi-Fi Network*
Blinking
On
Dialling Network
Connected to 3G Network*
On/Off
Blinking
Power Status*
Low Battery
On
Off
Blinking
Charging
Not charging
Battery Fault
NOTICE
In order to help conserve battery life, light indicators will automatically turn off after being connected for 10
seconds.
To refresh the light indicators, press the Wake button.
6
Page 8
Battery Guide & Charging Tips
NOTICE
It is recommended
to fully charge the battery for a minimum of 8 hours
before using the NR413-SA 3G
Mobile Router for the first time.
About the battery
• It takes a minimum of 5 hours for the battery to fully charge.
• Battery life will last up to 6 hours depending on usage.
• Battery life lasts up to 100 hours in Standby Mode.
The battery for the NR413-SA 3G Mobile Router will last for up to 6 hours depending on:
• The manufacturer’s USB 3G dongle.
• The number of Wi-Fi devices connected.
• Signal strength & Network.
• Online usage & Data transfers.
• Temperature, features, and accessories.
You can use the NR413-SA 3G Mobile Router while it is charging. However, be aware that it may take longer for the
battery to become fully charge.
Tips
To maximize the potential of the NR413-SA 3G Mobile Router‘s battery, we recommend users to note the
following:
• When charging your router, keep it near room temperature.
• Avoid leaving the router in direct sunlight.
• Allow for frequent full charge and discharge cycles.
• Store your router in a cool, dry place.
• Never expose batteries to temperatures below -10°C (14°F) or above 45°C (113°F).
• It is normal for batteries to gradually wear down and require longer charging times.
7
Page 9
Antenna Reception
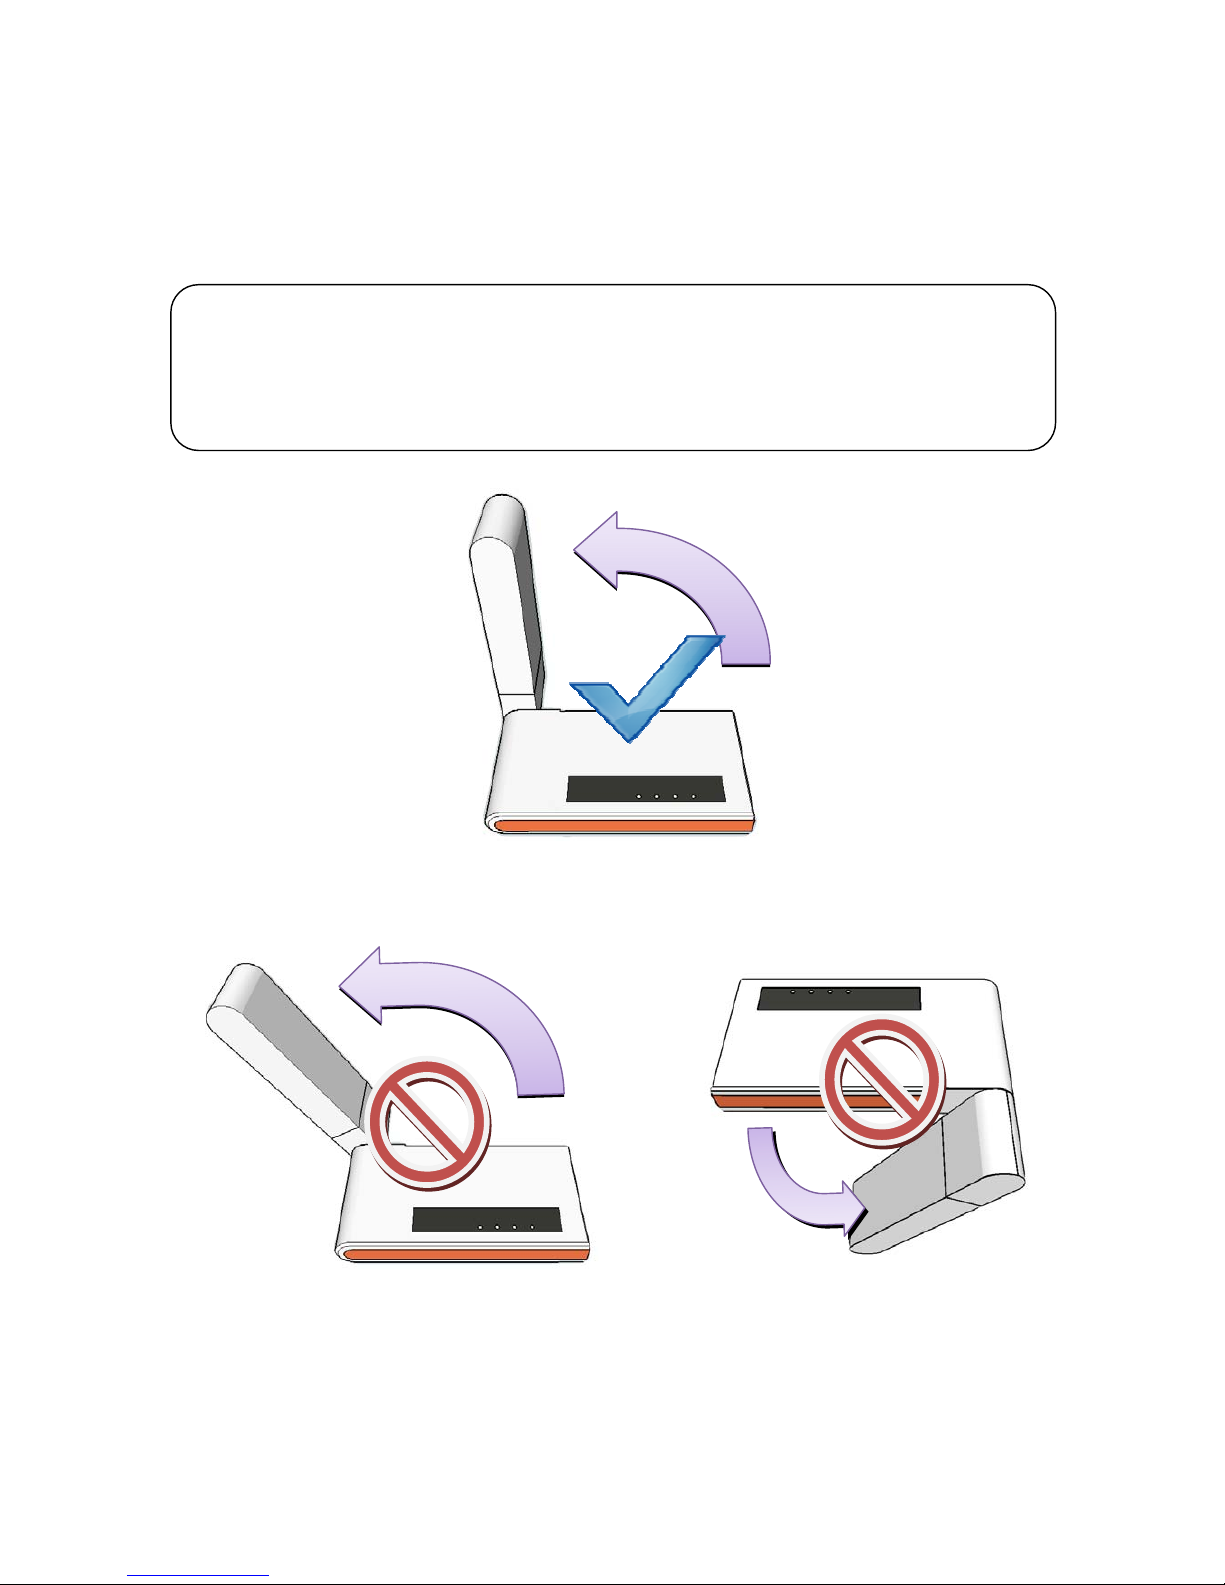
Users can rotate the dongle to improve the wireless 3G reception in weak signal areas.
For optimal reception strength, rotate the dongle to 90 degrees.
Although the Mobile Router is designed to rotate to a maximum of 180 degrees, it is recommended for users not to
rotate the dongle beyond 120 degrees.
WARNING!
Always rotate the dongle upwards with the light indicator panel of the Mobile Router facing upwards no
further than 180 degrees.
Similarly, do not rotate the dongle downwards beyond 45 degrees.
Rotating the dongle beyond these points will damage and void the warranty of the Mobile Router.
For optimal reception strength,
rotate the dongle to 90 degrees
Do not rotate the dongle upwards
beyond 90 degrees
Do not rotate the dongle downwards
beyond 45 degrees
8
Page 10
Quick Connection & Setup
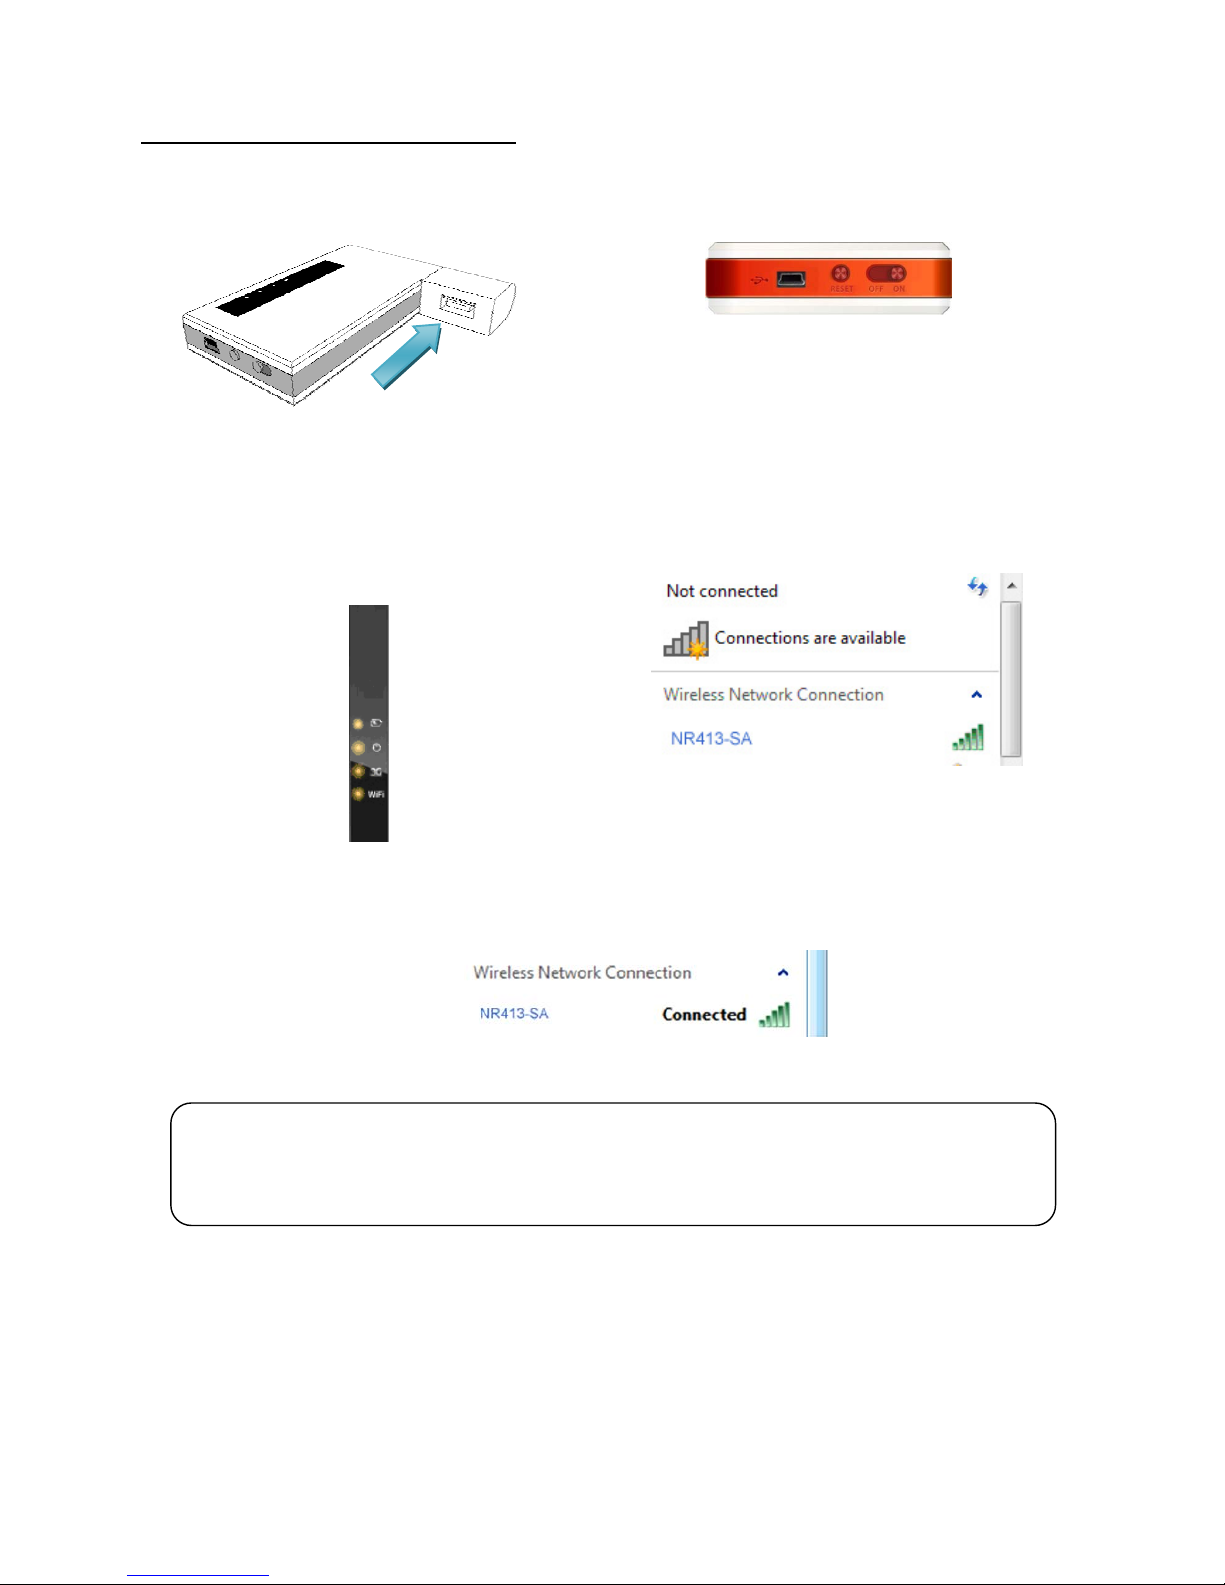
Connecting to the NR413-SA 3G Mobile Router
○
1 Plug in your USB 3G modem
○
2 Move the power switch from
OFF > ON
.
The power LED light will turn on. The Wi-Fi & 3G LED lights will flash.
○
3 The lights will stay on once a successful
connection has been established.
○
4 Open your wireless network and search for
NR413-SA
○
5 Connect to
NR413-SA
NOTICE
You can connect to the NR413-SA 3G Mobile Router without configuring any security settings.
However, it is highly recommend that you enable Wi-Fi security to prevent unauthorized users from accessing
your network
9
Page 11

Quick & Advanced Configuration
Once you have connected to the NR413-SA 3G Mobile Router you can now login and use the browser interface to con f igure the
router’s settings.
To login
1.
Open your Web browser. Enter
192.168.6.1
into the address bar and press
Enter
or the
Return
key. You will be directed
to the login page for the browser interface.
2.
Select the ‘
Quick
’ or ‘
Advanced
’ button on the login page.
Select the ‘
Quick
’ option to quickly configure the router’s basic settings, such as setting the Dial code, APN and wireless
security.
For more configuration options, select ‘
Advanced
’ to be directed to the Main Homepage. Users can then navigate through
the router’s advanced settings to configure MAC addresses, DCHP, Firewall, SMS and Firmware Upgrade.
3.
Enter your password & click ‘
login
’.
1.
(Default password is: ‘
admin’)
Tips
‘Add to Favorites’
or ‘
Bookmark this page
’ in your Web browser for faster & easier access.
10
Page 12
Quick Configuration Settings
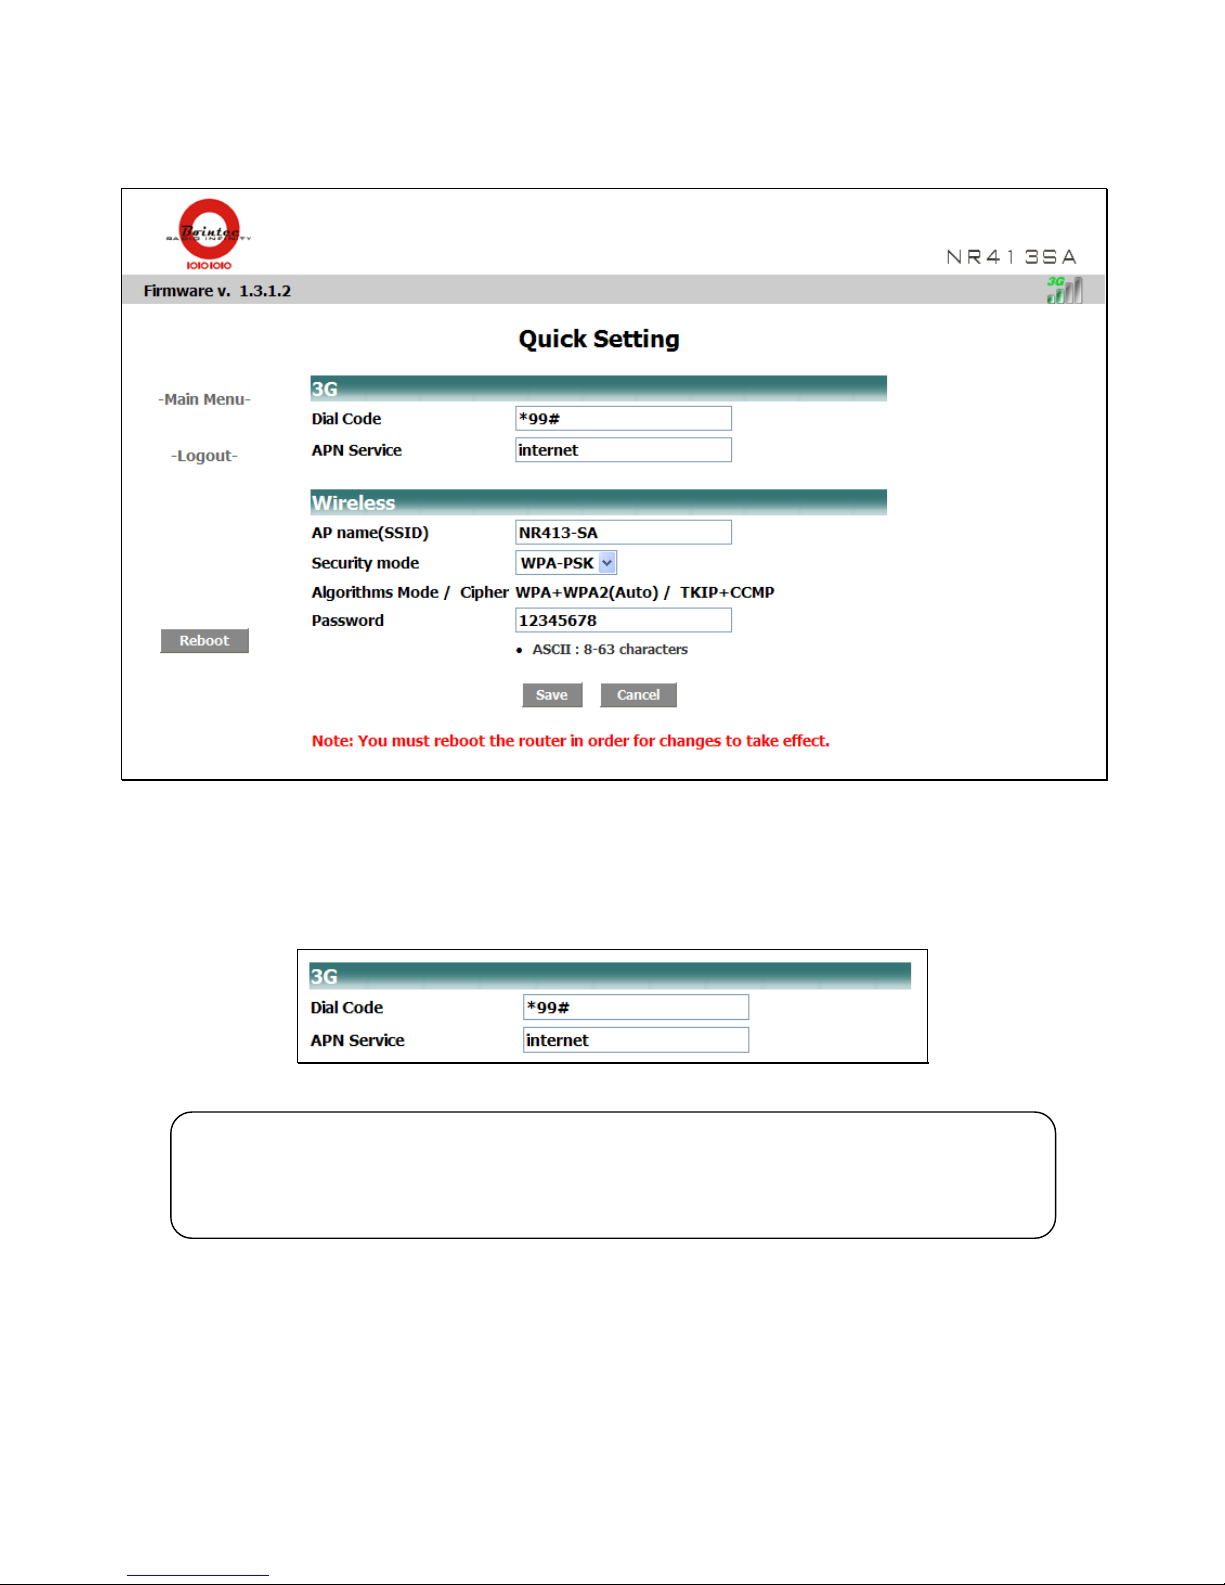
In the ‘
Quick Settings
’ window, users can quickly configure the basic 3G & Wireless settings for the NR413-SA 3G Mobile
Router.
3G
Dial code, APN Service
• Enter the
Dial Code
for your 3G network
• Enter the
APN service name
NOTICE
The dial code and APN service name should be given you to by your network provider. If you are not certain,
contact your network provider to find out the dial code & APN Service for your region, plus any additional
information you may require.
11
Page 13
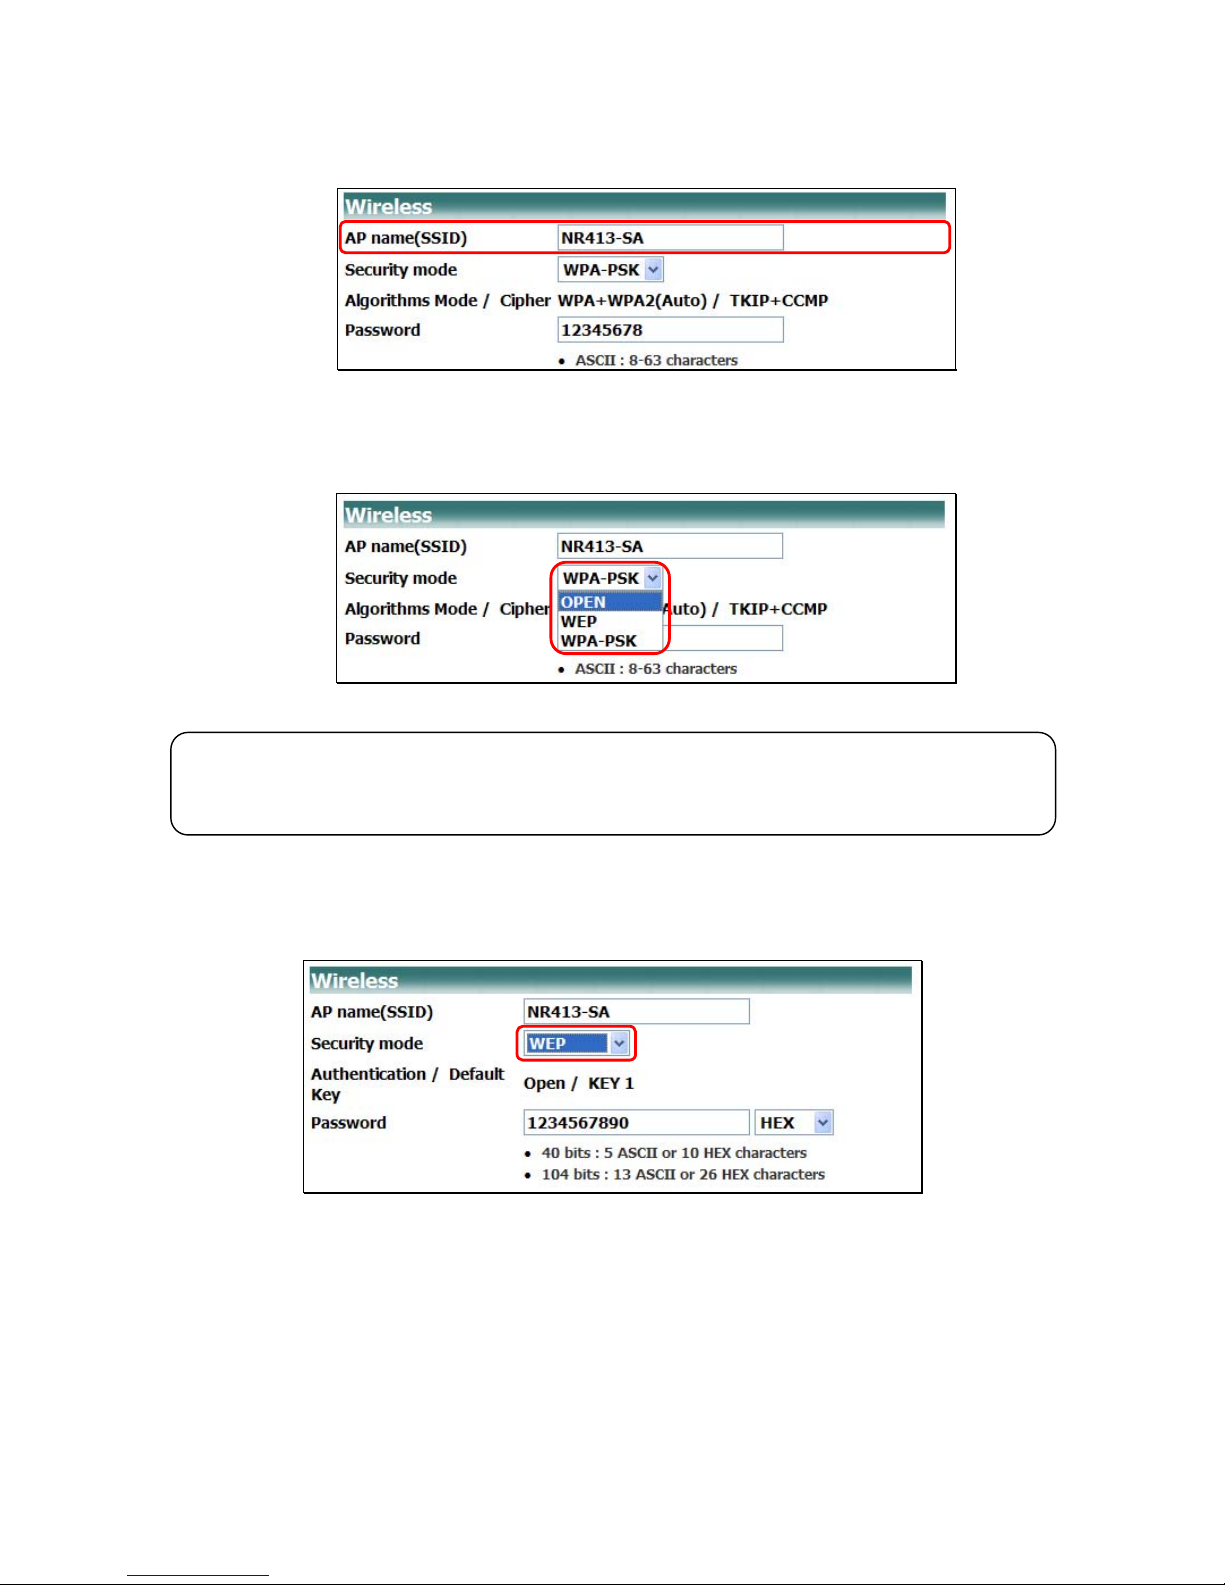
Wireless
•
SSID
- This is the wireless network’s name. Change it to something unique so that users can easily identify your
network.
•
Security
- The drop-down menu on the right will give you
Security mode
options. Select which type of the
security feature you would like to enable on your wireless net work (
OPEN, WEP
, or
WPA-PSK
)
12
NOTICE
You may leave your network ‘
OPEN
’ to allow access for all users without a network security key. However, this is
not recommended.
-- Using ‘
WEP’
Selecting ‘
WEP’
and the configuration window will expand and the following will become visible.
Authentification / Default Key
– This allows you to see the current settings for this configuration (See
Advanced Wireless Settings
).
Password & HEX / ASCII
– Select either
HEX
or
ASCII
encryption from the drop-down menu on the right
and then set the new password for your wireless network
-- Using ‘
WPA-PSK’
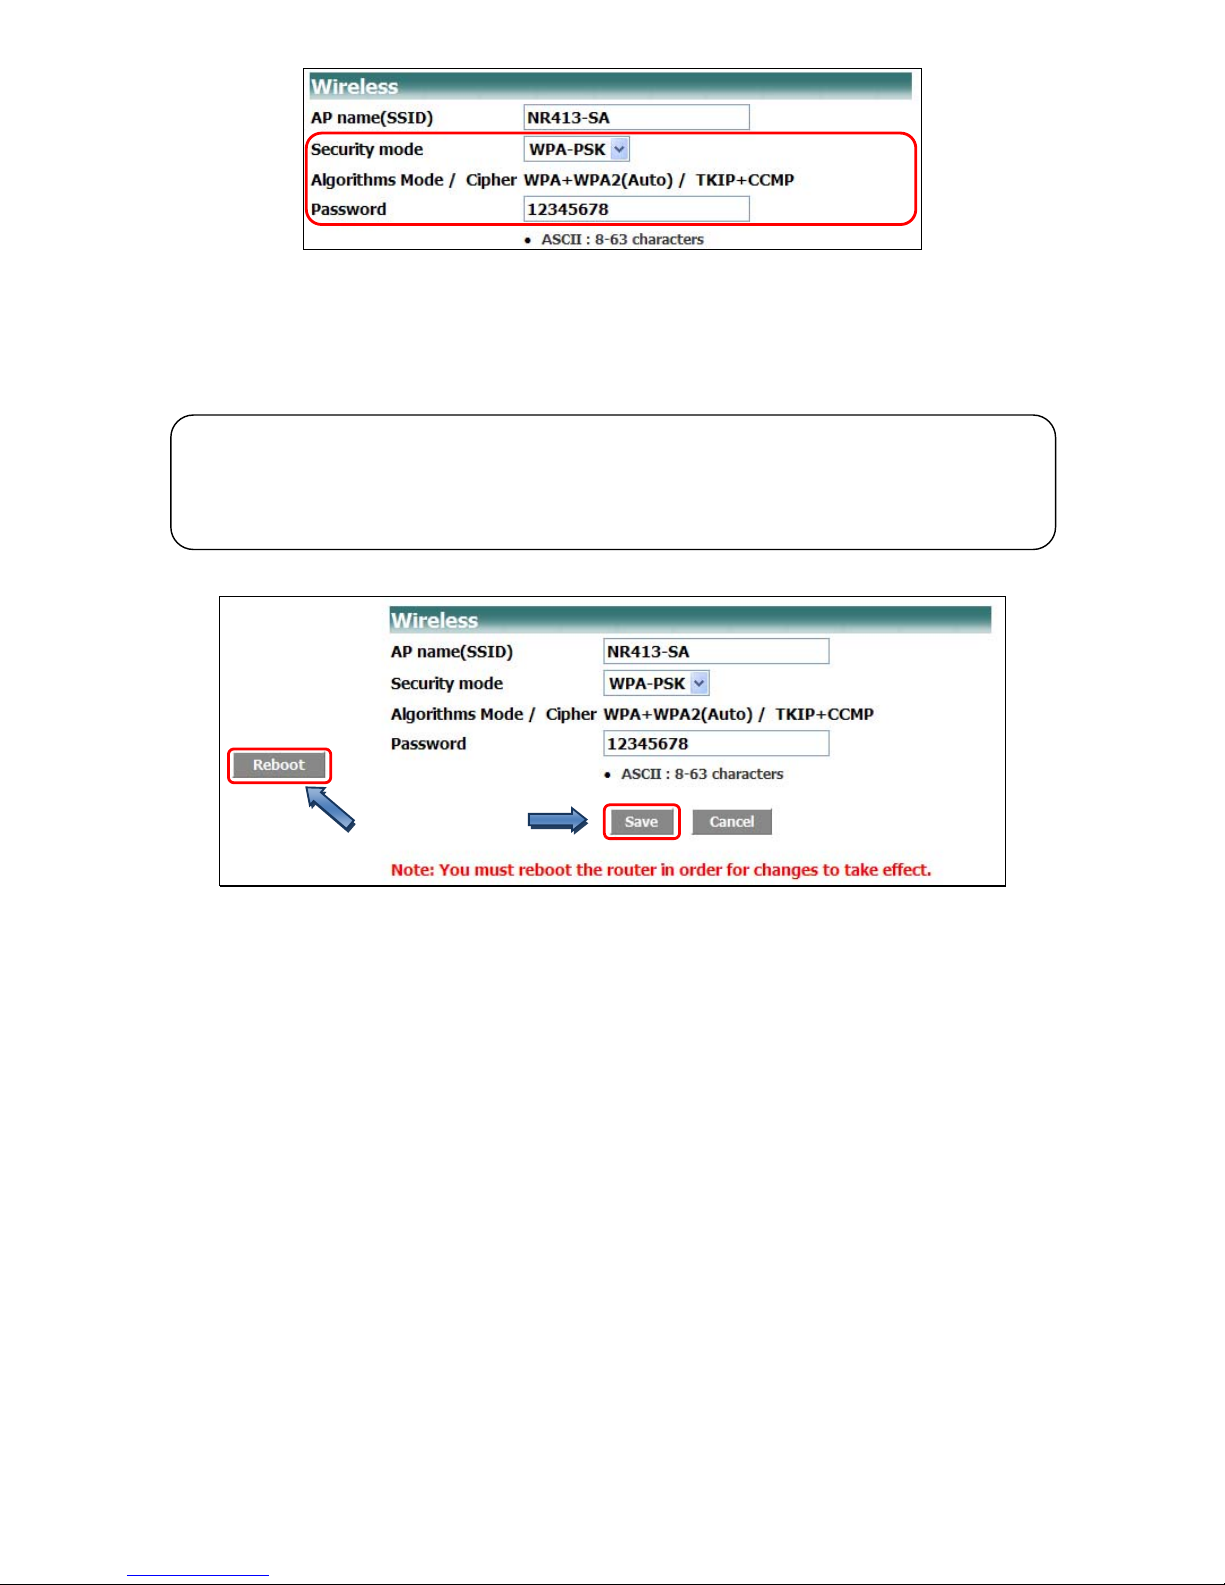
Selecting ‘
WPA-PSK’
and the configuration window will expand and the following will become visible.
Page 14
13
Mode / Cypher
– This allows you to see the current settings for this configuration. (See
Advanced
Wireless Settings
).
Password
– Set the new password for your wireless network (ASCII: between 8-63 alphanumeric
characters).
NOTICE
Each time you configure the settings, you must reboot the router in order for the changes to take effect
.
1. Click on the ‘
Save
’ button to save your settings.
2. Click on the ‘
reboot
’ button on the left side of the window.
②
①
Page 15
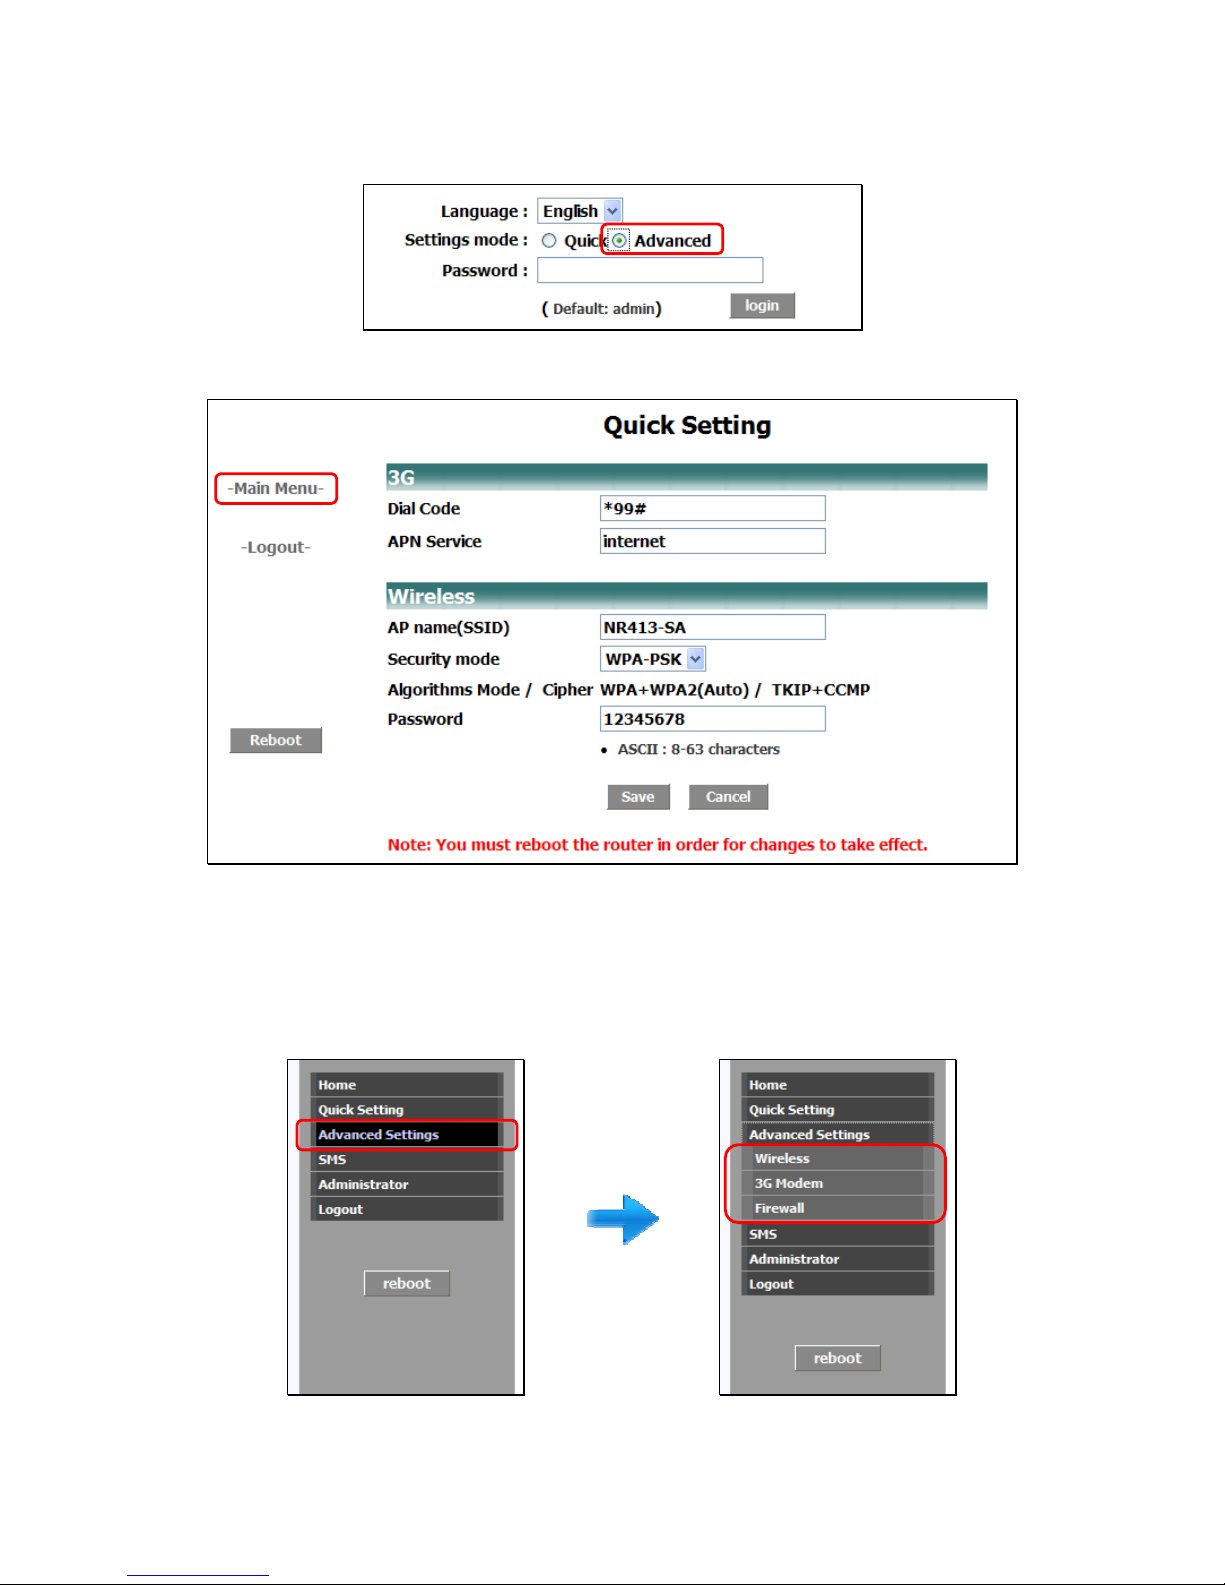
Accessing the Advanced Configuration Settings
You can access the ‘
Advanced Settings
’ from the router’s Main Homepage, either by:
○
1 Selecting the ‘
Advanced
’ button on the browser’s login page.
○
2 By clicking the ‘
Main Menu
’ link from the ‘
Quick Settings
’ page.
14
Once in the Main Homepage, click on the ‘
Advanced Settings
’ tab to expand further configuration options for:
○
1 Wireless
○
2 3G Modem
○
3 Firewall
Page 16
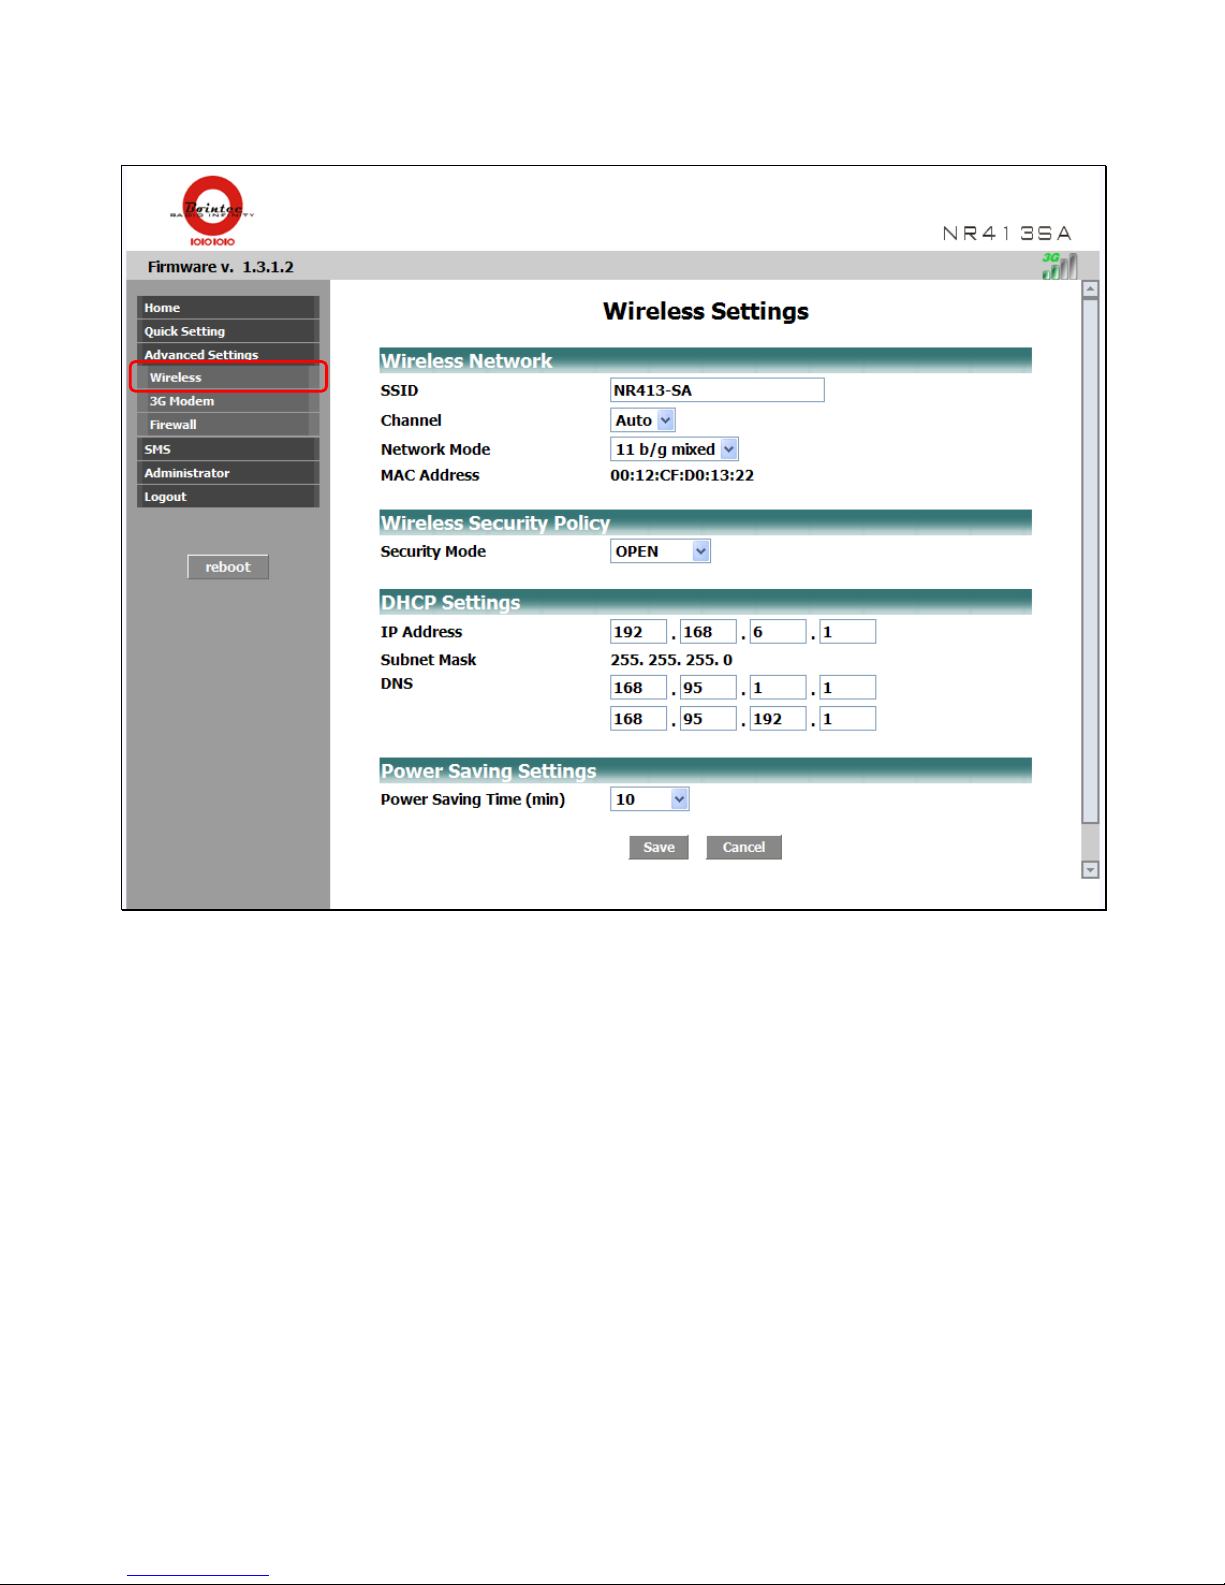
Advanced Wireless Settings
Click on ‘
Advanced Settings
’>‘
Wireless’
.
The page on the right will now give you options to configure the following settings for:
○
1 Wireless Network (SSID & Wireless Channels).
○
2 Wireless Security Policy (WEP, WPA, WPA-PSK, or open)
○
3 DHCP Setting
○
4 Power Saving Setting
15
Page 17
○
1
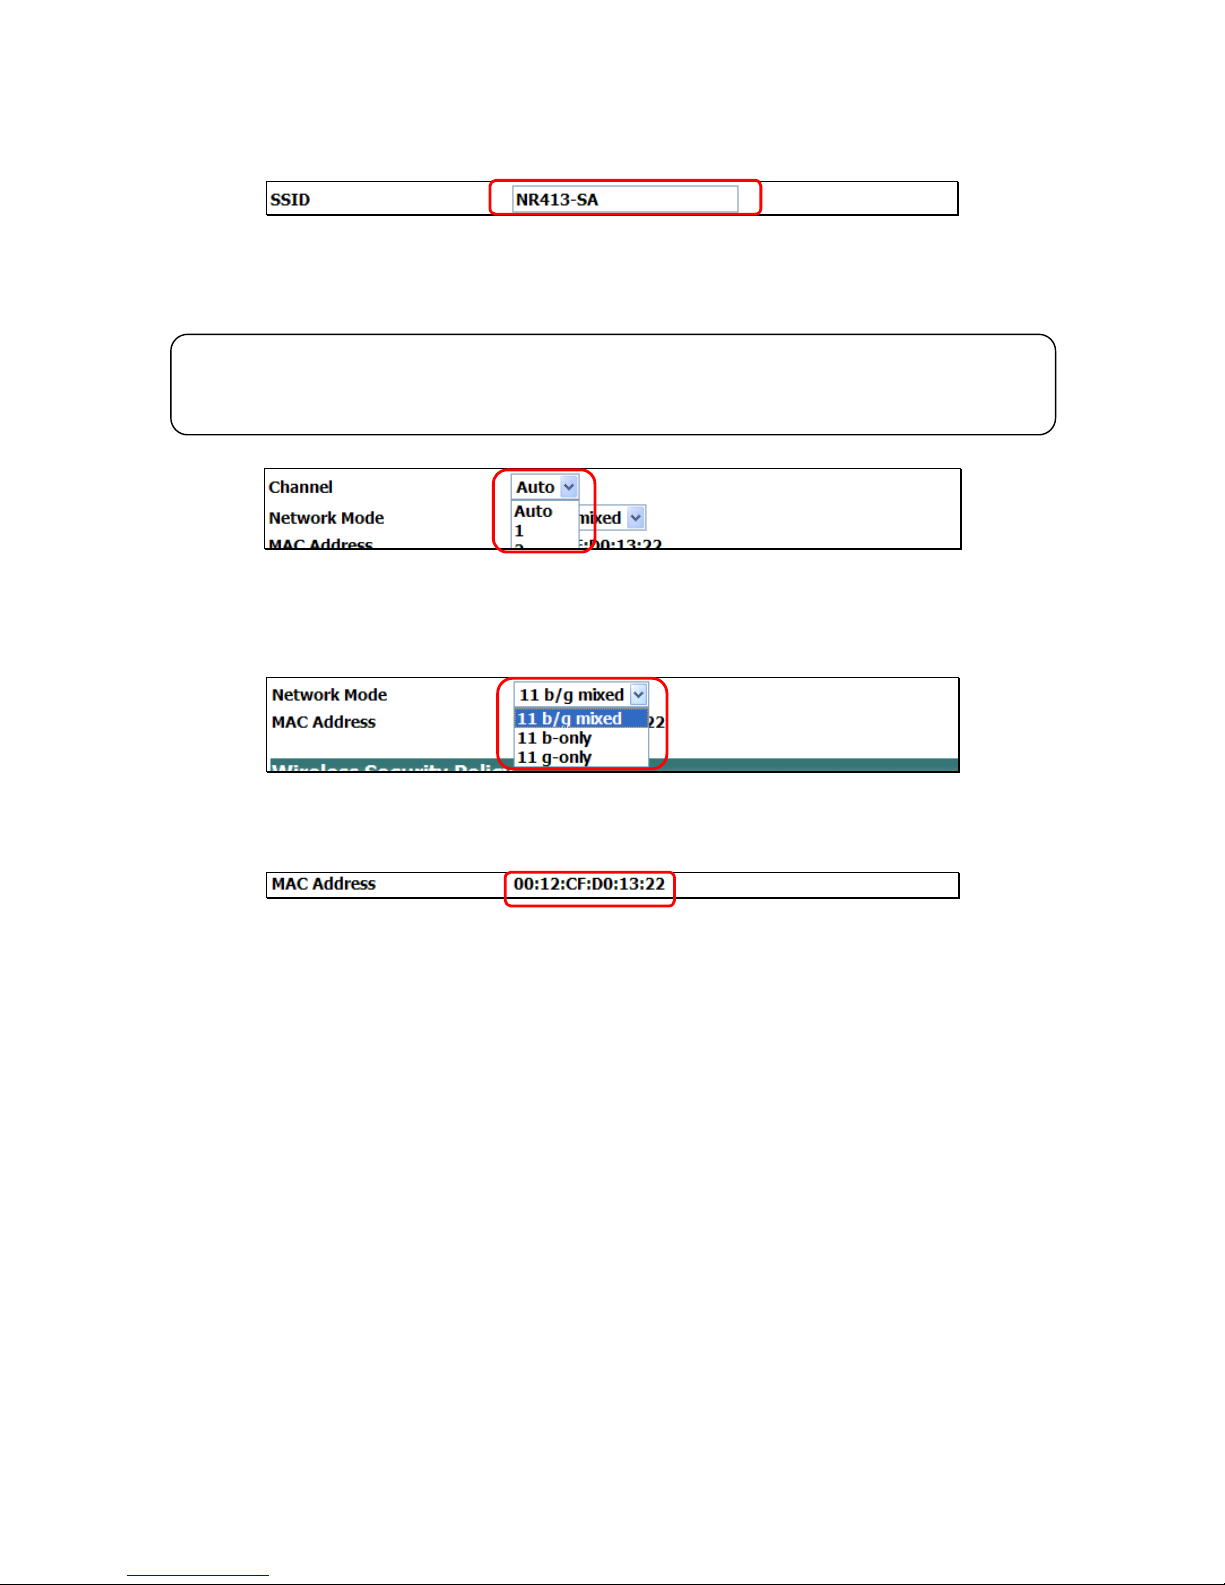
Wireless Network
•
SSID
- This is the wireless network’s name. Change it to something unique for other users to easily identify your network.
•
Wireless Channel
- Click on the drop-down menu to choose wireless channels. In North America and Europe, the
available channels are 1-13. In Japan, they are 1-14.
Tips
Try changing channels to get around interferences.
Preferred channels to use are 1, 6 and 11 since they are considered non-overlapping channels.
•
Network Mode
- Three wireless operating modes are supported on the router .Click on the drop-down menu to choose
11 b/g mixed, 11 b-only, or 11 g-only
.
16
•
MAC Address
- This is the router’s unique ID that can be identified by other devices.
Page 18
○
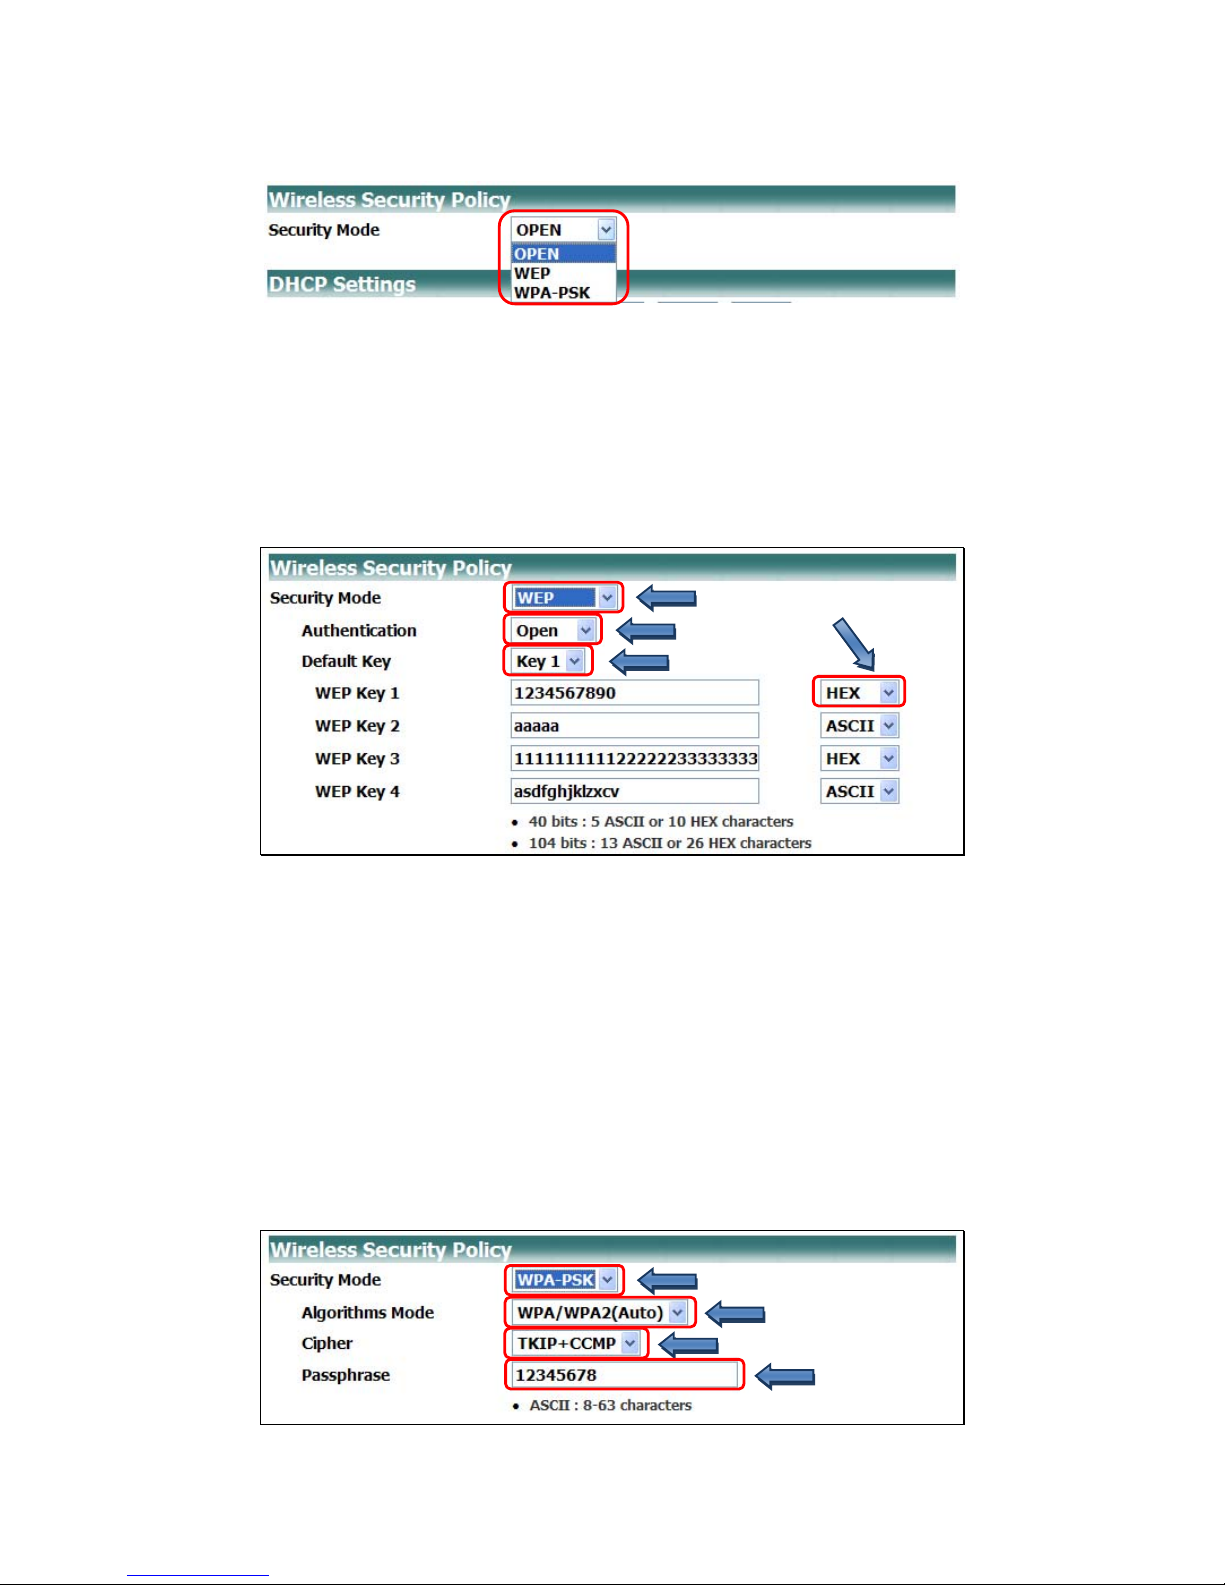
2 Wireless Security Policy
•
Security Mode
- Click on the drop-down menu to choose which type of Wireless Secur it y you would like to enable (WEP,
WPA-PSK).
17
•
Wired Equivalent Privacy (WEP)
- This is a 64-bit key with 10 hexadecimal digits or a 128-bit WEP key with 26
hexadecimal digits. This encryption will prevent other users from connecting to a
wireless network using your own WEP key. It will also protect your wireless
transmissions/communications from being accessed or received by other users.
To enable WEP, click on the drop-down menu and select ‘
WEP
’. Further security setting options for will become
available to you.
③
②
①
④
○
1 Select ‘
WEP
’ from drop-down menu
○
2 Choose either ‘
Open
’ or ‘
Shared
’ key authentication from the ‘
Authentication
’ drop-down menu.
○
3 Select which ‘
WEP Key (1-4)
’ you would like to enable.
○
4 Select ‘
HEX
’ or ‘
ASCII
’ encryption from the drop-down menu on the right and then type your WEP Key into the box
provided.
•
Wi-Fi Protected Access Pre Shared Key (WPA-PSK
) - This is a special mode of WPA that provides stronger
encryption protection than WEP encryption for users without an
enterprise authentication server. Click on the drop-down menu to
choose which type of Wireless Security you would like to enable
(WEP, WPA-PSK, WPA2-PSK).
③
①
②
④
Page 19
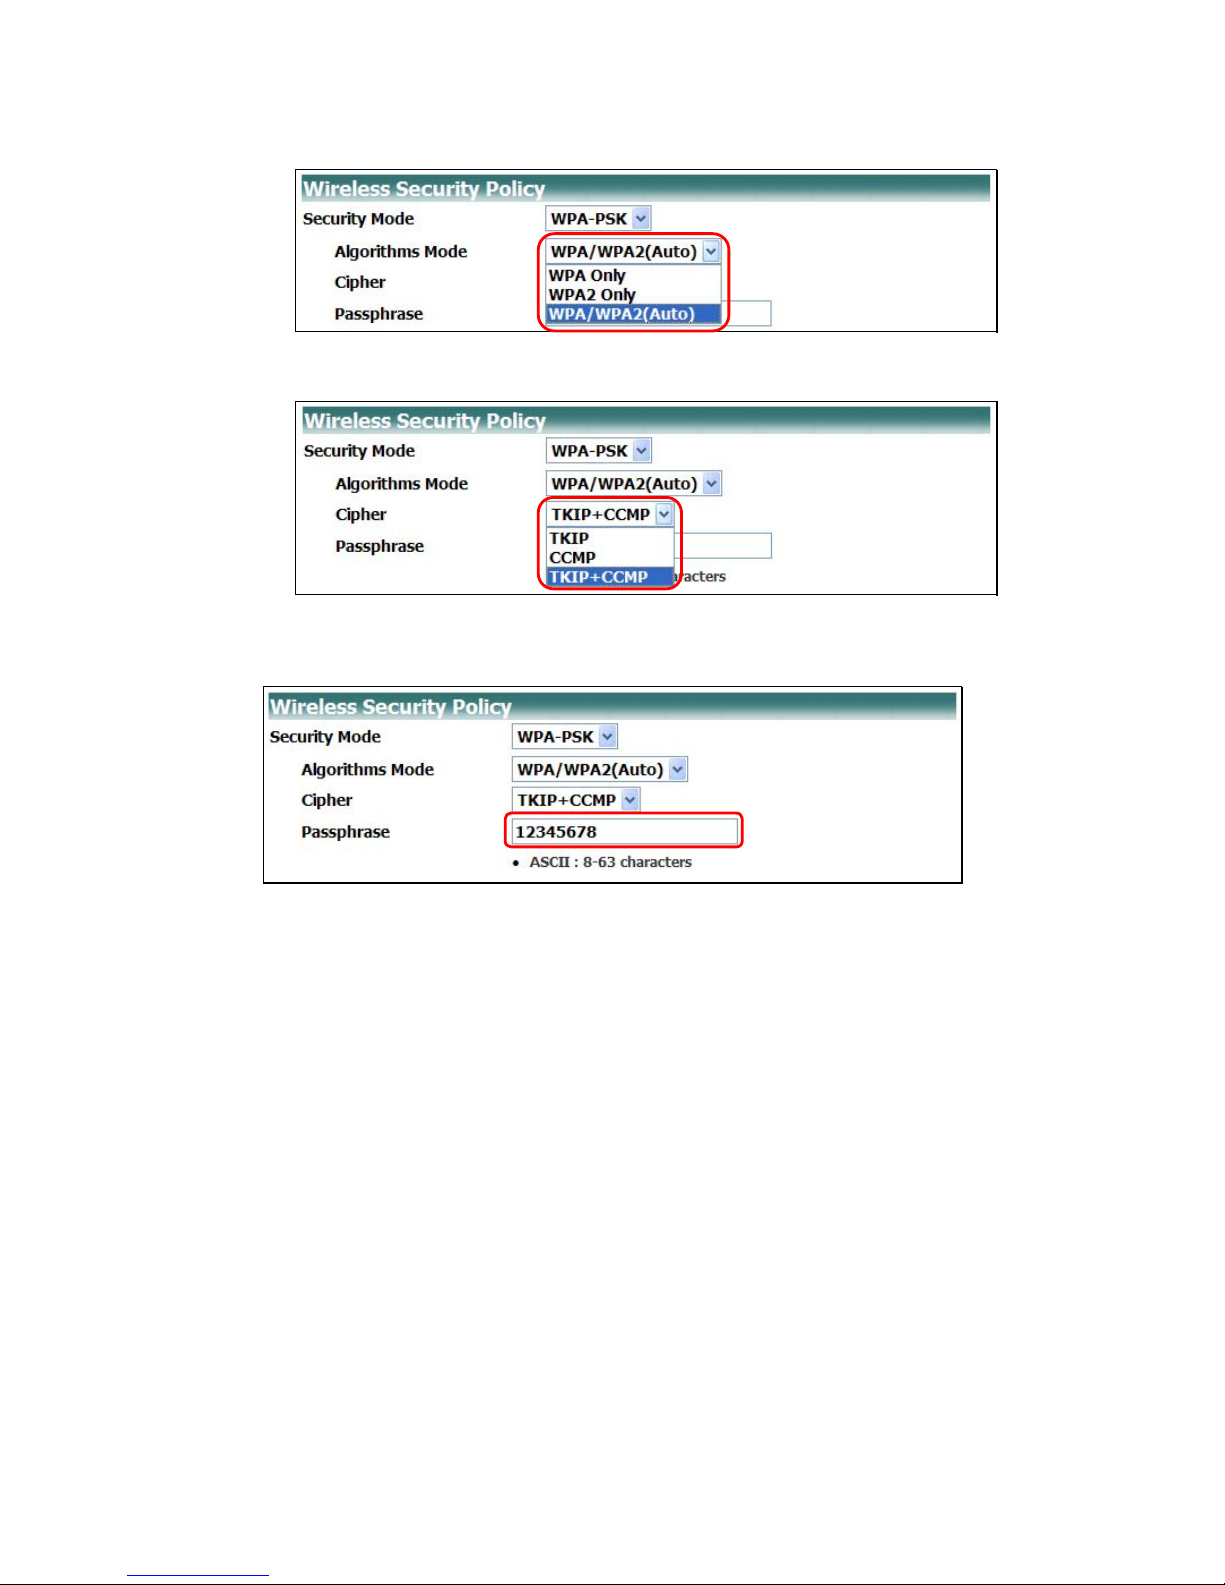
○
1 Select ‘
WPA-PSK
’ from the drop-down menu
○
2 Choose which network security ‘
Algorithms Mode
’ you would like to enable from the drop-down menu
18
○
3 Select which ‘
Cipher
’ to enable from the drop-down menu.
○
4 Enter your ’
Passphrase
‘ (between 8-63 characters).
This will serve as your network key whenever you connect to your wireless network.
Page 20
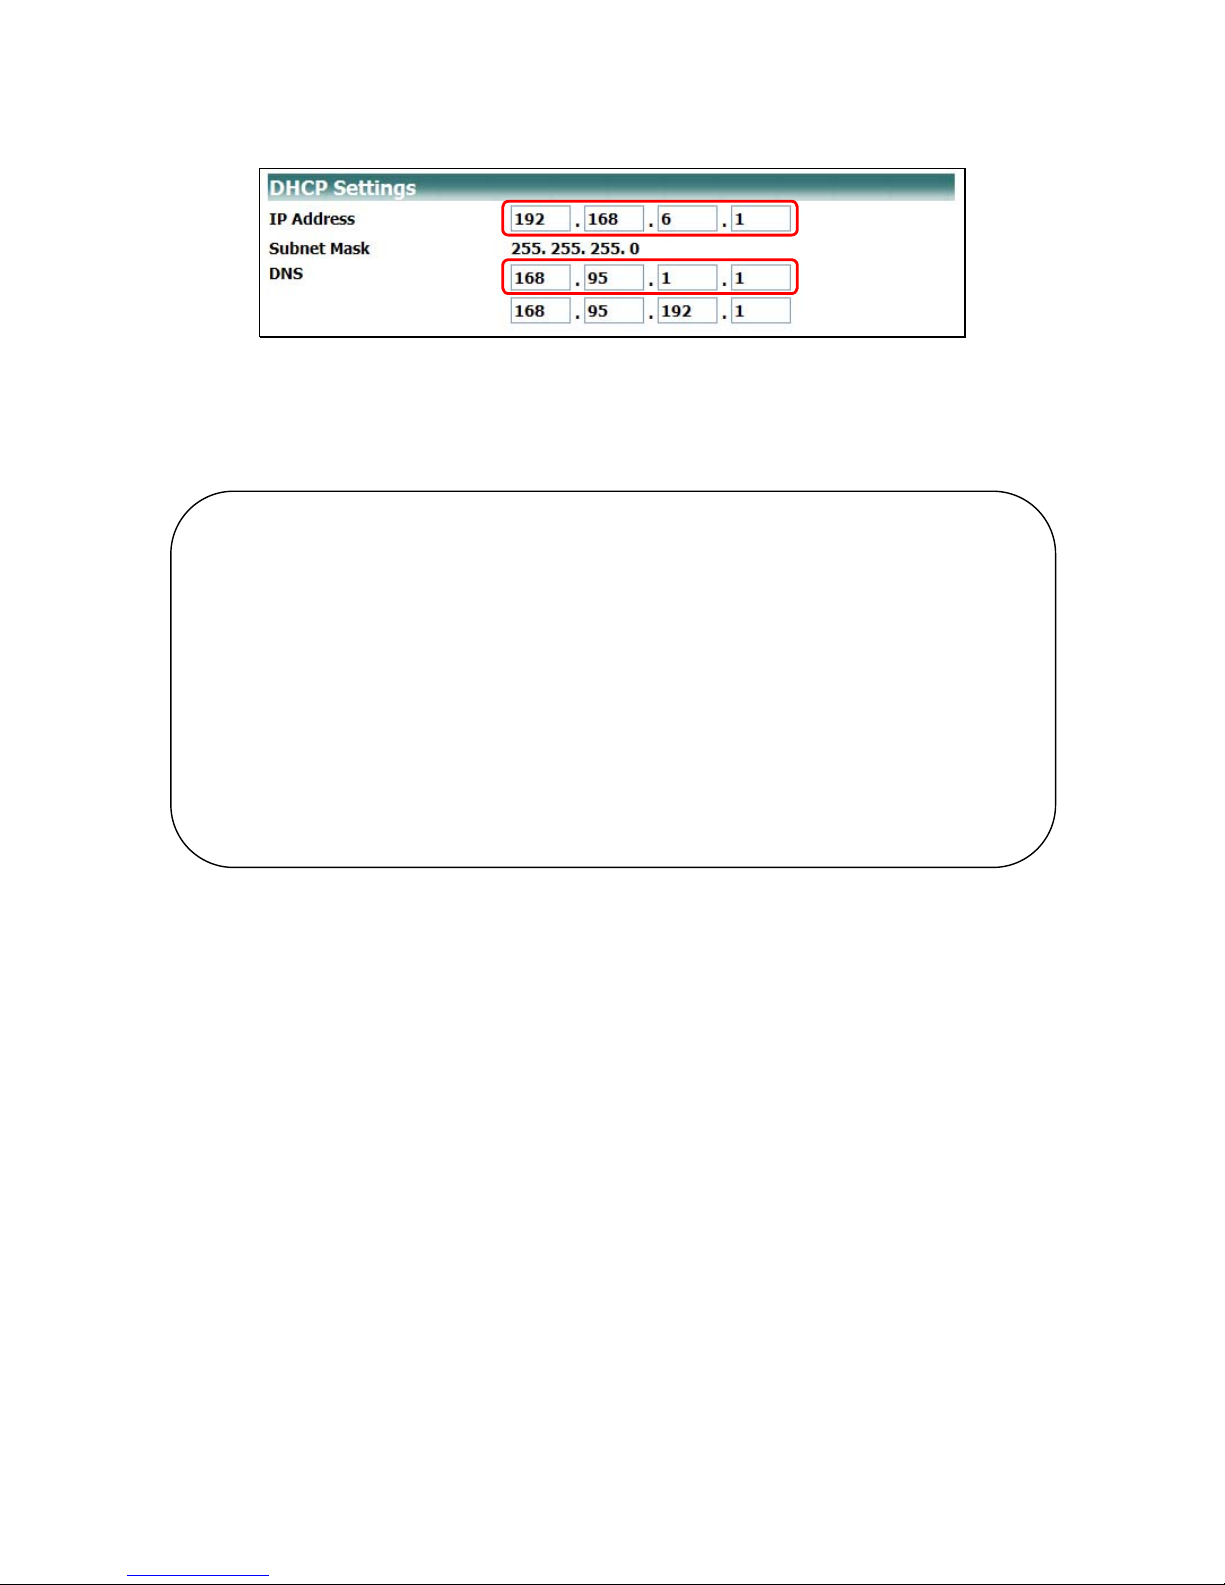
DHCP Settings
This is a method for automatically configuring TCP/IP network settings on computers, printers, and other network devices.
①
②
○
1 Configure you IP address in this field.
○
2 Configure the DNS address in this field
NOTICE
The Subnet mask will configure automatically according to the Class rules set by the IP Address Range.
IP Address Range
Class A: 10.0.0.1 – 10.255.255.254
Class B: 172.16.0.1 – 172.31.255.254
Class C: 192.168.0.1 – 192.168.255.254
Subnet mask
Class A: 255.0.0.0
Class B: 255.255.0.0
Class C: 255.255.255.0
19
Page 21
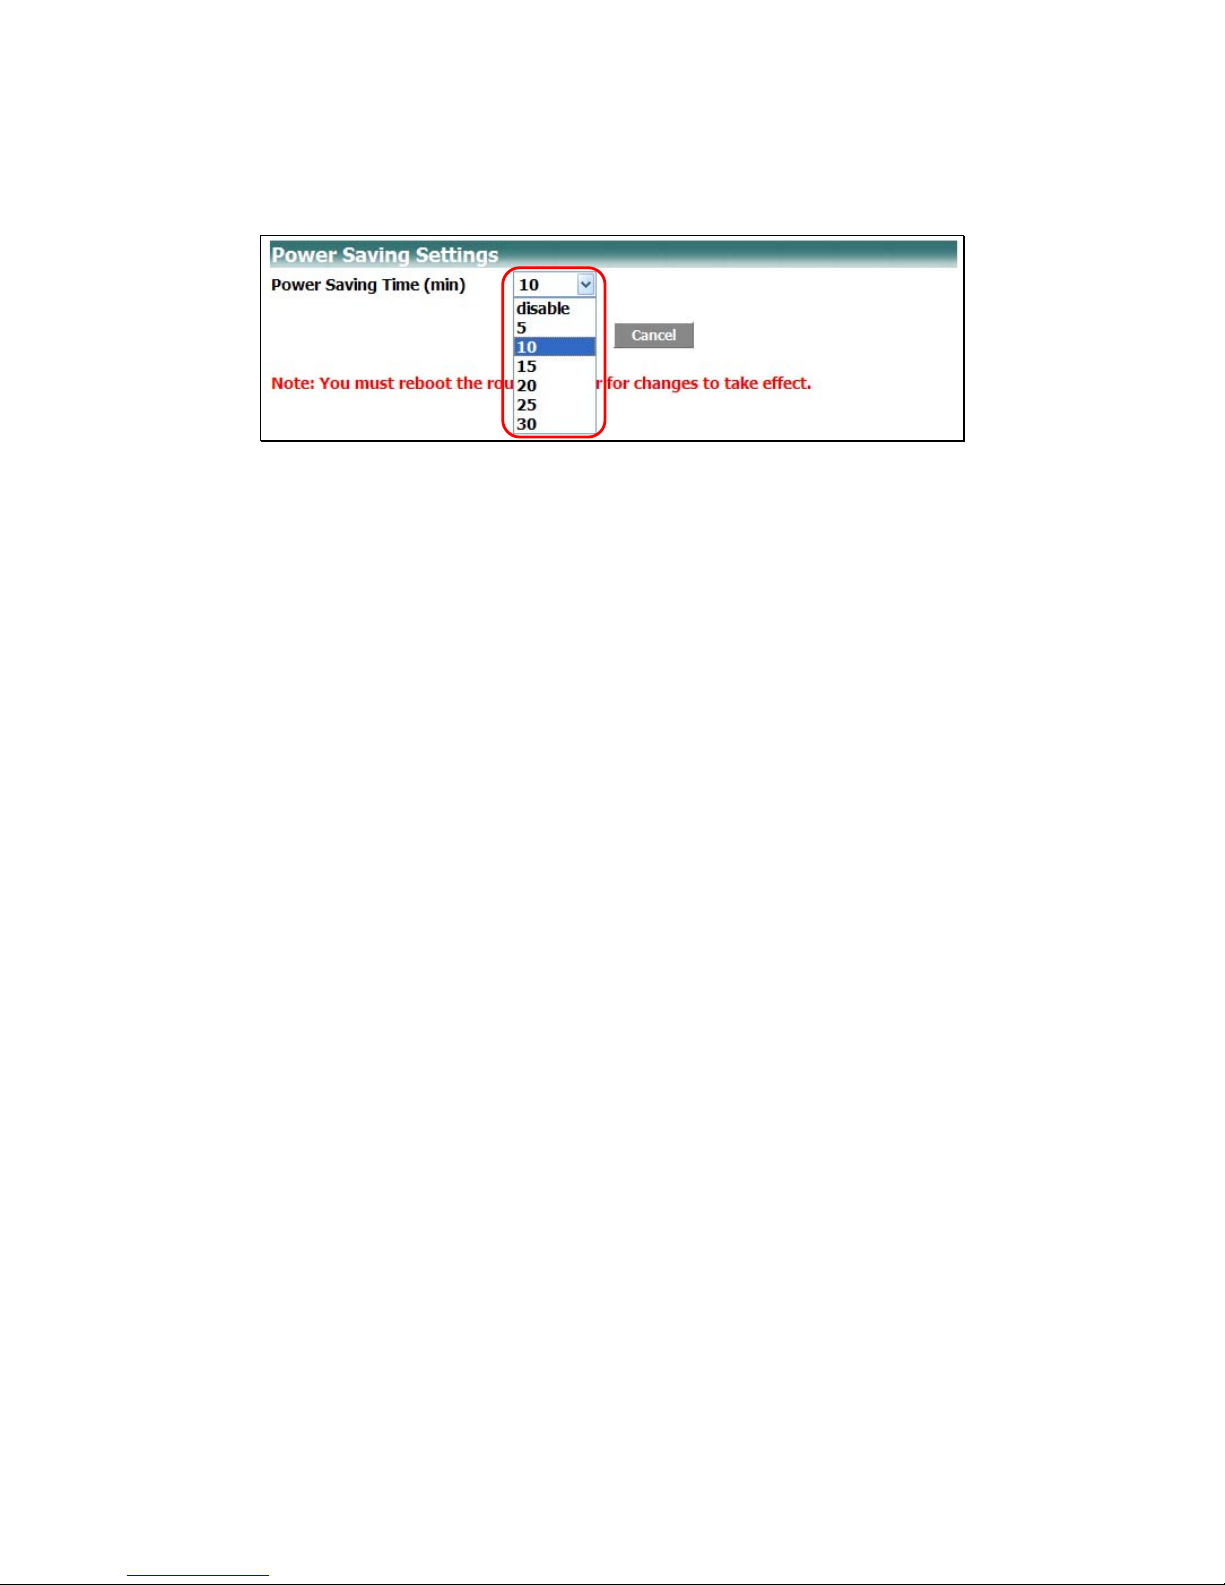
Power Saving Settings
In order to save battery life, the router will enter ’Sleep Mode’ if there is no data activity (upstream/downstream) over a given
period of time.
Use can enable/disable this setting, or configure the time period when the router to enters ’Sleep Mode’. (The default ’Sleep
Mode’ setting is set to 10mins.)
Select to disable Power Saving Time, or choose the time period in which the router enters ‘Sleep Mode’
between 5min-30mins (in 5min increments).
20
Page 22
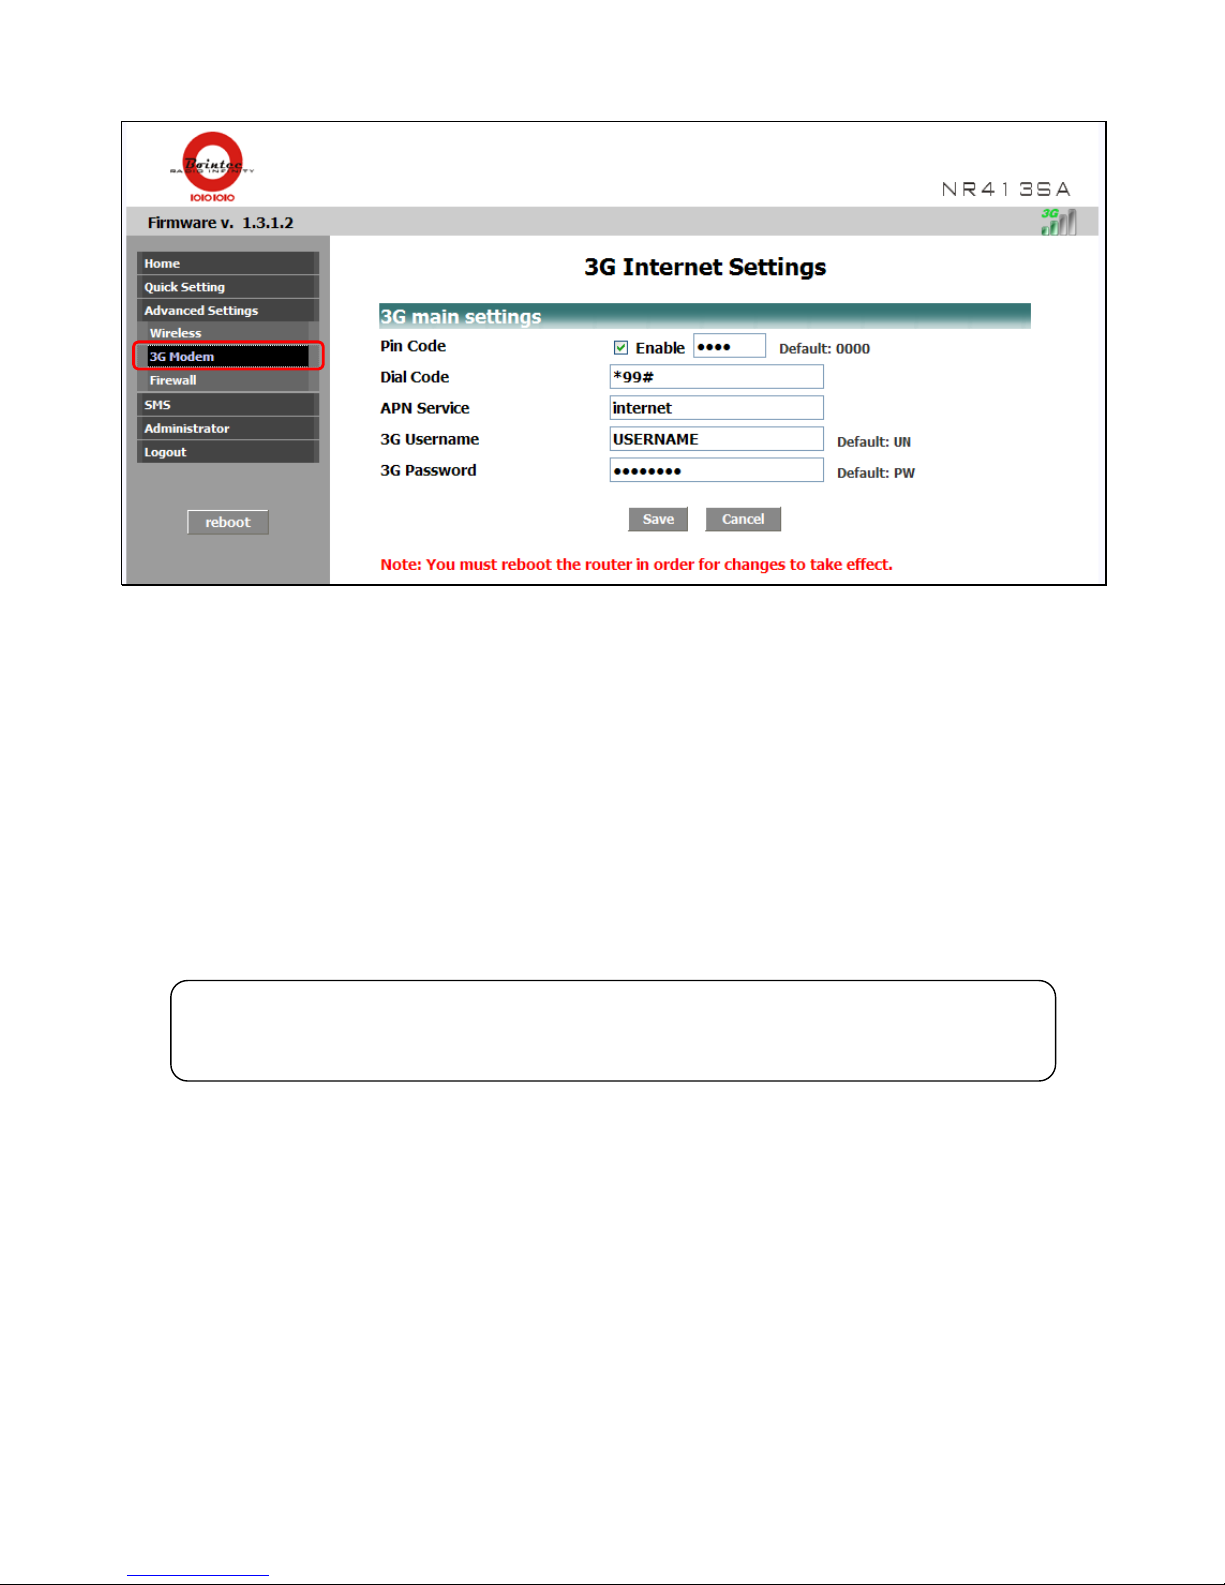
Advanced 3G Settings
The page on the right will now give you options to configure the following settings for:
○
1 Pin Code Protect
○
2 Dial Code
○
3 APN Service
○
4 3G Username & Password
•
Pin Code’ Protect
Click ‘
Enable
’ to enter the Pin Code for your 3G network. This is optional, and only required if your service provider asks
you to do so. If your PIN code is “0000” enter 0000.
WARNING!
If after 3 attempts you fail to enter the correct Pin Code, your SIM card will be locked. Please contact your ISP to
obtain the correct Pin Code for your SIM card.
•
Dial Code
Enter the Dial Code for your 3G network in this field. This is necessary to connect to your 3G network and should be given
by your Internet Service Provider (ISP).
•
Access Point Name (APN) Service
Enter the APN code assigned by your Internet Service Provider (ISP).
•
3G Username & 3G Password
Enter your 3G Username and password here.
21
Page 23
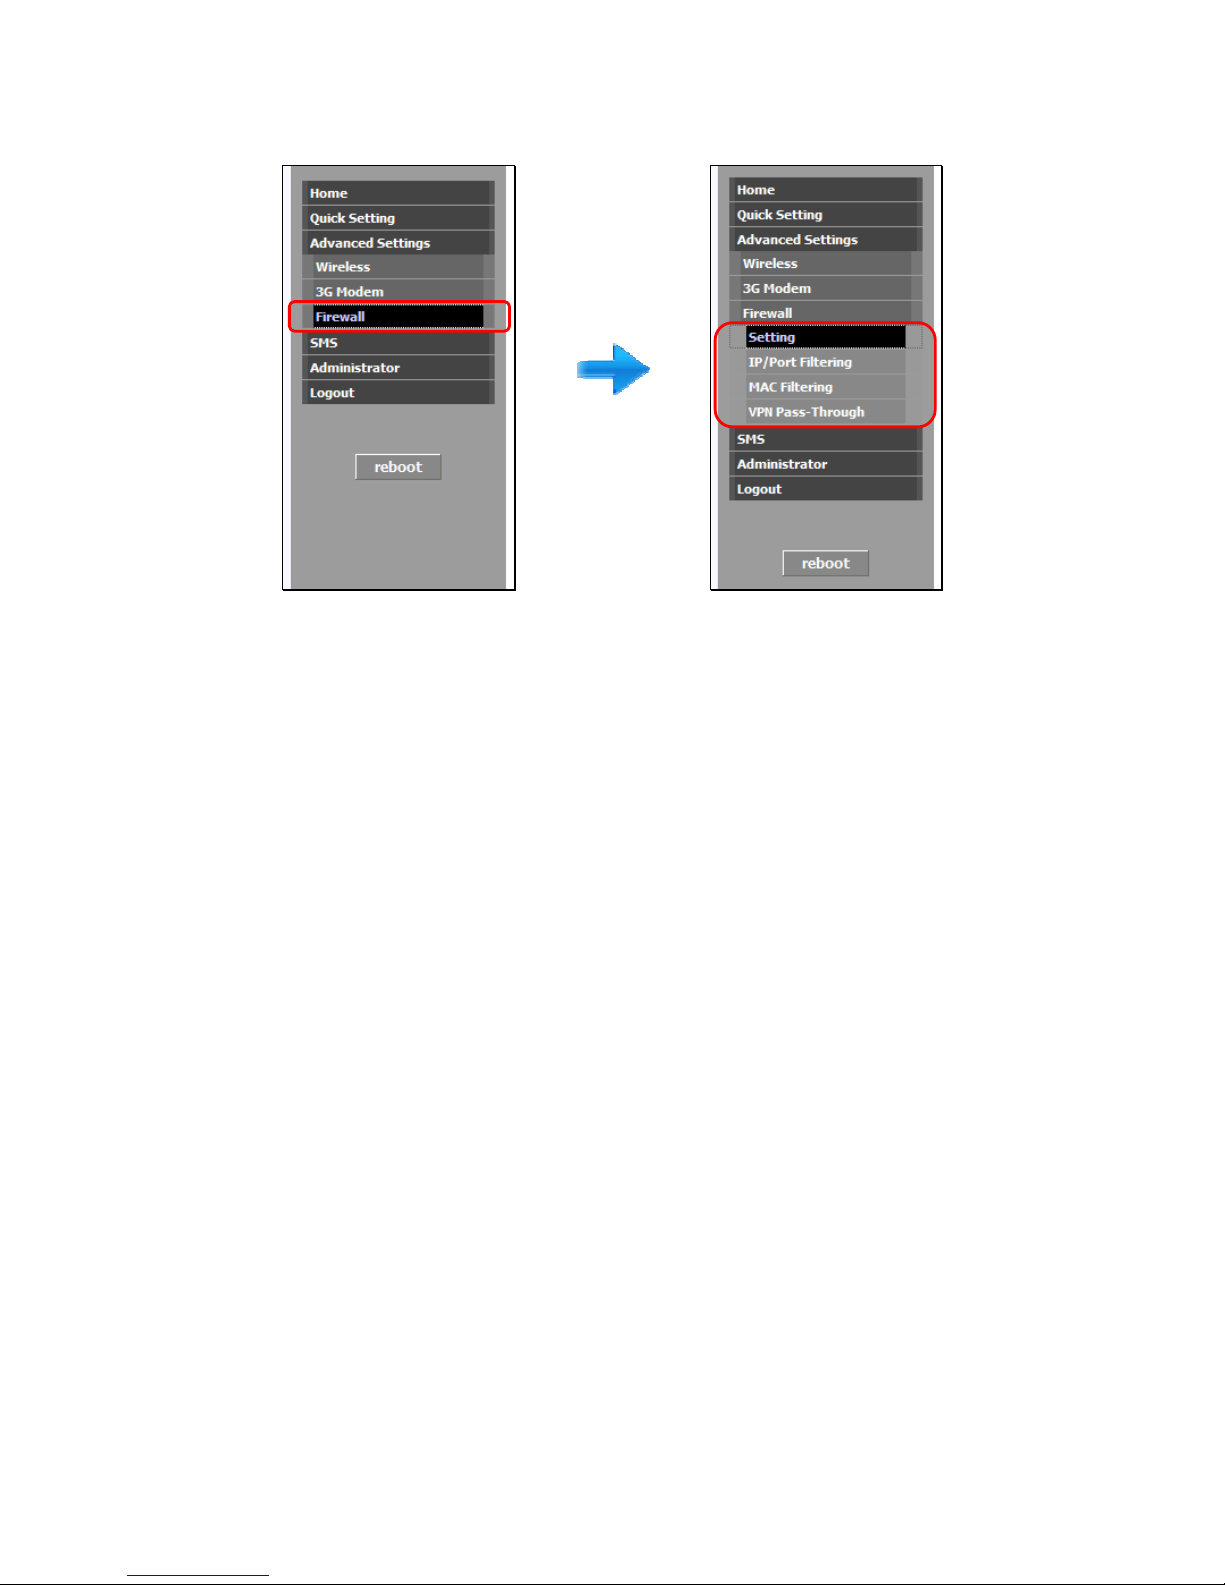
Advanced Firewall Settings
Click on ‘
Advanced Settings
’>‘
Firewall’
The menu on the left will expand to give you more configuration options for the following advanced F irewall setti ngs:
○
1 Firewall Enable/Disable Sett ing
○
2 IP/Port Filtering
○
3 MAC Filtering
○
4 VPN Pass-through
22
Page 24
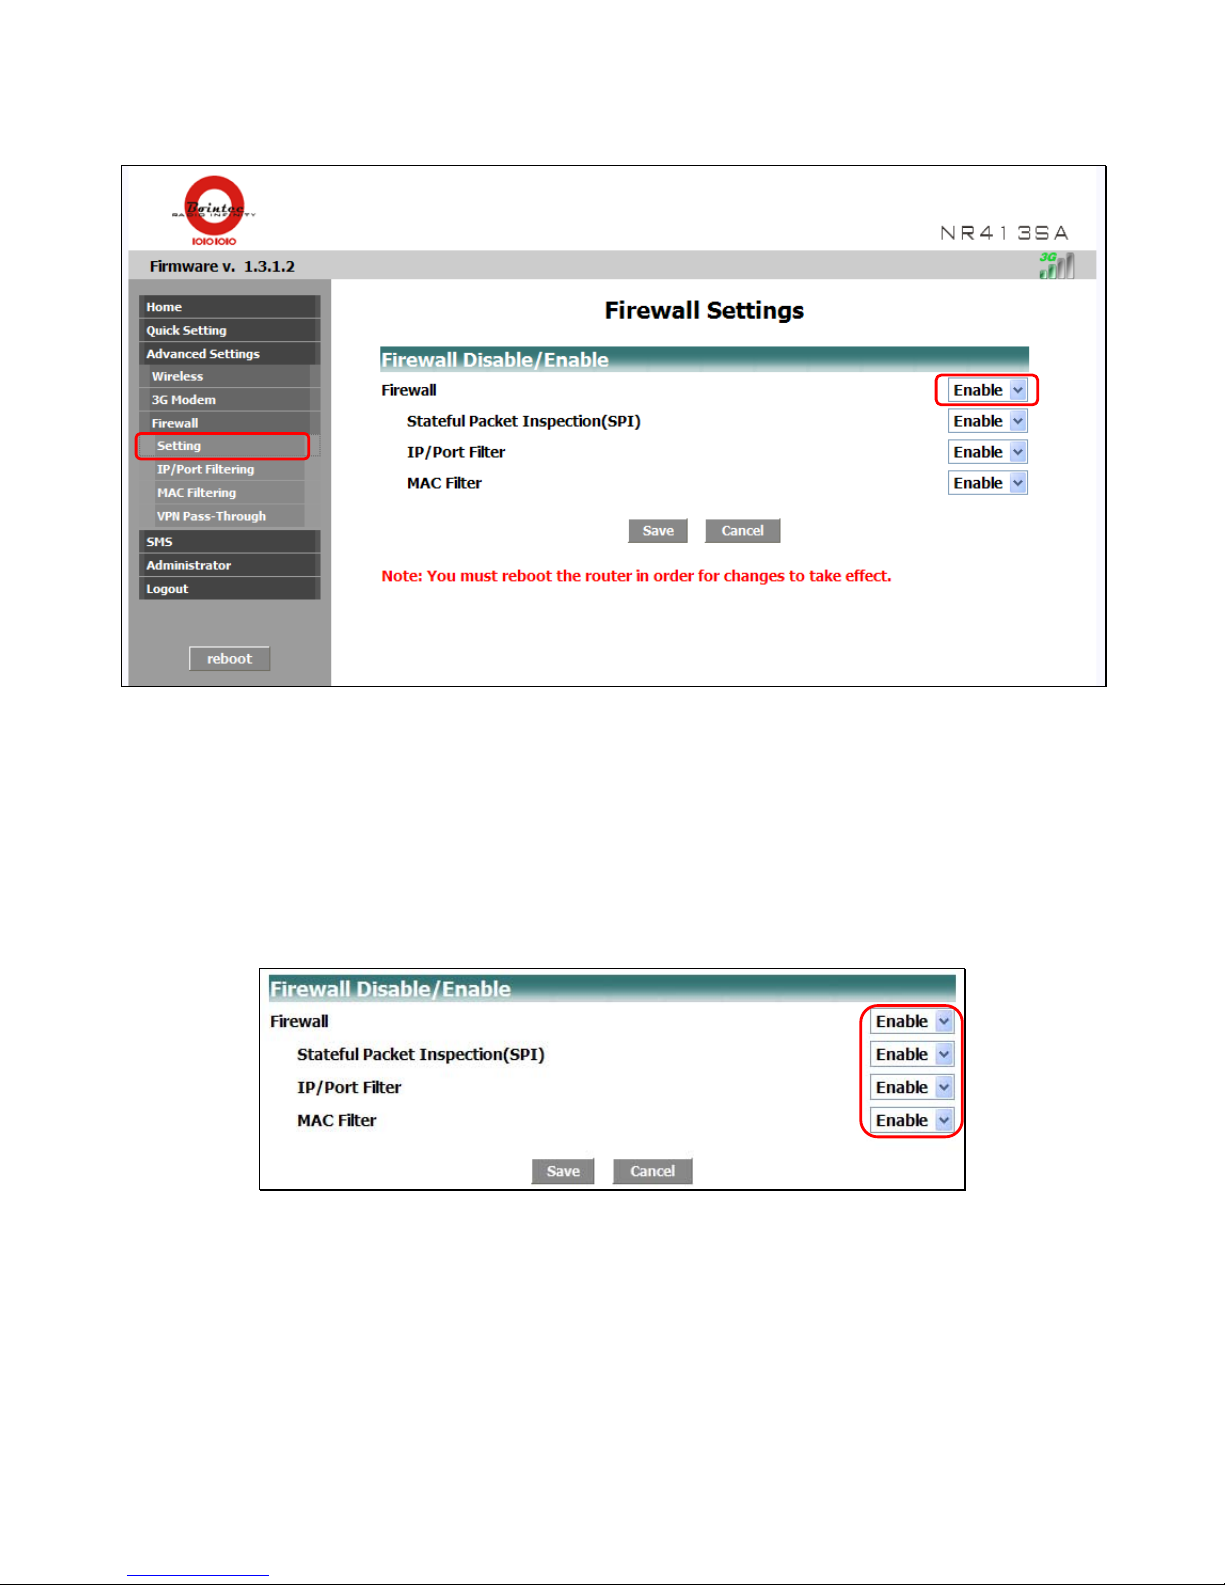
Firewall Setting
Click on ‘
Firewall
’>‘
Setting
’ under the ‘
Advanced Setting
’ drop-down menu.
23
The page on the right will now give you options to enable/disable the Firewall features for:
○
1 Firewall Enable/Disable Sett ing
○
2 Stateful Packet Inspection (SPI)
○
3 IP/Port Filter
○
4 MAC Filter
Click on the drop-down menu box to enable/disable the Firewall features.
Page 25
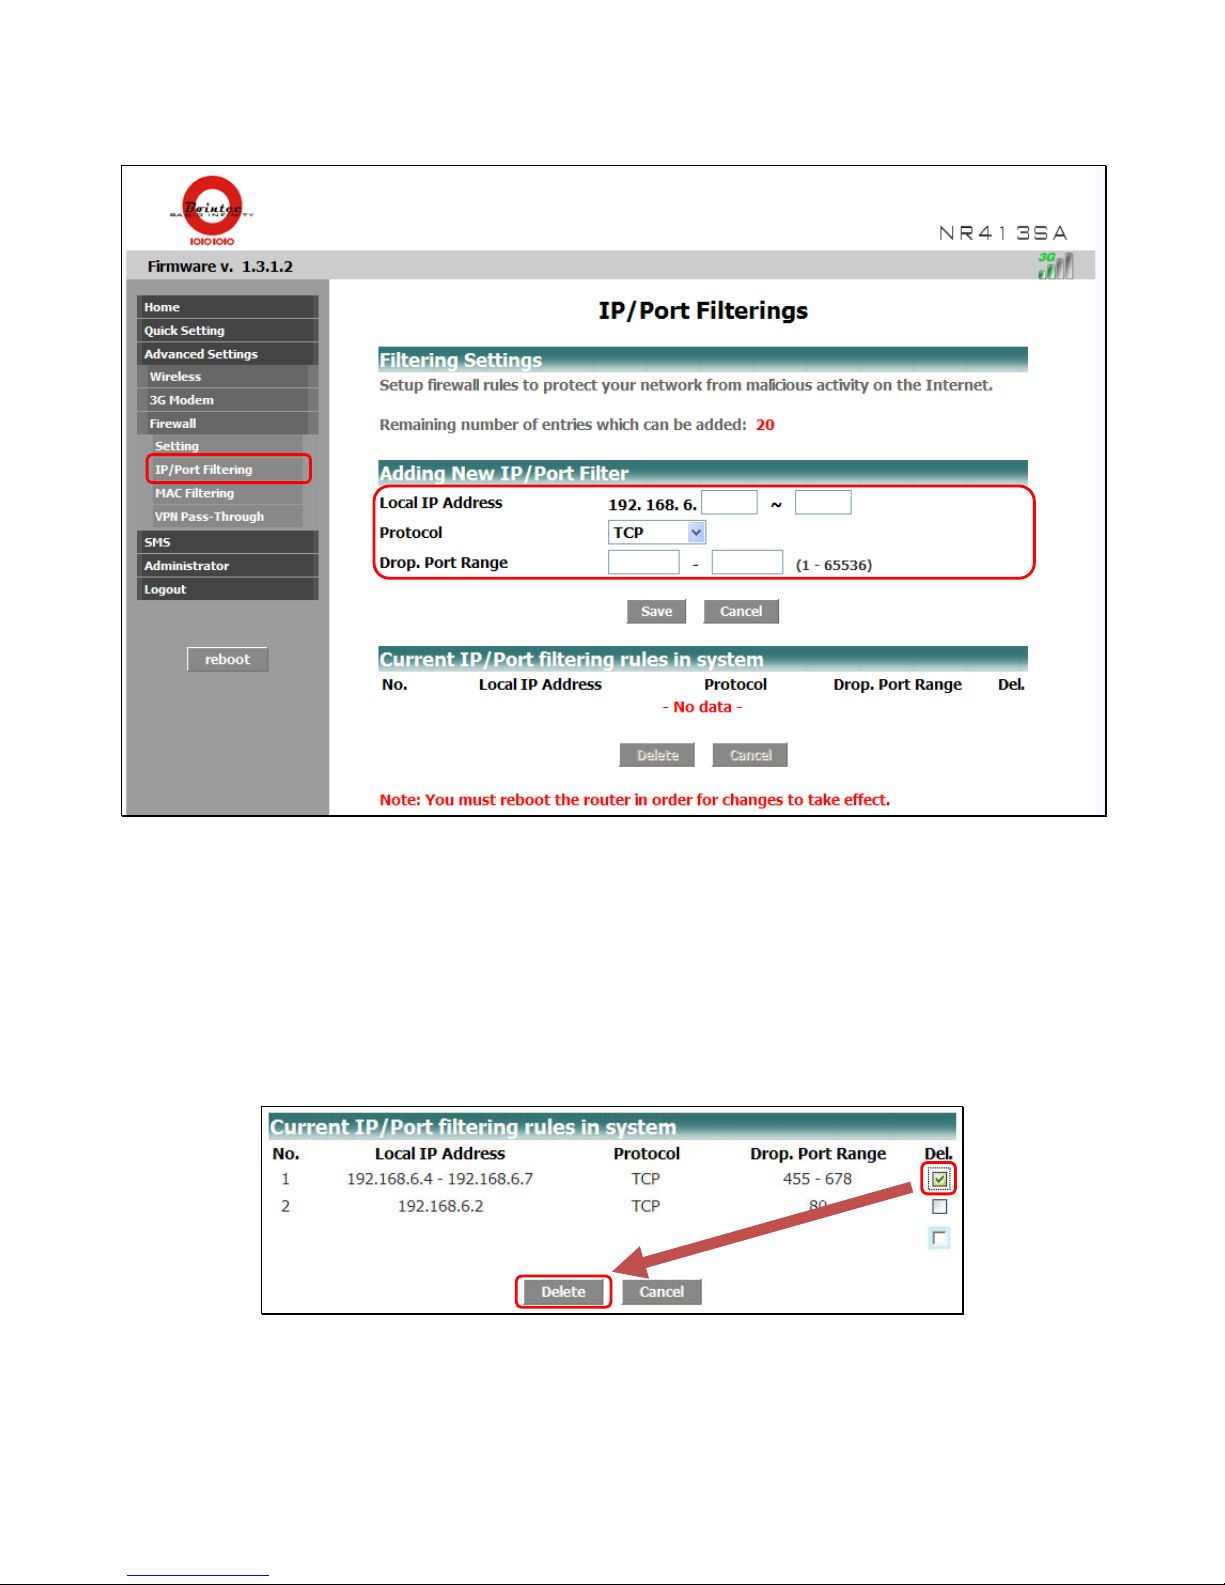
IP/Port Filtering
Click on ‘
Firewall’>‘IP/Port Filtering
’ under the ‘
Advanced Settings
’ drop-down menu.
The page on the right will now give you options to determine which Protocols and Port rul es you wish to enforce on IP Addresses
you add to the router’s filter system. The configuration options allow you to:
• Enter the Local IP Address
• Set Protocol (TCP/UDP, or Both)
• Determine the Port Ranges
Once you have determined the filter settings for the Local IP Address, click ‘`’ to add the address to the IP filter list.
24
If you wish to delete an IP Address from the Filter list, simply tick the box next to the address and click the ‘
Delete
’ button at the
bottom of the page.
Page 26
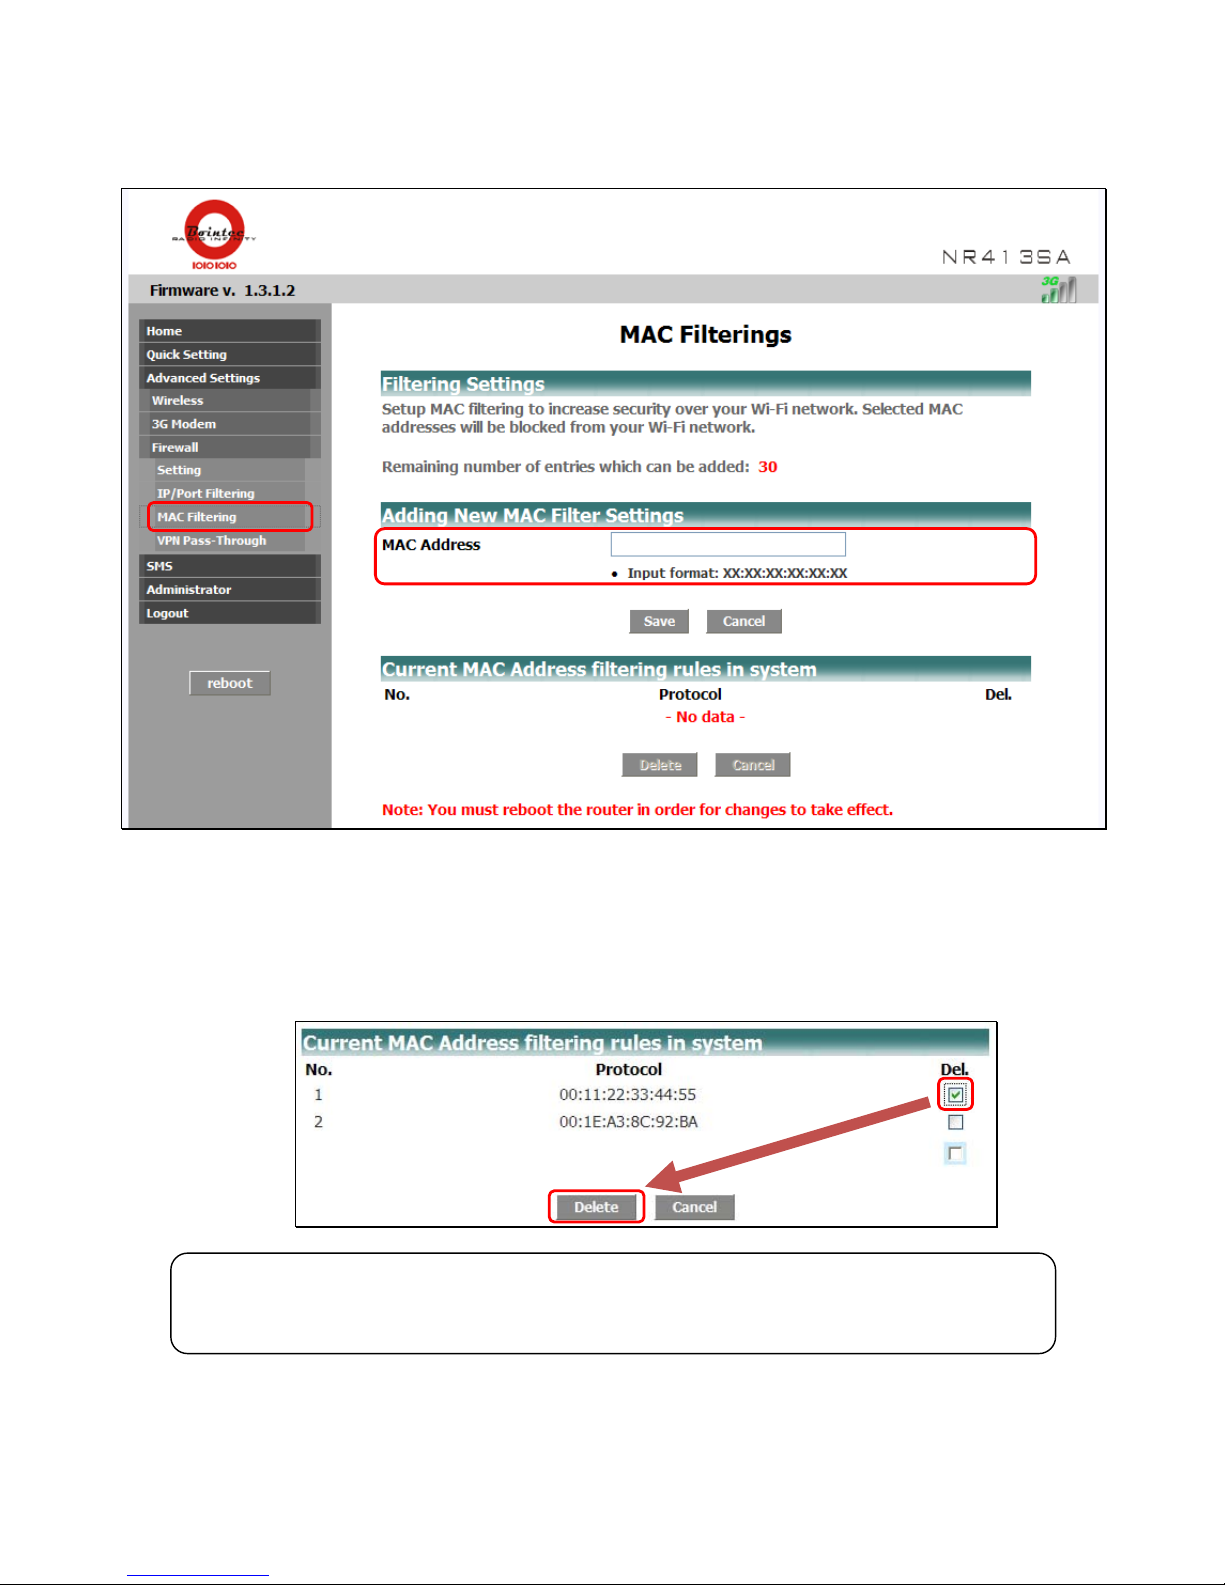
MAC Filtering
Click on ‘
Firewall
’>‘
MAC Filtering
’ under the ‘
Advanced Settings
’ drop-down menu. The page on the right will open and allow
you to add/delete MAC address settings.
25
MAC Filtering allows you to restrict access to your NR413-SA 3G Mobile Router to only those devices with a specific MAC
address. The MAC address is a unique code specific to a particular piece of hardware or device.
• Enter the MAC address of the device you want to add. Then click ‘
Add
’.
To delete a MAC address from the list, check the box next to the MAC address and then click on the ‘
Delete
’ button at the
bottom of the page.
Tips
On a Windows machine, you can view the MAC address of any device currently connected to the NR413-SA 3G
Mobile Router by running
ipconfig/all
from the command prompt window (cmd).
Page 27
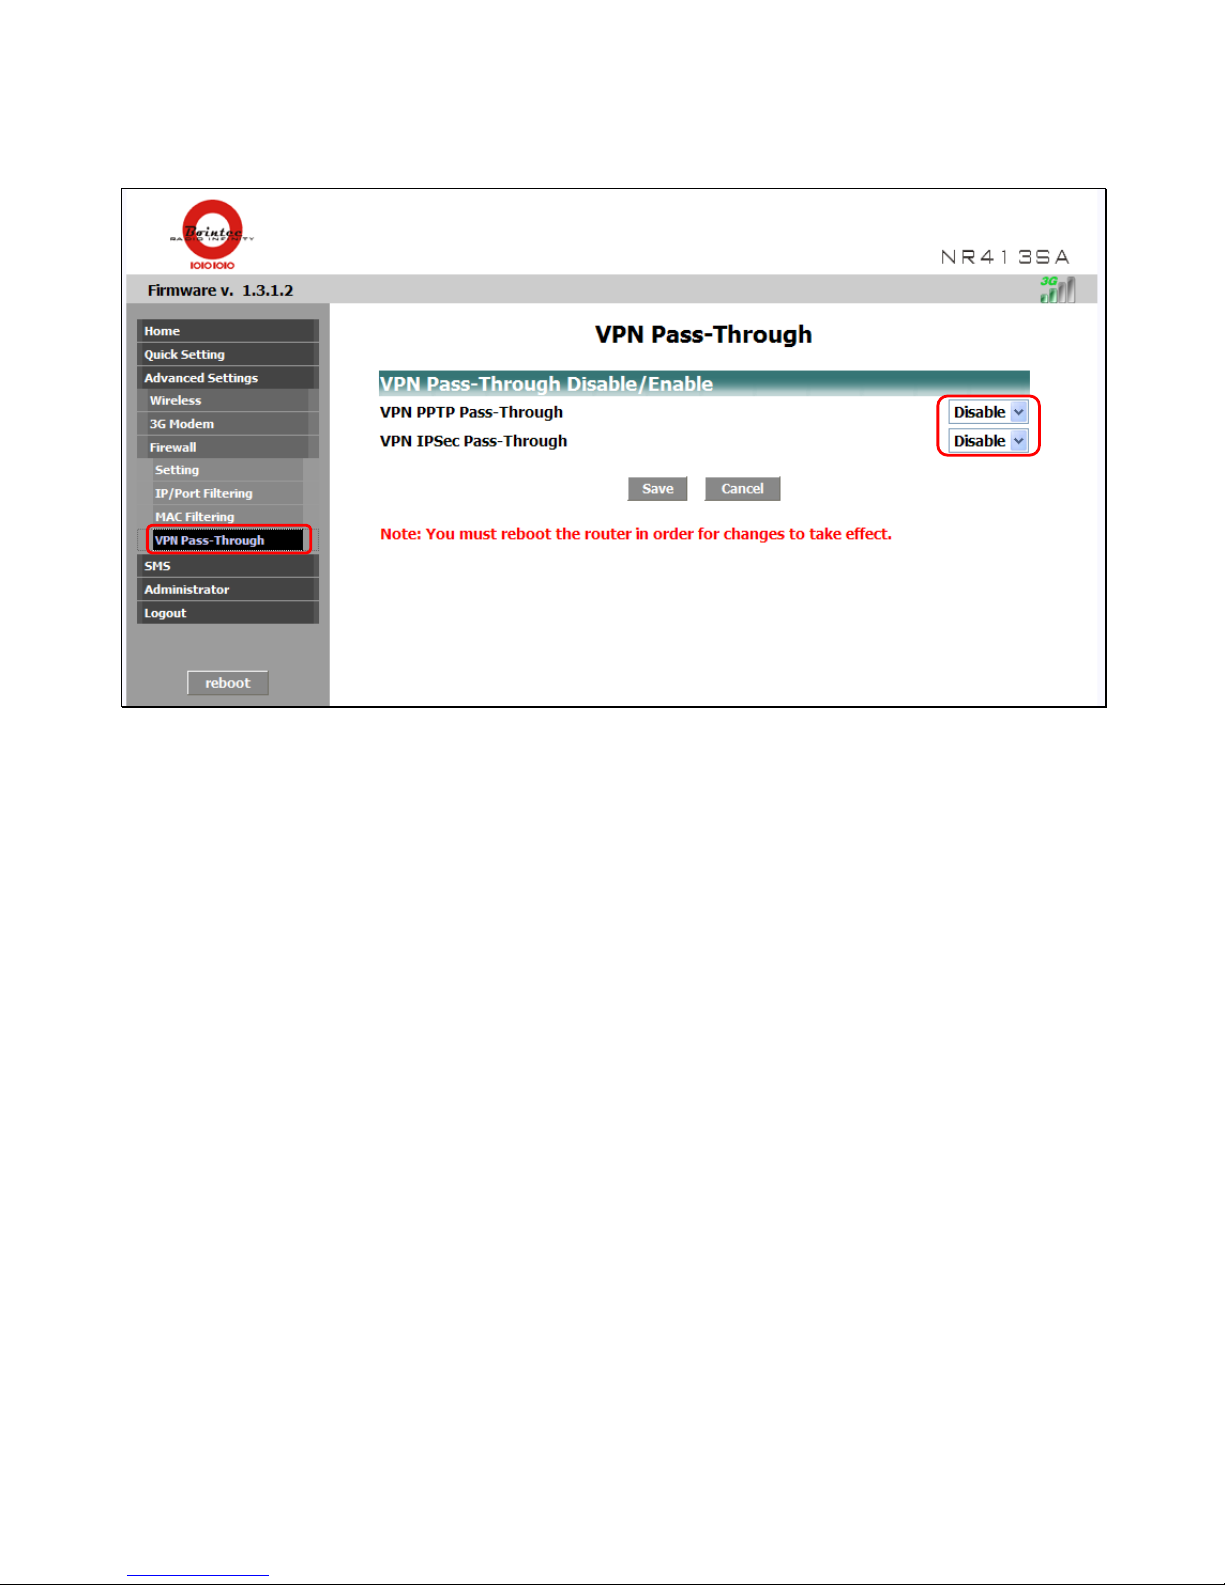
VPN Pass-through
Click on ‘
Firewall
’>‘
VPN Pass-through
’ under the ‘
Advanced Setting
’ drop-down menu. The page on the right will open and
allow you configure VPN Pass-through settings.
Use the drop-down menu on the right to enable/disable:
• VPN PPTP Pass-Through
• VPN IPsec Pass-Through
Click on the ‘
Save
’ button to save the new settings
26
Page 28
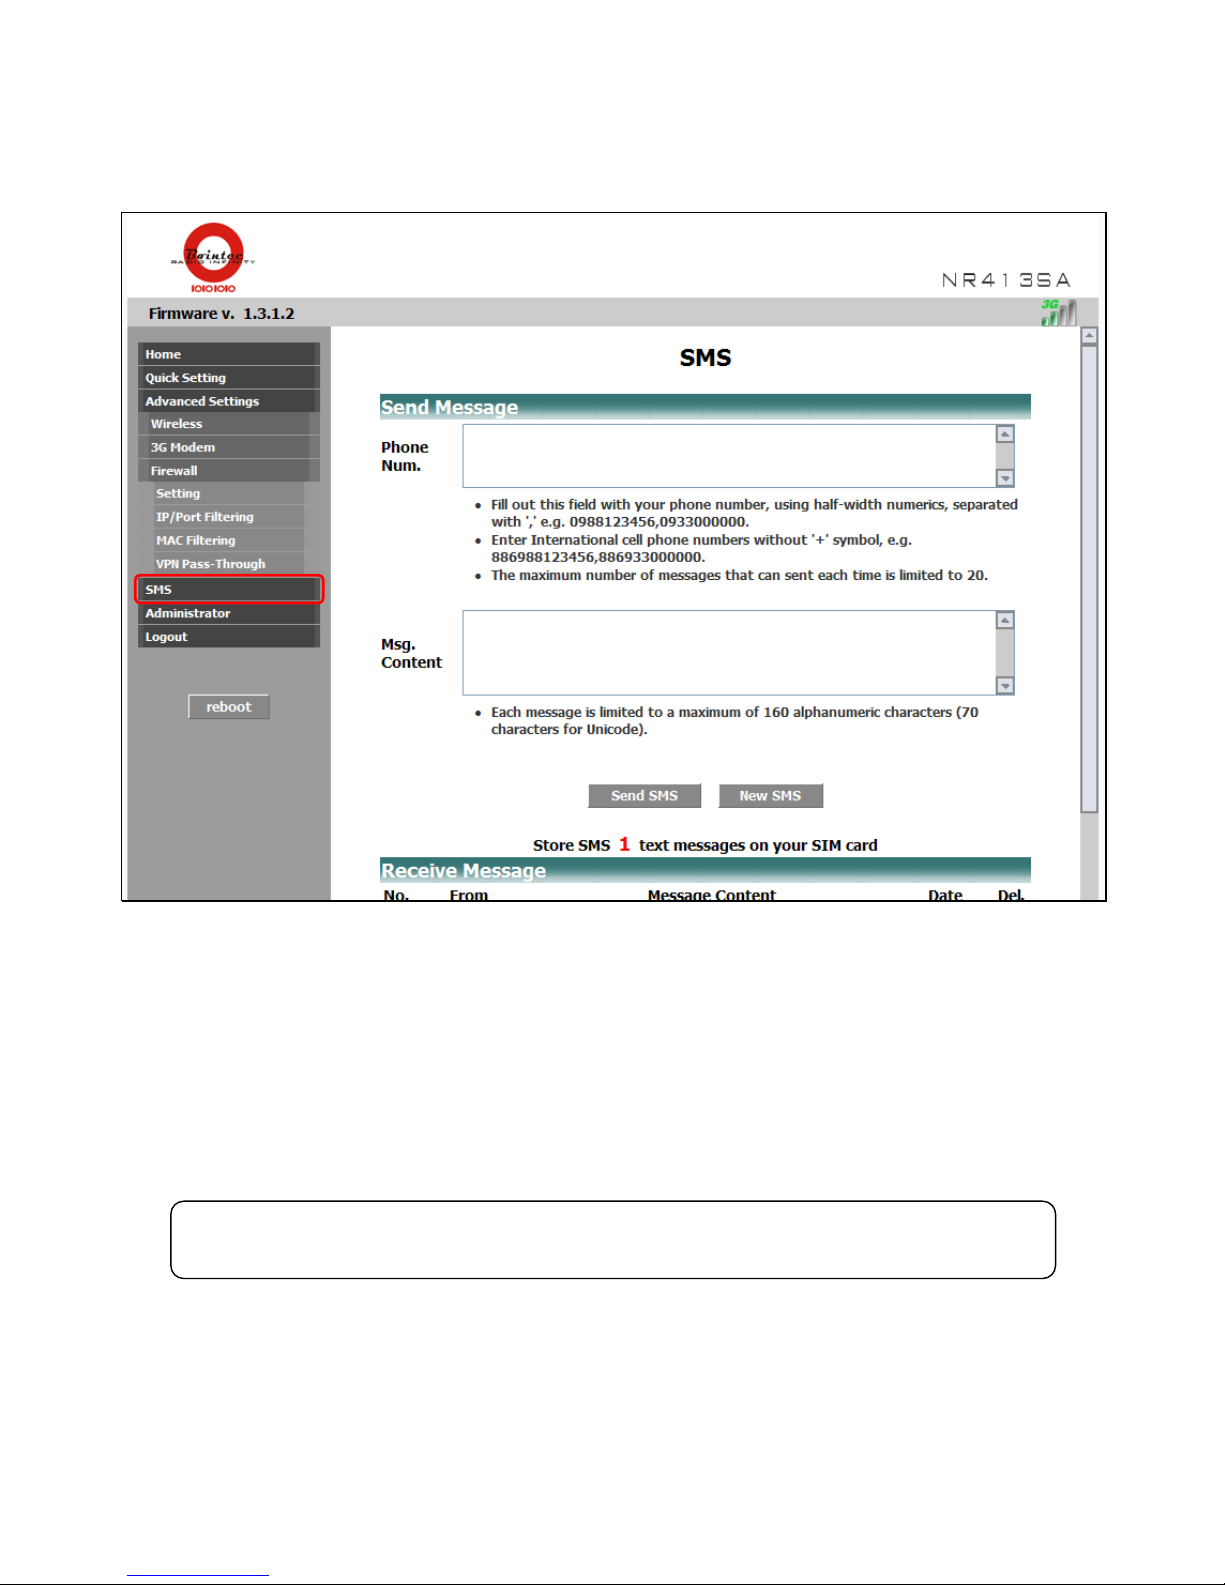
SMS
Use this setting to send text messages (Short Message Service)
Click on ‘
SMS
’ from the Main Menu
○
1
Enter the phone number(s) you wish to send the message to in the ‘
Phone Num.
’ box.
For international cell phone numbers, type in the international dialling codes without the ‘+’ symbol.
If you wish to send to multiple phone numbers, use the comma key ‘,’ to separate each phone number. e.g. 0988123456,
0988123457.
○
2
Type your message in the ‘
Msg. Content
’ box.
To start a new SMS message click on ‘
New SMS
’ button.
NOTICE
The SMS feature may not be supported or available to some 3G dongles.
27
Page 29
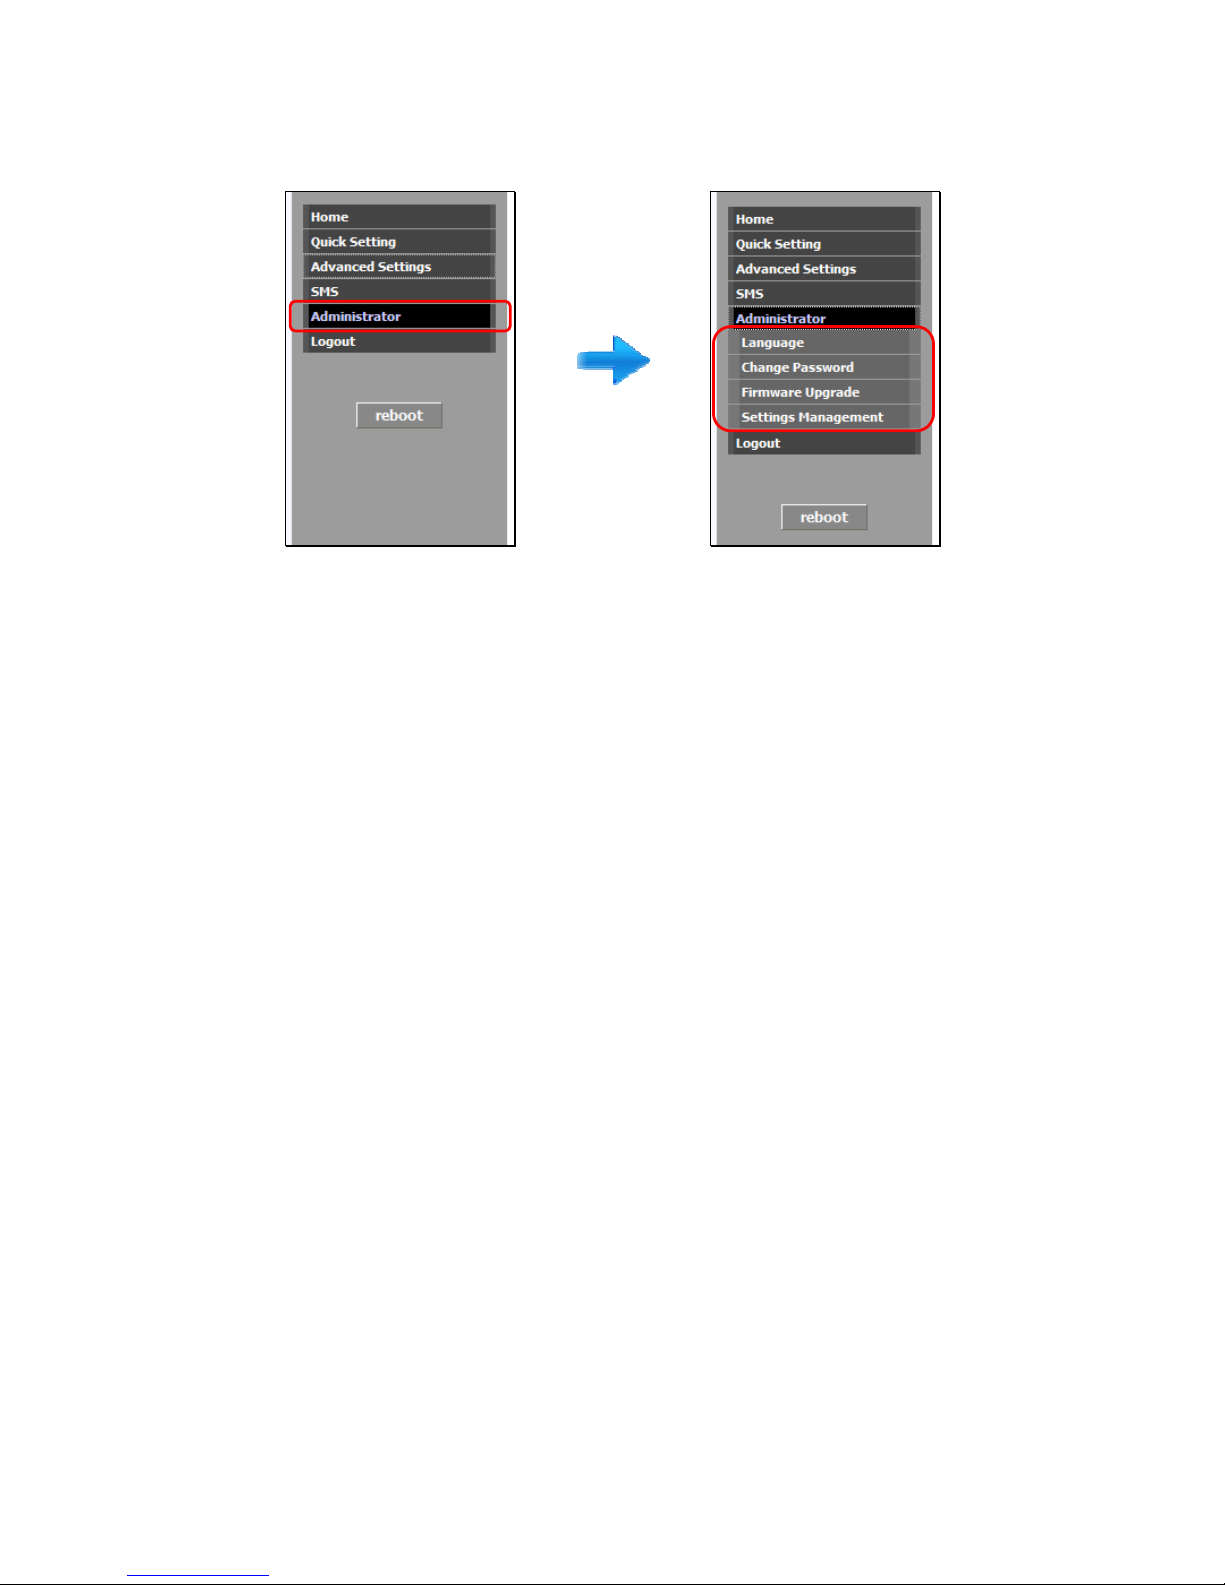
Administrator Options
Click on ‘
Administrator
‘ from the main Advanced menu on the left. The menu will expand to give you more configuration options:
Under ‘Administrator’ options you will be able to:
○
1 Change Language
○
2 Change Password
○
3 Apply Firmware Upgrade
○
4 Settings Management
28
Page 30
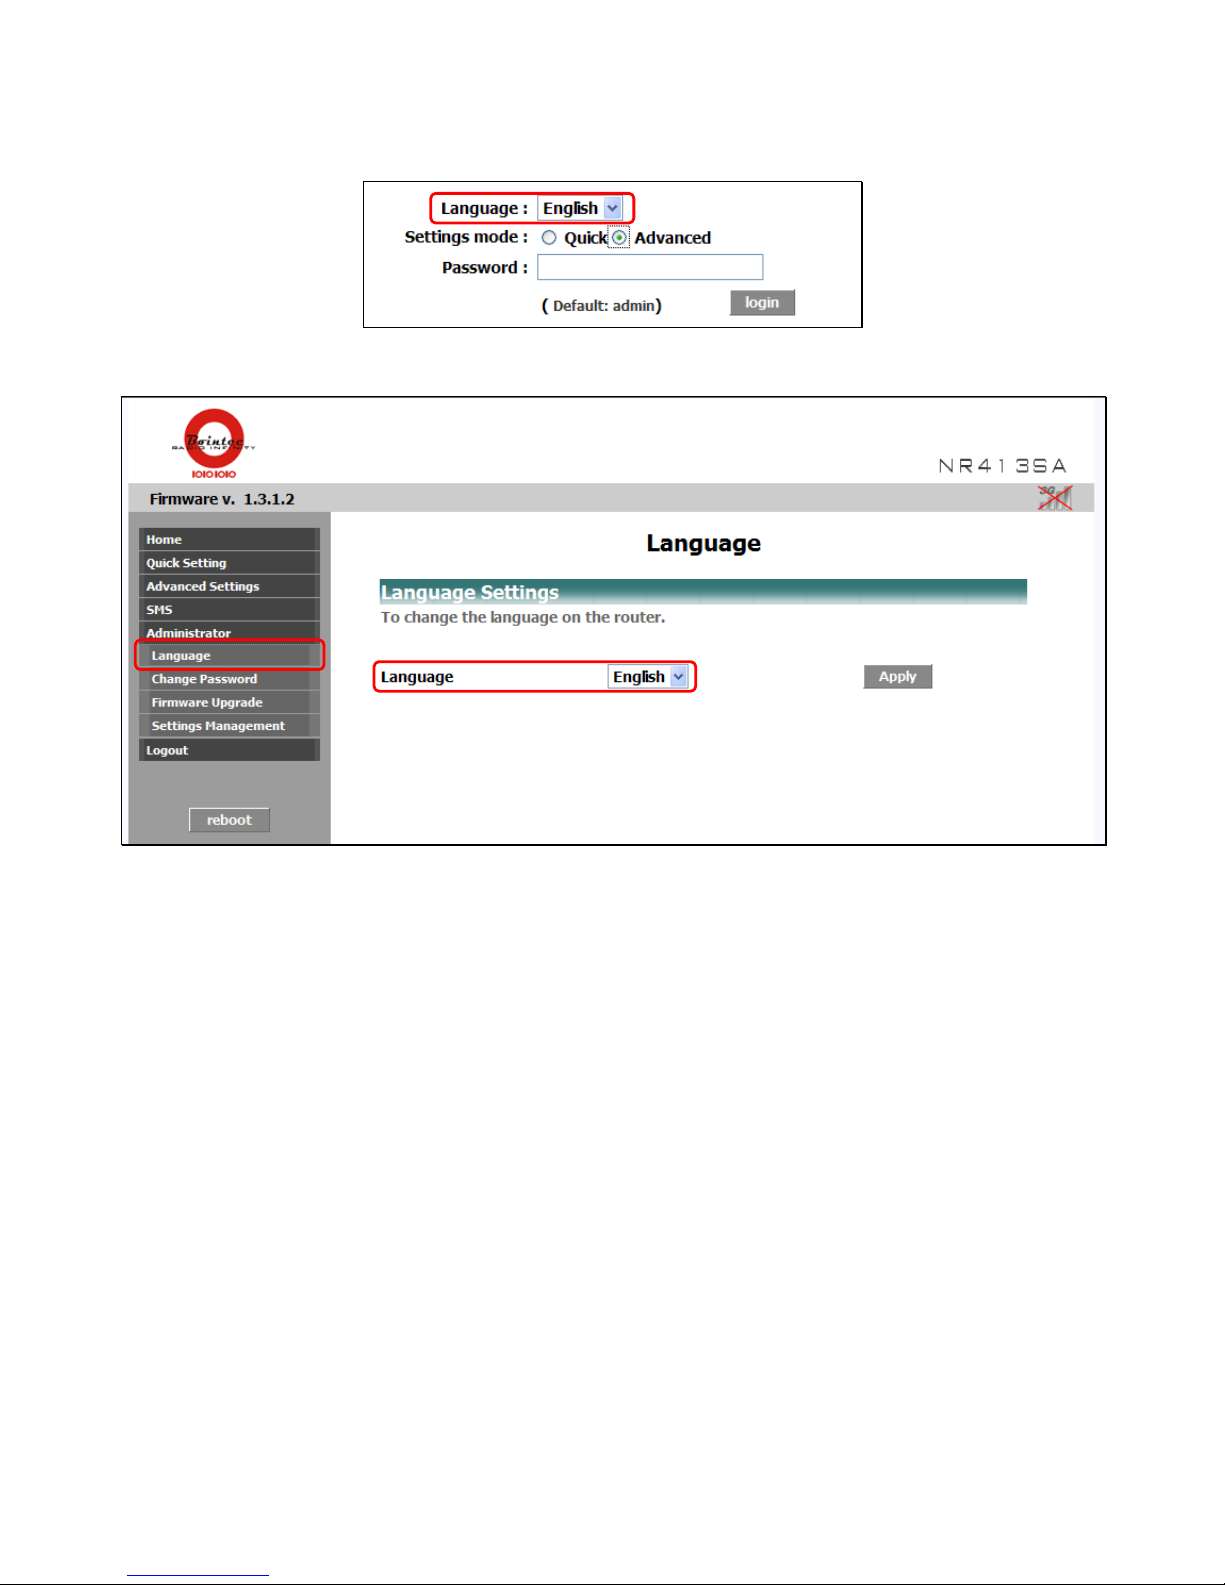
Change Language
There are 2 ways to change the WEB page language for the NR413-SA 3G Mobile Router.
○
1 Use the drop-down menu on the browser’s login page a nd select the language you want.
○
2 By clicking ‘
Administrator
’>‘
Language
’ and select the language you want.
29
Page 31
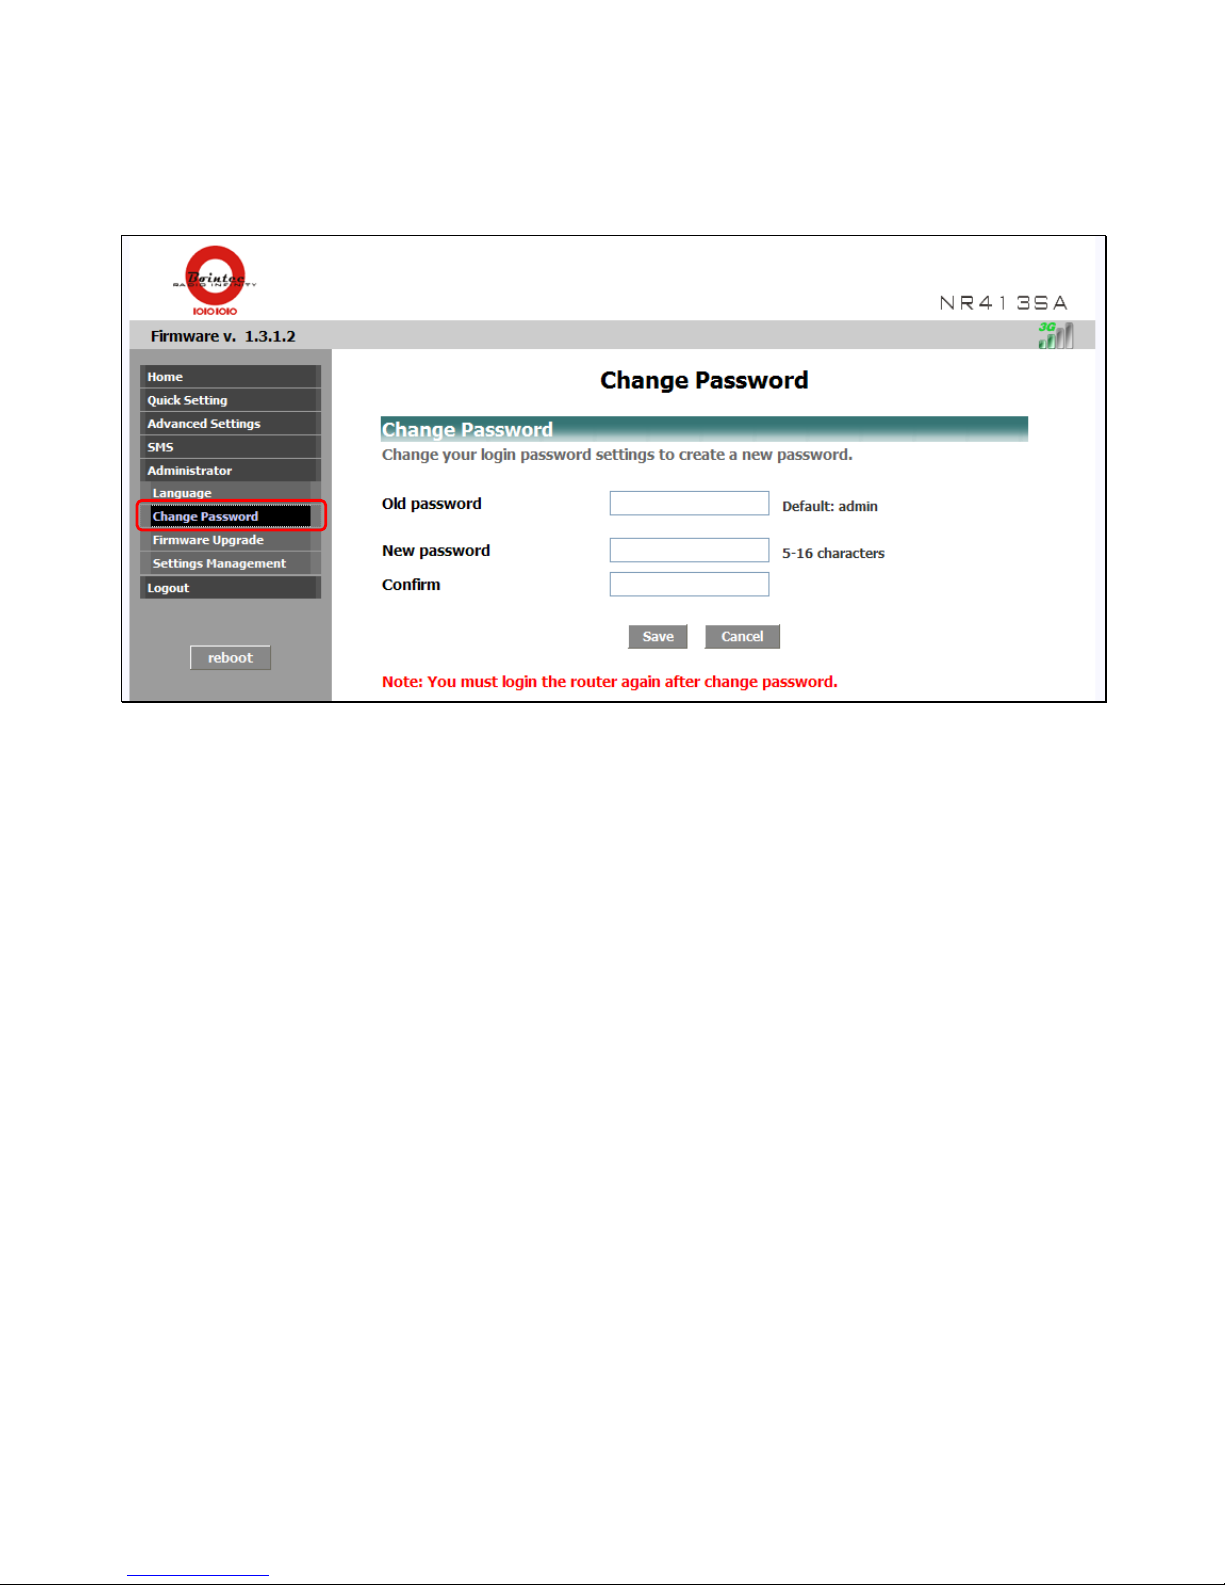
Change Password
Use this setting to change the Administrator Password for the NR413-SA 3G Mobile Router. This will become the new password
you use every time you login to the router.
Click on ‘
Administrator
’>‘
Change Password
’.
1. Enter your old password (default is ‘
admin
’)
2. Enter your new password
3. Confirm your new password
4. Click the ‘
Save
’ button to save your changes.
30
Page 32
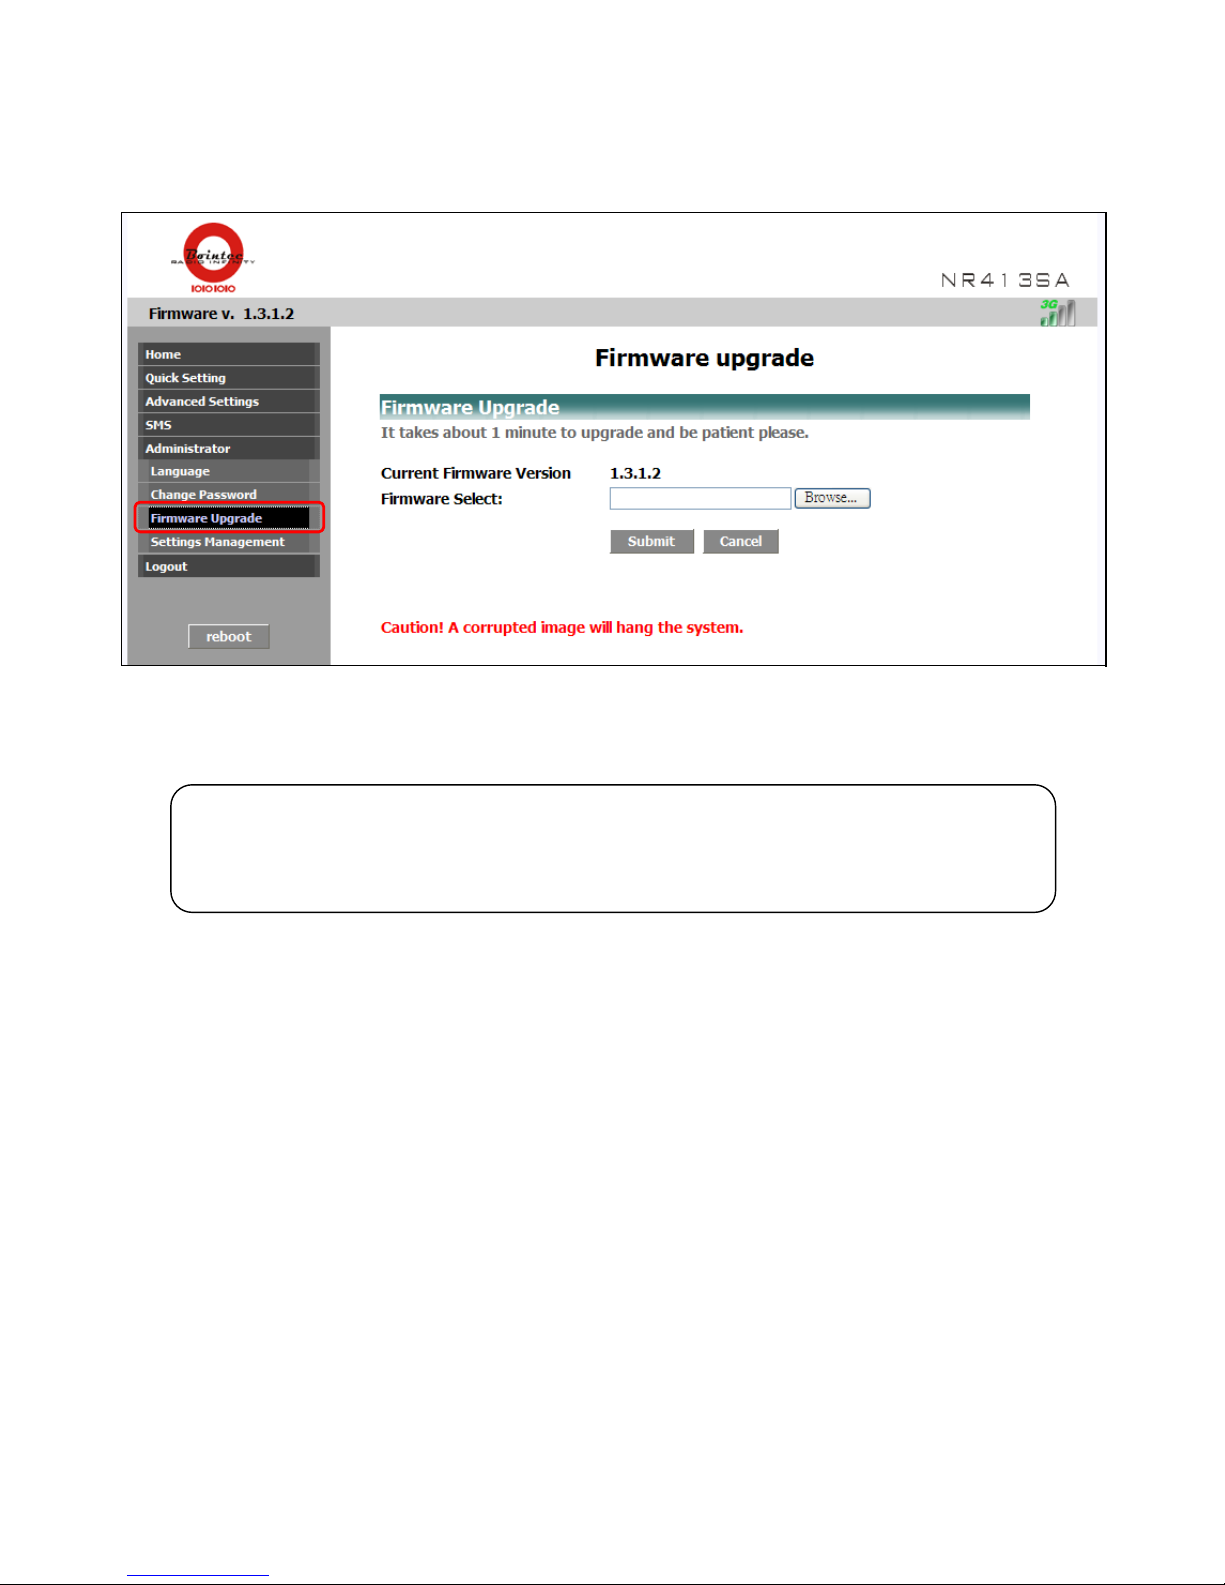
Firmware Upgrade
Use this setting to change the upgrade the firmware version for the NR413-SA 3G Mobile Router.
Click on ‘
Administrato
r’>‘
Firmware Upgrade
’.
Click on ‘
Choose File
’ to browse for the firmware file image on your computer then click on the ‘
Submit
’ button to apply the
firmware upgrade.
WARNING!
Do not apply the firmware upgrade when the battery is low!
The router may shutdown during the update process and cause a corrupt system.
Make sure to fully charge the router or connect to the power adapter to ensure a successful firmware upgrade.
31
Page 33
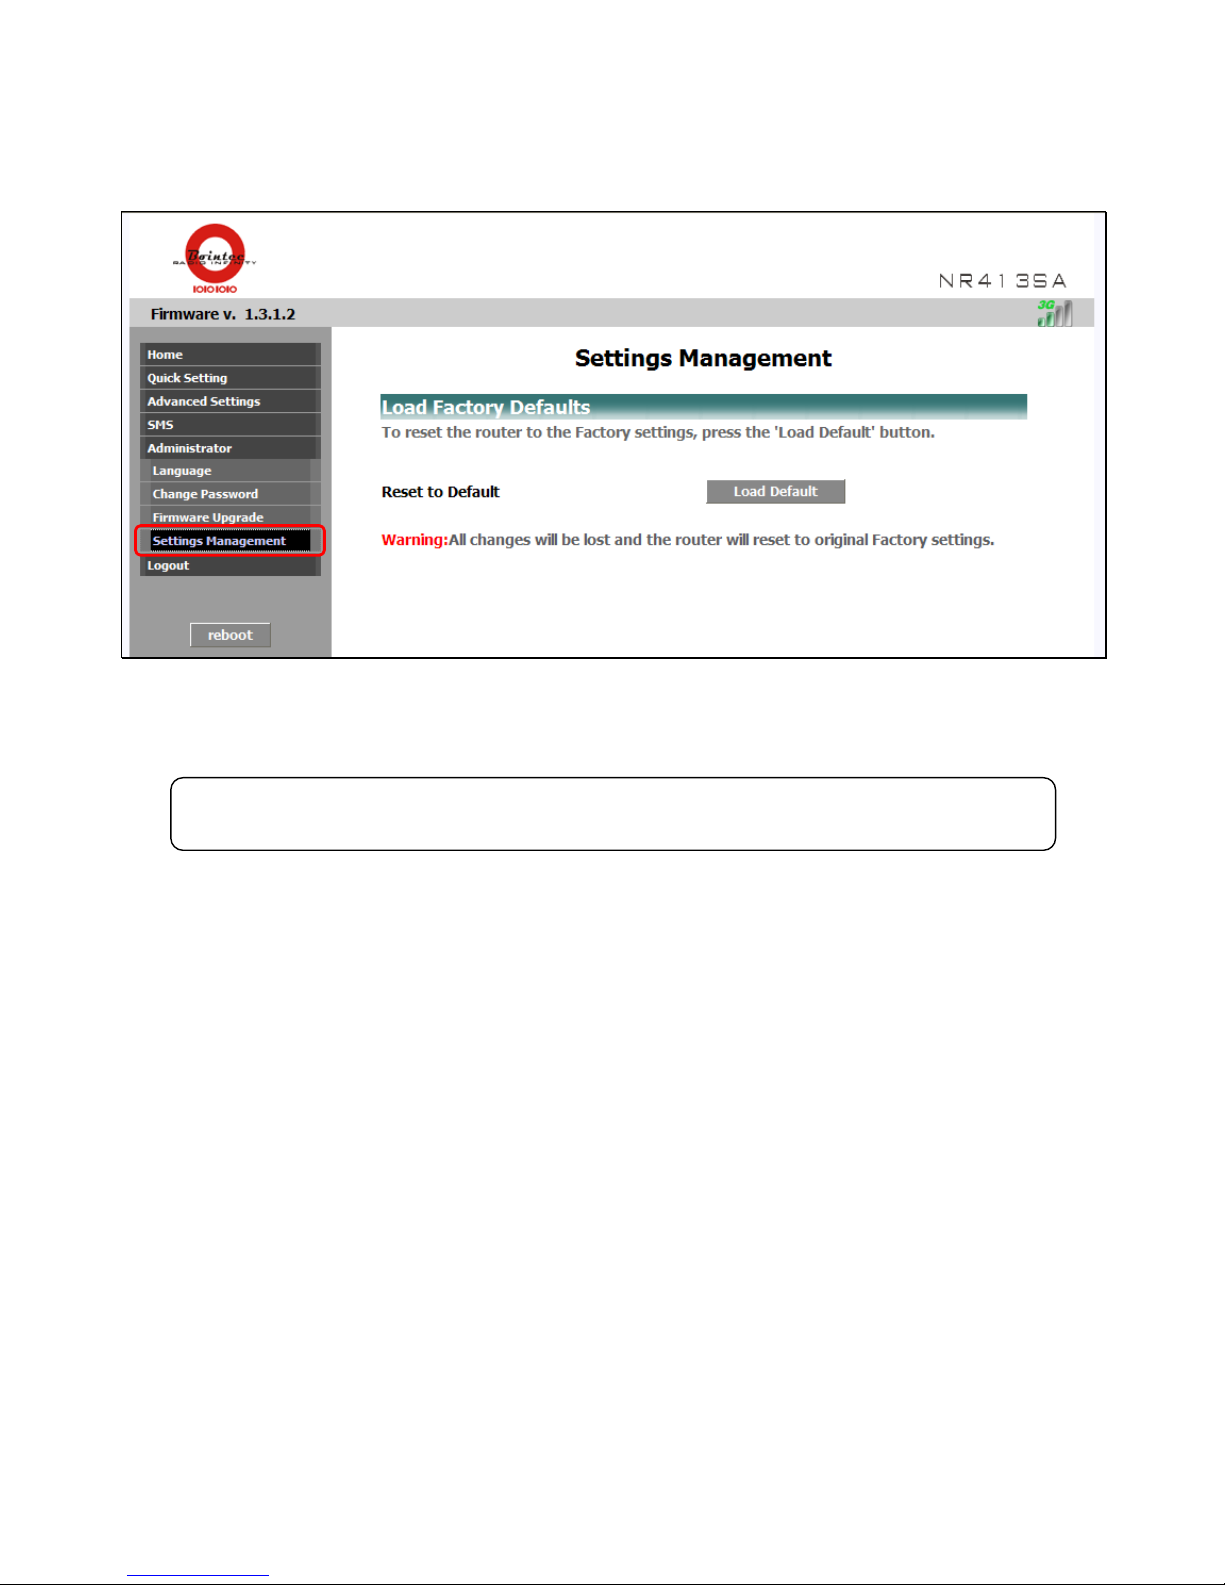
Settings Management
Use this setting to reset the router to its factory/default settings.
Click on ‘
Administrator
’>‘
Settings Managemen
t’.
To reset back to default settings, click on the ‘
Load Default
’ button.
All saved settings will be lost and the router will reset back to its original factory settings
WARNING!
Do not turn off the router while it resets.
32
 Loading...