

Radioddity GD-73 Series, GD-73A, GD-73E User Manual

English user manual - Radioddity GD-73 v1.0
Radioddity GD-73
User manual
Page1of
56
English user manual - Radioddity GD-73 v1.0
Overview of Radioddity
“You, our friend and customer, are our focus”
Nothing is more important than your time and money. When you buy radios online,
you face a dilemma: buy from a reputable website at a high price, or try to save
money by choosing a dealer who may or may not offer quality goods, service and
advice. At Radioddity.com, you do not have to choose between low prices and a
secure shopping experience. Whether you are buying from us for the first time or a
seasoned amateur radio operator, we always hope that with our products, prices,
content and sources, you will find exactly what you need.
In recent years, Radioddity has better met the needs of wireless device buyers by
creating a secure shopping experience. We do this by offering the highest quality
products at an affordable price and providing you with first-class service. You deserve
no less.
Our promise: to give you the best shopping experience
Strong partnerships enable us to offer you the latest technology and outstanding
value for money under the Radioddity brandname. Our thoughtful and responsive
customer service teams help us deliver on our promise to you and meet your every
day needs even better.
Wether providing you with the latest and greatest DMR and analog radios,
accessories and related products, providing outstanding technical support, or by
working with the leaders of the amateur radio industry to develop helpful content to
assist you with your purchase: Your concerns are our concerns.
We want to connect you with high quality radios at low prices. If, in your opinion, we
do not honor this promise in any way, please let us know by e-mail:
support@radioddity.com
Page2of
56

English user manual - Radioddity GD-73 v1.0
Contents
Overview of Radioddity................................................................................................................2
Product safety and RF exposure for portable radios.......................................................... 6
Notes on the use of the radio
What is in the box?........................................................................................................................8
Radio controls.................................................................................................................................8
General
Using the battery..........................................................................................................................11
Inserting / removing the battery
Charging the battery
Antenna.......................................................................................................................................... 12
Connection of an external headset.........................................................................................12
Basic functions............................................................................................................................ 13
Selecting a Zone
Selection of a channel
.........................................................................................................................................
Turning on the radio
Turning off the radio
Adjust the volume
...................................................................................................................
...................................................................................................................
..........................................................................................................................
.................................................................................................................
......................................................................................................
...............................................................................................................
...............................................................................................................
...............................................................................................
10
10
10
10
11
11
13
13
6
Receive and answer a group call
Receiving group calls
Answering a group call
Receiving and answering a private call
Receiving a private call
Answering a private call
All call feature
Receiving an all call
Initiating a call
Group call
Private call
All Call
Using a speed dial key to send a call
Emergency calls...........................................................................................................................16
Emergency mode
..............................................................................................................................
..............................................................................................................................
.................................................................................................................................
................................................................................................................................
.......................................................................................................................................
..............................................................................................................
...........................................................................................................
...........................................................................................................
.................................................................................................................
........................................................................................................................
...............................................................................................
.....................................................................................
..........................................................................................................
....................................................................................
13
13
13
14
14
14
14
14
15
15
15
16
16
16
Receiving emergency alarms
.................................................................................................
Page3of
17
56

English user manual - Radioddity GD-73 v1.0
Answering an emergency alarm
Send an emergency alarm
Emergency alarm followed by voice call
Sending an emergency alarm then automatically activate the microphone
Ending emergency mode
Menu operation.............................................................................................................................20
Contacts
Call lists
Short messaging functions
........................................................................................................................................
Group call contacts
Private call contacts
.........................................................................................................................................
Checking IDs of new calls
View name or ID of missed calls
Delete a call list
Sending a prepared short message
.................................................................................................................
.................................................................................................................
........................................................................................................................
.........................................................................................................
............................................................................................
......................................................................................................
...............................................................................
....................
.......................................................................................................
.......................................................................................................
............................................................................................
......................................................................................
17
17
18
19
19
20
20
21
21
21
22
22
22
22
Reading a received short message
Reading a short message already sent
Deleting short messages
Sending a short message with just one touch
Management of short messages
Encryption
Basic encryption
DTMF
Initiating a DTMF call
Security
Disable a radio
Activate a radio
Scan Lists
Scan types
Start/Stop the scan function
....................................................................................................................................
.......................................................................................................................
............................................................................................................................................
.........................................................................................................................................
.........................................................................................................................
........................................................................................................................
......................................................................................................................................
................................................................................................................................
........................................................................................................
..............................................................................................................
........................................................................................
.................................................................................
.....................................................................
...........................................................................................
..................................................................................................
23
23
23
24
24
24
24
25
25
25
25
25
25
25
26
Responding to transmissions found during scanning
Settings
Details about the set radio channel
.........................................................................................................................................
Information about the radio
TalkAround
...............................................................................................................................
..................................................................................................
..........................................................................................
.........................................................
Page4of
26
26
26
27
27
56

English user manual - Radioddity GD-73 v1.0
...........................................................................................................................................
TOT
27
Setting transmit output power
............................................................................................................................................
Slot
CC (Colour Code)
GroupList
SQ
SubCode
General settings
Zone
Tone
Others
Keypad lock
Backlight
FreqDis
Startup display
Volume keys
..................................................................................................................................
..............................................................................................................................................
...................................................................................................................................
..........................................................................................................................................
..........................................................................................................................................
.......................................................................................................................................
...................................................................................................................................
......................................................................................................................................
....................................................................................................................
...........................................................................................................................
..............................................................................................................................
.........................................................................................................................
.............................................................................................................................
...............................................................................................
28
29
29
29
30
30
32
32
33
33
33
34
34
34
35
Function keys
Reset to factory settings
Programming the GD-73............................................................................................................36
Introduction
Let’s go
Installation of the USB drivers
Function keys
Encryption
Digital emergency system
Preparation for DMR operation................................................................................................42
Overview
Requesting a DMR radio ID
Digital contacts
.........................................................................................................................................
Read Data
Write Data
.......................................................................................................................................
...........................................................................................................................
.........................................................................................................
.................................................................................................................................
....................................................................................................
.................................................................................................................................
................................................................................................................................
...............................................................................................................................
....................................................................................................................................
..........................................................................................................
........................................................................................................
............................................................................................................................
35
36
36
37
37
39
39
39
39
40
42
42
42
Digital RX Group
Channel settings
Bundling of channels into zones
Transfer the codeplug to the radio
..........................................................................................................................
..........................................................................................................................
................................................................................................
...........................................................................................
Page5of
43
44
46
47
56
English user manual - Radioddity GD-73 v1.0
Before using the radio, please read this manual carefully. It
contains important instructions for the safe and proper use of
the radio and operating instructions for compliance with the
limits of RF energy exposure in accordance with applicable
national and international standards.
Firmware update for GD-73.......................................................................................................48
Limitations of PMR446............................................................................................................... 49
Appendix A – RF exposure limits and product safety for portable radio equipment
...........................................................................................................................................................50
Radio licence
Operating instructions
Protect your hearing
Safe operation
Cautions
Reducing risk
Use of communication devices while driving
Appendix B – Technical data....................................................................................................53
General
Transmitter
Receiver
Appendix C – CE Certificate of Compliance........................................................................ 55
................................................................................................................................
................................................................................................................
...................................................................................................................
.............................................................................................................................
....................................................................................................................................
............................................................................................................................
.......................................................................
.........................................................................................................................................
...................................................................................................................................
........................................................................................................................................
50
50
51
52
52
52
52
53
53
54
Product safety and RF exposure for portable radios
Notes on the use of the radio
Please read the following quick start guide, as failure to comply with these rules can
be dangerous or in violation of the law.
1. Observe local regulations before using this radio, as improper use may violate the
law.
Page6of
56

English user manual - Radioddity GD-73 v1.0
2. Turn off the radio before approaching flammable or potentially explosive
atmospheres.
3. Do not charge or replace the battery in flammable or potentially explosive
atmospheres.
4. Turn the radio off before you come near any areas with explosives.
5. Do not use a radio whose antenna is damaged, as touching the damaged
antenna may result in injury.
6. Do not try to disassemble the radio; any maintenance work should be carried out
by qualified technicians.
7. To prevent electromagnetic interference issues, turn the radio off in locations that
have signs displaying similar instructions to “Do not use wireless devices” or
“Turn cell / mobile phones off” such as inside hospitals and healthcare facilities.
8. Do not place the radio in the area of airbag deployment in vehicles so equipped.
9. Do not store the radio in direct sunlight or hot areas
10. When transmitting with the radio, keep the antenna at least 5cm away from your
body or face.
11. If the radio emits any smoke or burning smells, switch the radio off immediately
and remove it’s battery and contact your dealer.
12. Do not transmit for long periods as this may damage the radio or cause it to be
come hot enough to cause injury
Page7of
56
English user manual - Radioddity GD-73 v1.0
What is in the box?
Thank you for choosing a Radioddity radio. We recommend that you first check the
delivery contents listed in the following table before you dispose of the packaging. If
something is missing, please contact your dealer immediately.
As part of the Box you should also find the following items for use with your GD-73:
1 pcs GD-73 radio body
1 pcs Li-ion battery
1 pcs belt clip(with two screws)
1 pcs Programming cable(available for charging)
1 pcs power adapter
1 pcs earpiece
1 pcs user manual
Note:
Further accessories for your radio are available at: https://www.radioddity.com/
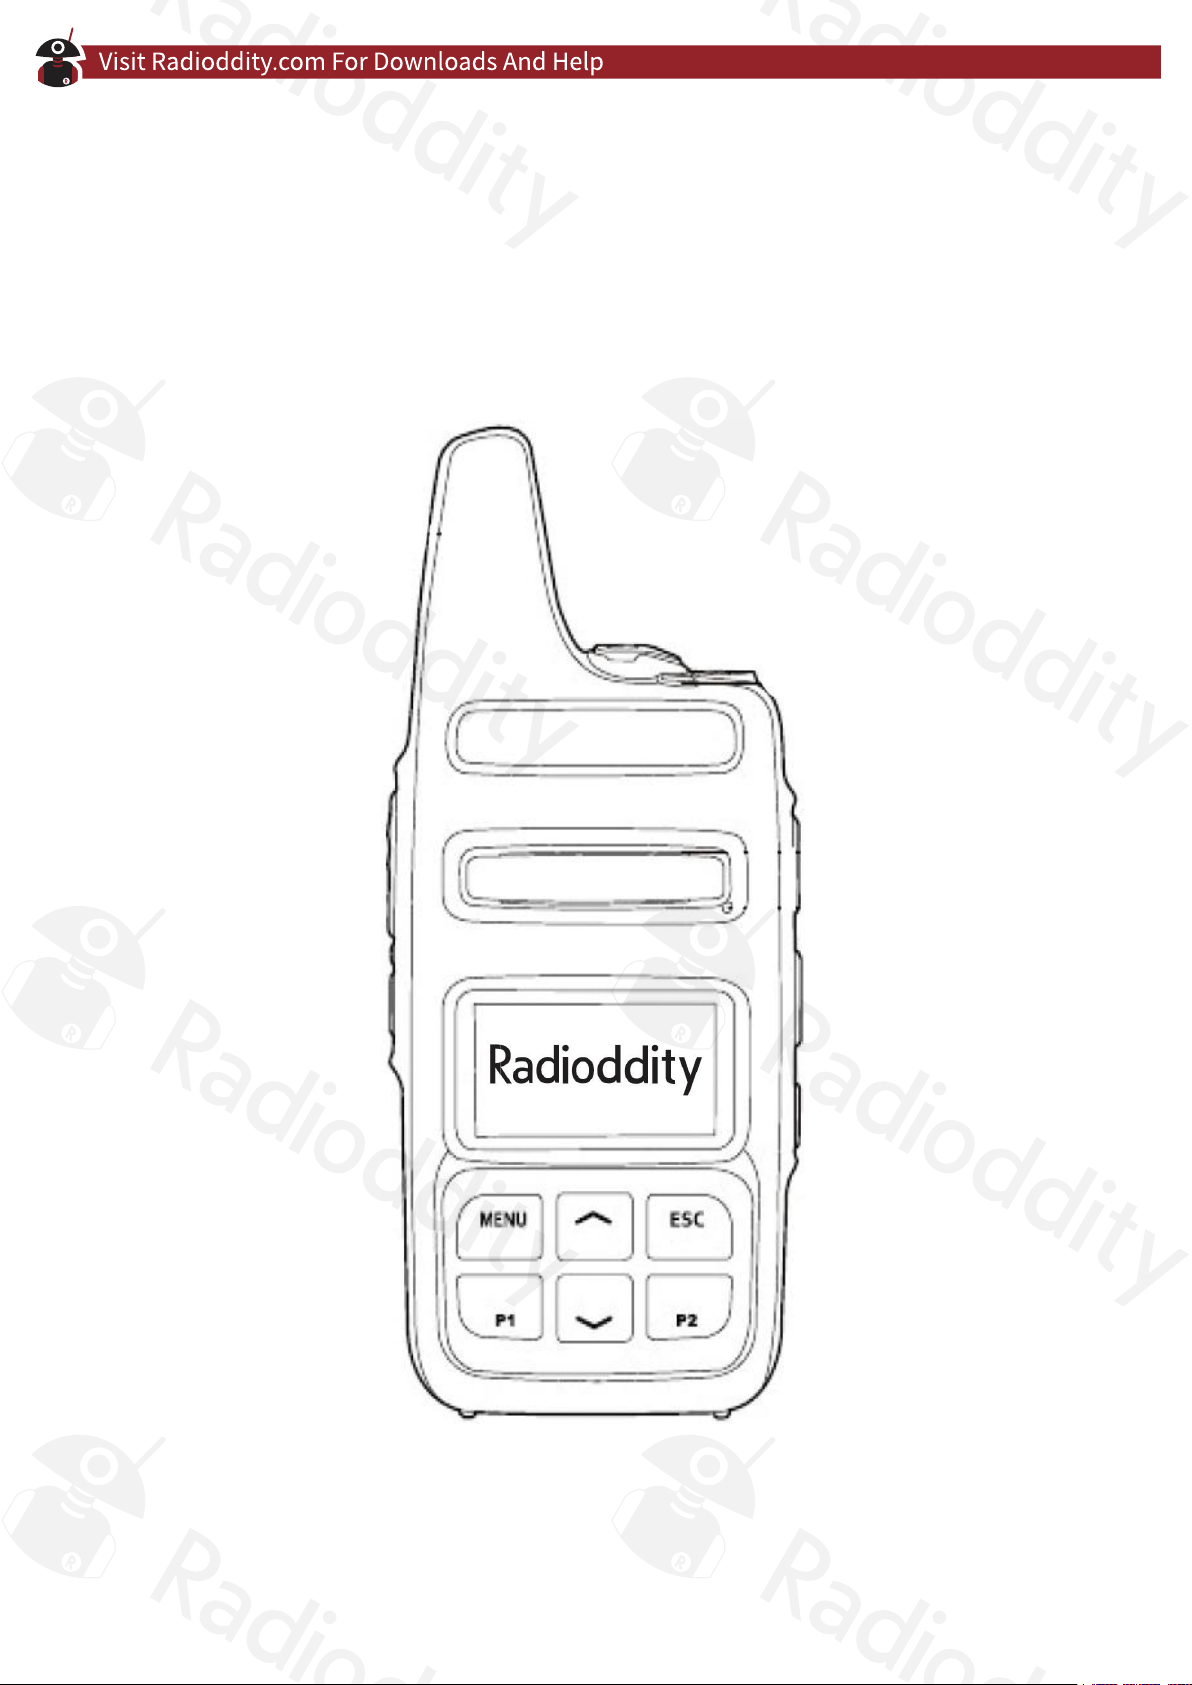
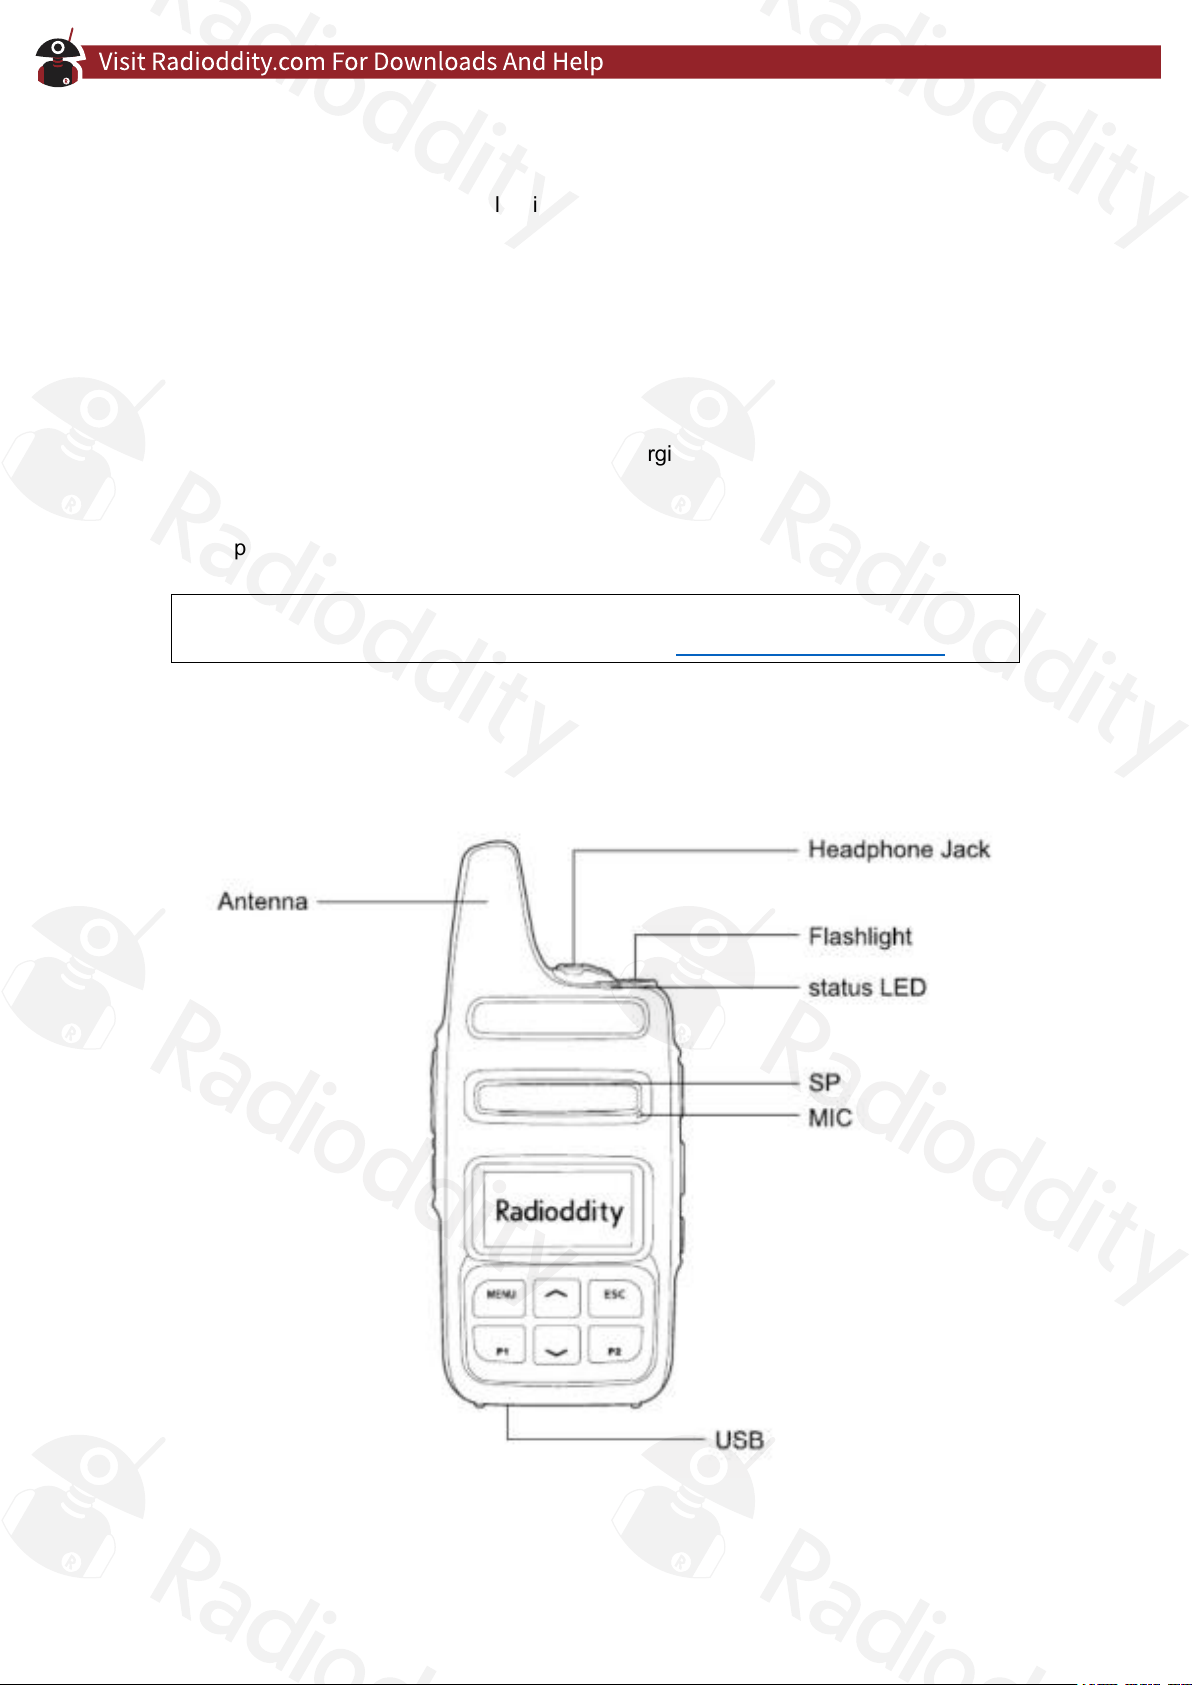
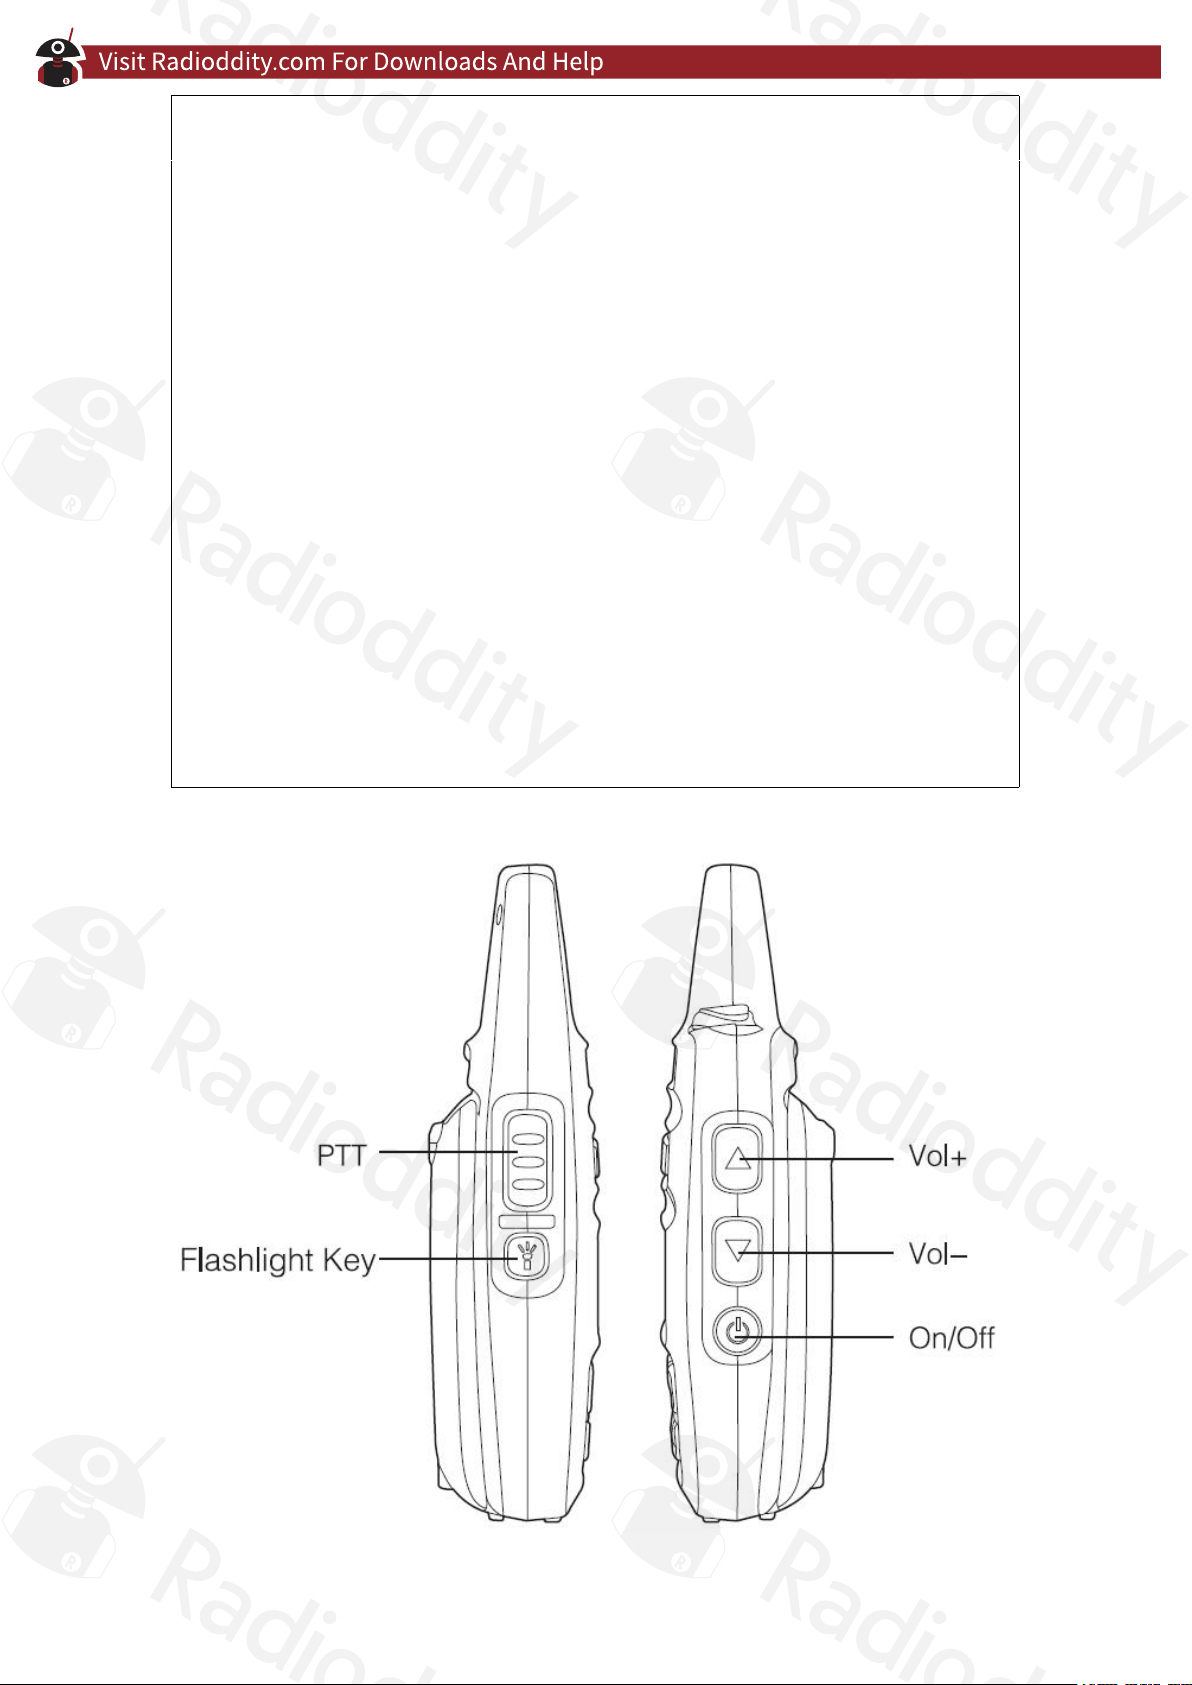
Radio controls
Page8of
56
English user manual - Radioddity GD-73 v1.0
Short and long presses of P1 and P2 can be assigned these functions in CPS:
1. No function
2. Radio Enable
3. Radio Check
4. Radio Disable
5. Power Level (not applicable to PMR & FRS versions of the radio)
6. Monitor
7. Emergency on
8. Emergency off
9. Zone select
10. Scan on/off
11. VOX on/off
12. One Touch Access 1
13. One Touch Access 2
14. One Touch Access 3
15. One Touch Access 4
16. One Touch Access 5
17. BER display
18. Repeater/Talk Around
19. Lone Worker
20. 1750Hz tone burst transmit
21. CallSwell
Page9of
56
English user manual - Radioddity GD-73 v1.0
General
Turning on the radio
The power on/off switch is located on the right side of the radio. Press and hold it for
about 3 seconds to turn on the radio. The Radioddity logo appears on the display, the
status LED lights up red briefly and an ascending 4-tone sequence sounds.
Turning off the radio
Press and hold the power on/off button for about 3 seconds to turn the radio off. The
display goes off.
Adjust the volume
Above the power on/off button are the volume up () and volume down () buttons,
use these to adjust the volume of the built in speaker or any attached external
earphone.
Note:
Later on in this manual the symbols and will refer to the front panel up/down
selector of the GD-73, underneath the LCD display.
Page10of
56

English user manual - Radioddity GD-73 v1.0
Using the battery
Caution:
Please only use battery packs from Radioddity. Other batteries could explode.
Note:
1. Do not short circuit a battery or throw it into a fire. Do not disassemble the
battery.
2. Charge the battery at temperatures between 0℃ und 45℃. Outside this
temperature range, the battery can not be charged fully.
3. Turn off the radio before charging.
4. Disconnect the radio from the external power supply as soon as charging is
complete.
5. Over time the battery will degrade and not give the same operating time. You
should replace the battery at this point.
6. Do not attempt recharging if either the radio or battery is wet. To avoid any
danger, dry it with a cloth before charging.
Warning:
If conductive metals, such as jewelry, keys, or chains, touch the external charging
contacts, damage or injury may occur.
Inserting / removing the battery
1. Align the two tabs on the battery and the holes on the bottom edge of the back
of the radio to ensure complete contact. Then clip the battery to the top of the
body
2. To remove the battery, please make sure that the radio is switched off, press
the two upper battery locks at the same time (for example, with your index and
middle finger) in the direction of the battery. The battery is unlocked and can
be removed.
Charging the battery
1. As soon as the micro-USB socket of the radio unit is connected to a PC or the
supplied power supply unit via a USB cable, a large battery symbol appears
on the display if the radio is switched off.
2. If, on the other hand, the radio is switched on, a small battery symbol appears
in the upper right corner of the LCD display.
3. After a few seconds, the battery icon fills up from left to right with several bars
to indicate the charging process has commenced.
4. As soon as the three bars are constantly filled, the battery is fully charged.
Now disconnect the radio from the external power supply.
Page11of
56

English user manual - Radioddity GD-73 v1.0
Antenna
The antenna is optimally tuned for the frequency range of the GD-73 and permanently
installed in the device. Therefore, it can not be changed.
Connection of an external headset
Carefully open (do not remove) the cover over the headphone jack and then insert the
headset plug into the jack socket firmly.
Page12of
56
English user manual - Radioddity GD-73 v1.0
Basic functions
Selecting a Zone
A zone is a collection of radio channels grouped together. Your radio can store up to
64 such zones, each with up to 16 channels.
1. Press the MENU button to enter the menu.
2. Using the buttons and navigate in the menu and confirm your selection by
pressing the MENU button again.
3. Select ‘settings’ in the menu
4. Then select ‘zone’ in the sub-menu
5. Using the buttons and navigate to the desired zone and confirm selection of
your chosen zone with the MENU button.
6. The display now shows the selected zone in the middle.
7. The line below shows the currently selected channel in the zone.
Selection of a channel
Navigate with the buttons and to select the desired channel. Confirmation with
the MENU key is not required here.
Receive and answer a group call
In order to receive a group call, a group (talkgroup or TG) must first be selected on the
radio. Each channel can be assigned exactly one group by means of the PC software.
Note:
It is helpful, but not essential, to have the channel name indicate what talkgroup is
assigned to the channel.
Receiving group calls
First, a channel must be selected on the radio to which a group (talkgroup or TG) is
assigned. Only then can a group call be received.
1. The status LED lights up green
2. If the channel is not active, then the display shows:
in the middle line of the name of the zone
the name of the selected group is displayed in the bottom line.
3. If the channel becomes active, then the display shows:
in the top row ‘Group’
in the middle line, the DMR ID of the caller
in the bottom line ‘Calling’ is displayed, followed by ‘end call’ if the channel
was not previously active.
Answering a group call
1. Hold the radio vertically, about 2.5 to 5cm from your mouth
2. Now press the PTT key to answer the call. The status LED lights up red. You can
talk now.
Page13of
56

English user manual - Radioddity GD-73 v1.0
3. Once finished speaking, release the PTT key to return to receive
4. If a response is not heard within a predetermined time, the call is terminated.
Receiving and answering a private call
A private call (also known as a single call) is an individual call to a specific remote
station. The remote station waits for the call and the calling party initiates it.
Receiving a private call
1. The status LED lights up green
2. The display shows:
in the middle line “single call”
in the bottom line the DMR-ID of the caller as well as the symbol for an
incoming call (digital mode only) is displayed.
Answering a private call
1. Hold the radio vertically, about 2.5 to 5cm from your mouth
2. If the Channel Free Indication Tone feature is enabled, you will hear a short beep
as soon as the radio channel is free in order to answer the call.
3. Now press the PTT key to answer the call. The status LED lights up red. You can
talk now.
4. Once finished speaking, release the PTT key to return to receive
All call feature
All calls are used to send important information to everyone on the channel,
regardless of the group they may have selected.
Receiving an all call
1. The status LED lights up green
2. The display shows:
on the first line ‘All Call’
on the middle line, the ID of the caller is seen
on the bottom line, ‘All Call’ is displayed only for analogue mode calls
3. When the All Call has finished, the display returns to the previous display.
4. If the Channel Free Indication Tone feature is enabled, you will hear a short beep
as soon as the transmission has finished.
5. Answering an All Call is not possible.
Note
If the channel is changed during reception of an All Call, reception of the All Call is
aborted. During an All Call, the programmed keys have no function.
Page14of
56
English user manual - Radioddity GD-73 v1.0
Initiating a call
You can select the channel, the DMR ID or the desired group (Talk Group, TG) with
the following options:
Channel selection keys
Preprogramed keys
Contacts
Manual entry (only for a private call)
Group call
All radios that you wish to communicate with must be on the same group.
1. Select the desired channel using the and buttons. Programming channel
names with a name that associates with the Talk Group is useful to facilitate this.
2. Hold the radio vertically, about 2.5 to 5cm from your mouth
3. Now press the PTT key to transmit. The status LED lights up red. The group name
appears on the display
4. Once finished speaking, release the PTT button to return to receive. If a response
is not heard within a predetermined time, the call is terminated.
5. When the call is answered, you will see the status LED light up green.
6. On the display you will see:
in the top line “Group”
in the middle line the DMR-ID of the caller
in the bottom line ‘Calling’ is displayed, followed by ‘end call’ if the channel
was not previously active.
7. If the Channel Free Indication Tone feature is enabled, you will hear a short beep
as soon as the transmission has finished.
8. When the group call is over, the display changes back to the previous display.
9. A group call can also be initiated from the contacts.
Private call
1. Using the and to select your desired channel.
2. Hold the radio vertically, about 2.5 to 5cm from your mouth
3. Now press the PTT key to transmit. The status LED lights up red.
4. The display will show:
in the top line ‘Single Call’
in the middle line the name of the contact you are calling
in the bottom line the DMR ID of the radio you are calling
5. Once finished speaking, release the PTT button to return to receive. If a response
is not heard within a predetermined time, the call is terminated. If the call is
answered, the status LED will light up green.
6. If the Channel Free Indication Tone feature is enabled, you will hear a short beep
as soon as the radio channel is free in order to make further responses.
7. The end of a private call is signalled by an audible short tone.
The two function keys can be programmed as shortcut keys.
Page15of
56
English user manual - Radioddity GD-73 v1.0
All Call
Your radio has the ability to call all radios on the channel regardless of what group
they have selected with the All Call facility. Your radio must first be programmed with
the All Call feature.
1. Using buttons and select the desired channel that has been programmed
with All Call, or you can select a contact programmed as All Call.
2. Hold the radio vertically, about 2.5 to 5cm from your mouth
3. Now press the PTT key to transmit. The status LED lights up red.
4. The display will show:
in the top line ‘All Call’
in the middle line the name programmed for All Call
in the bottom line the All Call ID and the outgoing call sign (in digital mode
only)
Note
Recipients of an All Call cannot answer these types of calls.
Using a speed dial key to send a call
The speed dial feature allows you to make a group or individual call to a predefined ID
or name. This function can be assigned to a key with short or long operation. Only one
ID or one name can be programmed to a key. However, several shortcut keys can be
programmed.
1. Start a call to a group or person by pressing the speed dial key.
2. Hold the radio vertically, about 2.5 to 5cm from your mouth
3. Now press the PTT key to transmit. The status LED lights up red.
4. The display will show the group, name or ID, and outgoing call sign (in digital
mode only)
5. Once finished speaking, release the PTT button to return to receive. If a
response is not heard within a predetermined time, the call is terminated. If
the call is answered, the status LED will light up green.
6. If the Channel Free Indication Tone feature is enabled, you will hear a short
beep as soon as the radio channel is free in order to make further
transmissions.
Emergency calls
Emergency mode
An emergency alarm should only be activated in case of a genuine emergency. This
can be done anytime, anywhere and is possible even when the channel is busy
Note
The emergency mode is only available in digital radio systems and assigned to a
special group call.
Page16of
56
English user manual - Radioddity GD-73 v1.0
The radio supports three emergency alarms:
Emergency alarm
Emergency alarm followed by call
Emergency alarm with automatic activation of microphone
Receiving emergency alarms
1. When receiving an emergency alarm, the number of emergency alarms received
so far as well as the ID of the caller and "Alarm" will be shown on the display. In
addition, the emergency alarm and the name / ID of the caller are displayed
alternately.
2. A beep will sound and the status LED will turn red.
3. If enabled, the radio automatically receives an emergency alarm. If the radio
receives an emergency alarm, the display will show an alarm icon. This will be
displayed until the alarm has been confirmed. As long as the alarm symbol is
displayed, reception of other stations is not possible.
Note
A short press of the ESC key, followed by pressing the programmed emergency mode
power off key clears the emergency alarm, thereby ending the emergency mode.
Answering an emergency alarm
After receiving an emergency alarm:
1. Press any key to acknowledge the audible alarm tone.
2. Hold the radio vertically, about 2.5 to 5cm from your mouth
3. If the Channel Free Indication Tone feature is enabled, you will hear a short
beep as soon as the radio channel is free
4. Then press the PTT button to respond to the emergency alarm. The status
LED is now red and the radio is in emergency mode. You can talk now.
5. Release the PTT button to return to receive mode. The status LED lights up
green if the emergency call is answered. The display shows "Group Call", the
group ID and the ID of the caller.
6. A short press of the ESC key, followed by pressing the programmed button to
turn off the emergency alarm clears the emergency alarm and also terminates
the emergency mode.
7. The radio will exit emergency mode and return to normal display.
Send an emergency alarm
This feature allows the sending of an emergency alarm. This is not a voice
transmission but any receiving radio will see the alarm being transmitted and will need
to confirm the alarm for further action. An emergency alarm can only be sent by an
emergency alarm contact in the appropriate emergency group.
1. Press the function key that has been programmed for ‘emergency alarm’
function to send an emergency alarm (function key 1, 2 or 3).
Page17of
56

English user manual - Radioddity GD-73 v1.0
2. The display will alternately show your own ID and "emergency call". The status
LED lights red and the emergency mode is activated.
3. When an emergency alarm is received, the emergency sound is heard. The
received emergency alarm is shown on the display. If there is no response
from other radios after several retries, a beep sounds and the emergency
mode is ended.
4. The radio will exit emergency mode and return to normal display. If the radio is
completely disabled for the playback of beeps, voice or text will not be output
in emergency mode.
Emergency alarm followed by voice call
This feature allows you to send an emergency alarm to another radio. After confirming
the call, both radios can communicate with a voice call via the previously defined radio
channel
1. Press the function key that has been programmed for ‘emergency call’ function
to send an emergency alarm (function key 1, 2 or 3).
2. The display will alternately show your own ID and "emergency call". The status
LED lights red and the emergency mode is activated.
3. When an emergency alarm is received, the emergency sound is heard. The
received emergency alarm is shown on the display. If there is no response
from other radios after several retries, a beep sounds and the emergency
mode is ended.
4. Hold the radio vertically, about 2.5 to 5cm from your mouth
5. Now press the PTT button to make the voice call. The status LED lights up red.
The radio is in emergency mode. You can talk now. The display shows the
group call icon.
6. Release the PTT button to return to receive mode. The status LED lights up
green if the emergency call is answered.
7. If the Channel Free Indication Tone feature is enabled, you will hear a short
beep as soon as the radio channel is free in order to make further
transmissions.
8. If necessary, press the PTT button again to acknowledge the emergency
alarm call. The status LED lights up red or press the corresponding function
key to switch off the emergency mode.
9. The radio will exit emergency mode and return to normal display. If the radio is
completely disabled in the playback of beeps, voice or text will not be output in
emergency mode until you press PTT to initiate a call. If the radio has been
programmed for "call permit", no beeps or special displays will be shown on
the display of the person called. A special display only appears on the display
when the PTT button is used to trigger or answer a call.
Page18of
56
English user manual - Radioddity GD-73 v1.0
Sending an emergency alarm then automatically activate the microphone
This feature allows you to send an emergency alarm to another radio. After the
emergency alarm has been triggered, your radio automatically switches to transmit
mode without you having to press the PTT button. This is also referred to as an
"emergency microphone".
Note: However, if you now press the PTT key, the message will continue to be sent
until you release the PTT key.
1. Press the function key that has been programmed for ‘emergency microphone’
function to send an emergency alarm (function key 1, 2 or 3).
2. "Alarm" appears on the display. The status LED lights red and the emergency
mode is activated.
3. Hold the radio vertically, about 2.5 to 5cm from your mouth, if possible, in the
circumstances.
4. As soon as "Alarm" appears on the display, you can speak into the microphone of
the radio without first having to press the PTT button.
5. This automatic transmission ends automatically after a specified period of time.
6. You can press the PTT button to initiate another voice call if needed. The status
LED lights red again. The radio is in emergency mode. You can talk now.
7. If the radio is completely disabled for the playback of beeps, in emergency mode,
neither voice nor text outputs until you press the PTT button to trigger a call.
8. If the radio has been programmed for "call permit", no beeps or special
indications will be shown on the display of the person called until the specified
time has elapsed. These outputs are only made again if the PTT key was
previously pressed once. This happens in the following two cases:
The emergency mode is ended as soon as the radio channel is changed.
Triggering an emergency alarm on the new radio channel returns the radio to
emergency mode.
If the radio is in emergency mode and the pre-programmed emergency
transmission button is pressed, the previous emergency alarm will stop and a
new emergency alarm will be triggered.
Ending emergency mode
Emergency mode is ended if one of the following occurs:
If there is no response when an emergency alarm is triggered even after
several repetitions by the remote station, a beep sounds and the emergency
mode is ended
Pressing the programmed emergency power off button clears the emergency
alarm, thereby ending the emergency mode
Turning off the radio stops the emergency mode. However, turning the radio
back on does not restart emergency mode.
Note
Pressing the PTT button does not end the emergency mode.
Page19of
56
English user manual - Radioddity GD-73 v1.0
Menu operation
1. Press the MENU button to get to the function menu. You can then scroll
through the sub-menus using the (up) and (down) keys.
2. Press the MENU button again to select the sub-menu item.
3. Press the ESC key to key to return to the higher-level menu. As soon as you
are in the top menu, you can return to the normal display output (frequency,
channel) by pressing the ESC key again.
Contacts
The contacts stored in the radio make up the address book of your radio. Each
individual contact corresponds to a name or an ID to which a targeted call can be
established. Each entry is assigned an additional property such as "Group Call",
"Individual Call" or "General Call". Each contact consists of the following three
elements:
1. Name Name of your contact
2. ID DMR ID number of your contact
3. Type Type of contact; group, private or all call
Note
You can only edit the contacts with the CPS software on PC. Editing directly on the
GD-73 is not possible because it does not have the necessary buttons.
Group call contacts
1. Press the MENU key to enter the function menu, then use the or buttons
to select the “contacts” sub-menu
2. Use the and buttons to select the desired group contact
3. Confirm your selection by pressing the MENU button again
4. Use the and buttons to select the sub-menu ‘select’.
5. The display of your GD-73 will then show "selected!"
6. Hold the radio vertically, about 2.5 to 5cm from your mouth
7. Now press the PTT button to start the call. The status LED lights up red. The
display shows the group name or group ID and the outgoing group call icon
8. Release the PTT button to return to receive.
9. When the call is answered, the status LED lights up green.
10. The display will show:
a. in the first line "Group Call",
b. in the middle row the name of the call group (Call Group Alias) and
c. in the bottom line the ID of the answering person as well as the icon for
an incoming call (only in digital mode)
11. If the Channel Free Indication Tone feature is enabled, you will hear a short
beep as soon as the radio channel is free in order to make further
transmissions.
Page20of
56
English user manual - Radioddity GD-73 v1.0
12. If a response is not heard within a predetermined time, the call is terminated
13. When the group call is over, the display changes back to the previous display.
Private call contacts
1. Press the MENU key to enter the function menu, then use the or buttons
to select the “contacts” sub-menu
2. Use the and buttons to select the desired private / individual contact
3. Confirm your selection by pressing the MENU button again
4. Use the and buttons to select the sub-menu ‘select’.
5. The display of your GD-73 will then show "selected!"
6. Hold the radio vertically, about 2.5 to 5cm from your mouth
7. Now press the PTT button to start the call. The status LED lights up red. The
display shows the private / individual name or ID and the outgoing private call
icon
8. Release the PTT button to return to receive.
9. When the call is answered, the status LED lights up green.
10. The display will show:
a. in the first line "Single Call"
b. in the middle row the name of contact
c. in the bottom line the ID of the called contact as well as the icon for an
outgoing call (only in digital mode)
11. If the Channel Free Indication Tone feature is enabled, you will hear a short
beep as soon as the radio channel is free in order to make further
transmissions.
12. If a response is not heard within a predetermined time, the call is terminated.
13. After completing a private call, the display changes back to the previous
display.
Call lists
The radio records all last dialled, received and not accepted calls since the radio was
last switched on in the call list log.
Checking IDs of new calls
Received (ReceCall), Missed (MissCall) and calls initiated (CallNumb)are logged.
1. Press the MENU key to enter the function menu, then use the or buttons
to select the “Call Log” sub-menu
2. Confirm your selection by pressing the MENU button again
3. Use the and buttons to select the desired list and confirm the selection
with the MENU button.
4. The last entry is now displayed in the top line of the display.
5. Use the and buttons to scroll through the list of up to 32 entries.
Page21of
56
English user manual - Radioddity GD-73 v1.0
View name or ID of missed calls
Whenever you have missed an incoming call, this is signalled by a message on the
display of the radio. In such a case, you can display the ID of the missed call
immediately ("view") or later ("view later").
1. Press the MENU key to enter the function menu, then use the or buttons
to select the “Call Log” sub-menu
2. Confirm your selection by pressing the MENU button again
3. Use the and buttons to select the desired list and confirm the selection
with the MENU button.
4. The display now shows the oldest entry in the first place.
5. Use the and buttons to select an entry from the list.
6. Pressing the MENU button will display the details for this entry (ID, Type, time
and date heard)
7. Alternatively, after selecting an entry, you can also press PTT to initiate a call
to the selected contact or group.
Note
If you press the PTT button while viewing a missed call, the missed calls menu will be
exited and an outgoing single call will be triggered.
The menu can also be used to edit the call list for answered, outgoing and missed
calls. There are options for viewing, adding a contact to the address book, deleting
individual and deleting all entries.
Delete a call list
To delete one of the call lists:
1. Press the MENU key to enter the function menu, then use the or buttons
to select the “Call Log” sub-menu and confirm your selection by pressing the
MENU button.
2. Use the and buttons to select the sub-menu “DelLogs” and confirm
selection by pressing the MENU button again.
3. Use the and buttons to select the list to be deleted and confirm this
selection by pressing MENU.
4. The selected list will be deleted and confirmed by “deleted!” being shown on
the display
Short messaging functions
Your radio can also send and receive short text messages with a maximum length of
144 characters each. Complete messages are no longer than 50 lines.
Sending a prepared short message
Navigate in the menu:
1. Press the MENU key to enter the function menu, then use the or buttons
to select the “Msg” sub-menu and confirm your selection by pressing the
MENU button.
Page22of
56
English user manual - Radioddity GD-73 v1.0
2. Use the and buttons to select the sub-menu “CommMsg” and confirm
selection by pressing the MENU button again.
3. Now select one of the messages previously defined and programmed with the
CPS
4. Select the intended recipient of the message from your list of contacts and
confirm the selection with MENU.
5. The message is now transmitted via the set digital channel to the other radio.
6. The display of the GD-73 will then show “sent OK “.
Reading a received short message
Navigate in the menu:
1. Press the MENU key to enter the function menu, then use the or buttons
to select the “Msg” sub-menu and confirm your selection by pressing the
MENU button.
2. Use the and buttons to select the sub-menu “Inbox” and confirm
selection by pressing the MENU button again.
3. Use the and keys to select one of the received short messages. Already
read short messages are displayed with an open envelope icon, while unread
short messages have a closed envelope icon in front of the DMR ID of the
sender. Confirm the selection with the MENU key.
4. The display of your GD-73 now displays the received short message.
Note
When the GD-73 receives a new short message the upper line of the display will show
an envelope icon to show that you have an unread message.
Reading a short message already sent
Navigate in the menu:
1. Press the MENU key to enter the function menu, then use the or buttons
to select the “Msg” sub-menu and confirm your selection by pressing the
MENU button.
2. Use the and buttons to select the sub-menu “Outbox” and confirm
selection by pressing the MENU button again.
3. Use the and keys to select one of the previously sent short messages.
Confirm the selection with the MENU key.
4. The display of your GD-73 now displays the sent short message.
Deleting short messages
Navigate in the menu:
1. Press the MENU key to enter the function menu, then use the or buttons
to select the “Msg” sub-menu and confirm your selection by pressing the
MENU button.
2. Use the and buttons to select the sub-menu “DelMsg” and confirm
selection by pressing the MENU button again.
Page23of
56
English user manual - Radioddity GD-73 v1.0
3. Use the and to select either the message memory for incoming
messages, "Inbox" or for messages sent, "Outbox". Confirm the selection as
usual with the MENU key.
4. The display will show “Deleted!”
Note
Editing messages is only possible using the CPS software on PC
Sending a short message with just one touch
1. Press the corresponding programmed key to send a prepared short message
to a specific user.
2. The message "Msg Sending ..." appears on the display.
3. As soon as the short message has been sent, the display again shows the
recipient specified by the programmed key.
4. If the transmission was successful, a short tone will sound and the text
"Message sent successfully" appears on the display. On the other hand, if the
transmission was unsuccessful, the message "Message Send Fail" appears
on the display and the message will need to be manually resent.
Management of short messages
After your short message has been sent, this short message is stored in the Outbox.
The last sent short message is always at the top of the list. The last 16 short
messages will be kept. Older short messages are deleted automatically.
The same applies to received messages.
Encryption
Enabling encryption ensures that other users who are on the channel cannot hear the
transmission. This is made possible by a special software encryption of the digital
signal to ensure secrecy of communications.
Basic encryption
Two (or more) radios that need to communicate in secret must all have encryption
enabled and be using the same encryption key as programmed by CPS software.
Note
Please check to see if encrypted radio transmissions are permitted in your country.
As a general rule, encryption is not permitted to be used on the amateur ‘ham’ radio
bands.
Page24of
56

English user manual - Radioddity GD-73 v1.0
DTMF
The DTMF feature (Dual Tone Multi Frequency) enables the operation of radios
despite interference on a radio channel. You can optionally add DTMF signalling using
the CPS.
Initiating a DTMF call
As usual, a call is initiated by pressing the PTT key. Now, however, a pre-determined
DTMF tone sequence is first sent to other radios before it outputs the received signal
on the speaker of the device. Any transmissions without a matching DTMF sequence
will be ignored, which can be useful to overcome interference on an analogue
channel.
Security
It is possible to activate and deactivate individual radios. This makes it possible, for
example, to lock a stolen radio from further use and unlock it when you get it back.
This feature needs to be pre-programmed in the radio by CPS software.
Disable a radio
All radios in your fleet must be pre-configured for this feature using the CPS. Then you
can use a programmed function key to send out a signal to disable the other radio.
Activate a radio
All radios in your fleet must be pre-configured for this feature using the CPS. Then you
can use a programmed function key to send out a signal to re-enable the other radio.
Scan Lists
A scan list can contain various channels as well as talk groups. Your radio can support
up to 16 scan lists and up to 30 members per list. Each scan list supports a mix of
analogue and digital channels. You can add / delete channels or prioritize channels by
editing the scan list. Create a scan list with the CPS and assign it to a single channel /
talk group.
Scan types
When the scan starts, your radio will check for any voice activity by flipping through the
pre-programmed scan list. There are two methods of commencing a scan:
Manual Scan
Start or stop a scan by pressing a key that has been pre-programmed with the
CPS with the function “scan on/off”
Automatic Scan
Page25of
56
English user manual - Radioddity GD-73 v1.0
If automatic scan is set for a particular channel in CPS, when the user selects
that channel on the GD-73, it will automatically commence scanning of the
scan list attached to that channel.
Start/Stop the scan function
With the CPS, one of the two function keys can be assigned to switch the scan
function on and off ("Scan On / Off"). There are two ways to commence the scan:
1. Use the or keys to select a channel which has been programmed for
automatic scan.
2. Press the "Scan On / Off" button pre-programmed with the CPS to start or stop
the scan.
When scanning is enabled, the frequency / channel name of the currently received
channel and its channel properties (analogue, digital and output power) are displayed.
Responding to transmissions found during scanning
If the radio detects an active channel / talk group while scanning, the radio remains on
the channel / talk group for the duration set by the CPS, so you then have the
opportunity to reply to the transmission if necessary.
Procedure
1. Hold the radio vertically, about 2.5 to 5cm from your mouth. If the Channel
Free Indication Tone feature is enabled, you will hear a short beep as soon as
the radio channel is free to prompt you that you can commence transmission.
2. Press the PTT button before the time set by the CPS has expired. The status
LED lights up red.
3. Release the PTT key so that the other station can answer.
4. If you do not respond within the pre-set time, scanning automatically resumes.
Settings
The "Settings" function allows you to specify a wide variety of parameters. Some of
the settings are global, while others refer to the radio channel selected and are
retained even after the radio is turned off.
Information about the radio
You can use the "Local" function menu to read out the ID of the radio as well as
detailed information about the hardware and software of the radio. Navigate to the
menu:
1. Press the MENU key to enter the function menu, then use the or buttons
to select the “Settings” sub-menu and confirm your selection by pressing the
MENU button.
2. Use the and buttons to select the sub-menu “Local” and confirm
selection by pressing the MENU button again.
Page26of
56
English user manual - Radioddity GD-73 v1.0
3. The display of your GD-73 now displays the following information about your
radio:
ID DMR ID of the radio (can only be set with the CPS)
Model GD-73
Versions Firmware version
4. Then press the ESC key to return to the main display or wait about 10
seconds.
Note
In digital mode, the radio is identified by its ID. Please note that unlawful use of an ID
(such as an amateur radio DMR ID) may result in criminal sanctions.
Details about the set radio channel
Analog and digital channels have a send and receive frequency and channel name.
For digital channels, there are also colour code and timeslot details.
TalkAround
With the talkaround function it is possible to communicate with other radio stations
outside the reception area of a repeater via a direct radio connection. Your radio
transmits on the "output frequency" of the repeater and receives accordingly on the
"input frequency" of the repeater. In the function menu:
1. Press the MENU key to enter the function menu, then use the or buttons
to select the “Settings” sub-menu and confirm your selection by pressing the
MENU button.
2. Use the and buttons to select the sub-menu “Channel” and confirm
selection by pressing the MENU button again.
3. Use the and buttons to select the option “TalkAround” and confirm
selection by pressing the MENU button again.
4. Now use the and buttons to select one of the two options “OFF” or “ON”
and confirm this with the MENU button.
5. Finally press ESC button several times to return to the main display, or wait
about 10 seconds.
With the CPS, turning on / off the talkaround function can be assigned to one of the
two available function keys.
Note
The radio retains the selected setting even after it has been turned off.
TOT
With TOT (Time out Timer) enabled, you can set a time limit between 30 seconds and
500 seconds for the length of any one transmission. The setting is made in 10 second
increments. This feature protects the battery since you cannot carry out excessively
Page27of
56
English user manual - Radioddity GD-73 v1.0
long transmissions, or in the event of a jammed talk button disturbance to other users
is minimised. In the function menu:
1. Press the MENU key to enter the function menu, then use the or buttons
to select the “Settings” sub-menu and confirm your selection by pressing the
MENU button.
2. Use the and buttons to select the sub-menu “Channel” and confirm
selection by pressing the MENU button again.
3. Use the and buttons to select the option “TOT” and confirm selection by
pressing the MENU button again.
4. Now use the and buttons to select between the options “OFF” or the
desired time out timer desired period (in 10 second increments) and confirm
this with the MENU button.
5. "OK!" Appears briefly on the display.
6. Finally press ESC button several times to return to the main display, or wait
about 10 seconds.
Note
Selecting "off" disables the TOT function.
Setting transmit output power
The output power can be switched between "High" with 2 W and "Low" with 500mW
for each channel. For nearby radio stations, the setting "Low" should be selected. On
the other hand, stations that are further away may be better reached by the "High"
setting. The function key specified by the PC software can be used to switch between
"High" and "Low".
In the function menu:
1. Press the MENU key to enter the function menu, then use the or buttons
to select the “Settings” sub-menu and confirm your selection by pressing the
MENU button.
2. Use the and buttons to select the sub-menu “Channel” and confirm
selection by pressing the MENU button again.
3. Use the and buttons to select the option “Power” and confirm selection
by pressing the MENU button again.
4. Use the and keys to select one of the two options "Low power" or "High
power" and confirm this selection by pressing MENU key
5. Finally press ESC button several times to return to the main display, or wait
about 10 seconds.
Note
The PMR version of the GD-73 does not have this option, and is fixed with a
maximum output power of 500mW.
Page28of
56
English user manual - Radioddity GD-73 v1.0
Slot
In digital mode it is possible to transmit two radio conversations simultaneously and
independently of each other on one channel. The timeslot serves to differentiate the
two radio conversations.
In the function menu:
1. Press the MENU key to enter the function menu, then use the or buttons
to select the “Settings” sub-menu and confirm your selection by pressing the
MENU button.
2. Use the and buttons to select the sub-menu “Channel” and confirm
selection by pressing the MENU button again.
3. Use the and buttons to select the option “Slot” and confirm selection by
pressing the MENU button again.
4. Use the and keys to select one of the two options "slot 1" or "slot 2" and
confirm this selection by pressing MENU key
5. Finally press ESC button several times to return to the main display, or wait
about 10 seconds.
CC (Colour Code)
The Colour Code (sometimes called system code) is used to differentiate between
DMR repeaters whose coverage areas may overlap. Values from 0 to 15 are allowed.
The default value is 1.
In the function menu:
1. Press the MENU key to enter the function menu, then use the or buttons
to select the “Settings” sub-menu and confirm your selection by pressing the
MENU button.
2. Use the and buttons to select the sub-menu “Channel” and confirm
selection by pressing the MENU button again.
3. Use the and buttons to select the option “CC” and confirm selection by
pressing the MENU button again.
4. Using the and keys to select a value between 0 and 15 and confirm the
selection as usual with the MENU key.
5. Finally press ESC button several times to return to the main display, or wait
about 10 seconds.
GroupList
Each digital channel can receive one or many talk groups. The actual talk groups that
are able to be heard are defined in a GroupList, and that GroupList is then attached to
the channel. GroupLists are programmed by using the CPS.
In the function menu:
1. Press the MENU key to enter the function menu, then use the or buttons
to select the “Settings” sub-menu and confirm your selection by pressing the
MENU button.
2. Use the and buttons to select the sub-menu “Channel” and confirm
selection by pressing the MENU button again.
Page29of
56
 Loading...