


English user manual - Radioddity GD-73 v1.0
Radioddity GD-73
User manual
Page1of
56
English user manual - Radioddity GD-73 v1.0
Overview of Radioddity
“You, our friend and customer, are our focus”
Nothing is more important than your time and money. When you buy radios online,
you face a dilemma: buy from a reputable website at a high price, or try to save
money by choosing a dealer who may or may not offer quality goods, service and
advice. At Radioddity.com, you do not have to choose between low prices and a
secure shopping experience. Whether you are buying from us for the first time or a
seasoned amateur radio operator, we always hope that with our products, prices,
content and sources, you will find exactly what you need.
In recent years, Radioddity has better met the needs of wireless device buyers by
creating a secure shopping experience. We do this by offering the highest quality
products at an affordable price and providing you with first-class service. You deserve
no less.
Our promise: to give you the best shopping experience
Strong partnerships enable us to offer you the latest technology and outstanding
value for money under the Radioddity brandname. Our thoughtful and responsive
customer service teams help us deliver on our promise to you and meet your every
day needs even better.
Wether providing you with the latest and greatest DMR and analog radios,
accessories and related products, providing outstanding technical support, or by
working with the leaders of the amateur radio industry to develop helpful content to
assist you with your purchase: Your concerns are our concerns.
We want to connect you with high quality radios at low prices. If, in your opinion, we
do not honor this promise in any way, please let us know by e-mail:
support@radioddity.com
Page2of
56

English user manual - Radioddity GD-73 v1.0
Contents
Overview of Radioddity................................................................................................................2
Product safety and RF exposure for portable radios.......................................................... 6
Notes on the use of the radio
What is in the box?........................................................................................................................8
Radio controls.................................................................................................................................8
General
Using the battery..........................................................................................................................11
Inserting / removing the battery
Charging the battery
Antenna.......................................................................................................................................... 12
Connection of an external headset.........................................................................................12
Basic functions............................................................................................................................ 13
Selecting a Zone
Selection of a channel
.........................................................................................................................................
Turning on the radio
Turning off the radio
Adjust the volume
...................................................................................................................
...................................................................................................................
..........................................................................................................................
.................................................................................................................
......................................................................................................
...............................................................................................................
...............................................................................................................
...............................................................................................
10
10
10
10
11
11
13
13
6
Receive and answer a group call
Receiving group calls
Answering a group call
Receiving and answering a private call
Receiving a private call
Answering a private call
All call feature
Receiving an all call
Initiating a call
Group call
Private call
All Call
Using a speed dial key to send a call
Emergency calls...........................................................................................................................16
Emergency mode
..............................................................................................................................
..............................................................................................................................
.................................................................................................................................
................................................................................................................................
.......................................................................................................................................
..............................................................................................................
...........................................................................................................
...........................................................................................................
.................................................................................................................
........................................................................................................................
...............................................................................................
.....................................................................................
..........................................................................................................
....................................................................................
13
13
13
14
14
14
14
14
15
15
15
16
16
16
Receiving emergency alarms
.................................................................................................
Page3of
17
56

English user manual - Radioddity GD-73 v1.0
Answering an emergency alarm
Send an emergency alarm
Emergency alarm followed by voice call
Sending an emergency alarm then automatically activate the microphone
Ending emergency mode
Menu operation.............................................................................................................................20
Contacts
Call lists
Short messaging functions
........................................................................................................................................
Group call contacts
Private call contacts
.........................................................................................................................................
Checking IDs of new calls
View name or ID of missed calls
Delete a call list
Sending a prepared short message
.................................................................................................................
.................................................................................................................
........................................................................................................................
.........................................................................................................
............................................................................................
......................................................................................................
...............................................................................
....................
.......................................................................................................
.......................................................................................................
............................................................................................
......................................................................................
17
17
18
19
19
20
20
21
21
21
22
22
22
22
Reading a received short message
Reading a short message already sent
Deleting short messages
Sending a short message with just one touch
Management of short messages
Encryption
Basic encryption
DTMF
Initiating a DTMF call
Security
Disable a radio
Activate a radio
Scan Lists
Scan types
Start/Stop the scan function
....................................................................................................................................
.......................................................................................................................
............................................................................................................................................
.........................................................................................................................................
.........................................................................................................................
........................................................................................................................
......................................................................................................................................
................................................................................................................................
........................................................................................................
..............................................................................................................
........................................................................................
.................................................................................
.....................................................................
...........................................................................................
..................................................................................................
23
23
23
24
24
24
24
25
25
25
25
25
25
25
26
Responding to transmissions found during scanning
Settings
Details about the set radio channel
.........................................................................................................................................
Information about the radio
TalkAround
...............................................................................................................................
..................................................................................................
..........................................................................................
.........................................................
Page4of
26
26
26
27
27
56

English user manual - Radioddity GD-73 v1.0
...........................................................................................................................................
TOT
27
Setting transmit output power
............................................................................................................................................
Slot
CC (Colour Code)
GroupList
SQ
SubCode
General settings
Zone
Tone
Others
Keypad lock
Backlight
FreqDis
Startup display
Volume keys
..................................................................................................................................
..............................................................................................................................................
...................................................................................................................................
..........................................................................................................................................
..........................................................................................................................................
.......................................................................................................................................
...................................................................................................................................
......................................................................................................................................
....................................................................................................................
...........................................................................................................................
..............................................................................................................................
.........................................................................................................................
.............................................................................................................................
...............................................................................................
28
29
29
29
30
30
32
32
33
33
33
34
34
34
35
Function keys
Reset to factory settings
Programming the GD-73............................................................................................................36
Introduction
Let’s go
Installation of the USB drivers
Function keys
Encryption
Digital emergency system
Preparation for DMR operation................................................................................................42
Overview
Requesting a DMR radio ID
Digital contacts
.........................................................................................................................................
Read Data
Write Data
.......................................................................................................................................
...........................................................................................................................
.........................................................................................................
.................................................................................................................................
....................................................................................................
.................................................................................................................................
................................................................................................................................
...............................................................................................................................
....................................................................................................................................
..........................................................................................................
........................................................................................................
............................................................................................................................
35
36
36
37
37
39
39
39
39
40
42
42
42
Digital RX Group
Channel settings
Bundling of channels into zones
Transfer the codeplug to the radio
..........................................................................................................................
..........................................................................................................................
................................................................................................
...........................................................................................
Page5of
43
44
46
47
56
English user manual - Radioddity GD-73 v1.0
Before using the radio, please read this manual carefully. It
contains important instructions for the safe and proper use of
the radio and operating instructions for compliance with the
limits of RF energy exposure in accordance with applicable
national and international standards.
Firmware update for GD-73.......................................................................................................48
Limitations of PMR446............................................................................................................... 49
Appendix A – RF exposure limits and product safety for portable radio equipment
...........................................................................................................................................................50
Radio licence
Operating instructions
Protect your hearing
Safe operation
Cautions
Reducing risk
Use of communication devices while driving
Appendix B – Technical data....................................................................................................53
General
Transmitter
Receiver
Appendix C – CE Certificate of Compliance........................................................................ 55
................................................................................................................................
................................................................................................................
...................................................................................................................
.............................................................................................................................
....................................................................................................................................
............................................................................................................................
.......................................................................
.........................................................................................................................................
...................................................................................................................................
........................................................................................................................................
50
50
51
52
52
52
52
53
53
54
Product safety and RF exposure for portable radios
Notes on the use of the radio
Please read the following quick start guide, as failure to comply with these rules can
be dangerous or in violation of the law.
1. Observe local regulations before using this radio, as improper use may violate the
law.
Page6of
56

English user manual - Radioddity GD-73 v1.0
2. Turn off the radio before approaching flammable or potentially explosive
atmospheres.
3. Do not charge or replace the battery in flammable or potentially explosive
atmospheres.
4. Turn the radio off before you come near any areas with explosives.
5. Do not use a radio whose antenna is damaged, as touching the damaged
antenna may result in injury.
6. Do not try to disassemble the radio; any maintenance work should be carried out
by qualified technicians.
7. To prevent electromagnetic interference issues, turn the radio off in locations that
have signs displaying similar instructions to “Do not use wireless devices” or
“Turn cell / mobile phones off” such as inside hospitals and healthcare facilities.
8. Do not place the radio in the area of airbag deployment in vehicles so equipped.
9. Do not store the radio in direct sunlight or hot areas
10. When transmitting with the radio, keep the antenna at least 5cm away from your
body or face.
11. If the radio emits any smoke or burning smells, switch the radio off immediately
and remove it’s battery and contact your dealer.
12. Do not transmit for long periods as this may damage the radio or cause it to be
come hot enough to cause injury
Page7of
56
English user manual - Radioddity GD-73 v1.0
What is in the box?
Thank you for choosing a Radioddity radio. We recommend that you first check the
delivery contents listed in the following table before you dispose of the packaging. If
something is missing, please contact your dealer immediately.
As part of the Box you should also find the following items for use with your GD-73:
1 pcs GD-73 radio body
1 pcs Li-ion battery
1 pcs belt clip(with two screws)
1 pcs Programming cable(available for charging)
1 pcs power adapter
1 pcs earpiece
1 pcs user manual
Note:
Further accessories for your radio are available at: https://www.radioddity.com/
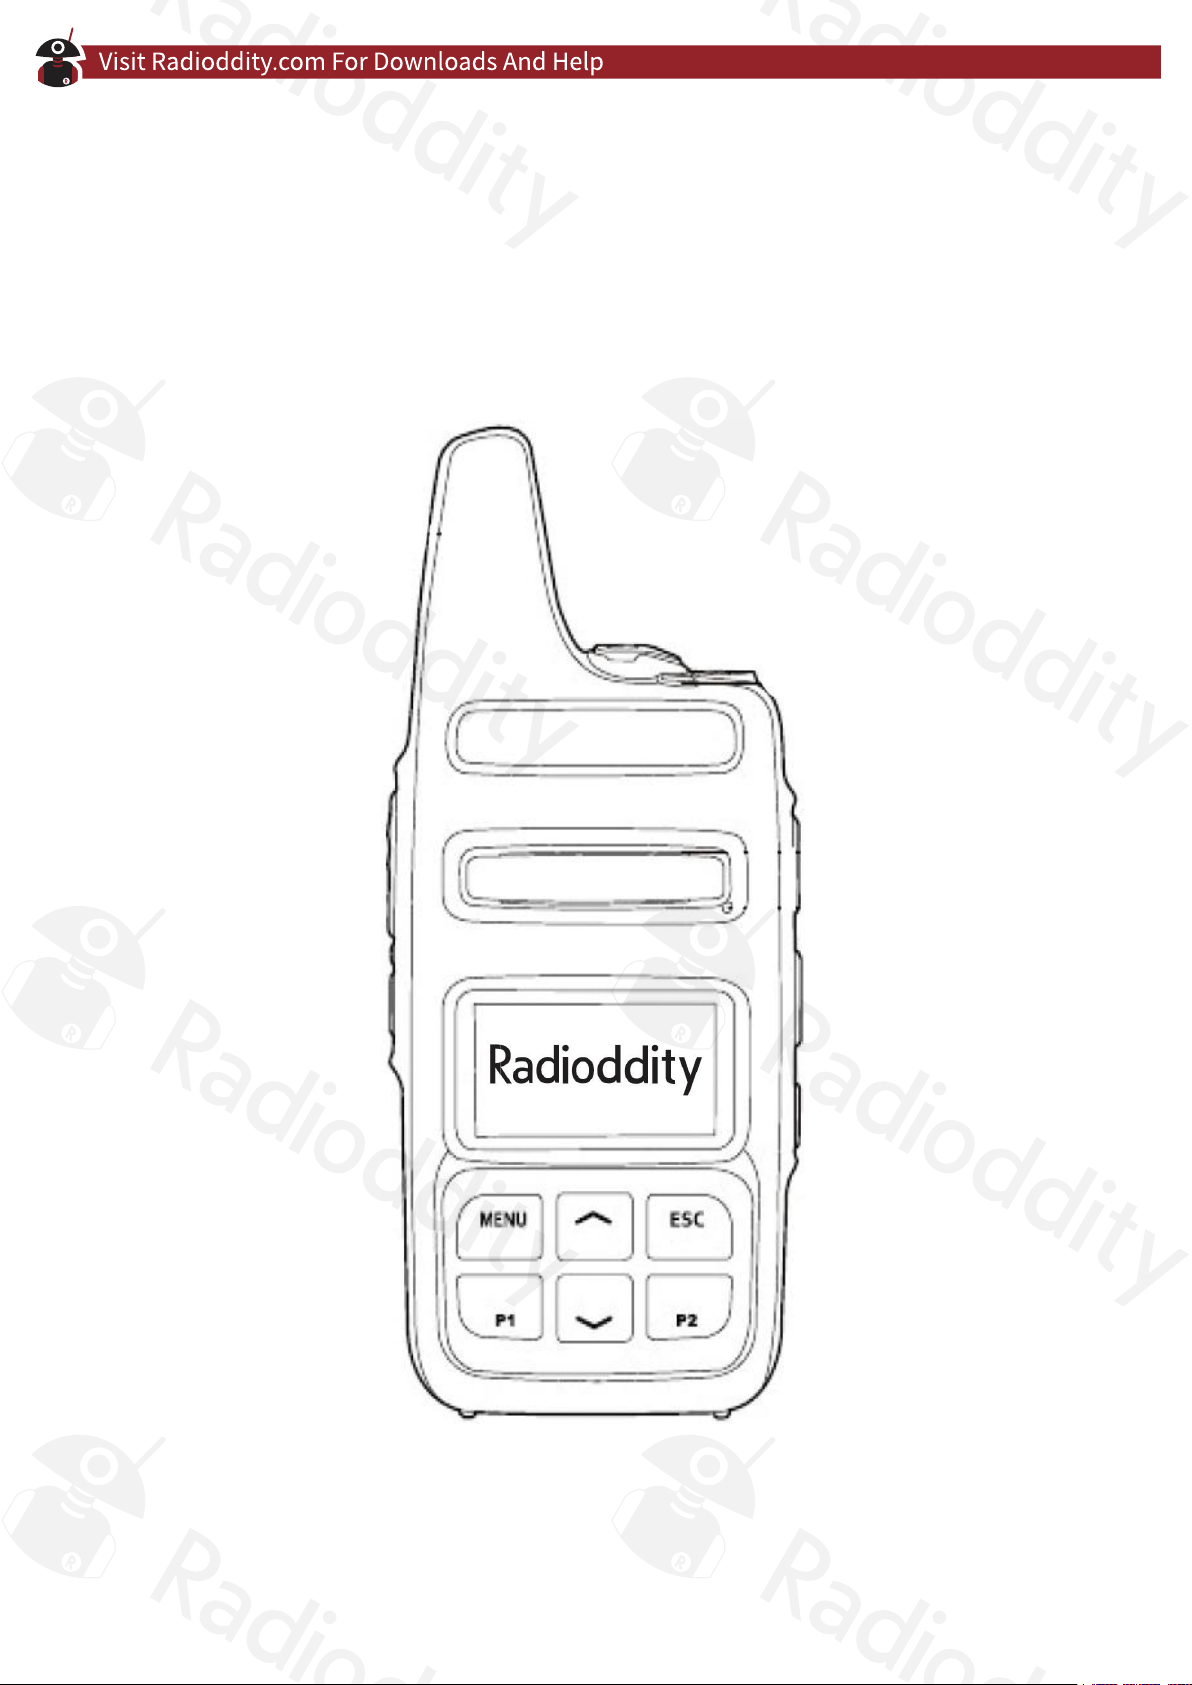
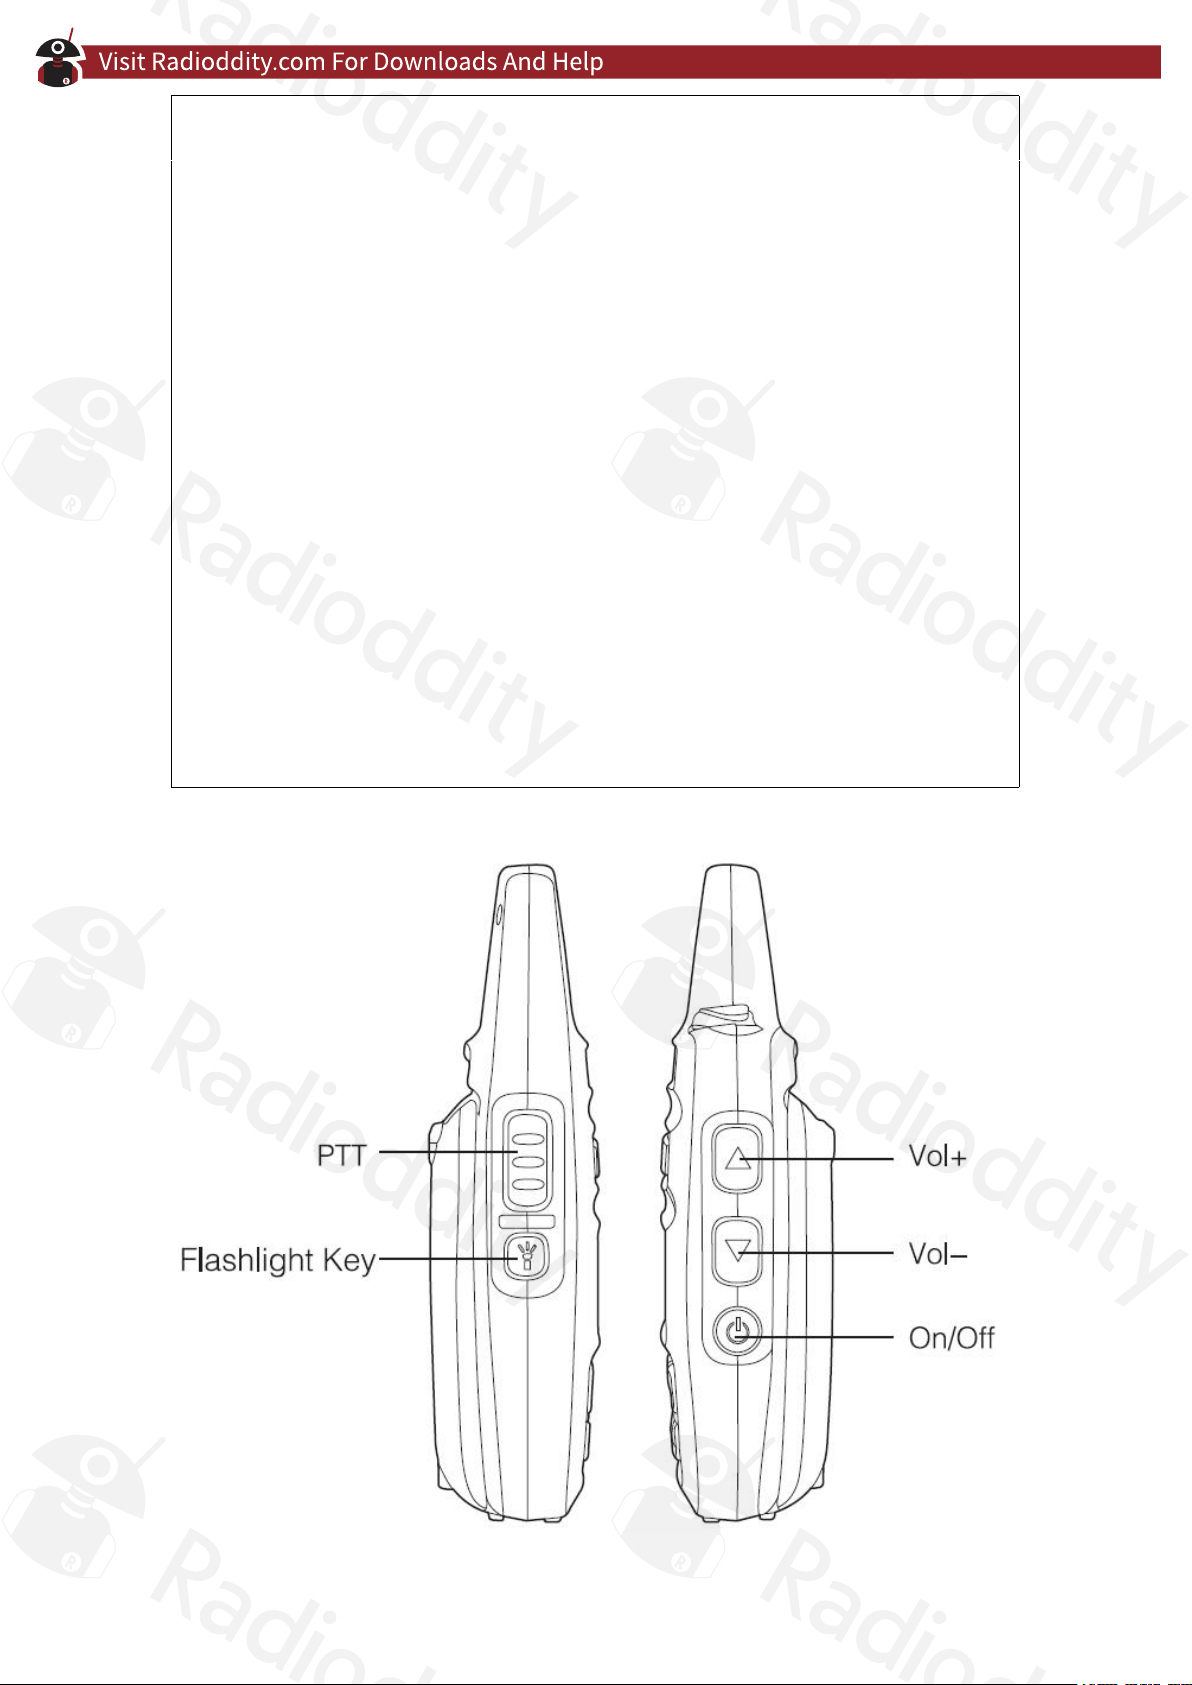
Radio controls
Page8of
56
English user manual - Radioddity GD-73 v1.0
Short and long presses of P1 and P2 can be assigned these functions in CPS:
1. No function
2. Radio Enable
3. Radio Check
4. Radio Disable
5. Power Level (not applicable to PMR & FRS versions of the radio)
6. Monitor
7. Emergency on
8. Emergency off
9. Zone select
10. Scan on/off
11. VOX on/off
12. One Touch Access 1
13. One Touch Access 2
14. One Touch Access 3
15. One Touch Access 4
16. One Touch Access 5
17. BER display
18. Repeater/Talk Around
19. Lone Worker
20. 1750Hz tone burst transmit
21. CallSwell
Page9of
56
English user manual - Radioddity GD-73 v1.0
General
Turning on the radio
The power on/off switch is located on the right side of the radio. Press and hold it for
about 3 seconds to turn on the radio. The Radioddity logo appears on the display, the
status LED lights up red briefly and an ascending 4-tone sequence sounds.
Turning off the radio
Press and hold the power on/off button for about 3 seconds to turn the radio off. The
display goes off.
Adjust the volume
Above the power on/off button are the volume up () and volume down () buttons,
use these to adjust the volume of the built in speaker or any attached external
earphone.
Note:
Later on in this manual the symbols and will refer to the front panel up/down
selector of the GD-73, underneath the LCD display.
Page10of
56

English user manual - Radioddity GD-73 v1.0
Using the battery
Caution:
Please only use battery packs from Radioddity. Other batteries could explode.
Note:
1. Do not short circuit a battery or throw it into a fire. Do not disassemble the
battery.
2. Charge the battery at temperatures between 0℃ und 45℃. Outside this
temperature range, the battery can not be charged fully.
3. Turn off the radio before charging.
4. Disconnect the radio from the external power supply as soon as charging is
complete.
5. Over time the battery will degrade and not give the same operating time. You
should replace the battery at this point.
6. Do not attempt recharging if either the radio or battery is wet. To avoid any
danger, dry it with a cloth before charging.
Warning:
If conductive metals, such as jewelry, keys, or chains, touch the external charging
contacts, damage or injury may occur.
Inserting / removing the battery
1. Align the two tabs on the battery and the holes on the bottom edge of the back
of the radio to ensure complete contact. Then clip the battery to the top of the
body
2. To remove the battery, please make sure that the radio is switched off, press
the two upper battery locks at the same time (for example, with your index and
middle finger) in the direction of the battery. The battery is unlocked and can
be removed.
Charging the battery
1. As soon as the micro-USB socket of the radio unit is connected to a PC or the
supplied power supply unit via a USB cable, a large battery symbol appears
on the display if the radio is switched off.
2. If, on the other hand, the radio is switched on, a small battery symbol appears
in the upper right corner of the LCD display.
3. After a few seconds, the battery icon fills up from left to right with several bars
to indicate the charging process has commenced.
4. As soon as the three bars are constantly filled, the battery is fully charged.
Now disconnect the radio from the external power supply.
Page11of
56

English user manual - Radioddity GD-73 v1.0
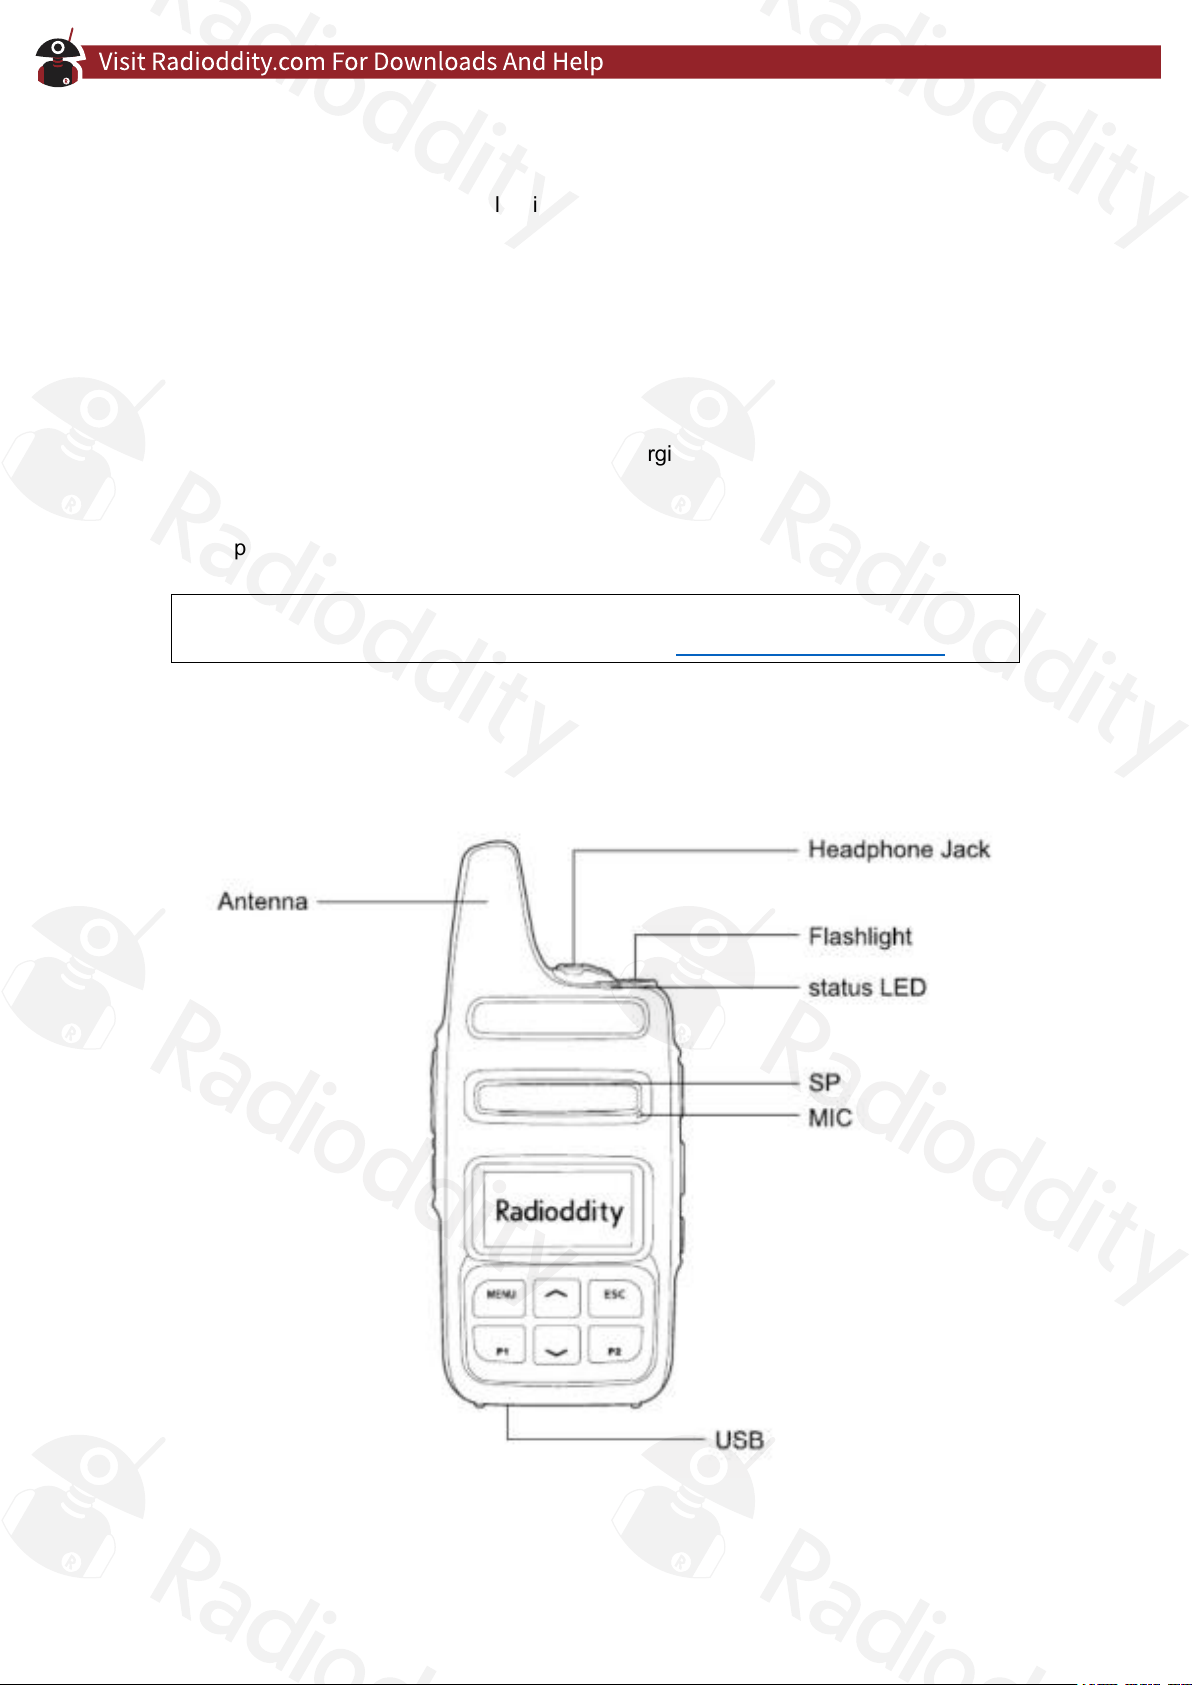
Antenna
The antenna is optimally tuned for the frequency range of the GD-73 and permanently
installed in the device. Therefore, it can not be changed.
Connection of an external headset
Carefully open (do not remove) the cover over the headphone jack and then insert the
headset plug into the jack socket firmly.
Page12of
56
English user manual - Radioddity GD-73 v1.0
Basic functions
Selecting a Zone
A zone is a collection of radio channels grouped together. Your radio can store up to
64 such zones, each with up to 16 channels.
1. Press the MENU button to enter the menu.
2. Using the buttons and navigate in the menu and confirm your selection by
pressing the MENU button again.
3. Select ‘settings’ in the menu
4. Then select ‘zone’ in the sub-menu
5. Using the buttons and navigate to the desired zone and confirm selection of
your chosen zone with the MENU button.
6. The display now shows the selected zone in the middle.
7. The line below shows the currently selected channel in the zone.
Selection of a channel
Navigate with the buttons and to select the desired channel. Confirmation with
the MENU key is not required here.
Receive and answer a group call
In order to receive a group call, a group (talkgroup or TG) must first be selected on the
radio. Each channel can be assigned exactly one group by means of the PC software.
Note:
It is helpful, but not essential, to have the channel name indicate what talkgroup is
assigned to the channel.
Receiving group calls
First, a channel must be selected on the radio to which a group (talkgroup or TG) is
assigned. Only then can a group call be received.
1. The status LED lights up green
2. If the channel is not active, then the display shows:
in the middle line of the name of the zone
the name of the selected group is displayed in the bottom line.
3. If the channel becomes active, then the display shows:
in the top row ‘Group’
in the middle line, the DMR ID of the caller
in the bottom line ‘Calling’ is displayed, followed by ‘end call’ if the channel
was not previously active.
Answering a group call
1. Hold the radio vertically, about 2.5 to 5cm from your mouth
2. Now press the PTT key to answer the call. The status LED lights up red. You can
talk now.
Page13of
56

English user manual - Radioddity GD-73 v1.0
3. Once finished speaking, release the PTT key to return to receive
4. If a response is not heard within a predetermined time, the call is terminated.
Receiving and answering a private call
A private call (also known as a single call) is an individual call to a specific remote
station. The remote station waits for the call and the calling party initiates it.
Receiving a private call
1. The status LED lights up green
2. The display shows:
in the middle line “single call”
in the bottom line the DMR-ID of the caller as well as the symbol for an
incoming call (digital mode only) is displayed.
Answering a private call
1. Hold the radio vertically, about 2.5 to 5cm from your mouth
2. If the Channel Free Indication Tone feature is enabled, you will hear a short beep
as soon as the radio channel is free in order to answer the call.
3. Now press the PTT key to answer the call. The status LED lights up red. You can
talk now.
4. Once finished speaking, release the PTT key to return to receive
All call feature
All calls are used to send important information to everyone on the channel,
regardless of the group they may have selected.
Receiving an all call
1. The status LED lights up green
2. The display shows:
on the first line ‘All Call’
on the middle line, the ID of the caller is seen
on the bottom line, ‘All Call’ is displayed only for analogue mode calls
3. When the All Call has finished, the display returns to the previous display.
4. If the Channel Free Indication Tone feature is enabled, you will hear a short beep
as soon as the transmission has finished.
5. Answering an All Call is not possible.
Note
If the channel is changed during reception of an All Call, reception of the All Call is
aborted. During an All Call, the programmed keys have no function.
Page14of
56
English user manual - Radioddity GD-73 v1.0
Initiating a call
You can select the channel, the DMR ID or the desired group (Talk Group, TG) with
the following options:
Channel selection keys
Preprogramed keys
Contacts
Manual entry (only for a private call)
Group call
All radios that you wish to communicate with must be on the same group.
1. Select the desired channel using the and buttons. Programming channel
names with a name that associates with the Talk Group is useful to facilitate this.
2. Hold the radio vertically, about 2.5 to 5cm from your mouth
3. Now press the PTT key to transmit. The status LED lights up red. The group name
appears on the display
4. Once finished speaking, release the PTT button to return to receive. If a response
is not heard within a predetermined time, the call is terminated.
5. When the call is answered, you will see the status LED light up green.
6. On the display you will see:
in the top line “Group”
in the middle line the DMR-ID of the caller
in the bottom line ‘Calling’ is displayed, followed by ‘end call’ if the channel
was not previously active.
7. If the Channel Free Indication Tone feature is enabled, you will hear a short beep
as soon as the transmission has finished.
8. When the group call is over, the display changes back to the previous display.
9. A group call can also be initiated from the contacts.
Private call
1. Using the and to select your desired channel.
2. Hold the radio vertically, about 2.5 to 5cm from your mouth
3. Now press the PTT key to transmit. The status LED lights up red.
4. The display will show:
in the top line ‘Single Call’
in the middle line the name of the contact you are calling
in the bottom line the DMR ID of the radio you are calling
5. Once finished speaking, release the PTT button to return to receive. If a response
is not heard within a predetermined time, the call is terminated. If the call is
answered, the status LED will light up green.
6. If the Channel Free Indication Tone feature is enabled, you will hear a short beep
as soon as the radio channel is free in order to make further responses.
7. The end of a private call is signalled by an audible short tone.
The two function keys can be programmed as shortcut keys.
Page15of
56
English user manual - Radioddity GD-73 v1.0
All Call
Your radio has the ability to call all radios on the channel regardless of what group
they have selected with the All Call facility. Your radio must first be programmed with
the All Call feature.
1. Using buttons and select the desired channel that has been programmed
with All Call, or you can select a contact programmed as All Call.
2. Hold the radio vertically, about 2.5 to 5cm from your mouth
3. Now press the PTT key to transmit. The status LED lights up red.
4. The display will show:
in the top line ‘All Call’
in the middle line the name programmed for All Call
in the bottom line the All Call ID and the outgoing call sign (in digital mode
only)
Note
Recipients of an All Call cannot answer these types of calls.
Using a speed dial key to send a call
The speed dial feature allows you to make a group or individual call to a predefined ID
or name. This function can be assigned to a key with short or long operation. Only one
ID or one name can be programmed to a key. However, several shortcut keys can be
programmed.
1. Start a call to a group or person by pressing the speed dial key.
2. Hold the radio vertically, about 2.5 to 5cm from your mouth
3. Now press the PTT key to transmit. The status LED lights up red.
4. The display will show the group, name or ID, and outgoing call sign (in digital
mode only)
5. Once finished speaking, release the PTT button to return to receive. If a
response is not heard within a predetermined time, the call is terminated. If
the call is answered, the status LED will light up green.
6. If the Channel Free Indication Tone feature is enabled, you will hear a short
beep as soon as the radio channel is free in order to make further
transmissions.
Emergency calls
Emergency mode
An emergency alarm should only be activated in case of a genuine emergency. This
can be done anytime, anywhere and is possible even when the channel is busy
Note
The emergency mode is only available in digital radio systems and assigned to a
special group call.
Page16of
56
English user manual - Radioddity GD-73 v1.0
The radio supports three emergency alarms:
Emergency alarm
Emergency alarm followed by call
Emergency alarm with automatic activation of microphone
Receiving emergency alarms
1. When receiving an emergency alarm, the number of emergency alarms received
so far as well as the ID of the caller and "Alarm" will be shown on the display. In
addition, the emergency alarm and the name / ID of the caller are displayed
alternately.
2. A beep will sound and the status LED will turn red.
3. If enabled, the radio automatically receives an emergency alarm. If the radio
receives an emergency alarm, the display will show an alarm icon. This will be
displayed until the alarm has been confirmed. As long as the alarm symbol is
displayed, reception of other stations is not possible.
Note
A short press of the ESC key, followed by pressing the programmed emergency mode
power off key clears the emergency alarm, thereby ending the emergency mode.
Answering an emergency alarm
After receiving an emergency alarm:
1. Press any key to acknowledge the audible alarm tone.
2. Hold the radio vertically, about 2.5 to 5cm from your mouth
3. If the Channel Free Indication Tone feature is enabled, you will hear a short
beep as soon as the radio channel is free
4. Then press the PTT button to respond to the emergency alarm. The status
LED is now red and the radio is in emergency mode. You can talk now.
5. Release the PTT button to return to receive mode. The status LED lights up
green if the emergency call is answered. The display shows "Group Call", the
group ID and the ID of the caller.
6. A short press of the ESC key, followed by pressing the programmed button to
turn off the emergency alarm clears the emergency alarm and also terminates
the emergency mode.
7. The radio will exit emergency mode and return to normal display.
Send an emergency alarm
This feature allows the sending of an emergency alarm. This is not a voice
transmission but any receiving radio will see the alarm being transmitted and will need
to confirm the alarm for further action. An emergency alarm can only be sent by an
emergency alarm contact in the appropriate emergency group.
1. Press the function key that has been programmed for ‘emergency alarm’
function to send an emergency alarm (function key 1, 2 or 3).
Page17of
56

English user manual - Radioddity GD-73 v1.0
2. The display will alternately show your own ID and "emergency call". The status
LED lights red and the emergency mode is activated.
3. When an emergency alarm is received, the emergency sound is heard. The
received emergency alarm is shown on the display. If there is no response
from other radios after several retries, a beep sounds and the emergency
mode is ended.
4. The radio will exit emergency mode and return to normal display. If the radio is
completely disabled for the playback of beeps, voice or text will not be output
in emergency mode.
Emergency alarm followed by voice call
This feature allows you to send an emergency alarm to another radio. After confirming
the call, both radios can communicate with a voice call via the previously defined radio
channel
1. Press the function key that has been programmed for ‘emergency call’ function
to send an emergency alarm (function key 1, 2 or 3).
2. The display will alternately show your own ID and "emergency call". The status
LED lights red and the emergency mode is activated.
3. When an emergency alarm is received, the emergency sound is heard. The
received emergency alarm is shown on the display. If there is no response
from other radios after several retries, a beep sounds and the emergency
mode is ended.
4. Hold the radio vertically, about 2.5 to 5cm from your mouth
5. Now press the PTT button to make the voice call. The status LED lights up red.
The radio is in emergency mode. You can talk now. The display shows the
group call icon.
6. Release the PTT button to return to receive mode. The status LED lights up
green if the emergency call is answered.
7. If the Channel Free Indication Tone feature is enabled, you will hear a short
beep as soon as the radio channel is free in order to make further
transmissions.
8. If necessary, press the PTT button again to acknowledge the emergency
alarm call. The status LED lights up red or press the corresponding function
key to switch off the emergency mode.
9. The radio will exit emergency mode and return to normal display. If the radio is
completely disabled in the playback of beeps, voice or text will not be output in
emergency mode until you press PTT to initiate a call. If the radio has been
programmed for "call permit", no beeps or special displays will be shown on
the display of the person called. A special display only appears on the display
when the PTT button is used to trigger or answer a call.
Page18of
56
English user manual - Radioddity GD-73 v1.0
Sending an emergency alarm then automatically activate the microphone
This feature allows you to send an emergency alarm to another radio. After the
emergency alarm has been triggered, your radio automatically switches to transmit
mode without you having to press the PTT button. This is also referred to as an
"emergency microphone".
Note: However, if you now press the PTT key, the message will continue to be sent
until you release the PTT key.
1. Press the function key that has been programmed for ‘emergency microphone’
function to send an emergency alarm (function key 1, 2 or 3).
2. "Alarm" appears on the display. The status LED lights red and the emergency
mode is activated.
3. Hold the radio vertically, about 2.5 to 5cm from your mouth, if possible, in the
circumstances.
4. As soon as "Alarm" appears on the display, you can speak into the microphone of
the radio without first having to press the PTT button.
5. This automatic transmission ends automatically after a specified period of time.
6. You can press the PTT button to initiate another voice call if needed. The status
LED lights red again. The radio is in emergency mode. You can talk now.
7. If the radio is completely disabled for the playback of beeps, in emergency mode,
neither voice nor text outputs until you press the PTT button to trigger a call.
8. If the radio has been programmed for "call permit", no beeps or special
indications will be shown on the display of the person called until the specified
time has elapsed. These outputs are only made again if the PTT key was
previously pressed once. This happens in the following two cases:
The emergency mode is ended as soon as the radio channel is changed.
Triggering an emergency alarm on the new radio channel returns the radio to
emergency mode.
If the radio is in emergency mode and the pre-programmed emergency
transmission button is pressed, the previous emergency alarm will stop and a
new emergency alarm will be triggered.
Ending emergency mode
Emergency mode is ended if one of the following occurs:
If there is no response when an emergency alarm is triggered even after
several repetitions by the remote station, a beep sounds and the emergency
mode is ended
Pressing the programmed emergency power off button clears the emergency
alarm, thereby ending the emergency mode
Turning off the radio stops the emergency mode. However, turning the radio
back on does not restart emergency mode.
Note
Pressing the PTT button does not end the emergency mode.
Page19of
56
English user manual - Radioddity GD-73 v1.0
Menu operation
1. Press the MENU button to get to the function menu. You can then scroll
through the sub-menus using the (up) and (down) keys.
2. Press the MENU button again to select the sub-menu item.
3. Press the ESC key to key to return to the higher-level menu. As soon as you
are in the top menu, you can return to the normal display output (frequency,
channel) by pressing the ESC key again.
Contacts
The contacts stored in the radio make up the address book of your radio. Each
individual contact corresponds to a name or an ID to which a targeted call can be
established. Each entry is assigned an additional property such as "Group Call",
"Individual Call" or "General Call". Each contact consists of the following three
elements:
1. Name Name of your contact
2. ID DMR ID number of your contact
3. Type Type of contact; group, private or all call
Note
You can only edit the contacts with the CPS software on PC. Editing directly on the
GD-73 is not possible because it does not have the necessary buttons.
Group call contacts
1. Press the MENU key to enter the function menu, then use the or buttons
to select the “contacts” sub-menu
2. Use the and buttons to select the desired group contact
3. Confirm your selection by pressing the MENU button again
4. Use the and buttons to select the sub-menu ‘select’.
5. The display of your GD-73 will then show "selected!"
6. Hold the radio vertically, about 2.5 to 5cm from your mouth
7. Now press the PTT button to start the call. The status LED lights up red. The
display shows the group name or group ID and the outgoing group call icon
8. Release the PTT button to return to receive.
9. When the call is answered, the status LED lights up green.
10. The display will show:
a. in the first line "Group Call",
b. in the middle row the name of the call group (Call Group Alias) and
c. in the bottom line the ID of the answering person as well as the icon for
an incoming call (only in digital mode)
11. If the Channel Free Indication Tone feature is enabled, you will hear a short
beep as soon as the radio channel is free in order to make further
transmissions.
Page20of
56
English user manual - Radioddity GD-73 v1.0
12. If a response is not heard within a predetermined time, the call is terminated
13. When the group call is over, the display changes back to the previous display.
Private call contacts
1. Press the MENU key to enter the function menu, then use the or buttons
to select the “contacts” sub-menu
2. Use the and buttons to select the desired private / individual contact
3. Confirm your selection by pressing the MENU button again
4. Use the and buttons to select the sub-menu ‘select’.
5. The display of your GD-73 will then show "selected!"
6. Hold the radio vertically, about 2.5 to 5cm from your mouth
7. Now press the PTT button to start the call. The status LED lights up red. The
display shows the private / individual name or ID and the outgoing private call
icon
8. Release the PTT button to return to receive.
9. When the call is answered, the status LED lights up green.
10. The display will show:
a. in the first line "Single Call"
b. in the middle row the name of contact
c. in the bottom line the ID of the called contact as well as the icon for an
outgoing call (only in digital mode)
11. If the Channel Free Indication Tone feature is enabled, you will hear a short
beep as soon as the radio channel is free in order to make further
transmissions.
12. If a response is not heard within a predetermined time, the call is terminated.
13. After completing a private call, the display changes back to the previous
display.
Call lists
The radio records all last dialled, received and not accepted calls since the radio was
last switched on in the call list log.
Checking IDs of new calls
Received (ReceCall), Missed (MissCall) and calls initiated (CallNumb)are logged.
1. Press the MENU key to enter the function menu, then use the or buttons
to select the “Call Log” sub-menu
2. Confirm your selection by pressing the MENU button again
3. Use the and buttons to select the desired list and confirm the selection
with the MENU button.
4. The last entry is now displayed in the top line of the display.
5. Use the and buttons to scroll through the list of up to 32 entries.
Page21of
56
English user manual - Radioddity GD-73 v1.0
View name or ID of missed calls
Whenever you have missed an incoming call, this is signalled by a message on the
display of the radio. In such a case, you can display the ID of the missed call
immediately ("view") or later ("view later").
1. Press the MENU key to enter the function menu, then use the or buttons
to select the “Call Log” sub-menu
2. Confirm your selection by pressing the MENU button again
3. Use the and buttons to select the desired list and confirm the selection
with the MENU button.
4. The display now shows the oldest entry in the first place.
5. Use the and buttons to select an entry from the list.
6. Pressing the MENU button will display the details for this entry (ID, Type, time
and date heard)
7. Alternatively, after selecting an entry, you can also press PTT to initiate a call
to the selected contact or group.
Note
If you press the PTT button while viewing a missed call, the missed calls menu will be
exited and an outgoing single call will be triggered.
The menu can also be used to edit the call list for answered, outgoing and missed
calls. There are options for viewing, adding a contact to the address book, deleting
individual and deleting all entries.
Delete a call list
To delete one of the call lists:
1. Press the MENU key to enter the function menu, then use the or buttons
to select the “Call Log” sub-menu and confirm your selection by pressing the
MENU button.
2. Use the and buttons to select the sub-menu “DelLogs” and confirm
selection by pressing the MENU button again.
3. Use the and buttons to select the list to be deleted and confirm this
selection by pressing MENU.
4. The selected list will be deleted and confirmed by “deleted!” being shown on
the display
Short messaging functions
Your radio can also send and receive short text messages with a maximum length of
144 characters each. Complete messages are no longer than 50 lines.
Sending a prepared short message
Navigate in the menu:
1. Press the MENU key to enter the function menu, then use the or buttons
to select the “Msg” sub-menu and confirm your selection by pressing the
MENU button.
Page22of
56
English user manual - Radioddity GD-73 v1.0
2. Use the and buttons to select the sub-menu “CommMsg” and confirm
selection by pressing the MENU button again.
3. Now select one of the messages previously defined and programmed with the
CPS
4. Select the intended recipient of the message from your list of contacts and
confirm the selection with MENU.
5. The message is now transmitted via the set digital channel to the other radio.
6. The display of the GD-73 will then show “sent OK “.
Reading a received short message
Navigate in the menu:
1. Press the MENU key to enter the function menu, then use the or buttons
to select the “Msg” sub-menu and confirm your selection by pressing the
MENU button.
2. Use the and buttons to select the sub-menu “Inbox” and confirm
selection by pressing the MENU button again.
3. Use the and keys to select one of the received short messages. Already
read short messages are displayed with an open envelope icon, while unread
short messages have a closed envelope icon in front of the DMR ID of the
sender. Confirm the selection with the MENU key.
4. The display of your GD-73 now displays the received short message.
Note
When the GD-73 receives a new short message the upper line of the display will show
an envelope icon to show that you have an unread message.
Reading a short message already sent
Navigate in the menu:
1. Press the MENU key to enter the function menu, then use the or buttons
to select the “Msg” sub-menu and confirm your selection by pressing the
MENU button.
2. Use the and buttons to select the sub-menu “Outbox” and confirm
selection by pressing the MENU button again.
3. Use the and keys to select one of the previously sent short messages.
Confirm the selection with the MENU key.
4. The display of your GD-73 now displays the sent short message.
Deleting short messages
Navigate in the menu:
1. Press the MENU key to enter the function menu, then use the or buttons
to select the “Msg” sub-menu and confirm your selection by pressing the
MENU button.
2. Use the and buttons to select the sub-menu “DelMsg” and confirm
selection by pressing the MENU button again.
Page23of
56
English user manual - Radioddity GD-73 v1.0
3. Use the and to select either the message memory for incoming
messages, "Inbox" or for messages sent, "Outbox". Confirm the selection as
usual with the MENU key.
4. The display will show “Deleted!”
Note
Editing messages is only possible using the CPS software on PC
Sending a short message with just one touch
1. Press the corresponding programmed key to send a prepared short message
to a specific user.
2. The message "Msg Sending ..." appears on the display.
3. As soon as the short message has been sent, the display again shows the
recipient specified by the programmed key.
4. If the transmission was successful, a short tone will sound and the text
"Message sent successfully" appears on the display. On the other hand, if the
transmission was unsuccessful, the message "Message Send Fail" appears
on the display and the message will need to be manually resent.
Management of short messages
After your short message has been sent, this short message is stored in the Outbox.
The last sent short message is always at the top of the list. The last 16 short
messages will be kept. Older short messages are deleted automatically.
The same applies to received messages.
Encryption
Enabling encryption ensures that other users who are on the channel cannot hear the
transmission. This is made possible by a special software encryption of the digital
signal to ensure secrecy of communications.
Basic encryption
Two (or more) radios that need to communicate in secret must all have encryption
enabled and be using the same encryption key as programmed by CPS software.
Note
Please check to see if encrypted radio transmissions are permitted in your country.
As a general rule, encryption is not permitted to be used on the amateur ‘ham’ radio
bands.
Page24of
56

English user manual - Radioddity GD-73 v1.0
DTMF
The DTMF feature (Dual Tone Multi Frequency) enables the operation of radios
despite interference on a radio channel. You can optionally add DTMF signalling using
the CPS.
Initiating a DTMF call
As usual, a call is initiated by pressing the PTT key. Now, however, a pre-determined
DTMF tone sequence is first sent to other radios before it outputs the received signal
on the speaker of the device. Any transmissions without a matching DTMF sequence
will be ignored, which can be useful to overcome interference on an analogue
channel.
Security
It is possible to activate and deactivate individual radios. This makes it possible, for
example, to lock a stolen radio from further use and unlock it when you get it back.
This feature needs to be pre-programmed in the radio by CPS software.
Disable a radio
All radios in your fleet must be pre-configured for this feature using the CPS. Then you
can use a programmed function key to send out a signal to disable the other radio.
Activate a radio
All radios in your fleet must be pre-configured for this feature using the CPS. Then you
can use a programmed function key to send out a signal to re-enable the other radio.
Scan Lists
A scan list can contain various channels as well as talk groups. Your radio can support
up to 16 scan lists and up to 30 members per list. Each scan list supports a mix of
analogue and digital channels. You can add / delete channels or prioritize channels by
editing the scan list. Create a scan list with the CPS and assign it to a single channel /
talk group.
Scan types
When the scan starts, your radio will check for any voice activity by flipping through the
pre-programmed scan list. There are two methods of commencing a scan:
Manual Scan
Start or stop a scan by pressing a key that has been pre-programmed with the
CPS with the function “scan on/off”
Automatic Scan
Page25of
56
English user manual - Radioddity GD-73 v1.0
If automatic scan is set for a particular channel in CPS, when the user selects
that channel on the GD-73, it will automatically commence scanning of the
scan list attached to that channel.
Start/Stop the scan function
With the CPS, one of the two function keys can be assigned to switch the scan
function on and off ("Scan On / Off"). There are two ways to commence the scan:
1. Use the or keys to select a channel which has been programmed for
automatic scan.
2. Press the "Scan On / Off" button pre-programmed with the CPS to start or stop
the scan.
When scanning is enabled, the frequency / channel name of the currently received
channel and its channel properties (analogue, digital and output power) are displayed.
Responding to transmissions found during scanning
If the radio detects an active channel / talk group while scanning, the radio remains on
the channel / talk group for the duration set by the CPS, so you then have the
opportunity to reply to the transmission if necessary.
Procedure
1. Hold the radio vertically, about 2.5 to 5cm from your mouth. If the Channel
Free Indication Tone feature is enabled, you will hear a short beep as soon as
the radio channel is free to prompt you that you can commence transmission.
2. Press the PTT button before the time set by the CPS has expired. The status
LED lights up red.
3. Release the PTT key so that the other station can answer.
4. If you do not respond within the pre-set time, scanning automatically resumes.
Settings
The "Settings" function allows you to specify a wide variety of parameters. Some of
the settings are global, while others refer to the radio channel selected and are
retained even after the radio is turned off.
Information about the radio
You can use the "Local" function menu to read out the ID of the radio as well as
detailed information about the hardware and software of the radio. Navigate to the
menu:
1. Press the MENU key to enter the function menu, then use the or buttons
to select the “Settings” sub-menu and confirm your selection by pressing the
MENU button.
2. Use the and buttons to select the sub-menu “Local” and confirm
selection by pressing the MENU button again.
Page26of
56
English user manual - Radioddity GD-73 v1.0
3. The display of your GD-73 now displays the following information about your
radio:
ID DMR ID of the radio (can only be set with the CPS)
Model GD-73
Versions Firmware version
4. Then press the ESC key to return to the main display or wait about 10
seconds.
Note
In digital mode, the radio is identified by its ID. Please note that unlawful use of an ID
(such as an amateur radio DMR ID) may result in criminal sanctions.
Details about the set radio channel
Analog and digital channels have a send and receive frequency and channel name.
For digital channels, there are also colour code and timeslot details.
TalkAround
With the talkaround function it is possible to communicate with other radio stations
outside the reception area of a repeater via a direct radio connection. Your radio
transmits on the "output frequency" of the repeater and receives accordingly on the
"input frequency" of the repeater. In the function menu:
1. Press the MENU key to enter the function menu, then use the or buttons
to select the “Settings” sub-menu and confirm your selection by pressing the
MENU button.
2. Use the and buttons to select the sub-menu “Channel” and confirm
selection by pressing the MENU button again.
3. Use the and buttons to select the option “TalkAround” and confirm
selection by pressing the MENU button again.
4. Now use the and buttons to select one of the two options “OFF” or “ON”
and confirm this with the MENU button.
5. Finally press ESC button several times to return to the main display, or wait
about 10 seconds.
With the CPS, turning on / off the talkaround function can be assigned to one of the
two available function keys.
Note
The radio retains the selected setting even after it has been turned off.
TOT
With TOT (Time out Timer) enabled, you can set a time limit between 30 seconds and
500 seconds for the length of any one transmission. The setting is made in 10 second
increments. This feature protects the battery since you cannot carry out excessively
Page27of
56
English user manual - Radioddity GD-73 v1.0
long transmissions, or in the event of a jammed talk button disturbance to other users
is minimised. In the function menu:
1. Press the MENU key to enter the function menu, then use the or buttons
to select the “Settings” sub-menu and confirm your selection by pressing the
MENU button.
2. Use the and buttons to select the sub-menu “Channel” and confirm
selection by pressing the MENU button again.
3. Use the and buttons to select the option “TOT” and confirm selection by
pressing the MENU button again.
4. Now use the and buttons to select between the options “OFF” or the
desired time out timer desired period (in 10 second increments) and confirm
this with the MENU button.
5. "OK!" Appears briefly on the display.
6. Finally press ESC button several times to return to the main display, or wait
about 10 seconds.
Note
Selecting "off" disables the TOT function.
Setting transmit output power
The output power can be switched between "High" with 2 W and "Low" with 500mW
for each channel. For nearby radio stations, the setting "Low" should be selected. On
the other hand, stations that are further away may be better reached by the "High"
setting. The function key specified by the PC software can be used to switch between
"High" and "Low".
In the function menu:
1. Press the MENU key to enter the function menu, then use the or buttons
to select the “Settings” sub-menu and confirm your selection by pressing the
MENU button.
2. Use the and buttons to select the sub-menu “Channel” and confirm
selection by pressing the MENU button again.
3. Use the and buttons to select the option “Power” and confirm selection
by pressing the MENU button again.
4. Use the and keys to select one of the two options "Low power" or "High
power" and confirm this selection by pressing MENU key
5. Finally press ESC button several times to return to the main display, or wait
about 10 seconds.
Note
The PMR version of the GD-73 does not have this option, and is fixed with a
maximum output power of 500mW.
Page28of
56
English user manual - Radioddity GD-73 v1.0
Slot
In digital mode it is possible to transmit two radio conversations simultaneously and
independently of each other on one channel. The timeslot serves to differentiate the
two radio conversations.
In the function menu:
1. Press the MENU key to enter the function menu, then use the or buttons
to select the “Settings” sub-menu and confirm your selection by pressing the
MENU button.
2. Use the and buttons to select the sub-menu “Channel” and confirm
selection by pressing the MENU button again.
3. Use the and buttons to select the option “Slot” and confirm selection by
pressing the MENU button again.
4. Use the and keys to select one of the two options "slot 1" or "slot 2" and
confirm this selection by pressing MENU key
5. Finally press ESC button several times to return to the main display, or wait
about 10 seconds.
CC (Colour Code)
The Colour Code (sometimes called system code) is used to differentiate between
DMR repeaters whose coverage areas may overlap. Values from 0 to 15 are allowed.
The default value is 1.
In the function menu:
1. Press the MENU key to enter the function menu, then use the or buttons
to select the “Settings” sub-menu and confirm your selection by pressing the
MENU button.
2. Use the and buttons to select the sub-menu “Channel” and confirm
selection by pressing the MENU button again.
3. Use the and buttons to select the option “CC” and confirm selection by
pressing the MENU button again.
4. Using the and keys to select a value between 0 and 15 and confirm the
selection as usual with the MENU key.
5. Finally press ESC button several times to return to the main display, or wait
about 10 seconds.
GroupList
Each digital channel can receive one or many talk groups. The actual talk groups that
are able to be heard are defined in a GroupList, and that GroupList is then attached to
the channel. GroupLists are programmed by using the CPS.
In the function menu:
1. Press the MENU key to enter the function menu, then use the or buttons
to select the “Settings” sub-menu and confirm your selection by pressing the
MENU button.
2. Use the and buttons to select the sub-menu “Channel” and confirm
selection by pressing the MENU button again.
Page29of
56

English user manual - Radioddity GD-73 v1.0
3. Use the and buttons to select the option “GroupList” and confirm
selection by pressing the MENU button again.
4. Then use the and keys to select between "None", "Not Match" and one
of the groups previously defined by the CPS and confirm the selection as
usual with the MENU key.
5. Finally press ESC button several times to return to the main display, or wait
about 10 seconds.
Note
Selecting “Not Match” means a transmission can be received without it’s talk group
being programmed in to a GroupList.
SQ
The squelch level is used to filter out weak analogue signals or analogue channels
with strong background noise. This setting, with values from 0 to 9, determines
the signal strength at which the received signal is heard through the speaker. Weaker
signals can be heard at lower settings, while higher settings require progressively
stronger signals in order to be heard. The default setting for squelch is 3. The lowest
setting of "0" disables the squelch completely. As a result, regardless of the selected
analogue channel, you would hear noise from the speaker even when there are no
transmissions on the channel. In contrast, "9" is the highest level and only very strong
nearby transmissions will be heard.
In the function menu:
1. Press the MENU key to enter the function menu, then use the or buttons
to select the “Settings” sub-menu and confirm your selection by pressing the
MENU button.
2. Use the and buttons to select the sub-menu “Channel” and confirm
selection by pressing the MENU button again.
3. Use the and buttons to select the option “SQ” and confirm selection by
pressing the MENU button again.
4. Then use the and keys to select squelch values between "0" and "9" and
confirm the selection as usual with the MENU key.
5. "OK!" Appears briefly on the display before returning automatically to the main
display.
Note
Squelch setting is only applicable to analogue channels
SubCode
CTCSS / DCS is a type of signalling using very low frequency tones (called sub
audible tones). When CTCSS / DCS is set, you will only hear signals that are being
transmitted with the same CTCSS / DCS setting. This prevents you from hearing
unwanted signals on the same frequency. If CTCSS / DCS is switched off, however,
Page30of
56

English user manual - Radioddity GD-73 v1.0
CTCSS
62,5
67,0
69,3
71,9
74,4
77,0
79,7
82,5
85,4
88,5
91,5
94,8
97,4
100,0
103,5
107,2
110,9
114,8
118,8
123,0
127,3
131,8
136,5
141,3
146,2
151,4
156,7
159,8
162,2
165,5
167,9
171,3
173,8
177,3
179,9
183,5
186,2
189,9
192,8
196,6
199,5
203,5
206,5
210,7
218,1
225,7
229,1
233,6
241,8
250,3
254,1
DCS
172325263132364347
50
5153546571727374114
115
116
122
125
131
132
134
143
145
152
155
156
162
165
172
174
205
212
223
225
226
243
244
245
246
251
252
255
261
263
265
266
271
274
306
311
315
325
331
332
343
346
351
356
364
365
371
411
412
413
423
431
432
445
446
452
454
455
462
464
465
466
503
506
516
523
526
532
546
565
606
612
624
627
631
632
645
654
662
664
703
712
723
731
732
734
743
754
you will receive all signals of the selected reception frequency within the reception
range.
CTCSS (Continuous Tone-Coded Squelch System) and DCS (Digital-Coded Squelch)
are two slightly different methods, but both achieve the same result.
Note
The transmission of CTCSS or DCS is only possible with analogue channels.
CTCSS
The CTCSS feature is often used to enable access to a repeater. The GD-73 supports
51 standard CTCSS subedited tones.
All frequencies given in Hz
DCS
DCS on the GD-73 has 214 (2*107) different codes, which can be set by both the PC
software and on the radio itself. DCS also distinguishes between normal DCS and
inverted DCS.
All frequencies given in Hz
CTCSS and DCS are added to the voice transmission in order to positively identify it
as a valid transmission to a similarly equipped receiver. Without a matching CTCSS
or DCS code, the receiver will remain quiet. This is useful to negate the effects of
interference or other unwanted transmissions.
Page31of
56

English user manual - Radioddity GD-73 v1.0
In the function menu:
1. Press the MENU key to enter the function menu, then use the or buttons
to select the “Settings” sub-menu and confirm your selection by pressing the
MENU button.
2. Use the and buttons to select the sub-menu “Channel” and confirm
selection by pressing the MENU button again.
3. Use the and buttons to select the option “SubCode” and confirm
selection by pressing the MENU button again.
4. Then use the and keys to select between "RX Type" (for setting sub
audible code on reception) and "TX Type" (for setting sub audible code on
transmission) and confirm the selection as usual with the MENU key.
5. Alternatively, select one of the remaining two options "RX Code" and "TX
Code" to select the corresponding sub audible code for the reception or
transmission.
Note
CTCSS and DCS are functions that prevent the squelch from opening if the
transmitter and receiver CTCSS / DCS settings do not match. These must be the
same in the radios that wish to inter-communicate. If these are not set in your radio,
you will hear all other transmissions on the frequency, including those that have set
these functions. CTCSS and DCS do not give users any degree of secrecy or
privacy of communications.
General settings
In addition to the channel-related settings, there are also various settings that apply
across channels. These are described below.
Zone
A zone is a collection or group of channels. They may be grouped any way you wish,
for example a zone for each geographic area, or a zone with different talk groups for
one repeater, or any other way you find useful or convenient.
In the function menu:
1. Press the MENU key to enter the function menu, then use the or buttons
to select the “Settings” sub-menu and confirm your selection by pressing the
MENU button.
2. Use the and buttons to select the sub-menu “Zone” and confirm
selection by pressing the MENU button again.
3. Then use the and keys to select your desired zone and confirm the
selection as usual with the MENU key.
4. Finally press ESC button several times to return to the main display, or wait
about 10 seconds.
Page32of
56

English user manual - Radioddity GD-73 v1.0
Tone
Audible tones that accompany each key or button press, as well as acknowledgement
tones can be turned on or off as desired.
In the function menu:
1. Press the MENU key to enter the function menu, then use the or buttons
to select the “Settings” sub-menu and confirm your selection by pressing the
MENU button.
2. Use the and buttons to select the sub-menu “Tone” and confirm selection
by pressing the MENU button again.
3. Then use the and keys to select one of the sub-menus “Profiles”,
“KeyPad Tone” or “PowerTone” and confirm the selection as usual with the
MENU key.
In the “Profiles” sub-menu, use the and keys to choose between
“General” and “Silent” options, and confirm your selection with the MENU
button.
In the “KeyPad Tone” sub-menu, use the and keys to choose
between “KeyToneON” or “KeyToneOFF” to turn the tones that accompany
key presses on or off respectively, and confirm your selection by pressing
MENU key.
In the “PowerTone” sub-menu, use the and keys to select options
“PowerToneON” or “PowerToneOFF” to enable or disable the start-up
tones when the radio is first turned on; press MENU to confirm.
Finally press ESC button several times to return to the main display, or
wait about 10 seconds.
Others
In the menu "Others" further options for locking of the keypad, beeps, display options
and the backlighting of the LCD can be found.
Keypad lock
To prevent accidental keystrokes, it is possible to turn on a keypad lock. This will be
active about 10 seconds after the last key press. To deactivate it, simply press the
function key "P1" until the message "Unlocked!" appears on the display.
In the function menu:
1. Press the MENU key to enter the function menu, then use the or buttons
to select the “Settings” sub-menu and confirm your selection by pressing the
MENU button.
2. Use the and buttons to select the sub-menu “Others” and confirm
selection by pressing the MENU button again.
3. Use the and buttons to select the option “LockKey” and confirm selection
by pressing the MENU button again.
4. Now use the and buttons to select the one of the options “Keylock ON” or
“Keylock OFF” and confirm the selection by pressing the MENU button again.
5. Finally press ESC button several times to return to the main display, or wait
about 10 seconds.
Page33of
56

English user manual - Radioddity GD-73 v1.0
Backlight
The backlighting for the LCD can be turned on or off as you desire.
In the function menu:
1. Press the MENU key to enter the function menu, then use the or buttons
to select the “Settings” sub-menu and confirm your selection by pressing the
MENU button.
2. Use the and buttons to select the sub-menu “Others” and confirm
selection by pressing the MENU button again.
3. Use the and buttons to select the option “BackLight” and confirm
selection by pressing the MENU button again.
4. Now use the and buttons to select the one of the “Long Open” options to
keep the backlight on for one of the values of 5, 10, 15, 30 or 60 seconds of
backlight operation after the last keypress was registered; confirm your
selection by pressing the MENU button again.
5. Finally press ESC button several times to return to the main display, or wait
about 10 seconds.
FreqDis
Depending on the situation, it may be useful to display the channel name or the
reception frequency stored for the selected channel.
In the function menu:
1. Press the MENU key to enter the function menu, then use the or buttons
to select the “Settings” sub-menu and confirm your selection by pressing the
MENU button.
2. Use the and buttons to select the sub-menu “Others” and confirm
selection by pressing the MENU button again.
3. Use the and buttons to select the option “FreqDis” and confirm selection
by pressing the MENU button again.
4. Now use the and buttons to select either “ON” to display the channel
frequency or “OFF” to show the channel by its name; confirm your selection by
pressing the MENU button again.
5. Finally press ESC button several times to return to the main display, or wait
about 10 seconds.
Startup display
After turning on the radio, a graphically animated image is displayed. This image can
be replaced / supplemented with the CPS by a static, two-line customisable text
banner.
In the function menu:
1. Press the MENU key to enter the function menu, then use the or buttons
to select the “Settings” sub-menu and confirm your selection by pressing the
MENU button.
2. Use the and buttons to select the sub-menu “Others” and confirm
selection by pressing the MENU button again.
Page34of
56

English user manual - Radioddity GD-73 v1.0
None
EmergencyOff
PushToTalk4
Activate
Zone
PushToTalk5
Check
Scan
Error Rate
Kill
VOX
Repeater
POWER
PushToTalk1
WorkAlone
Monitor
PushToTalk2
1750Tone
EmergencON
PushToTalk3
CallSwell
3. Use the and buttons to select the option “PWR ON” and confirm
selection by pressing the MENU button again.
4. Now use the and keys to select from the options “None”, “Word”, “Picture”
or “All” and confirm this selection with MENU.
a. If "None" is selected, neither the picture nor the two-line text is
displayed when the radio is turned on.
b. The selection of "Word" ensures that only the two-line text is displayed
when the radio is switched on.
c. "Picture" specifies that only the picture is displayed when the radio is
switched on.
d. If you want to display the image first and then the two-line text when
the radio is switched on, select the option "All".
5. Finally press ESC button several times to return to the main display, or wait
about 10 seconds.
Volume keys
The volume keys at the side of the radio can be disabled if required.
In the function menu:
1. Press the MENU key to enter the function menu, then use the or buttons
to select the “Settings” sub-menu and confirm your selection by pressing the
MENU button.
2. Use the and buttons to select the sub-menu “Others” and confirm
selection by pressing the MENU button again.
3. Use the and buttons to select the option “Volume Key” and confirm
selection by pressing the MENU button again.
4. Now use the and buttons to select either “VolumeKeyOff” to inhibit the
side volume buttons or “VolumeKeyON” to enable them; confirm your selection
by pressing the MENU button again.
5. Finally press ESC button several times to return to the main display, or wait
about 10 seconds.
Function keys
The GD-73 has two function keys labelled "P1" and "P2" on the front of the unit, to the
left and right of the key. Each function key can be assigned a total of two
functions, one for a short key press and one for a long key press, giving a total of four
functions possible with the two keys.
The following functions are available to be assigned:
Page35of
56

English user manual - Radioddity GD-73 v1.0
In the function menu:
1. Press the MENU key to enter the function menu, then use the or buttons
to select the “Settings” sub-menu and confirm your selection by pressing the
MENU button.
2. Use the and buttons to select the sub-menu “Hotkeys” and confirm
selection by pressing the MENU button again.
3. Now use the and buttons to select corresponding key “P1” or “P2” and
long (LP) or short (SP) key press and confirm the selection by pressing the
MENU button again.
SP_P1 indicates a short key press of the P1 key
SP_P2 indicates a short key press of the P2 key
LP_P1 indicates a long key press of the P1 key
LP_P2 indicates a long key press of the P2 key
4. Use the and keys to select the required function from the above list to
assign it, and press MENU to confirm the selection.
5. Finally press ESC button several times to return to the main display, or wait
about 10 seconds.
Reset to factory settings
If you ever need to reset the radio back to factory settings, follow this procedure.
In the function menu:
1. Press the MENU key to enter the function menu, then use the or buttons
to select the “Settings” sub-menu and confirm your selection by pressing the
MENU button.
2. Use the and buttons to select the sub-menu “Default” and confirm
selection by pressing the MENU button again.
3. If you confirm the “Factory Reset?” prompt now displayed with a press of the
MENU button, the GD-73 will reset and all memories and settings will be lost.
4. If you instead press the ESC key, the radio will not reset to factory default
settings.
Programming the GD-73
Introduction
The GD-73 is a UHF radio with digital DMR (true tier I and II) as well as analogue FM.
It offers a total of 1024 channels (analogue and digital), arranged in up to 64 zones.
Each zone can accommodate a maximum of 16 channels each. In addition, up to
1024 contacts with the CPS can be stored on the radio.
The following pages are designed to help you understand all aspects of radio
programming and setup to get the most out of your device.
Page36of
56

English user manual - Radioddity GD-73 v1.0
The file created by the Computer Programming Software (CPS) contains the
frequencies and other operating parameters and is referred to as a "code plug".
Creating a code plug is a bottom-up process where you first have to create the lowest
common elements, and then combine those elements to form a code plug that will be
transferred to the radio. With the GD-73's CPS, you can create the code plug yourself
to suit your exact requirements, or you can use another person’s code plug if you wish.
Don’t forget to save your code plug so you can easily make changes to your radio
configuration at some time in the future.
Let’s go
The programming cable for the GD-73 is an included accessory. The USB
programming cable has a Type A USB connector for connection to USB port of a PC
and a micro USB connector on the other side for connection to the GD-73. This is a
standard USB cable, the same as many smartphone USB cables. The cable does not
contain any special electronics. For the PC to identify the GD-73, it must be
connected to the PC by this cable and the GD-73 turned on.
Note
There is no chip or electronics in the cable so the radio's internal communications port
can only be identified when the radio is switched on.
Installation of the USB drivers
1. Locate the file "usblib_hrc7000.exe" in the software package.
2. Run this program as an Administrator
3. If possible, do not save the generated .inf driver on the desktop, but place a
different directory of your boot drive.
4. The driver is then automatically installed
5. Wait until the installation is complete
Page37of
56

English user manual - Radioddity GD-73 v1.0
6. Once driver installation is complete you will see a message indicating success
In case of an error, stop the installation process and then repeat the process one
more time by saving the file "walkie-talkie-C7000.inf" and the other files in a different
location.
Use Windows Device Manager to verify that the computer has loaded the appropriate
driver for the device. Additional configuration of the driver is not required.
If the driver does not load automatically, you can download the correct 32-bit and
64-bit drivers at https://www.radioddity.com
CPS and firmware updates provided by Radioddity
The computer programming software (CPS) for the GD-73 is updated by Radioddity
as new features are added, detected bugs are fixed or other improvements made. For
updates, visit the Radioddity website at https://www.radioddity.com
Note
The software version should always match the firmware version i.e. software version
1.00 should always be used with the firmware version 1.00, etc.
This firmware is specific to this model only. Loading a firmware from another model
radio will not add extra functionality to the GD-73, but will most likely render it
inoperable.
Page38of
56

English user manual - Radioddity GD-73 v1.0
None
EmergencyOff
PushToTalk4
Activate
Zone
PushToTalk5
Check
Scan
Error Rate
Kill
VOX
Repeater
POWER
PushToTalk1
WorkAlone
Monitor
PushToTalk2
1750Tone
EmergencON
PushToTalk3
CallSwell
To begin creating a code plug for your GD-73, first read data from the radio to your PC
to create a first CPS template, and at the same time save the factory data for future
use.
When reading or writing data to or from the GD-73, the software offers several
options:
Read Data
To read all frequency settings and other settings of your GD-73 radio, use this option.
Write Data
Whenever you have made your changes and additions to the settings of your GD-73
radio, use this option to transfer your settings to the radio.
Note
If you specify a PC programming password, you must remember this password. If you
forget it, there is no way to restore it.
Function keys
The function keys can each be assigned two different functions. One of the functions
is activated by briefly pressing the corresponding button while the other requires a
longer press. The Long Press Duration (ms) parameter defines the amount of time the
key must be pressed to enable the long press feature. Thus, 4 functions are available
via the two function keys.
You can assign the following functions to your P1 and P2 keys:
Encryption
Your GD-73 also supports digital encryption. You can specify the corresponding digital
encryption password yourself. The person you are talking to can only hear your voice
if the same encryption ‘key’ has been used on your radio. This prevents others from
hearing your call and provides secrecy of your communications. Select
Page39of
56

English user manual - Radioddity GD-73 v1.0
"Edit" "Encrypt" to go to the encryption key configuration page. The key value
consists of 8 hexadecimal digits, and you can program up to 16 different keys.
Note
Please note that encryption may not be allowed in the network you are using!
Digital emergency system
The availability of a digital emergency system depends on the digital network used.
Select "Edit""Digital Emergency System". Then select the emergency system to be
edited. Up to 8 emergency systems can be defined.
Page40of
56

English user manual - Radioddity GD-73 v1.0
System Name This entry displays the name of the system. The name can be up
to 8 characters long. Valid characters are letters, numbers,
spaces, and special characters.
Emergency Type An alarm is a non-voice signal that triggers an alarm indication on
another radio. This function sets the behavior of the triggering
radio alarm when the emergency call button is pressed.
Emergency Mode Defines the behavior of the radio when the radio emergency
button is pressed.
Revert Channel Defines the radio channel to be switched to when the emergency
alarm is triggered.
Impolite Retries An impolite transmission is one that, if necessary, will
over-transmit any others on the channel due to its urgent nature.
The radio repeatedly attempts such transmissions for
confirmation. This parameter sets the number of attempts to
transmit an emergency alarm.
Page41of
56

English user manual - Radioddity GD-73 v1.0
Preparation for DMR operation
Overview
Apply for and receive your DMR ID
Enter your Digital Contacts, consisting of Talkgroups (TG) and private ID
contacts
Set up your Digital RX Group Lists
Program in your Channels, and attach a Digital Contact for TX and attach a
Digital RX Group List for RX to each channel.
Program your Zones by attaching Channels to each zone.
(Optional) Set up a Scan List, and attach these Scan Lists to those Channels
you wish to scan
Requesting a DMR radio ID
To work in a DMR network, you must register for a DMR ID number. For amateur radio
this can be https://www.radioid.net/ or https://register.ham-digital.org/ depending on
where you live. Normally, new DMR IDs will be issued within 24 hours.
Once you have your DMR-ID issued, that can now be stored with CPS in the code
plug. Click on "Edit"”General Settings”
Note
Never operate the radio with an ID that has not been assigned to you. In amateur
radio networks this can lead to the loss of your license.
Digital contacts
Up to 1024 digital contacts can be stored. These digital contacts are used for storing
talkgroups (TG) as well as individual stations DMR ID numbers. Select "Edit"
"Digital Contacts" to edit the digital contacts.
Page42of
56

English user manual - Radioddity GD-73 v1.0
No
Entry in the list of digital contacts (up to 1024 entries)
Call Name
Display name of the contact
Call Type
You can choose between the following call types:
Group Call
Private Call
All Call
Call ID
ID for an individual / private digital call or a talkgroup (TG).
This ID is for identification and communication with a
destination radio (DMR-ID) or a group of radios (TG)
depending on the call type.
Call Receive Tone
A warning tone will sound on the receiving radio before it
mutes during a Group Call, Private Call, or All Call. This
feature is set on a call basis.
Digital RX Group
You need a "Digital RX Group" for your channel settings. Creating digital RX group
allows you to group your digital "contacts" (usually Talk Groups / TG) into logical
groups so they can be targeted.
Up to 250 individual Digital RX groups can be created and named to identify
each group
Each group can contain as few or as many contacts as you like.
Groups should be named with something meaningful to the user
Only contacts that are stored as group calls can be added to a group.
Each Digital (DMR) channel must have a Digital RX Group List, with at least
the transmit Talkgroup contact for the channel a member of the group you
attach to the channel.
Page43of
56

English user manual - Radioddity GD-73 v1.0
If you do not attach a Digital RX Group List to a DMR channel, you won’t be
able to hear or receive anything on that channel.
To edit these groups, use "Edit""Digital RX Group List". A typical group may look like:
By clicking on the "Add" button, you can now add another "Digital RX Group". A click
on the "Delete" button deletes the displayed "Digital RX Group".
Channel settings
To edit the channels, click on "Edit"”Channel Information”. You can then select one
of the existing channels.
Page44of
56

English user manual - Radioddity GD-73 v1.0
Digital+Analog
Mode
Choose between “analogue” and “digital”
Channel name
Name of the channel – this needs to be unique.
Receive Freq
The receive frequency in MHz
Transmit Freq.
The transmit frequency in MHz
Channel Space
Select the transmit / receive bandwidth here. In digital
mode this is fixed at 12.5 kHz
Power
Selection of RF output power (cannot be changed for
PMR)
Scan List
Select what scan list to scan when a scan is initiated on
this channel.
Talk Around
Enables the ability to swap transmit and receive
frequencies
Access Policy
Also known as ‘admit criteria’ this selects how a
transmission is allowed to be sent
RX Only
Sets the channel to receive only, transmit is disabled.
Auto Start Scan
As soon as this channel is selected, scanning
automatically starts with the scan list specified under
“Scan List”
PTT Template
For an analogue channel, the PTT template to be used
can be specified here.
By clicking on the "Add" button, you can now add another channel.
Here is a brief explanation of the different fields you can customise for each channel:
Page45of
56

English user manual - Radioddity GD-73 v1.0
VOX
Selects if VOX (voice activated transmit) is active for this
channel
Digital
TX Contact
The Talkgroup (TG) which is assigned to this channel
Slot
Selects which timeslot, 1 or 2, should be used. Often a
particular Talkgroup is assigned to a particular timeslot.
Color Code
Select which colour code (CC) is associated with this
channel.
RX Group List
This determines the RX Group List used for the channel
Emergency
Defines which emergency system is relevant for this
channel
Encrypt
Sets encryption to be used for this channel
Analog
TX CTCSS/DCS
Choice of sub audible variant for sending: "None"
"CTCSS", "DCS" and "DCS Invert"
RX CTCSS/DCS
Selecting the sub audible variant for the receiving: "None"
"CTCSS", "DCS" and "DCS Invert"
CTCSS Enc
If CTCSS has been selected for transmission, the
corresponding sub audible frequency to be transmitted is
selected here
CTCSS Dec
If CTCSS has been selected for receiving, the
corresponding sub audible frequency for reception is
selected here
DCS Enc
If DCS or DCS Invert signalling has been selected for
transmission, the corresponding sub audible DCS
signalling code to be transmitted is selected here
DCS Dec
If DCS or DCS Invert signalling has been selected for
reception, the corresponding sub audible DCS signalling
code to be received is selected here
When complete, click OK to save this channel.
Bundling of channels into zones
Once you have defined your channels, you are ready to bundle them into zones for
later use. Up to 16 radio channels can be stored in one zone of your GD-73. A total of
up to 64 zones are possible. It makes sense to bundle channels according to their use.
For example, it makes sense to bundle all channels of a DMR repeater within one
zone. Another zone could contain all analogue radio channels of a geographical
region.
Page46of
56

English user manual - Radioddity GD-73 v1.0
1. First give the zone a meaningful name (1), such as the identification of the
repeaters whose channels you want to store in the zone.
2. Then select from the list of available radio channels (2) all those you want to
bundle in that zone.
3. Click the "Add" button (3) to accept each channel.
4. The added channels will then be listed in the right window (4) under the
heading "Members".
That is all what is required.
Transfer the codeplug to the radio
After completing all the above steps, you can transfer the data from your PC to the
GD-73. Click on "Program"”Write Data”
Page47of
56

English user manual - Radioddity GD-73 v1.0
Firmware update for GD-73
1. 1. Make sure that the radio is not initially connected to the PC via a USB
cable and is turned off.
2. Press and hold the PTT button. At the same time, press the on / off switch
to turn on the GD-73. The red status LED lights up. Now you can release
the keys
3. Only now connect your GD-73 to your PC using a conventional USB cable
(USB-A to micro-USB).
4. Then start the previously installed update program as administrator
5. You should see “walkie-talkie-C7000” selected for your Com Port
6. Then select the desired firmware file
7. Click on Write to start the update process
8. Progress of the update will be shown by a green bar and percentage meter
Page48of
56

English user manual - Radioddity GD-73 v1.0
Depending on the particular model of GD-73, it may be that
operation is subject to certain legal restrictions. For example,for the
PMR version of the GD-73, operation with higher transmission
power or in unauthorized frequency ranges would be illegal.
9. When the update is complete, a successful message appears
10.Remove the micro-USB cable from the GD-73, and power cycle the radio
by pressing the on / off button to return to normal. The update process is
now complete.
Limitations of PMR446
Page49of
56

English user manual - Radioddity GD-73 v1.0
Attention:
Before using this radio, read this manual. It contains important
instructions for the operation, the safe use and the awareness of HF
energy as well as for the control of the compliance with the valid
norms and regulations.
Appendix A – RF exposure limits and product safety for
portable radio equipment
This radio uses radio frequency (RF) electromagnetic energy to allow communication
between two or more users over a distance. It uses radio frequency (RF) energy or
radio waves to send and receive calls. RF energy is a form of electromagnetic energy.
Other forms include sunlight and X-rays. However, RF energy should not be confused
with these other forms of electromagnetic energy, which can cause biological damage
if used improperly. Very high X-rays may be e.g. Damage tissue and genetic material.
Experts from science, technology, medicine, health and industry work with
organizations to develop standards for the safe use of RF energy. These standards
provide recommended exposure levels to both workers and the general public. These
recommended RF exposure values also include significant safety buffers.
All Radioddity radios are designed, manufactured and tested to meet
government-imposed RF exposure limits. In addition, manufacturers recommend
special operating instructions to radio users. These instructions are important as they
inform users about RF energy exposure and provide simple procedures for controlling
them.
Visit the following websites for more information on how to control RF energy
exposure to ensure compliance with specified limits:
http://www.who.int/en/
http://www.euro.who.int/de/home
Radio licence
Governments classify and regulate operation of radios. Most of these classified radios
require a permit from local government agencies. For EU PMR 446, the Radioddity
GD-73 PMR radio does not require a license.
Operating instructions
1. To send a radio transmission, hold the radio about 5cm away from your face and
push the PTT (Push to Talk) button, and release it to receive. Do not transmit for
more than 50% of your operating time. This not only helps to keep your RF
exposure to within acceptable limits, but also prolongs battery and electronics
lifespan.
Page50of
56

English user manual - Radioddity GD-73 v1.0
2. When carrying the radio on your body, always place it in a Radioddity approved
clip, holder, holster, case or harness for this product. Use of approved body-worn
accessories is important as the use of non-approved accessories may result in RF
exposure levels that exceed the Occupational / Controlled Environment (IEEE) /
ICNIRP limits.
3. If you do not use body-worn accessories make sure that the antenna and the radio
when transmitting is at least 2.5 cm from the body. This is important as the RF
exposure decreases as the distance from the antenna increases.
Protect your hearing
1. Use the lowest volume you need to carry out your work.
2. Increase the volume only when you are in a noisy environment.
3. Turn down the volume before connecting a headset or earphone.
4. Limit the amount of time you use headsets or earphones at high volume.
5. If you are using the radio without a headset or earphones, do not hold the radio's
speaker directly to your ear.
Note
Loud sounds from any source over a long period of time may affect your hearing
temporarily or permanently. The louder the volume of the radio, the less time it will
take for your hearing to be adversely affected. Hearing damage due to loud noise is
sometimes initially unrecognizable and can have a cumulative effect.
Page51of
56

English user manual - Radioddity GD-73 v1.0
Safe operation
Cautions
1. Do not use the AC adapter outdoors or in humid environments, but only in dry
environments.
2. Do not disassemble the AC adapter, otherwise there is a risk of electric shock or
fire.
3. Do not operate the AC adapter if it has been broken or damaged in any way.
4. Do not place a portable radio over an airbag or in the area of the airbag
deployment. In the event of a collision - which triggers the airbag - the radio can
be thrown at you with great force and cause serious injury to the vehicle
occupants.
Reducing risk
1. Disconnect the AC adapter from the USB port before performing any maintenance
or cleaning.
2. Contact Radioddity for help with repairs and service.
Use of communication devices while driving
1. Always check the laws and regulations for the use of radios in the countries and
areas in which you drive.
2. Give your full attention to driving and the road.
3. If available, use a hands-free kit or system (VOX).
4. If required by driving conditions or regulations, leave the road to park before
making or receiving a call.
Page52of
56

English user manual - Radioddity GD-73 v1.0
Frequency range
GD-73A: 406.1-470MHz
GD-73E: PMR
Number of channels
1024 (in 64 zones of 16 channels each)
Channel spacing
12.5kHz
Operating voltage
DC 3.6V
Battery chemistry
Li-Ion
Battery capacity
2600mAh standard Li-Ion
Working temperature range
-30℃~+60℃
Storage temperature range
-40℃~+85℃
Antenna impedance
50Ω
Audio output power
≤1W @16Ω
Dimensions (H*W*D)
115mm* 50mm * 32mm
Weight
148g
RF output power
GD-73A: ≤2W
GD-73E: ≤500mW
Frequency stability
±1.0ppm
Adjacent channel spurious
≤60dB
Free Time Slot Power
TDMA: ≤ -57dBm
Hum and Noise
-40dB@12.5kHz
Spurious Radiation
Antenna: 9kHz - 1GHz ≤-36dBm
1GHz – 12.75GHz ≤-30dBm
FM-Modulation
12.5kHz: 11K0F3E
4FSK Digital Mode
12.5kHz (data only): 7K60FXD
12.5kHz (data + voice): 7K60FXE
Modulation Maximum Deviation
2.5kHz@12.5kHz
Nonactive Slot Power
≤ -57dBm
Digital Protocol
ETSI TS 102 361-1 -2 -3
Vocoder Type
AMBE+2TM
Audio Response
+1dB~-3dB
Modulation BER (Bit Error Rate)
≤5%
Appendix B – Technical data
General
Transmitter
Page53of
56

English user manual - Radioddity GD-73 v1.0
Analog sensitivity
0.35µV/-116dBm (20dB SINAD)
0.22µV/-120dBm (Typical)
Digital sensitivity
0.3µV/-117.4dBm (BER 1%)
0.22µV/-110dBm (BER 5%)
Co-channel rejection
≥-12dB
Adjacent Channel Selectivity
TIA603C: 65dB ETSI: 60dB
Spurious Response
TIA603C: 75dB ETSI: 70dB
Audio output power
1W
Audio response
1dB~-3dB
Rated Audio Distortion
3% (Typical)
Spurious Radiation
Antenna: 9kHz - 1GHz ≤-57dBm
1GHz – 12.75GHz ≤-47dBm
Receiver
Note
We expressly reserve the right to revise the specifications at any time due to technical
improvements without prior notice. Thank you for your understanding.
Page54of
56

English user manual - Radioddity GD-73 v1.0
Appendix C – CE Certificate of Compliance
Page55of
56

English user manual - Radioddity GD-73 v1.0
Thank you for your purchase from Radioddity!
TUTORIALS, SUPPORT AND MORE CAN BE FOUND AT:
https://www.radioddity.com/
https://www.facebook.com/radioddity
https://www.youtube.com/c/Radioddityradio
Page56of
56

Radioddity GD-73
Benutzerhandbuch

Deutsches Benutzerhandbuch zum Radioddity GD-73 v1.0
Über Radioddity
“Sie, unser Freund und Kunde, stehen im Mittelpunkt unseres Handelns.”
Nichts ist wichtiger als Ihre Zeit und Ihr Geld. Wenn Sie Funkgeräte online kaufen,
stehen Sie vor einem Dilemma: Sparen Sie Zeit und kaufen Sie von einer seriösen
Website zu einem hohen Preis, oder versuchen Sie, Geld zu sparen, indem Sie von
einem unberechenbaren Händler auf Kosten Ihrer Zeit, die Sie mit Qualitäts- und
Servicefragen verbringen, kaufen. Bei Radioddity.com müssen Sie sich nicht
zwischen niedrigen Preisen und einem sicheren Einkaufserlebnis entscheiden. Ob
Sie nun das erste Mal bei uns etwas kaufen oder ein erfahrener Funkamateur sind,
wir hoffen stets, dass Sie mit unseren Produkten, Preisen, Inhalten und Quellen
genau das finden, was Sie brauchen.
In den letzten Jahren hat Radioddity die Bedürfnisse der Käufer von Funkgeräten
besser erfüllt, indem es ein sicheres Einkaufserlebnis geschaffen hat. Wir tun dies,
indem wir die hochwertigsten Produkte zu einem erschwinglichen Preis anbieten und
diese mit einem erstklassigen Service unterstützen. Das klingt für uns einfach.
Unser Versprechen: Ihr Einkaufserlebnis zu verbessern
Durch starke Partnerschaften sind wir in der Lage, Ihnen unter dem Markennamen
neueste Technologie anzubieten. Unsere fürsorglichen und reaktionsschnellen
Kundendienstteams unterstützen uns dabei, dieses Versprechen einzuhalten und Ihre
Bedürfnisse jeden Tag noch besser zu erfüllen.
Zusammen mit diesem Versprechen hoffen wir, Ihnen den entsprechenden Mehrwert
zu geben. Sei es, indem wir Ihnen die neuesten und besten DMR- und
Analogfunkgeräte, Zubehör und verwandte Produkte anbieten, indem wir einen
hervorragenden technischen Support bieten, oder indem wir mit führenden Köpfen
der Amateurfunkbranche zusammenarbeiten, um hilfreiche Inhalte zu entwickeln, die
Sie in Ihrem Kaufprozess unterstützen, einschließlich unseres Blogs, unserer FAQ
und unseres Newsletters. Ihre Anliegen sind unsere Anliegen.
All dies machen wir um Sie dabei zu unterstützen, qualitativ hochwertige Funkgeräte
zu niedrigen Preisen, mit so wenig Kopfschmerzen für den Verbraucher wie möglich
zu erwerben. Wenn wir Ihrer Meinung nach dieses Versprechen in irgendeiner Weise
nicht einhalten, lassen Sie es uns dies bitte per E-Mail wissen:
support@radioddity.com
Seite2von
63

Deutsches Benutzerhandbuch zum Radioddity GD-73 v1.0
Inhaltsverzeichnis
Über Radioddity..............................................................................................................................2
Produktsicherheit und HF-Exposition für tragbare Funkgeräte.......................................7
Hinweise zum bestimmungsgemäßen Gebrauch des Funkgerätes
Was ist im Karton?........................................................................................................................ 8
Die Bedienelemente des Funkgerätes..................................................................................... 8
Allgemein
Einschalten
Ausschalten
Lautstärke einstellen
Akkuwartung................................................................................................................................. 11
Einlegen/Entfernen des Akkus
Laden des Akkus
Antenne.......................................................................................................................................... 12
Anschluss eines externen Headsets......................................................................................12
Grundfunktionen..........................................................................................................................13
Auswahl einer Zone
Auswahl eines Kanals
.....................................................................................................................................
...............................................................................................................................
..............................................................................................................................
................................................................................................................
...................................................................................................
..........................................................................................................................
.....................................................................................................................
..................................................................................................................
.........................................
10
10
10
10
11
11
13
13
7
Empfangen und Beantworten eines Gruppenrufes
Ein Gruppenruf wird empfangen
Ein Gruppenruf wird beantwortet
Empfangen und Beantworten eines Einzelanrufes
Ein Einzelanruf wird empfangen
Ein Einzelanruf wird beantwortet
Empfangen eines globalen Anrufes
Ein globaler Anruf wird empfangen
Start eines Anrufes
Gruppenruf
Einzelanruf
Globaler Anruf
Verwenden einer Kurzwahltaste um einen Ruf zu starten
Notfallfunktionen......................................................................................................................... 18
Notfall-Modus
Notfallalarm empfangen
Notfallalarm beantworten
Notfallalarm senden
Notfallalarm mit anschließendem Sprachanruf auslösen
Notfallalarm senden und anschließend Mikrofon einschalten
......................................................................................................................
...............................................................................................................................
................................................................................................................................
.........................................................................................................................
.............................................................................................................................
.........................................................................................................
................................................................................................................
...........................................................................................
..........................................................................................
............................................................................................
...........................................................................................
..........................................................................................
......................................................................................
......................................................................................................
.................................................................
..................................................................
..................................................
...................................................
...........................................
13
13
14
14
14
14
15
15
15
15
16
17
17
18
18
18
19
19
20
Seite3von
63

Deutsches Benutzerhandbuch zum Radioddity GD-73 v1.0
Notfall-Modus beenden
Menübedienung............................................................................................................................22
Kontakte
Rufjournal
Kurznachrichtenfunktionen
Verschlüsselung
.......................................................................................................................................
Gruppenruf eines Kontakts
Einzelanruf eines Kontakts
.....................................................................................................................................
Überprüfen der IDs neuer Anrufe
Anzeigen des Namens oder der ID verpasster Anrufe
Löschen eines Rufjournals
Senden einer vorbereiteten Kurznachricht
Lesen einer empfangenen Kurznachricht
Lesen einer bereits gesendeten Kurznachricht
Löschen von Kurznachrichten
Senden einer Kurznachricht mit nur einem Tastendruck
Verwaltung von Kurznachrichten
...........................................................................................................................
.........................................................................................................
.....................................................................................................
......................................................................................................
..........................................................................................
.......................................................
......................................................................................................
........................................................................................................
...........................................................................
.............................................................................
....................................................................
................................................................................................
....................................................
...........................................................................................
21
22
22
23
24
24
24
25
25
25
26
26
27
27
27
27
Grundverschlüsselung
............................................................................................................................................
DTMF
Initiieren eines DTMF-Anrufes
Sicherheit
Funkgerät deaktivieren
Funkgerät aktivieren
Scanliste
Scan-Arten
Start/Stop der Scan-Funktion
Erfolgreicher Scan
Einstellungen
Informationen zum Funkgerät
Details zum eingestellten Funkkanal
TalkAround
TOT
Sendeleistung einstellen
Slot
CC
GroupList
SQ
SubCode
Globale Einstellungen
......................................................................................................................................
........................................................................................................................................
...............................................................................................................................
................................................................................................................................
...............................................................................................................................
...........................................................................................................................................
............................................................................................................................................
..............................................................................................................................................
..................................................................................................................................
..............................................................................................................................................
...................................................................................................................................
.............................................................................................................
...............................................................................................
...........................................................................................................
................................................................................................................
................................................................................................
....................................................................................................................
...............................................................................................
.........................................................................................
.........................................................................................................
.................................................................................................................
28
28
28
28
28
29
29
29
29
30
30
30
31
31
32
32
33
33
34
34
35
37
..........................................................................................................................................
Zone
Date&Time
Tone
...............................................................................................................................
..........................................................................................................................................
Seite4von
37
37
38
63

Deutsches Benutzerhandbuch zum Radioddity GD-73 v1.0
Others
Tastatursperre
Hintergrundbeleuchtung
FreqDis
Startanzeige
Lautstärketasten
Funktionstasten
Zurücksetzen auf Werkseinstellungen
Programmierung des GD-73.....................................................................................................43
Einführung
Los geht´s
Installation des erforderlichen USB-Treibers
Read Data
Write Data
Funktionstasten
Verschlüsselung
Digitales Notfallsystem
.......................................................................................................................................
..........................................................................................................................
........................................................................................................
......................................................................................................................................
.............................................................................................................................
.......................................................................................................................
........................................................................................................................
..................................................................................
....................................................................................................................................
.....................................................................................................................................
............................................................................
.................................................................................................................................
................................................................................................................................
.........................................................................................................................
...........................................................................................................................
...............................................................................................................
39
39
39
40
40
41
41
42
43
43
44
46
46
477
47
48
Vorbereitung für DMR-Betrieb..................................................................................................49
Anforderung einer gültigen DMR RADIO ID
Digitale Kontakte
Digital RX Group
Kanaleinstellungen
Bündlung von Kanälen in Zonen
Codeplug auf das Funkgerät übertragen
Firmware-Aktualisierung des GD-73...................................................................................... 55
Einschränkungen bei PMR446.................................................................................................57
Anhang A - HF-Energiebelastung und Produktsicherheit für tragbare Funkgeräte. 57
Funkzulassung
Bedienungshinweise
Schützen Sie Ihr Gehör
Sicherer Betrieb
Verboten
Um das Risiko zu reduzieren
Einsatz von Kommunikationsgeräten während der Fahrt
Anhang B - Technische Daten..................................................................................................60
.........................................................................................................................
..........................................................................................................................
......................................................................................................................
...............................................................................................
.............................................................................................................................
....................................................................................................................
...............................................................................................................
...........................................................................................................................
...................................................................................................................................
..................................................................................................
............................................................................
.................................................................................
...................................................
49
49
50
51
53
54
57
58
58
59
59
59
59
Allgemein
Sender
Empfänger
...........................................................................................................................................
.....................................................................................................................................
....................................................................................................................................
Seite5von
60
60
61
63

Deutsches Benutzerhandbuch zum Radioddity GD-73 v1.0
Anhang C – CE Certificate of Compliance............................................................................62
Seite6von
63

Deutsches Benutzerhandbuch zum Radioddity GD-73 v1.0
Bevor Sie das Funkgerät verwenden, lesen Sie bitte sorgfältig
dieses Handbuch durch. Es enthält wichtige Hinweise für den
sicheren und bestimmungsgemäßen Gebrauch des
Funkgerätes sowie eine Sensibilisierung für HF-Energie,
Kontrollinformationen und Betriebsanweisungen zur
Einhaltung der Grenzwerte der HF-Energiebelastung gemäß
den geltenden nationalen und internationalen Normen.
Produktsicherheit und HF-Exposition für tragbare Funkgeräte
Hinweise zum bestimmungsgemäßen Gebrauch des Funkgerätes
Bitte lesen Sie die folgende Kurzanleitung, da die Nichteinhaltung dieser Regeln eine
Gefahr darstellen oder gegen das Gesetz verstoßen kann.
1. Beachten Sie die Vorschriften der örtlichen Behörden, bevor Sie dieses
Funkgerät verwenden, da ein unsachgemäßer Gebrauch gegen das Gesetz
verstoßen kann.
2. Schalten Sie das Funkgerät aus, bevor Sie sich brennbaren oder
explosionsgefährdeten Bereichen nähern.
3. Laden oder wechseln Sie den Akku nicht in brennbaren oder
explosionsgefährdeten Bereichen.
4. Schalten Sie das Funkgerät aus, bevor Sie in die Nähe von Spreng- oder
Zündzonen kommen.
5. Verwenden Sie kein Funkgerät, dessen Antenne beschädigt ist, da ein Berühren
der beschädigten Antenne zu Hitzeschäden führen kann.
6. Versuchen Sie nicht, das Funkgerät zu öffnen; eventuelle Wartungsarbeiten
sollten nur von einem Fachmann durchgeführt werden.
7. Um Störungen durch elektromagnetische Interferenzen oder elektromagnetische
Strahlungen zu vermeiden, schalten Sie das Funkgerät an Orten aus, an denen
Hinweise wie beispielsweise "Keine drahtlosen Geräte verwenden" angebracht
sind, z. B. in Krankenhäusern und anderen Gesundheitseinrichtungen.
8. Stellen Sie das Funkgerät in Fahrzeugen die über Airbags verfügen nicht in den
Bereich der Airbagauslösung.
9. Bewahren Sie das Funkgerät nicht unter direkter Sonneneinstrahlung oder in
heißen Bereichen auf. Wenn Sie mit dem Funkgerät senden, halten Sie mit Ihrem
Körper einen Abstand von mindestens 5 cm zur Antenne.
10. Wenn das Funkgerät stinkt oder raucht, schalten Sie es bitte umgehend aus und
wenden Sie sich an Ihren Händler vor Ort.
11. Senden Sie nicht zu lange, da dies zu einer Überhitzung des Funkgerätes führen
kann.
Seite7von
63

Deutsches Benutzerhandbuch zum Radioddity GD-73 v1.0
Was ist im Karton?
Danke, dass Sie sich für ein Funkgerät von Radioddity entschieden haben. Wir
empfehlen Ihnen, zunächst den in der folgenden Tabelle aufgeführten Lieferumfang
zu überprüfen, bevor Sie die Verpackung entsorgen. Sollte etwas fehlen, wenden Sie
sich bitte umgehend an Ihren Fachhändler.
Zum Lieferumfang des Radioddity GD-73 gehört außerdem:
1× GD-73 Funkgert
1× Li-Ion Akku
1× Gürtelclip(mit 2 Schrauben)
1× Mikro USB-Kabel zum Laden und Programmieren
1× Netzteil
1× Headset
1× Handbuch
Hinweis
Weiteres Zubehör für Ihr Funkgerät erhalten Sie bei: https://www.radioddity.com/
Die Bedienelemente des Funkgerätes
Seite8von
63

Deutsches Benutzerhandbuch zum Radioddity GD-73 v1.0
Hinweis
Kurzen sowie langen Tastendrücken von P1 sowie P2 lassen sich per CPS folgende
Funktionen zuweisen:
1. Keine Funktion
2. Radio Enable
3. Radio Check
4. Radio Disable
5. Power Level (nicht bei PMR sowie FRS Version des Funkgerätes)
6. Monitor
7. Emergency (Notfallmodus) ein
8. Emergency (Notfallmodus) aus
9. Zone wechseln
10. Scan ein/aus
11. VOX ein/aus
12. One Touch Access 1
13. One Touch Access 2
14. One Touch Access 3
15. One Touch Access 4
16. One Touch Access 5
17. BER
18. Repeater/Talk Around
19. Lone Worker
20. 1750Hz
21. CallSwell
Seite9von
63

Deutsches Benutzerhandbuch zum Radioddity GD-73 v1.0
Allgemein
Einschalten
Auf der rechten Seite befindet sich die entsprechende Taste. Drücken Sie diese für
etwa 3 Sekunden auf die EIN/aus-Taste um das Funkgerät einzuschalten. Auf dem
Display erscheint das Radioddity-Logo, die Status-LED leuchtet kurz rot auf und es
ertönt eine aufsteigende 4-Tonfolge.
Ausschalten
Auf der rechten Seite befindet sich die entsprechende Taste. Drücken Sie diese für
etwa 3 Sekunden auf die EIN/aus-Taste um das Funkgerät auszuschalten. Das
Display erlischt.
Lautstärke einstellen
Oberhalb der EIN/Aus-Taste befinden sich auf der rechten Seite des GD-73 die
Tasten für lauter sowie leiser. Die obere Taste () erhöht die Lautstärke, die untere
( ) hingegen verringert die Lautstärke des eingebauten Lautsprechers oder eines
angeschlossenen Ohrhörers.
Hinweis:
Im weiteren Verlauf dieses Handbuchs beziehen sich die beiden Symbole sowie
hingegen auf die beiden Tasten auf der Front des GD-73, unterhalb der LC-Anzeige.
Seite10von
63

Deutsches Benutzerhandbuch zum Radioddity GD-73 v1.0
Akkuwartung
Achtung
Bitte verwenden Sie ausschließlich Akkupacks von Radioddity. Andere Akkus
könnten explodieren.
Hinweis
1. Akku nicht kurzschließen oder in offenes Feuer werfen. Nehmen Sie den Akku
nicht selbst auseinander.
2. Laden Sie den Akku bei einer Temperatur zwischen 0℃ und 45℃ auf.
Außerhalb dieses Temperaturbereichs kann der Akku nicht vollständig
geladen werden.
3. Schalten Sie das Gerät aus, bevor Sie es aufladen.
4. Trennen Sie das Gerät von der externen Stromversorgung sobald der
Ladevorgang abgeschlossen ist.
5. Ersetzen Sie den Akku, wenn die Betriebszeit nicht mehr ausreicht.
6. Laden Sie nicht, wenn der Akku oder das Funkgerät nass ist. Um jegliche
Gefahr zu vermeiden trocknen Sie es bitte vor dem Aufladen mit einem Tuch.
Warnung
Wenn leitfähige Metalle, wie Schmuck, Schlüssel oder Ketten, die externen
Ladekontakte berühren, können Schäden oder Verletzungen auftreten.
Einlegen/Entfernen des Akkus
1. Richten Sie die beiden Nase des Akkus und die Löcher an der unteren Kante
der Rückseite des Funkgerätes so aus, dass ein vollständiger Kontakt
gewährleistet ist. Anschließend klipsen Sie den Akku dann an der oberen
Seite des Grundkörpers ein
2. Um den Akku zu entfernen, stellen Sie bitte sicher, dass das Funkgerät
ausgeschaltet ist, drücken Sie die die beiden oberen Akkuverriegelungen
gleichzeitig (beispielsweise mit Zeige- und Mittelfinger) in Richtung des Akkus.
Der Akku wird dadurch entriegelt und kann entnommen werden.
Laden des Akkus
1. Sobald die micro-USB-Buchse des Funkgerätes über ein USB-Kabel mit
einem PC oder dem mitgelieferten Netzgerät verbunden ist, erscheint bei
ausgeschaltetem Funkgerät auf dem Display ein großes Akkusymbol.
2. Ist das Funkgerät hingegen eingeschaltet, so erscheint ein kleines
Akkusymbol ganz rechts oben auf dem LC-Display.
3. Nach einigen Sekunden füllt sich das Akkusymbol von links nach rechts mit
mehreren Balken um den Ladevorgang zu signalisieren.
4. Sobald die drei Balken konstant gefüllt dargestellt werden, ist der Akku
vollständig geladen. Trennen Sie nun das Funkgerät wieder von der externen
Spannungsversorgung.
Seite11von
63

Deutsches Benutzerhandbuch zum Radioddity GD-73 v1.0
Antenne
Die Antenne ist optimal für den Frequenzbereich des GD-73 abgestimmt und fest im
Gerät verbaut. Daher kann sie auch nicht gewechselt werden.
Anschluss eines externen Headsets
Die Abdeckung über dem Kopfhöreranschluss vorsichtig öffnen (nicht entfernen) und
anschließend den Stecker des Headsets bis zum Anschlag in die Klinkenbuchse
einstecken.
Seite12von
63

Deutsches Benutzerhandbuch zum Radioddity GD-73 v1.0
Grundfunktionen
Auswahl einer Zone
Unter einer Zone werden mehrere Kanäle zusammengefasst. In Ihrem Funkgerät
können bis zu 64 derartige Zonen mit jeweils bis zu 16 Kanälen hinterlegt werden.
1. Drücken Sie die MENU -Taste um in das Menü zu gelangen.
2. Mit den Tasten und navigieren Sie im Menü und Bestätigen Ihre Auswahl mit
MENU.
3. Wählen Sie im Menü „Settings“ aus.
4. Anschließend wählen Sie im Untermenü „Zone“ aus.
5. Mit den Tasten und navigieren Sie nun zu der gewünschten Zone und
bestätigen die Auswahl der entsprechenden Zone abermals mit MENU
6. Auf dem Display wird die nun in der Mitte die ausgewählte Zone angezeigt.
7. In der darunter liegenden Zeile wird der aktuell in der Zone ausgewählte Kanal
angezeigt.
Auswahl eines Kanals
Anschließend navigieren Sie mit den Tasten sowie und wählen den
gewünschten Kanal aus. Eine Bestätigung mit der MENU -Taste ist hierbei nicht
erforderlich.
Empfangen und Beantworten eines Gruppenrufes
Um einen Gruppenruf empfangen zu können, muss am Funkgerät zuvor eine Gruppe
(engl Talkgroup, TG) ausgewählt sein. Jedem Kanal kann mittels der PC-Software
genau eine Gruppe zugeordnet werden.
Hinweis:
Im praktischen Betrieb ist es hilfreich, wenn aus dem Namen des Kanals auch die
zugeordnete Gruppe hervorgeht.
Ein Gruppenruf wird empfangen
Zunächst muss am Funkgerät ein Kanal gewählt werden dem auch eine Gruppe (engl
Talk Group, TG) zugeordnet ist. Nur dann kann auch ein Gruppenruf empfangen
werden.
1. Die Status-LED leuchtet grün
2. Auf dem Display wird bei nicht aktivem Kanal
in der mittleren Zeile der Name der Zone
in der untersten Zeile der Name der ausgewählten Gruppe angezeigt.
3. Auf dem Display wird bei aktivem Kanal
in der obersten Zeile „Group“
in der mittleren Zeile die DMR-ID des Anrufers
in der untersten Zeile „Calling“ (gefolgt von „call end“ sofern der Kanal zuvor
Seite13von
63

Deutsches Benutzerhandbuch zum Radioddity GD-73 v1.0
nicht aktiv war)
angezeigt.
Ein Gruppenruf wird beantwortet
1. Halten sie das Funkgerät senkrecht und etwa 2,5 bis 5cm vor Ihren Mund.
2. Drücken Sie nun die Sprechtaste (PTT) um auf den Ruf zu antworten. Die
Status-LED leuchtet rot. Sie können nun sprechen.
3. Lassen Sie die Sprechtaste (PTT) wieder los um wieder auf Empfang
umzuschalten.
4. Wenn nicht innerhalb einer vorbestimmten Zeit eine Antwort zu hören ist, wird der
Ruf beendet.
Empfangen und Beantworten eines Einzelanrufes
Ein Einzelanruf (engl. Single Call) ist ein individueller Ruf zu einer bestimmten
Gegenstelle. Die Gegenstelle wartet auf den Anruf und die rufende Seite initiiert
diesen.
Ein Einzelanruf wird empfangen
1. Die Status-LED leuchtet grün
2. Auf dem Display wird
in der mittleren Zeile „Single Call“ und
in der untersten Zeile die DMR-ID des Anrufers sowie das Zeichen für einen
eingehenden Ruf (Nur in der digitalen Betriebsart)
angezeigt.
Ein Einzelanruf wird beantwortet
1. Halten sie das Funkgerät senkrecht und etwa 2,5-3cm vor Ihren Mund.
2. Sofern die Funktion zur Signalisierung eines freien Kanals (Channel Free
Indication Tone) aktiviert ist, ertönt beim Empfänger ein kurzes Tonsignal, sobald
am Funkgerät des Anrufers die Sprechtaste (PTT) losgelassen wurde um zu
signalisieren, dass der Funkkanal nun für eine Beantwortung des Anrufs zur
Verfügung steht.
3. Drücken Sie nun Sprechtaste (PTT) um auf den Ruf zu antworten. Die Status-LED
leuchtet rot. Sie können nun sprechen.
4. Lassen Sie die Sprechtaste (PTT) wieder los um wieder auf Empfang
umzuschalten.
Seite14von
63

Deutsches Benutzerhandbuch zum Radioddity GD-73 v1.0
Empfangen eines globalen Anrufes
Zur Verbreitung von wichtigen Informationen dient ein globaler Anruf (Engl. All Call).
Ein globaler Anruf wird empfangen
1. Die Status-LED leuchtet grün
2. Auf dem Display wird
in der erster Zeile „All Call“,
in der mittleren die ID des Anrufers
in der untersten Zeile „All Call“ (nur bei analoger Betriebsart)
angezeigt.
3. Nach Beendigung des globalen Anrufes wechselt die Anzeige wieder zurück auf
die vorangegangene Anzeige.
4. Sofern die Funktion zur Signalisierung eines freien Kanals (Channel Free
Indication Tone) aktiviert ist, ertönt beim Empfänger ein kurzes Tonsignal, sobald
am Funkgerät des Anrufers die Sprechtaste (PTT) losgelassen wurde.
5. Eine Beantwortung eines globalen Anrufes ist nicht möglich.
Hinweis
Wird während des Empfangs eines globalen Rufes der Kanal gewechselt, so wird
dadurch der Empfang des globalen Rufes abgebrochen. Während eines globalen
Rufes sind die programmierten Tasten ohne Funktion.
Start eines Anrufes
Mit den nachfolgenden Möglichkeiten kann der Kanal, die DMR-ID oder die
gewünschte Gruppe (engl. Talk Group, TG) ausgewählt werden:
Kanalwahltasten
vorprogrammierte Tasten
Kontakte
manuelle Eingabe (nur bei einem Einzelanruf)
Gruppenruf
Alle Funkgeräte die durch den Gruppenruf erreicht werden sollen, müssen sich in der
selben Gruppe befinden.
1. Wählen Sie mit den Tasten und den gewünschten Kanal aus. Nutzen Sie
dabei den Gruppennamen zur Auswahl des Kanals.
2. Halten sie das Funkgerät senkrecht und etwa 2,5-3cm vor Ihren Mund.
3. Drücken Sie nun die Sprechtaste (PTT) um auf den Ruf zu antworten. Die
Status-LED leuchtet rot. Auf der Anzeige wird der Gruppenname angezeigt,
4. Lassen Sie die Sprechtaste (PTT) wieder los um wieder auf Empfang
umzuschalten.
5. Sobald der Ruf beantwortet wird, wird dies durch die grüne Status-LED
signalisiert.
Seite15von
63

Deutsches Benutzerhandbuch zum Radioddity GD-73 v1.0
6. Auf dem Display wird
in der obersten Zeile „Group“
in der mittleren Zeile die DMR-ID des Anrufers
in der untersten Zeile „Calling“ (gefolgt von „call end“ sofern der Kanal zuvor
nicht aktiv war)
angezeigt.
7. Sofern die Funktion zur Signalisierung eines freien Kanals (Channel Free
Indication Tone) aktiviert ist, ertönt beim Empfänger ein kurzes Tonsignal, sobald
am Funkgerät des Anrufers die Sprechtaste (PTT) losgelassen wurde um zu
signalisieren, dass der Funkkanal nun für eine Beantwortung des Anrufs zur
Verfügung steht.
8. Drücken Sie nun die Sprechtaste (PTT) um zu antworten. Die Status-LED leuchtet
rot. Sie können nun sprechen.
9. Lassen Sie die Sprechtaste (PTT) wieder los um wieder auf Empfang
umzuschalten. Wenn nicht innerhalb einer vorbestimmten Zeit eine Antwort zu
hören ist, wird das Gespräch beendet.
10. Nach Beendigung des Gruppenrufes wechselt die Anzeige wieder zurück auf die
vorangegangene Anzeige.
11. Ein Gruppenruf kann auch aus den Kontakten heraus initiiert werden.
Einzelanruf
1. Wählen Sie mit den Tasten und den gewünschten Kanal aus. Nutzen Sie
dabei den Gruppennamen der aktiven Gruppe zur Auswahl des Kanals.
2. Halten sie das Funkgerät senkrecht und etwa 2,5-3cm vor Ihren Mund.
3. Drücken Sie nun die Sprechtaste (PTT) um den Ruf zu initiieren. Die Status-LED
leuchtet rot.
4. Auf dem Display wird
in der erster Zeile „Single Call“,
in der mittleren Zeile der Name des Angerufen und
in der untersten Zeile die ID des Angerufenen sowie das Zeichen für einen
ausgehenden Ruf (Nur in der digitalen Betriebsart)
angezeigt.
5. Lassen Sie die Sprechtaste (PTT) wieder los um wieder auf Empfang
umzuschalten. Die Status-LED leuchtet grün sobald der Angerufene antwortet.
6. Sofern die Funktion zur Signalisierung eines freien Kanals (Channel Free
Indication Tone) aktiviert ist, ertönt beim Empfänger ein kurzes Tonsignal, sobald
am Funkgerät des Anrufers die Sprechtaste (PTT) losgelassen wurde um zu
signalisieren, dass der Funkkanal nun für eine Beantwortung des Anrufs zur
Verfügung steht.
7. Drücken Sie nun die Sprechtaste (PTT) um zu antworten. Die Status-LED leuchtet
rot. Sie können nun sprechen.
8. Lassen Sie die Sprechtaste (PTT) wieder los um wieder auf Empfang
umzuschalten. Wenn nicht innerhalb einer vorbestimmten Zeit eine Antwort zu
hören ist, wird das Gespräch beendet.
Seite16von
63

Deutsches Benutzerhandbuch zum Radioddity GD-73 v1.0
9. Die Beendigung des Gespräches wird durch den Empfang eines kurzen Tons
signalisiert.
Die beiden Funktionstasten können als Kurzwahltasten programmiert werden.
Globaler Anruf
Zur Verbreitung von wichtigen Informationen dient ein globaler Anruf (Engl. All Call).
Das Funkgerät muss für einen globalen Anruf programmiert sein.
1. Wählen Sie mit den Tasten und den gewünschten Kanal aus. Nutzen Sie
dabei den Gruppennamen oder die ID der aktiven Gruppe zur Auswahl des
Kanals.
2. Halten sie das Funkgerät senkrecht und etwa 2,5-3cm vor Ihren Mund.
3. Drücken Sie nun die Sprechtaste (PTT) um den Ruf zu initiieren. Die
Status-LED leuchtet rot.
4. Auf dem Display wird
in der erster Zeile „All Call“,
in der mittleren Zeile der globale Name und
in der untersten Zeile die globale ID sowie das Zeichen für einen
ausgehenden Ruf (Nur in der digitalen Betriebsart)
angezeigt.
Hinweis
Die Empfänger des globalen Anrufes können diesen nicht beantworten.
Verwenden einer Kurzwahltaste um einen Ruf zu starten
Die Kurzwahlfunktion ermöglicht ihnen einen Gruppen- oder Einzelruf zu einer
vordefinierten ID oder einem Namen. Diese Funktion kann einer Taste mit kurzer oder
langer Betätigung zugewiesen werden. Es kann immer nur eine ID oder ein Name auf
eine Taste programmiert werden. Es lassen sich jedoch mehrere Kurzwahltasten
programmieren.
1. Starten Sie einen Ruf zu einer Gruppe oder Person indem Sie die
Kurzwahltaste betätigen.
2. Halten sie das Funkgerät senkrecht und etwa 2,5-3cm vor Ihren Mund.
3. Drücken Sie nun die Sprechtaste (PTT) um den Ruf zu initiieren. Die
Status-LED leuchtet rot.
4. Auf dem Display wird die Gruppe, der Name oder die ID sowie das Zeichen für
einen ausgehenden Ruf (Nur in der digitalen Betriebsart) angezeigt
5. Lassen Sie die Sprechtaste (PTT) wieder los um wieder auf Empfang
umzuschalten. Die Status-LED leuchtet grün sobald der Angerufene antwortet.
6. Sofern die Funktion zur Signalisierung eines freien Kanals (Channel Free
Indication Tone) aktiviert ist, ertönt beim Empfänger ein kurzes Tonsignal,
sobald am Funkgerät des Anrufers die Sprechtaste (PTT) losgelassen wurde
Seite17von
63

Deutsches Benutzerhandbuch zum Radioddity GD-73 v1.0
um zu signalisieren, dass der Funkkanal nun für eine Beantwortung des
Anrufs zur Verfügung steht.
7. Drücken Sie nun die Sprechtaste (PTT) um zu antworten. Die Status-LED
leuchtet rot. Sie können nun sprechen.
8. Lassen Sie die Sprechtaste (PTT) wieder los um wieder auf Empfang
umzuschalten. Wenn nicht innerhalb einer vorbestimmten Zeit eine Antwort zu
hören ist, wird das Gespräch beendet.
Notfallfunktionen
Notfall-Modus
Mit einem Notfallalarm soll auf eine wirkliche Notfallsituation hingewiesen werden. Ein
Notfallalarm darf daher nur in einem Notfall aktiviert werden. Dies kann zu jeder Zeit
und überall erfolgen und ist selbst dann möglich, wenn der Kanal belegt ist.
Hinweis
Der Notfall-Modus ist ausschließlich in digitalen Funksystemen verfügbar und dort
einem speziellen Gruppenruf zugeordnet.
Das Funkgerät unterstützt drei Notfallalarme:
Notfallalarm
Notfallalarm mit anschließendem Ruf
Notfall-Mikrofon
Notfallalarm empfangen
1. Beim Empfang eines Notfallalarms wird die Anzahl der bislang empfangenen
Notfallalarme sowie Nummer des Senders sowie „Alarm“ auf dem Display
angezeigt. Außerdem werden im Wechsel der Notfallalarm sowie der Name/ID
des Anrufers angezeigt.
2. Es ertönt ein Signalton und die Status-LED leuchtet rot.
3. Sofern aktiviert, nimmt das Funkgerät einen Notfallalarm automatisch entgegen.
Wurde Vom Funkgerät ein Notfallalarm empfangen, so zeigt das Display ein
Alarmsymbol an. Dieses wird solange angezeigt, bis der Alarm bestätigt wurde.
Solange das Alarmsymbol angezeigt wird, ist ein Empfang anderer Stationen
nicht möglich.
Hinweis
Eine kurze Betätigung der ESC-Taste, gefolgt von einer Betätigung der
programmierten Taste zum Ausschalten des Notfall-Modus löscht den Notfallalarm
und beendet dadurch auch den Notfall-Modus.
Notfallalarm beantworten
Nach Empfang eines Notfallalarms
Seite18von
63

Deutsches Benutzerhandbuch zum Radioddity GD-73 v1.0
1. Drücken Sie eine beliebige Taste um den hörbaren Alarmton zu quittieren.
2. Halten sie das Funkgerät senkrecht und etwa 2,5-3cm vor Ihren Mund.
3. Sofern die Funktion zur Signalisierung eines freien Kanals (Channel Free
Indication Tone) aktiviert ist, ertönt beim Empfänger ein kurzes Tonsignal,
sobald am Funkgerät des Anrufers die Sprechtaste (PTT) losgelassen wurde
um zu signalisieren, dass der Funkkanal nun für eine Beantwortung des
Anrufs zur Verfügung steht.
4. Drücken Sie anschließend die Sprechtaste (PTT) um auf den Notfallalarm zu
antworten. Die Status-LED leuchtet nun rot und das Funkgerät befindet sich
im Notfall-Modus. Sie können nun sprechen.
5. Lassen Sie die Sprechtaste (PTT) wieder los um wieder in den
Empfangsmodus umzuschalten. Die Status-LED leuchtet grün sobald der
Notfallruf beantwortet werden kann. Auf dem Display wird „Group Call“ (engl.
Gruppenruf), die Gruppen-ID sowie die ID des Anrufers angezeigt.
6. Eine kurze Betätigung der ESC-Taste, gefolgt von einer Betätigung der
programmierten Taste zum Ausschalten des Notfallalarms löscht den
Notfallalarm und beendet dadurch auch den Notfall-Modus.
7. Das Funkgerät beendet den Notfall-Modus und kehrt zur normalen Anzeige
zurück.
Notfallalarm senden
Diese Funktion ermöglicht das Senden eines Notfallalarms. Dabei handelt es sich
nicht um eine Sprachübertragung sondern es wird vom Empfangsgerät eine
Bestätigung erwartet. Einen Notfallalarm kann nur ein Notfallalarmkontakt in der
entsprechenden Notfallgruppe senden.
1. Drücken Sie die vorprogrammierte Funktionstaste um einen Notfallalarm zu
senden (Funktionstaste 1, 2 oder 3).
2. Auf dem Display werden abwechselnd die eigene ID sowie „emergency
call“ angezeigt. Die Status-LED leuchtet rot und der Notfall-Modus wird
aktiviert.
3. Beim Empfang des Notfallalarms ist der Notfallton zu hören. Auf dem Display
wird der empfangene Notfallalarm signalisiert. Erfolgt auch nach mehreren
Wiederholungen seitens der Gegenstelle keine Reaktion, so ertönt ein
Signalton und der Notfall-Modus wird beendet.
4. Das Funkgerät beendet den Notfall-Modus und kehrt zur normalen Anzeige
zurück. Sofern beim Funkgerät Die Wiedergabe von Signaltönen komplett
deaktiviert ist, erfolgen im Notfall-Modus weder Sprach- noch Text-Ausgaben.
Notfallalarm mit anschließendem Sprachanruf auslösen
Diese Funktion ermöglicht das Senden eines Notfallalarms zu einem anderen
Funkgerät. Nach Bestätigung des Rufes führen beide Funkgeräte über den zuvor
festgelegten Funkkanal das Funkgespräch geführt.
Seite19von
63

Deutsches Benutzerhandbuch zum Radioddity GD-73 v1.0
1. Drücken Sie die vorprogrammierte Funktionstaste um einen Notfallalarm zu
senden (Funktionstaste 1, 2 oder 3).
2. Auf dem Display werden abwechselnd die eigene ID sowie „emergency
call“ angezeigt. Die Status-LED leuchtet rot und der Notfall-Modus wird
aktiviert.
3. Nach Empfang des Notfallalarms ist der Notfallton zu hören und die
Status-LED leuchtet grün. Auf dem Display wird der empfangene Notfallalarm
signalisiert. Erfolgt auch nach mehreren Wiederholungen seitens der
Gegenstelle keine Reaktion, so ertönt ein Signalton und der Notfall-Modus
wird beendet.
4. Halten sie das Funkgerät senkrecht und etwa 2,5-3cm vor Ihren Mund.
5. Drücken Sie nun die Sprechtaste (PTT) um den Sprachanruf zu tätigen. Die
Status-LED leuchtet rot. Das Funkgerät befindet sich im Notfall-Modus. Sie
können nun sprechen. Auf dem Display wird das Symbol für Gruppenruf
angezeigt.
6. Lassen Sie die Sprechtaste (PTT) wieder los um wieder in den
Empfangsmodus umzuschalten. Die Status-LED leuchtet grün sobald der
Notfallruf beantwortet werden kann.
7. Sofern die Funktion zur Signalisierung eines freien Kanals (Channel Free
Indication Tone) aktiviert ist, ertönt beim Empfänger ein kurzes Tonsignal,
sobald am Funkgerät des Anrufers die Sprechtaste (PTT) losgelassen wurde
um zu signalisieren, dass der Funkkanal nun für eine Beantwortung des
Anrufs zur Verfügung steht.
8. Drücken Sie nun gegebenenfalls abermals die Sprechtaste (PTT) um den
Notfallalarmruf zu quittieren. Die Status-LED leuchtet rot oder betätigen Sie
die entsprechende Funktionstaste zum Ausschalten des Notfall-Modus.
9. Das Funkgerät beendet den Notfall-Modus und kehrt zur normalen Anzeige
zurück. Sofern beim Funkgerät die Wiedergabe von Signaltönen komplett
deaktiviert ist, erfolgen im Notfall-Modus weder Sprach- noch Text-Ausgaben
bis Sie die Sprechtaste (PTT) betätigen um einen Ruf auszulösen. Sofern das
Funkgerät für „call permit“ programmiert wurde, erfolgt weder die Ausgabe von
Signaltönen noch speziellen Anzeigen auf dem Display des Gerufenen. Eine
spezielle Anzeige erfolgt nur dann auf dem Display wenn die Sprechtaste
(PTT) zur Auslösung oder zur Beantwortung eines Rufes genutzt wird.
Notfallalarm senden und anschließend Mikrofon einschalten
Diese Funktion ermöglicht das Senden eines Notfallalarms zu einem anderen
Funkgerät. Nach Auslösen des Notfallalarms schaltet Ihr Funkgerät automatisch in
den Sendebetrieb, ohne dass Sie hierzu die Sprechtaste (PTT) betätigen müssen.
Dies wird auch als „Notfall-Mikrofon“ bezeichnet.
Hinweis: Sofern Sie nun denoch die Sprechtaste (PTT) betätigen, wird solange
weitergesendet, bis Sie die Sprechtaste (PTT) wieder loslassen.
Seite20von
63

Deutsches Benutzerhandbuch zum Radioddity GD-73 v1.0
1. Drücken Sie die vorprogrammierte Funktionstaste um einen Notfallalarm zu
senden (Funktionstaste 1, 2 oder 3).
2. Auf dem Display wird „Alarm“ angezeigt. Die Status-LED leuchtet rot und der
Notfall-Modus wird aktiviert.
3. Halten sie das Funkgerät senkrecht und etwa 2,5-3cm vor Ihren Mund.
4. Sobald auf dem Display „Alarm“ angezeigt wird, kann in das Mikrofon des
Funkgerätes gesprochen werden, ohne dass zuvor noch die Sprechtaste (PTT)
betätigt werden muss.
5. Dieser automatische Sendevorgang endet automatisch nach einer
vorgegebenen Zeitspanne.
6. Nun können Sie die Sprechtaste (PTT) betätigen um einen weiteren
Sprachanruf auszulösen. Die Status-LED leuchtet abermals rot. Das
Funkgerät befindet sich im Notfall-Modus. Sie können nun sprechen.
7. Sofern beim Funkgerät die Wiedergabe von Signaltönen komplett deaktiviert
ist, erfolgen im Notfall-Modus weder Sprach- noch Text-Ausgaben bis Sie die
Sprechtaste (PTT) betätigen um einen Ruf auszulösen.
8. Wurde das Funkgerät für „call permit“ programmiert, so erfolgt weder die
Ausgabe von Signaltönen noch speziellen Anzeigen auf dem Display des
Gerufenen bis die vorgegebene Zeitspanne abgelaufen ist. Diese Ausgaben
erfolgen erst dann wieder, wenn zuvor einmalig die Sprechtaste (PTT) betätigt
wurde. Dies passiert in den folgenden zwei Fällen:
Der Notfall-Modus wird beendet, sobald der Funkkanal gewechselt wird.
Durch Auslösen eines Notfallalarms auf dem neuen Funkkanal gelangt
das Funkgerät wieder in den Notfall-Modus.
Befindet sich das Funkgerät im Notfall-Modus und wird die
vorprogrammierte Taste zum Senden eines Notfalls betätigt, so wird der
bisherige Notfallalarm beendet und ein neuer Notfallalarm wird ausgelöst.
Notfall-Modus beenden
Tritt eine der nachfolgenden Bedingungen ein, so wird der Notfall-Modus beendet.
Erfolgt beim Auslösen eines Notfallalarms auch nach mehreren
Wiederholungen seitens der Gegenstelle keine Reaktion, so ertönt ein
Signalton und der Notfall-Modus wird beendet
Betätigung der programmierten Taste zum Ausschalten des Notfall-Modus
löscht den Notfallalarm und beendet dadurch auch den Notfall-Modus.
Ausschalten des Funkgerätes beendet den Notfall-Modus. Das
Wiedereinschalten startet den Notfalll–Modus hingegen nicht wieder neu.
Hinweis
Die Betätigung der Sprechtaste (PTT) beendet den Notfall-Modus nicht.
Seite21von
63

Deutsches Benutzerhandbuch zum Radioddity GD-73 v1.0
Menübedienung
Betätigen Sie die Taste MENU um in das Funktionsmenü zu gelangen.
1.
Anschließend können Sie mittels der Tasten für (Hoch) sowie (Runter)
durch die Untermenüs blättern.
Betätigen Sie abermals die Taste MENU um das angezeigte Untermenü
2.
auszuwählen.
Durch Betätigung der Taste ESC gelangen Sie zurück in das übergeordnete
3.
Menü. Sobald Sie sich im obersten Menü befinden, gelangen Sie durch eine
nochmalige Betätigung der Taste ESC zur normalen Display-Ausgabe
(Frequenz, Kanal).
Kontakte
Die im Funkgerät hinterlegten Kontakte ergeben das Adressbuch Ihres Funkgerätes.
Jeder einzelne Kontakt entspricht einem Namen oder einer ID zu der ein gezielter Ruf
aufgebaut werden kann. Jedem Eintrag wird eine zusätzliche Eigenschaft wie
„Gruppenruf“, „Einzelanruf“ oder „Allgemeiner Anruf“ zugeordnet. Jeder Kontakt
besteht aus folgenden drei Elementen:
1. Name Name des Kontakts
2. ID DMR ID des Kontakts
3. Type Art des Kontakts
Hinweis
Mit der CPS können Sie die Kontakte editieren. Ein Editieren direkt am GD-73 ist nicht
möglich da das Gerät hierzu nicht über die erforderlichen Tasten verfügt.
Gruppenruf eines Kontakts
1. Betätigen Sie die Taste MENU um in das Funktionsmenü zu gelangen.
Anschließend wählen Sie mittels der Tasten sowie das Untermenü
„Contact“ (engl.Kontakt) aus.
2. Wählen Sie mit den Tasten und die gewünschte Gruppe aus. Nutzen Sie
dabei den Gruppennamen der gewünschten Gruppe zur Auswahl.
3. Bestätigen Sie Ihre Auswahl durch erneutes Drücken der Taste MENU.
4. Wählen Sie mit den Tasten und den Untermenüpunkt „select“ aus.
5. Im Display Ihres GD-73 erscheint daraufhin „selected!“.
6. Halten sie das Funkgerät senkrecht und etwa 2,5-5cm vor Ihren Mund.
7. Drücken Sie nun die PTT-Taste um den Ruf zu starten. Die Status-LED
leuchtet rot. Auf der Anzeige wird der Gruppenname oder die Gruppen-ID
sowie das Zeichen für einen ausgehenden Gruppenruf angezeigt,
8. Lassen Sie die PTT-Taste wieder los um wieder auf Empfang umzuschalten.
9. Sobald der Ruf beantwortet wird, wird leuchtet die Status-LED grün.
10. Auf dem Display wird
a. in der erster Zeile „Group Call“,
Seite22von
63

Deutsches Benutzerhandbuch zum Radioddity GD-73 v1.0
b. in der mittleren Zeile der Name der Rufgruppe (Call Group Alias) und
c. in der untersten Zeile die ID des Antwortenden sowie das Zeichen für
einen eingehenden Ruf (Nur in der digitalen Betriebsart)
angezeigt.
11. Sofern die Funktion zur Signalisierung eines freien Kanals (Channel Free
Indication Tone) aktiviert ist, ertönt beim Empfänger ein kurzes Tonsignal,
sobald am Funkgerät des Anrufers die PTT-Taste losgelassen wurde um zu
signalisieren, dass der Funkkanal nun für eine Beantwortung des Anrufs zur
Verfügung steht.
12. Drücken Sie ggfs. abermals die PTT-Taste um zu antworten. Die Status-LED
leuchtet wie gewohnt rot. Sie können nun sprechen.
13. Lassen Sie die PTT-Taste wieder los um wieder auf Empfang umzuschalten.
Wenn nicht innerhalb einer vorbestimmten Zeit eine Antwort zu hören ist, wird
das Gespräch beendet.
14. Nach Beendigung des Gruppenrufes wechselt die Anzeige wieder zurück auf
die vorangegangene Anzeige.
Einzelanruf eines Kontakts
1. Betätigen Sie die Taste MENU um in das Funktionsmenü zu gelangen.
Anschließend wählen Sie mittels der Tasten sowie das Untermenü
„Contact“ (engl. Kontakt) aus.
2. Wählen Sie mit den Tasten und den gewünschten Kontakt aus. Nutzen
Sie dabei den Namen des Kontaktes zur Auswahl.
3. Bestätigen Sie Ihre Auswahl durch erneutes Drücken der Taste MENU.
4. Wählen Sie mit den Tasten und den Untermenüpunkt „select“ aus.
5. Im Display Ihres GD-73 erscheint daraufhin „selected!“.
6. Halten sie das Funkgerät senkrecht und etwa 2,5-5cm vor Ihren Mund.
7. Drücken Sie nun die PTT-Taste um den Ruf zu starten. Die Status-LED
leuchtet rot. Auf der Anzeige wird der Gruppenname oder die Gruppen-ID
sowie das Zeichen für einen ausgehenden Gruppenruf angezeigt,
8. Lassen Sie die PTT-Taste wieder los um wieder auf Empfang umzuschalten.
9. Sobald der Ruf beantwortet wird, wird leuchtet die Status-LED grün.
10. Auf dem Display wird
a. in der erster Zeile „Single Call“,
b. in der mittleren Zeile der Name des Kontakts und
c. in der untersten Zeile die ID des angerufenen Kontakts sowie das
Zeichen für einen ausgehenden Ruf (Nur in der digitalen Betriebsart)
angezeigt.
11. Sofern die Funktion zur Signalisierung eines freien Kanals (Channel Free
Indication Tone) aktiviert ist, ertönt beim Empfänger ein kurzes Tonsignal,
sobald am Funkgerät des Anrufers die PTT-Taste losgelassen wurde um zu
signalisieren, dass der Funkkanal nun für eine Beantwortung des Anrufs zur
Verfügung steht.
12. Drücken Sie ggfs. abermals die PTT-Taste um zu antworten. Die Status-LED
leuchtet wie gewohnt rot. Sie können nun wieder sprechen.
Seite23von
63

Deutsches Benutzerhandbuch zum Radioddity GD-73 v1.0
13. Lassen Sie die PTT-Taste wieder los um wieder auf Empfang umzuschalten.
Wenn nicht innerhalb einer vorbestimmten Zeit eine Antwort zu hören ist, wird
das Gespräch beendet.
14. Nach Beendigung des Einzelanrufs wechselt die Anzeige wieder zurück auf
die vorangegangene Anzeige.
Rufjournal
Das Funkgerät protokolliert alle seit dem letzten Einschalten des Gerätes zuletzt
gewählten, empfangenen und nicht angenommenen Rufe im Rufjournal.
Überprüfen der IDs neuer Anrufe
Es werden angenommene (ReceCall), verpasste (MissCall) sowie selbst getätigte
Anrufe (CallNumb)protokolliert.
1. Betätigen Sie die Taste MENU um in das Funktionsmenü zu gelangen.
Anschließend wählen Sie mittels der Tasten sowie das Untermenü „Call
Log“ (engl.Rufjournal) aus.
2. Bestätigen Sie die Auswahl des Untermenüs durch Betätigen der Taste
MENU.
3. Wählen Sie mit den Tasten und nun die gewünschte Liste aus und
bestätigen Sie die Auswahl mit der Taste MENU.
4. Der letzte Eintrag wird nunmehr in der obersten Zeile des Displays angezeigt.
5. Mit den Tasten und können Sie durch die bis zu 32 Einträge der Liste
blättern.
Anzeigen des Namens oder der ID verpasster Anrufe
Immer, wenn Sie einen eingehenden Anruf verpasst haben wird dies durch einen
entsprechenden Hinweis auf dem Display des Funkgerätes signalisiert. Sie können in
einem solchen Fall die ID des verpassten Anrufs sofort („view“) oder später („view
later“) anzeigen lassen.
1. Drücken Sie die Taste MENU um in das Funktionsmenü zu gelangen.
2. Anschließend wählen Sie mittels der Tasten sowie das Untermenü „Call
Log“ (engl.Rufjournal) aus und bestätigen Sie die Auswahl des Untermenüs
durch Betätigen der Taste MENU.
3. Wählen Sie nun mittels der Tasten sowie das entsprechende Rufjournal
aus und bestätigen Sie Ihre Auswahl durch Betätigen der Taste MENU.
4. Auf dem Display wird nun der älteste Eintrag an erster Stelle angezeigt.
5. Wählen Sie nun mittels der Tasten sowie einen Eintrag aus der Liste aus.
6. Durch anschließendes Betätigen der Taste MENU werden Ihnen die Details
(ID, Type, Zeit, sowie Datum)Time, Day) zu diesem Eintrag angezeigt.
7. Alternativ können Sie nach Auswahl eines Eintrags auch die Sprechtaste (PTT)
betätigen um einen Anruf zu dem ausgewählten Kontakt oder der
ausgewählten Gruppe zu initiieren.
Seite24von
63

Deutsches Benutzerhandbuch zum Radioddity GD-73 v1.0
Hinweis
Wenn Sie während des Anzeigens eines verpassten Anrufes die PTT-Taste betätigen,
so wird das Menü für verpasste Anrufe verlassen und ein ausgehender Einzelanruf
ausgelöst.
Über das normale Menü kann das Journal für angenommene, ausgehende sowie
verpasste Anrufe ebenfalls bearbeitet werden. Es stehen Optionen zum Ansehen
(„View“), Hinzufügen zum Adressbuch („Add Contact“) sowie Löschen einzelner
(„Delete“) sowie Löschen aller („Delete all“) Einträge zur Verfügung.
Löschen eines Rufjournals
Um eines der Rufjournale zu löschen gehen Sie folgendermaßen vor:
1. Betätigen Sie die Taste MENU um in das Funktionsmenü zu gelangen.
Anschließend wählen Sie mittels der Tasten sowie das Untermenü „Call
Log“ (engl.Rufjournal) aus und bestätigen Sie die Auswahl des Untermenüs
durch Betätigen der Taste MENU.
2. Wählen Sie mit den Tasten und nun den Untermenüpunkt „DelLogs“ aus
und bestätigen Sie die Auswahl wiederum mit der Taste MENU.
3. Anschließend wählen Sie mit den Tasten und die zu löschende Liste aus
und bestätigen Sie die Auswahl abermals mit der Taste MENU.
4. Die zuvor gewählte Liste wird nun gelöscht.
5. Nachdem die Liste gelöscht wurde erscheint auf dem LC-Display „deleted!“.
Kurznachrichtenfunktionen
Ihr Funkgerät kann auch Daten in Form von Kurznachrichten mit einer maximalen
Länge von jeweils 144 Zeichen senden als auch empfangen. Komplette Nachrichten
sind nicht länger als 50 Zeilen.
Senden einer vorbereiteten Kurznachricht
Navigieren Sie hierzu im Menü
1. Betätigen Sie die Taste MENU um in das Funktionsmenü zu gelangen.
2. Wählen Sie nun mittels der Tasten sowie das Untermenü „Msg“ (engl.
Nachricht) aus und bestätigen Sie die Auswahl des Untermenüs durch
Betätigen der Taste MENU.
3. Anschließend wählen Sie mit den Tasten und den Untermenüpunkt
„CommMsg“ aus und bestätigen Sie die Auswahl wiederum mit der Taste
MENU.
4. Wählen Sie nun einer der zuvor mit der CPS vorbereiteten Nachrichten aus
5. Anschließen wählen Sie aus der Liste der Kontakte den Empfängerkontakt
aus und bestätigen Sie die Auswahl wie gewohnt mit der Taste MENU.
6. Die Nachricht wird nun über den eingestellten Digitalkanal an die Gegenstelle
übertragen
Seite25von
63

Deutsches Benutzerhandbuch zum Radioddity GD-73 v1.0
7. Auf dem Display Ihres GD-73 erscheint daraufhin die Ausgabe “sent OK“.
Lesen einer empfangenen Kurznachricht
Navigieren Sie hierzu im Menü
1. Betätigen Sie die Taste MENU um in das Funktionsmenü zu gelangen.
2. Wählen Sie nun mittels der Tasten sowie das Untermenü „Msg“ (engl.
Nachricht) aus und bestätigen Sie die Auswahl des Untermenüs durch
Betätigen der Taste MENU.
3. Anschließend wählen Sie mit den Tasten und den Untermenüpunkt
„Inbox“ aus und bestätigen Sie die Auswahl wiederum mit der Taste MENU.
4. Wählen Sie nun mit den Tasten und eine der empfangenen
Kurznachrichten aus. Bereits gelesene Kurznachrichten werden mit einem
offenen Briefumschlag, ungelesene Kurznachrichten mit einem noch
verschlossenen Briefumschlag vor der DMR ID des Senders angezeigt.
Bestätigen Sie die Auswahl wie gewohnt mit der Taste MENU.
5. Auf dem Display Ihres GD-73 wird nun die empfangene Kurznachricht
angezeigt.
Hinweis
Sobald Ihr GD-73 eine neue Kurznachricht empfängt, wird in der oberen Zeile des
Displays - zwischen den Symbolen für die Ausgangsleistung („H“ oder „L“) und die
Betriebsart „D“ - das Symbol eines geschlossenen Briefumschlages angezeigt.
Lesen einer bereits gesendeten Kurznachricht
Navigieren Sie hierzu im Menü
1. Betätigen Sie die Taste MENU um in das Funktionsmenü zu gelangen.
2. Wählen Sie nun mittels der Tasten sowie das Untermenü „Msg“ (engl.
Nachricht) aus und bestätigen Sie die Auswahl des Untermenüs durch
Betätigen der Taste MENU.
3. Anschließend wählen Sie mit den Tasten und den Untermenüpunkt
„Outbox“ aus und bestätigen Sie die Auswahl wiederum mit der Taste MENU.
4. Wählen Sie nun mit den Tasten und eine der bereits gesendeten
Kurznachrichten anhand der angezeigten DMR ID des Empfängers aus.
Bestätigen Sie die Auswahl wie gewohnt mit der Taste MENU.
5. Auf dem Display Ihres GD-73 wird nun die gesendete Kurznachricht
angezeigt.
Seite26von
63

Deutsches Benutzerhandbuch zum Radioddity GD-73 v1.0
Löschen von Kurznachrichten
Navigieren Sie hierzu im Menü
1. Betätigen Sie die Taste MENU um in das Funktionsmenü zu gelangen.
2. Wählen Sie nun mittels der Tasten sowie das Untermenü „Msg“ (engl.
Nachricht) aus und bestätigen Sie die Auswahl des Untermenüs durch
Betätigen der Taste MENU.
3. Anschließend wählen Sie mit den Tasten und den Untermenüpunkt
„DelMsg“ aus und bestätigen Sie die Auswahl wiederum mit der Taste MENU.
4. Wählen Sie nun mit den Tasten und einen entweder den
Nachrichtenspeicher für eingegangene Nachrichten, „Inbox“ oder den für
gesendete Nachrichten, „Outbox“ aus. Bestätigen Sie die Auswahl wie
gewohnt mit der Taste MENU.
5. Auf dem Display Ihres GD-73 erscheint anschließend „Deleted!“.
Hinweis
Das Bearbeiten von Nachrichten ist nur mit der CPS möglich.
Senden einer Kurznachricht mit nur einem Tastendruck
1. Drücken Sie die entsprechend programmierte Taste, um eine vorbereitete
Kurznachricht an einen bestimmten Benutzer zu senden.
2. Auf dem Display erscheint nun der Hinweis „Msg Sending…“
3. Sobald die Kurznachricht gesendet wurde, wird auf dem Display nochmals der
durch die programmierte Taste vorgegebene Empfänger angezeigt.
4. War der Sendevorgang erfolgreich, so wird dies mit einem kurzen Ton
signalisiert. Zusätzlich erscheint auf dem Display der Text „Message sent
successfully“. War der Sendevorgang hingegen nicht erfolgreich, so erscheint
auf dem Display der Hinweis „Message Send Fail“ und es besteht die
Möglichkeit den Kurznachrichtenversand zu wiederholen.
Verwaltung von Kurznachrichten
Nachdem ihre Kurznachricht gesendet wurde, wird diese Kurznachricht in der Outbox
(engl. Nachrichtenausgang) gespeichert. Die zuletzt gesendete Kurznachricht steht
stets am Anfang der Liste. Es werden die jeweils 16 letzten Kurznachrichten
vorgehalten. Ältere Kurznachrichten werden dabei automatisch gelöscht.
Ebenso verhält es sich bei empfangenen Nachrichten.
Verschlüsselung
Durch Aktiviren der Verschlüsselung wird sichergestellt, dass andere Benutzer, die
sich auf dem Kanal befinden die Aussendungen nicht abhören können. Ermöglicht
wird dies durch eine spezielle Softwareverschlüsselung des Digitalsignals. Der
Rufaufbau erfolgt hingegen unverschlüsselt. Ihr Funkgerät muss auf dem Kanal
verschlüsselt sein, damit Sie verschlüsselte Übertragungen senden können, auch
Seite27von
63

Deutsches Benutzerhandbuch zum Radioddity GD-73 v1.0
wenn es nicht unbedingt zum Empfangen von unverschlüsseltenb Signalen
erforderlich ist.
Grundverschlüsselung
Um einen verschlüsselten Anruf oder eine Datenübertragung zu entschlüsseln,
müssen senden und empfangendes Funkgerät den gleichen "Verschlüsselungscode"
aufweisen (für Grundverschlüsselung).
Die Verschlüsselung wird mit der CPS aktiviert/deaktiviert.
Hinweis
Es kann sein, dass der von Ihnen genutzte Frequenzbereich nicht für eine
Verschlüsselung von Übertragungen freigegeben ist. Signale von
Amateurfunkstationen dürfen beispielsweise nicht verschlüsselt werden.
DTMF
Die DTMF-Funktion (Dual Tone Multi Frequency) ermöglicht den Betrieb von
Funkgeräten trotz Störungen auf einem Funkkanal. Weisen Sie hierzu mittels der
CPS der Betätigung der Sprechtaste eine zusätzliche DTMF-Signalisierung zu.
Initiieren eines DTMF-Anrufes
Wie gewohnt wird ein Anruf durch die Betätigung der Sprechtaste initiiert. Nun wird
jedoch zunächst eine DTMF-Tonfolge ausgesandt um sich bei der Gegenstelle
entsprechend zu autorisieren bevor diese das empfangene Signal auf dem
Lautsprecher des Gerätes ausgibt.
Sicherheit
Es ist möglich einzelne Funkgeräte zu aktivieren als auch zu deaktivieren. Damit ist
es beispielsweise möglich, ein gestohlenes Funkgerät für weitere Benutzung zu
sperren und es wieder zu entsperren, wenn Sie es zurückerhalten haben.
Die Verfügbarkeit dieser Funktion ist abhängig von der durch die CPS
vorgenommenen Einstellung des Funkgerätes.
Funkgerät deaktivieren
Zuvor müssen mit Hilfe der CPS auf beiden Geräten die entsprechenden
Einstellungen hinterlegt werden. Anschließend können Sie die programmierte
Funktionstaste nutzen um das Signal für die Sperrung des anderen Funkgerätes
auszusenden.
Seite28von
63

Deutsches Benutzerhandbuch zum Radioddity GD-73 v1.0
Funkgerät aktivieren
Für die Nutzung dieser Funktion müssen in gleicherweise wie zuvor beschriebven mit
Hilfe der CPS auf beiden Geräten die entsprechenden Einstellungen hinterlegt
werden. Anschließend können Sie die programmierte Funktionstaste nutzen um das
Signal für die Entsdperrung des anderen Funkgerätes auszusenden.
Scanliste
Eine Scanliste kann verschiedene Kanäle sowie Talkgroups enthalten. Ihr Funkgerät
kann bis zu 16 Scan-Listen und bis zu 30 Mitglieder pro Liste unterstützen. Jede
Scanliste unterstützt einen Mix aus analogen und digitalen Kanälen. Sie können
Kanäle hinzufügen/löschen oder Kanäle priorisieren, indem Sie die Scanliste
bearbeiten. Erstellen Sie mit der CPS eine Scanliste und ordnen Sie sie einer
einzelnen Kanal-/Gesprächsgruppe zu.
Scan-Arten
Wenn der Scan gestartet wird, überprüft Ihr Funkgerät den aktuellen Kanal auf
Sprachaktivität, indem es durch die vorprogrammierte Scan-Liste blättert. Es wird
zwischen zwei Scan-Methoden unterschieden:
Manueller Scan
Startet/beendet den Scanvorgang bei Betätigung der vorprogrammierten
Funktionstaste „Scan On/Off“. Das Funkgerät erkennt dabei automatisch alle
programmierten Gruppen und IDs.
Automatischer Scan
Wenn Sie einen Kanal/Talkgroup auswählen, bei dem zuvor mit der CPS die
automatische Suche aktiviert wurde, so startet das Funkgerät den
Scanvorgang von dem Kanal, bei dem die automatische Suche aktiviert ist
Start/Stop der Scan-Funktion
Mit der CPS kann eine der beiden Funktionstasten zum Ein- sowie Ausschalten
(„Scan On/Off“) der Scanfunktion belegt werden.
Dennoch stehen zwei Möglichkeiten zur Verfügung um den Scanvorgang auszulösen:
1. Wählen Sie mittels der Tasten sowie den Kanal dem zuvor mit der CPS
die Scanliste zugewiesen wurde.
2. Drücken Sie die mit der CPS vorprogrammierte „Scan On/Off“ –Taste um den
Scanvorgang zu starten oder zu stoppen.
Wenn der Scanvorgang aktiviert wurde, wird die Frequenz/Kanalname des aktuell
empfangene Kanals sowie seine Kanaleigenschaften (analog, digital sowie
Ausgangsleistung) angezeigt.
Seite29von
63

Deutsches Benutzerhandbuch zum Radioddity GD-73 v1.0
Erfolgreicher Scan
Wenn das Funkgerät beim Scannen einen aktiven Kanal/Gesprächsgruppe erkennt,
verweilt das Funkgerät auf dem Kanal/Talkgroup für die mit der CPS eingestellte
Zeitdauer.
Ablauf:
1. Halten Sie das Funkgerät in einer vertikalen Position mit einem Abstand von
2,5 bis 5,0 cm vom Mund. Wenn die Funktion "Channel Idle Tone" aktiviert ist
und die Gegenstelle die Sprechtaste loslässt, hören Sie einen kurzen Piepton,
der anzeigt, dass der Kanal frei ist und Sie nun antworten können.
2. Drücken Sie die Sprechtaste bevor die mit der CPS eingestellte Zeitspanne
abgelaufen ist. Die Status-LED leuchtet rot.
3. Lassen Sie die Sprechtaste wieder los, so dass die Gegenstelle antworten
kann.
4. Wenn Sie nicht innerhalb der voreingestellten Zeit antworten, wird der
Scanvorgang automatisch fortgesetzt.
Einstellungen
Über die Funktion „Settings“ (engl. Einstellungen) lassen sich unterschiedlichste
Parameter festlegen. Einige der Einstellungen sind global, andere hingegen beziehen
sich auf den jeweils gewählten Funkkanal und bleiben auch nach dem Ausschalten
des Funkgerätes erhalten.
Informationen zum Funkgerät
Über das Funktionsmenü “Local” kann die ID des Funkgerätes sowie detaillierte
Informationen zur Hard- und Software des Funkgerätes ausgelesen werden.
Navigieren Sie hierzu im Menü
1. Betätigen Sie die Taste MENU um in das Funktionsmenü zu gelangen.
2. Wählen Sie nun mittels der Tasten sowie das Untermenü „Settings“ aus
und bestätigen Sie die Auswahl des Untermenüs durch Betätigen der Taste
MENU.
3. Anschließend wählen Sie mit den Tasten und den Untermenüpunkt
„Local“ aus und bestätigen Sie die Auswahl wiederum mit der Taste MENU.
4. Auf dem Display Ihres GD-73 werden nun folgende Informationen zu Ihrem
Funkgerät angezeigt:
ID DMR ID des Funkgerätes (läßt sich nur mit der CPS einstellen)
Model GD-73
Versions Version der installierten Firmware
5. Betätigen Sie anschließend die Taste ESC um zur Hauptanzeige zu gelangen
oder warten Sie etwa 10 Sekunden.
Seite30von
63

Deutsches Benutzerhandbuch zum Radioddity GD-73 v1.0
Hinweis
Im Digitalbetrieb wird das Funkgerät an Hand seiner ID identifiziert. Bitte beachten Sie,
dass die unrechtmäßige Nutzung einer ID (wie beispielsweise einer Amateurfunk
DMR ID) ggfs. strafrechtliche Folgen nach sich ziehen kann.
Details zum eingestellten Funkkanal
Analog- als auch Digitalkanäle sind durch Send- und Empfangsfrequenz sowie
Kanalname gekennzeichnet. Bei Digitalkanälen kommen noch der sogenannte Color
Code (engl. Farbkode) sowie der zu verwendende Timeslot (engl. Zeitschlitz) hinzu.
All diese Einstellungen beziehen sich ausschließlich auf den zuvor ausgewählten
Kanal.
TalkAround
Mit der Talkaround-Funktion (engl. Umhersprechen) ist es möglich auch außerhalb
des Empfangsbereichs eines Repeaters mit anderen Funkstationen über eine direkte
Funkverbindung zu kommunizieren. Dabei sendet das eigene Funkgerät auf der
„Ausgabefrequenz“ des außer Reichweite befindlichen Repeaters und empfängt
dementsprechend auf der „Eingabefrequenz“ des Repeaters.
Über das Funktionsmenü:
1. Betätigen Sie die Taste MENU um in das Funktionsmenü zu gelangen.
2. Anschließend wählen Sie mittels der Tasten sowie das Untermenü
„Settings“ (engl. Einstellungen) aus und bestätigen die Auswahl durch
Betätigen der Taste MENU.
3. Wählen Sie anschließend mit den Tasten und das Untermenü
„Channel“ (engl. Kanal) aus und bestätigen Sie diese mit der Taste MENU.
4. Wählen Sie anschließend mit den Tasten und die Option
„Talkaround“ aus und bestätigen Sie die Auswahl wiederum mit der Taste
MENU.
5. Nun wählen Sie mit den Tasten und eine der beiden Optionen
„OFF“ (engl. Aus) oder „ON“ (engl ein) aus und bestätigen diese mit der Taste
MENU.
6. Betätigen Sie abschließend mehrfach die Taste ESC um zur Hauptanzeige zu
gelangen oder warten Sie etwa 10 Sekunden.
Mit der CPS kann das Ein/Ausschalten der Talkaround-Funktion einer der beiden
vorhandenen Funktionstasten zugewiesen werden.
Hinweis
Das Funkgerät behält die gewählte Einstellung auch nach dem Ausschalten.
Seite31von
63

Deutsches Benutzerhandbuch zum Radioddity GD-73 v1.0
TOT
Mit aktivierter TOT-Funktion (Time out timer) können Sie für das Senden eine
Zeitbegrenzung zwischen 30 und 500 Sekunden festlegen. Die Einstellung erfolgt in
10 Sekunden-Schritten. Diese Funktion bietet eine Art Sicherheitsschalter, der die
Übertragungszeit auf den programmierten Wert begrenzt. Dies schont zudem den
Akku, da Sie keine übermäßig langen Übertragungen durchführen können. Im Falle
einer verklemmten Sprechtaste werden dadurch Störungen anderer Benutzer sowie
eine Entladung des Akkus verhindert. Ein Sendevorgang wird dadurch spätestens
nach der voreingestellten Zeitdauer (zwischen 30 und 500 Sekunden) beendet.
Über das Funktionsmenü:
1. Betätigen Sie die Taste MENU um in das Funktionsmenü zu gelangen.
2. Anschließend wählen Sie mittels der Tasten sowie das Untermenü
„Settings“ (engl. Einstellungen) aus und bestätigen die Auswahl durch
Betätigen der Taste MENU.
3. Wählen Sie anschließend mit den Tasten und das Untermenü
„Channel“ (engl. Kanal) aus und bestätigen Sie diese mit der Taste MENU.
4. Wählen Sie anschließend mit den Tasten und die Option „TOT“ aus und
bestätigen Sie die Auswahl wiederum mit der Taste MENU.
5. Nun können Sie mit den Tasten und zwischen der Optionen „off“ (engl.
ausgeschaltet) sowie dem gewünschten Zeitraum (in 10 Sekunden-Schritten)
wählen.
6. Anschließend bestätigen Sie die gewünschte Option mit der Taste MENU.
7. Auf dem Display erscheint kurz „OK!“
8. Betätigen Sie abschließend mehrfach die Taste ESC um zur Hauptanzeige zu
gelangen oder warten Sie etwa 10 Sekunden.
Hinweis
Die Auswahl von „off“ deaktiviert die TOT-Funktion.
Sendeleistung einstellen
Die Ausgangsleistung kann für jeden Kanal zwischen „High“ mit 2 W und „Low“ mit
500mW umgeschaltet werden. Für nahe gelegene Funkstationen sollte die
Einstellung „Low“ gewählt werden. Weiter entfernt gelegene Stationen hingegen
können durch die Einstellung „High“ eventuell besser erreicht werden.
Mit der durch die PC-Software festgelegten Funktionstaste kann zwischen „High“ und
„Low“ gewechselt werden.
Über das Funktionsmenü:
1. Betätigen Sie die Taste MENU um in das Funktionsmenü zu gelangen.
2. Anschließend wählen Sie mittels der Tasten sowie das Untermenü
„Settings“ (engl. Einstellungen) aus und bestätigen die Auswahl durch
Betätigen der Taste MENU.
3. Wählen Sie anschließend mit den Tasten und das Untermenü
„Channel“ (engl. Kanal) aus und bestätigen Sie diese mit der Taste MENU.
Seite32von
63

Deutsches Benutzerhandbuch zum Radioddity GD-73 v1.0
4. Wählen Sie anschließend mit den Tasten und die Option „Power“ aus
und bestätigen Sie die Auswahl wiederum mit der Taste MENU.
5. Nun wählen Sie mit den Tasten und eine der beiden Optionen „Low
power“ (engl. Niedrige Ausgangsleistung) oder „High power“ (engl. Hohe
Ausgangsleistung) aus und bestätigen diese mit der Taste MENU.
6. Betätigen Sie abschließend mehrfach die Taste ESC um zur Hauptanzeige zu
gelangen oder warten Sie etwa 10 Sekunden.
Hinweis
Die PMR-Version des GD-73 verfügt nicht über diese Option da dieses Gerät
grundsätzlich mit einer maximalen Ausgangsleistung von 500mW arbeitet.
Slot
Im Digitalbetrieb ist es möglich auf einem Kanal gleichzeitig und unabhängig
voneinander zwei Funkgespräche zu übertragen. Zur Differenzierung der beiden
Funkgespräche dient der Timeslot (engl. Zeitschlitz).
Über das Funktionsmenü:
1. Betätigen Sie die Taste MENU um in das Funktionsmenü zu gelangen.
2. Anschließend wählen Sie mittels der Tasten sowie das Untermenü
„Settings“ (engl. Einstellungen) aus und bestätigen die Auswahl durch
Betätigen der Taste MENU.
3. Wählen Sie anschließend mit den Tasten und das Untermenü
„Channel“ (engl. Kanal) aus und bestätigen Sie diese mit der Taste MENU.
4. Wählen Sie anschließend mit den Tasten und die Option „Slot“ aus und
bestätigen Sie die Auswahl wiederum mit der Taste MENU.
5. Nun wählen Sie mit den Tasten und eine der beiden Optionen „slot
1“ oder „slot 2“ aus und bestätigen Ihre Auswahl mit der Taste MENU.
6. Betätigen Sie abschließend mehrfach die Taste ESC um zur Hauptanzeige zu
gelangen oder warten Sie etwa 10 Sekunden.
CC
Der Color Code (teilweise auch Systemcode genannt) dient zur Unterscheidung von
DMR-Relais deren Einzugsbereich sich überschneidet. Es sind Werte von 0 bis 15
zulässig. Der Standardwert ist 1.
Über das Funktionsmenü:
1. Betätigen Sie die Taste MENU um in das Funktionsmenü zu gelangen.
2. Anschließend wählen Sie mittels der Tasten sowie das Untermenü
„Settings“ (engl. Einstellungen) aus und bestätigen die Auswahl durch
Betätigen der Taste MENU.
3. Wählen Sie anschließend mit den Tasten und das Untermenü
„Channel“ (engl. Kanal) aus und bestätigen Sie diese mit der Taste MENU.
4. Wählen Sie anschließend mit den Tasten und die Option „Slot“ aus und
bestätigen Sie die Auswahl wiederum mit der Taste MENU.
5. Anschließend wählen Sie mit den Tasten und einen Wert zwischen 0 und
15 aus und bestätigen die Auswahl wie gewohnt mit der Taste MENU.
Seite33von
63

Deutsches Benutzerhandbuch zum Radioddity GD-73 v1.0
6. Betätigen Sie abschließend mehrfach die Taste ESC um zur Hauptanzeige zu
gelangen oder warten Sie etwa 10 Sekunden.
GroupList
Die Empfangsgruppe legt fest, welche Gruppen aus der Liste der Kontakte auf dem
eingestellten Kanal empfangen werden können. Die entsprechenden Gruppen
müssen zuvor mit der CPS entsprechend definiert worden sein.
Über das Funktionsmenü:
1. Betätigen Sie die Taste MENU um in das Funktionsmenü zu gelangen.
2. Anschließend wählen Sie mittels der Tasten sowie das Untermenü
„Settings“ (engl. Einstellungen) aus und bestätigen die Auswahl durch
Betätigen der Taste MENU.
3. Wählen Sie anschließend mit den Tasten und das Untermenü
„Channel“ (engl. Kanal) aus und bestätigen Sie diese mit der Taste MENU.
4. Wählen Sie anschließend mit den Tasten und die Option „GroupList“ aus
und bestätigen Sie die Auswahl wiederum mit der Taste MENU.
5. Anschließend wählen Sie mit den Tasten und zwischen „None“, „Not
Match“ sowie einer der durch die CPS zurvor definierten Gruppen aus und
bestätigen die Auswahl wie gewohnt mit der Taste MENU.
6. Betätigen Sie abschließend mehrfach die Taste ESC um zur Hauptanzeige zu
gelangen oder warten Sie etwa 10 Sekunden.
SQ
Durch die Rauschsperre (engl. Squelch Level) können schwache Analogsignale, oder
Analogkanäle mit starken Hintergrundgeräuschen ausgefiltert werden. Der
Rauschpegel bestimmt mit Werten von 0 bis 9 die Signalstärke, bei der das
empfangene Signal über den Lautsprecher zu hören ist. Wenn der Rauschpegel
niedrig ist, sind weiter entfernte Sender eher zu hören, als bei einem höheren
Pegelwert. Jedoch ist das empfangene Signal von weit entfernten Stationen in der
Regel nicht so klar und deutlich zu hören.
Die Standardeinstellung der Rauschsperre ist 3. „0“ ist ansonsten die niedrigste Stufe
(Die Rauschsperre ist in diesem Fall deaktiviert). Dies hat zur Folge, dass Sie
unabhängig vom gewählten Analogkanal immer dann ein Rauschen aus dem
Lautsprecher hören würden, wenn kein anderes Funkgerät sendet. Die Akkulaufzeit
wird dadurch deutlich reduziert. Im Gegensatz dazu ist „9“ die höchste Stufe. Diese
sollte nur dann verwendet werden, wenn die zu empfangende Station sich immer in
unmittelbarer Nähe befindet und dadurch das empfangene Signal entsprechend stark
ist.
Über das Funktionsmenü:
1. Betätigen Sie die Taste MENU um in das Funktionsmenü zu gelangen.
2. Anschließend wählen Sie mittels der Tasten sowie das Untermenü
„Settings“ (engl. Einstellungen) aus und bestätigen die Auswahl durch
Betätigen der Taste MENU.
Seite34von
63

Deutsches Benutzerhandbuch zum Radioddity GD-73 v1.0
CTCSS
62,5
67,0
69,3
71,9
74,4
77,0
79,7
82,5
85,4
88,5
91,5
94,8
97,4
100,0
103,5
107,2
110,9
114,8
118,8
123,0
127,3
131,8
136,5
141,3
146,2
151,4
156,7
159,8
162,2
165,5
167,9
171,3
173,8
177,3
179,9
183,5
186,2
189,9
192,8
196,6
199,5
203,5
206,5
210,7
218,1
225,7
229,1
233,6
241,8
250,3
254,1
3. Wählen Sie anschließend mit den Tasten und das Untermenü
„Channel“ (engl. Kanal) aus und bestätigen Sie diese mit der Taste MENU.
4. Wählen Sie anschließend mit den Tasten und die Option „SQ“ aus und
bestätigen Sie die Auswahl wiederum mit der Taste MENU.
5. Anschließend wählen Sie mit den Tasten und einen Wert zwischen „0“,
„1“, „2“, …“9“ aus und bestätigen die Auswahl wie gewohnt mit der Taste
MENU.
6. Auf der LC-Anzeige wird kurz „OK!“ angezeigt bevor Sie wieder automatisch
zur Hauptanzeige geleitet werden.
Hinweis
Eine Rauschsperre ist nur für Analogkanäle verfügbar.
SubCode
Bei CTCSS/ DCS handelt es sich um eine Signalisierungsart unter Verwendung von
Tönen im nicht hörbaren Frequenzbereich (sogenannte Subaudio-Töne). Damit wird
verhindert, dass das Funkgerät unerwünschte Signale auf der gleichen Frequenz
hörbar macht. Wenn CTCSS/DCS eingestellt ist, können Sie innerhalb des
Empfangsbereichs nur Signale von derselben Frequenz mit identischen CTCSS/DCS
-Einstellung hören. Wenn CTCSS/DCS hingegen ausgeschaltet ist, empfangen Sie
alle Signale der gewählten Empfangsfrequenz innerhalb des Empfangsbereichs.
Normalerweise wird, abhängig von der Empfindlichkeit der Rauschsperre (siehe
vorherigen Abschnitt) ein Funksignal bei erkanntem Träger (English carrier) hörbar
gemacht. Es stehen jedoch auch noch die Typen CTCSS, DCS sowie invertiertes
DCS zur Verfügung. CTCSS (Continuous Tone-Coded Squelch System) und DCS
(Digital-Coded Squelch) sind nur verschiedene Namen für die gleiche
Funktionsweise.
Hinweis
Die Aussendung von Subaudio-Tönen ist nur bei analogen Kanälen möglich.
CTCSS
Die Funktion CTCSS erlaubt das gezielte Auswählen eines Funkgerätes und wird
beispielsweise oft zum Öffnen eines Repeaters genutzt. Mittels CTCSS werden beim
GD-73 so bis zu 51 Gruppen oder Einzelgeräte unterstützt.
Alle Frequenzangaben in Hz
Seite35von
63

Deutsches Benutzerhandbuch zum Radioddity GD-73 v1.0
DCS
172325263132364347
50
5153546571727374114
115
116
122
125
131
132
134
143
145
152
155
156
162
165
172
174
205
212
223
225
226
243
244
245
246
251
252
255
261
263
265
266
271
274
306
311
315
325
331
332
343
346
351
356
364
365
371
411
412
413
423
431
432
445
446
452
454
455
462
464
465
466
503
506
516
523
526
532
546
565
606
612
624
627
631
632
645
654
662
664
703
712
723
731
732
734
743
754
DCS
DCS unterstützt im Standard bereits 214 (2*107) Gruppen oder Einzelgeräte. Die
entsprechenden Einstellungen können sowohl mit der PC-Software, als auch am
Funkgerät selbst vorgenommen werden. Bei DCS wird zudem zwischen normalem
DCS sowie invertiertem DCS unterschieden.
Alle Frequenzangaben in Hz
Durch diese gezielte Auswahl der Empfangsstation wird bei analoger Betriebsart
somit sichergestellt, dass das Empfangssignal auf der Funkstation nur dann zu hören
ist, wenn ein Trägersignal sowie das entsprechende CTCSS/DCS -Signal vorhanden
ist.
Über das Funktionsmenü:
1. Betätigen Sie die Taste MENU um in das Funktionsmenü zu gelangen.
2. Anschließend wählen Sie mittels der Tasten sowie das Untermenü
„Settings“ (engl. Einstellungen) aus und bestätigen die Auswahl durch
Betätigen der Taste MENU.
3. Wählen Sie anschließend mit den Tasten und das Untermenü
„Channel“ (engl. Kanal) aus und bestätigen Sie diese mit der Taste MENU.
4. Wählen Sie anschließend mit den Tasten und die Option „SubCode“ aus
und bestätigen Sie die Auswahl wiederum mit der Taste MENU.
5. Anschließend wählen Sie mit den Tasten und zwischen „RX Type“ (um
den Subaudio-Code für den Empfangsvorgang festzulegen) sowie
„TX-Type“ (um den Subaudio-Code für den Sendevorgang festzulegen) aus
und bestätigen die Auswahl wie gewohnt mit der Taste MENU.
6. Alternativ wählen Sie eine der beiden übrigen Optionen „RX Code“ sowie „TX
Code“ aus um den entsprechenden Subaudio-Code für den Empfangs- oder
Sendevorgang auszuwählen.
Seite36von
63

Deutsches Benutzerhandbuch zum Radioddity GD-73 v1.0
Hinweis
CTCSS und DCS sind Funktionen, die das Öffnen der Rauschsperre verhindern,
wenn die Einstellungen auf Sender- und Empfängerseite nicht übereinstimmen. Diese
müssen in den Funkgeräten, die Sie für die selektive Kommunikation verwenden
möchten, gleich eingestellt sein. Wenn diese nicht in Ihrem Funkgerät eingestellt
sind, hören Sie alle anderen auf der Frequenz sendenden Funkgeräte, also auch
solche, die diese Funktionen eingestellt haben.
Globale Einstellungen
Ausser den Kanalbezogenen Einstellungen gibt es darüber hinaus auch noch diverse
Einstellungen die Kanal-übergreifend gelten. Diese sind im Folgenden beschrieben.
Zone
Bei Ihrem GD-73 werden mittels der CPS mehrere Funkkanäle zu einer Zone
zusammengefasst. In der Praxis hat es sich bewährt, alle Kanäle in einer Zone
zusammenzufassen, die sich auf den selben Repeater beziehen.
Über das Funktionsmenü:
1. Betätigen Sie die Taste MENU um in das Funktionsmenü zu gelangen.
2. Anschließend wählen Sie mittels der Tasten sowie das Untermenü
„Settings“ (engl. Einstellungen) aus und bestätigen die Auswahl durch
Betätigen der Taste MENU.
3. Wählen Sie anschließend mit den Tasten und das Untermenü
„Zone“ aus und bestätigen Sie diese mit der Taste MENU.
4. Wählen Sie anschließend mit den Tasten und eine der verfügbaren
Zones aus und bestätigen Sie die Auswahl wiederum mit der Taste MENU.
5. Betätigen Sie abschließend mehrfach die Taste ESC um zur
Hauptanzeige zu gelangen oder warten Sie etwa 10 Sekunden.
Date&Time
Damit Datum und Uhrzeit von xxxx xxxxx Kurznachrichten korrekt sind, ist es
erforderlich diese Daten im GD-73 Funkgerät zu hinterlegen
Über das Funktionsmenü:
1. Betätigen Sie die Taste MENU um in das Funktionsmenü zu gelangen.
2. Anschließend wählen Sie mittels der Tasten sowie das Untermenü
„Settings“ (engl. Einstellungen) aus und bestätigen die Auswahl durch
Betätigen der Taste MENU.
3. Wählen Sie anschließend mit den Tasten und das Untermenü
„Date&Time“ aus und bestätigen Sie diese mit der Taste MENU.
4. Wählen Sie nun mit den Tasten und eins der Untermenüs „Date“ oder
„Time aus“ aus und bestätigen Sie die Auswahl wie gewohnt mit der Taste
MENU.
Seite37von
63

Deutsches Benutzerhandbuch zum Radioddity GD-73 v1.0
Im Untermenü „Date“ (engl. Datum) können Sie anschließend mit den
Tasten und den für die entsprechende Stelle (Jahr : Monat : Tag)
angezeigten Zahlenwert erhöhen () oder erniedrigen ().. Ein Druck auf
die Taste P1 bewirkt, dass der Cursor zum nächsten Eingabefeld nbach
rechts sprint. Ein Druck auf die Funktionstaste P2 bewirkt, dass der Cursor
zum nächstren Eingabefeld nach links springt. Sobald Sie die Taste MENU
betätigen, werden die vorgenommenen Einstellungen übernommen..
Im Untermenü „Time“ (engl. Uhrzeit) können in vergleichbarer Art und
Weise die aktuelle Uhrzeit eingestellt werden. Auch hier werden die
Einstellungen durch Betätigen der Taste MENU übernommen.
5. Betätigen Sie abschließend mehrfach die Taste ESC um zur Hauptanzeige zu
gelangen oder warten Sie etwa 10 Sekunden.
Tone
Im Gegensatz zu Notfallalarmtönen können hingegen Tastentöne als auch
Quittierungstöne ein- und ausgeschaltet werden.
Über das Funktionsmenü:
6. Betätigen Sie die Taste MENU um in das Funktionsmenü zu gelangen.
7. Anschließend wählen Sie mittels der Tasten sowie das Untermenü
„Settings“ (engl. Einstellungen) aus und bestätigen die Auswahl durch
Betätigen der Taste MENU.
8. Wählen Sie anschließend mit den Tasten und das Untermenü „Tone“ aus
und bestätigen Sie diese mit der Taste MENU.
9. Wählen Sie nun mit den Tasten und eins der Untermenüs „Profiles“,
„KeyPad Tone“ oder „PowerTone“ aus und bestätigen Sie die Auswahl wie
gewohnt mit der Taste MENU.
Im Untermenü „Profiles“ (engl. Profile) können Sie anschließend mit den
Tasten und zwischen den Optionen „General“ (engl. allgemein)
sowie „Silent“ (engl. ruhig) auswählen und Ihre Wahl wiederum mit der
Taste MENU bestätigen.
Im Untermenü „KeyPad Tone“ (engl. Tastaturton) können Sie hingegen mit
den Tasten und zwischen den Optionen „KeyToneON“ (zum
Einschalten der Tastaturtöne) sowie „KeyToneOFF“ (zum Ausschalten der
Tastaturtöne) auswählen und Ihre Wahl ebenfalls mit der Taste MENU
bestätigen
Im Untermenü „PowerTone “können Sie anschließend mit den Tasten
und zwischen den beiden Optionen „PowerToneON“ zum Aktivieren
oder „PowerToneOFF“ zum Deaktivieren der Startmelodie beim
Einschalten des Funkgerätes auswählen und Ihre Wahl wiederum mit der
Taste MENU bestätigen.
10. Betätigen Sie abschließend mehrfach die Taste ESC um zur Hauptanzeige zu
gelangen oder warten Sie etwa 10 Sekunden.
Seite38von
63

Deutsches Benutzerhandbuch zum Radioddity GD-73 v1.0
Others
Im Menü “Others” (engl andere) sind weitere Optionen hinterlegt. Diese beziehen sich
insbesondere auf das Sperren von Tasten, Signaltöne, Anzeigeoptionen sowie die
Hintergrundbeleuchtung der LC-Anzeige.
Tastatursperre
Um versehentliche Tastatureingaben zu vermeiden ist es möglich eine Tastatursperre
einzuschalten. Diese wird etwa 10 Sekunden nach dem letzten Tastendruck aktiv. Um
Sie wieder zu deaktivieren muss lediglich die Funktionstaste „P1“ solange gedrückt
werden, bis auf dem Display die Meldung „Unlocked!“ erscheint. . Die gewählte
Einstellung ist Kanal-übergreifend.
Über das Funktionsmenü:
1. Betätigen Sie die Taste MENU um in das Funktionsmenü zu gelangen.
2. Anschließend wählen Sie mittels der Tasten sowie das Untermenü
„Settings“ (engl. Einstellungen) aus und bestätigen die Auswahl durch
Betätigen der Taste MENU.
3. Wählen Sie anschließend mit den Tasten und das Untermenü
„Others“ aus und bestätigen Sie diese mit der Taste MENU.
4. Wählen Sie anschließend mit den Tasten und eine die Option
„LockKey“ aus und bestätigen Sie die Auswahl wie gewohnt mit der Taste
MENU.
5. Wählen Sie anschließend mit den Tasten und eine der beiden Optionen
„Keylock ON“ (engl. Tastatursperre eingeschaltet) oder „Keylock OFF“ (engl
Tastatursperre ausgeschaltet) aus und bestätigen die selektierte Option
anschließend wie gewohnt mit der Taste MENU.
6. Betätigen Sie abschließend mehrfach die Taste ESC um zur Hauptanzeige zu
gelangen oder warten Sie etwa 10 Sekunden.
Hintergrundbeleuchtung
Die Hintergrundbeleuchtung läßt sich nach Belieben ein- und ausschalten. Die
gewählte Einstellung ist Kanal-übergreifend.
Über das Funktionsmenü:
1. Betätigen Sie die Taste MENU um in das Funktionsmenü zu gelangen.
2. Anschließend wählen Sie mittels der Tasten sowie das Untermenü
„Settings“ (engl. Einstellungen) aus und bestätigen die Auswahl durch
Betätigen der Taste MENU.
3. Wählen Sie anschließend mit den Tasten und das Untermenü
„Others“ aus und bestätigen Sie diese mit der Taste MENU.
4. Wählen Sie anschließend mit den Tasten und eine die Option
„BackLight“ aus und bestätigen Sie die Auswahl wie gewohnt mit der Taste
MENU.
5. Wählen Sie anschließend mit den Tasten und eine der Optionen „Long
Open“ um die Hintergrundbeleuchtung eingeschaltet zu lassen oder einen der
Werte von 5, 10, 15, 30 oder 60Sekunden um die Hintergrundbeleuchtung des
Seite39von
63

Deutsches Benutzerhandbuch zum Radioddity GD-73 v1.0
Displays nach erfolgtem Tastendruck für die entsprechende Dauer
eingeschaltet zu lassen
6. Bestätigen Sie anschließend Ihre Auswahl wie gewohnt mit der Taste MENU.
7. Betätigen Sie abschließend mehrfach die Taste ESC um zur Hauptanzeige zu
gelangen oder warten Sie etwa 10 Sekunden.
FreqDis
Je nach Anwendungsfall kann es sinnvoll sein, den Kanalnamen oder die für den
ausgewählten Kanal hinterlegte Empfangsfrequenz anzuzeigen. Die gewählte
Einstellung ist Kanal-übergreifend.
Über das Funktionsmenü:
1. Betätigen Sie die Taste MENU um in das Funktionsmenü zu gelangen.
2. Anschließend wählen Sie mittels der Tasten sowie das Untermenü
„Settings“ (engl. Einstellungen) aus und bestätigen die Auswahl durch
Betätigen der Taste MENU.
3. Wählen Sie anschließend mit den Tasten und das Untermenü
„Others“ (engl. andere) aus und bestätigen Sie diese mit der Taste MENU.
4. Wählen Sie anschließend mit den Tasten und die Option „FreqDis“ aus
und bestätigen Sie die Auswahl wiederum mit der Taste MENU.
5. Nun wählen Sie mit den Tasten und eine der beiden Optionen
„OFF“ (engl. Aus) oder „ON“ (engl ein) aus und bestätigen diese mit der Taste
MENU.
6. Betätigen Sie abschließend mehrfach die Taste ESC um zur Hauptanzeige zu
gelangen oder warten Sie etwa 10 Sekunden.
Startanzeige
Nach Einschalten des Funkgerätes wird ein grafisch animiertes Bild angezeigt.
Dieses Bild kann mit der CPS durch einen statischen, zweizeiligen und individuellen
Text ersetzt/ergänzt werden.
Über das Funktionsmenü:
1. Betätigen Sie die Taste MENU um in das Funktionsmenü zu gelangen.
2. Anschließend wählen Sie mittels der Tasten sowie das Untermenü
„Settings“ (engl. Einstellungen) aus und bestätigen die Auswahl durch
Betätigen der Taste MENU.
3. Wählen Sie anschließend mit den Tasten und das Untermenü
„Others“ (engl. andere) aus und bestätigen Sie diese mit der Taste MENU.
4. Wählen Sie anschließend mit den Tasten und die Option „PWR
ON“ (engl. Gerät einschalten) aus und bestätigen Sie die Auswahl wiederum
mit der Taste MENU.
5. Nun wählen Sie mit den Tasten und eine der Optionen „None”, „Word“,
„Picture“ oder „All“ aus und bestätigen diese mit der Taste MENU.
a. Bei Auswahl von „None“ wird beim Einschalten des Funkgerätes weder
das Bild noch der zweizeilige Text angezeigt.
Seite40von
63

Deutsches Benutzerhandbuch zum Radioddity GD-73 v1.0
None
EmergencyOff
PushToTalk4
Activate
Zone
PushToTalk5
Check
Scan
Error Rate
Kill
VOX
Repeater
POWER
PushToTalk1
WorkAlone
Monitor
PushToTalk2
1750Tone
EmergencON
PushToTalk3
CallSwell
b. Die Auswahl von „Word“ sorgt dafür, dass lediglich der zweizeilige Text
beim Einschalten des Funkgerätes angezeigt wird.
c. „Picture“ (engl. Bild) legt fest, dass lediglich das Bild beim Einschalten
des Funkgerätes angezeigt wird.
d. Soll zunächst das Bild und anschließend auch der zweizeilige Text
beim Einschalten des Funkgerätes angezeigt werden, so ist die
Option“all“ (engl alles) auszuwählen.
6. Betätigen Sie abschließend mehrfach die Taste ESC um zur Hauptanzeige zu
gelangen oder warten Sie etwa 10 Sekunden.
Lautstärketasten
Die seitlichen Tasten zum Einstellen der Lautstärke lassen sich ein- als auch
ausschalten.
Über das Funktionsmenü:
1. Betätigen Sie die Taste MENU um in das Funktionsmenü zu gelangen.
2. Anschließend wählen Sie mittels der Tasten sowie das Untermenü
„Settings“ (engl. Einstellungen) aus und bestätigen die Auswahl durch
Betätigen der Taste MENU.
3. Wählen Sie anschließend mit den Tasten und das Untermenü
„Others“ aus und bestätigen Sie diese mit der Taste MENU.
4. Wählen Sie nun mit den Tasten und das Untermenü „Volume Key“ aus
und bestätigen Sie die Auswahl wie gewohnt mit der Taste MENU.
5. Nun können Sie mit den Tasten und zwischen „VolumeKeyOff“ zum
Ausschalten der Lautstärketasten oder „VolumeKeyON“ zum Einschalten der
Lautstärketasten auswählen und Ihre Wahl mit der Taste MENU bestätigen.
6. Betätigen Sie abschließend mehrfach die Taste ESC um zur Hauptanzeige zu
gelangen oder warten Sie etwa 10 Sekunden.
Funktionstasten
Das GD-73 verfügt über zwei, mit „P1“ sowie „P2“ beschriftete Funktionstasten auf
der Vorderseite des Gerätes,links und rechts neben der Taste xxx.
den beiden Funktionstasten können insgesamt 4 Funktionen zugeordnet werden. Pro
Funktionstaste je eine Funktion für einen kurzen sowie einen langen Tastendruck.
Folgende Funktionen sind möglich:
Seite41von
63

Deutsches Benutzerhandbuch zum Radioddity GD-73 v1.0
Über das Funktionsmenü:
1. Betätigen Sie die Taste MENU um in das Funktionsmenü zu gelangen.
2. Anschließend wählen Sie mittels der Tasten sowie das Untermenü
„Settings“ (engl. Einstellungen) aus und bestätigen die Auswahl durch
Betätigen der Taste MENU.
3. Wählen Sie anschließend mit den Tasten und das Untermenü
„Hotkeys“ aus und bestätigen Sie diese mit der Taste MENU.
4. Wählen Sie nun mit den Tasten und die entsprechende Taste „P1“ oder
„P2“ sowie langen (LP) oder kurzen (SP) Tastendruck aus und bestätigen Sie
die Auswahl wie gewohnt mit der Taste MENU.
SP_P1 bezeichnet einen kurzen Tastendruck der Taste P1
SP_P2 bezeichnet einen kurzen Tastendruck der Taste P2
LP_P1 bezeichnet einen langen Tastendruck der Taste P1
LP_P2 bezeichnet einen langen Tastendruck der Taste P2
5. Nun können Sie mit den Tasten und aus den oben genannten
Funktionen die benötigte Funktion auswählen und Ihre Wahl mit der Taste
MENU bestätigen.
6. Betätigen Sie abschließend mehrfach die Taste ESC um zur Hauptanzeige zu
gelangen oder warten Sie etwa 10 Sekunden.
Zurücksetzen auf Werkseinstellungen
Manchmal kann es erforderlich sein, alle Einstellungen des Funkgerätes auf
Werkseinstellungen zurückzusetzen.
Über das Funktionsmenü:
1. Betätigen Sie die Taste MENU um in das Funktionsmenü zu gelangen.
2. Anschließend wählen Sie mittels der Tasten sowie das Untermenü
„Settings“ (engl. Einstellungen) aus und bestätigen die Auswahl durch
Betätigen der Taste MENU.
3. Wählen Sie anschließend mit den Tasten und das Untermenü
„Default“ aus und bestätigen Sie diese mit der Taste MENU.
4. Sobald Sie die auf dem LC-Display ausgegebene Sicherheitsanfrage „Factory
Reset?“ mit der Taste MENU bestätigen, gehen alle Einstellungen verloren
und das Gerät wird auf Werkeinstellungen zurückgesetzt.
5. Betätigen Sie hingegen die Taste ESC, so wird das Gerät nicht auf
Werkseinstellungen zurückgesetzt.
Seite42von
63

Deutsches Benutzerhandbuch zum Radioddity GD-73 v1.0
Programmierung des GD-73
Einführung
Das GD-73 ist ein UHF-Funkgerät mit digitalen DMR- (true Tier I und II) als auch
analogen FM-Funktionen. Es bietet insgesamt 1024 Kanäle (analog und digital), Jede
der bis zu 64 Zonen kann maximal jeweils 16 Kanäle aufnehmen. Zudem können bis
zu 1024 Kontakte mit der CPS auf dem Funkgerät hinterlegt werden.
Die folgenden Seiten sollen Ihnen dabei helfen, alle Aspekte der erfolgreichen
Programmierung und Einrichtung des Funkgerätes zu verstehen um das Gerät
bestmöglich zu nutzen.
Die von der ComputerProgrammierSoftware (CPS) erstellte Datei enthält die
Frequenzen und sonstigen Betriebsparameter und wird als "Codeplug" bezeichnet.
Das Erstellen eines Codeplugs ist ein Bottom-up-Prozess, bei dem zuerst die
niedrigsten (gemeinsamen) Elemente erstellt werden müssen. Anschließend kann
darauf ein voll funktionsfähiger Codeplug aufgebaut werden. Mit der CPS des GD-73
können Sie den Codeplug selbst erstellen und anschließend auf das Funkgerät
übertragen.
Los geht´s
Das Programmierkabel für das GD-73 gehört in der Regel zum Lieferumfang des
Geräts. Das USB-Programmierkabel hat auf einer Seite den typischen USB-Stecker
vom Typ A (zum Anschluss an den entsprechenden USB-Port eines PCs) und auf der
anderen Seite einen micro-USB-Stecker zum Anschluss an das GD-73. Es handelt
sich dabei um ein ganz gewöhnliches Anschlusskabel, so wie es auch bei
Smartphones zum Einsatz kommt.
Wie bei anderen Funkgeräten oft üblich, beinhaltet das Kabel hingegen keine
zusätzliche Elektronik. Damit der PC das GD-73 identifizieren kann, muss es mit dem
entsprechenden Kabel verbunden werden. Außerdem muss das GD-73 eingeschaltet
werden.
Hinweis
Es befindet sich kein Chip im Kabel, so dass der interne Kommunikations-Port des
Funkgerätes nur bei einem eingeschalteten Funkgerät identifiziert werden kann).
Seite43von
63
 Loading...