

Radioddity GA-5S User Manual
User Manual
GA-5S
Thank You for Shopping at Radioddity!
FIND TUTORIALS, SUPPORT AND MORE
https://www.radioddity.com/
https://www.facebook.com/radioddity
https://www.youtube.com/c/Radioddityradio
Two Way Radio
Table of Contents
Part I. Getting started
Chapter 1. - Initial setup
Safety Information
What's in the box
Available Accessories: https://www.radioddity.com/
Notice
Antenna
Belt clip
Battery
Charging and battery maintenance
Charging
Battery Maintenance
Chapter 2. - Getting to know your radio
The main display
Battery Level Indicator
Status LED
01
01
03
04
04
04
05
06
07
07
09
10
12
14
14
Visit Radioddity.com For Downloads And Help
Side key 1 - CALL (Broadcast FM and Alarm)
Side key 2 - MONI (Monitor and Flashlight)
VFO /MR-mode key
A/B select key
Numeric keypad
Pound # Key
Star * Key
Menu and function keys
Accessory jack
Chapter 3. - Basic Use
Power and volume
Turning the unit on
Turning the unit off
Adjusting the volume
Making a call
14
15
15
15
16
16
17
17
18
19
19
19
20
20
20
Channel selection
Frequency (VFO) mode
Channel (MR) mode
Part ll. Advanced topics
Chapter 4. - Working the menu system
Basic use
Using short-cuts
Chapter 5. - Scanning
Scanning modes
Time operation
Carrier operation
Search operation
Scanning a Frequency Range (VFO Mode)
Scanning Your Selected Channels (Channel Mode)
Tone Scanning
Scanning for CTCSS and DCS Tones/Codes
21
21
24
25
25
26
27
27
28
28
28
29
29
30
31
Visit Radioddity.com For Downloads And Help
Visit Radioddity.com For Downloads And Help

Chapter 6. - Dual Watch
Chapter 7. - DTMF
Chapter 8. - Selective calling
CTCSS
DCS
1000Hz, 1450Hz, 1750Hz Tone-burst
Chapter 9. - Customization
Display
Power-on message
Chapter 10. - Programming
Manual programming
Simplex channels
Duplex channels
Computer programming
32
34
36
37
38
39
40
40
42
44
44
45
46
46
Part lll. How-to and setup guides
Chapter 11. - Repeaters
Chapter 12. - Application Specific Setup
Commercial Radio Setup
Amateur Radio Setup
FRS, GMRS, MURS, PMR446
Appendix A. – Troubleshooting
Appendix B. - Menu definitions
Appendix C. - Technical specifications
General
Transmitter
Receiver
DCS table
CTCSS table
48
51
51
52
53
53
54
62
62
63
63
64
66
Visit Radioddity.com For Downloads And Help
Visit Radioddity.com For Downloads And Help
The following safety precautions should always be observed during operation,
service and repair of this equipment.
● Qualified technicians shall service this equipment only.
● Do not tamper the radio for any reason.
● Use only Radioddity radio supplied or approved batteries and chargers.
● Do not use any portable radio with a damaged antenna. If a damaged antenna
comes into contact with your skin, a minor burn can result.
● Turn off your radio prior when entering any area with explosive and flammable
materials.
● Do not charge your battery in the area with explosive and flammable materials.
● To avoid electromagnetic interference and/or compatibility conflicts, please turn off
your radio in any area where posted notices instruct you to do so
Visit Radioddity.com For Downloads And Help
01
Chapter 1.-Initial setup
Safety Information
● CHAPTER 1 INITIAL SETUP
● CHAPTER 2 GETTING TO KNOW YOUR RADIO
● CHAPTER 3 BASIC USE
Part I Getting Started
Part one covers the basic setup and use of
your hand-held two-way transceiver.
● Turn off your radio before boarding an aircraft; any use of a radio must be in
accordance with airline regulations or crew instructions.
● Turn off your radio before entering a blasting area.
● Do not place a radio over an air bag area or in the air bag deployment area for
vehicles with an air bag.
● Do not expose the radio under direct sunlight over a long time, nor place it close
to heating source.
● When transmitting with a portable radio, hold the radio in a vertical position with
the microphone 3 to 4 centimeters away from your lips; also make sure the antenna
stays at least 2.5 centimeters away from your body when transmitting.
FIND TUTORIALS, SUPPORT AND MORE
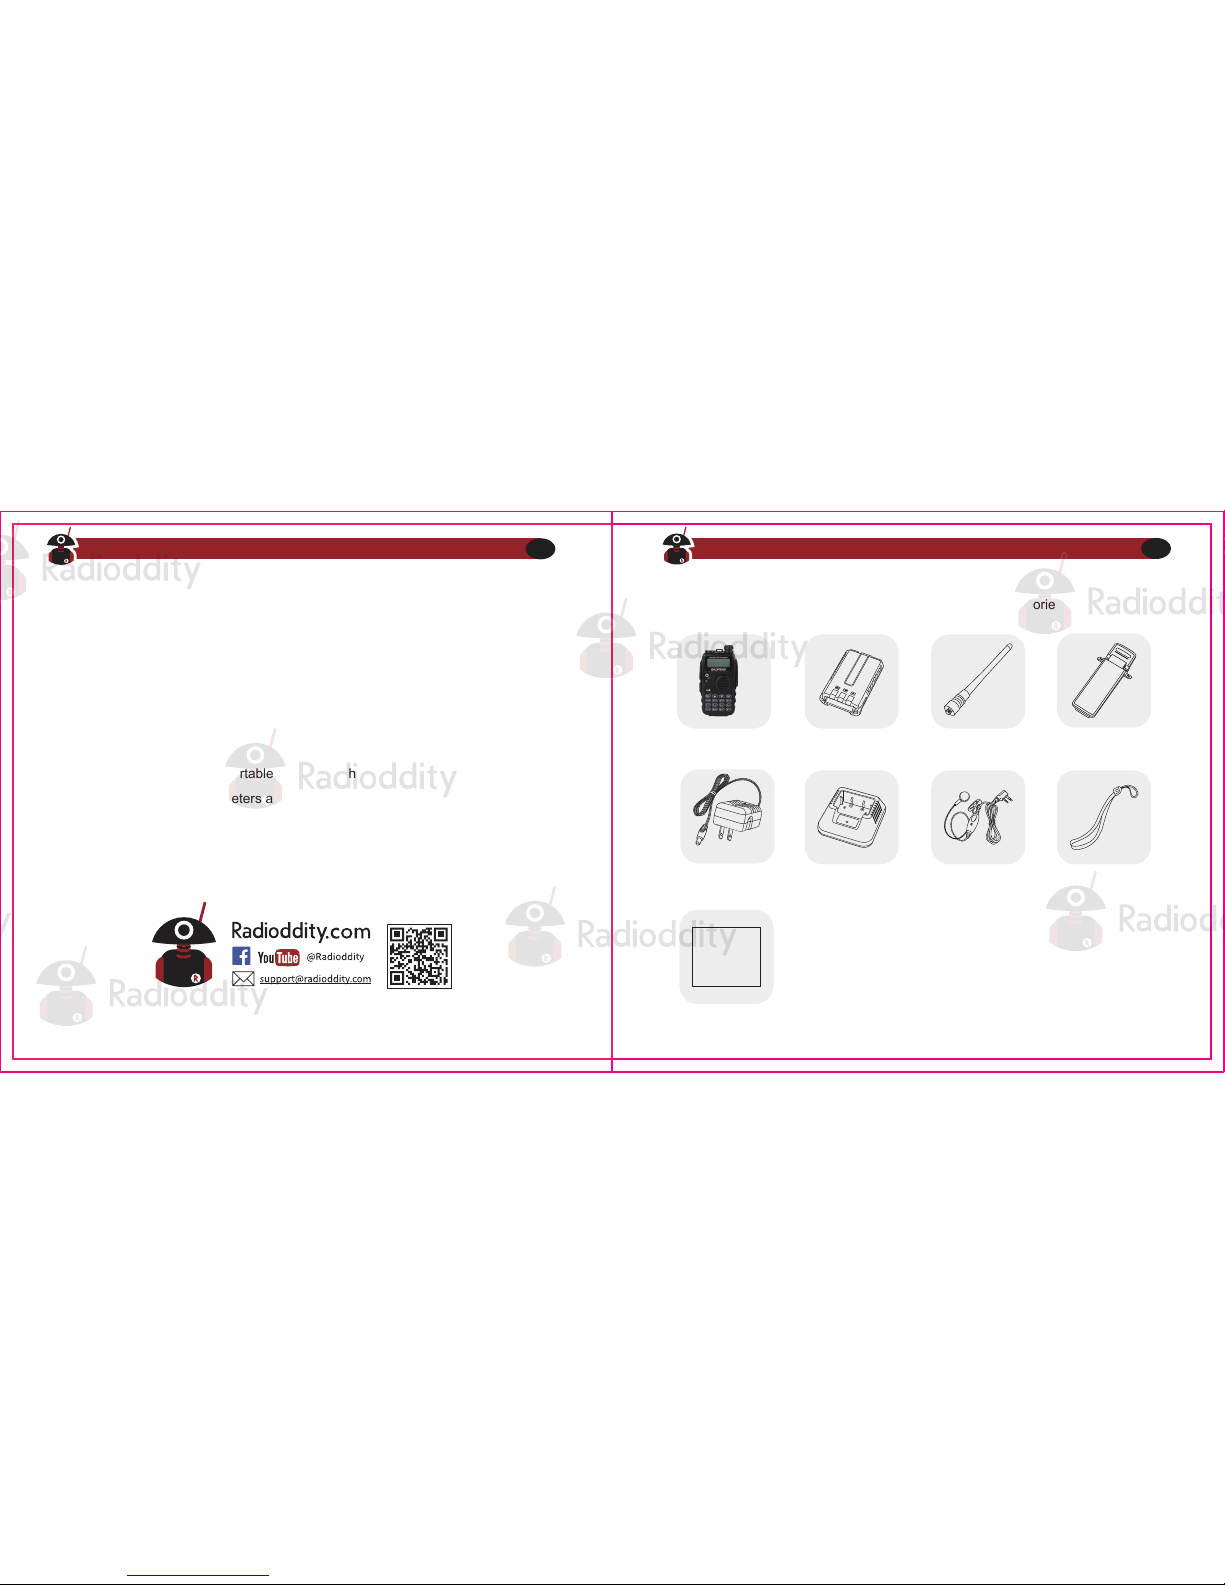
This transceiver comes shipped with below items and accessories in the box:
GA-5S Radio 1800mAh Battery Dual Band Antenna
Desktop Charger Earpiece Kit Wrist Strap
Belt Clip
User manual
User Manual
Adapter
Visit Radioddity.com For Downloads And Help
02
Visit Radioddity.com For Downloads And Help
03
What’s in the box
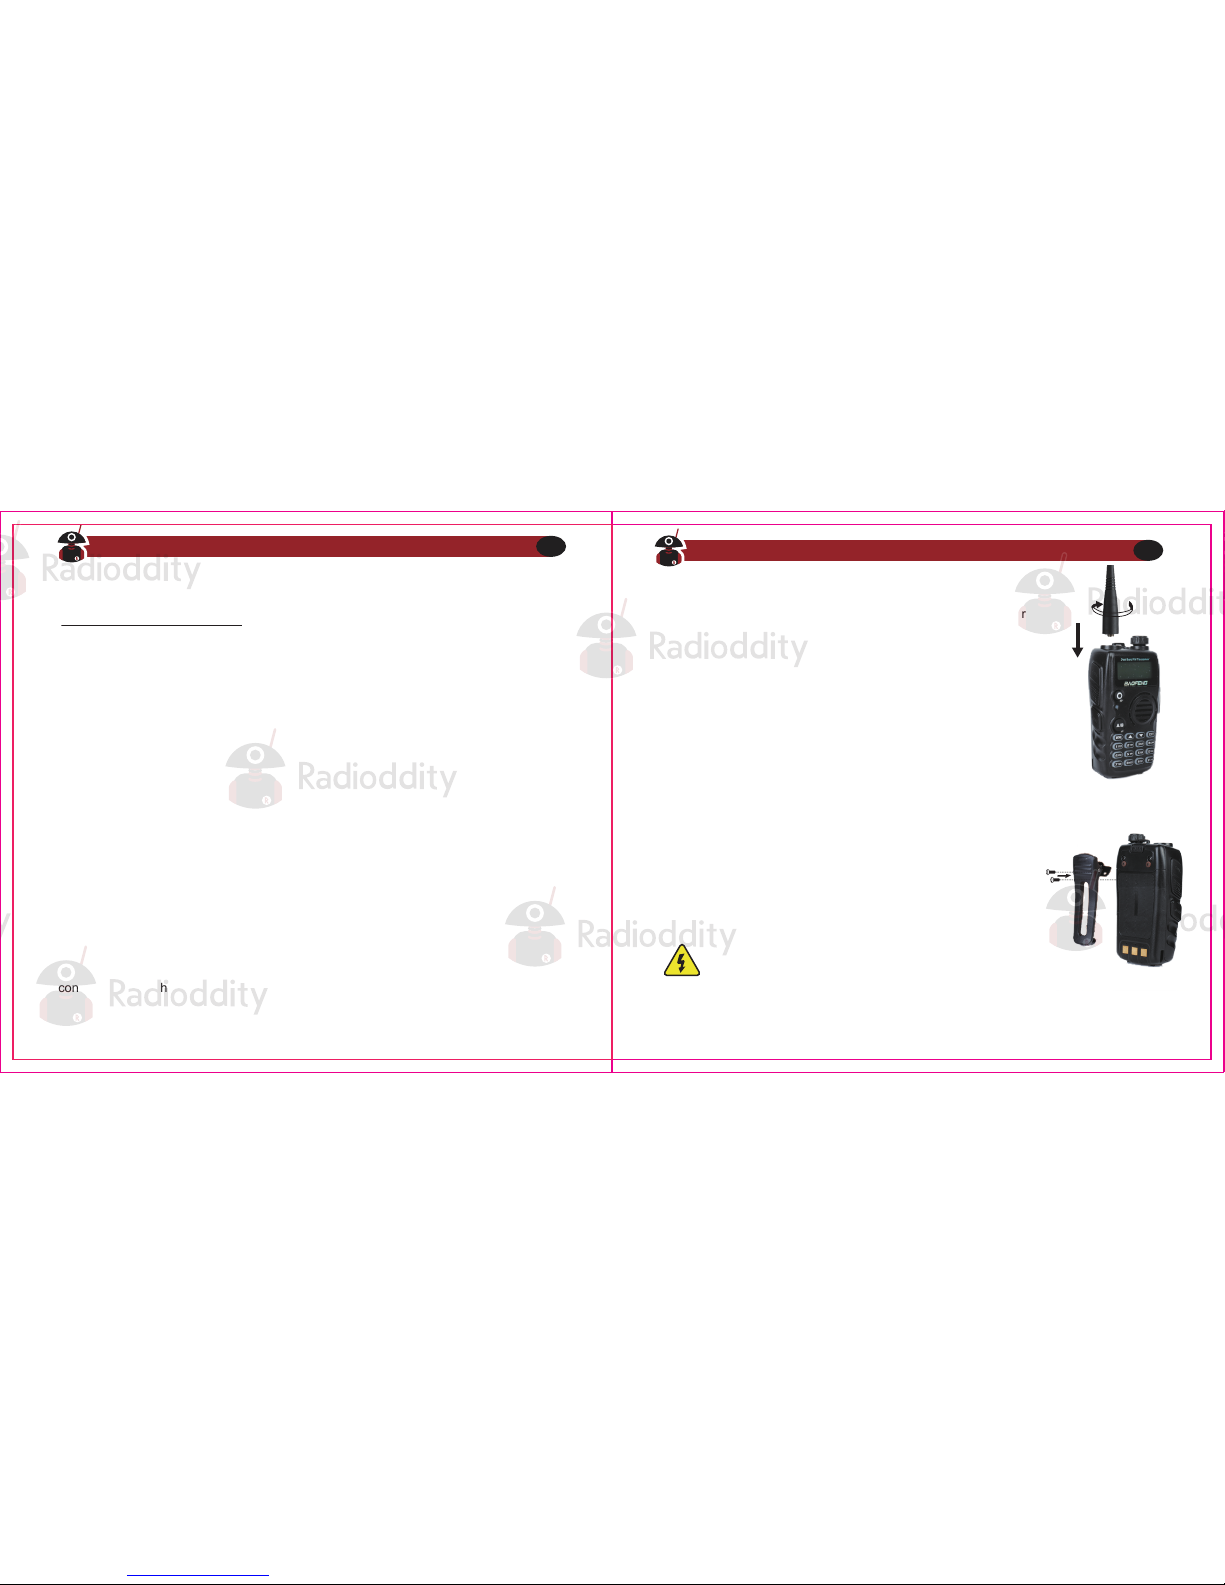
Please make sure to install the antenna and battery is charged when start using a radio.
This transceiver is fitted with a Male SMA connector. To mount your antenna (Female SMA
connector), align the two connectors and turn clockwise until it stops.
● Do not over-tighten your antenna to avoid damage to the outer
materials and the connect base.
● When installing the antenna, please remember to grip it by the
base and screw.
● When you choose using an external antenna, make sure its SWR
is about 1.5:1 or lower to avoid damage to the transceiver.
● Do not hold the antenna with your hand or wrap the outside of it to
avoid interference to the transceiver.
● Never transmitting without an antenna.
There are two parallel screws mounted on rear radio body, remove
them and thread through the holes on the belt clip as you screw
them back into the radio body.
Notice
Antenna
Belt clip
Do not add any form of glue to fix the screws on the
battery clip.The solvents in the glue may cause damage
to the battery casing.
The radio is compatible with other accessories which are available on:
https://www.radioddity.com/
Visit Radioddity.com For Downloads And Help
04
Visit Radioddity.com For Downloads And Help
05
The radio must be powered off before attaching or
removing the battery, you may rotate the power/volume
knob all the way counter-clockwise to make sure it has
been turned off.
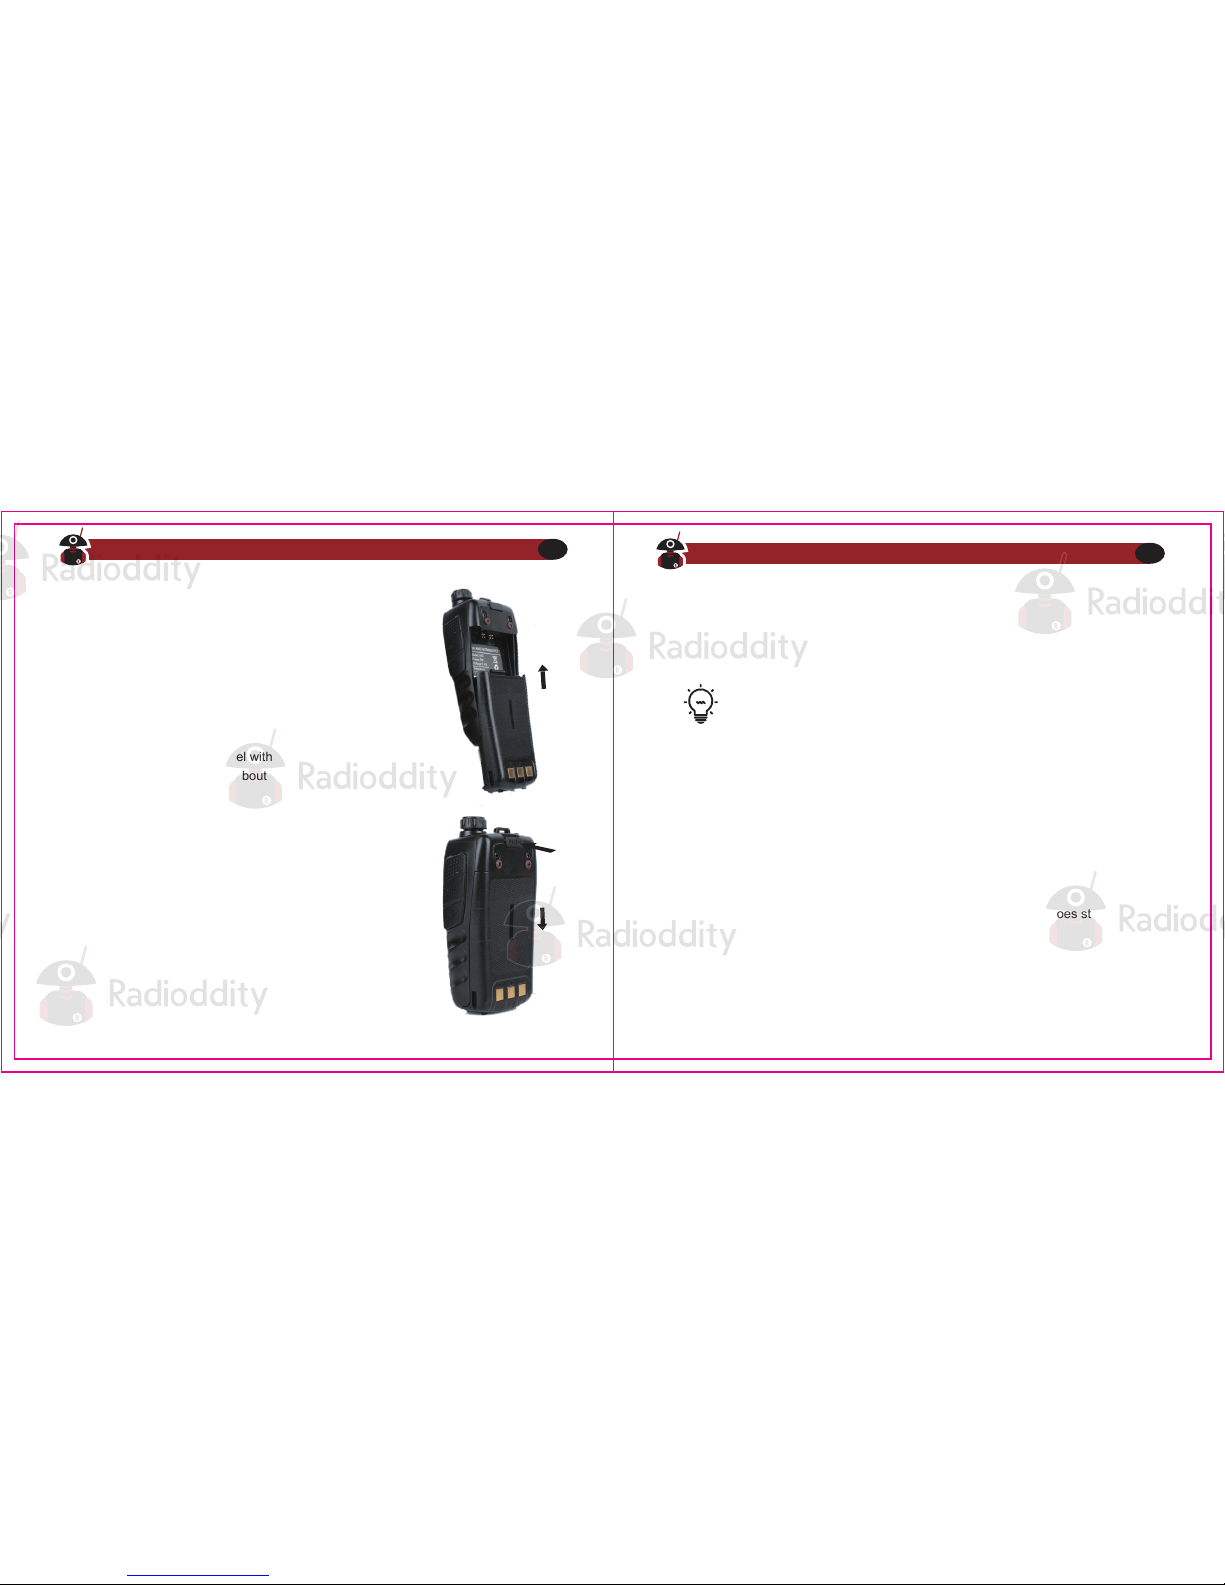
Push the battery slowly in parallel with the radio body,
the lower edge of the battery is about 1-2 cm below the
radio’s edge.
Once aligned with the guide-rails, slide the battery
upward until you hear a click to lock the battery in
place.
Battery
Installation
To remove the battery, press “PUSH” buckle on the middle top
(see Figure 2. 1,”Radioddity GA-5S Radio, overview”), as you
slide the battery downward.
Removal
How to hook up and use the charger correctly:
1. Plug the DC connector of the power adaptor into the charger base.
2. Plug the AC connector of the power adaptor into a main ac wall outlet.
3. Place the radio in the charging base.
4. Make sure the radio is making contact with the charger. When the red LED
comes on steady, your radio is charging.
5. The radio is fully charged once the charger’s green status LED goes steady.
Please remove the radio at that time to avoid the over-charging.
Charging and battery maintenance
Charging
Battery should be fully charged before initial use. Optimum battery efficiency
will be achieved after the three full battery charge and discharge cycles.
Visit Radioddity.com For Downloads And Help
06
Visit Radioddity.com For Downloads And Help
07
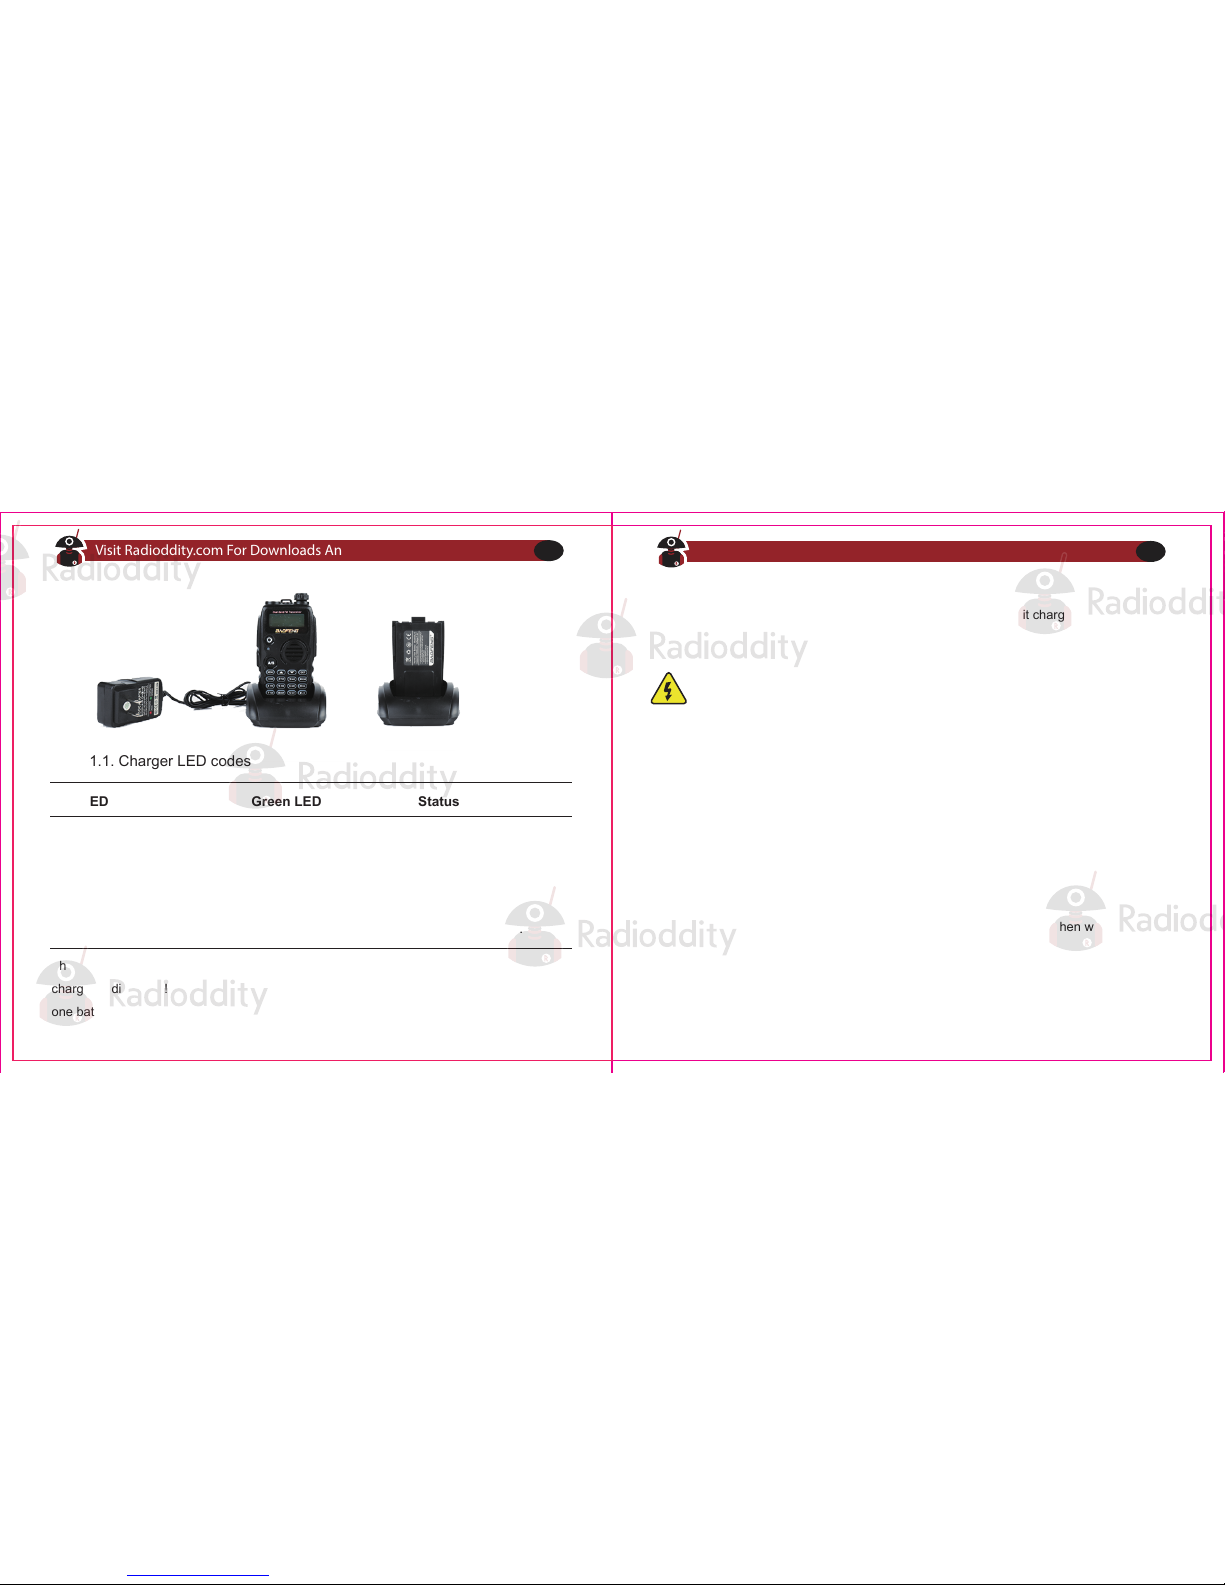
The charger and battery are fitted with matching notches so that the battery can be
charged individually! That is very practical if you have two batteries, that you can charge
one battery while still using your radio.
The battery is provided without power from the factory; please let it charged for at least four
to five hours before you start using your radio.
Only charging batteries in normal room temperatures.
● When charging a battery attached to the radio, power off the radio for a faster charge.
Before the charging is completed, do not unplug the power to the charger or remove the
battery.
● Never charge or use a wet battery.
● Batteries wear out over time. When the radio is operated in a shorter time, please consider
purchasing a new battery to replace.
● Battery’s performance will be reduced in temperatures below Zero. When working in cold
environments, it is suggested to prepare a spare battery. Preferably inside your jacket or in a
similar location in order to keep the battery warm.
● Dust can interfere with the connection between battery and the radio. lf necessary wipe the
contacts with a clean cloth to ensure proper contact with radio and charger.
Battery Maintenance
Prolonging your battery’s life
Table 1.1. Charger LED codes
Red LED Green LED Status
Standby (charger empty)
Error (charger with radio)
Flashing Steady
Steady Off Charging
Off Steady Charge complete.
Visit Radioddity.com For Downloads And Help
08
Visit Radioddity.com For Downloads And Help
09
● Use only batteries approved by the original manufacturer.
● Never attempt to disassemble your battery pack.
● Do not expose your batteries to fire or intense heat
● Dispose of batteries in accordance with local recycling regulations.
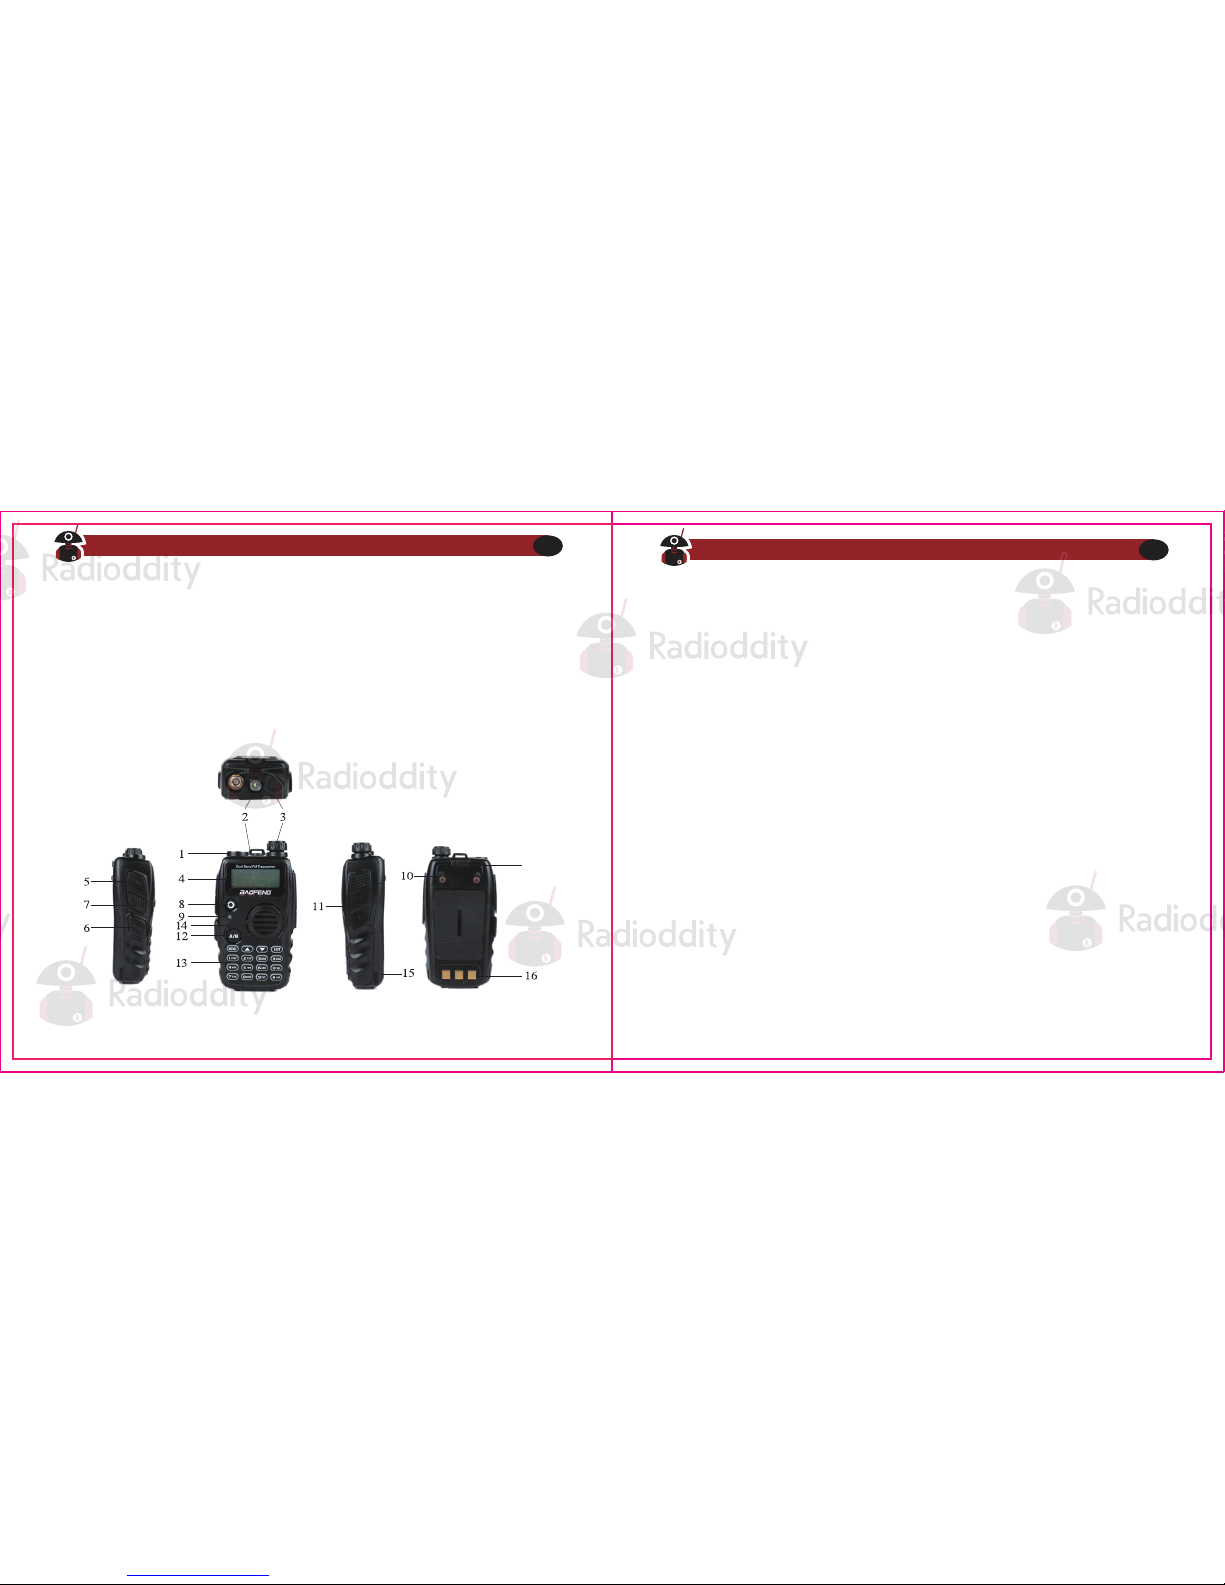
1. Antenna, see the section called "Notice" for details.
2. LED flashlight-See the section called "Side key 2 - MONI
(Monitor and Flashlight)" for more information.
3. Power/ Volume knob, usage discussed in the section called "Power and volume".
4. Two-line LCD
5. Call key
6. Monitor key
7. PTT key, usage discussed in the section called "Making a call'
8. VFO / MR mode key
9. Status LED
10. Starap buckle
11. Accessory jack
12. A / B select key
13. Keypad
14. SP.&MIC
15. Battery pack; see the section called "Charging
and battery maintenance" for detailsLanyard loop
16. Battery contacts
17. Battery remove button
In order to prevent damage from over discharge, the battery must be left with partial power.
This radio uses a lithium-based battery and a 40% charge is recommended. This level
minimizes age-related capacity loss while keeping the battery in operating condition and
allowing self-discharge.
Storage
Chapter 2. - Getting to know your radio
Figure 2.1. Radioddity GA-5S, overview
17
Visit Radioddity.com For Downloads And Help
10
Visit Radioddity.com For Downloads And Help
11
Please make sure to install the antenna and battery is charged when start using a radio.
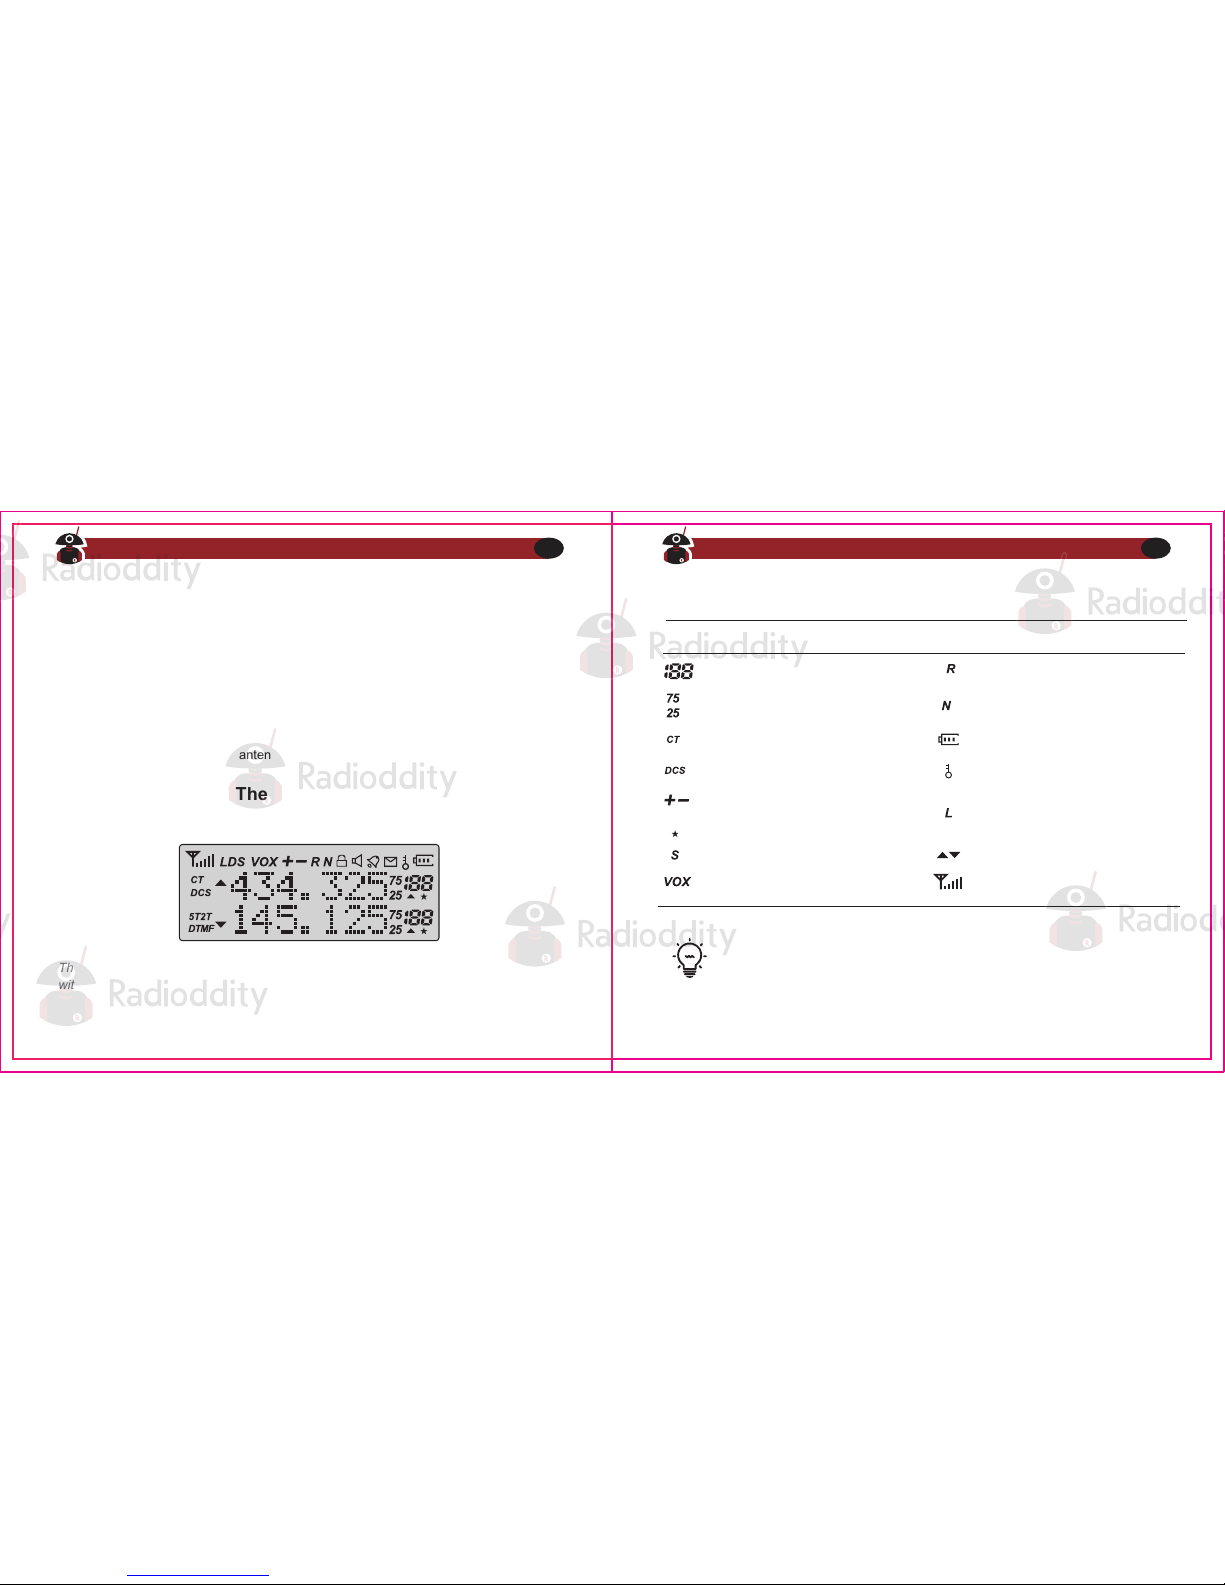
The transceiver is fitted with a seven character by two line dot matrix alphanumeric LCD,
with auxiliary icons for miscellaneous features.
Even though it is a seven character by two-line display, channel memories are
only configurable to six character names.
● Do not over-tighten your antenna to avoid damage to the outer materials and the
connect base.
● When installing the antenna, please remember to grip it by the base and screw.
● When you choose using an external antenna, make sure its SWR is about 1.5:1 or
lower to avoid damage to the transceiver.
● Do not hold the antenna with your hand or wrap the outside of it to avoid interference
to the transceiver.
● Never transmitting without an antenna.
Figure 2,2. Radioddity , display
Table 2.1. Charger LED codes
Icon Description Icon Description
Reverse function enabled
Narrowband enabled
Memory channel
Least significant modifiers
Battery level indicator
Keypad lock enabled
High Power enabled When
X7 not Displayed
Low Power Enabled
Squelch Open/Close Indicator
Indicates active band or
channel
CTCSS enabled
DCS enabled
Channel Scan Enabled
Frequency shift direction
(Offset) Channel
Dual watch enabled
VOX enabled
Visit Radioddity.com For Downloads And Help
12
Visit Radioddity.com For Downloads And Help
13
The main display
Battery Level Indicator
VFO / MR - mode key
A / B select key
The status LED has a very simple and traditional design. When you receive a signal it
shows green, when you transmit it shows red, and it's off in standby.
Status LED
When the battery level indicator reads the battery is depleted. At this point the radio
will start beeping periodically as well as flashing the backlight of the display and when
voice prompts are enabled, a "Low Voltage" announcement will be heard, indicating that
you need to change your battery or put your radio in the charger.
Side key 1 - CALL (Broadcast FM and Alarm)
Press momentarily to start the broadcast FM receiver. Another momentary press turns
the broadcast FM receiver off. If a signal is received on the active frequency or channel
while you are listening to the broadcast FM, the squelch will be activated to that frequency
(as if scanning) and remain there until the signal goes away; it will then switch back to
broadcast FM.
Press and hold to activate the alarm function. Press (a short press) again to turn it
off.
Side key 2 - MONI (Monitor and Flashlight)
Press momentarily to turn on the LED flashlight. Another momentary press will flash
the LED. Another momentary press turns the flashlight off.
Press and hold to monitor the signal. This will open up the squelch so you can listen
to the unfiltered signal.
Pressing switches between Frequency (VFO) Mode and Memory (MR) mode.
Memory mode is sometimes also referred to as Channel mode.
To save frequencies to channel memory you must be in Frequency (VFO) mode.
VFO/MR
The key switches between A (upper) and B (lower) displays. The frequency or
channel on the selected display becomes the active listening and transmit frequency
or channel.
A/B
Visit Radioddity.com For Downloads And Help
14
Visit Radioddity.com For Downloads And Help
15
 Loading...