

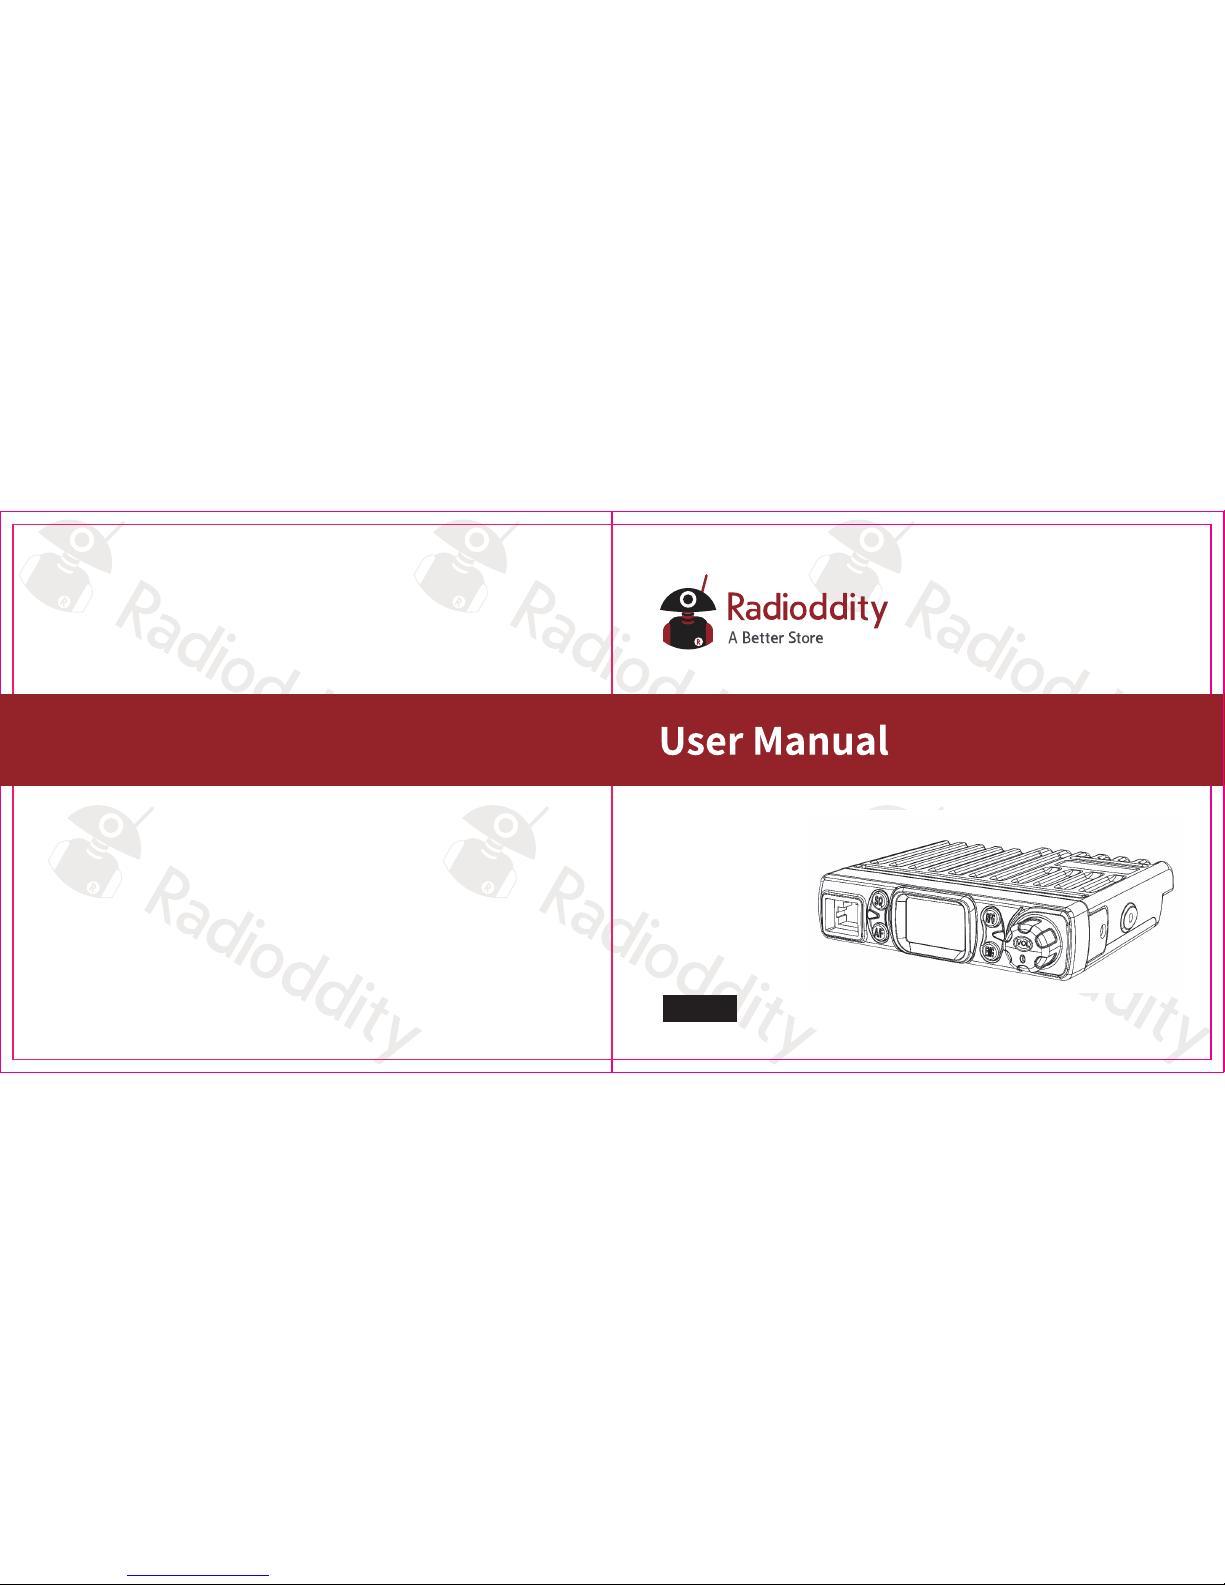
CB radio
CB-27
www.radioddity.com

About Radioddity
“You, our friend and customer, are at the forefront of what we do.”
Nothing is more important than your time, and your money. When buying radios online, you face a dilemma:
Save time and purchase from a reputable website at a high price, or try to save money by purchasing from an
unreputable dealer at the cost of your time spent dealing with quality and service issues. At Radioddity.com,
you don’t have to choose between low prices and a safe shopping experience. Whether you’re a first time buyer
or a seasoned HAM, we hope you’ll find our products, prices, content and resources to be just what you need.
In the past several years, Radioddity has been better serving the needs of two-way radio buyers by creating a
safe shopping experience. We do this by providing the highest quality products, at an affordable price, and
backing that up with superior quality service. It sounds simple to us
That is our promise: to improve your buying experience.
Through strong partnerships which allow us to bring you the latest technology from our own brand Radioddity
and on behalf of our caring and responsive Customer Support team, we strive to fulfill that promise and better
meet your needs every day.
Along with this promise, we hope to give you more value. Be that by offering you the latest and greatest in
DMR and analog radios, accessories and related products, by providing superior technical support, or by
working with thought leaders in the Amateur Radio Industry to develop enriching content to entertain and
assist you in your buying process including our Blog, FAQ, and Newsletter. Your concerns are our concerns.
We do all of this to help you find the highest quality of radios, for low prices, with as little headache to the
consumer as possible. If we are failing you in this promise in any way, let us know via email:
support@radioddity.com
Chapter 1 - Getting Started
Safty Information
What’s In The Box?
Chapter 2 - Know About This Radio
Power ON/OFF The Tadio
Adjusting the Volume
Channel Selection
Squelch Setting
Modulation Selection
RF Gain Control Function
Emergency Channel Switching
Keyboard Lock
Scan function
07
07
08
09
10
10
10
11
12
12
13
13
13
Table of Contents
----------------------------------------------------------
--------------------------------------------------------------------
-----------------------------------------------------------------
------------------------------------------------
-----------------------------------------------------------
---------------------------------------------------------------
-------------------------------------------------------------------
----------------------------------------------------------------------
---------------------------------------------------------------
----------------------------------------------------------
---------------------------------------------------
----------------------------------------------------------------------
-----------------------------------------------------------------------
Inhaltsverzeichnis
Norm Selection
Install External Microphone
Chapter 3 - Basic Operation
Quick Start Guide
Chapter 4 - Trouble Shooting Guide
Appendix A - RF Energy Exposure and
Product Safety Guide for Portable Radios
ATTENSION!
Radio License
Operating Instructions
Protect Your Hearing
Safety Operation
Apendix B - Technical Specifications
Appendix C - built-in frequencies table
14
14
15
15
16
17
17
18
18
18
19
21
23
---------------------------------------------------------------------
--------------------------------------------------------
--------------------------------------------------------
-------------------------------------------------------------------
-----------------------------------------------
----------------------------------------
------------------------------------------------------------------------
-----------------------------------------------------------------------
------------------------------------------
-------------------------------------------------------------
--------------------------------------------------------------
-------------------------------------------------------------------
--------------------------------------------
Kapitel 1 - Allgemeine Informationen
Sicherheitshinweise
Was ist im Karton?
Mitgeliefertes Zubehör
Kapitel 2 - Mit dem Funkgerät vertraut werden
Funkgerät ein-/ausschalten
Lautstärke
Kanalwahl
Rauschsperre
Manuelle Rauschsperre SQ
Automatische Rauschsperre AQ
Betriebsart
31
31
32
32
33
34
34
34
35
35
35
36
---------------------------------------------
----------------------------------------------------------------
-----------------------------------------------------------------
-------------------------------------------------------------
---------------------------------
-------------------------------------------------------
---------------------------------------------------------------------------
---------------------------------------------------------------------------
----------------------------------------------------------------------
-------------------------------------------------------
-------------------------------------------------
--------------------------------------------------------------------------

Empfangsdämpfung
Notfallkanal
Tastatursperre
Scan-Funktion
Frequenzband
Externen Lautsprecher anschließen
Kapitel 3 - Grundlegende Funktionsweise
Kurzanleitung
Kapitel 4 - Anleitung zur Fehlerbehebung
Anhang A - HF-Energiebelastung und
Produktsicherheit für tragbare Funkgeräte
ACHTUNG!
Funkzulassung
Bedienungshinweise
Schützen Sie Ihr Gehör
Sicherer Betrieb
Anhang B - Technische Daten
Anhang C - Ausführliche Frequenzbänder
37
38
38
38
39
39
40
40
41
42
42
43
43
---------------------------------------------------------------
-------------------------------------------------------------------------
----------------------------------------------------------------------
----------------------------------------------------------------------
44
44
46
48
------------------------------------------------------------
---------------------------------------------------------------------
------------------------------------------------------
----------------------------------------
----------------------------------------------------------------------
---------------------------------------------
---------------------------------------
-----------------------------------------------------------------------
---------------------------------------
---------------------------------------
-------------------------------------------------------------------------
---------------------------------------------------------------------
---------------------------------------------------------------
Safety Information
Please read the following brief instructions, non-compliance with these rules may cause danger
or violate the law.
1. Refer to local government regulations before using this radio, improper use may violate the law.
2. Turn off the radio before getting close to flammable or explosive areas.
3. Turn off the radio before you get near explosive or ignition zones.
4. Do not use radio whose antenna is damaged, touching of damaged antenna will cause heat
injury.
5. Do not attempt to open the radio; the maintenance work should be done by technical expert
only.
6. To avoid troubles caused by electromagnetic interference or electromagnetic compatibility,
please turn off the radio in places where have the banner "Do not use wireless equipment",
such as hospital and other healthcare facilities.
7. In the car with an airbag, do not put the radio within the scope of the airbag deployment.
8. Do not store the radio under the direct sunshine or in hot areas. When you transmit with the
radio, do keep away from its antenna for 5cm at least.
9. If the radio appears smelly or smokey, please shut off its power immediately and contact
your local dealer.
10. Do not transmit too long due to possible heat build-up.
Chapter 1 - Getting Started
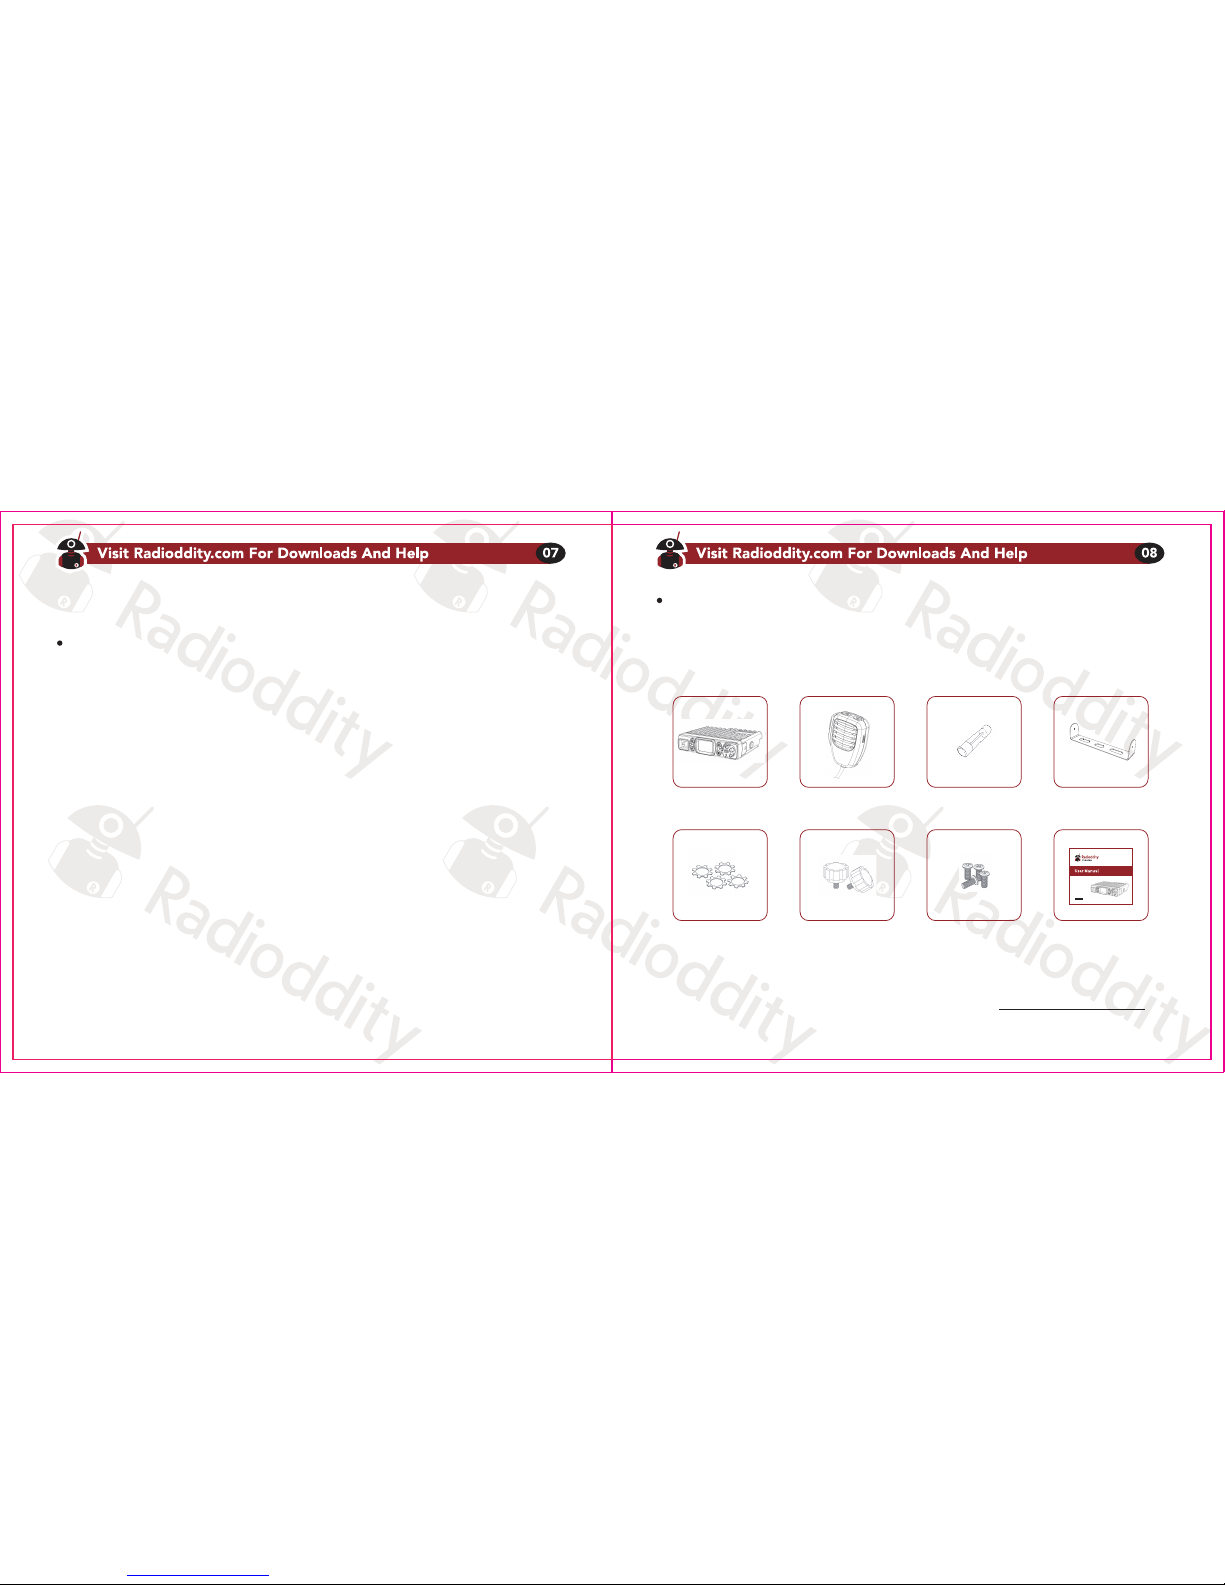
What’s in the box?
Thanks for choosing Radioddity CB radio. We recommend you to check the items listed in the
following table before discarding the package.
Supplied accessories:
Note
The Radio is compatible with other accessories available on: https://www.radioddity.com/
CB-27 Microphone Fuse F5A220V Bracket
Teeth Eashers Srews for Bracket Mounting Screws Users Manual
CB radio
CB-27
Power ON/OFF the Radio
1. Turn [VOL] switch clockwise to power on the radio, the LCD displays the Norms and then
displays channel number.
2. Turn [VOL] switch counter-clock-wise until you hear a click. The radio is powered off.
Adjusting the Volume
To turn up the volume, turn the volume clock-wise.
To turn the volume down, turn the volume counter-clock-wise. Be careful not to turn it too far,
as you may inadvertently turn your radio off.
Channel Selection
Use the channel selector keys [UP] and [DN] keys at the microphone for channel selection.
The actual channel is displayed on the LCD. For communication, the same channel and the
same modulation type AM/FM has to be selected.
1. Short press [UP] key to change CB channels. Channel will increase by 1;
Long press [UP] key for a few seconds and release, channel will increase by 1 per second.
2. Likewise, short press [DN] key to decreased by 1;
long press [DN] key for a few seconds and release, channel will decreased by 1 per second.
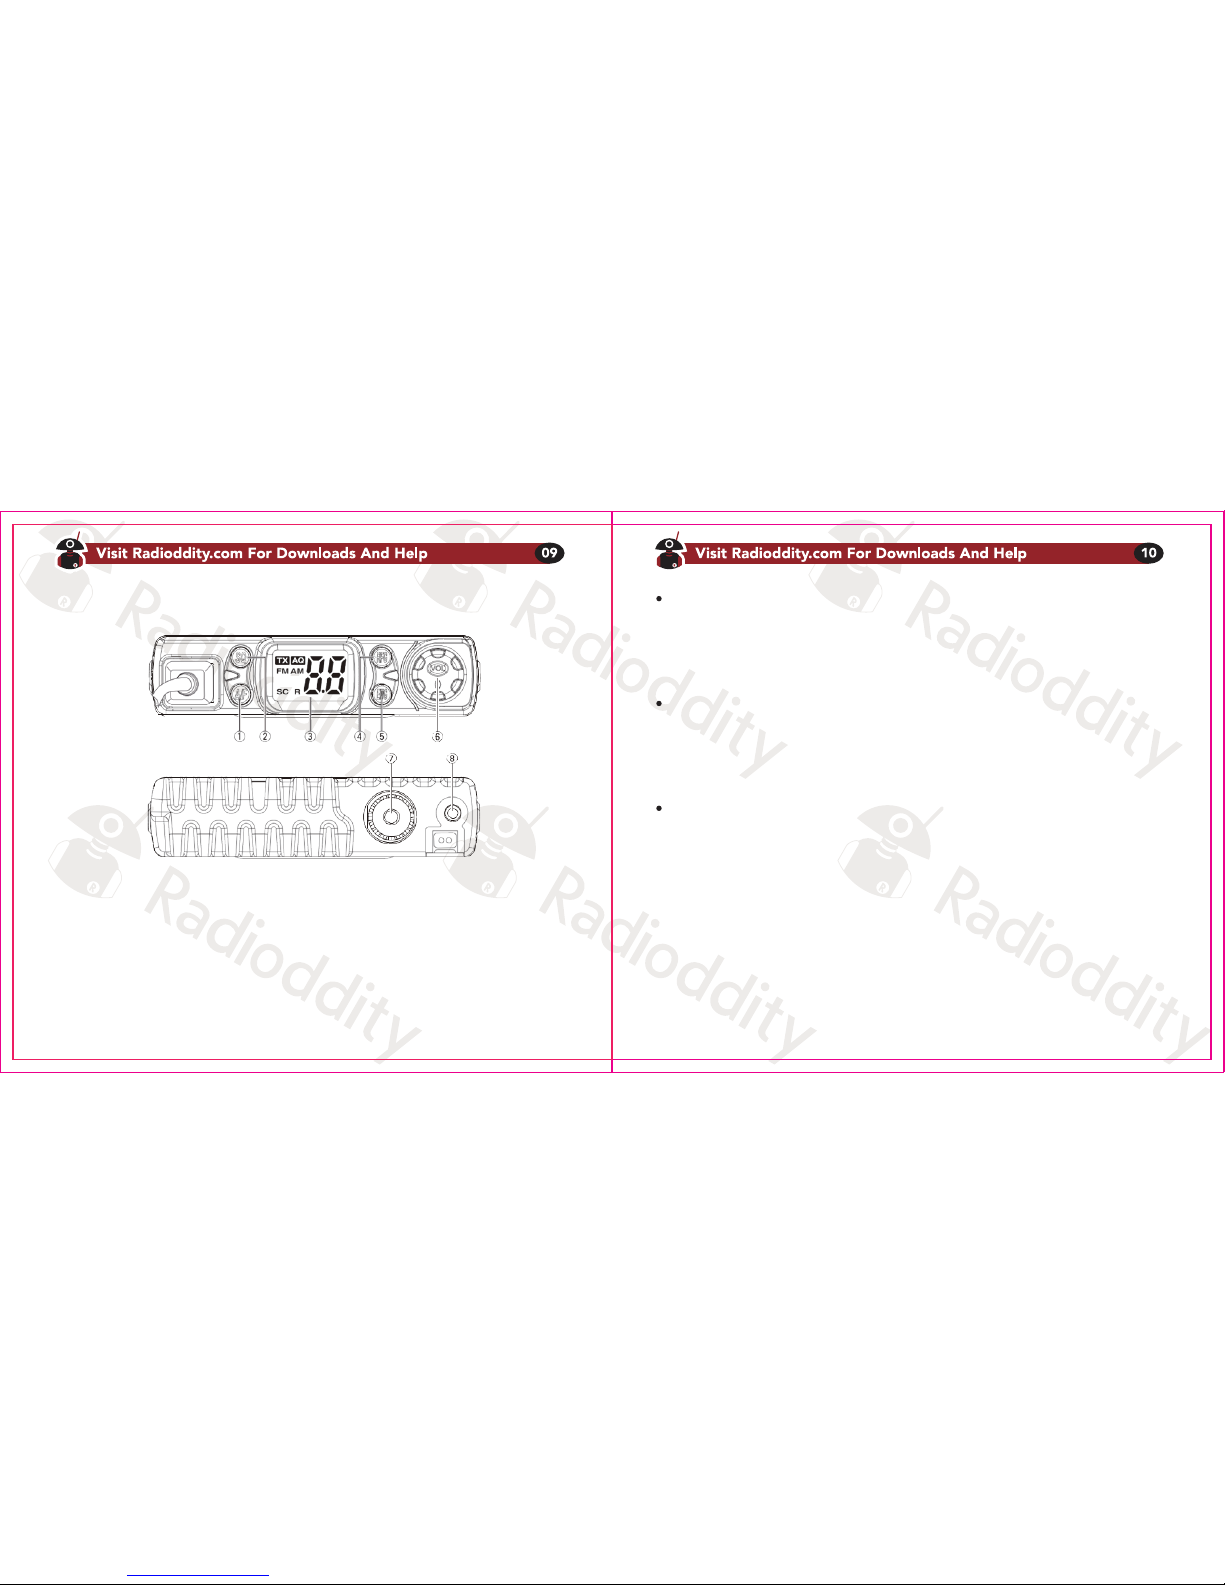
Chapter 2 - Know about this radio
1. A/F Key: Channel Scan
2. SQ Key: SQ_ASQ/SQ_SQ
3. LC Display
4. RFG Key: Receive RF Gain control
5. ENG Key: Emergency channel witching/Keyboard lock
6. Power/Volume Knob
7. Antenna Jack (Type SO-239) for Plug Type PL-259
8. External speaker Jack (3,5mm)
Squelch Setting
SQ_SQ: Signal strength monitoring squelch setting
This function is used for squelch level setting, but it detects the strength of received signal, and
better strength means a better signal. It is divided into 29 levels (0.F~2.8), 0.F is the lowest level,
and 2.8 is the highest level. For example, when set to 2.8, the audio channel can only be turned
on when the received signal reaches its maximum. (In an experiment, the noise adjustment
range of SQ_SQ is obviously larger than SQ_AQ. We recommend using SQ_SQ as the first
choice, as SQ-SQ and SQ-ASQ can’t work at the same time. One will stop working when the
other one is running.)
Operation instructions:
1. Enter: short press the SQ button, the screen displays “sq” for one second, and then display
the current SQ level. At this time, the SQ level can be adjusted by pressing UP and DN.
2. Exit: After the adjustment is completed, you can press SQ again to exit the SQ setting mode,
or you can automatically exit the SQ setting mode and enter the waiting mode. Keep it for a
while without any operation will also exit the SQ setting..
SQ_ASQ: Noise monitoring squelch setting.
This function is also used for squelch level setting, but it detects the noise of received signal,
and the smaller the noise, the better the signal. It is divided into 9 levels (A1~A9), A1 is the
lowest level, and A9 is the highest level.
Operation instructions:
1. Enter: Long press the SQ button, the screen displays the AQ icon and the current ASQ level.
Short press the SQ button or wait for a while, back to waiting mode, the AQ icon will still light
up. When SQ_ASQ is in waiting mode, short press SQ will return to SQ_ASQ setting status.
2. Exit: When the SQ_ASQ function is on, long press SQ will exit.
Modulation Selection
Depending on the selected frequency range and the selected channel, the device supports FM
(Frequency Modulation) and AM (Amplitude Modulation) modes.
Long press [A/F] key to select AM mode and FM mode. However, such a change is only possible
if the set channel is also allowed in the respective operating mode. This function is only available
for European version.
The respective operating mode is indicated on the LC display with "AM" or "FM" to the left of the
channel number.
RF Gain Control Function
This function will affect the strength of signal reception.
1. Enter: short press [RFG] key to enter. After entering, the screen will display current RFG level,
you can press [UP] and [DN] keys to adjust RFG level. The RFG level is not a continuous
number but “6”, “12”, “18”, “24”, “30”, “36”, “42”, “48” a total of 8 levels. When the RFG function
is turned on, the signal reception intensity will be attenuated. The higher the level is, the

greater the attenuation. After completing the setup, wait for a while and the radio will
automatically go to the waiting mode and display the “R” icon on the screen.
2) Exit: short press [RFG] key to enter RFG setting mode, and short press RFG again will exit
the RFG function.
Emergency Channel Switching
Operation: short press [EMG] key to switch between “the current channel’’, “19th channel”,
“9th channel”.
1. Short press EMG] key to switch 9th channel
2. Short press [EMG] key again to switch 19th channel.
3. Short press [EMG] key third time to return to last normal channel.
Keyboard Lock
1. Enter: long press [EMG] button to enter the locked status. In locked status, nothing happens
except for pressing the PTT button.
2. Exit: In the locked status, long press [EMG] again will exit the EMG_LC function.
Scan function
1. In the waiting status, a short press of [A/F] key will enter the scan mode.
2. The CB radio will scan all channels of the mode in 2 channels per second. When the scanned
channel has a signal and the signal strength reaches the SQ or ASQ setting, the speaker will
transmit the sound, automatically stop scanning, and maintain the current channel.
3. When the channel signal disappears or decreases to not meet SQ/ASQ requirements, the CB
radio will continue to scan. Short Press [A/F] key again or press transmit will exit scan mode.
Norm Selection
This CB radio supports multiple frequency bands. Depending on the country in which the device
is operated, it may be necessary to choose a different frequency band. This function is only
available for European version.
1. For changing the current norm, please hold [A/F] key while turning the radio on. The current
norm appears in the display.
2. Use the channel selectors [UP] and [DN] keys of the microphone to set a different norm
3. Confirm your selection by turning the radio off and on again.
For further frequency band information see Appendix C.
Regarding the permissions and restrictions of the individual norms in the various European
countries, please check the radio passport, which is included in the scope of delivery. The user
is solely responsible for the selection of the permissible norm in the country of operation.
Install External Microphone
The microphone is fixed to the radio, it cannot be removed. It contains the PTT key, as well as
the channel selectors [UP] and [DN] keys.

Chapter 3 - Basic Operation
Chapter 4 - Trouble Shooting Guide
Quick Start Guide
1. Open the box carefully and remove the radio, the cable and the microphone.
2. Connect the SO-239 socket of the radio to a corresponding antenna via a PL-259 plug.
You will need to purchase an antenna to operate the radio.
3. Connect the power supply cable to an appropriate 12V DC power source.
This should be able to supply at least 5A continuous current.
4. Turn ON/OFF switch clockwise and set the volume to a medium level.
5. Use the channel selector keys [UP] and [DN] at the microphone for channel selection.
The actual channel is displayed on the LCD.
6. Press the [PTT] key and talk to her! If necessary, use VOL knob to adjust the volume of the
built-in speaker.
The Radioddity CB-27 is a cost-effective CB analog radio. It can communicate with any other CB
analog radio but without spending an exorbitant amount of money on it! You only need to make
sure that you are on the same channels with the same modulation type.
Why can't this CB radio communicate with my other two way radios?
a) Make sure that the two radios are on the same channel.
b) Check if the same channel is set to receive the same type of modulation.
c) Check if the volume of the two radios is high enough
d) Check the correct installation of the antennas
e) Check the talking range of the radios.
Other often seen problems:
Troubles Solution
1. The power source is not turned on.
2. The fuse has triggered. Replace them with the
supplied replacement fuse
1. Set the volume control to the highest level.
2. The microphone may be damaged, send it to
your local dealer for inspection.
The radio is out of reception range.
Turn on the radio at a short distance and try again.
The radio doesn’t start.
Others can’t hear my transmission.
There are constant noises to hear.
Align the microphone connector with the jack on the front of the radio. An external microphone
with an impedance of 8Ω can be connected to the 3.5mm mono connector. This automatically
turns off the built-in speaker.

operating instrutions to users of two-way radios.These instructions are important because they
inform users about RF energy exposure and provide simple procedures on how to control it.
Please refer to the following websites for more information on what RF energy exposure how to
control your exposure to assure compliance with eastablished RF exposure limits:
http://www.who.int/en
Radio License
Governments keep the radios in classification, most of the classified radios need to get local
government license and operation is allowed. For this CB-27, the individual license is not required.
Operating Instructions
Do not send more than the rated operating factor of 50% of the time. Press [PTT] key (Push to
Talk) to transmit the signals. Release [PTT] key to receive signals. The transmission of 50% of
the time or less is important because the radio will only produce a measurable RF energy load
in the sense of conforming to the standard.
Protect Your Hearing
1. Use the lowest volume you need for your work.
2. Increase the volume only when you are in a noisy environment.
3. Turn down the volume before connecting a headset or earphone.
4. Limit the time you use headsets or earphones at high volume.
Appendix A - RF Energy Exposure and
Product Safety Guide for Portable Radios
ATTENSION!
Before using this radio, read this guide which contains important operating instructions for safe
usage and RF energy awareness and control of compliance with applicable standards and
regulations.
This CB radio uses electromagnetic energy in the radio frequency (RF) spectrum to provide
communications between two or more users over a distance. It uses radio frequency (RF)
energy or radio waves to send and receive calls. RF energy is one form of electromagnetic
energy. Other forms include, but are not limited to, sunlight and x-rays. RF energy, however,
should not be confused with these other forms of electromagnetic energy, which when used
improperly, can cause biological damage. Very high levels of x-rays, for example, can damage
tissues and genetic material.
Experts in science,engineering,medicine,health,and industry work organizations to develop
standards foe safe exposure to RF energy.These standards provide recommended levels of
exposure for both workers and the general public.These recommended RF exposure levels
include substantial margins of protection.
All Radioddity two-way radios are designed,manufactured,and tested to ensure they meet
government established RF exposure levels.In addition,manufacturers also recommend specific

5. If you are using the radio without headset or earphone, do not hold the radio's speaker directly
to your ear.
6. Loud sounds from any source over a long period of time may affect your hearing temporarily
or permanently. The louder the volume of the radio, the less time it will take for your hearing
to be adversely affected. Hearing damage due to loud noise is sometimes initially
unrecognizable and can have a cumulative effect.
Note
Loud noises from any source over a long period of time can temporarily or permanently affect
your hearing. The louder the volume of the radio, the less time it take to negatively affect your
hearing.
Hearing damage caused by loud noise is sometimes not visible at first and can have cumulative
effects.
Safety Operation
Forbidden
1. Do not use the radio outdoors or in a humid environment, but only in dry environments.
2. Do not disassemble the radio, otherwise there is a risk of electric shock or fire.
3. Do not operate the radio if it has been broken or damaged in any way.
4. Do not mount the radio above an airbag or in the airbag deployment area. In the event of a
collision which triggers the airbag, the radio unit can be thrown at you with great force and
cause serious injuries to the occupants of the vehicle when the airbag is inflated.
To Reduce The Risk
1. Pull the plug, not the cable when disconnecting the radio.
2. Disconnect the radio from the power supply before carrying out any maintenance or cleaning
work.
3. Contact Radioddity for repair and service assistance.
Use of Communication Devices While Driving
1. Always check the laws and regulations for the use of radios in the countries and areas where
you drive.
2. Pay full attention to driving.
3. If required by driving conditions or regulations, leave the road to park before making or
receiving a call.

Appendix B - Technical Specification
General Specifications
Model number
Frequency Range
Frequency Tolerance
Frequency Control
Modulation Mode
Input Voltage
power consumption
Dimensions
Weight
Operating Temperature Range
Antenna Impedance
Antenna Connector
Mode of Operation
CB-27
26.965…27.405 MHz
±5.0 ppm
PLL Synthesizer
AM(US) AM/FM(EU)
13,8V, 1.5A
Transimit: < 2A
Receive: Squelched 0.3A
VOL Max: 0.8A
109mm x 104mm x 24mm
432g
-20°C … +50°C
50Ω
27MHz, SO-239
Simplex
Transmitter
Sender
Power Output
FM frequency deviation
AM modulation depth
Transmission interference
Frequency Response
Modulated signal distortion
Adjacent Channel Rejection
4W
< 1,9 kHz
< 90 %
< 4nW (-54dBm)
300-3000Hz
inferior to 5%
60dB
Sensitivity
Adjacent Channel Rejection
Image Rejection
Squelch
Audio Output Power
Audio Impedanz
Frequency Response
< 1μV bei 10dB (S+N)/N
60dB
70dB
1. ZF 10.695MHz
2. ZF 455KHz
< 1μV
1 Watt
8Ω
300-3000 Hz
IF Frequencies

Appendix C - built-in frequencies table
Note
The specifications will be revised due to technical improvements without prior notice.
Thanks for understanding.
US
AM (4W, 40Channel)
1
2
3
4
5
6
7
8
9
10
11
12
13
14
15
16
17
18
19
20
21
22
23
24
25
26
27
28
29
30
31
32
33
34
35
36
37
38
39
40
26.965
26.975
26.985
27.005
27.015
27.025
27.035
27.055
27.065
27.075
27.085
27.105
27.115
27.125
27.135
27.155
27.165
27.175
27.185
27.205
27.215
27.225
27.255
27.235
27.245
27.265
27.275
27.285
27.295
27.305
27.315
27.325
27.335
27.345
27.355
27.365
27.375
27.385
27.395
27.405
DE
FM (4W, 40Channel) / AM (4W, 40Channel) FM (4W, 40Channel)
1
2
3
4
5
6
7
8
9
10
11
12
13
14
15
16
17
18
19
20
21
22
23
24
25
26
27
28
29
30
31
32
33
34
35
36
37
38
39
40
41
42
43
44
45
46
47
48
49
50
51
52
53
54
55
56
57
58
59
60
61
62
63
64
65
66
67
68
69
70
71
72
73
74
75
76
77
78
79
80
26.965
26.975
26.958
27.005
27.015
27.025
27.035
27.055
27.065
27.075
27.085
27.105
27.115
27.125
27.135
27.155
27.165
27.175
27.185
27.205
27.215
27.225
27.255
27.235
27.245
27.265
27.275
27.285
27.295
27.305
27.315
27.325
27.335
27.345
27.355
27.365
27.375
27.385
27.395
27.405
26.565
26.575
26.585
26.595
26.605
26.615
26.625
26.635
26.645
26.655
26.665
26.675
26.685
26.695
26.705
26.715
26.725
26.735
26.745
26.755
26.765
26.775
26.785
26.795
26.805
26.815
26.825
26.835
26.845
26.855
26.865
26.875
26.885
26.895
26.905
26.915
26.925
26.935
26.945
26.955

FM (UK Model, 4W, 40Channel) FM (CE Model, 4W, 40Channel)
1
2
3
4
5
6
7
8
9
10
11
12
13
14
15
16
17
18
19
20
21
22
23
24
25
26
27
28
29
30
31
32
33
34
35
36
37
38
39
40
1
2
3
4
5
6
7
8
9
10
11
12
13
14
15
16
17
18
19
20
21
22
23
24
25
26
27
28
29
30
31
32
33
34
35
36
37
38
39
40
27.60125
27.61125
27.62125
27.63125
27.64125
27.65125
27.66125
27.67125
27.68125
27.69125
27.70125
27.71125
27.72125
27.73125
27.74125
27.75125
27.76125
27.77125
27.78125
27.79125
27.80125
27.81125
27.82125
27.83125
27.84125
27.85125
27.86125
27.87125
27.88125
27.89125
27.90125
27.91125
27.92125
27.93125
27.94125
27.95125
27.96125
27.97125
27.98125
27.99125
26.965
26.975
26.985
26.005
26.015
26.025
26.035
26.055
26.065
26.075
26.085
26.105
26.115
26.125
26.135
26.155
26.165
26.175
26.185
26.205
27.215
27.225
27.255
27.235
27.245
27.265
27.275
27.285
27.295
27.305
27.315
27.325
27.335
27.345
27.355
27.365
27.375
27.385
27.395
27.405
IN
FM (4W, 27Channel) / AM (4W, 27Channel)
1
2
3
4
5
6
7
8
9
10
11
12
13
14
15
16
17
18
19
20
21
22
23
24
25
26
27
26.965
26.975
26.988
27.005
27.015
27.025
27.035
27.055
27.065
27.075
27.085
27.105
27.115
27.125
27.135
27.155
27.165
27.175
27.185
27.205
27.215
27.225
27.255
27.235
27.245
27.265
27.275
PL
FM (4W, 40Channel) / AM (4W, 40Channel)
1
2
3
4
5
6
7
8
9
10
11
12
13
14
15
16
17
18
19
20
21
22
23
24
25
26
27
28
29
30
31
32
33
34
35
36
37
38
39
40
26.960
26.970
26.980
27.000
27.010
27.020
27.030
27.050
27.060
28.070
27.080
27.100
27.110
27.120
27.130
27.150
27.160
27.170
27.180
27.200
27.210
27.220
27.250
27.230
27.240
27.260
27.270
27.280
27.290
27.300
26.310
27.320
27.330
27.340
27.350
27.360
27.370
27.380
27.390
27.400

I
FMAM (4W, 40Channel) / AM (4W, 40Channel)
1
2
3
4
5
6
7
8
9
10
11
12
13
14
15
16
17
18
19
20
21
22
23
24
25
26
27
28
29
30
31
32
33
34
35
36
37
38
39
40
26.965
26.975
26.985
27.005
27.015
27.025
27.035
27.055
27.065
28.075
27.085
27.105
27.115
27.125
27.135
27.155
27.165
27.175
27.185
27.205
27.215
27.225
27.255
27.235
27.245
27.265
27.275
27.285
27.295
27.305
26.315
27.325
27.335
27.345
27.355
27.365
27.375
27.385
27.395
27.405
I2 (12 )
FM / AM (4W, 34Channel)
1
2
3
4
5
6
7
8
9
10
11
12
13
14
15
16
17
18
19
20
21
22
23
24
25
26
27
28
29
30
31
32
33
34
26.965
26.975
26.985
27.005
27.015
27.025
27.035
27.055
27.065
28.075
27.085
27.105
27.115
27.125
27.135
27.155
27.165
27.175
27.185
27.205
27.215
27.225
27.255
27.245
27.265
27.875
27.885
27.895
27.905
27.915
26.825
27.935
27.945
27.955
EU
FM (4W, 40Channel) / AM (1W, 40Channel)
1
2
3
4
5
6
7
8
9
10
11
12
13
14
15
16
17
18
19
20
21
22
23
24
25
26
27
28
26.965
26.975
26.985
27.005
27.015
27.025
27.035
27.055
27.065
28.075
27.085
27.105
27.115
27.125
27.135
27.155
27.165
27.175
27.185
27.205
27.215
27.225
27.255
27.235
27.245
27.265
27.275
27.285
EU
FM (4W, 40Channel) / AM (1W, 40Channel)
29
30
31
32
33
34
35
36
37
38
39
40
27.295
27.305
26.315
27.325
27.335
27.345
27.355
27.365
27.375
27.385
27.395
27.405

CE
Only FM (4W, 40Channel)
1
2
3
4
5
6
7
8
9
10
11
12
13
14
15
16
17
18
19
20
21
22
23
24
25
26
27
28
29
30
31
32
33
34
35
36
37
38
39
40
26.965
26.975
26.985
27.005
27.015
27.025
27.035
27.055
27.065
28.075
27.085
27.105
27.115
27.125
27.135
27.155
27.165
27.175
27.185
27.205
27.215
27.225
27.255
27.235
27.245
27.265
27.275
27.285
27.295
27.305
26.315
27.325
27.335
27.345
27.355
27.365
27.375
27.385
27.395
27.405
Über Radioddity
“Sie, unser Freund und Kunde, stehen im Mittelpunkt unseres Handelns.”
Nichts ist wichtiger als Ihre Zeit und Ihr Geld. Wenn Sie Funkgeräte online kaufen, stehen Sie vor einem Dilemma:
Sparen Sie Zeit und kaufen Sie von einer seriösen Website zu einem hohen Preis, oder versuchen Sie, Geld zu sparen,
indem Sie von einem unberechenbaren Händler auf Kosten Ihrer Zeit, die Sie mit Qualitäts- und Servicefragen
verbringen, kaufen. Bei Radioddity.com müssen Sie sich nicht zwischen niedrigen Preisen und einem sicheren
Einkaufserlebnis entscheiden. Ob Sie nun das erste Mal bei uns etwas kaufen oder ein erfahrener Funkamateur sind,
wir hoffen stets, dass Sie mit unseren Produkten, Preisen, Inhalten und Quellen genau das finden, was Sie brauchen.
In den letzten Jahren hat Radioddity die Bedürfnisse der Käufer von Funkgeräten besser erfüllt, indem es ein sicheres
Einkaufserlebnis geschaffen hat. Wir tun dies, indem wir die hochwertigsten Produkte zu einem erschwinglichen Preis
anbieten und diese mit einem erstklassigen Service unterstützen. Das klingt für uns einfach.
Unser Versprechen: Ihr Einkaufserlebnis zu verbessern.
Durch starke Partnerschaften sind wir in der Lage, Ihnen unter dem Markennamen neueste Technologie anzubieten.
Unsere fürsorglichen und reaktionsschnellen Kundendienstteams unterstützen uns dabei, dieses Versprechen
einzuhalten und Ihre Bedürfnisse jeden Tag noch besser zu erfüllen. Zusammen mit diesem Versprechen hoffen wir,
Ihnen den entsprechenden Mehrwert zu geben. Sei es, indem wir Ihnen die neuesten und besten DMR- und
Analogfunkgeräte, Zubehör und verwandte Produkte anbieten, indem wir einen hervorragenden technischen Support
bieten, oder indem wir mit führenden Köpfen der Amateurfunkbranche zusammenarbeiten, um hilfreiche Inhalte zu
entwickeln, die Sie in Ihrem Kaufprozess unterstützen, einschließlich unseres Blogs, unserer FAQ und unseres
Newsletters. Ihre Anliegen sind unsere Anliegen.
All dies machen wir um Ihnen zu helfen, qualitativ hochwertige Funkgeräte zu niedrigen Preisen, mit so wenig
Kopfschmerzen für den Verbraucher wie möglich zu erwerben. Wenn wir Ihrer Meinung nach dieses Versprechen in
irgendeiner Weise nicht einhalten, lassen Sie es uns dies bitte per E-Mail wissen: support@radioddity.com

Sicherheitshinweise
Bitte lesen Sie die folgende Kurzanleitung, da die Nichteinhaltung dieser Regeln eine Gefahr
darstellen oder gegen das Gesetz verstoßen kann.
1. Beachten Sie die Vorschriften der örtlichen Behörden, bevor Sie dieses Funkgerät verwenden,
da ein unsachgemäßer Gebrauch gegen das Gesetz verstoßen kann.
2. Schalten Sie das Funkgerät aus, bevor Sie sich brennbaren oder explosionsgefährdeten
Bereichen nähern (beispielsweise Tankstellen).
3. Schalten Sie das Funkgerät aus, bevor Sie in die Nähe von Spreng- oder Zündzonen kommen.
4. Verwenden Sie kein Funkgerät, dessen Antenne beschädigt ist, da ein Berühren der
beschädigten Antenne zu Hitzeschäden führen kann.
5. Versuchen Sie nicht, das Funkgerät zu öffnen; eventuelle Wartungsarbeiten sollten nur von
einem Fachmann durchgeführt werden.
6. Um Störungen durch elektromagnetische Interferenzen oder elektromagnetische Strahlungen
zu vermeiden, schalten Sie das Funkgerät an Orten aus, an denen Hinweise wie beispielsweise
"Keine drahtlosen Geräte verwenden" angebracht sind, z. B. in Krankenhäusern und anderen
Gesundheitseinrichtungen.
7. Montieren Sie das Funkgerät in Fahrzeugen die über Airbags verfügen nicht im Bereich der
Airbag-Auslösung.
8. Bewahren Sie das Funkgerät nicht unter direkter Sonneneinstrahlung oder in heißen
Bereichen auf.
9. Wenn das Funkgerät stinkt oder raucht, schalten Sie es bitte umgehend aus und wenden Sie
sich an Ihren Händler vor Ort.
10. Senden Sie nicht zu lange, da dies zu einer Überhitzung des Funkgeräts führen kann.
Kapitel 1 - Allgemeine Informationen
Was ist im Karton?
Danke, dass Sie sich für ein Funkgerät von Radioddity entschieden haben. Wir empfehlen Ihnen,
zunächst den in der folgenden Tabelle aufgeführten Lieferumfang zu überprüfen, bevor Sie die
Verpackung entsorgen. Sollte etwas fehlen, wenden Sie sich bitte umgehend an Ihren
Fachhändler.
Mitgeliefertes Zubehör
Hinweis
Weiteres Zubehör für Ihr Funkgerät erhalten Sie bei: https://www.radioddity.com/
CB-27 Mikrofon Ersatzsicherung F5A220V Befestigungsbügel
Zahnscheiben Rändel-schrauben Befestigungs-schrauben Benutzerhandbuch
CB radio
CB-27

Kapitel 2 - Mit dem Funkgerät vertraut werden
1. AF-Taste: Modulationsart / Kanalscan / (Frequenzband)
2. SQ-Taste: Rauschsperre (manuell SQ / automatisch SQ)
3. LC-Anzeige
4. RFG-Taste: Empfangsdämpfung
5. EMG-Taste: Notfallkanal / Tastatursperre
6. Ein-/Ausschalter sowie Lautstärkeregler
7. Antennenbuchse (Typ SO-239) für Stecker (Typ PL-259)
8. Externe Lautsprecherbuchse (3,5mm mono-Klinke)
Funkgerät ein-/ausschalten
1. Drehen Sie den Ein-/Ausschalter im Uhrzeigersinn, um das Radio einzuschalten, die
LC-Anzeige zeigt zunächst den für das Land in dem das Gerät betrieben werden soll fest
eingestellten Frequenzband und anschließend die Modulationsart (FM/AM) sowie den
gewählten Kanal an.
2. Drehen Sie den Ein-/Ausschalter gegen den Uhrzeigersinn, bis Sie ein Klickgeräusch hören.
Das Funkgerät ist nun ausgeschaltet.
Lautstärke
Drehen Sie den Ein-/Ausschalter im Uhrzeigersinn, um die Lautstärke zu erhöhen, und gegen
den Uhrzeigersinn, um die Lautstärke zu verringern.
Kanalwahl
1. Drücken Sie am Mikrofon kurz eine der Kanalwahltasten um in den nächst höheren (Taste
„UP“, englisch „up“) oder nächst niedrigeren (Taste „DN“, englisch „down“) Funkkanal zu
wechseln.
2. Halten Sie eine der Kanalwahltasten gedrückt um den Funkkanal automatisch hoch (Taste
„UP“, englisch „up“) oder runter (Taste „DN“, englisch „down“) zu zählen.

Rauschsperre
Das Gerät verfügt über eine manuelle Rauschsperre (SQ) mit einstellbarem Rauschpegel sowie
eine automatische Rauschsperre (AQ).
Manuelle Rauschsperre SQ
Nach kurzer Betätigung der Taste [SQ] erscheint für etwa eine Sekunde „SQ“ auf der LC Anzeige.
Sodann wird der derzeit eingestellte Wert für die manuelle Rauschsperre angezeigt. Dieser kann
über die Kanalwahltasten des Mikrofons eingestellt werden. Mögliche Werte sind dabei „o.F“
(english „off“, aus, „ohne Funktion“) sowie „0.1“ … “2.8“ (in 0.1er Schritten). Der eingestellte Wert
gibt dabei die mindestens erforderliche Stärke des Eingangssignals vor. „o.F“ ist die niedrigste
Stufe. Dabei ist der Audiokanal permanent geöffnet. „2,8“ ist die höchste Stufe und öffnet den
Audiokanal nur dann, wenn das Empfangssignal sehr stark ist.
Wird die Taste [SQ] erneut kurz gedrückt oder erfolgt längere Zeit keine Betätigung der
Kanalwahltasten, so wechselt die Anzeige wieder in die normale Darstellung der Kanalnummer.
Automatische Rauschsperre AQ
Nach längerer Betätigung der Taste [SQ] leuchtet der Schriftzug „AQ“ in invertierter Darstellung
dauerhaft auf der LC-Anzeige. Sodann wird der derzeit eingestellte Wert für die automatische
Rauschsperre angezeigt. Dieser kann über die Kanalwahltasten des Mikrofons in 9 Stufen
eingestellt werden. Mögliche Werte sind dabei „A.1“ ..“A.9“. Dabei ist A1 ist die niedrigste Stufe,
A9 ist die höchste Stufe.
Diese Funktion kann ebenfalls zur Einstellung des Rausch-Pegels verwendet werden. Dabei
wird jedoch der Rauschanteil des empfangenen Signals zur Auswertung herangezogen.
Weniger Rauschen ist dabei gleichbedeutend mit einer besseren Verständlichkeit des
empfangenen Signals. Ein hoher Rauschanteil hingegen erschwert die Verständlichkeit des
empfangenen Signals deutlich.
Erfolgt längere Zeit keine Betätigung der Kanalwahltasten, so wechselt die Anzeige wieder zur
normalen Darstellung der Kanalnummer. Der Schriftzug „AQ“ leuchtet jedoch weiterhin.
Bei bereits eingeschalteter automatischer Rauschsperre AQ reicht eine kurze Betätigung der
Taste [SQ] um zur Einstellung der Empfindlichkeit für die automatische Rauschsperre zu
gelangen.
Durch erneutes, langes Betätigen der Taste [SQ] wird die automatische Rauschsperre wieder
deaktiviert und der Schriftzug „AQ“ auf der LC-Anzeige erlischt.
Hinweis
Versuche haben ergeben, dass der Rausch-Einstellbereich der manuellen Rauschsperre SQ
offensichtlich größer ist als bei der automatischen Rauschsperre AQ. Daher empfehlen wir die
Verwendung der manuellen Rauschsperre SQ.
Manuelle (SQ) und automatische (AQ) Rauschsperre können nicht gleichzeitig aktiviert werden.
Betriebsart
Das Gerät unterstützt, abhängig vom gewählten Frequenzband sowie gewählten Kanal die

Betriebsarten FM (Frequenz-Modulation) sowie AM (Amplituden- Modulation).
Durch lange Betätigung der Taste [A/F] kann zwischen den Betriebsarten AM und FM
umgeschaltet werden. Ein derartiger Wechsel ist jedoch nur dann möglich, wenn der eingestellte
Kanal auch in der jeweiligen Betriebsart erlaubt ist. Siehe hierzu „Frequenzband“.
Die jeweilige Betriebsart wird auf der LC-Anzeige entsprechend mit „AM“ oder „FM“ links neben
der eingestellten Kanalnummer angegeben.
Empfangsdämpfung
Stationen in unmittelbarer Nähe zur eigenen Funkstation können gegebenenfalls das
Empfangsteil Ihres Funkgerätes übersteuern (vergleichbar damit wenn Ihnen jemand ganz laut
ins Ohr spricht und Sie dadurch das gesprochene Wort auf Grund der Lautstärke nicht mehr
identifizieren können). In einem solchen Fall ist es erforderlich das empfangene Signal
entsprechend zu dämpfen, bevor es das ansonsten sehr empfindliche Empfangsteil Ihres
Funkgerätes erreicht. Ihr Funkgerät verfügt hierzu über eine entsprechende RFG-Funktion,
1. Drücken Sie kurz die Taste [RFG]. Daraufhin zeigt in der LC-Anzeige ein kleines „R“ sowie der
Wert der aktuell eingestellten Empfangsdämpfung in dBm.
2. Die Empfangsdämpfung kann nun über die Kanalwahltasten des Mikrofons eingestellt werden.
Mögliche Werte sind dabei 6…48 dBm (in 6dB-Schritten). Wenn der RFG-Pegel beispielsweise
6 ist, bedeutet dies eine Dämpfung des Empfangspegels um 6dBm.
3. Drücken Sie erneut kurz die Taste [RFG], um die Einstellung der Empfangsdämpfung wieder
zu verlassen.
Wenn die RFG-Funktion eingeschaltet ist, zeigt die LC-Anzeige dauerhaft ein „R“ an.
Notfallkanal
Im CB-Funk sind die Kanäle 9 sowie 19 für Notfälle vorgesehen. Zu diesem Zweck verfügt Ihr
Funkgerät über eine spezielle Taste [EMG]
1. Drücken Sie kurz die Taste [EMG] um Kanal 9 auszuwählen.
2. Betätigen Sie abermals die Taste [EMG] um Kanal 19 auszuwählen.
3. Ein weiteres Betätigen der Taste [EMG] aktiviert wieder den letzten, normal eingestellten
Kanal.
Tastatursperre
1. Um die Tastatursperre einzuschalten, halten Sie die Taste [EMG] länger als 2 Sekunden
gedrückt. Auf der LC-Anzeige erscheint "LC".
2. Um die Tastatursperre wieder aufzuheben, halten Sie die Taste [EMG] erneut länger als 2
Sekunden gedrückt. Auf der LC-Anzeige erscheint „oF“.
Hinweis
Bei aktivierter Tastatursperre funktioniert lediglich die Sprechtaste.
Scan-Funktion
1. Halten Sie die Taste [A/F] gedrückt, um die Scanfunktion zu aktivieren. In der LC-Anzeige
blinkt "SC".
2. Durch Drücken einer der Kanalwahltasten am Mikrofon können Sie die Scanrichtung während
des Scanvorgangs ändern.

3. Um die Scanfunktion zu deaktivieren, betätigen Sie erneut die Taste [A/F] oder drücken Sie
die Sprechtaste
Frequenzband
Das Funkgerät unterstützt mehrere Frequenzbänder. Abhängig vom Land in dem das Gerät
betrieben wird, kann es erforderlich sein, ein anderes Frequenzband zu wählen
1. Halten Sie die Taste [A/F] gedrückt und schalten Sie das Radio ein, bis die LC-Anzeige das
aktuell ausgewählte Frequenzband anzeigt.
2. Mit den Kanalwahltasten am Mikrofon können Sie nun das gewünschte Frequenzband
auswählen.
3. Schalten Sie anschließend das Gerät aus und wieder ein.
Die möglichen Frequenzbänder sind im Anhang C aufgeführt.
Externen Lautsprecher anschließen
Am rückwärtigen 3,5mm Mono-Klinkenanschluss kann ein externer Lautsprecher mit einer
Impedanz von 8Ω angeschlossen werden. Der eingebaute Lautsprecher wird dadurch
automatisch ausgeschaltet.
Kapitel 3 - Grundlegende Funktionsweise
Kurzanleitung
1. Öffnen Sie die vorsichtig den Karton und entnehmen Sie das Funkgerät, das Anschlusskabel
sowie das Mikrofon.
2. Verbinden Sie die SO-239-Buchse des Funkgerätes über einen PL-259-Stecker mit einer
entsprechenden Antenne. Bitte beachten Sie, dass eine Antenne nicht zum Lieferumfang gehört.
3. Verbinden Sie das mitgelieferte Stromversorgungskabel mit einer entsprechenden
12V-Gleichspannungsquelle. Diese sollte mindestens 5A Dauerstrom liefern können.
4. Drehen Sie den Ein-/Ausschalter im Uhrzeigersinn und stellen Sie zunächst eine mittlere
Lautstärke ein.
5. Wählen Sie mit dem Kanalwahlschalter am Mikrofon den gewünschten Funkkanal. Dieser
wird Ihnen auf der LC-Anzeige angezeigt.
6. Drücken Sie die Sprechtaste (PTT) und reden Sie Sie! Korrigieren Sie gegebenenfalls mit
dem Regler des Ein-/Ausschalters die Lautstärke des eingebauten Lautsprechers.
Das Radioddity CB-27 ist ein kostengünstiges CB- Analogfunkgerät. Es kann mit jedem anderen
CB Analogfunkgerät kommunizieren, dies jedoch ohne dafür eine exorbitante Menge an Geld
auszugeben! Sie müssen nur sicherstellen, dass Sie sich auf den gleichen Kanälen mit
identischer Modulationsart befinden.
Hinweis:
Betreiben Sie das Gerät nie ohne eine zum Frequenzbereich (27MHz) passende Antenne.
Das Gerät kann dadurch dauerhaften Schaden nehmen.

Kapitel 4 - Anleitung zur Fehlerbehebung
Warum kann ich zwischen meinen beiden Funkgeräten keine Unterhaltung führen?
a) Stellen Sie sicher, dass die beiden Funkgeräte auf dem gleichen Kanal sind.
b) Überprüfen Sie, ob der gleiche Kanal für den Empfang der identischen Modulationsart
eingestellt ist.
c) Überprüfen Sie, ob die Lautstärke der beiden Funkgeräte ausreichend hoch ist
d) Überprüfen Sie die korrekte Installation der Antennen
e) Überprüfen Sie die Reichweite der Funkgeräte (ggfs in Sichtweite).
Andere, häufig auftretende Probleme
Problem Lösung
1. Die Spannungsquelle ist nicht eingeschaltet
2. Die Schmelzsicherung hat ausgelöst. Ersetzen
Sie diese durch die mitgelieferte Ersatzsicherung
1. Stellen Sie den Lautstärkeregler auf die höchste
Stufe.
2. Das Mikrofon kann beschädigt sein, senden Sie
es zur Überprüfung an den örtlichen Händler.
1. Das Funkgerät ist außerhalb der Empfangsreichweite
2. Schalten Sie das Funkgerät in kürzerer Entfernung
ein und versuchen Sie es erneut
Das Funkgerät kann nicht
eingeschaltet werden
Andere Funkgeräte können
Sende-Signale nicht oder nur in
geringer Lautstärke empfangen.
Es sind fortwährend Geräusche
zu hören
Anhang A - HF-Energiebelastung und
Produktsicherheit für tragbare Funkgeräte
ACHTUNG!
Bevor Sie dieses Funkgerät benutzen, lesen Sie diese Anleitung. Sie enthält wichtige Hinweise
zur Bedienung, den sicheren Gebrauch und das Bewusstsein für HF-Energie sowie zur Kontrolle
der Einhaltung der geltenden Normen und Vorschriften.
Dieses Funkgerät nutzt elektromagnetische Energie im Hochfrequenzspektrum (HF), um die
Kommunikation zwischen zwei oder mehr Benutzern über eine Entfernung zu ermöglichen. Es
nutzt Radiofrequenz (RF) Energie oder Funkwellen, um Anrufe zu senden und zu empfangen.
HF-Energie ist eine Form der elektromagnetischen Energie. Andere Formen sind unter anderem
Sonnenlicht und Röntgenstrahlen. HF-Energie sollte jedoch nicht mit diesen anderen Formen
elektromagnetischer Energie verwechselt werden, die bei unsachgemäßer Verwendung
biologische Schäden verursachen kann. Sehr hohe Röntgenstrahlen können z.B. Gewebe und
Erbgut schädigen.
Experten aus Wissenschaft, Technik, Medizin, Gesundheit und Industrie arbeiten mit
Organisationen zusammen, um Standards für den sicheren Umgang mit HF-Energie zu entwickeln.
Diese Normen bieten sowohl für die Arbeitnehmer als auch für die breite Öffentlichkeit empfohlene
Expositionswerte. Diese empfohlenen HF-Belastungswerte beinhalten zudem erhebliche
Sicherheitspuffer.

Alle Radioddity Funkgeräte sind so konzipiert, hergestellt und getestet, dass sie die von den
Regierungen festgelegten Grenzwerte für HF-Belastung erfüllen. Darüber hinaus empfehlen die
Hersteller den Anwendern von Funkgeräten spezielle Bedienungsanleitungen. Diese
Anweisungen sind wichtig, da sie die Benutzer über die HF-Energiebelastung informieren und
einfache Verfahren zu ihrer Kontrolle bieten.
Auf den folgenden Websites finden Sie weitere Informationen darüber, wie Sie die Belastung
durch HF-Energie kontrollieren können, um die Einhaltung der festgelegten Grenzwerte zu
gewährleisten:
http://www.who.int/en/
http://www.euro.who.int/de/home
Funkzulassung
Regierungen klassifizieren die Funkgeräte. Die meisten dieser klassifizierten Funkgeräte
benötigen von den örtlichen Regierungsstellen eine Betriebserlaubnis. Für Ihr Radioddity CB-27
Funkgerät ist keine Einzellizenz erforderlich da es über eine entsprechende Allgemeinzulassung
verfügt.
Bedienungshinweise
Senden Sie nicht mehr als den Nennbetriebsfaktor von 50% der Zeit. Zum Senden (Sprechen)
drücken Sie die Sprechtaste (PTT - Push To Talk), um Anrufe entgegenzunehmen (Hören),
lassen Sie die Sprechtaste los. Die Übertragung von 50% der Zeit oder weniger ist wichtig, da
das Funkgerät nur dann eine messbare HF-Energiebelastung im Sinne der Normkonformität
erzeugt.
Schützen Sie Ihr Gehör
1. Verwenden Sie die geringste Lautstärke die Sie für Ihre Arbeit benötigen.
2. Erhöhen Sie die Lautstärke nur dann, wenn Sie sich in einer lauten Umgebung befinden.
3. Drehen Sie die Lautstärke herunter, bevor Sie ein Headset oder einen Ohrhörer anschließen.
4. Begrenzen Sie die Zeit, in der Sie Headsets oder Ohrhörer bei hoher Lautstärke verwenden.
5. Wenn Sie das Funkgerät ohne Headset oder Ohrhörer verwenden, halten Sie den
Lautsprecher des Funkgeräts nicht direkt an Ihr Ohr.
Hinweis
Laute Geräusche aus irgendeiner Quelle über einen längeren Zeitraum können Ihr Gehör
vorübergehend oder dauerhaft beeinträchtigen. Je lauter die Lautstärke des Funkgeräts ist,
desto weniger Zeit wird benötigt, bis Ihr Gehör negativ beeinträchtigt wird.
Hörschäden durch lauten Lärm sind manchmal zunächst nicht erkennbar und können sich
kumulativ auswirken.
Sicherer Betrieb
Verboten
1. Verwenden Sie das Funkgerät nicht im Freien oder in feuchter Umgebung, sondern nur in
trockenen Umgebungen.

2. Nehmen Sie das Funkgerät nicht auseinander, da sonst die Gefahr eines elektrischen
Schlages oder eines Brandes besteht.
3. Betreiben Sie das Funkgerät nicht, wenn es gebrochen oder in irgendeiner Weise beschädigt
wurde.
4. Befestigen Sie das Funkgerät nicht über einem Airbag oder im Bereich der Airbagauslösung.
Das Funkgerät kann Ihnen im Falle eines Aufpralls welcher den Airbag auslöst mit hoher
Wucht entgegengeschleudert werden und beim Aufblasen des Airbags zu schweren
Verletzungen der Fahrzeuginsassen führen.
Um das Risiko zu reduzieren
1. Ziehen Sie am Stecker und nicht am Kabel, wenn Sie das Funkgerät abziehen.
2. Trennen Sie das Funkgerät von der Spannungsversorgung bevor Sie Wartungs-oder
Reinigungsarbeiten durchführen.
3. Kontaktieren Sie Radioddity für Hilfe zu Reparatur und Service.
Einsatz von Kommunikationsgeräten während der Fahrt
1. Überprüfen Sie immer die Gesetze und Vorschriften für den Gebrauch von Funkgeräten in
den Ländern und Gebieten, in denen Sie fahren.
2. Schenken Sie dem Fahren und der Straße Ihre volle Aufmerksamkeit.
3. Wenn es die Fahrbedingungen oder Vorschriften erfordern, verlassen Sie die Straße um zu
parken bevor Sie einen Anruf tätigen oder entgegennehmen.
Anhang B - Technische Daten
Allgemein
Modell-Nummer
Frequenzbereich
Frequenzgenauigkeit
Frequenzkontrolle
Modulationsart
Anzahl Kanäle
Betriebsspannung
Stromverbrauch
Abmessungen
Gewicht
Arbeitstemperaturbereich
Antennen-Impedanz
Antennenanschluss
Betriebsart
CB-27
26.965…27.405 MHz
±5.0 ppm
PLL Synthesizer
AM (Europa sowie USA) / FM (nur Europa)
Maximal 40 AM, 80 FM (je nach Frequenzband
13,8V Gleichspannung
Senden: 1.5A
Empfang: 0,3A bei eingeschalteter Rauschsperre
und 0,8A bei maximaler Lautstärke
109mm x 104mm x 24mm
432g (einschließlich Mikrofon)
-20°C … +50°C
50Ω
27MHz,SO-239
Simplex

Sender
Empfänger
Ausgangsleistung
FM-Frequenzhub
AM-Modulationsgrad
Störübertragungen
Übertragener Audio-Frequenzbereich
Modulierte Signalverzerrung
Nachbarkanal-Unterdrückung
4W
< 1,9 kHz
< 90 %
< 4nW (-54dBm)
300-3000Hz
Unter 5%
60dB
Empfindlichkeit
Nachbarkanaldämpfung
Spiegelselektion
Zwischenfrequenzen
Rauschsperre
Audioausgang
Audioimpedanz
Frequenzgang
< 1μV bei 10dB (S+N)/N
60dB
70dB
1. ZF 10.695MHz
2. ZF 455KHz
< 1μV
1 Watt
8Ω
300-3000 Hz
Hinweis:
Die Spezifikationen werden aufgrund technischer Verbesserungen jederzeit ohne
Vorankündigung überarbeitet. Herzlichen Dank für Ihr Verständnis.
Anhang C - Ausführliche Frequenzbänder
DE
FM (4W, 40Channel) / AM (4W, 40Channel)
1
2
3
4
5
6
7
8
9
10
11
12
13
14
15
16
17
18
19
20
21
22
23
24
25
26
27
28
29
30
31
32
33
34
35
36
37
38
39
40
26.965
26.975
26.958
27.005
27.015
27.025
27.035
27.055
27.065
27.075
27.085
27.105
27.115
27.125
27.135
27.155
27.165
27.175
27.185
27.205
27.215
27.225
27.255
27.235
27.245
27.265
27.275
27.285
27.295
27.305
27.315
27.325
27.335
27.345
27.355
27.365
27.375
27.385
27.395
27.405

DE
FM (4W, 40Channel)
41
42
43
44
45
46
47
48
49
50
51
52
53
54
55
56
57
58
59
60
61
62
63
64
65
66
67
68
69
70
71
72
73
74
75
76
77
78
79
80
26.565
26.575
26.585
26.595
26.605
26.615
26.625
26.635
26.645
26.655
26.665
26.675
26.685
26.695
26.705
26.715
26.725
26.735
26.745
26.755
26.765
26.775
26.785
26.795
26.805
26.815
26.825
26.835
26.845
26.855
26.865
26.875
26.885
26.895
26.905
26.915
26.925
26.935
26.945
26.955
FM (UK Model, 4W, 40Channel) FM (CE Model, 4W, 40Channel)
1
2
3
4
5
6
7
8
9
10
11
12
13
14
15
16
17
18
19
20
21
22
23
24
25
26
27
28
29
30
31
32
33
34
35
36
37
38
39
40
1
2
3
4
5
6
7
8
9
10
11
12
13
14
15
16
17
18
19
20
21
22
23
24
25
26
27
28
29
30
31
32
33
34
35
36
37
38
39
40
27.60125
27.61125
27.62125
27.63125
27.64125
27.65125
27.66125
27.67125
27.68125
27.69125
27.70125
27.71125
27.72125
27.73125
27.74125
27.75125
27.76125
27.77125
27.78125
27.79125
27.80125
27.81125
27.82125
27.83125
27.84125
27.85125
27.86125
27.87125
27.88125
27.89125
27.90125
27.91125
27.92125
27.93125
27.94125
27.95125
27.96125
27.97125
27.98125
27.99125
26.965
26.975
26.985
26.005
26.015
26.025
26.035
26.055
26.065
26.075
26.085
26.105
26.115
26.125
26.135
26.155
26.165
26.175
26.185
26.205
27.215
27.225
27.255
27.235
27.245
27.265
27.275
27.285
27.295
27.305
27.315
27.325
27.335
27.345
27.355
27.365
27.375
27.385
27.395
27.405

IN
FM (4W, 27Channel) / AM (4W, 27Channel)
1
2
3
4
5
6
7
8
9
10
11
12
13
14
15
16
17
18
19
20
21
22
23
24
25
26
27
26.965
26.975
26.988
27.005
27.015
27.025
27.035
27.055
27.065
27.075
27.085
27.105
27.115
27.125
27.135
27.155
27.165
27.175
27.185
27.205
27.215
27.225
27.255
27.235
27.245
27.265
27.275
PL
FM (4W, 40Channel) / AM (4W, 40Channel)
1
2
3
4
5
6
7
8
9
10
11
12
13
14
15
16
17
18
19
20
21
22
23
24
25
26
27
28
29
30
31
32
33
34
35
36
37
38
39
40
26.960
26.970
26.980
27.000
27.010
27.020
27.030
27.050
27.060
28.070
27.080
27.100
27.110
27.120
27.130
27.150
27.160
27.170
27.180
27.200
27.210
27.220
27.250
27.230
27.240
27.260
27.270
27.280
27.290
27.300
26.310
27.320
27.330
27.340
27.350
27.360
27.370
27.380
27.390
27.400
I
FMAM (4W, 40Channel) / AM (4W, 40Channel)
1
2
3
4
5
6
7
8
9
10
11
12
13
14
15
16
17
18
19
20
21
22
23
24
25
26
27
28
29
30
31
32
33
34
35
36
37
38
39
40
26.965
26.975
26.985
27.005
27.015
27.025
27.035
27.055
27.065
28.075
27.085
27.105
27.115
27.125
27.135
27.155
27.165
27.175
27.185
27.205
27.215
27.225
27.255
27.235
27.245
27.265
27.275
27.285
27.295
27.305
26.315
27.325
27.335
27.345
27.355
27.365
27.375
27.385
27.395
27.405
EU
FM (4W, 40Channel) / AM (1W, 40Channel)
1
2
3
4
5
6
7
8
9
10
11
12
13
14
15
16
17
18
19
20
21
22
23
24
25
26
27
28
26.965
26.975
26.985
27.005
27.015
27.025
27.035
27.055
27.065
28.075
27.085
27.105
27.115
27.125
27.135
27.155
27.165
27.175
27.185
27.205
27.215
27.225
27.255
27.235
27.245
27.265
27.275
27.285

CE
Only FM (4W, 40Channel)
1
2
3
4
5
6
7
8
9
10
11
12
13
14
15
16
17
18
19
20
21
22
23
24
25
26
27
28
29
30
31
32
33
34
35
36
37
38
39
40
26.965
26.975
26.985
27.005
27.015
27.025
27.035
27.055
27.065
28.075
27.085
27.105
27.115
27.125
27.135
27.155
27.165
27.175
27.185
27.205
27.215
27.225
27.255
27.235
27.245
27.265
27.275
27.285
27.295
27.305
26.315
27.325
27.335
27.345
27.355
27.365
27.375
27.385
27.395
27.405
I2 (12 )
FM / AM (4W, 34Channel)
1
2
3
4
5
6
7
8
9
10
11
12
13
14
15
16
17
18
19
20
21
22
23
24
25
26
27
28
29
30
31
32
33
34
26.965
26.975
26.985
27.005
27.015
27.025
27.035
27.055
27.065
28.075
27.085
27.105
27.115
27.125
27.135
27.155
27.165
27.175
27.185
27.205
27.215
27.225
27.255
27.245
27.265
27.875
27.885
27.895
27.905
27.915
26.825
27.935
27.945
27.955
EU
FM (4W, 40Channel) / AM (1W, 40Channel)
29
30
31
32
33
34
35
36
37
38
39
40
27.295
27.305
26.315
27.325
27.335
27.345
27.355
27.365
27.375
27.385
27.395
27.405

Vielen Dank für Ihren Einkauf bei Radioddity!
TUTORIALS, SUPPORT UND MEHR FINDEN SIE UNTER
www.radioddity.com
www.facebook.com/radioddity
www.youtube.com/c/Radioddityradio
 Loading...