

Page 1

SPECTRALIS 2
Spectralis 2
1
Page 2

SPECTRALIS 2
Spectralis
Spectralis 2 manual
Vers. 2 for Spectralis 1/2 Versions above 1.5
Jörg Schaaf, Radikal Technologies Deutschland GmbH, http://www.raditec.de
Copyright © 2009
Radikal Technologies Deutschland GmbH
Mariahilfstr. 8
81541 München, Germany
Maintaining the highest quality standards is the top priority for Radikal Technologies
GmbH. This is why the design process for any of our new products continues even
after they are released to the public. Technical changes are implemented at any time
without prior notification, if we feel they serve to improve the product. According to
this statement the technical specifications and/or the look of the instrument might
vary from the specs and pictures shown in this Manual.
Any duplication, of all or parts of this manual, in any form and for any reason, requires
prior written permission from Radikal Technologies GmbH.
© 2009, Radikal Technologies Deutschland GmbH
2
Page 3

SPECTRALIS 2
We herewith confirm that the following product
conforms to the requirements of the council Directive 89/336/FWG for radio frequency
interference. It also complies with regulations for radio interference of electronic
devices (EMVG) dated August 30th, 1995.
Declaration of Conformity
SPECTRALIS 2
The following standards have been used to determine conformity:
-EN 50082-1:1992, EN 50081-1:1992, EN 60065:1993
This declaration has been made solely on behalf of the manufacturer:
Radikal Technologies Deutschland GmbH
Mariahilfstr. 8
D-81541 München
Munich/Germany, 01.04.2009
Jurgen Korduletsch, Managing Director
3
Page 4

Declaration of Conformity......................................................................................................................... 3
1.1 Warranty ............................................................................................................................................... 7
1.1.1 Term .................................................................................................................................................... 7
1.1.2 Coverage ...................................................................................................................... 7
1.1.3 Transfer of warranty .................................................................................................. 7
1.1.4 Liability ....................................................................................................................... 7
1.2 Safety notices ........................................................................................................................................ 8
2. Introduction ............................................................................................................................................ 9
2.1 What is the Spectralis? ................................................................................................ 10
2.2 Preparations ........................................................................................................................................ 10
2.2.1 Unpacking .................................................................................................................. 10
2.2.2 Set-Up......................................................................................................................... 10
2.2.3 Firmware update ..................................................................................................... 10
2.3 Connections and File operation ........................................................................................................ 11
2.3.1 Audio connections ..................................................................................................... 11
2.3.2 MIDI connections ..................................................................................................... 12
2.3.3 Formatting Media ..................................................................................................... 13
2.3.4 Power connection ...................................................................................................... 13
2.4 Explanations of basic terms ............................................................................................................... 13
2.5 Frontpanel overview........................................................................................................................... 16
2.5.1 „Part“-button section ............................................................................................... 16
2.5.2 „Num-Button-Assignment“-section ........................................................................ 17
2.5.3 "Sequence-Edit"-section .......................................................................................... 18
2.5.4 "Groove-Edit"-section ............................................................................................. 18
2.5.5 "Filterbank"-section ................................................................................................ 19
2.5.6 "Mixing-desk"-section ............................................................................................. 20
2.5.7 "Master"-section ...................................................................................................... 20
2.5.8 "Creativator"-section ............................................................................................... 20
2.5.9 "Synth-Edit"-section (LFO, VCO, VCF, VCA) ..................................................... 21
2.5.10 "Transport"-section (the section with the green button) .................................... 21
2.5.11 Numeric buttons..................................................................................................... 22
2.6 Control elements ................................................................................................................................. 22
2.6.1 Buttons ....................................................................................................................... 22
2.6.2 Rotary encoders ........................................................................................................ 22
2.6.3 Display ....................................................................................................................... 22
3.0 "How to...?"-chapters: It's finally time to get started! ................................................................... 24
3.0.1 Preparations ..............................................................................................................24
3.0.2 Establishing audio connections ............................................................................... 24
3.0.3 Connect MIDI-keyboard .......................................................................................... 24
3.1 Select, play and adjust patterns - the ”Pattern-Jam” mode ......................................................... 25
3.1.1 Introduction............................................................................................................... 25
3.1.2 The first “Pattern-Jam”-session .............................................................................. 25
3.1.3 "Mute"-function – Muting individual parts ......................................................... 30
3.1.4 "Solo"-mode .............................................................................................................. 26
3.1.5 Adjusting levels to your liking ................................................................................. 26
3.1.6 Editing panorama and FX-sends ............................................................................ 26
3.1.7 Sound selection for your parts ................................................................................. 26
3.1.7a The pattern transpose function ............................................................................. 27
3.1.8 Saving patterns ......................................................................................................... 28
3.1.9 What data are saved inside a pattern? ................................................................... 29
3.1.10 Turning off the “Default”-sound .......................................................................... 29
3.1.11. Deactivating the “Pattern changed, Save First”-messages ................................ 30
3.2 Editing DSP-synthesizer sounds ....................................................................................................... 32
3.2.1 Introduction............................................................................................................... 32
3.2.2 Selecting a sample or multisample for the sound .................................................. 32
3.2.3 Tuning the sample set ............................................................................................... 33
3.2.4 Further Sample-Oscillator parameters .................................................................. 33
Page 5

3.2.5 Reverse sample playback ......................................................................................... 34
3.2.6 Changing the volume envelopes .............................................................................. 35
3.2.7 Velocity Sensitivity and adjusting the VCA-level .................................................. 36
3.2.8 Using the digital multimode filter .......................................................................... 36
3.2.9 Playing filtered sounds ............................................................................................. 37
3.2.10 Envelope control of the filter frequency ............................................................... 37
3.2.11 Filter frequency keyboard scaling ......................................................................... 37
3.2.12 The DSP synth LFO section ................................................................................... 38
3.2.13 Assigning LFO and MIDI modulation to the cutoff frequency .......................... 39
3.2.14 Assigning LFO and MIDI modulation to the resonance, volume, panpot position
and sample-oscillator pitch ..................................................................................... 37
3.3 Playing the "Analog"-synthesizer .................................................................................................... 40
3.3.1 Differences to other synthesizers ............................................................................. 41
3.3.2 Let's go - Getting familiar with the analog filters. ................................................. 42
3.3.3 Short excursion: oscillators and envelopes ............................................................ 44
3.3.4 Back to analog-technology – the multimode filter and filter-routing. ................. 46
3.3.5 The LFO section of the analog-synth ...................................................................... 50
3.3.6 Oscillators – the improved LFO’s! .......................................................................... 58
3.3.7 The fixed filterbank .................................................................................................. 59
3.3.8 The envelopes of the Spectralis analog-synth ........................................................ 62
3.3.9 Note priority and multitrigger settings ................................................................... 63
3.4 Step-sequencer basics ......................................................................................................................... 65
3.4.1 Filterbank rhythms ................................................................................................... 65
3.4.2 Tonal sequences......................................................................................................... 69
3.5 Step-sequencer advanced I
3.5.1 Tonal Sequences ........................................................................................................ 69
3.5.2 Option 1: Adjusting preset values and entering steps ........................................... 70
3.5.3 Option 2: Setting pitch, length, probability and dynamic value separately ...... 71
3.5.4 Option 3: Input and editing of notes in the single-step editor .............................. 72
3.5.5 MIDI learn function for pitch .................................................................................. 73
3.5.6 Line rotation .............................................................................................................. 73
3.6 Target selection ................................................................................................................................... 74
3.6.1 Special features for MIDI targets ............................................................................ 75
3.7 Creating triggergroups - multiple analog synth parts .................................................................... 75
3.7.1 Playing the triggergroups ........................................................................................ 76
3.7.2 The definition of triggergroups ............................................................................... 77
3.8 Step-sequencer advanced II
3.8.1 Parameter lines ......................................................................................................... 79
3.8.2 Triggerpoint muting and overwriting ..................................................................... 81
3.8.3 Single step editor ....................................................................................................... 81
3.8.4 Single parameter editor ............................................................................................ 82
3.9 Editing motifs and patterns ............................................................................................................... 83
3.9.1 Exchanging motifs .................................................................................................... 83
3.9.2 The motif edit menu.................................................................................................. 84
3.9.3 Initialising motifs and part parameters .................................................................. 85
3.9.4 Exchanging drum grooves ....................................................................................... 85
3.9.5 Recording your own motifs ...................................................................................... 86
3.9.6 Realtime recording ................................................................................................... 86
3.9.7Start Realtime Recording during playback ............................................................ 87
3.9.8 Step by Step Input ..................................................................................................... 88
3.9.9 "Chord-Trigger" recording - independent note and rhythm input ................... 88
3.9.10 Programming new rhythms with the beat-matrix ............................................... 90
3.9.11 Swing feeling and shuffle quantisation ................................................................. 92
3.9.12 Randomize patterns ................................................................................................ 93
3.9.13 Randomize sounds .................................................................................................. 94
Page 6

SPECTRALIS 2
3.10 The song-chain mode ....................................................................................................................... 96
3.10.1 Playing a song ....................................................................................................... 96
3.10.2 Jumping into pattern-jam mode ......................................................................... 97
3.10.3 Editing a song chain ............................................................................................. 97
3.11 External synchronisation and metronome settings ....................................................................... 99
3.11.1 External synchronisation .............................................................................................................. 99
3.11.2 Metronome settings ....................................................................................................................... 99
3.12 Part activity monitoring................................................................................................................. 100
3.13 FX1 and FX2 ................................................................................................................................... 101
3.13.1 Editing the FX-settings ......................................................................................... 101
3.13.2 Storing of FX programs ....................................................................................... 102
3.14 The arpeggiator .............................................................................................................................. 103
3.15 Keyboard Transpose ...................................................................................................................... 105
3.16 Signal routings - foreword .................................................................................... 107
3.16.1 Routing DSP-parts to the analog-synthesizer .................................................. 107
3.16.2 Routing external signals to the analog synth ................................................... 108
3.16.3 Feed parts to individual outputs ....................................................................... 109
4.0 Hybrid Synthesizer reference manual ................................................................... 110
4.1 Edit Menus general usage ....................................................................................... 110
4.2 The Oscillators section of the hybrid engine.................................................................................. 110
4.2.1 The oscillator wave menu....................................................................................... 110
4.2.2 The oscillator pitch menu....................................................................................... 116
4.2.3 The oscillator glide menu ....................................................................................... 119
4.3 Master LFO section .......................................................................................................................... 119
4.3.1 LFO wave menu ...................................................................................................... 119
4.3.2 LFO depth menu ..................................................................................................... 119
4.3.3 LFO rate menu ........................................................................................................ 121
4.4 Filter section ...................................................................................................................................... 121
4.4.1 24dB lowpass filter .................................................................................................. 121
4.4.2 Multimode filter ...................................................................................................... 124
4.4.3 Filters envelope generator menu ........................................................................... 127
4.5 Triggergroup edit menu ................................................................................................................... 129
4.6 VCA section ....................................................................................................................................... 131
4.7 Filterbank section ............................................................................................................................. 133
5.0 Quicksound function ........................................................................................................................ 134
5.1 Storing sounds ................................................................................................................................... 135
5.1.1 Saving a new sound in an existing soundbank ..................................................... 135
5.1.2 Creating a new soundbank .................................................................................... 137
5.2 Using your own samples .................................................................................................................. 138
6.1 Controlling external MIDI gear ...................................................................................................... 140
6.1.1 Assigning a part to MIDI .............................................................................................................. 140
7.1 The USB port and storage media ................................................................................................... 143
7.1.1 Safe file operation ................................................................................................... 144
7.1.2 USB Troubleshooting.............................................................................................. 144
8.0 Spectralis Realtime Clock ................................................................................................................ 145
8.1 Filetypes and the directory structure of the Spectralis flash memory ........................................ 145
8.2 Restoring the factory patterns, songs, sounds and samples ......................................................... 147
8.3 Switching the Sample-Set file-type from "fix" to "dynamic" loading........................................ 148
9.0 Help needed? The integrated spectralis help-system .................................................................... 149
9.1 Final comments ................................................................................................................................. 150
9.2 Spectralis accessories ....................................................................................................................... 150
6
Page 7

SPECTRALIS 2
1.1 Warranty
1.1.1 Term
Radikal Technologies warrants all electronic und mechanical components of this
product, subjects to the conditions herein described, for a period of 12 months from
purchase. If any covered malfunctions arise during the warranty period, the unit will
either be repaired or replaced at the Manufacturer’s election. The general business
terms and conditions of Radikal Technologies GmbH Germany shall apply.
1.1.2 Coverage
Radikal Technologies Deutschland GmbH reserves the right to perform warranty
repairs or product replacement only subject to prior warranty registration by the
customer. Such registration needs to be submitted together with a copy of dealer
invoice or sales receipt. The final decision concerning validity of the warranty is
made by Radikal Technologies GmbH. In case of a justified warranty claim the
submitted product will be repaired or replaced within 30 days of receipt at Radikal
Technologies offices.
Any physical damage to the instrument or unauthorized attempts to open or fix the
unit will render the warranty null and void. Repair of non-registered products or
products with a lapsed warranty will be performed at customer’s expense. We
strongly recommended that customers ask for an estimate of costs before sending in
their instruments for repair. Cost of packaging and shipping will be charged additionally.
In case of covered warranty claims the product will be shipped back to the customer
free of charge. Shipment to customers residing outside of Germany will take place at
the cost of the customer.
Warranty
1.1.3 Transfer of warranty
This warranty is exclusive and personal to the original owner and may not be
transferred. Other than Radikal Technologies Deutschland GmbH, no third party
(retailer, etc.) is authorized to promise or perform warranty services. Services other
than ones specified herein are not covered under this warranty
1.1.4 Liability
Claims for additional damages of any kind, including all claims of financial damages
as a result of malfunction of a product, are specifically excluded hereunder. The
liability of Radikal Technologies Deutschland GmbH in all cases is expressly limited
to the purchase price or the adjusted value of the product only. All warranty services
and shipments are performed subject exclusively to Radikal Technologies Deutschland GmbH’general business terms and conditions.
7
Page 8

SPECTRALIS 2
1.2 Safety notices
CAUTION: Please do not open the instrument’s case at any time, to avoid the
possibility of electric shock. There are no functions or features inside the unit intended
for the user. Do not ever make any attempt to repair the instrument yourself! Any
technical problems should be addressed with qualified service personnel only.
WARNING: Do not expose the unit to rain or humidity to avoid electric shock or
shorts.
- Before using your unit please read the security and user instructions
carefully.
- Store the safety and user instructions in a readily accessible place.
- Never use the unit close to water (i.e. bathtub, sink, swimming-pool)!
- Do not to set your unit up too close to heat-sources (heaters, Amps,
etc.). To ensure proper air ventilation it is important not to obstruct the
unit’s heat vents.
- Make sure to place the unit on a solid surface strong enough to support
its weight.
- Connect the unit only with the correct and sufficient power sources.
- Position the power-cord carefully, so nobody will fall over it.
- Only use undamaged and fully functioning power-cords
- Turn your unit off and remove the power-cord before moving or
transporting the unit.
- Unplug the power-cord before cleaning the unit
- When you’re not using the unit for any extended period of time make
sure to turn it off and to remove the power-cord.
- Clean the unit only with a dry or slightly damp cloth. NEVER use
cleaning solutions!
- Make sure that no hard particles or liquid can get inside the unit.
- As a result of rapid temperature-changes it is possible that condensation
canform inside the unit. Make sure your unit has sufficient time for the
condensation to dry off, before reconnecting it to a power-supply after
such temperature change.
Safety notices
The unit needs to be checked by a qualified service-technician in case:
- The power-cord or the plug has been damaged
- Hard particles or liquid have managed to get inside the unit
- The unit has been exposed to rain or humidity
- The unit has been dropped and/or shows physical damage
- The unit is not functioning in the usual or described fashion
8
Page 9

SPECTRALIS 2
2. Introduction
We first would like to thank you for purchasing the Spectralis 2. You have
purchased a modern music instrument, which not only sounds great, but also
doubles as a powerful ”music-machine”, which will provide new impulses for
your future LIVE-performances as well as production activities. This manual
is intended to help you to utilize as much of the Spectralis 2’ potential right
from the get-go. It should accompany you through the basic exploration period
and introduce you to a number of its special features. Beside the reference
sections it is mostly of a practical users guide and workshop handbook, which
can provide you with a pretty extensive overview of the Spectralis’ potential.
The emphasis is on practical, repetitive and repeatable lessons. The Spectralis
comes with an integrated help system which works a little bit like an additional
on board reference manual. If you need further information about the meaning
of an displayed parameter name just press the shift button and touch the encoder
button of the assigned rotary encoder.
2.1 What is the Spectralis 2?
The Spectralis is a performance-oriented music instrument with multiple
sequencer-sections optimized for LIVE-operation. In addition it is also an extravagant and powerful sound-design tool. The Spectralis also doubles as a
workstation and can handle complete music production jobs - due to its sampling
engine which comes with digital multimode-filters.
Introduction
What the Spectralis has to offer:
– A pattern-based 17-track sequencer with unique performance-
possibilities, drum-grid, „Step by Step“- and realtime programming/
editing
– A complex, subtractive synthesizer with 4 digital oscillators and analog
filters.
– Sample/DSP based sound-engine with 32 stereo-voices, sound
processing with 128 MB RAM, 4 GB internal flash rom for data
storaging.
– A 32 track analog-style step-sequencer, which not only plays notes, but
can also modulate most of the soundparameters of the Spectralis.
– A filterbank with ten bands (8 bandpass-, plus one high- and one lowpass
filter), controllable with the help of the step sequencer.
– A DSP based effect section and an internal audiomixer with various In-
and Outputs.
– SD Card slot for data backups, sample import and firmware upgrade
transfers
As you spend more time with your Spectralis you’re sure to realize and master
its full potential. Hopefully this manual will prove to be a valuable companion
9
Page 10

SPECTRALIS 2
on your path to enlightenment! In case you do come across questions not
sufficiently addressed in this guide it is probably something we overlooked. In
any such case we invite you to visit the spectralis user forum at our Spectralis
website:
http://www.spectralis.de/phpBB2/
We will be posting additional tips and tricks, FAQ-entries and example patterns
regularly, in the beginning probably quite frequently.
2.2 Preparations
2.2.1 Unpacking
You should find the following contents in your shipping box:
- Spectralis 2
- the power-cord
- this Spectralis 2 manual
- a backup DVD with the current patterns and samples/factory presets.
Unpacking, Set-Up, Firmware Update
Firmware:
The Firmware is the
program operating
the Spectralis hard-
ware platform.
Contrary to the
hardware, which is
fixed, the firmware can
be updated to add new
functions or to improve
functionality
Please contact your retailer right away if any of the above items are missing.
You may also contact Radikal Technologies GmbH (j.schaaf@raditec.de). If
you do notice any physical damage to the Spectralis 2 after shipping, please
immediately contact the shipping company with your complaint. We will be
happy to assist you with further documentation if needed.
2.2.2 Set-Up
Place the Spectralis on a level, clean and sufficiently spacious surface or a suitable
Keyboard stand. Make sure that there is no obstruction to the ventilation slots. Avoid
operating the Spectralis close to technical equipment which generates heat.
In case you wish to install the Spectralis 2 in a 19” rack you can order the
optional rack-ears available at your retailer or directly from Radikal
Technologies. The Spectralis will take up 5 rack spaces plus a little extra headroom room for the cables connected to it. Make sure to follow the instructions
described in the rack-setup instructions.
2.2.3 Firmware update
We currently are working full steam on adding more and more features to the Spectralis
firmware. For this reason we advise you to update your Spectralis whenever new
firmware versions are announced. To check for and obtain the latest versions you
can visit the user-forum of the Spectralis website http://www.spectralis.de/
phpBB2. In the section ”updates” you can easily download the latest versions free of charge of course. There are usually detailed descriptions available of
the new features or differences to previous releases. Please take time to read
the information provided for the respective firmware expansions or updates.
The update process is rather simple. However, it is definitely recommended to
read the update Info on the website first and to follow the instructions carefully
to ensure a successful upgrade process.
10
Page 11
SPECTRALIS 2
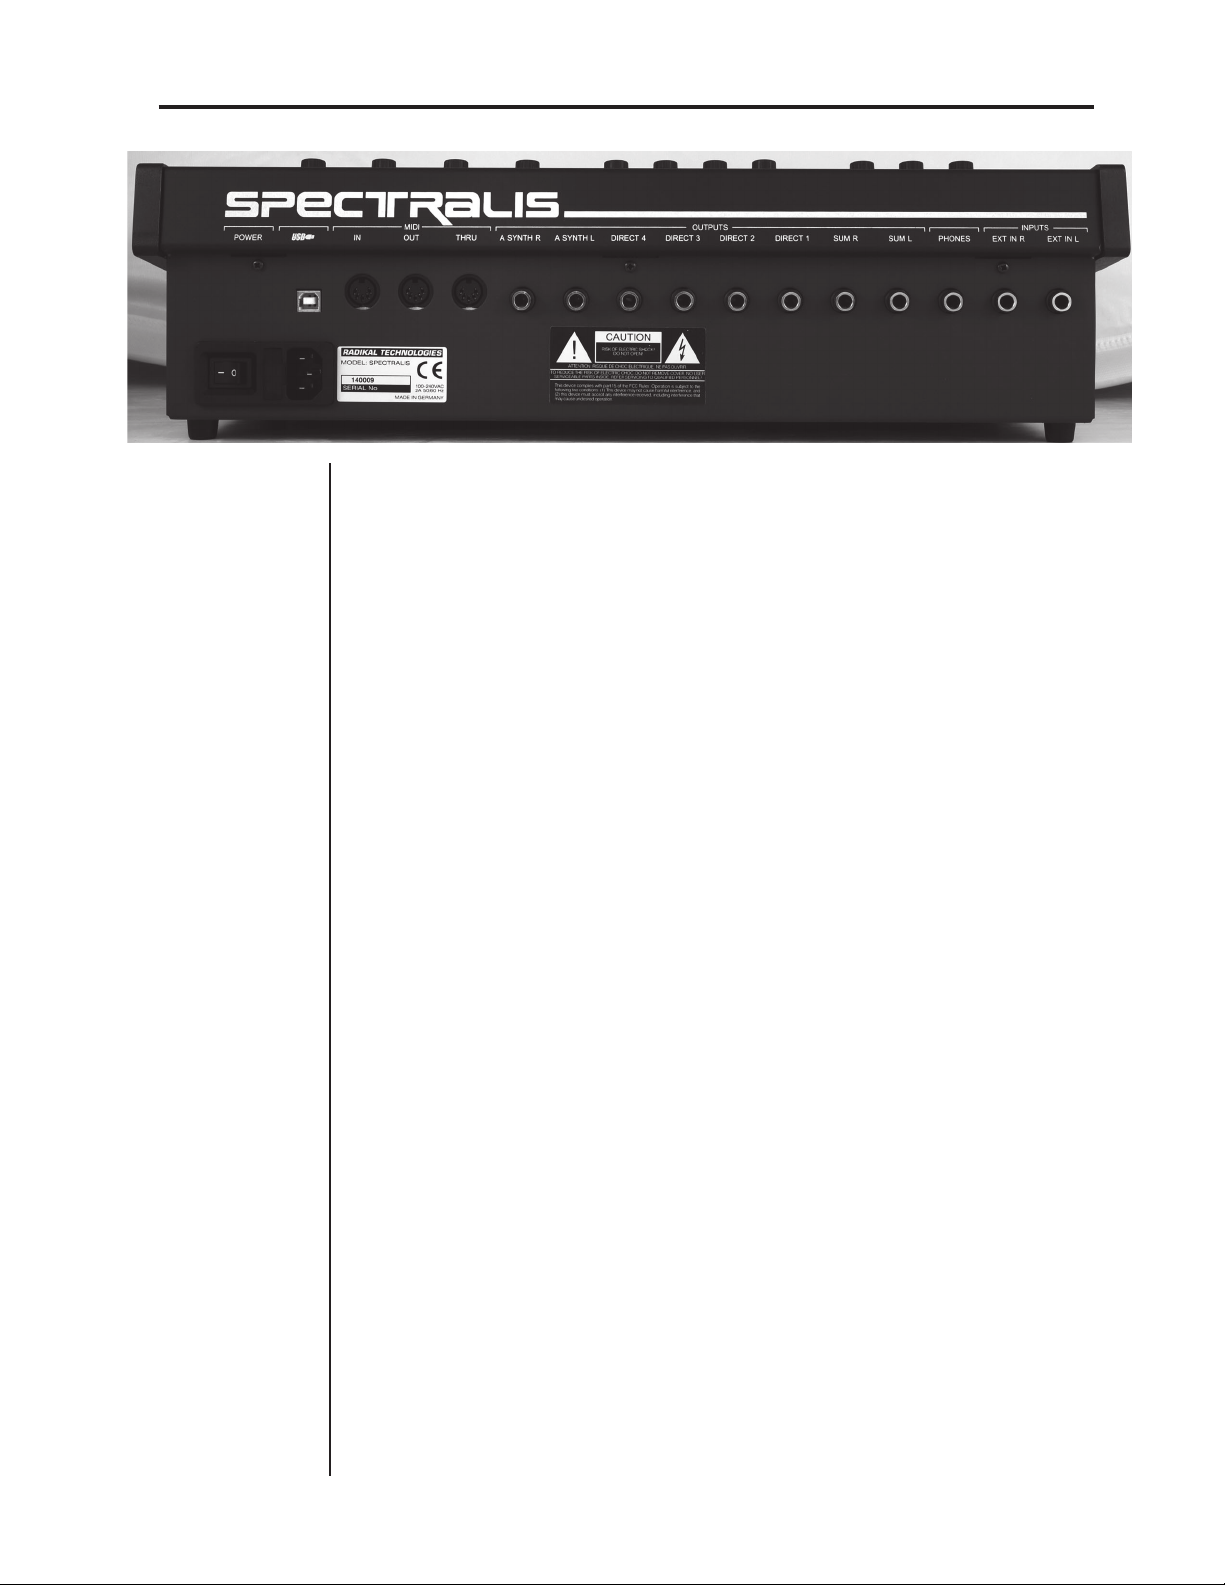
2.3 Connections and operation
2.3.1 Audio connections
I. Connect the outputs ”Sum R” and ”Sum L” with your audio/monitoring
system. You can use the inputs of a normal stereo-system, the inputs of a mixer,
a soundcard with hardware monitoring or active monitors. If you’re connecting
the Spectralis to a stereo system or a separate stereo preamp, select inputs with
suitable impedance. In no case should you use the phono-inputs of your stereosystem! Suitable inputs for the Spectralis are ”cd”, ”aux” or ”line in”. All audio
signals of our preset patterns from the various sections of the Spectralis are
output via the sum-outs. Signals can also be routed to the sum outputs just as
well as to the individual outs. In an extreme case you can even add the signal
of a single oscillator to a sum output, in order to modulate an external analog
sound generator.
II. Signals of the hybrid synth section can be recorded individually via the “A
SYNTH R” und “A SYNTH L” Outputs.
Connection and operation
Hybrid-
Synthesizer
indicates a tone
generator
where the resulting
sounds consist of a
combination of
digital and analog
components
Due to the analog sounds and the analog filters, we have are using the term
analog synth on the frontpanel, to create a clearer distinction between
samplebased tone-generation and the hybrid synth. From here on in and for
these same reasons we will use the term ”analog-synthesizer” instead of
”hybrid-synthesizer” frequently, even though a large part of the sound
creation was accomplished digitally.
Please keep in mind, that direct outputs always deliver a dry signal. Potential
effects, which you may have used in the other DSP for processing of the analog-synth sound, will not be part of the signal on these outputs.
III. You can add random signals of the DSP/sample or the analog-synthesizer
section to the "DIRECT“ 1 – 4 outputs with adjustable level.
IV. Connect the "PHONES“-Output with your headphones. The signal is
equivalent to the level of the sum-out pair. The level of the headphone signal
can be controlled with the (master-volume)-encoder
V. Connect the external inputs with the audio-outs of external instruments if
you wish to process their audio-signals with the Spectralis.
11
Page 12

SPECTRALIS 2
MIDI connections
MIDI:
The shortcut „MIDI“
stands for Musical
Instrument Digital
Interfac and is used for
unified digital control of
different electronic
musical instruments.
Before MIDI was inven-
ted, it used to be very
difficult to connect
electronic sound gene-
rators by different
manufacturers.
2.3.2 MIDI connections
The MIDI port enables the communication between different synthesizers,
serves to synch up various music-machines (synchronizing tempos and the
start/stop process) and is used to connect to a computer. No audio signals are
transmitted via the MIDI port – only control-data. The control data are uniform for all manufacturers and make it possible to use instruments by a variety
of companies together.
I. Connect the MIDI OUT of a keyboard or a MIDI-interface with the MIDI IN
on your Spectralis, to play Spectralis sounds via an external controller-keyboard.
II. Connect the MIDI OUT of your Spectralis with the MIDI IN of another
MIDI- device, such as another synth, MIDI-interface and the like, to control
any such external devices/ soundsources with the Spectralis. You can find additional information in the manual of the respective MIDI-instrument.
III. Connect the MIDI THRU port of the Spectralis 2 with other soundsources,
in case you want to transmit MIDI-data received by the Spectralis 2 to other
instruments. Generally you should not connect more than 3 instruments serially
via MIDI THRU and MIDI IN, because you might encounter data transmission
lost depending on the quality of the optocopplers used in the instruments. It is
advisable to centrally connect your studio equipment using a MIDI-interface.
For this purpose you will need MIDI-interfaces with multiple outputs or MIDI
THRU-boxes, which can distribute an incoming MIDI-signal to multiple MIDI
THRU ports.
12
Page 13

SPECTRALIS 2
2.3.3 Formatting Media (internal Flash and SD-Cards)
In case something goes wrong after all or when using a SD-Card for the first
time it will be necessary to format the media. The formatting should have to be
done in the Spectralis 2.
To start formatting use the [Shift]-button and hold it down while simultaneously
pushing the [Browse]-button. All two of the media in the Spectralis will now
show up in the 2x40 character display of the Spectralis. When pushing any of
the encoders assigned to one of the drives showing in the display, drive
information will be displayed. Using the [Page-Up]- and [Page-Down]-buttons
you can browse the selected medium.To begin formatting use the [Record]button, after selection of the desired medium. You will need to confirm your
intent to format by pushing the [Enter]-button.
Use the [Exit]-button to leave the browse menu.
Once you’re done formatting you might be looking at an empty display
window. Don’t panic! As soon as you push one of the select buttons on the
Spectralis 2 text will appear once again in the Display.
Formatting, power and explanation of terms
2.3.4 Power connection
The Spectralis has a power connection on the back of the instrument, right next to
the power switch. Please use the enclosed power-cord to connect your Spectralis
2 with a wall socket or power strip. The Spectralis has an internal switching
AC-Transformer which can be operated from 100 to 240 Volts and at 50 and
60 Hz.
2.4 Explanations of basic terms
To make this manual easy to understand we would like to explain a few frequently
used terms, which are of significance with the Spectralis 2..
2.4.1 Sound:
A Sound-Program of the Hybrid Synthesizer or a sample-based Sound of
the DSP-Synth.
2.4.2 Part:
A part is a track in the sequencer, played by a particular instrument. Each
part of the Spectralis has its own sound parameters and a special set
channel on the internal mixer of the Spectralis. Due to the pre-assignment
of various part categories it becomes easy to create new patterns simply
by swapping motifs. You will find the following parts in the Spectralis:
Kick, Snare, Closed HiHat, Open HiHat, Clap, HiTom, MidTom and
LoTom, three Percussion-parts, the Analog Synth-part plus three additional polyphonic DSP Synthesizer parts.
2.4.3 Motif:
An exchangeable musical phrase consisting of a series of notes, which
can be assigned to a part.
2.4.5 Drum Groove:
The Parts 1 – 11 (Kick – Perc3) can be treated as a Group independent of
the Parts with tonal Instruments and are referred to jointly as ”Drum
Groove”.
13
Page 14

SPECTRALIS 2
2.4.6 Pattern:
Consists of up to 17 parallel parts. Patterns can be changed in real-time
sonically and musically by selecting and swapping songs, motifs and
drum-grooves.
The pattern is also the most important storage level of the Spectralis.
When you add a new motif to a part, the contents of the motif will be
automatically copied to the Pattern Slot. In short the Spectralis
automatically creates a copy of the motif. The same applies for the sound
parameters. Rather than administering a program number in the pattern,
the pattern always contains the complete set of parameters for the sound.
Due to this form of storage management you never run the risk to lose a
setting for instance in pattern ”xy” when making changes in pattern ”yz”.
2.4.7 Song:
You can combine up to 32 Patterns in a song, which can be played back
either in a predetermined order which can be accessed, changed, varied
or transposed during LIVE operation.
step.
2.4.8 Sequence:
With the Spectralis a ”sequence” is a succession of notes or soundparameter changes, which are generated by the internal ”quasi-analog”
step-sequencer. This means you can not only control the note-output but
also the sound of the Spectralis rhythmically. Contrary to the data of the
drum-grid and the realtime sequencer the settings of the step-sequencer
are stored within an "analog-synthesizer"-sound.
2.4.9 Fixed Filterbank:
In recent years it’s become a bad habit to refer to any instrument with
more than one filter as a filterbank. This can be rather confusing for the
user, which is why we would like to describe what actually constitutes a
fixed filterbank. There are very few musical instruments which don’t
have at least some kind of filter. Most feature a lowpass filter, which cut
off overtones upward of a predetermined frequency more or less steeply.
You may be used to decreasing or increasing the cutoff-frequency to
create the typical synthetic sounds. However, it is not possible with this
kind of filter, to selectively boost multiple different frequency bands
simultaneously, while other bands above, below or in between these bands
are being limited. In nature this kind of behavior is quite common.
Your oral cavity serves as a prime example. Different vocal sounds can
be shaped by unconsciously changing your oral cavity’s shape to form
different types of resonance bodies which will emphasize some
frequencies and dampen others. The fixed filterbank of the Spectralis
can effectively do the same thing. For this reason they consist of multiple, parallel bandpasses, fed thru amplifiers allowing you to emphasize
or limit selected frequencies.
These levels of these amplifiers can be controlled by the step-sequencer
of the Spectralis. This set-up allows you to create quite unusual sounds,
which far exceed the sound-repertoire of a normal ”subtractive”
synthesizer.
The Step Sequencer
originated at a time
when the possibility
of recording musical
Motifs simply by
playing them was
just a fantasy. The
classical Step
Sequencer consisted
of one or more rows
of potentio-meters
which were read in
sequential order -
sending an individual value per
If you applied the
control frequency to
the pitch modulation
input of
an VCO, the Sequen-
cer changed the
pitch ac-cording to
the potentio-meter
Settings.
Explanations of terms
14
Page 15
SPECTRALIS 2
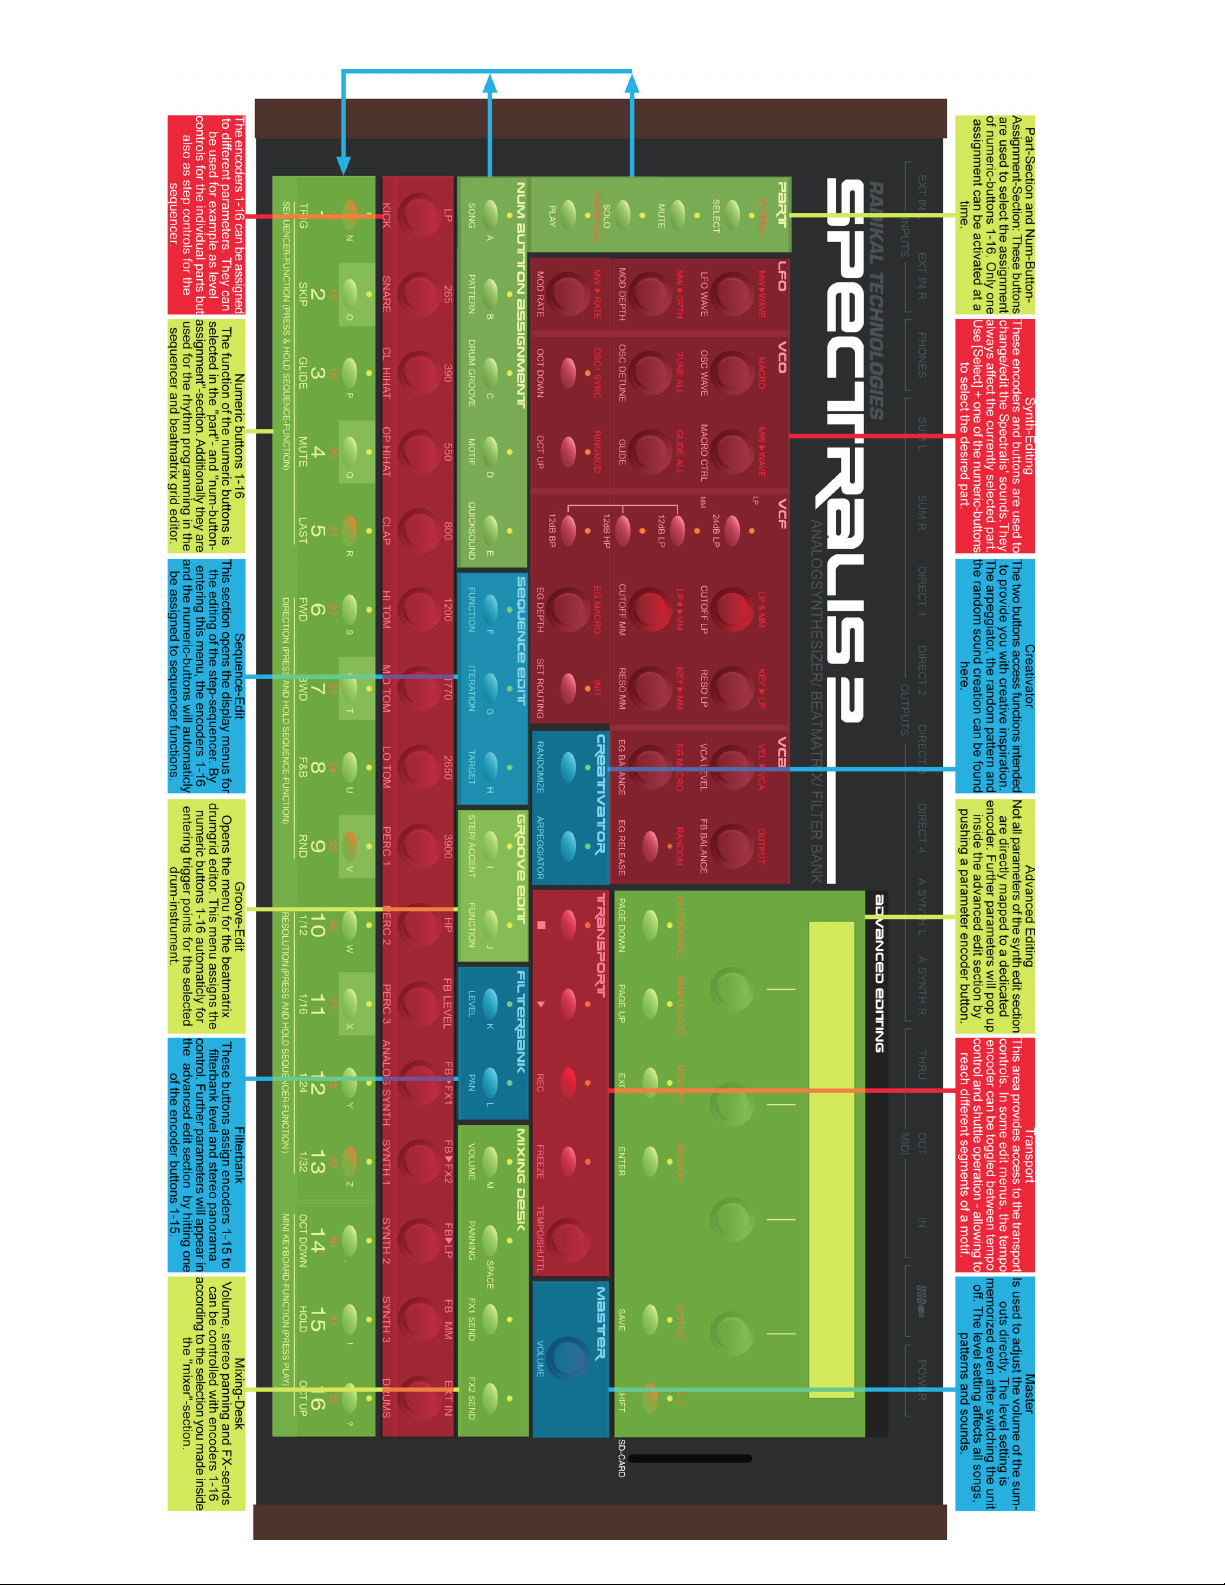
2.5 Frontpanel Overview
15
Page 16

SPECTRALIS 2
2.5 Frontpanel overview
The following is a first overview of the assorted sections of the frontpanel.The
enclosed picture and written descriptions are provided for easy orientation and
to help you easily understand the basic structure of the Spectralis. Once you’re
done reading this chapter and are moving on to the section dealing with practical
tips for the use of the Spectralis, you will find this basic orientation helpful.
2.5.1 „PART“-button section
(upper left)
Just like the ”Num-Button-Assignment” Section, the ”Part Section” also can
be used to change the assignments of numeric Buttons [1]-[16].
[Select]
The [Select]-button assigns the part-selection to the numeric buttons. A
part selected with a numeric button can be edited using the encoders and
buttons of the ”Synth-Edit” Section (LFO-,VCO,VCF,VCA-Section). A
real-time recording of the sequencer starts the recording of the motif
always for the selected part. Any keyboard sending data on MIDI-channel
1, will always be assigned to the currently selected part. In addition to
the part-numbers the part-names are also printed on the panel right above
the corresponding numeric buttons. For instance you can access the analog-synth-part by pushing numeric button [12].
Panel overview, "Part"-section
Transposing:
Transposing is the
shifting of the pitch of a
"motif of tones" by a
musical interval.
16
[Mute]
The [Mute]-button allows you to mute individual parts using the numeric
buttons. Once you’ve muted one or more parts and are done with the
”Mute”-selections and want to move on to assign a different function to
these buttons, the [Mute]-button will blink. This is to remind you that
you are not currently hearing all of the parts.
[Solo]
The [Solo]-Button enables you to Solo individual parts once again using
the numeric buttons. Once you’ve Solo’ed one or more parts and want to
assign a different function to the numeric buttons, the [Solo]-button will
continue to blink, to remind you that you are not currently hearing all of
the parts.
[Play]
The [Play]-Button also allows you to use the numeric Buttons as a
”Keyboard” in case you don’t have a MIDI-keyboard handy.
[TRANSPOSE]
By pushing [PLAY] while holding down the [SHIFT] button you can
transpose the pitch of a selected pattern. The pattern will be played in its
original key when the C1 key is pushed. Numeric buttons [1]-[13] shift
the pitch of all tonal motifs in half-tone steps, the numeric buttons [14]
and [16] transpose the key by full octaves. In this case the [PLAY] button
blinks.
Page 17

SPECTRALIS 2
Whichever function you use last in this Section, determines the assignment of
the numeric Buttons. It’s all quite simple – once you know!
TIP: Changing numeric Button assignments temporarily:
When you are pushing the ”Part-Section” Button, the corresponding
function kicks in and the assignment is permanent. Holding the ”PartSection” Button down however and pushing a numeric Button at the same
time, activates the function only temporarily. Once you release the button
you’ll return to the previously selected Menu.
2.5.2 „Num-Button-Assignment“-section
(upper left above the encoders 1-16)
This is the section where you can determine the assignment of the numeric
buttons [1]-[16]. Any function activated in the part section can be turned off
with these buttons. Only one of the "Num Button Assignment"-buttons can be
active at a time.
[Song]
By using the [Song]-button you can select one of the 16 current songs
via the numeric buttons [1]-[16].
Overview: Num-Button-Assignment
[Pattern]
When using the [Pattern]-button, you can select patterns of the current
songs by using the numeric buttons [1]-[16] in combination with [Shift]
+ [1]-[16]. The patterns you’ve selected, will start playing instantly once
you push the numeric buttons. There is no need to push the [Play]-button
in the transport field.
You will find a separate chapter ”How to..." Jamming with patterns starting
on page 25.
[Drum-Groove]
Using the [Drum-Groove]-button you can simultaneously change the
motifs 1-11 of the patterns in order hear a selected pattern with a different drum-rhythm, by pushing the numeric buttons [1]-[16] or rather
[Shift] + [1]-[16].
[Quicksound]
The quicksound button gives access to a special soundbank with your
favorite sounds for drums, DSP synth and analog synth parts. This bank
holds 32 Hybridsynth sounds, 32 DSP synth sounds and additional 16
sounds for each drumpart. Patches 17 - 32 can be recalled by holding
down shift and pressing numberbuttons 1-16. Press and hold [SAVE]
and touch the desired memory location on the num buttons to save a
patch into the quicksound bank.
17
Page 18

SPECTRALIS 2
2.5.3 "Sequence-Edit"-section
(to the right next to the NUM BUTTON ASSIGNMENT-Section)
Edit-Section of the step-sequencer, with the following control elements:
[Function]
The use of the [Function]-button opens the display-menu for the editing
of the step-sequencer. The step-sequencer menu has a number of pages,
which can be accessed via the [Page-Up]- and [Page-Down]-buttons.
After pushing the [Function]- button the value data for the individual
steps will be assigned to the encoders 1-16. By holding down the
[Function]-button you can access a number of useful functions with the
numeric buttons directly. These functions are printed on the frontpanel
between numbers 1–10. (Trig, Skip, Glide, Mute, Last, FWD, BWD,
F&B, RND).
Please take note that all of these functions for each sequencer line can be
adjusted differently! True step-sequencer afficinados will be thrilled with
this information and make the most of it. As a basic overview though
this may be information overkill at this early stage. On page 66 you will
find a practical "How to...?" chapter for this powerful tool!
The step-sequencer menu itself also has a number of display pages, which
can be accessed by using the [Page-Up]- and [Page-Down]-buttons.
Overview: "Sequence"- and "groove edit"-section
[Iteration]
The [Iteration]-button opens a menupage for changing the playback of
a sequence-line. The lines can be rotated by steps.
[Target]
The [Target]-button opens the menu for the change of sequencer-line
targets. Sequencer lines can control parameters of the analog-synth, trigger
note events for the DSP- and the analog synth and can control external
MIDI-equipment!
2.5.4 "Groove-Edit"-section
(in the middle of the panel directly above the encoders 1-16)
In the "groove-edit"-section of the Spectralis you can create new rhythm motifs for
your patterns.
[Step/Accent]
The [Step/Accent]-button opens the beatmatrix menu in the display. The
Beatmatrix is a powerful grid editor which enables you to create and edit
new drum grooves fast and easily in the style of vintage drum computers.
The Beatmatrix uses the buttons [1]-[16] for creating new rhythms. A
practical lesson for the input of new rhythm-motifs can be found on page
78 of this manual.
18
Page 19

SPECTRALIS 2
[Function]
The [Function]-button opens an additional display menu with the swing
and shuffle quantisation.
2.5.5 "Filterbank"-section
(In between the transport field and the encoder row 1-16)
In this section you have access to the fixed filterbank.
[Level]
By using the [Level]-button you can adjust the levels of the filterbank
amps with the help of the encoders 1-15, as well as insert the output of
the filterbank into the various sections of the Spectralis. The assignment
of the encoders when the filterbank-[Level]-button is active is printed
just above the encoders. The filterbank has 10 filter bands.
Encoder 1 (LP) controls the output level of the lowpass filter, which lets
all frequencies below the lowest bandpass pass through.
Encoders 2-9 control the levels of the individual bandpasses. The
bandpasses are factory set to the following middle frequencies:
265Hz, 390Hz, 550Hz, 800 Hz, 1200Hz, 1770Hz, 2650Hz, 3900Hz
Encoder 10 (HP) changes the level of the highpass filter, which only lets
frequencies above the highest bandpass pass through.
Using encoder 11 (FB Level) you can adjust the sum-volume of the
filterbank to the level of the overall signal of the Spectralis.
Using encoder 12 (FB->FX1) und 13 (FB->FX2) you can determine
with what level the output signal of the filterbank is fed into the two
effects.
With encoder 14 you can feed the output signal of the filterbank into the
24dB lowpass filter.
With encoder 15 you can feed the output signal of the filterbank into the
analog multimode filter.
Pushing one of the rotary encoders 1-15 buttons allows you to change
additional parameters of the filterbank in the display menu.
Overview: Filterbank-section, mixer-section
[PAN]
Pushing the [Pan]-button you can set the stereo position of the individual
filter-outputs via encoders 1-10.
You will find another "How to" chapter for filterbank use on page 64 of this
manual.
19
Page 20

SPECTRALIS 2
2.5.6. "Mixing-desk"-section (to the right above the encoders 1-16)
This section assigns the 16 encoder row to the Part-Mixer of the Spectralis.
[Volume]
Pushing the [Volume]-button in the mixer section activates the volume-control
via encoders 1-16. Encoders 1-15 control the volumes of parts 1-15 and encoder
16 controls the volume of all drum-parts, relative to the set value.
In reality the activated volume-controls in regards to drum-parts 1-11 don’t
affect the part-volumes, but rather determine the level at which the parts are
being routed into the subgroup ”drums”. This allows for smooth control of the
whole rhythm group with just one controller – the ”drums” subgroup volumecontrol 16.
The use of one of the 16 encoder buttons opens a channel strip for the respective
part. In the corresponding mixer menu, visible in the display, all mixer
parameters of a part can be edited directly. This menu has multiple edit pages,
which can be accessed using the [Page-Up] and [Page-Down]-buttons.
Overview: Mixer-section, master-section, creativator
[Pan]
The [Pan]-button assigns the control of the stereo position of the parts to
encoders 1-15.
[FX1-Send] + [FX2-Send]
The [FX1-Send] and [FX2-Send]-buttons assign the control over effect-
intensity for the two effect-processors to encoders 1-16. Encoders 1-15
control the effect-intensity for the Parts 1-15 and encoder 16 for the
subgroup drums.
Using one of the encoder buttons functioning as FX sends, will open the
menu for changes to the effect-programs.
2.5.7. "Master"-section
(to the far right, about half way up on the Panel)
Using the master volume control you can change the output level of the sumoutput and the headphones output. The Spectralis saves the most recently
selected volume level when the unit is being turned of, so you won’t experience
any disadvantage compared to having a volume-potentiometer.
2.5.8 "Creativator"-section
(right in the middle of the panel)
20
In the Creativator-section you will find possibility to apply the arpeggiator to
a selected part, having it create new patterns randomly or letting it create new
sounds in random fashion.
[Randomize]
The [Randomize]-button opens a display menu for the selection of
assorted randomize-functions.
Page 21

SPECTRALIS 2
[Arpeggiator]
The [Arpeggiator]-button opens the display-menu for editing the
arpeggiator settings. A typical classic arpeggiator is a setting which breaks
down played chords (a polyphonic sound consisting of multiple notes)
into individual notes and plays these notes corresponding to a variety of
instructions sequentially.
2.5.9 "Synth-Edit"-section (LFO, VCO, VCF, VCA)
This Section provides the encoders and buttons needed for editing sounds.
They always affect the currently selected part or in the case of subgroup drums
always relative to the selected parameters of all drumparts (available in Versi-
on 1.0). A more detailed description of these sections will be contained in the
reference manual. Suggestions on adjusting the DSP synth parts can be found
in Lession 3.2 on page 36 of this manual. Still, we don’t want to keep you
completely in the dark regarding the analog-synth, which is why we’ve also
included a basic overview of this powerful synthesizer in a dedicated "How
to"-chapter on page 43.
Overview : Filterbank-section, mixer-section
2.5.10. "Transport"-section (the section with the green button)
If we had to guess we’d think that the transport-section is probably the one section
of the Spectralis which will generate the fewest questions.
[
] = [Stop]
Using the [Stop]-button will stop the sequencer. When restarted, the
sequencer will start with beat 1 of the song or the selected pattern.
[ ] = [Play]
Pushing the [Play]-button starts the Sequencer. If the [Play]-button is
pushed while the sequencer is running, the button doubles as a ”pause”function. Pushing the [Play]-button again will start the Sequencer right
at the position where it was stopped.
[Rec]
Pushing the [Rec]-button activates the record function for the currently
selected part. In the menu visible in the diplay you can change the meter
length and tempo settings. The real recording process though will only
start once the [Play]-button is pushed
[Overdub]
This button starts overdub recording directly.
21
Page 22

SPECTRALIS 2
2.5.11 Numeric buttons
Corresponding to the selection in the num button assignment- or the part-section,
you can use the numeric buttons [1] – [16] to select songs, patterns, drumgrooves or motifs, as well as transpose patterns and select, mute, solo or play
parts. In addition the numeric buttons are used in various edit-sections for
direct input of rhythmical structures.
2.6 Control elements
The Spectralis has an abundance of buttons and encoders. To make things a
little easier we will introduce them in more detail.
2.6.1 Buttons
The buttons of the Spectralis have lighting elements so a selected function can
be easily made visible or to draw your attention to events. You can find details
about this in the respective section chapters. The [Shift]-button in the upper
right has a particular function. It allows the selection of alternative functions
for encoders and buttons. The alternative assignment choices are also printed
on the panel near to the respective control elements in a white, circular field.
Overview: Nummeric buttons, control elements
2.6.2 Rotary encoders
Encoder is the name for the rotary knobs on the Spectralis. They allow you to
control a parameter always from the currently memorized setting. Accordingly
you won’t have to worry during LIVE performances about value changes
frequently encountered with traditional potentiometers. To make sure that you
won’t miss out on real ”potentiometer-feeling” these encoders have a high
resolution and in most cases can cover the whole value range of a parameter
with one turn of the encoder. When turning the encoder fast, a larger value
range is covered with the same segment move as with a slow turn of the encoder.
All of the encoders have an additional push button function. This allows for
the direct
call-up of menu pages in the display menus, which are in direct correlation
with the selected assignment of the encoder. For instance, if you are pushing
the encoder button (CutOff LP) of the 24dB lowpass filter, you will see
parameter pages in the display, which offer particular parameters for adjusting
the cutoff frequency of the filter. All menus addressed via one of the encoderbuttons, can also be exited by pushing the [Exit]-button.
Additional special functions of the encoder buttons are explained in the
descriptions of the individual sections of the Spectralis.
2.6.3 Display
The 2x40 characters display of the Spectralis will provide you with lots of
useful information while you are jamming and programming. It’s easiest to
illustrate the structure of the display-info with two specific examples. Let’s
start with the display notice you will find right after turning on your Spectralis.
Once powered up the Spectralis will be automatically in pattern-jam-mode:
22
Page 23

SPECTRALIS 2
1/9:24dB Lowpass:Cutoff Modulation LFO
FMWve:0 FmRte:0 FMDpt:0
In the upper row you will see the current information such as song-number
(S01), current song-name (Song01), the name of the selected pattern and the
selected song-tempo in BPM (beats per minute).
The lower row shows parameters, which can be changed with the encoders located
below the display. The significance of the various parameters is explained in the
respective chapters in this manual.
The type of entry will indicate the functionality of the encoders at the time:
For all display-entries where the description is followed by a colon and a parameter
value or a selection option turning the encoder will either prompt a selection list or
change of parameters.
FMWve:0 FmRte:0 FMDpt:0
For all entries which are shown in square parenthesis [ ] the encoder only has a
push-button function:
Overview: Display-section
C:Funky | [NO] [YES]
There are additional encoder functions in the menus for editing of sounds. Just
push the encoder button (OSCWAVE) in the oscillator-section right after turning
on the Spectralis. You will see the following display-message:
01/26:VCO Shape
^Osc1:100 ^Osc2:100 ^Osc3:100 ^Osc4:100
Here as well you will see a parameter description followed by a parameter-value,
however there is also an additional up-arrow right before the description. In this case
you can turn the encoder to change a parameter-value – the arrow however indicates,
that the encoder has also a button function – usually to call up a submenu connected
to this parameter.
23
Page 24

SPECTRALIS 2
3.0 "How to...?"-chapters: It's finally time to get started!
We wouldn’t be at all surprised if this is actually the first chapter in this manual,
which you are reading. After all we’re already on Page 24 of the manual and so
far we haven’t even addressed getting your Spectralis to make noise! It’ll get
much more entertaining from here on in!!
3.0.1 Preparations
You should make the following preparations, before you start working your way
through the ”How to...?” part of the manual:
3.0.2 Establishing audio connections
a.) Make sure that all your equipment (mixer, amplifier, active speakers, Spectralis
etc.) are turned off.
b.) Connect the sum-outs of the Spectralis with the input of the audio-system you are
using – whatever that may be.
c.) One by one turn on your other gear. Ideally start with the Spectralis. This eliminates
any chance that any sound from switching on power will reach your speakers. Turn
the mixer on next, then the amplifier and in case of self-powered speakers, turn them
on last.
d.) Once everything is powered up, first lower the master-volume of the Spectralis.
e.) You can now use one of the numeric buttons, to start a pattern and can start
raising the volume – SLOWLY! Try to avoid running your system in the red all the
time - even if you like your music loud! You should set your input gain at level that will
only occasionally overdrive your LEDs rather than turning them into constant warning
lights.
f.) Finally adjust the playback level on your amplifier. This should keep the distortion
level under control and you can work at your desired volume level.
It's finally time to get started
24
3.0.3 Connect MIDI-keyboard
There are times when you will want to play your Spectralis via a keyboard for one of
the included "How to?"-chapters. Proceed as follows:
a.) Set your MIDI-keyboard up in close proximity to the Spectralis and connect it
with a power supply.
b.) Set the MIDI-channel of the keyboard to MIDI-Channel 1.
c.) Connect the MIDI-Out of your keyboard with the MIDI-In of the Spectralis
using a MIDI-cable.
d.) Once turned on the Spectralis can now receive the note-information sent by your
keyboard on MIDI-channel 1 and will assign the notes to the analog synthesizer
section. In case you are playing your keyboard right now, you should hear what you
are playing.
Now that you’re all set we’re ready to GO!
Page 25

SPECTRALIS 2
3.1 Select, play and adjust patterns - the ”Pattern-Jam”
mode
3.1.1 Introduction
Patterns are connections of assorted musical motifs with a duration of 1 to 16 bars,
normally consisting of drums, bass, chords and melodies of a song segment. Once
you put a number of these patterns together you end up with a complete song.
Contrary to many sequencer programs the pattern-sequencer of the Spectralis has a
very different design. While the goal of the average sequencer usually is the definite
production of a piece of music, the sequencer of the Spectralis was optimized with
an eye towards LIVE-use and LIVE "On the Fly Editing". That’s the feature we
would like to introduce to you first.
3.1.2 The first “Pattern-Jam”-session
In case it is not lit up already, push the [Pattern]-button in the "Num-ButtonAssignment"-section now. Next use one of the numeric buttons [1]-[16] or
[Shift]+[1]-[16], which will start the corresponding pattern. Use the tempo encoder
in the transport-section to set the tempo of the pattern corresponding to your personal
preference and liking.Up to 32 pattern can be holded by one song.
"Pattern-Jam"-mode
[Shift] allows to view
the part activity during
playback. Just hold the
[Shift] button down
during muting or
soloing parts to see,
which parts are play-
ing. The corres-ponding
Num-Button LEDs will
It's much easier to
identify a part you want
to mute if the part
activity is visible.
3.1.3 "Mute"-function – Muting individual parts
While jamming with the patterns it is likely you won’t want to hear all of the parts all
of the time. Usually you will want to start by playing a few of the parts and continue
adding more parts as you go along. That’s exactly what we will do next.
Push the [Mute]-button in the part-section next. Now the [Mute]-button will be lit
while the [Pattern]-Button light is turned off.
Tip:
The buttons of the "Num-Button-Assignment"-section and the buttons
of the "Part"-section change the assignments of the numeric buttons.
This is why only one of these function can be accessed at a time. As a rule
this will be the most recently selected function.
Using the numeric buttons 1-15 you are now able to mute individual parts. After
you’re done muting once again push the [Pattern]-button. If one of the parts is still
muted when you push the button, you will see the [Mute]-button blinking, signaling
that you are not currently hearing all of the tracks. When you are selecting a new
pattern, the settings of the new pattern will override your current mute settings.
Sometimes you may just want to selectively mute a few parts – without losing the
previous assignments of the numeric buttons. That is definitly possible.
Tip:
If you are currently in "Pattern-Jam"-mode, you can also select the mutefunction on a ”temporary” basis. Hold down the [Mute]-button in the
"Part"-section and push the numeric button of the parts which you wish
to mute. Once you release the numeric button the Spectralis will
automatically revert to the "Pattern-Select"-mode. This tip will also work
with the [Select]-and the [Solo]-button.
25
Page 26

SPECTRALIS 2
Tip: What actually happens during muting if you are pushing numeric
button 16 – [Drums]? Pushing that button will actually mute the whole
drum section!
3.1.4 "Solo"-mode
The Solo-Mode allows you to activate individual tracks for closer analysis. Of
course the "Solo"-function is also a popular gimmick when jamming with a
pattern. Push the [Solo]-button in the part-section , then push one or more of
the numeric buttons, which will solo the tracks you’d like to hear by themselves
Tip:
The "Solo"-mode can also be activated ”temporarily”. The process is
exactly the same as the one described for the "Mute"-function.
Tip : Of course you can also use the "Solo"-function to hear the subgroup ”Drums” all by itself.
"Pattern-Jam"-mode
3.1.5 Adjusting levels to your liking
You’re not happy with what you’re hearing? The balance of the Sounds just
isn’t quite right and individual sounds are too loud or soft? Let’s change that
now! First push the [Volume]-button in the "Mixer"-section. Now adjust the
levels corresponding to your taste using encoders 1-15. Additionally you can
use encoder 16 to adjust the overall level of the whole drum-group.
3.1.6 Editing panorama and FX-sends
Now that you’re happy with the level settings, you can also adjust the FXsends and pan-position in the same way.
- Push the [Pan]-button in the "mixer"-section
- Using the encoders 1-15 you can now move each part between the two speakers
until you‘re perfectly happy with the stereo-balance.
- Push the [FX1-Send]- or the [FX2-Send]-button
- Using encoders 1-15 you will now be able to adjust the FX-level for each part
individually.
3.1.7 Sound selection for your parts
You’re saying the Kick-drum is too boomy, the Snare doesn’t have enough
attack and the Hi-Hat doesn’t sizzle enough? Well maybe you should try some
different sounds!
Push the [Select] button in the "Part"-section.
Use numeric button [1] to choose the Kick-part
You will now see the following message in the display (of course song-number
and pattern-names may vary!):
26
Page 27

SPECTRALIS 2
S01:<Song 01> Pattern:<Patt01> Tempo:120
C:Kick S:TR-Alike 808Deep <Vol>
C:Kick
Using the first Encoder you can now select the sound-category.
If you want to stick with the Category ”Kick” the Spectralis will offer
you a selection of sounds (in this case ONLY Kicks), which are part of
this category. By setting the category to "ALL" you can select all drum
sounds stored in the machine.
S:TR-Alike
Using the second Encoder you can select another subcategory.
Subcategories allow to make a kind of preselection for your sound search.
If you for example are looking for TR-909 kicks, select TR-Alike and
the Spectralis will list all sounds, taken from the TR-family of
drumcomputers.
"Pattern-Jam"-mode
808Deep
The third encoder selects the sound itself. The sound you are selecting
will will not be loaded until you push down the encoder button. That is
necessary for all sample-based sounds to avoid unnecessary sample
loading during your sound search. But you can overcome this by simply
hitting the [page-up] and [page-down] buttons for selecting and activating
a samplebased sound. That often also works faster than the rotary encoder
function. By selecting subcategory "All" in advance, you can switch
through the entire range of kick drums available on your machine.
<Vol>
Using the fourth encoder you can determine the Volume of the new sound.
Currently (version 097L) this encoder has no function. But you can adjust
the volume in the volume mixer by hitting [Volume] in the mixing desk
section and dialing the encoder of the desired part.
3.1.7a The pattern transpose function"How to...?"
The Pattern transpose function is enabled in pattern jam mode as well. Just
play a pattern, hit and hold the [SHIFT]-button and hit the [PLAY] button in
the part section. Now the pattern get gat transposed by pressing the num buttons
1 - 13. 14 and 16 switch the whole transpose range one octave up or down.
27
Page 28

SPECTRALIS 2
3.1.8 Saving patterns
Now that you have made some changes to the patterns, you’re probably curious
how you can actually save your changes – especially since the Spectralis will
remind you to do so after changes during each pattern-change. As soon as you
have made a change, the [Save]-button will start to blink. If you are pushing
the [Save]-button you will see the following display-menu:
What do you want to save?
<Sound> [Pattern] <Song> <Creativ>
Use the encoder-button below the entry [Pattern]. This should prompt the
following display message:
Select Memory Location and press „SAVE“
<extern> [Song] [Current] [Exit]
As you can see, you will have three options available. The option <Extern> is
not available yet but will be part of a future firmware revision.
Saving patterns
[Song]
Once you select [Song] using your soft button, you will be able to save
the current pattern to multiple memory locations at the same time. This
option also provides the possibility to save the changed pattern to a different slot than the one containing the original pattern. Confirm by pushing
[Song] and you should see the following display-message:
Choose Pattern-Number(s) and „Save“
Have a look at the numeric buttons. Memory locations already in use
will be lit. Select the numeric button 1-16 with which you would like to
be able to select your new patterns at a later stage. Please keep in mind
that each song can have up to 32 patterns. You can reach the second bank
of 16 patterns, by using the [Shift]-button during selection. Flashing
numeric buttons will indicate your memory slot selection. You can also
remove a selected memory slot by pushing the flashing button once more.
Once you’re done with your selection, confirm the save procedure by
pushing the [Save]-button once more.
[Current]
[Current] just updates the current pattern memory with the changes,
you have programmed. This is a very useful function if all you want to
do is to make your changes permanent for the currently selected pattern.
You will automatically leave the "Pattern-Save"-menu thereafter.
28
[Exit]
Exits the ”Pattern-Save”-menu without saving any changes!
Page 29

SPECTRALIS 2
3.1.9 What data are saved inside a pattern?
With many synthesizer workstations or grooveboxes you’ll encounter a common
problem, which is that you have to know at all times what you want! All you
may do is change a sound and suddenly a dozen patterns sound different than
before. Another time you edit a rhythmic motif and the changes appear also in
patterns which were perfectly alright. This is mostly the result of the memory
structure of these instrument. In many cases a pattern is nothing else than a
assigned selection of sounds and motifs, which are being read from internal
memory somewhere in the unit once selected. To make things less confusing,
the Spectralis saves its data in a different fashion. If you decide to save a pattern,
all of the current sound-settings and musical motifs, as well as the mixer settings
become part of the pattern. You can always count on the fact that a pattern will
sound the way you heard it before saving it. You won’t have to concern yourself
with any of the other storage slots during this process.
Here once again as a reminder a small List of the Data contained in a Pattern:
I. The settings of the analog synthesizer including filterbank and step-
sequencer settings.
II. The sound setting for the DSP-synth, incl. all of the drum sounds.
III. All motifs used
IV. The mixer settings
V. The mute- and solo-settings of the pattern
Saving patterns
What's not saved?
For a number of reasons the samples of the DSP-synth are not being
saved within a pattern. You will however receive a warning display
message when accessing a pattern, if the originally used sample set cannot
be found in memory. This message will only show up for a few seconds.
However - you can recall this message by pressing [Shift]+[Page-Up].
The message will resist there until another text info has been displayed.
Additionally the Spectralis – if you want it to – will play an alternative
sound, once you are starting a pattern the samples of which are not in
RAM memory. You will hear immediately that something isn’t right with
the pattern. You can also turn off the ”Default”-sound if you wish.
3.1.10 Turning off the “Default”-sound
As already mentioned in the previous chapter, the Spectralis will play a standard
sound, whenever a motif tries to access a sound, the samples of which are not in
RAM memory of the Spectralis 2 – if you want it to! This of course could
result in some unpleasant surprises, especially during LIVE operation. On the
other hand at home while arranging a song it could turn out to be useful, because
you’re more likely to notice a wrong sound than a missing part. This is the
way you can deactivate the ”Default Sound”:
I. Use the [Shift]-button, hold it down and push the [Save/System]-button.
II. Push the [Page-Up]-button once. This will prompt the following display
message.
29
Page 30

SPECTRALIS 2
2/5: System
USB:HIGH DSnd:Yes Sync:Dis Play:Yes
The first Parameter is of no interest for this purpose. The second parameter,
“DSound:Yes” turns the default-sound on (YES) or off (DIS).
“DIS” stands for “Disable”, which in this case means “deactivate”.
3.1.11. Deactivate the “Pattern changed, Save First”-messages
Occasionally it is quite helpful to get a reminder not to forget saving your
changes – however it can also be a nuisance, when it starts to affect the flow
and fun of jamming.
When selecting another pattern the following display message will appear when
changes are being made to the current pattern:
Sxx:<Song0 |Pattern Changed, Save first?
C:Funky | [NO] [YES]
Saving of patterns
If you chose to ignore this message without answering [NO] or [YES] via the
encoder buttons, the pattern won’t be changed.
[NO]
Confirming [NO] will enable the Pattern to change and your changes
will be lost!
[YES]
If you confirm [YES] the changes are being saved into the active Pattern.
This is the equivalent of saving a pattern with the option ”Current” in the
previous chapter.
Even if you have not selected any of the options it doesn’t mean you have lost
your pattern changes – however, you will then have to save them via the ”Save”function.
If you don’t the next pattern-change will definitely have the same result. If you
can’t keep an eye on the display during LIVE operation and don’t react to the
messages, the Spectralis just won’t effect pattern changes. That could become
a problem.
In order to turn off the warning messages, you will have to change the basic
settings of the "system"-menu. Use the [Shift]-button, hold it down and push
the [Save/System]-button. This should prompt the following diplay-message:
30
1/5:System SN:00xxxxxx V1.5
Drum:OFF Contr:100 Save:Yes Load:Ask
Page 31

SPECTRALIS 2
The first two parameters are currently not of interest. Important are however
the settings for ”Save” and ”Load”.
„Save:“
“Save:” offers the following Options:
-YES
Memory Protection is turned off. You can overwrite existing settings, by
executing the Save Process.
-DIS DIS=Disable prevents the overwriting of patterns, sounds and settings.
The Memory is protected in this setting..
You now won’t be able to save any data. On the other hand you won’t have
to deal with the warning messages anymore.
„Load:“
„Load:“ provides the following options:
-Ask
The warning messages will appear when at the same time "Save" has
been set to ”Yes”
-Ignore
The alerts won’t appear again – regardless whether the write protection
”Save” is acticated or not.
-Save
This is a special mode, which is currently not available yet. When you
have made changes to patterns and want to switch to another pattern the
previous pattern will be automatically saved. The mode is very useful,
when you’re almost done with your patterns and don’t want to dial up
the "Save"-menu all the time during finetuning.
Saving of patterns
31
Page 32

SPECTRALIS 2
3.2 Editing DSP-synthesizer sounds
3.2.1 Introduction
In chapter 3.1.7 you already found out how you can exchange a sound for
another. For the truly impatient users we will now familiarize you with a number
of tone-generator-parameters, so you can tailor the sounds even more to your
taste. At this time the sample engine of the DSP-synth already provides the
following features:
a.) 12dB multimode filter with lowpass, highpass and bandpass operation
Modes
b.) Separate envelopes for the multimode filter and the amplifier
c.) Velocity sensitivity settings for amplifier as well as keyboard scaling
for the cutoff frequency.
d.) Sample-selection and tuning the sample-oscillator
In the upper part of the Spectralis frontpanel, is the section which controls the
sound edit functions. The controls always affect the current selected part. For
instance if you’d like to change the sound of the snare-drum proceed as follows:
Editing DSP-synthesizer sounds
- Chose the [Select]-Button in the Part-Section.
- Select the desired Part (Snare) using the numeric button [2].
- The Control elements have now been assigned to the snare-drum.
3.2.2 Selecting a sample or multisample for the sound
The DSP based synthesizer for the drums and polyphonic synthesizer parts are
sample based. The spectralis comes with a basic sample-set, that loads
automaticly during startup from the 4 GB Flash Memory to the internal RAM
memory. Chapter 4 in this manual gives you detailed instructions on how to
create your own samplesets - at this moment we concentrate on using them for
the DSP engine.
Samples in the Spectralis 2 can be loaded during startup or can be loaded
dynamically on request. At startup, the Spectralis 2 reads all sample names
from available samples in the internal Flash Memory. For that reason, the sample
selection in the oscillator menu lists all samples - also those, which are not
already loaded.These will be loaded automaticly on selection. This Memory
Managment avoids any sample library confusion. You must not care about
loading samples. The Spectralis does that for you automaticly. When you for
example select another song, the Spectralis will load all necessary samples and
will show up an error message for sample-sets, which are not available because
32
Page 33

SPECTRALIS 2
of a missing sample on flash memory. This missing samples message can be
recalled by pressing [Shift] + [Page-Up].Just copy the missing sample onto
the flash memory and select the browse function for giving your Speckie the
chance to load the sample.
The sample-selection can be found inside the "VCO"-menu. The encoders of
the VCO section are assigned to the following targets:
OSC WAVE:
Turning: Selects a sample from the current category and subcategory.
Pushing: Opens the sample selection menu:
OSC WAVE
C:Kick S:TR-Alike 808Phatt [Init]
C:Kick
The first encoder let's you select the category from which the sample has
to be taken.from.
Editing DSP-synthesizer sounds - sample oscillator
S:TR-Alike
The second encoder allows to select the subcategory for the sample
selection.
808Phatt
With the third encoder, the sample can be selected. The selection must be
confirmed by pushing down the encoder button. Samples, not already
loaded will be loaded after confirmation.
[Init]
The [Init] function allows to initialize the synth parameters to default
values.
3.2.3 Tuning the sample set
The standard pitch of the sample-oscillator can be adjusted in the oscillator section
as well. The oscillator standard pitch can be transposed by octaves using the [Oct-
Up] and [Oct-Down]-buttons.
The sample oscillator can also be transposed by halftones by turning the [OSC-
DETUNE]-knob.
3.2.4 Further Sample-Oscillator parameters
A sample normally sounds very static. Every triggered note does sound exactly the
same. That is a limitation of the sample based tone generation. On real synthesizers
like the hybrid sound engine every note sounds slighly different resulting in more
liveness in the sound character. Some samples of the current spectralis sample
library are created by sampling real synthesizer waveforms. Some of them are
two oscillator samples where you can hear the typical phase cancellation shifting
33
Page 34

SPECTRALIS 2
that makes a synth sounding phatt. However, at real synthesizers the oscillators
are freerunning. Every note, you are playing opens the VCA at another position
of this oscillator phase shift beating. The sample oscillators of the Spectralis
can simulate that by shifting the sample-start point resulting in a sample based
sound with liveness. Additionally you can add rhichness by trigger up to 8
DSP voices simultaneously with detuning.
Please push the [MACRO-CONTROL]-encoder button inside the VCOsection to open the Oscillator sample playback mode menu:
1/2 Oscillator Sample playback mode
Start:0 StartM:0 Mode:Poly Detn:0
Start - Sample Startpoint
Start lets you truncate the sample startpoint.
StartM - Sample Startpoint Modulation
This encoder sets the speed of the sample startpoint Modulation. A setting
of "0" disables the Sample-Startpoint Modulation.
Editing DSP- synthesizer sounds - sample oscillator
Mode - Playmode Selection
Offers different sample playback modes:
Poly: Standard polyphonic playmode.
Mono: Monophonic Playmode
Uni2-8: Unisono 2, 4 and 8 are the different unisono playback modes
that can create very rhich sounds and flanging FX depending on the
settings. Unisono modes are using multiple sample voices per note. Unisono 8 will need 8 voices per tone. The maximum polyphony for such a
sound is limited to 4.
Detn - Detune parameter for unisono voices
The detune parameter sets the amount of detune for the unisono voices.
Settings around 1-3 are resulting in deep flanging effects - especially on
using Unsisono 8 mode.
3.2.5 Reverse sample playback
At the second page of the oscillator sample playback menu one can activate a
reversed sample playback mode for oneshot samples like drumsounds or FXs.
Press the [page-up]-button to open the following menupage:
2/2 Oscillator Sample Playback mode
VDir:Norm
34
Simply set "VDir" to "REVERSE" to activate the reversed playback algorithm.
Page 35

SPECTRALIS 2
3.2.6 Changing the volume envelopes
Envelopes make it possible to change a volume progression of a sound. Some
sounds resonate percussively, like the noise of a hammer being hit on a metal
plate, or may take a couple of seconds to reach maximum volume, like for
instance a Philicorda Organ when a volume pedal is pressed slowly. Sounds
can end apruptly just after releasing a key on your keyboard or can end slowly
like the Sound of a piano-wire when the sustain pedal is used.
When changing the envelope of the DSP-synth it is important to note:
The maximum duration of the sound with non-looped samples is dependent on the
length of the sample. There is no point to set the release time of an envelope to a high
value, if you’re using the sound of a champagne cork or a click as your sound. The
sound won’t get any longer, no matter how hard you try ;-). Similarly shortening the
attack time of the envelope will not speed up a sample with a slow fade-in at the
beginning.
Tip:
In order for you to hear the changes of an envelope directly just start any
pattern, select the desired part as described above and solo it. While
solo’ing is not necessary it makes it much easier to hear the full range of
the soundchanges.
Editing DSP-synth sounds - Volume envelopes
Next push the encoder-button (EG-Balance) in the "VCA"-section on the front-
panel. This will open the following menu:
Volume Envelope
Att:0 Dcy:90 Stn:0 Rls:90
You now are able to control the envelope curve of the sound:
Att: Attack Time
Here you can determine how fast a Sound will reach maximum volume.
Dcy Decay Time
Adjust how fast the volume decreases to sustain level.
Stn: Sustain Level
The parameter ”Sustain” has nothing to do with timing input, but rather
is the level sustained after completion of the decay phase while a key is
being held down. This parameter is meaningless for short ”One-Shot”samples, as the sample often has decreased too much in volume by the
time it reaches the sustain level. For drum sounds it is usually best to set
the sustain level to 0 and to control the envelope with the attack and
decay phase.
Rls: Release Time
The release time is the time elapsed between letting releasing a key and
the complete disappearance of the sound.
35
Page 36

SPECTRALIS 2
3.2.7 Velocity Sensitivity and adjusting the VCA-level
The maximum level depends on the VCA-level setting of the sound. You can
adjust the maximum level with the (VCA-Level)-encoder inside the "VCA"section. The level also can be controlled with the velocity sensitivity of your
keyboard. The amount of velocity dependent level control can be adjusted by
holding down the [Shift]-button and adjusting the amount with the (VCA-
Level)-encoder.
3.2.8 Using the digital multimode filter
The Spectralis provides a stereo multimode filter for each of its 32 stereo voices.
This filter can be used as a lowpass, highpass and bandpass filter. A filter is a
function which will let a frequency range of a sound pass through, while
suppressing another range of the frequency mix. Depending on the selected
basic tone color you can achieve dramatic results or subtle changes. The sound
character of a sinewave for instance will hardly be affected by turning down
the cutoff-frequency of the lowpass filter, it will just get quieter when you’re
turning the cutoff-frequency knob. This is because the sinewave has no overtones
and only makes the fundamental audible. The most dramatic effect of the Filter
can be heard when it is applied to a sawtooth or pulse-waveform. The
descriptions of these filter functions are pretty self-explanatary.
Editing DSP-synth sounds - digital multimode filter
Note! If you are
playing a DSP Synth
that no Sample has
been assigned to, the
selected Part will
have no Sound or the
default sound only!.
We have described in
chapter 3.1.7 how to
assign Multisamples
to a Part.
Lowpass
The lowpass filter only lets the overtones above the selected frequency
pass through. It is the most frequently used type of filter, as it offers the
most musical sound. The reason is that we have a tendency to feel sounds
as being ”warm” when they strongly emphasize the fundamental. The
sounds of course can be glisteningly bright when the filter is opened –
however the fundamental will always be clearly audible. The frequency
of the filter, at which the overtones of a tone colour are surpressed is
called the cutoff-frequency.
Highpass
This Filter cuts off all overtones below a set frequency. This results in a
somewhat unusual, ”hollow” sound. The highpass filter is very useful
when trying to make a sound fit into an arrangement. Once you start
layering a bunch of voluminous sounds on top of each other, you might
end up with sound-mush and some of the sounds start canceling each
other out. Using a highpass filter you can thin out sounds in the
problematic bass or lower midrange. With a high resonance setting though,
you can also implement a number of wonderful special effects.
Bandpass
With this Filter the frequencies above and below of the selected frequency
are dampened/limited, so that only a narrow frequency range remains
audible. This filter is also perfectly suited for the creation of special effects
and for proper layering of multiple sounds.
36
Page 37

SPECTRALIS 2
3.2.9 Playing filtered sounds
This might be the right time to actually give a first listen to the filters. Use the
[Select]-button in the "Part"-section und chose one of the three DSP synthparts
with the help of the numeric buttons. You can now play this part with your
MIDI-keyboard. Once you’ve selected the part, the encoders of the Spectralis
frontpanel are assigned to the selected synth part. You might want to select a
multi-sample with lots of overtones. Waveform multi-samples like "SFSaw"
or "Puls70" (both part of the downloadable "multis.SLC" soundbank) are
perfectly suited for this task.
Using the buttons [12dBLP], [12dBHP] and [12dBBP] you can activate the
desired filter function. The (Cutoff LP)-knob changes the frequency of the
selected sound directly. When you are activating the filter you will immediately
hear a sound-change, as we have set the filter approximately to a medium
frequency in the factory settings, so there is an audible signal with all filter
functions. When switching on one of the [12dBXX]-buttons you will definitely
be able to hear the sound changes. You should experiment with different
resonance settings to get an idea of the frequency changes possible.
Editing DSP-synth sounds - playing filtered sounds
3.2.10 Envelope control of the filter frequency
The envelope allows automatic frequency control of the multimode filter. In order to
make the envelope control of the filter audible, the filter should not be completely
opened. When the envelope amount is set to a positive value and the filter frequency
is already set to it's highest frequency, the envelope will not affect the sound at all.
a.) For your first try use the [12dB LP]-button to activate the lowpass mode.
b.) Set the cutoff-frequency to a value which either will make the sound appear
filtered heavily or not audible at all.
c.) Turn the (EG-Depth)-encoder clockwise, until the envelope control takes control.
d.) Push the (EG-Depth)-encoder-button, to prompt the envelope parameters in
the display. You should see the following menu:
Cutoff Envelope
Att:0 Dcy:90 Stn:0 Rls:90
You can now change the assorted envelope parameters to create the desired envelope
shape for your frequency control.
3.2.11 Filter frequency keyboard scaling
When a Sound is played in different regions of your keyboard, the frequency of the
fundamental and all overtones are being shifted right along. When the cutofffrequency is set to a fixed value for the whole keyboard, the resulting tone will
not sound the same in different areas on your keyboard because some transposed
overtones will already be affected by the cutoff frequency setting at higher
notes on the keyboard where the same sound beeing played two octaves down
still is audible with the complete overtone structure. To avoid this from
happening, it is possible to shift the filterfrequency dependent on the MIDI
note number. This kind of control is called ”Keyboard-Scaling”.
37
Page 38

SPECTRALIS 2
"Keyboard-Scaling"-settings can be adjusted as follows:
Push the [Shift]-button and turn the (Reso-MM)-knob. The value of the
keyboard-scaling will be displayed while the changes are taking place. When
you are pushing the (Cutoff MM)-encoder button, the KeyScaling Parameters
will be visible continuously in the display.
1/3 Filter Parameters
Scale:12 Pitch:A3
The parameter ”Pitch” determines the key, which - when used - will have no
effect on the frequency during keyboard scaling. With positive values set for
the keyboard scaling, the keys above the note selected here will raise the
frequency of the filter up und keys below this value will lower the frequency
downward.
3.2.12 The DSP-synth LFO-section
The samplebased DSP soundengine provides 2 LFO's for parameter modulations
.The three encoders [LFO-WAVE], [MOD-DEPTH] and [MOD-RATE] in
the LFO section allows for editing of these parameters direct for both LFOs.
Pushing these encoder buttons opens up the menu for independent parameter
tweaking of both LFOs.
Editing DSP-synth sounds - LFO section
[LFO WAVE] opens the menu for the LFO waveform selection..
LFO Wave Menu (Dsyn1)
Lfo1: 0 Lfo2: 0
Encoders 1 and 2 are selecting the LFO waveform for LFO 1 and LFO 2 from
a wavetable.
[MOD DEPTH] - opens the menu for independent mod-depth control for LFO1
and LFO2..
LFO Depth Menu (Dsyn1)
´`Lfo1: 0 ´`Lfo2: 0
The little arrows to the left of the parametername are indicating, that you can
open further menus for LFO depth control.
1/2 LFO 1 Depth Modifier Menu (Dsyn1)
LEDl: 0 LEAt: 0 LErl: 0 LEdp: 0
Two additional edit pages can be found for both LFO's. The first one has been
selected. The following parameters are now available:
38
[LEDl] - controls the delay until the LFO depth envelope gets triggered after a
key has been pressed down on your keyboard.
Page 39

SPECTRALIS 2
[LEAt] - controls the attack time of the depth envelope.
[LErl] - Controls the release time of the LFO depth envelope.
[LEdp] - Controls how much the depth envelope affects the modulation depth.
By hitting [Page-Up] you reach the second menupage:
2/2 LFO 1 Depth Modifier Menu (Dsyn1)
LMWD: 0
[LMWD] - controls, how much the modulationwheel controls the LFO-depth.
3.2.13 Assigning LFO and MIDI modulation to the cutoff frequency
The LFO and MIDI controls can be assigned to the cutoff frequency for filter
modulation. The filter-cutoff menu of the DSP engine comes with three menu-pages.
You can reach these menu pages by hitting one of the [cutoff]-encoder buttons.
Entering the menu followed by hitting [Page-Up] opens the assignment dialog:
Editing DSP-synth sounds - filter modulation
2/3:Filter Cutoff Modulators (Dsyn1)
Src1:None Dph1:0 Src2:None Dph2:0
On the second menupage, you can choose between different modulation sources for
the Cutoff-Frequency - the two LFO’s, aftertouch, breath-controller and the
pitchbend wheel. Are you may missing velocity and the modulation-wheel in this
dialog? Don’t worry, these very essential modulators can be adjusted independently
from the modulation routing options on page 3/3:
3/3:Filter Cutoff Modulators (Dsyn1)
CoMw: 0 CoVel: 0
"CoMw“ controls the depth of the modulation-wheel cutoff tweaking and "CoVel“
controls the velocity control over the filter frequency.
3.2.14 Assigning LFO and MIDI modulation to resonance, volume, panpot
position and DSP oscillator pitch
The same two menu pages described in the chapter above can be found in the VCALevel, OSC-Detune, "FB-Balance" and VCA-Level menu for the corresponding
parameters. The following encoder-buttons can be pushed down to enter the menus:
[OSC DETUNE] - modulation assignment pages for pitch modulation.
[RESO MM] or [RESO MM] - modulation assignment for the filter resonance.
[VCA LEVEL] - modulation assignment for the VCA Level (Volume).
[FB BALANCE] - modulation assignment for the panpot position.
39
Page 40

SPECTRALIS 2
3.3 Playing the "Analog"-synthesizer
Before we discuss some of the special features of the analog synth, you probably
want to hear some of the sounds, to get an idea of the sound potential of the
Spectralis. As with all examples in the "practising/in use" section you'll have
to have your Midi-keyboard connected to the Spectralis and the Midi Channel
set to send on 1. Push Part->[Select] and chose Part 12 [Analog Synth]. You
will now see the sound selection mode of the analog synth in the display:
S01:<Song 01> PA01:Let’s go Pa:12 T135
C:A-Synth S:SynBass S:Classc1 <Vol>
C: - Category
In the analog-synthesizer part the main category "A-Synth" is of course
fixed. You won't need to use the first display encoder. The display message
just serves as orientation, so you can see that you currently have selected
the analog-synth.
S: - Subcategory
Using the second encoder "S:SynBass" you can select your sound category
of choice, to narrow down your search for the kind of sounds you're
looking for.
Playing the "Analog"-synthesizer
S: - Sound
Finally with the third rotary encoder you can select the desired sound
and confirm your selection with the rotary-encoder push button.
You might to try to change the selected sound. As an example select the category
"SynBass" and chose the sound "Classc1". In case you can't find this sound or
instead of the sound name all you see is "- - -" in your display, it is likely that
the soundbank "HybBnk1.SSB" is not stored on the Spectralis flash-rom. You
will need to download this file in the user-area of our website or at the spectralis
user forum at: http://www.spectralis.de/phpBB2/
Once dowloaded you can copy the data directly to the flash-rom of the
Spectralis. The sounds can now be selected easily inside the Spectralis. To
start the file transfer connect your Spectralis to your computer via USB. The
flash-rom of the Spectralis should show up at your desktop as a harddrive. Just
move the file "HybBnk1.SSB" to the flash-rom drive. After the transfer the
sounds should be readily available.
To make sound searches as easy as possible, we have sorted them alphabetically
by name within each category. Even though you might not remember at times
in which subcategory you might have stored a particular sound. In order to
avoid nerve-racking searches, the Spectralis allows you to set the subcategory
to "All" to view sounds independantly of their soundbanks in alphabetical order.
Once you have found the sound you were looking for and have confirmed your
selection using the push button, the corresponding category will appear in your
display. The category filter will only be active now once you use the subcategory
encoder again.
40
Page 41

SPECTRALIS 2
You may have noticed during playback of the sounds that the main voice of the
Spectralis - the Hybrid Synth - is very flexible and is free of compromises in its
This chapter deals with
Essentials!
You should definitely
take the time to work
through this chapter
undisturbed.
The reward for such
effort is one of the most
complex ”Analog”
Synthesizers ever
unleashed on the
public.
soundquality.
Originally we were planning to make this a true analog section. During the design
process we did find however, that many Spectralis features were impossible to
implement without breaking the bank. The two filters however - a 24dB lowpass
filter with discrete circuitry and a 12dB multi-mode filter - are fully analog still. As
these two play a major part in shaping the overall sound the Spectralis has a truly
amazing "analog" sound. Combining the best of both worlds - digital technology for
maximum flexibility and analog technology for perfect filter technology - is what really
sets the Spetralis apart from the field and gives it is truly distinct character. Of course
it is not possible to describe the Analog-Synth in every last detail in the "first steps"
manual. We're sure though that the info contained in these paragraphs will motivate
you to experiment with the sound possibilites of the Spectralis even without a full
reference manual.
3.3.1 Difference to other synthesizers
There are a number of distinguishing features the Spectralis has, which we’d like to
point out right at the start, to improve the success-ratio for your initial programming
efforts:
Differences to other synthesizers
a.) Each of the modules generating a signal for sound creation (oscillator, noise) has:
I.) it’s own amplifier with envelope
II.) independent level controls for the assorted modules changing the sound such
as the analog filter, the filter-bank and the FX-processors. This not only
allows for very flexible routing (connection to other Modules) and dynamic
changes.
Such luxury has one downside though – a large number of parameters, which make
the Spectralis extremely flexible but also somewhat complex. Rather than scaring
them, we are hopeful that this ”disadvantage” is likely to get an enthusiastic thumbs
up from all real synth-fanatics.
b.) Each sound-processing module also has:
I.) it’s own amplifier with envelope
II.) independent level controls for the assorted modules changing the
sound!
c.) The oscillators have a broad pitch range. You can pitch them up all the way
to a point where they become inaudible (it might get your dog’s attention
though), but also down low to a point where all you will hear is a slow cracking
noise from your monitors rather than an actual tone. This means you are able to
use the oscillators as LFOs.
d.) Because of the flexible and dynamic routing, you can even generate feedback.
For instance you could route an oscillator to the lowpass filter, then route the
41
Page 42

SPECTRALIS 2
signal from there to the multimode-filter and finally send the output signal of
the multimode-filter back to the lowpass. Without fail this will prompt the
Spectralis to create a sharp high-pitched noise. No pain, no gain – especially if
you’re not sure at which stage of the routing the feedback was generated. Still,
”Effect”-sounds especially can benefit from the feedback and produce beautiful
noise! When you consider the possibilities, who would want to eliminate such
features?! We certainly didn’t!
e.) You’ll be hard-pressed to find a more impressive modulation-matrix. All of
the possible modulation- and signal sources are already connected with the
modulation-and signal-targets.You can determine with an encoder how much
you want the respective connection to affect a parameter. Just imagine a semimodular system, where VCA’s have taken the place of cables connecting the
individual modules and you will have a pretty good idea what the Spectralis
has to offer.
What’s the purpose of such totally flexible routing? For one, while you can’t
get around establishing all of the connections with cables in a modulationmatrix, all of the possible connections are already set up in the Spectralis. This
allows very dynamic control over the sounds. It basically enables you to crossfade between different routings.
The analog filter section
42
3.3.2 Let's go - Getting familiar with the analog filters.
Enough with the preamble. I’m sure you’re dieing to finally hear the synthesizer
by now. As with all the examples in the "How to...?"-section, we will be
assuming that you have already connected a MIDI-Keyboard to your Spectralis
and have it set to send on MIDI-channel 1. Now push the Part->[Select]-button
and select part 12 [Analog Synth]. For this example we are also going from
the assumption that the original factory presets are still present in your Spectralis.
Next select the [Song]-button in the "Num-Button-Assignment"-section and
chose song 6 with Numeric button [6]. Also in the "Num-Button-Assignment"-
section now push the [Pattern]-Button and last the numeric button [1]. Playing
a key on your MIDI-Keyboard you should now be hearing a pretty fat synthbass sound. This sound uses the 24dB lowpass filter. The filter-frequency is
being controlled via the envelope of the 24dB lowpass filter.
You can now turn the (CutOff LP)-encoder while playing your keyboard. You
should hear some definite sound changes. If you are turning the encoder to the
right the sound should become brighter and more sparkling, turning the encoder
to the left should make the sound darker and duller. You will notice however
that turning the encoder further to the left is not closing the filter fully. Don’t
be alarmed. This results from the fact, that the filter is being controlled by the
encoder, however the resulting control voltage is being added to the control
voltages of the other modulators.
As mentioned earlier, the cutoff-frequency of the sound is being controlled by
the envelope. Obviously in this case the ”sustain-level” of the controlling
envelope is opened to a point, where the filter won’t close completely.
This means of course, if you were to change the amount of the envelopedependency it should be possible to close the filter further??! We’ll give it a
try! If you have paid close attention during the earlier chapters of this manual
you will remember how to access a parameter. Just use the (CutOff LP)-button
Page 43

SPECTRALIS 2
to access the parameter pages, which allow you to change the filter frequencies.
You should see the following menu in your display:
1/9:24dB Lowpass: Cutoff Modulation LFO
FMWve:0 FMRte:0 DmDpt:0
It is plain to see, that this menu does not deal with envelope-amount EG-depth.
So push the [Page-Up]-Button two times to access the following page:
3/9:24dB Lowpass: Filter Control
Exp:37 Reso:238 EgAm:63 Kscl:4
“EgAm” (envelope generator amount) confirms that you have reached your target.
Play a note on your keyboard, hold the key down and first turn the (CutOff-LP)-
encoder to the left until you hear no more change to the filter-frequency - in other
words until the sound does not get any duller. Now, when you are also turning down
the (EgAM)-encoder the filter is being closed further and the bass-sound begins to
pump. If you want to hear the full ”Oomph” of the filter, all you have to do is to
additionally reduce the resonance of the filter.
To do so, use the (Reso LP)-encoder and turn it to the left. Depending which key
on your keyboard you are playing you can now subject your monitors to a real test
;-)! Because of the reduction of the filter-feedback (resonance) it is not the overtone
structure around the cutoff-frequency that is being emphasized now, but the fundamental is getting louder.
If you increase the resonance further, the lowpass filter almost takes on the character
of a bandpass filter, emphasizing the range of the overtones around the cutoff
frequency, creating the perception of a more synthetic sound.
If you are increasing resonance to maximum level, the feedback will be so strong,
that the filter will start oscillating at the adjusted cutoff frequency. The term envelope
of course has already been explained in the DSP-synthesizer chapter earlier. To
complete the basic overview here is one more tip how you can access the envelope
of the lowpass filter. Before openening the envelope menu, you should increase the
”EgAM”-Parameter at the third lowpass-filter edit page (by pushing (CutOff LP)-
encoderswitch, selecting the third page with [Page-Up] and increasing the "EgAm"-
parameter) and reduce the filter-frequency (CutOff LP) as described before. Now
you can push the (EG-Depth)-button. You will now see the first page of the envelope
menus for the two analog filters:
The analog filter section
1/4:Multimode: Volume Envelope Page1
Att:0 ^Dcy:0 Stn:255 Rls:10
This menu-page is not the one showing the envelope of the lowpass yet, but rather
the volume-envelope of the multimode filter. Remember? Each filter has two envelopes
– one to control level and one for the cutoff-frequency. By pushing the [Page-Up]-
button three times, you will arrive at your destination – the cutoff-frequency envelope
of the 24dB lowpass filter:
43
Page 44

SPECTRALIS 2
4/4:24dB Lowpass: Cutoff Envelope Page1
Att:0 ^Dcy:71 Stn:137 Rls:70
Now you can control the most essential functions of the 24 dB lowpass. Just
play around for a while with all the functions described so far. This way you
will get a good feel for the sonic capabilities of the filter. Once you’ve had
your fill, we can move on with this chapter. In case you are wondering why the
tone stops abruptly when you release the keyboard, even with the Release (”Rls”)
set to it's maximum value you may want to go back two pages in the menu.
Here is where you will find the level envelope for the 24dB Lowpass. If the
release time is set to a low value, the tone will end despite the filter being open
because the amplifier behind the filter is at the end of the signal-path. To avoid
this from happening you should set the release-time of the 24dB lowpass level
envelope to a value of around 100!
If you’re hitting another key now with high expectations, you will still not hear
a change in the duration. In case you are now confused and start questioning
the usefulness of this chapter, you might want to re-read the introduction to the
chapter. It’ll take you to a small Sidebar:
Hybrid engine - oscillators and envelopes
3.3.3 Short Excursion: oscillators and envelopes
Corresponding to the introduction each oscillator has its own amp with envelope
control!
If the sound stops right after releasing a key on your keyboard, it indicates that
the envelopes of the oscillators are active and have a short release-time setting.
Let’s test that theory. In the following drawing you can see a simplified sketch
of the ”inside” of one oscillator.
Directly next to the sound-source (Waveform Generation) there is an amplifier
(triangle-symbol), which is controlled by an envelope. The level controls for
the individual filters come after it! Below the amp you will see the ”EG-bypass-
signal path”. This one routes the signal of the current waveform directly to the
output volume pots - just bypassing the volume envelope.
Corresponding there are two ways to make the release-phase of the two filterenvelopes audible.
I.) You can either open the EG-bypass parameter, so that the oscillator provides
continuous sound regardless of the envelope setting, or
44
II.) You can set the release-time of all involved oscillators to a bigger value.
Page 45

SPECTRALIS 2
Version I.) is closest to what you may be used to from other synthesizers. Having
an additional envelope controlled amp for each oscillator is definitely pure
luxury – a luxury however that will show its benefits once we start dealing
with phase-modulation and frequency-modulation
Push the (Osc-Wave)-encoder-button to once again open the oscillator-menu
Using the [Page-Up]-Button you should now select menu-page 10/27:
10/27:VCO EG Bypass
Osc1:0 Osc2:0 Osc3:0 Osc:0
As you can see with this sound, all EG-bypass controls of the oscillators 1-4 are set
to 0 value. Set the EG-bypass encoder for all oscillators to the maximum value
(255).
Now, when you are playing a key on your keyboard and having set both filterenvelopes to a high value for the release-time, the new sound will still continue even
after you release the key.
Hybrid engine - Oscillators and envelopes
TIP: The bypass settings can also be reached by pushing the [EG-Release] button in the VCA section.
Turn the “VCO-EG-Bypass”-button back to 0. We still want to have a look at
version II.)
Push the (OSC-Wave)-button once again and use the [Page-Up]-button to select
menu-page 2:
2/27:Volume Envelope Macro
^Osc1:0 ^Osc2:0 ^Osc3:0 ^Osc4:0
The four encoders visible now, are so called macro-encoders. They allow you to
change virtually the whole envelope with just one encoder. The little upward arrows
you see in the display show that you can also use the push-button function of these
encoders to access additional sub-menus.
Please push the first encoder-button “Osc1:0”. You will see the following Display
message:
1/5:VCO1 Volume Envelope Generator Page1
Att:0 ^Dcy:00 Stn:255 Rls:0
Looking at the envelope setting it’s easy to tell, why your audio signal disappeared
when you let go of the key: only sustain shows as open. attack, decay and releasetime are set to 0 value!
Right from this page you can also access the envelopes of the other oscillators.
45
Page 46

SPECTRALIS 2
All you have to do is push the [Page-Up]-button repeatedly. One after another
you will now see oscillators 2-4 appear as well as the fifth sound-source ”Noise”.
Working with these oscillator envelopes alone provides you with an extensive
playground, which you will start to appreciate more and more the longer you
work with your Spectralis.
TIP: If the attack-time or the release-time are set to ”0”, it is possible that
an annoying click-sound might pop up at the start or end of the sound.
This may be a result of the oscillators operating in free-oscillation mode –
when you are playing a key the oscillator signal is output directly. If the
Waveform being output currently happens to be in maximum-position, a
steep curve is being generated, which you might end up hearing as a click.
This does apply to all involved envelopes. You can however suppress these
click-noises - which tend to show up primarily with dull sounds and could
be annoying -, rather effectively by either setting the values for attack and
release a little higher or by switching the oscillators from free oscillation
to a start with fixed phase-position. The start phase-position of the
oscillators can be set individually for each oscillator on edit-pages 18-21.
A set value of 0 plays the oscillators in free oscillation mode and a value
above 0 sets the position in the waveform, from which the oscillator is
being started, once a key is being played. Whichever waveform you are
chosing – they all will have a zero-pass position. If the waveform is started
in the zero position of course you won’t hear any click even if the attack is
hard. Depending on the selected waveform the zero-position of the
waveform can be found at a different value! The clicking noise at the end
of a sound cannot be avoided with the phase-position. In case of doubt
always set the release time to a value of 10, so the click at the end of the
sound is being eliminated with a soft fade.
Hybrid engine - Multimode-filter and filter-routing
46
3.3.4 Back to analog-technology – the multimode filter and filterrouting.
Now that we’ve eliminated the first potential stumbling block let’s look at
another one. You’ll see that the [12dB HP]-button on the frontpanel is lit. This
indicates that the highpass filter-output is active. Yet, when you are turning the
cutoff-frequency of the multimode filter (Cutoff MM) nothing happens .
”WHY”? Among other things in our Spectralis each oscillator has its own levelcontrol for each filter. Could it be that these controls are turned down? It’s best
to check – better safe than sorry! To do so, you’ll have to push the (OSC
Wave)-encoder-button in the oscillator-section. This will take you straight to
the oscillator menu.
From menu-Page 3 onwards (2x [Page-Up]) you will find all the oscillator
level menus. The first one controls the level for the filterbank for each oscillator.
On page 4 you will find the levels for the multimode-filter:
Page 47

SPECTRALIS 2
4/27:VCO Multimode Filter Volume
Osc1:00 Osc2:00 Osc3:00 Osc4:00
As suspected all of them are set to 0!! No wonder there was no audible signal
from the multimode-filter. We definitely need to up the oscillator-level for the
multimode-filter. You can generously set all levels to a value of 230 and then
turn the (CutOff MM)-encoder again. Depending how high the cutoff-frequency
of the lowpass was set, you should now definitely hear a sonic change. However
if the 24dB filter is completely closed, you won’t be hearing any signal from
the multimode filter either anymore. Go ahead and open the (CutOff-LP)-
encoder some more, so that the multimode filter can be heard clearly. Increasing
the resonance of the multimode-filter even more (RESO MM), makes the
highpass filter effect even more apparent.
Still, you will only hear the signal if the 24dB lowpass is open as well. You can easily
find out why this is the case by looking at the current routing. At this time all four
oscillators are being routed both to the 24dB lowpass-filter and the multimode-filter.
While the output of the lowpass filter is connected with the output of the Spectralis,
this doesn’t appear to be the case with multimode filter. Otherwise we’d obviously
be hearing the ighpass-effect even when the lowpass is closed. The multimode-filter
is only sending its signal to the 24dB lowpass filter. To clarify this even more, we
have created a diagram, which is intended to illustrate the signal-flow for the selected
sound:
Hybrid engine - Multimode-filter and filter-routing
We hope that the drawing is somewhat helpful to you, rather than confusing you even
more. In the diagram you can see the individual modules. To make things a little
simpler we did leave oscillators 3 and 4 off. We also didn’t include any non-relevant
part of the routing. The sum-bus for instance is shown in Mono mode, while the
original is actually in stereo. It is of no particular consequence though for now. It’s
basically a simplified diagram of the routing.
All Encoders shown in grey are open. All the ones shown in white are set to 0. As
you can see in the drawing the signal is being sent by all oscillators both to the
multimode filter as well as to the 24dB lowpass filter (keeping in mind that
you have just opened the levels to the multimode-filter yourself).
You can also see, that only the 24dB lowpass filter is connected with the sum-
47
Page 48

SPECTRALIS 2
output. For the multimode-filter only the signal-path to the 24dB lowpass is
open. In order to route the multimode-filter directly to the output as well, you
will have to open the encoders to the right of this module as shown in the
drawing. At the same time you should reduce the signal feed level from the
multimode to the 24dB lowpass-filter. You have located the problem! To change
the routing as described, first push the (CutOff MM)-encoder button. You
should see the following menu:
1/8:Multimode: Cutoff Modulation LFO
FmWve:0 FmRte:0 FmDpt:0
We don’t want to spend a lot of time here, so please push the [Page-Up]-button
a couple of times which will get you directly to menu-page 6
6/8:Multimode: Output Volumes
BusV:0 Pan:<0> FB:0 LP:255
Hybrid engine - Multimode-filter and filter-routing
48
Let’s set the bus-level to a value of 230, Pan to center and the encoder LP to 0.
6/8:Multimode: Output Volumes
BusL:230 BusR:230 FB:0 LP:0
You will now hear the multimode-filter always – even when the 24dB lowpass
filter is connected. Both filters are now set to operate in parallel mode.
We’re hopeful that you are developing a feel for the inner workings of the
Spectralis by now. In that case you should not find it difficult to make the
multimode-filter audible by itself. There are two ways to achieve that goal.
You can either set the oscillator level for the 24dB lowpass-filter to 0 or you
can set the sum-out level of the 24dB lowpass filter to 0. The second choice
appears to be the more sensible one, as it requires fewer parameters to be edited
to accomplish the goal and also because you stand to get a better signal/noise
ratio by simply removing an analog filter not being used from the sum-out.
Operation is very simple. You probably still remember which menu-page
provides the needed parameters.
Simply push the (CUTOFF LP)-encoder button and dial up menu-page 6 ”LP
Feed” via the [Page-Up]-button. You can now lower the output level of the
24dB lowpass filter, allowing you to hear the multimode filter by itself.
This would be the perfect time to extensively test the multimode-filter. Contrary
to the multimode-filters of the DSP section this analog version has a number of
additional features. For instance you can not only toggle the different filteroutputs, but you can also route the various filter-types simultaneously to the
output. Any activated output will light up the corresponding button [12dB LP],
[12dB HP] and [12dB BP]. You can now try out the various filter-types, change
the cutoff-frequency (CUTOFF MM) and the resonance (RESO MM) and
hopefully memorize the effect of the various settings.
Page 49

SPECTRALIS 2
The (CUTOFF MM)-button opens the multimode-filter menu. On the second
menu- page you will find the envelope sensitivity “EgAm”. Turn it up, to
experiment with the effect of the envelope on this filter. The corresponding
filter-envelope can be found by pushing the (EG-Depth)-encoder button and
by pushing the [Page-Up]-button twice. Keep in mind that the effect of the
envelope will only be noticeable when the frequency encoder (CUTOFF MM)
is not completely open.
TIP: Have you noticed that the “EgAm” encoder can also be set to a
negative value? Just imagine a mirror image of the envelope around the
0 level axis. With the help of a negative value you will end up with a
reversed envelope. According to this statement the oscillation time will
affect the frequency negatively, rather than positively. This is a very useful
characteristic, especially with an eye toward the highpass filter.
Hybrid engine - Multimode-filter and filter-routing
49
Page 50

SPECTRALIS 2
3.3.5 The LFO section of the analog-synth
Since firmware version 93k the Spectralis Analog-Synth has a very extensive
LFO section. No less than 10 LFOs in the Spectralis in the Analog section
alone are at your disposal. 4 of these LFO's have been designated as MasterLFO's. These LFO's have some additional features compared to the other 6
LFO's.
1.) The master-LFO's have a central edit section.
2.) The 3 main parameters LFO-wave, LFO-rate and LFO-depth on these
master-LFO's can be adjusted using just simultaneously for all LFO's using
just one Encoder.
3.) The master-LFO's don't have fixed routing. You can select in the edit-sections
of the oscillators and filters which parameters you want to be affected.
4.) The master-LFO's have envelope curves for control over modulation depths.
5.) The master-LFO's have a depth parameter, which makes it possible to change
modulation levels for multiple parameters simultaneously.
The master-LFO's have three controls on the left side of the synthesizer edit
section.
Encoder 1 allows the selection of the LFO waveforms, encoder 2 is used for
adjusting the master-LFO's modulation levels and encoder 3 controls the
modulation rate of the four master-LFO's. The encoders on the control panel
always simultaneously affect all 4 master-LFO's. When you are pushing the
one of the encoders, the corresponding parameters for all 4 master-LFO's will
be shown in the display.
Hybrid engine - The LFO section of the analog-synth
[LFO-rate]
When pushing the encoder button the following display message shows:
Master LFO Rate Menu
^MLFO1:0 ^MLFO2:0 ^MLFO3:0 ^MLFO4:0
You now can either change the speed of each LFO individually using the
4 controls under the display or change the speed of all LFOs
simultaneously using the encoder [Mod Rate]. If you are adjusting all
four parameters individually, the [Mod-Rate]-Encoder will adjust the
values of the individual LFOs' in additive fashion.
[LFO Mod Depth]
This Encoder changes the modulation depth (intensity) of the 4 MasterLFO's. The modulation value of the Spectralis uses exponential scaling.
Close to the Zero setting you can effect subtle sound changes. The further you move away from zero, the more obvious the modulation change
increases will become with each step. At the upper end of the scale rather dramatic modulations will take place. The modulation range is from
-127 to +127. Using negative values the modulation will affect the
parameter values in opposite direction.. When using the [Mod-
50
Page 51

SPECTRALIS 2
Depth]encoder you will see the following display message:
Master LFO Modulation Depth
^MLFO1:0 ^MLFO2:0 ^MLFO3:0 ^MLFO4:0
The arrows in front of the parameter names indicate, that you can reach
additional parameters by simply pushing of the 4 encoders. Using the the
first encoder under the display will prompt the following display message:
1/4: Master LFO 1 Depth Control
LDpt:0 ´`LEDp:0
The message in the upper left quadrant indicates, that there are 4 additional menupages that can be selected by using the [Page-Up]-button. The
successive menupages in this case will show the same parameters for the
other LFO's.
LDpt:0
This parameter repeats the modulationdepth-parameter of the upper editsection - in other words controls the modulationdepth of the selected
LFO's.
Hybrid engine - The LFO section of the analog-synth
´`LEDp:0
This parameter controls the intensity of the modulationdepthenvelopecontrol. This parameter has a push-button function, which leads
to the envelope menu of this LFO. When pushing the encoder the
following display message will appear:
1/4:LFO1 Depth Control Envelope
LEDl:0 LEAt:0 LERl:0 LEDp:0
LED:0 - LFO Envelope Delay
Here you can adjust whether the use of the envelope is started immediately
upon the start of playback of a sound, or after an adjustable delay period.
LEAt:0 - LFO Envelope Attack
Lets you adjust, how quickly the modulation intesity will increase
LERl:0 - LFO Envelope Release
Allows you to adjust how quickly the modulation intensity will decrease
after release of the keyboard key.
LEDp:0 - LFO Envelope Depth
Is used to adjust the intensity of the modulation control via envelope. As
this parameter frequently only receives its final value when setting the
envelope control, we have repeated the parameter in this edit-menu for
you.The modulation depth which is dependent on the envelope, will be
added to the set LFO-Depth value.
51
Page 52

SPECTRALIS 2
[Page]-button
Using the [Page-Up/Down]-buttons you can address the other three
Master-LFO's directly.
[LFO-Wave] - Waveform selection for LFO's
This encoder changes the waveformselection of all four Master-LFO's
simultaneously. The LFO's of the Spectralis provide non-detent waveform
selection.
If set to value 0 you select a sinewaveform.
If set to value 63 you select a triange waveform.
If set to value 127 you select a sawtooth waveform.
If set to value 192 you select a rectangle waveform.
If set to value 255 you select random.
In between values create transitional forms between the major waveforms
LFO Waveform start-point
The Spectralis allows both - a "freerunning" mode, in which the LFO's continue
oscillating totally independent from your keypresses, and a LFO fixed starting
point mode where a played note will start the LFO on a desired phase starting
point. This starting point is also referred to as start-phase. In freerunning
operation the LFO is not being stopped anytime. Depending on when you push
a key, the waveform-output will be at a different spot of the waveform. As a
result the amount of a parameter change using the LFO's will be different with
each keystroke. As a result a self oscillating LFO is a simple way to create
lively sounds.
Push the [LFO-Wave]-Encoder to open the LFO-Wave menu. You will see the
following diplay message:
Hybrid engine - The LFO section
52
Master LFO Wave Menu
´`LWve:0 ´`LWve:0 ´`LWve:0 ´`LWve:0
The encoders assigned to the display in this menu allow the editing of the
waveform or all 4 Master-LFO's individually. When using one of the encoder
buttons, you will find yourself in the menu for setting the startphase:
1/4:Master LFO 1 Waveform Control
LWve:0 LPhs:0
While the first parameter will only repeat the waveform-selection parameter,
the second parameter
[LPhs]
enables the setting of the startphase. At a value of "0" the LFO has been
set to freerunning mode - values other than 0 generate a fixed startphase
for the LFO. Using the [Page]-buttons you can dial up the parameterpages
for all 4 LFO's.
Page 53

SPECTRALIS 2
By now you have learned quite a bit about the LFOs. Depending on the selected
sounds, all of the LFO parameters may not affect any change at all. You might
be able to adjust the LFO-velocity, waveform and modulationfrequency to your
liking - however all of these parameters become audible once you have
additionally increased the LFO-Modulation for a modulation target. Just imagine
you want to modulate the filter frequency of the 24dB Lowpass using MasterLFO 1. In the LFO section
itself there is no possibility to assign the LFO to a target. Such assignments can only
be made in the individual sections, which offer parameters that can be modulated. In
our example Master LFO1 is supposed to modulate the filter frequency of the 24dB
filter proceed as follows:
1.) Push the [Cutoff] encoder button in the filtersection of the 24dB filter.
2.) Go to menupage 4/8 of the filter menu, where you'll see the following display
message:
4/9:24dB Lowpass: Cutoff-Modulators
Src1:None Dph1:0 Src2:None Dph2:0
Hybrid engine - The LFO section
In this menu you can select the modulationsource and adjust the modulation intensity
for two modulationsources
[Src1] and [Src2]
Stand for Modulationsource 1 and 2.
[Dph1] and [Dph2]
Stand for modulation intensity of the sources for this parameter.
Once you've made these adjustments the display should show the following message:
4/9:24dB Lowpass: Cutoff-Modulators
Src1:MLFO1Dph1:34 Src2:None Dph2:0
Once you've made changes to the Master-LFO1 parameters in the LFO section,
you should be able to hear the effect of the changes to the Master-LFO's. The
following modulationsource are being offered in the modulation assignment section:
MLFO1-MFLO4 - Master-LFO 1-4
MMLFO - Multimode-filter section LFO
LPLFP - Lowpass-filter-section LFO
VLFO1-VLFO4 - Oscillator-section LFO1-4
Vel - Velocity
Aft - Aftertouch
Whee1 - Modulationwheel
Brth - Breathcontroller
Pitch - Pitch Bender
53
Page 54

SPECTRALIS 2
This Display message is repeated in a number of sections of the Spectralis in
slighty modified form:
Waveform-Modulation
1.) Push the [Osc Wave] encoder button in the oscillator section.
2.) Depending on the desired oscillator push the [VCO-Shape] encoder button
under the display. You should see the following display message:
1/2: VCO1 Waveform Modifiers
^Shape:100 ^TLM:-1 ^Sync:0
3.) Push the [Shape] encoder button in this menu. You should see the following,
already familiar display message.
VCO1 Wavetable Modulation
Src1:None Dph:0 Src2:None Dph2:0
Time-Linearity-Modulation
1.) Push the [OSC Wave] encoder button in the oscillator section
2.} Depending on which oscillator is selected push the [Shape] encoder button
under the display. You should see the following display-message:
Hybrid engine - The LFO section
1/2: VCO1 Wave
^Shape:100 ^Pwm:-1 Sync:0
3.) Push the [PWM] encoder button in this menu. You should now see the
following, already somewhat familiar display message:
VCO1 Time Linearity Modulation (PWM)
Src1:None Dph:0 Src2:None Dph2:0
VCO pitch-modulation
1.) push the [OscDetune] encoder button. You should see the following menu:
1/4:VCO Fine Tune
^Osc1:0 ^Osc2:0 ^Osc3:0 ^Osc4:0
Now push the Oscillator finetune encoder buttonof your choice. The following
function is available for each of the Oscillators:
1/8:VCO1 Fine Tune Modulation
LWve:0 LRte:0 LDpt:0
54
2.) Pushing the [Page-Up] button twice will direct you to the Edit page of the
Modulator-Assignment:
2/8:VCO1 Pitch Modulation
Src1:None Dph:0 Src2:None Dph2:0
Page 55

SPECTRALIS 2
In this menu you can select and edit the modulation sources and pitchmodulation depths.
24dB Lowpass filter frequency and resonance modulation
1.) push the [Cutoff LP] encoder button in the filter section
2.) Use the [Page-Up] button to select menupage 4/8 to choose the following
menupage:
4/9:24dB Lowpass: Cutoff-Modulators
Src1:None Dph:0 Src2:None Dph2:0
You now can adjust the desired modulation sources and modulation values.
Pushing the [Page-Up] button again will take you to the filterresonance-control page:
5/9:24dB Lowpass: Resonance-Modulators
Src1:None Dph:0 Src2:None Dph2:0
Multimode filter frequency-and resonance-modulation
1.) Push the [Cutoff MM] encoder button in the filter section
2.} Using the [Page-Up] button select menupage 4/7 to prompt the following
menupage:
Hybrid engine - The LFO section
4/8:Multimode: Cutoff Modulators
Src1:None Dph:0 Src2:None Dph2:0
The resonance modulators page for the MM-filter follows at page 5/8.
LFO sections
By now you should be somewhat familiar with some key details of the LFOs.
However we have not yet discussed the 6 additional LFOs, which can be found
in the edit sections of the individual sound creation banks. For many of you 4
LFO might be enough. If you want to liven up sounds in a more detailed and
subtle fashion, you can never have enough LFOs. The section LFO's don't
quite have the range of parameters as the master-LFO's. They still should be
sufficient to basic tasks - as they do have the same wavetable waveforms as the
master-LFO's. The section LFO's always are always set to freerunning operation.
Filter section LFO's
When using the 24dB Lowpass and the Multimode filter the parameters of the
section-LFO's can be found directly on the first 2 edit-pages. You'll get there
by pushing the [Cutoff] encoder button:
24dB Lowpass section-LFO menupage
1/9:24dB Lowpass: Cutoff Modulation LFO
FmWve:0 FmRte:0 FmDpt:0
55
Page 56

SPECTRALIS 2
Multimode filter section LFO menupage:
1/8:Multimode: Cutoff Modulation LFO
FmWve:0 FmRte:0 FmDpt:0
[FMWve] - filterfrequency modulation LFO waveform
The first encoder selects the desired waveform. You can find an overview
of the waveforms in the description of the master-LFO waveforms.
[FmRte] - Rate of the filterfrequency modulation
At 0 value the LFO oscillates at it's slowest rate and at 255 value at it's
fastest.
[FmDpt] - Frequency modulation depth
This parameter controls the Modulation depth of the LFO.
Pressing [Page-Up] one time in both filters opens the second section LFO edit
page:
Hybrid engine - The LFO section
2/9:24dB Lowpass: LFO Depth Envelope
FmEDl:0 FmEDa:0 FmEDr:0 FmEDp:0
The filter section LFO's have a delay and an envelope parameter to control the
modulation depth of the LFO.
[FmEDl] - Cutoff frequency modulation delay
At value 0 the modulation takes effect immediately when hitting a key,
at higher values the modulation starts with a delay.
FmEDa: - Cutoff Frequency Modulation Depth Envelope Attack Time
FmEDr: - Cutoff Frequency Modulation Depth Envelope Release Time
FmEDp: - Cutoff Frequency Modulation Envelope Depth
Oscillator Section LFO's
In the oscillator section there are also additional sections-LFO's. Each oscillator
has its own LFO for frequency modulation. You will reach these LFO's in the
oscillator pitch-menu, which can be selected using the [OSC-Detune] encoder
button. On the first menupage you will see the following parameters:
1/4:VCO Fine Tune
^Osc1:-11 ^Osc2:+11 ^Osc3:0 ^Osc4:0
56
In this menu you can set the finepitch of the oscillators. Looking at the small
indicated arrows, you can see that it is possible to jump to an additional menusection from here.
The sub-menu under this edit page has 12 sections - 3 for each oscillator. Each
one of these 3 pages is reserved for the control of the corresponding section
Page 57

SPECTRALIS 2
LFO's. Using the finepitch encoder of the first oscillator, will tkae you to the
first menu page of this level, using the encoder of the second oscillator will
take you to menupage 4 of the sub level. If you're looking to work with the
sections-LFO of the third oscillator, you need to use the third encoder button
instead of the first. This will take you directly to the parameters affecting the
pitch of the third oscillator.
Push the OSC-finetune button of your choice. The following function is available for
all of the oscillators equally:
1/8:VCO1 Pitch LFO
LWve LRte:0 LDpth:0
LWve - LFO wave
Using this parameter allows you to adjust the waveform for the oscillator
section LFO. A description of the available waveforms can be found in
the previous paragraph on master-LFO's.
Hybrid engine - The LFO section
LRte - LFO Rate
Used to adjust the frequency of the LFO.
LDpt - LFO-Depth
Used to adjust the modulation depth of this LFO
As you've seen in the description of the master-LFOs, the section LFO's can also be
used for multiple modulation targets at the same time. This is very useful, when two
or more parameters have to be modulated with the same frequency. Sometimes a
desired modulation effect can sound much better and intensive, when additional
parameters have to follow the control signals slightly at the same time. For instance
you may want to modulate the filter frequency with the same LFO as the resonance,
the oscillator-waveform and the frequency of one of the oscillators, to generate
a phat detuning effect at maximum setting of the modulation. It certainly sounds
much more interesting than to modulate the filter frequency only.
Once you've created a super-atmo with the help of generous LFO use, you may
want to try to add a special touch to the result, by feeding all signals into the
filterbank, rather than routing directly from the analog filters to sum. A particular
nice example of this process is factory preset "Deepatmo" in the "Effects"
category. Starting with a low rumble, which has been intensified using the
lowpass of the filterband, an unusual effect sound evolves, which is primarily
controlled with the lowpass-filter section LFO. In one of the next couple of
chapters you will find more info regarding the filterbank.
57
Page 58

SPECTRALIS 2
3.3.6 Oscillators, the improved LFO’s!
The frequency range of the LFO's is limited compared to real oscillators. As a
consolation we’d like to introduce you to something even better than LFO’s –
oscillators which can be tuned from subaudio all the way beyond the audible
range and can be used as modulators. This is why we’ve opted to refer to the
”Oscillators” as ”VCO”s (VCO stands for ”Very Cool Oscillator” in our case
;-)!). Similarities to terminology used in older analog synthesizer are purely
accidental and not intentional. OK, all kidding aside, in the filters you can use
up to four oscillators simultaneously as modulators for the filter-frequency.
Doing so allows for rather complex sound-changes and effects.
Please select song 5 of the Spectralis factory presets and select pattern 1. Playing
a key on your keyboard, you will now hear a pretty nice filter-self-oscillationeffect with modulation, which should make you forget the missing LFO’s for
the moment.
As the oscillators also have pitch-envelopes the modulation speed can be
modulated as well. Let’s not forget that even FM- and PM- or time linearity
modulated waveforms can be the source of the filter modulation etc. Just a
little Bag of tricks for modulation freaks. Sooo - Let’s make a few changes to
the sound, to get an idea of the depth of the modulation possibilities.
First push the (CutOff LP)-encoder-button and select menu-page 8 of the filtermenu with the help of the [Page-Up]-button. You will see the following display
message:
Hybrid engine - Oscillators, the improved LFO’s!
8/9:24dB Lowpass:exp. Filter FM
Osc1:0 Osc2:0 Osc3:0 Osc4:227
You can now see the menu for setting the exponential filter-frequency
modulation.The four parameters represent the modulation-depth of oscillators
1-4. If you are adding additional oscillators the various modulations will
superimpose each other resulting in more complex modulation waves. As this
cutoff frequency is controlled by the envelope as well, the cutoff-frequency
will be be increased with an overlaying modulation wave from the oscillators.
For the following experiments you can either hold down a key on your keyboard,
so the effect does not end early and you can make sound-changes audible
directly, or alternatively you can use the note-hold function of the Spectralis,
which the Spectralis’ MINI-keyboard has available. This second option works
as follows:
I. Push the [PLAY]-button in the parts section.
II. Use one of the numeric buttons [1]-[13] and hold down the selected
button down
III. While holding the selected button down, push the [Hold]-button
(numeric-button [15]).
IV. Even when you release both buttons now, the sound will still be
audible.
58
TIP: This hold-function can be a useful feature quite frequently when
editing the synthesizer. You must remember though, that you can turn off
Page 59

SPECTRALIS 2
the sustained note simply by playing another key on your keyboard (or the
MINI-keyboard of the Spectralis) without simultaneously pushing the
[Hold]-Button.
At this point you should play around some with the ”Modulator”-oscillator 4.
To do so push the (OSC-Detune)-encoder button and - by using [Page-Up]-
button select - the menu for adjusting the tuning “Coarse-Tune”. Make changes
now with the fourth encoder under the diplay and you can hear modulation
with a variety of frequencies. In order to keep the results clearly audible
throughout, set the filter-frequency to middle position with the help of the
(CutOff LP)-encoder – in other words set it to a value of 127. This is important
as the filter-envelope in a matter of seconds will pitch the filter-frequency way
down, After raising the filter-frequency you should be able to hear the
modulation loud and clear again and a change of the modulation-frequency
will show off the advantages of the oscillator-modulation as compared to the
LFO-modulation.
Pitch the coarse tuning way down just once – let’s say to a value of minus 120.
You will now hear your typical LFO modulation-speed.
You can experiment now with a variety of waveforms. To get there push the (Osc
Wave)-button. Using the fourth display encoder you can shift the waveform of the
modulator continuously and seamlessly from a sine-wave (0) to a triangle wave (63)
to a sawtooth wave (127) all the way to a rectangle (255). Of course all other
adjustment possibilities that change waveforms have an effect on the filter-frequency
modulation as well. Why not give the ringmodulator a try?! Once you activate the
ringmodulator, its signal will take up the output of oscillator 4 instead of the usual
oscillator signal. Oscillator 3 and 4 are being routed into the ringmodulator.
Activating the ringmodulator can be done as follows:
Use the [Shift]-button, hold it down and push the [RingMod]-button at the bottom
right under the oscillator-section. Set the coarse tuning of both oscillators to different
values – for instance at around minus 100. Both oscillators should have at least
slightly different frequencies. This will generate modulation-patterns which are
considerably more complex than pure LFO waveforms. You can now modify them
either by adjusting the frequencies or the oscillator waveforms.
You can add a little more ”spice” by adding additional filter-modulators. You might
for instance want to add oscillator 2 as an additional modulator and set it into audio
range – while setting its modulation-depth in the filter-menu to a lower value.
Hybrid engine - The fixed filterbank
3.3.7 The fixed filterbank
In the chapter: Descriptions – “The fixed filterbank” on page 15 you already have
received a brief introduction to the fixed filterbank. At this point we’re finally going to
hear what it is all about. To simplify matters we have saved a preset-sound, which
allows initial contact without too many detours. We are assuming that you are familiar
with the basic-information contained in the opening segments of the Hybrid Synth
"How to..." chapters and you should already know how to feed oscillators into the
filterbank (push the (Osc-Wave)-button and dial up menu-page 3, then insert
the desired oscillators into the filterbank). Select sound category “Voice” in the
selection-menu and choose the “VoiceSng” preset contained in this category.
59
Page 60

SPECTRALIS 2
The first oscillator of this preset has been fed into the filterbank. The remaining
oscillators are not in use for this sound. Triggering notes from your midikeyboard will produce notes with a peculiar sound character as a result of the
filterbank spectral filtering.
Next push the [Level]-button in the filterbank section. This button assigns the
volumes of the individual filterbands to the encoders (1)-(10). Above the rotary
encoders (1)-(16) you can check the encoder-assignment corresponding to the
activated filterbank section. Adjusting the volume settings of the individual
filterbands 1-10 results in strong spectrum variations. Rolling back all levels
to 0 creates silence - no signal will pass the filterbank anymore. This behaviour
is the most significant difference compared to a normal graphic EQ.
The Spectralis allows feeding the filterbank signal either into the two analogfilters or directly into the FX-processors or the output bus. For the preset
sound "VoiceSng" the filterbank signal has been fed into the multimode filter.
By turning the [CutOff MM]-encoder you can tweak the sound further. We
have kept the routing options as flexible as possible. Due to the fact that the
analog filters can be fed into the filterbank as well, it is possible to generate
feedback loops in the Spectralis sound engine. Used diligently you can create
totally off the wall special effects or of course kill your speakers if you overdo
it. To avoid the latter it is advisable to reduce the level of your monitor system
before starting any filterbank routing experiments.
Hybrid engine - The fixed filterbank
Tip: In case you forgot about the above advice and all of a sudden – after
moving some parameters around - you are confronted with some
unexpected and annoying squeaking noises, chances are it is the result of
the multitude of routing options which as mentioned above can be used to
generate feedback. You already know a number of possible sources for
feedback - both of the analog-filters are resonating up to self-oscillation –
something also referred to “feedback”. It will be fairly easy to differentiate
this noise source from routing feedback , as the frequency of the
selfresonance oscillation will change according to the cutoff frequency.
The pitch of feedback caused by routing does not change when the cutoff
frequency is altered. It might get louder or softer, but that’s it. You should
have no problem differentiating the two sources of squeaking sounds.
When using the [Pan]-button in the filterbank-section, encoders 1-10 are
functioning as panpot-controls for the individual filterbands. You can set a
separate panorama position for each filterband, which allows the creation of
pseudostereo-effects.
We will now explore some additional parameters of the filterbank. First we
should select another soundsource with more spectral content than the basic
oscillator waveform, we used so far. An ideal source is white noise. Please
push the [Osc Wave]-button and then use the [Page-Up]-button to select menu
page 3/27. There you need to set the volume of the oscillator 1 to Zero. Now
select menu-page 24/27 “Noise Direct Volume”. You should see the following
display message:
60
Page 61

SPECTRALIS 2
24/27:Noise Direct Volumes
FB:0 LP:0 MM:00 SumL:0
Turn the first encoder and adjust the filterbank level for the noise source to a
value of about 200.
Push the filter-bank [Level]-button once more and make sure that the button is
lit, as this button can also alternatively be used to exit the filterbank. If the
button does not light up just push it once more. Encoders 1-10 are now assigned
to the level of the individual frequency-bands. If you set all filter levels to 0
beside the lowpass filter and if you rise up the volume for the LP-filter output
to a high volume, the sound engine should produce a low rumbling noisefloor,
in case you have a speaker-system that is capable of reproducing such low
frequencies. In case you are not hearing anything, please check the routing
once again. Turn the encoder [12]-[15] to a value of 0 and turn the filterbank
direct volume to a value of about 200 using the encoder [11]([FB Level]).
Now create a frequency band mix with encoders 1-10. Once you have set up a nice
sounding spectral mix push one of the control buttons (1)-(10) to open the filterbank
edit menu.
Hybrid engine - The fixed filterbank
1/2:Filterbank Configuration
Morph:0 FBBP:255 FbQ:0 FbFs:0
You have the following parameters available in this menu:
Morph:
Using just this one control you can change the progression of the volume
envelope for the two filterbank outputs R and L. On the next menu-page
the envelope will be available for editing with the obligatory attack, decay,
sustain and release parameters.
FBBP:
This is the previously mentioned bypass-control, which allows you to
pass the filterbank signal through an additional envelope controlled
amplifier. This menu-entry is definitely the most important one in the
filterbank menu if you start routing external signals into the filterbank.
For that process you should definitely turn up the bypass control so that
you can hear the external signal even if the analog-part is not being played.
More about this in a chapter later on. Turn this encoder up for the
upcoming experiments, to ensure constant sound from the filterbank
output.
FbQ:
This parameter changes the resonance of all filterbands. It changes the
sound of the filterbank quite dramatically – just turn the encoder and
hear for yourself how much the noise-mix can be twisted around.
61
Page 62

SPECTRALIS 2
FbFs:
The individual filterbands of the filterbank consist of cascaded filterstages.
The bandpass-filter response curve - which is the result of all cascaded
filters – can be changed by adjusting the frequencies of the cascaded
stages. This parameter decreases the lower stages frequency and increases
the higher stages frequency . By using both parameters – quality and
spread of the partial bands – it is possible to vary the soundcharacter of
the filterbank substantially.
Next push the [Page-Up] button to go to the next menu page:
2/2 Filterbank Main Volume Envelope
Att:7 Dcy:60 Stn:204 Rls:65
Att (attack), Dcy (decay), Stn (sustain), Rls (release)
You are probably already familiar with the envelope parameters.
Menupage 2 shows the envelope parameters for the filterbank amplifier.
We won’t need these parameters right now, but you should memorize
that the filterbank has an additional envelope controlled Amplifier for
it's output. If the envelope amplifier bypass is not opened and the filterbank
is not triggered by the analog part, the output of the filterbank will create
nothing more than silence.
A later chapter will demonstrate how to create filterbank rhythms using
noise, the filterbank and the stepsequencer. The settings already done in
this chapter are a good starting point for this basic stepsequencer lesson.
You may want to have a look into the filterbank rhythms chapter in the
stepsequencer section.
Hybrid engine - The fixed filterbank
62
3.3.8 The envelopes of the Spectralis analog synth
In addition to the usual attack, decay, sustain and release parameters the
envelopes of the analog synth have an additional parameter hold-time, which
directly follows the attack-phase. You can get to the filter envelopes by pushing
the (EG-Depth) button. The post filter VCA- and VCF-envelopes of both
analog filters are distributed on four parameter pages.
As an addition to the envelope edit pages in the VCO, fixed filterbank and
VCF sections, we have created duplicates for all volume-envelope edit pages
in a special envelope edit menu located in the VCA section. Pushing the (EG-
Balance)-button opens the envelope edit page duplicates.
You may instantly notice an arrow symbol close to the decay parameter label.
This arrow indicates you can select an additonal menu page with the
corresponding encoder button. Depending on the selected envelope the message
might look something like:
1/8:VCO1 Volume Envelope Generator Page2
Hld:0 Byp:0
Using the additional parameter ”Hold” forces the envelope to remain at the
maximum level of the attack phase before entering the decay phase for an
Page 63

SPECTRALIS 2
adjustable period of time. This is a valuable parameter if you are trying to
emulate the inconsistencies of analog envelopes. The typical Minimoog
envelopes for instance have a slight delay between the attack and the decay
phase, which can be simulated rather well with a hold value of about 14 with
the Spectralis envelopes.
3.3.9 Note priority and multitrigger settings
Monophonic synths like the Spectralis analog synth can only play one note at
a time. Depending on which note is played the pitch can be higher or lower.
This is certainly not news to anyone. What happens however, if two notes are
played at the same time on your keyboard? Early monophonic synths of the
late 60s and early 70s were available only with two different behaviors: either
the highest note played had priority or the lowest one. This determination
definitely was not the result of choice but rather a result of the technology
used. The keyboards at the time used key contacts and a resister chain.
Depending on which way tone recognition was set up the outcome was either
highest note priority or lowest note priority.
Early analog keyboard scanning circuits had another problem too. Overlapping notes
played on the keyboard didn’t retrigger the envelopes – a problem especially for
flashy but somewhat less than precise soloists!
A popular modification for Synthesizers at that time, was to fix this problem with a
multitrigger system. To reset the trigger logic it was now not necessary anymore to
release all keys, instead it was sufficient to change the pitch. These kinds of systems
detected a new note by comparing the keyboard voltage with the last triggered note.
As soon as a difference between the old and the new voltage was detected, this
keyboard logic created a new gate impulse triggering the envelopes. The Mini Moog
for instance didn’t have a retriggering feature for legato notes to begin with – a
severe limitation especially in light of the MM’s outstanding percussive sounds.
With the emergence of digital key control an additional note priority became popular
– the so-called last note priority. Now the pitch of a note wasn’t the decisive factor
in pitch determination but the last note played. With the introduction of digital key
control the retrigger problem became a thing of the past.
Still, not everyone was happy with the new system. It became obvious pretty quickly
that no matter the limitations of the old key-controls, they also offered possibilities
which could be used creatively - especially during solos. When holding the highest
note while playing a solo a lower key rhythmically automatically created a two note
trill which was much easier to play than actually playing both notes rhythmically. Even
the lack of retriggering had its bright sides. It made it possible to control the sound
and to set accents by playing deliberate legato and staccato.
In our opinion it wouldn’t be right to eliminate the possibility to emulate these vintage
note-priority and trigger ”features”. As a result the Spectralis features the following
trigger and note priority settings for all three of its trigger groups:
Hybrid engine - Note priority & multitrigger settings
LAST
Last Note Priority without retriggering of envelopes during legato play.
LS-TR
Last Note Priority with retriggering of envelopes during legato play.
63
Page 64

SPECTRALIS 2
Hybrid engine - Note priority &multitrigger settings
What the hell are
trigger-groups?
The sound engine of
the analog synth can
be divided into
subparts. For example
one can create 3
different voices by
using one VCO and
the LP-filter for voice
1, 2 VCOs and the
MM-Filter for voice 2
and 1 VCO, noise and
the filterbank for the
third voice.
By defining triggergroups, you instruct
the system which part
12, 13 and 14 triggers
which envelopes. In
the example above you
would create three
triggergroups. Trigger-
group 1 would trigger
VCO 1- and the LP-
Filter-envelopes,
trigger-group 2 VCO 2
and 3- and the MM-
filter- envelopes and
trigger-group 3 would
trigger the VCO 4-,
noise- and filterbank-
envelopes. Trigger-
groups can use
independent sequen-
cerlines and pattern
sequencer motifs.You'll
find more on this later
in this manual.
LOW
Lowest Note Priority without retriggering of envelopes during legato
play.
LO-TR
Lowest Note Priority with retriggering of envelopes during legato play.
HIGH
Highest note priority without retriggering of envelopes during legato
play.
HI-TR
Highest Note Priority with retriggering of envelopes during legato play.
You will find the menu for setting the assorted note priority choices and retrigger
options in the expanded part-select menu for the analog synth.
Use the Part->[Select]-button and then push and hold the numeric button [12]
button until you reach the expanded menu:
1/4:S01:Bass2Ass PA01:BasicBass PA:12
[Part12] [Part13] [Part14] [current]
Push the [Page-Up]-button three times. This will open the menu for setting the
notepriority and triggerswitches:
4/4:Trigger-Group Note-Priority
TG1:HIGH TG2:LOW TG3:HI-TR
Using the Encoders 1-3 under the display the trigger and note priority settings
for triggergroups 1 - 3 can be selected. For most analog synth sounds of the
soundlibrary triggergroup 1 is in use. If you have selected a solosound on the
analog synth part and you want to explore these settings, triggergroup 1 is the
one in use usually. You should instantly hear the result if you change the settings
there. Please keep in mind that you can save the settings for note-priority and
triggersetting for each separate sound. When you are choosing a different sound,
the original settings of this sound will be restored.
You have an additional direct access to the Triggergroup definition menu by
simply pressing the [SET ROUTING] button in the filter section!
64
Page 65

SPECTRALIS 2
3.4.1 Step-sequencer basics - Filterbank rhythms
The parameters of the step-sequencer are an integral part of rhythmic modulated
hybrid synth patches and are stored therefor inside the hybrid synth sound memory.
That is the reason why we have included it’s description in this Analog Synthesizer
"How to...?"-chapter.
As a preparation for the first part of this "Step-Sequencer"-chapter you can either
use the settings prepared in the preceding "Filterbank"-chapter or your will have to
make the following preparations now:
I. Select an empty pattern in an empty song
II. Select the "Analog"-synthesizer using the [Select]-button plus
Numeric Button [12] .
III. Push the [OSC WAVE]-encoder-button and select successively
menu-pages 3-7 with the [Page-Up]-button, to set the levels of the
oscillators for all filters to 0.
IV. Now select menu-page 23, where you can use the first display encoder
to adjust the filterbank-volume (FB) for noise to a value of 200.
V. In the "Filterbank"-section you should now push first the [Level]button and then one of the encoder-buttons [1] to [10], to open the Filter-
bank menu.
VI.) Set the Parameters “FbQ” and “FbFs” to “0”.
VII. As a final step in your preparations set the bypass parameter ”FBBP”
at the this menu-page of the filterbank menu to a value of 255.
Step sequencer basics - Filterbank rhythms
We will now use the step-sequencer to automate the gain control of the various
filterbands.
Select the [Function]-button in the sequence-edit section. You will see the following
display message:
1/8:Fnc TrigMod->FBV LP Stp:1-16
Seq:L01 ^Type:Decay ^Len:4th ^Dpth:63
If the Sequencer is already playing, you can now set the levels for each 16th note of
the running sequencer using encoders (1) through (16). We won’t do that right now
though, but we will deal with an even better option for Level-Control – the stepenvelopes.
The step-envelopes of the Spectralis are a somewhat unusual feature for a stepsequencer. They permit the triggering of tempo-based mini-envelopes, which are
independent of the note-triggering of the synth work in addition to the already existing
envelopes in the synthesizer parameter section. What makes this feature even more
special is, that the envelope-direction, curve-shape and duration for each step of the
sequencer can be different. Independent envelope triggering for each filterband
amplifier provides an excellent option to create complete drum grooves from simple
white noise. The following Parameters can be found on the first sequencer-edit page:
SEQ: This is where you can select the Sequencerline, which you would
like to work on in the Editor. The stepsequencer has 24 sequencerlines
with free assignable routing targets, you can choose from.
65
Page 66

SPECTRALIS 2
Type: Here is where you can select the basic envelope shapes. The
following are at your disposal:
Step sequencer basics - Filterbank rhythms
Decay, Hard, Pulse, Soft, Attack
Len: Allows you to adjust the length of the envelope. The range goes
from fractions of a step (8
Depth: Determines the depth of the envelope direction.
We are now ready to input the first ”Steps”. The sequencer-lines 1-10 have
been assigned to filterband volumes 1-10. Select a medium frequency-band
such as line 5 ”800 Hz”, set the envelope shape to "Decay", the "Length" to
4 steps and the "Depth" to a value of "20". Next push any of the numeric
buttons [1]-[16] to set a trigger step. You should now be hearing the envelope
control – at least if the sequencer is playing already. All additional steps which
you are about to input, will have the same envelope shape and length, until you
change their parameters. After such change the following trigger steps will use
the new values.
You may now chose different sequencer lines anywhere from 1-10 and use the
above described method to set different step-envelopes for all filter band gain
stages. The results will sound pretty cool and unusual right away. If an individual
step creates an unwanted ”clipping”noise, just lower the parameter ”Depth”
some and set the corresponding step again. If you are not happy with one of the
steps you have input, it is very easy to erase it simply by pushing the same
button again. Following these instructions you should be creating interesting
filterbank rhythms in no time!
th
, 4th, 2th) up to a length of 13 steps.
TIP: When you are playing back your noise grooves, try different settings
of the two filterbank parameters ”FbQ’ and ”FbFs’. The changes of the
sound should provide an interesting effect especially during playback of a
groove.
TIP: The grooves will appear even more lively when you are adding a
tempo-based delay effect. Use the "FX1-Send" control to add a little delay
to the filterbank groove.
If you’ve created something nice you want to keep, save all of the settings
using the ”Save-Pattern”-function (for details see Page 33, Chapter:3.1.8
"Saving Patterns”)
3.4.2 Step-sequencer basics - tonal sequences
In the second part of the step-sequencer description we will attempt to program a little melody sequence. First we’ll have to select an existing factory
preset prepared for this purpose. You can find one in song32, pattern 5. Stop
the Sequencer, select song ”32” and then chose pattern ”5”. The sequencer will
start right away – even though you won’t hear anything yet, as we have turned
off all note-triggers in sequence line 11.
By adding a number of trigger-points now, more and more notes will be
66
Page 67

SPECTRALIS 2
generated. To simplify these first steps, we already have set the pitchinformation. - so you will get to hear decent results even without pitch changes
when you are switching on individual trigger points. The sequencer line
responsible for the triggering of the synth voice, which also allows the input of
the pitch, is sequencer line L11 “Tgrp1”. Push the [Function]-button in the
"Sequence-Edit"-section now and select sequencerline 11 with the first display
encoder.
Trigger:
The trigger sends out
control information
which can initiate a
predeter-mined action.
In our
case the trigger starts
the envelopes, which
are part of a sound
being played. Doing
this will open enve-
lope-controlled
amplifiers and filters.
Press and hold the [Function]-button in the sequence section again and push the
numeric button [1]. This shortcut selects parameter page 7 of the stepsequencer
menu. However - this page can be selected by pressing the [Page-Up] button
repeatedly:
7/8:Fnc TrigSet->TGrp1 Stp:01-16
Seq:L11 ^Note:A3 ^Len:1 ^Vel:100
The page you have reached allows the activating/deactivating of already defined
triggerpoints in a sequence.
You will now see the indicator lights moving corresponding to the sequence position
and you can turn individual notes on and off using the numeric buttons [1]-[16].
If you would like to change the pitch of a note, you can do so by adjusting the
corresponding encoder (1)-(16) to the desired pitch.
Once you have created a melody line you like, the step sequencer will allow you a
host of options to make changes. You can change the direction of the melody, skip
single or multiple steps, mute steps and determine the length and the resolution of the
line. By holding down the [Function]-button in the sequence-edit-section, you can
access all of these sequencer functions directly via the numeric-buttons.
Step sequencer basics - Tonal sequences
Changing Playback Direction:
Push the [Function]-button in the sequence-edit-section, hold it down and push one
of the numeric buttons [6]-[9]. These have corresponding descriptions right under
the numbers.
[FWD] - The selected line will be played forward.
[BWD] - The selected line will be played in reverse.
[F&B] - The selected line will be played back alternating in
forward and backward mode.
[RND] - The tones will be played in random fashion.
If you don’t notice any impact on the note sequence, you may have selected the
wrong sequencer line by mistake – the direction can be set differently for each
line! The note line is line L11 “TGrp1”.
Using the "Skip"-function:
The ”Skip”-function allows for the skipping of single steps or a whole sequence
of steps. Select the [Function]-button in the sequence-edit-section and hold it
down. While holding it down push numeric-button 2 [Skip]. You can now
release both buttons. The "Skip"-function has now been assigned to the numeric
buttons. Accessing this function prompts the following display-menu:
67
Page 68

SPECTRALIS 2
3/8:Fnc Skip ->TGrp1 Stp:01-16
Seq:L11
With the numeric buttons you can select the steps you want to ”Skip”.
TIP: You have just learned that you can access various edit-pages in the
"Sequence-Edit"-menu directly with the help of the [Function]- and
numeric-buttons. This functionality exists parallel to the usual selection
mode using [Page-Up]- and [Page-Down]-buttons. For instance you can
access the page for activating triggerpoints by pushing the [Page-Down]
button repeatedly, but also alternativly by pushing [Function] + numeric
button [1] (Trig).
Using the "Mute"-function
You can access the "Mute"-function by holding down the [Function]-button
and
simultaneously selecting numeric-button 4 [Mute]. Once you’ve accessed the
function, you’ll be able to mute individual/single steps using numeric buttons
[1]-[16]. Contrary to the skip-functions the muted steps are not being skipped
but will create pauses.
The step-sequencer basics - Tonal sequences
Changing the resolution
Most presets – when no sequencer line has been edited – have the resolution of
the sequencer line set to 16
th
notes. However, the Spectralis sequencer allows
for a wide range of step resolutions. You can set the length of a single-step
from anywhere between a 192th note and 12 bars. You will really appreciate
the wide range of options, when you wish to enter extended parameter-changes
controlled by sequencerlines. For instance, if you are setting the step resolution
of a line to a value of 1 bar, a 4 step long filter-modulation-decay-Step Envelope
will close the filter slowly over the course of 4 bars.
To change the step-resolution select menu-page 2 of the sequence-edit-menu.
Just chose the [Function]-button within the sequence-edit-section, select the
desired sequencer line in the corresponding menu (in our example line 11
”AllOsc”) and push
the [Page-Up]-button. You will now see the following menu:
2/8:Resol LastStep Style Start
Reso:16th Len:16
Once you start changing the setting of the resolution with the first encoder
“Reso” it will have an immediate impact on the currently playing sequence.
68
Changing the length of a sequenceline
The length of each individual Sequencer Line can be set to anywhere from one
to 192 Steps. The number of the Steps can be adjusted on the same menu-page
(page 2 of the sequence-edit-menu), as the resolution.
Page 69

SPECTRALIS 2
2/8:Resol LastStep Style Start
Reso:16th Len:16
Once again you can either use the ”Len”-encoder to change your setting or do it
directly with the help of the numeric buttons [1]-[16], as long as the intention is to
change the length within a range of 16 steps. In case you have selected more than 16
steps, you can move the displayed section with the help of the (Tempo/Shuttle)-
encoder like a window along the complete line. Please note that the assignment of
this encoder can be changed from tempo-change to section-change using the encoderbutton. In case you wish to change the tempo from within the "Sequence-edit"-menu
all you have to do is push the (Tempo/Shuttle)-Button.
Adding a filtermodulation
By now you should be familiar with a number of options for controlling the settings of
the step sequencer. Still, our little Melody will become truly interesting, once you
start to animate the sound parameters in the next step employing the help of another
line. We’ll give this a try right now.
The step-sequencer basics - Tonal sequences
I. Let’s select the part “Analog Synth” by pushing the [Select]-button in
the "Part"-section plus numeric button [12]. The synthesizer-edit controls
are now assigned to the analog-synthesizer. Turn the frequency of the
24dB lowpass counterclockwise to 0, using the (Cutoff LP)-encoder.
You will hear very little of the original sequencer, as the lowpass is almost
completely closed.
II. In the "sequence-edit"-section chose sequencerline 16 “LpFreqEx2”.
This sequencer-line allows for the exponential control of the filterfrequency.
III. Use a suitable step-envelope for the filter frequency modulation. For
instance you might want to chose a decay envelope with a length of 4
steps and an envelope depth of 18. The Display will show the following
message:
1/8:Fnc Trigger->LpFreqEx2
^Seq:L16 ^Type:Decay ^Len:4 ^Dpth:18
IV. Now, when you are pushing one of the numeric buttons, you should
be able to hear a significant change to the filter-frequency. During the
course of the sequence the filter-frequency will continue to shift relative
to the note-sequencer-line. To challenge you we have set the length of
this line at 15 steps, a little shorter than the actual sequence of notes;-)!
3.5 Step-sequencer advanced I
3.5.1Tonal sequences
The previous two chapters have introduced some of the basic functionality of
the step-sequencer. In the following chapters you will become familiar with
some advanced features. There are different types of sequencer lines available
69
Page 70

SPECTRALIS 2
in the Spectralis step-sequencer. We differentiate between tonal lines and
parameter lines. We will deal with the tonal lines first.
A tonal-sequencerline has different parameters from the parametersequencerlines. Each step of a tonal sequencerline contains the following
parameters:
Pitch
Determines the note you will hear when the step is played
Velocity
Determines the velocity with which a note is played
Length
Determines the length of the played note
Probability
This step-parameter determines the probability with which a note is being
played. This way a sequence will appear more lively, because steps are
not necessarily being triggered every time during each sequence.
Step-sequencer advanced - Tonal sequences
Glide
The parameter “glide” is being used to determine if a note “glides” to the
next note or if the next note-pitch is reached directly. The glide-function
can be turned on and off for each step. The glide effect of the note-lines
works in connection with the settings prepared in the oscillator-section
corresponding to the note-lines.
There are a number of variations concerning input of notes available, which
we will tell you about now. Sometimes you may want to set all steps to the
same pitch, other times you may want to change the velocity of individual
steps. At times it may be preferable to adjust the pitch with the help of encoders
1-16 – other times you may prefer to enter the notes via MIDI. The following
will provide a complete overview of the input options. By selecting the right
option for the respective purpose you will get to the desired result quickly.
Before we get started you need to select an empty pattern. Also you’ll have to
select a sound, which is suitable for use in a sequencer line. How about the
sound “Moogish” from the “Sequencer” category?!
3.5.2 Option 1: Adjusting preset value and entering steps
Push the [Function]-button in the sequence-edit section and select page 1/7 of
the sequence edit menu by hitting the [page-down]-button if not already
selected.
70
1/8:Fnc TrigMod->TGrp1 Stp:01-16
Seq:L11 ^Note:A3 ^Len:1 ^Vel:92
Page 71

SPECTRALIS 2
Next select a note-line (TGrp1) with the first encoder and set the values for
pitch, length and velocity in the display menu. By hitting numeric buttons 116, you can copy the defined parameterset to the corresponding stepnumbers.
If you want to erase one of the steps, simply push the according numeric button
again.
If you want to change an existing step, adjust the values in the display and push the
desired numeric button again. The step won’t be erased but changed, if it's values
differ from the display parameterset.
In this mode you can additionally change the pitch of the steps with encoders 1-16
3.5.3 Option 2: Setting pitch, length, probability and dynamic value
separately
On menu-page 1/7 you may already have noticed a little arrow pointing upwards in
front of the entries “Pitch”, “Length” and “Velocity”. This arrow indicates, that there
is an additional menu page which you can access by pushing the according
encoderbutton.
Changing the pitch
Push the encoder button (Note). The following menu will open:
Step-sequencer advanced - Tonal sequences
1/4: Pitch->TGrp1 Stp:01-16
Seq:L11 Pitch:A3 [SetAll]
In this menu you can determine the pitch, which you can apply to individual
steps by pushing the according numeric buttons 1-16 or use as a global overwrite
for all steps by using control button [SetAll]. In the menu all numeric buttons
with a parameter value different from the displayed value will blink. Buttons
with conforming value will be lit.
You will find this blink/lit display in all of the following menus.
Changing the trigger-probability
Using the [Page-Up]-button will get you to the next menu-page:
2/4:Probability->TGrp1 Stp:01-16
Seq:L11 Prob:100% [SET All]
In this menu page you can adjust the probability for the triggering of a note
separately for each step. At 100% the note will be triggered during each pass.
The lower the set value the less the probability that the note will actually be
triggered. Use the numeric buttons to copy the value displayed to additional
steps. You will also be able to see in this menu as well which steps conform
with the value shown in the display by looking at the blink/lit indicator of the
numeric buttons . If the step value conforms the button will be lit (light on).
Using the button [SET ALL] the probability for all notes can be set to the same
value simultaneously.
71
Page 72

SPECTRALIS 2
Setting gate-times
On the third menu page you will be able to adjust the length of notes. As above
you can set the values you chose in the display and then use the numeric
buttons to select the steps which you want to assign the new length to.
3/4:Gate Length->TGrp1 Stp:01-16
Seq:L11 Len:1 [SET ALL]
The length of notes can be entered in multiples of steps. The range goes from
1/8 Step to a maximum of 13 steps. If you want to create really long notes in
the step sequencer, simply set the resolution of the sequencer line to a higher
note value. After all you have the option to set the step-resolution anywhere
from 1/192th notes all the way to 12 bars. We already have described how to
change the resolution in chapter 3.4.2. The preset setting for step-resolution is
th
1/16
per step. Use the menu to select the desired note length and then push all
numeric buttons which you want to assign the new length to. Using the
encoderbutton [SET ALL] you can assign the new value to all notes at the
same time.
Step-sequencer advanced - Tonal sequences
Changing the velocity
On menu page 4/4 you will find the menu for changing velocity of all steps:
4/4: Velocity->TGrp1 Stp:01-16
Seq:L11 Vel:100 [SET ALL]
Here as well you can adjust the desired value in the display. When you’re done
use the numeric buttons to set the trigger points which are supposed to output
the newly set velocity. Using [STEP ALL] you can assign the same velocity
value to all steps simultaneously. By the way, you can leave the menu level for
the editing of the parameters pitch, probability, gate-length and velocity any
time using the [EXIT]-button. If you are exiting the sequencer menu by dialing
up another function and plan to return to the step-sequencer again later, you
will find yourself back on the lower level of the step-sequencer menu.
3.5.4 Option 3: Input and editing of notes in the single-step editor
If you have closed the step-sequencer menu already, please push the sequenceedit [Function]-button once again as we are going to demonstrate the third
input-mode for notes. Once the mode opens you can select any particular step
by pushing one of the 16 control buttons. Your should see the following menu:
72
Edit Step 1->TGrp1 Stp:01-16
Pitch:F#1 Prob:100% Len:1 Vel:100
In the upper left corner of the display you can see which step you have selected
and what destination this step has been assigned to. In the upper right the position
of the section of the sequence you can currently select with the numeric buttons
and control buttons is indicated. You can scroll through sections of longer
sequences by using the [Tempo/Shuttle]-encoder. The adjustable parameters
Page 73

SPECTRALIS 2
in the lower display line during the edit process have an immediate effect on
the sequence. You may select other (alternate) notes at any time using control
buttons 1-16. You can also scroll the steps into the display successively via the
[Page-Up] function. Especially when multiple tonal sequences are active
simultaneously, you will welcome an option that enables you to scroll through
all lines directly using the key combinations [Shift]+[Page-Up] or
[Shirt]+[Page-down]. This menu also contains a copy-function. It is possible
to copy the settings of a selected step directly into other steps. To do so use the
[Shift] + the control button of the step you want to apply the new settings to.
With the help of this function you can save a set note to random positions very
quickly.
3.5.5 MIDI learn function for pitch
When the single-step editor is opened the Spectralis has a MIDI-learn function. If
you want to assign a new pitch to a step via MIDI, simply push the control button 116 of the according step, hold it down and play the desired note on your connected
MIDI keyboard.
Step-sequencer advanced - Line Rotation
3.5.6 Line rotation
In chapter 4.13.3 we already have explained many basic functions, such as change
of direction, skip, resolution and others. When you use these functions extensively
you may end up with a sequence which sounds terrific – but somehow doesn’t match
up well with the current drum-groove. Often you won’t even notice until the sequencer
is stopped and restarted. It suddenly becomes obvious that the sequence isn’t starting
together with beat 1 but possibly beat 5. This can cause real problems, especially
when changing from one pattern to another. To deal with this issue the Spectralis has
a function which allows you to rotate the sequencer line step by step. If you move the
line rotation by one step to the right, the 16
th
step-position will skip to 1 and the
remaining events will also move to the right by one step. The line rotation function
can serve as a nice source of inspiration when you have created a number of tonal
lines and start shifting them relative to each other. This can generate completely new
and unexpected rhythmic structures which you might like even better than the originally
planned one. You can access the menu for rotating lines by using the [Iterati-
on]-button in the sequence-edit section.
Rotate Line->TGrp1 Stp:01-16
Seq:L11 [<ROT] [0] [ROT>]
The menu is largely self explanatory. The menu can be operated via the buttonfuction of the rotary encoders under the display.
[<ROT]
Enables the rotation of a sequencer line to the left by one step. The numeric
buttons will indicate the amount of the shift of the trigger points.
[ROT>]
Enables moving the whole sequencer line to the right by one step. Again
the numeric buttons will indicate the amount of the shift.
73
Page 74

SPECTRALIS 2
[0]
Displays the actual value of the shift in steps and additionally enables
you to return the sequence to the original position by pushing this button.
Please note, that after a pattern has been saved the shift of the sequencer
line will be memorized as the new original position. Using encoder
(Seq:L11) you can directly select another line for rotation. Not only tonal lines can be rotated but also other parameter lines.
3.6 Target selection
The sequencer lines of the Spectralis can play notes, affect parameters of the
Analog Synth and send MIDI data. In the “Target Selection” menu you can
determine which target you want the sequencer-line to control. The line resulting
from your selection will appear differently depending on the target. Note-lines
for each step contain settings for the note length, pitch, velocity and probability.
Pure parameter lines contain settings for the step envelope, its length and
intensity of the envelope-control. MIDI control tracks have no envelopes. Most
of the demo patterns in the Spectralis’ RAM already have preset step-sequencer
targets. These date back to the early design phase of the Spectralis when targets
still remained set. The Spectralis has a total of 32 sequencer-lines, which should
be sufficient even for complex automations. You can generate new sequencerlines in the sequencer functions menu. The controller for the sequencer-line
selection at the end of the list has an entry “Create”. If you push the lineselection controller the Spectralis will create a new sequencer-line and will
directly display the menu for Target Selection for the sequencer-line. The menu
can also be accessed via the [Target]-button in the Sequencer-Edit section:
Step-sequencer advanced - Target selection
Line Section->Group->Parameter
Seq:L01 Filter Volume FBByp
Line:
Use the first rotary encoder to select the sequencer-line for which you
want to determine the target.
Section:
For better orientation the parameters have been set up in sections. The
following sections are available for the Target selection:
Filter-> Filterbank Parameter
AVCF-> Analog Synth analog filterparameters
AVCO-> Analog Synth oscillator parameter
AVCA-> Analog Synth VCA parameter
ALFO-> Analog Synth LFO parameter
DSYN-> DSP Engine Targets (notelines)
ASYN-> Triggergroup control (notelines)
MIDI-> Notes. Aftertouch or MIDI Controller
Device-> Parameter which affect all parts such as FXParameter (not
available yet)
Mixer-> Mixer parameter (not available yet)
74
Page 75

SPECTRALIS 2
Group:
Divide the section further into logical subgroups. For instance you will
find the groups VCO1-VCO-4 in the AVCO section.
Parameter:
The place to select the target parameter. The selection flashes until you
have pushed the parameter-rotary controller. Only then the line has been
assigned to the parameter.
3.6.1 Special features for MIDI targets
We already have listed some of the possible MIDI targets such as MIDI Controller,
Notes and Aftertouch. The selection of these targets will require more detailed
specification. When you confirm the selection of MIDI controllers, MIDI notes or
aftertouch with the control button, it will prompt an additional menu-page on which
you can enter the MIDI channel number for the three potential targets and in case
you have selected the MIDI controller also the MIDI controller number. You’re sure
to find information about the use of MIDI controllers in the MIDI implementation of
any connected sound generator or the selected soft synth. Most of the important
sound parameters of modern synthesizers can be controlled via simple MIDI
controllers. The Spectralis is likely to tease brand-new patterns out of your existing
arsenal of instruments. When editing a MIDI sequence line the MIDI messages of
the connected MIDI keyboard won’t be transmitted to the Hybrid Synth but to the
selected MIDI instrument. This allows you to hear immediately how the sequencerline will sound on the selected MIDI channel.
Creating triggergroups - multiple analog synth parts
Tip: Please make sure when editing a sequencer line that the used
controllers don’t mute your instrument. For instance if you are setting
the step values of a line to 0 and transmit the line to controller 7 the
synth in all likelihood will remain quiet – the Spectralis doesn’t send
default values for the MIDI controllers used after the end of such a
sequence. After all, the Spectralis has no way of knowing.
3.7 Creating triggergroups - multiple analog synth parts
In this chapter we will explain how you can use the Hybrid Synth sound
generation to play multiple sounds. Assuming you paid attention to the previous
chapter you will already know about the extensive routing capabilities inside
the Spectralis’ hybrid synth sound-engine. Of course you will use sounds once
in a while which are only using one or two oscillators. Considering the
Spectralis’ sonic power it would be nice if the unused sound components could
be used to play back multiple Hybrid Synth sounds at once. The Spectralis
offers that possibility. In so-called “trigger groups” you can determine which
envelopes and oscillators are assigned to which of the trigger groups. You can
set up a maximum of three trigger groups in the Spectralis which will allow
you to play three different sounds simultaneously or play them back via the
built in sequencer. The one thing being determined in the trigger groups is
which envelope is being assigned to each trigger group. From here in a trigger
group can be played as a Part. The long and short of it is that now you don’t
have just one single analog Part available – as in the original release version of
the Spectralis - but a total of 3 analog Parts with numbers 12, 13, 14
75
Page 76

SPECTRALIS 2
Oscillators:
When you assign a n oscillator to the trigger group the following happens:
If the trigger group is being triggered (via MIDI notes, the built in Mini
Keyboard, the step-sequencer or by a Motiv of the pattern sequencer) the
trigger group transmits the received pitch information to the oscillator
and triggers its envelopes (pitch-envelope and level-pitch).
This oscillator can now not be accessed by the other trigger groups. Pitchbend, after-touch or modulation-wheel data of course are also transmitted
to the selected oscillator.
24dB LP-Filter and Multimode Filter
The process works similarly with the two analog filters. The cutoff-and
level-envelope of the filter are being addressed by the selected triggergroup. Its pitch-information controls a possible keyboard scaling
sensitivity and all other MIDI data are being processed as expected as
well.
Filterbank and Noise
Things work a little different with the filter-bank and the noise source.
As these two sections don’t utilize pitch and have no parameter which
could be controlled by standard MIDI controllers, only their levelenvelopes are being triggered. You might ask yourself why we’re going
into such detail to describe this subject. Basically most of it sounds like
normal MIDI multimode. There are distinct differences though. For one
it is up to you how you are assembling a voice and additionally a trigger
group does not automatically determine the routing of the audio signals.
When you are assigning an oscillator and the low-pass filter to a trigger
group, you have to make sure that the output signal of the oscillator is
being inserted into the lowpass-filter. Otherwise you might experience
that there is no audible signal even though you have assigned both sound
components to a group. No need to panic! We already have programmed
a number of finished useful examples of multimode sounds, which you
can use right away – to get started. You will locate these sounds in the
category “Multi”. For sounds in this category multiple trigger groups are
being used, to generate multiple sounds simultaneously and independently.
Creating triggergroups - multiple analog synth parts
76
3.7.1 Playing the triggergroups
If you select the analog Part in part-select mode ([Part-Select]+numeric button
[12]) you in fact are selecting Part 12. If you want to access another analog-
Part and to change the trigger group, hold down numeric button [12] for a little
longer. You will then see another menu in the display for he selection of the
Analog-Parts 12-14 resulting from the trigger groups
1/4:S06:<Song06>PA05:WetSolo Pa12
[Part12] [Part13] [Part14] [CURRENT]
Using the rotary buttons 1-3 below the display select the desired Part according
to the trigger group. You will see the currently selected Part in the upper right.
Page 77

SPECTRALIS 2
Please note that the selection of a new sound will overwrite already prepared
trigger-group settings, as these are sound-parameters. We spared ourselves from
saving the trigger groups individually, as a recombination of trigger groups
makes no sense. Many defined trigger groups won’t be able to play in parallel
mode due to the limited amount of oscillators and filters. That’s why you should
select a sound in the category “Multi” for which sound creation is already
separated into trigger groups. Accordingly it is also not possible to save the
sound settings of individual trigger groups separately.
A trigger group which has been selected in the display menu will of course be assigned
to the connected MIDI keyboard or can alternatively be played back via the MINIKeyboard of the Spectralis by using the Part-Play Function. Simply select a sound
from the category “Multi” in your sound selection. You can use that sound to familiarize
yourself with the selection and playing of the trigger groups. You should now be able
to play various sounds by selecting the trigger groups.
3.7.2 The definition of triggergroups
The definition of the trigger groups is rather simple. Select Part->[Select] and hold
down the numeric button [12] for a moment. This will prompt a display message for
the selection of trigger groups
The definition of triggergroups
1/4:S-6:<Song 06>PA05:WetSolo Pa12
[Part12] [Part12] [Part14] [current]
Using the [Page-Up]-button will get you to the menu for defining the trigger-groups:
2/4:Trigger-Group VCO:
VCO1:TG1 VCO2:TG1 VCO3:TG1 VCO4:TG1
The menu is largely self-explanatory. You can select the desired trigger group
for each VCO in this menu. The determination of the trigger group assigns the
selected element to the according Part:
Trigger group 1-> Part 12
Trigger group 2-> Part 13
Trigger group 3-> Part 14
On the next menu page you can assign the filter, the filter-bank and the noisesource to a trigger group
3/4:Trigger-Group Filter, Noise
MM:TG1 LP:TG1 NSE:TG1 FB:TG1
In this case MM stands for the 12dB Multimode-filter, LP for the 24dB lowpassfilter, NSW for the noise-source envelope and FB for the filterbank-sumenvelopes.
This of course leaves one more question: The Master-LFOs have envelopes for
the control of the modulation depth. Which of the trigger groups will trigger
the Master LFO-envelopes? To avoid complicating matters unnecessarily, the
77
Page 78

SPECTRALIS 2
triggering of the Master-LFO envelopes is assigned to the trigger groups of
oscillators 1-4. If you are assigning oscillator 2 to trigger group 3, the MasterLFO2 will also be controlled by trigger group 3. Keep in mind, that even though
trigger-groups have been defined no sound has yet been created. Once you
have assigned oscillator 1 and the multimode filter to a trigger group, you will
have to route the oscillator into the multimode filter and then assign the multimode filter to an output to generate a sound. More on this subject in chapter
3.3.4.
Tip1: All filters – the low-pass filter, the multimode filter and the filterbank - allow for routing of the output signal not only to an output but also
additionally into the effect section. This means you can even add some
effect to the three parts separately from each other (select menupage 7/9
of the 24dB Lowpass filter menu or page 7/8 of the multimode filter menu)
Tip 2: Fans of phase modulation, frequency modulation or oscillator
synchronization will be happy to hear, that the independent routing can
be used to control the modulating oscillators independently. Just assign
one of the two phase-modulators VCO3 and 4 to their own trigger group
and use it to modulate VCOs 1 and 2. It will become apparent why it
makes sense to be able to determine the routing completely independent
of the trigger groups.
The definition of triggergroups
Tip3: You have direct access to the trioggergroup definition menu by
pushing the [SET ROUTING] button in the filters section.
78
Page 79

SPECTRALIS 2
3.8 Step sequencer advanced II
You already have learned how to manage tonal sequencerlines and some of the
features we are describing in this section have been discussed already in the
first advanced step-sequencer chapter. However, while tonal sequencerlines
offer gate-length, probability, velocity and pitch, in parameter control lines
you have to deal with step envelopes and value offsets.
3.8.1 Parameter control lines
Push the sequence-edit->[Function]-button, to enter the step-sequencer edit menu.
The sequencer menu contains 7 edit pages. Most of them can be reached by press
and hold [Function] and selecting the desired page with the numeric buttons [1]-[5]
corresponding to the labelling under the numeric-buttons. By hitting [Page-Up] and
[Page-Down], you can reach all available edit pages one after another.
Menu page 1
1/8:Fnc TrigMod->FBV 390Hz Stp:01-16
Seq:L03 ´`Typ:Decay´`Len:4th ´`Depth:63
Step sequencer advanced II - Parameter control lines
This menu works in the way that you are adjusting parameters for one or multiple
sequence steps and hit the numeric buttons of the steps you want to activate with
the settings afterwards. If you hit a stepnumber, that already is activated with a different parametersetting, the step gets updated with the new values. If you hit an already
activated step with a similar parameter setting again, the step gets deactivated again.
Seq - Sequence line selection
Choose the sequencer line for editing with the first display encoder.
Typ - Step envelope type selection (attack, decay, puls, hard and soft)
The envelope type can be selected independently for each step you want
to enter.
Len - Step envelope length
You can define the length of a step envelope in multiples or fractions of
steps. 4 means, the envelope has a duration of 4 complete steps and 1/4
means, the length is only a quarter step.
Depth - The step envelope depth
Depending on the depth, the envelope will control a parameter value
more or less. Negative values are decreasing the value and positive values
will increase them.
Additionally to the step envelopes you can define an offset value per step.
Encoders 1-16 are controlling the offsets of the corresponding steps directly.
The encoder buttons [1]-[16] call up an additional single step editing menu we
are describing in a dedicated chapter below.
79
Page 80

SPECTRALIS 2
You may already have noticed the upward arrows left to the parameter names.
They are indicating, that further edit pages can be reached by pushing the
corresponding encoder button. A later chapter will cover these menu pages,
which allow to change a single parameter for all steps simultaneously.
Resolution and sequence length
[Page-Up] opens the second page of the sequence edit menu:
2/8:Resol LastStep Style Start
Rslt:16th Len:16
Rslt - Sequence line resolution
Each sequence line in the Spectralis has it's independent resolution. By
default, the resolution is set to 16th which means, that every step is
equivalent to a 16th note. The resolution can be set from 1/192th to 13/1.
Len - Linelength
Each sequence line has an independent length in multiples of steps. The
length of a sequence can vary between 1 and 192 steps.
As soon as a line has a length above 16 steps, the tempo/shuttle encoder
allows for shifting the visible segment of a sequence. Menupages 1 and 3
to 7 are showing the selected line segment in the upper left corner of the
display. The tempo/shuttle encoder toggles between tempo control and
segment shifting by pushing the encoder button.
Step sequencer advanced II - Parameter control lines
80
Skip-function
The third page of the sequence menu assigns the skip function to the numeric
buttons. Press and hold [Function] and press numeric button [2] (Skip) to
access this page directly:
3/8:Fnc Skip ->FBV 390 Hz Stp:01-16
Seq:L03
The function is self explanatory. Just keep in mind, that a sequence line with
skipped steps differs in length from a line, that has no skipped steps and the
same defined sequence length. Instead of creating a pause, like with the mute
function, the skipped step will force the sequencer to jump ahead to the next
step reducing the linelength defined with the resolution parameter.
Step-glide
The next menupage allows to activate a glide function for selectable steps.
4/8:Fnc Glide ->FBV 390Hz Stp01-16
Seq:L03 LGld:20
If you enter value-offsets for the steps the sequencer normally plays aprupt
valuechanges between the defined steps. Sometimes a smooth transition from
one step to the next gives much better sonic results. The glide function creates
Page 81

SPECTRALIS 2
these smooth transitions. Just hit the steps you want to get smooth results for
with the buttons 1-16 and change the transition time with the LGld- (Lineglide)
parameter.
Step-mute
The mute function not only disables the step envelope trigger points but also the
offset values will be suppressed for muted steps as well:
5/8:Fnc Mute ->FBV 390 Hz Stp:01-16
Seq:L03
Numeric buttons 1-16 can be used for the mute function, if this menu page is active.
Line-length
We already have described the menu for defining the line length. You may be
wondering, why we are adding a second page for that. We did that to improve the
workflow a little bit. Just memorize, that you can select the line length definition by
holding down the [Function]-button and pressing the numeric button 5. This menu
has some advantages compared to the other one, because it does not have to handle
multiple parameters. That allows to show some other important info like the current
sequence segment information (here 01-16) and the line selection.
Step sequencer advanced II - Parameter control lines
6/8:Fnc Mute ->FBV 390 Hz Stp:01-16
Seq:L03 Len:17
3.8.2 Triggerpoint muting and overwriting
Menupage 7 is another dialog we added for improving the workflow a little bit. This
menu allows you to mute/unmute triggerpoints and to enter new triggerpoints
in one single edit page. Numeric buttons 1-16 are assigned to the triggerpoint
mute/unmute function. [Shift] + Encoder-button [1]-[16] copies the display
settings to the corresponding step. Aside from the combined button and encoder
functionality, the menupage is largely identical to the first edit page:
7/8:Fnc TrigSet->FBV 390 Hz Stp:01-16
Seq:L03 ´`Typ:Attac´`Len:4th ´`Depth:63
3.8.3 Single step editor
Encoder buttons [1]-[16] activate a special single step editor mode in the
sequencer menu. This menu allows for selecting steps and editing them. You
can use this dialog to check the step values of a sequence line as well.
Edit Step 1 ->FBV 390 Hz Stp:01-16
Off:0 Typ:Decay Len:4th Depth:0
The upper row of this menu displays the current selected stepnumber and the
line assignment. By hitting encoder buttons [1]-[16] other steps can be selected
directly. [Page-Up] and [Down] allows to jump for and backwards in your
81
Page 82

SPECTRALIS 2
sequence to edit one step after the other. Press and hold [Shift] and [Page-Up]
and [Page-Down] to reach other sequencerlines without leaving the singlestep
edit mode.
If you want to copy the settings of the current step to other steps in the sequencer
line, just press and hold [Shift] and hit the encoderbuttons, you want to copy
the settings to.
Hitting the numeric buttons activates the triggerpoints for the corresponding
step positions.
You can leave this special single step editor by pressing [Exit].
3.8.4 Single parameter editor
All step parameters have additionally a special edit menu that allows a very
fast updating of sequence parameters. A "SetAll" function allows to initialise
one parameter for a complete sequence line with a selectable value.
This special single parameter editor can be reached from the first and the seventh
menupage of the sequence edit menu. Select the sequence menu by hitting
[Function] and select the 1st or the 7th menupage. You should see the following
menu:
Step sequencer advanced II - Parameter control lines
1/8:Fnc TrigMod->FBV 390Hz Stp:01-16
Seq:L03 ´`Typ:Decay´`Len:4th ´`Depth:63
Encoderbuttons [2]-[4] under the display are entering the single parameter editor.
1/4: Offset->FBV 390 Hz Stp:01-16
Seq:L03 Off:0 [SETALL]
With [Page-Up] and [Page-Down] all other single parameter edit pages become
available.
The editor works in the way that you are setting a value with the display encoder.
Afterwards you can hit all numeric buttons corresponding to the steps, you
want to update with the new value. If you want to set the value for the entire
sequence line simply press [SetAll] with the display encoderbutton.
Menupage 1 is assigned to the step offset values, page 2 selects the envelope
type, page 3 the length of the step envelope and page 4 the depth of the step
envelope modulation.
82
Page 83

SPECTRALIS 2
3.9 Editing motifs and patterns
In this chapter you will learn how you can change the motifs of the parts. The chapter
starts with a rather simple exercise – exchanging existing motifs with the goal of
creating new patters – and it ends with instructions for realtime-recording and the
use of the beatmatrix for the creation of new rhythms
3.9.1 Exchanging motifs
You can replace the Motifs of the Sequencer to create new Patterns. Of course you
can make your selection while the Sequencer is playing. Exchanging Motifs can be
done as follows:
I. First chose the part, in which you want to replace the motif.
II. In the "Part"-section upper left -> push the [Select]-button
Select the desired part in the numeric button row below!
III. Opening the motif selection menu:
Push the [MOTIF]-button in the "Num-Button-Assignment"-section.
You will see the following display message:
Exchanging motifs
S01 PA01: Exchange Motif for Part Kick
S01:01 P:01 M:Kick [EDIT]
Using the encoders right under the display you can now handle the
following functions:
S:01 – Use the first encoder to chose the song, in which you want to
select a motif.
P:01 – Use the second encoder to select one of the patterns 1-32 from
which a motif is to be extracted.
M:KICK – use the third encoder to select the part from which the motif
is to be selected. For easier orientation the motifs are named
corresponding to their part designation. If all you are seeing is the (”—”)
Symbol instead of a part-name, you will know that the selected motifnumber of this Pattern does not actually contain a motif.
Towards the bottom of the list you will find an additional entry ”EMPTY”.
This is to be used for erasing a motif while the current pattern is playing.
When you are turning the 3 encoders you will immediately be able to
hear the respective motif.
The Num-Buttons can be used as well to select a motif. Pressing
numbutton [1] for example loads the motif, which was assigned to the
same part at pattern number one. In case, that there can't be found a motif
at the same part, the spectralis automaticly selects another part as the
motif source.
IV.) Executing the motif exchange
To transfer your selection to the pattern, push encoder-button ”3”.
83
Page 84

SPECTRALIS 2
You will see the following display message:
Load Motif into Pattern Freaky with:
[origSND] [curSND] [NO] [YES]
This message appears as well, if you select a motif with the numbuttons. Independent from this menu you still can change the motif by using the numbottons.
In this display menu the encoder-buttons have the following functions:
[OrigSND] – Original Sound
Loads the motif with the corresponding sounds
[curSND] – Current Sound
Loads only the notes, however plays the motif with the sounds contained
in the pattern currently playing
[NO]
Ends the process. (Maybe the motif wasn’t all that good???!)
[YES] –
Loads the motif to the pattern.
Using the [Exit]-button you can leave the menu! You will find yourself
back in the Motif-Selection Menu.
The Motif Edit Menu
84
3.9.2 The Motif Edit Menu
S01 PA01: Exchange Motif for Part Kick
S01:01 P:01 M:Kick [EDIT]
Up to now we have not discussed the [Edit]-command in the motif menu. By
pressing the [Edit]-encoder button, the edit menu will appear in the display.
This edit menu allows to change the way, a motif will be played within the
pattern:
1/2:Pat:BasicBass Line: Kick Motif-Edit
Len: 1 Loop:Cont
Len - Motif Length
The length of a motif can be set between a quarter note and 16 bars in
steps of a quarter note.
Loop - Motif Loop Mode
Motifs can be played continuously independent from the pattern length,
can be restarted at the end of the pattern or can be played just one time at
the beginning of a pattern.
Cont - Continuous playing of the motif. The motif repeats independently
from the pattern length.
Once - Motif will played one time only at the begin of the pattern.
Repeat - The motif repeats continuously but resets to the start position
on a pattern restart.
Page 85

SPECTRALIS 2
3.9.3 Initialising motifs and part parameters
The second menu-page lets you reset the sound or clear the motif:
2/2: Reset Sound of Part Kick?
[ClrSND] [ClrMotif]
[ClrSND] - Clear Sound
Pushing down the first Encoder-Button intializes the sound of the selected
part.
[ClrMotif] - Clear Motif
Pushing down the fourth encoder deletes the motif.
3.9.4 Exchanging drum grooves
Parts 1-11 are the drum-parts of a Spectralis pattern. Sometimes it is handy to
exchange the entire drum-groove of an pattern. You can do that by hitting the [Drum
Groove]-button in the Num Button Assignment Section. The following display menu
will appear:
Exchanging drum-grooves
S08 PA15: Exchange Drumgroove
S:08 P:15
In the first display row you see the current song- and patternnumber.
S - Song-Selection
The first encoder selects the song, from which one wants to load a drum
groove into the current pattern.
P - Pattern Selection
The second encoder selects the drum-groove corresponding to the pattern
number you are selecting. The selection must be confirmed by hitting
the Pattern-Select Encoder. As soon you hit the encoder button, the
following menu appears:
Load Drumgroove of S08 PA15?
[No] [Yes]
The num-buttons can be used for the drumgroove-selection as well. The buttons
[1]-[16] and [Shift]+[1]-[16] are directly assigned to the drum grooves of pattern
1-32 (PA01 - PB16) of the current song. Although the confirm dialog is already
opened, you still can switch from one groove to another by hitting the num-buttons.
[YES]
If you found the desired drum-groove, you can press [Yes] to load the
drum-groove into the pattern.
[No]
By pressing [No], you leave the confirm dialog and the drum-groove
selection menu will appear again to give you the opportunity to select
another song as the source for drum-grooves. Pressing any other num
85
Page 86

SPECTRALIS 2
button assignment or part button closes the drum-groove selection dialog.
After selecting another motif or drumgroove you should save the new
pattern. Otherwise the next pattern selection will result in loosing these
changes.
3.9.5 Recording your own motifs
If you are not satisfied with the preset-motifs of the spectralis, there is only one
way to achieve happiness: You will have to create some motifs of your own!!
There are different ways to record or input new motifs into the spectralis
sequencer. It doesn't matter, whether you want to record in realtime or step by
step - the recording of an motif always starts by pushing the [record]-button in
the transport field. Currently, recording motifs can only be started, if the
sequencer has been stopped before - however, very soon a new firmware will
allow to start the recording on the fly.
3.9.6 Realtime recording
This is how you should proceed when recording a new motif:
Recording your own motifs
I. Selection of the desired part:
In the "Part"-section in the upper left, push the -> [Select]-button.
II. Select your desired part in the numeric button row below. Num-button
13 for example arms the DSP synth part 1.
III. Select the Pattern-mode with the [Pattern]-button in the num-button
assignment section.
IV. Access "Record"-menu by pushing the [Rec]-button.
The following record-mode selection dialog will appear:
Motif Record Menu
[ChordRec][StepRec][Realtime]<Overdub>
For realtime recording please press the encoder button [Realtime] now.
1/2:Record Arm Part Dsyn1
Len: 8/8 NumBar:1 Cycle:On Quant:16
The individual display entries have the following functions:
Len: 8/8 - Bar Length
Here is where you can set the bar-length for your recording.
86
NumBar:1 - Number of bars for this motif
Allows you to set the number of bars between 1 and 16 which you’d
like your motif to have.
Cycle: – Cycle Recording Mode On/Off
When the cycle mode is active ("On"), the Spectralis will record a
new version in each cycle.
Page 87

SPECTRALIS 2
Quant: – Quantize Grid Setting
Here you can select a quantize setting for your recorded notes. Directly
after finishing your recording you can check different quantize setting of
your recorded notes. The quantize function will be audible during
changing the setting.
IV. Start Recording!
As soon as you push the [Play]-button, the metronome will start to click
with the precounter and jump into recording after the precount. By looking
at the numeric buttons you will be able to tell in which bar you are
currently recording. The num-buttons are acting like bar and beat counters
during the recording. Once you’re finished recording, you may want to
change the quantize setting. As soon as you stop playing the keyboard,
the Spectralis will playback the recorded notes with the selected quantize
setting. Satisfied with the reult? Then simply push the [Stop]-button.
You will see the following display message:
Keep Recorded Events?
[Replace] [DISCARD]
Start Realtime Recording during playback
[REPLACE]
Replaces an already existing motif with the new quantized recording
[DISCARD]
Discards your most recent recording and reverts to the previous version.
If you are noticing during recording, that your performance is not quite up to
snuff or you made a mistake playing, you can push the [Rec]-button while the
sequencer is still playing. This will immediately discard the bad recording in
process and will keep the sequencer in record mode.
V. Current Limitations (Version 1.5)
For now all you can record are notes, Pitchbender and Modulation wheel.
By assigning the Modulation Wheel to the cutoff frequency filter
frequency automation can be easily recorded.
3.9.7 Start Realtime recording during playback
If the pattern is already running, the realtime recording starts direct by pushing
the [record] button. Pressing play or selecting another part after your recording
opens the "Keep recorded events" dialog automaticly without stopping the
sequencer. When ending the realtime recording by selecting another part, the
realtime recording for the latest selected part starts immediatly after pressing
the [Replace] or the [Discard] button.
If you press [overdub] instead of [record], the realtime recording starts in
overdub mode. Recorded events will remain and new played notes will be
added to the recording.
87
Page 88

SPECTRALIS 2
3.9.8 Step by Step Input
Select a new patterm and the part which you'd like to record in step by step
recording mode and hit the [RECORD]-button. The following display dialog
will appear:
Motif Record Menu
[ChordRec][StepRec] [Realtime]<Overdub>
Instead of realtime recording next select [StepRec]. You will see the following
display message:
1/2 Step-by-Step Recording 0/16
[Bwd] [Pause] [Len] [Done]
If you'd like to change the resolution of the steps or the number of the possible
bars, use the [Page-Up]-button to call up the second menu-page of the Step by
Step Editor:
Step by Step Input
2/2:Step-by-Step Recording 0/16
Reso:16th NumBar:1 [CLEAR]
When done return to the first menu page using [Page-Down]:
1/2 Step-by-Step Recording 0/16
[Bwd] [Pause] [Len] [Done]
Play a couple of notes or chords on your connected Midi-Keyboard or the
num-buttons "mini-keyboard". After each note you're playing the Spectralis
will move forward by the selected note value.
Using [Pause] will let you program a pause in the next position instead of a
note. using [Len] allows you to extend the length of a note by one step. Using
[Bwd] enables you to go back one or more steps. The number of steps you are
going back by will be erased.
Once you are happy with your pattern, confirm using [Done]. you will be asked
if you wish to convert the pattern into an actual Motif [Transform]. Push
[Transform], then the [Play] button to listen back to your pattern.
3.9.9 "Chord-Trigger" recording - independent note and rhythm input
May we will find a better name for this special recording mode in the future.
This mode allows to specify some notes and chords and tap the rythm for these
notes and chords independent afterwards.
Select a new patterm and the part which you'd like to record in step by chord
recording mode and hit the [RECORD]-button. The following display dialog
will appear:
88
Motif Record Menu
[ChordRec][StepRec] [Realtime]<Overdub>
Page 89

SPECTRALIS 2
Instead of realtime recording next select [ChordRec]. You will see the following
display message:
Step Record Arm Part DSyn1
[Notes] [Tapping] <Grid> [Exit]
When using Chord-Record mode, notes and chords will be recorded independent of the rhythmic play. First push [Notes] to prompt the following display-
message:
Note and Chord Input 0/16
[Bwd] [Clear]
You have 16 chord/note memories for your later tapping session.
Once you play a couple of notes on your keyboard or the spectralis "minikeyboard", you will notice, that the counter with each keystroke is moving
forward by one number. If you made a mistake, simply press [Bwd] to decrease
the memory location for the next chord/note entering. Once you have specified
all desired notes and/or chords, the Spectralis of course does not have any
information yet regarding touch sensitivity, time position or the length of the
notes. This information is being input in the next step - the "Tapping" dialog.
Once you're finished defining the pitch of the notes use [Exit]. The following
Display message shows the option [Tapping] not in pointed but square brackets,
as this function has now been activated after the definition of chord memories.
Use [Tapping] to get to the following display:
Chord Trigger Recording
StepbyStep Tapping Part Asyn1
Len: 8/8 NumBar: 8 [Rnd] Quant:16
The dialog here is very similar to the real-time record dialog. You can now define
the measure format and select the number of bars, you want to tap with your chord
memories. When done push [START]. You will hear the metronome and you now
can record the rhythmic pattern for the chord-memories using your keyboard or the
Spectralis "Mini-Keyboard" again. It does not matter which keys you now are playing,
only the rhythmic pattern matters. What is being recorded are the values of the touch
dynamics, the time position and the length of the keystrokes. With each recorded
key, the next available note/chord will be played back. A special creative tool is
being done by the button "Rnd". It arranges that chord-memories are not recalled
while tapping successively in order but in random order. Each use of the "Rnd" function
creates a new random order.Once you're finished recording, you can change the
quantisation in this menu and then end the recording process using [Stop]. You will
then see the menu "replace or discard". These option operate the same way as in the
realtime record process.
TIP: Sometimes you would like to trigger a desired chord memory during
the tapping procedure directly. By holding the [Shift]-button, you can
trigger the chord memories 1-16 directly by the corresponding numbuttons.
89
Page 90

SPECTRALIS 2
3.9.10 Programming new rhythms with the beat-matrix
For the Spectralis realtime-access to all functions was a top priority. When we
were discussing the step-sequencer you surely have noticed that there is no
function, for which you will have to stop the sequencer. It’s no different with
the beat-matrix! For easier orientation here is a brief survey over the possibilities
of the beat-matrix:
- The beat-matrix has 11 tracks.
- The length of a bar can be set between 1/8 and 10/8.
This means an ordinary 4/4 bar has a length of 8/8! Of course the bar
measure can be set separately for each of the drum-tracks. If you are
curious what happens when you are playing a 7/8 beat against a 9/8,
the Spectralis will provide you with the necessary tools to find out.
- The length of the various beat-matrix tracks is completely independent of each other and can be set from one to sixteen (!) bars.
- The beat-matrix grid for the rhythmic motifs can be adjusted across a
broad range. The highest resolution of the grid is an amazing 192th
note (!) which allows for very detailed editing not only of the rhythm
but also for the creation of special effects.
- Up to 16 are visible in the beat matrix at a time. Further steps or bars
can always be reached with the [Tempo/Shuttle]-Encoder.
Beatmatrix programming of new rhythms
90
Now let’s get started!
First select an empty song and within the song an empty pattern.
Next push the [Step/Accent]-button in the "Groove-Edit"-section. You will
see the following display message:
1/2:Part Sound Velo 3 3| 1 - 1
Kick 127 +20
The first encoder selects the part you want to edit the rhythm motif from. The
part -selection is available at the encoder buttons 1-11 as well. Just push the
encoder button of the desired drum part to change the selection. The third display
encoder allows for the input of velocity values from 0-127. The velocity
setting always is valid for all steps you are entering until you change the setting
again. If you just want to view a velocity setting of a step you already entered,
press the and hold [Shift]-button and press the num-button of the step you
want to view. The value instantly will become the default value for the following
steps. Start entering some steps by hitting the num-buutons and hear the results
instantly while the sequencer is still running.
Do you want to select another sound for the selected drumpart? Just follow the
following steps:
I. Chose the [Select]-Button and hold it down.
II. While holding down the [Select]-button, you can select another category
and/or sample. Don’t forget to confirm your selection by pushing the "Sound"encoder button.
III. After releasing the [Select]-button it will automatically revert to the "beat-
matrix" menu.
Page 91

SPECTRALIS 2
The value of the third encoder under the display – the velocity– is always in
effect until the next value change for all Step-Inputs following the most recent
change. If you want to change the velocity value for an already existing Step,
simply enter the desired value and push the corresponding position in the matrix
once more. If you want to erase a step, you can also just push the numeric
button once more. If there is no new velocity value entered when you are
pushing the button, the step will automatically erased.
On the second page of the "Beat-Matrix"-editor you can determine the resolution of
the "Beat-Matrix"-grid, the bar length, the number of bars in the new motif and
the pitch of the corresponding note. Push the [Page-Up]-button, to access this menu
page.
2/2:Resol BarLen Num X XX| 1- 1
Reso:16th Len: 8/8 NumBar: 4 Pitch:C3
Reso: Allows you to adjust the resolution of the grid from between 192th notes
and 12 full notes.
Len: Enter the bar length of the motif. You can set the bar length anywhere from
1/8 to 10/8.
NumBar:The number of bars can be set between one and sixteen bars.
Pitch: Adjust at which pitch the sample will be triggered.
Beatmatrix programming of new rhythms
Now you know pretty much everything there is to know about the beat-matrix at
this time. The whole thing is very easy to program, yet it still offers different motiflength, bar-length and so on.
TIP: If you are not happy with the result of the velocity control, it could
be the result of you not having activated velocity control for your selected
sound, or you may have it set to a very low value. Access the corresponding
part using the [Select]-button and turn the (VCA-Level)-encoder, while
holding down the [Shift]-button. Setting a value of 127 will give you the
highest possible dynamic range.
TIP: You have direct access to the different drum matrix resolutions by
holding down Groove-Edit->[Step/Accent] and pushing [num]-buttons 1013 for resolutions 12th, 16th, 24th and 32th.
91
Page 92

SPECTRALIS 2
3.9.11 Swing feeling and shuffle quantisation
The Spectralis sports a Shuffle function that allows for bringing some nice
groove feeling into your tracks. The Shuffle function can be assigned to 8th,
12th, 16th, 24th and 32th notes. The shuffle function always delays the second
and the fourth note of a 4 note group by an selectable amount between one and
nine 192th notes.
The Shuffle Function can be enabled for different tracks independently and
you can assign the groove quantize function to step sequencer lines as well.
Please select a pattern and start the sequencer. We will check the Groove
Quantize function now. Push the [FUNCTION] button in the „Groove Edit“
section of the frontpanel. The following edit menu will appear:
S01:Bass2Ass PA01:BasicBass Groove
MODE:SONG Reso:32th +9/192
[MODE] - selects, whether you want to change the groove setting for
the whole song or for the selected pattern only. The setting „Songs“ allows
to change the groove settings for all patterns at once very quickly. The
Mode parameter will be stored in the pattern memory. If set to "pattern",
the swing parameters get stored in the pattern as well. Patterns, where
the mode parameter is set to "song" follow the swing parameters you
have set in "song" mode.
Swing and Shuffle quantize
[RESO] - select the notevalue for the shuffle effect. Most patterns in the
Spectralis factory set work fine with a resolution setting of 16th notes.
[+9/192] here you can set the delay for the second and fourth step in
192th notes. +0/192 is the straight setting without any shuffle FX. +9/
192 is the max setting.
The settings will not become audible until you activate the shuffle effect
for at least one part. That is quite easy. Just push the [NUM]-buttons 115 for the parts you want to get shuffled.
Shuffle quantize is even available for sequencerlines. Just press SequenceEdit->[FUNCTION] to open the step-sequencer edit menu:
1/8:Fnc TrigMod->FBV LP Stp:01-16
Seq:L01 Typ:Decay Len:4th Depth:63
Press the [PAGE-UP]-button multiple times until you reach menu page 8/8:
8/8:Fnc TrigMod->FBV LP Stp:01-16
Seq:L01 Groove:OFF
92
Seq:L01 - choose the sequence line you want apply the shuffle function
to.
Groove:OFF - The fourth encoder activates the shuffle quantize function
for the selected sequence line.
Page 93

SPECTRALIS 2
3.9.12 Randomize Pattern
You already learned about the Spectralis 2 ability to load motifs or complete
drumgrooves from any song into the currentsong, you are working on.
Sometimes you would like to get some new ideas by selecting these motifs just
by accident. You press [Kick] and the Spectralis 2 suggests a kick motif. If you
don't like it you can just hit the buttom again and a new suggestion becomes
audible. The Spectralis 2 has this functionality for all parts. You can even
randomize multiple tracks at once with this function.
Before trying this function please select an empty song. If you still have the
factory set loaded select any of the songs 27-31. After loading the song choose
the pattern mode by pressing [PATTERN] in the num button assignment section
and press select in the part menu.
Now press [Randomize] in the creativator section. The following menu opens:
S27 PA01 Randomize Menu
[SOUND] [PATTERN]
Select [PATTERN] in this menu. If you press that button for the first time after
booting the Spectralis 2, the firmware starts enumerating available motifs. That
takes some seconds but is important to avoid selections of empty motifs. After
the enumeration the display should look like that:
Randomize Pattern
S27 PA01 Randomize Pattern
RND:[ALL] Snd:CUR Song:ALL Grp:[DRMS]
RND:[ALL]
By pushing the encoder button, the Spectralis 2 randomizes the whole
pattern, if the parameter is set to ALL. This randomize function mostly
creates something not really usable. For that reason you have multiple
choices for this randomisation.
"ALL" - selects a new motif by random for all parts.
"DRM"- randomizes the drumparts only
"TON" - randomizes tonal parts (Hybrid Synth and DSP parts only)
"DSP" - randomizes the polyphonic parts 13-15 only.
Beside these randomize functions you can also randomize one or more
part by pushing any of the number buttons. Pushing the kick drum button,
makes a kick suggestion, pressing the DSP synth part 1, chooses any of
the DSP synth motifs etc. If you like a selected motif just go for the next
part.
Snd:CUR
Setting "CUR" (current) Selects a new motif but keeps the current sound.
Setting "ORI" selects the motif and loads the original sound for this motif.
Make sure to set this parameter to "ORI" in case you started with an
empty song. Otherweise the Spectralis loads no sound into the DSP part.
93
Page 94

SPECTRALIS 2
Song:ALL
Here you can choose a song you want to take the motifs from or "ALL"
if you are happy with motifs from all songs.
Grp:DRMS
Groups allows to select complete groups of motifs by accident. That often
makes more sense than loading single motifs with different keys or scales.
"DRMS" - selects any of your complete drumgrooves into the current
pattern.
"TON" - loads the motifs of part 12 - 15 from any pattern as a group
into the current pattern.
"DSP" - loads the motifs of the DSP synth parts from any pattern into
the current pattern.
If the motif suggestion is already OK you maybe want to randomize the
sound as the next step. That works even without leaving the pattern
randomize menu. Just hold [SHIFT] + press the desired part [number]
button.
Randomize Sound
Randomize Sound
The randomize function creates new sounds by taking different elements from
a number of sounds and mixing them together into new sounds. Furthermore,
the randomize function copies the new sounds into a list with 16 entries. After
creating some random sounds you can step backwards through the list to check
always the last 16 random sounds you created. Going forward into the list
creates new random sounds as soon as you have reached the end of the list.
Additionally the randomize function comes with a buffer sound memory. You
can hold one of your best randomize results inside this buffer and recall this
buffer later. By pressing prev and recall, you can compare the current selected
randomized sound from the list with the one, you have saved temporarily into
the buffer.
Enter the randomize menu with the [RANDOMIZE] button.
S07 PA08 Randomize Menu
[SOUND] [PATTERN]
Choose [SOUND] by pressing the assigned encoderbutton. Now the Randomize
sound menu opens:
94
S01 PA01 Asyn1 Cat:Lead Rand:Both
[PREV] [NEXT] [KEEP] [RECALL]
[PREV] decrements the list pointer and loads the random sound of the list
position. When reaching the beginning of the list, it starts to create new sounds.
Page 95

SPECTRALIS 2
[NEXT] increments the list pointer and loads the random sound of the list
position. When reaching the end of the list, it starts to create new sounds.
[KEEP] saves the current sound into a temporary memory.
[RECALL] inserts the sound from the temporary buffer to this position of the
random sound list.
Please remember - the list has a maximum of 16 entries. Sounds, you have
created with that function will get lost, if you press [NEXT] or [PREV] more
than 15 times after the creation of the sound.
Cat:Lead allows for selecting a category. If for example "lead" is selected, the
randomize function mixes only sound parameters of lead sounds together. The
results are mostly lead sounds;-) Choose the desired category with the third
encoder.
Rand:Both The fourth encoder controls the level of randomisation. At the
hybrid engine you can select, whether only the filtersettings, only the oscillator
parameters or both groups of parameters are affected by the randomize function.
At the DSP synth engine and drum sounds you can decide, whether only the
samples, only the parameters or both sound elements of the current timbre get
randomized.
Randomize Sound
Shortcuts:
Pushing the numberbuttons randomizes the part directly. Button 1 for example
controls the [NEXT] button of the kick drum random menu. Button 16
randomizes the whole drumset.
Pushing one of the encoder buttons 1-15 selects the according part in the
randomize menu.
Turning any of the encoders 1-15 changes the category setting of the according
part.
[Shift] + [RANDOM] in the VCA edit section calls randomize sound ->NEXT
for the selected part.
If you want to keep a random sound permanently, the sound must be saved either by saving the whole pattern or by storing the sound into a soundbank.
95
Page 96

SPECTRALIS 2
3.10 The song-chain mode
The pattern you have created can be chained to complete songs. The song chain
mode of the spectralis provides you great freedom.During a live session you
can always directly jump from song-chain to pattern-mode and back. If you
realize, a songstep is not working for the audience, just skip the songstep on
the fly. When reaching a pattern, which drives your audience crazy - just loop
this pattern and start jamming with the mute and solo buttons. After the jam
session is over, jump back to the song chain and let the song run until your endmarker. The Spectralis so far can memorize up to 32 songs with 32 patterns
each and up to 499 songsteps. That should be enough for your next rave event,
electronic mega festival or even your little brothers birthday party.
Songs inside the Spectralis memory are stored into the flash memory. When
browsing the flash rom with your computer, you will notice songfolders. They
all have the same naming conventions - The folders are named "SONGXX",
where XX is the corresponding memory location on your spectralis. Inside the
folders are the patterns of the selected song. By hitting the [Song]-button in the
num-button assignment section, you set the Spectralis into the song-chain mode.
The songs now can be selected by hitting the num-buttons [1]-[16] with and
without holding down the [Shift]-button. All patterns must be placed into these
songfolders. If you want to use a pattern from another song, just copy this
pattern from the other song to the computers harddisk, rename the file in order
to specify the memory-location for this pattern and copy it to the desired songfolder. If you want to backup the songs to your computer, simply copy the
folders to the harddisk.
The song-chain mode
3.10.1 Playing a song
The Spectralis 2 comes with preprogrammed songs. Just select one of these
songs with the num-buttons and press start. If you don't interrupt the songchain
by the commands below, the selected song will be played back from the
beginning until the end of the song.
[Page-Up] and [Page-Down]
The [Page]-buttons will jump to the next or the former songstep. The
pattern change will be done after the current bar is completed. If you
push the [Page-Up]-button multiple times before the bar end is reached,
the Spectralis will jump multiple songsteps. The next songstep can also
be checked at the upper right corner of the display message:
S03:EMbient PA08:Speckie Pa:15 S 10
[Edit] <undo> [RENAME] <MIDI>
The first line of the display shows the following informations. S03 is the selected
songnumber followed by the songname. PA08:Speckie is the current pattern
that plays at the selected songstep followed by the pattern name. Pa:15 is the
currently selected partnumber assigned to the knobs and the masterkeyboard
and S 10 is the current songstep-number.
96
Page 97

SPECTRALIS 2
[Stop]
The [Stop]-button stops the song at the current songstep. If you restart
the song by pressing [Play], the song will automaticly start at the
beginning of the current songstep. If you press [Stop] twice or if you
press [Stop] when the songs was already stopped, the sonstep-number
will be resetted to songstep 1.
[Play]
Always starts the song at the current songstep.
3.10.2 Jumping into pattern-jam mode
As mentioned above - you can leave the current song-chain without stopping the
sequencer. Just press the [Pattern]-button in the num-button assignment section
and start jamming. If you want to jump back into your song-chain, press [Song]
again and press [Page-Up] one time, to play back the rest of the songsteps of your
song-chain.This handlling is very robust. You can for example jump into the patternmode, select another pattern, edit some drum-groove steps on the fly, save the pattern
and still are allowed to jump back into the song-chain, that already will play then
your edited patterns in case they they are in use inside the songchain.
Editing a song-chain
3.10.3 Editing a song chain
Editing a song-chain is very easy and can also be done on the fly without stopping the
sequencer. Select [Song] inside the num-button assignment section to get the following
display message:
S04:Ambient PA09:Filters3 Pa:15 S 6
[Edit] <UNDO> [RENAME] <MIDI>
Please press the [Edit]-encoder button to open the songchain editor page:
1/2 Ambient Step: 8 of 8
Filters8 Ofst:0/4 Repeat: 1Trnc:0/4
The display always shows the information about the current songstep. The songstep
plays in cycle mode while editing.
Selecting the pattern for the current songstep
Select the pattern for the current songstep by pressing a num-button or a
[shift]+num-button combination. All patterns of your songchain should
already be placed inside the songfolder of the selected song.
Setting the Mutings of the current songstep
Press and hold the [Mute]-button and press the num-button of the part,
you want to mute or unmute. The current setting will become visible at
the num-buttons LED's.
97
Page 98

SPECTRALIS 2
Setting the transpose settings for the current songstep
Press and hold the [Transpose]-button and select the desired transpose
setting with the Spectralis "Mini-Keyboard". Pressing the CFlat will
play the original pitch.
Setting the Solo-Settings of the current songstep
Press and hold the [Solo]-button and select the parts with the num-buttons
to specify the solo-seting for the current songstep.
Set repeats for the current songstep
With the encoder underneath the display you can set the number of times,
a songstep will be played. The length of a single songstep is dependent
on the pattern length you specified in the edit pattern section. Changing
the pattern length is described below. You may should specify the lengths
of all patterns before starting the song-chain editing. Otherwise you always
have to jump between songchain editor and pattern editor. It's much faster
and easier to do the pattern editing as the first job. By default, all patterns
are set to a length of 4 bars.
Editing a song-chain
Truncate the beginning of a songstep pattern
Sometimes, you want a pattern play only a truncated version of itself.
The beginning truncate function allows to cut the beginning of a pattern
in steps of quarter notes.
Truncate the end of songstep pattern
Sometimes you want to truncate the end of an pattern in order to jump to
the next songstep earlier than after a completed pattern. The End truncate
function allows to truncate the end of an pattern in steps of quarter notes.
Navigate inside the songchain
Enter jumps to the next songstep. At the end of a song-chain, the display
reads New of XX. That means that the end of the song-chain was reached
and the song-chain editor added a new songstep at the end.
If you already have programmed some songsteps you can navigate back
and forth with the [Tempo/Shuttle]-encoder. By pushing the [Tempo/
Shuttle] encoder button the functionality of the encoder toggles between
Tempo and songstep selection.
Specifying the pattern length
Please select [Pattern] in the num button assignment section, select the
pattern, you want to change and press the Encoder button next to the
[Edit]-entry of the diplay menue. Now you see the following display
menu:
98
1/2:S04: Ambient PA10:Filters8 Tempo:
Len: 8/8 Bar: 4 [NAME] <Grv:Sfl>
Page 99

SPECTRALIS 2
Len: Measure format and resulting length of bar.
Here you can dial the desired measure format.
Bar: Number of bars.
Here you can define the length of the pattern in bars.
Please don't forget to save your pattern after changing the the length and measure
format. Otherwise these settings will get lost by jumping back to the songchain editor. (Shortcut: Just press [Save]->[Pattern]->[Current])
Deleting and Inserting of songsteps
Adding and deleting songsteps is a very important feature. Just imagine adding
a Break beween two songsteps without the opportunity to insert a step - that
would mean to edit all songsteps behind that position and adding a songstep at
the end of the song-chain.
The second edit page of the songstep editor offers the insert and delete songstep
function.
2/2: Ambient Step: 8 of 8
[Insert] <insBLCK> <cpyBLCK> [delSTEP]
External sync and metronome
Both functions always are acting at the current songstep. [Delete] deletes the
current songstep and [Insert] inserts a songstep behind the current songstep.
In a future version, we will allow to specify blocks of multiple songsteps to be
copied and inserted at any desired position within the song-chain.
3.11 External synchronisation and metronome Settings
3.11.1 External synchronisation
The Spectralis can be synchronised to external MIDI gear capable of sending
MIDI Realtime messages. Please press and hold the [Shift]-button and push
the [Tempo/Shuttle]-rotary encoder button to open the following display menu:
1/2 Metronome | Sync-Settings
Count:4 Rslt:4th Sync:OFF Play:YES
If [Sync] is set to "IN" the Spectralis will start and stop when MIDI Start/Stop
Messages were received and will sync to external clock. The transport bar of
the spectralis will still start and stop the sequencer with it's internal clock. If
set to "OUT" the Spectralis will send MIDI clock to other MIDI devices.
If [Play] is set to "YES", a pattern selection will automaticly start the Spectralis
sequencer. That feature can be disabled in order to select a pattern without
starting the sequencer. Especially if synchronised to external equipment,
disabling the pattern "Autoplay" feature is very essential.
3.11.2 Metronome settings
The Spectralis comes with a built in metronome. The metronome becomes
audible in realtime recording and tapping mode.
At the first menu page (see above), you can select the measure format of the
metronome.
99
Page 100

SPECTRALIS 2
[Count] - lets you decide, after how many clicks a accent will be triggered by
the metronome.
[Rslt] - One further can select the metronome resolution between 24th and
quarter notes.
At the second menu page the pitch for the counter and metronome beats can be
specified and the metronome volume can be adjusted:
2/2: Metronome Settings
Pitch:H6 Pitch:E6 Vol:100
3.12 Part acitivity monitoring
Sometimes, one listens to a preprogrammed pattern and just would like to know,
which part is playing which instrument or effect in that pattern. The Spectralis
has a kind of part activity monitor function, that lets the partnumber buttons
flash corresponding to note events played on this part. Activating this
partmonitor is straight forward. Just select the patternmode by hitting [Pattern]
and press and hold [Shift] and push the [volume]-button in the mixing desk
section. Now the partnumber buttons should flash corresponding to the motifs,
playing on that part. If you push one of these flashing number buttons, you will
hear the corresponding part "solo". That makes it very easy to identify a part.
Part activity monitoring
100
 Loading...